ZTE Telstra Frontier Handleiding
ZTE
Smartphone
Telstra Frontier
Lees hieronder de 📖 handleiding in het Nederlandse voor ZTE Telstra Frontier (144 pagina's) in de categorie Smartphone. Deze handleiding was nuttig voor 41 personen en werd door 2 gebruikers gemiddeld met 4.5 sterren beoordeeld
Pagina 1/144

1
Telstra
FRONTIER
Mobile Phone
User Manual

2
LEGAL INFORMATION
Copyright © 2012 ZTE CORPORATION.
All rights reserved.
No part of this publication may be quoted, reproduced,
translated or used in any form or by any means, electronic or
mechanical, including photocopying and microfilm, without the
prior written permission of ZTE Corporation.
ZTE Corporation reserves the right to make modifications on print
errors or update specifications in this guide without prior notice.
The Bluetooth® trademark and logos are owned by the Bluetooth
SIG, Inc. and any use of such trademarks by ZTE Corporation is
under license. Other trademarks and trade names are the
property of their respective owners.
This product supports expandable memory up to 32GB
microSD(HC) card as an optional accessory. External memory
card is not included in the box.
The microSD logo is a trademark of the SD Card
Association.
V1.4 April 2013
This product is user-upgradeable. Please check for updates
at zte.com.au or call the service hotline for more technical
support.

3
Contents
Getting Started ......................................................... 5
Connect to Networks and Devices ....................... 34
People ..................................................................... 54
Accounts ................................................................ 61
Email ....................................................................... 63
GmailTM ................................................................... 68
Messaging .............................................................. 73
Calendar ................................................................. 77
Google Talk 80............................................................
Google+ .................................................................. 83
Browser ..................................................................85
Google Location Services ..................................... 90
Google Search .......................................................93
Camera .................................................................... 96
Gallery ..................................................................... 99
Music..................................................................... 102
Google Music ....................................................... 106
Video Player ......................................................... 110

4
FM Radio ............................................................... 111
Sound Recorder ................................................... 114
More Apps ............................................................ 115
Play Store ............................................................. 119
Settings ................................................................. 121
Troubleshooting ................................................... 128
For Your Safety - General Safety ........................ 132
Technical Specifications ..................................... 143
Declaration of RoHS Compliance ....................... 144
Disposal of Your Old Device ............................... 145
5
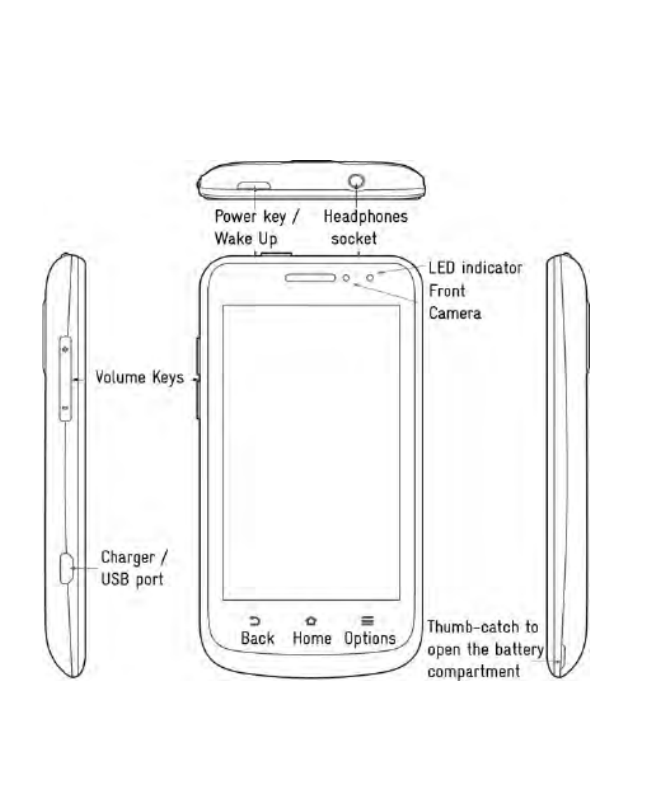
Getting Started
Device Overview

6
Key Functions
Key
Function
Power Key
• Press and hold to select Silent, Vibrate or
Flight mode, or to power off.
• Press to switch your phone to Sleep mode.
•
Press to wake up your phone.
Back Key
• Touch to go to the previous screen.
Home Key
•
Touch to return to the Home Screen from
any application or screen.
• Touch and hold to see recently used
applications.
Options Key
Touch to get the options for the current screen.
Volume Keys
Press or hold to turn the volume up or down.

7
Installing the SIM Card, microSD Card*,
and battery
Switch off your phone before installing or replacing the battery, SIM
card or microSD card* (optional accessory)
1 . Remove the back cover
2. Hold the SIM card with the cut corner oriented as shown and
slide it into the card holder.

8
3. optional) Hold your microSD card (* with the metal contacts
facing down and slide it in.
4. Insert the battery by aligning the gold contacts on the battery
with the gold contacts in the battery compartment. Gently
push down on the battery until it clicks into place.
5. Press the cover gently back into place until you hear a click.
* The microSD card is not included in the box

9
Charging the Battery
When you first get your new phone you’ll need to charge the
battery.
1. Insert the charger lead carefully. Ensure that the plug is
inserted with the correct orientation. Do not force the
connector into the charger jack.
2. Connect the charger to a standard AC wall outlet.
3. Disconnect the charger when the battery is fully charged.
How much charge have you got?
If the battery is low, there will be a pop-up message on the
screen. As you charge your phone, the screen will tell you the
exact battery level each time you wake up your phone.
If the phone is on, you’ll see charging icon the / on the
status bar.

10
Battery and Charging Tips
• Only use the AC charger and USB lead supplied. Insert the
charger lead carefully.
• Be careful to avoid tripping over or pulling on the lead whilst it
is plugged in.
• Physical damage to the charging port is NOT covered by
warranty.
• The phone can also be charged by connecting it to a
computer using the USB lead supplied.
• Avoid high temperatures and direct sunlight. The battery will
not charge above 45°C
• Do not leave the battery in a discharged state. Charge the
battery promptly when flat.
• Keep your handset cool. High temperatures degrade the
battery more quickly.
• Normal charge time is 3-4 hours. Do not leave on charge for
more than 24hrs.
• After 2-3 charge/discharge cycles the battery life will improve.
From then on use top up charging to recharge frequently and
always charge promptly when flat.
• When not using the phone for long periods charge to approx
40% and remove the battery.
• With poor network conditions (less than 2 bars) battery life is
reduced, turn off Bluetooth and Wi-Fi when not in use to
extend battery life.

12
Powering On/Off
Make sure the SIM card and the battery are inserted.
• Press and hold the Power Key to turn on your phone.
• To turn it off, press and hold the Power Key to open the
options menu. Touch Power off and then touch OK.
Setting Up for the First Time
When you first power on your phone or after a factory reset
(see Settings > Personal > Backup and Reset
1. The default language is English (Australia) touch to change if
required or touch Start.
), you need to enter
some settings before use.
2. Select Sign in if you have a Google account or Get an
account ato create a Google ccount or Not now to skip .
3. Review the Google location settings if required. Touch Next
to continue.
4. Enter your name which the phone uses to personalise some
apps and touch Next to continue.
5. the Review Google services if required. Touch Next to
continue.
6. Touch Finish to complete the setup.
7. Further assistance is given in the form of pop ups describing
how to use various features. Press to clear these notices.OK

13
Locking/Unlocking your phone
Your phone allows you to quickly lock the screen and keys when
not in use and to turn the screen back on when you need it.
To lock the screen and keys:
Press the Power Key to turn the screen off and lock the keys,
NOTE: To save battery power, the phone automatically turns off
the screen after a certain period of time when you leave it idle.
Review this setting at
You can still receive messages and calls while the phone screen
is off.
Settings Display > > .Sleep
To unlock the phone:
1. Press the Power Key to turn the screen on.
2. Press and hold the unlock button to unlock the screen.
3. You can also slide the unlock button to unlock the handset
and go directly to the functions shown:
4. Configure your shortcuts by going to
Apps > Mi- EasyAccess
NOTE: If you have set an unlock pattern,
PIN, face unlock, or password for your
phone (see Settings> SecurityPersonal > ),
you’ll need to draw the pattern or enter the
PIN/password to unlock your screen.

14
Using the Touch Screen
Your phone’s touch screen lets you control actions through a
variety of touch gestures.
• Touch
When you want to type using the onscreen keyboard, select
items, or press onscreen buttons, simply touch them with
your finger.
• Touch and Hold
To open the available options for an item (for example, a
message or link in a Web page), touch and hold the item.
• Swipe or Slide
To swipe or slide means to quickly drag your finger vertically
or horizontally across the screen.
• Drag
To drag, press and hold your finger with some pressure
before you start to move your finger. While dragging, do not
release your finger until you have reached the target position.
• Pinch
In some apps (such as Maps, Browser, and Gallery), you can
zoom in and out by placing two fingers on the screen at once
and pinching them together (to zoom out) or spreading them
apart (to zoom in).
• Rotate the hange from portrait to phone to c landscape.

16
Changing the System Language
1. Touch Home Apps > > > > Settings Language & input
Language.
2. Select your chosen language.
Setting the Date and Time
1. Touch Home Apps > > > Settings Date & time.
2. Clear the Automatic date & time and Automatic time zone
check boxes if you want to set the date, time and time zone
yourself.
3. Set the date, time, time zone, and date/time format.
Changing Ringtone and Notification
Sounds
You can customise the ringtone for incoming calls and the default
notification sound.
1. Touch Home Apps > > > Settings Sound.
2. or Tap on Phone ringtone Default notification.
3. Scroll through the ringtone list and select the ringtone you
want to use.
4. Touch OK.

17
Set a unique Ringtone or Photo for a
Contact
Firstly the Contact must be saved to the handset:
Go to > tap the contact Options > Copy to People >
phone.
To set a unique Ringtone for a Contact
Select the phone copy of the Contact (indicated by the smiley
face)> Options >Set ringtone.
To add a photo to your Contact
Select the phone copy of the Contact (indicated by the smiley
face)> Options > > tap on the smiley face to Edit Take
photo or Choose photo from Gallery
Adjusting Volumes
1. Touch Home Apps > > > > . Settings Sound Volumes
2. Adjust the volume for music, video, games, and other media,
the ringtone and notification volume.
3. Touch OK to save.
TIP: You can adjust the media volume when a media
application is in use by pressing the Volume Keys. If no
media application is active, press the Volume Keys to adjust
ringtone volume (or the earpiece volume during a call).

18
Enable Silent or Vibrate mode in the following ways:
• Press and hold the Power Key and then touch to
enable silent mode, touch to enable vibrate mode, or
touch to disable silent mode.
• With no media application running pressing the volume keys
will control the Ring volume. When the icon appears in
the status bar, the phone is set to the vibrate mode. When the
icon appears in the status bar, the phone is in the silent
mode.
• Touch Home Apps > > > > Settings Sound Silent mode,
and touch Off, Vibrate . or Mute
Applying New Wallpapers
You can change the Home Screen wallpaper:
1. Touch Home > > . Options Wallpaper
2. Choose from Download Wallpapers, Gallery, Live
Wallpapers, or Wallpapers and select the image or
animation to use.
3. If using a Gallery image then use the on screen box to
select the cropping area of the picture.
4. Touch DONE at the top of the screen (for Gallery images)
or Set wallpaper for other images .

19
Changing Screen Brightness
1. Touch Home > > > > . Apps Settings Display Brightness
2. Tick the Automatic brightness box to make the phone adjust
the screen brightness automatically, or clear the tick box to
adjust the brightness manually.
3. Touch OK.
Protect Your Phone With Screen Locks
You can protect your phone by creating a screen lock. The phone
supports face recognition, pattern, a numeric PIN or password to
unlock the screen and keys.
1. Touch Home Apps > > Settings >Security.
2. Touch Screen lock.
3. Select from Long Press, Face Unlock, Pattern, PIN or
Password.
• If you touch Pattern, you’re guided to create a pattern you
must draw to unlock the screen. The first time you do this,
a short tutorial about creating an unlock pattern appears.
Then you’re prompted to draw and redraw your own
pattern.
• If you touch PIN or Password, you’re prompted to set a
numeric PIN or a password you must enter to unlock your
screen.
• If you select Face Unlock you are guided through the face
recognition application to lock and unlock your handset.

20
The next time you turn on your phone or wake up the screen use
your unlock pattern, face, PIN or password to unlock it.
IMPORTANT: Screen lock options are listed in the approximate
order of the strength of their security, starting with None and
Long Press, which provide no security. Pattern provides minimal
security, although it can be more convenient than the stronger
options.
If you forget your unlock pattern, PIN or password you have to
hard reset your device. From the locked screen, touch
Emergency call, enter the code *983*987# and follow the
instructions. All data on the handset (not the SD card) is erased.
Protecting Your Phone With Encryption
You can encrypt all the data on your phone: Google Accounts,
application data, music and other media, downloaded information,
and so on. After encryption is applied you need to enter a
numeric PIN or password each time you power on your phone.
WARNING! Encryption is irreversible. The only way to revert to
an unencrypted phone is to perform a factory data reset, which
erases all your data.
Encryption provides additional protection in case your phone is
stolen, and may be required or recommended in some
organisations. Consult your system administrator before turning it
on. In many cases the PIN or password you set for encryption is
controlled by the system administrator.

21
Before turning on encryption, prepare as follows:
1. Set a lock screen PIN or password.
2. Connect your phone to the charger.
3. Schedule an hour or more for the encryption process: you
must not interrupt it or you will lose some or all of your
data.
When you're ready to proceed:
4. Touch Home Apps > > > > Settings Security Encrypt
phone.
5. Read the instructions encryption carefully.
The Encrypt phone button is not available if the battery is not
sufficiently charged or your phone is not plugged in.
If you are unsure about proceeding then touch the Back Key.
WARNING! If you interrupt the encryption process, you will lose
data.
6. Touch Encrypt phone.
7. Enter your lock screen PIN or password and touch
Next.
8. Touch Encrypt phone again.
The encryption process starts and displays its progress.
Encryption can take an hour or more, during which time your
phone may restart several times.
When encryption is complete, you are prompted to enter your
PIN or password.
Subsequently, you must enter your PIN or password each time
you power on your phone, to decrypt it.

22
Monitoring the Phone Status
The status bar at the top of the home screen provides phone and
service status information on the right side. You can monitor the
phone status by checking the following status icons.
G GPRS network
Signal strength (no data)
E EDGE network Signal strength (data ready)
3G 3G network Mobile data in use
4G
4G LTE network
G E
Green indicates data ready
H HSDPA network
3G H 4G
Green indicates data ready
Flight mode
Ringer off
Emergency calls only Muted (microphone off)
Battery flat
Vibrate mode
Battery low
Speaker on
Battery partially drained Connected to a Wi-Fi
network
Battery full
Wi- Fi data in use
/
Battery charging
Wired headset connected
Bluetooth on
23
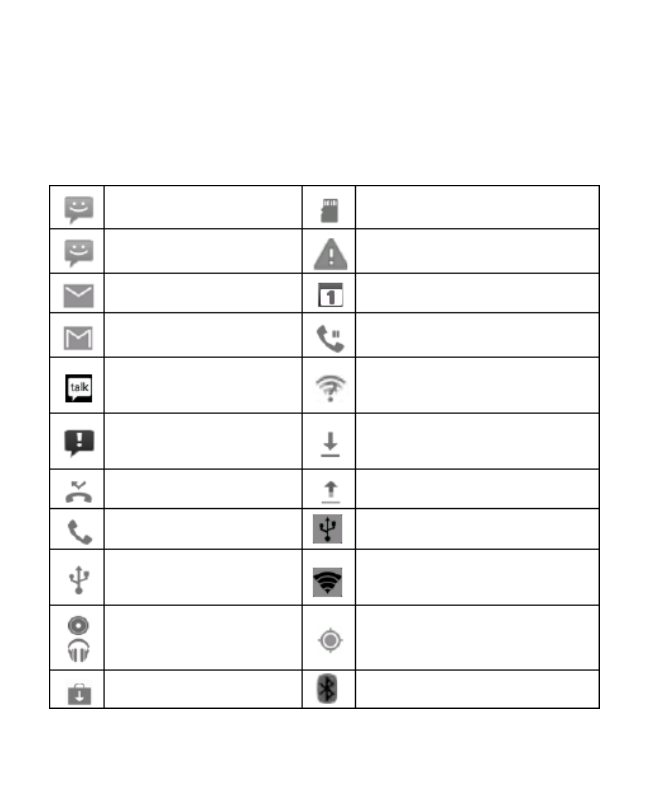
Managing Notifications
Notification Icons
The status bar at the top of the home screen provides notification
alerts on the left. You can view the following notification icons.
New SMS
microSD card not mounted
New MMS microSD card removed
New Email
Upcoming event
New Gmail message
Call on hold
New Google Talk
message New Wi- Fi network detected
Problem with
SMS/MMS delivery Downloading data
Missed call
Sending data
Call in progress USB tethering is on
USB connected Portable Wi Fi hotspot or -
Wi- Fi direct is on
Song is playing GPS is on
Updates available Bluetooth is on
24
View the Notifications Panel
Notifications report the arrival of new messages, calendar
events, and alarms, as well as ongoing events, such as when
you've configured your phone as a Wi-Fi hotspot. Swipe your
finger down from the top of the screen to view notifications.
• To open the notification panel, swipe your finger down from
the top of the screen.
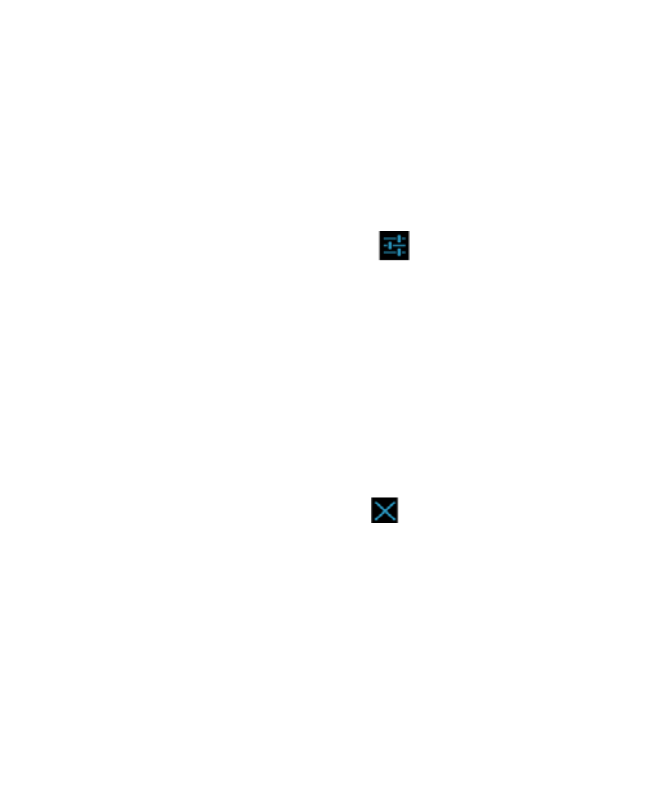
• TIP: In the notification panel, touch at the top of the
screen as a shortcut to the system Settings menu.
• To close the notification panel, swipe your finger up from the
bottom of the screen or touch the Back Key.
Respond to or Remove a Notification
In the notification panel, you can respond to a notification or
remove the notifications.
• To respond to a notification, just touch it.
• To remove a notification, swipe it sideways.
• To remove all notifications, touch in the top right corner.
• Most apps that send notifications, such as Gmail and Google
Talk, have notification settings that you can adjust.

25
Managing Shortcuts and Widgets
Add Shortcuts and Widgets
1. Touch Home Widgets > > Select the tab at the top of
the screen.
2. Swipe right to view all available widgets
3. Touch and hold a widget or shortcut and drag it to your
chosen Home Screen.
Move Shortcuts or Widgets
1. Touch and hold a widget or shortcut on the screen.
2. Drag it to your chosen location.
Remove Shortcuts or Widgets
1. Touch and hold a widget or shortcut on the Home Screen.
2. Drag it to to remove it.
Adjust Widget Size
1. Touch and hold a widget on the Home Screen and then
release it.
2. An outline appears on the widget. Drag the outline to resize
the widget.
NOTE: Not all widgets can be resized.

26
Rearranging the Favourites Tray
The Home Screen includes a customisable favourites tray
visible from all extended Home Screens. You can drag apps,
shortcuts, folders, and other priority items in or out of the
favourites tray for instant access from any Home Screen.
To remove items from the favourites tray:
Touch and hold an item in the favourites tray and drag it out
of the tray.
To add items to the favourites tray:
Touch and hold an item and drag it onto the favourites tray.
If the favourites tray is full, you need to remove an item in the
tray.
Entering Text
The onscreen keyboard will pop up whenever you need to enter
text. Just tap in any text entry box to open the keyboard. Some
apps open it automatically. Touch the Back Key to hide the
onscreen keyboard if required.
Go to Settings > Language & input > Default to change the
default keyboard if required.

27
Android Keyboard
The Android Keyboard provides a layout similar to a desktop
computer keyboard. Turn the phone sideways and the keyboard
will change from portrait to landscape. The landscape keyboard
is not supported in all applications.
• Touch the alphabet keys to enter letters. Touch and hold
specific keys to enter associated accented letters or numbers.
For example, to enter È, touch and hold then slide to
choose È.
• Lower case is indicated by . Touch once to change to
upper case . Double-tap aps lock for c - .
• Touch to delete the text before the cursor.

28
• Touch to select numbers and symbols. You can then
touch to find more. Also, often used symbols are
displayed on top of the keyboard.
• Touch and hold and then swipe to choose emoticons.
• Touch to use Google’s networked voice input.
• Touch and hold to change the input languages or set up
the Android keyboard.
TouchPal Keyboard
TouchPal keyboard offers three layouts: Full QWERTY, 12-Key
PhonePad and CooTek T+. You can swipe left or right on the
TouchPal keyboard to switch the layout.
You can also use TouchPal CurveTM to speed up text input by
replacing the key tapping motion of input with a tracing gesture
where you move your finger from letter to letter without lifting the
finger until you reach the end of the word.
To switch the keyboard layout:
1. > >Go to Apps > Settings Language & input
(TouchPal Keyboard) Keyboard layout> .
2. Tick the Swipe layout check box.
3. In the TouchPal keyboard screen, touch and clear the
Curve box, and then touch Close.
4. Swipe left or right on the TouchPal keyboard to select from
Full QWERTY Key PhonePad CooTek T+ , 12- or layouts.

30
keyboard.
• Touch to set the TouchPal keyboard.
• Touch to open text editing options. You can select, cut,
copy, paste, and delete text, or move the cursor.
• Touch to use voice input.
• Touch to hide the onscreen keyboard. You can touch the
text field again to show the keyboard.
12-Key PhonePad
• Touch a key repeatedly until the desired letter or symbol
appears. If word prediction is enabled ( ), just touch the
keys once and choose the right word.

32
NOTE: TouchPal Curve is only available in the Full QWERTY
layout.
Touch Input Settings
Choose the touch input settings by touching the >System
settings > Language & input from the Home Screen.
In the section, you can set KEYBOARD & INPUT METHODS
the default input method and settings.
Editing Text
• Move the insertion point: Touch where you want to type.
The cursor blinks in the new position, and a tab appears
below it. Drag the tab to move the cursor.
• Select text: Touch and hold or double-tap within the text.
The nearest word highlights, with a tab at each end of the
Start of the word
End of the word
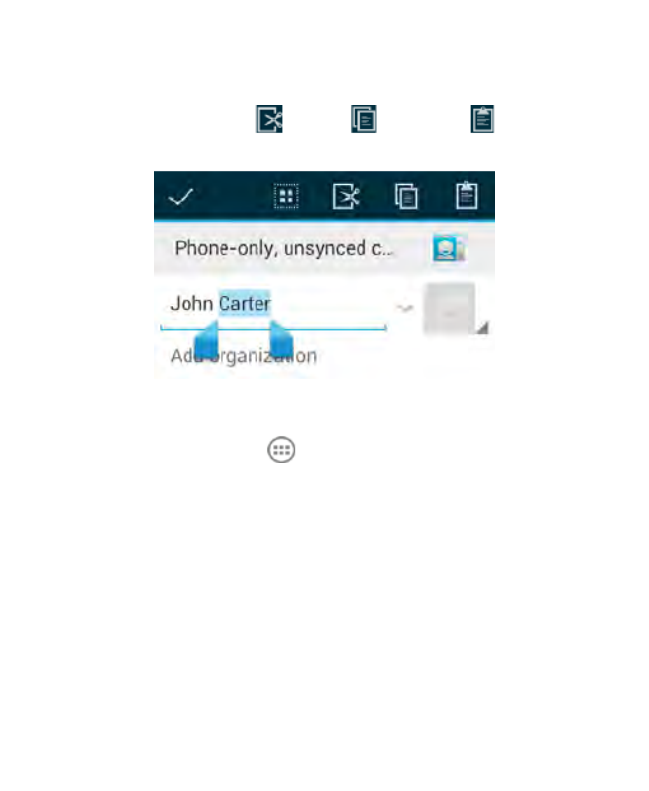
33
selection. Drag the tabs to change the selection.
• Cut, copy, paste: Select the text you want to manipulate.
Then touch the Cut , or Paste , Copy button:
Opening and Switching apps
1. Touch Home Key >to open the Apps
2. Slide left or right on the screen and touch an app to open it.
Switch Between Recently Opened Apps
When you run an application, if you press the Home key and start
another app, the original app is still open in the background.
1. Press and hold the Home Key to view the recently used apps.
2. Scroll up and down and touch the required app to return to it.
3. Tip: Go to Apps > Task Manager to close any unwanted
apps, or remember to use the Back key to step back through
the app to close it.

34
Connect to Networks and Devices
Your device is pre-configured to connect to your carrier’s network.
Do not change any network settings unless instructed to by your
carrier.
1. Touch Home Apps > > > > Settings More Mobile
networks > Network operators.
2. Touch Search networks to search for all available
networks.
3. Touch a network in the network list to register manually.
You can also touch Select automatically to select
preferred network automatically.
Control Mobile Data Use
To enable or disable data access:
1. Touch Home Apps > > > > Settings More Mobile
networks.
2. Tick the Data enabled check box to enable data access
over the mobile network. Clear the check box to disable
data access.
To enable data services when roaming:
1. Touch Home Apps > > > > Settings More Mobile
networks.
2. Tick the Data roaming check box.
IMPORTANT: Data roaming may incur significant charges.

35
Use 2G Network Only to Save Power
1. Touch Home > > > > Apps Settings More Mobile
networks.
2. Tick the Use only 2G networks check box to save battery
power, data services will be limited.
Set Access Point Names
APN settings control Internet and MMS access and are pre-set
for your carrier. If you want to add a new APN, please contact
your service provider to get the required information.
1. Touch Home > > > > Apps Settings More Mobile
networks > Access Point Names.
2. Touch > . New APN
3. Configure as specified by your service provider.
4. Touch > Save to complete.
TIPS: >To restore your original APN settings touch Reset
to default.
Connecting to a local Wi- Fi network
1. Touch Home > > > . Apps Settings -Wi Fi
2. Slide the Wi-Fi switch to the ON position to turn on Wi- Fi.
The detected Wi-Fi networks are displayed with their names and
security status. Previously connected networks will connect
automatically.
Touch a network name to connect to it.

36
NOTE: If the network is secured, you need to enter a password.
Get Notified of Open Networks
1. Touch Home > Apps > > Settings Wi-Fi.
2. Slide the Wi-Fi switch to the ON position.
3. Touch Options >> Advanced Tick the Network
notification check box.
When Wi-Fi is on, you receive notifications in the Status bar
when your phone detects an open Wi Fi network. Clear the -
check box to turn off notifications.
Add a Wi- Fi Network
You can add a Wi-Fi network manually if the network does not
broadcast its name (SSID), or to add a Wi-Fi network when you
are out of range.
To connect to a secured network, you first need to get the
security details from the network's administrator.
1. Touch Home > > > . Apps Settings -Wi Fi
2. Slide the Wi-Fi switch to the ON position.
3. Touch ADD NETWORK.
4. Enter the network SSID (name). If necessary, enter security
or other network configuration details.
5. Touch Save.

37
Forget a Fi Network -Wi
To delete a Wi Fi network that you no longer use or if you don’t -
want to connect to it automatically:
1. Touch Home > > > . Apps Settings -Wi Fi
2. Slide the Wi-Fi switch to the ON position.
3. Touch the Wi-Fi network name and then touch Forget.
Using Wi- Fi Direct
Wi-Fi Direct allows Wi-Fi devices to connect to each other
without the need for wireless access points (hotspots).
NOTE: Activating this feature will disconnect your current Wi-Fi
network connection.
Connect to a Wi- Fi Direct Device
1. Touch Home > > > . Apps Settings More
2. Tick the Wi-Fi direct check box to turn on Wi- Fi direct.
3. Your phone will search for other devices enabled with Wi-Fi
direct connections. Touch to see all Wi-Fi direct settings
available devices.
4. Touch a device name to begin the connection process.
NOTE: The target device must also have Wi-Fi Direct service
activated and running before it can be detected by your
phone.
5. Touch Connect.
The other device will receive a Wi-Fi Direct connection
prompt and need to accept the request for connection.

38
6. Once connected the device is displayed as “Connected” in
the Wi-Fi Direct devices list.
7. Wi-Fi Direct requires other compatible applications and
devices to use the feature.
Connecting to Bluetooth Devices
Bluetooth® -is a short range wireless communication technology.
Phones or other devices with Bluetooth capabilities can exchange
information wirelessly within a distance of about 10 meters. The
Bluetooth devices must be paired before the communication is
performed.
Turning Bluetooth On/Off
1. > > > .Touch Home Apps Settings Bluetooth
2. Slide the Bluetooth switch to the ON or position. OFF
When Bluetooth is on, the icon will appear in the Status bar.
Making Your Phone Visible
In order to work with other phones or devices that have Bluetooth,
you need to make your phone ‘visible’ to them.
1. > > > .Touch Home Apps Settings Bluetooth
2. Slide the Bluetooth switch to the ON position.
3. Touch your device name on the top of the screen to make
your phone visible or invisible.
NOTE: Options Touch >Visibility timeout to set the Bluetooth
visibility timeout of your phone.

39
Change the Device Name
When your phone is visible it will broadcast the name shown at
the top of the Bluetooth screen.
1. > > > .Touch Home Apps Settings Bluetooth
2. Slide the Bluetooth switch to the ON position.
3. Touch Options > . Rename phone
4. .Edit the name and touch Rename
Pair With a Bluetooth Device
1. > > > .Touch Home Apps Settings Bluetooth
2. Slide the Bluetooth switch to the ON position.
3. Your phone searches and displays the available Bluetooth
devices in range.
4. Touch the device you want to pair with.
Follow the instructions to complete the pairing. If you're prompted
to enter a passcode, try entering 0000 or 1234 or consult the
documentation that came with the other device.
Connect to a Bluetooth Device
Once you've paired with a Bluetooth device, you can connect to it
manually; for example, to switch devices or to reconnect after it is
back in range.
1. > > >Touch Home Apps Settings Bluetooth and make
sure Bluetooth is turned on.
2. In the list of paired devices, touch a paired but unconnected
device.

40
Disconnect a Bluetooth Device
1. > > >Touch Home Apps Settings Bluetooth and make
sure Bluetooth is turned on.
2. In the list of paired devices, touch a device to Connect.
3. Touch OK to disconnect it.
Remove Pairing from a Bluetooth Device
Delete a pairing connection with a Bluetooth device. To connect
to the device again, you may need to enter or confirm a passcode
again.
1. > > > .Touch Home Apps Settings Bluetooth On
2. In the list of paired devices, touch the options icon
beside the Bluetooth device to unpair.
3. Touch Unpair.
Connecting to Your Computer via USB
Connect your phone to a computer using the supplied USB cable
to transfer music, pictures, and other files in both directions. Your
phone stores these files in internal storage or on a removable
microSD card.
If you are using USB tethering, you must turn that off before you
can use USB to transfer files between your phone and computer.

43
Share Your Mobile Data Connection as a
Wi- Fi Hotspot
Enable the Wi-Fi hotspot feature to share your network data with
other devices via Wi- Fi.
NOTE: When the Wi-Fi hotspot feature is enabled, you cannot
access the internet via Wi Fi. You remain connected to the -
Internet via your mobile data network.
1. > > > >Touch Home Apps Settings More Tethering &
portable hotspot.
2. Tick the Portable Wi-Fi hotspot check box.
3. Select C -onfigure Wi Fi hotspot to view the SSID, security
settings and password for your hotspot.
4. Uncheck Portable Wi-Fi hotspot to stop sharing.
Remove the microSD Card From Your Phone
If you need to remove the microSD card while the phone is on,
you should unmount it first.
1. > > > .Touch Home Apps Settings Storage
2. Slide down the screen, select Unmount SD card > OK
Erase microSD Card
1. > > > .Touch Home Apps Settings Storage
2. Slide down the screen and touch Erase SD card > Erase
SD card > . Erase everything
NOTE: The formatting procedure permanently erases all the data
on the microSD card and is not recoverable.

44
Connecting to Virtual Private Networks
Virtual private networks (VPNs) allow you to connect to the
resources inside a secured local network. VPNs are commonly
deployed by corporations, schools, and other institutions to let
people access local network resources when not in the office, or
when connected to a wireless network.
Depending on the type of VPN you are using, you may be
required to enter your login credentials or install security
certificates before you can connect to your VPN. You can get this
information from your network administrator.
Lock screen PIN or Passwords must be set before configuring
the VPN function.
Add a VPN
1. > > > > .Touch Home Apps Settings More VPN
2. Touch Add VPN network and fill in the information
provided by your network administrator.
3. Touch Save - The VPN is added to the list on the VPN
screen.
Connect to a VPN
1. > > > > .Touch Home Apps Settings More VPN
2. Touch the VPN that you want to connect to.
3. When prompted, enter any requested credentials, and then
touch Connect - the VPN connected icon appears in the
Status bar.

45
Modify a VPN
1. > > > > .Touch Home Apps Settings More VPN
2. Touch and hold the VPN that you want to modify.
3. Touch Edit network > Touch Save when done.
Delete a VPN
1. > > > > .Touch Home Apps Settings More VPN
2. Touch and hold the VPN > Delete network
Making Calls
1. > .Touch Home Key
2. In the dialer tab , enter the phone number using the
on-screen keypad. Touch to delete wrong digits.
3. Press and hold the * key to add the Pause symbol indicated
by ‘,’. Press and the # key to add the Wait symbol indicated
by ‘;’
4. Press and hold the 0 key to enter the plus (+) symbol for
international dialling.
5. Touch the Phone icon below the keypad to dial.
TIP: In other applications, wherever you see a phone number or
handset icon, touch it to make a call.
End a Call
During a call, touch on the screen.

46
Answering or Rejecting Calls
When you receive a phone call, the Incoming Call screen opens,
displaying the caller ID and any additional information about the
caller that you've entered in People. You can answer or reject the
call, or reject it with a text message.
Answer a Call
When you receive a phone call, drag over to answer
the call.
NOTE: To silence the ringer before answering the call, press the
Volume Keys up or down.
Reject a Call
When you receive a phone call, drag over to reject
the call.
You can also drag to reject the call and send a over
preset text message to the caller.
TIP: To edit the default text response from within the Phone app,
touch Options > > . Settings Quick responses
(or > >Home Apps Settings >Call >Quick responses from
outside of the Dialer application).
Working With Call Logs
The Call log is a list of all the calls you've placed, received, or
missed. It provides a convenient way to redial a number, return a
call, or add a number to your Contacts.

47
Touch Home > then select the tab.
Make a Call from Call Logs
1. > Touch Home then select the tab.
2. Touch the number for more details about the call, or touch
to call back.
NOTE: You can touch on the bottom of the screen and
select the call log type you want to view.
Add a Call Log Number as a Contact
1. > Touch Home then select the tab.
2. Touch the number for more details, touch to add to
your Contacts
3. Touch an existing contact to modify or Create New Contact
to save to a new entry.
Other Actions in Call Logs
1. > Touch Home then select the tab.
2. Touch the number for more details:
• Touch the number to call it.
• Touch Options > Edit number before call to edit the
number in the dialer before calling it.
• Touch to send a message.

48
• Touch to view contact details.
• Touch to add the number as a contact.
Delete Call Logs
1. > Touch Home then select the tab.
2. Touch Options >Clear call log
3. Touch OK to delete all call logs.
4. To remove an individual number, touch the call record then
touch Options >Remove from call log.
Calling Your Contacts
1. > .Touch Home then touch the Contact tab
2. Flick the screen up or down to view all your contacts with
phone numbers.
TIPS: Search for a contact by touching on the bottom of
the screen or use the blue scroll bar to flick through A- Z.
3. Touch a contact or number to call it.
Call a Favourite Contact
1. > Touch Home Key and then touch the Contact tab
.
2. Your favourite contacts and frequently called contacts or
numbers are listed on the top of the screen. Touch a
contact or number to call it.

49
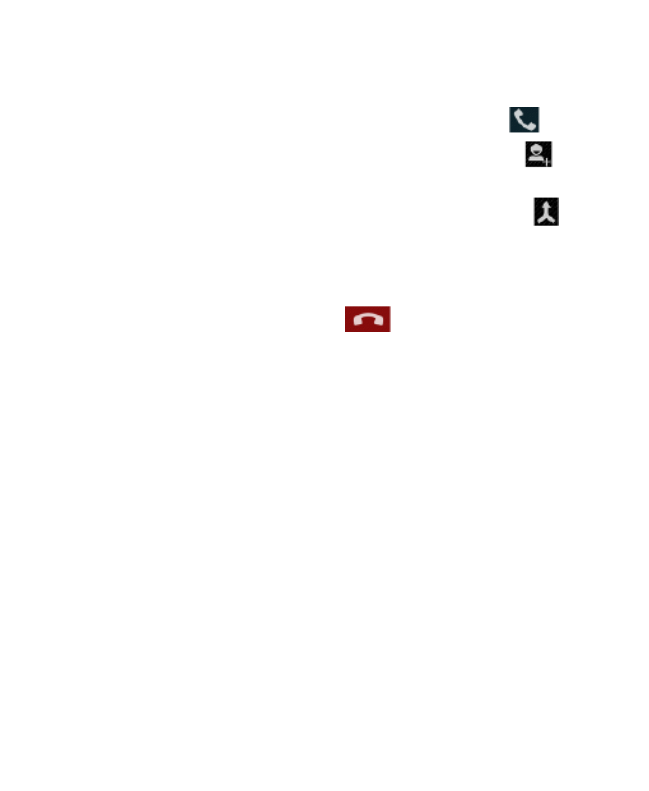
Options During a Call
During a call, you will see a number of onscreen options. Touch
an option to select it.
• Touch to turn on or off the speaker.
• Touch to mute or unmute your microphone.
• Touch to make a new call, the first call is put on hold.
• Touch to switch to the dialer, eg to send keytones.
• Touch to merge separate calls conference call.into a
• Touch Options > Record to record the call.
• Touch to end the current call.
Managing Multi- party Calls
Call waiting and -multi party features are provisioned by your
service provider, you can switch between two calls or set up a
conference call.
When you’re on a call, your phone screen informs you that
another call is coming in and displays the caller ID.
To respond to an incoming call while you’re on a call:
Drag over to answer the call. (This puts the first caller
on hold and answers the second call.)
To switch between two calls:
Touch Options > . Swap
50
Set Up a Conference Call
With this feature, you can talk to two people at the same time.
1. On the dialer screen, enter a number and touch .
2. Once you have established the connection, touch and
dial the second number. (The first call is put on hold)
3. . When you’re connected to the second party, touch
If the other party hangs up, you and the remaining caller stay
connected. If you initiated the call and hang up, all callers are
disconnected.
To end the conference call, touch .
Adjusting Your Call Settings
Use Fixed Dialling Numbers
Fixed Dialling Numbers (FDN) allows you to restrict outgoing
calls to a limited set of phone numbers. This feature requires
carrier support and the PIN2 code.
1. > > > >Touch Home Apps Settings Call Fixed Dialling
Numbers.
2. The following options are available:
• Enable FDN: Input the PIN2 code to enable.
• Change PIN2: Change the PIN2 code for FDN access.
• FDN list: Manage the FDN list.
NOTE: Contact your service provider for assistance with PIN2.

52
1. . Touch Home > Apps > Settings > Call > Speed dial
2. Touch a speed dial key.
3. Enter a phone number or select one from the contact list.
4. Touch OK.
Call Barring
Call barring feature allows you to forbid certain types of calls from
your phone.
1. > > > >Touch Home Apps Settings Call Call Barring
Settings.
2. Set the restriction of specific types of calls from your phone.
Call Forwarding
Call forwarding allows you to forward incoming calls to another
phone number.
1. > > > >Touch Home Apps Settings Call Call forwarding.
2. Touch the available options (Always forward, Forward
when busy Forward when , Forward when unanswered, or
unreachable) to configure.
Caller ID and Call Waiting
1. > > > >Touch Home Apps Settings Call Additional
settings.
2. Caller ID determines if your number is displayed to other
parties.
3. Call waiting notifies you of incoming calls during a call.

53
Internet Call Settings
To add Internet calling account:an
1. > > > > . Touch Home Apps Settings Call Accounts
2. Touch ADD ACCOUNT.
3. Follow the instructions from your service provider.
4. Touch SAVE.
To configure which calls use Internet calling:
You can configure your phone to place all calls using Internet
calling (when you’re connected to a Wi-Fi network), just calls to
Internet calling addresses, or to ask each time you place a call.
1. > > > . Touch Home Apps Settings Call
2. Touch Use Internet calling.
3. Touch the Internet calling option you want.
To configure your phone to receive Internet calls:
By default, your phone is configured to make Internet calls, but
not to ensure that you will receive them. But you can configure
your phone to listen for Internet calls made to an Internet calling
account you added to your phone.
1. > > > > . Touch Home Apps Settings Call Accounts
2. Tick the Receive incoming calls check box. Checking this
setting will reduce your battery life.

54
People
You can add contacts on your phone and synchronise them with
the contacts in your Google account or other accounts that
support contact syncing.
Touch Home > to view your Contacts. Touch the tabs to
quickly switch to contact groups . or favourites
1. Touch Home > and touch the all contacts tab to
access your contact list.
2. Scroll through the list to view all your contacts.
3. Touch a contact to view its details.
TIP: If you have a lot of contacts stored, you'll see a slider when
you touch the right side of the screen. To go directly to a letter,
touch and hold the slider and drag it to a letter.
Adding a New Contact
1. Touch Home > and touch the all contacts tab .
2. Touch to add a new contact.
3. Touch the account field on the top of the screen to choose
where to save the contact. If a sync account is selected, the
contacts will be synced automatically with your account
online.
4. Enter the contact name, phone numbers, email addresses,
and other information.
5. Touch DONE to save the contact.

56
Export Contacts to the SIM Card
1. Touch Home > > Options
2. Touch Import/export > . Export to SIM card
3. Touch to select the contacts and then touch .
Export Contacts to the microSD Card
1. Touch Home > > Options
1. Touch Import/export > . Export to SD card
2. The phone will prompt you with the name of the vCard file.
Touch OK to create the file in the microSD card.
Share Contacts
1. Touch Home > . , touch the all contacts tab
2. Touch Options >Select item(s).
3. Touch to select the contacts you want to share and then
touch .
4. Choose to share the contacts via Bluetooth, Email, Gmail
or Messaging.
Add a Contact to Favourites
You can add the contacts used frequently to Favourites, so you
can find them quickly.
1. Touch Home > and touch the all contacts tab .
2. Touch a contact and then touch to add to favourites.

59
Edit Contact Details
1. Touch Home > .
2. Touch a contact to edit and then touch Options Edit > .
3. Edit the contact and touch DONE when finished
Set a Ringtone for a Contact
1. Touch Home > .
2. Touch a contact you want to set a ringtone for and then
touch the Options > Set ringtone (Contact must be saved
on the phone)
3. Select a ringtone you like and touch OK.
Delete a Contact
1. Touch Home > .
2. Touch a contact you want to delete and touch Options >
Delete.
3. Touch OK to confirm.
To delete several contacts, you can:
1. Touch Options > Select item(s) in the all contacts screen.
2. . Touch to select the contacts to remove and then touch
3. Touch OK to confirm.

63
sync.
3. Check or uncheck items as required. Checked items will be
kept in sync when auto sync is turned on.-
Email
Touch in the Home Screen and select Email. Use it to read
and send emails from services other than Gmail.
Set Up the First Email Account
1. When you open Email for the first time, enter your email
address and password and then touch Next.
NOTE: Your device will connect to the Internet and verify
incoming and outgoing server settings before proceeding to
the next step. If the email service provider is not recognised
you need to the incoming and outgoing server settings. enter
Please contact your email service provider for more
information or go to Play Store and download your email
provider’s application.
2. eSet the mail checking frequency, download options, account
name and other settings. Touch when you finish.Next
Your phone will show the inbox of the email account and start to
download e mail messages.
TIP: eTo add more mail accounts, open Email to get the Inbox
screen. Then touch > the Options Account settings and touch
ADD ACCOUNT . at the top right of the screen

66
Adding Signature to Your Emails
You can set a plain text signature for every outgoing email
message, such as your name and contact information.
1. Open the Email app.
2. Touch >Options Account settings and select the account
you want to add signature to.
3. Touch Signature and enter the text.
4. Touch . OK
Adding and Editing Email Accounts
Add an Email Account
After setting up your first email account (see Email > Set Up the
First Email Account), you can add more email accounts and
manage them separately.
1. Open Email to get the Inbox screen.
2. Touch >Options Account settings and touch ADD
ACCOUNT at the top right of the screen.
3. Set up the account as you have done previously.

67
Edit an Email Account
You can change a number of settings for an account, including
how often you check for email, how you’re notified of new mails,
and details about the servers the account uses to send and
receive mails.
1. Open Email to get the Inbox screen.
2. Touch >Options Account settings and touch the account
whose settings you want to change.
3. Make the changes you want and touch the Back Key when
you’re finished.
Remove an Email Account
1. Open Email to get the Inbox screen.
2. Touch >Options Account settings and touch the account
you want to remove.
3. Touch Remove account > . OK
Changing General Email Settings
General settings apply to all email accounts you add.
1. Open Email to get the Inbox screen.
2. Touch > Options Account settings > . General
3. Make the changes you want and touch the Back Key when
you’re finished.

68
Gmail TM
After you sign in to your Google account on the device, you can
send and retrieve Gmail messages with the Gmail app.
Opening Your Gmail Inbox
Touch in the Home Screen and select Gmail. The Inbox
screen appears.
If you haven’t signed in, you will be prompted to do so or create a
new account.
Touch at the bottom right of the screen to refresh your Inbox
and download new messages.
Switching Accounts
Gmail displays conversations, messages, and settings from one
Google account at a time. If you have signed in to more than one
Google account on your device, you can switch accounts and
view information in each account.
1. From your Inbox, touch the current account at the top of the
screen.
2. From the drop down menu, touch the account you want to -
see. The account’s Inbox will open.
70
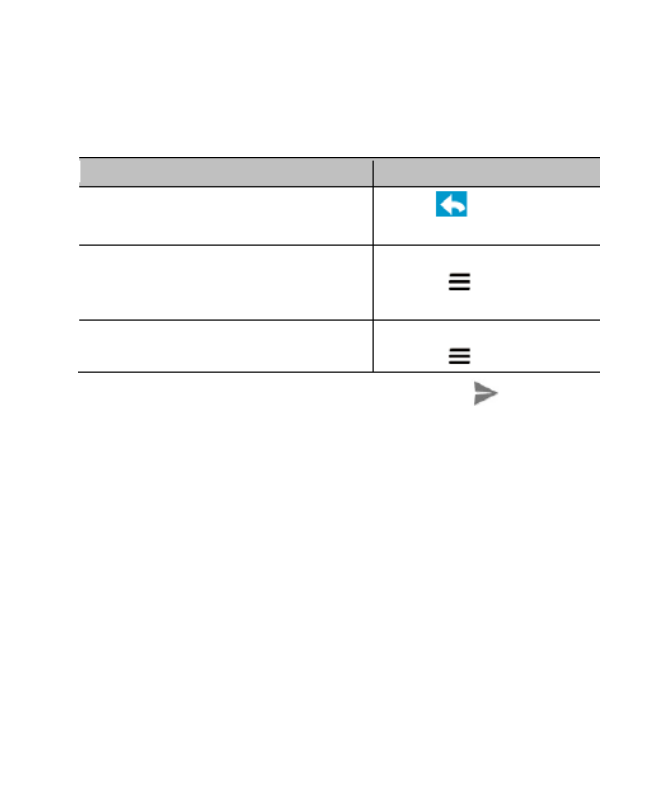
Replying to or Forwarding a Message
1. Open the Gmail message you want to reply to or forward to
another person.
2. Do the following as you need:
To…
do…
Reply to the sender,
touch in the
message header.
Reply to the sender and all
recipients of the original
message,
touch in the message
header >Reply all.
Forward the message, touch in the message
header
>
Forward
.
3. Enter your message and touch the send icon .
Working With Received Attachments
When a message has an attachment, Gmail displays information
about that attachment at the top of the message.
Depending on the attachment type, the applications installed on
your device as well as your settings, you may preview, view, play,
save the attachment, or check information about the attachment.
TIP: For documents with multiple pages, touching the Preview
option will only download the pages you view, whereas touching
View Play Save, , or will download the entire file and taking more
time and data.
Product specificaties
| Merk: | ZTE |
| Categorie: | Smartphone |
| Model: | Telstra Frontier |
Heb je hulp nodig?
Als je hulp nodig hebt met ZTE Telstra Frontier stel dan hieronder een vraag en andere gebruikers zullen je antwoorden
Handleiding Smartphone ZTE

23 November 2024
29 Mei 2024
18 Juli 2023
18 Juli 2023
26 Juli 2023
26 Juli 2023
26 Juli 2023
18 Juli 2023
19 Juni 2023
17 Juni 2023
Handleiding Smartphone
- Smartphone Philips
- Smartphone HP
- Smartphone Sony
- Smartphone Samsung
- Smartphone Xiaomi
- Smartphone Panasonic
- Smartphone Brondi
- Smartphone LG
- Smartphone Huawei
- Smartphone Asus
- Smartphone AEG
- Smartphone Fysic
- Smartphone Garmin
- Smartphone Gigaset
- Smartphone Honeywell
- Smartphone Motorola
- Smartphone Medion
- Smartphone Nokia
- Smartphone Toshiba
- Smartphone Wiko
- Smartphone Yarvik
- Smartphone Acer
- Smartphone Aiwa
- Smartphone Albrecht
- Smartphone Alcatel
- Smartphone Alcatel-Lucent
- Smartphone Alecto
- Smartphone Aligator
- Smartphone Allview
- Smartphone Amazon
- Smartphone Amplicom
- Smartphone Amplicomms
- Smartphone Androidtech
- Smartphone Apple
- Smartphone AQISTON
- Smartphone Archos
- Smartphone AT Telecom
- Smartphone Audioline
- Smartphone Auro
- Smartphone Avus
- Smartphone Beafon
- Smartphone Benefon
- Smartphone BenQ
- Smartphone Binatone
- Smartphone Blackberry
- Smartphone Blaupunkt
- Smartphone Blu
- Smartphone Bluebird
- Smartphone BQ
- Smartphone Brigmton
- Smartphone Bury
- Smartphone Danew
- Smartphone Dell
- Smartphone Denver
- Smartphone Doogee
- Smartphone Doro
- Smartphone Easypix
- Smartphone Echo
- Smartphone Ecom
- Smartphone Emporia
- Smartphone Energizer
- Smartphone Energy Sistem
- Smartphone Fairphone
- Smartphone Fero
- Smartphone Garmin-Asus
- Smartphone Geemarc
- Smartphone General Mobile
- Smartphone Gigabyte
- Smartphone Gionee
- Smartphone Goclever
- Smartphone Google
- Smartphone GreatCall
- Smartphone Haier
- Smartphone Hammer
- Smartphone Handheld
- Smartphone Hannspree
- Smartphone Hisense
- Smartphone HomTom
- Smartphone Honor
- Smartphone HTC
- Smartphone Hyundai
- Smartphone I.safe Mobile
- Smartphone Iget
- Smartphone Infinix
- Smartphone InFocus
- Smartphone Intermec
- Smartphone Intex
- Smartphone Itel
- Smartphone ITT
- Smartphone Kazam
- Smartphone Klipad
- Smartphone Kodak
- Smartphone Kogan
- Smartphone KPN
- Smartphone Kurio
- Smartphone Kyocera
- Smartphone Lava
- Smartphone Leagoo
- Smartphone Lenovo
- Smartphone Leotec
- Smartphone Lexibook
- Smartphone Logicom
- Smartphone Lumigon
- Smartphone Manta
- Smartphone Maxcom
- Smartphone Maxx
- Smartphone Media-tech
- Smartphone Meizu
- Smartphone Micromax
- Smartphone Microsoft
- Smartphone Mio
- Smartphone Mitsubishi
- Smartphone Mobistel
- Smartphone Mpman
- Smartphone Mustang
- Smartphone Nec
- Smartphone Nedis
- Smartphone Neffos
- Smartphone NGM
- Smartphone Nordmende
- Smartphone NTech
- Smartphone NUU Mobile
- Smartphone Palm
- Smartphone Pantech
- Smartphone Phicomm
- Smartphone Polaroid
- Smartphone Prestigio
- Smartphone Profoon
- Smartphone Razer
- Smartphone RCA
- Smartphone Realme
- Smartphone RugGear
- Smartphone Sagem
- Smartphone Sanyo
- Smartphone Sencor
- Smartphone Sharp
- Smartphone Silvercrest
- Smartphone Sonim
- Smartphone Sony Ericsson
- Smartphone Spice
- Smartphone Storex
- Smartphone Sunny
- Smartphone Sunstech
- Smartphone Swissvoice
- Smartphone Switel
- Smartphone T-Mobile
- Smartphone TCL
- Smartphone Tecdesk
- Smartphone Telefunken
- Smartphone Telme
- Smartphone Telstra
- Smartphone Tesla
- Smartphone Thomson
- Smartphone Tiptel
- Smartphone TP Link
- Smartphone Trekstor
- Smartphone Ulefone
- Smartphone UMi
- Smartphone UTStarcom
- Smartphone Vestel
- Smartphone Vivax
- Smartphone Vivo
- Smartphone Vodafone
- Smartphone Wileyfox
- Smartphone Wolder
- Smartphone Wolfgang
- Smartphone Xtreamer
- Smartphone Yota
- Smartphone Zipy
- Smartphone O2
- Smartphone OK
- Smartphone Olympia
- Smartphone OnePlus
- Smartphone Oppo
- Smartphone Overmax
- Smartphone CSL
- Smartphone Krüger And Matz
- Smartphone NGS
- Smartphone Umidigi
- Smartphone Facom
- Smartphone Bush
- Smartphone Infiniton
- Smartphone Nevir
- Smartphone Aplic
- Smartphone Alba
- Smartphone Majestic
- Smartphone Trevi
- Smartphone XD
- Smartphone AT&T
- Smartphone Billow
- Smartphone SPC
- Smartphone EVOLVEO
- Smartphone Lark
- Smartphone BGH
- Smartphone CAT
- Smartphone Coolpad
- Smartphone Crosscall
- Smartphone Custom
- Smartphone EStar
- Smartphone Freeman
- Smartphone Karbonn
- Smartphone Keneksi
- Smartphone Konrow
- Smartphone M3 Mobile
- Smartphone Maxwest
- Smartphone Mediacom
- Smartphone ORA
- Smartphone Oukitel
- Smartphone Piranha
- Smartphone Plum
- Smartphone TAG Heuer
- Smartphone Tremay
- Smartphone Cubot
- Smartphone JCB
- Smartphone Aspera
- Smartphone CRUX
- Smartphone Casper
- Smartphone Unnecto
- Smartphone MyPhone
- Smartphone Primux
- Smartphone ToughGear
- Smartphone Komu
- Smartphone Verykool
- Smartphone Senifone
- Smartphone Syco
- Smartphone Pharos
- Smartphone ITTM
- Smartphone Cyrus
- Smartphone Posh Mobile
- Smartphone THL
- Smartphone NGM-Mobile
- Smartphone Nothing
- Smartphone Tecno
- Smartphone Olitech
- Smartphone Mobiola
- Smartphone TIM
- Smartphone Nubia
- Smartphone LeEco
- Smartphone Best Buy
- Smartphone GSmart
- Smartphone Bea-fon
- Smartphone Opticon
- Smartphone Saiet
- Smartphone Jitterbug
- Smartphone POCO
- Smartphone HMD
- Smartphone Opis
- Smartphone Krüger&Matz
- Smartphone Volla
- Smartphone Nothing Tech
- Smartphone Kalley
Nieuwste handleidingen voor Smartphone

9 Maart 2025
25 Februari 2025
25 Februari 2025
25 Februari 2025

25 Februari 2025
25 Februari 2025
25 Februari 2025
25 Februari 2025

25 Februari 2025

25 Februari 2025