Ricoh SP 5310DN Handleiding
Lees hieronder de 📖 handleiding in het Nederlandse voor Ricoh SP 5310DN (124 pagina's) in de categorie Printer. Deze handleiding was nuttig voor 41 personen en werd door 2 gebruikers gemiddeld met 4.5 sterren beoordeeld
Pagina 1/124

For safe and correct use, be sure to read the Safety Information in
Read This First before using the machine.
Troubleshooting
Loading Paper
Getting Started
User Guide


TABLE OF CONTENTS
Manuals for This Machine................................................................................................................................. 3
1. Getting Started
Before You Start..................................................................................................................................................5
How to Read the Manuals.............................................................................................................................5
Model-Specific Information...........................................................................................................................6
List of Options................................................................................................................................................. 7
Guide to Names and Functions of Components..............................................................................................9
Guide to Components....................................................................................................................................9
Guide to the Names and Functions of the Control Panel......................................................................... 13
Guide to the Names and Functions of the Control Panel Screen............................................................ 15
Installing Options............................................................................................................................................. 16
Order of Option Installation........................................................................................................................16
Attaching the 500-sheet paper feed unit...................................................................................................16
Installing the Interface Units........................................................................................................................ 18
Installing SD Card Options......................................................................................................................... 24
Turning On/Off the Power..............................................................................................................................28
Turning On the Power..................................................................................................................................28
Turning Off the Power..................................................................................................................................28
Saving Energy.............................................................................................................................................. 29
Replenishing and Replacing Consumables....................................................................................................32
Replacing the Print Cartridge......................................................................................................................32
Replacing the Waste Toner Bottle.............................................................................................................. 37
Displaying the Printer Configuration Screens Using the Control Panel........................................................41
Using Web Image Monitor............................................................................................................................. 42
Displaying the top page..............................................................................................................................43
2. Loading Paper
Paper Loading Procedure................................................................................................................................47
Paper Size Specifications................................................................................................................................ 48
Paper Type Specifications............................................................................................................................... 51
Paper Precautions.............................................................................................................................................53
Loading Paper into Paper Trays......................................................................................................................56
Loading Paper into the Bypass Tray............................................................................................................... 60
Loading Orientation-Fixed Paper or Two-Sided Paper................................................................................ 62
1

Manuals for This Machine
The operating instructions of this machine are provided in the following formats:
Format Manuals
Printed manuals • Read This First
• Quick Installation Guide
CD-ROM • Driver Installation Guide
• (mainly Asia)
• HTML manuals (Only for English
version)
Web page • Read This First
• User Guide
• Operating Instructions (HTML manuals)
• Quick Installation Guide
• Driver Installation Guide
Read This First
Before using the machine, be sure to read the section of this manual entitled Safety Information. It
also describes each regulation and environmental conformance.
User Guide
Regarding the basic usage of this machine, frequently used functions, troubleshooting when an
error message appears, etc., summaries are provided for each user manual.
Operating Instructions (HTML manuals)
Describes the setup for using the machine, how to use functions to print or for maintenance and
specifications, troubleshooting, system settings, and security functions.
Manuals are available in English, German, French, Italian, Spanish, Dutch, and Russian.
User Guide and Security Guide are available in the seven languages above and other languages.
For details about how to use the HTML manuals, see "How to Use the Operating Instructions",
Read This First.
Quick Installation Guide
Describes procedures for unpacking and setting up the machine, which include loading paper and
installing print cartridge and waste toner bottle, etc.
Driver Installation Guide
Describes how to install and configure each driver. This manual is included in the drivers CD.
3

• Before you configure the extended security and authentication settings, refer to "Before Using This
Printer" in the Security Guide.
• You can see the following manuals on the Web page.
• Appendix
• DHCP Option 204
4
1. Getting Started
This section describes the symbols used in the manuals supplied with the printer, available options, and
names and functions of components.
Before You Start
How to Read the Manuals
Symbols used in the manuals
This manual uses the following symbols:
Indicates points to pay attention to when using the machine, and explanations of likely causes of paper
misfeeds, damage to originals, or loss of data. Be sure to read these explanations.
Indicates supplementary explanations of the machine's functions, and instructions on resolving user
errors.
This symbol is located at the end of sections. It indicates where you can find further relevant information.
[ ]
Indicates the names of keys on the machine's display or control panels.
Indicates the key sequence order you should perform using the control panel.
Example:
Select [Host Interface] Press [OK]
(Select [Host Interface], and then press the [OK] key.)
(mainly Europe and Asia), (mainly Europe), or (mainly Asia)
(mainly North America)
Differences in the functions of Region A and Region B models are indicated by the two symbols. Read
the information indicated by the symbol that corresponds to the region of the model you are using. For
details about which symbol corresponds to the model you are using, see "Model- Specific Information",
Operating Instructions.
5
Disclaimer
To the maximum extent permitted by applicable laws, in no event will the manufacturer be liable for any
damages whatsoever arising out of failures of this machine, losses of the registered data, or the use or
non-use of this product and operation manuals provided with it.
Make sure that you always copy or have backups of the data registered in this machine. Documents or
data might be erased due to your operational errors or malfunctions of the machine.
In no event will the manufacturer be responsible for any documents created by you using this machine or
any results from the data executed by you.
Notes
Contents of this manual are subject to change without prior notice.
The manufacturer shall not be responsible for any damage or expense that might result from the use of
parts other than genuine parts from the manufacturer with your office products.
For good output quality, the manufacturer recommends that you use genuine toner from the
manufacturer.
Some illustrations in this manual might be slightly different from the machine.
About IP addresses
In this manual, "IP address" covers both IPv4 and IPv6 environments. Read the instructions that are
relevant to the environment you are using.
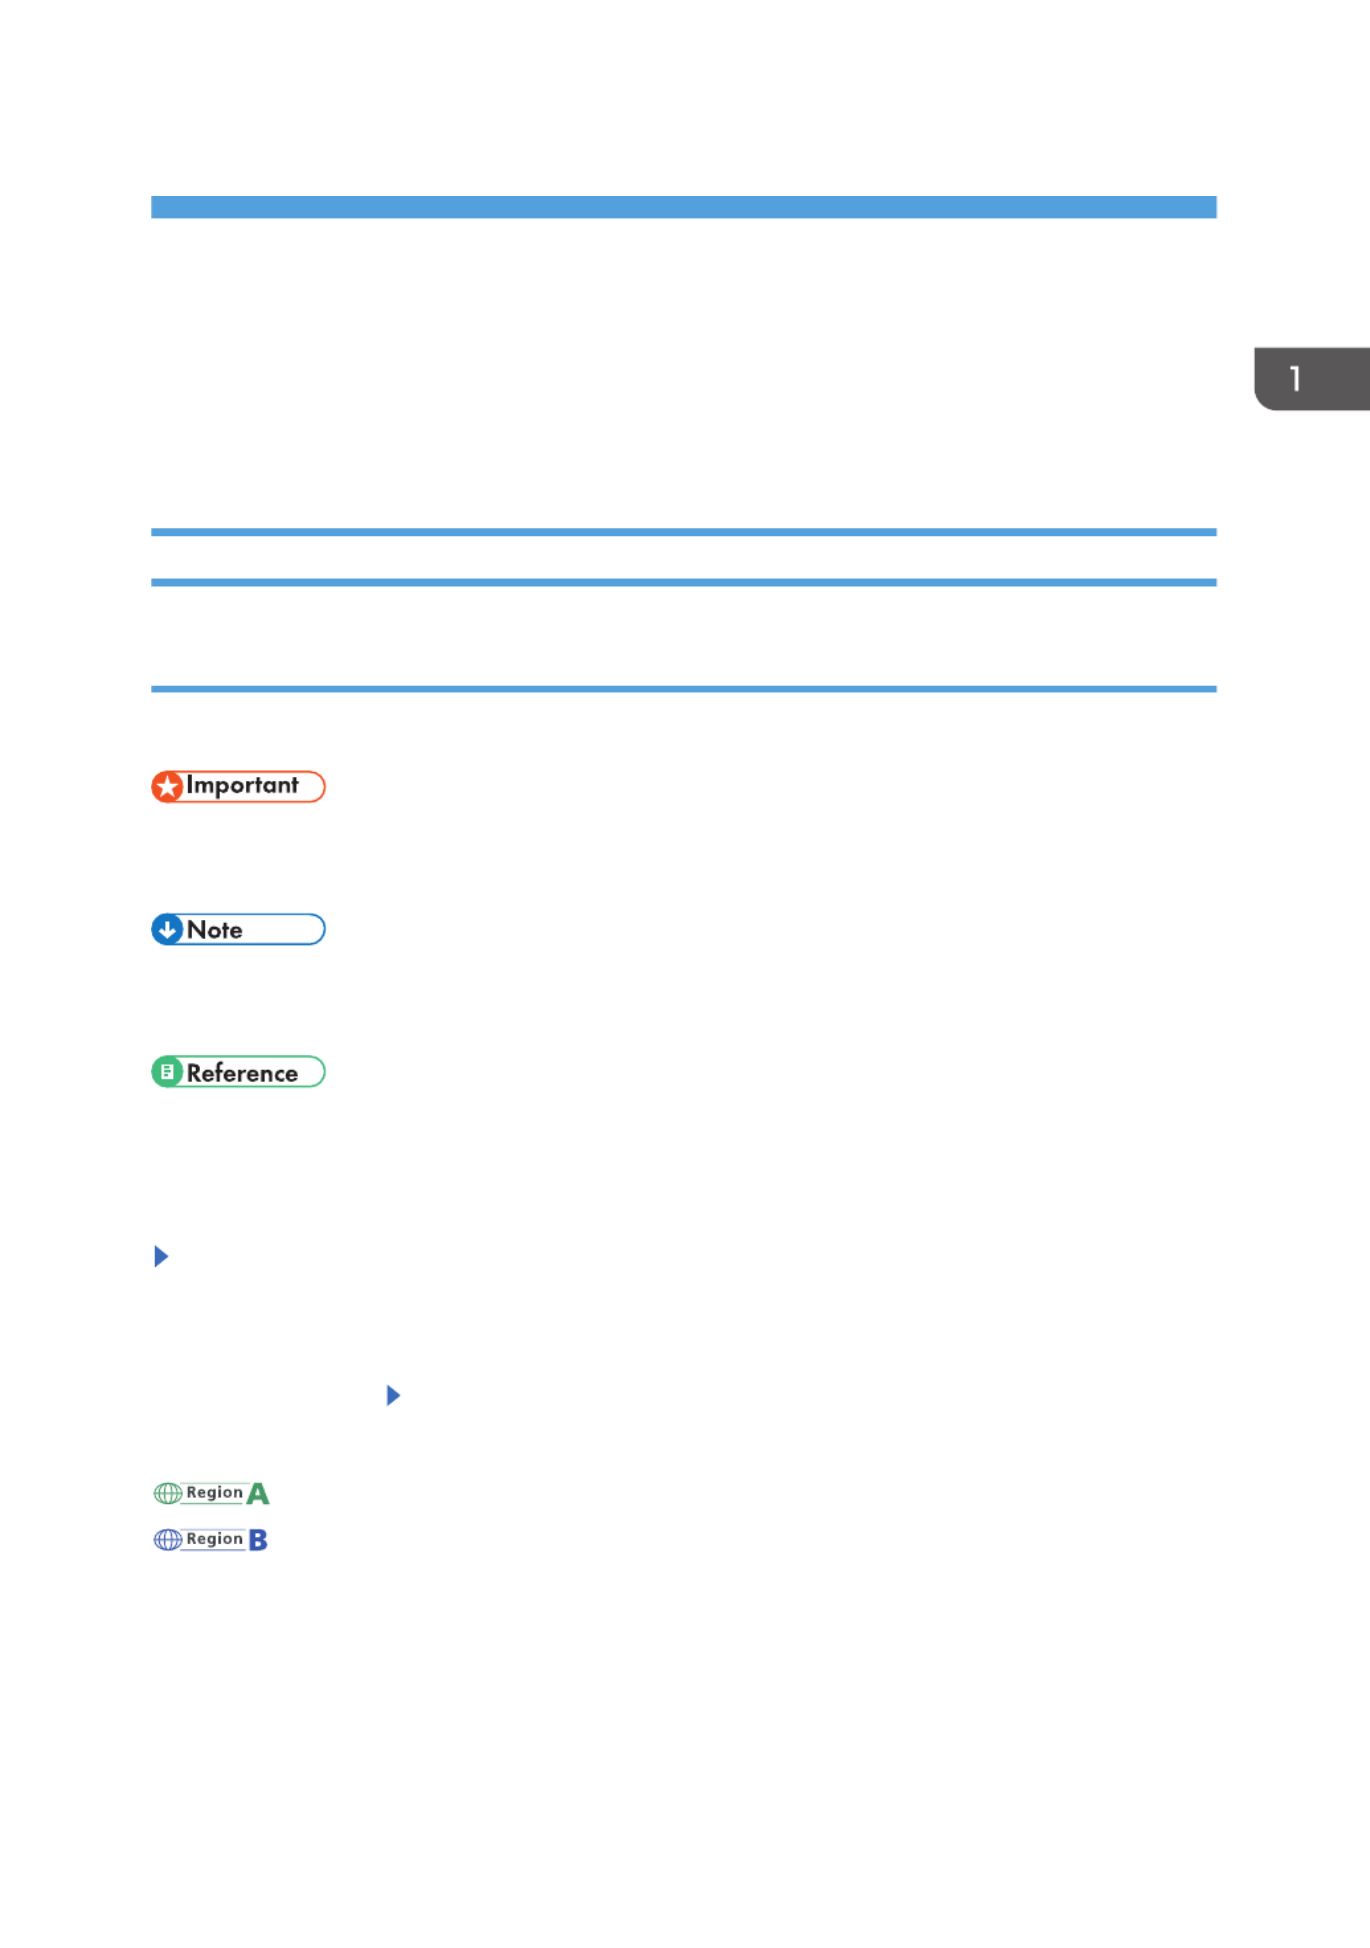
Model-Specific Information
This section explains how to identify the region to which your printer belongs.
There is a label on the rear of the printer, located in the position shown below. The label contains details
that identify the region to which your printer belongs. Read the label.
DPL001
1. Getting Started
6

The following information is region-specific. Read the information under the symbol that corresponds to
the region of your printer.
(mainly Europe and Asia)
If the label contains the following, your printer is a Region A model:
• CODE XXXX -27, -29
• 220–240 V
(mainly North America)
If the label contains the following, your printer is a Region B model:
• CODE XXXX -17
• 120–127 V
• Dimensions in this manual are given in two measurement units: metric and imperial. If your printer is
a Region A model, refer to the metric units. If your printer is a Region B model, refer to the imperial
units.
• If your machine is a region A model and "CODE XXXX -27" is printed on the label, see
" (mainly Europe)" also.
• If your machine is a region A model and "CODE XXXX -29" is printed on the label, see
" (mainly Asia)" also.
List of Options
This section provides a list of options for this printer and the names commonly used in this manual.
Option name Description
Paper Feed Unit PB1100 500-sheet paper feed unit
Caster Table Type M24 Caster Table
Hard Disk Drive Option Type P8 Hard disk
Enhanced Security HDD Option Type M10 Enhanced Security HDD
IEEE 802.11 Interface Unit Type M24 Wireless LAN interface board
IEEE 1284 Interface Board Type M19 IEEE 1284 interface board
USB Device Server Option Type M19A USB device server board
Extended USB Board Type M19 Extended USB Board
Before You Start
7

Option name Description
XPS Direct Print Option Type M24 XPS card
VM CARD Type P8 VM card
IPDS Unit Type P15 IPDS Unit
1. Getting Started
8

Guide to Names and Functions of Components
Guide to Components
• Do not obstruct the machine's vents. Doing so risks fire caused by overheated internal
components.
Exterior: Front view
DPL002
9
12
10
11
58 7 6
4
1 2 3
1. Top cover
Open to access the inside of the printer and remove jammed paper.
Open here to replace the print cartridge.
2. Standard tray
Output is stacked here with the print side down.
3. Control panel
For details, see page 13 "Guide to the Names and Functions of the Control Panel".
4. Vents
Prevent overheating.
5. Paper size dial
Use this dial to specify the paper size. To use a paper size that is not indicated on the paper size dial, set the
dial to " ". If this is the case, set the paper size using the control panel.
Guide to Names and Functions of Components
9

6. Main power switch
Use this switch to turn the power on and off.
For details about how to shut down the printer, see page 28 "Turning Off the Power".
7. Front cover
Open to access the inside of the printer and remove jammed paper.
Open here to replace the print cartridge.
8. Tray 1
Up to 500 sheets of plain paper can be loaded.
For details about the sizes and types of paper that can be used, see page 48 "Paper Size Specifications"
and page 51 "Paper Type Specifications".
9. Extender for the bypass tray
Pull this extender out when loading A4 , 81/2 × 11 or larger size paper in the bypass tray.
10. Bypass tray
Up to 100 sheets of plain paper can be loaded.
For details about the sizes and types of paper that can be used, see page 48 "Paper Size Specifications"
and page 51 "Paper Type Specifications".
11. Paper guides
When loading paper in the bypass tray, align the paper guides flush against the paper.
12. Tray Extension
Pull this fence to prevent paper from falling off.
Exterior: Rear view
DPL003
6
5
4
312
1. Getting Started
10
1. Rear cover
Open to access the inside of the printer.
Open here to replace the fusing unit.
2. Power connector
Connect the power cord to the printer. Insert the other end into an electrical outlet.
3. USB port A
Connect external devices such as a card authentication device, etc.
4. USB port B
Connect to the USB port of the USB device server. Remove the cover to use this port.
5. Ethernet port
Use a network interface cable to connect the printer to a network.
6. Optional interface board slot
Optional interface boards can be inserted.
Insert an optional wireless LAN interface board, IEEE 1284 interface board, USB device server, or Extended
USB Board.
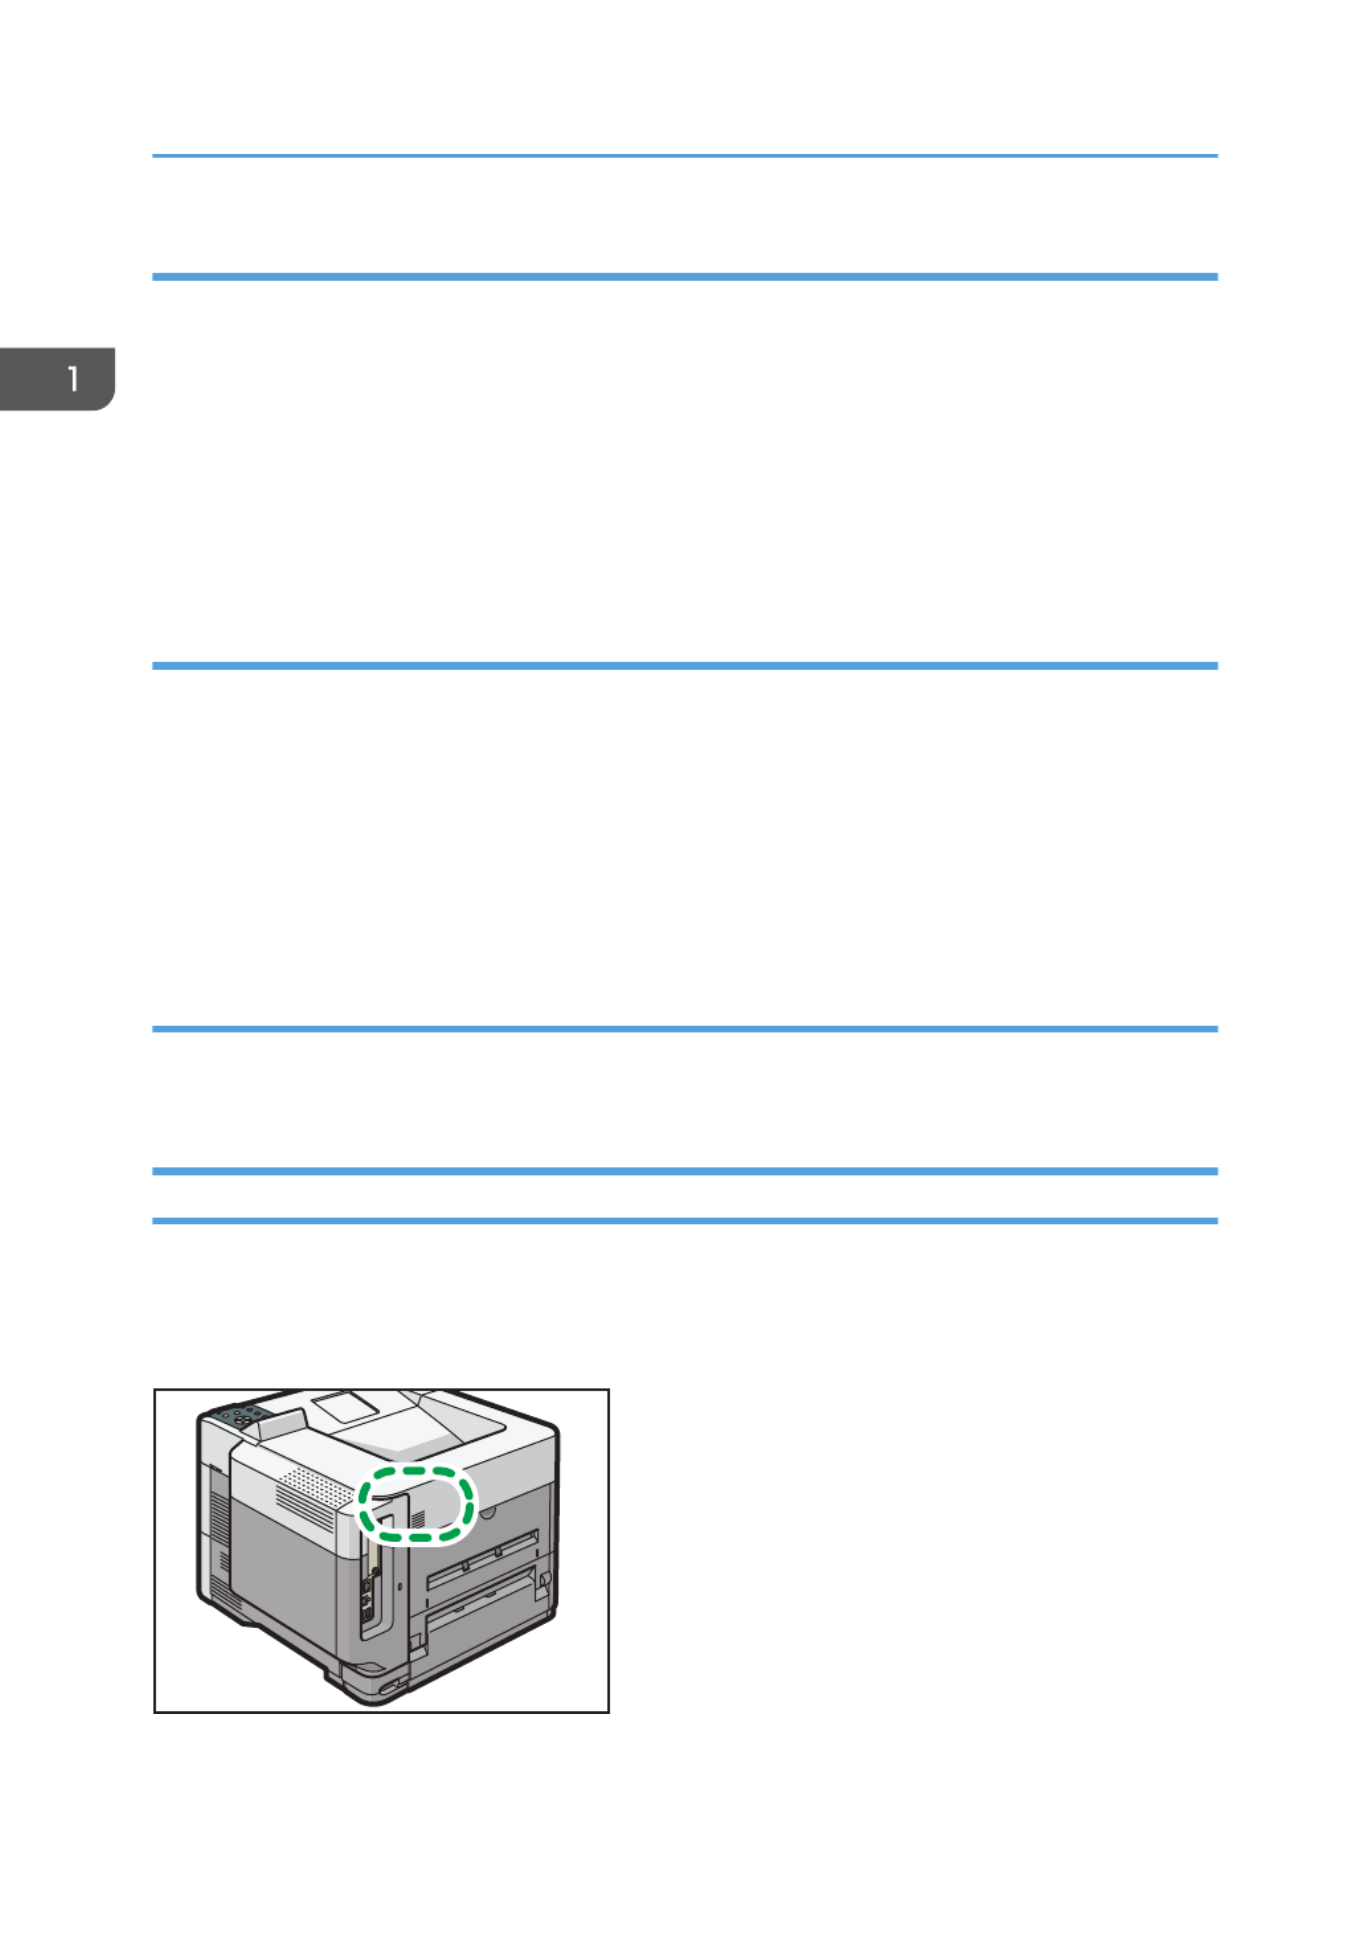
Interior: Front view
DPL004
1
1. Print cartridge
Messages appear on the screen when the print cartridge needs to be replaced, or a new cartridge needs to
be prepared.
For details about the messages that appear on the screen when consumables need to be replaced, see
page 32 "Replenishing and Replacing Consumables".
Guide to Names and Functions of Components
11

Guide to functions of the printer's internal options
1
2
DPL006
1. SD memory card options
• VM card
With this card, you can install embedded software applications.
• XPS card
Allows you to print XPS files.
• IPDS unit
Allows you to print using Intelligent Printer Data Stream (IPDS).
To attach this option, see page 24 "Installing SD Card Options".
2. Optional interface units
• Wireless LAN board
Allows you to communicate over a wireless LAN.
• IEEE 1284 interface board
Allows you to connect to an IEEE 1284 cable.
• USB device server
Allows you to add an Ethernet port to the printer and use two IP addresses at the same time.
• Extended USB Board
Allows you to add a USB port.
To attach this option, see page 18 "Installing the Interface Units".
To install the following options, contact your service representative.
• Hard disk
Allows you to store documents to be printed.
• Enhanced Security HDD
1. Getting Started
12

Allows you to enhance the security of the hard disk by using an encryption function that is
compliant with FIPS 140-2.
• If you want to use two or more SD cards that can be inserted in the same slot, contact your sales or
service representative.
Guide to the Names and Functions of the Control Panel
This illustration shows the control panel of the printer.
CYN041
10
1
2
3
4
5
6
7 8 9
11
12
13
1. Display
Displays current printer status and error messages.
Entering energy saver mode turns off the back light. For details about energy saver mode, see page 29
"Saving Energy".
2. Selection keys
Correspond to the function items at the bottom line on the display.
Guide to Names and Functions of Components
13

Example: When this manual instructs you to press [Option], press the selection key on the left below the initial
screen.
3. [Switch Functions] key
Press this key to switch between the operation screen of the printer function and the function screens of the
extended features currently in use.
4. [Menu] key
Press this key to configure and check the current printer settings.
Press to change the default settings to meet your requirements. See "Function Details of the Printer
Configuration Items", Operating Instructions.
5. [Job Reset] key
Press to cancel the current print job.
6. [Suspend/Resume] key
Press this to suspend the print job currently being processed. The indicator remains lit as long as the job is
suspended.
To resume the job, press this key again. The suspended job will resume automatically when the time specified
in [Auto Reset Timer] elapses (default: ).
60 seconds
60 seconds
60 seconds
60 seconds60 seconds
For details about the [Auto Reset Timer] setting, see "Timer Settings", Operating Instructions.
7. Power indicator
Lights up when the printer is ready to receive data from a computer. Flashes when the printer is warming up or
receiving data. It is unlit when the power is off or when the printer is in energy saver mode.
8. Alert indicator
Lights up or flashes when a printer error occurs.
Steady red: printing is not possible, or is possible but print quality cannot be ensured.
Flashing yellow: the printer will soon require maintenance or a replacement consumable such as print
cartridge.
Follow the instructions that appear on the display.
9. Data in indicator
Flashes when the printer is receiving data from a computer. The data in indicator is lit if there is data to be
printed.
10. Light sensor
The sensor that detects the ambient light level when the ECO Night Sensor function is enabled.
11. [Escape] key
Press this key to cancel an operation or return to the previous display.
12. [OK] key
Use this key to confirm settings or setting values, or move to the next menu level.
13. Scroll keys
Press these keys to move the cursor in each direction.
When the [ ] [ ] [ ] [ ] keys appear in this manual, press the applicable key for the direction that you
want to move the cursor.
1. Getting Started
14

Guide to the Names and Functions of the Control Panel Screen
CYN901
1. Operational Status or Messages
Displays the printer status and messages.
2. [Option]
Press to display the following items:
• Form Feed
You can output data that is unprintable due to errors such as a missing line-feed code.
• Error Log
If a document cannot be printed due to errors or other reasons, an error log is created. You can check
the error log using the control panel.
3. [Prt.Jobs]
Press to display print jobs sent from a computer.
[Prt.Jobs] is displayed only when the optional hard disk is installed in the printer.
4. [Supplies]
Press to display the information about printer supplies.
• By default, the remaining amount of toner is displayed. To avoid displaying the remaining amount
of toner, set [Display Supply Info] to [Off] in [General Settings] under [Maintenance].
Guide to Names and Functions of Components
15

Installing Options
By installing options, you can improve printer performance and expand the available features.
Order of Option Installation
When installing multiple options, the following order is recommended:
1. Attach the paper feed unit.
Attach the paper feed unit to the bottom of the printer.
You can attach up to four paper feed units. Up to 2,000 sheets of paper can be loaded.
2. Install the caster table.
3. Install the optional interface board.
Install in the slot of the printer.
Only one interface board can be installed.
4. Insert SD card options.
Insert in the SD card slot of the printer.
There are two slots for SD cards.
Each slot supports different types of SD cards.
If you want to use two or more SD cards that can be inserted in the same slot, contact your sales or
service representative.
Attaching the 500-sheet paper feed unit
You can install a 500-sheet paper feed unit.
• It is dangerous to handle the power cord plug with wet hands. Doing so could result in electric
shock.
• The printer weighs approximately 18 kg (40 lb.).
• When moving the machine, use the inset grips on both sides, and lift slowly in pairs. The
machine will break or cause injury if dropped.
• Lifting the paper feed unit carelessly or dropping may cause injury.
1. Getting Started
16

• Unplug the power cord from the wall outlet before you move the machine. While moving the
machine, take care that the power cord is not damaged under the machine. Failing to take these
precautions could result in fire or electric shock.
•
•
•
•• Do not place the printer directly on the floor.
Do not place the printer directly on the floor.
Do not place the printer directly on the floor.
Do not place the printer directly on the floor.Do not place the printer directly on the floor.
•
•
•
•• When attaching multiple options, attach the paper feed unit first.
When attaching multiple options, attach the paper feed unit first.
When attaching multiple options, attach the paper feed unit first.
When attaching multiple options, attach the paper feed unit first.When attaching multiple options, attach the paper feed unit first.
•
•
•
•• To attach two or three paper feed units at the same time, first stack them one upon the other, and
To attach two or three paper feed units at the same time, first stack them one upon the other, and
To attach two or three paper feed units at the same time, first stack them one upon the other, and
To attach two or three paper feed units at the same time, first stack them one upon the other, and To attach two or three paper feed units at the same time, first stack them one upon the other, and
then attach them as a single unit.
then attach them as a single unit.
then attach them as a single unit.
then attach them as a single unit.then attach them as a single unit.
•
•
•
•• Before turning on the power, remove the packaging material from the paper feed unit.
Before turning on the power, remove the packaging material from the paper feed unit.
Before turning on the power, remove the packaging material from the paper feed unit.
Before turning on the power, remove the packaging material from the paper feed unit.Before turning on the power, remove the packaging material from the paper feed unit.
1. Turn the printer off and unplug the power cord.
2. Remove the packaging from the paper feed unit.
3. Lift the printer using the inset grips on both sides of the printer.
DPL023
Lifting the machine requires two people.
When moving the printer, do not touch the following parts:
• Convex parts on the right side of the machine
• Places indicated on the labels attached to the machine
• The bottom of the optional paper tray
Installing Options
17

4. There are two upright pins on the optional paper feed unit. Align them with the holes on
the underside of the printer, and then carefully lower the printer.
DPK939
5. Plug in the power cord, and then turn on the printer.
6. Print the configuration page to confirm that the unit was attached correctly.
• To check whether the optional paper feed unit was correctly attached, print the configuration page,
and check "Attached Equipment" on the configuration page. If the unit was attached correctly,
"Tray 2", "Tray 3", "Tray 4", and "Tray 5" will appear.
• For information about printing the configuration page, see "Test Printing", Operating Instructions.
• If the optional paper feed unit was not installed properly, repeat the procedure from the beginning.
If it cannot be installed correctly even after trying the installation a second time, contact your sales
or service representative.
• To use the paper feed unit, configure the printer options in "Accessories" in the printer driver. For
details about opening "Accessories", see "Configuring Option Settings for the Printer", Driver
Installation Guide.
Installing the Interface Units
•
•
•
•• Before beginning work, ground yourself by touching something metal to discharge any static
Before beginning work, ground yourself by touching something metal to discharge any static
Before beginning work, ground yourself by touching something metal to discharge any static
Before beginning work, ground yourself by touching something metal to discharge any static Before beginning work, ground yourself by touching something metal to discharge any static
electricity. Static electricity can damage the interface units.
electricity. Static electricity can damage the interface units.
electricity. Static electricity can damage the interface units.
electricity. Static electricity can damage the interface units.electricity. Static electricity can damage the interface units.
•
•
•
•• Do not subject the interface units to physical shocks.
Do not subject the interface units to physical shocks.
Do not subject the interface units to physical shocks.
Do not subject the interface units to physical shocks.Do not subject the interface units to physical shocks.
Installing the Wireless LAN interface board
1. Check the contents of the package.
2. Turn the printer off and unplug the power cord.
1. Getting Started
18

3. Loosen the two screws and remove the slot cover.
DPL009
The removed cover will not be reused.
4. Fully insert the interface board.
DPL010
Check that the interface board is firmly connected to the controller board.
5. Tighten the two screws to secure the interface board.
DPL011
6. Plug in the power cord, and then turn on the printer.
7. Print the configuration page to confirm that the board was attached correctly.
Installing Options
19

5. Tighten the two screws to secure the interface board.
DPL013
6. Plug in the power cord, and then turn on the printer.
7. Print the configuration page to confirm that the board was attached correctly.
• Check that the board was correctly installed by printing the configuration page. If it is correctly
installed, "Parallel Interface" will appear for "Device Connection" on the configuration page. For
details about printing the configuration page, see "Test Printing", Operating Instructions.
• If the board was not installed properly, repeat the procedure from the beginning. If it cannot be
installed correctly even after trying the installation a second time, contact your sales or service
representative.
Installing the Extended USB board
1. Check the contents of the package.
2. Turn the printer off and unplug the power cord.
3. Loosen the two screws and remove the slot cover.
DPL009
The removed cover will not be reused.
Installing Options
21

4. Fully insert the interface board.
DPL014
Check that the interface board is firmly connected to the controller board.
5. Tighten the two screws to secure the interface board.
DPL015
6. Plug in the power cord, and then turn on the printer.
7. Print the configuration page to confirm that the board was attached correctly.
• If the board was not installed properly, repeat the procedure from the beginning. If it cannot be
installed correctly even after trying the installation a second time, contact your sales or service
representative.
Installing the USB device server
The optional USB device server is an interface board that adds an Ethernet port to the printer.
With this option installed, two Ethernet cables can be connected at the same time using the standard port
on the printer and an additional port on the USB device server. You can assign different IP addresses to
each port, so the printer can print jobs from different network segments.
Procedure for installing the USB device server
1. Check the contents of the package.
1. Getting Started
22

2. Turn the printer off and unplug the power cord.
3. Loosen the two screws and remove the slot cover.
DPL009
The removed cover will not be reused.
4. Fully insert the interface board.
DPL016
Check that the interface board is firmly connected to the controller board.
5. Tighten the two screws to secure the interface board.
DPL030
6. Connect the USB device server to the printer.
For details, see the Setup Guide provided with the USB device server.
Installing Options
23

Configuring settings
After installing and connecting the USB device server to the printer, configure the printer settings.
•
•
•
•• When using the USB device server, set [Engy Sv Md to Dsbl Prt Srv] to [Disable mode] to prevent
When using the USB device server, set [Engy Sv Md to Dsbl Prt Srv] to [Disable mode] to prevent
When using the USB device server, set [Engy Sv Md to Dsbl Prt Srv] to [Disable mode] to prevent
When using the USB device server, set [Engy Sv Md to Dsbl Prt Srv] to [Disable mode] to prevent When using the USB device server, set [Engy Sv Md to Dsbl Prt Srv] to [Disable mode] to prevent
the printer from entering Energy Saver mode. Otherwise, the USB device server loses
the printer from entering Energy Saver mode. Otherwise, the USB device server loses
the printer from entering Energy Saver mode. Otherwise, the USB device server loses
the printer from entering Energy Saver mode. Otherwise, the USB device server loses the printer from entering Energy Saver mode. Otherwise, the USB device server loses
communication with the network while the printer is in Energy Saver mode, and the printer cannot
communication with the network while the printer is in Energy Saver mode, and the printer cannot
communication with the network while the printer is in Energy Saver mode, and the printer cannot
communication with the network while the printer is in Energy Saver mode, and the printer cannot communication with the network while the printer is in Energy Saver mode, and the printer cannot
receive print jobs.
receive print jobs.
receive print jobs.
receive print jobs.receive print jobs.
1. Select [System] Press [OK]
2. Select [Engy Sv Md to Dsbl Prt Srv] Press [OK]
3. Select [Disable Mode] Press [OK]
Installing SD Card Options
• Keep SD cards or USB flash memory devices out of reach of children. If a child accidentally
swallows an SD card or USB flash memory device, consult a doctor immediately.
•
•
•
•• Do not subject the card to physical shocks.
Do not subject the card to physical shocks.
Do not subject the card to physical shocks.
Do not subject the card to physical shocks.Do not subject the card to physical shocks.
1. Turn the printer off and unplug the power cord.
2. Open the rear cover.
DPL040
1. Getting Started
24

3. Unhook the tab on the interface cover, which is located on the side of the rear cover.
DPL041
4. Unhook the two tabs on the outside of the interface cover.
DPL042
5. Insert the SD card into the slot until it clicks.
DPL043
If you insert only one SD card, use the upper slot. If you insert two SD cards simultaneously, use
both slots. If you insert the optional VM card, use only the lower slot.
If you want to use two or more SD cards simultaneously, contact your service representative.
Installing Options
25

6. Hook the two tabs on the outside of the interface cover.
DPL044
7. Hook the tab on the interface cover, which is located on the side of the rear cover.
DPL045
8. Close the rear cover.
DPL046
9. Plug in the power cord, and then turn on the printer.
10. Check that the SD card was installed correctly.
• You can confirm that the SD card was installed correctly by checking the control panel menu or
configuration page.
• VM card: Make sure [JavaTM/X] appears when the [Switch Functions] key is pressed.
1. Getting Started
26

• XPS card: Printing the configuration page, if the XPS card is installed properly, "XPS" will
appear for "Printer Language" in "System Reference". For details about printing the
configuration page, see "Test Printing", Operating Instructions.
• If the card is not installed properly, repeat the procedure from the beginning. If it cannot be
installed correctly even after trying the installation a second time, contact your sales or service
representative.
• Do not touch the card while the printer is in use. It may come loose, even if pushed only slightly. The
slot cover must be reattached.
Installing Options
27

Turning On/Off the Power
This section explains how to turn on/off the printer.
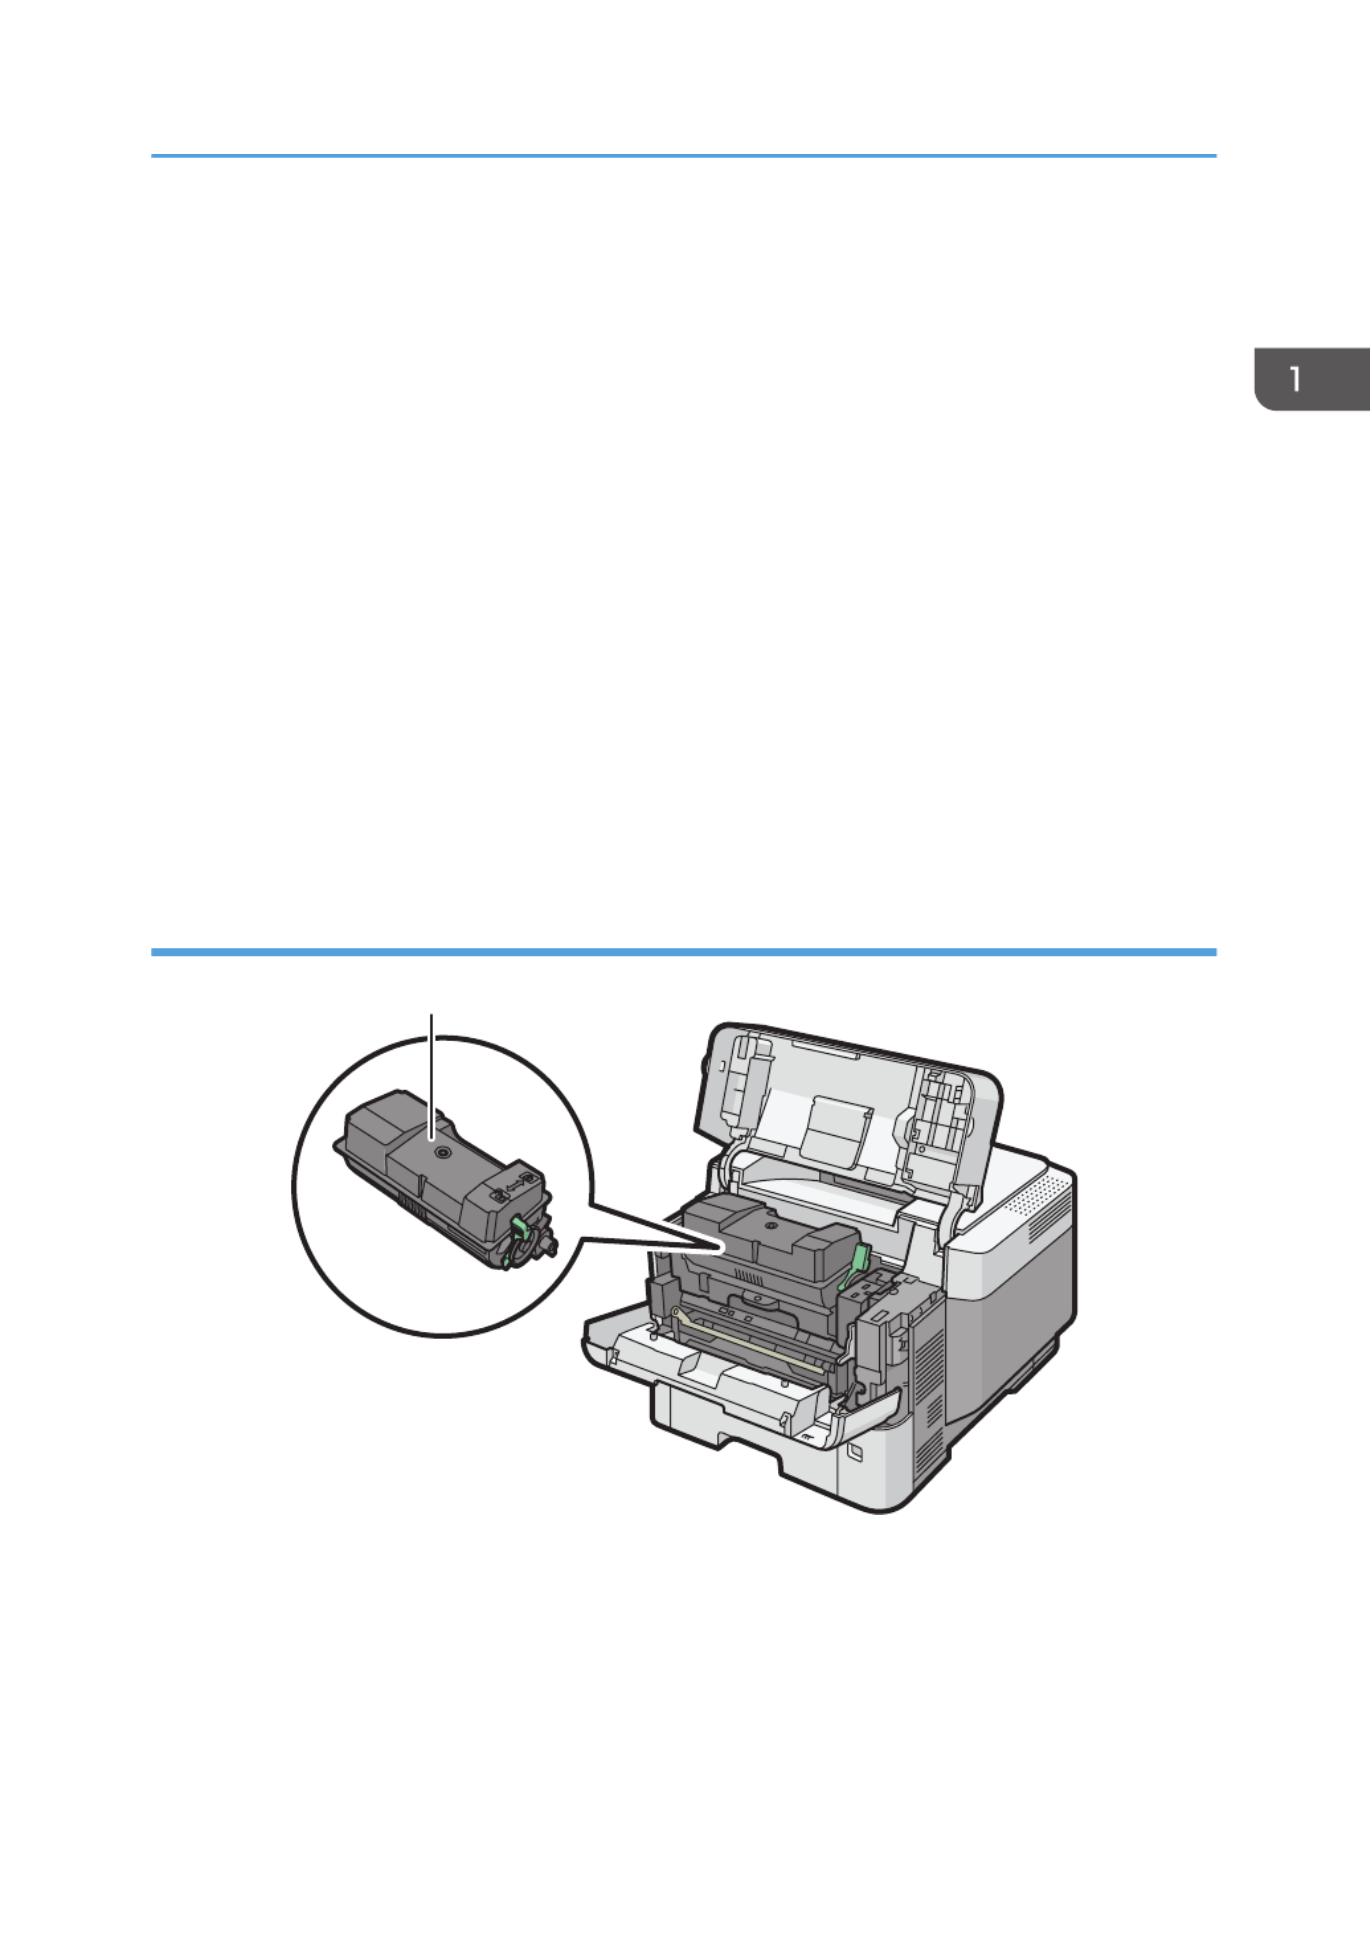
Turning On the Power
1. Make sure the power cord is firmly plugged into the wall outlet.
2. Push the main power switch.
DPK914
The power indicator turns on.
• After you switch the main power on, a screen may appear to indicate that the printer is initializing.
Do not switch the power off during this process. Initialization takes about 5 minutes.
Turning Off the Power
• When disconnecting the power cord from the wall outlet, always pull the plug, not the cord.
Pulling the cord can damage the power cord. Use of damaged power cords could result in fire
or electric shock.
•
•
•
•• Do not press and hold the main power switch when turning off the printer. Doing so shuts down the
Do not press and hold the main power switch when turning off the printer. Doing so shuts down the
Do not press and hold the main power switch when turning off the printer. Doing so shuts down the
Do not press and hold the main power switch when turning off the printer. Doing so shuts down the Do not press and hold the main power switch when turning off the printer. Doing so shuts down the
printer forcefully and may damage the hard disk and the SDRAM module, causing a malfunction of
printer forcefully and may damage the hard disk and the SDRAM module, causing a malfunction of
printer forcefully and may damage the hard disk and the SDRAM module, causing a malfunction of
printer forcefully and may damage the hard disk and the SDRAM module, causing a malfunction of printer forcefully and may damage the hard disk and the SDRAM module, causing a malfunction of
the printer.
the printer.
the printer.
the printer.the printer.
•
•
•
•• Before unplugging the power cord plug, turn off the power switch and make sure the power switch
Before unplugging the power cord plug, turn off the power switch and make sure the power switch
Before unplugging the power cord plug, turn off the power switch and make sure the power switch
Before unplugging the power cord plug, turn off the power switch and make sure the power switch Before unplugging the power cord plug, turn off the power switch and make sure the power switch
indicator turns off. Not doing so may result in damage to the hard disk or memory, leading to a
indicator turns off. Not doing so may result in damage to the hard disk or memory, leading to a
indicator turns off. Not doing so may result in damage to the hard disk or memory, leading to a
indicator turns off. Not doing so may result in damage to the hard disk or memory, leading to a indicator turns off. Not doing so may result in damage to the hard disk or memory, leading to a
malfunction.
malfunction.
malfunction.
malfunction.malfunction.
1. Getting Started
28
•
•
•
•• Do not turn off the power while the printer is in operation.
Do not turn off the power while the printer is in operation.
Do not turn off the power while the printer is in operation.
Do not turn off the power while the printer is in operation.Do not turn off the power while the printer is in operation.
1. Push the main power switch.
DPK914
The main power is turned off automatically when the shutdown process is complete.
If the shutdown process is not complete within the period of time displayed on the screen, contact
your service representative.
Saving Energy
This printer has the following energy saving functions:
Low Power mode
If the printer is not used for a certain period of time, it enters Low Power mode.
In Low Power mode, the printer consumes less electricity than in the standby mode by turning off the
display and lowering the temperature of the fusing unit heater. If the printer receives a job, it
increases the temperature of the fusing unit and perform printing, but the display remains off.
You can configure the period of time the printer waits before it enters Low Power mode in [Low
Power Mode Timer]. For details, see "System", Operating Instructions.
To exit Low Power mode, do one of the following:
• Start print jobs
• Press any key on the control panel
• Open any cover
• Open any paper tray
The printer also exits Low Power mode when the ECO Night Sensor detects an increase in the
ambient light level.
Fusing Unit Off mode
If you do not use the printer for a certain period after an operation, the display will turn off and the
printer goes into Fusing Unit Off mode. The printer uses less electricity in Fusing Unit Off mode.
Turning On/Off the Power
29

When the printer is in Fusing Unit Off mode, the display is on but the fusing unit heater is off to save
energy. In this mode, you can change the printer settings on the control panel. However, the printer
must exit this mode to print.
You can change the amount of time that the printer waits before switching to Fusing Unit Off mode
under [Fusing Unit Off Mode Timer]. For details, see "System", Operating Instructions.
To exit Fusing Unit Off mode, do one of the following:
• Start print jobs
• Display the [Maintenance] screen on the control panel
• Operate the control panel when [Exit Fusing Unit Off Mode] is set to [On Operating Control
Panel]
Sleep mode
If the printer remains inactive for a specified period after entering Fusing Unit Off mode, it enters
Sleep mode to further reduce the power consumption. The printer also enters Sleep mode when:
• The printer waits before entering Sleep mode is set in [Sleep Mode Timer]
• It is the day and time specified in [Weekly Timer]
The printer can print jobs from computers.
You can change the amount of time that the printer waits before switching to Sleep mode.
For details about setting [Sleep Mode Timer] and [Weekly Timer], see "System", Operating
Instructions.
To exit Sleep mode, do one of the following:
• Press one of the keys on the control panel
• Start print jobs
ECO Night Sensor
ECO Night Sensor can detect darkness and automatically turn off this product's power.
If ECO Night Sensor is enabled and detects darkness in a room after the lights are turned off, the
sensor automatically turns the power off and reduces the power consumption of this product to 1W
or less.
The default settings of ECO Night Sensor are enabled.
To change the settings, see "System", Operating Instructions.
•
•
•
•• The ECO Night Sensor function's factory default is [Auto Power Off Only]. If the printer is
The ECO Night Sensor function's factory default is [Auto Power Off Only]. If the printer is
The ECO Night Sensor function's factory default is [Auto Power Off Only]. If the printer is
The ECO Night Sensor function's factory default is [Auto Power Off Only]. If the printer is The ECO Night Sensor function's factory default is [Auto Power Off Only]. If the printer is
located in an environment where the ambient light level is low (such as in a hallway or a
located in an environment where the ambient light level is low (such as in a hallway or a
located in an environment where the ambient light level is low (such as in a hallway or a
located in an environment where the ambient light level is low (such as in a hallway or a located in an environment where the ambient light level is low (such as in a hallway or a
location with motion sensor lighting), it is advisable that you either keep this function disabled
location with motion sensor lighting), it is advisable that you either keep this function disabled
location with motion sensor lighting), it is advisable that you either keep this function disabled
location with motion sensor lighting), it is advisable that you either keep this function disabled location with motion sensor lighting), it is advisable that you either keep this function disabled
or adjust its sensitivity.
or adjust its sensitivity.
or adjust its sensitivity.
or adjust its sensitivity.or adjust its sensitivity.
•
•
•
•• You can configure the printer to automatically turn its power on when it detects an increase in
You can configure the printer to automatically turn its power on when it detects an increase in
You can configure the printer to automatically turn its power on when it detects an increase in
You can configure the printer to automatically turn its power on when it detects an increase in You can configure the printer to automatically turn its power on when it detects an increase in
the ambient light level. The printer may also react to daylight and turn its power on. If the
the ambient light level. The printer may also react to daylight and turn its power on. If the
the ambient light level. The printer may also react to daylight and turn its power on. If the
the ambient light level. The printer may also react to daylight and turn its power on. If the the ambient light level. The printer may also react to daylight and turn its power on. If the
1. Getting Started
30

printer is located in an environment where it is exposed to direct sunlight, it is advisable that
printer is located in an environment where it is exposed to direct sunlight, it is advisable that
printer is located in an environment where it is exposed to direct sunlight, it is advisable that
printer is located in an environment where it is exposed to direct sunlight, it is advisable that printer is located in an environment where it is exposed to direct sunlight, it is advisable that
you do not change the factory default configuration and only enable [Auto Power Off Only].
you do not change the factory default configuration and only enable [Auto Power Off Only].
you do not change the factory default configuration and only enable [Auto Power Off Only].
you do not change the factory default configuration and only enable [Auto Power Off Only].you do not change the factory default configuration and only enable [Auto Power Off Only].
• The energy saving functions will not activate when:
• Communicating with external devices
• The hard disk is active
• A warning message is displayed
• The service call message is displayed
• Paper is jammed
• The printer's covers are opened
• Toner is being replenished
• The printer settings screen is displayed
• Fixed warm-up is in progress
• Data is being processed
• Operations are suspended during printing
• The Data In indicator is on or flashing
• The sample print, locked print, hold print, or stored print screen is displayed
• Accessing the printer using Web Image Monitor
• The printer consumes less energy when in Sleep mode, but it takes longer to start printing.
• If two or more energy saving functions are set, the function for which the predetermined conditions
to enter energy saving mode are met takes effect first.
Turning On/Off the Power
31
Replenishing and Replacing Consumables
This section explains how to replenish consumables when they run out.
Replacing the Print Cartridge
This section explains precautions to add toner when it has run out, and how to dispose of used toner.
• Do not incinerate toner (new or used) or toner containers. Doing so risks burns. Toner will ignite
on contact with naked flame.
• Do not store toner (new or used) or toner containers anywhere near naked flames. Doing so
risks fire and burns. Toner will ignite on contact with naked flame.
• Do not use a vacuum cleaner to remove spilled toner (including used toner). Absorbed toner
may cause a fire or explosion due to electrical contact flickering inside the vacuum cleaner.
However, it is possible to use a vacuum cleaner that is explosion-proof and dust ignition-proof. If
toner is spilled on the floor, remove the spilled toner slowly using a wet cloth, so that the toner is
not scattered.
• Do not crush or squeeze toner containers. Doing so can cause toner spillage, possibly resulting
in dirtying of skin, clothing, and floor, and accidental ingestion.
• Store toner (new or used), toner containers, and components that have been in contact with
toner out of reach of children.
• If toner or used toner is inhaled, gargle with plenty of water and move into a fresh air
environment. Consult a doctor if necessary.
• If toner or used toner gets into your eyes, flush immediately with large amounts of water. Consult
a doctor if necessary.
• If toner or used toner is swallowed, dilute by drinking a large amount of water. Consult a doctor
if necessary.
• When removing jammed paper or replacing toner, avoid getting toner (new or used) on your
clothing. If toner comes into contact with your clothing, wash the stained area with cold water.
Hot water will set the toner into the fabric and make removing the stain impossible.
1. Getting Started
32

5. Remove the new print cartridge from the toner kit.
DPK921
6. Shake the new print cartridge at least 10 times to the left and right so that the toner inside
it spreads uniformly.
10
DPK922
7. Insert the new print cartridge into the printer.
Press the new print cartridge until it clicks into place.
DPK924
Replenishing and Replacing Consumables
35

8. Lock the lever of the print cartridge.
DPK925
9. Close the front cover and the top cover.
• If appears when there is a lot of toner, follow the toner replacement instructions that appear on
the screen: Pull out the cartridge, and then reinstall it.
• Comply with our Print Cartridge Recycling Program, whereby used print cartridges are collected
for processing. For details, ask your sales or service representative.
Disposing of used toner
This section describes what to do with used toner.
Toner cannot be re-used.
Pack used toner containers in the container's box or a bag to prevent the toner from leaking out of the
container when you dispose of it.
(mainly Europe and Asia)
If you want to discard your used toner container, please contact your local sales office. If you discard it
by yourself, treat it as general plastic waste material.
(mainly North America)
Please see our local company website for information on the recycling of supply products, or you can
recycle items according to the requirements of your local municipalities or private recyclers.
1. Getting Started
36

Replacing the Waste Toner Bottle
• The following explains the warning messages on the plastic bag used in this product's
packaging.
• Keep the polythene materials (bags, etc.) supplied with this machine away from babies
and small children at all times. Suffocation can result if polythene materials are brought into
contact with the mouth or nose.
• Do not incinerate toner (new or used) or toner containers. Doing so risks burns. Toner will ignite
on contact with naked flame.
• Do not store toner (new or used) or toner containers anywhere near naked flames. Doing so
risks fire and burns. Toner will ignite on contact with naked flame.
• Do not use a vacuum cleaner to remove spilled toner (including used toner). Absorbed toner
may cause a fire or explosion due to electrical contact flickering inside the vacuum cleaner.
However, it is possible to use a vacuum cleaner that is explosion-proof and dust ignition-proof. If
toner is spilled on the floor, remove the spilled toner slowly using a wet cloth, so that the toner is
not scattered.
• Do not crush or squeeze toner containers. Doing so can cause toner spillage, possibly resulting
in dirtying of skin, clothing, and floor, and accidental ingestion.
• Store toner (new or used), toner containers, and components that have been in contact with
toner out of reach of children.
• If toner or used toner is inhaled, gargle with plenty of water and move into a fresh air
environment. Consult a doctor if necessary.
• If toner or used toner gets into your eyes, flush immediately with large amounts of water. Consult
a doctor if necessary.
• If toner or used toner is swallowed, dilute by drinking a large amount of water. Consult a doctor
if necessary.
• When removing jammed paper or replacing toner, avoid getting toner (new or used) on your
clothing. If toner comes into contact with your clothing, wash the stained area with cold water.
Hot water will set the toner into the fabric and make removing the stain impossible.
Replenishing and Replacing Consumables
37

• When removing jammed paper or replacing toner, avoid getting toner (new or used) on your
skin. If toner comes into contact with your skin, wash the affected area thoroughly with soap and
water.
• When replacing a toner or waste toner container or consumables with toner, make sure that the
toner does not splatter. Put the waste consumables in a bag after they are removed. For
consumables with a lid, make sure that the lid is shut.
•
•
•
•• Waste toner bottles cannot be reused.
Waste toner bottles cannot be reused.
Waste toner bottles cannot be reused.
Waste toner bottles cannot be reused.Waste toner bottles cannot be reused.
•
•
•
•• Before removing the waste toner bottle from the machine, spread paper or some other material
Before removing the waste toner bottle from the machine, spread paper or some other material
Before removing the waste toner bottle from the machine, spread paper or some other material
Before removing the waste toner bottle from the machine, spread paper or some other material Before removing the waste toner bottle from the machine, spread paper or some other material
around the area to keep toner from dirtying your workspace.
around the area to keep toner from dirtying your workspace.
around the area to keep toner from dirtying your workspace.
around the area to keep toner from dirtying your workspace.around the area to keep toner from dirtying your workspace.
•
•
•
•• When removing the waste toner bottle, do not touch the inside of the machine.
When removing the waste toner bottle, do not touch the inside of the machine.
When removing the waste toner bottle, do not touch the inside of the machine.
When removing the waste toner bottle, do not touch the inside of the machine.When removing the waste toner bottle, do not touch the inside of the machine.
•
•
•
•• Be careful to not allow the toner to leak from the waste toner bottle when you remove it.
Be careful to not allow the toner to leak from the waste toner bottle when you remove it.
Be careful to not allow the toner to leak from the waste toner bottle when you remove it.
Be careful to not allow the toner to leak from the waste toner bottle when you remove it.Be careful to not allow the toner to leak from the waste toner bottle when you remove it.
•
•
•
•• Carefully pull the waste toner bottle out horizontally when you are replacing it.
Carefully pull the waste toner bottle out horizontally when you are replacing it.
Carefully pull the waste toner bottle out horizontally when you are replacing it.
Carefully pull the waste toner bottle out horizontally when you are replacing it.Carefully pull the waste toner bottle out horizontally when you are replacing it.
•
•
•
•• Do not use a waste toner bottle that has not been used for a long time.
Do not use a waste toner bottle that has not been used for a long time.
Do not use a waste toner bottle that has not been used for a long time.
Do not use a waste toner bottle that has not been used for a long time.Do not use a waste toner bottle that has not been used for a long time.
•
•
•
•• Take care not to drop the waste toner bottle.
Take care not to drop the waste toner bottle.
Take care not to drop the waste toner bottle.
Take care not to drop the waste toner bottle.Take care not to drop the waste toner bottle.
•
•
•
•• Make sure the waste toner bottle is fully inserted. If it is not, toner will leak inside the machine.
Make sure the waste toner bottle is fully inserted. If it is not, toner will leak inside the machine.
Make sure the waste toner bottle is fully inserted. If it is not, toner will leak inside the machine.
Make sure the waste toner bottle is fully inserted. If it is not, toner will leak inside the machine.Make sure the waste toner bottle is fully inserted. If it is not, toner will leak inside the machine.
•
•
•
•• We recommend purchasing and keeping a spare waste toner bottle on hand since waste toner
We recommend purchasing and keeping a spare waste toner bottle on hand since waste toner
We recommend purchasing and keeping a spare waste toner bottle on hand since waste toner
We recommend purchasing and keeping a spare waste toner bottle on hand since waste toner We recommend purchasing and keeping a spare waste toner bottle on hand since waste toner
bottles are consumable items.
bottles are consumable items.
bottles are consumable items.
bottles are consumable items.bottles are consumable items.
1. Open the left cover.
DPK928
1. Getting Started
38

2. Remove the waste toner bottle from the printer.
DPK929
3. Put the full waste toner bottle in a plastic bag and seal it so that the toner does not spill
out.
DPK930
2
1
4. Remove the new waste toner bottle from the toner kit.
DPK931
5. Insert the new waste toner bottle into the printer
Leave the cap open.
Replenishing and Replacing Consumables
39

DPK932
Press the new waste toner bottle it clicks into place.
DPK933
6. Close the left cover.
DPK934
• Replace the waste toner bottle if "Waste Toner full" appears on the display.
• When the "Waste Toner almost full" appears on the display, the waste toner bottle should be
replaced soon. Prepare a new waste toner bottle.
• Your service representative can replace the waste toner bottle if it is included in your contract. For
details, contact your local dealer or service representative.
1. Getting Started
40
Displaying the Printer Configuration Screens
Using the Control Panel
The configuration screens allow you to change or set defaults.
•
•
•
•• If Administrator Authentication Management is specified, contact your administrator.
If Administrator Authentication Management is specified, contact your administrator.
If Administrator Authentication Management is specified, contact your administrator.
If Administrator Authentication Management is specified, contact your administrator.If Administrator Authentication Management is specified, contact your administrator.
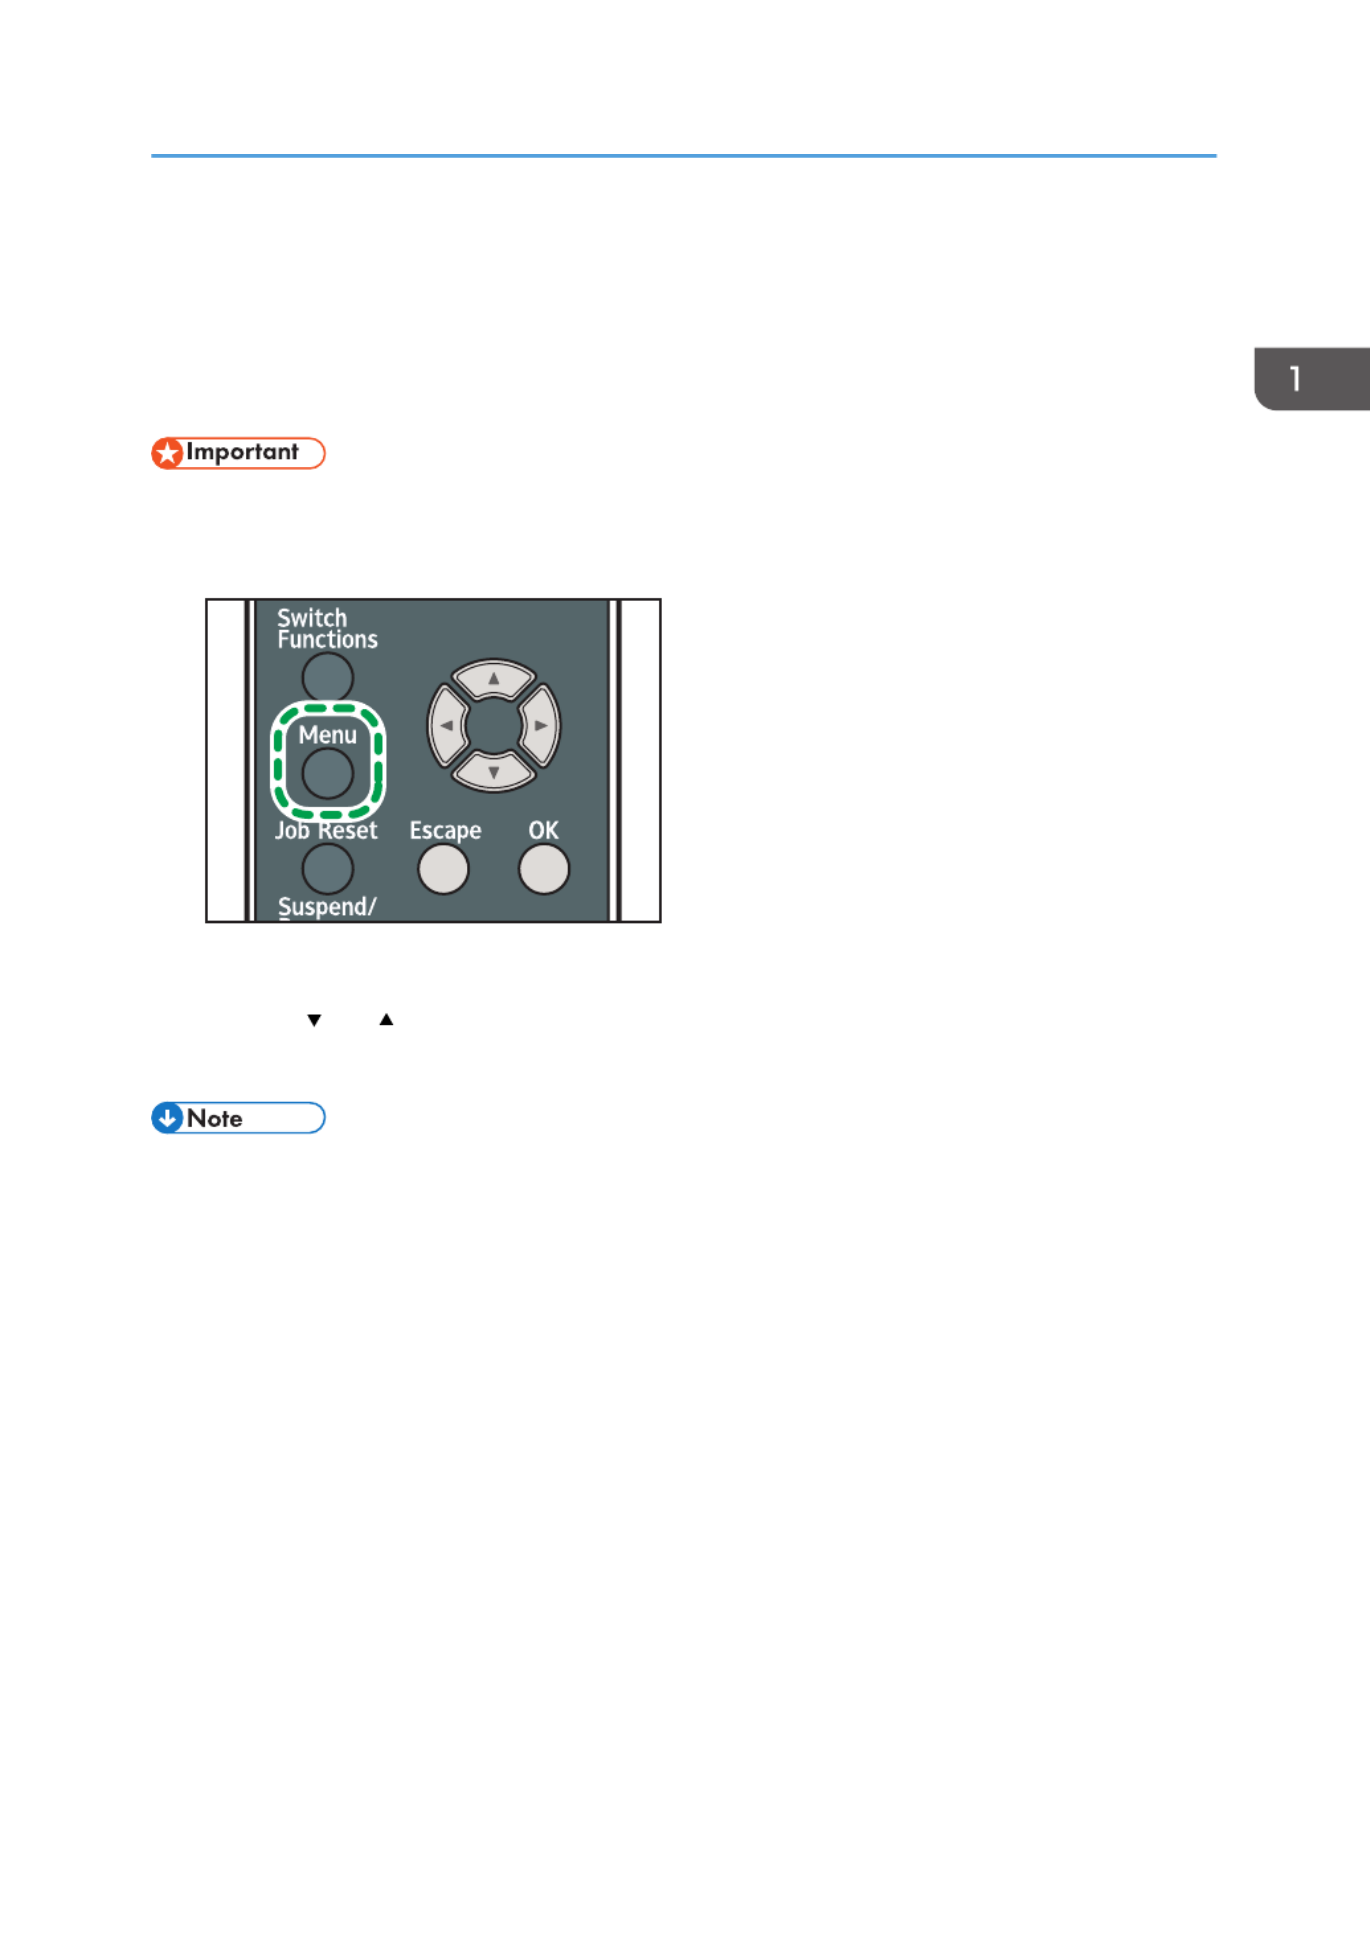
1. Press the [Menu] key.
CYN042
2. Select the settings you want to change.
Press the [ ] or [ ] key to select the next or previous items.
3. Press the [OK] key.
• Any changes you make with configuration screens remain in effect even if the main power switch is
turned off.
• To cancel changes made to settings and return to the initial display, press the [Escape] key.
Displaying the Printer Configuration Screens Using the Control Panel
41
Product specificaties
| Merk: | Ricoh |
| Categorie: | Printer |
| Model: | SP 5310DN |
| Kleur van het product: | Wit |
| Ingebouwd display: | Ja |
| Gewicht: | 18000 g |
| Breedte: | 420 mm |
| Diepte: | 410 mm |
| Hoogte: | 345 mm |
| Gebruikershandleiding: | Ja |
| Kleur: | Nee |
| Frequentie van processor: | 1460 MHz |
| Processorfamilie: | Intel® Celeron® |
| Ethernet LAN: | Ja |
| Vermogensverbruik (max): | 1400 W |
| Inclusief netsnoer: | Ja |
| Intern geheugen: | 2048 MB |
| Type processor: | Ja |
| Maximale resolutie: | 1200 x 1200 DPI |
| Aantal printcartridges: | 1 |
| Printkleuren: | Zwart |
| Papierlade mediatypen: | Bond paper, Envelopes, Labels, Plain paper, Recycled paper, Thick paper, Thin paper, Transparencies |
| Opwarmtijd: | 25.4 s |
| Printtechnologie: | Laser |
| Standaard interfaces: | Ethernet, USB 2.0, Wireless LAN |
| Afdruk Resolutie in kleur: | 1200 x 1200 DPI |
| Printsnelheid (zwart, standaardkwaliteit, A4/US Letter): | 60 ppm |
| Duplex printen: | Ja |
| Paginabeschrijving talen: | PCL 5e, PCL 6, PDF 1.2, PDF 1.3, PDF 1.4, PDF 1.5, PDF 1.6, PDF 1.7, PDF 1.7+, PostScript 3 |
| Gebruiksindicatie (maximaal): | - pagina's per maand |
| Totale invoercapaciteit: | - vel |
| Maximum invoercapaciteit: | 2600 vel |
| Totale uitvoercapaciteit: | - vel |
| Maximale uitvoercapaciteit: | 500 vel |
| Maximale ISO A-series papierformaat: | A4 |
| ISO A-series afmetingen (A0...A9): | A4, A5, A6 |
| Tijdsduur tot de eerste pagina (zwart, normaal): | 6 s |
| Gemiddeld stroomverbruik tijdens printen: | - W |
| Maximaal intern geheugen: | 2048 MB |
| Papierlade mediagewicht: | 64 - 120 g/m² |
| ISO B-series afmetingen (B0...B9): | B5, B6 |
| Meegeleverde drivers: | Ja |
| Zuinig printen: | Ja |
| Wifi: | Ja |
| AC-ingangsspanning: | 220 - 240 V |
| AC-ingangsfrequentie: | 50/60 Hz |
| Multifunctionele lade papiergewicht: | 60 - 220 g/m² |
Heb je hulp nodig?
Als je hulp nodig hebt met Ricoh SP 5310DN stel dan hieronder een vraag en andere gebruikers zullen je antwoorden
Handleiding Printer Ricoh

18 Juni 2024
18 Juni 2024
7 Juni 2024
16 Mei 2024
16 Mei 2024
20 Juli 2023
20 Juli 2023
27 Juli 2023
16 Juni 2023
13 Juni 2023
Handleiding Printer
- Printer HP
- Printer Sony
- Printer Samsung
- Printer Xiaomi
- Printer Panasonic
- Printer Epson
- Printer LG
- Printer Huawei
- Printer Canon
- Printer Honeywell
- Printer Olympus
- Printer Toshiba
- Printer Xerox
- Printer Agfaphoto
- Printer AVM
- Printer Brother
- Printer Builder
- Printer D-Link
- Printer Dell
- Printer Digitus
- Printer Dymo
- Printer Epson 7620
- Printer Frama
- Printer Fujifilm
- Printer Fujitsu
- Printer Ibm
- Printer Intermec
- Printer Kern
- Printer Kodak
- Printer Kogan
- Printer Konica Minolta
- Printer Kyocera
- Printer Lenovo
- Printer Lexmark
- Printer Minolta
- Printer Mitsubishi
- Printer MSI
- Printer Nec
- Printer Paxar
- Printer Polaroid
- Printer Primera
- Printer Renkforce
- Printer Roland
- Printer Royal Sovereign
- Printer Sagem
- Printer Seiko
- Printer Sharp
- Printer Star
- Printer Thomson
- Printer Tomy
- Printer Toshiba TEC
- Printer Triumph-Adler
- Printer Velleman
- Printer Zebra
- Printer Oce
- Printer Oki
- Printer Olivetti
- Printer Olympia
- Printer CSL
- Printer Argox
- Printer DTRONIC
- Printer Metapace
- Printer Citizen
- Printer Nilox
- Printer Approx
- Printer Ultimaker
- Printer Custom
- Printer Bixolon
- Printer Brady
- Printer GoDEX
- Printer Testo
- Printer EC Line
- Printer Sawgrass
- Printer Pantum
- Printer DNP
- Printer TSC
- Printer Equip
- Printer StarTech.com
- Printer Fichero
- Printer GG Image
- Printer Posiflex
- Printer ZKTeco
- Printer Star Micronics
- Printer Datamax-O'neil
- Printer Panduit
- Printer Dascom
- Printer HiTi
- Printer Vupoint Solutions
- Printer Elite Screens
- Printer Phoenix Contact
- Printer Videology
- Printer Colop
- Printer Raspberry Pi
- Printer Evolis
- Printer Unitech
- Printer Middle Atlantic
- Printer IDP
- Printer Fargo
- Printer Microboards
- Printer Mutoh
- Printer Tally Dascom
- Printer Nisca
Nieuwste handleidingen voor Printer

29 Maart 2025
29 Maart 2025

11 Maart 2025
11 Maart 2025
9 Maart 2025
4 Maart 2025
26 Februari 2025
26 Februari 2025
25 Februari 2025
25 Februari 2025