Rane MP2014 Handleiding
Rane
Mengpaneel
MP2014
Lees hieronder de 📖 handleiding in het Nederlandse voor Rane MP2014 (24 pagina's) in de categorie Mengpaneel. Deze handleiding was nuttig voor 46 personen en werd door 2 gebruikers gemiddeld met 4.5 sterren beoordeeld
Pagina 1/24

MP2014 MANUAL
RANE MP2014
MIXER MANUAL
CUE
SPLIT
CUE
CUE
I
I
MIX
FILTER
FILTER
TONE
SESSION OUT
BOOTH
LEVEL
MAIN
LEFT
RIGHT
AUX
FX
FX
FX
OFF
MIC
ON
DUCK
PHONES
PHONES
LOW
MID
HIGH
GAIN
SESSION IN
LOW
CROSSOVER
CROSSOVER
MID
SOURCE
GAIN
RESONANCE
HIGH
ISO
1B1A
II
II
MIX
FILTER
PAN
LOW
MID
HIGH
SOURCE
GAIN
2B2A
PH/CD 2 AUX 2PH/CD 1 AUX 1
MP2014
135 380
OL
+10
+7
+5
+3
+2
+1
0
-1
-2
-3
-5
-7
-10
-15
-24
OL
+10
+7
+5
+3
+2
+1
0
-1
-2
-3
-5
-7
-10
-15
-24
OL
+10
+7
+5
+3
+2
+1
0
-1
-2
-3
-5
-7
-10
-15
-24
0
2
1
3
456
7
8
9
10
0
2
1
3
456
7
8
9
10
∞
0 dB
+10
∞
0 dB
+10
∞
0 dB
+10
OFF +6
OFF +6
OFF +6
0
2
1
3
456
7
8
9
10
0
2
1
3
456
7
8
9
10
0
2
1
3
456
7
8
9
10
0
2
1
3
456
7
8
9
10
0
2
1
3
456
7
8
9
10
OFF +6
OFF +6
OFF +6
0
2
1
3
456
7
8
9
10
0
2
1
3
456
7
8
9
10
0
2
1
3
456
7
8
9
10
BASS TREBLE
LOW HIGH
80
225
640
1.7k 4.75k
1.0k
2.8k
8.0k
CUE MIX

2
MP2014 MANUAL
ATTENTION: RISQUE DE CHOCS ELECTRIQUE - NE PAS OUVRIR
RISK OF ELECTRIC SHOCK
DO NOT OPEN
CAUTION
To reduce the risk of electrical shock, do not open the unit. No
user serviceable parts inside. Refer servicing to qualied service
personnel.
The symbols shown below are internationally accepted symbols
that warn of potential hazards with electrical products.
This symbol indicates that a dangerous voltage
constituting a risk of electric shock is present
within this unit.
This symbol indicates that there are important
operating and maintenance instructions in the
literature accompanying this unit.
WARNING
Important Safety Instructions
1. Read these instructions.
2. Keep these instructions.
3. Heed all warnings.
4. Follow all instructions.
5. Do not use this apparatus near water.
6. Clean only with a dry cloth.
7. Do not block any ventilation openings. Install in accordance with manufacturer’s instructions.
8. Do not install near any heat sources such as radiators, registers, stoves, or other apparatus (including ampliers) that produce heat.
9. Do not defeat the safety purpose of the polarized or grounding-type plug. A polarized plug has two blades with one wider than the other. A
grounding-type plug has two blades and a third grounding prong. The wide blade or third prong is provided for your safety. If the provided
plug does not t into your outlet, consult an electrician for replacement of the obsolete outlet.
10. Protect the power cord and plug from being walked on or pinched particularly at plugs, convenience receptacles, and the point where it exits
from the apparatus.
11. Only use attachments and accessories specied by Rane.
12. Use only with the cart, stand, tripod, bracket, or table specied by the manufacturer, or sold with the apparatus. When a cart is used, use
caution when moving the cart/apparatus combination to avoid injury from tip-over.
13. Unplug this apparatus during lightning storms or when unused for long periods of time.
14. Refer all servicing to qualied service personnel. Servicing is required when the apparatus has been damaged in any way, such as power
supply cord or plug is damaged, liquid has been spilled or objects have fallen into the apparatus, the apparatus has been exposed to rain or
moisture, does not operate normally, or has been dropped.
15. The plug on the power cord is the AC mains disconnect device and must remain readily operable. To completely disconnect this apparatus
from the AC mains, disconnect the power supply cord plug from the AC receptacle.
16. This apparatus shall be connected to a mains socket outlet with a protective earthing connection.
17. When permanently connected, an all-pole mains switch with a contact separation of at least 3 mm in each pole shall be incorporated in the
electrical installation of the building.
18. If rackmounting, provide adequate ventilation. Equipment may be located above or below this apparatus, but some equipment (like large
power ampliers) may cause an unacceptable amount of hum or may generate too much heat and degrade the performance of this apparatus.
19. This apparatus may be installed in an industry standard equipment rack. Use screws through all mounting holes to provide the best support.
WARNING: To reduce the risk of re or electric shock, do not expose this apparatus to rain or moisture. Apparatus shall not be exposed to
dripping or splashing and no objects lled with liquids, such as vases, shall be placed on the apparatus.
NOTE: This equipment has been tested and found to comply with the limits for a Class B digital device, pursuant to part 15 of the FCC
Rules. These limits are designed to provide reasonable protection against harmful interference in a residential installation. This equipment
generates, uses and can radiate radio frequency energy and, if not installed and used in accordance with the instructions, may cause harmful
interference to radio communications. However, there is no guarantee that interference will not occur in a particular installation. If this
equipment does cause harmful interference to radio or television reception, which can be determined by turning the equipment off and on,
the user is encouraged to try to correct the interference by one or more of the following measures:
• Reorient or relocate the receiving antenna.
• Increase the separation between the equipment and receiver.
• Connect the equipment into an outlet on a circuit different from that to which the receiver is connected.
• Consult the dealer or an experienced radio/TV technician for help.
CAUTION: Changes or modications not expressly approved by Rane Corporation could void the user's authority to operate the equipment.
CAN ICES-3 (B)/NMB-3(B)
WARNING: This product may contain chemicals known to the State of California to cause cancer, or birth defects or other reproductive harm.

3
MP2014 MANUAL
ATTENTION: RISQUE DE CHOCS ELECTRIQUE - NE PAS OUVRIR
RISK OF ELECTRIC SHOCK
DO NOT OPEN
CAUTION
An d’éviter tout risque de choc électrique, ne pas ouvrir l’appareil.
Aucune pièce ne peut être changée par l’utilisateur. Contactez un
SAV qualié pour toute intervention.
Les symboles ci-dessous sont reconnus internationalement comme
prévenant tout risque électrique.
Ce symbole indique que cette unité utilise un voltage
élevé constituant un risque de choc électrique.
Ce symbole indique la présence d’instructions
d’utilisation et de maintenance importantes dans le
document fourni.
ATTENTION
Instructions de Sécurité
1. Lisez ces instructions.
2. Gardez précieusement ces instructions.
3. Respectez les avertissements.
4. Suivez toutes les instructions.
5. Ne pas utiliser près d’une source d’eau.
6. Ne nettoyer qu’avec un chiffon doux.
7. N’obstruer aucune évacuation d’air. Effectuez l’installation en suivant les instructions du fabricant.
8. Ne pas disposer près d’une source de chaleur, c-à-d tout appareil produisant de la chaleur sans exception.
9. Ne pas modier le cordon d’alimentation. Un cordon polarisé possède 2 lames, l’une plus large que l’autre. Un cordon avec tresse de masse
possède 2 lames plus une 3è pour la terre. La lame large ou la tresse de masse assurent votre sécurité. Si le cordon fourni ne correspond pas à
votre prise, contactez votre électricien.
10. Faites en sorte que le cordon ne soit pas piétiné, ni au niveau du l, ni au niveau de ses broches, ni au niveau des connecteurs de vos appareils.
11. N’utilisez que des accessoires recommandés par Rane.
12. N’utilisez que les éléments de transport, stands, pieds ou tables spéciés par le fabricant ou vendu avec l’appareil. Quand vous utlisez une
valise de transport, prenez soin de vous déplacer avec cet équipement avec prudence an d’éviter tout risque de blessure.
13. Débranchez cet appareil pendant un orage ou si vous ne l’utilisez pas pendant un certain temps.
14. Adressez-vous à du personnel qualié pour tout service après vente. Celui-ci est nécessaire dans n’importe quel cas où l’appareil est abimé :
si le cordon ou les ches sont endommagés, si du liquide a été renversé ou si des objets sont tombés sur l’appareil, si celui-ci a été exposé à la
pluie ou l’humidité, s’il ne fonctionne pas correctement ou est tombé.
15. La che du cordon d’alimentation sert à brancher le courant alternatif AC et doit absolument rester accessible. Pour déconnecter totalement
l’appareil du secteur, débranchez le câble d’alimentation de la prise secteur.
16. Cet appareil doit être branché à une prise terre avec protection.
17. Quand il est branché de manière permanente, un disjoncteur tripolaire normalisé doit être incorporé dans l’installation électrique de l’immeuble.
18. En cas de montage en rack, laissez un espace sufsant pour la ventilation. Vous pouvez disposer d’autres appareils au-dessus ou en-dessous
de celui-ci, mais certains (tels que de gros amplicateurs) peuvent provoquer un buzz ou générer trop de chaleur au risque d’endommager votre
appareil et dégrader ses performances.
19. Cet appareil peut-être installé dans une baie standard ou un chassis normalisé pour un montage en rack. Visser chaque trou de chaque oreille
de rack pour une meilleure xation et sécurité.
ATTENTION: an d’éviter tout risque de feu ou de choc électrique, gardez cet appareil éloigné de toute source d’humidité et
d’éclaboussures quelles qu’elles soient. L’appareil doit également être éloigné de tout objet possédant du liquide (boisson en
bouteilles, vases,…).
REMARQUE: Cet équipement a été testé et approuvé conforme aux limites pour un appareil numérique de classe B, conformément au chapitre 15
des règles de la FCC. Ces limites sont établis pour fournir une protection raisonnable contre tout risque d’interférences et peuvent provoquer une
énergie de radiofréquence s'il n'est pas installé et utilisé conformément aux instructions, peut également provoquer des interférences aux niveaux
des équipements de communication. Cependant, il n'existe aucune garantie que de telles interférences ne se produiront pas dans une installation
particulière. Si cet équipement provoque des interférences en réception radio ou télévision, ceci peut être detecté en mettant l'équipement sous/
hors tension, l'utilisateur est encouragé à essayer de corriger cette interférence par une ou plusieurs des mesures suivantes:
• Réorienter ou déplacer l'antenne de réception.
• Augmenter la distance entre l'équipement et le récepteur.
• Connecter l'équipement à une sortie sur un circuit différent de celui sur lequel le récepteur est branché.
• Consulter un revendeur ou un technicien radio / TV expérimenté.
ATTENTION: Les changements ou modications non expressément approuvés par Rane Corporation
peuvent annuler l'autorité de l'utilisateur à manipuler cet équipement et rendre ainsi nulles toutes les
conditions de garantie.
CAN ICES-3 (B)/NMB-3(B) Cartons et papier à recycler.

4
MP2014 MANUAL
Copyright Notices
©2016 Rane Corporation. All rights reserved. Windows® is a registered trademark of Microsoft Corporation in the United
States and other countries. Apple, Mac, Macintosh, iTunes, Safari, QuickTime, GarageBand, and OS X are registered
trademarks of Apple Inc., registered in the United States and other countries. ASIO is a trademark of Steinberg Media
Technologies GMBH. Traktor, Traktor Pro and Maschine are trademarks of Native Instruments GMBH. Virtual DJ is a
registered trademark of Atomix Productions Inc. Ableton is a trademark of Ableton AG.
Check List
These items are included in the box:
• MP2014 Mixer.
• 1 USB cable.
• 1 control panel install disc.
• IEC C5 line cord.
• This MP2014 Mixer Manual.
Wear Parts
The MP2014 Mixer contains no wear parts. See "Limited Warranties" on page 23.
This product is engineered, manufactured and supported by Rane Corporation in Mukilteo, WA, USA, using globally
sourced materials.

6
MP2014 MANUAL
MP2014 Overview
Highest quality user control surface
• Excellent control ergonomics with intuitive and comfortable layout.
• Potentiometers with exceptional feel and 1 million cycle life.
• Studio console grade backlit push switches.
Digital Signal Processing
• A/D and D/A dynamic range 116 dB A-weighted, THD+N 0.001%.
• All audio processing is 32-bit oating point with supported sample rates: 44.1 kHz, 48 kHz or 96 kHz.
• S/PDIF input for Session input with 128 dB dynamic range with ultra-low jitter and 16:1 SRC conversion range.
• S/PDIF Session output to record mix or chain mixers together without analog conversion.
Two USB ports allow simultaneous connection of two computers
• Each USB port supports 6 playback and 14 record channels.
• Simultaneously play stereo tracks to Deck 1, Deck 2, and the USB Aux.
• Simultaneously record 2 Decks as pre-fader, as post-fader, the Session Input, the Mic Input, and the Main mix.
• USB 2.0 high-speed class compliant MIDI and Audio
• Driver installation is not required for Mac OS X.
• High-performance universal ASIO driver is provided for Windows.
• Computer control panel supports additional options and status.
Analog I/O designed with attention to detail
• Accurate, low noise RIAA stages with 3rd-order Infrasonic (rumble) and 2nd-order low-pass lters.
• Transient voltage and EMI protection, turn-on muting and overload protection.
• 8 Vrms balanced outputs, 4 Vrms unbalanced I/O.
Two Deck inputs with these features:
• Select USB A, PH/CD, AUX or USB B input with Gain trim and RIAA Phono sensitivity.
• Deck 1 USB playback channels 1-2
• Deck 2 USB playback channels 3-4
• 3-band full-cut EQ with 2 selectable crossover points: Linkwitz-Riley 2nd-order
• 4th-Order selectable Low-pass, Low/High-pass, or High-pass lter with Mode, Resonance and on/off controls.
• Effects Loop send to an external processor, returned to the Main Mix.
• Main Mix Level control, Headphone Cue, 16-segment Q-peak meter with Peak-hold.
Session Input with Level control
• Source may be unbalanced RCA, S/PDIF or USB AUX playback channels 5-6.
Microphone input with Mic / Line-level switch
• Combo XLR and 1/4" TRS input jack.
• May be used directly with a mic, or a line-level (wireless) input.
• Input Level control, 1-knob Tone control, on/off switch and music Duck controls.
High performance Integrated Isolator EQ
• 4th-order Linkwitz-Riley 3-band Isolator with adjustable crossover points; exceptionally smooth.
Main Mix with 16-segment stereo Meter
• Balanced XLR Main Output with Level control.
• Balanced 1/4" TRS Booth Output with Level control.
• Session Output with Level control.
• S/PDIF output for digital recording or chaining mixers together.
• Unbalanced RCA analog outputs.
Headphone monitor
• Level Control, Cue/Main Pan, Mono Split or Stereo Cue.
• Conveniently located 3.5 mm and 1/4" jacks on the front panel and another 1/4" jack on the top plate.
USB Record outputs:
• USB record channels 1-2: Deck 1 pre-fader (for DVS).
• USB record channels 3-4: Deck 2 pre-fader (for DVS).
• USB record channels 5-6: Main Mix.
• USB record channels 7-8: Deck 1 post-fader (for DAW or archiving).
• USB record channels 9-10: Deck 2 post-fader (for DAW or archiving).
• USB record channels 11-12: Session In.
• USB record channels 13-14: Mic In.

8
MP2014 MANUAL
Connections
Mixer Inputs
• One stereo Phono / CD input is provided for each Deck channel on a red and white pair of RCA jacks. Set each channel
to PH or CD using the rear panel slide switches. Connect your turntable ground wires to the rear panel ground posts.
• Computer control panel: Phono Sensitivity adjustment will match source levels. See "Control Panel" on page 14.
• One stereo line-level AUX input is provided for each of the two Deck channels on a red and white pair of RCA jacks. An
AUX input can be from a CD deck, electronic instrument, or other consumer audio device.
• One stereo Session Input is available as analog on a pair of red and white RCA jacks, or digitally using the orange S/PDIF
jack. Select the input type with the LINE - S/PDIF switch. Use this input to connect two mixers together. Using S/PDIF
Session Input with another mixer's S/PDIF Session Output can digitally link mixers without converting to analog.
• This input may also be an auxiliary 3rd channel line input, with it's own sweep Filter, headphone Cue and Level.
• The balanced microphone input on a combination TRS / XLR jack can be switched to:
• LINE level for the output of a wireless mic receiver.
• MIC level for a regular dynamic microphone. The MP2014 does not supply phantom power.
• External FX Loop Return stereo input is on a pair of unbalanced RCA jacks. The FX Return input is normally used in
combination with the FX Loop Send output to connect an outboard effects processor.
Mixer Outputs
All of these outputs carry the same Main mix, each with its own Level control:
• MAIN Output is on a pair of balanced XLR jacks.
The control panel has a mono option and clean feed option for the Main Output. See "General Tab" on page 14.
• BOOTH Output is on a pair of balanced 1/4" TRS jacks.
• SESSION Out is on a pair of unbalanced RCA jacks, and digitally via S/PDIF on an RCA jack.
The FX Loop Send output is from a pair of unbalanced RCA jacks. The FlexFX Send output is normally used in combination
with the FlexFX Loop Return input to connect the Deck and Mic Inputs to outboard analog effects.
• The SEND output level can be switched to -10 (for unbalanced devices) or +4 (for balanced devices).
Cabling Note: When using unbalanced 1/4" tip-sleeve cables from the Booth Outputs, or RCA cables from the analog
Session Outputs, keep cables short, less than 3 meters (10 feet) to avoid hum and interference. Balanced 1/4" TRS or XLR
cables are the best choice, allowing greater distance runs without problems.
Two USB Ports
The MP2014 allows simultaneous connection of two computers, each port completely independent. The USB ports are
100% class compliant, allowing hook-up to Mac OS X without the need for an additional driver. A high-performance ASIO
driver connects the audio in most Windows DAW and DJ software. MIDI end points are class compliant with both OS X and
Windows devices. Connect either port to a single computer. See "Class Compliant USB Ports" on page 14.
Power Supply
The MP2014 Mixer features an internal universal switching power supply that operates on any AC mains 100 to 240 VAC, 50
or 60 Hz (most places in the world). All that is required for the traveling DJ is the appropriate IEC line cord, available from a
local electronics store. Though this mixer has turn on/off muting, it’s smart to leave the power unplugged until everything
else is connected.
100-240V 50/60 Hz 20 WATTS
MP2014
A
B
USB
SESSION
DECK
DECK
BOOTH
MIC
MAIN
AUX 1
AUX 2
PH/CD 1
PH/CD 2
OUT
LINE
IN
OUT
IN
EXTERNAL FX LO
PH - CD 1
PH - CD 2
LINE - S/PDI
SEND
L
R
L
R
L
S/PDIF
R
L
R
RETURN
BALANCED OUTPU
LINE
MIC
+4
-10
L
R

9
MP2014 MANUAL
Input Channels
Source Selectors
The source selectors choose the active USB port, USB audio slot or analog input for each input channel. To use USB
playback you must assign the USB slots in your DJ or DAW software preferences panel.
Channel 1 Source Selections Channel 2 Source Selections USB AUX / Session In
Port A playback for Deck 1
• USB audio slots 1-2.
• Routes audio and MIDI for Deck 1
only to/from USB Port A.
Port A playback for Deck 2
• USB audio slots 3-4.
• Routes audio and MIDI for Deck 2
only to/from USB Port A.
Switch in the up position.
AUX playback
• USB audio slots 5-6, both ports.
• AUX audio is summed from USB
Port A and Port B.
• Phono / CD 1
• Set the PH-CD rear panel switch.
• Phono / CD 2
• Set the PH-CD rear panel switch.
• Aux Input Aux Input • 1 2Switch in the down position.
• Session In line-level or S/PDIF
inputs.
Port B playback for Deck 1
• USB audio slots 1-2.
• Routes audio and MIDI for Deck 1
only to/from USB Port B.
Port B playback for Deck 2
• USB audio slots 3-4.
• Routes audio and MIDI for Deck 2
only to/from USB Port B.
To share the MP2014 with a second computer, see "DJ Changeover" on page 13.
Deck Source Selection is followed by:
• GAIN trim: Off to +15 dB with unity gain (equal in and out) at 12 o’clock.
• 3-band HIGH / MID / LOW tone controls
Off to +6 dB with unity gain at 12 o’clock.•
• Linkwitz-Riley 2nd-order isolator full-cut lters (LR-2).
Crossover points for Low/Mid and Mid/High default at 300 Hz between Low and Mid, 3 kHz •
between Mid and High. This can be changed in the "Control Panel" on page 14.
• High-Pass / Low-High-Pass / Low-Pass Sweep FILTER (button is lit green when active)
LP: Low-pass lter cutoff moves from 20 kHz toward 20Hz as the knob is turned CCW.•
HP: High-pass lter cutoff moves from 20 Hz toward 20kHz as the knob is turned CW.•
L-H: In Low-High mode, there is no effect at the center (at response).•
Low-pass increases CCW from the center, and High-pass increases CW from the center.•
Resonance can be adjusted for all Sweep Filters with the central RESONANCE control.•
• CUE select (button is lit yellow when active): Assigns an input to the headphone monitor.
• (button is lit blue when active): Assigns an input to the external effects send.FX select
• with peak hold: Adjust the GAIN trim to get the signal into the yellow during Q-peak meter
peaks, and to prevent overload.
• : Adjusts the channel level feeding the "post" USB record outputs and the Main mix.MIX control
CUE
I
I
MIX
FILTER
FX
LOW
MID
HIGH
SOURCE
GAIN
1B1A
PH/CD 1 AUX 1
OL
+10
+7
+5
+3
+2
+1
0
-1
-2
-3
-5
-7
-10
-15
-24
0
2
1
3
456
7
8
9
10
OFF +6
OFF +6
OFF +6
0
2
1
3
456
7
8
9
10

10
MP2014 MANUAL
Session Input
Session input sources may be analog line RCA, digital S/PDIF, or USB audio channels 5/6. Session
input can independently mix in an additional stereo source, or use in conjunction with Session Out
to chain mixers together.
Connect any line-level device (e.g., CD player, another mixer, keyboard, phone, etc.) to the
Session In RCA white and red jacks. The orange S/PDIF input connects a digital device (e.g., a CDJ
2000 or another MP2014 or MP2015 mixer) using a single coax RCA cable. The switch above the
jacks selects the orange S/PDIF input or the red/white line-level inputs as a source. Alternatively,
USB Aux audio channels 5/6 can be the Session input source by ipping the toggle switch up next
to the Session In level control.
To play audio from a device plugged into the RCA or S/PDIF Session Inputs, set the USB AUX
toggle switch to SESSION IN (down position). To play audio from USB audio channels 5/6 set
the USB AUX switch to USB AUX (up position). To use USB AUX playback, you must assign USB
channels 5/6 to tracks in your DJ or DAW software preferences panel. Playback from both USB
Ports A and B on channels 5/6 are mixed together.
The Session Input is available for recording on USB record channels 11-12.
Session Output
Session Output is available on analog line-level RCA white and red jacks, and an orange digital
S/PDIF jack. Use these outputs in combination with the Session Input when chaining mixers
together, for an auxiliary zone output, or for external digital S/PDIF main mix recording. Both analog
and digital outputs are active at the same time.
Note: Using S/PDIF provides better sound and higher performance when connecting an available
S/PDIF source like an equipped CDJ or another mixer.
The Session Out control affects the level of audio output on the Session Out RCA jacks and the
S/PDIF jack.
Microphone Input
The mic input has these controls:
• On / Off switch turns the mic on or off.
• Duck momentarily turns down the other inputs by 10 dB (by about 1/3).
• Gain control sets the mic level.
• One-knob spectral tilt Tone control:
Increasing Treble reduces Bass by the same amount.•
Decreasing Treble increases Bass by the same amount.•
• A rear panel switch has two positions for different mic types:
Line level accepts the output from a wireless mic receiver.•
Mic level is suitable for a dynamic mic.•
• Control panel option: with Clean Feed selected, the Mic signal is sent directly to the Main Out and is not present in the
USB Main Record, Booth Out or Session Out. See "Control Panel" on page 14.
• The Mic Input is available for recording on USB record channels 13-14.
CUE
FILTER
AUX
SESSION IN
0
2
1
3
456
7
8
9
10
TONE
SESSION OUT
FX
OFF
MIC
ON
DUCK
GAIN
0
2
1
3
456
7
8
9
10
0
2
1
3
456
7
8
9
10
BASS TREBLE

11
MP2014 MANUAL
Main Mix Outputs
• These signals combine to create the Main Mix signal:
Decks 1 and 2.•
Session In.•
FX Return.•
• Mic.
• Main Mix outputs are:
Main: balanced XLR jacks with a maximum output of 8 volts rms.•
Booth: balanced 1/4" TRS jacks with a maximum output of 8 volts rms.•
Session: unbalanced RCA jacks with a maximum output of 4 volts rms.•
S/PDIF digital session output on one RCA jack.•
• Common to all Main Mix outputs:
Stereo Q-peak meter with peak hold:•
If the red overload LED is off, the mixer will not clip at any output level setting.•
• Main Output Isolator:
Off to +10 dB with unity gain at 12 o’clock.•
Low-mid crossover is adjustable from 80 Hz to 640 Hz. •
Mid-high crossover is adjustable from 1 kHz to 8 kHz.•
• Main, Booth and Session outputs have independent Level controls; their range is off to 0 dB.
• Control panel option: the Main Output can be set to Mono or Stereo. Other outputs remain in
stereo. See "Control Panel" on page 14.
Headphone Cueing
• The Headphone monitor provides stereo or mono split cue operation.
When set for stereo operation (off), the Pan control pans between stereo Cue and stereo •
Main Mix.
When set for Split Cue operation (ON), the Pan control pans between Mono Cue in the left •
ear and mono Main Mix in the right ear.
• Individual Cue buttons are provided for Deck 1, Deck 2, and Session In.
• Cue buttons engage headphone monitoring for each channel. Multiple channels can be cued
simultaneously by pressing the Cue for each.
• The Phones Level control adjusts the volume to the headphone jacks.
• Headphones output is available on two 1/4" jacks, one on the front and one on the top. An
additional 3.5mm jack is located on the front. All share the same signal.
• The Control Panel allows Bass and Treble adjustment in headphones. See "Control Panel" on
page 14.
SPLIT
LEVEL
PHONES
PAN
0
2
1
3
456
7
8
9
10
CUE MIX
BOOTH
MAIN
LEFT
RIGHT
LOW
CROSSOVER
CROSSOVER
MID
HIGH
ISO
135 380
OL
+10
+7
+5
+3
+2
+1
0
-1
-2
-3
-5
-7
-10
-15
-24
0
2
1
3
456
7
8
9
10
∞
0 dB
+10
∞
0 dB
+10
∞
0 dB
+10
0
2
1
3
456
7
8
9
10
80
225
640
1.7k 4.75k
1.0k
2.8k
8.0k

12
MP2014 MANUAL
USB Audio
There are ve stereo record channels and three stereo playback channels. These channels are available on two USB ports,
allowing two computers to share the mixer. This allows two DJs to play together, and supports uninterrupted transitions
between them by simply changing one of the mixer input sources. USB audio is 24-bit PCM with a sample rate of 44.1, 48
or 96 kHz. Sample rate and USB slot assignments are made in the preferences screen in your DJ or DAW software. You can
simultaneously record both Deck channels as pre-Mix control (for DVS) and post-Mix playback, and record the Main Mix
output through USB audio channels. Multitrack recording allows you to “x” a recording in the studio.
USB Playback Channels Assignment
Deck 1 Playback Deck 2 Playback Session In USB Playback
In USB audio playback slots 1-2. In USB audio playback slots 3-4. In USB audio playback slots 5-6.
Routed from either USB A or USB B depending on the Input source selection. Sum of USB A and USB B.
USB Record Channel Assignment (Broadcast to both USB A and USB B at all times).
Deck 1
Record (Pre)
Deck 2
Record (Pre)
Main Mix
Record
Deck 1
Record (Post)
Deck 2
Record (Post)
Session In
Record
Mic Input
Record
In USB audio
record slots
1-2.
In USB audio
record slots
3-4.
In USB audio
record slots
5-6.
In USB audio
record slots
7-8.
In USB audio
record slots
9-10.
In USB audio
record slots
11-12.
In USB audio
record slots
13-14.
Use "Pre" with DVS software. Use "Post" for multi-track
recording (uses Mix controls).
Deck 2 Record (post)
x2 USB Ports
Deck 2 Record (pre)
Deck 1 Record (pre)
Deck 1 Record (post)
Main Mix Record
USB 3-4
USB 1-2
USB 7-8
USB 9-10
Mic Record
Session In Record USB 11-12
USB 13-14
USB 5-6
Deck 2 Playback
USB AUX Playback
Deck 1 PlaybackUSB 1-2
USB 3-4
USB 5-6
USB RECORD
USB PLAYBACK
CUE
CUE
CUE
I
I
MIX
FILT ER
FILT ER
T ON E
SESSION O UT
BOOT H
LEVEL
MAIN
LEFT
RIGHT
AUX
ACT IVE
FX
FX
FX
OFF
MIC
ON
DUC K
PHONES
PHONES
LO W
MID
HIGH
GAIN
SESSIO N IN
LOW
CROSSOVER
CROSSOVER
MID
SOURCE
GAIN
RESONANCE
HIGH
ISO
1B1A
II
II
MIX
FILTER
PAN
MAIN
SPLIT
NORM
LOW
MID
HIGH
SOURCE
GAIN
2B2A
PH/CD 2 AUX 2PH/CD 1 AUX 1
MP2014
135 380
OL
+10
+7
+5
+3
+2
+1
0
-1
-2
-3
-5
-7
-10
-15
-24
OL
+10
+7
+5
+3
+2
+1
0
-1
-2
-3
-5
-7
-10
-15
-24
OL
+10
+7
+5
+3
+2
+1
0
-1
-2
-3
-5
-7
-10
-15
-24
0
2
1
3
456
7
8
9
10
0
2
1
3
456
7
8
9
10
∞
0 dB
+10
∞
0 dB
+10
∞
0 dB
+10
OFF
|
+6
OFF
|
+6
OFF
|
+6
0
2
1
3
456
7
8
9
10
0
2
1
3
456
7
8
9
10
0
2
1
3
456
7
8
9
10
0
2
1
3
456
7
8
9
10
OFF
|
+6
OFF
|
+6
OFF
|
+6
0
2
1
3
456
7
8
9
10
0
2
1
3
456
7
8
9
10
0
2
1
3
456
7
8
9
10
BASS TREBLE
LOW HIGH
0
2
1
3
456
7
8
9
10
80
225
640
1.7k 4.75k
1.0k
2.8k
8.0k
MIX
CUE

13
MP2014 MANUAL
DJ Changeover
One of the biggest challenges of digital DJing has been seamlessly
changing over from one DJ to the next and playing back-to-back DJ sets.
With the dual USB architecture of the MP2014 mixer, changeover between
digital DJs has never been easier.
Deck Changeover Controls
At the top of each input channel is the Source selector to switch input
sources. If your computer is connected to USB port A, switch a channel
Source knob to USB A, and the mixer assigns the corresponding virtual
deck to that channel for audio playback. For example, assigning both
channels to USB 1A-2A assigns both virtual decks to the computer
connected to USB port A.
The same applies to USB port B. If your computer is connected to USB
port B, switching a channel Source Select knob to USB B, assigns the
corresponding virtual deck to that channel for audio playback.
When two DJs are connected to the MP2014, they can quickly swap
deck control between computers just using the Source select knobs.
The DJ Changeover Walkthrough
In the scenario below, one DJ, let’s call him DJ A, is already connected to
the MP2014 using either USB port A or B. With DJ A’s computer already
connected and playing music, do the following:
1. Connect your computer to the unused USB port on the MP2014.
2. Switch the Input Source on the other non-playing input channel to the
USB source of your computer.
3. Play a track on this Deck and mix it in when you're ready — audio from
both computers are in the mix.
4. Fade out the audio playing from DJ A’s computer to the audio playing
from your computer.
5. Assign the Input Source for the remaining free mixer channel(s) to your
computer and continue DJing.
When DJ A is done, disconnect his computer from the USB port. If you’re
back-to-back mixing with DJ A, keep the computer connected and
perform the same swapping instructions to regain deck control.
CUE
CUE
I
I
MIX
FILTER
FX
FX
LOW
MID
HIGH
SOURCE
GAIN
RESONANCE
1B1A
II
II
MIX
FILTER
LOW
MID
HIGH
SOURCE
GAIN
2B2A
PH/CD 2 AUX 2PH/CD 1 AUX 1
MP2014
OL
+10
+7
+5
+3
+2
+1
0
-1
-2
-3
-5
-7
-10
-15
-24
OL
+10
+7
+5
+3
+2
+1
0
-1
-2
-3
-5
-7
-10
-15
-24
0
2
1
3
456
7
8
9
10
OFF +6
OFF +6
OFF +6
0
2
1
3
456
7
8
9
10
0
2
1
3
456
7
8
9
10
OFF +6
OFF +6
OFF +6
0
2
1
3
456
7
8
9
10
LOW HIGH
TURNTABLE OUT
MIC
TURNTABLE OUT
CD OUT CD OUT
USBUSB
CUE
CUE
CUE
I
I
MIX
FILTER
FILTER
TONE
SES SION OUT
BOOTH
LEVEL
MAI N
LEFT
RIGHT
AUX
ACTIVE
FX
FX
FX
OFF
MIC
ON
DUCK
PHONES
PHONES
LOW
MID
HIGH
GAIN
SESSION IN
LOW
CROSSOVER
CROSSOVER
MID
SOURCE
GAIN
RES ONANCE
HIGH
ISO
1B1A
II
II
MIX
FILTER
PAN
MAIN
SPLIT
NORM
LOW
MID
HIGH
SOURCE
GAIN
2B2A
PH/CD 2 AUX 2PH/CD 1 AUX 1
MP2 014
135 380
OL
+10
+7
+5
+3
+2
+1
0
-1
-2
-3
-5
-7
-10
-15
-24
OL
+10
+7
+5
+3
+2
+1
0
-1
-2
-3
-5
-7
-10
-15
-24
OL
+10
+7
+5
+3
+2
+1
0
-1
-2
-3
-5
-7
-10
-15
-24
0
2
1
3
4
5
6
7
8
9
10
0
2
1
3
4 5 6
7
8
9
10
∞
0 dB
+10
∞
0 dB
+10
∞
0 dB
+10
OFF
|
+6
OFF
|
+6
OFF
|
+6
0
2
1
3
4
5
6
7
8
9
10
0
2
1
3
4
5
6
7
8
9
10
0
2
1
3
4 5 6
7
8
9
10
0
2
1
3
4
5
6
7
8
9
10
OFF
|
+6
OFF
|
+6
OFF
|
+6
0
2
1
3
4 5 6
7
8
9
10
0
2
1
3
4
5
6
7
8
9
10
0
2
1
3
4
5
6
7
8
9
10
BASS TREBLE
LOW HIGH
0
2
1
3
4 5 6
7
8
9
10
80
225
640
1.7k 4.75k
1.0k
2.8k
8.0k
MIX
CUE

14
MP2014 MANUAL
Class Compliant USB Ports
The USB ports are 100% class compliant, connecting to Mac OS X without the need for an additional driver. A high-
performance ASIO driver runs most Windows DAW and DJ software. MIDI end points are class compliant with both OS X
and Windows devices. Mac and Windows Control Panel installers with additional mixer settings are included on the CD-
ROM with the MP2014, and current versions available from the Downloads link in the MP2014 page at dj.rane.com.
ASIO (Windows)
A low-latency ASIO driver interfaces with most DJ and DAW audio software applications on Windows operating systems.
Multi-client ASIO allows different audio software applications to simultaneously stream audio to and from the MP2014.
If the same playback channel is selected in more than one application, the driver mixes the audio from the applications
before streaming it to the device. ASIO driver and Rane Control Panel system requires Windows 7-SP1, 8.1, or 10. The driver
Control Panel may be launched from the Windows Control Panel. Select Start > Control Panel > Rane Products.
Core Audio (Macintosh)
No driver installation is required. Connect the MP2014 to a Mac running OSX, and the MP2014 inputs and outputs become
available in your audio program. Install the Rane control panel to provide additional setting as described below.
Control Panel
NOTE: Settings are saved in the mixer. The control panel for Windows or Macintosh is updated with the mixer’s settings.
Therefore, when you connect to a different MP2014 Mixer, it's saved settings override your previous Control Panel settings.
NOTE: The Rane Control Panel and Firmware may be updated with new features over time. To get the most from your
MP2014, occasionally check the Downloads link in the MP2014 page at dj.rane.com.
Settings
The MP2014 allows you to save and export settings. You can load your preferences when using a different MP2014 than
your own, or putting things back after another DJ has used your mixer.
Once you have set control panel preferences, click to write these to a computer le. Click to load a .rms Export Import
settings le. The control panel shows the current settings le loaded in the mixer. If any changes are made since the last
import, [Modied] will appear after the lename along with a button, offering to save your changes as the new default.Save
Firmware
The MP2014 Firmware Version currently installed in the MP2014 is shown. The link on the MP2014 page at Downloads
dj.rane.com is the place to check if there is a control panel / rmware update. After downloading and installing, if the
MP2014 rmware installed on your computer is newer than the rmware in your MP2014, an Update Firmware button is
enabled. Pressing the button updates the MP2014 rmware to the new version.
General Tab
Main Out can be set to Stereo or Mono. The Booth and
Session Outputs are always in stereo.
Headphone Tone slider adjusts the tone going to the
headphones using spectral tilt lters.
• Increasing Treble reduces lows by the same amount.
• Increasing Bass reduces highs by the same amount.
Mic Clean Feed when selected, the microphone signal
is only sent to the Main Out and is not present in the USB
Main Record, Booth Out or Session Out. This allows you to
record your set without any house announcements. Default
is Off.
15
MP2014 MANUAL
Port MIDI Enable enables MIDI commands to/from the MP2014 Mixer controls at the current USB Port. Default is Off.
Port MIDI Channel assigns MIDI channel 1-16 to the MP2014 Mixer at the current USB Port. Default is MIDI channel 1.
USB Port Status indicates the connection status of both USB ports. Active indicates a USB connection between the mixer
and a computer. Local shows the USB Port connected to this control panel's computer.
The control allows the USB buffer to be increased or decreased. This only appears in the Rane Control Panel Buffer Size
for ASIO in Windows. In Mac systems, the buffer control is in the DAW or DJ audio preferences screen and does not appear
here. The Rane driver is designed to run at latencies as low as 5 milliseconds round-trip. However, computer performance
and available resources (number of applications running) may adversely affect the computer’s ability to stream audio
reliably. If pops and clicks are heard in USB audio, try increasing the buffer size to eliminate them. With ASIO, total round-
trip latency is equal to Buffer Size plus device latency. With Core Audio, total round-trip latency is determined by the Buffer
Size set by the DAW/DJ software, plus device latency. Device latency is 3 to 4 ms.
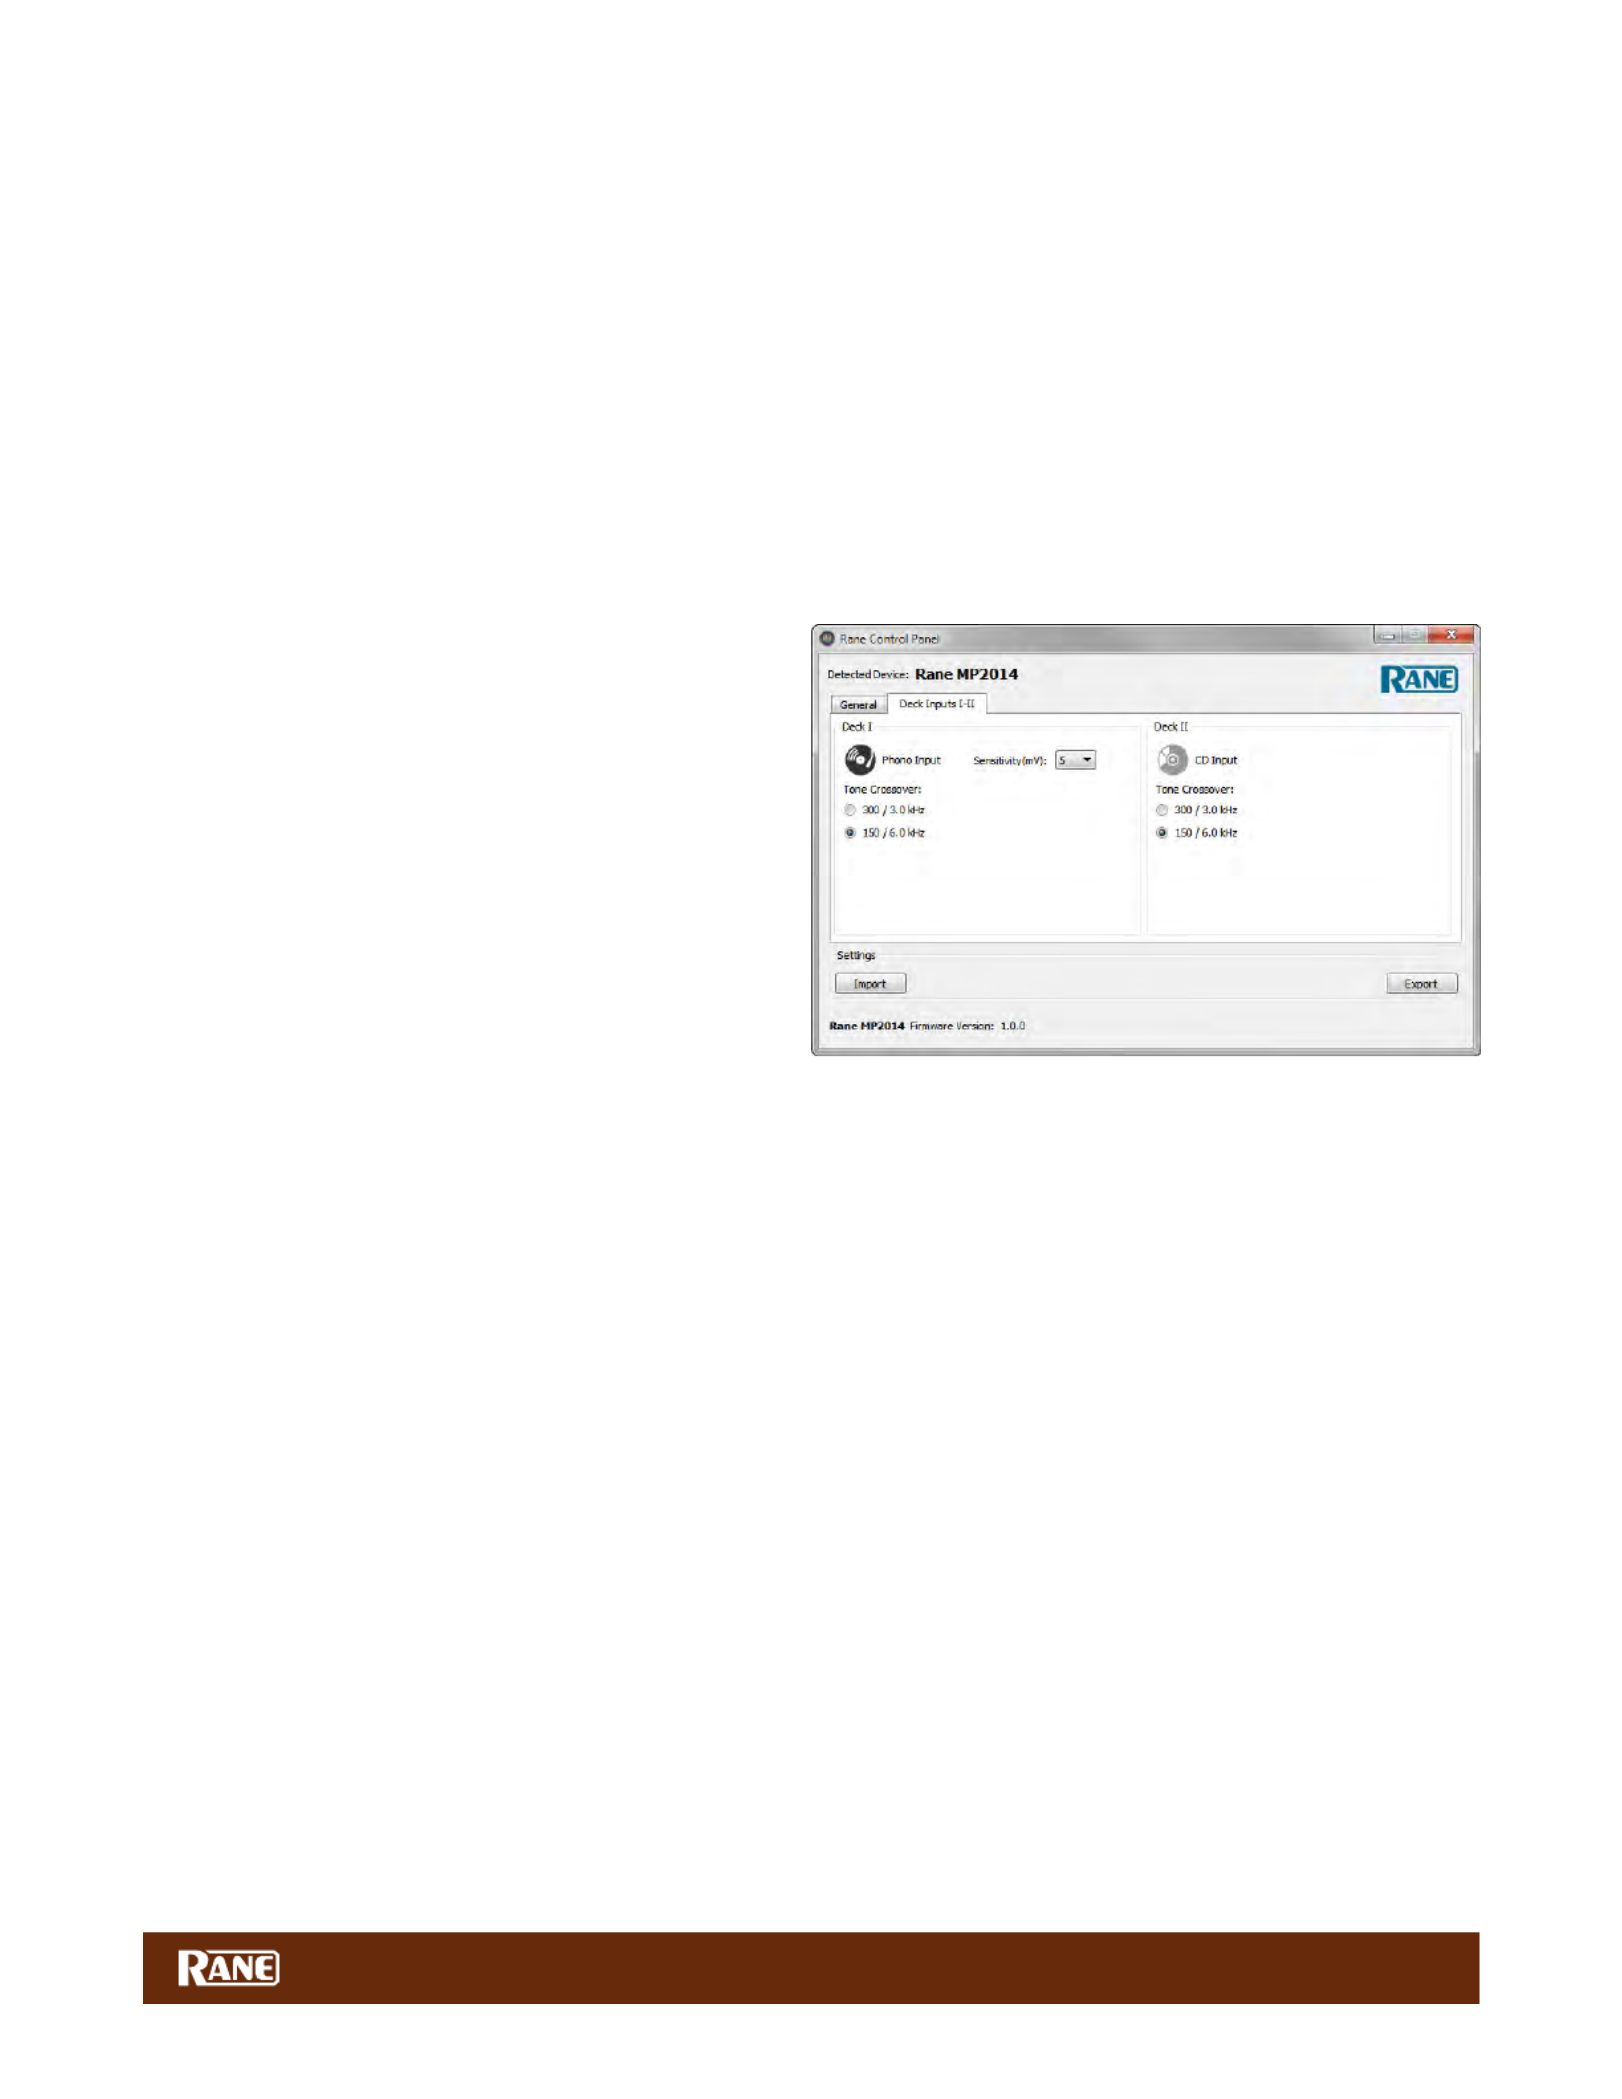
Deck Inputs I-II Tab
Analog Input Source: The analog input for each Deck
must be set appropriately for Phono or CD player using a
switch on the rear of the mixer. The control panel shows the
mode selected by these switches for Decks I and II. This
mode can only be changed on the mixer.
Phono Sensitivity: If a Phono Input is selected on the
mixer (as shown for Deck I) the Sensitivity (mV) adjustment
appears in the panel. Click the down-arrow to display a
list of 16 Sensitivity settings between 2.5mV and 10mV in
0.5mV steps. The default is 5mV. Set the Phono Sensitivity
to the same level of your cartridge (see your cartridge
documentation for the correct value). Another method is to
match the level of the turntable to a CD playing on another
input.
Tone Crossover sets the crossover points of the 3-band Tone controls for each of the Deck channels to either:
• 300 Hz between Low and Mid, 3 kHz between Mid and High.
• 150 Hz between Low and Mid, 6 kHz between Mid and High (default).
Product specificaties
| Merk: | Rane |
| Categorie: | Mengpaneel |
| Model: | MP2014 |
| Gewicht: | 4700 g |
| Breedte: | 279.4 mm |
| Diepte: | 109.5 mm |
| Hoogte: | 355.6 mm |
| Aantal USB 2.0-poorten: | 2 |
| Microfoon, line-in ingang: | Ja |
| Frequentiebereik: | 20 - 20000 Hz |
| AUX ingang: | Ja |
| Totale harmonische vervorming (THD): | 0.001 procent |
| Phono ingang (RCA): | 2 |
| Digitaal geluid verwerken: | 32 Bit |
| DJ mixer: | Ja |
Heb je hulp nodig?
Als je hulp nodig hebt met Rane MP2014 stel dan hieronder een vraag en andere gebruikers zullen je antwoorden
Handleiding Mengpaneel Rane

7 Juli 2023
3 Juli 2023
3 Juli 2023
2 Juli 2023
1 Juli 2023
29 Juni 2023
28 Juni 2023
28 Juni 2023
26 Juni 2023
23 Juni 2023
Handleiding Mengpaneel
- Mengpaneel Electrolux
- Mengpaneel Braun
- Mengpaneel Bosch
- Mengpaneel Philips
- Mengpaneel Sony
- Mengpaneel Delonghi
- Mengpaneel Inventum
- Mengpaneel JBL
- Mengpaneel Kenwood
- Mengpaneel Krups
- Mengpaneel Pioneer
- Mengpaneel Siemens
- Mengpaneel Yamaha
- Mengpaneel ADB
- Mengpaneel Adler
- Mengpaneel Akai
- Mengpaneel Alecto
- Mengpaneel Alesis
- Mengpaneel Allen-Heath
- Mengpaneel Alpina
- Mengpaneel Alto
- Mengpaneel Alto Professional
- Mengpaneel American Audio
- Mengpaneel Apart
- Mengpaneel Arendo
- Mengpaneel Ariete
- Mengpaneel Audio-Technica
- Mengpaneel Audiophony
- Mengpaneel Auna
- Mengpaneel BeamZ
- Mengpaneel Behringer
- Mengpaneel Bestron
- Mengpaneel Bifinett
- Mengpaneel Blaupunkt
- Mengpaneel Blaze
- Mengpaneel Bomann
- Mengpaneel Bose
- Mengpaneel Boss
- Mengpaneel DAP
- Mengpaneel DAP Audio
- Mengpaneel Dateq
- Mengpaneel Denon
- Mengpaneel Domo
- Mengpaneel Efbe-schott
- Mengpaneel Emerio
- Mengpaneel Envivo
- Mengpaneel Exquisit
- Mengpaneel Fagor
- Mengpaneel Fritel
- Mengpaneel Gemini
- Mengpaneel Gorenje
- Mengpaneel Hanseatic
- Mengpaneel Home Electric
- Mengpaneel HQ Power
- Mengpaneel Hyundai
- Mengpaneel Icon
- Mengpaneel Ion
- Mengpaneel Kalorik
- Mengpaneel KitchenAid
- Mengpaneel Koda
- Mengpaneel Koenic
- Mengpaneel Konig
- Mengpaneel Korg
- Mengpaneel Korona
- Mengpaneel LD Systems
- Mengpaneel Mackie
- Mengpaneel Marquant
- Mengpaneel Martin
- Mengpaneel Melissa
- Mengpaneel Mesko
- Mengpaneel Midas
- Mengpaneel Monacor
- Mengpaneel Moulinex
- Mengpaneel Nedis
- Mengpaneel Nordland
- Mengpaneel Numark
- Mengpaneel NutriBullet
- Mengpaneel Peavey
- Mengpaneel Philco
- Mengpaneel Power Dynamics
- Mengpaneel Primo
- Mengpaneel ProfiCook
- Mengpaneel Proline
- Mengpaneel Pyle
- Mengpaneel RCF
- Mengpaneel Redmond
- Mengpaneel Reloop
- Mengpaneel Roadstar
- Mengpaneel Roland
- Mengpaneel Samson
- Mengpaneel Santos
- Mengpaneel Scott
- Mengpaneel Severin
- Mengpaneel Showtec
- Mengpaneel Silvercrest
- Mengpaneel Skytec
- Mengpaneel Solac
- Mengpaneel Soundcraft
- Mengpaneel Stagg
- Mengpaneel Stirling
- Mengpaneel Sunbeam
- Mengpaneel Tascam
- Mengpaneel Taurus
- Mengpaneel TC Helicon
- Mengpaneel Team
- Mengpaneel Technics
- Mengpaneel Toa
- Mengpaneel Tristar
- Mengpaneel Turmix
- Mengpaneel Velleman
- Mengpaneel Venga
- Mengpaneel Vonyx
- Mengpaneel Waves
- Mengpaneel Wharfedale
- Mengpaneel Zelmer
- Mengpaneel Zolid
- Mengpaneel Zoom
- Mengpaneel JB Systems
- Mengpaneel Omnitronic
- Mengpaneel Black And Decker
- Mengpaneel Camry
- Mengpaneel Caso
- Mengpaneel Clatronic
- Mengpaneel Concept
- Mengpaneel Cuisinart
- Mengpaneel Monoprice
- Mengpaneel Shure
- Mengpaneel Steren
- Mengpaneel Instant
- Mengpaneel Comfee
- Mengpaneel Hobart
- Mengpaneel IMG Stageline
- Mengpaneel QTX
- Mengpaneel Stanton
- Mengpaneel Valcom
- Mengpaneel Dash
- Mengpaneel CaterChef
- Mengpaneel Flama
- Mengpaneel Citronic
- Mengpaneel Crown
- Mengpaneel Dynacord
- Mengpaneel Phonic
- Mengpaneel Yorkville
- Mengpaneel Karma
- Mengpaneel DataVideo
- Mengpaneel ART
- Mengpaneel Bogen
- Mengpaneel Allen & Heath
- Mengpaneel AV:link
- Mengpaneel Pyle Pro
- Mengpaneel PreSonus
- Mengpaneel IDance
- Mengpaneel Rupert Neve Designs
- Mengpaneel Chandler
- Mengpaneel RDL
- Mengpaneel Fredenstein
- Mengpaneel Swissonic
- Mengpaneel Aviom
- Mengpaneel QSC
- Mengpaneel Golden Age Project
- Mengpaneel Radial Engineering
- Mengpaneel ATen
- Mengpaneel Russound
- Mengpaneel DBX
- Mengpaneel Extron
- Mengpaneel Ibiza Sound
- Mengpaneel Elysia
- Mengpaneel Proel
- Mengpaneel Solid State Logic
- Mengpaneel OSD Audio
- Mengpaneel Crestron
- Mengpaneel Avid
- Mengpaneel Adastra
- Mengpaneel TeachLogic
- Mengpaneel Warm Audio
- Mengpaneel SPL
- Mengpaneel Lindell Audio
- Mengpaneel Sonifex
- Mengpaneel Kramer
- Mengpaneel Manley
- Mengpaneel Ashly
- Mengpaneel Dangerous Music
- Mengpaneel Speco Technologies
- Mengpaneel M-GAME
- Mengpaneel Ecler
- Mengpaneel Fun Generation
- Mengpaneel ANT
- Mengpaneel IMG Stage Line
- Mengpaneel Atlas Sound
- Mengpaneel Nektar
- Mengpaneel JTS
- Mengpaneel RCS
- Mengpaneel Klark Teknik
- Mengpaneel Analogue Solutions
- Mengpaneel Sound Devices
- Mengpaneel Alfatron
- Mengpaneel CAD Audio
- Mengpaneel Trident
- Mengpaneel DNA
- Mengpaneel Rolls
- Mengpaneel Heritage Audio
- Mengpaneel Audibax
- Mengpaneel The T.mix
- Mengpaneel Inter-M
- Mengpaneel Cloud
- Mengpaneel Bellari
- Mengpaneel OWI
- Mengpaneel Glemm
- Mengpaneel Røde
- Mengpaneel Auna Pro
Nieuwste handleidingen voor Mengpaneel
3 April 2025
18 Maart 2025
25 Januari 2025
30 Januari 2025
4 Maart 2025
30 Januari 2025
28 Februari 2025
28 Februari 2025
28 Februari 2025
28 Februari 2025