Kathrein UFS 912sw Handleiding
Kathrein
Digitale decoder
UFS 912sw
Lees hieronder de 📖 handleiding in het Nederlandse voor Kathrein UFS 912sw (188 pagina's) in de categorie Digitale decoder. Deze handleiding was nuttig voor 46 personen en werd door 2 gebruikers gemiddeld met 4.5 sterren beoordeeld
Pagina 1/188

Operating Manual Englisch
UFS 912

2
Dear customer,
this operating manual is intended to help you make the fullest use of the extensive range of functions
offered by your new satellite receiver.
We have tried to make the operating instructions as easy as possible to understand, and to keep them
as concise as possible. To help you understand particular specialist terms that cannot be translated,
we have added a short glossary at the end of the manual.
The power switch is an environmentally friendly feature. If you will not be using your receiver for an
extended period, you should use the on/off switch to disconnect it from the power supply and save energy.
For shorter breaks, you can use the remote control to switch the receiver to standby, which uses only a
minimal amount of energy.
We wish you good reception and hope you will enjoy using your new HDTV receiver.
Your
KATHREIN team
Preface

3
The difference between PAL and HDTV
High-resolution TV is characterised by a signifi cantly higher number of picture lines on the TV set.
The usual European standard PAL achieves a resolution of 576 lines vertically and 720 lines horizontally.
High-resolution TV provides an impressive resolution, up to fi ve times higher than the usual PAL
standard TV, and hence delivering more detail sharpness and responsiveness.
A HDTV picture can contain up to fi ve times as many picture points, that is, approximately 2 million pixels
compared to a conventional PAL picture with only approximately 400,000 pixels.
Worldwide there are currently two HDTV standards, based on the two formats 1080i and 720p. The two
standards differ in the number of picture lines and in the transmission procedure. To the human eye, the
difference between the two HDTV standards is hardly perceptible; whereas in comparison to the PAL
system, moving pictures look much more dynamic in HDTV. Transmission technology and reception
equipment will be able to handle both standards in the future.
Difference Between PAL and HDTV
PAL 720 x 576
720p 1280 x 720
1080i 1920 x 1080

4
List of Contents
Preface.......................................................... 2
Difference Between PAL and HDTV ........... 3
List of Contents ........................................... 4
Safety Instructions - Important Notes ....... 6
Receiver Features/Scope of Supply ........ 10
Receiver features ...................................... 10
Product package ....................................... 10
Features .................................................... 10
Features....................................................... 11
Connection and Setup .............................. 12
View of rear panel ..................................... 12
View of front panel (flap folded down) ....... 13
Connecting the unit (Sat-IF connections) .. 14
Connection example ................................. 15
TV and video recorder connection ............ 16
Audio connection ....................................... 16
Optical digital output .................................. 16
Inserting batteries into the remote control ..
16
First installation ......................................... 17
General Operating Instructions................ 46
Alphanumeric entries ................................ 46
Editing and selection options in the
menus ....................................................... 47
Basic Operation in TV or Radio Mode
(Live Operation) ......................................... 48
Remote control for live operation
(TV/Radio) ................................................. 48
Changeover between TV and Radio
operation ................................................... 49
Setting the volume .................................... 49
Channel selection ...................................... 49
Direct channel selection ................................... 49
Channel selection from the channel list ............ 50
Channel information .................................. 52
Calling up channel options ........................ 53
Select Audio track ..................................... 54
Subtitle selection ....................................... 54
Teletext ...................................................... 55
Automatic timeshift .................................... 56
One-Touch Recording (OTR) -
recording directly to a hard disk *) .............. 57
Premium tvtv EPG ..................................... 58
General information about the
Premium tvtv EPG ..................................... 58
Calling up the EPG .................................... 59
Selection options
(remote control buttons in the EPG) .......... 60
Views using the EPG................................. 61
“Current” view ................................................... 61
“Preview” view (programme listings) ................ 62
Categories view ................................................ 63
Extras menu .............................................. 64
My hints ............................................................ 64
Search function ......................................... 66
More Episodes ................................................. 66
Actor ................................................................. 67
Keyword search in detailed information ........... 67
Full-text search ................................................. 68
Recording settings
(programming the timer) ............................ 69
Setting the storage location for recordings ....... 71
Recording “once” .............................................. 72
Recording “daily” .............................................. 72
Recording “weekly” ........................................... 73
Recording “user-defined” .................................. 73
“Series recording” ............................................. 74
Reminder function (switch over to
programme) ............................................... 75
Timer list view ............................................ 76
Editing a recording ........................................... 77
Timer overlap .................................................... 77
Editing the Channel List ........................... 78
Calling up the “Edit TV Channellist”
menu ......................................................... 78
Selection of the channel list/favorites
list to be edited .......................................... 79
Selecting the channels to be edited .......... 80
Editing channels (channel lists) ................. 80
Move ................................................................. 81
Delete ............................................................... 81
Skip .................................................................. 81
Lock .................................................................. 82
To Favorite ........................................................ 82
Start Blockselection .......................................... 83
Editing channels (favorites lists) ................ 83
Move ................................................................. 83
Remove from favoritelist ................................... 83
Lock .................................................................. 84
Start block selection ......................................... 84
Rename favoritelist ........................................... 84
Recording Archive
(Playing Back/Editing Recordings) .......... 85
Calling up the recording archive ................ 85
Selection options (remote control
buttons in the recording archive) ............... 86

5
List of Contents
Views (sorting the recordings)
in the recording archive ............................. 87
Folders in the recording archive ................ 88
Creating folders ................................................ 88
Editing folders (delete/rename) ........................ 89
Playback of a recording ............................. 90
Playback functions .................................... 90
Creating chapters ...................................... 91
Selection of the recording(s) to be edited .. 92
Editing recordings ..................................... 92
Delete ............................................................... 93
Lock .................................................................. 93
Rename ............................................................ 93
Change category .............................................. 94
Create new folder ............................................. 95
Move to folder ................................................... 95
Chapter view ............................................. 96
Deleting chapters ............................................. 97
Main Menu .................................................. 99
Calling up the main menu and
introduction ................................................ 99
Menu overview ........................................ 100
Main Menu - Channel Search .................. 101
Automatic Channel Search ..................... 101
Manual Search ........................................ 103
Search with Service ID ............................ 105
Main Menu - Service Menu...................... 107
Automatic Software Update .................... 107
Software update by satellite .................... 109
Software update by USB .......................... 110
Update Firmware ............................................ 111
Update Channel List ....................................... 111
Save channel list to USB ................................ 111
Factory Reset ........................................... 112
Main Menu - Settings ................................ 113
First Installation ........................................ 113
Basic Settings .......................................... 113
Video Settings ................................................ 114
Audio Settings ................................................ 116
Time Setting ................................................... 117
Remote control code ...................................... 118
User Defined Settings ............................. 120
Parental Lock ................................................. 120
Customize Screen Menu ................................ 122
EPG Setup ..................................................... 123
PVR (recording) Setup ................................... 125
Mediacenter Setup ......................................... 126
Automatic channel name update .................... 126
Antenna & Satellite .................................. 126
SatFinder ........................................................ 127
Tuner Configuration ........................................ 128
Edit Satellites .................................................. 128
Edit Transponder ............................................ 130
Main Menu - Interfaces (CI, hard disk
and network) ............................................ 134
Common interface ................................... 134
Important information ..................................... 134
Inserting the smart card and the CA module .. 135
Multidecryption ............................................... 136
HDD Management .................................. 137
Ethernet Settings ..................................... 138
Main Menu - Applications ....................... 141
Applications ............................................. 141
Main Menu - Language Settings ............. 142
Tuner Configuration ................................ 143
Media Centre ............................................ 165
Operation Without the Remote Control .. 166
Backup operation .................................... 166
Software update via the USB port ........... 167
Performing the software update ..................... 167
Troubleshooting ...................................... 168
Technical Appendix ................................. 169
Technical Specifications .......................... 169
Sat IF connection examples .................... 170
Individual reception systems .......................... 170
Community antenna network systems
(4 x Sat IF) ...................................................... 170
Community antenna network systems
(8 x Sat IF), multi-feed .................................... 171
Community antenna network systems
(16 x Sat IF), multi-feed .................................. 171
Single cable systems ...................................... 172
Connection examples for network
functionality ............................................. 174
Short Technical Glossary ....................... 178
Service ...................................................... 182
Subject Index ........................................... 183
For your notes ......................................... 186

6
Safety Instructions - Important Notes
Mains cable
Make sure that the mains cable
(power supply cable) is not damaged.
Units with a damaged mains cable
must be disconnected from the
mains (unplugged at the mains
power socket) and repaired by an
electrical specialist before being
used. Only use the power pack
supplied (if available)!
Risk of fatal injury due to electric
shock!
Danger!
Cleaning
Disconnect the mains plug before
cleaning the unit. Only use a dry
cloth for cleaning and only clean
the outer surface. Never open the
casing of the unit.
Touching the parts inside the unit
carries a risk of death due to electric
shock!
Playing children
Make sure that children do not push
any objects into the ventilation slots.
Risk of fatal injury due to electric
shock!
Earthing
The antenna system must be
earthed as specifi ed or equi-
potentially bonded.
EN 60728/11 and any national
regulations must be complied with.
Risk of voltage surges due to lightning
strikes!
Power supply voltage
Only operate the unit at the specifi ed
mains voltage (indicated on the
rear of the unit or on the external
power pack). The unit may only be
connected to the mains and turned
on once it has been connected to
the antenna and to the TV set or
the cable network and PC.
If the mains voltage is too high, there
is a risk of fi re!
Moisture, direct sunlight, heat,
naked fl ames
Protect the unit against moisture,
dripping and splashed water (do
not place any fi lled objects such
as vases on top of the unit). Do not
place the unit close to a heater or
expose it to direct sunlight and do
not operate it in damp locations.
Only use the unit in a moderate
climate, not in tropical conditions!
Place no naked fl ames such as
candles on top of the unit!
There is a risk of fi re!
Ventilation
The heat generated in this unit is
adequately dissipated. However,
the unit should never be installed
in a cupboard or on shelves with
inadequate ventilation. Never cover
the cooling slots on the unit (e.g.
with other equipment, magazines,
tablecloths, clothing or curtains)!
Batteries
If your unit was supplied with
batteries (e.g. for the remote control),
take care that the batteries are
not exposed to excessively high
temperatures, direct sunshine or
fi re. Exchange the batteries only with
types that are identical or equivalent.
Otherwise the batteries and also the
remote control may be damaged.
Comply also with the safety
instructions stated on the batteries:
There is a risk of explosions!
Warning!
Warning!
Warning!
These two pages contain important information about operation, installation location and connection of the
unit. Read these instructions carefully before setting up the device.
Do not
cover

7
Safety Instructions - Important Notes
Periods of extended absence,
thunderstorms, mains socket
accessibility
In order to disconnect the unit from
the mains completely, the mains
plug must be unplugged from the
wall socket! Therefore install the unit
close to a mains socket and make
sure this socket is accessible at all
times, so that you can disconnect
the unit from the mains if necessary.
If you are away for an extended
period, and during thunderstorms,
always switch the unit off at the
mains and unplug it from the socket.
This also applies to the other
equipment connected to the unit.
Isolation from the cable network is
also recommended. Note any timer
programming (receiver) and turn the
unit on again promptly before the
recording time.
Installation location
All electronic equipment generates
heat. The temperature rise of
this unit does however lie within
the permissible range. Sensitive
furniture surfaces and veneers may
become discoloured by the effects
of constant heat over time. The feet
of the unit can also cause colour
changes to treated furniture surfaces.
If necessary, place the unit on a
suitable stable and fl at base!
Repairs
Ensure that any repairs to your
unit are carried out by qualifi ed
personnel. Opening the unit and
attempting to repair it yourself
voids all warranty claims!
Improper work on the unit may
jeopardise the electrical safety of
the unit.
The manufacturer accepts no liability
for accidents caused by the user
opening the casing of the unit.
Connections
Incorrect wiring of the connections
can lead to malfunctions or defects
on the unit!
Important!
Do not place any objects on top
of the unit. Unless stated to the
contrary in the “Connection and
Set-Up” and “Installation” sections
in the manual supplied, maintain
a clearance of at least 10 cm
above the unit, 2 cm to either side
and 5 cm behind the unit, to allow
unobstructed dissipation of the heat
generated.
There is a risk of fi re!
Electronic equipment is not domestic
waste - it must be disposed of
properly in accordance with directive
2002/96/EC OF THE EUROPEAN
PARLIAMENT AND THE COUNCIL
dated 27th January 2003 concerning
used electrical and electronic
appliances.
At the end of its service life, take this
device for disposal at a designated
public collection point.
Spent batteries are special waste!
Do not throw spent batteries into
your domestic waste; take them to a
collection point for spent batteries!

10
UFS 912
Remote control RC 671
HDMI cable
2 batteries AAA 1.5 V
The UFS 912 HDTV receiver is suitable for the reception of digital satellite TV and radio channels.
This receiver can receive both HDTV (High Defi nition Television) and also conventional TV (Standard
Defi nition Television).
The receiver has a premium tvtv EPG. This EPG is not only a clearly laid out electronic TV guide, but also
enables programmes to be copied directly from the related EPG view to the timer. It also offers the facility
of selectively sorting the programme information by categories and the generation and management of
your own programme tips. The premium tvtv EPG also offers a comprehensive search function allowing
searches by repeats, actors and key words amongst others.
The receiver indicates the channel name on the 16-character alphanumeric display. In addition, the display
has 16 icons that provide information on specifi c receiver conditions at a glance (e.g. Dolby Digital, HD,
timer ...).
The HDMI interface is ideal for connecting the receiver to a fl at-screen TV set. In addition a YPbPr connection,
a video composite connection and two Scart connections are provided. Via the optical audio output,
the receiver can output a Dolby Digital data stream AC 3 to a Dolby Digital system.
Using the USB port on the rear it is possible to connect an external USB hard disk to record fi lms and radio
broadcasts without loss of quality. Timeshifting is also possible with a hard disk.
Using the USB port on the front of the unit, software updates can be loaded onto the receiver.
The receiver’s operating system is based on LINUX.
The receiver is available in a silver or black casing.
Receiver Features/Scope of Supply
Power supply cable
Operating Manual
Safety instructions (multi-lingual)
Reception of digital satellite TV channels and
radio programmes using DVB-S2 (HDTV)
and DVB-S transmission standards
Video decoding of MPEG-2 and
MPEG-4/H.264 signals (HDTV)
16-character alphanumeric display with
status icons for indication of channel names
and transmission information
Premium tvtv EPG (Electronic Programme
Guide) for up to 14 days detailed information
on approx. 60 channels

11
Features
¹) Function only with external hard disk connected
²) CA modules and smart cards are not included with this product
3) Tested only with hard disks from the Kathrein product range (see also: www.kathrein.de Service FAQs)→ →
4) The unit is not fully disconnected from the mains (see the sections “Safety Instructions - Important Instructions” and “Periods of
extended absence, thunderstorms, mains socket accessibility”)
Extended EPG functions:
Selective sorting by categories,
comprehensive search function, generation
and management of programme tips
Facility for recording TV and radio broadcasts
to an external USB hard disk 3)
Timeshifting using external USB hard disk
3)
Recording archive with chapter menu and
images ¹)
Multimedia archive for video and MP 3
playback ¹)
Common interface for two CA modules 2)
HDMI output for best picture quality on your
fl at-screen TV set
Upscaler for upscaling the PAL signal to
576p, 720p, 1080i and automatic
Built-in SD card reader
Cinch sockets for AV signals
(composite FBAS, stereo audio)
Two USB 2.0 ports at the rear of the unit for
connecting external USB storage media 3)
One USB 2.0 port on the front of the unit for
software update with a USB stick
Ethernet interface for multimedia applications
and integration of the receiver in a network
UPNP support via the network interface for
audio and video streaming
Guided fi rst installation
Pre-loaded channel list - Watch TV
immediately without doing a channel search
Automatic software and programme lists
download
Display of broadcaster logo in various on-
screen displays
Unlimited number of timer recordings can be
programmed (one-off, daily, weekly, user-
defi ned and series timer)
8 favorite channel lists for TV and 8 for radio
YPbPr, TV and VCR Scart output
Composite colour, RGB and Y/C signal
output programmable via the Scart
socket (TV)
Optical audio output for Dolby Digital data
stream (AC 3)
Teletext decoder with 800 page memory
capacity and teletext generation (only via
Scart)
Soundtrack selection for multilingual
broadcasts
Suitable for software updates via satellite,
USB stick and PC (the operating software
and the channel list can be updated
separately)
On-screen display (OSD) in 10 languages
(D, GB, F, I, E, CZ, NL, PL, TR, RUS)
DiSEqC™1.0/1.1/1.2/1.3 and SCR single
cable system control signals
Operating system based on LINUX
Power switch
4,000 channel memory positions
12
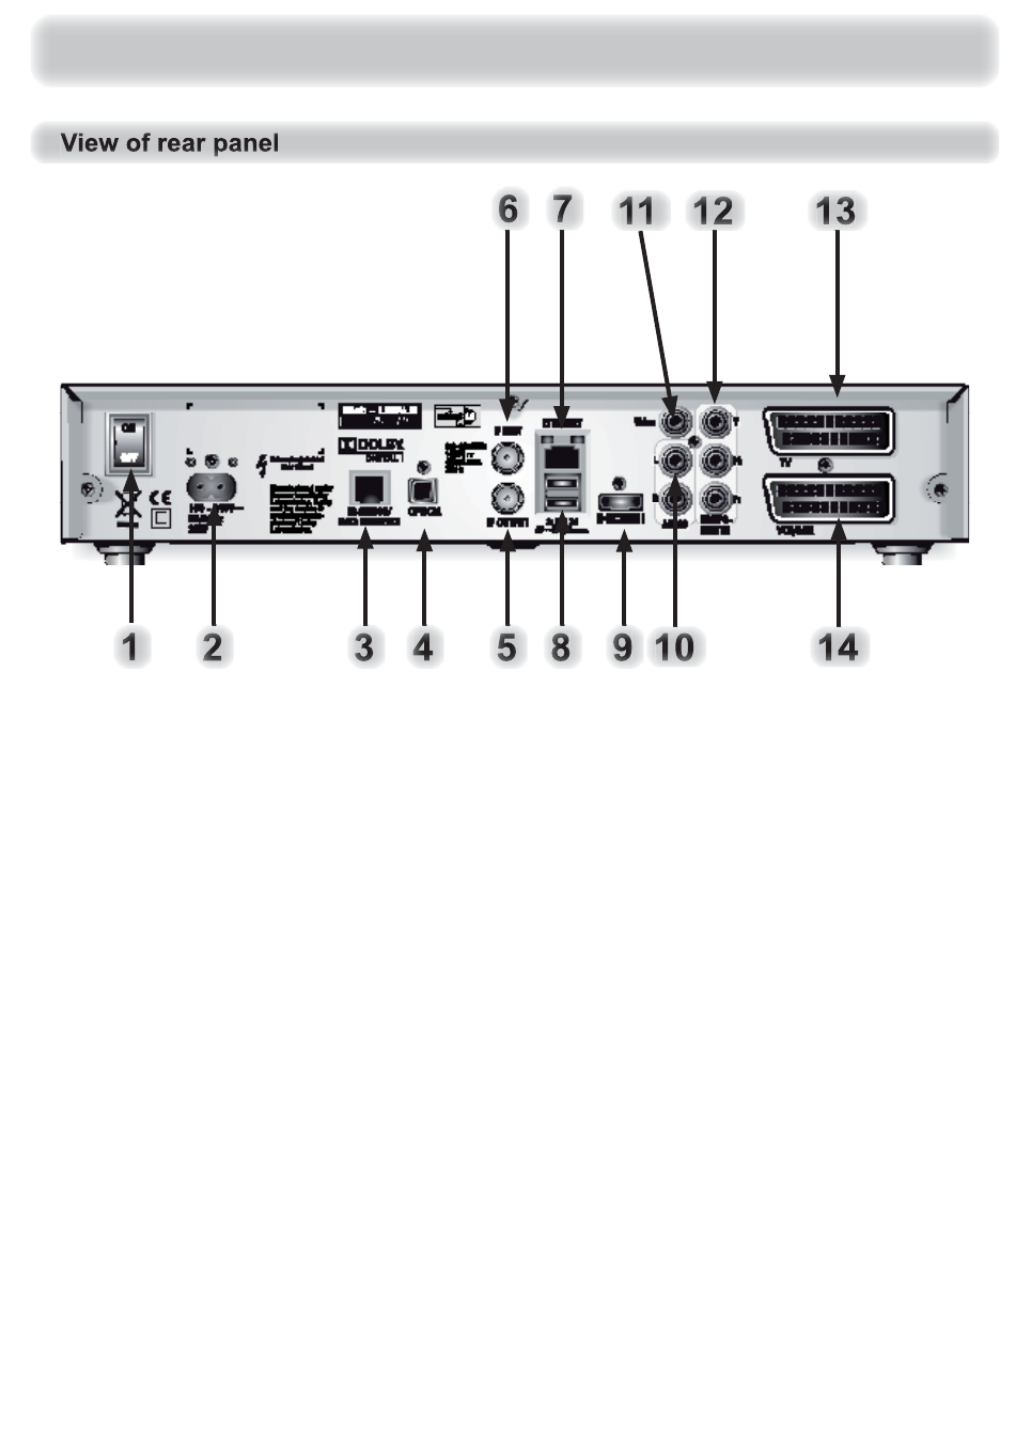
Connection and Setup
1. On/Off switch 1)
2. Mains power cable
3. Data interface (only for service), optionally
for an infrared sensor (not included)
4. Optical data stream output (SPDIF/Sony
Philips Digital Interface Format) for Dolby
Digital AC 3 audio
5. IF loop-through output
6. IF input
7. Network connection (Ethernet)
8. 2 x USB 2.0 ports (USB-A connectors)
9. HDMI connection
10. Audio outputs (L/R) - cinch sockets
11. Video output (composite colour)
12. 3 x Cinch connections for component
outputs YUV labelled = Y/Pb/Pr
13. Scart socket for TV connection
14. Scart socket for VCR/AUX connection
1) The unit is not fully disconnected from the mains (see the sections “Safety Instructions - Important Instructions” and “Periods of
extended absence, thunderstorms, mains socket accessibility”)

13
Connection and Setup
1. SD card slot
2. USB 2.0 port for software updates
3. Standby button (On/Off)
4. Media button
5. Common Interface for two CA modules for
pay TV cards *)
6. 16 character alphanumeric display
7. Channel selection buttons
8. TV/R button (switching between TV and
radio mode)
*) CA modules and Smartcards are not included with this product
LED in the front panel display:
The LED lights up:
Red Receiver is in standby mode
Green Receiver is in operation (archive hard disk connected and functional)
Orange A recording is running that was started from the standby mode (on completion of the
recording the receiver switches back to the standby mode)

14
Connection and Setup
Connect the Sat IF inputs on the receiver to the satellite reception system.
Use coaxial cable with an F standard connector.
If the F standard connectors are not yet fi tted on the cables, strip the insulation
from the cables as shown in the following illustration and carefully screw the
F standard connectors on to the ends of the cables until they are securely attached.
When fi tting the connector, make sure that no strands of the braid are touching
the inner conductor, otherwise a short circuit will occur.
The quality of the reception signal depends on a good connection at this point!

15
Connection and Setup
Conventional
DiSEqC™ system
Dolby Digital system
Network
PC/laptop
External hard disk HiFi system

16
Connection and Setup
Connect the satellite receiver (HDMI or alternatively TV Scart socket) and the TV set using an HDMI or
Scart cable (see “Connection example”). If your TV is stereo, you can receive the sound in stereo via
the HDMI or Scart connection.
For system reasons, the same video signals are present at both the TV Scart socket and also the
video cinch output.
Connect the satellite receiver (VCR/AUX Scart socket) to the video recorder/DVR using a Scart cable.
To play back a DVD, i.e. output the signal from the DVR through the receiver on the TV set, the TV set
must also be connected to the receiver with a Scart cable. This is necessary as there is no upscaling
of the video signal from the VCR Scart socket to the HDMI output.
If you want to play the sound on your hi-fi system, connect the audio cinch sockets to the input sockets
on the hi-fi system, using an appropriate cable (see “Connection example”).
The fi bre-optic cable output is intended for the connection of a Dolby Digital system (see “Connection
example”).
Remove the cover on the rear of the remote control. Insert the two batteries supplied into the remote
control. Ensure correct polarity of the batteries; the + and – markings as indicated inside the battery
compartment. Slide the cover back onto the housing until it locks in place.
If you are recording using an external video recorder, remember not to operate
the receiver during recording, otherwise all the on-screen displays will appear
on your recording.

17
Connection and Setup
Required buttons on remote control for fi rst installation:
... Numeric entry (green)
Proceed to next step in
the fi rst installation
(red)
Go back one step in
the fi rst installation Confi rm the changed
values/setting
Select/change individual
menu parameters, navigation
Cancel entry, go back
Before you start to use the UFS 912, read the sections “Safety Instructions -
Important Instructions” and “Connection and Getting Started” through to the
item “First installation”.
Do not connect the unit to the mains until all installation work has been
properly carried out.
The guidance given in the “First installation” section assumes that the receiver has
been properly connected as per the “Safety Instructions - Important Instructions”
and “Connection and Setup” through to the “First installation” section.
First switch your TV set on and select the AV/HDMI input you have used to connect the receiver to your
TV set. Switch on the receiver at the power switch on the rear of the unit. Undertake the fi rst installation.
If you have any questions or encounter problems, contact your specialist dealer.
Use the buttons to select
the desired menu language for your
UFS 912 and confi rm your selection using
the button. The selected language is
Always pay attention to
the bar at the bottom of
the on-screen display.
This provides information
on what to do next.
indicated with a tick. The following languages are available: German, English, French, Italian, Spanish,
Czech, Dutch, Polish, Turkish and Russian.
Press the (green) button to move to the next menu.

18
The following on-screen display appears:
Use the buttons here to select the
basic settings for the video and audio
output of the receiver to the TV set.
For this, refer to the operating manual
for your TV set and take care to select
only those settings that your TV set can
process.
Video Output via
Select the connection on the receiver to which you have connected your television.
Either
HDMI/YUV Resolution
Here you can select the video resolution that will
be sent to your TV set. Either
- 1080i (resolution 1920 x 1080, half-screen
images)
- 576p (resolution 720 x 576, full-screen images)
or
- 720p (resolution 1280 x 720, full-screen
images)
- Automatically
Force 576i (must be supported by the TV set
otherwise you will not see a TV picture)
You can only/only need to make this setting if
you have selected the setting “Automatic” for
“HDMI/YUV Resolution”. If for a programme
that is transmitted in the format 720 x 576
(standard TV), the original format is to be
transmitted to the TV set, select the “On” setting.
If the setting is “Off”, the programme may be
automatically scaled-up to the HDTV format 720p
by the receiver.
TV aspect ratio
Here you can select the TV picture format. Either
- 4:3 or
- 16:9
Picture format
Select the type of screen display, depending on
your setting for the TV aspect ratio:
- TV aspect ratio “4:3”: Pan & Scan or Letterbox
- TV aspect ratio “16:9”: Always 16:9 or Auto-
matic
HDMI/YUV SCARTor
Connection and Setup

19
Connection and Setup
HDCP
Select here whether HDCP (digital copy
protection) is to be constantly set to “On” or is not
to be activated, “Off”. To view some programmes
it may be necessary for the setting to be
set to “On”.
Show 4:3 Event
Here you can select the type of screen display
mode for 4:3 broadcasts on a 16:9 TV set:
- Normal (Pillarbox)
- Stretched (Full Screen) or
- Zoom in (Pan & Scan)
Audio Format via HDMI
Here you can select the type of audio signal
that is transmitted by the HDMI interface. Select
the signal that your TV set can process:
- Decoded PCM or
- S/PDIF format
Auto Dolby Digital Output
Here you can select whether the receiver
should automatically select the Dolby Digital
soundtrack (if this is transmitted).
TV-SCART-Output
Select the type of video signal at the TV Scart
socket here. Select the signal that your TV set
can process.
- FBAS (video) or
- RGB – Red/Green/Blue signal or
- Y/C – S-Video signal (luminance/chrominance)
VCR-SCART-Output
Select the type of video signal at the VCR
Scart socket here. Select the signal that your
external recorder can process.
- FBAS (video) or
- Y/C – S-Video signal (luminance/chrominance)
Auto Dolby Digital Output
Here you can select whether the receiver should
automatically output the Dolby Digital signal
(if this is transmitted).
Press the (green) button to move to the next menu.
Important instruction for
picture output using “YUV”:
The “YUV” output can be used
only if “RGB” is not selected
as the output signal for the
TV Scart socket!
In this case, select “Y/C” or
“FBAS” as the output signal
for the TV Scart socket.

20
The following on-screen display appears:
The settings for the
tuner confi guration
should be made by a
specialist engineer for
this reception system.
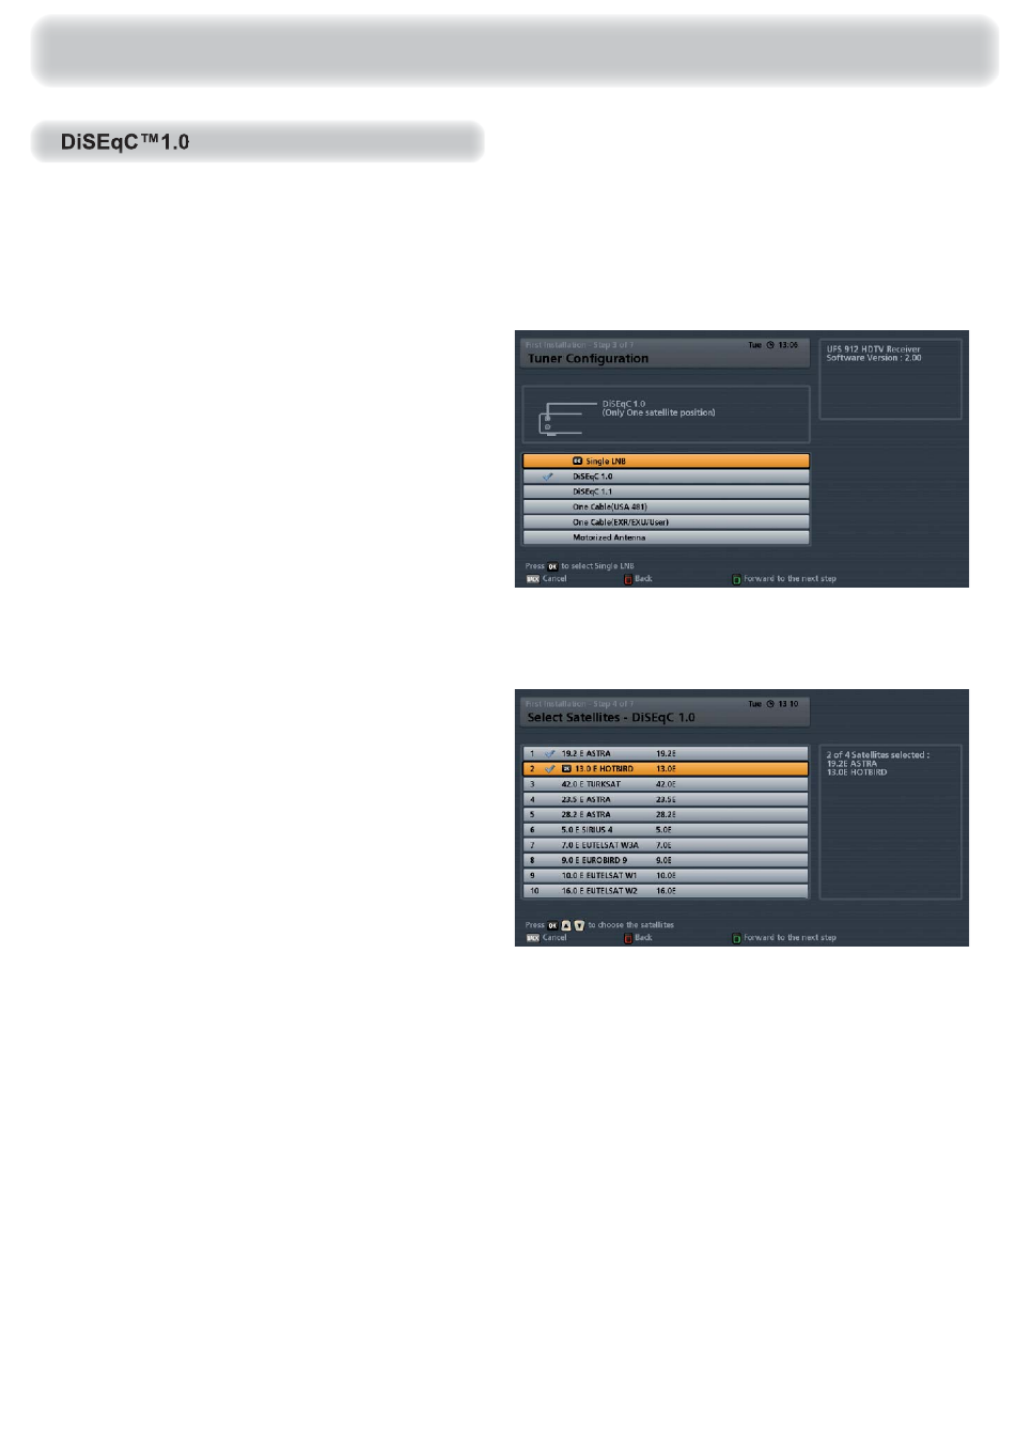
You can set up the tuner confi guration for the following types of reception systems:
- Simple LNB
- DiSEqC™1.0
- DiSEqC™1.1
- One Cable (UAS 481)
- One Cable (EXR/EXU/User) or
- Motorized Antenna (DiSEqC™1.2/ DiSEqC™1.3)
Continue as described in the fi rst installation for the type of reception you have
selected.
Connection and Setup
If your receiver is connected as in the connection example (see
illustration above), only one change/selection is necessary in the
rest of the fi rst installation. If you are not familiar with the details of
your reception system, note the following:
In many cases the satellite reception system is a DiSEqC™1.0 system.
This type of system is preadjusted. Confi rm the current on-screen displays
using the (green) button. You then select, using the buttons
the required satellites in the satellite selection (in Germany mostly
ASTRA 19.2° East) and confi rm the selection using the button. Confi rm
the rest of the on-screen displays during the fi rst installation using the
(green) button. You cannot damage your reception system during this
process! If you do not receive a TV picture at the end of the fi rst installation,
contact your specialist dealer.
Tip!
Tip!
You should perform the tuner confi guration/make changes yourself only if you
are fully familiar with the particulars of your reception system.

21
Connection and Setup
The individual items are selected using the buttons. If you need to access sub-menus, they
can be called up using the button. The changes to the current settings can be performed using
the buttons or the number pad.
The following on-screen display appears:
Select Satellites
Use the buttons here to select the
satellite from which the signal is present
at the tuner, and press the button to
confi rm your selection.
The selected satellite will be identifi ed with
a tick.
Once you have selected the required
satellites, press the (green) button.
The following on-screen display appears:
Satellite Confi guration
Make the settings for the satellites here.
LNB Type:
If your reception system does not have a Universal LNB, use the buttons to select the
LNB types that are used in your reception system. You can choose from the following LNB types:
- Universal or
- Simple or
- User-defi ned

22
Connection and Setup
LNB Frequency (MHz):
You only need to specify this data if your LNB type is not “Universal LNB”. The data required differ for
the settings “Simple” and “user-defi ned”. On this aspect, also refer to the documentation supplied
with your LNB.
- Selection “Simple” LNB: Use the number pad to enter the LNB frequency
- Selection “user-defi ned”: Press the button to enter the required low, high and limit
frequencies. The entry is made using the number pad
22 kHz control:
You only need to specify this data if your LNB type is “Simple”. The 22 kHz signal is needed to switch
LNBs when using multi-feed reception and to switch between Low and High band.
- On
- Off
Test-Transponder:
Select the “Test-Transponder” fi eld. Here you can select a transponder for checking whether your
settings are correct using the signal strength bar and signal quality bar.
When you have completed all settings for this satellite, press the
(green) button.
The receiver will automatically display the screen for the channel search. Continue the fi rst installation
with the “Channel Search” section.
23
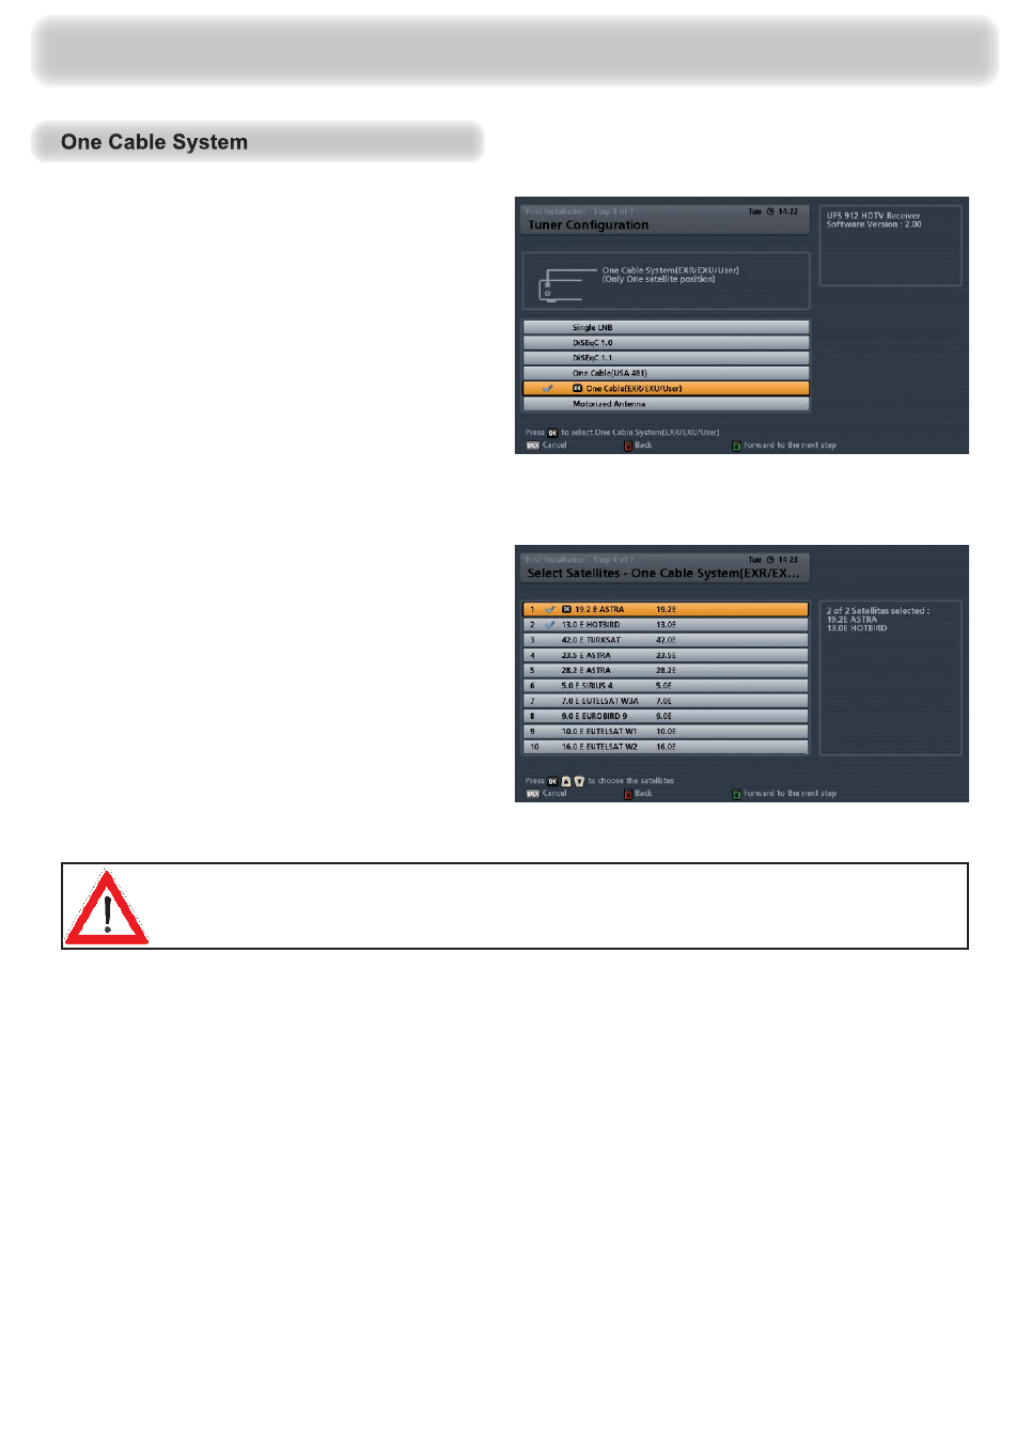
Connection and Setup
The individual items are selected using the buttons. If you require to access submenus, they
can be called up using the button. The changes to the current settings can be performed using
the buttons or the number pad.
The following on-screen display appears:
Select Satellites
Here, you can select up to four available
satellites in the signal. Use the
buttons to select the satellite you
want and confi rm your selection with
the button.
The selected satellites will be identifi ed
with a tick.
When you have completed all settings,
press the (green) button.
Press the (green) button.

24
Connection and Setup
The following on-screen display appears:
Satellite Confi guration
Make the settings for the fi rst satellite for
tuner 1 here.
LNB Type:
If your reception system does not have a Universal LNB, use the buttons to select the
LNB types that are used in your reception system. You can choose from the following LNB types:
- Universal or
- Simple or
- User-defi ned
LNB Frequency (MHz):
You only need to specify this data if your LNB type is not “Universal LNB”. The data required differ for
the settings “Simple” and “user-defi ned”. Refer to the documentation supplied for your LNB.
- Selection “Simple” LNB: Use the number pad to enter the LNB frequency
- Selection “user-defi ned”: Press the button to enter the required low, high and limit
frequencies. The entry is made using the number pad
DiSEqC™ Input:
- 1 of 4: For the fi rst satellite on the tuner (item A on the system)
- 2 of 4: For the second satellite on the tuner (item B on the system)
- 3 of 4: For the third satellite on the tuner (item C on the system)
- 4 of 4: For the fourth satellite on the tuner (item D on the system)

25
Connection and Setup
DiSEqC™ Repeat:
The setting for how often the DiSEqC™ command must be repeated depends on the confi guration of
your reception system. Refer to the documentation for your reception system or seek assistance from a
specialist engineer.
- Off DiSEqC™ command is not repeated
- 1 DiSEqC™ command is repeated once
- 2 DiSEqC™ command is repeated twice
- 3 DiSEqC™ command is repeated three times
22 kHz Control:
You only need to specify this data if your LNB type is “Simple”. The 22 kHz signal is needed to switch
LNBs when using multi-feed reception and to switch between Low and High band.
- On
- Off
Test-Transponder:
Select the “Test-Transponder” fi eld. Here you can select a transponder for checking whether your
settings are correct using the signal strength bar and signal quality bar.
When you have completed all settings for this satellite, press the
(green) button.
If you have selected more than one satellite (max. four), the receiver will automatically skip to the settings
for the second satellite. Now make the settings for the second satellite, followed by the third and fourth
satellites as required, in the same way as described for the fi rst satellite.
Once you have completed the settings for the satellites assigned, the receiver will automatically display
the screen for the channel search. Continue the fi rst installation with the “Channel Search” section.

26
Connection and Setup
The individual items are selected using the buttons. If you require to access submenus, they
can be called up using the button. The changes to the current settings can be performed using
the buttons or the number pad.
Press the (green) button.
The following on-screen display appears:
Select Satellites
Here, you can select the available
satellites (max. 64) in the signal. Use
the buttons to select the satellite
you want and confi rm your selection with
the button.
The selected satellites will be identifi ed
with a tick.
When you have completed all settings,
press the (green) button.

27
Connection and Setup
The following on-screen display appears:
Satellite Confi guration
Make the settings for the fi rst satellites
here.
LNB Type:
If your reception system does not have a Universal LNB, use the buttons to select the
LNB types that are used in your reception system. You can choose from the following LNB types:
- Universal or
- Simple or
- User-defi ned
LNB Frequency (MHz):
You only need to specify this data if your LNB type is not “Universal LNB”. The data required differ for
the settings “Simple” and “user-defi ned”. On this aspect, also refer to the documentation supplied with
your LNB.
- Selection “Simple” LNB: Use the number pad to enter the LNB frequency
- Selection “user-defi ned”: Press the button to enter the required low, high and limit
frequencies. The entry is made using the number pad
Uncommitted Switch:
Set the “Uncommitted Switches” here to match the confi guration of your reception system. You can
select “Off” or a value between “1” and “16” in single unit increments.
DiSEqC™ Repeat:
The setting for how often the DiSEqC™ command must be repeated depends on the confi guration of
your reception system. Refer to the documentation for your reception system or seek assistance from a
specialist engineer.
- Off DiSEqC™ command is not repeated
- 1 DiSEqC™ command is repeated once
- 2 DiSEqC™ command is repeated twice
- 3 DiSEqC™ command is repeated three times

28
Connection and Setup
SatPos:
Select the fi eld “SatPos”. Set the “SatPos” here to match the confi guration of your reception system.
You can choose between: “Off” or a value between “1” and “4” in single unit increments.
Test-Transponder:
Select the “Test-Transponder” fi eld. Here you can select a transponder for checking whether your
settings are correct using the signal strength bar and signal quality bar.
When you have completed all settings for this satellite, press the
(green) button.
If you have selected more than one satellite (max. 64), the receiver will automatically skip to the settings
for the second satellite. Now make the settings for the second satellite, followed by the other selected
satellites, in the same way as described for the fi rst satellite.
Once you have completed the settings for the satellites assigned, the receiver will automatically display
the screen for the channel search. Continue the fi rst installation with the “Channel Search” section.

29
The individual items are selected using the buttons. If you require to access submenus, they
can be called up using the button. The changes to the current settings can be performed using
the buttons or the number pad.
Press the (green) button.
The following on-screen display appears:
Select Satellites
Here select up to max. 64 satellites that
are in the signal. Use the buttons to
select the satellite you want and confi rm
your selection with the button.
The selected satellites will be identifi ed
with a tick.
When you have completed all settings,
press the (green) button.
Connection and Setup

30
Connection and Setup
The following on-screen display appears:
Motor Control
Select the control type “DiSEqC™1.2”.
For this, refer to the documentation for
your motorized antenna.
Go to Null Position
Select the “Go to Null Position” fi eld.
Press the button to instruct the
turntable to move to its null position.
Set Borders
Select the “Set Borders” fi eld. In this menu
you can set the limits for your turntable.
This is particularly necessary if the turntable
has only a restricted range in which it
can turn before striking an obstruction
(such as a wall or tree).
Press the button. The following on-
screen display appears:
The following buttons allow you to control
the movement of the turntable:
Start slow rotation to the West
Rotate to the West step by step
Stop the current movement
Rotate to the East step by step
Start slow rotation to the East
Once you have reached the desired East/West limit, switch to the respective fi eld “Set current position
for “****” border” and press the button to confi rm.
If you subsequently want to delete the set limits, switch to the “Reset border positions” fi eld and press
the button to confi rm deletion of the limits. You can then set new values for the limits. Once you

31
Connection and Setup
have set all the limits, press the button.
Press the (green) button to move to the next menu.
The following on-screen display appears:
LNB Type:
If your reception system does not have a Universal LNB, use the buttons to select the
LNB types that are used in your reception system. You can choose from the following LNB types:
- Universal or
- Simple or
- User-defi ned
LNB Frequency (MHz):
You only need to specify this data if your LNB type is not “Universal LNB”. The data required differ for
the settings “Simple” and “user-defi ned”. On this aspect, also refer to the documentation supplied with
your LNB.
- Selection “Simple” LNB: Use the number pad to enter the LNB frequency
- Selection “user-defi ned”: Press the button to enter the required low, high and limit
frequencies. The entry is made using the number pad
Stop on Signal:
Select the “Stop on Signal” fi eld. Here, you can select whether the motorized antenna should stop its
rotary movement immediately on reception of a signal from the desired satellite. You can choose between
“On” and “Off”.

32
Connection and Setup
Move Antenna:
Select the “Move Motorized Antenna” eld. Here you can control the movements of the motorised
antenna, using the following buttons:
Start slow rotation to the West
Rotate to the West step by step
Stop the current movement
Rotate to the East step by step
Start slow rotation to the East
Set the turntable so that both of the bars “Signal-Strength” and “Signal-Quality” on the right of the
screen show the highest available percentage values.
Test-Transponder:
Select the “Test-Transponder” eld. Here you can select a transponder for checking whether your
settings are correct using the signal strength bar and signal quality bar.
Once you have achieved the best reception signal, press the (green) button. The receiver will now
save these values for this satellite and skips automatically to the setting for the next satellite.
If you have selected more than one satellite, the receiver will automatically skip to the settings for the
second satellite. Now perform the settings for the second satellite, followed by the other satellite selections,
in the same way as described for the rst satellite.
Once you have completed the settings for the satellites assigned, the receiver will automatically display
the screen for the channel search. Continue the rst installation with the “Channel Search” section.

33
Connection and Setup
Motor Control
Select the control type “DiSEqC™1.3”.
For this, refer to the documentation for
your motorized antenna.
My Longitude
Select the eld “My Longitude” and use
the number pad here to enter your actual
longitude.
My Latitude
Select the “My Latitude” eld and use the number pad to enter your current latitude.
Go to Null Position
Select the “Go to Null Position” eld. Press the button to instruct the turntable to move to its null
position.
Set Borders
Select the “Set Borders” eld. In this menu
you can set the limits for your turntable.
This is particularly necessary if the turntable
has only a restricted range in which it
can turn before striking an obstruction
(such as a wall or tree).
Press the button. The following on-
screen display appears:
The following buttons allow you to control the movement of the turntable:
Start slow rotation to the West
Rotate to the West step by step
Stop the current movement
Rotate to the East step by step
Start slow rotation to the East

34
Connection and Setup
Once you have reached the desired East/West limit, switch to the respective eld “Set current position
for “****” border” and press the button to con rm.
If you subsequently want to delete the set limits, switch to the “Reset border positions” eld and press
the button to con rm deletion of the limits. You can then set new values for the limits. Once you
have set all the limits, press the button.
Press the (green) button to move to the next menu.
The following on-screen display appears:
LNB Type:
If your reception system does not have a Universal LNB, use the buttons to select the
LNB types that are used in your reception system. You can choose from the following LNB types:
- Universal or
- Simple or
- User-de ned
LNB Frequency (MHz):
You only need to specify this data if your LNB type is not “Universal LNB”. The data required differ for
the settings “Simple” and “user-de ned”. On this aspect, also refer to the documentation supplied with
your LNB.
- Selection “Simple” LNB: Use the number pad to enter the LNB frequency
- Selection “user-de ned”: Press the button to enter the required low, high and limit
frequencies. The entry is made using the number pad

35
Connection and Setup
Test-Transponder:
Select the “Test-Transponder” eld. Here you can select a transponder for checking whether your
settings are correct using the signal strength bar and signal quality bar.
When you have completed all settings for this satellite, press the (green) button. The receiver will
now save these values for this satellite and skips automatically to the setting for the next satellite.
If you have selected more than one satellite, the receiver will automatically skip to the settings for the
second satellite. Now perform the settings for the second satellite, followed by the other satellite selections,
in the same way as described for the rst satellite.
Once you have completed the settings for the satellites assigned, the receiver will automatically display
the screen for the channel search. Continue the rst installation with the “Channel Search” section.
36
Connection and Setup
Use the buttons to select
the single cable system used in your
reception system: Either One Cable
(UAS 481 - one cable LNB) or One Cable
(EXR/EXU/User). Con rm your selection
with the button. The selected single
cable system will be identi ed with a tick.
Press the (green) button.
Continue as described in the rst installation for the type of
single cable reception you selected.
The following on-screen display appears:
Select Satellites
Here select up to max. two satellites that
are in the signal. Use the buttons to
select the satellite you want and con rm
your selection with the button.
The selected satellites will be identi ed
with a tick.
If you use a UAS 481 (single cable LNB) in your reception system, you are only
allowed to select one satellite.
When you have completed all settings, press the (green) button.

37
Connection and Setup
When you have completed all settings, press the (green) button.
Secure channel with PIN:
If your single cable system allows the transmission frequency to be protected by entering a PIN, this is
the menu where that can be done. No other receiver can then use this transmission frequency unless
the PIN is entered.
Select the setting “On”. You can then use the number pad to enter a PIN code (0-255) in the line
underneath “Tuner PIN-Code”.
Refer to the documentation supplied with your system for the settings for
the SCR, frequencies and any PIN assigned to the tuner. You will nd there
a printed list showing the assignment between the various SCRs and the
respective transmission frequencies. It may happen that you cannot freely
select the PIN for protection of individual frequencies; this also may be listed
in the documentation for the single-cable components.
Please note also that multiple receivers cannot share the same frequencies/
channels - the receivers would interfere with each other.
Tuner (transmission channel):
Select a free available transmission
channel (SCR 0 - SCR 7).
Tuner SCR Frequency
(transmission frequency:)
Select here one of the free available
transmission frequencies.
See example on the right (EXR 551) for
assignment of a transmission channel
to a transmission frequency.
The individual items are selected using
the buttons. The changes to the
current settings can be performed using
the buttons or the number pad.

38
Connection and Setup
The following on-screen display appears:
LNB Type (settings):
If your reception system does not have a
Universal LNB, use the buttons
to select the LNB types that are used in
your reception system. You can choose
from the following LNB types:
- Universal or
- Simple or
- User-de ned
LNB Frequency (MHz):
You only need to specify this data if your LNB type is not “Universal LNB”. The data required differ for
the settings “Simple” and “user-de ned”. On this aspect, also refer to the documentation supplied with
your LNB.
- Selection “Simple” LNB: Use the number pad to enter the LNB frequency
- Selection “user-de ned”: Press the button to enter the required low, high and limit
frequencies. The entry is made using the number pad
DiSEqC™ Input:
Select the “DiSEqC™ Input” eld. Here, you set the “SatPos” for the satellite displayed on the screen,
to match the con guration of your reception system. You can choose between: “1/1”, “1/2” and “2/2”,
depending on whether at “Satellite selection” you selected one or two satellites.
Test-Transponder:
Select the “Test-Transponder” eld. Here you can select a transponder for checking whether your
settings are correct using the signal strength bar and signal quality bar.
If no connection can be established to the single-cable system, check your settings (frequency and
transmission channel) and if necessary call for expert help.
When you have completed all settings for this satellite, press the (green) button. The receiver
will now save these values for this satellite and skips automatically to the setting for the next satellite.
Now make the settings for the second satellite in the same way as described for the rst satellite.
Once you have completed the settings for the satellites assigned, the receiver will automatically display
the screen for the channel search. Continue the rst installation with the “Channel Search” section.
39
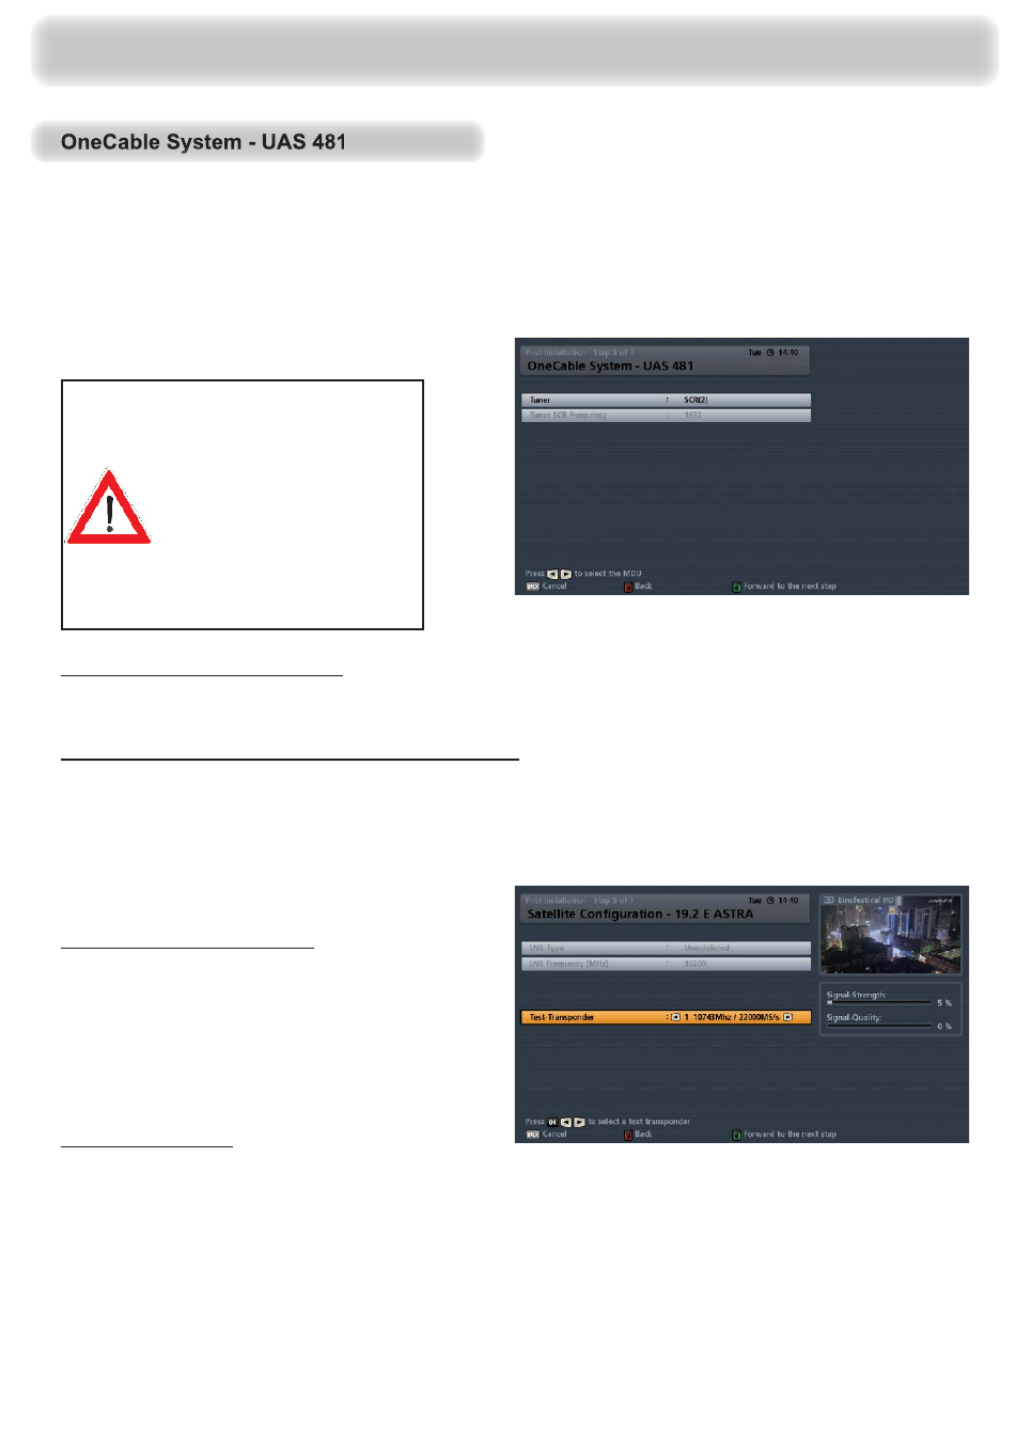
Connection and Setup
The individual items are selected using the buttons. If you need to access sub-menus, they
can be called up using the button. The changes to the current settings can be performed using
the buttons or the number pad.
For the settings please
refer to the documenta-
tion with the UAS 481.
No frequency can be
used by more than one
receiver. The receivers
would interfere with each
other.
Tuner (transmission channel):
Select a free available transmission channel (SCR 0 - SCR 3).
Tuner SCR Frequency (transmission frequency:)
This setting is already pre-set on the UAS 481 and cannot be changed.
When you have completed all settings, press the (green) button. The following on-screen display
appears:
LNB Type/LNB Frequency:
These settings are pre-set for the
UAS 481 and cannot be changed.
Test-Transponder:
Select the “Test-Transponder” eld. Here you can select a transponder for checking whether your
settings are correct using the signal strength bar and signal quality bar.
If a connection to the one cable system cannot be established, check your settings (frequency and
transmission channel) and if necessary call for expert help.
When you have completed all settings for the satellite, press the (green) button.
The receiver will automatically display the screen for the channel search. Continue the rst installation with
the “Channel Search” section.

40
The individual items are selected using the buttons. Changes to the current settings can be
made using the buttons.
If you do not wish to perform a channel
search, press the (green) button and
continue with the section “Time Setup”.
If you want to perform a channel search,
use the buttons to select “Yes”.
The following on-screen display appears:
Connection and Setup
Country Select
Using the buttons you can select
whether the channels found after the
search are to be sorted using a factory
channel list for the selected country.
Currently this feature is only available
for Germany, Austria and Switzerland.
Satellite
You can now use the buttons to select between the individual satellites you have set up, or
choose the setting “All”. If “All” is selected, all the individual satellites you have set up will be searched
for new channels. Make sure your reception system is aligned to this/these selected satellite(s).
Channel Search Mode
Use the buttons to select the type of channels that are to be searched for. You have three options:
- “free & scrambled” All channels are searched for
- “free channels only” Only free-to-air channels are searched for
- “scrambled only” Only encrypted channels are searched for
To view encrypted channels you need an appropriate CA (Conditional Access) module and a
valid smart card together with a valid subscription to the relevant Pay TV provider.

41
During the search you will see the
following on-screen display (example):
New channels found are identi ed by the
suf x “NEW” (see screenshot example,
right).
Note:
You can cancel the search at any time by
pressing the button.
Connection and Setup
After completion of the search, you will
see the following on-screen display
(example):
Press the button. The newly found
channels are added at the end of the
existing complete list.
Network Search
Use the buttons (On/Off) to select whether a network search should be performed. If you set
the “Network Search” to “Off”, only the factory default transponders for the satellite(s) you previously
selected will be searched for new as yet unsaved channels. If you set the “Network Search” to “On”,
the transponder network enables additional transponders that have not yet been stored to be located.
They are then stored and searched for new channels in the same way as the existing transponders.
When you have completed all settings, press the (green) button. The following on-screen displays
appear (example):

42
Connection and Setup
The individual items are selected using the buttons. Changes to the current settings can be
made using the buttons.
Time Mode
Here you can select whether the time information should be obtained by the receiver automatically
from a speci c channel that you select or whether the time information should be entered manually.
Either
- Automatically or
- Manual
Set Local Time
Here you can select the local time offset to UTC (formerly GMT) (e.g. for Germany: + 1 hour). You can
set the offset in 30 minute steps. The maximum offset is 11 hours and 30 minutes (+ and -).
Summer Time (time setting)
Here you can select whether the receiver should automatically change over to and from summer and
winter time. The “Manual” setting only makes sense if you also selected “Manual” for the selection
item “Time Mode”, since otherwise the time information is obtained automatically by the receiver.
Either
- Automatically or
- Manual
Time setup channel (only works if the time setup is set to “Automatical”)
Here you can select the channel from which the receiver should obtain the time information. Press
the button to call up a channel list from which you can select the channel you want using the
cursor ( ) buttons. Con rm your selection with the button.

43
Connection and Setup
Automatic Manual
You need not enter any further data, the
receiver will automatically update the date
and time.
Use the number pad or the buttons to
enter the correct date. Then use the
buttons to switch to the “Time” eld and use
the number pad or the buttons to enter
the correct time. Then use the button to
con rm your entry.
Depending on the desired time setup option (Automatic/Manual) the following on-screen display then
appears:
When you have completed all settings, press the (green) button, to complete the rst installation. If
you have already connected an external hard disk to the rear of your unit, the receiver automatically
displays the message “Set up the archive hard disk” (see next page). If no external hard disk is
connected to your receiver, this completes the rst installation and the receiver goes into TV mode.
Setup Time now
Press the button.
To make recordings using the UFS 912 and utilise the timeshifting and
recording archive functions you must connect an external hard disk *) to the rear
of the receiver (USB) and set it up as explained in following.
*) Tested only with hard disks from the Kathrein product range (see also: www.kathrein.de Service FAQs)→ →

44
Connection and Setup
If you now wish to set up an archive hard
disk, press the button; if not, press
the button to abort this procedure.
Now remove all hard disks or USB sticks
from the receiver and then con rm by
pressing the button, or pressing the
button to abort this procedure.
If you have aborted this procedure the
following on-screen display appears
(see screenshot on the right). Press the
button to revert to the TV picture.
Now connect the hard disk that is to
be set up as an archive hard disk to the
receiver.
Now set the respective capacities for
the various areas (media center and
timeshift). The respective lines are
selected using the buttons. Make
the settings using the buttons.
The storage volume that you assign to
each area is dependent on the size of the
hard disk being used.
The following on-screen display appears
(see screenshot on the right):

45
Connection and Setup
During the set-up the following on-screen
display appears (see screenshot on the
right):
After a successful set-up the following on-
screen display appears (see screenshot
on the right):
Press the button to con rm and
close the procedure.
In the “Recording Archive” line you will
see how must hard disk storage volume
is reserved for recordings. The capacity
remaining for the recording archive is
adjusted automatically depending on
the storage volume assigned to the
media center and timeshift area (max.
15 Gigabytes). Use the buttons
to switch to the “Start set-up” line and
con rm by pressing the button
to start the process.
On completion of a successful rst installation (TV picture can be seen) we
recommend having the receiver search for any available software update.
It is a prerequisite that you have selected (included in the selection) the
satellite ASTRA 19.2° East in the rst installation. Press the button to
switch to the main menu. Use the buttons to select “Service Menu”
and con rm by pressing the button. Use the buttons to select
“Software Update by Satellite” and con rm again by pressing the button.
The receiver will now automatically start to search for new software. For
information on the rest of the update process, please refer to the section
“Main menu”, “Service menu”, “Software update by satellite” in these
instructions.
Tip!
Tip!

46
In this section we would like to offer you some basic tips and explanations about using
the UFS 912. These are not speci c to any one menu, rather they can be used as help and
orientation in practically all menus.
For entries such as names of favorites
or search expressions, use the keyboard
displayed on the screen (see example
screenshot).
The letters assigned to the number
pad also apply to your remote control.
They are used very similarly to a mobile
phone. The following buttons can be used
for entry or to select an action:
Button Assigned character/action
Press 1 x 2 x 3 x 4 x 5 x
. ß ? ! 1
abc2ä
d e f 3
g h i 4
j k l 5
m n o 6 ö
p q r s 7
t u v 8 ü
w x y z 9
1 x space 2 x 0
General Operating Instructions
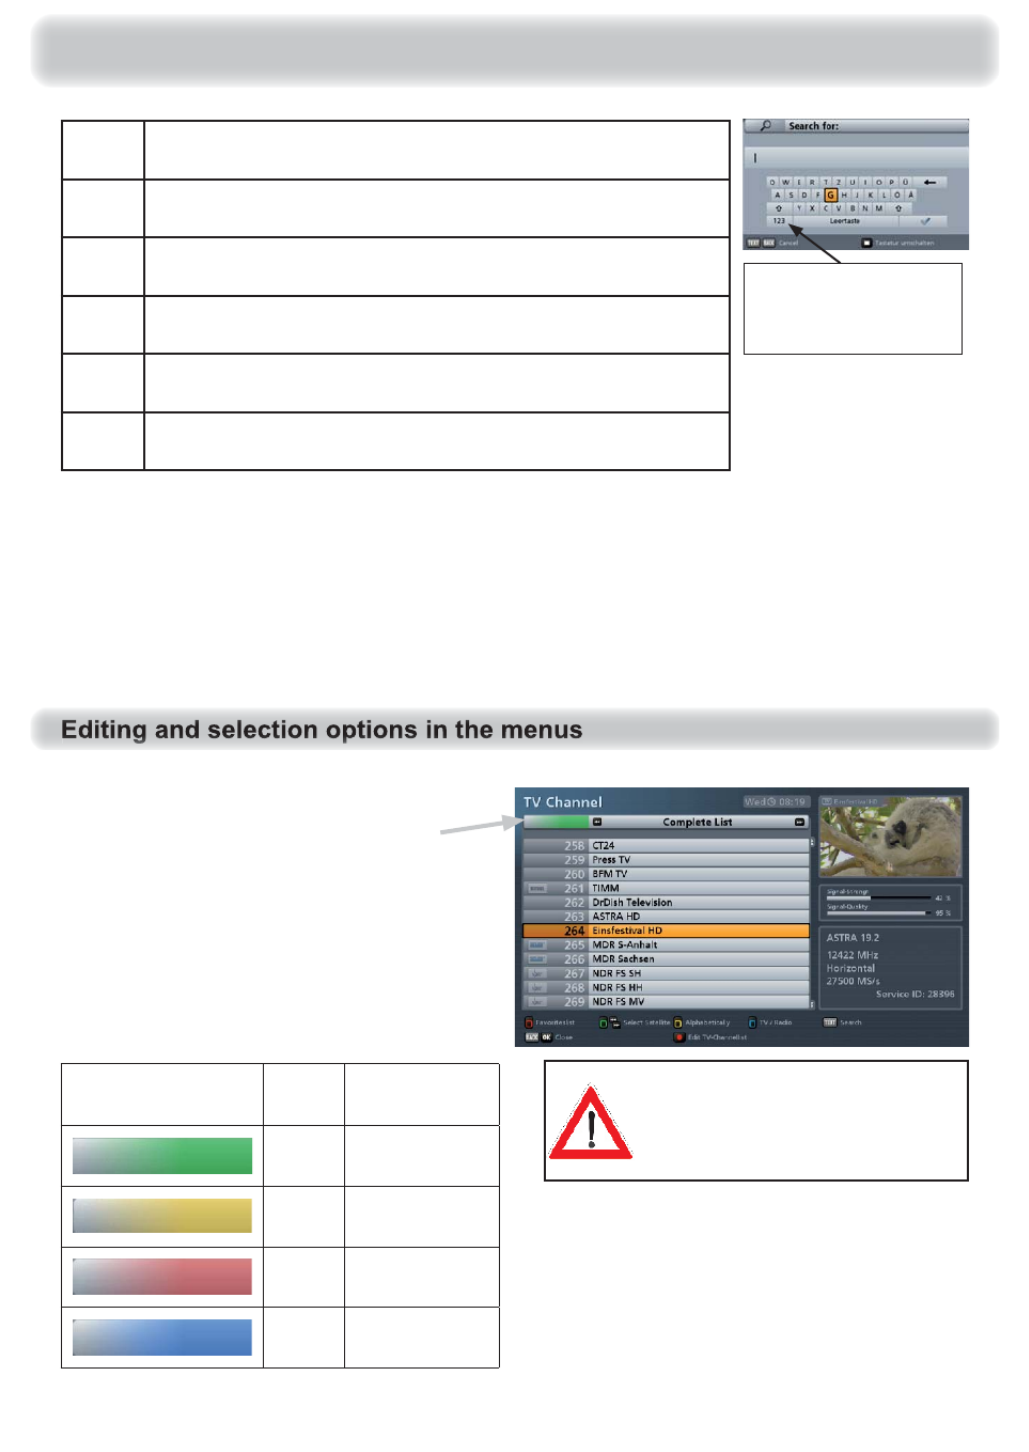
47
Switch to qwertz keyboard (control using the arrow buttons
and the OK button) - see screenshot on the right
Last character is deleted
Switch between upper case and lower case letters
Con rm the term entered
Cancel entry without saving
Cancel entry without saving
General Operating Instructions
After you have entered the desired expression, press the button in order to load the name/search
expression or the button to abort the entry.
Colour Button on the
remote control
Green
Yellow
Red
Blue
In some menus/on-screen displays this
box is shown with a particular colour
gradation. Each colour gradation stands
for a speci c view/selection. The colours
assigned to the buttons are shown in
the table below. Where the functions of
these buttons are assigned for the current
menu/view, they are also shown in the
line at the bottom of the on-screen display.
Always pay attention to the
bar at the bottom of the on-
screen display. This provides
information on what to do next.
In many menus, all the editing and selection
options for that menu are shown at the
bottom of the on-screen display. Where a
speci c remote control button is required for
executing them or calling them up, this also will
be shown (see example screenshot above).
Switch between letters
and numbers/special
characters

48
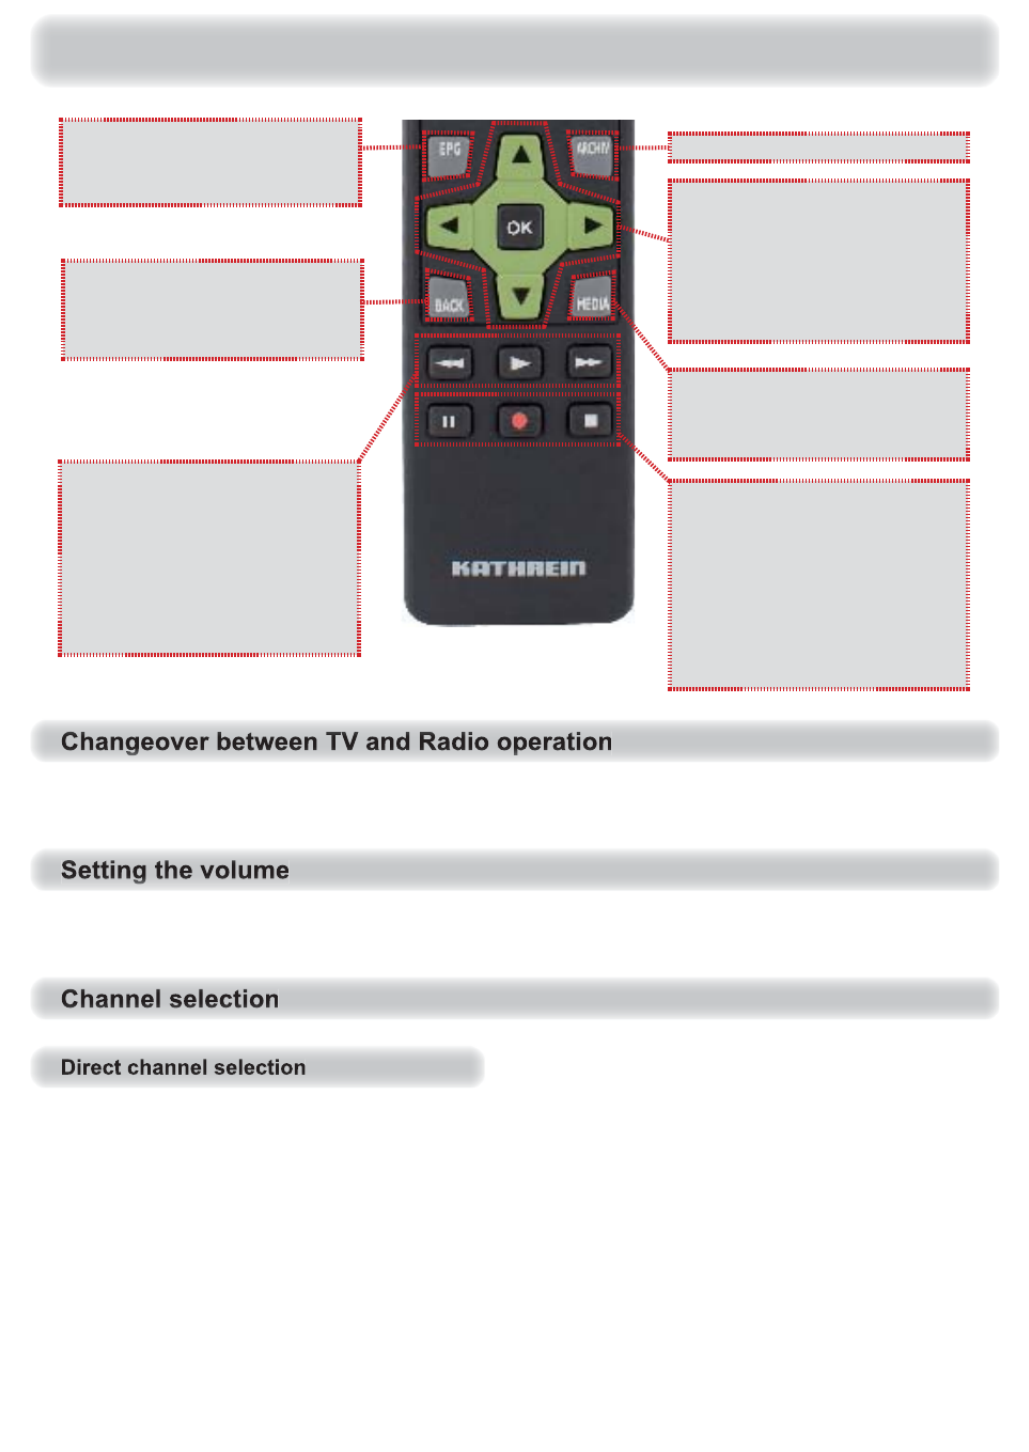
Basic Operation in TV or Radio Mode (Live Operation)
= Call up favorites list
= Picture-in-picture function
Volume “-” (softer)
Volume “+” (louder)
Call up teletext
Operation (on)/standby (off)
Currently unavailable
Number pad
Call up main menu
Mute
Channel selection
Call up channel information (info
banner and detailed information)
= Call up options menu
= Switch between
TV/radio mode
= If an external device is connected to the VCR Scart socket, the TV signal present at the
VCR Scart socket can be looped through to the TV Scart socket. Pressing the button
more than once toggles between the TV Scart mode and the VCR Scart loop-through mode.
49
Basic Operation in TV or Radio Mode (Live Operation)
Call up EPG (Electronic
Programme Guide)
Call up the recording archive
= Navigation/channel
or change channel option
= Call up channel list,
con rmation/call up selection
Call up media center
(MP 3, JPEG)
= Start timeshift
(freeze-frame)/pause
= Start recording (OTR)
= Stop playback/
timeshift/record
= Fast rewind
= Start playback/
Call up recording archive
= Fast forward
Select last channel called up,
exit on-screen displays/
menus step by step
The changeover between TV and radio operation is performed using the (blue) button.
The volume is adjusted using the buttons.
The button allows the channel to be selected from the sorted version of the currently selected
channel list/favorites list. If the channel slot in the channel list is known, the desired channel can also be
called up directly by entering the channel slot, using the number pad on the remote control (example:
ASTRA HD+ is at channel slot 10 in the currently selected channel list - to call it up, successively
press the buttons on the remote control).

50
Press the button to open the channel list. The following on-screen display appears:
Information on selecting favorites lists:
You can also call up the favorites lists directly from TV screen, using the (red) button. Then use the
cursor ( ) buttons to select the desired favorites list and con rm your selection using the button.
The receiver automatically selects the rst channel saved in the favorites list and returns to the TV screen.
You can now select the sequence of channels saved in the selected favorites list, using the buttons.
Basic Operation in TV or Radio Mode (Live Operation)

51
Now use the respective coloured button to select the category in which you wish to open a channel list:
Channel list selection:
Use the buttons to scroll through the currently available channel lists. If you want to see an
overview of the currently available channel lists, press the coloured button for the selected category
again; you will then obtain the following on-screen display (for example the favorites lists):
(red) button: Call up the
“Favoriteslist” category
Contains the following channel lists:
- Favoritelists 1-8
(yellow) button: Call up the
alphabetically sorted lists
Contains the following channel lists:
- A-Z
- Z-A
- 0-9
- Ordered by individual letters
(green) button: Call up the
“Complete List” category
Contains the following channel lists:
- Complete list
- Channel lists sorted by satellite
Select the channel:
After selecting the desired channel list,
the desired channel is selected using
The desired channel list is selected using
the cursor buttons ( ) and called up
using the button.
the cursor ( ) buttons and called up using the button. To exit the channel list and return to the
TV picture, press the button again, or press the button.
Basic Operation in TV or Radio Mode (Live Operation)
52
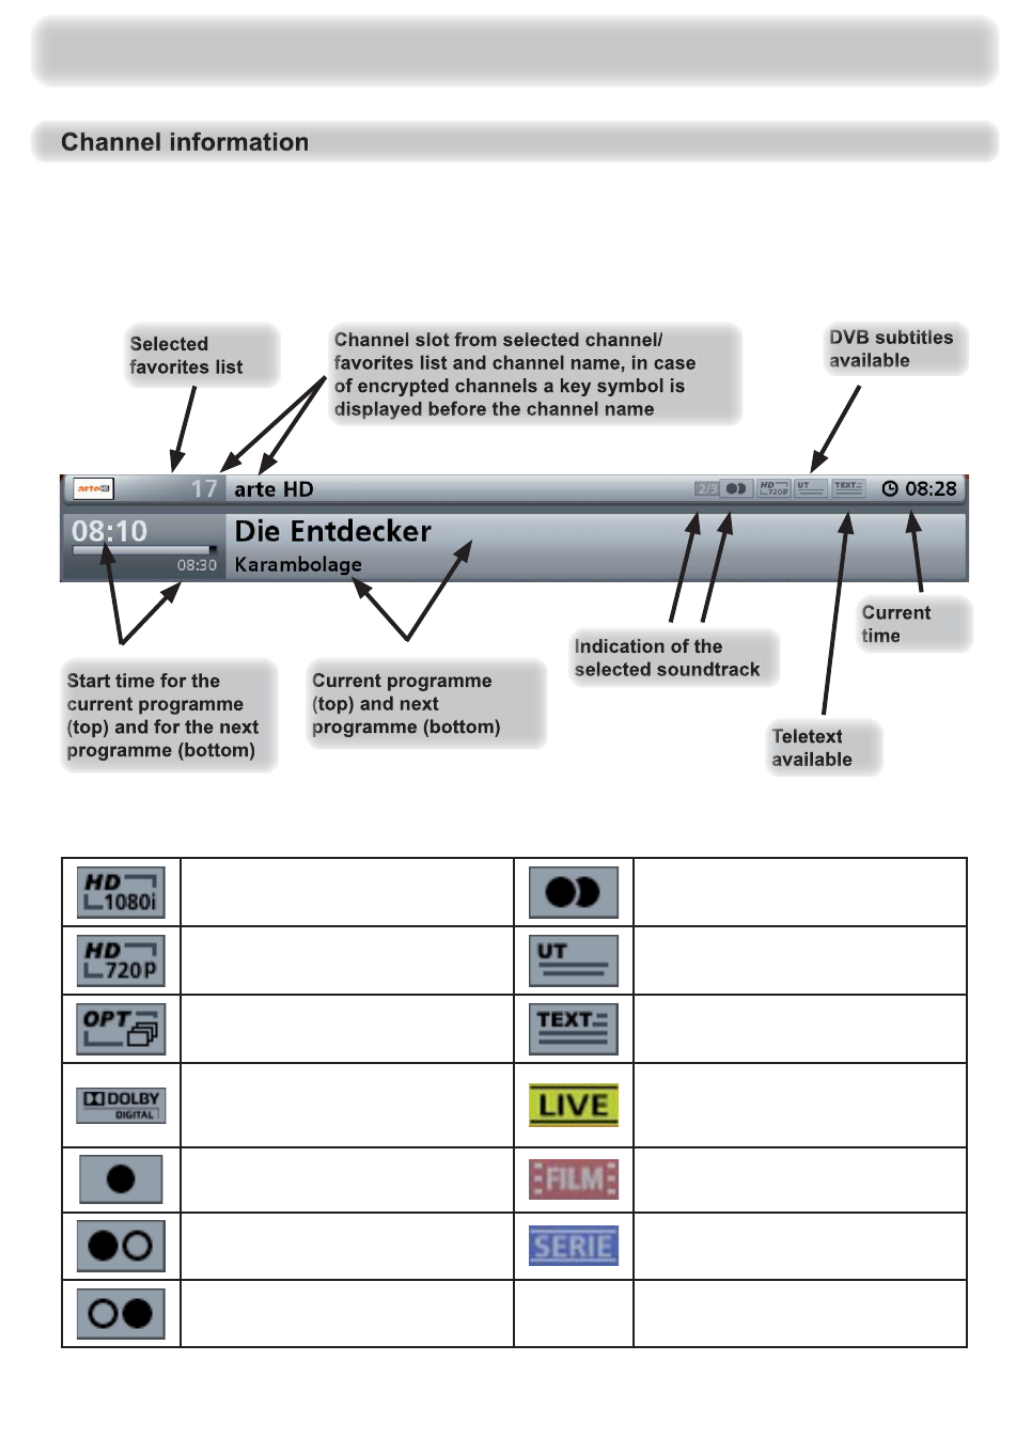
Basic Operation in TV or Radio Mode (Live Operation)
Channel information is shown for a few seconds each time the channel is changed (this can
be changed under “Settings”, “User De ned Settings”, “Customize Screen Menu”) or displayed
continuously by pressing the button.
The following icons (symbols) may appear in the channel information:
Broadcast transmitted in
HDTV standard 1080i
Audio selection is:
Stereo
In HDTV standard 720p
transmission broadcast Subtitles are available
Portal channel
(channel options available) Teletext is available
Dolby Digital
soundtrack selected
Receiver registers
the programme as
a live broadcast
Audio selection is:
mono
Receiver registers the
programme as a lm
Audio selection is:
Mono left
Receiver registers the
programme as a series
Audio selection is:
Mono right
53
Basic Operation in TV or Radio Mode (Live Operation)
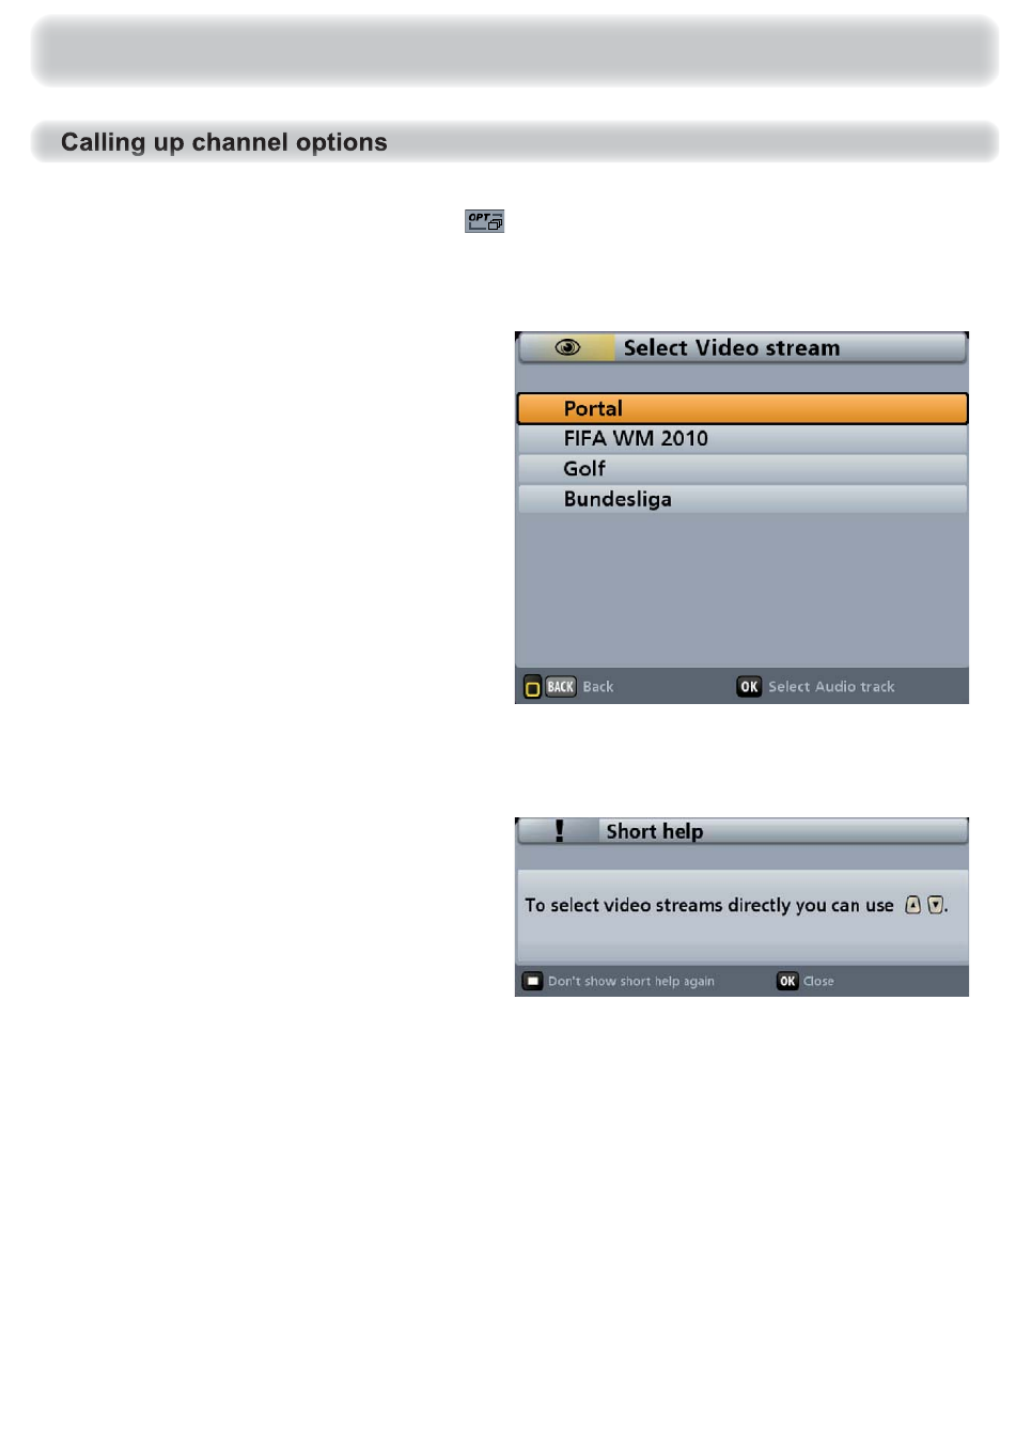
If the channel OSD contains the following icon , this is a portal channel. Press the (yellow) button,
use the buttons to select “Select Video stream” and press the button to con rm your selection.
The following on-screen display then appears (example):
Use the buttons to select your desired channel option, and press the button to con rm
your selection. The following on-screen display appears:
Press the button if you want to be reminded of this function next time, or the button, if you don't
want to see this message again.
After selecting a channel option using the buttons, skip through the other channel options in
your selected portal channel.
54
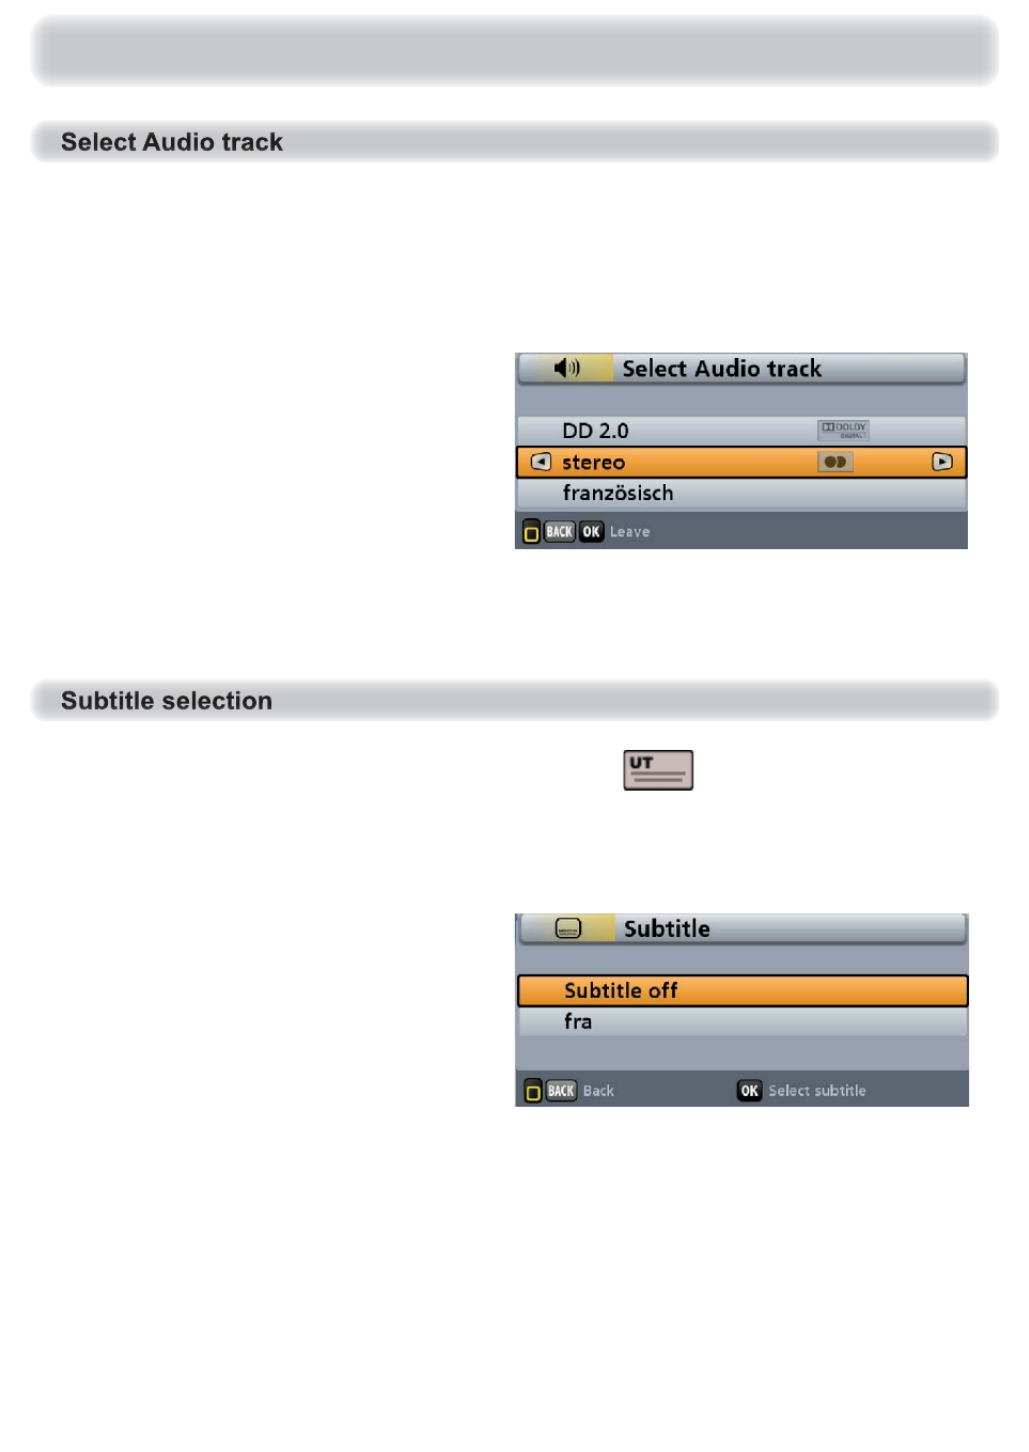
If the channel banner displays “1/3” in front of the symbol for the selected soundtrack, this tells you that
you have currently selected the rst of the three available soundtracks. Press the (yellow) button, use
the buttons to select “Select Audio track” and press the button to con rm your selection.
The following on-screen display then appears (example):
Use the cursor ( ) buttons to select your desired soundtrack option, and press the button to
con rm your selection.
If the channel OSD includes the following symbol for subtitles , you can call up the “Subtitle”
function as follows: Press the (yellow) button twice, use the buttons to select “Subtitle” and
press the button to con rm your selection. The following on-screen display then appears (example):
Use the buttons to select the desired subtitles and con rm by pressing the button.
The receiver will automatically return to the TV picture.
Basic Operation in TV or Radio Mode (Live Operation)
55
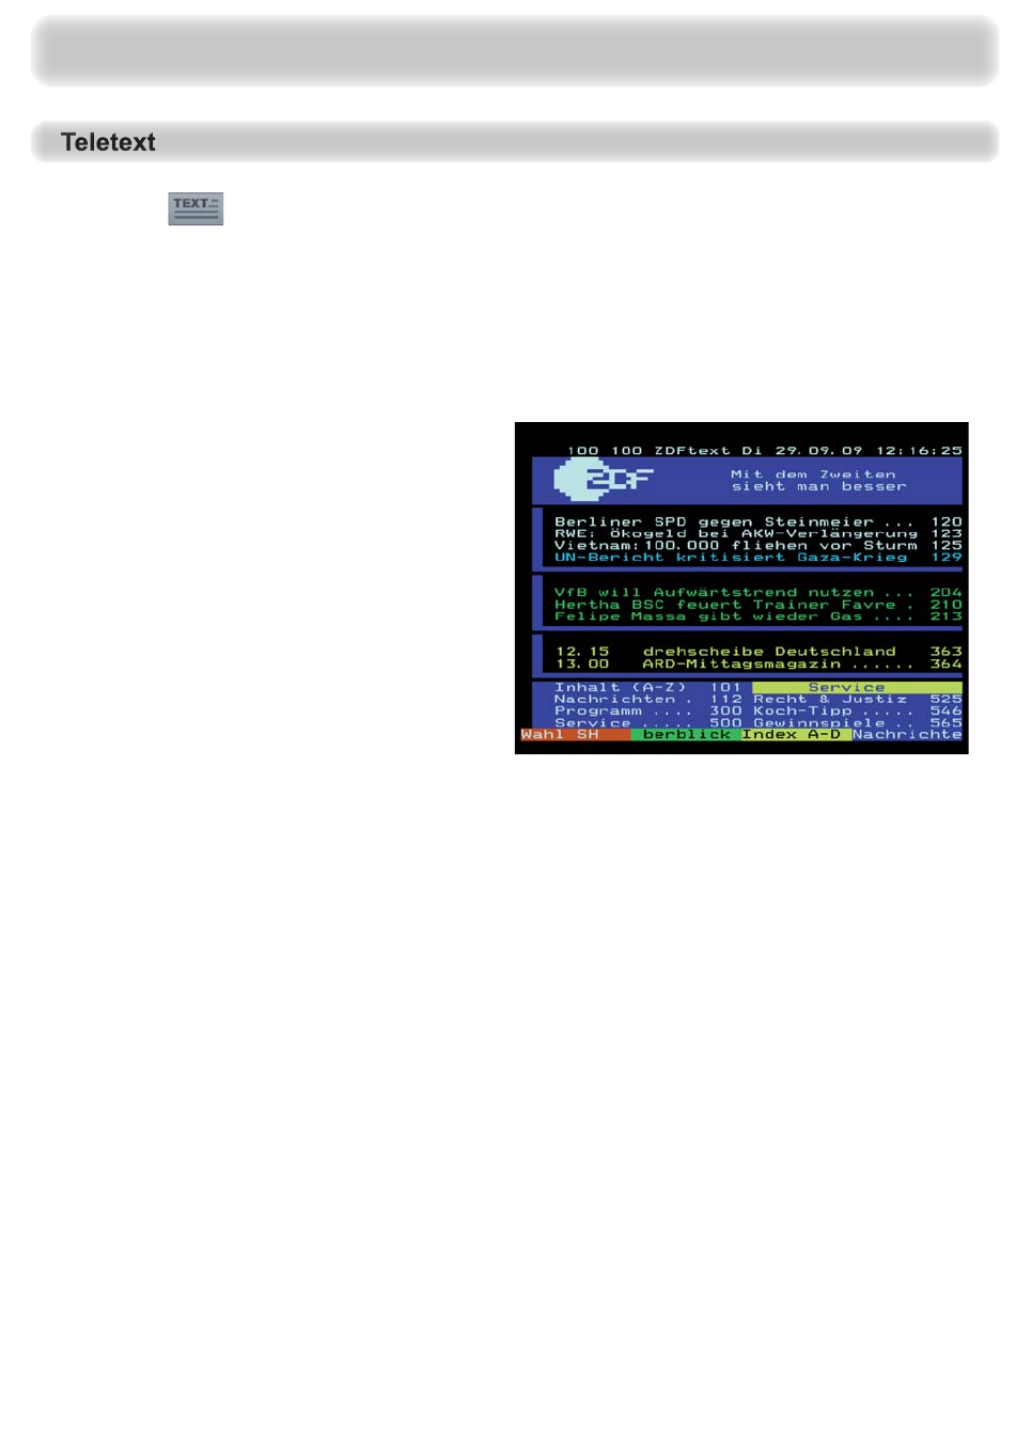
This symbol in the channel OSD shows you whether teletext is available for the selected channel.
When you press the button, the receiver processes the teletext service data for your TV set to
display, even when the signal is encrypted.
During the search, the page which is being searched for is displayed in the top left-hand corner with
the time and date displayed at the top right. When the search is nished, the teletext broadcast by
the relevant encrypted channel provider appears.
You have several options for opening the
desired pages:
- Entry using the number pad
- Scroll backwards and forwards using
the buttons
- Scroll up and down in the sub-pages
(e.g. 1/2 and 2/2) using the
buttons
- Select using the options indicated by the coloured buttons (red), (green), (yellow) and
(blue) listed across the bottom of the screen
Press or to exit teletext.
Basic Operation in TV or Radio Mode (Live Operation)
56
The UFS 912 provides a special function here. As soon as you switch to a channel, the receiver
automatically starts recording the programme you are viewing to the hard disk in the background.
When you change channel again, this stored data is deleted and background recording begins again.
This continuous background recording by the receiver offers you the following options:
- Rewind back to the time when you switched to this channel, and also fast forward up to the live
signal ( buttons)
- Pause function ( button), the picture is frozen
- Going forward and back in 30-second steps ( buttons)
If, after viewing a programme for a time, you decide you want to record it, you can do so as from the
point you switched to that channel (function only available from software version 2.0, see also “OTR”).
Precondition: In the “Settings”, “User-Defi ned Settings”, “PVR Settings” menu the “Automatic
Timeshift” option must be set to “On” and the “Default Record Duration” selection
must allow suffi cient time for the timeshift recording.
For this see also the sections “Main Menu”, “Settings”, “User-defi ned settings”, “PVR settings”.
Basic Operation in TV or Radio Mode (Live Operation)
Function can be used only when the archive hard disk is connected and has
been set up *).
*) Tested only with hard disks from the Kathrein product range (see also: www.kathrein.de Service FAQs)→ →
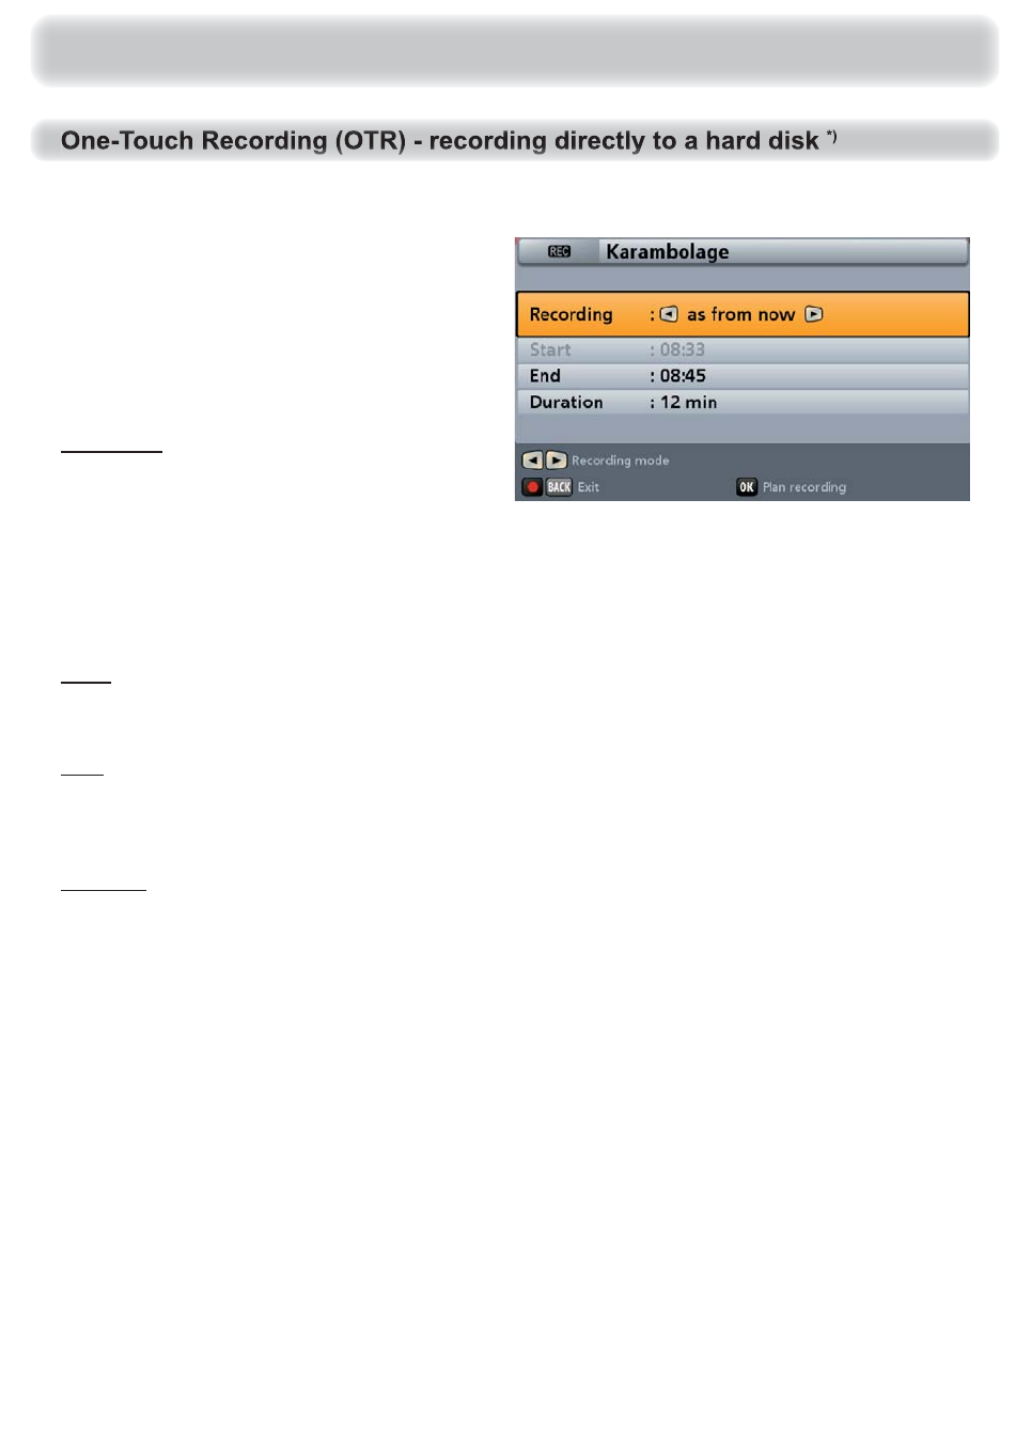
57
Basic Operation in TV or Radio Mode (Live Operation)
Recording:
You have the following selection options:
- “as from now” Recording is performed from the present time
- “later” Recording begins at the start time entered in the “Start” line
- “From start” Recording is performed from the time since when the current channel has been
watched without interruption (option available only if automatic timeshift is
activated, see “Automatic timeshift”)
Start:
You only need to enter the start time for a recording if you have selected the recording type “later”.
End:
The end of the recording is determined automatically by the receiver, based on the available EPG data.
If you wish you can however change this manually.
Duration:
The duration of a recording is determined automatically by the receiver, based on the start and fi nish
times. You can however correct the duration manually. In this case the receiver automatically adjusts
the end time to correspond to the new recording duration. The start time of the recording remains
unchanged.
Press the button to start the recording - you can cancel it by pressing the
or the (red dot)
button. To abort the recording after it has started, you must press the button, use the buttons
to select the recording to be aborted and press the
button to confi rm the action.
To start recording directly to the hard disk, press the (red dot) button. The following on-screen
display appears (example):
Use the buttons to select the
lines to be changed; make the changes
using the buttons.
*) Tested only with hard disks from the Kathrein product range (see also: www.kathrein.de Service FAQs)→ →

58
What is the Premium EPG?
The Premium EPG (referred to below just as EPG) represents the latest generation
editorially prepared programme guide. It provides all the EPG information for around 100 TV channels
free of charge, without you having to change channel, and also offers schedule information up to
two weeks ahead.
Which channels are supported by EPG?
You can see in the channel list which channels are supported by the EPG (see “Basic Operation in
TV or Radio Mode (Live Operation)” section, “Channel selection from the channel list”. On the one
hand the broadcaster logos are indicated in front of the channels supported, on the other hand you
have the facility of displaying a channel list (this is operational only once an EPG grabbing
has been performed).
What restrictions are there with EPG?
Because of the large amount of data being transmitted, the receiver cannot store all the data for the
channels supported by EPG. Therefore the receiver confi guration is factory-set to accept
data for only a limited number of channels. Refer to “Editing channel lists”, “Editing channels (channel
lists)”, “ (on/off)” for details of how to edit this pre-confi gured list. The more channels are
added to this list, the less data is available for them, due to system restrictions.
Where does the EPG data come from?
The EPG is broadcast over the ASTRA satellite at the frequency of 12,603.75 MHz, with a symbol
rate of 22 MSymb/s and horizontal polarisation (18 V). If you have accidentally deleted the
transponder for this frequency, you will need to start a new satellite and transponder search for the
ASTRA satellite (see “Channel Search”).
Is there any reason external to the receiver that might mean EPG does not work?
With non-Kathrein reception systems it may happen that the EPG data cannot be transmitted, because
the necessary transponder (12,603.75 MHz, symbol rate 22 MSymb/s, horizontal) is not transmitted
by that system.
What about EPG data for broadcasters that are not broadcast using ASTRA?
For broadcasters that broadcast using the “HOTBIRD 13° East” satellite you must perform an additional
channel search using that satellite. exception: Broadcasters supported by , the EPG data for
these broadcasters is also drawn via ASTRA.
Premium EPG

59
You will only see information on the current or subsequent programmes in the
EPG if this data is supplied/transmitted by or by the channel provider. If
no EPG data is available, the receiver shows the message “no data available”
instead of showing information on the current program.
The EPG data are not available immediately after fi rst installation. The data are
only updated/loaded after the fi rst EPG update at night or the fi rst time you
switch the receiver to standby mode. The data are saved on the archive hard
disk that is connected and has been set up (see Main Menu/Interfaces/HDD
Management/Make dedicated HDD). These data are loaded after the receiver
is started.
The full scope of the EPG is accessible only when the archive hard disk is
connected and has been set up.
The EPG is called up by pressing the button. You will automatically see the view you selected in
the menu (“Settings”, “User Defi ned Settings”, “EPG Setup”) - irrespective of which view you selected
last time before exiting the EPG. The following on-screen display appears (example):
Note: If you selected a favorites list before opening the EPG, the EPG will only show the
data for the channels that are included in this favorites list. Press the button
again to display the EPG for all channels.
Premium EPG

60
- (red) button
Call up the recording schedule (display of all pre-programmed
recordings/reminders)
- button
Navigation in the individual views (e.g. 15 minutes skip forward in the
“Current” view)
- (yellow) button
Call up a preview of the currently selected channel (Program guide)
- (blue) button
Call up the category selection (sorting the programs by categories such
as movies, sport, series ...)
- button
(P+) to jump forward 24 hours in the EPG, (P-) to jump backward
24 hours in the EPG (e.g. into “Current” and into “Preview”)
- button
Select the currently selected channel in all views. Pressing the or
button again closes the EPG and the selected channel is shown
again on the TV screen
- (red dot) button
Add a programme to the recording settings
- button
Search for a particular programme or programme content (e.g. key word
search from the detail information) or other programme times (enter
the search expression using the number pad on the remote control,
see also the section “Operating Instructions”, “Alphanumeric entries”)
- button
Shows any further information on the selected programme
- button
Call up the tools menu
Navigation within each view is always performed using the cursor (
) buttons. The buttons
allow you to select individual channels/programs, and the buttons allow you to scroll from page
to page in the currently selected list. Pressing the or button exits the EPG and returns to the
TV picture.
Premium EPG

61
The “Current” view can be called up at any
time in EPG by pressing the (green)
button.
In the “Current” view you can see all
channels displayed in the order of the
complete channel list. Provided that EPG
data have been supplied/transmitted
by or by the channel provider, the receiver shows the current programme being shown
on each channel, with start time, fi nish time, and progression bar.
You can use the cursor buttons () or the number pad to select the desired channel and, if available,
you can use the button to open further information on the desired programme.
If you want to view the programme currently being shown on a channel, you need not exit the EPG,
just select the desired channel and press the button. At the top right of the screen you will see the
current TV picture for the selected channel. The picture however only appears once the button has
been pressed. Previously what you saw was the picture of the old channel that had previously been
selected, even though the EPG was no longer set to that channel.
The button allows you to look ahead in 15 minute steps to future programmes on the channels
(press the button to return to the current time).
By pressing the (green) button in the
“Current” view you can display a schedule
in 15 minute steps (see screenshot on
the right). The selection of the desired is
performed using the cursor buttons ()
and confi rmed using the button.
Premium EPG

62
The “Preview” view can be called up at any
time in EPG by pressing the (yellow)
button.
In the “Preview” view you will see all
the programmes that will be shown
on the channel previously selected in
the “Current” view. Provided that EPG
data have been supplied/transmitted by
or by the channel provider, the
receiver displays the programme lists for
two weeks in advance.
You can use the cursor () buttons to select the desired programme and, if available, you can use
the button to open further information on the desired programme.
You can use the buttons to scroll through the programmes in the order of the overall list of
programmes (programmes can also
be selected by entering digits with the
number pad); you remain however in
“Preview” mode.
You can also press the (yellow)
button to select the desired channel. The
overall channel list is then displayed (see
screenshot right). Use the cursor buttons
() to select the desired channel.
Confi rm the selection with the button.
The receiver automatically returns to the
“Preview” view.
The button allows you to scroll
backwards and forwards a day at a time.
Using the (red dot) button you
can copy the selected programme to
the recording settings (see “Recording”
section).
Premium EPG
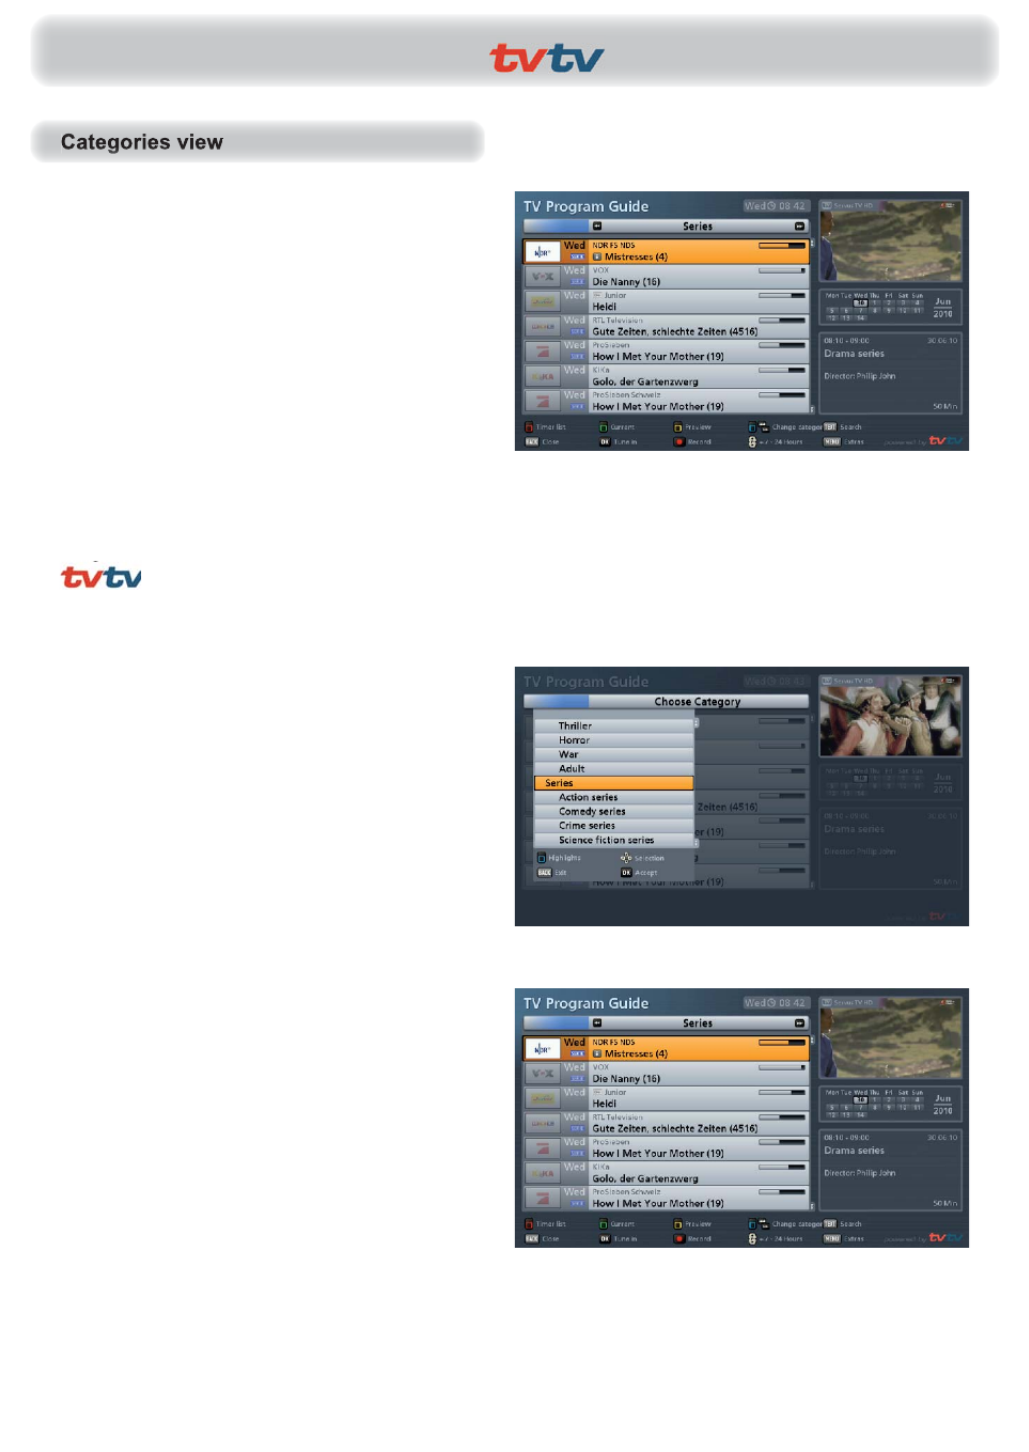
63
The “Preview” view can be called up at any time
in EPG by pressing the (blue) button.
In the “Category” view you can see all
programmes sorted by category and starting time.
The following main categories are available
for selection: Highlights, My hints (see “Extras
menu”), Movie, Entertainment, Sport, News,
Children, Music, Special interest, Movie rating
and HD broadcast.
Some main categories are further subdivided
into sub-groups, such as movies (action,
comedy, crime ...).
Programmes can only be assigned to the above categories if the EPG data have been supplied by
or the channel provider.
Select the required category using the
buttons.
You can also press the (blue) button
to select the desired category. The list
of categories is then displayed (see
screenshot right). Select the required
category using the cursor () buttons.
Confi rm the selection with the button.
The receiver automatically returns to
the “Categories” view.
You can then use the cursor ()
buttons to select the desired programme
in that category and, if available, you
can use the button to view further
information on the desired programme.
The button allows you to scroll
backwards and forwards a day at a time.
Using the (red dot) button you
can copy the selected programme to
the recording settings (see “Recording”
section).
Premium EPG

64
You can create your own categories
within this section. Press the
button to activate the input fi eld. Now
you can enter the search expression/
category name for your new category.
Alphanumeric characters are entered
as described in “Operating instructions”,
“Alphanumeric entries”.
To search the available programmes for
one of your hints/categories, you need
only select the desired hint/category
in the categories view (called up using
the (blue) button) or in the “My hints”
window, and press the button
to confi rm.
If programmes are available for your
hints (categories), in future this will be
indicated by an asterisk in a blue fi eld
when opening the EPG. Each time the
EPG is updated the programmes for
the picks you created will be updated
automatically.
The “Extras” menu is opened in the EPG
by pressing the button. In this menu
you are offered the following additional
sorting/search facilities:
- My hints
- Actors list
The selection is made using the
buttons and confi rmed by pressing
the button.
Premium EPG

65
In this section you have the facility to
select an actor that is shown in the actors
list (using the cursor () buttons) and
the by pressing the button to search
through all available data for programmes
in which this person appears. If there
are programmes available for which the
name of this person appears in the
information data, a list of the relevant
programmes will be displayed by the
receiver.
So as to fi nd a specifi c actor more quickly,
you can enter their name using the
number pad and its alphanumeric
assignments. Alphanumeric characters
are entered as described in “Operating
instructions”, “Alphanumeric entries”.
The only data that will be shown is that
for persons whose name includes the
characters you entered (see screenshot
on the right).
You can also select your favourite actors
using the cursor () buttons, providing
their names are in the list; and then press
the (red dot) button to confi rm their
inclusion in the “My hints” section.
If programmes are available for your
picks (categories), in future this will be
indicated by an asterisk in a blue fi eld
when opening the EPG. Each time the
EPG is updated the programmes for
the picks you created will be updated
automatically.
Premium EPG

66
The search function can be called up in
EPG at any time by pressing the
button. The following on-screen display
appears (see screenshot on the right).
You have the following search options:
- Search further broadcasts (in the
example on the right “Sturm der Liebe”)
The following on-screen display appears
(see example on the right):
The selection is made using the
buttons.
- Actor: Select the actor listed in the channel information (selection using the
buttons)
- Keywordsearch in detailed information
- Full text search (called up by pressing the button again)
The selection is made using the buttons. To open the menu for “More Episodes” and
“Keywordsearch in detailed information”, press the
button.
Premium EPG
For the “YouTube” function, please follow the instructions for the “Mediacenter
und Netzwerk(Web)-Interface“, that you can download at: www.kathrein.de →
“Service” “Software and Downloads” “Receiver” “UFS 912”.→ → →

67
Use the buttons to select an
available actor. Press the button to
see a list of those programmes (if any) in
which this actor appears. This depends
on the name of this actor being included
in the channel information. The following
on-screen display appears (example):
The selection is made using the
buttons.
The following on-screen display appears
(see example on the right):
Now use the cursor ( ) buttons to
select the rst letter of the word by which
you wish to search the available EPG
information. At the start of the selection
process, press the button. You can
now use the buttons to select the
desired word (see example on the right).
Pressing the button again starts the
search for your keyword.
You will then see a listing of all
programmes that contain your keyword
in their detailed information.
Premium EPG
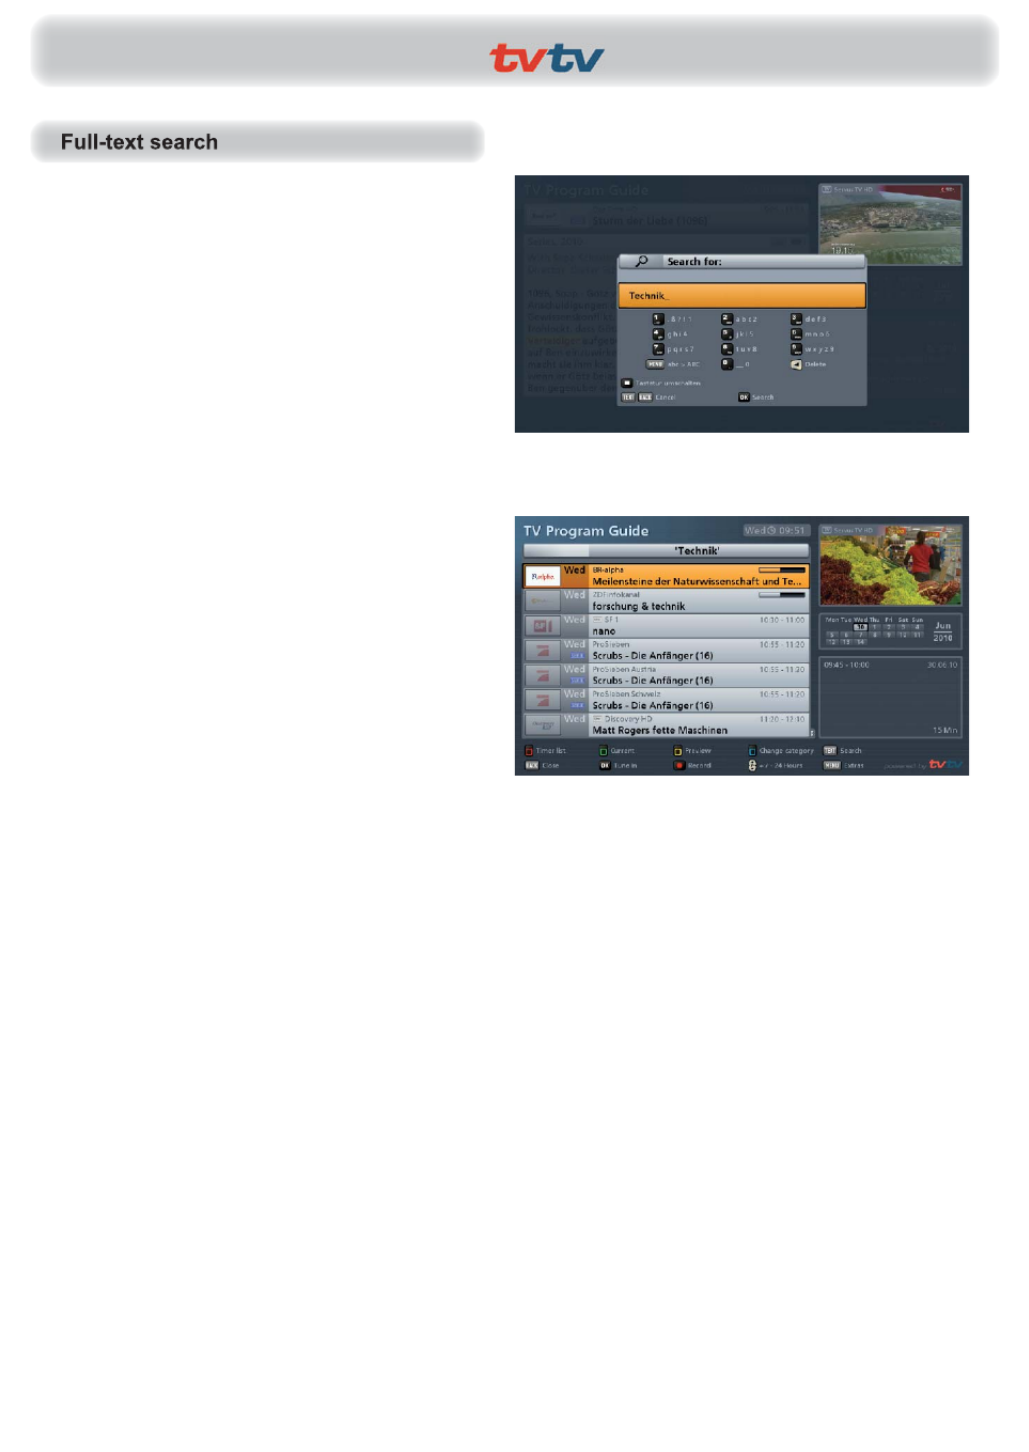
68
After calling up the search function, press
the button again to gain access to
the full text search.
The following on-screen display
appears (see example on the right): If
necessary the last search expression
used is offered. Pressing the
button allows you to delete your entry
or a search expression provided by the
receiver.
Search expressions are entered
using the number pad as described in
“Operating Instructions”, “Alphanumeric
entries”.
Pressing the button starts the search
for your search expression.
You will then see a listing of all
programmes that contain your search
expression in their detailed information.
Premium EPG

69
The (red dot) button allows you to
set a programme for recording at any
time. The programme to be recorded
can be selected in any of the EPG
views, provided the (red dot) button
appears at the bottom of the on-screen
display.
Note:
You can set the automatic pre-recording
and post-recording times for your
recordings in the menu “Settings”,
“User Defi ned Settings”, “EPG Setup”
(see also the “User Defi ned Settings”,
“EPG setup” sections).
Programme in the EPG:
Select the desired programme and press
the (red dot) button. The following
on-screen display appears (see example
screenshot on the right):
Use the buttons to select the
desired recording mode. The following
recording mode options are available:
- Once: The recording will be performed once
- Daily: The recording will be performed daily at the time you specify
- Weekly: The recording will be performed once a week on the same day and at the same time
- User-defi ned: The recording will be performed on days specifi ed by you at times specifi ed by you
- Series recording: The selected programme will be set up by the EPG for recording every time it is
broadcast (may even be on different channels). However this function requires an update of the EPG
data (the update time for the EPG can be specifi ed in the “Settings” menu, “User Defi ned Settings”,
“EPG Setup”).
- Reminder function: See “Reminder function (switch over to programme)” section in this section.
Use the cursor () buttons to select the further items and use the number pad to complete the settings.
When all settings have been made, press the button to save the recording settings. You can view the
scheduled recordings in the timer list view of the EPG (see “Timer list” section).
Premium EPG

70
Programme not in EPG:
Select any programme on the channel
on which the desired programme is to be
broadcast at a later date, and press the
(red dot) button. The following on-
screen display appears (example):
As there is no EPG data, you must enter
the data (date, start, end) manually. Enter
the data using the cursor () buttons
or the number pad. Press the button to save your settings.
Premium EPG

71
In the recording settings, press the
buttons to select the “Target”
fi eld and then press the button. The
following on-screen display appears
(example):
As described in the “Recording Archive” section, it is possible to create folders for your recordings
and to store them in these folders. If folders have already been created for recordings, you have
the option of specifying a folder as the destination when scheduling recordings in the EPG. It
makes no difference which recording mode you choose after selecting the folder (e.g. for a series
recording, all subsequent recordings of the programme will be stored in the folder you have selected).
The procedure is as follows:
Now use the buttons to select the desired folder or select “To Recording Archive Record” and
then press the button.
The following on-screen display appears
(example with a folder selected as the
recording destination):
Now use the buttons to select
“To “\xxxx” Record” and then press the
button. The receiver then returns
automatically to the recording settings
(see example screen).
You can now select the recording mode you want to use.
Premium EPG

72
Use the buttons to select the
“once” recording mode (see screenshot
on the right).
Use the buttons to switch to the
“Date” fi eld and use the buttons
to select the desired recording day.
Use the buttons to switch to
the selection fi eld “Start” and use the
buttons or the numeric pad buttons to select the desired recording start time.
Use the buttons to switch to the selection fi eld “End” and use the buttons or the
number pad button to select the desired recording end time.
When all settings have been made, press the
button to save the recording settings.
Use the buttons to select the
“daily” recording mode (see screenshot
on the right).
Use the buttons to switch to
the selection fi eld “Start” and use the
buttons or the numeric pad
buttons to select the desired recording
start time. Use the buttons to
switch to the selection fi eld “End” and use the buttons or the number pad button to select the
desired recording end time.
When all settings have been made, press the
button to save the recording settings.
Premium EPG

73
Use the buttons to select the “weekly” recording mode (see screenshot above). Use the
buttons to switch to the selection fi eld “Start” and use the buttons or the numeric pad
buttons to select the desired recording start time. Use the buttons to switch to the selection fi eld
“End” and use the buttons or the number pad button to select the desired recording end time.
When all settings have been made, press the
button to save the recording settings.
Remember that the
day of the week for the
desired programme is
loaded in the recording
schedule and you can
make no further manual
corrections to it!
Therefore, before press-
ing the button,
select the programme on
the day of the week that
you will want to make
the weekly recording in
future.
Use the buttons to select the
“user-defi ned” recording mode (see
screenshot on the right).
Use the buttons to switch to the
“Day” fi eld and use the buttons to
select the required day for the recording.
Press the button to fi x the selection
(the day will be shown in red).
If necessary the receiver will suggest some days to you; you can accept these suggestions or
deactivate them using the cursor buttons and pressing the
button.
Premium EPG
Product specificaties
| Merk: | Kathrein |
| Categorie: | Digitale decoder |
| Model: | UFS 912sw |
| Kleur van het product: | Zwart |
| Gewicht: | 3000 g |
| Stroomvoorziening: | 100 - 240V, 50 - 60Hz |
| Ondersteund audioformaat: | MP3 |
| Ondersteunde videoformaten: | H.264 |
| Ondersteunde video-modi: | 1080i, 576p, 720p |
| Aantal USB 2.0-poorten: | 3 |
| Aantal Ethernet LAN (RJ-45)-poorten: | 1 |
| HDMI: | Ja |
| Audio (L,R) out: | 1 |
| Teletext: | Ja |
| Elektronische TV-gids: | Ja |
| Aantal RF-poorten: | 2 |
| RS-232: | Ja |
| Teletekst: | 800 pagina's |
| Aantal SCART-poorten: | 2 |
| Composiet video-uitgang: | 1 |
| Componentuitgang video (YPbPr/YCbCr): | 3 |
| Aantal kanalen: | 4000 kanalen |
| S/PDIF-uitgang: | Ja |
| Afmetingen (B x D x H): | 342 x 273 x 67 mm |
| Frequentie bereik: | 950 - 2150 MHz |
| Afstandsbediening inbegrepen: | Ja |
| Stroomverbruik (typisch): | 26 W |
| Bedrijfstemperatuur (T-T): | 5 - 40 °C |
| Digital Satellite Equipment Control (DiSEqC): | 1.0, 1.1, 1.2, 1.3 |
| RF-connector: | F |
| Lijst met favoriete TV-programma's: | 8 |
| Lijst met favoriete radioprogramma's: | 8 |
| Symboolsnelheid: | 2 - 45 Msps |
Heb je hulp nodig?
Als je hulp nodig hebt met Kathrein UFS 912sw stel dan hieronder een vraag en andere gebruikers zullen je antwoorden
Handleiding Digitale decoder Kathrein

4 Juni 2023
30 Mei 2023
18 Mei 2023
14 Mei 2023
11 Mei 2023
29 April 2023
20 April 2023
12 April 2023
24 Maart 2023
18 Maart 2023
Handleiding Digitale decoder
- Digitale decoder Philips
- Digitale decoder JVC
- Digitale decoder Nokia
- Digitale decoder Acti
- Digitale decoder ADB
- Digitale decoder Amiko
- Digitale decoder Axis
- Digitale decoder Denver
- Digitale decoder Devolo
- Digitale decoder Dreambox
- Digitale decoder Edision
- Digitale decoder Emtec
- Digitale decoder Fagor
- Digitale decoder Ferguson
- Digitale decoder Formuler
- Digitale decoder Genius
- Digitale decoder Goclever
- Digitale decoder Hama
- Digitale decoder Hikvision
- Digitale decoder Humax
- Digitale decoder Hyundai
- Digitale decoder Konig
- Digitale decoder KPN
- Digitale decoder Laser
- Digitale decoder Manta
- Digitale decoder Marklin
- Digitale decoder Marmitek
- Digitale decoder Media-tech
- Digitale decoder Megasat
- Digitale decoder Monacor
- Digitale decoder Sitecom
- Digitale decoder Strong
- Digitale decoder Sunstech
- Digitale decoder Synology
- Digitale decoder Technisat
- Digitale decoder Telefunken
- Digitale decoder Telestar
- Digitale decoder Thomson
- Digitale decoder Triax
- Digitale decoder Viessmann
- Digitale decoder Xoro
- Digitale decoder ECG
- Digitale decoder EMOS
- Digitale decoder Televés
- Digitale decoder Conceptronic
- Digitale decoder Vu+
- Digitale decoder Atlona
- Digitale decoder Majestic
- Digitale decoder Trevi
- Digitale decoder Savio
- Digitale decoder EVOLVEO
- Digitale decoder Matrox
- Digitale decoder Gefen
- Digitale decoder Planet
- Digitale decoder QFX
- Digitale decoder AVerMedia
- Digitale decoder Black Box
- Digitale decoder IFM
- Digitale decoder DataVideo
- Digitale decoder Dahua Technology
- Digitale decoder Engel Axil
- Digitale decoder Extron
- Digitale decoder AMX
- Digitale decoder Crestron
- Digitale decoder Infomir
- Digitale decoder KanexPro
- Digitale decoder Blustream
- Digitale decoder Teradek
- Digitale decoder Telesystem
- Digitale decoder Hanwha
- Digitale decoder Tams Elektronik
- Digitale decoder I-CAN
- Digitale decoder TELE System
- Digitale decoder WyreStorm
- Digitale decoder Massoth
- Digitale decoder Best Buy
- Digitale decoder Atlantis Land
- Digitale decoder C2G
- Digitale decoder Golden Media
Nieuwste handleidingen voor Digitale decoder
28 Maart 2025
28 Maart 2025
20 Februari 2025
11 Februari 2025
27 Januari 2025
27 Januari 2025
27 Januari 2025
27 Januari 2025
27 Januari 2025
27 Januari 2025