ZyXEL NWA1123-AC Pro Handleiding
ZyXEL
Access point
NWA1123-AC Pro
Lees hieronder de 📖 handleiding in het Nederlandse voor ZyXEL NWA1123-AC Pro (114 pagina's) in de categorie Access point. Deze handleiding was nuttig voor 102 personen en werd door 2 gebruikers gemiddeld met 4.5 sterren beoordeeld
Pagina 1/114

Default Login Details
User’s Guide
NWA/WAC/WAX Series
802.11 a/b/g/n/ac/ax Access Point
Copyright © 2021 Zyxel and/ or its affiliates. All rights reserved.
Management IP
Address
http://DHCP-assigned IP
OR
http://192.168.1.2
User Name admin
Password 1234
Version 6.10-6.20 Edition 1, 5/2021

NWA/WAC/WAX Series User’s Guide
3
Document Conventions
Warnings and Notes
These are how warnings and notes are shown in this guide.
Warnings tell you about things that could harm you or your device.
Note: Notes tell you other important information (for example, other things you may need to
configure or helpful tips) or recommendations.
Syntax Conventions
• All models in this series may be referred to as the “Zyxel Device” in this guide.
• Product labels, screen names, field labels and field choices are all in bold font.
• A right angle bracket ( > ) within a screen name denotes a mouse click. For example, Conguration >
Network > IP Setting means you first click Configuration Network in the navigation panel, then the sub
menu and finally the IP Setting tab to get to that screen.
Icons Used in Figures
Figures in this guide may use the following generic icons. The Zyxel Device icon is not an exact
representation of your device.
Zyxel Device Router Switch Internet
Server Desktop Laptop AP Controller
Printer Nebula Switch Nebula Gateway Smart T.V.
IP Phone

NWA/WAC/WAX Series User’s Guide
12
CHAPTER 1
Introduction
1.1 Overview
This User’s Guide covers the models listed in the following table. They can be managed in one of the
following methods: remote management through Nebula Control Center (NCC) or an AP Controller
(AC) such as the NXC, or local management in Standalone Mode. Each Zyxel Device runs in standalone
mode by default, but it is recommended to use NCC management if it is available for your device.
For more information about Access Point (AP) management, see Section 2.1 on page 25.
Use the Zyxel Device to set up a wireless network with other IEEE 802.11a/b/g/n/ac/ax compatible
devices in either 2.4 GHz and 5 GHz networks or both at the same time.
When two or more APs are interconnected, this network is called a Wireless Distribution System (WDS).
See Section 1.2.2 on page 14 for more information on root and repeater APs and how to set them up.
1.2 Zyxel Device Roles
This section describes some of the di can take up within a network. fferent roles that your Zyxel Device
Not all roles are supported by all models (see Section 1.4 on page 18). The Zyxel Device can serve as a:
• Access Point (AP) - This is used to allow wireless clients to connect to the Internet.
NCC, AC or Standalone
(NebulaFlex PRO)
NCC or Standalone
(NebulaFlex)
AC or Standalone
• NWA5123-AC HD • NWA1123-ACv2 • NWA5123-AC
• WAC6103D-I • NWA1123-AC PRO • WAC5302D-S
• WAC6303D-S • NWA1123-AC HD
• WAC6502D-E • NWA1302-AC
• WAC6502D-S • NWA110AX
• WAC6503D-S • NWA210AX
• WAC6552D-S • NWA1123ACv3
• WAC6553D-E
• WAC500
• WAC500H
• WAC5302D-Sv2
• WAX510D
• WAX610D
• WAX650S

Chapter 1 Introduction
NWA/WAC/WAX Series User’s Guide
14
1.2.2 Wireless Repeater
Using Repeater mode, your Zyxel Device can extend the range of the WLAN. In the figure below, the
Zyxel Device in Repeater mode (Z) has a wireless connection to the Zyxel Device in Root AP mode (X)
which is connected to a wired network and also has a wireless connection to another Zyxel Device in
Repeater mode (Y) at the same time. Z and Y act as repeaters that forward traffic between associated
wireless clients and the wired LAN. Clients A and B access the AP and the wired network behind the AP
through repeaters Z and Y.
Figure 2 Repeater Application
When the Zyxel Device is in Repeater mode, repeater security between the Zyxel Device and other
repeater is independent of the security between the wireless clients and the AP or repeater. When
repeater security is enabled, both APs and repeaters must use the same pre-shared key. See Section
10.2 on page 76 Section 14.2 on page 120 and for more details.
For NCC managed devices, you only need to enable AP Smart Mesh to automatically create wireless
links between APs. See the NCC User’s Guide for more details.
To set up a WDS in standalone mode APs, do the following steps. You should already have the root AP
set up (see the Quick Start Guide for hardware connections).
1Go to Configuration > Object > WDS Profile in your root AP Web Configurator and click Add.
2Enter a profile name, an SSID for the WDS, and a pre-shared key.
3Do steps 1 and 2 for the wireless repeater using the same SSID and pre-shared key.
4Once the security settings of peer sides match one another, the connection between the root and
repeater Zyxel Devices is made.
To set up a WDS in NXC managed Zyxel Devices, see the NXC User’s Guide.

Chapter 1 Introduction
NWA/WAC/WAX Series User’s Guide
17
Figure 3 Multiple BSSs
1.3.2 Dual-Radio
Some of the Zyxel Device models are equipped with dual wireless radios. This means you can configure
two different wireless networks to operate simultaneously.
Note: A different channel should be configured for each WLAN interface to reduce the
effects of radio interference.
You could use the 2.4 GHz band for regular Internet surfing and downloading while using the 5 GHz
band for time sensitive traffic like high-definition video, music, and gaming.

Chapter 2 AP Management
NWA/WAC/WAX Series User’s Guide
28
Note: If the Zyxel Device is already registered to NCC, the controller will be unable to manage
it.
An AC uses Control And Provisioning of Wireless Access Points (CAPWAP, see RFC 5415) to discover and
configure multiple managed APs.
2.2 Switching Management Modes
The Zyxel Device is in standalone mode by default, with NCC and/or AC discovery enabled.
Standalone-to-NCC
Register the Zyxel Device at the NCC website and then turn on the Zyxel Device. Make sure that NCC
Discovery is enabled (see Section 9.4 on page 73). The NCC manages the Zyxel Device automatically
when it is discovered.
Standalone-to-AC (NXC)
By default, the Zyxel Device must be in the same subnet as the NXC. See Section 9.1.1 on page 69 for
setting it up in a different subnet. Make sure AC Discovery is enabled (see Section 9.4 on page 73). The
NXC manages the Zyxel Device automatically when it is discovered.
NXC-to-NCC
Register the Zyxel Device at the NCC website. Make sure that NCC Discovery is enabled on your Zyxel
Device (see Section 9.4 on page 73). In the NXC Web Configurator, select the Zyxel Device and press
the Nebula button. The NCC manages the Zyxel Device automatically when it is discovered.
NCC-to-NXC
Unregister the Zyxel Device at the NCC portal. By default, the Zyxel Device must be in the same subnet
as the NXC. See Section 9.1.1 on page 69 for setting it up in a different subnet. Make sure AC Discovery
is enabled (see Section 9.4 on page 73). The NXC manages the Zyxel Device automatically when it is
discovered.
NCC-to-Standalone
Unregister the Zyxel Device from the NCC organization/site. Reset the Zyxel Device to factory defaults
(see Section 26.6 on page 205).
AC-to-Standalone
Use the Reset button to return the Zyxel Device to its factory default settings (see Section 26.6 on page
205).

Chapter 2 AP Management
NWA/WAC/WAX Series User’s Guide
30
Figure 6 Supported Devices and Versions
If you want to check the supported models and firmware versions later, you can click the Show
information about ZON icon in the upper right hand corner of the screen. Then select the Supported
model and rmware version link. If your device is not listed here, see the device release notes for ZON
utility support. The release notes are in the firmware zip file on the Zyxel web site.
Figure 7 ZON Utility Screen
3Select a network adapter to which your supported devices are connected.

Chapter 2 AP Management
NWA/WAC/WAX Series User’s Guide
33
2.4 Ways to Access the Zyxel Device
You can use the following ways to configure the Zyxel Device.
Web Configurator
The Web Configurator allows easy Zyxel Device setup and management using an Internet browser. If
your Zyxel Device is managed by the NCC or an AC, use this only for troubleshooting if you cannot
connect to the Internet. This User’s Guide provides information about the Web Configurator.
NCC
This is the primary means by which you manage the Zyxel Device in cloud (NCC) mode. With the NCC,
you can remotely manage and monitor the Zyxel Device through a cloud-based network management
system. See the NCC User’s Guide for more information.
ZON Utility
Zyxel One Network (ZON) Utility is a utility tool that assists you to set up and maintain network devices in a
simple and efficient way. You can download the ZON Utility at www.zyxel.com and install it on your
computer (Windows operating system). For more information on ZON Utility see Section 2.3 on page 29.
Command-Line Interface (CLI)
The CLI allows you to use text-based commands to configure the Zyxel Device. You can access it using
remote management (for example, SSH or Telnet) or via the console port. See the Command Reference
Guide for more information.
MAC Address This field displays the MAC address of the discovered device.
IP Address This field displays the IP address of an internal interface on the discovered device that
first received an ZDP discovery request from the ZON utility.
System Name This field displays the system name of the discovered device.
Location This field displays where the discovered device is.
Status This field displays whether changes to the discovered device have been done
successfully. As the Zyxel Device does not support IP Configuration, Renew IP address
and Flash Locator LED, this field displays “Update failed”, “Not support Renew IP
address” and “Not support Flash Locator LED” respectively.
NCC Discovery This field displays if the discovered device supports the Nebula Control Center (NCC)
discovery feature. If it’s enabled, the selected device will try to connect to the NCC.
Once the selected device is connected to and has registered in the NCC, it’ll go into
the Nebula cloud management mode.
Serial Number Enter the admin password of the discovered device to display its serial number.
Hardware Version This field displays the hardware version of the discovered device.
Table 8 ZON Utility Fields
LABEL DESCRIPTION

Chapter 3 Hardware
NWA/WAC/WAX Series User’s Guide
37
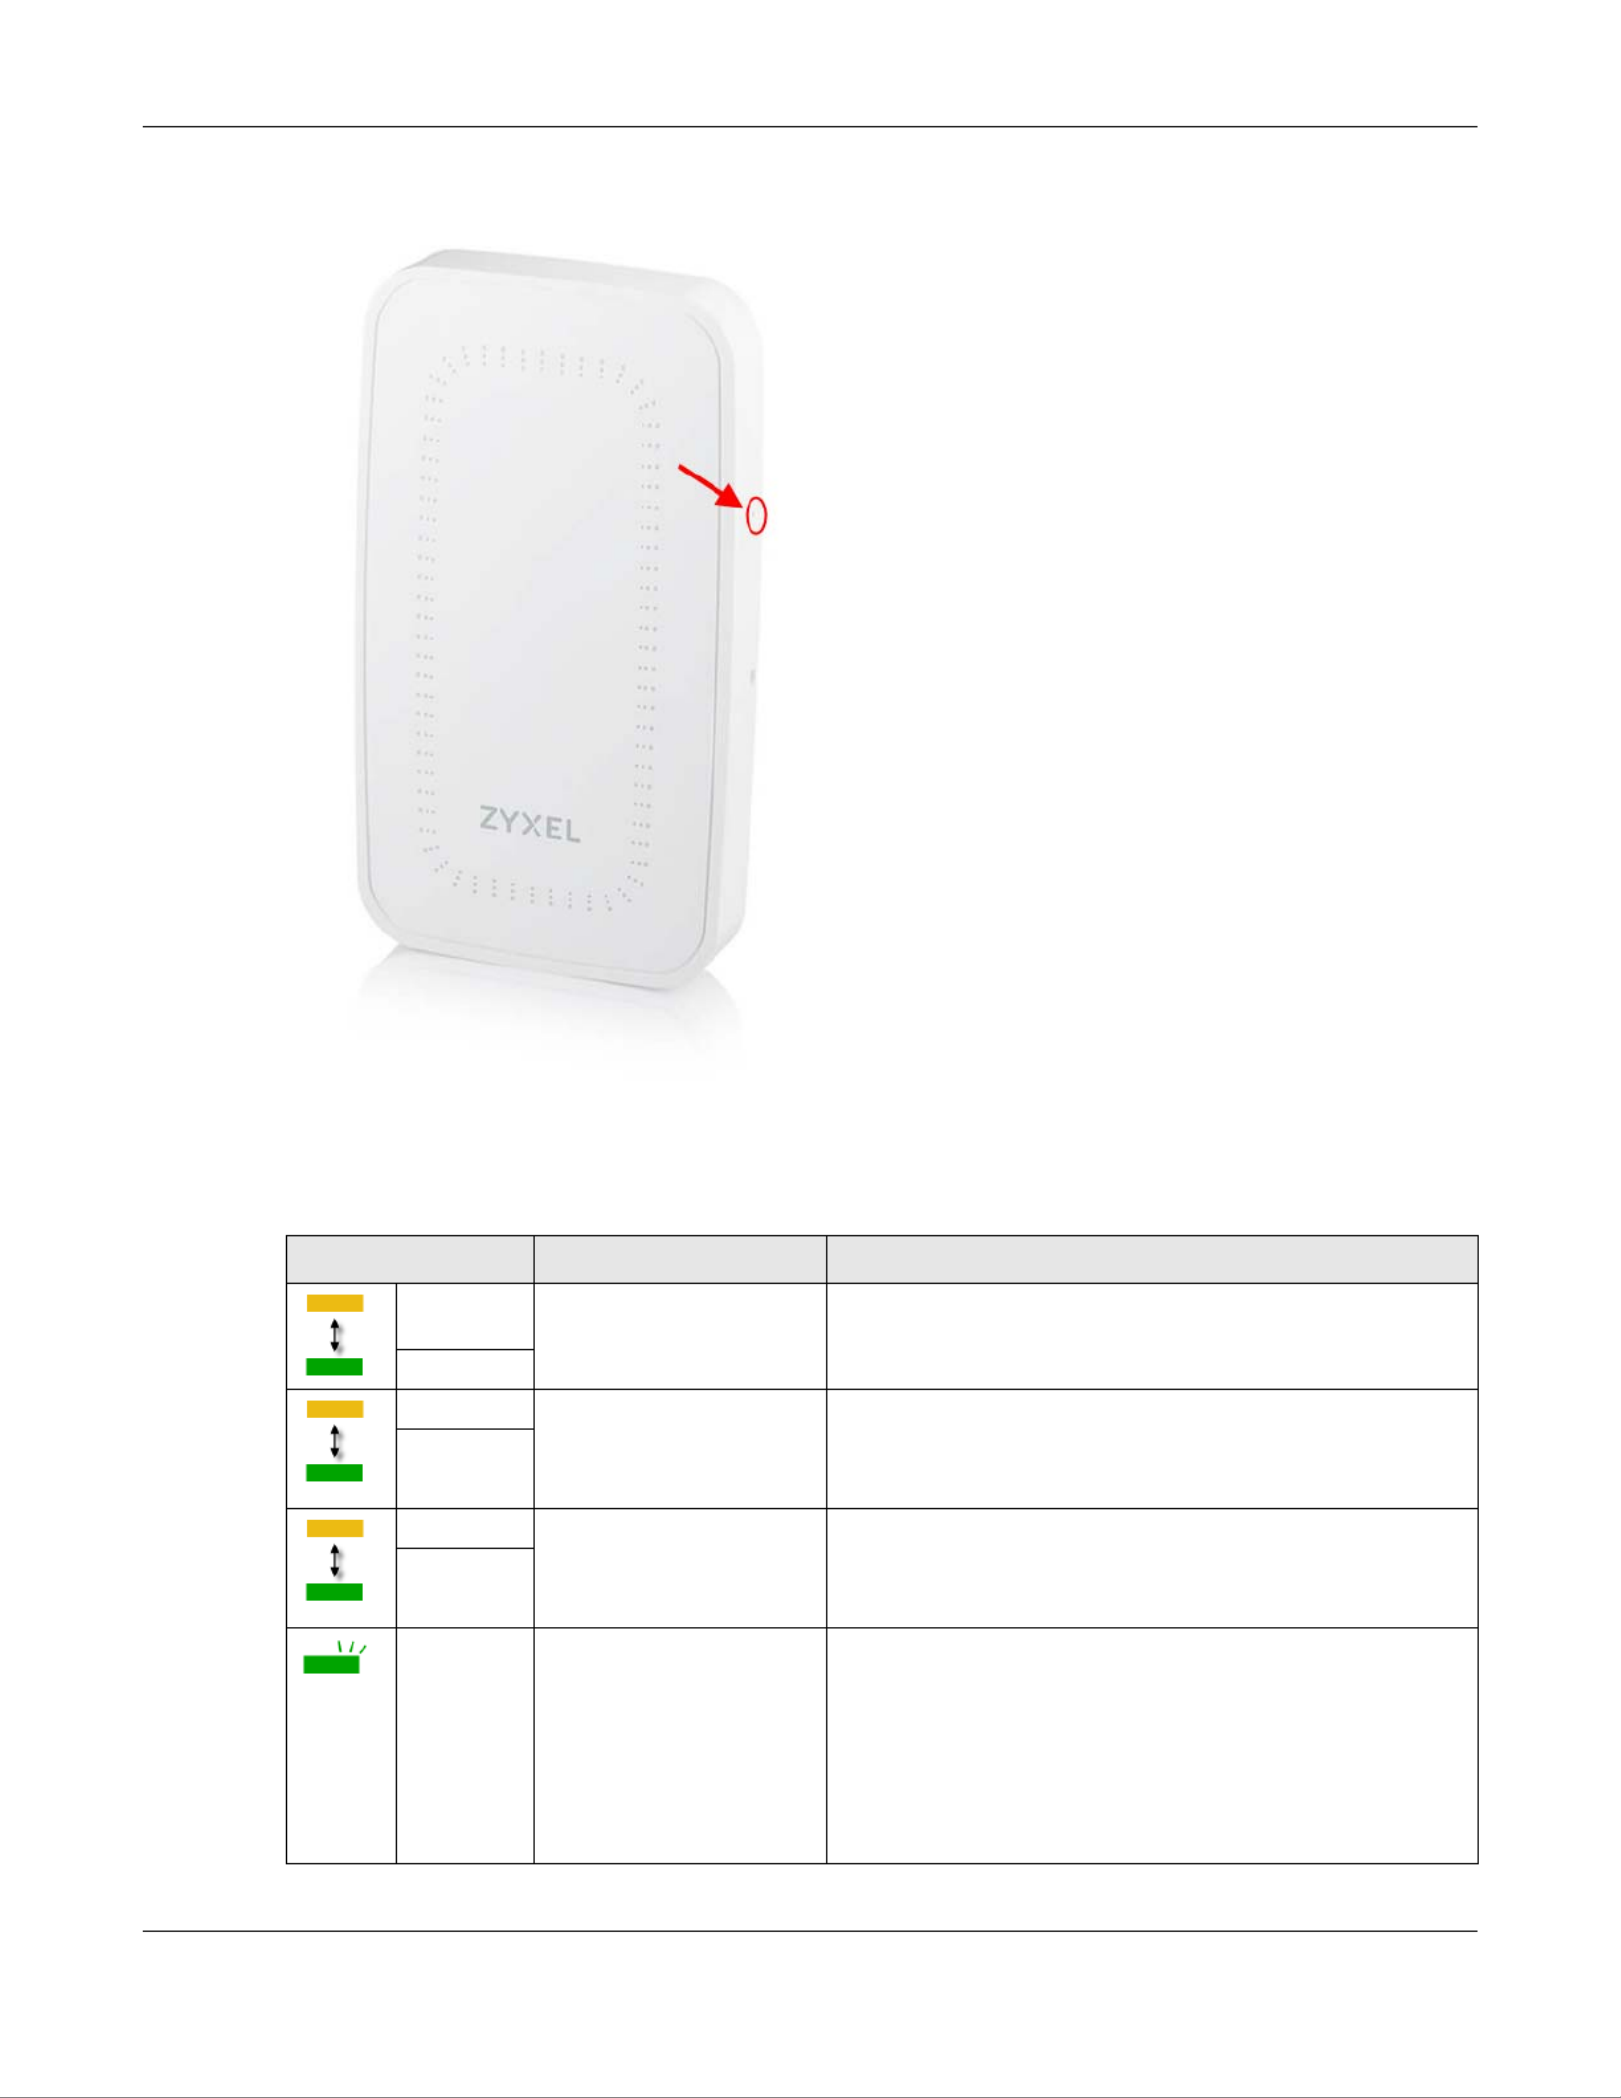
3.3.1 NWA1123-ACv2
Figure 13 NWA1123-ACv2 LED
The following are the LED descriptions for your NWA1123-ACv2.
Table 9 NWA1123-ACv2 LED
COLOR STATUS DESCRIPTION
Amber Blinks amber for 1 second
and green for 1 second
alternatively.
The LED blinks amber and green alternatively when the Zyxel
Device is booting up or is connecting to the NCC.
Green
Amber Blinks amber and green
alternatively 3 times and
then turns solid green for 3
seconds.
The Zyxel Device is discovering the NCC.
Green
Green On The Zyxel Device is ready for use and its wireless interface is
activated.
Slow Blinking (On for 1s,
Off for 1s)
The wireless module of the Zyxel Device is disabled or failed,
the Zyxel Device is using default wireless settings, or the Zyxel
Device is connected to the NCC but is unregistered with the
NCC.
Fast Blinking (On for 50 ms,
Off for 50 ms)
The Locator LED is on.
Amber On The Zyxel Device is powered up.

Chapter 3 Hardware
NWA/WAC/WAX Series User’s Guide
41
3.3.4 WAC500, WAC500H, NWA1123ACv3, NWA110AX, NWA210AX,
WAX510D, WAX610D and WAX650S
Figure 16 WAC500, NWA1123Acv3, NWA110AX, NWA210AX, WAX510D, WAX610D and WAX650S LED
Red Steady On The Zyxel Device failed to boot up or is experiencing system
failure.
Slow Blinking (Blink for 3
times, Off for 3s)
The Uplink interface is down.
Fast Blinking (On for 50 ms,
Off for 50 ms)
The Zyxel Device is undergoing firmware upgrade.
Table 11 NWA5123-AC LED (continued)
COLOR STATUS DESCRIPTION
Chapter 3 Hardware
NWA/WAC/WAX Series User’s Guide
42
Figure 17 WAC500H LED
The following are the LED descriptions for your WAC500, WAC500H, NWA1123ACv3, NWA110AX,
NWA210AX, WAX510D, WAX610D and WAX650S.
Table 12 WAC500, WAC500H, NWA1123ACv3, NWA110AX, WAX510D and WAX650S LED
COLOR STATUS DESCRIPTION
Amber Blinks amber for 1 second
and green for 1 second
alternatively.
The Zyxel Device is booting up or is connecting with NCC.
Green
Amber Blinks amber and green
alternatively 3 times and
then turns solid green for 3
seconds.
The Zyxel Device is discovering the NCC or an AC.
Green
Amber Blinks amber and green
alternatively 2 times and
then turns solid green for 3
seconds.
The Zyxel Device is managed by an AC but the uplink is
disconnected.
Green
Green Slow Blinking (On for 1
second, Off for 1 second)
The wireless module of the Zyxel Device is disabled or fails, the
Zyxel Device is using default wireless settings, or the Zyxel
Device is configured to be managed by NCC but is not yet
registered with the NCC.
Note: WiFi networks on the WAX650S are turned off
automatically when it is connected to a device
that supplies power using IEEE 802.3af PoE.

Chapter 3 Hardware
NWA/WAC/WAX Series User’s Guide
48
3.4.3 WAC6502D-E, WAC6502D-S, and WAC6503D-S
Figure 20 WAC6502D-E, WAC6502D-S, or WAC6503D-S LEDs
The following table describes the LEDs.
Table 15 WAC6502D-E, WAC6502D-S, or WAC6503D-S LEDs
LED DESCRIPTIONCOLOR STATUS
PWR/SYS Amber Blinks amber for 1
second and green for 1
second alternatively.
The Zyxel Device is booting up or is connecting to the
NCC or to an AC.
Green
Green On The Zyxel Device is ready for use.
Slow Blinking (On for 1s,
Off for 1s)
The wireless module of the Zyxel Device is disabled or
failed.
Red On There is system error and the Zyxel Device cannot boot
up, or the Zyxel Device suffered a system failure.
Fast Blinking (On for
50ms, Off for 50 ms)
The Zyxel Device is doing firmware upgrade.
Slow Blinking (Blink for 3
times, Off for 3s)
The Uplink interface is down.
Slow Blinking (Blink for 2
times, Off for 3s)
The Zyxel Device is managed by an AC and the uplink is
disconnected.

Chapter 3 Hardware
NWA/WAC/WAX Series User’s Guide
49
Management Green On The Zyxel Device is managed by a the NCC or an AC.
Slow Blinking (Blink for 3
times, Off for 3s)
The Zyxel Device is searching (discovery) for an AC.
Slow Blinking (On for 1s,
Off for 1s)
The Zyxel Device is using default wireless settings, or the
Zyxel Device is connected to the NCC but is unregistered
with the NCC.
Off The Zyxel Device is in standalone mode.
Amber Blinks amber for 1
second and green for 1
second alternatively
The Zyxel Device is searching (discovery) for the NCC.
Green
Amber Blinks amber and green
alternatively 3 times
and then turns solid
green for 3 seconds.
The NCC is connecting to the registered Zyxel Device.
Green
WLAN Green On The 2.4 GHz WLAN is active.
Off The 2.4 GHz WLAN is not active.
WLAN Green On The 5 GHz WLAN is active.
Off The 5 GHz WLAN is not active.
UPLINK Amber On The port is operating as a 100 Mbps connection.
Blinking The Zyxel Device is sending/receiving data through the
port at 100 Mbps.
Green On The port is operating as a Gigabit connection (1000
Mbps).
Blinking The Zyxel Device is sending/receiving data through the
port at 1 Gbps.
Off The port is not connected.
LAN Amber On The port is operating as a 100 Mbps connection.
Blinking The LAN port is sending/receiving data through the port
at 100 Mbps.
Green On The port is operating as a Gigabit connection (1000
Mbps).
Blinking The LAN port is sending/receiving data through the port
at 1 Gbps.
Off The LAN port is not connected.
Locator White Blinking The Locator is activated and will blink to show the actual
location of the Zyxel Device between several devices in
the network.
Off The Locator function is off.
Table 15 WAC6502D-E, WAC6502D-S, or WAC6503D-S LEDs (continued)
LED DESCRIPTIONCOLOR STATUS

Chapter 4 Web Configurator
NWA/WAC/WAX Series User’s Guide
32
remotely manage and monitor the Zyxel Device (see Section 2.1.2 on page 26).
If you want to return to the login page, click Standalone Mode and follow the next steps.
4Enter the user name (default: “admin”) and password (default: “1234”). If the Zyxel Device is being
managed or has been managed by the NCC, check the NCC's Site-Wide > Congure > General setting
screen for the Zyxel Device's current password.
5Select the language you prefer for the Web Configurator. Click Login.
6The wizard screen opens when the Zyxel Device is accessed for the first time or when you reset the Zyxel
Device to its default factory settings.
7If you logged in using the default user name and password, the Update Admin Info screen appears.
Otherwise, the dashboard appears.
The Update Admin Info screen appears every time you log in using the default user name and default
password. If you change the password for the default user account, this screen does not appear
anymore.

Chapter 4 Web Configurator
NWA/WAC/WAX Series User’s Guide
34
4.3.1 Title Bar
The title bar provides some useful links that always appear over the screens below, regardless of how
deep into the Web Configurator you navigate. If your Zyxel Device is in NCC mode, not all icons will be
available in the Title Bar.
Figure 15 Title Bar
The icons provide the following functions.
Site Map
Click Site MAP to see an overview of links to the Web Configurator screens. Click a screen’s link to go to
that screen.
Figure 16 Site Map
Table 7 Title Bar: Web Configurator Icons
LABEL DESCRIPTION
Wizard Click this to open the wizard. See Chapter 7 on page 49 for more information.
Help Click this to open the help page for the current screen.
Forum Click this to go to Zyxel Biz User Forum, where you can get the latest Zyxel Device information
and have conversations with other people by posting your messages.
Site Map Click this to see an overview of links to the Web Configurator screens.
CLI Click this to open a popup window that displays the CLI commands sent by the Web
Configurator.
Logout Click this to log out of the Web Configurator.
nebula Click this to open the NCC web site login page in a new tab or window.

Chapter 4 Web Configurator
NWA/WAC/WAX Series User’s Guide
37
Maintenance Menu
Use the maintenance menu screens to manage configuration and firmware files, run diagnostics, and
reboot or shut down the Zyxel Device.
AP Profile Radio Create and manage wireless radio settings files that can be
associated with different APs.
SSID Create and manage wireless SSID, security, MAC filtering, and layer-2
isolation files that can be associated with different APs.
MON Profile MON Profile Create and manage rogue AP monitoring files that can be
associated with different APs.
WDS Profile WDS Create and manage WDS profiles that can be used to connect to
different APs in WDS.
Certificate My Certificates Create and manage th e Zyxel Device’s certificates.
Trusted Certificates Import and manage certificates from trusted sources.
System
Host Name Host Name Configure the system and domain name for the Zyxel Device.
Power Mode Power Mode Configure the Zyxel Device’s power settings.
Date/Time Date/Time Configure the current date, time, and time zone in the Zyxel Device.
WWW Service Control Configure HTTP, HTTPS, and general authentication.
SSH SSH Configure SSH server and SSH service settings.
TELNET TELNET Configure telnet server settings for the Zyxel Device.
FTP FTP Configure FTP server settings.
SNMP SNMP Configure SNMP communities and services.
Log & Report
Email Daily
Report
Email Daily Report Configure where and how to send daily reports and what reports to
send.
Log Setting Log Setting Configure the system log, e-mail logs, and remote syslog servers.
Table 10 Maintenance Menu Screens Summary
FOLDER OR LINK TAB FUNCTION
File Manager Configuration File Manage and upload configuration files for the Zyxel Device.
Firmware Package View the current firmware version and to upload firmware.
Shell Script Manage and run shell script files for the Zyxel Device.
Diagnostics Diagnostics Collect diagnostic information.
LEDs Suppression Enable this feature to keep the LEDs off after the Zyxel Device starts.
Locator Enable this feature to see the actual location of the Zyxel Device
between several devices in the network.
Antenna Antenna Switch Change antenna orientation for the radios.
Reboot Reboot Restart the Zyxel Device.
Shutdown Shutdown Turn off the Zyxel Device.
Table 9 Configuration Menu Screens Summary (continued)
FOLDER OR LINK TAB FUNCTION
NWA/WAC/WAX Series User’s Guide
44
CHAPTER 6
Dashboard
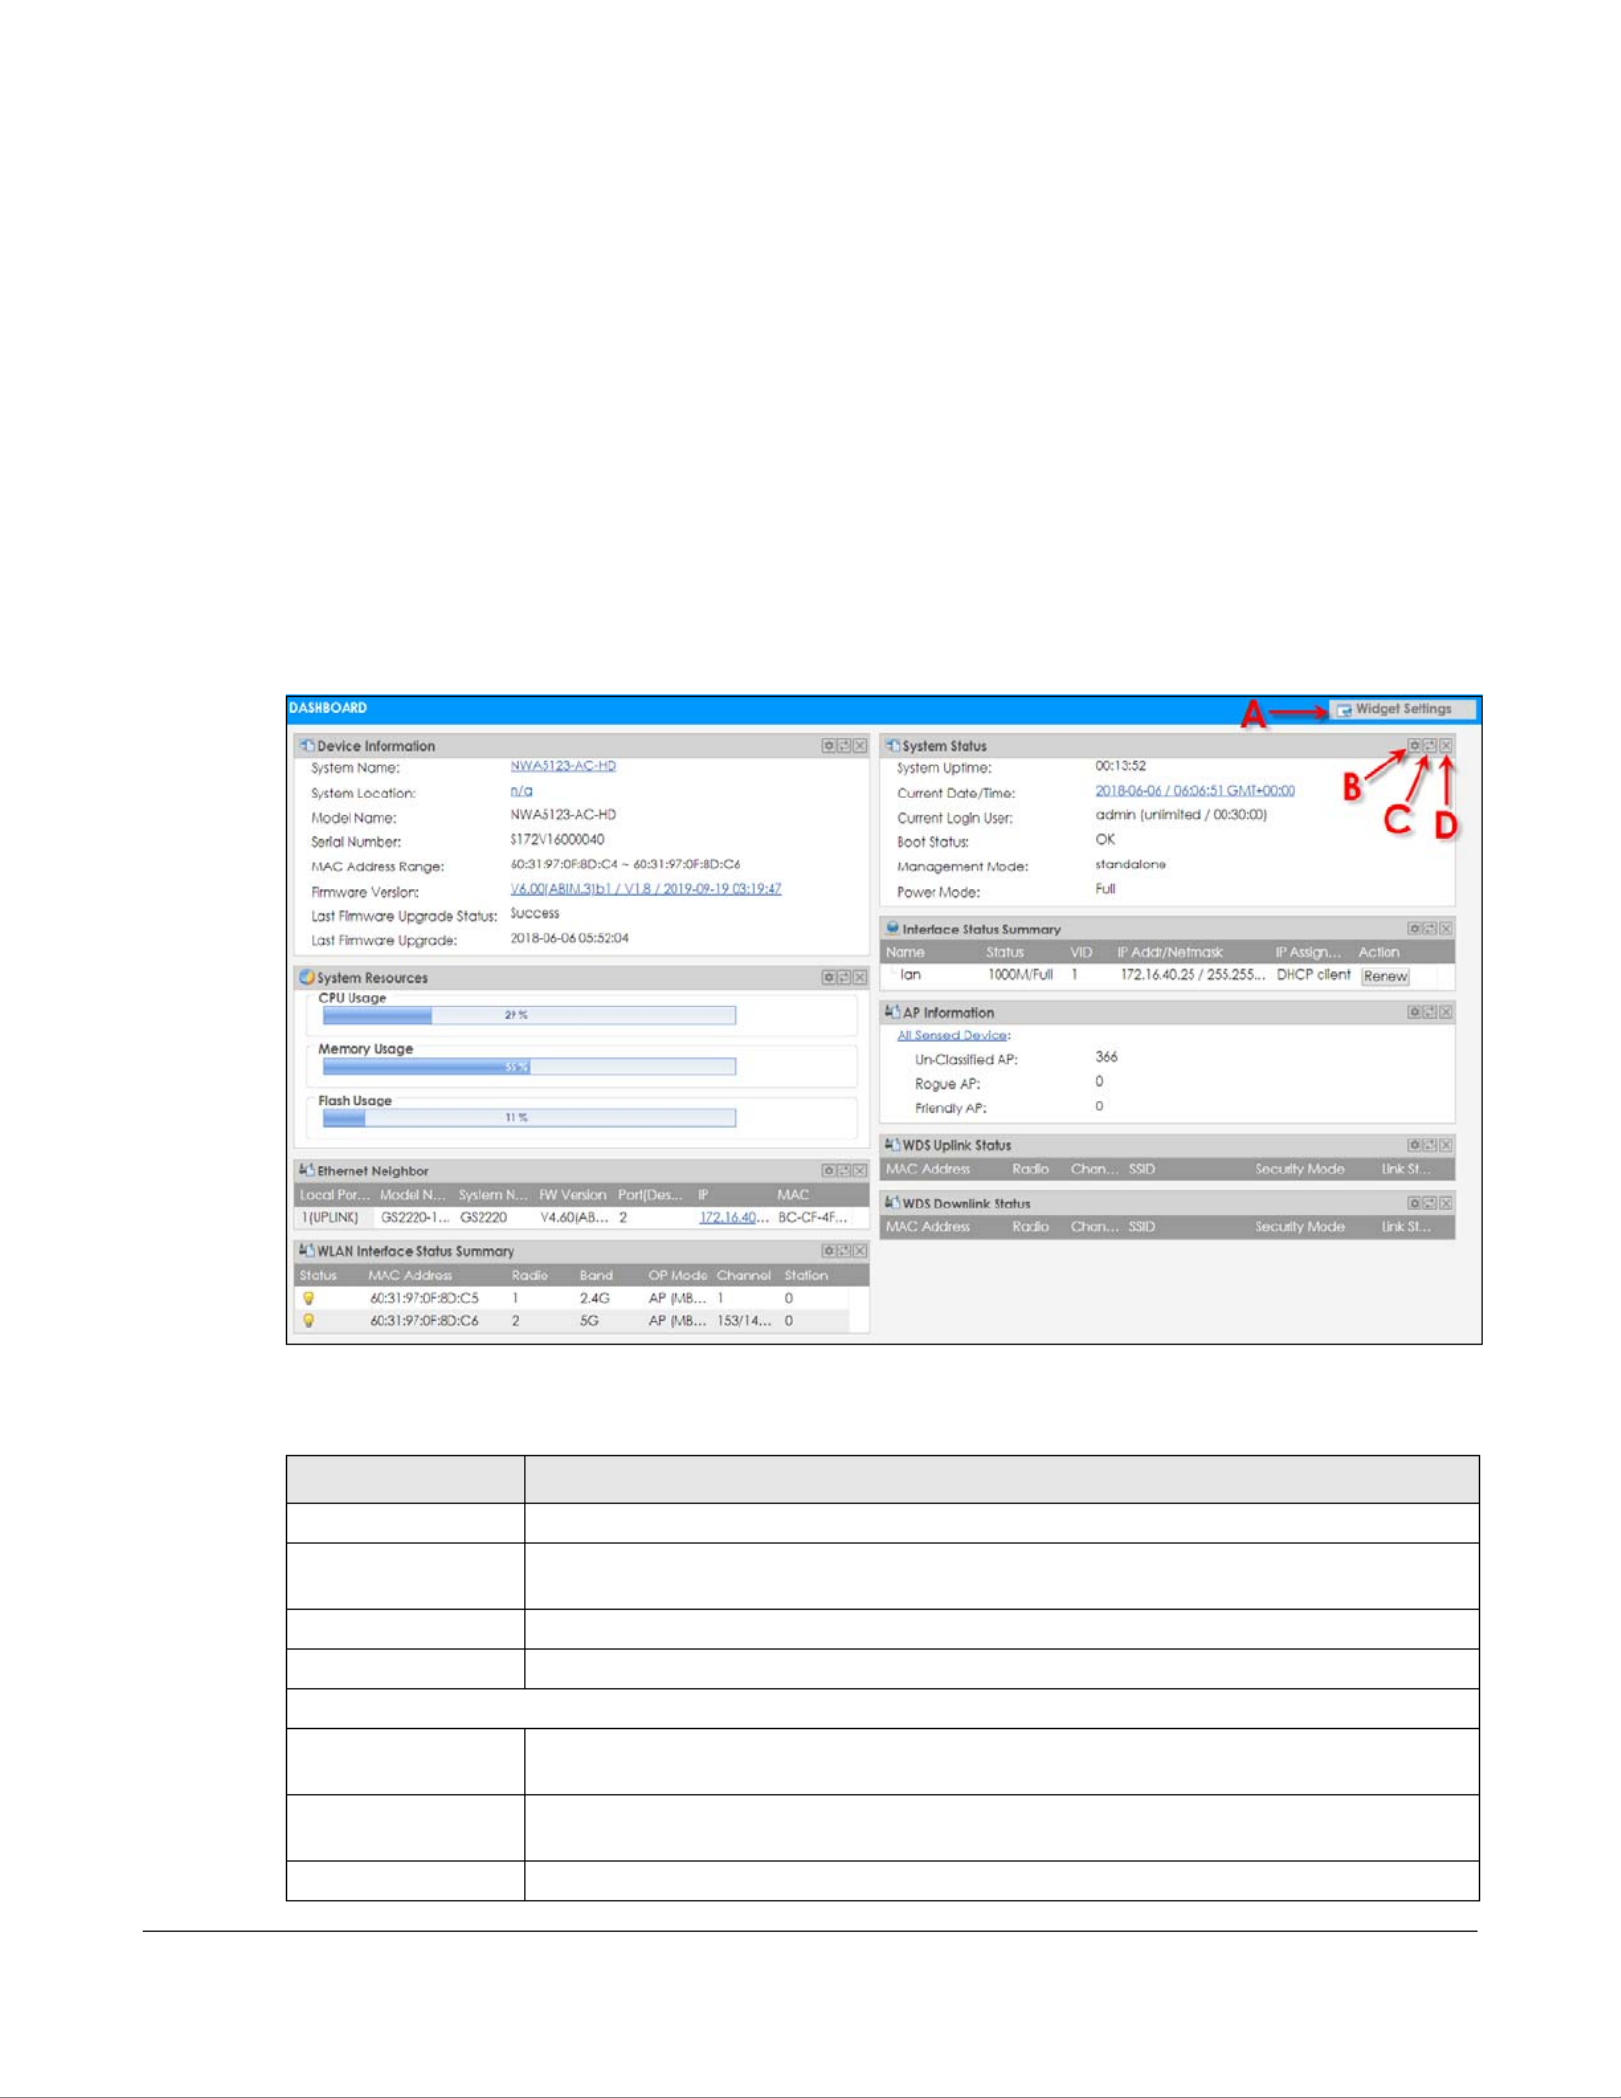
6.1 Overview
This screen displays general device information, system status, system resource usage, and interface
status in widgets that you can re-arrange to suit your needs. You can also collapse, refresh, and close
individual widgets.
Figure 20 Dashboard
The following table describes the labels in this screen.
Table 14 Dashboard
LABEL DESCRIPTION
Widget Settings (A) Use this link to re-open closed widgets. Widgets that are already open appear grayed out.
Refresh Time Setting
(B)
Set the interval for refreshing the information displayed in the widget.
Refresh Now (C) Click this to update the widget’s information immediately.
Close Widget (D) Click this to close the widget. Use Widget Settings to re-open it.
Device Information
System Name This field displays the name used to identify the Zyxel Device on any network. Click the icon
to open the screen where you can change it.
System Location This field displays the location of the Zyxel Device. Click the icon to open the screen where
you can change it.
Model Name This field displays the model name of this Zyxel Device.

Chapter 6 Dashboard
NWA/WAC/WAX Series User’s Guide
47
6.1.1 CPU Usage
Use this screen to look at a chart of the Zyxel Device’s recent CPU usage. To access this screen, click
CPU Usage in the dashboard.
Status This field displays the current status of each interface. The possible values depend on what
type of interface it is.
Inactive - The Ethernet interface is disabled.
Down - The Ethernet interface is enabled but not connected.
Speed / Duplex - The Ethernet interface is enabled and connected. This field displays the
port speed and duplex setting (Full or Half).
VID This field displays the VLAN ID to which the interface belongs.
IP Addr/Netmask This field displays the current IP address and subnet mask assigned to the interface. If the IP
address is 0.0.0.0, the interface is disabled or did not receive an IP address and subnet mask
via DHCP.
IP Assignment This field displays how the interface gets its IP address.
Static - This interface has a static IP address.
DHCP Client - This interface gets its IP address from a DHCP server.
Action If the interface has a static IP address, this shows n/a.
If the interface has a dynamic IP address, use this field to get or to update the IP address for
the interface. Click Renew to send a new DHCP request to a DHCP server.
WLAN Interface
Status Summary
This displays status information for the WLAN interface.
Status This displays whether or not the WLAN interface is activated.
MAC Address This displays the MAC address of the radio.
Radio This indicates the radio number on the Zyxel Device.
Band This indicates the wireless frequency band currently being used by the radio.
This shows - when the radio is in monitor mode.
OP Mode This indicates the radio’s operating mode. Operating modes are AP (MBSSID), MON
(monitor), Root AP or Repeater.
Channel This indicates the channel number the radio is using.
Antenna This indicates the antenna orientation for the radio (Wall or Ceiling).
This field is not available if the Zyxel Device does not allow you to adjust antenna orientation
for the Zyxel Device’s radio(s) using the web configurator or a physical switch. Refer to
Section 1.4 on page 18 to see if your Zyxel Device has an antenna switch.
Station This displays the number of wireless clients connected to the Zyxel Device.
AP Information This shows a summary of connected wireless Access Points (APs).
All Sensed Device This sections displays a summary of all wireless devices detected by the network. Click the
link to go to the Monitor > Wireless > Detected Device screen.
Un-Classified AP This displays the number of detected unclassified APs.
Rogue AP This displays the number of detected rogue APs.
Friendly AP This displays the number of detected friendly APs.
Table 14 Dashboard (continued)
LABEL DESCRIPTION

Chapter 6 Dashboard
NWA/WAC/WAX Series User’s Guide
48
Figure 21 Dashboard > CPU Usage
The following table describes the labels in this screen.
6.1.2 Memory Usage
Use this screen to look at a chart of the Zyxel Device’s recent memory (RAM) usage. To access this
screen, click Memory Usage in the dashboard.
Figure 22 Dashboard > Memory Usage
Table 15 Dashboard > CPU Usage
LABEL DESCRIPTION
% The y-axis represents the percentage of CPU usage.
time The x-axis shows the time period over which the CPU usage occurred.
Refresh Interval Enter how often you want this window to be automatically updated.
Refresh Now Click this to update the information in the window right away.
Chapter 7 Setup Wizard
NWA/WAC/WAX Series User’s Guide
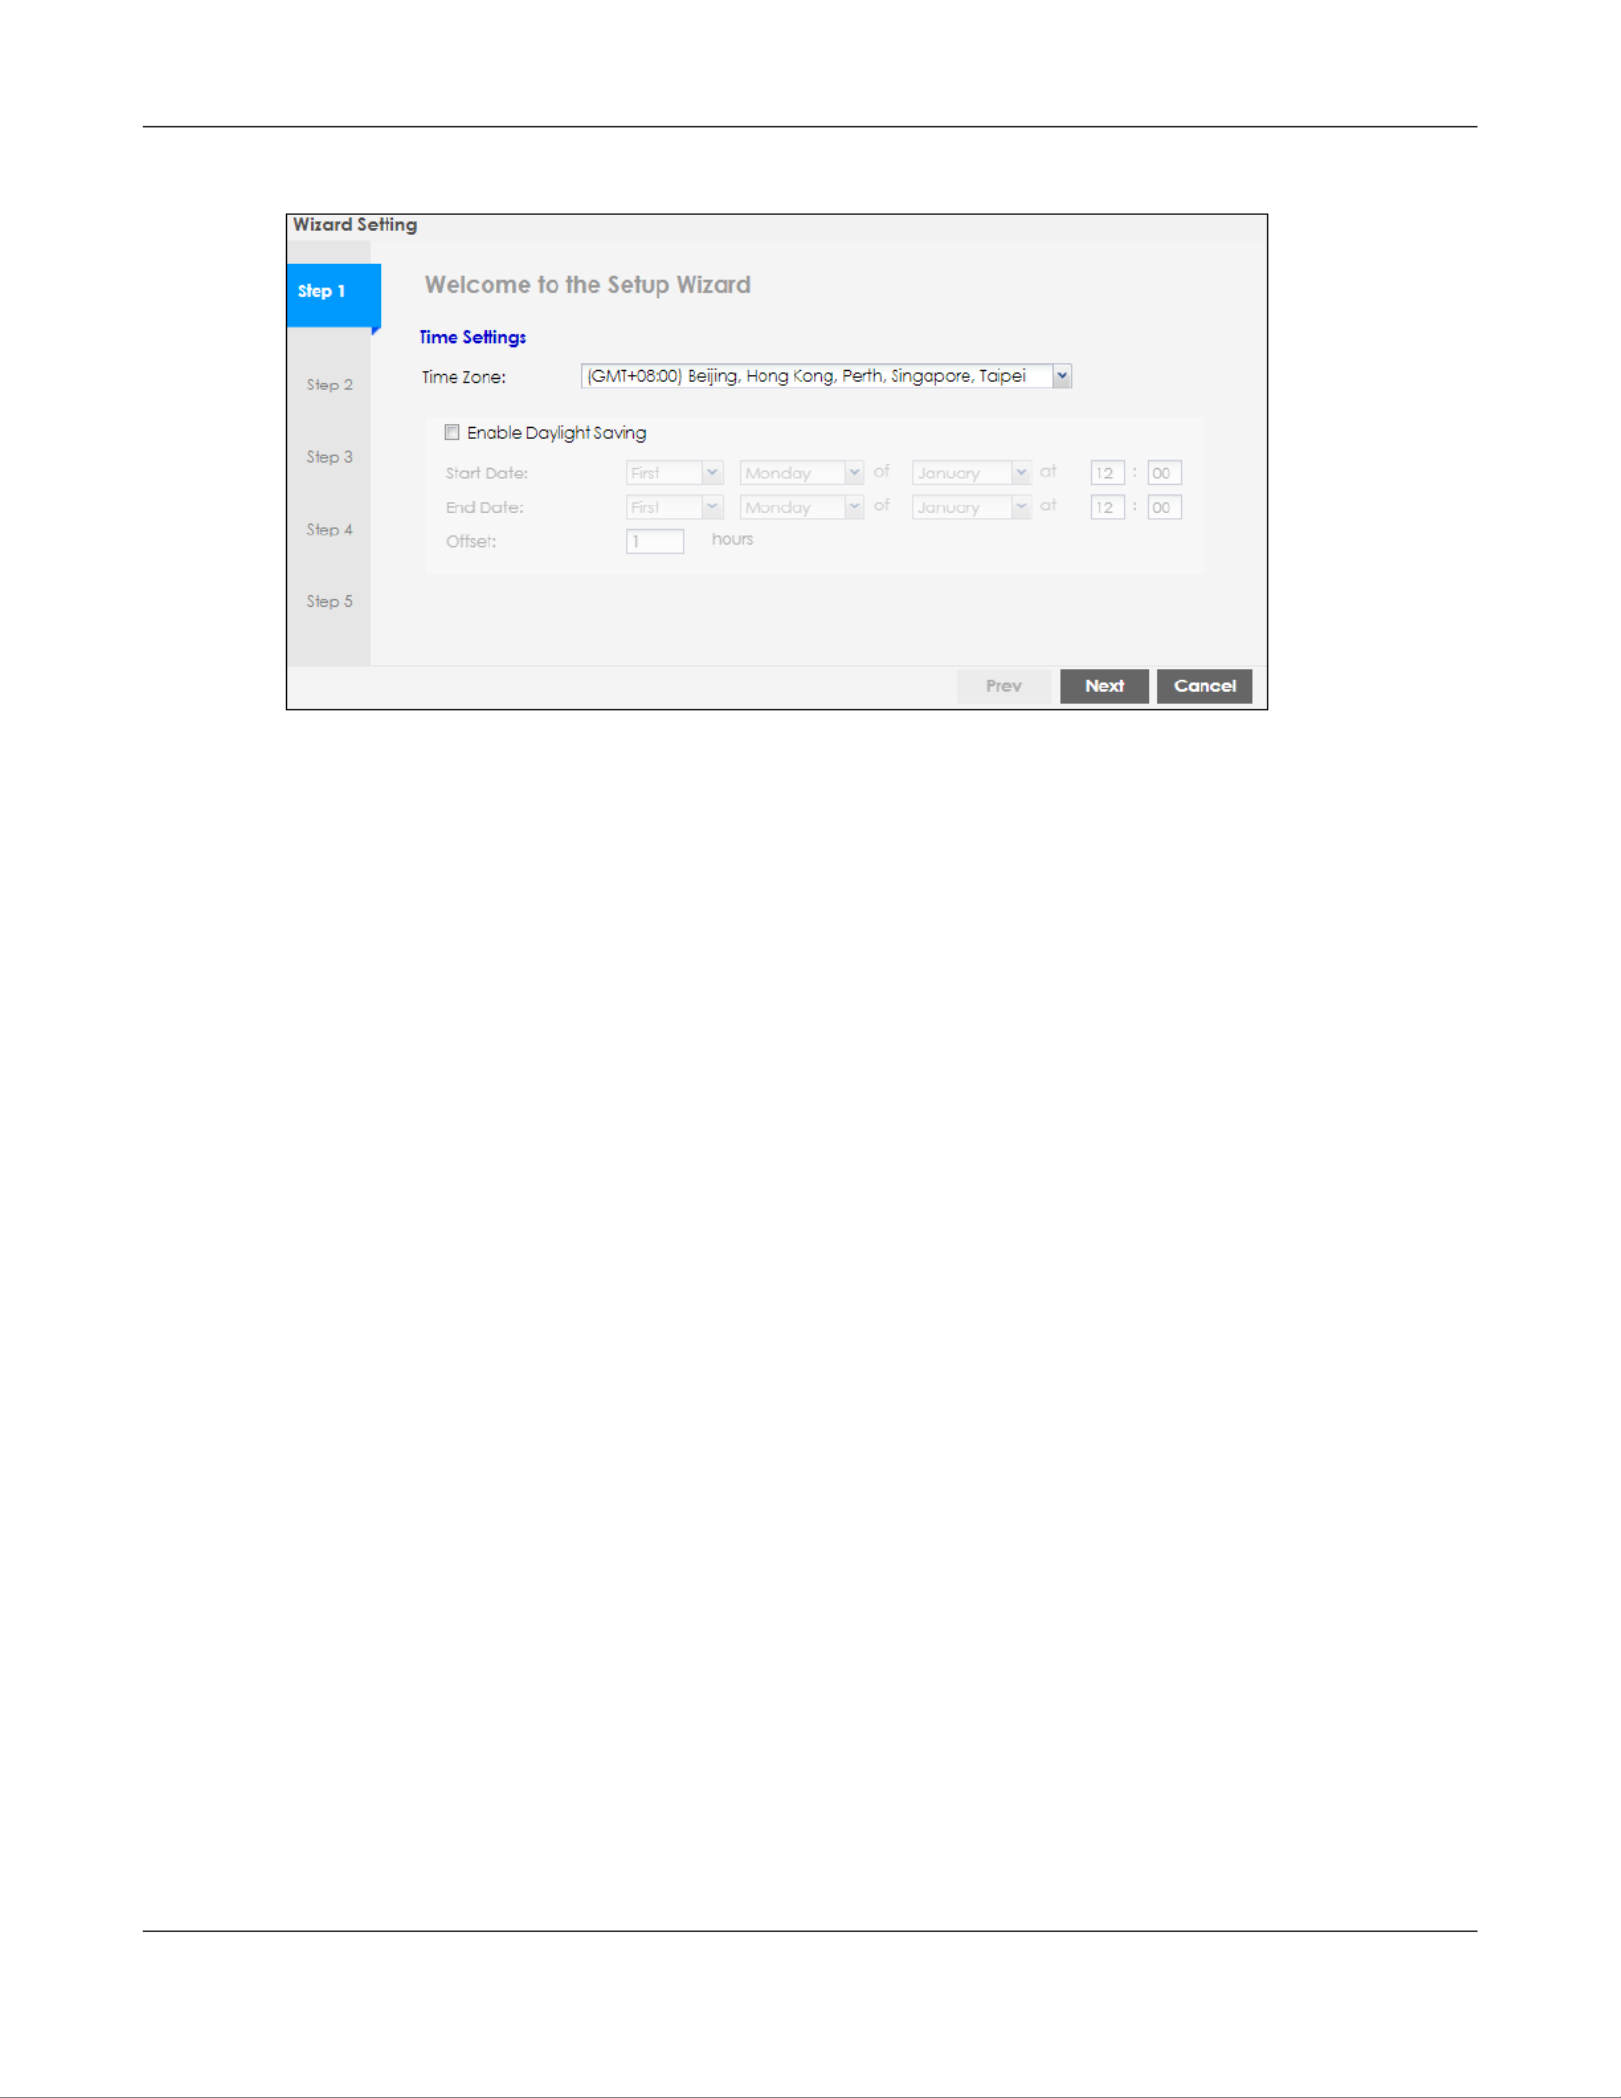
50
Figure 23 Wizard: Time Settings
7.2.2 Step 2 Password and Uplink Connection
Use this screen to configure the Zyxel Device’s system password and IP address.
Change Password: Enter a new password and retype it to confirm.
Uplink Connection Auto (DHCP): Select if the Zyxel Device is connected to a router with the DHCP server
enabled. You then need to check the router for the IP address assigned to the Zyxel Device in order to
access the Zyxel Device’s Web Configurator again.
Otherwise, select Static IP when the Zyxel Device is NOT connected to a router or you want to assign it a
fixed IP address. You will need to manually enter:
• the Zyxel Device’s IP address and subnet mask.
• the IP address of the router that helps forward traffic.
• a DNS server's IP address. The Domain Name System (DNS) maps a domain name to an IP address
and vice versa. The DNS server is extremely important because without it, you must know the IP
address of a computer before you can access it.
Click Prev to return to the previous screen. Click Next to proceed. Click Cancel to close the wizard
without saving.

NWA/WAC/WAX Series User’s Guide
54
CHAPTER 8
Monitor
8.1 Overview
Use the Monitor screens to check status and statistics information.
8.1.1 What You Can Do in this Chapter
• The Network Status screen (Section 8.3 on page 55) displays general LAN interface information and
packet statistics.
• The AP Information > Radio List screen (Section 8.4 on page 57) displays statistics about the wireless
radio transmitters in the Zyxel Device.
• The Station Info screen (Section 8.5 on page 61) displays statistics pertaining to the associated
stations.
• The WDS Link Info screen (Section 8.6 on page 62) displays statistics about the Zyxel Device’s WDS
(Wireless Distribution System) connections.
• The Detected Device screen (Section 8.7 on page 63) displays information about suspected rogue
APs.
• The View Log screen (Section 8.8 on page 66) displays the Zyxel Device’s current log messages. You
can change the way the log is displayed, you can e-mail the log, and you can also clear the log in
this screen.
8.2 What You Need to Know
The following terms and concepts may help as you read through the chapter.
Rogue AP
Rogue APs are wireless access points operating in a network’s coverage area that are not under the
control of the network’s administrators, and can open up holes in a network’s security. See Chapter 13
on page 117 for details.
Friendly AP
Friendly APs are other wireless access points that are detected in your network, as well as any others that
you know are not a threat (those from neighboring networks, for example). See Chapter 13 on page 117
for details.

Chapter 8 Monitor
NWA/WAC/WAX Series User’s Guide
56
8.3.1 Port Statistics Graph
Use the port statistics graph to look at a line graph of packet statistics for the Ethernet port. To view, click
Monitor > Network Status Switch to Graphic View and then the button.
Set Interval Click this to set the Poll Interval the screen uses.
Stop Click this to stop the window from updating automatically. You can start it again by setting the
Poll Interval and clicking Set Interval.
Switch to Graphic
View
Click this to display the port statistics as a line graph.
Name This field displays the name of the interface.
Status This field displays the current status of the physical port.
Down - The physical port is not connected.
Speed / Duplex - The physical port is connected. This field displays the port speed and duplex
setting (Full or Half).
TxPkts This field displays the number of packets transmitted from the Zyxel Device on the physical port
since it was last connected.
RxPkts This field displays the number of packets received by the Zyxel Device on the physical port
since it was last connected.
Tx Bcast This field displays the number of broadcast packets transmitted from the Zyxel Device on the
physical port since it was last connected.
Rx Bcast This field displays the number of broadcast packets received by the Zyxel Device on the
physical port since it was last connected.
Collisions This field displays the number of collisions on the physical port since it was last connected.
Tx This field displays the transmission speed, in bytes per second, on the physical port in the one-
second interval before the screen updated.
Rx This field displays the reception speed, in bytes per second, on the physical port in the one-
second interval before the screen updated.
Up Time This field displays how long the physical port has been connected.
System Up Time This field displays how long the Zyxel Device has been running since it last restarted or was
turned on.
Table 17 Monitor > Network Status (continued)
LABEL DESCRIPTION

Chapter 8 Monitor
NWA/WAC/WAX Series User’s Guide
61
8.5 Station List
Use this screen to view statistics pertaining to the associated stations (or “wireless clients”). Click Monitor
> Wireless > Station Info to access this screen.
Figure 33 Monitor > Wireless > Station Info
The following table describes the labels in this screen.
SSID Name This displays an SSID associated with this radio. There can be up to eight maximum.
BSSID This displays a BSSID associated with this radio. The BSSID is tied to the SSID.
Security
Mode
This displays the security mode in which the SSID is operating.
VLAN This displays the VLAN ID associated with the SSID.
Traffic Statistics This graph displays the overall traffic information of the radio over the preceding 24 hours.
Kbps/Mbps This y-axis represents the amount of data moved across this radio in megabytes per second.
Time This x-axis represents the amount of time over which the data moved across this radio.
Station Count This graph displays the connected station information of the radio over the preceding 24 hours
Stations The y-axis represents the number of connected stations.
Time The x-axis shows the time period over which a station was connected.
Last Update This field displays the date and time the information in the window was last updated.
OK Click this to close this window.
Cancel Click this to close this window.
Table 20 Monitor > Wireless > AP Information > Radio List > More Information (continued)
LABEL DESCRIPTION
Table 21 Monitor > Wireless > Station Info
LABEL DESCRIPTION
# This is the station’s index number in this list.
IP Address This is the station’s IP address.
MAC Address This is the station’s MAC address.
Radio This is the radio number on the Zyxel Device to which the station is connected.
Capability This displays the supported standard currently being used by the station or the standards
supported by the station.
802.11 Features This displays whether the station supports IEEE802.11r, IEEE 802.11k, IEEE 802.11v or none of the
above (N/A).

Chapter 8 Monitor
NWA/WAC/WAX Series User’s Guide
62
8.6 WDS Link Info
Use this screen to view the WDS traffic statistics between the Zyxel Device and a root AP or repeaters.
See Section 1.2 on page 12 to know more about WDS. Click Monitor > Wireless > WDS Link Info to access
this screen.
Figure 34 Monitor > Wireless > WDS Link Info
The following table describes the labels in this screen.
SSID Name This indicates the name of the wireless network to which the station is connected. A single AP
can have multiple SSIDs or networks.
Security Mode This indicates which secure encryption methods is being used by the station to connect to the
network.
Signal Strength This is the RSSI (Received Signal Strength Indicator) of the station’s wireless connection.
Tx Rate This is the maximum transmission rate of the station.
Rx Rate This is the maximum reception rate of the station.
Association Time This displays the time the station first associated with the Zyxel Device’s wireless network.
Refresh Click this to refresh the items displayed on this page.
Table 21 Monitor > Wireless > Station Info (continued)
LABEL DESCRIPTION
Table 22 Monitor > Wireless > WDS Link Info
LABEL DESCRIPTION
WDS Uplink Info
WDS Downlink
Info
Uplink refers to the WDS link from the repeaters to the root AP.
Downlink refers to the WDS link from the root AP to the repeaters.
When the Zyxel Device is in root AP mode and connected to a repeater, only the downlink
information is displayed.
When the Zyxel Device is in repeater mode and connected to a root AP directly or via another
repeater, the uplink information is displayed.
When the Zyxel Device is in repeater mode and connected to a root AP and other repeater(s),
both the uplink and downlink information would be displayed.
# This is the index number of the root AP or repeater in this list.

Chapter 9 Network
NWA/WAC/WAX Series User’s Guide
70
Figure 39 AC managed Network Example
Note: The Zyxel Device can be a standalone device or be managed by an AC.
AC Discovery and Management
The link between AC Discovery-enabled access points proceeds as follows:
1An Zyxel Device with AC Discovery enabled joins a wired network (receives a dynamic IP address).
2The Zyxel Device sends out a discovery request, looking for an AC.
3If there is an AC on the network, it receives the discovery request. If the AC, such as NXC, is in Manual
mode it adds the details of the Zyxel Device to its Unmanaged Access Points list, and you decide which
available APs to manage. If the AC is in Always Accept mode, it automatically adds the Zyxel Device to
its Managed Access Points list and provides the managed Zyxel Device with default configuration
information, as well as securely transmitting the DTLS pre-shared key. The managed Zyxel Device is ready
for association with wireless clients.
Managed AP Finds the Controller
A managed Zyxel Device can find the controller in one of the following ways:
• Manually specify the controller’s IP address in the Web Configurator’s AC Discovery screen.
• Get the controller’s IP address from a DHCP server with the controller’s IP address configured as
option 138.
• Get the controller’s IP address from a DNS server SRV (Service) record.
• Broadcasting to discover the controller within the broadcast domain.
Chapter 9 Network
NWA/WAC/WAX Series User’s Guide
72
• The NCC Discovery screen (Section 9.4 on page 73) configures the Zyxel Device’s Nebula Control
Center (NCC) discovery settings.
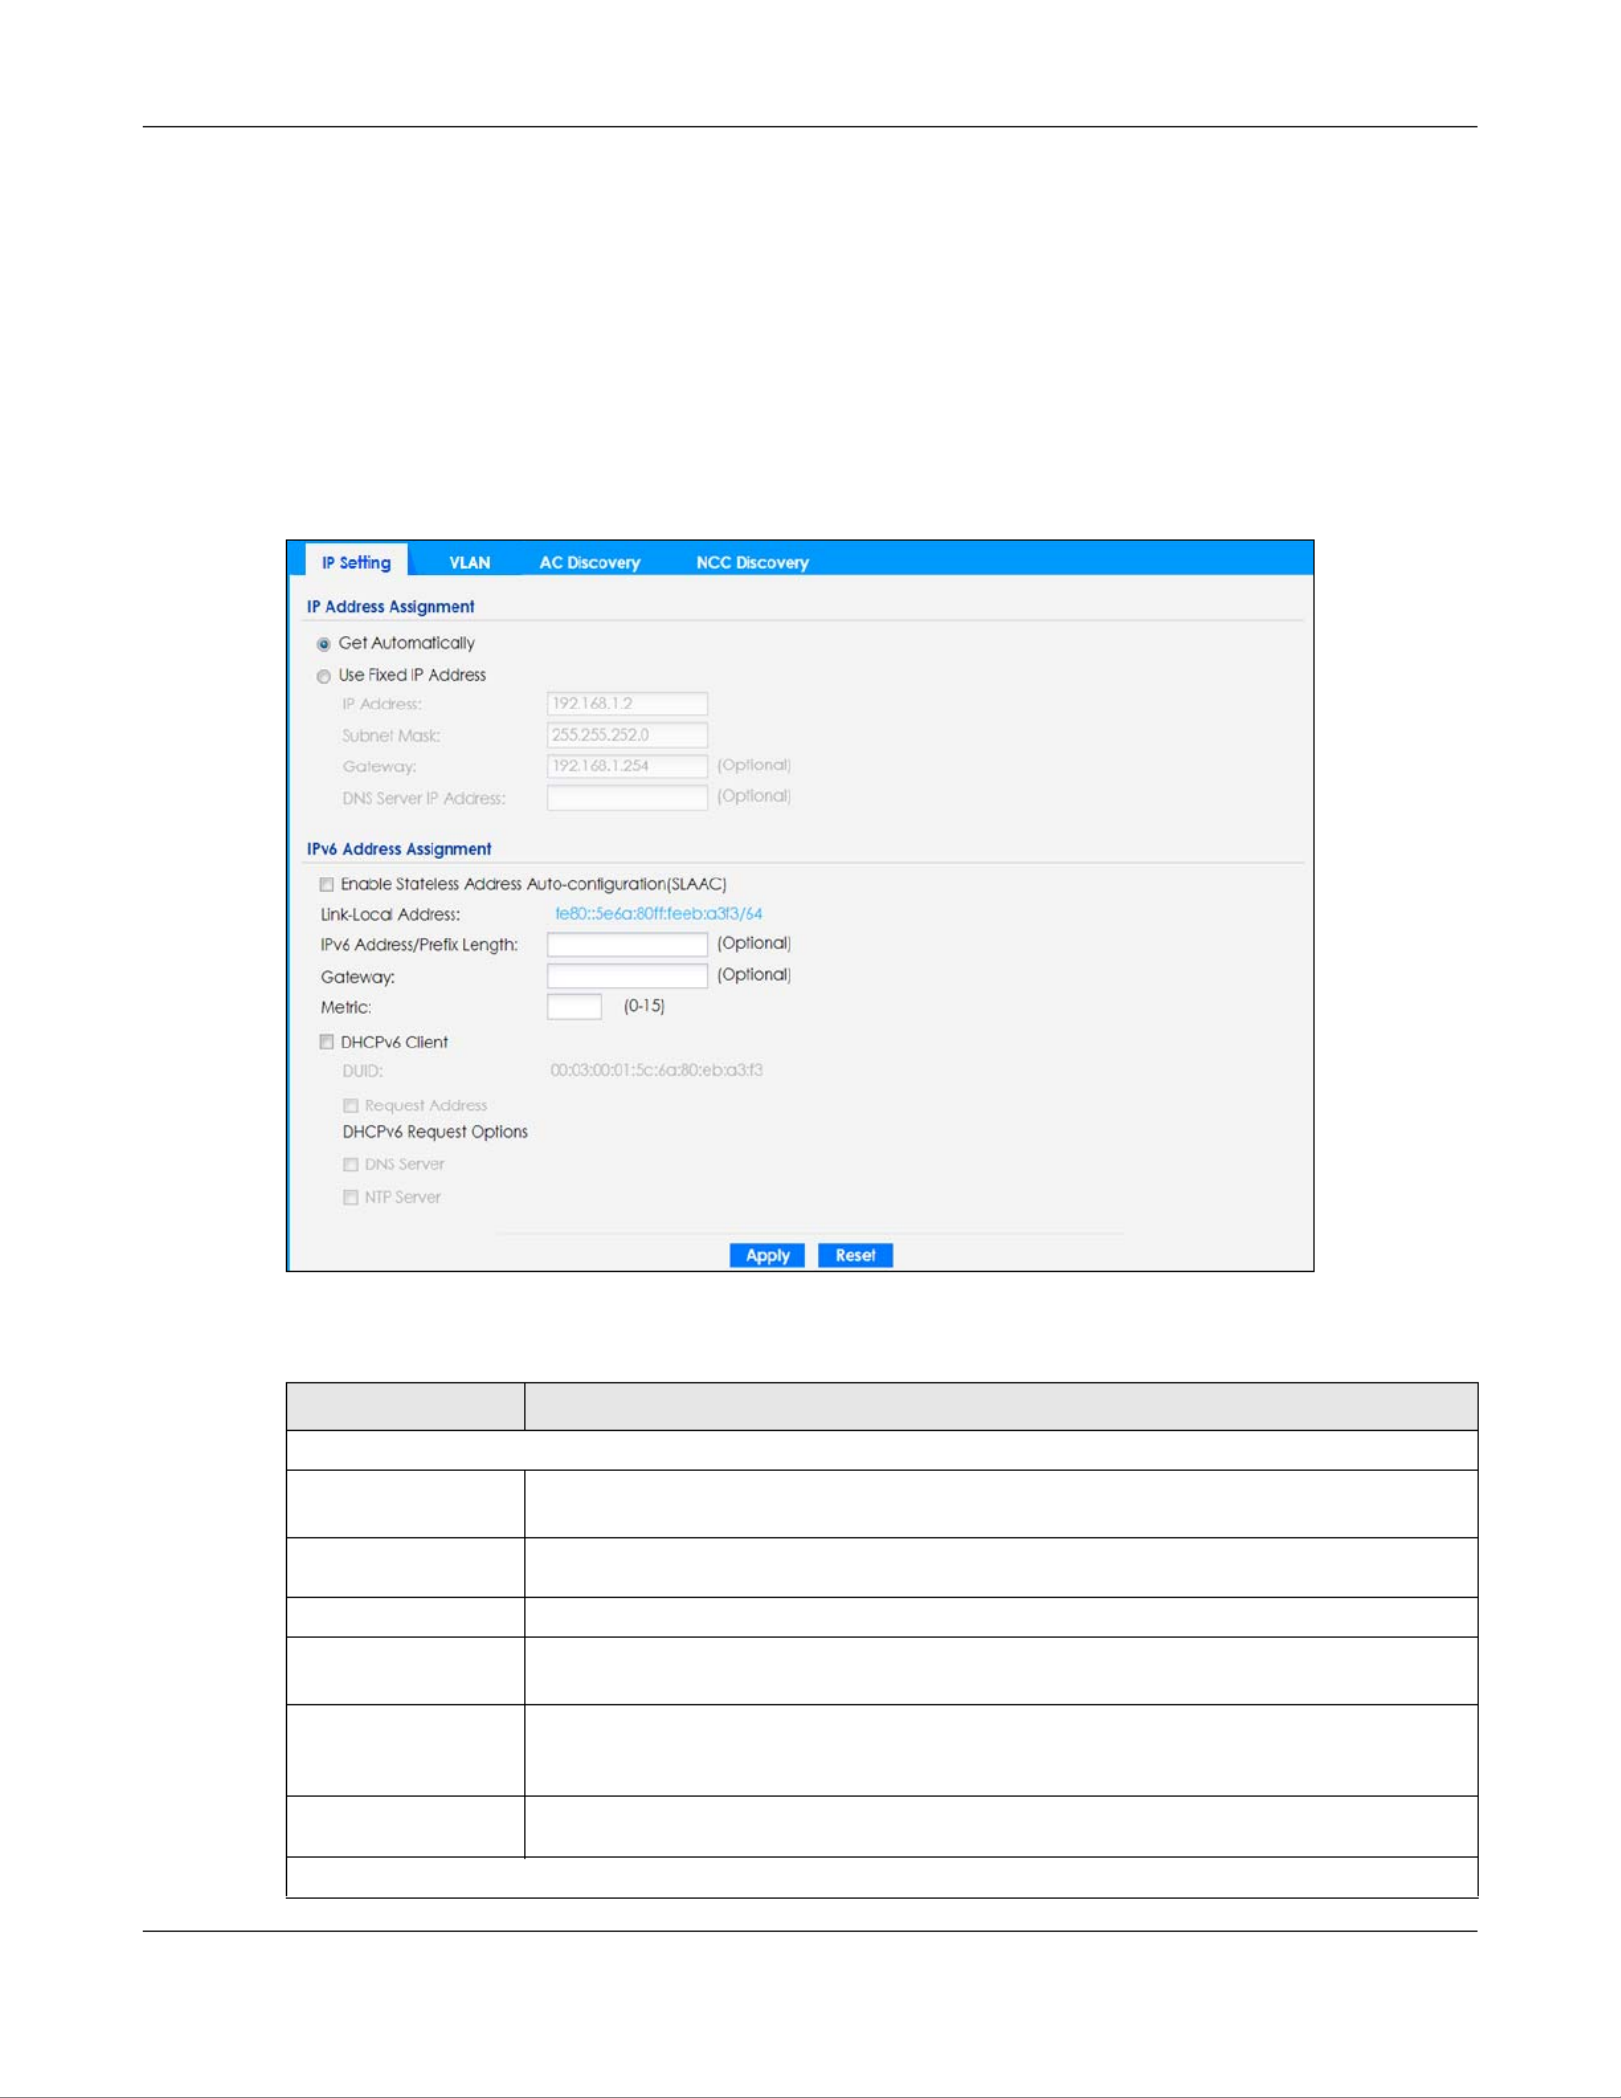
9.2 IP Setting
Use this screen to configure the IP address for your Zyxel Device. To access this screen, click
Configuration > Network > IP Setting.
Figure 41 Configuration > Network > IP Setting
Each field is described in the following table.
Table 25 Configuration > Network > IP Setting
LABEL DESCRIPTION
IP Address Assignment
Get
Automatically
Select this to make the interface a DHCP client and automatically get the IP address,
subnet mask, and gateway address from a DHCP server.
Use Fixed IP
Address
Select this if you want to specify the IP address, subnet mask, and gateway manually.
IP Address Enter the IP address for this interface.
Subnet Mask Enter the subnet mask of this interface in dot decimal notation. The subnet mask indicates
what part of the IP address is the same for all computers in the network.
Gateway Enter the IP address of the gateway. The Zyxel Device sends packets to the gateway when
it does not know how to route the packet to its destination. The gateway should be on the
same network as the interface.
DNS Server IP
Address
Enter the IP address of the DNS server.
IPv6 Address Assignment

Chapter 9 Network
NWA/WAC/WAX Series User’s Guide
75
Figure 43 Configuration > Network > VLAN (for Zyxel Device with multiple Ethernet ports)
Figure 44 Configuration > Network > VLAN (for Zyxel Device with one Ethernet port)
Each field is described in the following table.
Table 26 Configuration > Network > VLAN
LABEL DESCRIPTION
VLAN Settings
Management
VLAN ID
Enter a VLAN ID for the Zyxel Device.
As Native VLAN Select this option to treat this VLAN ID as a VLAN created on the Zyxel Device and not one
assigned to it from outside the network.
LAN Setting
Port Setting
Edit Double-click an entry or select it and click Edit to open a screen where you can modify the
entry’s settings. In some tables you can just click a table entry and edit it directly in the
table. For those types of tables small red triangles display for table entries with changes that
you have not yet applied.
Activate/
Inactivate
To turn on an entry, select it and click Activate. To turn off an entry, select it and click
Inactivate.
# This is the index number of the port.
Status This field indicates whether the port is enabled (a yellow bulb) or not (a gray bulb).
Port This field displays the name of the port.

Chapter 9 Network
NWA/WAC/WAX Series User’s Guide
77
Each field is described in the following table.
9.5 AC (AP Controller) Discovery
This section discusses how to configure the Zyxel Device’s AC Discovery settings. You can have the Zyxel
Device managed by an AC on your network. When you do this, the Zyxel Device can be configured
ONLY by the AC. See Section 8.9.1 on page 102 for more information on AC management.
Note: The AC Discovery settings are not available in all Zyxel Devices. See Section 0.4 on page
19 for more information.
If you want to return the Zyxel Device to function in standalone mode, you can do one of the two
following options:
• Press the Reset button.
• Check the AC for the Zyxel Device’s IP address and use FTP to upload the default configuration file to
the Zyxel Device. You can get the configuration file at conf/system-default.conf. You must reboot the
Zyxel Device after uploading the configuration file.
To access the Controller Discover screen, click Configuration > > Network AC Discovery.
Figure 46 Configuration > Network > AC Discovery
Table 27 Configuration > Network > Storm Control
LABEL DESCRIPTION
Broadcast Storm
Control
Select the check box to enable broadcast storm control on the Zyxel Device. Enabling this
will drop ingress broadcast traffic in the physical Ethernet port if it exceeds the maximum
traffic rate.
Multicast Storm
Control
Select the check box to enable multicast storm control on the Zyxel Device. Enabling this will
drop ingress multicast traffic in the physical Ethernet port if it exceeds the maximum traffic
rate.
Apply Click Apply to save your changes back to the Zyxel Device.
Reset Click Reset to return the screen to its last-saved settings.

Chapter 9 Network
NWA/WAC/WAX Series User’s Guide
78
Each field is described in the following table.
9.6 NCC Discovery
You can manage the Zyxel Device through the Zyxel Nebula Control Center (NCC). Use this screen to
configure the proxy server settings if the Zyxel Device is behind a proxy server.
To access this screen, click Configuration > > Network NCC Discovery.
Figure 47 Configuration > Network > NCC Discovery
Table 28 Configuration > Network > AC Discovery
LABEL DESCRIPTION
Discovery Setting
Auto Select this option to use DHCP option 138/DNS SRV record/Broadcast to get the AC’s IP
address. If the Zyxel Device and a Zyxel AC, such as the NXC2500 or NXC5500, are in the
same subnet, it will be managed by the controller automatically.
Manual Select this option and enter the IP address of the AC manually. This is necessary when
the AP Controller is not in the same subnet and you want it to manage the Zyxel
Device.
Primary / Secondary
Static AC IP
Specify the primary and secondary IP address of the AC to which the Zyxel Device
connects.
Disable Select this to manage the Zyxel Device using its own Web Configurator, neither
managing nor being managed by other devices. Please note if an AP Controller is in
the same subnet, you will need to click Disable if you do not want the Zyxel Device to
be managed.
Apply Click Apply to save the information entered in this screen.
If you select Auto or Manual, the AC uploads the firmware package for managed AP
mode to the Zyxel Device and you cannot log in as the web configurator is disabled;
you must manage the Zyxel Device through the AC on your network.
Reset Click Reset to return the screen to its last-saved settings.

Chapter 10 Wireless
NWA/WAC/WAX Series User’s Guide
78
Radio 1 OP Mode Select the operating mode for radio 1.
AP Mode means the radio can receive connections from wireless clients and pass their data
traffic through to the Zyxel Device to be managed (or subsequently passed on to an
upstream gateway for managing).
MON Mode means the radio monitors the broadcast area for other APs, then passes their
information on to the Zyxel Device where it can be determined if those APs are friendly or
rogue. If a radio is set to this mode it cannot receive connections from wireless clients (see
Section 1.2.3 on page 15).
Root AP means the radio acts as an AP and also supports the wireless connections with
other APs (in repeater mode) to form a WDS (Wireless Distribution System) to extend its
wireless network.
Repeater means the radio can establish a wireless connection with other APs (in either root
AP or repeater mode) to form a WDS.
Radio 1 Profile Select the radio profile the radio uses.
Note: You can only apply a 2.4G AP radio profile to radio 1. Otherwise, the first
radio will not be working.
Radio 1 WDS Profile This field is available only when the radio is in Root AP or Repeater mode.
Select the WDS profile the radio uses to connect to a root AP or repeater.
Enable WDS Wireless
Bridging
This field is available only when the radio is in Root AP or Repeater mode.
A Wireless Distribution System is a wireless connection between two or more APs. Enable this
to establish wireless links with other APs. See Section 0.2 on page 13 for more information.
Only the models below support this feature at the time of writing:
• WAC6103D-I
• WAC6303D-S
• WAC6502D-E
• WAC502D-S
• WAC6503D-S
• WAC6552D-S
• WAC6553D-E
• WAX610D
• WAX650S
Note: You must enable the same wireless security settings on the Zyxel Device
and on all wireless clients that you want to associate with it.
Uplink Selection
Mode
This field is available only when the radio is in Repeater mode.
Select AUTO to have the Zyxel Device automatically use the settings in the applied WDS
profile to connect to a root AP or repeater.
Select Manual to have the Zyxel Device connect to the root AP or repeater with the MAC
address specified in the Radio 1 Uplink MAC Address field.
Max Output Power Enter the maximum output power (between 0 to 30 dBm) of the Zyxel Device in this field. If
there is a high density of APs in an area, decrease the output power of the Zyxel Device to
reduce interference with other APs.
Note: Reducing the output power also reduces the Zyxel Device’s effective
broadcast radius.
MBSSID Settings
Table 28 Configuration > Wireless > AP Management (continued)
LABEL DESCRIPTION

Chapter 10 Wireless
NWA/WAC/WAX Series User’s Guide
81
Figure 45 Rogue AP Example
Friendly APs
If you have more than one AP in your wireless network, you should also configure a list of “friendly” APs.
Friendly APs are wireless access points that you know are not a threat. It is recommended that you
export (save) your list of friendly APs often, especially if you have a network with a large number of
access points. Exported lists show MAC addresses in txt file format separated by line breaks.
Rogue AP Detection
This feature allows the Zyxel Device to monitor the WiFi signals for other wireless APs (see also Section
1.2.3 on page 15). Detected APs will appear in the Monitor > Wireless > Detected Device screen, where
the Zyxel Device will label APs with the criteria you select in Suspected Rogue AP Classification Rule as a
suspected rogue. The APs which you mark as either rogue or friendly APs in the Monitor > Wireless >
Detected Device screen will appear in the Wireless > Rogue AP screen. See Section 1.4 on page 18 to
know which models support Rogue AP Detection.
Note: Enabling Rogue AP Detection might affect the performance of wireless clients
associated with the Zyxel Device.

Chapter 10 Wireless
NWA/WAC/WAX Series User’s Guide
84
Each field is described in the following table.
10.4 Load Balancing
Use this screen to configure wireless network traffic load balancing between the APs on your network
(see Load Balancing on page 125). Click Conguration > Wireless > Load Balancing to access this
screen.
Figure 49 Configuration > Wireless > Load Balancing
Table 30 Configuration > Wireless > Rogue AP > Add/Edit Rogue/Friendly AP List
LABEL DESCRIPTION
MAC Enter the MAC address of the AP you want to add to the list. A MAC address is a unique
hardware identifier in the following hexadecimal format: xx:xx:xx:xx:xx:xx where xx is a
hexadecimal number separated by colons.
Description Enter up to 60 characters for the AP’s description. Spaces and underscores are allowed.
Role Select either Rogue AP or Friendly AP for the AP’s role.
OK Click OK to save your changes back to the Zyxel Device.
Cancel Click Cancel to close the window with changes unsaved.

Chapter 10 Wireless
NWA/WAC/WAX Series User’s Guide
85
Each field is described in the following table.
Table 31 Configuration > Wireless > Load Balancing
LABEL DESCRIPTION
Enable Load
Balancing
Select this to enable load balancing on the Zyxel Device.
Use this section to configure wireless network traffic load balancing between the managed
APs in this group.
Mode Select a mode by which load balancing is carried out.
Select By Station Number to balance network traffic based on the number of specified
stations connected to the Zyxel Device.
Select By Traffic Level to balance network traffic based on the volume generated by the
stations connected to the Zyxel Device.
Select By Smart Classroom to balance network traffic based on the number of specified
stations connected to the Zyxel Device. The Zyxel Device ignores association request and
authentication request packets from any new station when the maximum number of
stations is reached.
If you select By Station Number or By Traffic Level, once the threshold is crossed (either the
maximum station numbers or with network traffic), the Zyxel Device delays association
request and authentication request packets from any new station that attempts to make a
connection. This allows the station to automatically attempt to connect to another, less
burdened AP if one is available.
Max Station
Number
Enter the threshold number of stations at which the Zyxel Device begins load balancing its
connections.
Traffic Level Select the threshold traffic level at which the Zyxel Device begins load balancing its
connections (Low, Medium, High).
The maximum bandwidth allowed for each level is:
•Low - 11 Mbps
•Medium - 23 Mbps
•High - 35M bps
Disassociate
station when
overloaded
This function is enabled by default and the disassociation priority is always Signal Strength
when you set Mode to By Smart Classroom.
Select this option to disassociate wireless clients connected to the AP when it becomes
overloaded. If you do not enable this option, then the AP simply delays the connection until
it can afford the bandwidth it requires, or it transfers the connection to another AP within its
broadcast radius.
The disassociation priority is determined automatically by the Zyxel Device and is as follows:
•Idle Timeout - Devices that have been idle the longest will be kicked first. If none of the
connected devices are idle, then the priority shifts to Signal Strength.
•Signal Strength - Devices with the weakest signal strength will be kicked first.
Note: If you enable this function, you should ensure that there are multiple APs
within the broadcast radius that can accept any rejected or kicked
wireless clients; otherwise, a wireless client attempting to connect to an
overloaded AP will be disassociated permanently and never be allowed to
connect.
Apply Click Apply to save your changes back to the Zyxel Device.
Reset Click Reset to return the screen to its last-saved settings.

Chapter 10 Wireless
NWA/WAC/WAX Series User’s Guide
89
available bandwidth to the point where each connecting device receives a meager trickle, the load
balanced AP instead limits the incoming connections as a means to maintain bandwidth integrity.
There are three kinds of wireless load balancing available on the Zyxel Device:
Load balancing by station number limits the number of devices allowed to connect to your AP. If you
know exactly how many stations you want to let connect, choose this option.
For example, if your company’s graphic design team has their own AP and they have 10 computers,
you can load balance for 10. Later, if someone from the sales department visits the graphic design
team’s offices for a meeting and he tries to access the network, his computer’s connection is delayed,
giving it the opportunity to connect to a different, neighboring AP. If he still connects to the AP
regardless of the delay, then the AP may boot other people who are already connected in order to
associate with the new connection.
Load balancing by smart classroom also limits the number of devices allowed to connect to your AP.
But any new connections will be just rejected when the AP is overloaded.
Load balancing by trac level limits the number of connections to the AP based on maximum
bandwidth available. If you are uncertain as to the exact number of wireless connections you will have
then choose this option. By setting a maximum bandwidth cap, you allow any number of devices to
connect as long as their total bandwidth usage does not exceed the configured bandwidth cap
associated with this setting. Once the cap is hit, any new connections are rejected or delayed provided
that there are other APs in range.
Imagine a coffee shop in a crowded business district that offers free wireless connectivity to its
customers. The coffee shop owner can’t possibly know how many connections his AP will have at any
given moment. As such, he decides to put a limit on the bandwidth that is available to his customers but
not on the actual number of connections he allows. This means anyone can connect to his wireless
network as long as the AP has the bandwidth to spare. If too many people connect and the AP hits its
bandwidth cap then all new connections must basically wait for their turn or get shunted to the nearest
identical AP.

NWA/WAC/WAX Series User’s Guide
130
CHAPTER 11
Bluetooth
11.1 Overview
Use this screen to configure the iBeacon advertising settings for the Zyxel Device that supports Bluetooth
Low Energy (BLE). Bluetooth Low Energy, which is also known as Bluetooth Smart, transmits less data over
a shorter distance but consumes less power than classic Bluetooth.
On the WAC5302D-S, you need to attach a supported BLE USB dongle to its USB port to have the AP act
as a beacon to broadcast packets. Contact Zyxel customer support if you are not sure whether your BLE
USB dongle is compatible with the Zyxel Device.
11.1.1 What You Need To Know
iBeacon is Apple’s communication protocol on top of Bluetooth Low Energy wireless technology.
Beacons (Bluetooth radio transmitters) or BLE enabled devices broadcast packets to every device
around it to announce their presence. Advertising packets contain their iBeacon ID, which consists of
the Universally Unique Identifier (UUID), major number, and minor number. These packets also contain a
TX (transmit) power measured at a reference point, which is used to approximate a device’s distance
from the beacon. The UUID can be used to identify a service, a device, a manufacturer or an owner.
The 2-byte major number is to identify and distinguish a group, and the 2-byte minor number is to identify
and distinguish an individual.
For example, a company can set all its beacons to share the same UUID. The beacons in a particular
branch uses the same major number, and each beacon in a branch can have its own minor number.
Developers can create apps that respond to the iBeacon ID that your Zyxel Device broadcasts. An app
that is associated with the Zyxel Device’s iBeacon ID can measure the proximity of a customer to a
beacon. This app can then push messages or trigger prompts and actions based on this information. This
allows you to send highly contextual and highly localized advertisements to customers.
COMPANY A
BRANCH X BRANCH Y
BEACON 1 BEACON 2 BEACON 3
UUID EBAECFAF-DFE0-4039-BE5A-F030EED4303C
Major 10 10 20
Minor 1 2 1

Chapter 11 Bluetooth
NWA/WAC/WAX Series User’s Guide
132
Figure 75 Configuration > Bluetooth > Advertising Settings > Edit
The following table describes the labels in this screen.
Table 50 Configuration > Bluetooth > Advertising Settings > Edit
LABEL DESCRIPTION
Activate Select this option to enable the advertising settings.
UUID To specify a UUID for the Zyxel Device’s beacon ID, enter 32 hexadecimal digits in the range of
“A-F”, “a-f” and “0-9”, split into five groups separated by hyphens (-). The UUID format is as
follows: xxxxxxxx-xxxx-xxxx-xxxx-xxxxxxxxxxxx (8-4-4-4-12)
Generate new
UUID
Click this button to have the Zyxel Device generate a new UUID automatically.
Major Enter an integer from 0 to 65535 as the major value to identify the group to which the beacon
belongs.
Minor Enter an integer from 0 to 65535 as the minor value to identify the individual beacon.
OK Click OK to save your changes back to the Zyxel Device.
Cancel Click Cancel to exit this screen without saving your changes.

Chapter 11 User
NWA/WAC/WAX Series User’s Guide
89
11.3 Setting
This screen controls default settings, login settings, lockout settings, and other user settings for the Zyxel
Device.
To access this screen, login to the Web Configurator, and click Conguration > Object > User > Setting.
Authentication
Timeout Settings
This field is not available if the user type is user.
If you want to set authentication timeout to a value other than the default settings, select
Use Manual Settings then fill your preferred values in the fields that follow.
Lease Time This field is not available if the user type is user.
Enter the number of minutes this user has to renew the current session before the user is
logged out. You can specify 1 to 1440 minutes. You can enter 0 to make the number of
minutes unlimited. Admin users renew the session every time the main screen refreshes in the
Web Configurator.
Reauthentication
Time
This field is not available if the user type is user.
Type the number of minutes this user can be logged into the Zyxel Device in one session
before the user has to log in again. You can specify 1 to 1440 minutes. You can enter 0 to
make the number of minutes unlimited. Unlike Lease Time, the user has no opportunity to
renew the session without logging out.
OK Click OK to save your changes back to the Zyxel Device.
Cancel Click Cancel to exit this screen without saving your changes.
Table 34 Configuration > User > User > Add/Edit A User (continued)
LABEL DESCRIPTION

Chapter 11 User
NWA/WAC/WAX Series User’s Guide
91
11.3.1 Edit User Authentication Timeout Settings
This screen allows you to set the default authentication timeout settings for the selected type of user
account. These default authentication timeout settings also control the settings for any existing user
accounts that are set to use the default settings. You can still manually configure any user account’s
authentication timeout settings.
To access this screen, go to the Conguration > Object > User > Setting screen, select one of the Default
Authentication Timeout Settings Editentry and click the icon.
Figure 56 User > Setting > Edit User Authentication Timeout Settings
Limit the number of
simultaneous logons for
administration account
Select this check box if you want to set a limit on the number of simultaneous logins
by admin users. If you do not select this, admin users can login as many times as they
want at the same time using the same or different IP addresses.
Maximum number per
administration account
This field is effective when Limit ... for administration account is checked. Type the
maximum number of simultaneous logins by each admin user.
User Lockout Settings
Enable logon retry limit Select this check box to set a limit on the number of times each user can login
unsuccessfully (for example, wrong password) before the IP address is locked out for
a specified amount of time.
Maximum retry count This field is effective when Enable logon retry limit is checked. Type the maximum
number of times each user can login unsuccessfully before the IP address is locked
out for the specified lockout period. The number must be between 1 and 99.
Lockout period This field is effective when Enable logon retry limit is checked. Type the number of
minutes the user must wait to try to login again, if logon retry limit is enabled and the
maximum retry count is reached. This number must be between 1 and 65,535 (about
45.5 days).
Apply Click Apply to save the changes.
Reset Click Reset to return the screen to its last-saved settings.
Table 35 Configuration > Object > User > Setting (continued)
LABEL DESCRIPTION

Chapter 11 User
NWA/WAC/WAX Series User’s Guide
92
The following table describes the labels in this screen.
Table 36 User > Setting > Edit User Authentication Timeout Settings
LABEL DESCRIPTION
User Type This read-only field identifies the type of user account for which you are configuring the
default settings.
•admin - this user can look at and change the configuration of the Zyxel Device.
•limited-admin - this user can look at the configuration of the Zyxel Device but not to
change it.
Lease Time Enter the number of minutes this type of user account has to renew the current session
before the user is logged out. You can specify 1 to 1440 minutes. You can enter 0 to make
the number of minutes unlimited.
Admin users renew the session every time the main screen refreshes in the Web Configurator.
Access users can renew the session by clicking the Renew button on their screen. If you allow
access users to renew time automatically, the users can select this check box on their screen
as well. In this case, the session is automatically renewed before the lease time expires.
Reauthentication
Time
Type the number of minutes this type of user account can be logged into the Zyxel Device in
one session before the user has to log in again. You can specify 1 to 1440 minutes. You can
enter 0 to make the number of minutes unlimited. Unlike Lease Time, the user has no
opportunity to renew the session without logging out.
OK Click OK to save your changes back to the Zyxel Device.
Cancel Click Cancel to exit this screen without saving your changes.

NWA/WAC/WAX Series User’s Guide
93
CHAPTER 12
AP Profile
12.1 Overview
This chapter shows you how to configure preset profiles for the Zyxel Device.
12.1.1 What You Can Do in this Chapter
• The Radio screen (Section 12.2 on page 94) creates radio configurations that can be used by the APs.
• The SSID screen (Section 12.3 on page 100) configures three different types of profiles for your
networked APs.
12.1.2 What You Need To Know
The following terms and concepts may help as you read this chapter.
Wireless Profiles
At the heart of all wireless AP configurations on the Zyxel Device are profiles. A profile represents a group
of saved settings that you can use across any number of connected APs. You can set up the following
wireless profile types:
•Radio - This profile type defines the properties of an AP’s radio transmitter. You can have a maximum
of 64 radio profiles on the Zyxel Device.
•SSID - This profile type defines the properties of a single wireless network signal broadcast by an AP.
Each radio on a single AP can broadcast up to 8 SSIDs. You can have a maximum of 64 SSID profiles
on the Zyxel Device.
•Security - This profile type defines the security settings used by a single SSID. It controls the encryption
method required for a wireless client to associate itself with the SSID. You can have a maximum of 64
security profiles on the Zyxel Device.
•MAC Filtering - This profile provides an additional layer of security for an SSID, allowing you to block
access or allow access to that SSID based on wireless client MAC addresses. If a client’s MAC address
is on the list, then it is either allowed or denied, depending on how you set up the MAC Filter profile.
You can have a maximum of 64 MAC filtering profiles on the Zyxel Device.
•Layer-2 Isolation - This profile defines the MAC addresses of the devices that you want to allow the
associated wireless clients to have access to when layer-2 isolation is enabled.
SSID
The SSID (Service Set IDentifier) is the name that identifies the Service Set with which a wireless station is
associated. Wireless stations associating to the access point (AP) must have the same SSID. In other
words, it is the name of the wireless network that clients use to connect to it.

Chapter 12 AP Profile
NWA/WAC/WAX Series User’s Guide
95
Figure 57 Configuration > Object > AP Profile > Radio
The following table describes the labels in this screen.
12.2.1 Add/Edit Radio Profile
This screen allows you to create a new radio profile or edit an existing one. To access this screen, click
the Add button or select a radio profile from the list and click the Edit button.
Table 37 Configuration > Object > AP Profile > Radio
LABEL DESCRIPTION
Add Click this to add a new radio profile.
Edit Click this to edit the selected radio profile.
Remove Click this to remove the selected radio profile.
Activate To turn on an entry, select it and click Activate.
Inactivate To turn off an entry, select it and click Inactivate.
Object
Reference
Click this to view which other objects are linked to the selected radio profile.
# This field is a sequential value, and it is not associated with a specific user.
Status This field shows whether or not the entry is activated.
A yellow bulb signifies that this rule is active. A gray bulb signifies that this rule is not active.
Profile Name This field indicates the name assigned to the radio profile.
Frequency Band This field indicates the frequency band which this radio profile is configured to use.
Apply Click Apply to save your changes back to the Zyxel Device.
Reset Click Reset to return the screen to its last-saved settings.

Chapter 12 AP Profile
NWA/WAC/WAX Series User’s Guide
97
802.11 Mode Select how to let wireless clients connect to the AP.
If 802.11 Band is set to 2.4G:
•11b/g: allows either IEEE 802.11b or IEEE 802.11g compliant WLAN devices to associate
with the Zyxel Device. The Zyxel Device adjusts the transmission rate automatically
according to the wireless standard supported by the wireless devices.
•11n: allows IEEE802.11b, IEEE802.11g and IEEE802.11n compliant WLAN devices to
associate with the Zyxel Device.
•11ax: allows IEEE802.11b, IEEE802.11g, IEEE802.11n, and IEEE802.11ax compliant WLAN
devices to associate with the Zyxel Device. If the WLAN device isn’t compatible with
802.11ax, the Zyxel Device will communicate with the WLAN device using 802.11n, and
so on.
If 802.11 Band is set to 5G:
•11a: allows only IEEE 802.11a compliant WLAN devices to associate with the Zyxel
Device.
•11n: allows both IEEE802.11n and IEEE802.11a compliant WLAN devices to associate
with the Zyxel Device.
•11ac: allows IEEE802.11n, IEEE802.11a, and IEEE802.11ac compliant WLAN devices to
associate with the Zyxel Device. If the WLAN device isn’t compatible with 802.11ac, the
Zyxel Device will communicate with the WLAN device using 802.11n, and so on.
•11ax: allows IEEE802.11n, IEEE802.11a, IEEE802.11ac, and IEEE802.11ax compliant WLAN
devices to associate with the Zyxel Device. If the WLAN device isn’t compatible with
802.11ax, the Zyxel Device will communicate with the WLAN device using 802.11ac,
and so on.
Channel Width Select the channel bandwidth you want to use for your wireless network.
Select 20 MHz if you want to lessen radio interference with other wireless devices in your
neighborhood.
Select 20/40 MHz to allow the Zyxel Device to choose the channel bandwidth (20 or 40
MHz) that has least interference.
Select 20/40/80 to allow the Zyxel Device to choose the channel bandwidth (20 or 40 or 80)
that has least interference. This option is available only when you select 11ac or 11ax in the
802.11 Mode field.
Select 20/40/80/160 MHz to allow the Zyxel Device to choose the channel bandwidth (20
or 40 or 80 or 160 MHz) that has least interference. This option is available only when you
select 11ax in the 802.11 Mode field.
Note: If the environment has poor signal-to-noise ratio (SNR), the Zyxel Device will
switch to a lower bandwidth.
Note: 160 MHz is only available in NWA210AX, WAX610D and WAX650S.
Channel
Selection
This is the radio channel which the signal will use for broadcasting by this radio profile.
•DCS: Choose Dynamic Channel Selection to have the Zyxel Device choose a radio
channel that has least interference.
•Manual: Choose from the available radio channels in the list. If your Zyxel Device is
outdoor type, be sure to choose non-indoors channels.
Enable DCS
Client Aware
Select this to have the Zyxel Device switch channels only when there are no clients
connected to it. If there is a client connected, the Zyxel Device will not switch channels but
generate a log. The Zyxel Device tries to scan and switch channels again at the end of the
specified time interval or at the scheduled time.
If you disable this then the Zyxel Device switches channels immediately regardless of any
client connections. In this instance, clients that are connected to the Zyxel Device when it
switches channels are dropped.
Table 38 Configuration > Object > AP Profile > Radio > Add/Edit (continued)
LABEL DESCRIPTION
Chapter 12 AP Profile
NWA/WAC/WAX Series User’s Guide
101
12.3 SSID
The SSID screens allow you to configure three different types of profiles for your networked APs: an SSID
list, which can assign specific SSID configurations to your APs; a security list, which can assign specific
encryption methods to the APs when allowing wireless clients to connect to them; and a MAC filter list,
which can limit connections to an AP based on wireless clients MAC addresses.
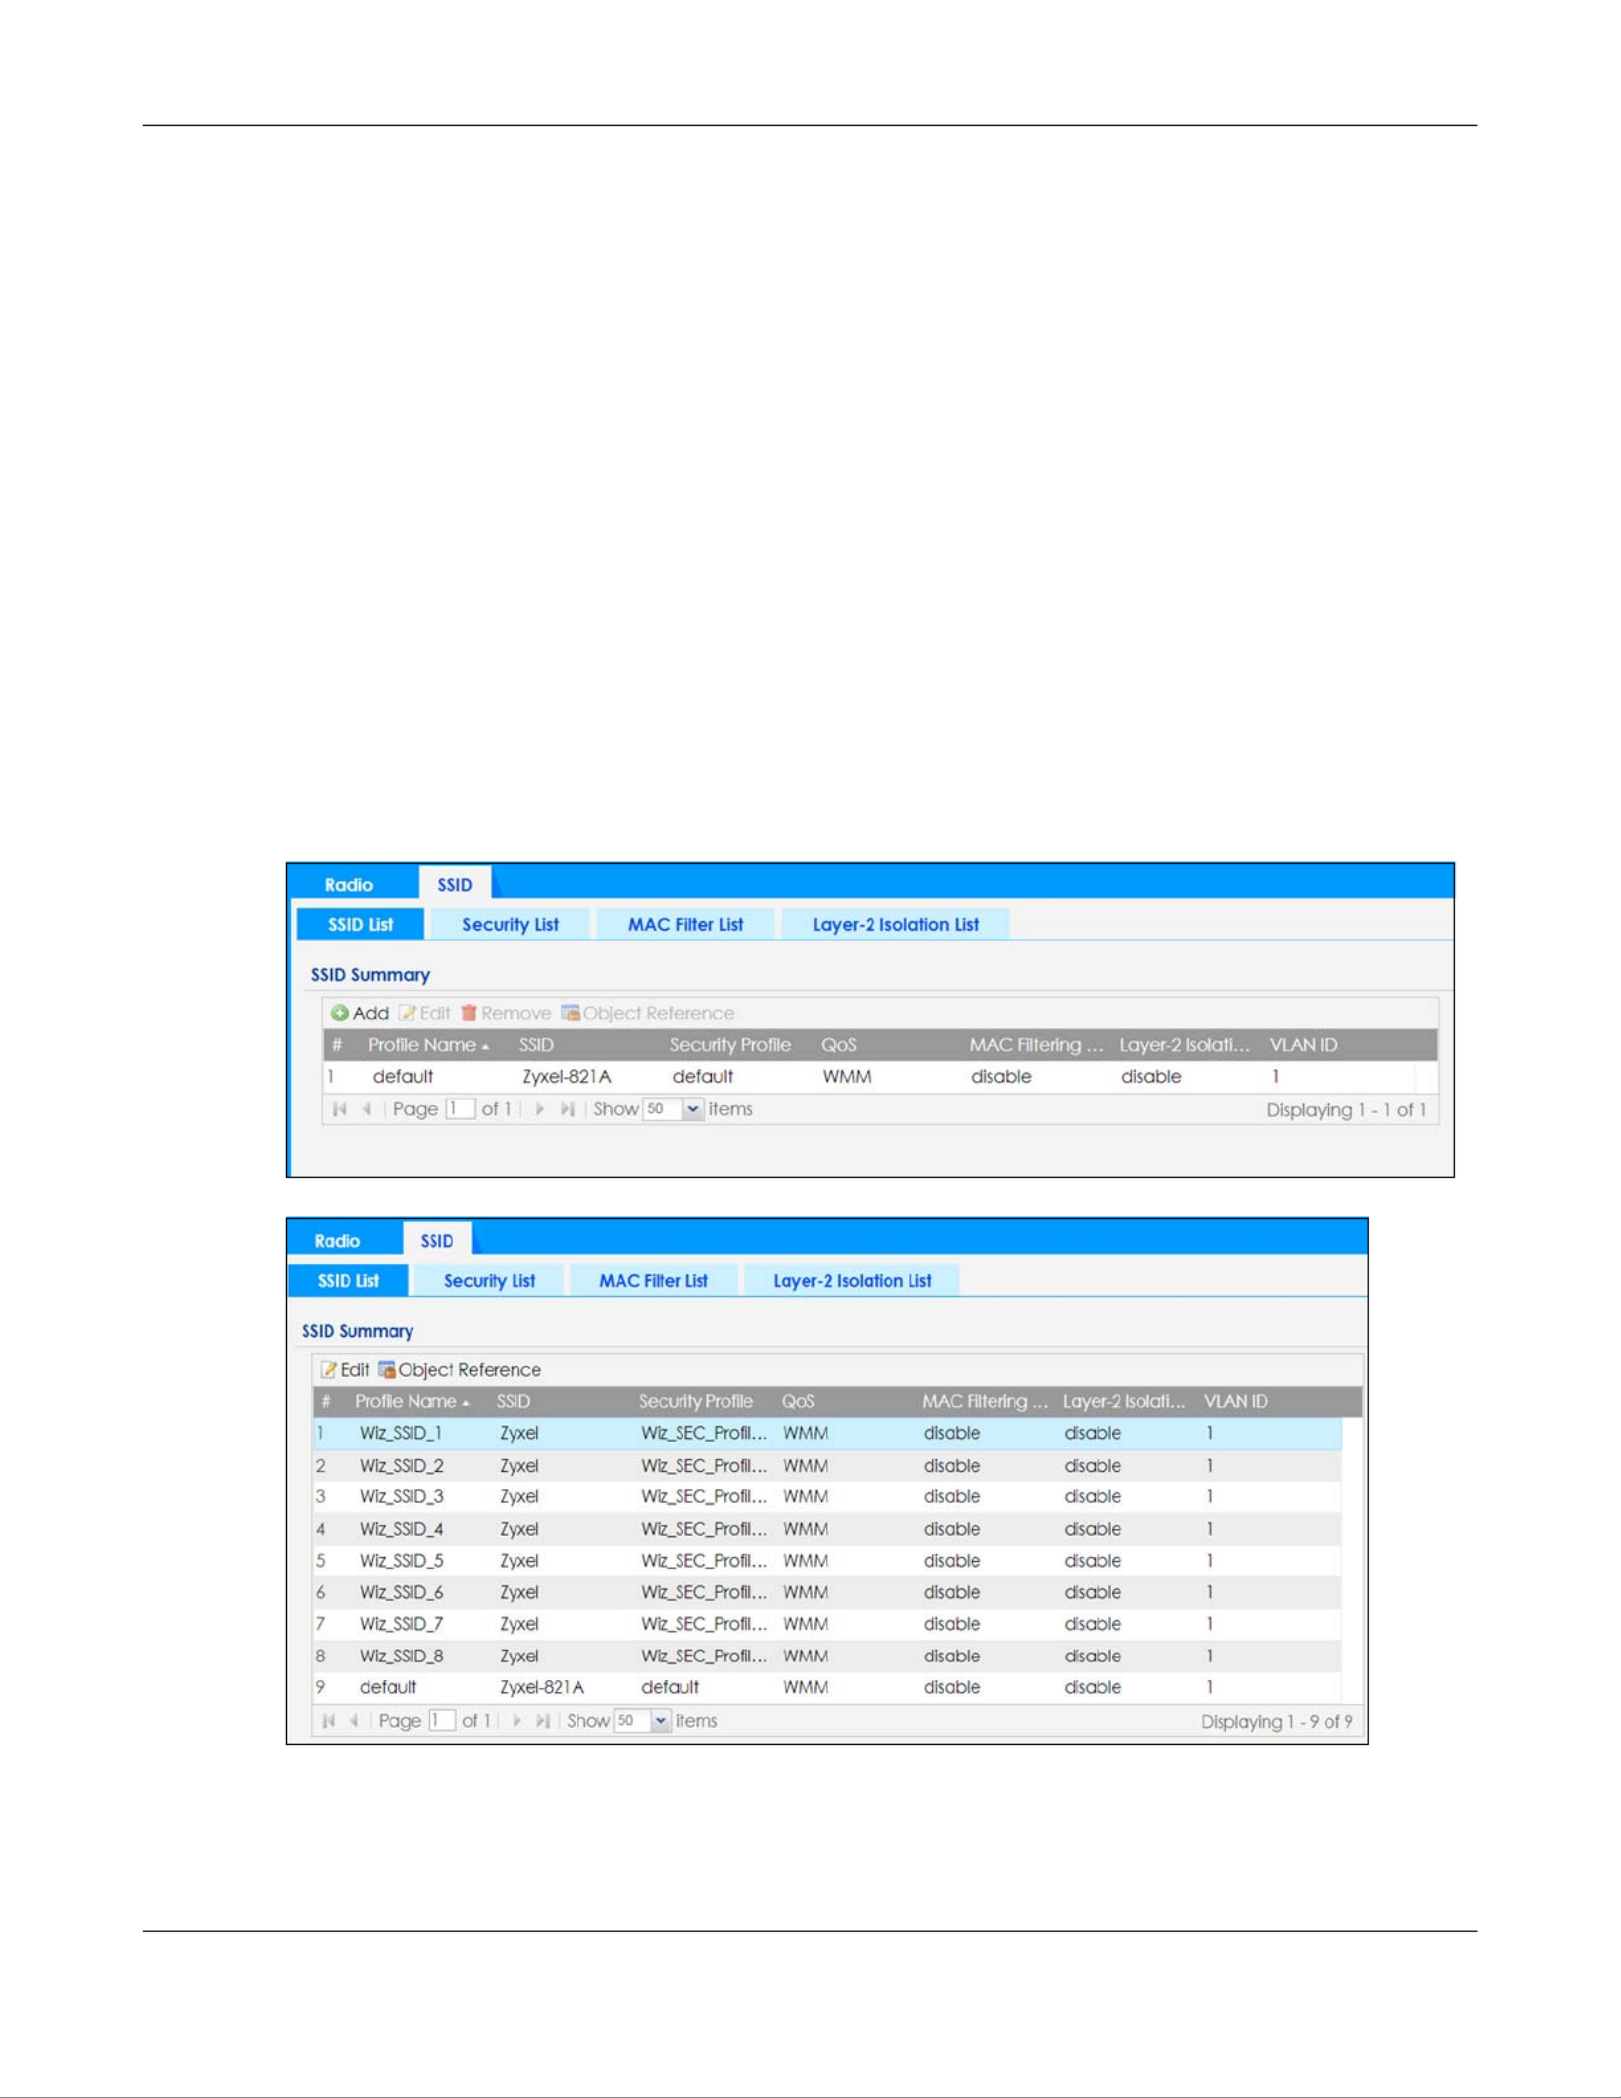
12.3.1 SSID List
This screen allows you to create and manage SSID configurations that can be used by the APs. An SSID,
or Service Set IDentifier, is basically the name of the wireless network to which a wireless client can
connect. The SSID appears as readable text to any device capable of scanning for wireless frequencies
(such as the WiFi adapter in a laptop), and is displayed as the wireless network name when a person
makes a connection to it.
To access this screen click Conguration > Object > AP Prole > SSID > SSID List.
Note: You cannot add or remove an SSID profile after running the setup wizard.
Figure 59 Configuration > Object > AP Profile > SSID > SSID List (Default)
Figure 60 Configuration > Object > AP Profile > SSID > SSID List (After wizard setup)

Chapter 12 AP Profile
NWA/WAC/WAX Series User’s Guide
104
MAC Filtering
Profile
Select a MAC filtering profile from the list to associate with this SSID. If none exist, you can use
the Create new Object menu to create one.
MAC filtering allows you to limit the wireless clients connecting to your network through a
particular SSID by wireless client MAC addresses. Any clients that have MAC addresses not in
the MAC filtering profile of allowed addresses are denied connections.
The disable setting means no MAC filtering is used.
Layer-2 Isolation
Profile
Select a layer-2 isolation profile from the list to associate with this SSID. If none exist, you can use
the Create new Object menu to create one.
Layer-2 isolation allows you to prevent wireless clients associated with your Zyxel Device from
communicating with other wireless clients, APs, computers or routers in a network.
The disable setting means no layer-2 isolation is used.
QoS Select a Quality of Service (QoS) access category to associate with this SSID. Access categories
minimize the delay of data packets across a wireless network. Certain categories, such as
video or voice, are given a higher priority due to the time sensitive nature of their data packets.
QoS access categories are as follows:
disable: Turns off QoS for this SSID. All data packets are treated equally and not tagged with
access categories.
WMM: Enables automatic tagging of data packets. The Zyxel Device assigns access categories
to the SSID by examining data as it passes through it and making a best guess effort. If
something looks like video traffic, for instance, it is tagged as such.
WMM_VOICE: All wireless traffic to the SSID is tagged as voice data. This is recommended if an
SSID is used for activities like placing and receiving VoIP phone calls.
WMM_VIDEO: All wireless traffic to the SSID is tagged as video data. This is recommended for
activities like video conferencing.
WMM_BEST_EFFORT: All wireless traffic to the SSID is tagged as “best effort,” meaning the data
travels the best route it can without displacing higher priority traffic. This is good for activities
that do not require the best bandwidth throughput, such as surfing the Internet.
WMM_BACKGROUND: All wireless traffic to the SSID is tagged as low priority or “background
traffic”, meaning all other access categories take precedence over this one. If traffic from an
SSID does not have strict throughput requirements, then this access category is recommended.
For example, an SSID that only has network printers connected to it.
Rate Limiting
Downlink Define the maximum incoming transmission data rate (either in mbps or kbps) on a per-station
basis.
Uplink Define the maximum outgoing transmission data rate (either in mbps or kbps) on a per-station
basis.
VLAN ID Enter a VLAN ID for the Zyxel Device to use to tag traffic originating from this SSID.
Hidden SSID Select this if you want to “hide” your SSID from wireless clients. This tells any wireless clients in the
vicinity of the AP using this SSID profile not to display its SSID name as a potential connection.
Not all wireless clients respect this flag and display it anyway.
When a SSID is “hidden” and a wireless client cannot see it, the only way you can connect to
the SSID is by manually entering the SSID name in your wireless connection setup screen(s)
(these vary by client, client connectivity software, and operating system).
Enable Intra-BSS
Traffic Blocking
Select this option to prevent crossover traffic from within the same SSID on the Zyxel Device.
Enable U-APSD Select this option to enable Unscheduled Automatic Power Save Delivery (U-APSD), which is
also known as WMM-Power Save. This helps increase battery life for battery-powered wireless
clients connected to the Zyxel Device using this SSID profile.
Table 40 Configuration > Object > AP Profile > SSID > SSID List > Add/Edit SSID Profile (continued)
LABEL DESCRIPTION

Chapter 12 AP Profile
NWA/WAC/WAX Series User’s Guide
105
12.4 Security List
This screen allows you to manage wireless security configurations that can be used by your SSIDs.
Wireless security is implemented strictly between the AP broadcasting the SSID and the stations that are
connected to it.
To access this screen click Conguration > Object > AP Prole > SSID > Security List.
Note: You can have a maximum of 32 security profiles on the Zyxel Device.
Figure 62 Configuration > Object > AP Profile > SSID > Security List
The following table describes the labels in this screen.
Enable Proxy ARP The Address Resolution Protocol (ARP) is a protocol for mapping an IP address to a MAC
address. An ARP broadcast is sent to all devices in the same Ethernet network to request the
MAC address of a target IP address.
Select this option to allow the Zyxel Device to answer ARP requests for an IP address on behalf
of a client associated with this SSID. This can reduce broadcast traffic and improve network
performance.
802.11k/v Assisted
Roaming
Select this option to enable IEEE 802.11k/v assisted roaming on the Zyxel Device. When the
connected clients request 802.11k neighbor lists, the Zyxel Device will response with a list of
neighbor APs that can be candidates for roaming.
Schedule SSID Select this option and set whether the SSID is enabled or disabled on each day of the week.
You also need to select the hour and minute (in 24-hour format) to specify the time period of
each day during which the SSID is enabled/enabled.
OK Click OK to save your changes back to the Zyxel Device.
Cancel Click Cancel to exit this screen without saving your changes.
Table 40 Configuration > Object > AP Profile > SSID > SSID List > Add/Edit SSID Profile (continued)
LABEL DESCRIPTION
Table 41 Configuration > Object > AP Profile > SSID > Security List
LABEL DESCRIPTION
Add Click this to add a new security profile.
Edit Click this to edit the selected security profile.
Remove Click this to remove the selected security profile.
Object
Reference
Click this to view which other objects are linked to the selected security profile (for example,
SSID profile).
# This field is a sequential value, and it is not associated with a specific user.
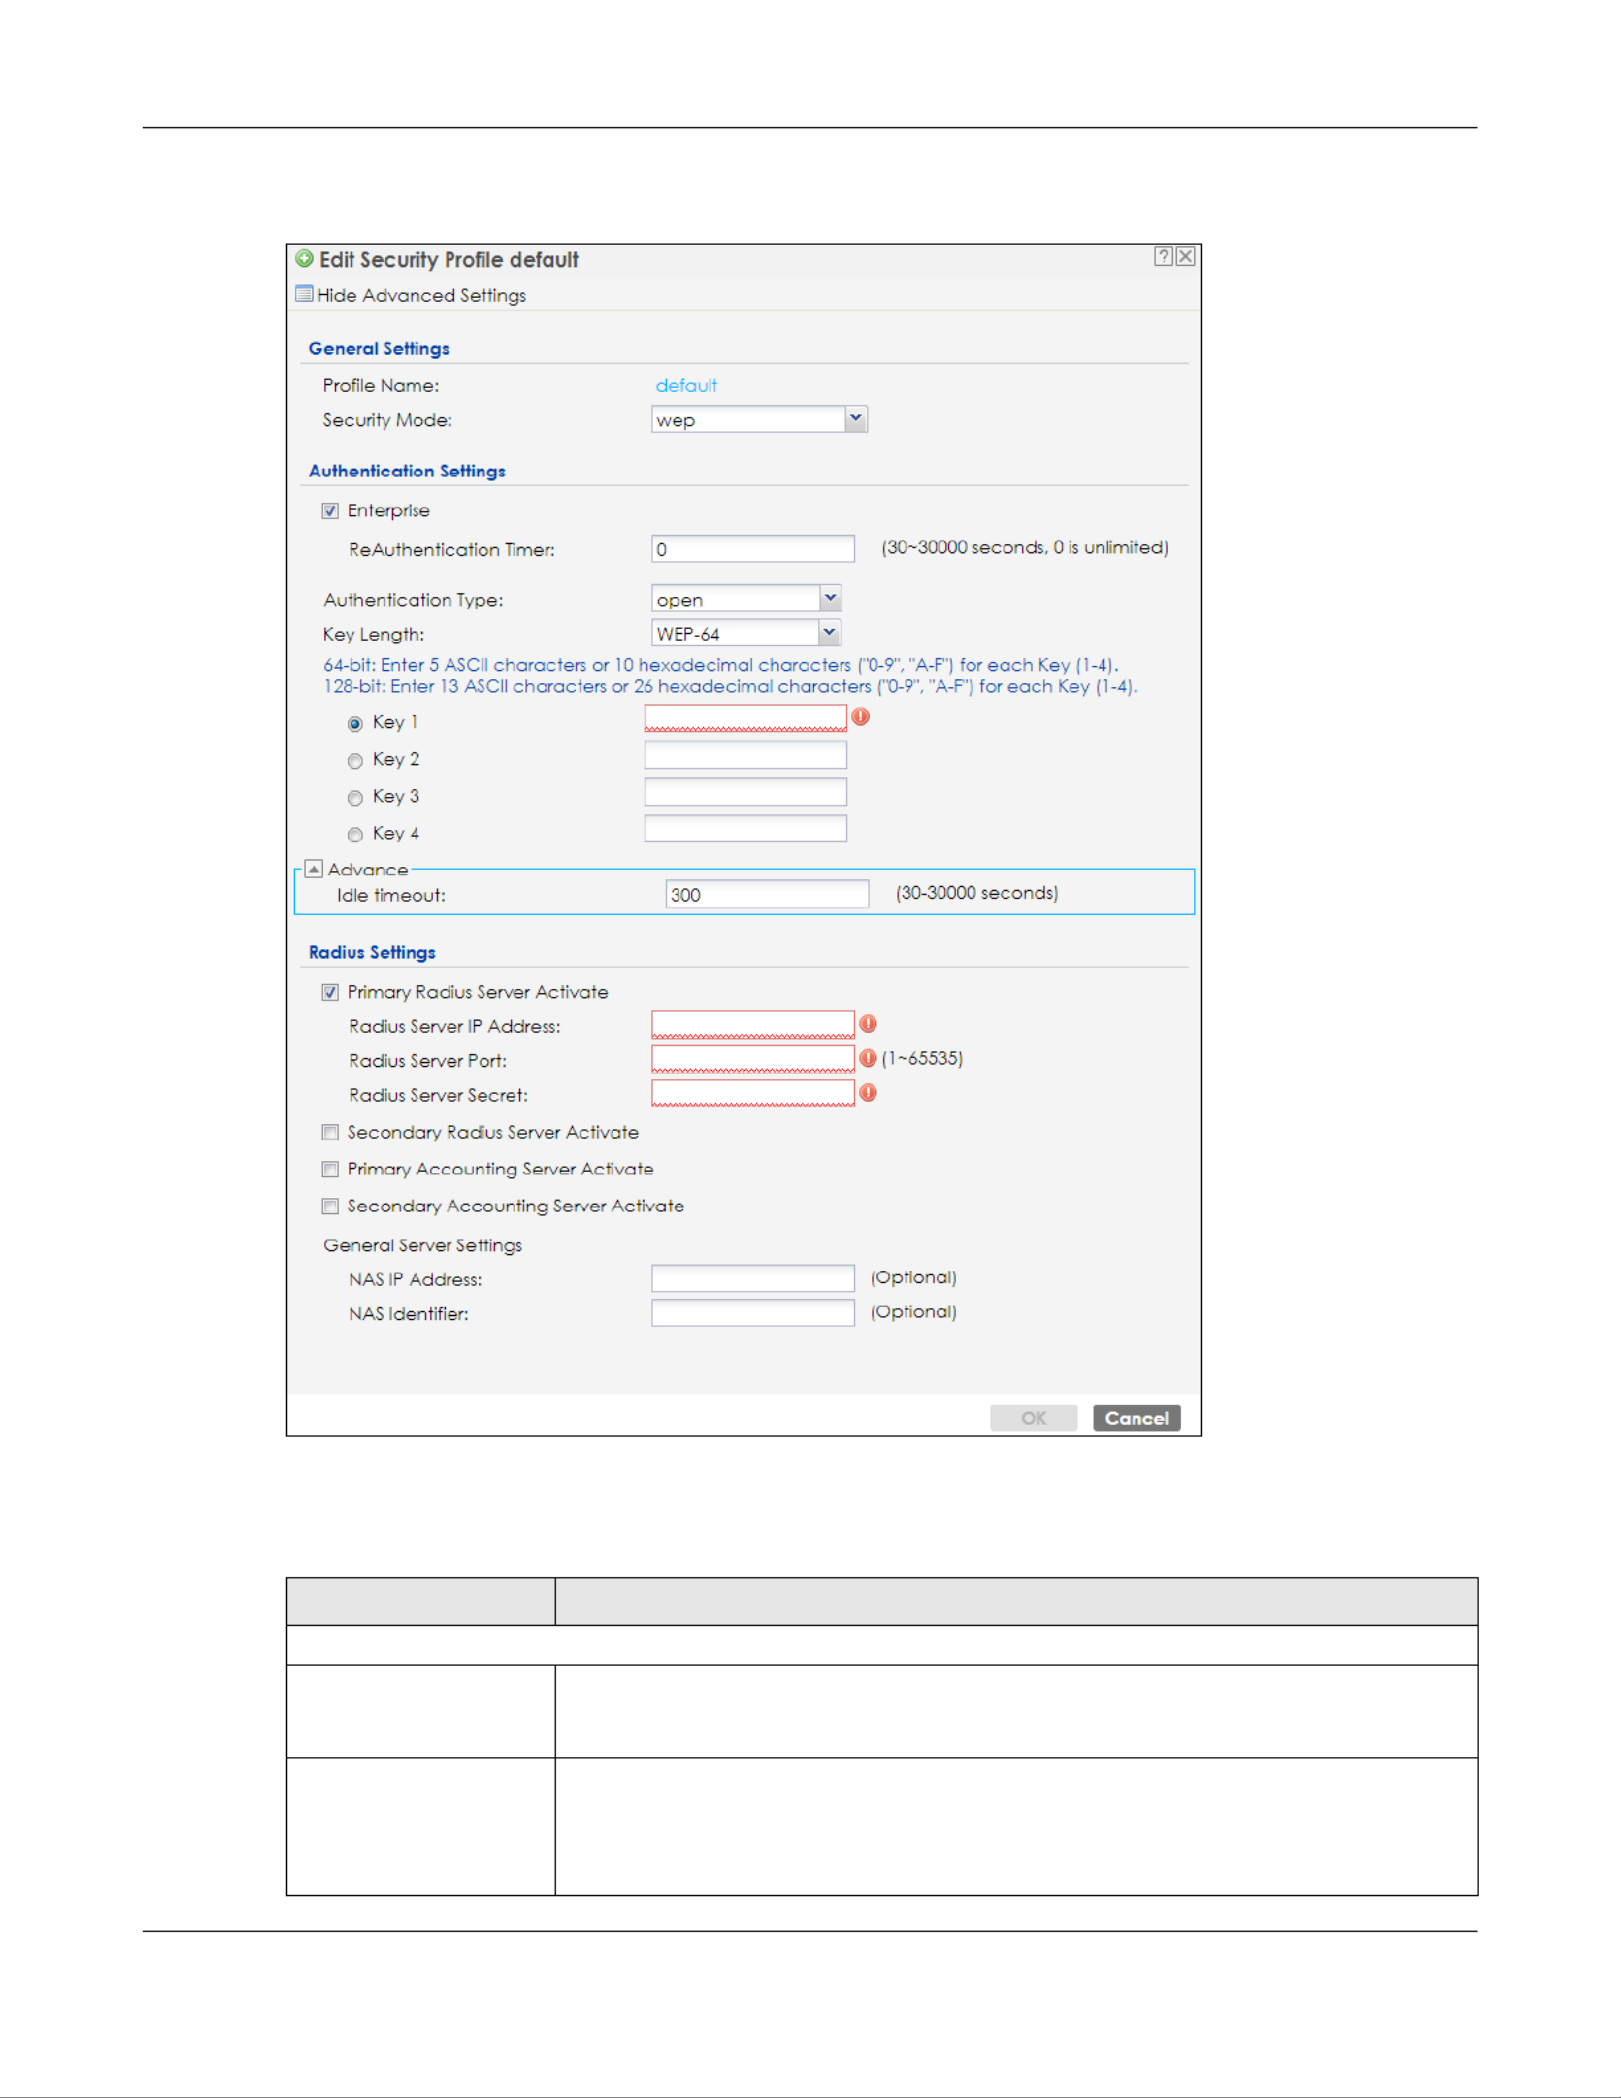
Chapter 12 AP Profile
NWA/WAC/WAX Series User’s Guide
110
Figure 65 Configuration > Object > AP Profile > SSID > Security List > Add/Edit Security Profile> Security
Mode: wep
The following table describes the labels in this screen.
Table 44 Configuration > Object > AP Profile > SSID > Security List > Add/Edit Security Profile> Security
Mode: wep
LABEL DESCRIPTION
General Settings
Profile Name Enter up to 31 alphanumeric characters for the profile name. This name is only visible in
the Web Configurator and is only for management purposes. Spaces and underscores
are allowed.
Security Mode Select a security mode from the list: none, enhanced-open wpa2, wep, , wpa2-mix or
wpa3.
enhanced-open uses Opportunistic Wireless Encryption (OWE) which encrypts the
wireless connection when possible.

Chapter 12 AP Profile
NWA/WAC/WAX Series User’s Guide
111
Authentication Settings
Enterprise Select this to enable 802.1x secure authentication with a RADIUS server.
ReAuthentication
Timer
Enter the interval (in seconds) between authentication requests. Enter a 0 for unlimited
time.
Authentication Type Select a WEP authentication method. Choices are Open or Share key.
Key Length Select the bit-length of the encryption key to be used in WEP connections.
If you select WEP-64:
• Enter 10 hexadecimal digits in the range of “A-F”, “a-f” and “0-9” (for example,
0x11AA22BB33) for each Key used.
or
• Enter 5 ASCII characters (case sensitive) ranging from “a-z”, “A-Z” and “0-9” (for
example, MyKey) for each Key used.
If you select WEP-128:
• Enter 26 hexadecimal digits in the range of “A-F”, “a-f” and “0-9” (for example,
0x00112233445566778899AABBCC) for each Key used.
or
• Enter 13 ASCII characters (case sensitive) ranging from “a-z”, “A-Z” and “0-9” (for
example, MyKey12345678) for each Key used.
Key 1~4 Based on your Key Length selection, enter the appropriate length hexadecimal or ASCII
key.
Advance
Note: Click on the Show Advanced Settings button to show the fields describe below.
Idle Timeout Enter the idle interval (in seconds) that a client can be idle before authentication is
discontinued.
Radius Settings
Primary / Secondary
Radius Server Activate
Select this to have the Zyxel Device use the specified RADIUS server.
Radius Server IP
Address
Enter the IP address of the RADIUS server to be used for authentication.
Radius Server Port Enter the port number of the RADIUS server to be used for authentication.
Radius Server Secret Enter the shared secret password of the RADIUS server to be used for authentication.
Primary / Secondary
Accounting Server
Activate
Select the check box to enable user accounting through an external authentication
server.
Accounting Server
IP Address
Enter the IP address of the external accounting server in dotted decimal notation.
Accounting Server
Port
Enter the port number of the external accounting server. The default port number is 1813.
You need not change this value unless your network administrator instructs you to do so
with additional information.
Accounting Share
Secret
Enter a password (up to 128 alphanumeric characters) as the key to be shared between
the external accounting server and the Zyxel Device. The key must be the same on the
external accounting server and your Zyxel Device. The key is not sent over the network.
Accounting Interim
Update
This field is available only when you enable user accounting through an external
authentication server.
Select this to have the Zyxel Device send subscriber status updates to the accounting
server at the interval you specify.
Table 44 Configuration > Object > AP Profile > SSID > Security List > Add/Edit Security Profile> Security
Mode: wep (continued)
LABEL DESCRIPTION
Chapter 12 AP Profile
NWA/WAC/WAX Series User’s Guide
112
Interim Update
Interval Specify the time interval for how often the Zyxel Device is to send a subscriber status
update to the accounting server.
General Server Settings
NAS IP Address If the RADIUS server requires the Zyxel Device to provide the NAS (Network Access Server)
IP address attribute, enter it here.
NAS Identifier If the RADIUS server requires the Zyxel Device to provide the NAS (Network Access Server)
identifier attribute, enter it here. The NAS identifier is to identify the source of access
request. It could be the NAS’s fully qualified domain name.
OK Click OK to save your changes back to the Zyxel Device.
Cancel Click Cancel to exit this screen without saving your changes.
Table 44 Configuration > Object > AP Profile > SSID > Security List > Add/Edit Security Profile> Security
Mode: wep (continued)
LABEL DESCRIPTION

Chapter 12 AP Profile
NWA/WAC/WAX Series User’s Guide
114
Security Mode Select a security mode from the list: none, enhanced-open wpa2, wep, , wpa2-mix or
wpa3.
enhanced-open uses Opportunistic Wireless Encryption (OWE) which encrypts the
wireless connection when possible.
Authentication Settings
Enterprise Select this to enable 802.1x secure authentication with a RADIUS server.
ReAuthentication
Timer Enter the interval (in seconds) between authentication requests. Enter a 0 for unlimited
time.
Personal This field is available when you select the wpa2 wpa3, wpa2-mix or security mode.
Select this option to use a Pre-Shared Key (PSK) with WPA2 encryption or Simultaneous
Authentication of Equals (SAE) with WPA3 encryption.
Pre-Shared Key Enter a pre-shared key of between 8 and 63 case-sensitive ASCII characters (including
spaces and symbols) or 64 hexadecimal characters.
Advance
Note: Click on the Show Advanced Settings button to show the fields describe below.
Cipher Type Select an encryption cipher type from the list.
•auto - This automatically chooses the best available cipher based on the cipher in
use by the wireless client that is attempting to make a connection.
•aes - This is the Advanced Encryption Standard encryption method. It is a more
recent development over TKIP and considerably more robust. Not all wireless clients
may support this.
Idle Timeout Enter the idle interval (in seconds) that a client can be idle before authentication is
discontinued.
Group Key Update
Timer
Enter the interval (in seconds) at which the AP updates the group WPA2 encryption key.
Pre-Authentication Select Enable to allow pre-authentication. Otherwise, select Disable.
Management Frame
Protection
This field is available only when you select wpa2 in the Security Mode field and set Cipher
Type to aes.
Data frames in 802.11 WLANs can be encrypted and authenticated with WEP, WPA or
WPA2. But 802.11 management frames, such as beacon/probe response, association
request, association response, de-authentication and disassociation are always
unauthenticated and unencrypted. IEEE 802.11w Protected Management Frames allows
APs to use the existing security mechanisms (encryption and authentication methods
defined in IEEE 802.11i WPA/WPA2) to protect management frames. This helps prevent
wireless DoS attacks.
Select the check box to enable management frame protection (MFP) to add security to
802.11 management frames.
Select Optional if you do not require the wireless clients to support MFP. Management
frames will be encrypted if the clients support MFP.
Select Required and wireless clients must support MFP in order to join the Zyxel Device’s
wireless network.
Radius Settings
Primary / Secondary
Radius Server Activate
Select this to have the Zyxel Device use the specified RADIUS server.
Radius Server IP
Address Enter the IP address of the RADIUS server to be used for authentication.
Radius Server Port Enter the port number of the RADIUS server to be used for authentication.
Table 45 Configuration > Object > AP Profile > SSID > Security List > AAdd/Edit Security Profile> Security
Mode: wpa2 (continued)
LABEL DESCRIPTION

Chapter 12 AP Profile
NWA/WAC/WAX Series User’s Guide
115
Radius Server Secret Enter the shared secret password of the RADIUS server to be used for authentication.
Primary / Secondary
Accounting Server
Activate
Select the check box to enable user accounting through an external authentication
server.
Accounting Server
IP Address
Enter the IP address of the external accounting server in dotted decimal notation.
Accounting Server
Port
Enter the port number of the external accounting server. The default port number is 1813.
You need not change this value unless your network administrator instructs you to do so
with additional information.
Accounting Share
Secret
Enter a password (up to 128 alphanumeric characters) as the key to be shared between
the external accounting server and the Zyxel Device. The key must be the same on the
external accounting server and your Zyxel Device. The key is not sent over the network.
Accounting Interim
Update
This field is available only when you enable user accounting through an external
authentication server.
Select this to have the Zyxel Device send subscriber status updates to the accounting
server at the interval you specify.
Interim Update
Interval
Specify the time interval for how often the Zyxel Device is to send a subscriber status
update to the accounting server.
General Server Settings
NAS IP Address If the RADIUS server requires the Zyxel Device to provide the NAS (Network Access Server)
IP address attribute, enter it here.
NAS Identifier If the RADIUS server requires the Zyxel Device to provide the NAS (Network Access Server)
identifier attribute, enter it here. The NAS identifier is to identify the source of access
request. It could be the NAS’s fully qualified domain name.
OK Click OK to save your changes back to the Zyxel Device.
Cancel Click Cancel to exit this screen without saving your changes.
Table 45 Configuration > Object > AP Profile > SSID > Security List > AAdd/Edit Security Profile> Security
Mode: wpa2 (continued)
LABEL DESCRIPTION

Chapter 12 AP Profile
NWA/WAC/WAX Series User’s Guide
116
Figure 67 Configuration > Object > AP Profile > SSID > Security List > Add/Edit Security Profile> Security
Mode: wpa2-mix
The following table describes the labels in this screen.
Table 46 Configuration > Object > AP Profile > SSID > Security List > AAdd/Edit Security Profile> Security
Mode: wpa2-mix
LABEL DESCRIPTION
General Settings
Profile Name Enter up to 31 alphanumeric characters for the profile name. This name is only visible in
the Web Configurator and is only for management purposes. Spaces and underscores
are allowed.

Chapter 12 AP Profile
NWA/WAC/WAX Series User’s Guide
117
Security Mode Select a security mode from the list: none, enhanced-open wpa2, wep, , wpa2-mix or
wpa3.
enhanced-open uses Opportunistic Wireless Encryption (OWE) which encrypts the
wireless connection when possible.
Authentication Settings
Enterprise Select this to enable 802.1x secure authentication with a RADIUS server.
ReAuthentication
Timer
Enter the interval (in seconds) between authentication requests. Enter a 0 for unlimited
time.
Personal This field is available when you select the wpa2 wpa3, wpa2-mix or security mode.
Select this option to use a Pre-Shared Key (PSK) with WPA2 encryption or Simultaneous
Authentication of Equals (SAE) with WPA3 encryption.
Pre-Shared Key Enter a pre-shared key of between 8 and 63 case-sensitive ASCII characters (including
spaces and symbols) or 64 hexadecimal characters.
Advance
Note: Click on the Show Advanced Settings button to show the fields describe below.
Cipher Type Select an encryption cipher type from the list.
•auto - This automatically chooses the best available cipher based on the cipher in
use by the wireless client that is attempting to make a connection.
•aes - This is the Advanced Encryption Standard encryption method. It is a more
recent development over TKIP and considerably more robust. Not all wireless clients
may support this.
Idle Timeout Enter the idle interval (in seconds) that a client can be idle before authentication is
discontinued.
Group Key Update
Timer
Enter the interval (in seconds) at which the AP updates the group WPA2 encryption key.
Pre-Authentication Select Enable to allow pre-authentication. Otherwise, select Disable.
Radius Settings
Primary / Secondary
Radius Server Activate
Select this to have the Zyxel Device use the specified RADIUS server.
Radius Server IP
Address
Enter the IP address of the RADIUS server to be used for authentication.
Radius Server Port Enter the port number of the RADIUS server to be used for authentication.
Radius Server Secret Enter the shared secret password of the RADIUS server to be used for authentication.
Primary / Secondary
Accounting Server
Activate
Select the check box to enable user accounting through an external authentication
server.
Accounting Server
IP Address
Enter the IP address of the external accounting server in dotted decimal notation.
Accounting Server
Port
Enter the port number of the external accounting server. The default port number is 1813.
You need not change this value unless your network administrator instructs you to do so
with additional information.
Accounting Share
Secret
Enter a password (up to 128 alphanumeric characters) as the key to be shared between
the external accounting server and the Zyxel Device. The key must be the same on the
external accounting server and your Zyxel Device. The key is not sent over the network.
Table 46 Configuration > Object > AP Profile > SSID > Security List > AAdd/Edit Security Profile> Security
Mode: wpa2-mix (continued)
LABEL DESCRIPTION
Chapter 12 AP Profile
NWA/WAC/WAX Series User’s Guide
120
Security Mode Select a security mode from the list: none, enhanced-open wpa2, wep, , wpa2-mix or
wpa3.
enhanced-open uses Opportunistic Wireless Encryption (OWE) which encrypts the
wireless connection when possible.
Authentication Settings
Enterprise Select this to enable 802.1x secure authentication with a RADIUS server.
ReAuthentication
Timer
Enter the interval (in seconds) between authentication requests. Enter a 0 for unlimited
time.
Personal This field is available when you select the wpa2 wpa3, wpa2-mix or security mode.
Select this option to use a Pre-Shared Key (PSK) with WPA2 encryption or Simultaneous
Authentication of Equals (SAE) with WPA3 encryption.
Pre-Shared Key Enter a pre-shared key of between 8 and 63 case-sensitive ASCII characters (including
spaces and symbols) or 64 hexadecimal characters.
Transition Mode Enable this for backwards compatibility. This option is only available if the Security Mode
is wpa3 or enhanced-open. This creates two virtual APs (VAPs) with a primary (wpa3 or
enhanced-open) and fallback (wpa2 or none) security method.
If the Security Mode is wpa3, enabling this will force Management Frame Protection to be
set to Optional. If this is disabled or if the Security Mode is enhanced-open, Management
Frame Protection will be set to Required.
Advance
Note: Click on the Show Advanced Settings button to show the fields describe below.
Idle Timeout Enter the idle interval (in seconds) that a client can be idle before authentication is
discontinued.
Group Key Update
Timer
Enter the interval (in seconds) at which the AP updates the group WPA2 encryption key.
Pre-Authentication Select Enable to allow pre-authentication. Otherwise, select Disable.
Management Frame
Protection
This field is available only when you select wpa2 in the Security Mode field and set Cipher
Type to aes.
Data frames in 802.11 WLANs can be encrypted and authenticated with WEP, WPA or
WPA2. But 802.11 management frames, such as beacon/probe response, association
request, association response, de-authentication and disassociation are always
unauthenticated and unencrypted. IEEE 802.11w Protected Management Frames allows
APs to use the existing security mechanisms (encryption and authentication methods
defined in IEEE 802.11i WPA/WPA2) to protect management frames. This helps prevent
wireless DoS attacks.
Select the check box to enable management frame protection (MFP) to add security to
802.11 management frames.
Select Optional if you do not require the wireless clients to support MFP. Management
frames will be encrypted if the clients support MFP.
Select Required and wireless clients must support MFP in order to join the Zyxel Device’s
wireless network.
Radius Settings
Primary / Secondary
Radius Server Activate
Select this to have the Zyxel Device use the specified RADIUS server.
Radius Server IP
Address
Enter the IP address of the RADIUS server to be used for authentication.
Radius Server Port Enter the port number of the RADIUS server to be used for authentication.
Table 47 Configuration > Object > AP Profile > SSID > Security List > Add/Edit Security Profile> Security
Mode: wpa3 (continued)
LABEL DESCRIPTION

Chapter 12 AP Profile
NWA/WAC/WAX Series User’s Guide
121
12.5 MAC Filter List
This screen allows you to create and manage security configurations that can be used by your SSIDs. To
access this screen click Configuration > Object > AP Profile > SSID > MAC Filter List.
Note: You can have a maximum of 32 MAC filtering profiles on the Zyxel Device.
Figure 69 Configuration > Object > AP Profile > SSID > MAC Filter List
Radius Server Secret Enter the shared secret password of the RADIUS server to be used for authentication.
Primary / Secondary
Accounting Server
Activate
Select the check box to enable user accounting through an external authentication
server.
Accounting Server
IP Address
Enter the IP address of the external accounting server in dotted decimal notation.
Accounting Server
Port
Enter the port number of the external accounting server. The default port number is 1813.
You need not change this value unless your network administrator instructs you to do so
with additional information.
Accounting Share
Secret
Enter a password (up to 128 alphanumeric characters) as the key to be shared between
the external accounting server and the Zyxel Device. The key must be the same on the
external accounting server and your Zyxel Device. The key is not sent over the network.
Accounting Interim
Update
This field is available only when you enable user accounting through an external
authentication server.
Select this to have the Zyxel Device send subscriber status updates to the accounting
server at the interval you specify.
Interim Update
Interval
Specify the time interval for how often the Zyxel Device is to send a subscriber status
update to the accounting server.
General Server Settings
NAS IP Address If the RADIUS server requires the Zyxel Device to provide the NAS (Network Access Server)
IP address attribute, enter it here.
NAS Identifier If the RADIUS server requires the Zyxel Device to provide the NAS (Network Access Server)
identifier attribute, enter it here. The NAS identifier is to identify the source of access
request. It could be the NAS’s fully qualified domain name.
OK Click OK to save your changes back to the Zyxel Device.
Cancel Click Cancel to exit this screen without saving your changes.
Table 47 Configuration > Object > AP Profile > SSID > Security List > Add/Edit Security Profile> Security
Mode: wpa3 (continued)
LABEL DESCRIPTION

Chapter 12 AP Profile
NWA/WAC/WAX Series User’s Guide
125
The following table describes the labels in this screen.
Table 51 Configuration > Object > AP Profile > SSID > Layer-2 Isolation List > Add/Edit Layer-2 Isolation
Profile
LABEL DESCRIPTION
Profile Name Enter up to 31 alphanumeric characters for the profile name. This name is only visible in the
Web Configurator and is only for management purposes. Spaces and underscores are
allowed.
Add Click this to add a MAC address to the profile’s list.
Edit Click this to edit the selected MAC address in the profile’s list.
Remove Click this to remove the selected MAC address from the profile’s list.
# This field is a sequential value, and it is not associated with a specific user.
MAC This field specifies a MAC address associated with this profile. You can click the MAC address to
make it editable.
Description This field displays a description for the MAC address associated with this profile. You can click
the description to make it editable. Enter up to 60 characters, spaces and underscores
allowed.
OK Click OK to save your changes back to the Zyxel Device.
Cancel Click Cancel to exit this screen without saving your changes.

Chapter 12 AP Profile
NWA/WAC/WAX Series User’s Guide
128

NWA/WAC/WAX Series User’s Guide
117
CHAPTER 13
MON Profile
13.1 Overview
This screen allows you to set up monitor mode configurations that allow your Zyxel Device to scan for
other wireless devices in the vicini screen ty. Once detected, you can use the Wireless > MON Mode
(Section 10.3 on page 79) to classify them as either rogue or friendly.
Not all Zyxel Devices support monitor mode and rogue APs detection.
13.1.1 What You Can Do in this Chapter
The MON Profile screen (Section 13.2 on page 117) creates preset monitor mode configurations that can
be used by the Zyxel Device.
13.2 MON Profile
This screen allows you to create monitor mode configurations that can be used by the APs. To access
this screen, log into the Web Configurator, and click Configuration > Object > MON Profile.
Figure 71 Configuration > Object > MON Profile
The following table describes the labels in this screen.
Table 50 Configuration > Object > MON Profile
LABEL DESCRIPTION
Add Click this to add a new monitor mode profile.
Edit Click this to edit the selected monitor mode profile.
Remove Click this to remove the selected monitor mode profile.
Activate To turn on an entry, select it and click Activate.
Inactivate To turn off an entry, select it and click Inactivate.

NWA/WAC/WAX Series User’s Guide
120
CHAPTER 14
WDS Profile
14.1 Overview
This chapter shows you how to configure WDS (Wireless Distribution System) profiles for the Zyxel Device
to form a WDS with other APs.
14.1.1 What You Can Do in this Chapter
The WDS Profile screen (Section 14.2 on page 120) creates preset WDS configurations that can be used
by the Zyxel Device.
14.2 WDS Profile
This screen allows you to manage and create WDS profiles that can be used by the APs. To access this
screen, click Conguration > Object > WDS Prole.
Figure 73 Configuration > Object > WDS Profile
The following table describes the labels in this screen.
Table 52 Configuration > Object > WDS Profile
LABEL DESCRIPTION
Add Click this to add a new profile.
Edit Click this to edit the selected profile.
Remove Click this to remove the selected profile.
# This field is a sequential value, and it is not associated with a specific profile.
Profile Name This field indicates the name assigned to the profile.
WDS SSID This field shows the SSID specified in this WDS profile.

NWA/WAC/WAX Series User’s Guide
122
CHAPTER 15
Certificates
15.1 Overview
The Zyxel Device can use certificates (also called digital IDs) to authenticate users. Certificates are
based on public-private key pairs. A certificate contains the certificate owner’s identity and public key.
Certificates provide a way to exchange public keys for use in authentication.
15.1.1 What You Can Do in this Chapter
• The My Certificates screens (Section 15.2 on page 125) generate and export self-signed certificates or
certification requests and import the Zyxel Device’s CA-signed certificates.
• The Trusted Certificates screens (Section 15.3 on page 132) save CA certificates and trusted remote
host certificates to the Zyxel Device. The Zyxel Device trusts any valid certificate that you have
imported as a trusted certificate. It also trusts any valid certificate signed by any of the certificates
that you have imported as a trusted certificate.
15.1.2 What You Need to Know
The following terms and concepts may help as you read this chapter.
When using public-key cryptology for authentication, each host has two keys. One key is public and can
be made openly available. The other key is private and must be kept secure.
These keys work like a handwritten signature (in fact, certificates are often referred to as “digital
signatures”). Only you can write your signature exactly as it should look. When people know what your
signature looks like, they can verify whether something was signed by you, or by someone else. In the
same way, your private key “writes” your digital signature and your public key allows people to verify
whether data was signed by you, or by someone else.
This process works as follows:
1Tim wants to send a message to Jenny. He needs her to be sure that it comes from him, and that the
message content has not been altered by anyone else along the way. Tim generates a public key pair
(one public key and one private key).
2Tim keeps the private key and makes the public key openly available. This means that anyone who
receives a message seeming to come from Tim can read it and verify whether it is really from him or not.
3Tim uses his private key to sign the message and sends it to Jenny.
4Jenny receives the message and uses Tim’s public key to verify it. Jenny knows that the message is from
Tim, and that although other people may have been able to read the message, no-one can have
altered it (because they cannot re-sign the message with Tim’s private key).

Chapter 15 Certificates
NWA/WAC/WAX Series User’s Guide
126
15.2.1 Add My Certificates
Click Configuration > Object > Certificate > My Certificates and then the Add Add icon to open the My
Certificates screen. Use this screen to have the Zyxel Device create a self-signed certificate, enroll a
certificate with a certification authority or generate a certification request.
Figure 76 Configuration > Object > Certificate > My Certificates > Add
Issuer This field displays identifying information about the certificate’s issuing certification authority,
such as a common name, organizational unit or department, organization or company and
country. With self-signed certificates, this is the same information as in the Subject field.
Valid From This field displays the date that the certificate becomes applicable.
Valid To This field displays the date that the certificate expires. The text displays in red and includes an
Expired! message if the certificate has expired.
Import Click Import to open a screen where you can save a certificate to the Zyxel Device.
Refresh Click Refresh to display the current validity status of the certificates.
Table 54 Configuration > Object > Certificate > My Certificates (continued)
LABEL DESCRIPTION

Chapter 15 Certificates
NWA/WAC/WAX Series User’s Guide
129
Figure 77 Configuration > Object > Certificate > My Certificates > Edit

Chapter 15 Certificates
NWA/WAC/WAX Series User’s Guide
136
15.3.2 Import Trusted Certificates
Click Configuration > Object > Certificate > Trusted Certificates > Import to open the Import Trusted
Certificates screen. Follow the instructions in this screen to save a trusted certificate to the Zyxel Device.
Note: You must remove any spaces from the certificate’s filename before you can import the
certificate.
Valid From This field displays the date that the certificate becomes applicable. The text displays in red
and includes a Not Yet Valid! message if the certificate has not yet become applicable.
Valid To This field displays the date that the certificate expires. The text displays in red and includes
an Expiring! or Expired! message if the certificate is about to expire or has already expired.
Key Algorithm This field displays the type of algorithm that was used to generate the certificate’s key pair
(the Zyxel Device uses RSA encryption) and the length of the key set in bits (1024 bits for
example).
Subject Alternative
Name
This field displays the certificate’s owner‘s IP address (IP), domain name (DNS) or e-mail
address (EMAIL).
Key Usage This field displays for what functions the certificate’s key can be used. For example,
“DigitalSignature” means that the key can be used to sign certificates and
“KeyEncipherment” means that the key can be used to encrypt text.
Basic Constraint This field displays general information about the certificate. For example, Subject Type=CA
means that this is a certification authority’s certificate and “Path Length Constraint=1”
means that there can only be one certification authority in the certificate’s path.
MD5 Fingerprint This is the certificate’s message digest that the Zyxel Device calculated using the MD5
algorithm. You can use this value to verify with the certification authority (over the phone for
example) that this is actually their certificate.
SHA1 Fingerprint This is the certificate’s message digest that the Zyxel Device calculated using the SHA1
algorithm. You can use this value to verify with the certification authority (over the phone for
example) that this is actually their certificate.
Certificate This read-only text box displays the certificate or certification request in Privacy Enhanced
Mail (PEM) format. PEM uses lowercase letters, uppercase letters and numerals to convert a
binary certificate into a printable form.
You can copy and paste the certificate into an e-mail to send to friends or colleagues or
you can copy and paste the certificate into a text editor and save the file on a
management computer for later distribution (via floppy disk for example).
Export Certificate Click this button and then Save in the File Download screen. The Save As screen opens,
browse to the location that you want to use and click Save.
OK Click OK to save your changes back to the Zyxel Device. You can only change the name.
Cancel Click Cancel to quit and return to the Trusted Certificates screen.
Table 59 Configuration > Object > Certificate > Trusted Certificates > Edit (continued)
LABEL DESCRIPTION

Chapter 15 Certificates
NWA/WAC/WAX Series User’s Guide
137
Figure 81 Configuration > Object > Certificate > Trusted Certificates > Import
The following table describes the labels in this screen.
15.4 Technical Reference
The following section contains additional technical information about the features described in this
chapter.
OCSP
OCSP (Online Certificate Status Protocol) allows an application or device to check whether a certificate
is valid. With OCSP the Zyxel Device checks the status of individual certificates instead of downloading a
Certificate Revocation List (CRL). OCSP has two main advantages over a CRL. The first is real-time status
information. The second is a reduction in network traffic since the Zyxel Device only gets information on
the certificates that it needs to verify, not a huge list. When the Zyxel Device requests certificate status
information, the OCSP server returns a “expired”, “current” or “unknown” response.
Table 60 Configuration > Object > Certificate > Trusted Certificates > Import
LABEL DESCRIPTION
File Path Type in the location of the file to find it.you want to upload in this field or click Browse
You cannot import a certificate with the same name as a certificate that is already in the Zyxel
Device.
Browse Click Browse to find the certificate file you want to upload.
OK Click OK to save the certificate on the Zyxel Device.
Cancel Click Cancel to quit and return to the previous screen.

Chapter 16 System
NWA/WAC/WAX Series User’s Guide
140
16.4 Date and Time
For effective scheduling and logging, the Zyxel Device system time must be accurate. The Zyxel Device
has a software mechanism to set the time manually or get the current time and date from an external
server.
To change your Zyxel Device’s time based on your local time zone and date, click Conguration >
System > Date/Time. The screen displays as shown. You can manually set the Zyxel Device’s time and
date or have the Zyxel Device get the date and time from a time server.
Figure 84 Configuration > System > Date/Time
The following table describes the labels in this screen.
Table 63 Configuration > System > Date/Time
LABEL DESCRIPTION
Current Time and Date
Current Time This field displays the present time of your Zyxel Device.
Current Date This field displays the present date of your Zyxel Device.
Time and Date Setup
Manual Select this radio button to enter the time and date manually. If you configure a new time
and date, time zone and daylight saving at the same time, the time zone and daylight
saving will affect the new time and date you entered. When you enter the time settings
manually, the Zyxel Device uses the new setting once you click Apply.
New Time
(hh:mm:ss)
This field displays the last updated time from the time server or the last time configured
manually.
When you set Time and Date Setup to Manual, enter the new time in this field and then click
Apply.
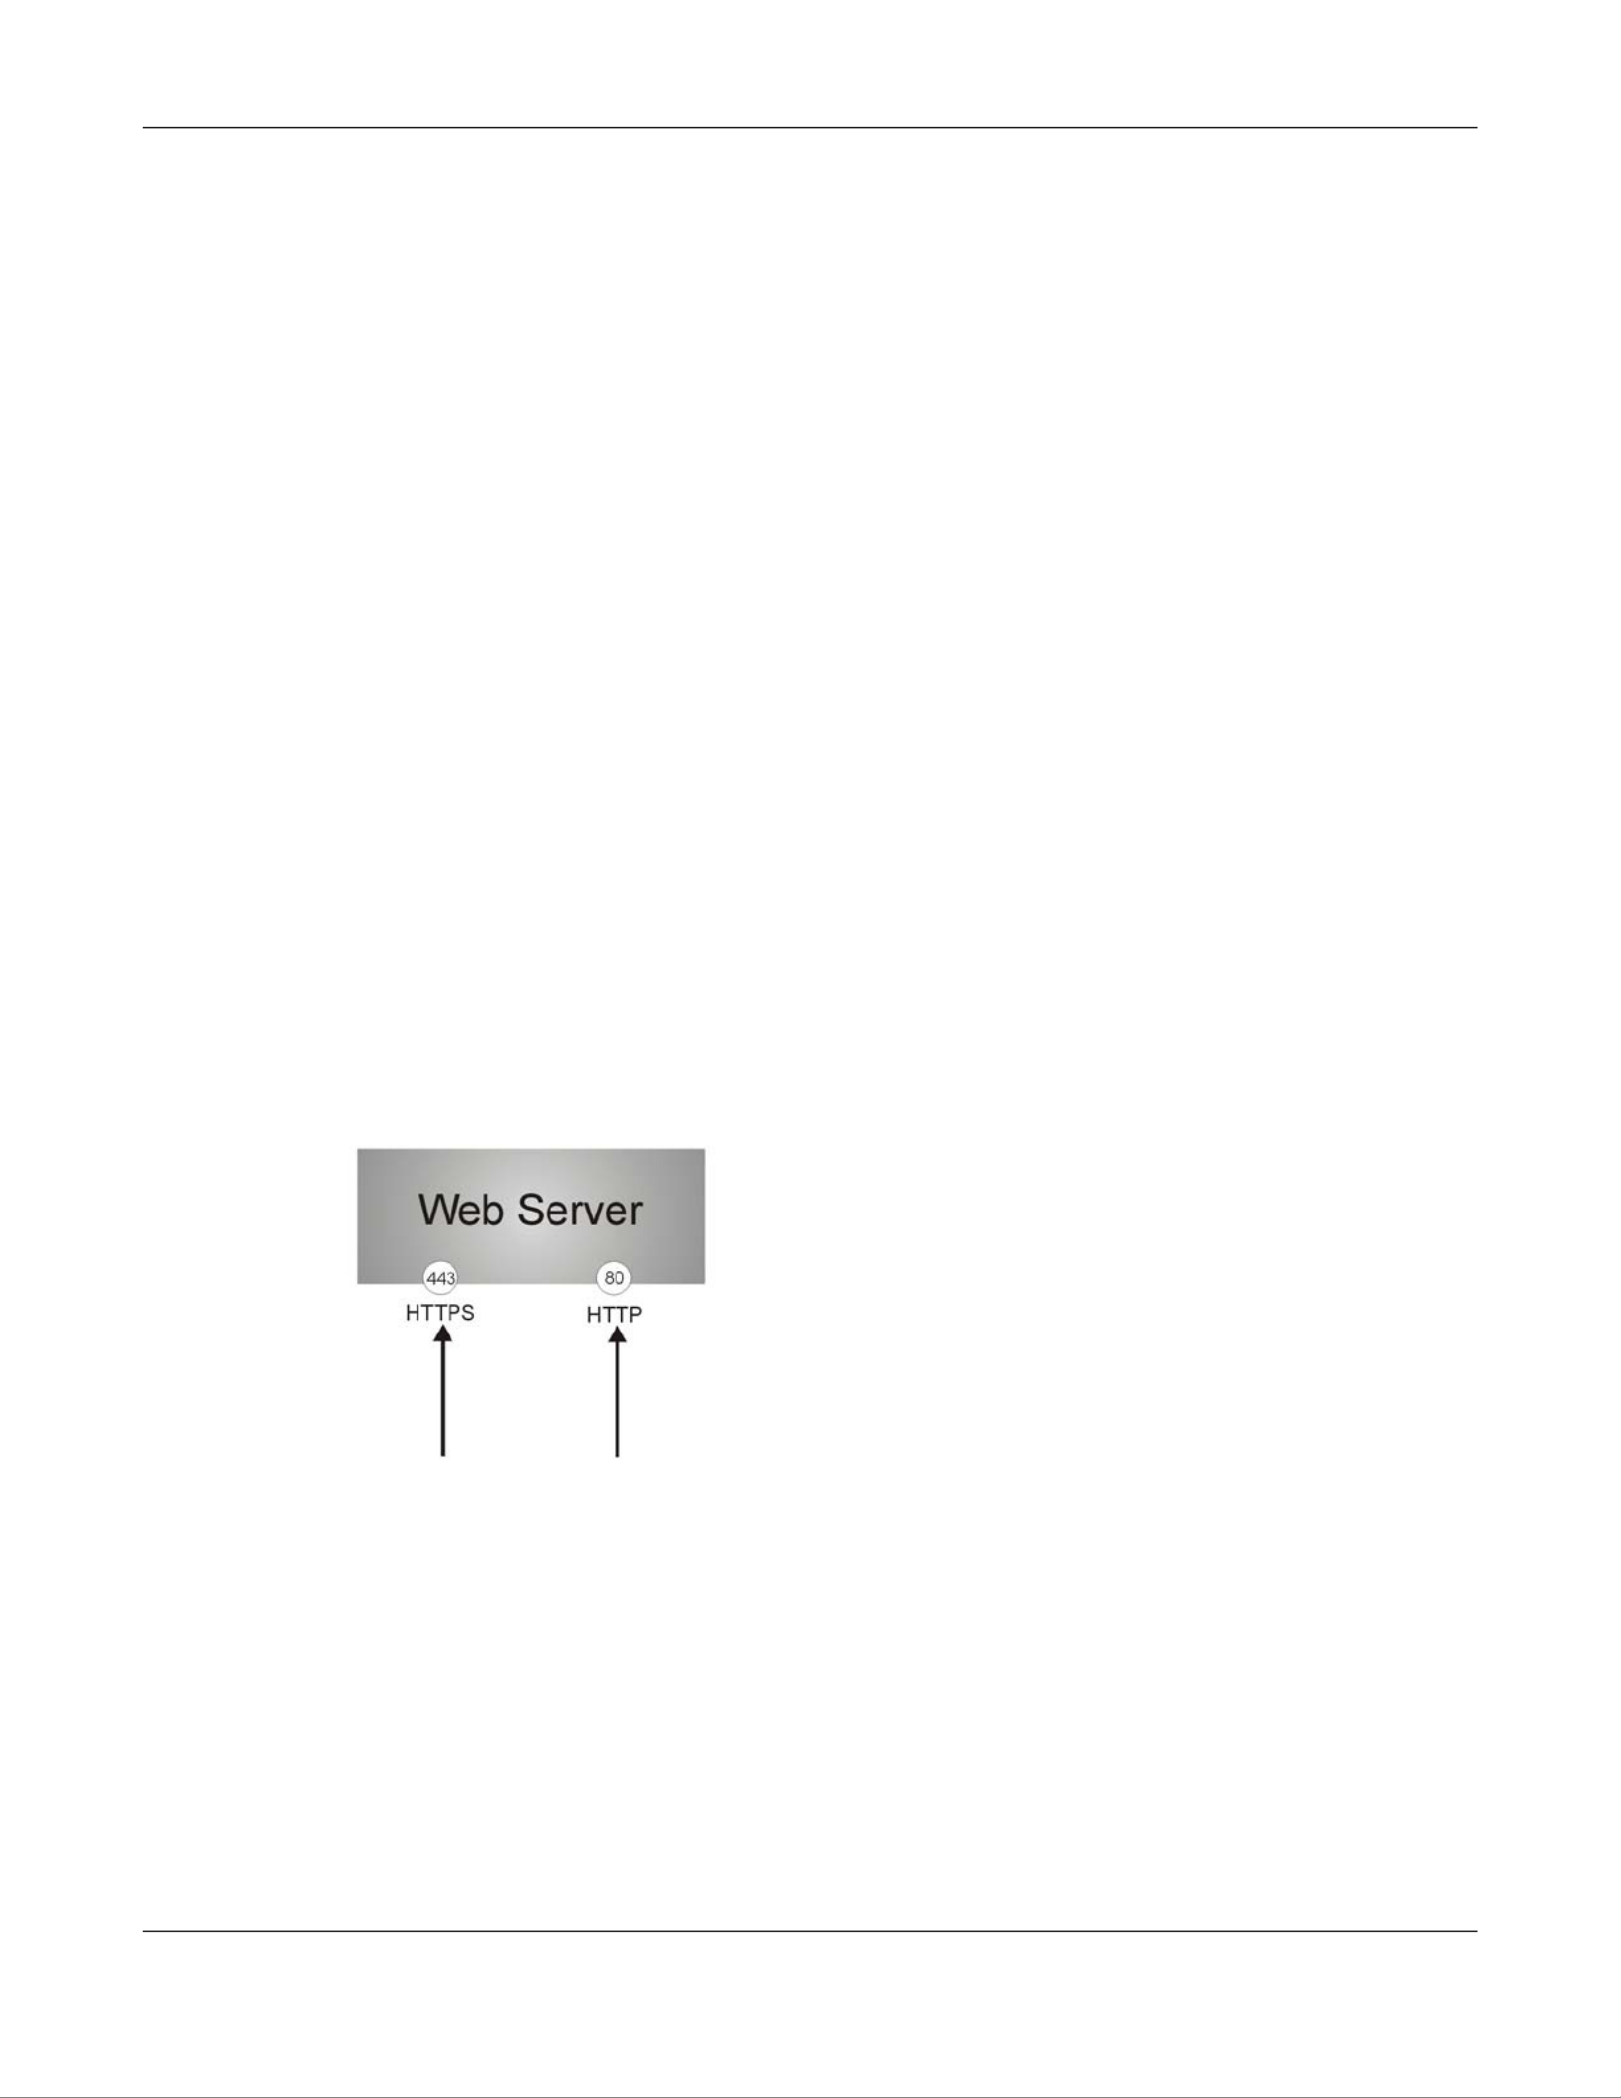
Chapter 16 System
NWA/WAC/WAX Series User’s Guide
144
16.5.3 HTTPS
You can set the Zyxel Device to use HTTP or HTTPS (HTTPS adds security) for Web Configurator sessions.
HTTPS (HyperText Transfer Protocol over Secure Socket Layer, or HTTP over SSL) is a web protocol that
encrypts and decrypts web pages. Secure Socket Layer (SSL) is an application-level protocol that
enables secure transactions of data by ensuring confidentiality (an unauthorized party cannot read the
transferred data), authentication (one party can identify the other party) and data integrity (you know if
data has been changed).
It relies upon certificates, public keys, and private keys (see Chapter 15 on page 122 for more
information).
HTTPS on the Zyxel Device is used so that you can securely access the Zyxel Device using the Web
Configurator. The SSL protocol specifies that the HTTPS server (the Zyxel Device) must always
authenticate itself to the HTTPS client (the computer which requests the HTTPS connection with the Zyxel
Device), whereas the HTTPS client only should authenticate itself when the HTTPS server requires it to do
so (select Authenticate Client Certificates in the WWW screen). Authenticate Client Certificates is
optional and if selected means the HTTPS client must send the Zyxel Device a certificate. You must apply
for a certificate for the browser from a CA that is a trusted CA on the Zyxel Device.
Please refer to the following figure.
1HTTPS connection requests from an SSL-aware web browser go to port 443 (by default) on the Zyxel
Device’s web server.
2HTTP connection requests from a web browser go to port 80 (by default) on the Zyxel Device’s web
server.
Figure 87 HTTP/HTTPS Implementation
Note: If you disable HTTP in the WWW screen, then the Zyxel Device blocks all HTTP connection
attempts.
16.5.4 Configuring WWW Service Control
Click Conguration > System > WWW to open the WWW screen. Use this screen to specify HTTP or HTTPS
settings.
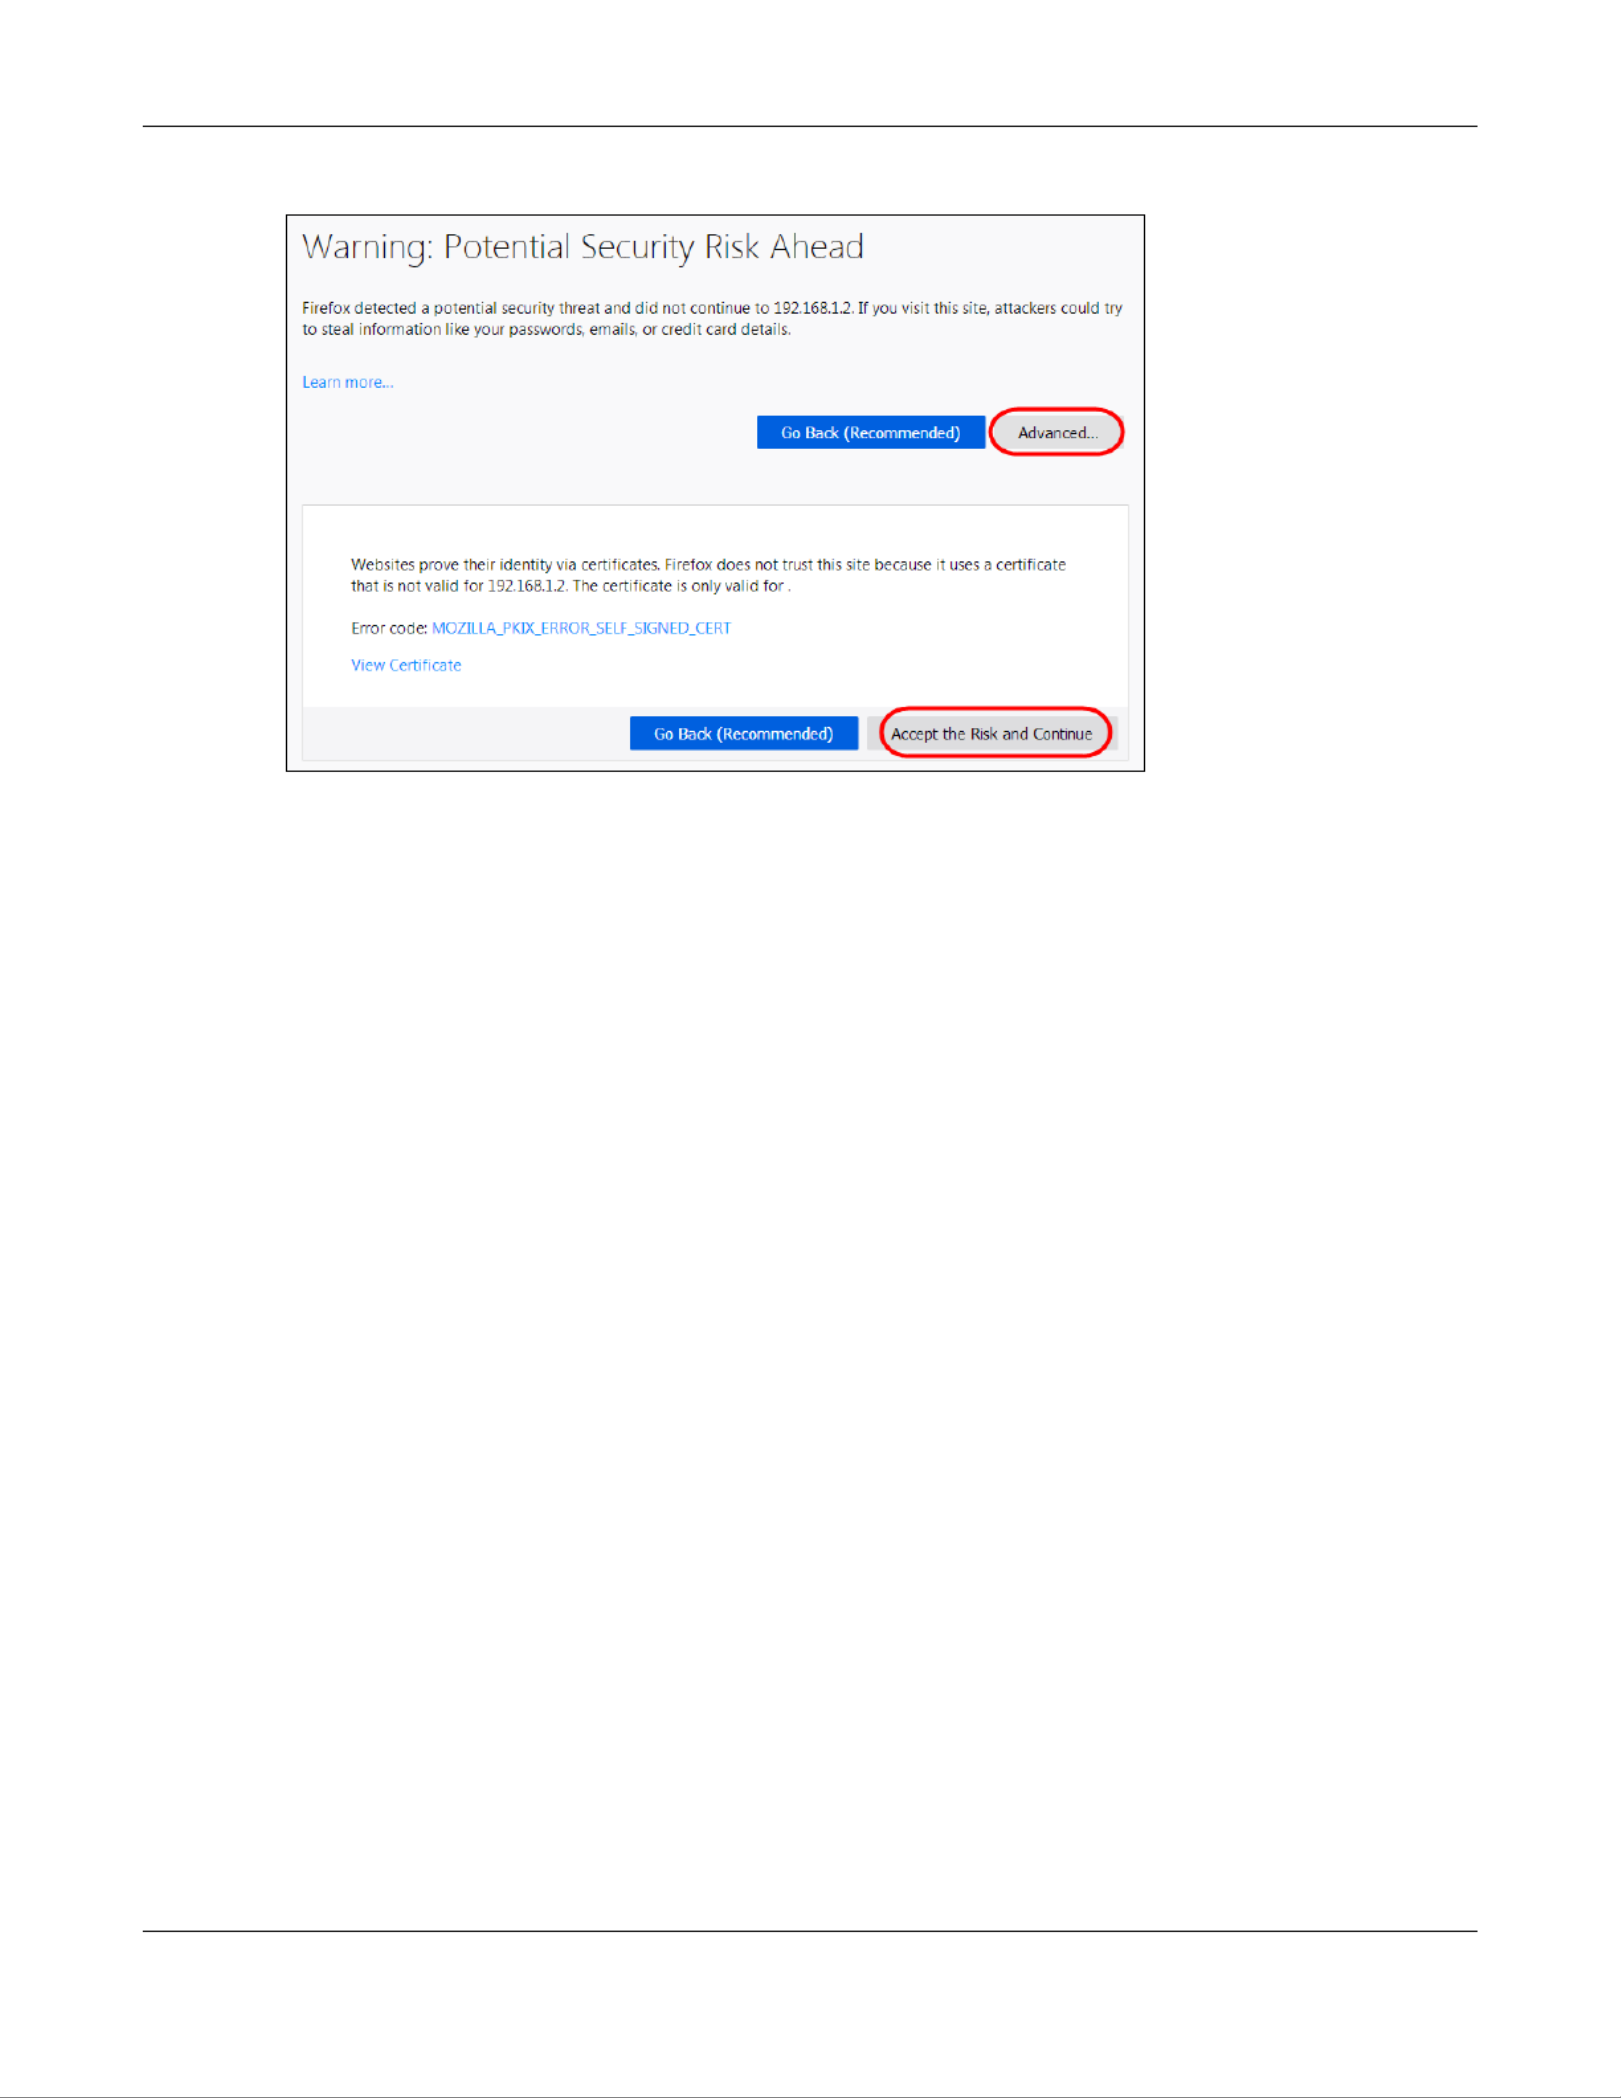
Chapter 16 System
NWA/WAC/WAX Series User’s Guide
147
Figure 90 Security Certificate 1 (Firefox)
16.5.5.3 Avoiding Browser Warning Messages
Here are the main reasons your browser displays warnings about the Zyxel Device’s HTTPS server
certificate and what you can do to avoid seeing the warnings:
• The issuing certificate authority of the Zyxel Device’s HTTPS server certificate is not one of the browser’s
trusted certificate authorities. The issuing certificate authority of the Zyxel Device's factory default
certificate is the Zyxel Device itself since the certificate is a self-signed certificate.
• For the browser to trust a self-signed certificate, import the self-signed certificate into your operating
system as a trusted certificate.
• To have the browser trust the certificates issued by a certificate authority, import the certificate
authority’s certificate into your operating system as a trusted certificate. Refer to Appendix A on
page 206 for details.
16.5.5.4 Enrolling and Importing SSL Client Certicates
The SSL client needs a certificate if Authenticate Client Certificates is selected on the Zyxel Device.
You must have imported at least one trusted CA to the Zyxel Device in order for the Authenticate Client
Certificates to be active (see the Certificates chapter for details).
Apply for a certificate from a Certification Authority (CA) that is trusted by the Zyxel Device (see the
Zyxel Device’s Trusted Certificates Web Configurator screen).

Chapter 16 System
NWA/WAC/WAX Series User’s Guide
159
The following table describes the labels in this screen.
16.9.4 Adding or Editing an SNMPv3 User Profile
This screen allows you to add or edit an SNMPv3 user profile. To access this screen, click the
Conguration > System > SNMP screen’s Add button or select a SNMPv3 user profile from the list and
click the Edit button.
Table 70 Configuration > System > SNMP
LABEL DESCRIPTION
Enable Select the check box to allow or disallow users to access the Zyxel Device using SNMP.
Server Port You may change the server port number for a service if needed, however you must use the
same port number in order to use that service for remote management.
Trap
Community Type the trap community, which is the password sent with each trap to the SNMP manager.
The default is public and allows all requests.
Destination Type the IP address of the station to send your SNMP traps to.
Trap Wireless
Event
Select this to have the Zyxel Device send a trap to the SNMP manager when a wireless client is
connected to or disconnected from the Zyxel Device.
SNMPv2c Select this to allow SNMP managers using SNMPv2c to access the Zyxel Device.
Get Community Enter the Get Community, which is the password for the incoming Get and GetNext requests
from the management station. The default is public and allows all requests.
Set Community Enter the Set community, which is the password for incoming Set requests from the
management station. The default is private and allows all requests.
SNMPv3 Select this to allow SNMP managers using SNMPv3 to access the Zyxel Device.
Add Click this to create a new entry. Select an entry and click Add to create a new entry after the
selected entry.
Edit Double-click an entry or select it and click Edit to be able to modify the entry’s settings.
Remove To remove an entry, select it and click Remove. The Zyxel Device confirms you want to remove
it before doing so. Note that subsequent entries move up by one when you take this action.
# This the index number of an SNMPv3 user profile.
User Name This is the name of the user for which this SNMPv3 user profile is configured.
Authentication This field displays the type of authentication the SNMPv3 user must use to connect to the Zyxel
Device using this SNMPv3 user profile.
Privacy This field displays the type of encryption the SNMPv3 user must use to connect to the Zyxel
Device using this SNMPv3 user profile.
Privilege This field displays whether the SNMPv3 user can have read-only or read and write access to
the Zyxel Device using this SNMPv3 user profile.
Apply Click Apply to save your changes back to the Zyxel Device.
Reset Click Reset to return the screen to its last-saved settings.

Chapter 17 Log and Report
NWA/WAC/WAX Series User’s Guide
159
17.3 Log Setting
These screens control log messages and alerts. A log message stores the information for viewing (for
example, in the Monitor > View Log screen) or regular e-mailing later, and an alert is e-mailed
immediately. Usually, alerts are used for events that require more serious attention, such as system errors
and attacks.
The Zyxel Device provides a system log and supports e-mail profiles and remote syslog servers. The
system log is available on the View Log screen, the e-mail profiles are used to mail log messages to the
specified destinations, and the other four logs are stored on specified syslog servers.
The Log Setting tab also controls what information is saved in each log. For the system log, you can also
specify which log messages are e-mailed, where they are e-mailed, and how often they are e-mailed.
For alerts, the Log Setting screen controls which events generate alerts and where alerts are e-mailed.
The Log Setting screen provides a summary of all the settings. You can use the Edit Log Setting screen to
maintain the detailed settings (such as log categories, e-mail addresses, server names, etc.) for any log.
Alternatively, if you want to edit what events is included in each log, you can also use the Active Log
SSL/TLS
Encryption
Select SSL/TLS to use Secure Sockets Layer (SSL) or Transport Layer Security (TLS) if you want
encrypted communications between the mail server and the Zyxel Device.
Select STARTTLS to upgrade a plain text connection to a secure connection using SSL/TLS.
Select No to not encrypt the communications.
Mail Server Port Enter the same port number here as is on the mail server for mail traffic.
Mail Subject Type the subject line for the outgoing e-mail. Select Append system name to add the Zyxel
Device’s system name to the subject. Select Append date time to add the Zyxel Device’s
system date and time to the subject.
Mail From Type the e-mail address from which the outgoing e-mail is delivered. This address is used in
replies.
Mail To Type the e-mail address (or addresses) to which the outgoing e-mail is delivered.
SMTP
Authentication
Select this check box if it is necessary to provide a user name and password to the SMTP server.
User Name This box is effective when you select the SMTP Authentication check box. Type the user name to
provide to the SMTP server when the log is e-mailed.
Password This box is effective when you select the SMTP Authentication check box. Type the password to
provide to the SMTP server when the log is e-mailed.
Send Report
Now
Click this button to have the Zyxel Device send the daily e-mail report immediately.
Time for sending
report
Select the time of day (hours and minutes) when the log is e-mailed. Use 24-hour notation.
Report Items Select the information to include in the report. Select Reset counters after sending report
successfully if you only want to see statistics for a 24 hour period.
Reset All
Counters
Click this to discard all report data and start all of the counters over at zero.
Apply Click Apply to save your changes back to the Zyxel Device.
Reset Click Reset to return the screen to its last-saved settings.
Table 67 Configuration > Log & Report > Email Daily Report (continued)
LABEL DESCRIPTION
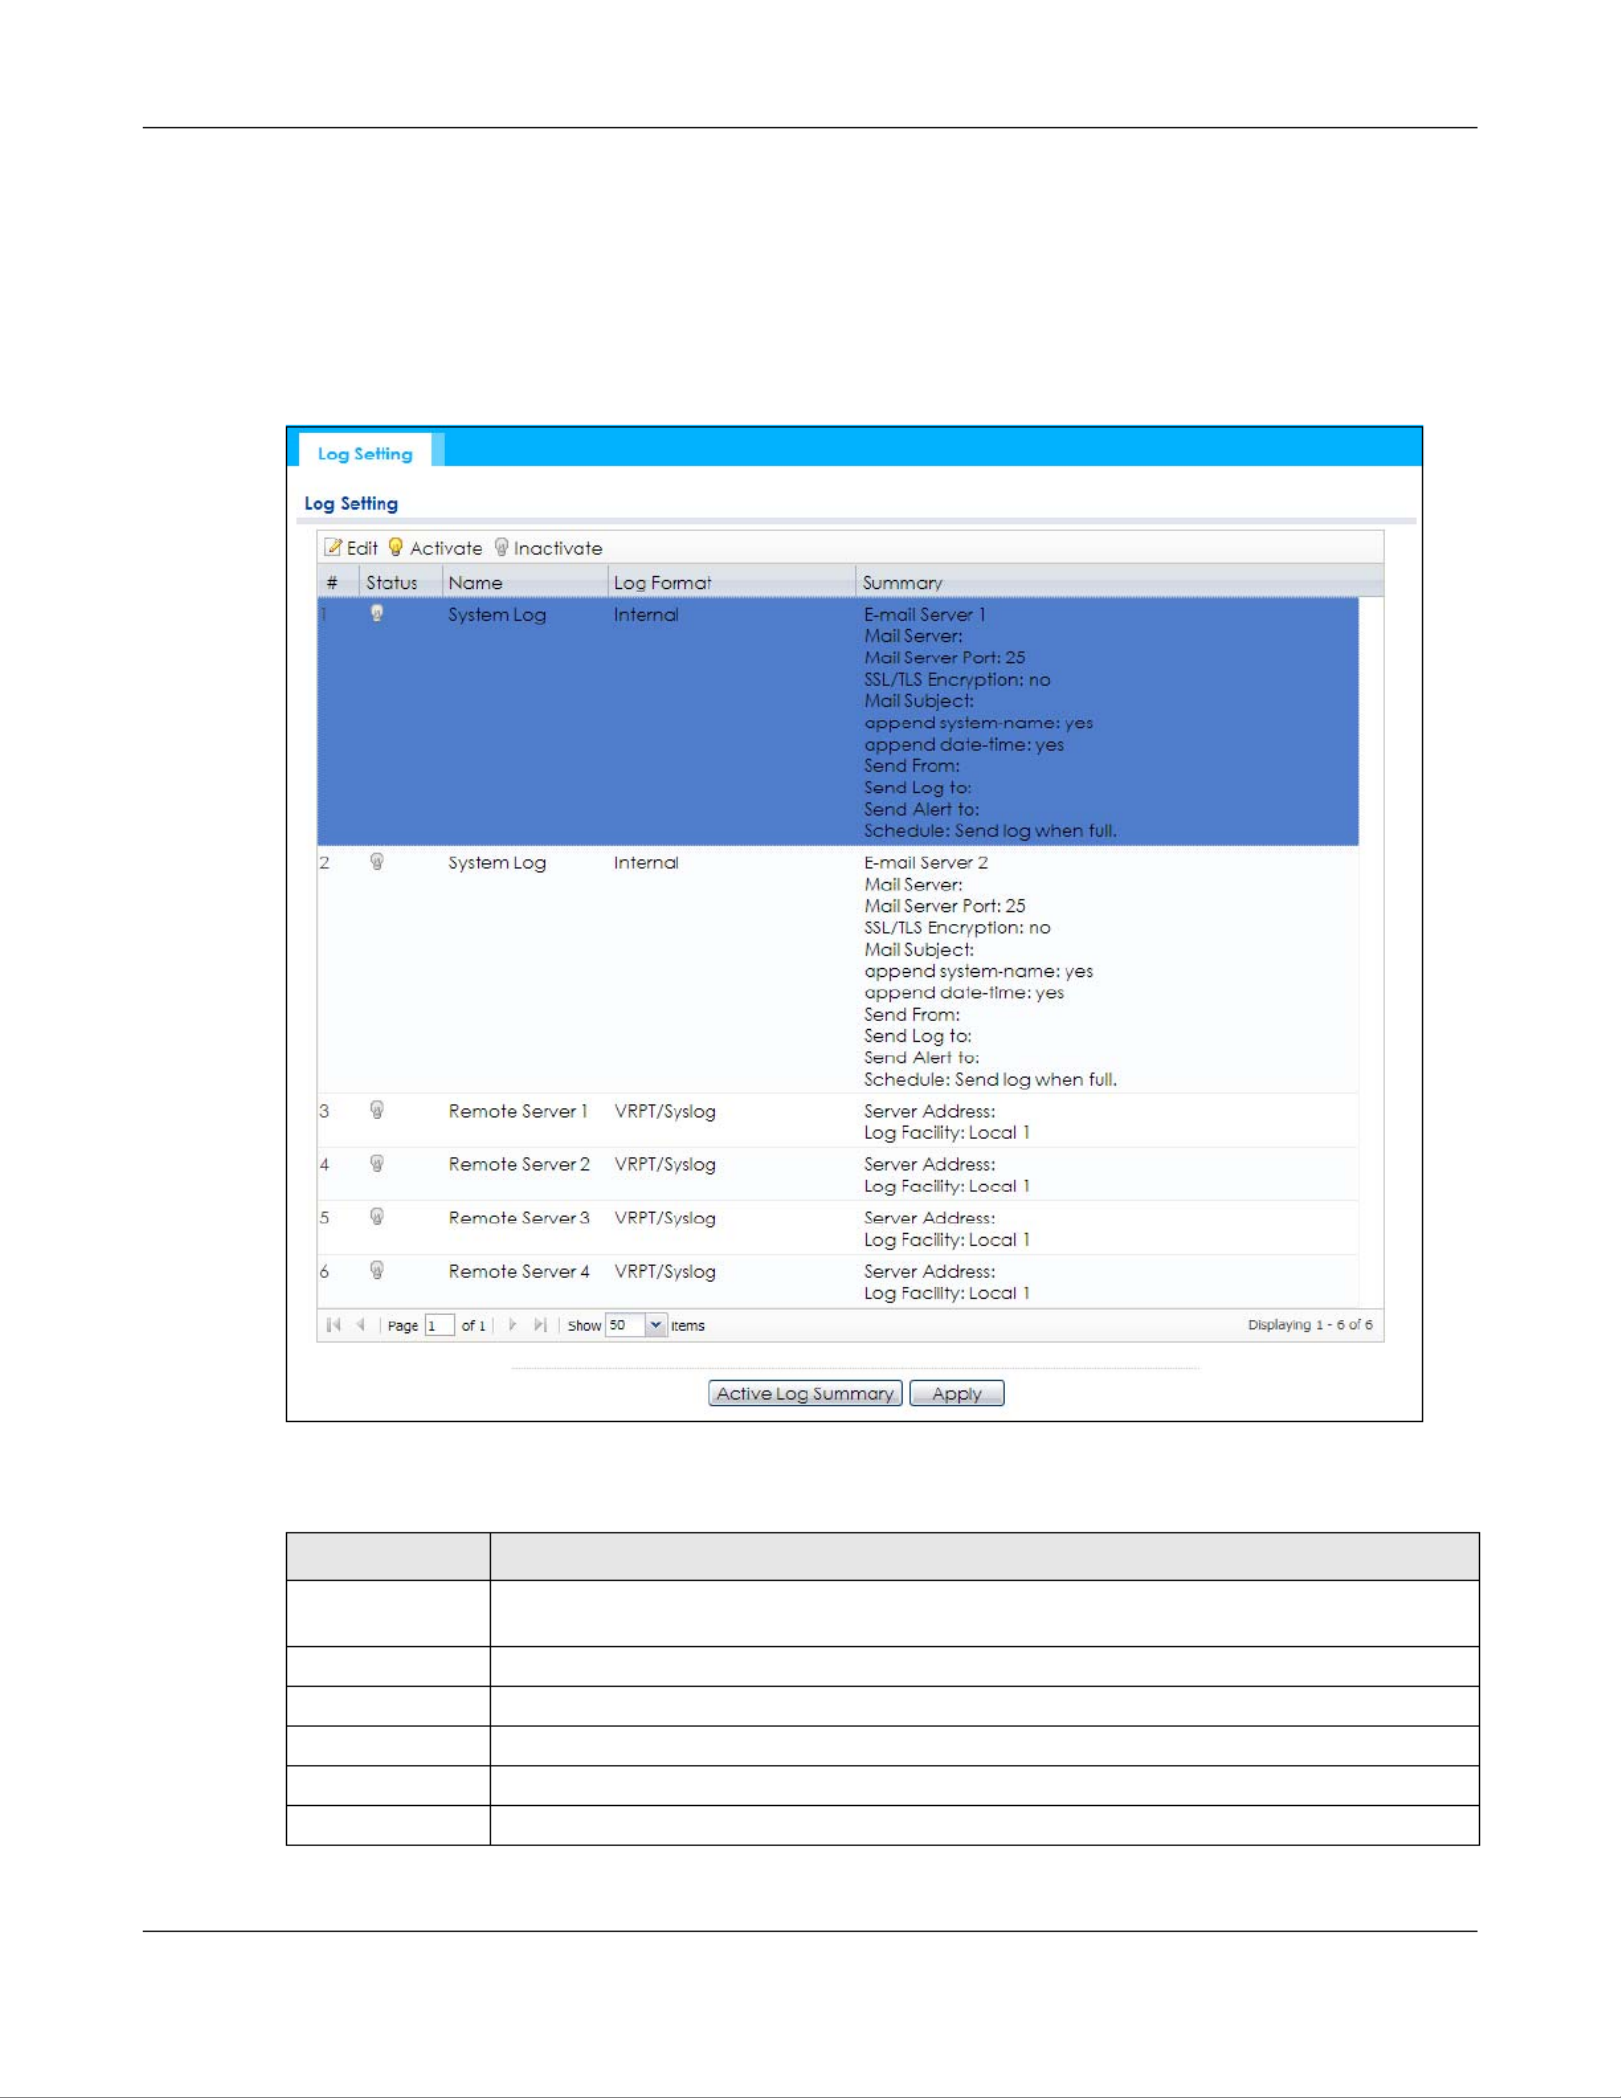
Chapter 17 Log and Report
NWA/WAC/WAX Series User’s Guide
160
Summary screen to edit this information for all logs at the same time.
17.3.1 Log Setting Screen
To access this screen, click Conguration > Log & Report > Log Setting.
Figure 99 Configuration > Log & Report > Log Setting
The following table describes the labels in this screen.
Table 68 Configuration > Log & Report > Log Setting
LABEL DESCRIPTION
Edit Double-click an entry or select it and click Edit to open a screen where you can modify the
entry’s settings.
Activate To turn on an entry, select it and click Activate.
Inactivate To turn off an entry, select it and click Inactivate.
# This field is a sequential value, and it is not associated with a specific log.
Status This field shows whether the log is active or not.
Name This field displays the name of the log (system log or one of the remote servers).

Chapter 17 Log and Report
NWA/WAC/WAX Series User’s Guide
163
The following table describes the labels in this screen.
Table 69 Configuration > Log & Report > Log Setting > Edit System Log Setting
LABEL DESCRIPTION
E-Mail Server 1/2
Active Select this to send log messages and alerts according to the information in this section.
You specify what kinds of log messages are included in log information and what kinds of
log messages are included in alerts in the Active Log and Alert section.
Mail Server Type the name or IP address of the outgoing SMTP server.
SSL/TLS Encryption Select SSL/TLS to use Secure Sockets Layer (SSL) or Transport Layer Security (TLS) if you
want encrypted communications between the mail server and the Zyxel Device.
Select STARTTLS to upgrade a plain text connection to a secure connection using SSL/TLS.
Select No to not encrypt the communications.
Mail Server Port Enter the same port number here as is on the mail server for mail traffic.
Mail Subject Type the subject line for the outgoing e-mail. Select Append system name to add the
Zyxel Device’s system name to the subject. Select Append date time to add the Zyxel
Device’s system date and time to the subject.
Send From Type the e-mail address from which the outgoing e-mail is delivered. This address is used
in replies.
Send Log To Type the e-mail address to which the outgoing e-mail is delivered.
Send Alerts To Type the e-mail address to which alerts are delivered.
Sending Log Select how often log information is e-mailed. Choices are: When Full, Hourly and When
Full, Daily and When Full, and Weekly and When Full.
Day for Sending Log This field is available if the log is e-mailed weekly. Select the day of the week the log is e-
mailed.
Time for Sending
Log
This field is available if the log is e-mailed weekly or daily. Select the time of day (hours
and minutes) when the log is e-mailed. Use 24-hour notation.
SMTP
Authentication
Select this check box if it is necessary to provide a user name and password to the SMTP
server.
User Name This box is effective when you select the SMTP Authentication check box. Type the user
name to provide to the SMTP server when the log is e-mailed.
Password This box is effective when you select the SMTP Authentication check box. Type the
password to provide to the SMTP server when the log is e-mailed.
Active Log and Alert
System log Use the System Log drop-down list to change the log settings for all of the log categories.
disable all logs (red X) - do not log any information for any category for the system log or
e-mail any logs to e-mail server 1 or 2.
enable normal logs (green check mark) - create log messages and alerts for all
categories for the system log. If e-mail server 1 or 2 also has normal logs enabled, the
Zyxel Device will e-mail logs to them.
enable normal logs and debug logs (yellow check mark) - create log messages, alerts,
and debugging information for all categories. The Zyxel Device does not e-mail
debugging information, even if this setting is selected.
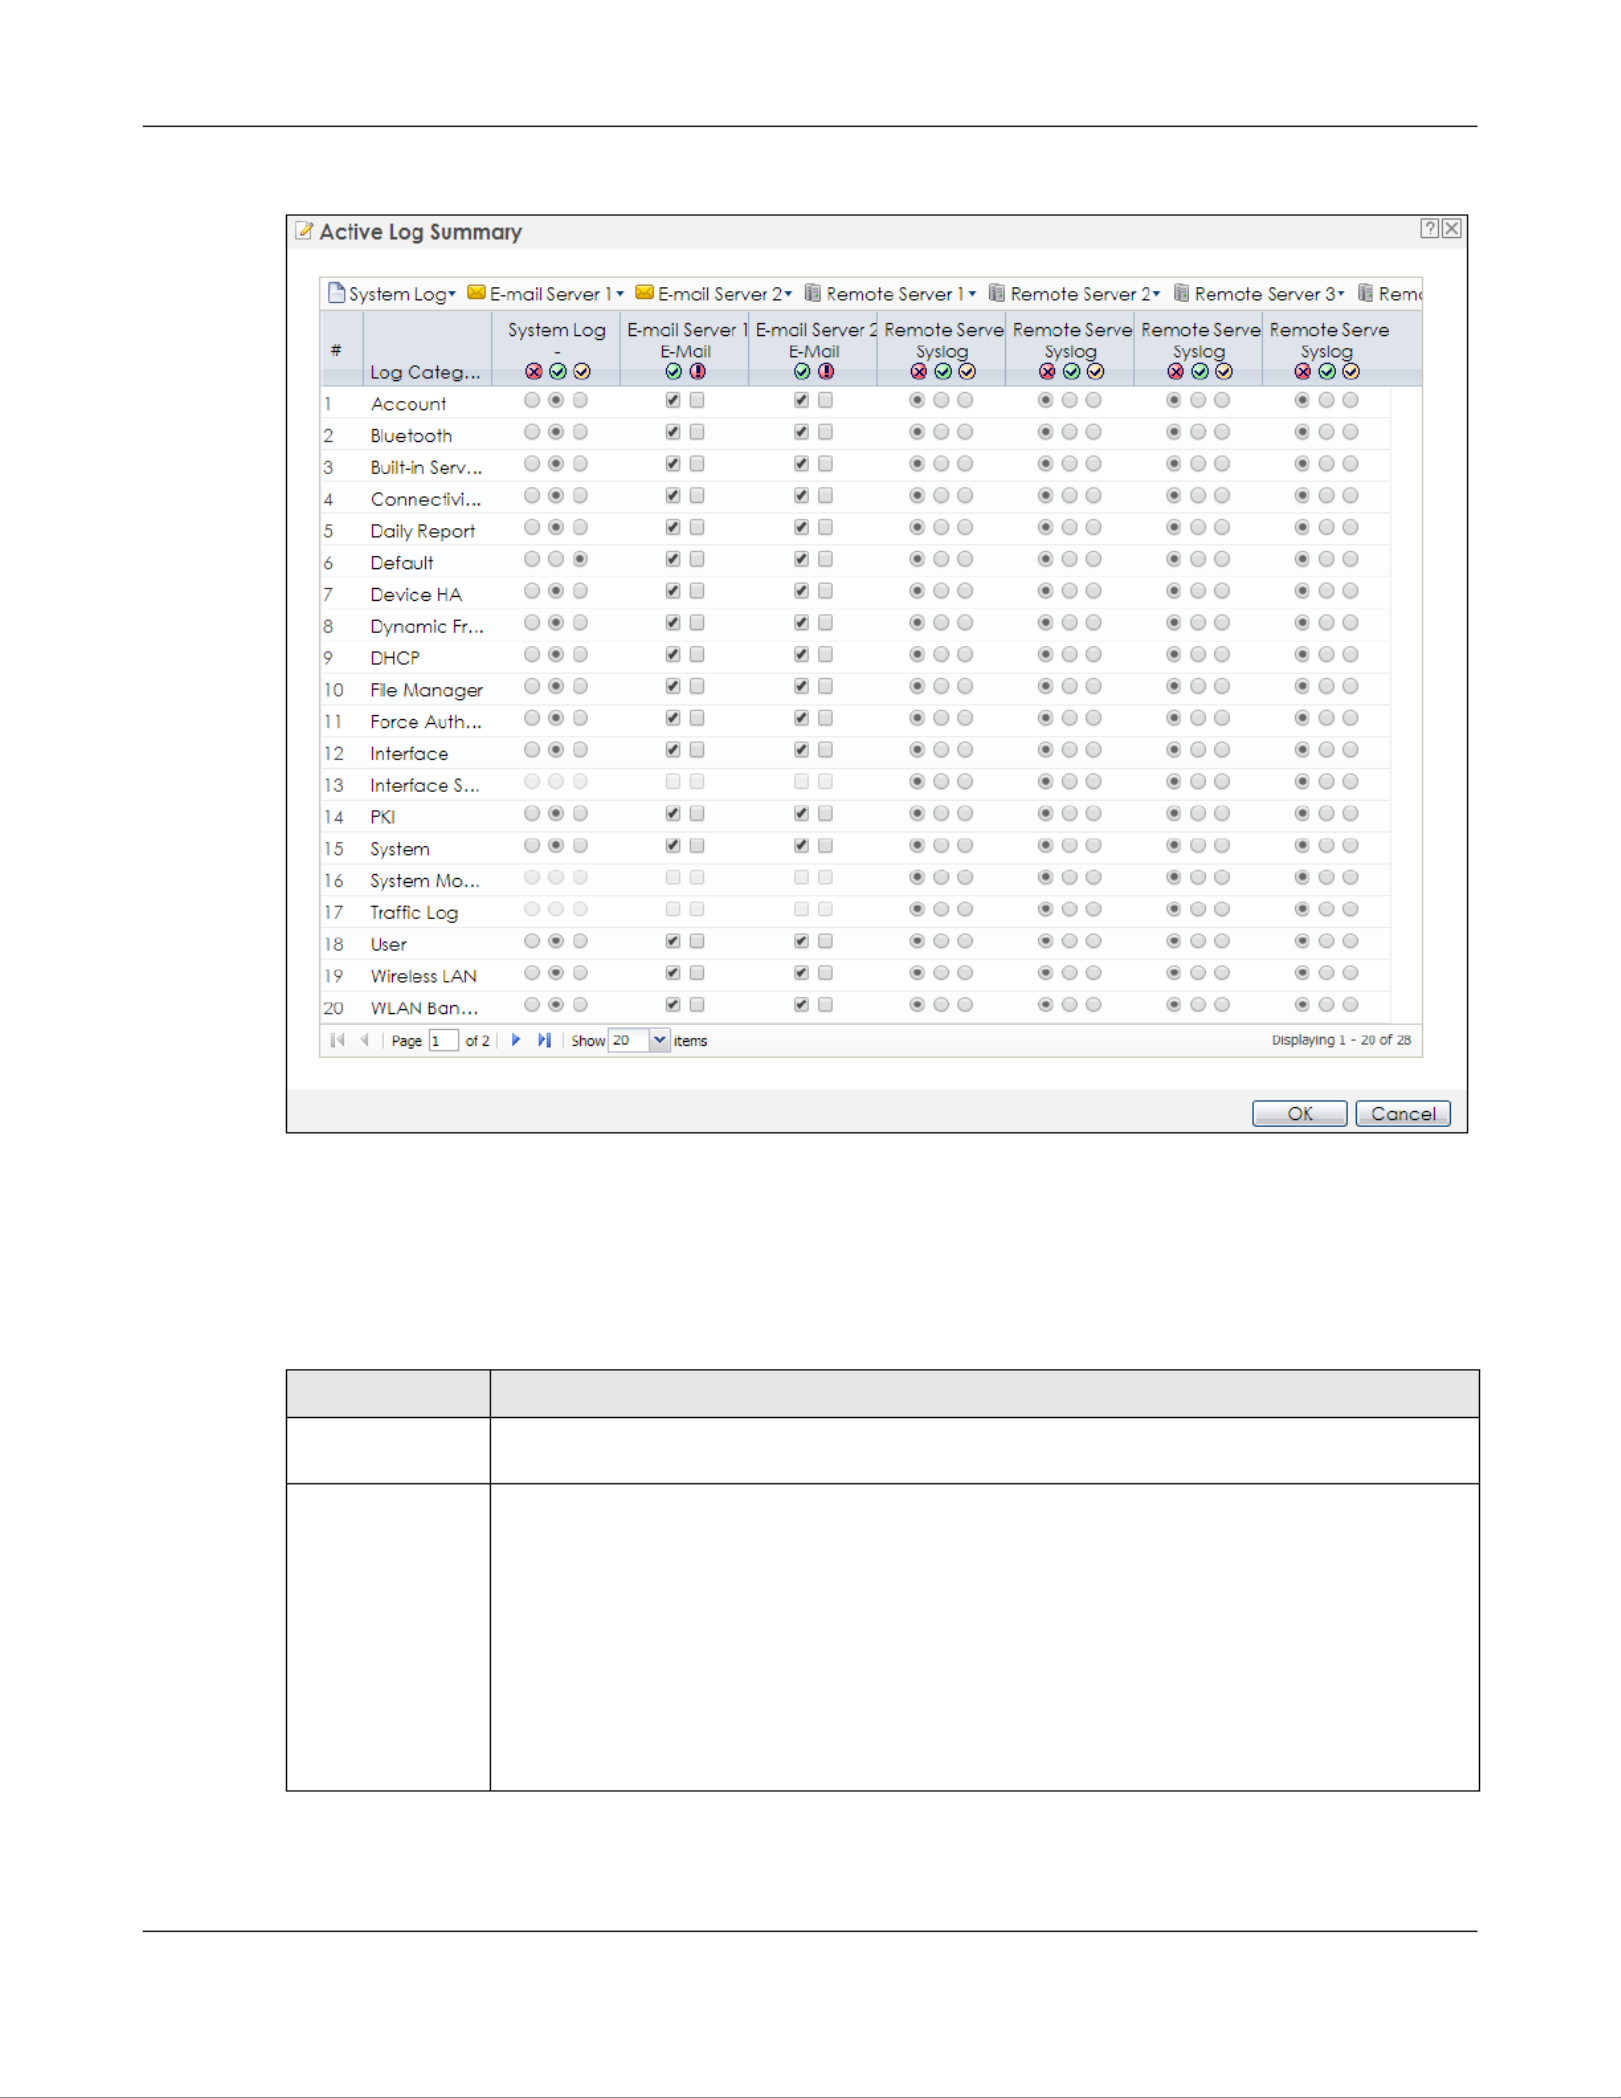
Chapter 17 Log and Report
NWA/WAC/WAX Series User’s Guide
167
Figure 102 Active Log Summary
This screen provides a different view and a different way of indicating which messages are included in
each log and each alert. (The Default category includes debugging messages generated by open
source software.)
The following table describes the fields in this screen.
Table 71 Configuration > Log & Report > Log Setting > Active Log Summary
LABEL DESCRIPTION
Active Log
Summary
If the Zyxel Device is set to controller mode, the AC section controls logs generated by the
controller and the AP section controls logs generated by the managed APs.
System log Use the System Log drop-down list to change the log settings for all of the log categories.
disable all logs (red X) - do not log any information for any category for the system log or e-mail
any logs to e-mail server 1 or 2.
enable normal logs (green check mark) - create log messages and alerts for all categories for
the system log. If e-mail server 1 or 2 also has normal logs enabled, the Zyxel Device will e-mail
logs to them.
enable normal logs and debug logs (yellow check mark) - create log messages, alerts, and
debugging information for all categories. The Zyxel Device does not e-mail debugging
information, even if this setting is selected.

Chapter 17 Log and Report
NWA/WAC/WAX Series User’s Guide
168
E-mail Server 1 Use the E-Mail Server 1 drop-down list to change the settings for e-mailing logs to e-mail server
1 for all log categories.
Using the System Log drop-down list to disable all logs overrides your e-mail server 1 settings.
enable normal logs (green check mark) - e-mail log messages for all categories to e-mail server
1.
enable alert logs (red exclamation point) - e-mail alerts for all categories to e-mail server 1.
E-mail Server 2 Use the E-Mail Server 2 drop-down list to change the settings for e-mailing logs to e-mail server
2 for all log categories.
Using the System Log drop-down list to disable all logs overrides your e-mail server 2 settings.
enable normal logs (green check mark) - e-mail log messages for all categories to e-mail server
2.
enable alert logs (red exclamation point) - e-mail alerts for all categories to e-mail server 2.
Remote Server
1~4
For each remote server, use the Selection drop-down list to change the log settings for all of the
log categories.
disable all logs (red X) - do not send the remote server logs for any log category.
enable normal logs (green check mark) - send the remote server log messages and alerts for all
log categories.
enable normal logs and debug logs (yellow check mark) - send the remote server log
messages, alerts, and debugging information for all log categories.
# This field is a sequential value, and it is not associated with a specific address.
Log Category This field displays each category of messages. It is the same value used in the Display and
Category fields in the View Log tab. The Default category includes debugging messages
generated by open source software.
System log Select which events you want to log by Log Category. There are three choices:
disable all logs (red X) - do not log any information from this category
enable normal logs (green checkmark) - create log messages and alerts from this category
enable normal logs and debug logs (yellow check mark) - create log messages, alerts, and
debugging information from this category; the Zyxel Device does not e-mail debugging
information, however, even if this setting is selected.
E-mail Server 1 E-
mail
Select whether each category of events should be included in the log messages when it is e-
mailed (green check mark) and/or in alerts (red exclamation point) for the e-mail settings
specified in E-Mail Server 1. The Zyxel Device does not e-mail debugging information, even if it
is recorded in the System log.
E-mail Server 2 E-
mail
Select whether each category of events should be included in log messages when it is e-
mailed (green check mark) and/or in alerts (red exclamation point) for the e-mail settings
specified in E-Mail Server 2. The Zyxel Device does not e-mail debugging information, even if it
is recorded in the System log.
Remote Server
1~4 Syslog
For each remote server, select what information you want to log from each Log Category
(except All Logs; see below). Choices are:
disable all logs (red X) - do not log any information from this category
enable normal logs (green checkmark) - log regular information and alerts from this category
enable normal logs and debug logs (yellow check mark) - log regular information, alerts, and
debugging information from this category
OK Click this to save your changes and return to the previous screen.
Cancel Click this to return to the previous screen without saving your changes.
Table 71 Configuration > Log & Report > Log Setting > Active Log Summary (continued)
LABEL DESCRIPTION

Chapter 18 File Manager
NWA/WAC/WAX Series User’s Guide
169
Once your Zyxel Device is configured and functioning properly, it is highly recommended that you back
up your configuration file before making further configuration changes. The backup configuration file
will be useful in case you need to return to your previous settings.
Configuration File Flow at Restart
• If there is not a startup-cong.conf when you restart the Zyxel Device (whether through a
management interface or by physically turning the power off and back on), the Zyxel Device uses the
system-default.conf configuration file with the Zyxel Device’s default settings.
• If there is a startup-cong.conf, the Zyxel Device checks it for errors and applies it. If there are no
errors, the Zyxel Device uses it and copies it to the lastgood.conf configuration file as a back up file. If
there is an error, the Zyxel Device generates a log and copies the startup-cong.conf configuration
file to the startup-cong-bad.conf configuration file and tries the existing lastgood.conf configuration
file. If there isn’t a lastgood.conf configuration file or it also has an error, the Zyxel Device applies the
system-default.conf configuration file.
• You can change the way the startup-cong.conf file is applied. Include the setenv-startup stop-
on-error off command. The Zyxel Device ignores any errors in the startup-cong.conf file and
applies all of the valid commands. The Zyxel Device still generates a log for any errors.
Figure 103 Maintenance > File Manager > Configuration File
Do not turn off the Zyxel Device while configuration file upload is in
progress.
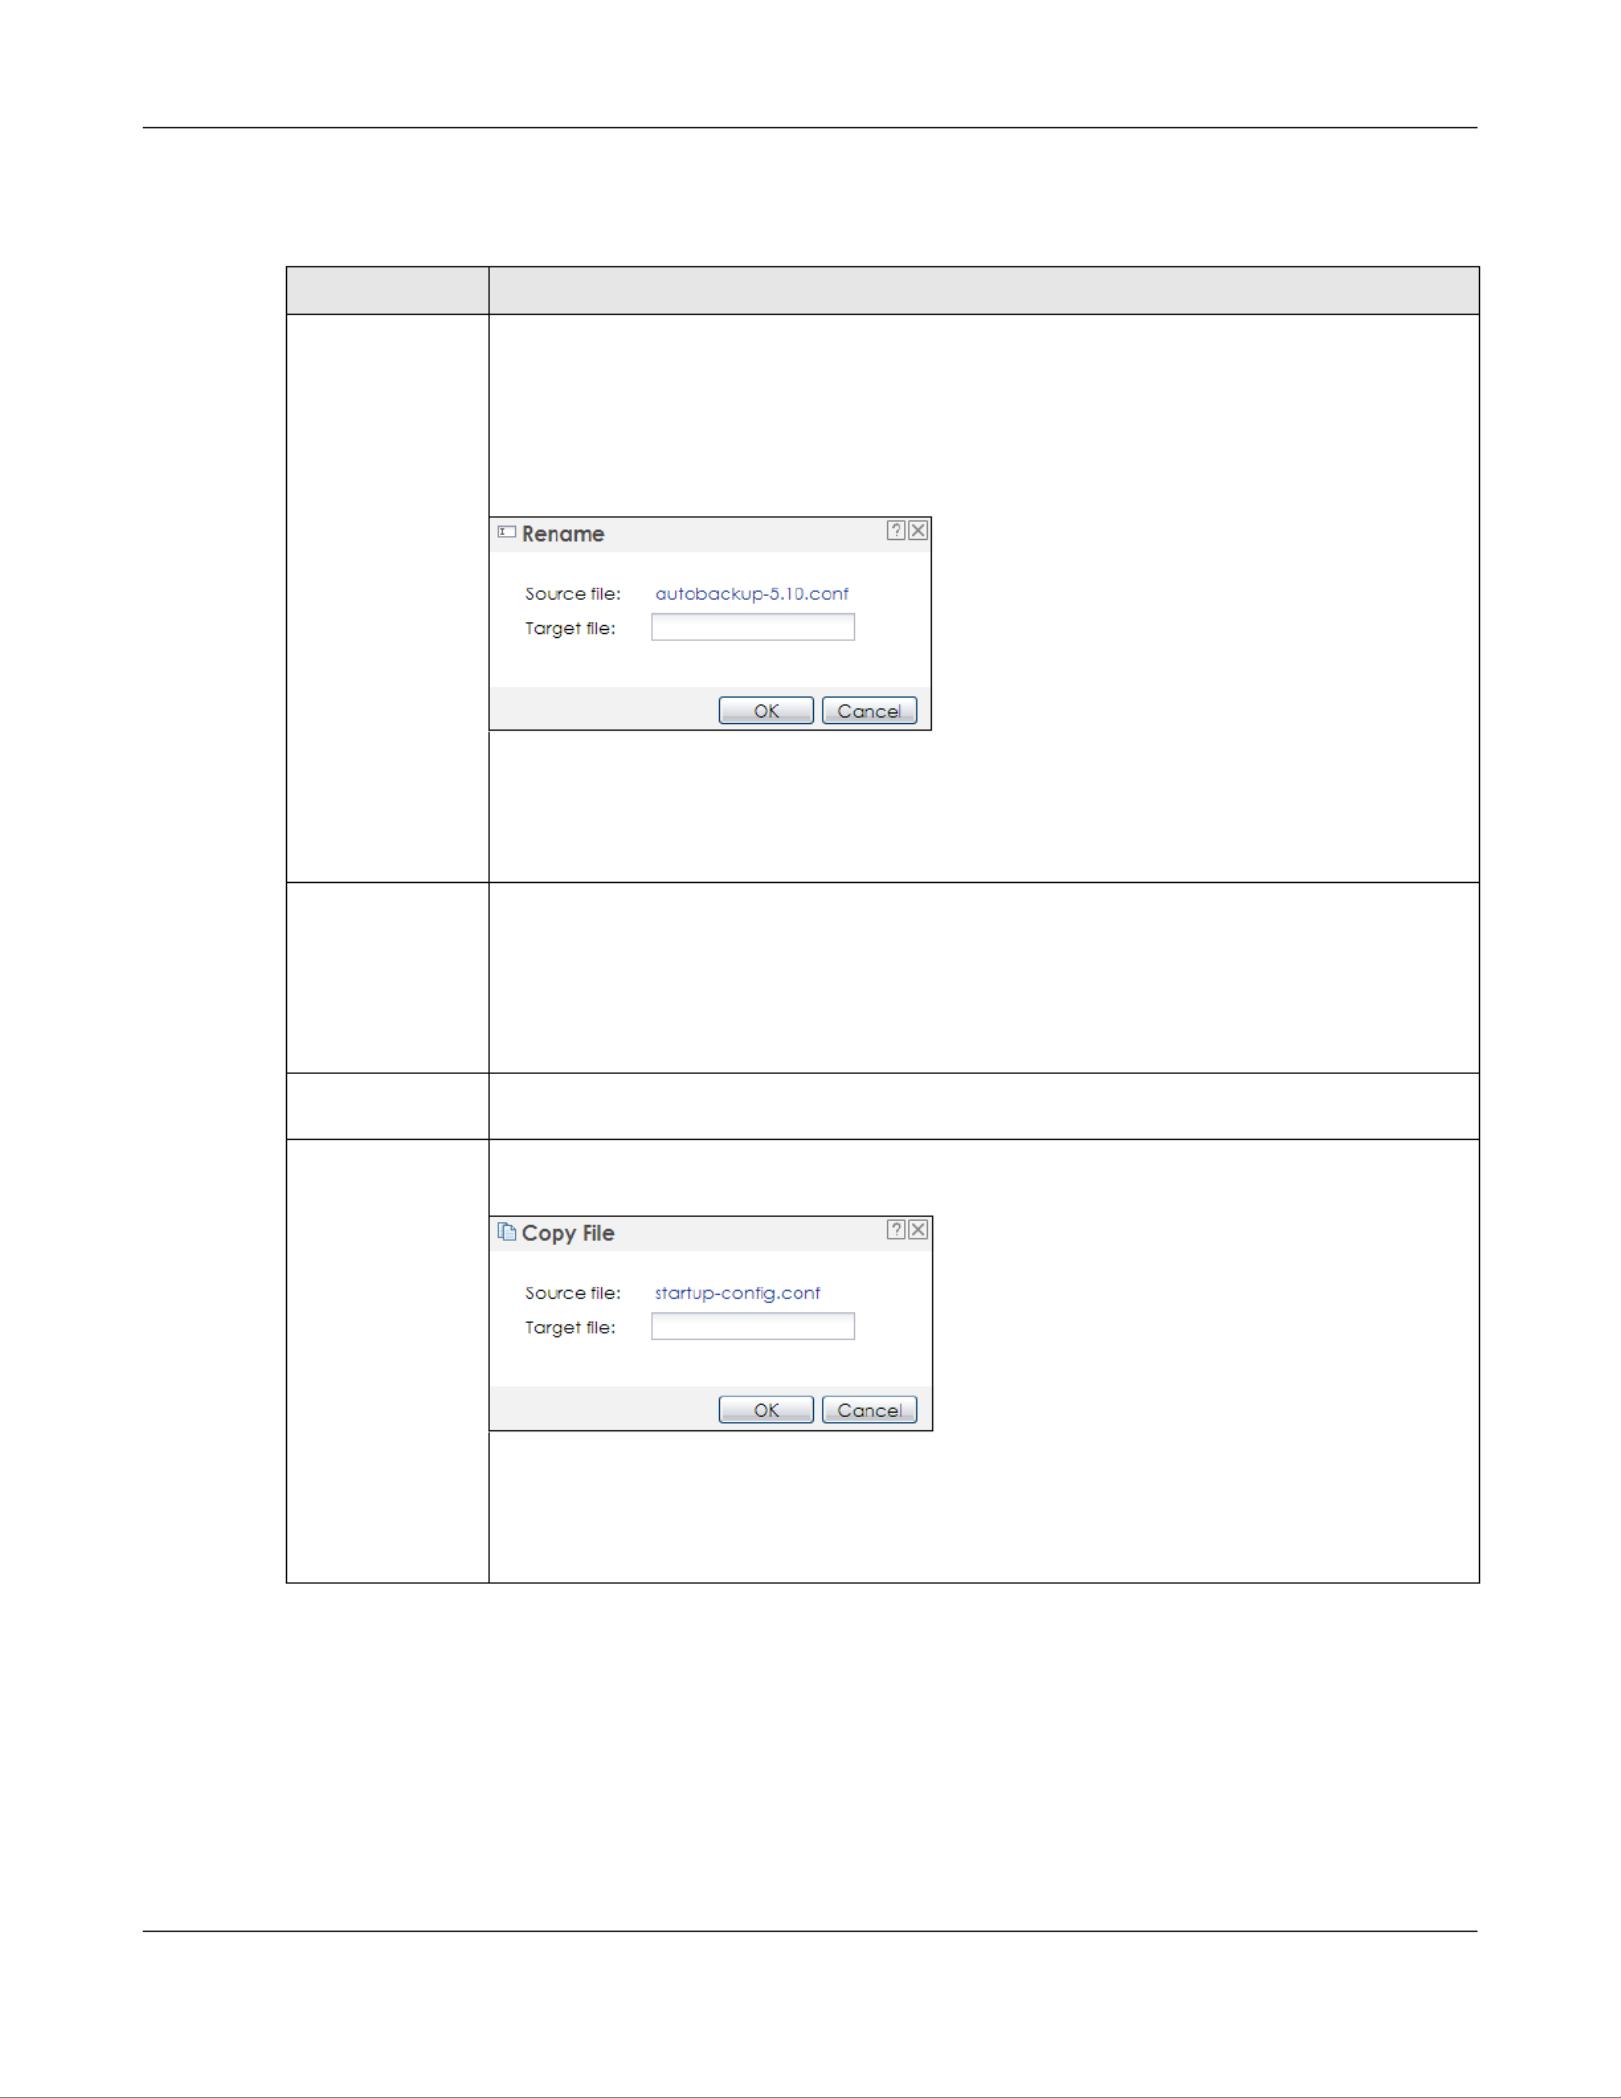
Chapter 18 File Manager
NWA/WAC/WAX Series User’s Guide
170
The following table describes the labels in this screen.
Table 72 Maintenance > File Manager > Configuration File
LABEL DESCRIPTION
Rename Use this button to change the label of a configuration file on the Zyxel Device. You can only
rename manually saved configuration files. You cannot rename the lastgood.conf, system-
default.conf and startup-config.conf files.
You cannot rename a configuration file to the name of another configuration file in the Zyxel
Device.
Click a configuration file’s row to select it and click Rename to open the Rename File screen.
Specify the new name for the configuration file. Use up to 25 characters (including a-zA-Z0-
9;‘~!@#$%^&()_+[]{}’,.=-).
Click OK to save the duplicate or click Cancel to close the screen without saving a duplicate of
the configuration file.
Remove Click a configuration file’s row to select it and click to delete it from the Zyxel Device. Remove
You can only delete manually saved configuration files. You cannot delete the system-
default.conf, startup-config.conf and lastgood.conf files.
A pop-up window asks you to confirm that you want to delete the configuration file. Click OK
to delete the configuration file or click Cancel to close the screen without deleting the
configuration file.
Download Click a configuration file’s row to select it and click Download to save the configuration to your
computer.
Copy Use this button to save a duplicate of a configuration file on the Zyxel Device.
Click a configuration file’s row to select it and click Copy to open the Copy File screen.
Specify a name for the duplicate configuration file. Use up to 25 characters (including a-zA-Z0-
9;‘~!@#$%^&()_+[]{}’,.=-).
Click OK to save the duplicate or click Cancel to close the screen without saving a duplicate of
the configuration file.

Chapter 18 File Manager
NWA/WAC/WAX Series User’s Guide
171
Apply Use this button to have the Zyxel Device use a specific configuration file.
Click a configuration file’s row to select it and click Apply to have the Zyxel Device use that
configuration file. The Zyxel Device does not have to restart in order to use a different
configuration file, although you will need to wait for a few minutes while the system
reconfigures.
The following screen gives you options for what the Zyxel Device is to do if it encounters an error
in the configuration file.
Immediately stop applying the configuration file - this is not recommended because it would
leave the rest of the configuration blank. If the interfaces were not configured before the first
error, the console port may be the only way to access the Zyxel Device.
Immediately stop applying the configuration file and roll back to the previous configuration -
this gets the Zyxel Device started with a fully valid configuration file as quickly as possible.
Ignore errors and finish applying the configuration file - this applies the valid parts of the
configuration file and generates error logs for all of the configuration file’s errors. This lets the
Zyxel Device apply most of your configuration and you can refer to the logs for what to fix.
Ignore errors and finish applying the configuration file and then roll back to the previous
configuration - this applies the valid parts of the configuration file, generates error logs for all of
the configuration file’s errors, and starts the Zyxel Device with a fully valid configuration file.
Click OK to have the Zyxel Device start applying the configuration file or click Cancel to close
the screen.
# This column displays the number for each configuration file entry. This field is a sequential value,
and it is not associated with a specific address. The total number of configuration files that you
can save depends on the sizes of the configuration files and the available flash storage space.
File Name This column displays the label that identifies a configuration file.
You cannot delete the following configuration files or change their file names.
The system-default.conf file contains the Zyxel Device’s default settings. Select this file and click
Apply to reset all of the Zyxel Device settings to the factory defaults. This configuration file is
included when you upload a firmware package.
The startup-config.conf file is the configuration file that the Zyxel Device is currently using. If you
make and save changes during your management session, the changes are applied to this
configuration file. The Zyxel Device applies configuration changes made in the Web
Configurator to the configuration file when you click Apply or OK. It applies configuration
changes made via commands when you use the write command.
The lastgood.conf is the most recently used (valid) configuration file that was saved when the
Zyxel Device last restarted. If you upload and apply a configuration file with an error, you can
apply lastgood.conf to return to a valid configuration.
Size This column displays the size (in KB) of a configuration file.
Table 72 Maintenance > File Manager > Configuration File (continued)
LABEL DESCRIPTION

Chapter 18 File Manager
NWA/WAC/WAX Series User’s Guide
173
9Wait for the file transfer to complete.
10 Enter “quit” to exit the ftp prompt.
18.3 Firmware Package
Click Maintenance > File Manager > Firmware Package to open this screen. Use the Firmware Package
screen to check your current firmware version and upload firmware to the Zyxel Device.
Note: The Web Configurator is the recommended method for uploading firmware. You only
need to use the command line interface if you need to recover the firmware. See the
CLI Reference Guide for how to determine if you need to recover the firmware and
how to recover it.
Find the firmware package at www.zyxel.com in a file that (usually) uses a .bin extension.
The firmware update can take up to five minutes. Do not turn off or reset
the Zyxel Device while the firmware update is in progress!
C:\>ftp 192.168.1.2
Connected to 192.168.1.2.
220---------- Welcome to Pure-FTPd [privsep] [TLS] ----------
220-You are user number 1 of 5 allowed.
220-Local time is now 21:28. Server port: 21.
220-This is a private system - No anonymous login
220 You will be disconnected after 600 minutes of inactivity.
User (192.168.1.2:(none)): admin
331 User admin OK. Password required
Password:
230 OK. Current restricted directory is /
ftp> cd conf
250 OK. Current directory is /conf
ftp> ls
200 PORT command successful
150 Connecting to port 5001
lastgood.conf
startup-config.conf
system-default.conf
226 3 matches total
ftp: 57 bytes received in 0.33Seconds 0.17Kbytes/sec.
ftp> get startup-config.conf
200 PORT command successful
150 Connecting to port 5002
226-File successfully transferred
226 0.002 seconds (measured here), 1.66 Mbytes per second
ftp: 2928 bytes received in 0.02Seconds 183.00Kbytes/sec.
ftp>

Chapter 18 File Manager
NWA/WAC/WAX Series User’s Guide
177
Browse... Click Browse... to find the .zysh file you want to upload.
Upload Click Upload to begin the upload process. This process may take up to several minutes.
Table 74 Maintenance > File Manager > Shell Script (continued)
LABEL DESCRIPTION
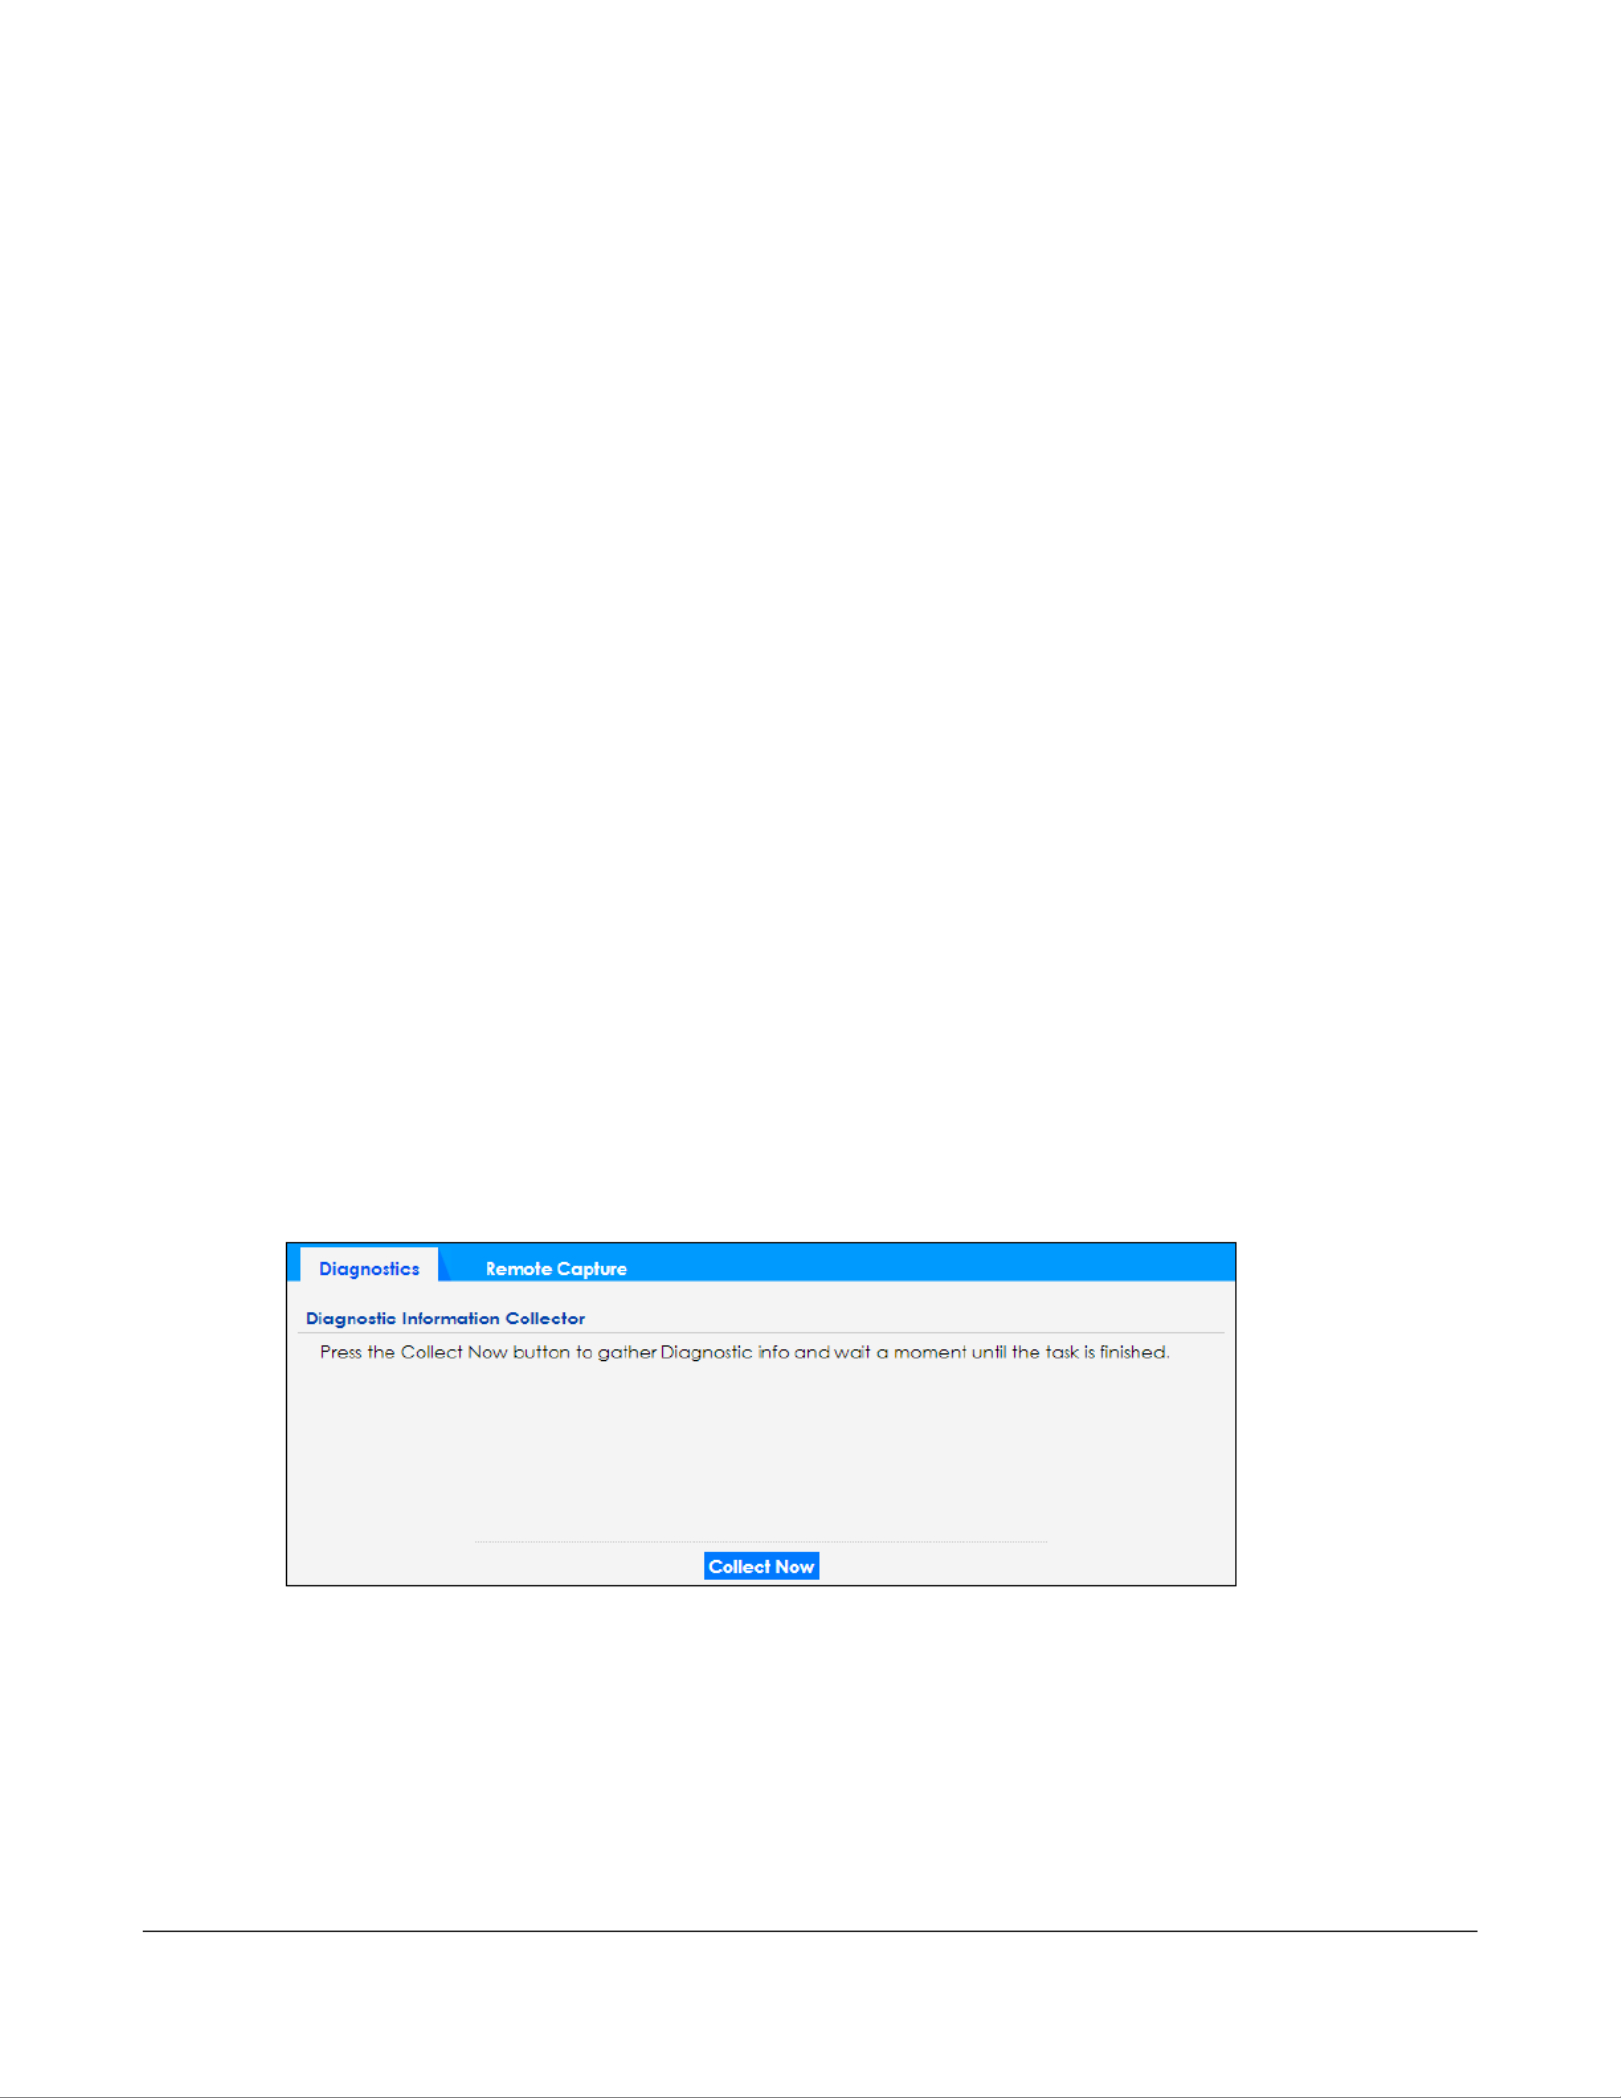
NWA/WAC/WAX Series User’s Guide
178
CHAPTER 19
Diagnostics
19.1 Overview
Use the diagnostics screen for troubleshooting.
19.1.1 What You Can Do in this Chapter
The Diagnostics screen (Section 19.2 on page 178) generates a file containing the Zyxel Device’s
configuration and diagnostic information if you need to provide it to customer support during
troubleshooting.
19.2 Diagnostics
This screen provides an easy way for you to generate a file containing the Zyxel Device’s configuration
and diagnostic information. You may need to generate this file and send it to customer support during
troubleshooting. All categories of settings and shell script files stored on the Zyxel Device will be included
in the diagnostic file.
Click Maintenance > Diagnostics> Diagnostics to open the Diagnostics screen. Click Collect Now to
have the Zyxel Device create a new diagnostic file.
Figure 107 Maintenance > Diagnostics> Diagnostics
The Debug Information Center screen then displays showing whether the collection is in progress, was
successful, or has failed. When the data collection is done, click Download to save the most recent
diagnostic file to a computer.

NWA/WAC/WAX Series User’s Guide
180
CHAPTER 20
LEDs
20.1 Overview
The LEDs of your Zyxel Device can be controlled such that they stay lit (ON) or OFF after the Zyxel Device
is ready. There are two features that control the LEDs of your Zyxel Device - Locator and Suppression (see
Section 1.4 on page 18).
20.1.1 What You Can Do in this Chapter
• The Suppression screen (Section 20.2 on page 180) allows you to set how you want the LEDs to
behave after the Zyxel Device is ready.
• The Locator screen (Section 20.3 on page 181) allows users to see the actual location of the Zyxel
Device between several devices in the network.
20.2 Suppression Screen
The LED Suppression feature allows you to control how the LEDs of your Zyxel Device behave after it’s
ready. The default LED suppression setting of your AP is different depending on your Zyxel Device model.
You can go to the Maintenance > LEDs > Suppression screen to see the default LED behavior and
change the LED suppression setting. After you make changes in the suppression screen, it will be stored
as the default when the Zyxel Device is restarted. See (Section 3.2 on page 36) for information on default
values for different models.
Note: When the ZyXEL Device is booting or performing firmware upgrade, the LEDs will light up
regardless of the setting in LED suppression.
To access this screen, click Maintenance > LEDs > Suppression.

Chapter 20 LEDs
NWA/WAC/WAX Series User’s Guide
181
Figure 110 Maintenance > LEDs > Suppression
The following table describes fields in the above screen.
20.3 Locator Screen
The Locator feature identifies the location of your Zyxel Device among several devices in the network.
You can run this feature and set a timer in this screen.
To run the locator feature, enter a number of minutes and click Turn On button to have the Zyxel Device
find its location. The Locator LED will start to blink for the number of minutes set in the Locator screen. The
default setting is 10 minutes. While the locator is running, the turn on button will gray out and return after
it’s finished. If you make changes to the time default setting, it will be stored as the default when the
Zyxel Device restarts.
Note: The Locator feature is not affected by the Suppression setting.
To access this screen, click Maintenance > LEDs > Locator.
Table 76 Maintenance > LED > Suppression
LABEL DESCRIPTION
Suppression On If the Suppression On check box is checked, the LEDs of your Zyxel Device will turn off after
it’s ready.
If the check box is unchecked, the LEDs will stay lit after the Zyxel Device is ready.
Apply Click Apply to save your changes back to the Zyxel Device.
Reset Click Reset to return the screen to its last-saved settings.

NWA/WAC/WAX Series User’s Guide
250
CHAPTER 22
Antenna Switch
22.1 Overview
Use this screen to adjust coverage depending on the orientation of the antenna.
22.1.1 What You Need To Know
Positioning the antennas properly increases the range and coverage area of a wireless LAN.
On the Zyxel Device that comes with internal antennas and also has an antenna switch, you can adjust
coverage depending on the antenna orientation for the Zyxel Device radios using the web
configurator, the command line interface (CLI) or a physical switch. Check Section 1.4 on page 18 to
see if your Zyxel Device has an antenna switch.
Figure 151 WAC Physical Antenna Switch
Note: With the physical antenna switch, you apply the same antenna orientation settings to
both radios. You can set the radios to have different settings while using the Web
Configurator or the command line interface.
Note: The antenna switch in the Web Configurator has priority over the physical antenna
switch after you Enable Software Control in the Maintenance > Antenna screen. By
default, software control is disabled.
22.2 Antenna Switch Screen
To access this screen, click Maintenance > Antenna.
The screen varies depending on whether the Zyxel Device has a physical antenna switch or allows you
to change antenna orientation settings on a per-radio basis or on a per-AP basis.

NWA/WAC/WAX Series User’s Guide
188
If the Zyxel Device cannot connect to the Internet or to NCC, an error message is shown on this screen,
as in the following.
Nebula Control
Center
Activation Status
This field displays whether the Zyxel Device has been registered and can be managed by
the NCC.
Use Proxy to
Access NCC
This displays whether the NAP uses a proxy server to access the NCC (Nebula Control
Center).
Table 78 Dashboard (continued)
LABEL DESCRIPTION
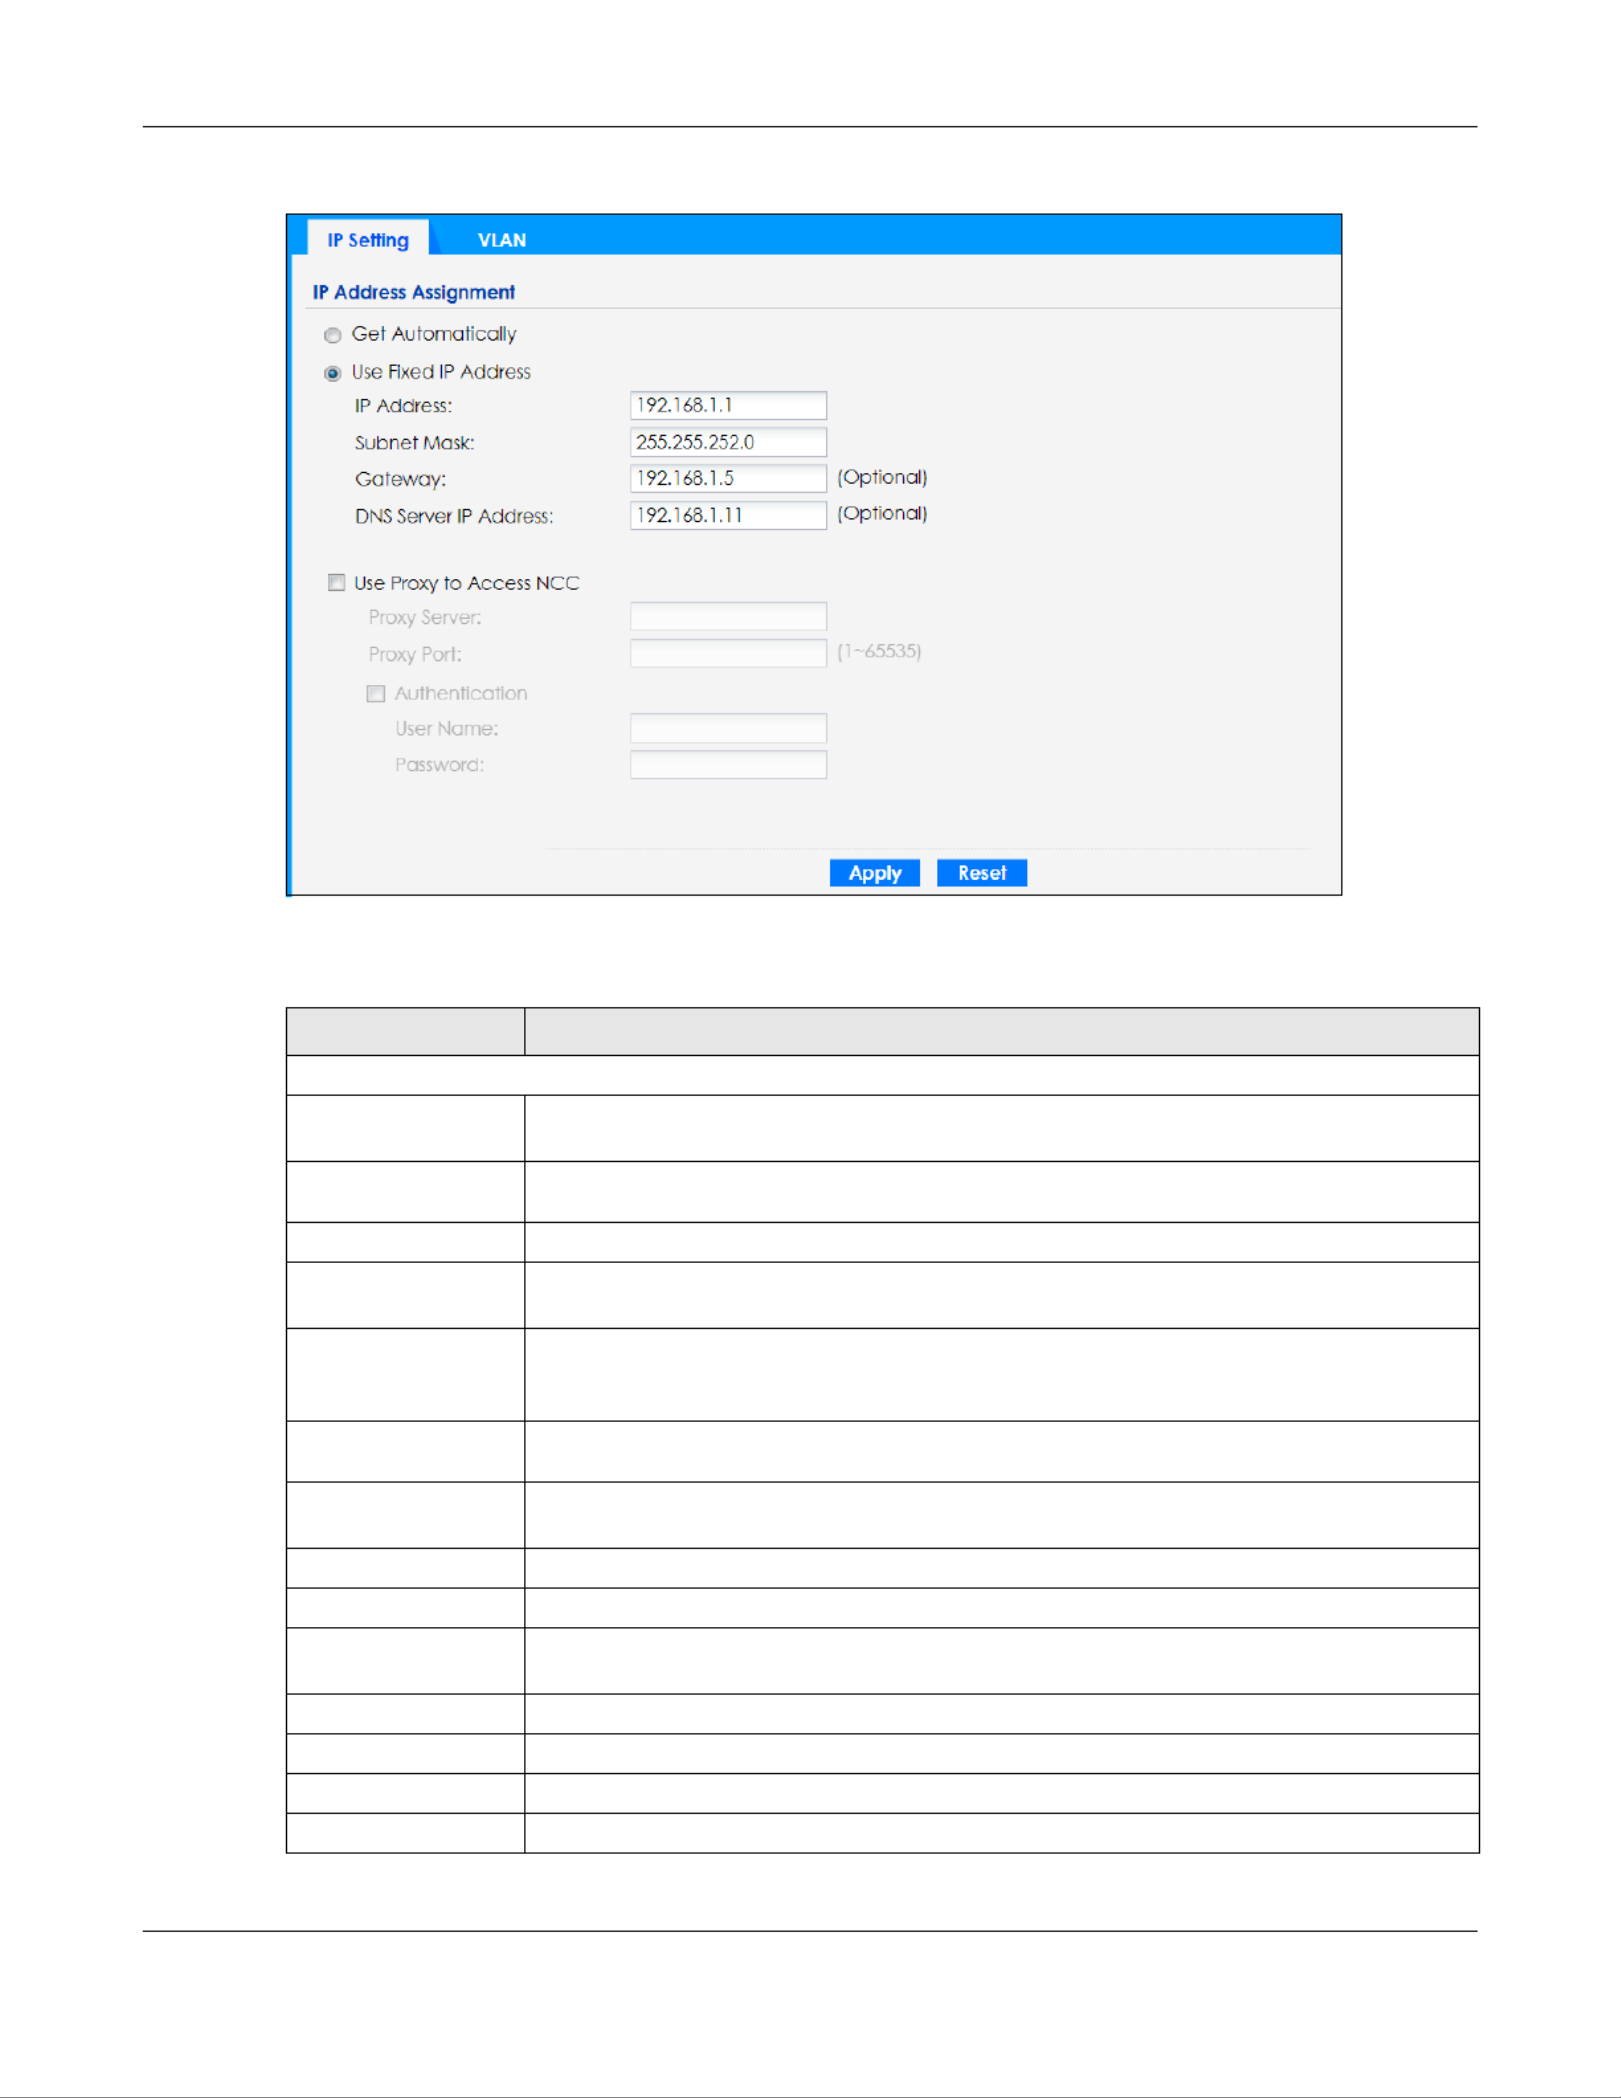
Chapter 24 Network
NWA/WAC/WAX Series User’s Guide
190
Figure 116 Configuration > Network > IP Setting
Each field is described in the following table.
Table 79 Configuration > Network > IP Setting
LABEL DESCRIPTION
IP Address Assignment
Get
Automatically
Select this to make the interface a DHCP client and automatically get the IP address,
subnet mask, and gateway address from a DHCP server.
Use Fixed IP
Address
Select this if you want to specify the IP address, subnet mask, and gateway manually.
IP Address Enter the IP address for this interface.
Subnet Mask Enter the subnet mask of this interface in dot decimal notation. The subnet mask indicates
what part of the IP address is the same for all computers in the network.
Gateway Enter the IP address of the gateway. The Zyxel Device sends packets to the gateway when
it does not know how to route the packet to its destination. The gateway should be on the
same network as the interface.
DNS Server IP
Address
Enter the IP address of the DNS server.
Use Proxy to Access
Internet
If the Zyxel Device is behind a proxy server, you need to select this option and configure the
proxy server settings so that the Zyxel Device can access the NCC through the proxy server.
Proxy Server Enter the IP address of the proxy server.
Proxy Port Enter service port number used by the proxy server.
Authentication Select this option if the proxy server requires authentication before it grants access to the
Internet.
User Name Enter your proxy user name.
Password Enter your proxy password.
Apply Click Apply to save your changes back to the Zyxel Device.
Reset Click Reset to return the screen to its last-saved settings.

Chapter 25 Maintenance
NWA/WAC/WAX Series User’s Guide
193
Each field is described in the following table.
25.3 Diagnostics
This screen provides an easy way for you to generate a file containing the Zyxel Device’s configuration
and diagnostic information. You may need to generate this file and send it to customer support during
troubleshooting. All categories of settings and shell script files stored on the Zyxel Device will be included
in the diagnostic file.
Click Maintenance > Diagnostics to open the Diagnostics screen. Click Collect Now to have the Zyxel
Device create a new diagnostic file.
Table 81 Maintenance > Shell Script
LABEL DESCRIPTION
Rename Use this button to change the label of a shell script file on the Zyxel Device.
You cannot rename a shell script to the name of another shell script in the Zyxel Device.
Click a shell script’s row to select it and click Rename to open the Rename File screen.
Specify the new name for the shell script file. Use up to 25 characters (including a-zA-Z0-
9;‘~!@#$%^&()_+[]{}’,.=-).
Click OK to save the duplicate or click Cancel to close the screen without saving a duplicate of the
configuration file.
Remove Click a shell script file’s row to select it and click Delete to delete the shell script file from the Zyxel
Device.
A pop-up window asks you to confirm that you want to delete the shell script file. Click OK to delete
the shell script file or click Cancel to close the screen without deleting the shell script file.
Download Click a shell script file’s row to select it and click Download to save the configuration to your
computer.
Copy Use this button to save a duplicate of a shell script file on the Zyxel Device.
Click a shell script file’s row to select it and click Copy to open the Copy File screen.
Specify a name for the duplicate file. Use up to 25 characters (including a-zA-Z0-
9;‘~!@#$%^&()_+[]{}’,.=-).
Click OK to save the duplicate or click Cancel to close the screen without saving a duplicate of the
configuration file.
# This column displays the number for each shell script file entry.
File Name This column displays the label that identifies a shell script file.
Size This column displays the size (in KB) of a shell script file.
Last
Modified
This column displays the date and time that the individual shell script files were last changed or
saved.
Upload Shell
Script
The bottom part of the screen allows you to upload a new or previously saved shell script file from
your computer to your Zyxel Device.
File Type in the location of the file you want to upload in this field or click Browse... to find it.
Browse... Click Browse... to find the .zysh file you want to upload.
Upload Click Upload to begin the upload process. This process may take up to several minutes.

Chapter 25 Maintenance
NWA/WAC/WAX Series User’s Guide
196
Refresh Click this to update the list of logs.
Clear Log Click this button to clear the whole log, regardless of what is currently displayed on the screen.
# This field is a sequential value, and it is not associated with a specific log message.
Time This field displays the time the log message was recorded.
Priority This field displays the priority of the log message. It has the same range of values as the Priority
field above.
Category This field displays the log that generated the log message. It is the same value used in the
Display and (other) Category fields.
Message This field displays the reason the log message was generated. The text “[count=x]”, where x is a
number, appears at the end of the Message field if log consolidation is turned on and multiple
entries were aggregated to generate into this one.
Source This field displays the source IP address and the port number in the event that generated the
log message.
Source Interface This field displays the source interface of the packet that generated the log message.
Destination This field displays the destination IP address and the port number of the event that generated
the log message.
Destination
Interface
This field displays the destination interface of the packet that generated the log message.
Protocol This field displays the service protocol in the event that generated the log message.
Note This field displays any additional information about the log message.
Table 82 Maintenance > Log > View Log (continued)
LABEL DESCRIPTION

Chapter 26 Troubleshooting
NWA/WAC/WAX Series User’s Guide
201
I enabled NCC Discovery, but the Zyxel Device is still in standalone mode.
Make sure your Zyxel Device is registered to the NCC.
The Zyxel Device is already registered with NCC, but it is still in standalone mode; it cannot
connect to the NCC.
1Make sure that NCC Discovery is enabled (see Section 9.4 on page 73).
2Check your network’s firewall/security settings. Make sure the following TCP ports are allowed: 443, 4335,
and 6667.
3Make sure your Zyxel Device can access the Internet.
4Check your network’s VLAN settings (see Section 9.3 on page 71). You may have to change the
Management VLAN settings of the Zyxel Device to allow it to connect to the Internet and access the
NCC.
Note: Changing the management VLAN and IP address settings on the Zyxel Device also
pushes these changes to the NCC. Do this only if your device cannot otherwise
connect to the NCC.
5Make sure your Zyxel Device does not have to go through network authentication such as a captive
portal, If your network uses a captive portal, the network administrator may have to create a new VLAN
without this requirement. Change your Zyxel Device’s management VLAN settings as necessary.
I want to switch from NCC to AC management, but I could not find the AC Discovery menu in the
Zyxel Device Web Configurator.
1Unregister the Zyxel Device from the NCC.
2Reset your Zyxel Device to the factory defaults.
3Make sure that your Zyxel Device is in the same subnet as the AC, and enable AC Discovery in
Configuration Network > > AC Discovery.
The Zyxel Device cannot discover the AC.
1Make sure your Zyxel Device is not registered to NCC.
2Enable AC Discovery in Configuration > Network > AC Discovery.
Product specificaties
| Merk: | ZyXEL |
| Categorie: | Access point |
| Model: | NWA1123-AC Pro |
| Kleur van het product: | Wit |
| Gewicht: | 445 g |
| Breedte: | 203.9 mm |
| Diepte: | 191.7 mm |
| Hoogte: | 34.7 mm |
| Gewicht verpakking: | 1210 g |
| Breedte verpakking: | 240 mm |
| Diepte verpakking: | 235 mm |
| Hoogte verpakking: | 100 mm |
| Plaatsing: | Ceiling, Wall |
| Certificering: | FCC part 15C, FCC part 15E, ETSI EN 300 328, EN 301 893, LP0002 |
| Aansluiting voor netstroomadapter: | Ja |
| Diepte ( zonder voet ): | 191.7 mm |
| Hoogte (zonder voet ): | 34.7 mm |
| Breedte ( zonder voet ): | 203.9 mm |
| Gewicht (zonder voet): | 445 g |
| Modulatie: | 16-QAM, 64-QAM, 256-QAM, BPSK, CCK, DPSK, DQPSK, QPSK |
| Ethernet LAN, data-overdrachtsnelheden: | 10,100,1000 Mbit/s |
| Netwerkstandaard: | IEEE 802.11ac, IEEE 802.11b, IEEE 802.11g, IEEE 802.3ab, IEEE 802.3u |
| Ondersteunde beveiligingsalgoritmen: | 802.1x RADIUS, EAP-AKA, EAP-FAST, EAP-PEAP, EAP-SIM, EAP-TLS, EAP-TTLS, SNMP, SSH, WEP, WPA, WPA2-Enterprise, WPA2-PSK |
| Soort antenne: | Intern |
| Antennas quantity: | 3 |
| Antenne versterkingsniveau (max): | 5 dBi |
| Temperatuur bij opslag: | -40 - 70 °C |
| Intern: | Nee |
| Upgraden van firmware mogelijk: | Ja |
| Luchtvochtigheid bij opslag: | 10 - 90 procent |
| MAC adres filtering: | Ja |
| Maximale overdrachtssnelheid van gegevens: | 1300 Mbit/s |
| 2,4 GHz: | Ja |
| 5 GHz: | Ja |
| Kanaalbandbreedte: | 80 MHz |
| VLAN=ondersteuning: | Ja |
| Wifi Multimedia (WMM)/(WME): | Ja |
| Service Set Identifier (SSID) functies: | SSID-broadcast aan/uit |
| DHCP client: | Ja |
| Power over Ethernet (PoE): | Ja |
| Draadloze isolatie: | Ja |
| AC-ingangsspanning: | 100 - 240 V |
| AC-ingangsfrequentie: | 50 Hz |
| Bedrijfstemperatuur (T-T): | 0 - 50 °C |
| Relatieve vochtigheid in bedrijf (V-V): | 10 - 90 procent |
| Aantal SSID-ondersteuningen: | 16 |
Heb je hulp nodig?
Als je hulp nodig hebt met ZyXEL NWA1123-AC Pro stel dan hieronder een vraag en andere gebruikers zullen je antwoorden
Handleiding Access point ZyXEL

16 April 2023
3 April 2023
20 Februari 2023
17 Februari 2023
15 Februari 2023
11 Februari 2023
8 Februari 2023
4 Februari 2023
1 Januari 2022
Handleiding Access point
- Access point Bosch
- Access point HP
- Access point Huawei
- Access point Asus
- Access point Honeywell
- Access point Airlive
- Access point Allied Telesis
- Access point Allnet
- Access point AVM
- Access point Buffalo
- Access point D-Link
- Access point Dell
- Access point Devolo
- Access point Digitus
- Access point Draytek
- Access point Edimax
- Access point Eminent
- Access point Engenius
- Access point EQ-3
- Access point Grandstream
- Access point Hercules
- Access point INCA
- Access point Interlogix
- Access point Lancom
- Access point LevelOne
- Access point Linksys
- Access point Media-tech
- Access point Mikrotik
- Access point Mojo
- Access point Netgear
- Access point Netis
- Access point Renkforce
- Access point Sitecom
- Access point SMC
- Access point Tenda
- Access point TP Link
- Access point Trendnet
- Access point Zebra
- Access point Macally
- Access point Steren
- Access point Ubiquiti Networks
- Access point Techly
- Access point Cisco
- Access point 3Com
- Access point Amped Wireless
- Access point Comtrend
- Access point CradlePoint
- Access point Juniper
- Access point Planet
- Access point Intellinet
- Access point Silex
- Access point Lindy
- Access point Black Box
- Access point Fortinet
- Access point DataVideo
- Access point Totolink
- Access point Dahua Technology
- Access point Mercusys
- Access point Aruba
- Access point EQ3
- Access point Homematic IP
- Access point Hawking Technologies
- Access point AMX
- Access point Moog
- Access point Crestron
- Access point StarTech.com
- Access point WatchGuard
- Access point LigoWave
- Access point Advantech
- Access point Moxa
- Access point Kingston
- Access point Vimar
- Access point Aerohive
- Access point Bountiful
- Access point V7
- Access point NUVO
- Access point Cudy
- Access point IP-COM
- Access point Syscom
- Access point Peplink
- Access point Meru
- Access point Cambium Networks
- Access point Ruckus Wireless
- Access point Bintec-elmeg
- Access point Mach Power
- Access point ICC
- Access point Insteon
- Access point Brocade
- Access point Premiertek
- Access point Extreme Networks
- Access point Atlantis Land
- Access point FlyingVoice
- Access point Luxul
Nieuwste handleidingen voor Access point
8 April 2025
5 April 2025
19 Maart 2025
13 Januari 2025
13 Januari 2025

23 December 2024
11 December 2024

8 December 2024
8 December 2024
3 December 2024