Skytronic 351.149 IP Camera Handleiding
Skytronic
Beveiliging
351.149 IP Camera
Lees hieronder de 📖 handleiding in het Nederlandse voor Skytronic 351.149 IP Camera (40 pagina's) in de categorie Beveiliging. Deze handleiding was nuttig voor 45 personen en werd door 2 gebruikers gemiddeld met 4.5 sterren beoordeeld
Pagina 1/40

3
351.149
IP Camera with Pan/Tilt and
SD recording
Quickguide
UK-NL-DE

3
UK: IMPORTANT SAFETY INSTRUCTIONS
1) Read these instructions, 2) Keep these instructions, 3) Heed all warnings, 4) Follow all instructions.
5) Do not use this aparatus near water, 6) Clean only with dry cloth.
7) Do not block any ventilation openings. Install in accordance with the manufacturer's instructions.
8) Do not install near any heat sources such as radiators, heat registers, stoves, or other apparatus
(including amplifiers) that produce heat.
9) Do not defeat the safety purpose of the polarized or grounding-type plug.
A polarized plug has two blades with one wider than the other. A grounding type plug has two blades and third grounding prong.
The wide blade or the third prong are provided for your safety.
If the provided plug does not fie into your outlet, consult an electrician for replacement of the obsolete outlet.
10) Protect the power cord from being walked on or pinched particularly at plugs, convenience receptacles, and the point where they exit from the apparatus.
11) Only use attachments/accessories specified by the manufacturer.
12) Use only with the cart, stand, tripod, bracket, or table specified by the manufacturer, or sold with the apparatus. When a cart is used, use caution when moving
the cart/apparatus combination to
avoid injury from tip-over.
13) Unplug this apparatus during lightning storms or when unused for long periods of time.
14) Refer all servicing to qualified service personnel. Servicing is required when the apparatus has been damaged in anyway, such as power-supply cord or plug is
damaged, liquid has been spilled or
objects have fallen into the apparatus, the apparatus has been exposed to rain or moisture, does not operate normally, or has been dropped.
- The apparatus shall not be exposed to dripping or splashing and that no objects filled with liquids, such as vases, shall be placed on the apparatus.
- Minimum distances(e.q. 10cm) around the apparatus for sufficient ventillation.
"WARNING - To reduce the risk of fire or electric shock, do not expose the apparatus to rain or moisture."
Do not place this product on an unstable cart, stand or table. The product may fall, causing
serious damage to the product.
Never push objects of any kind into this product through cabinet slots as they may touch
dangerous voltage points or short out parts that could result in a risk of fire or electric shock. Never spill any kind of liquid on the product.
10. Do not attempt to service this product yourself, as opening or removing covers may expose
you to dangerous voltage points or other risks. Refer all servicing to service personnel.
NL: Veiligheid
1. Bewaar de verpakking zodat u indien het apparaat defect is, dit in de originele verpakking kunt opsturen om beschadigingen te voorkomen.
2. Voordat het apparaat in werking wordt gesteld, altijd eerst een deskundige raadplegen.
3. In het apparaat bevinden zich onder spanning staande onderdelen; open daarom NOOIT dit apparaat.
4. Bij het verwijderen van de stekker/adapter uit het stopcontact nooit aan het netsnoer trekken.
5. Verwijder of plaats een stekker/adapter nooit met natte handen resp. uit en in het stopcontact.
6. Indien voedingssnoeren beschadigd zijn dient dit door een vakman hersteld te worden.
7. Indien het apparaat zo beschadigd is dat inwendige (onder)delen zichtbaar zijn mag de stekker NOOIT in het stopcontact worden geplaatst én het apparaat
NOOIT worden ingeschakeld. Neem in dit geval contact op met de dealer.
8. Reparatie aan het apparaat dient te geschieden door een vakman of een deskundige.
9. Sluit het apparaat alléén aan op een 220-240VAC / 50Hz (geaard) stopcontact.
10. Toestel niet opstellen in de buurt van warmte bronnen zoals radiatoren etc. en niet op een vibrerende ondergrond plaatsen. Dek ventilatie-openingen nooit
af. Bevat geïntegreerde ventilator.
11. Bij onweer altijd de stekker/adapter uit het stopcontact halen, zo ook wanneer het apparaat voor een langere tijd niet gebruikt wordt.
12. Als u het apparaat lang niet gebruikt heeft en het weer wil gebruiken kan er condens ontstaan; laat het apparaat eerst op kamertemperatuur komen alvorens
het weer in werking te stellen ; apparaat nooit in vochtige ruimten en buiten gebruiken.
13. Om ongevallen in bedrijven te voorkomen moét rekening worden gehouden met de daarvoor geldende richtlijnen en moeten de
aanwijzingen/waarschuwingen worden gevolgd.
14. Het apparaat buiten bereik van kinderen houden.
15. Gebruik geen schoonmaakspray om de schakelaars te reinigen. Restanten van deze spray zorgen ervoor dat smeer en stof ophopen. Raadpleeg bij storing
te allen tijde een deskundige.
16. Zorg dat uw handen schoon zijn tijdens het gebruik.
17. Gebruik geen overmatige kracht bij het bedienen van het apparaat.
18. Tracht het apparaat niet schoon te maken met chemische oplossingen. Dit kan de lak beschadigen. Gebruik een droge doek om schoon te maken.
19. Blijf uit de buurt van electronische apparatuur die bromstoringen zouden kunnen veroorzaken.
20. Bij reparatie dienen altijd originele onderdelen te worden gebruikt om onherstelbare beschadigingen en/of ontoelaatbare straling te voorkomen.
Schakel eerst het toestel uit voordat u aansluitsnoeren verwijdert. Verwijder deze voordat u dit product gaat verplaatsen. Zorg ervoor dat snoeren niet
beschadigd/defect raken wanneer mensen erover heen lopen. In Nederland/Belgie is de netspanning 230Vac/50Hz. Indien u reist (en u neemt het apparaat mee)
informeer dan naar de netspanning in het land waar u verblijft.
Lees deze handleiding eerst door alvorens het product te gebruiken. Volg de instructies op anders zou de garantie kunnen vervallen. Neem ook altijd alle
veiligheids maatregelen om brand en/of een electrische schok te voorkomen. Tevens is het ook raadzaam om reparaties / modificaties e.d. over te laten aan
gekwalificeerd personeel om een electrische schok te voorkomen.. Bewaar deze handleiding ook voor toekomstig gebruik.

3
Sicherheit
DE :
Bewahren Sie die Verpackung auf, um das Gerät im Bedarfsfall sicher transportieren zu können.
- Bevor das Gerät in Betrieb genommen wird, muss es erst von einem Fachmann überprüft werden. Bei der ersten Benutzung kann etwas Geruch auftreten. Das
ist normal und verschwindet nach einer Weile
- Das Gerät enthält unter Spannung stehende Teile. Daher NIEMALS das Gehäuse öffnen.
- Keine Metallgegenstände oder Flüssigkeiten ins Gerät dringen lassen. Sie können zu Stromschlag und Defekten führen.
- Gerät nicht in der Nähe von Wärmequellen wie Heizkörpern aufstellen. Nicht auf eine vibrierende Oberfläche stellen. Niemals die Belüftungsschlitze abdecken.
- Das Gerät ist nicht für Dauerbetrieb geeignet.
- Gehen Sie vorsichtig mit dem Netzkabel um und beschädigen Sie es nicht. Eine beschädigte Netzschnur kann zu Stromschlag und Defekten führen.
- Wenn Sie das Gerät vom Netz trennen, immer am Stecker ziehen, niemals an der Schnur.
- Um Feuer und Stromschlag zu vermeiden, das Gerät vor Regen und Feuchtigkeit schützen.
- Den Stecker nie mit nassen Händen in eine Netzsteckdose stecken oder abziehen.
- Wenn sowohl der Stecker und/oder die Netzschnur bzw. der Kabeleintritt ins Gerät beschädigt sind, müssen sie von einem Fachmann repariert werden.
- Wenn das Gerät so beschädigt ist, dass Innenteile sichtbar sind, darf der Stecker NICHT in eine Steckdose gesteckt werden und das Gerät darf NICHT
eingeschaltet werden. Wenden Sie sich in dem Fall an Ihren Fachhändler. Das Gerät darf nicht an einen Dimmer angeschlossen werden.
- Reparaturen dürfen nur von einem Fachmann oder Sachverständigen ausgeführt werden.
- Das Gerät nur an eine geerdete 10-16A Netzsteckdose mit 220-240V AC/50Hz Spannung anschließen.
- Bei Gewitter oder längerem Nichtgebrauch den Netzstecker abziehen. Die Regel gilt: Bei Nichtgebrauch Netzstecker abziehen.
- Wenn das Gerät längere Zeit nicht benutzt wurde, kann sich Kondenswasser gebildet haben. Lassen Sie das Gerät erst auf Zimmertemperatur kommen, bevor
Sie es einschalten. Das Gerät nicht in feuchten Räumen oder im Freien benutzen.
- Das Gehäuse wird sehr warm. Während des Betriebs und gleich danach nicht das Gehäuse anfassen.
- Um Unfällen in der Öffentlichkeit vorzubeugen, müssen die geltenden Richtlinien beachtet und die Anweisungen/Warnungen befolgt werden.
- Wenn das Gerät an der Decke befestigt werden soll, muss es mit einer zusätzlichen Sicherheitskette abgesichert werden. Benutzen Sie ein Traversensystem mit
Haken. Während der Montage darf sich niemand im Bereich darunter aufhalten. Das Gerät muss mindestens 50cm von brennbaren Materialien entfernt
angebracht werden. Lassen Sie einen Mindestabstand von 1m an jeder Seite des Geräts frei, um ausreichende Kühlung zu gewährleisten.
- Das Gerät besitzt eine hochintensive LED. Niemals direkt in die LED blicken, um die Augen nicht zu beschädigen.
- Das Gerät nicht ohne Leuchtmittel einschalten. Niemals die Lampe kurz hintereinander ein- und ausschalten. Dadurch verkürzt sich die Lebensdauer erheblich.
- Das Gerät außerhalb der Reichweite von Kindern halten. Das Gerät niemals unbeaufsichtigt lassen.
- Die Regler nicht mit Reinigungssprays reinigen. Diese hinterlassen Rückstände, die zu Staub- und Fettansammlungen führen. Bei Störungen immer einen
Fachmann um Rat fragen.
- Das Gerät nicht mit Gewalt bedienen.
- Nach einem Unfall mit dem Gerät immer erst einen Fachmann um Rat fragen, bevor Sie es wieder einschalten.
- Keine chemischen Reinigungsmittel benutzen, die den Lack beschädigen. Das Gerät nur mit einem trockenen Tuch abwischen.
- Nicht in der Nähe von elektronischen Geräten benutzen, die Brummstörungen verursachen können.
- Bei Reparaturen nur die Original-Ersatzteile verwenden, um starke Schäden und/oder gefährliche Strahlungen zu vermeiden.
- Bevor Sie das Netz- und/oder Anschlusskabel abziehen, erst das Gerät ausschalten. Netz- und Anschlusskabel abziehen, bevor Sie das Gerät umstellen.
- Sorgen Sie dafür, dass das Netzkabel nicht beschädigt werden kann, wenn Menschen darüber laufen. Das Netzkabel vor jedem Einsatz auf Brüche/Schadstellen
überprüfen.
In Deutschland beträgt die Netzspannung 220-240V AC / 50Hz. Wenn Sie das Gerät auf Reisen mitnehmen, prüfen Sie, ob die örtliche Netzspannung den
Anforderungen des Geräts entspricht.
Lesen Sie erst die Anleitung vollständig vor der ersten Inbetriebnahme durch. Treffen Sie stets alle Sicherheits-vorkehrungen um Feuer und/oder Stromschlag zu
vermeiden. Reparaturen dürfen nur von qualifiziertem Fachpersonal ausgeführt werden, um Stromschlag zu vermeiden. Bewahren Sie diese Anleitung für spätere
Bezugnahme auf.
3
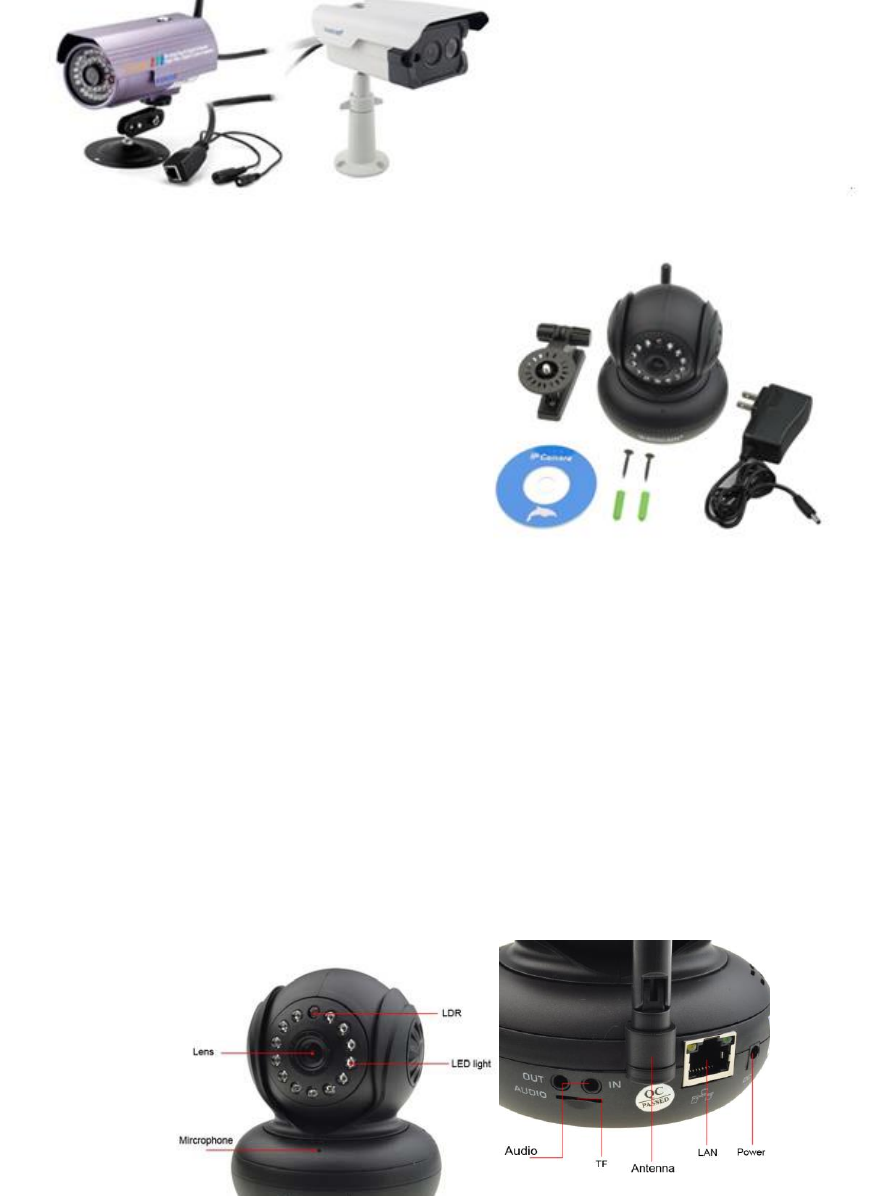
UK:
Packing List
●IP Camera X1
●DC Power Supply X1
●CD X1
●Certificate of Quality X1
●Warranty Card X1
●Mounting bracket X1
●Mounting screw X1
Key Features
1.300k Pixel Lens
2.Free P2P
3.Support 9 screens viewing by IE Browser
4.Remote viewing by Mobile
5.Support pan/tilt, wifi, night vision functions
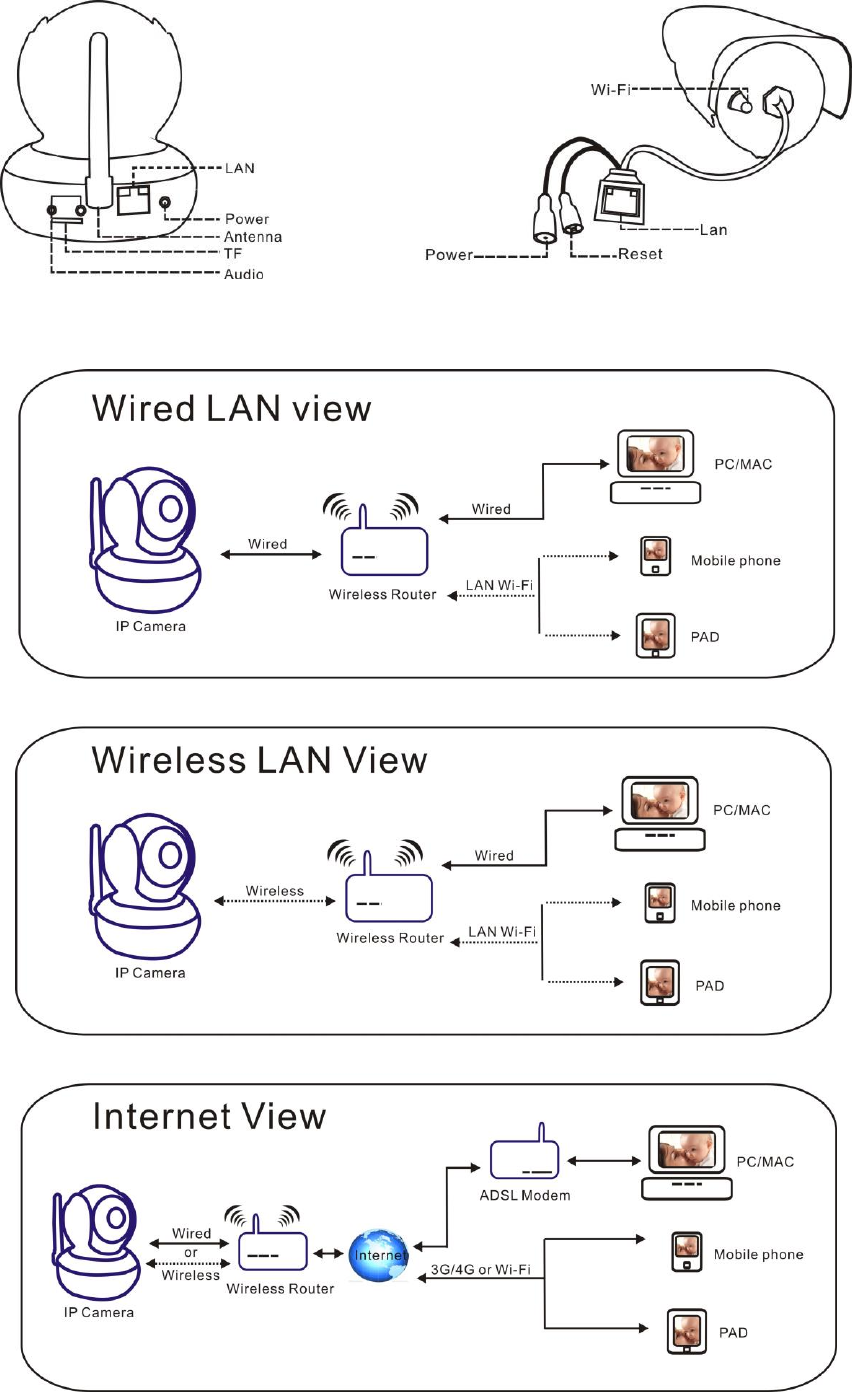
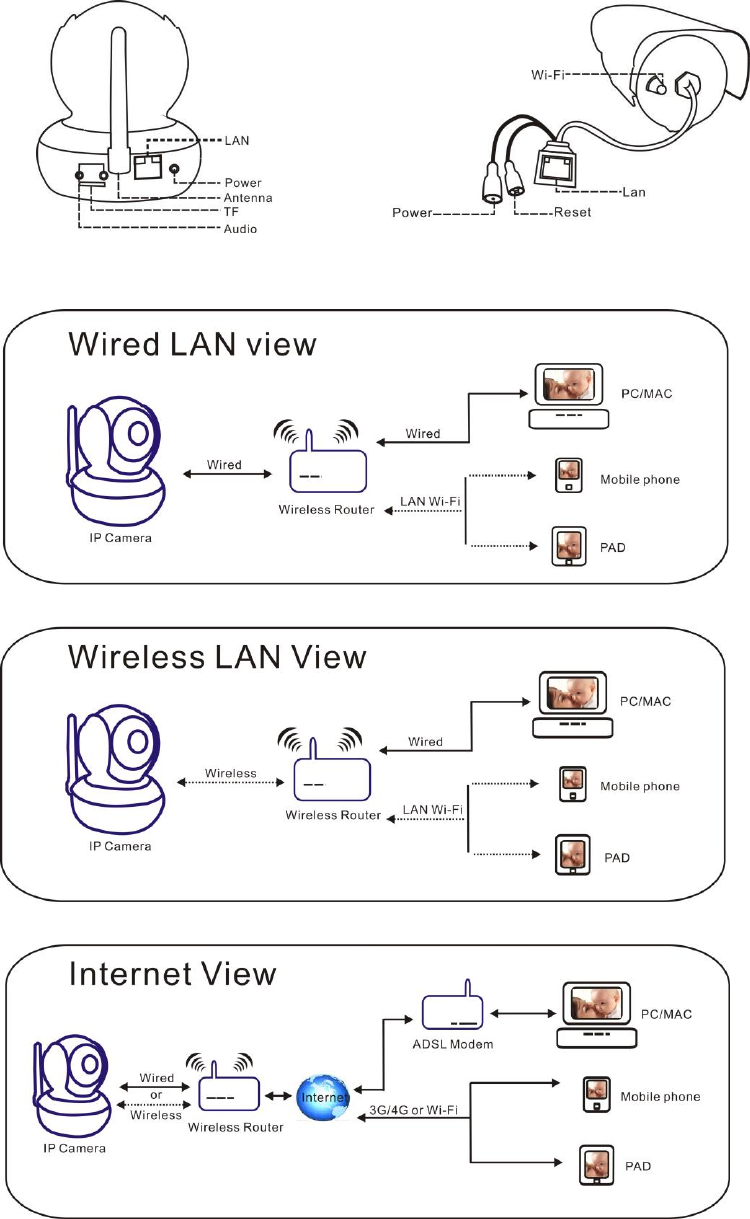
Step 1: Hardware Installation
1. Install the antenna.
2. Plug in the right power supply.
3. Connect your camera to the router (Modem or Switcher) with net cable.
Screw the antenna to the back of the camera; Make sure it is attached securely.Connect your camera to the
router, modem or switcher with net cable. Plug in the power. After a while, the yellow network light at the rear
of the camera will blink and the camera will pan and tilt automatically. The green power light will keep on.( If
off, said the search network fails, pls check the network cable is correctly used)
3
The method of the camera connection:
3
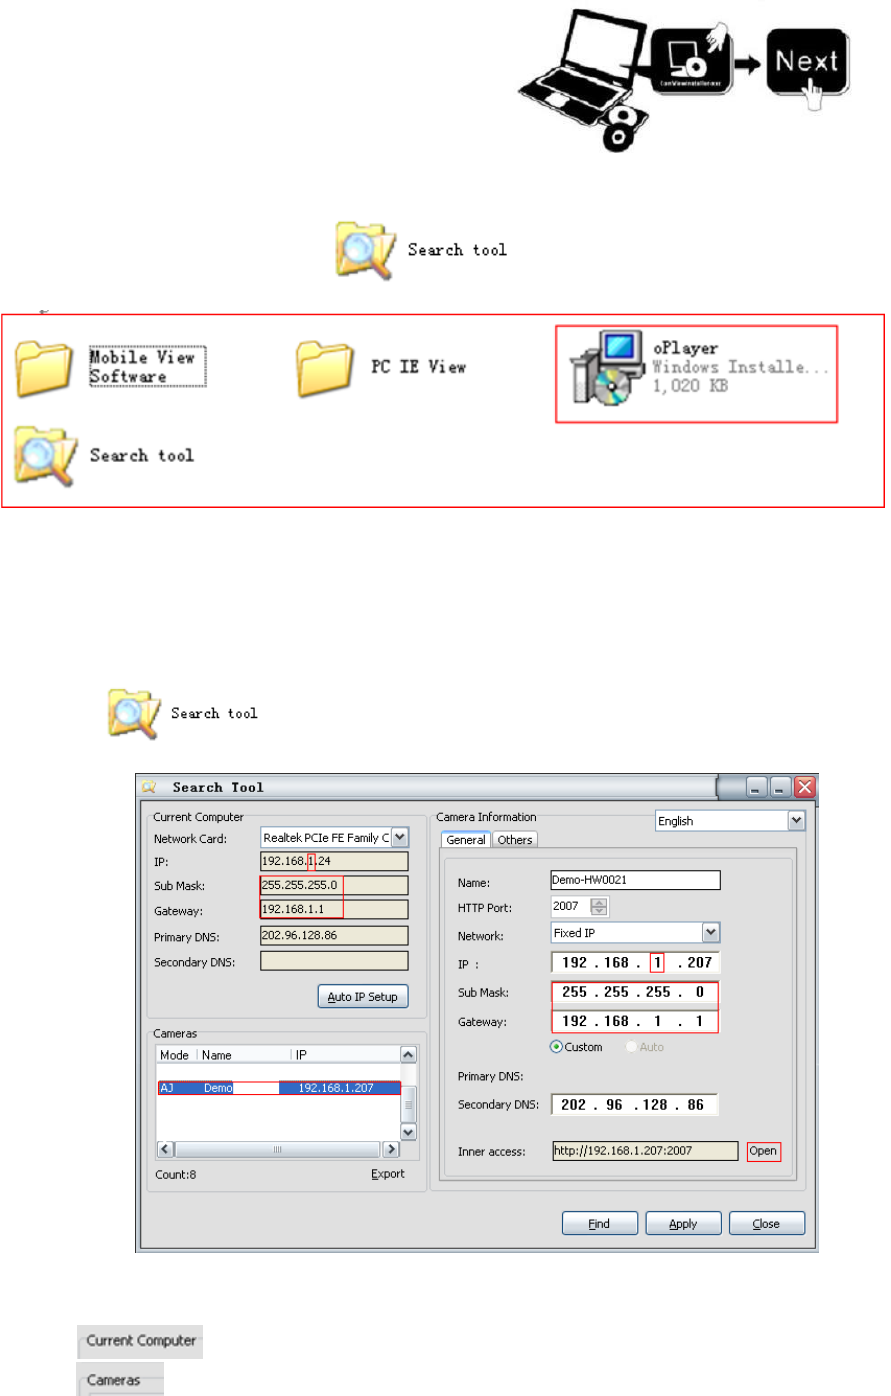
Step 2: Software Installation
Insert the small CD to your computer CD driver, open the CD, install the following software:
1. ActiveX: Click “oPlayer”—“Next”—“Install”—“Finish”. (This is just a plugin.)
2. Search Tool: Open the CD, click ,the search tool will run automatically.(
No need to install. You can copy this software to your desktop.)
Every camera has an IP address, fixed or dynamic. The search tool is used to find its IP address and port,
and also you can use the search tool to modify your camera’s information.
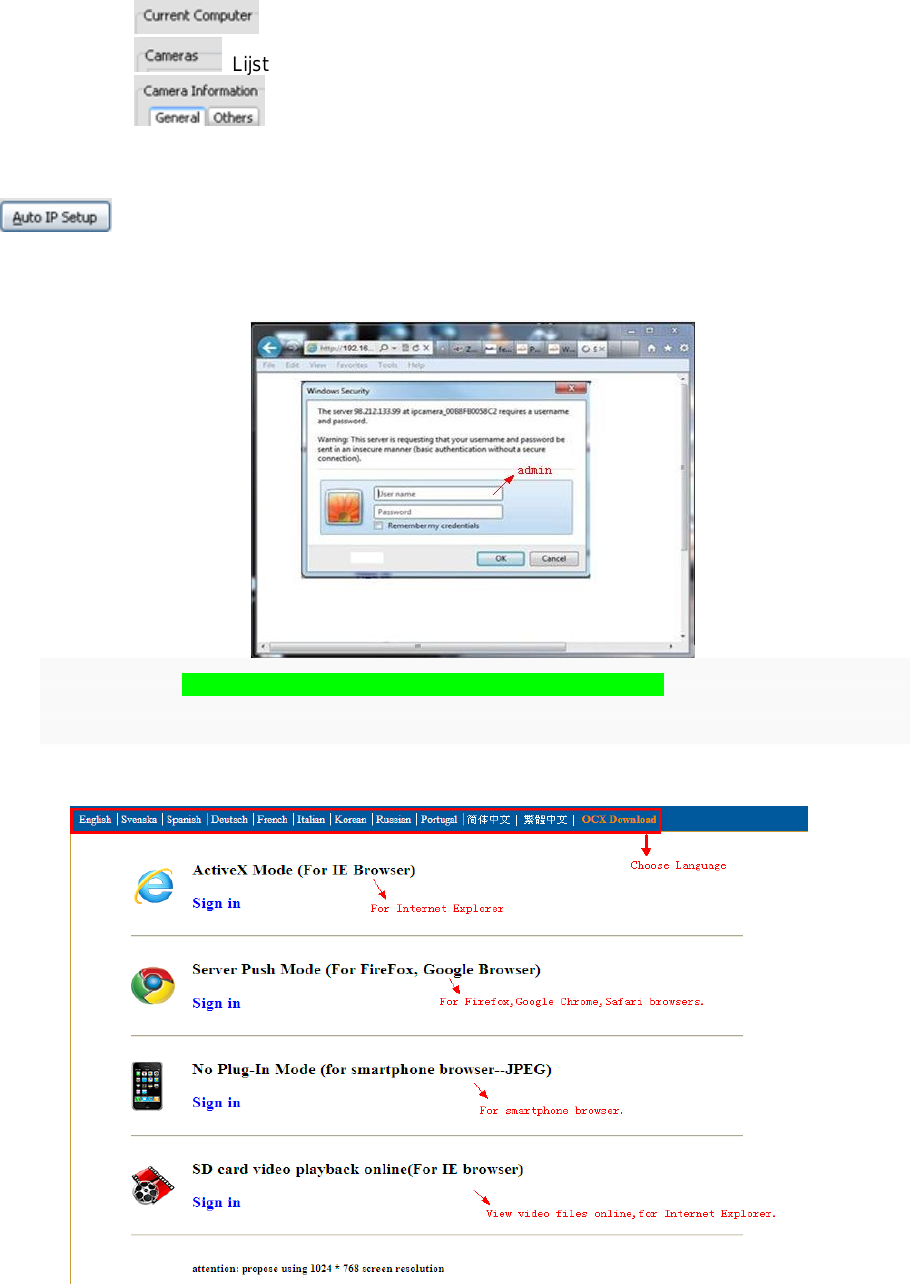
Step 3: Login the Camera
1. Double click , and following screen will pop up.
Default Username: admin
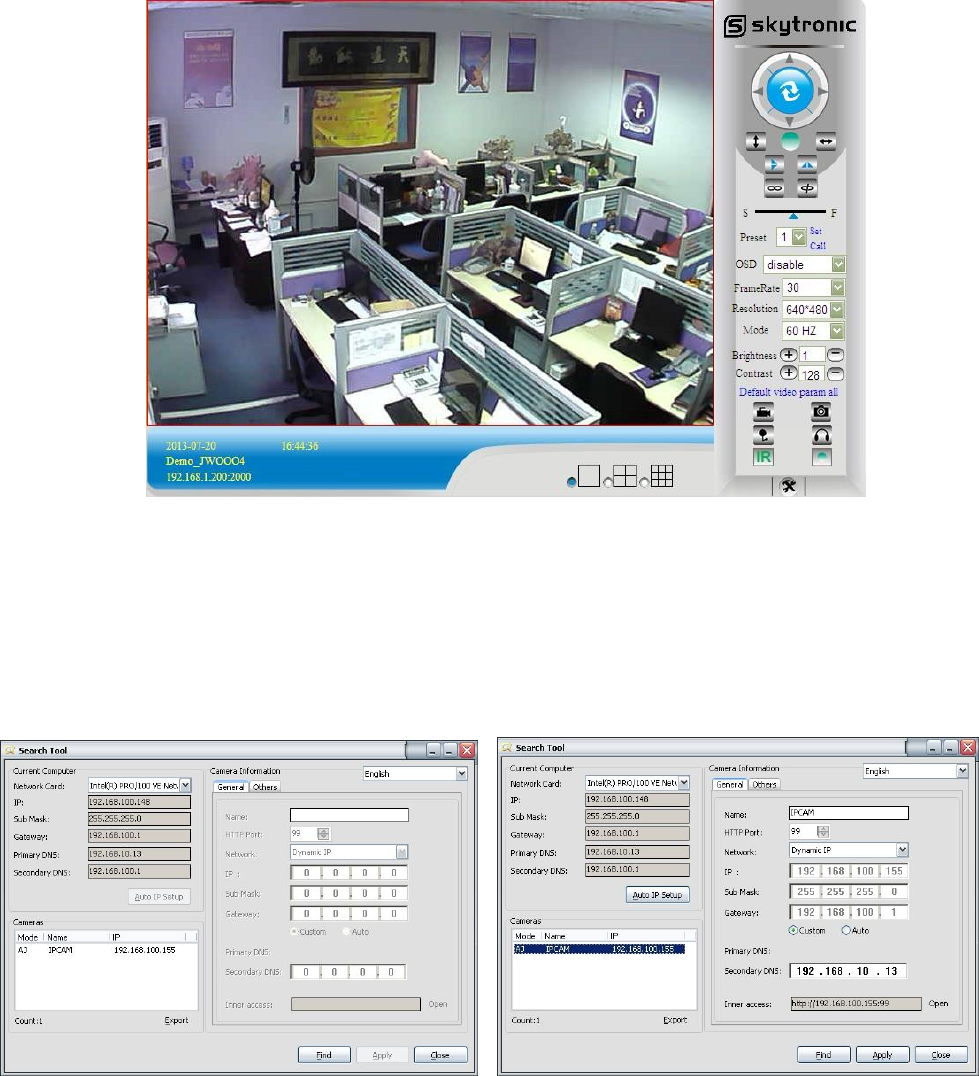
Attention:1. Shows the computer’s IP address information.
2. List shows the cameras which are connected in LAN.

3
3. Indicates the camera IP address information.
Confirm that your camera “ Subnet M ask” , “ Gateway” , “ DNS Server” a r e the
same with
your
computer’s. If not, try to modify it. You can change it manually. When you finished , click “Apply”.
Click , it can help you configure an usable IP address automatically.
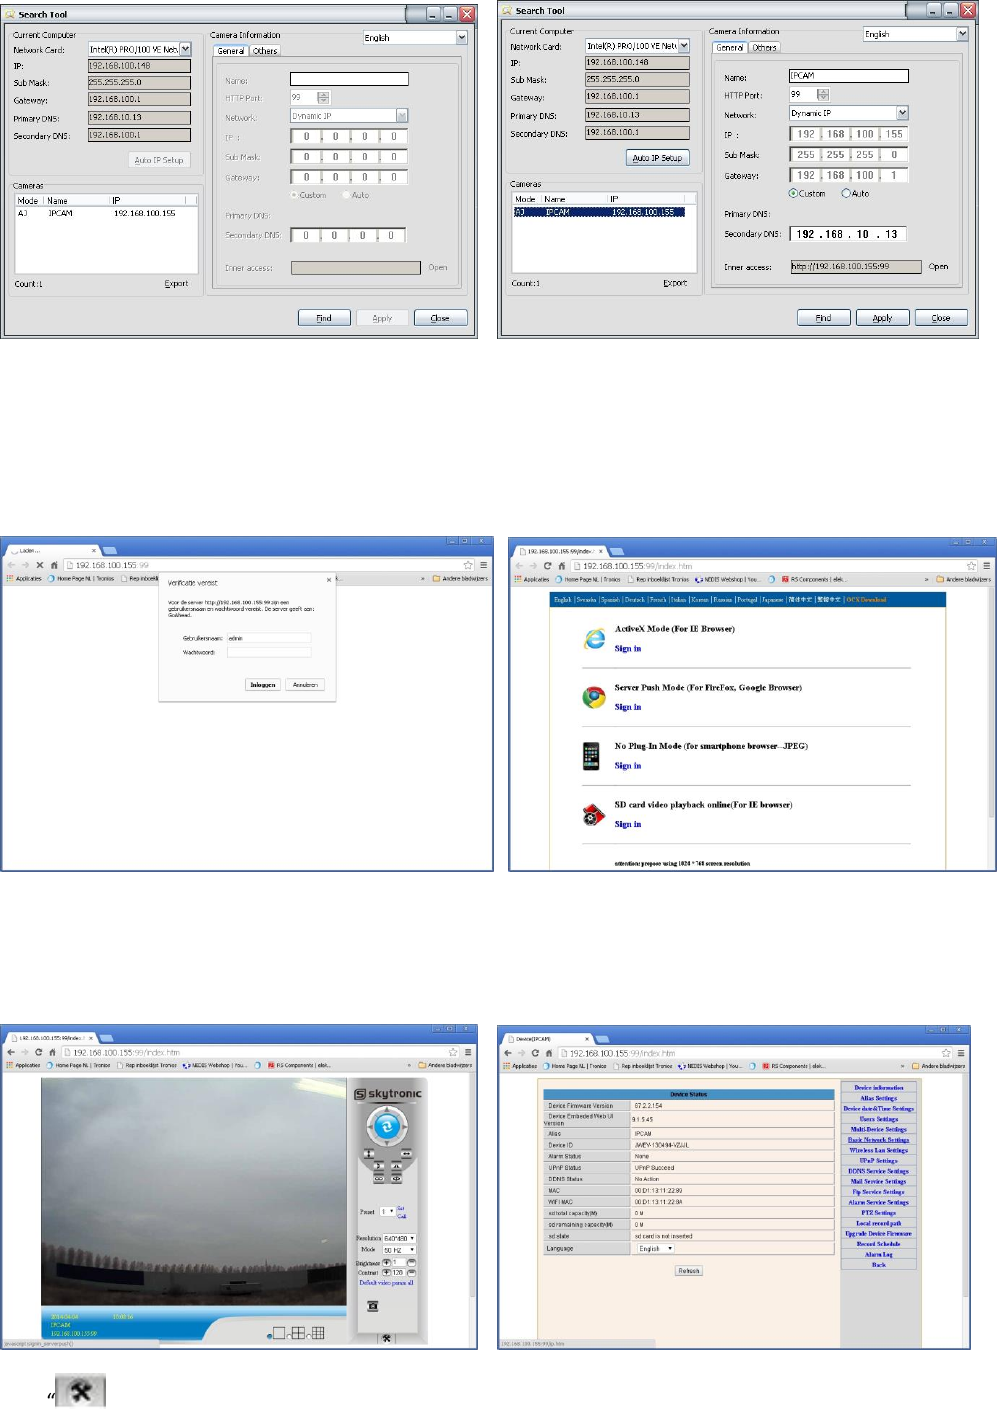
2. Finish confirmation, double click the camera IP address in the search tool or click “open” button. Then the
default browser will run automatically, asking for username and password.
Default username: admin without password
Input the correct username and password, the logon screen will pop up(support 4 visitors to view online at
the same time). There are four modes to login.

3
Note: 1)If you use IE browser, please choose the first sign-in mode (ActiveX Mode) to login. If you use other
browsers, such as Firefox, Safari of Google Chrome, you should choose the second sign-in mode (Server
Push Mode).Don’t choose the wrong mode, or you will not see the video.
On the other hand, using Server Push Mode, you lose functions like Recording, 2-way audio, IR
control.
2)If use IE browser to connect the camera for the frist time, maybe there is no image displayed,
there will be an ActiveX prompt, please click the prompt and choose Run Add- on, refresh the IE
interface, and login the camera again, then will see live video.
Live video of IE browser:
If the ActiveX installation failed,then you are still unable to see a live video, just a black screen, please don't forget
to allow the ActiveX plug-in to run when prompted. ( Tools-Internet Options-Security-Custom level-Enable all
the ActiveX.)
Step 4: Wireless LAN Settings
Connect IP Camera with a network cable to your router. Start the search tool which is supplied.
3
You are able to select the camera by clicking on the info in the pitch below. You will get the following picture.
Double click on the same info again will start the browser.
In this example Google Chrome.
Fill in the username “admin” , do not fill in the Password and press Log-in.
Select the correct browser ( in this case “chrome”)
Start the application and you’ll see the below shown info.
Click “ ” the lower right.(settings)

3
Click right on the Wireless Lan Settings.
Thereafter press the “scan button”.
You will see now ( if available) the wifi network.
Select your network and enter your password in “share key”.
Then click ”submit”.
Then gently remove the network cable from the IP camera and close the browser. Start the searchtool again.
Repeat the first 5 steps.

3
Step 5: DDNS Service Settings
1).Click , go to “DDNS Service Settings”.
2).Choose the DDNS server , input the DDNS user and password.
3).Submit, refresh, then DDNS status will show “DDNS Succeed”.
Thus the remote address is http://demo.p2pipc.com To make it work, you have to do port
Forwarding In your router . That is, create a virtual server; put your camera IP address and port in.
Step 6: Mail Service Settings and Alarm Service Settings
1). Mail service is a preparation for the alarm function. When your camera is triggered, it will send
You email attached with photo. As Premise, you should set mail service right, and test ok.
Take Gmail as example.

3
The informations need fill out as follows:
Sender:Fill out your email
Receiver: Fill out your email or others email
SMTP user:Fill out your email username
SMTP password: Fill out your email password
Note: This function works when the ip camera access network .When you use Gmail, the port should be 465, SSL
should be TLS. The most important, make sure your Gmail has enabled SMTP.
2).Alarm Service Settings, please do the same settings like following screenshot:
If you keep the camera page (browser) on, it will record for 1 minute when be triggered.
Step 7: Record & Capture Path
Record & Capture Path: Where to put the files, video and photos. (If you can’t choose this, pay attention to
your PC OS and IE version, use IE browser.)
Record file length: At least 100MB
Record time length: At least 5 minutes.
Reserved disk space: when your pc disk is less than 200MB, stop recording.
Record cover: Delete the old files when the disk capacity is not enough.

3
Step 8: Record Schedule (For JW0005 with SD card recording function)
This sector is for SD card recording settings. When the SD card has been inserted, it will show the capacity
of the card. But at first, you need to format it. It include: Record coverage, Record time, Timer recording. The
settings are like following:
Record coverage: Delete old files when the SD card is nearly full.
Record time: Create a video file every 10 minutes.
Timer recording: Set the time, select all, keep recording to the SD card.
You can playback the video online with IE browser. Press “Enter” button, choose the last sign in mode:

3
Step 9: Install PC Client and Mobile App
1. For PC, install the progam in the CD, add the cameras in.
2. For Android, copy the app “E-view” to the phone, install it.
3. For iPhone, iPad, go to App Store, search to download “e-View”.
FAQ
1.Why does my computer or security software say the software is dangerous and it is a
virus?
The wizard will detect device in oyur network, and it seems like a virus.
Please ignore the warning and continue.
2.Why can’t the wizard detect the camera?
Please make sure the network cable is connected and turn off firewall and security software on
your computer.
3.Why does the wizard say “the camera cannot be accessed,please choose Auto IP Set
or manual setting”after we have alrealy done Auto IP Set and Manual Setting?
Please connect the camera to your router or ADSL router,and DO NOT connect it to your PC
directly.
4.Why does the camera always ask for username and password,or it says Incorrect User?
The camera’s default username is admin,and please leave password blank.
If you forget your username or password,you can reset the camera to factory settings to get the
default username and password.
5.How can I reset the camera to factory settings?
Please press the reset button under or on the camera for about 1 minute until the camera
reboots.Please make sure the power supply is connected to the camera when you are doing it.
6.Why is there no audio and video from the camera(Only indoor camera support audio)?
No audio:Please sign in Internet Explorer mode for IE.
No video:IE does not support Firefox mode and other web browers do not support ActiveX
mode,please login the correct mode for video.
Mobile application supports video but does not support audio,you could find some 3rd party
application support audio for this IP camera.
7.Why is the image blurry?

3
Remove the protective film on the lens and rotate the lens of the camera to get a clear image.
8.Why doesn’t the camera pan/tilt properly?
Maybe the camera is stuck.Please rotate its head manually to fix it.
9.Why does the camera always drop wireless connection?
Please tighten the antenna of the camera.Make sure it is not far away from the router and there
is no big barrier between the camera and the router.
10.The comparison of different browers.
IE
Firefox, Chrome, Safari in all platforms
Video
YES
YES
Record
YES
NO
Alarm Record
YES(Only in live video page)
NO
By E-mail or FTP
YES
YES
Multiple View
YES
NO
Audio
2 Way
NO
Learn more
This Class-I equipment can be used on the market without restrictions.

3
NL:
Inhoud verpakking
●IP Camera X1
●DC Adapter X1
●CD X1
●Certificaat X1
●Garantiekaart X1
●Montage beugel X1
●Montage schroef X1
Kenmerken
1.300k Pixel Lens
2.Free P2P
3.Ondersteunt 9 schermen via IE Browser
4.Op afstand bekijken via uw mobiel
5.Ondersteunt pan/tilt-, wifi-, nachtvisie -functie
Stap 1: Hardware Installatie
1. Installeer de antenne.
2. Sluit de adapter aan.
3. Verbind uw camera met de router (Modem of Switcher) m.b.v. de LAN kabel.
Schroef de antenne deugdelijk vast op de achterkant van de camera. Verbind uw camera met de router,
modem of switcher. Sluit de adapter aan. Na een poos zal de gele netwerk-LED op de achterkant van de
camera knipperen en de camera zal automatisch heen en weer bewegen (pan en tilt). De groene LED blijft
aan. Als deze uit is, is er geen netwerkverbinding, controleer of de netwerkkabel juist is aangesloten!
3
Camera aansluiting:

3
Stap 2: Software Installatie
Plaats de CD in uw computer, open de CD, installeer de volgende software:
1. ActiveX: Klik “oPlayer”—“Next”—“Install”—“Finish”. (Dit is een plugin.)
2. Search Tool: Open de CD, klik , Search tool start automatisch.( Niet installeren.
U kunt de software kopiëren naar uw desktop/bureaublad.)
Iedere camera heeft een IP adres, vast of dynamisch. De Search tool wordt gebruikt om het IP adres en poort op te
zoeken. U kunt ook de Search tool gebruiken om de informatie van uw camera’s te wijzigen.
Stap 3: Camera log in
1. Dubbelklik , en het volgende scherm verschijnt.
Standaard gebruikersnaam is : admin
3
Attentie: 1. Laat het computer IP adres zien.
2. Lijst laat de camera’s zien die beschikbaar zijn in LAN.
3. Vermeldt de camera IP adres-informatie.
Controleer of uw camera “ Subnet M ask” , “ Gateway” , “ DNS Server” o v e r e e n k o m e n m e t d i e
v a n u w
computer. Indien niet, wijzig deze dan handmatig. Na voltooiing klikt u op “Apply”.
Klik , helpt u bij het automatisch configureren van een bruikbaar IP adres.
2. Na de configuratie, dubbelklikt u op het camera IP adres in de Search tool of klik op de “open” toets. De
standaard browser zal nu automatisch starten en vragen naar de gebruikersnaam en passwoord.
Standaard gebruikersnaam: admin zonder passwoord
Bij het inloggen zal het logon scherm verschijnen (ondersteunt 4 bezoekers tegelijkertijd om online te kijken). De 4
inlog modes zijn :
3
NB: 1) Als u IE browser gebruikt, kies (ActiveX Mode) om in te loggen. Als u andere browsers gebruikt, zoals Firefox, Safari of
Google Chrome, kies (Server Push Mode). Kies geen andere mode, anders kunt u de video niet gebruiken. Bij gebruik
van Server Push Mode kunnen functies als Recording, 2-way audio, IR control verloren gaan.
2) Als u IE browser voor de eerste keer gebruikt voor een cameraverbinding, kan het zijn dat geen beeld wordt
weergegeven, er verschijnt een ActiveX prompt, klik op deze prompt en kies Run Add- on, vernieuw IE interface en
log de camera opnieuw in.
Live video van IE browser:
Als de ActiveX installatie mislukt kunt u geen live video zien, er verschijnt alleen een zwart scherm, vergeet dan niet om de
ActiveX plug-in te starten indien gevraagd. ( Tools-Internet Options-Security-Custom level-Enable all the ActiveX.)
Stap 4: Draadloze LAN Instellingen
Sluit de ip-camera met een netwerk kabel aan op uw router.
Start de mee geleverde searchtool op.
U kunt de camera selecteren door op de info te klikken in het veld links onder. U krijgt dan het volgende beeld.
Product specificaties
| Merk: | Skytronic |
| Categorie: | Beveiliging |
| Model: | 351.149 IP Camera |
Heb je hulp nodig?
Als je hulp nodig hebt met Skytronic 351.149 IP Camera stel dan hieronder een vraag en andere gebruikers zullen je antwoorden
Handleiding Beveiliging Skytronic

8 Juni 2023
8 Juni 2023
Handleiding Beveiliging
- Beveiliging Bosch
- Beveiliging Panasonic
- Beveiliging Bticino
- Beveiliging Fysic
- Beveiliging Grundig
- Beveiliging Honeywell
- Beveiliging Medion
- Beveiliging Siemens
- Beveiliging Abus
- Beveiliging AceSee
- Beveiliging Airbolt
- Beveiliging Ajax
- Beveiliging Alecto
- Beveiliging Alhua - Dahua
- Beveiliging Alphatronics
- Beveiliging AngelEye
- Beveiliging Aritech
- Beveiliging Audiovox
- Beveiliging AVTech - Velleman
- Beveiliging Axa
- Beveiliging Axis
- Beveiliging Basetech
- Beveiliging Batavia
- Beveiliging Bavaria
- Beveiliging Bellman
- Beveiliging Bitron Video
- Beveiliging Blaupunkt
- Beveiliging BML
- Beveiliging Bolyguard
- Beveiliging Brennenstuhl
- Beveiliging BRK
- Beveiliging BRK DICON
- Beveiliging Dahua
- Beveiliging Dedicated Micros
- Beveiliging Dericam
- Beveiliging Devolo
- Beveiliging Directed Electronics
- Beveiliging Dnt
- Beveiliging Doro
- Beveiliging Dymond
- Beveiliging Easy Home
- Beveiliging Easymaxx
- Beveiliging Eden
- Beveiliging Edimax
- Beveiliging Ednet
- Beveiliging Electronics Line
- Beveiliging Elkron
- Beveiliging Elro
- Beveiliging Elro-Flamingo
- Beveiliging Eminent
- Beveiliging Entrya
- Beveiliging Epine
- Beveiliging Eufy
- Beveiliging Ezviz
- Beveiliging FBII
- Beveiliging Fenton
- Beveiliging First Alert
- Beveiliging Flamingo FA15RF
- Beveiliging FlinQ
- Beveiliging Foscam
- Beveiliging Fracarro
- Beveiliging Friedland
- Beveiliging Galaxy
- Beveiliging GE Security
- Beveiliging Geemarc
- Beveiliging Gira
- Beveiliging Goliath
- Beveiliging Golmar
- Beveiliging Goobay
- Beveiliging Grandstream
- Beveiliging Grothe
- Beveiliging Guardall
- Beveiliging Hagenuk
- Beveiliging Heidemann
- Beveiliging Hikvision
- Beveiliging Home Protector
- Beveiliging Home8
- Beveiliging HomeWizard
- Beveiliging HUMANTECHNIK
- Beveiliging I-onik
- Beveiliging I-Tel
- Beveiliging Iget
- Beveiliging Iiquu
- Beveiliging Indexa
- Beveiliging Inner Range
- Beveiliging Interlogix
- Beveiliging Kocom
- Beveiliging Kompernass
- Beveiliging Kopp
- Beveiliging Ksenia
- Beveiliging Lamax
- Beveiliging LevelOne
- Beveiliging Logicom
- Beveiliging Maginon
- Beveiliging Marmitek
- Beveiliging Marquant
- Beveiliging ME
- Beveiliging Microtech
- Beveiliging Mikros
- Beveiliging Monacor
- Beveiliging Mr Safe
- Beveiliging Muller
- Beveiliging Myfox
- Beveiliging Nedis
- Beveiliging Nemef
- Beveiliging Nest
- Beveiliging Netatmo
- Beveiliging NetBotz
- Beveiliging Netgear
- Beveiliging NetworX
- Beveiliging Niko
- Beveiliging Nor-tec
- Beveiliging Notifier
- Beveiliging Paradox
- Beveiliging Perel
- Beveiliging PIR Alarm
- Beveiliging Plustek
- Beveiliging Powerfix
- Beveiliging Powermax
- Beveiliging Prestigio
- Beveiliging Profile
- Beveiliging PROmax
- Beveiliging Protector
- Beveiliging Provision ISR
- Beveiliging QuattSecure
- Beveiliging Ranex
- Beveiliging RISCO Group
- Beveiliging Satel
- Beveiliging SecuFirst
- Beveiliging Secure Pro
- Beveiliging Securitas
- Beveiliging Selvag
- Beveiliging Smanos
- Beveiliging Smartalarm
- Beveiliging SmartHome
- Beveiliging Smartwares
- Beveiliging Somfy
- Beveiliging Sonic Alert
- Beveiliging Steinel
- Beveiliging Stobo
- Beveiliging Storage Options
- Beveiliging Storex
- Beveiliging Switel
- Beveiliging Sygonix
- Beveiliging Technaxx
- Beveiliging Tegui
- Beveiliging Tevion
- Beveiliging Theben
- Beveiliging Topcraft
- Beveiliging Trebs
- Beveiliging Trendnet
- Beveiliging Trust
- Beveiliging Unitec
- Beveiliging Unitron
- Beveiliging Urmet
- Beveiliging V-Tac
- Beveiliging Velbus
- Beveiliging Velleman
- Beveiliging Visonic
- Beveiliging Voxx
- Beveiliging Waeco
- Beveiliging Wanscam
- Beveiliging Woonveilig
- Beveiliging Xavax
- Beveiliging Xena
- Beveiliging Y-cam
- Beveiliging Yale
- Beveiliging Zmodo
- Beveiliging Jablotron
- Beveiliging Jacob Jensen
- Beveiliging Jung
- Beveiliging Jupiter Pro
- Beveiliging Juwel
- Beveiliging One2track
- Beveiliging Oplink
- Beveiliging Optex
- Beveiliging Orbis
- Beveiliging Overmax
- Beveiliging Fito
- Beveiliging One Concept
Nieuwste handleidingen voor Beveiliging
6 Maart 2024
4 Februari 2024
16 Oktober 2023
16 Oktober 2023
16 Oktober 2023
16 Oktober 2023
16 Oktober 2023
16 Oktober 2023
16 Oktober 2023
16 Oktober 2023