Epson PowerLite Home Cinema 707 Handleiding
Lees hieronder de 📖 handleiding in het Nederlandse voor Epson PowerLite Home Cinema 707 (168 pagina's) in de categorie Beamer. Deze handleiding was nuttig voor 35 personen en werd door 2 gebruikers gemiddeld met 4.5 sterren beoordeeld
Pagina 1/168

Gold Edition
PowerLite Home Cinema 707
User's Guide


Contents
Introduction to Your Projector ................................................................................................................... 9
Projector Features................................................................................................................................ 9
Product Box Contents.................................................................................................................... 10
Additional Components ................................................................................................................ 11
Optional Equipment and Replacement Parts................................................................................. 11
Warranty and Registration Information.......................................................................................... 12
Notations Used in the Documentation ........................................................................................... 13
Where to Go for Additional Information.......................................................................................... 13
Projector Part Locations..................................................................................................................... 13
Projector Parts - Front/Top ............................................................................................................ 14
Projector Parts - Rear.................................................................................................................... 15
Projector Parts - Base.................................................................................................................... 16
Projector Parts - Control Panel ...................................................................................................... 17
Projector Parts - Remote Control................................................................................................... 19
Setting Up the Projector ........................................................................................................................... 21
Projector Placement........................................................................................................................... 21
Projector Setup and Installation Options ....................................................................................... 21
Projection Distance........................................................................................................................ 23
Projector Connections........................................................................................................................ 24
Connecting to Video Sources ........................................................................................................ 25
Connecting to an HDMI Video Source ...................................................................................... 25
Connecting to a Component-to-VGA Video Source.................................................................. 26
Connecting to an S-Video Video Source................................................................................... 27
Connecting to a Composite Video Source ................................................................................ 27
Connecting to a Video Source for Sound .................................................................................. 28
Connecting to Computer Sources.................................................................................................. 29
Connecting to a Computer for USB Video and Audio................................................................ 29
Connecting to a Computer for VGA Video................................................................................. 30
Connecting to a Computer for HDMI Video and Audio.............................................................. 31
Connecting to a Computer for USB Mouse Control................................................................... 31
3

Connecting to a Computer for Sound........................................................................................ 32
Connecting to External USB Devices ............................................................................................ 32
USB Device Projection.............................................................................................................. 32
Connecting a USB Device or Camera to the Projector.............................................................. 33
Selecting the Connected USB Source ...................................................................................... 34
Disconnecting a USB Device or Camera From the Projector.................................................... 34
Connecting to a Document Camera .............................................................................................. 34
Installing Batteries in the Remote Control .......................................................................................... 35
Opening the Lens Cover .................................................................................................................... 36
Using Basic Projector Features ............................................................................................................... 37
Turning On the Projector .................................................................................................................... 37
Turning Off the Projector .................................................................................................................... 39
Selecting the Language for the Projector Menus................................................................................ 41
Adjusting the Image Height ................................................................................................................ 41
Image Shape...................................................................................................................................... 43
Correcting Image Shape with the Horizontal Keystone Slider ....................................................... 43
Correcting Image Shape with the Keystone Buttons...................................................................... 44
Correcting Image Shape with Quick Corner .................................................................................. 45
Resizing the Image With the Zoom Ring ............................................................................................ 47
Focusing the Image Using the Focus Ring......................................................................................... 47
Remote Control Operation ................................................................................................................. 48
Using the Remote Control as a Wireless Mouse ........................................................................... 49
Using the Remote Control as a Presentation Pointer .................................................................... 50
Selecting an Image Source ................................................................................................................ 50
Projection Modes ............................................................................................................................... 52
Changing the Projection Mode Using the Remote Control ............................................................ 52
Changing the Projection Mode Using the Menus........................................................................... 53
Image Aspect Ratio............................................................................................................................ 53
Changing the Image Aspect Ratio ................................................................................................. 54
Available Image Aspect Ratios...................................................................................................... 54
Color Mode......................................................................................................................................... 55
Changing the Color Mode.............................................................................................................. 55
Available Color Modes................................................................................................................... 56
4

Replacing the Air Filter.............................................................................................................. 88
Projector Lamp Maintenance......................................................................................................... 90
Replacing the Lamp.................................................................................................................. 91
Resetting the Lamp Timer......................................................................................................... 96
Replacing the Remote Control Batteries ....................................................................................... 97
Transporting the Projector.................................................................................................................. 99
Solving Problems .................................................................................................................................... 100
Projection Problem Tips ................................................................................................................... 100
Projector Light Status ....................................................................................................................... 100
Using the Projector Help Displays .................................................................................................... 103
Solving Image or Sound Problems................................................................................................... 103
Solutions When No Image Appears............................................................................................. 104
Solutions When Image is Incorrect Using the USB Display Function .......................................... 104
Solutions When "No Signal" Message Appears........................................................................... 105
Displaying From a PC Laptop ................................................................................................. 105
Displaying From a Mac Laptop ............................................................................................... 106
Solutions When "Not Supported" Message Appears................................................................... 106
Solutions When Only a Partial Image Appears ............................................................................ 106
Solutions When the Image is Not Rectangular ............................................................................ 107
Solutions When the Image Contains Noise or Static ................................................................... 107
Solutions When the Image is Fuzzy or Blurry .............................................................................. 108
Solutions When the Image Brightness or Colors are Incorrect .................................................... 109
Solutions When There is No Sound or Low Volume .................................................................... 110
Solving Projector or Remote Control Operation Problems ............................................................... 110
Solutions to Projector Power or Shut-Off Problems..................................................................... 110
Solutions to Problems with the Remote Control........................................................................... 111
Solutions to Password Problems ................................................................................................. 112
Where to Get Help............................................................................................................................ 112
Technical Specifications ........................................................................................................................ 114
General Projector Specifications ...................................................................................................... 114
Projector Lamp Specifications.......................................................................................................... 115
Remote Control Specifications ......................................................................................................... 115
Projector Dimension Specifications.................................................................................................. 116
6

Projector Electrical Specifications .................................................................................................... 116
Projector Environmental Specifications............................................................................................ 116
Projector Safety and Approvals Specifications................................................................................. 117
Supported Video Display Formats.................................................................................................... 117
USB Display System Requirements................................................................................................. 119
Notices ..................................................................................................................................................... 121
Recycling.......................................................................................................................................... 121
Important Safety Information............................................................................................................ 121
Important Safety Instructions............................................................................................................ 122
Restriction of Use ........................................................................................................................ 124
FCC Compliance Statement............................................................................................................. 125
Trademarks...................................................................................................................................... 125
Software Copyright........................................................................................................................... 126
Copyright Notice............................................................................................................................... 167
A Note Concerning Responsible Use of Copyrighted Materials................................................... 168
Copyright Attribution.................................................................................................................... 168
7


Related concepts
Projector Part Locations
Product Box Contents
Save all the packaging in case you need to ship the projector. Always use the original packaging (or
equivalent) when shipping.
Make sure your projector box included all of these parts:
1 Projector
2 Remote control
3 Remote control batteries (two AA alkaline)
4 Power cord
5 Component-to-VGA adapter cable
10

Option or part Part number
Air filter replacement set (2 filters; ELPAF32) V13H134A32
AP-60 Projector Sound Solution V12H329020
Accolade Duet portable projector screen ELPSC80
ES1000 Ultra Portable Tabletop Projection screen V12H002S4Y
ES3000 Ultra Portable Tabletop Projection screen V12H002S3Y
Universal projector ceiling mount ELPMBPJF
Adjustable suspended ceiling channel kit ELPMBP01
False ceiling plate kit ELPMBP02
Structural round ceiling plate ELPMBP03
Adjustable extension column (pipe) 8" - 11" (20 to 28 cm) ELPMBC01
VGA video cable 1.8 m length ELPKC02
VGA video cable 3.0 m length ELPKC09
VGA video cable 20 m length ELPKC10
Kensington security lock ELPSL01
In addition to the accessories listed above, 1-year and 2-year extended service plans are available.
Parent topic: Projector Features
Warranty and Registration Information
Your projector comes with a basic warranty that lets you project with confidence. For details, see the
warranty brochure that came with your projector.
In addition, Epson offers free Extra Care Home Service. In the unlikely event of an equipment failure,
you won’t have to wait for your unit to be repaired. Instead, Epson will ship you a replacement unit
anywhere in the United States, Canada, or Puerto Rico. See the Extra Care Home Service brochure for
details.
Register your product online using the projector CD or at this site: www.epson.com/webreg
Registering also lets you receive special updates on new accessories, products, and services.
Parent topic: Projector Features
12

Notations Used in the Documentation
Follow the guidelines in these notations as you read your documentation:
• must be followed carefully to avoid bodily injury.Warnings
• must be observed to avoid damage to your equipment.Cautions
• contain important information about your projector.Notes
• contain additional projection information.Tips
Parent topic: Projector Features
Where to Go for Additional Information
Need quick help on using your projector during a presentation? Here's where to look for help:
• Built-in help system
Press the button on the remote control or projector to get quick solutions to common problems.Help
• (U.S) or (Canada)www.epson.com/support www.epson.ca/support
View FAQs (frequently asked questions) and e-mail your questions to Epson technical support 24
hours a day.
• If you still need help after checking this manual and the sources listed above, you can use the EPSON
PrivateLine Support service to get help fast. For details, see "Where to Get Help".
Parent topic: Projector Features
Related references
Where to Get Help
Projector Part Locations
Check the projector part illustrations to learn about the parts on your projector.
Projector Parts - Front/Top
Projector Parts - Rear
Projector Parts - Base
Projector Parts - Control Panel
Projector Parts - Remote Control
Parent topic: Introduction to Your Projector
13

Projector Parts - Front/Top
1 Exhaust vent
2 Lamp cover
3 Horizontal keystone slider
4 Control panel
5 Projector status lights
6 Speaker
7 Air filter cover
8 Intake vent
9 Zoom ring
10 Focus ring
14
11 Remote receiver
12 A/V Mute slide
13 Front adjustable foot
14 Foot release lever
15 A/V Mute slide lever
Parent topic: Projector Part Locations
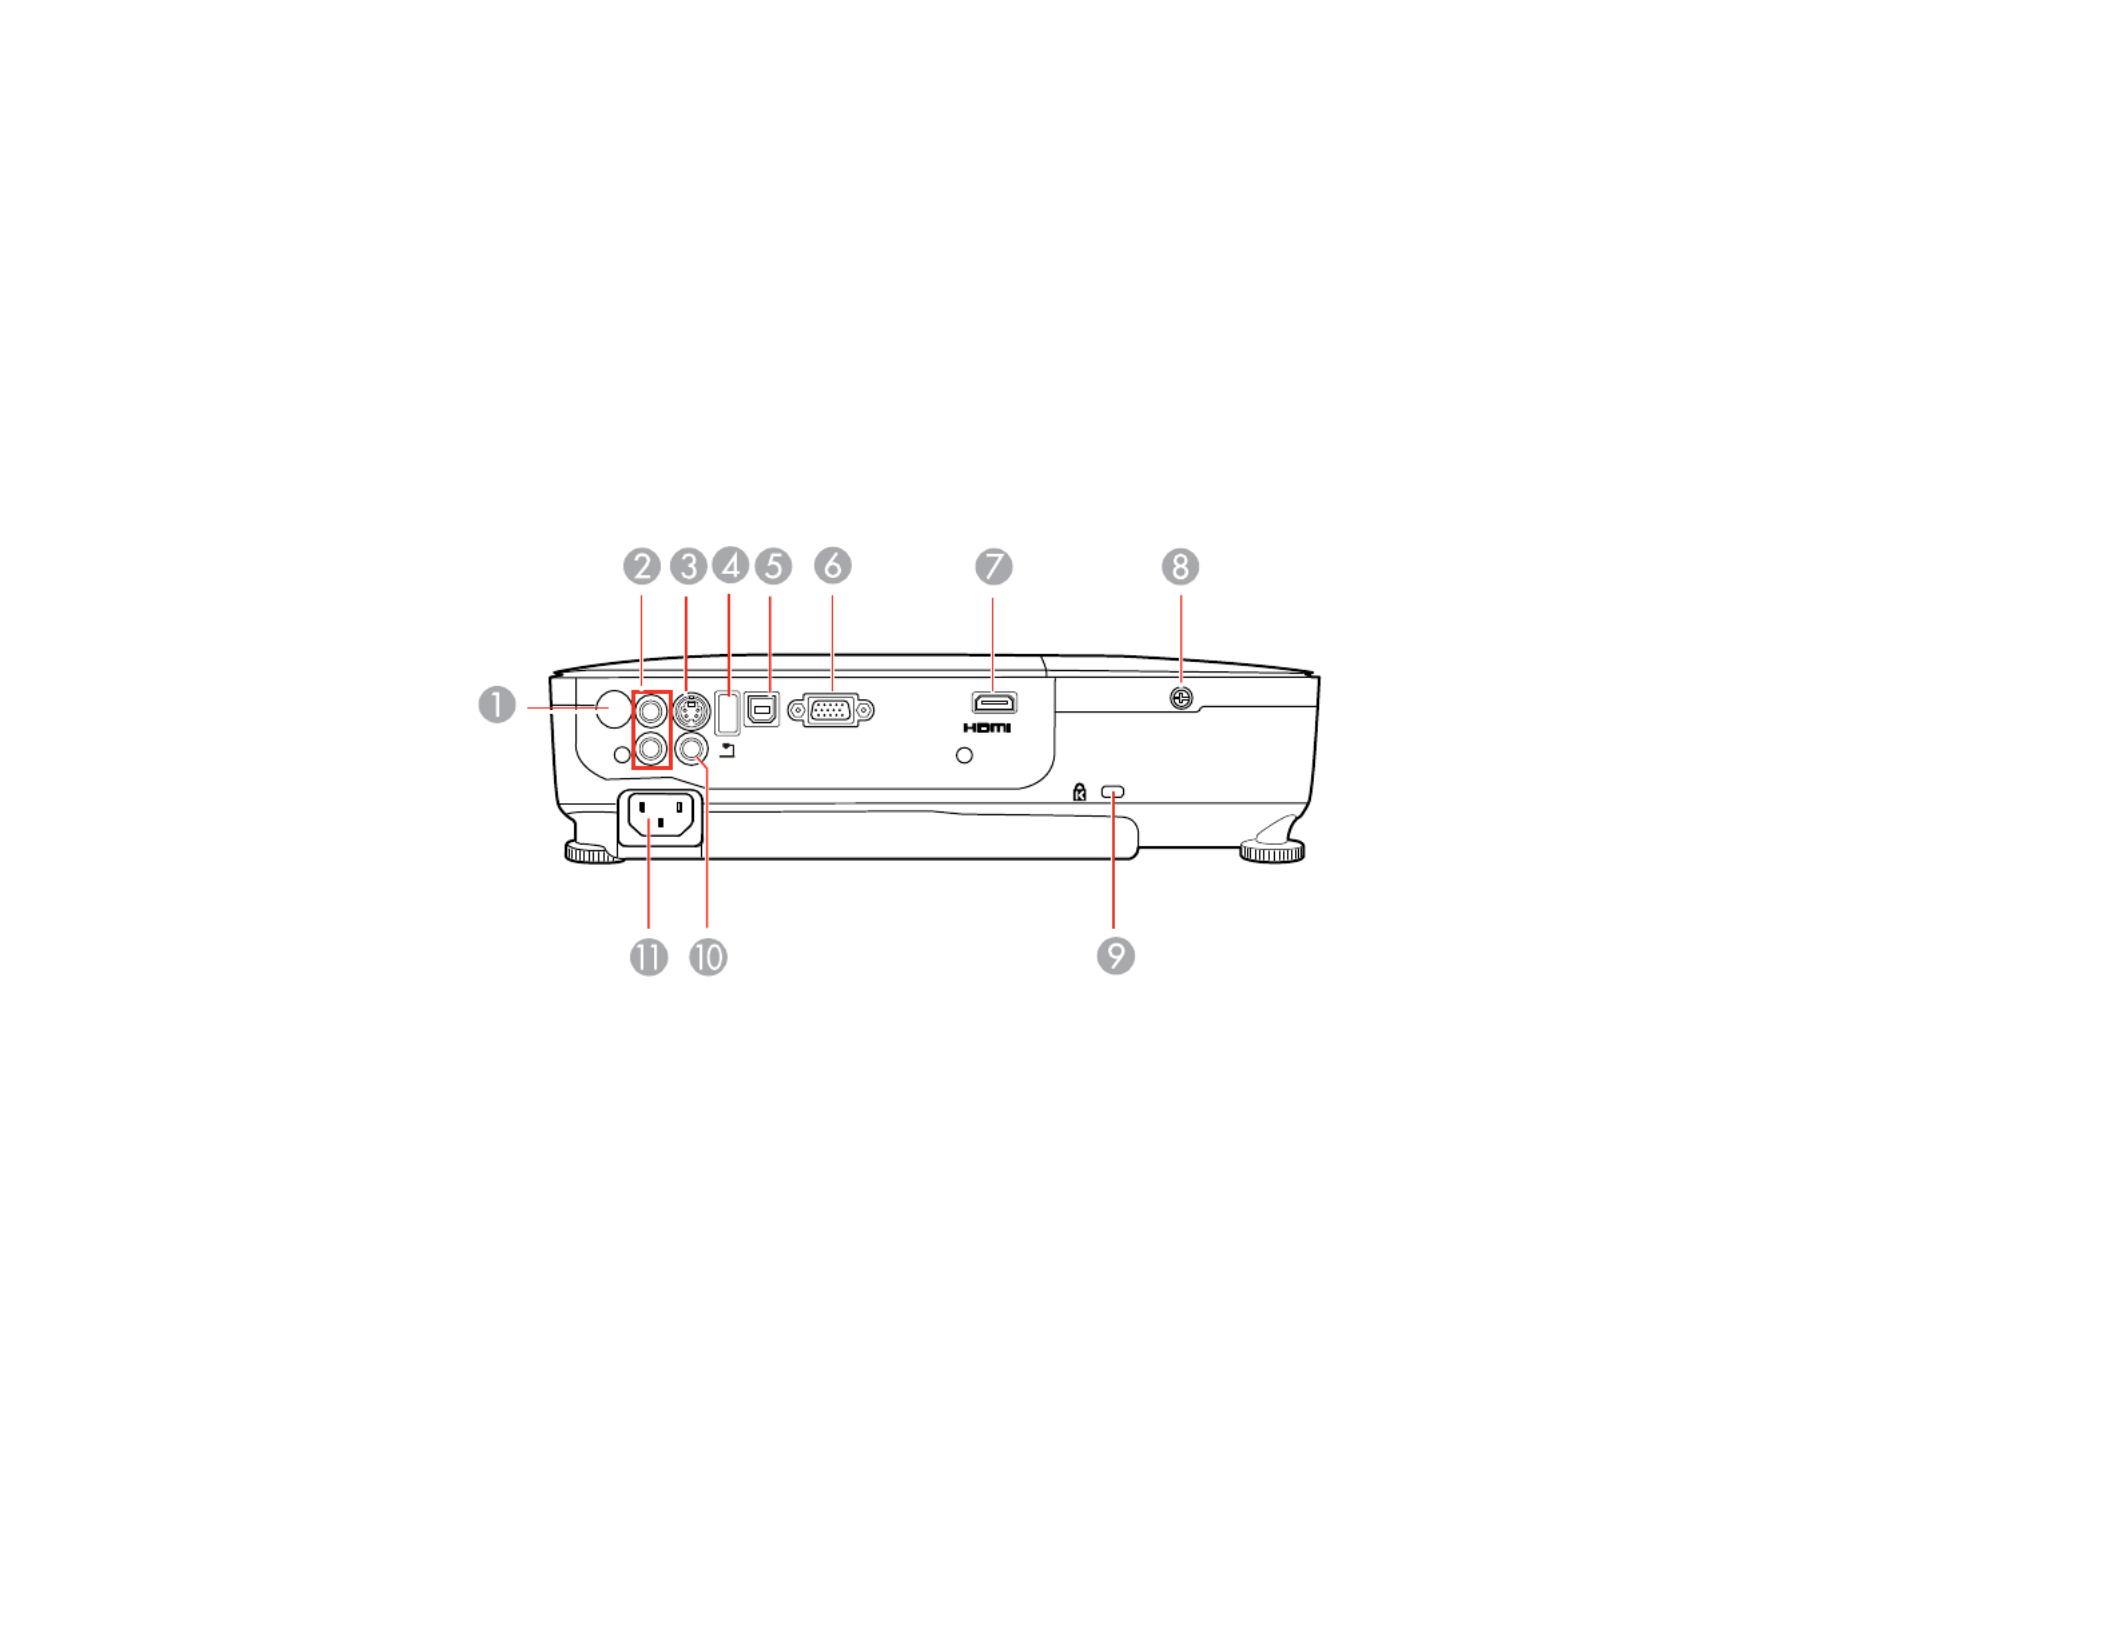
Projector Parts - Rear
1 Remote receiver
2 portsAudio
3 portS-Video
4 USB /document camera portTypeA
5 USB portTypeB
6 portComputer
7 portHDMI
8 Lamp cover screw
15

9 Kensington security lock slot
10 portVideo
11 AC input port
Parent topic: Projector Part Locations
Related tasks
Installing a Security Cable
Projector Parts - Base
1 Mounting bracket holes
16
2 Front adjustable foot
3 Rear feet
4 Security cable attachment point
Parent topic: Projector Part Locations
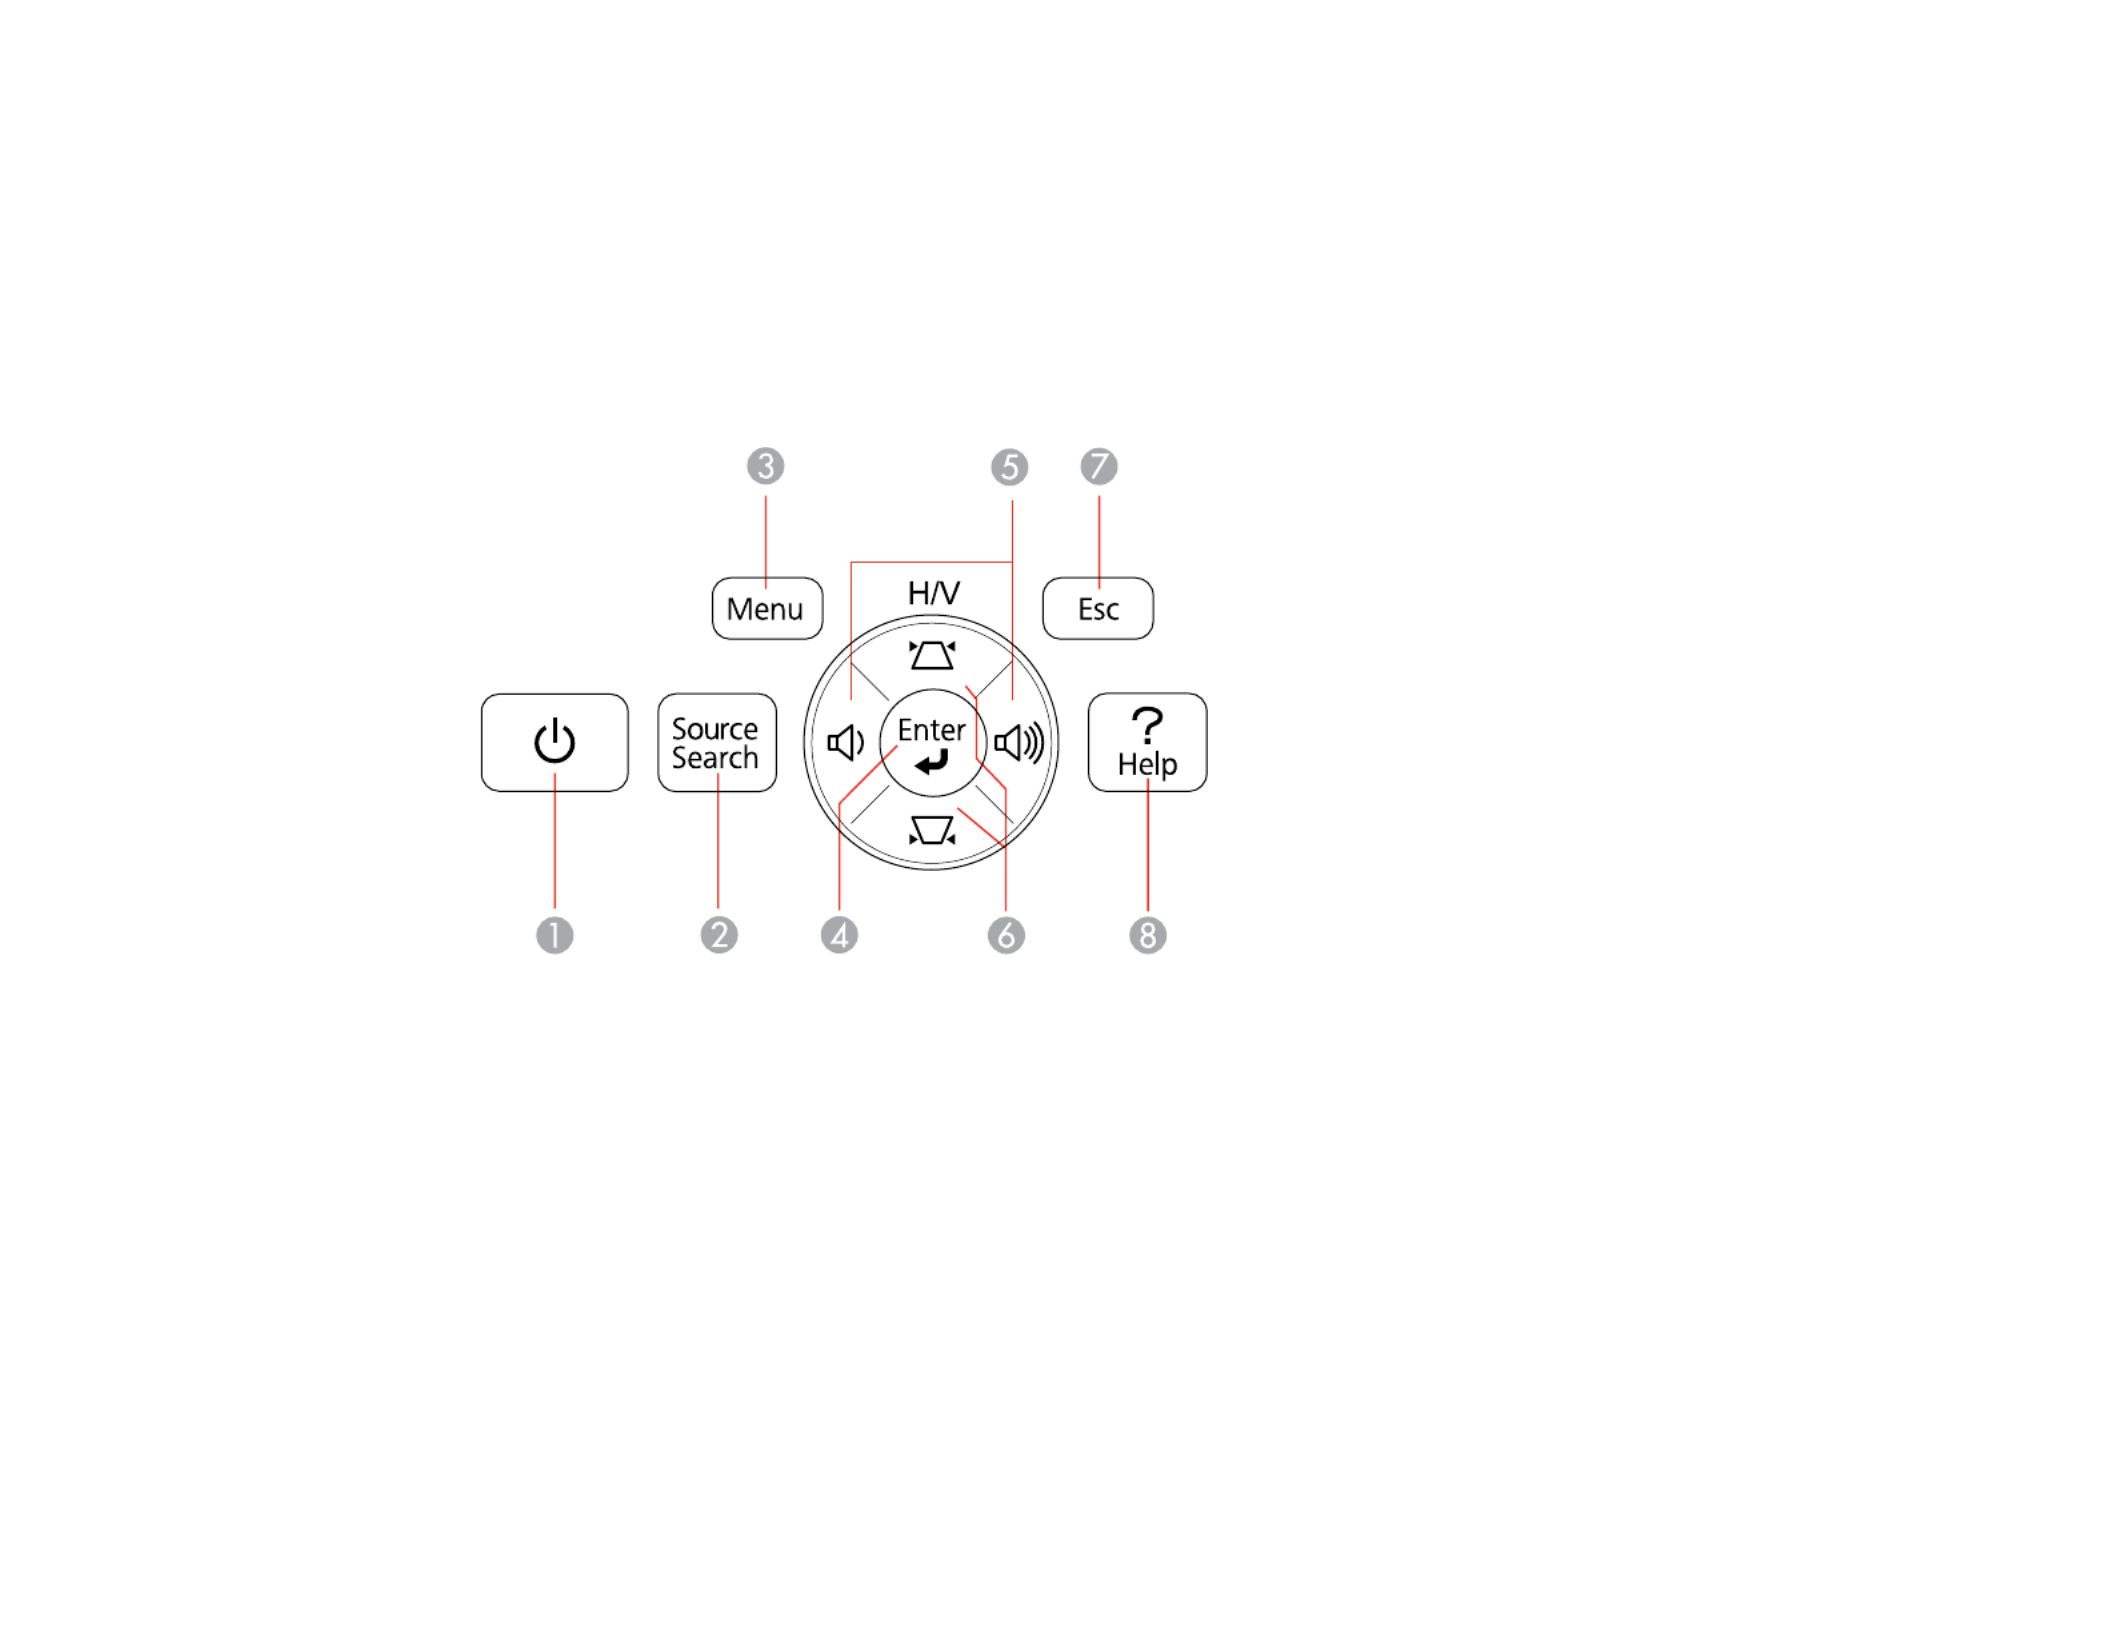
Projector Parts - Control Panel
1 Power button
2 button (searches for connected sources)Source Search
3 button (accesses projector menu system)Menu
4 button (selects options)Enter
5 Volume control buttons, horizontal keystone adjustment buttons (adjust screen shape), and arrow
buttons
6 Vertical keystone adjustment buttons (adjust screen shape) and arrow buttons
7 button (cancels/exits functions)Esc
8 button (accesses projector help information)Help
17

Parent topic: Projector Part Locations
Related references
Projector Light Status
18

2 button (cycles through connected computer sources)Computer
3 button (cycles through connected video sources)Video
4 Numeric buttons (enter numbers)
5 button (automatically adjusts position, tracking, and sync settings)Auto
6 button (selects the image aspect ratio)Aspect
7 button (when held down, switches numeric buttons to number function)Num
8 button (accesses projector menu system)Menu
9 Arrow buttons (move through on-screen options and control wireless mouse functions)
10 Enter button (selects options and controls wireless mouse functions)
11 button (customizable for different functions)User
12 up/down buttons (control presentation slides)Page
13 / buttons (zoom into and out of the image)E-Zoom + –
14 button (turns off picture and sound)A/V Mute
15 button (accesses projector help information)Help
16 button (stops video action)Freeze
17 up/down buttons (adjust speaker volume)Volume
18 button (activates on-screen pointer)Pointer
19 button (cancels/exits functions and controls wireless mouse functions)Esc
20 button (selects display modes)Color Mode
21 button (button is not functional)LAN
22 button (cycles through connected USB sources)USB
23 button (searches for connected sources)Source Search
Parent topic: Projector Part Locations
20
Setting Up the Projector
Follow the instructions in these sections to set up your projector for use.
Projector Placement
Projector Connections
Installing Batteries in the Remote Control
Opening the Lens Cover
Projector Placement
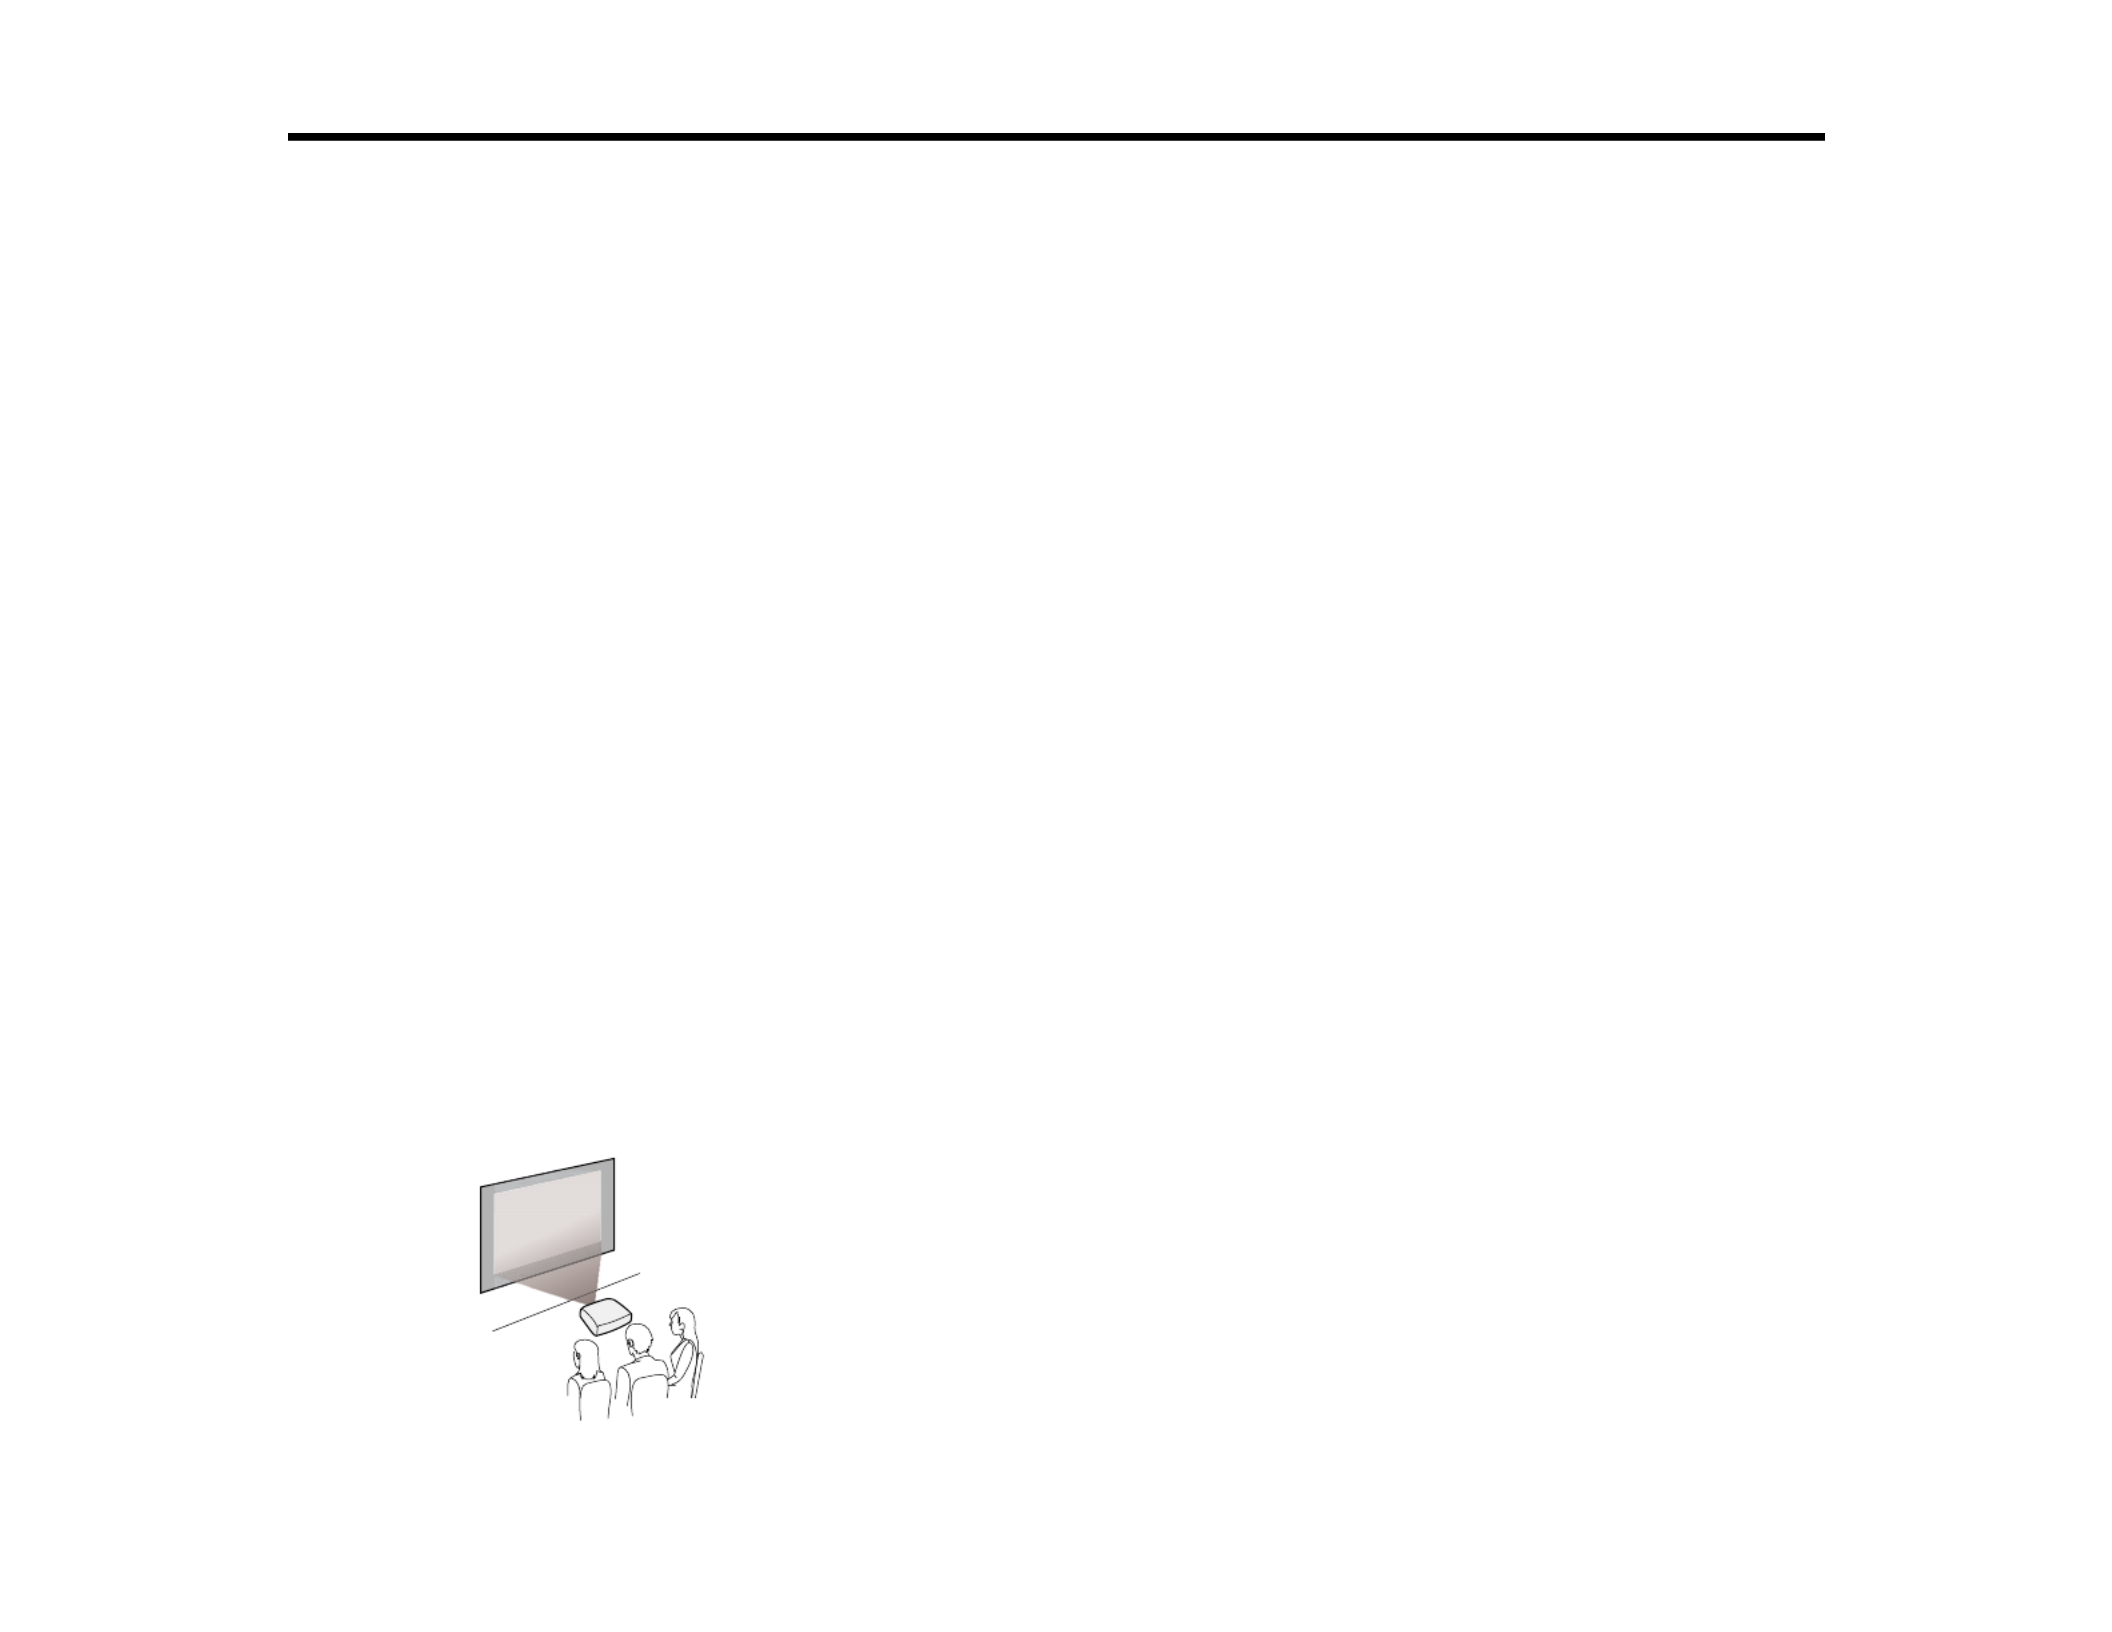
You can place the projector on almost any flat surface to project your presentation.
You can also install the projector in a ceiling mount if you want to use it in a fixed location.
Keep these considerations in mind as you select a projector location:
• Place the projector on a sturdy, level surface or install it using a compatible mount.
• Leave plenty of space around and under the projector for ventilation, and do not place it on top of or
next to anything that could block the vents.
• Position the projector within reach of a grounded electrical outlet or extension cord.
Projector Setup and Installation Options
Projection Distance
Parent topic: Setting Up the Projector
Projector Setup and Installation Options
You can set up or install your projector to view presentations in the following ways:
Front
21
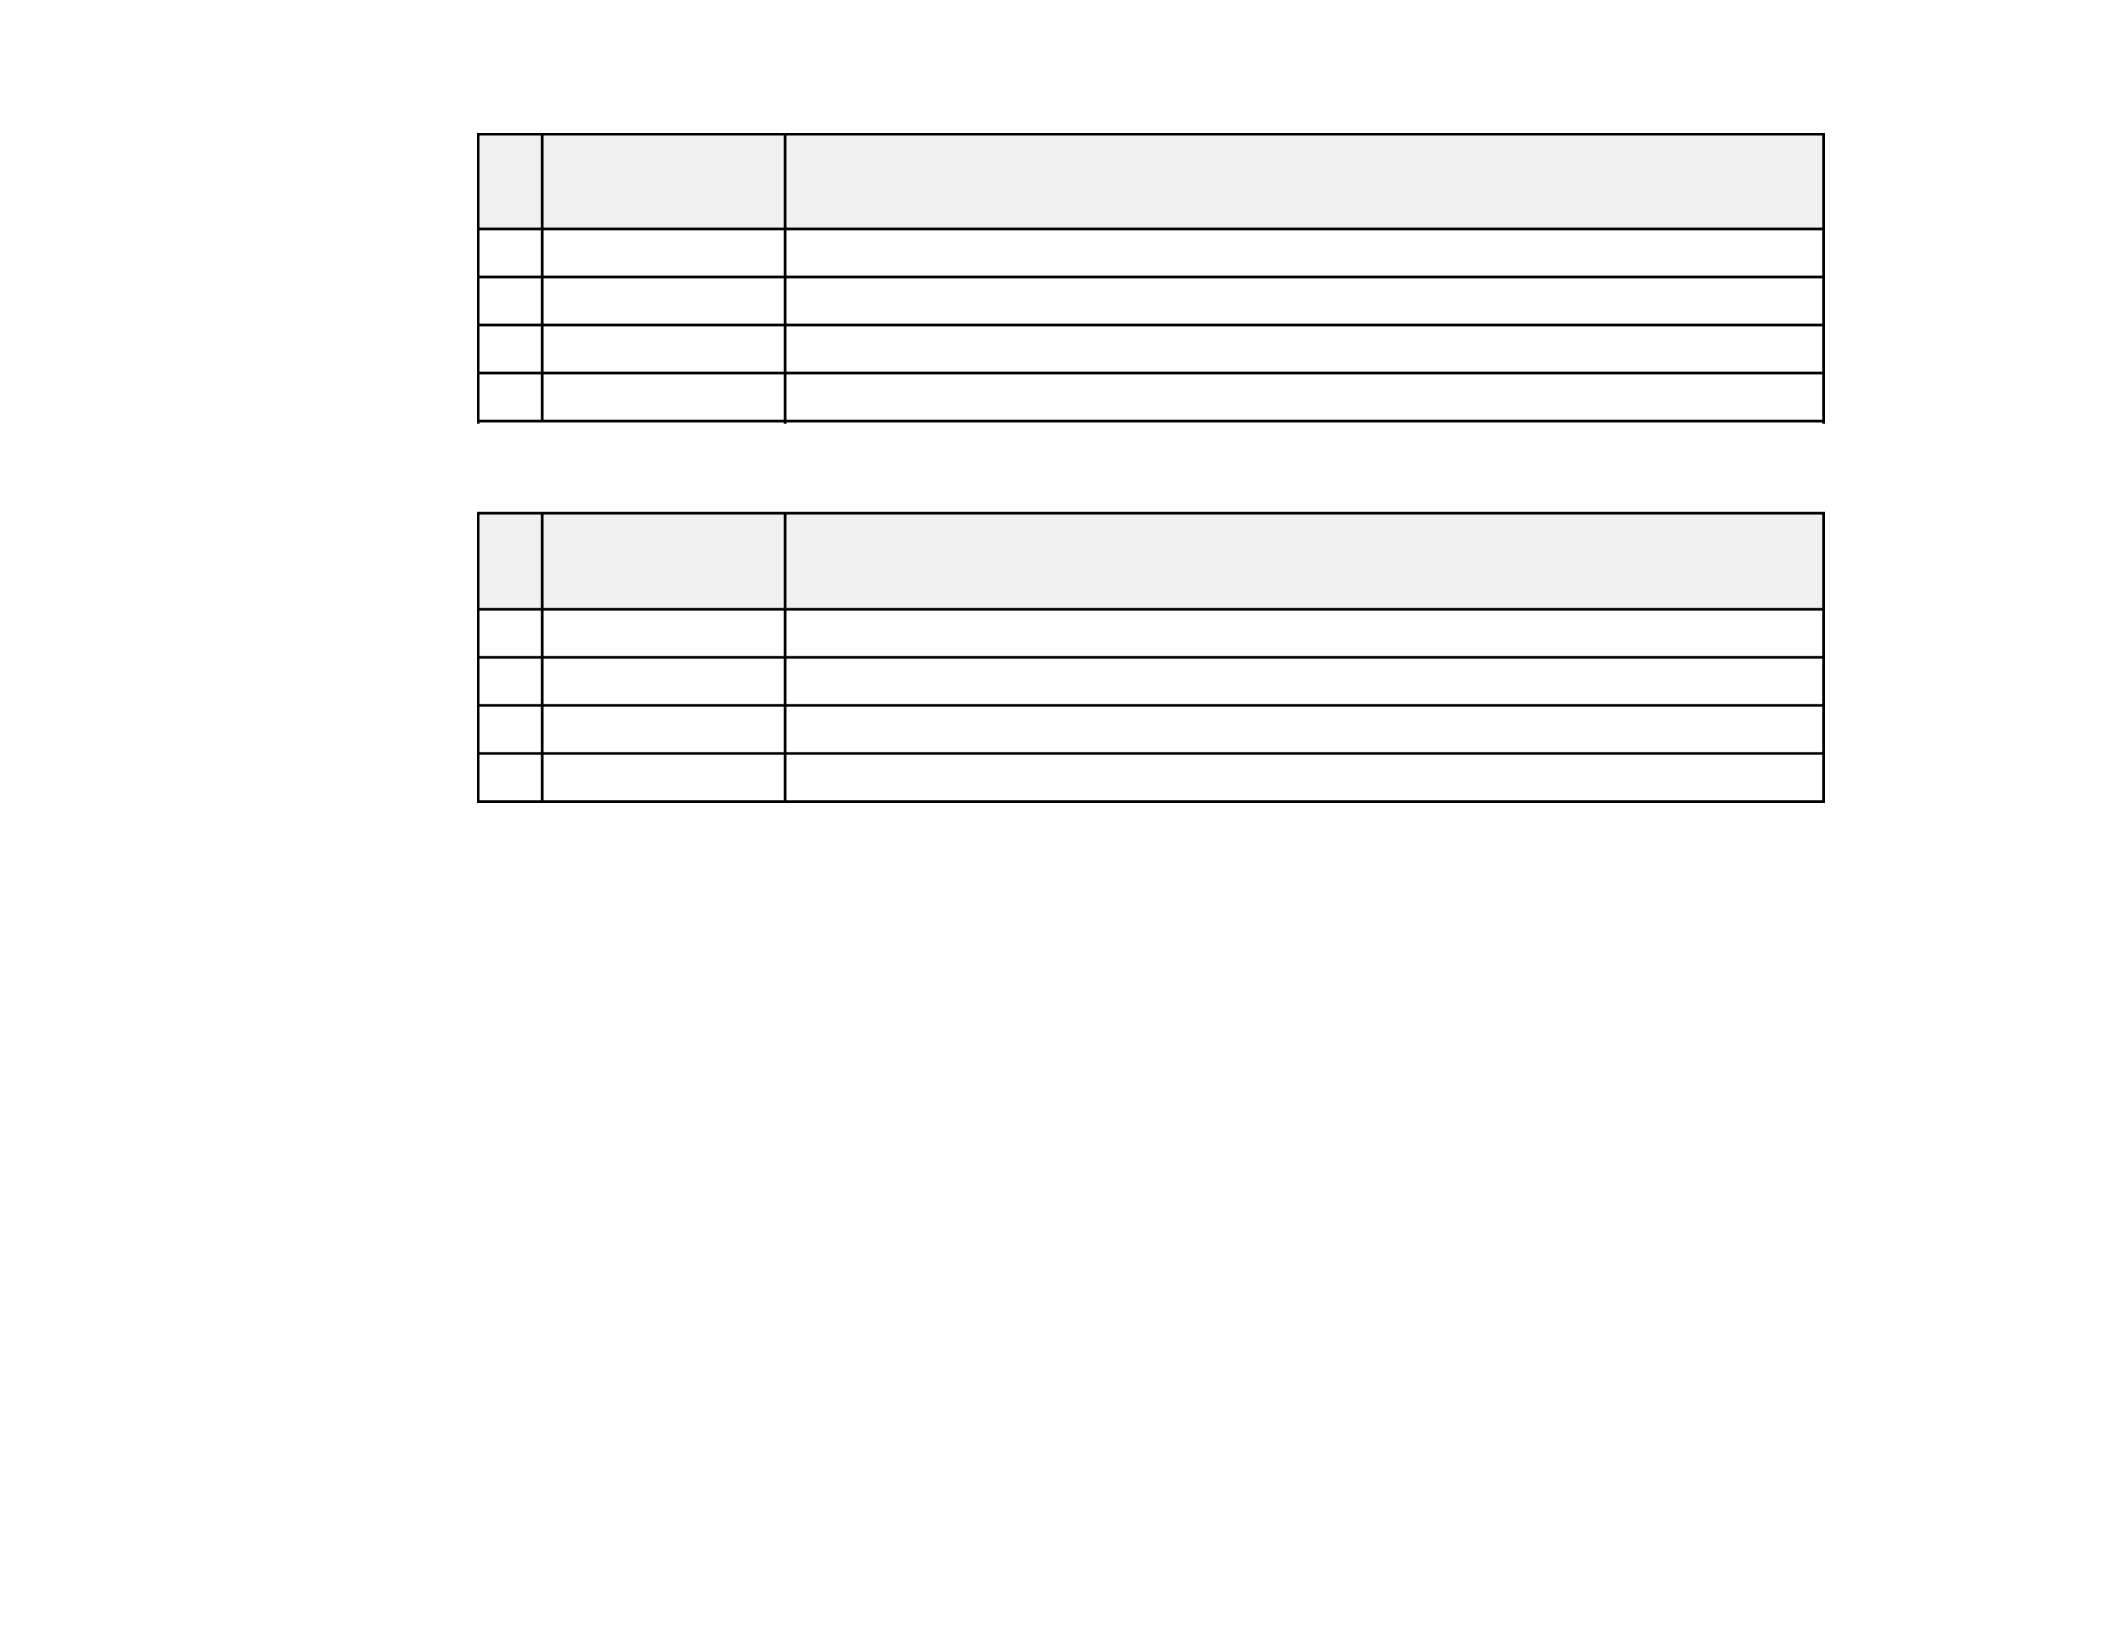
Screen or Projection distance
image size Wide to Tele
1 50 inches 56 to 68 inches (143 to 172 cm)
2 80 inches 91 to 110 inches (231 to 278 cm)
3 100 inches 114 to 137 inches (289 to 348 cm)
4 150 inches 171 to 206 inches (435 to 523 cm)
4:3 Aspect Ratio
Screen or Projection distance
image size Wide to Tele
1 50 inches 62 to 75 inches (158 to 190 cm)
2 80 inches 100 to 120 inches (255 to 306 cm)
3 100 inches 126 to 151 inches (319 to 383 cm)
4 150 inches 189 to 227 inches (480 to 577 cm)
Parent topic: Projector Placement
Related references
General Projector Specifications
Projector Connections
You can connect the projector to a variety of computer, video, and audio sources to display
presentations, movies, or other images, with or without sound.
• Connect any type of computer that has a USB port, standard video output (monitor) port, or HDMI port.
• For video projection, connect devices such as DVD players, gaming consoles, digital cameras, and
camera phones with compatible video output ports.
• If your presentation or video includes sound, you can connect audio input cables, if necessary.
• For slide shows without a computer, you can connect USB devices (such as a flash drive or camera)
or an optional EPSON document camera.
Caution: High Altitude ModeIf you will use the projector at altitudes above 4921 feet (1500 m), turn on
to ensure the projector's internal temperature is regulated properly.
24

Related tasks
Connecting to a Video Source for Sound
Connecting to an S-Video Video Source
If your video source has an S-Video port, you can connect it to the projector using an optional S-Video
cable.
1. Connect the S-Video cable to your video source's S-Video output port.
2. Connect the other end to the projector's port.S-Video
Note: If you connected a game console, it may take a few seconds for your image to appear. To reduce
the lag time, set your game console's input signal to a progressive signal of 480p or 720p. See your
game console documentation for instructions.
Parent topic: Connecting to Video Sources
Related tasks
Connecting to a Video Source for Sound
Connecting to a Composite Video Source
If your video source has a composite video port, you can connect it to the projector using an optional
RCA-style video or A/V cable.
1. Connect the cable with the yellow connector to your video source's yellow video output port.
27

Parent topic: Connecting to Video Sources
Connecting to Computer Sources
Follow the instructions in these sections to connect a computer to the projector.
Connecting to a Computer for USB Video and Audio
Connecting to a Computer for VGA Video
Connecting to a Computer for HDMI Video and Audio
Connecting to a Computer for USB Mouse Control
Connecting to a Computer for Sound
Parent topic: Projector Connections
Connecting to a Computer for USB Video and Audio
If your computer meets the system requirements, you can send video and audio output to the projector
through the computer's USB port (preferably USB 2.0). Connect the projector to your computer using a
USB cable.
1. In the projector's Extended menu, set the setting to .USB Type B USB Display
2. Turn on your computer.
3. Connect the cable to your projector's USB port.TypeB
4. Connect the other end to any available USB port on your computer.
5. Do one of the following:
• : Select in the dialog box that appears to installWindows 7/Windows Vista Run EMP_UDSe.exe
the EPSON USB Display software.
• : Wait as messages appear on your computer screen and the projector installs theWindows XP
EPSON USB Display software on your computer.
29

Related tasks
Connecting to a Computer for Sound
Connecting to a Computer for HDMI Video and Audio
If your computer has an HDMI port, you can connect it to the projector using an optional HDMI cable.
Note: To connect a Mac that includes only a Mini DisplayPort or Mini-DVI port for video output, you need
to obtain an adapter that allows you to connect to the projector's port. Contact Apple forHDMI
compatible adapter options. Older Mac computers (2009 and earlier) may not support audio through the
HDMI port.
1. Connect the HDMI cable to your computer's HDMI output port.
2. Connect the other end to the projector's port.HDMI
Parent topic: Connecting to Computer Sources
Connecting to a Computer for USB Mouse Control
If you connected your computer to a , USB , or port on the projector, you can setComputer TypeB HDMI
up the remote control to act as a wireless mouse. This lets you control computer presentations at a
distance from your computer. To do this, connect the projector to your computer using a USB cable, if it
is not connected already.
1. Connect the USB cable to your projector's USB port.TypeB
31

2. Connect the other end to any available USB port on your computer.
3. If necessary, configure your computer to work with an external USB mouse. See your computer
documentation for details.
Parent topic: Connecting to Computer Sources
Connecting to a Computer for Sound
If your computer presentation includes sound and you did not connect it using the projector's USB
TypeB HDMIor port, you can still play sound through the projector's speaker system. Just connect an
optional stereo mini-jack adapter cable (with one 3.5 mm mini-plug and two RCA plugs).
1. Connect the audio cable to your laptop's headphone or audio-out jack, or your desktop's speaker or
audio-out port.
2. Connect the other end to the projector's ports.Audio
Parent topic: Connecting to Computer Sources
Connecting to External USB Devices
Follow the instructions in these sections to connect external USB devices to the projector.
USB Device Projection
Connecting a USB Device or Camera to the Projector
Selecting the Connected USB Source
Disconnecting a USB Device or Camera From the Projector
Parent topic: Projector Connections
USB Device Projection
You can project images and other content without using a computer or video device by connecting any of
these devices to your projector:
• USB flash drive
32

• Digital camera or camera phone
• USB hard drive
• Multimedia storage viewer
• USB memory card reader
Note: Digital cameras or camera phones must be USB-mounted devices, not TWAIN-compliant devices.
You can project slide shows from image files on a connected USB device or memory card reader.
Parent topic: Connecting to External USB Devices
Related topics
Projecting a Slide Show
Connecting a USB Device or Camera to the Projector
You can connect your USB device or camera to the projector's USB port and use it to projectTypeA
images and other content.
1. If your USB device came with a power adapter, plug the device into an electrical outlet.
2. Connect the USB cable (or USB flash drive or USB memory card reader) into the projector's USB
TypeA port shown here.
Note: Do not connect a USB hub or a USB cable longer than 10 feet (3 m), or the device may not
operate correctly.
3. Connect the other end of the cable (if applicable) to your device.
Parent topic: Connecting to External USB Devices
33
Related topics
Projecting a Slide Show
Selecting the Connected USB Source
You can switch the projector's display to the source you connected to a USB port.TypeA
1. Make sure the connected USB source is turned on, if necessary.
2. Press the button on the remote control.USB
3. Press the button again to cycle through other USB sources, if available.
Parent topic: Connecting to External USB Devices
Disconnecting a USB Device or Camera From the Projector
When you finish presenting with a connected USB device or camera, you must prepare to disconnect the
device from the projector.
1. If the device has a power button, turn off and unplug the device.
2. Disconnect the USB device or camera from the projector.
Parent topic: Connecting to External USB Devices
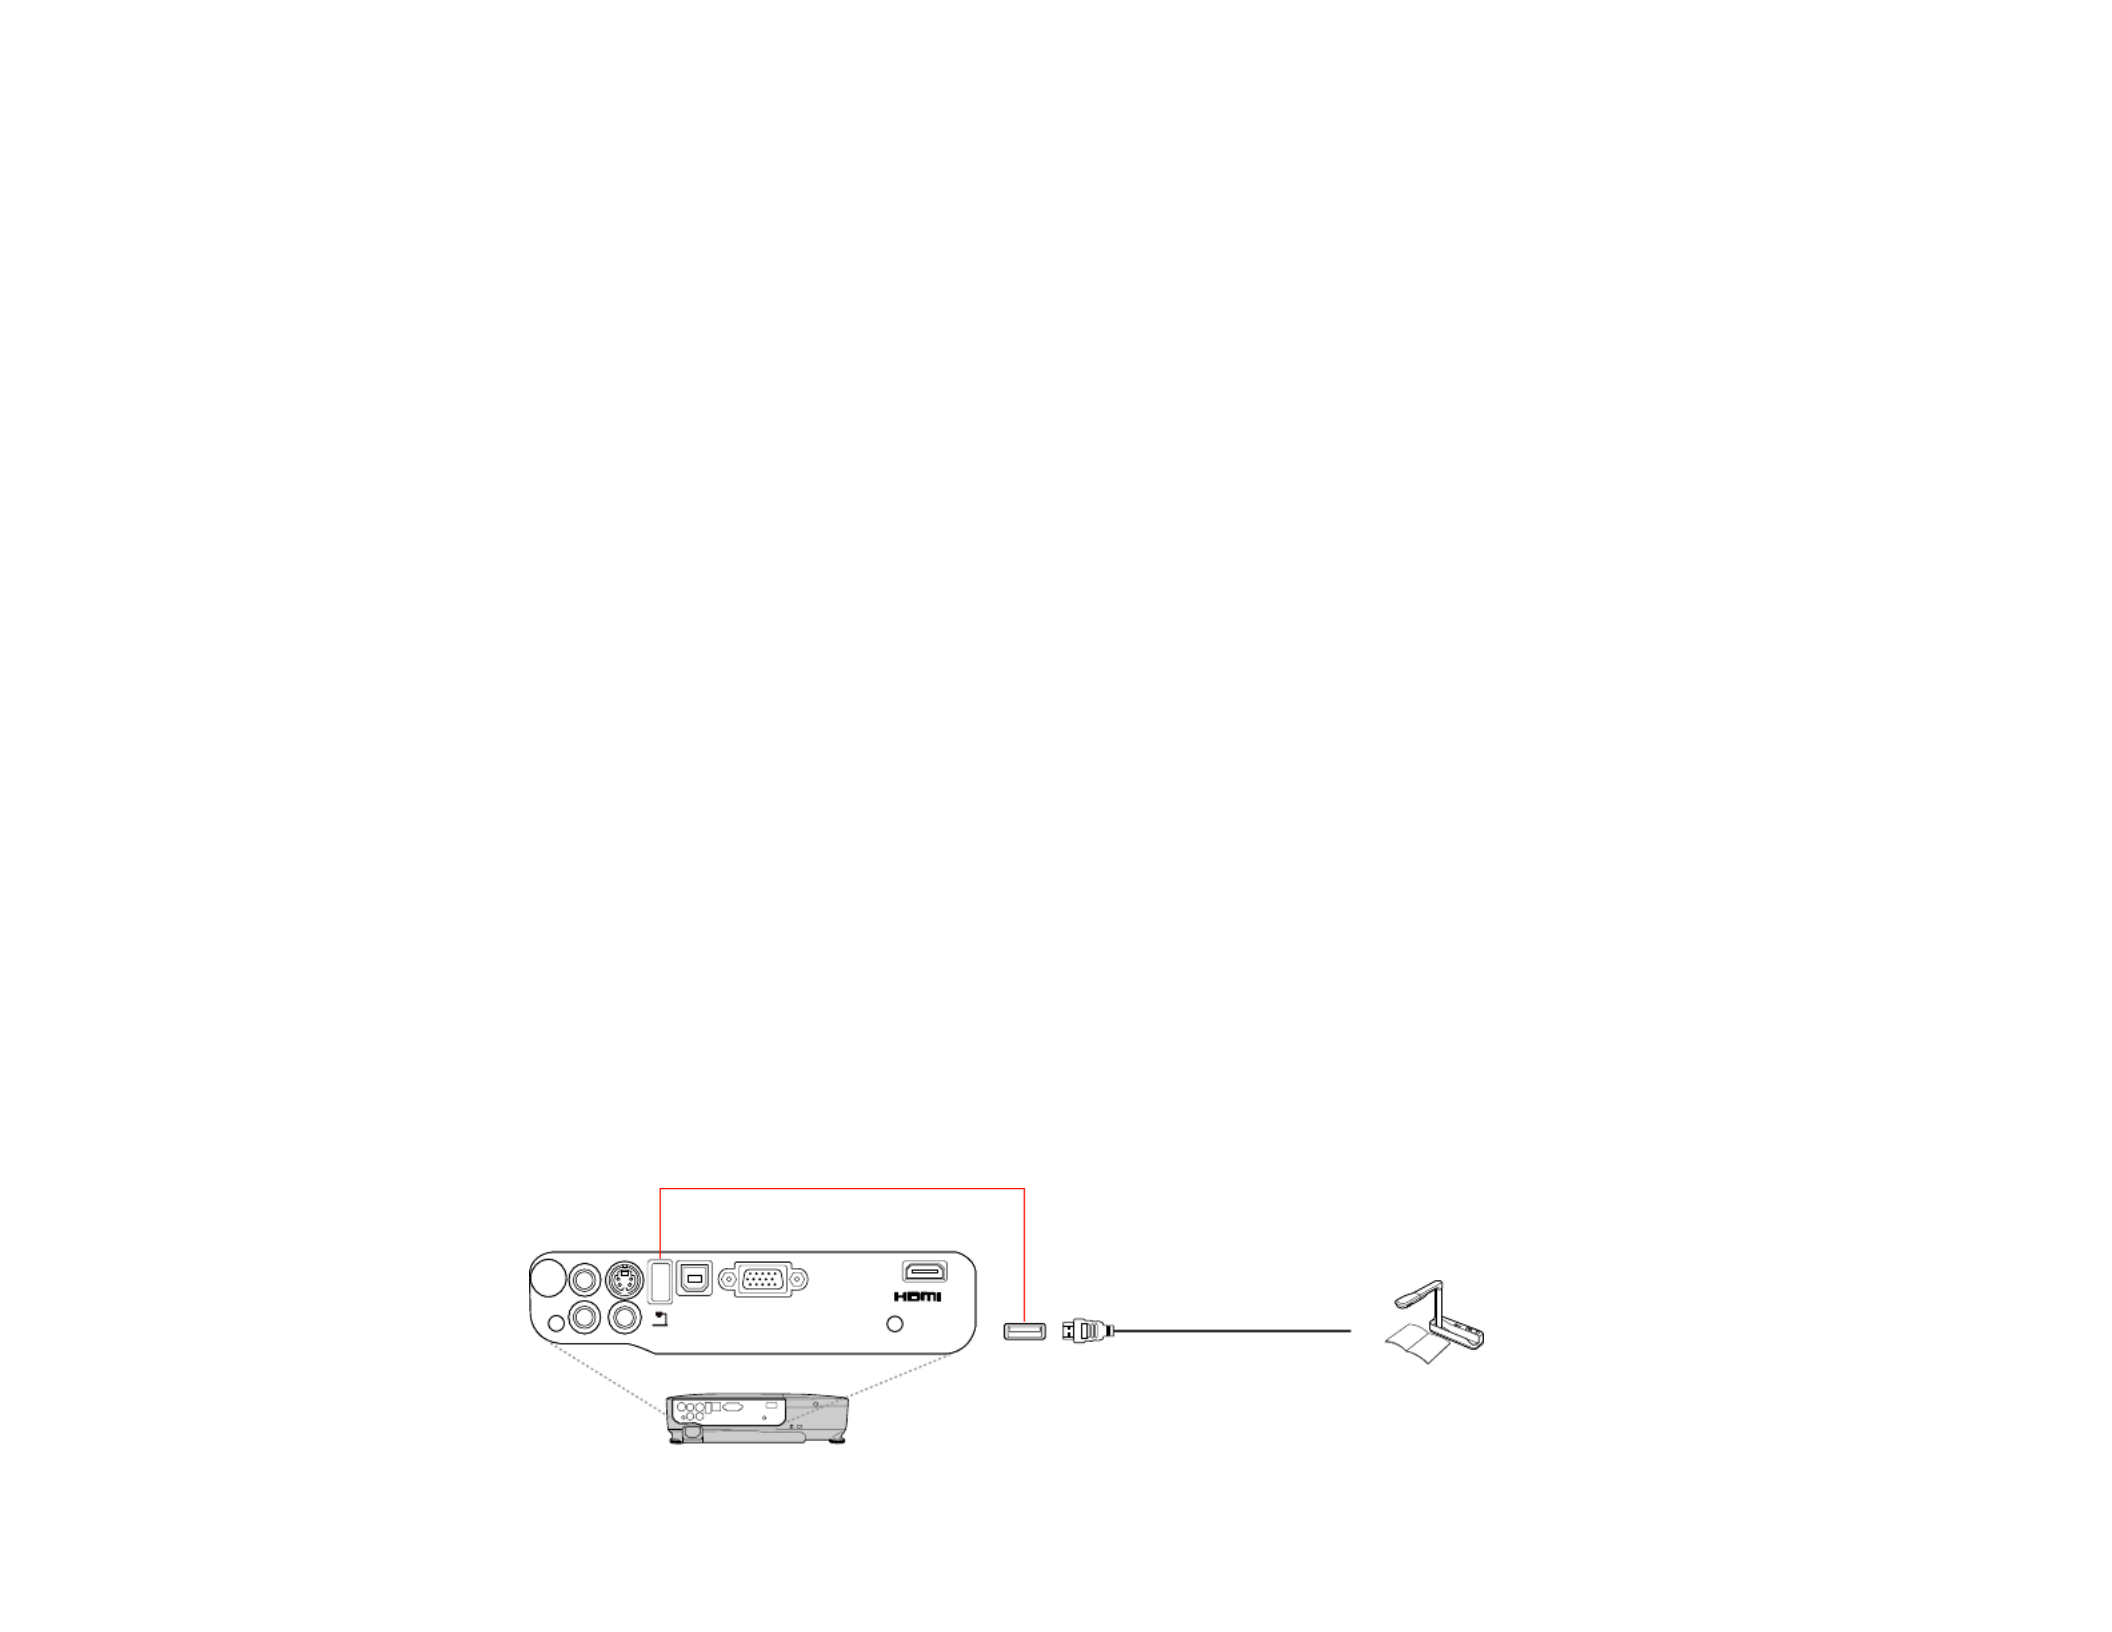
Connecting to a Document Camera
You can connect the EPSON DC-06 document camera to your projector's USB port to projectTypeA
images viewed by the camera.
Note: For additional features supported by software, connect the EPSON DC-06 document camera to
your computer instead of the projector. You may be able to connect different EPSON document camera
models to your projector's port. See the document camera's manual for instructions.Computer
1. Locate the USB cable that came with the document camera.
2. Connect the USB cable to the projector's USB port.TypeA
34

3. Connect the other end of the cable to the document camera's USB Type B port.
Parent topic: Projector Connections
Related references
Optional Equipment and Replacement Parts
Installing Batteries in the Remote Control
The remote control uses the two AA batteries that came with the projector.
Caution: Use only the type of batteries specified in this manual. Do not install batteries of different types,
or mix new and old batteries.
1. Open the battery cover as shown.
2. Insert the batteries with the and ends facing as shown.+ –
35
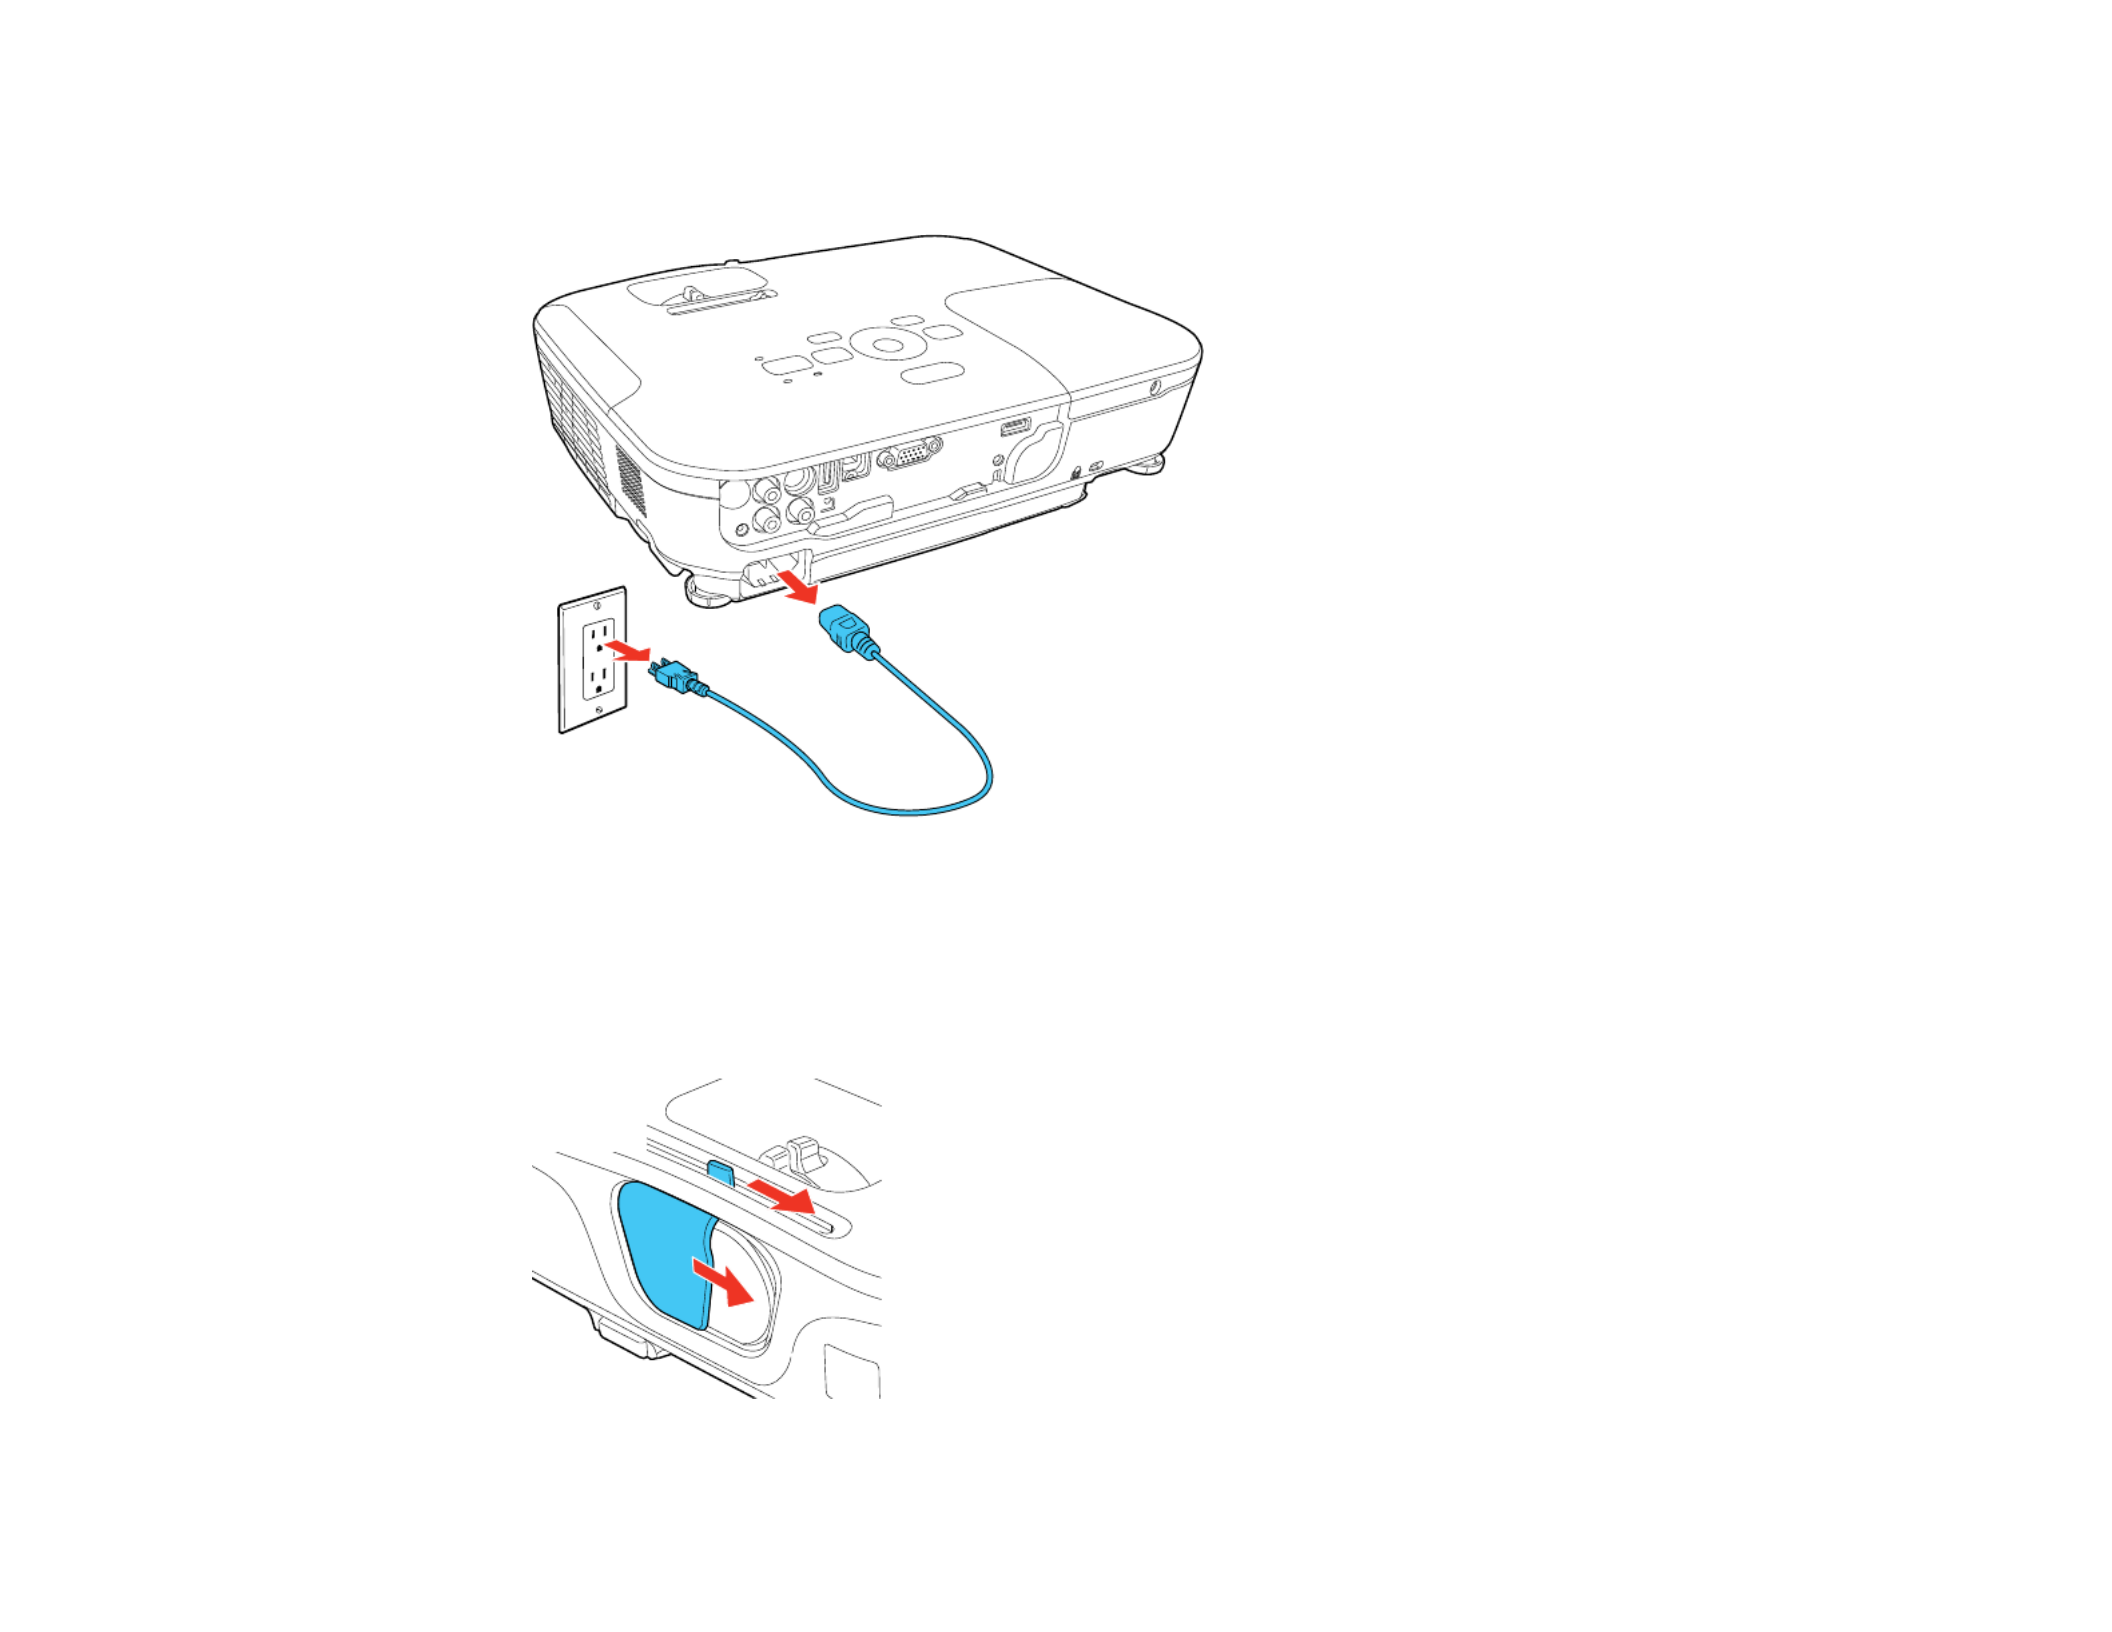
3. To transport or store the projector, make sure the power light is orange (but not flashing), then
unplug the power cord.
Caution: To avoid damaging the projector or lamp, never unplug the power cord when the power
light is green or flashing orange.
4. Close the projector's lens cover.
40
Product specificaties
| Merk: | Epson |
| Categorie: | Beamer |
| Model: | PowerLite Home Cinema 707 |
Heb je hulp nodig?
Als je hulp nodig hebt met Epson PowerLite Home Cinema 707 stel dan hieronder een vraag en andere gebruikers zullen je antwoorden
Handleiding Beamer Epson

14 December 2024
14 December 2024
14 December 2024
14 December 2024
14 December 2024
14 December 2024
14 December 2024
21 November 2024
5 November 2024
5 November 2024
Handleiding Beamer
- Beamer Philips
- Beamer HP
- Beamer Sony
- Beamer Samsung
- Beamer Xiaomi
- Beamer Casio
- Beamer Panasonic
- Beamer LG
- Beamer Asus
- Beamer Canon
- Beamer JVC
- Beamer Medion
- Beamer Toshiba
- Beamer Yamaha
- Beamer Acco
- Beamer Acer
- Beamer Aiptek
- Beamer Anker
- Beamer AOpen
- Beamer ASK Proxima
- Beamer Auna
- Beamer Barco
- Beamer Bauer
- Beamer BenQ
- Beamer Blaupunkt
- Beamer D-Link
- Beamer Dell
- Beamer Easymaxx
- Beamer Eiki
- Beamer Elmo
- Beamer Emtec
- Beamer GPX
- Beamer Hama
- Beamer Hisense
- Beamer Hitachi
- Beamer Ibm
- Beamer InFocus
- Beamer Ion
- Beamer Klarstein
- Beamer Kodak
- Beamer Kogan
- Beamer La Vague
- Beamer Leica
- Beamer Lenco
- Beamer Lenovo
- Beamer Livoo
- Beamer Marantz
- Beamer Maxell
- Beamer Mitsubishi
- Beamer Nebula
- Beamer Nec
- Beamer PLUS
- Beamer Polaroid
- Beamer Pyle
- Beamer RCA
- Beamer Reflecta
- Beamer Renkforce
- Beamer Ricoh
- Beamer Salora
- Beamer Sanyo
- Beamer Sharp
- Beamer Showtec
- Beamer Smart
- Beamer Smartwares
- Beamer Speaka
- Beamer Steinel
- Beamer Strong
- Beamer Technaxx
- Beamer Viewsonic
- Beamer Vivitek
- Beamer Vogels
- Beamer XGIMI
- Beamer ZTE
- Beamer Odys
- Beamer OK
- Beamer Oki
- Beamer Optoma
- Beamer Overmax
- Beamer 3M
- Beamer Krüger And Matz
- Beamer Naxa
- Beamer Steren
- Beamer Eurolite
- Beamer Prixton
- Beamer Planar
- Beamer Dukane
- Beamer Yaber
- Beamer Mimio
- Beamer Da-Lite
- Beamer Adj
- Beamer Dahua Technology
- Beamer Derksen
- Beamer Celly
- Beamer Promethean
- Beamer Stairville
- Beamer Laserworld
- Beamer Beghelli
- Beamer Cameo
- Beamer Tzumi
- Beamer EKO
- Beamer MicroVision
- Beamer Elite Screens
- Beamer Celexon
- Beamer Fun Generation
- Beamer Christie
- Beamer Futurelight
- Beamer Varytec
- Beamer Ultimea
- Beamer Dracast
- Beamer Dream Vision
- Beamer Knoll
- Beamer DTS
- Beamer Touchjet
- Beamer Boxlight
- Beamer AAXA Technologies
- Beamer Miroir
- Beamer Vankyo
- Beamer AWOL Vision
- Beamer Smart Tech
- Beamer Atlantis Land
- Beamer KickAss
- Beamer Microtek
- Beamer VAVA
- Beamer Panamorph
- Beamer Mirabella Genio
Nieuwste handleidingen voor Beamer

1 April 2025

4 Maart 2025
4 Maart 2025

25 Februari 2025
20 Februari 2025
20 Februari 2025

20 Februari 2025

10 Februari 2025
30 Januari 2025
30 Januari 2025