Cryorig M9i Handleiding
Lees hieronder de 📖 handleiding in het Nederlandse voor Cryorig M9i (4 pagina's) in de categorie Processorkoeler. Deze handleiding was nuttig voor 35 personen en werd door 2 gebruikers gemiddeld met 4.5 sterren beoordeeld
Pagina 1/4
INTEL LGA 115x
Product Registration Guide for 3yr Extended Warranty
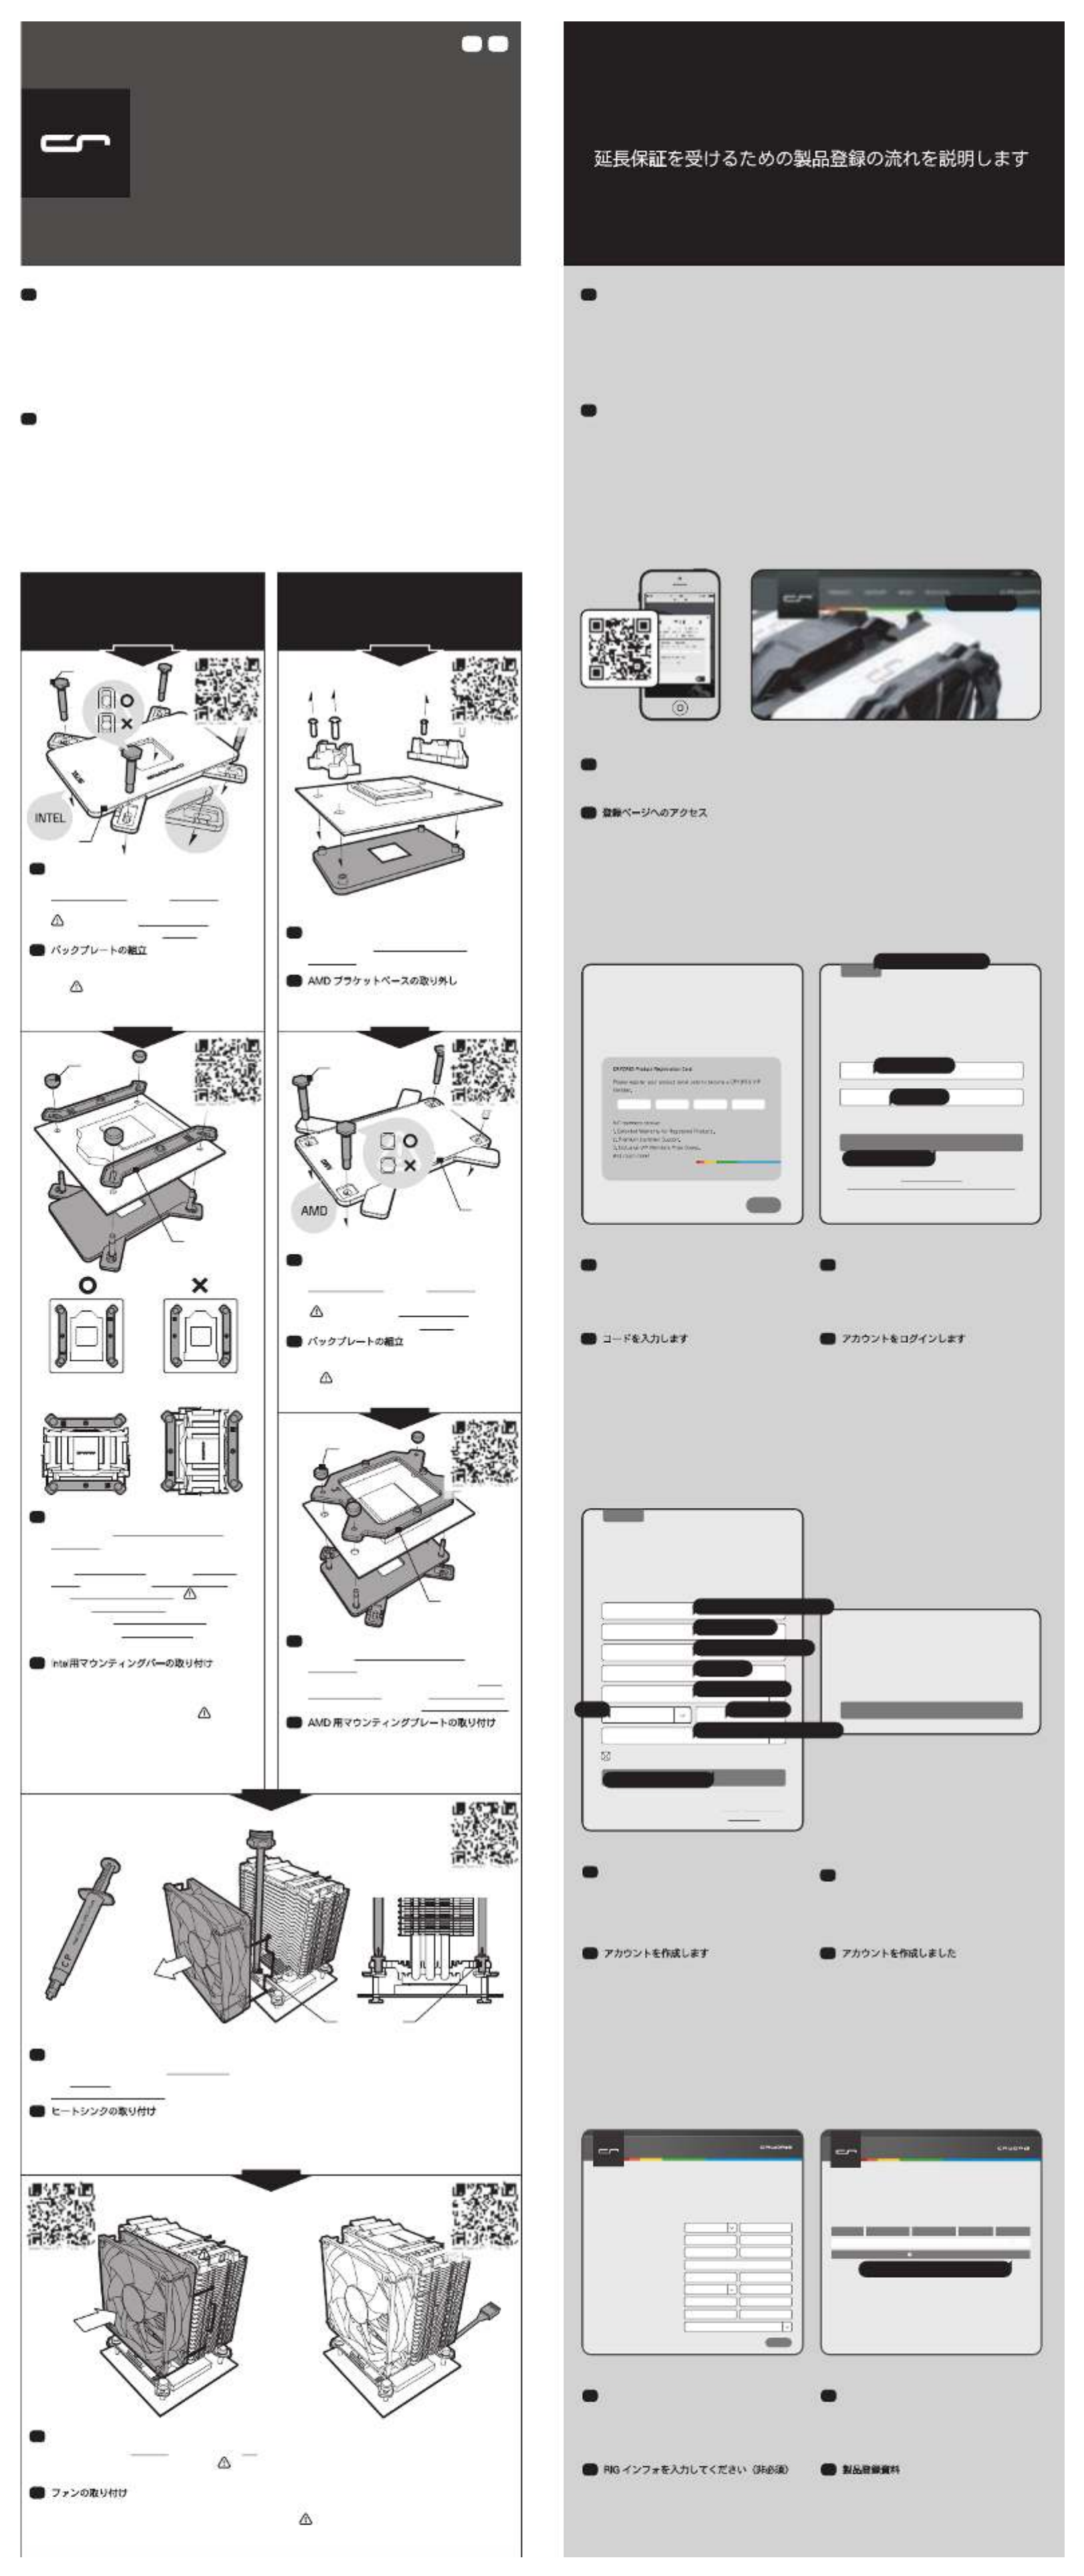
延長保証を受けるための製品登録の流れを説明します
CRYORIG M 9
INSTALL MANUAL
Ultra Fast Installation, Get Started in 4 Minutes.
JPEN
with Step-By-Step Animated Guide
AMDの刻印面を上にし、六角ボルトをバックプ
レートの固定穴に通し、パチンとはめ込みます
。 六角ボルトの頭部を溝位置にあわせ、正し
く溝収まっていることを確認してください
バックプレートの組立
JP
AMD ブラケット上のネジをはずし、ブラケッ
ト及びバックプレートを取り外してください。
AMD ブラケットベースの取り外し
JP
Unscrew the AMD Bracket Base and
backplate.
Removing the AMD Bracket Base
EN
Watch Video
AMD
Thank you for choosing CRYORIG! At CRYORIG we believe in delivering the best quality
products and providing the upmost user experience and service. Because of this we are offering
you the user the chance to become our VIP member and receiver additional extended warranty
for your official CRYORIG product. All you need to do now is register your product at our
website. Registering your product will automatically certify you as a VIP Member and extended
your product warranty. This following section will guide you through each step of registering your
CRYORIG Product.
EN
この度、弊社の製品をお買い上げいただき、誠にありがとうございます。CRYORIG はお客様に高品質な
製品及びサービスを提供することに力を注いでおり、お客様には CRYORIG の VIP 会員の登録をお勧めし
ております。VIP会員最大のメリットは製品の延長保証です!CRYORIG の登録ページに製品登録を行って
いただくと、自動的に VIP 会員になり、ご購入いただいた製品の延長保証が付与されます。以下は製品登
録に関してのご説明です。
JP
登録ページ
Use your mobile device to scan the above QR CODE to jump directly to our Registration Area, or visit
CRYORIG.com and click on REGISTER on the top navigation bar.
Login to CRYORIG’s Registration Area
EN
弊社Webサイトのメニューより「REGISTER」を選択、または QR コードを読み込み、登録ページへアク
セスします。
登録ページへのアクセス
JP
02 03
ENTER YOUR CODE
Enter the serial code found on the back of the
Product Registration Card. Registering your product
will double the warranty period.
NEXT
LOG IN
If you’re already a CRYORIG VIP member please
enter your email and password to log in to your
account.
SIGN UP
PASSWORD
LOG IN
EMAIL
I forgot my password.
Don't have a Registration account? Create one in seconds.
アカウントを作成します
メールアドレス
パスワード
ログインします
01
カードに記載されている 16 文字の英数字を入
力し、NEXT をクリックします。
コードを入力します
JP
CRYORIG のアカウント持っている場合、登録し
たメールアドレスを入力します。アカウントを作
成していない場合、一番上の SIGN UP をクリッ
クしてアカウントを作成します。
アカウントをログインします
JP
If you already have a CRYORIG VIP account then
type in your email and password to login. If you
are new to CRYORIG then click on SIGN UP at
the top.
Login Your Account
EN
Enter the 16 digit code supplied on your
Product Registration Card then click NEXT.
Enter Your Code
EN
05
アカウントを作成します
JP
メールアドレスは誤りがないように登録をし
てください(登録後自動返信メールが届きます)
。項目を入力した後 SIGN UP をクリックして
ください。( *をマークしてある項目は必須項
目です。)
CONTINUE をクリックして、次のページにアク
セスします。
アカウントを作成しました
JP
One more step Click on CONTINUE to continue.
Congratulations You’re a VIP Member!
EN
04
CONGRATULATIONS!
You are now an official CRYORIG VIP member!
We have sent your registration info to your
specified email account.
CONTINUE
Sign Up
EN
Fill in all required fields marked by “*” and
please enter your correct email address so
you can receive your registration confirmation.
After filling all required information click on
SIGN UP.
SIGN UP
If you’re already a CRYORIG VIP member please
enter your email and password to log in to your
account.
LOG IN
MY PRIMARY PC USAGE IS FOR
GENDER AGE
* COUNTRY OF RESIDENCE
* FULL NAME
* REPEAT PASSWORD
* PASSWORD
SIGN UP
* EMAIL
By clicking Sign up, you agree to Cryorig’s terms & privacy policy.
Already have a Registration account? Login Here.
Get product announcements and updatesand special offers.
性別
メインで使用しているPCの目的
年齢
*住んでいる国(必須)
*氏名(必須)
*パスワードの再入力(必須)
*パスワード(必須)
*登録するメールアドレス(必須)
入力内容を確認します
06 07
RIGインフォには、ご利用いただいている環境
などを登録していただくページです。RIGイン
フォメーションは必須ではありません。RIGイ
ンフォメーションは、登録後でも変更が可能
です。
RIG インフォを入力してください(非必須)
JP
このページにて製品種類、製品名、製品コー
ド、保証期間及び保証状態を表示します。
製品登録資料
JP
This step is optional and can later be edited in
your Profile section. Fill in your corresponding
system information to fullest and click on
submit to go to the next page.
Entering Your RIG Info (Optional)
EN
PRODUCT SUPPORT NEWS REGISTER
LOING SIGN UP
SUBMIT
RIG INFO INPUT
RIG INFORMATION
Number of Case Fans
PSU Brand / PSU Wattage
Case Brand / Case Model
VGA (GPU) Brand / VGA (GPU) Model
Mainboard Brand / Mainboard Model
RAM Size
RAM Brand / RAM Model
CPU Clock / Vcore
CPU Brand / CPU Model
Help us understand yo ur s yste m to impro ve our brand. The f o llo wing informatio n is all e ditable
later in your me mber profi le .
Number of Case Fans
CPU BRAND
CPU BRAND
This page will show your product registration
information, including product type, model
name, serial number, warranty expiration date
and current warranty status.
Product Registration Information
EN
PRODUCT SUPPORT NEWS REGISTER
LOING SIGN UP
PRODUCT REGISTRATION INFO
Check on y our product re gis tratio n s tatus and find o ut yo ur ex act pro duct w arranty pe riod.
HELLO! WELCOME!
The following is your prod uct regis tration details
Warr ant y St atu sWarr ant y DateSe rial NumberModel NameCol lectio n
REGIST ER NEW PRODUCT
CPU COOLER 11 11-1 111-11 11-11 11 2020-02-12R1 UN IVERSAL
ほかの製品を登録します
01
01 02
01
02 Orientation BOrientation A
02
01. ファンクリップをファンにひっかけ、ヒートシンクにファンを取り付けます。 02. ファンクリップをフ
ァンにひっかけ、ヒートシンクにファンを取り付けます。 追加ファン(オプション)を取り付ける際は、付
属の92mmx25.4mmファン用ファンクリップ(予備)をお使いください。
ファンの取り付け
JP
01. Hook on the fanclips and place the fan in front of the heatsink. 02. Connect the Fan to the
mainboard’s CPU Fan connector. An extra set of fanclips for a 2nd 92mmx25.4mm fan is
included.
Installing the Fan
EN
01.CPU面上に、付属のグリス" CRYO-Paste"を均一にそして薄く塗布します。 02. ヒートシンクからフロン
トファンを取り外し、CPU面にヒートシンクを設置し、前後のマウンティングプレートをネジ止めしてくだ
さい。
ヒートシンクの取り付け
JP
01. Apply a thin layer of CRYO-Paste on the CPU so that it is barely visible. 02. First remove
the front fan, then place the heatsink on top of the CPU and screw the front and back
Mounting Plate Screws.
Mounting the Heatsink
EN
Intel用マウンティングバーの取り付け
JP
01. Pass the Hexagon Pillars on the
Backplate through the mounting holes on
the back of the mainboard. Place the
Intel Mounting Bars onto the Hexagon
Pillars, then cap the Hexagon Pillars with
the Thumb Screws Caps. Make sure
that the numbered side is facing up and
the bars are protruding towards the CPU.
02. Adjust the Mounting Bars for the
desired heatsink orientation.
Fitting the Intel Mounting Bars
EN
01.マザーボードの裏側から、バックプレート
取り付け位置に六角ボルトを通します。その後
、六角ボルトにIntel用マウンティングバーを通
し、ネジキャップで固定します。 マウンテ
ィングバーに刻印された番号面を上にしてくだ
さい。 02.
Intel用マウンティングバーの取り付
け方向は、ヒートシンクの取り付け方向に影響
します。図をご参照のうえ、ご希望の方向に調
整してください。
INTELの刻印面を上にし、六角ボルトをバック
プレートの固定穴に通し、パチンとはめ込みま
す。 六角ボルトの頭部を溝位置にあわせ、
きちんと溝に収まっていることを確認してくだ
さい。
バックプレートの組立
JP
With the Intel marking facing up fit the
Hexagon Pillars into the inner hole on the
backplate until you feel it snap locked.
Make sure the hexagon head is
aligned and fit into the groove.
Assembling the Backplate
EN
INTEL
AMD
With the AMD side facing up fit the
Hexagon Pillars into the AMD hole on the
backplate until you feel it snap locked.
Make sure the hexagon head is
aligned and fit into the groove.
Assembling the Backplate
EN
マザーボードの裏側から、バックプレート取り
付け位置に六角ボルトを通します。AMD用マウ
ンティングプレートに六角ボルトを通し、ネジ
キャップで固定します。
AMD 用マウンティングプレートの取り付け
JP
Pass the Hexagon Pillars on the
Backplate through the mounting holes on
the back of the mainboard. Fit the AMD
Mounting Plate onto the Hexagon Pillars
and cap them with the Screw Pillar Caps.
Fitting the AMD Mounting Plate
EN
Thank you for choosing CRYORIG the most sophisticated and compatible thermal solution on the
market. We will now guide you through the simple steps of installing your CRYORIG product
featuring our proprietary Quick Mount Systems. We advise you to first log on to www.cryorig.com to
check for the latest information for your product. Scan the QR code on each guide box for a
step-by-step Animated Guide. Before beginning your installation we advise to first remove your
mainboard from the PC chassis and unplug all power connectors to allow for safer and easy access
and installation. If any problems occur please check the product FAQ and contact our support team
at support@cryorig.com. Also, remember to register your product to receive our extended warranty.
Hope you have an awesome time with our product.
EN
この度は、弊社の CRYORIG CPUクーラー をお買い上げいただき、誠にありがとうございます。このマニュ
アルでは、AMDプラットフォーム とINTEL LGA115x プラットホームにおいて、クイックマウントシステムに
よる本製品の取り付け手順の説明となります。各セクションのステップ・バイ・ステップのアニメーションガ
イドを参照する場合、QRコードをスキャンし、表示されるリンク先のページを参照してください。CRYORIG
CPUクーラー の詳細情報、、サポートに関する情報については、弊社のホームページ www.cryorig.com をご
覧ください。CRYORIG CPUクーラー を安全に取り付けていただくために、取り付け前に必ず電源をOFFの状
態とし、PC ケースからマザーボードを取り出してください。なお、取付方法についてご不明な点がざいまし
たら、製品詳細ページの FAQ をご覧いただくか、 support@cryorig.com までお気軽にお問合せください。ま
た、本製品購入いただいたお客様のサポートの充実を図るため、本製品のユーザー登録をお勧めしています。
ご登録いただきますと、さらに製品保証期間を延長することができます。最後に、CRYORIG の製品をご購入
していただきましたこと、改めて感謝の意を表します。CRYORIG CPUクーラー によって、すばらしい体験を
提供できましたら幸いです。
JP
Watch Video
Watch Video
Watch VideoWatch Video
Watch Video
Watch Video
Watch Video
Hexagon Pillars
Hexagon Pillars
Mounting Bar
Thumb
Screws Caps
AMD Mounting Plate
Thumb
Screws Caps
Backplate
Backplate
Mounting Plate Screws

AMD Mounting Plate
Thumb
Screws Caps
Mounting Plate screws
INTEL LGA 115x
CRYORIG M 9
INSTALL MANUAL
Ultra Fast Installation, Get Started in 4 Minutes.
with Step-By-Step Animated Guide
Watch Video
AMD
01
01 02
01
02 Orientation BOrientation A
02
INTEL
AMD
Watch Video
Watch Video
Watch VideoWatch Video
Watch Video
Watch Video
Watch Video
Hexagon Pillars
Hexagon Pillars
Mounting Bar
Thumb
Screws Caps
Backplate
Backplate
02 03
01
0504
06 07
註冊區 注册区
ENTER YOUR CODE
Enter the serial code found on the back of the
Product Registration Card. Registering your product
will double the warranty period.
NEXT
LOG IN
If you’re already a CRYORIG VIP member please
enter your email and password to log in to your
account.
SIGN UP
PASSWORD
LOG IN
EMAIL
I forgot my password.
Don't have a Registration account? Create one in seconds.
申請帳號 申请账号
電子郵件 电子邮件
密碼 密码
登入完成註冊 登入完成注册
CONGRATULATIONS!
You are now an official CRYORIG VIP member!
We have sent your registration info to your
specified email account.
CONTINUE
SIGN UP
If you’re already a CRYORIG VIP member please
enter your email and password to log in to your
account.
LOG IN
MY PRIMARY PC USAGE IS FOR
GENDER AGE
* COUNTRY OF RESIDENCE
* FULL NAME
* REPEAT PASSWORD
* PASSWORD
SIGN UP
* EMAIL
By clicking Sign up, you agree to Cryorig’s terms & privacy policy.
Already have a Registration account? Login Here.
Get product announcements and updatesand special offers.
性別 性別
電腦用途 计算机用途
年齡 年龄
*居住國家 居住国家
*全名 全名
*重覆密碼 重复密码
*密碼 密码
*郵件 邮件
提交完成註冊 提交完成注册
PRODUCT SUPPORT NEWS REGISTER
LOING SIGN UP
SUBMIT
RIG INFO INPUT
RIG INFORMATION
Number of Case Fans
PSU Brand / PSU Wattage
Case Brand / Case Model
VGA (GPU) Brand / VGA (GPU) Model
Mainboard Brand / Mainboard Model
RAM Size
RAM Brand / RAM Model
CPU Clock / Vcore
CPU Brand / CPU Model
Help us understand yo ur s yste m to impro ve our brand. The f o llo wing informatio n is all e ditable
later in your me mber profi le .
Number of Case Fans
CPU BRAND
CPU BRAND
PRODUCT SUPPORT NEWS REGISTER
LOING SIGN UP
PRODUCT REGISTRATION INFO
Check on y our product re gis tratio n s tatus and find o ut yo ur ex act pro duct w arranty pe riod.
HELLO! WELCOME!
The following is your prod uct regis tration details
Warr ant y St atu sWarr ant y DateSe rial NumberModel NameCol lectio n
REGIST ER NEW PRODUCT
CPU COOLER 11 11-1 111-11 11-11 11 2020-02-12R1 UN IVERSAL
註冊其他產品 注册其他产品
延長3年保固註冊流程說明
延长3年保固注册流程说明
感謝您選擇 CRYORIG 產品! CRYORIG 公司致力於打造最優秀的產品及提供每一位支持者
最完整的使用經驗於服務。因此 CRYORIG 提供消費者,成為我們VIP 會員的機會,且成
為 VIP 會員後即可獲得延長保固的福利!成為 VIP 會員非常簡單,您只需要登入CRYORIG
官網完成產品註冊程序,自動就會成為CRYORIG VIP 會員以及獲得延長保固時間。接下來
的說明將帶領您一步一步完成註冊程序。
TW
感谢您选择 CRYORIG 产品! CRYORIG 公司致力于打造最优秀的产品及提供每一位支持者
最完整的使用经验于服务。因此 CRYORIG 提供消费者,成为我们VIP 会员的机会,且成
为 VIP 会员后即可获得延长保固的福利!成为 VIP 会员非常简单,您只需要登入CRYORIG
官网完成产品注册程序,自动就会成为CRYORIG VIP 会员以及获得延长保固时间。接下来
的说明将带领您一步一步完成注册程序。
CN
用行動裝置掃描 QR CODE,或至CRYORIG 官網按下 REGISTER 選項進入產品註冊區。
登入 CRYORIG 產品註冊區
TW
用行动装置扫描 QR CODE,或至CRYORIG 官网按下 REGISTER 选项进入产品注册区。
登入 CRYORIG 产品注册区
CN
输入保固卡背面的 16 码序号,输入完
后按右下角 NEXT 进入下一步骤。
输入序号
CN
输入账号 / 密码后按下 LOG IN 完成产品
注册。尚未申请账号的用户按下 SIGN UP
跳至下一步骤 04 申请账号。
登入账号
CN
輸入帳號 / 密碼後按下 LOG IN 完成產品
註冊。尚未申請帳號的用戶按下 SIGN UP
跳至下一步驟 04 申請帳號。
登入帳號
TW
輸入保固卡背面的 16 碼序號,輸入完
後按右下角 NEXT 進入下一步驟。
輸入序號
TW
申请账号
CN
输入基本数据,* 为必填项目,请填写
正确的邮件必免收不到注册讯息。输入
完毕后按下 SIGN UP 完成产品注册。
按下 CONTINUE 至下个画面。
恭禧会员注册成功
CN
按下 CONTINUE 至下個畫面。
恭禧會員註冊成功
TW
申請帳號
TW
輸入基本資料,* 為必填項目,請填寫
正確的郵件必免收不到註冊訊息。輸入
完畢後按下 SIGN UP 完成產品註冊。
在此页面编辑设备信息,皆非必填信息
,可于稍后再到 PROFILE 里编辑信息
,按右下角 SUBMIT 跳至下一画面。
编辑个人设备信息 (非必填)
CN
此页面显示注册产品的相关数据,日后
可以到 PROFILE 里查询,下方
REGISTER NEW PRODUCT 按下可注
册其他产品。
产品注册信息
CN
在此頁面編輯設備資訊,皆非必填資訊
,可於稍後再到 PROFILE 裡編輯資訊
,按右下角 SUBMIT 跳至下一畫面。
編輯個人設備資訊 (非必填)
TW
此頁面顯示註冊產品的相關資料,日後
可以到 PROFILE 裡查詢,下方
REGISTER NEW PRODUCT 按下可註
冊其他產品。
產品註冊資訊
TW
CNTW
感謝您選購相容性跟效率最好的CRYORIG快睿科技空冷散熱工藝精華!在接下來的安裝說明
中,我們將以簡易的步驟帶領使用者完成產品安裝。我們建議使用者先行登入
www.cryorig.com瀏覽該產品頁面,獲取最新最詳細的資訊及注意事項。使用者可同時用智
慧型手機掃描各安裝步驟右上角的QR碼,來觀看該步驟之動態示範。在開始安裝您的
CRYORIG快睿科技散熱器之前,我們強烈建議您先將主機板從機殼中取出,且移除所有電源
插頭以確保產品安裝時方便及安全。如果產品或安裝過程產生任何問題,請登入產品FAQ頁面
或電郵support@cryorig.com聯絡客服人員。另外提醒消費者請記得註冊您的產品以獲得產
品延長保固。最後感謝您選購CRYORIG快睿科技產品,希望我們的產品能為您帶來無與倫比
的震撼與體驗!
TW
感谢您选购兼容性跟效率最好的CRYORIG快睿科技空冷散热工艺精华!在接下来的安装说明
中,我们将以简易的步骤带领用户完成产品安装。我们建议使用者先行登入
www.cryorig.com浏览该产品页面,获取最新最详细的信息及注意事项。用户可同时用智能
型手机扫描各安装步骤右上角的QR码,来观看该步骤之动态示范。
在开始安装您的CRYORIG快睿科技散热器之前,我们强烈建议您先将主板从机壳中取出,且
移除所有电源插头以确保产品安装时方便及安全。如果产品或安装过程产生任何问题,请登入
产品FAQ页面或电邮support@cryorig.com联络客服人员。另外提醒消费者请记得注册您的
产品以获得产品延长保固。最后感谢您选购CRYORIG快睿科技产品,希望我们的产品能为您
带来无与伦比的震撼与体验!
CN
01. 以风扇线扣扣于散热器侧边,将风扇扣于散热器前方。 02. 将风扇接头插入主板CPU的风
扇接孔中。 如需挂第二颗风扇,产品包装额外附一组线扣,适用于所有 92 x 25.4 mm的
风扇。
安装风扇
CN
01. 以風扇線扣扣於散熱器側邊,將風扇扣於散熱器前方。02. 將風扇接頭插入主機板的CPU
風扇接孔中。 如需掛第二顆風扇,產品包裝額外附一組線扣,適用於所有 92 x 25.4
mm的風扇。
安裝風扇
TW
01. 在CPU表面上薄涂抹一层导热膏,导热膏涂越薄效能越好。 02. 首先移除前风扇再将散热
器置于CPU上,接着将前后压板螺丝锁紧。
安装散热器
CN
01. 在CPU表面上薄塗抹一層導熱膏,導熱膏塗越薄效能越好。02. 首先移除前風扇再將散熱
器置於CPU上,接著將前後壓板螺絲鎖緊。
安裝散熱器
TW
01. 将背板上的六角螺柱穿过主板背面的
安装孔,以扣具支架置于六角螺柱上,
再以手转螺帽锁紧。 确认 Intel 扣具
支架数字面朝上,且凹处朝向中央的
CPU。 02. 可依照想要的散热器摆放方向
调整 Intel 扣具支架之方向。
安装INTEL扣具支架
CN
01. 將背板上的六角螺柱穿過主機板背面
安裝孔,以扣具支架置於六角螺柱上,
再以手轉螺帽鎖緊。 確認 Intel 扣具
支架數字面朝上,且凹處朝向中央的
CPU。 02. 可依照想要的散熱器擺放方向
調整 Intel 扣具支架之方向。
安裝INTEL扣具支架
TW
将背板上的Intel字样朝上,再将六角螺
柱插入靠内的孔,直到感受到螺柱被扣
住。 六角螺柱应对齐塞入沟槽中。
组合背板
CN
將背板上的Intel字樣朝上,再將六角螺
柱插入靠內的孔,直到感受到螺柱被扣
住。 六角螺柱應對齊塞入溝槽中。
組合背板
TW
将背板上的六角螺柱穿过主板背面的安
装孔,将 AMD 固定框放置在四个螺柱
上, 再以手转螺帽锁紧。
安装AMD固定框
CN
將背板上的六角螺柱穿過主機板背面的
安裝孔,將 AMD 固定框放置在四個螺
柱上, 再以手轉螺帽鎖緊。
安裝AMD固定框
TW
将背板上的AMD字样朝上,再将六角螺
柱插入孔内,直到感受到螺柱被扣住。
六角螺柱应对齐塞入沟槽中。
组合背板
CN
將背板上的AMD字樣朝上,再將六角螺
柱插入孔內,直到感受到螺柱被扣住。
六角螺柱應對齊塞入溝槽中。
組合背板
TW
将 AMD 固定框之螺丝退下,移除主板
配附的固定框 背板与 。
移除 AMD 固定框
CN
將 AMD 固定框之螺絲退下,移除主機
板配附的固定框 背板與 。
移除 AMD 固定框
TW

02 03
ENTER YOUR CODE
Enter the serial code found on the back of the
Product Registration Card. Registering your product
will double the warranty period.
NEXT
LOG IN
If you’re already a CRYORIG VIP member please
enter your email and password to log in to your
account.
SIGN UP
PASSWORD
LOG IN
EMAIL
I forgot my password.
Don't have a Registration account? Create one in seconds.
01
0504
CONGRATULATIONS!
You are now an official CRYORIG VIP member!
We have sent your registration info to your
specified email account.
CONTINUE
06 07
PRODUCT SUPPORT NEWS REGISTER
LOING SIGN UP
SUBMIT
RIG INFO INPUT
RIG INFORMATION
Number of Case Fans
PSU Brand / PSU Wattage
Case Brand / Case Model
VGA (GPU) Brand / VGA (GPU) Model
Mainboard Brand / Mainboard Model
RAM Size
RAM Brand / RAM Model
CPU Clock / Vcore
CPU Brand / CPU Model
Help us understand yo ur s yste m to impro ve our brand. The f o llo wing informatio n is all e ditable
later in your me mber profi le .
Number of Case Fans
CPU BRAND
CPU BRAND
PRODUCT SUPPORT NEWS REGISTER
LOING SIGN UP
PRODUCT REGISTRATION INFO
Check on y our product re gis tratio n s tatus and find o ut yo ur ex act pro duct w arranty pe riod.
HELLO! WELCOME!
The following is your prod uct regis tration details
Warr ant y St atu sWarr ant y DateSe rial NumberModel NameCol lectio n
REGIST ER NEW PRODUCT
CPU COOLER 11 11-1 111-11 11-11 11 2020-02-12R1 UN IVERSAL
INTEL LGA 115x
CRYORIG M 9
INSTALL MANUAL
Ultra Fast Installation, Get Started in 4 Minutes.
PLDE
with Step-By-Step Animated Guide
Z oznaczeniem AMD skierowanym w górę włożyć
sześciokątne kolumny w otwory AMD w tylnej
płycie aż
poczujesz że się zatrzasną. zwró ć
uwagę aby sześciokątna nakrętka była
prawidłowo wło
żona wytłoczenie na płycie tylnej.
Składanie tylnej płyty (backplate)
PL
Watch Video
AMD
01
01 02
01
02 Orientation BOrientation A
02
01.Umieść wentylator na radiatorze i zahacz druty montażowe na radiatorze. 02.Podłącz
wentylator do gniazda CPU FAN na płycie głównej komputera. Je żeli chcesz, możesz kupi ć
i zamontowa
ć drugi wentylator za pomoc ą znajdującego się w zestawie dodatkowego zestawu
drutów montażowych.
Montaż wentylatora
PL
01.Haken Sie die Lüfterklemmen ein und befestigen Sie den Lüfter am CPU-Kühler.
02.Verbinden Sie das Lüfterkabel mit dem CPU-Lüfteranschluss auf dem Motherboard. Für
den Fall, dass Sie einen zweiter Lüfter anbringen möchten, befindet sich ein weiteres
Klemmenset für 92 x 25,4 mm Lüfter im Lieferumfang.
Befestigung des Lüfters
DE
01.Nałóż pastę CRYO na procesorze w kształcie litery X. Nacisk radiatora rozprowadzi past ę.
02.Zdemontuj przedni wentylator a potem umie ść radiator na procesorze i przykr ęć radiator do
poprzeczek mocuj ących.
Montowanie radiatora
PL
01.Tragen Sie eine dünne Schicht der CRYO-Wärmeleitpaste auf die CPU auf. 02.Entfernen
Sie zuerst den Lüfter, platzieren Sie dann den CPU-Kühler auf der CPU und ziehen Sie die
Schrauben der Befestigungsschiene auf der Vorder- und Rückseite fest.
Kühlermontage
DE
Instalacja poprzeczki mocującej radiator
PL
01.Schieben Sie die an der Backplate
befestigten Sechskant-Abstandshalter
durch die Löcher im Motherboard. Setzen
Sie danach die Intel Befestigungsschienen
auf die Sechskant-Abstandshalter und
fixieren Sie diese mit den
Rändelschrauben. Die Intel
Befestigungsschienen müssen in Richtung
CPU vorstehen. 02.Die Ausrichtung der
Befestigungsschienen wirkt sich auf
Montagerichtung des CPU-Kühlers aus.
Befestigungsschiene montieren
DE
01.Przełóż sześciok ątne kolumny poprzez
otwory w płycie tylnej pod płytą główną.
Umieść poprzeczki mocujące Intel na
sześciok ątnych kolumnach a potem nakr ęć
na nie nakr ętki. Upewnić si ę,
że
poprzeczki mocujące dla platformy Intel
skierowane są wypukłą stroną do
procesora. 02.W razie konieczności
zmieni ć uło żenie poprzeczek mocuj ących o
90°. Zmieni to orientacj ę schładzacza
CRYORIG w obudowie.
Z oznaczeniem Intel skierowanym w górę
włożyć sześcioką
tne kolumny w otwory w tylnej
płycie a ż
poczujesz że się zatrzasn
ą. zwróć
uwag ę aby sześciokątna nakrętka była
prawidłowo wło
żona wytłoczenie na płycie
tylnej.
Składanie tylnej płyty (backplate)
PL
Die Backplate muss mit der Intel Markierung
nach oben zeigen. Die Sechskant-Abstandshalter
müssen in die passenden Bereiche der
Backplate einrasten. Vergewissern Sie sich,
dass der Kopf des Sechskant-Abstandshalters
richtig ausgerichtet ist und in die Nut hineinpasst.
Befestigung der Backplate
DE
INTEL
AMD
Die Backplate muss mit der AMD Markierung
nach oben zeigen. Die
Sechskant-Abstandshalter müssen in die
passenden Bereiche der Backplate einrasten.
Vergewissern Sie sich, dass der Kopf des
Sechskant-Abstandshalters richtig ausgerichtet
ist und in die Nut hineinpasst.
Befestigung der Backplate
DE
Przełóż sześciokątne kolumny poprzez
otwory w płycie tylnej pod płyt ą
główn ą.
Umieść ram ę mocuj ącą AMD na
sześciok ątnych kolumnach a potem nakr ęć
na nie nakr ętki.
Instalacja obejmy mocującej radiator AMD
PL
Schieben Sie die an der Backplate
befestigten Sechskant-Abstandshalter
durch die Löcher im Motherboard. Setzen
Sie danach die AMD Befestigungsplatte auf
die Sechskant-Abstandshalter und fixieren
Sie diese mit den Rändelschrauben.
AMD Befestigungsplatte montieren
DE
Vielen Dank, dass Sie sich für ein Produkt aus dem Hause CRYORIG, dem Spezialisten für
innovative High-End-Kühllösungen, entschieden haben. Nachfolgend finden Sie eine
einfache Schritt-für-Schritt-Einbauanleitung, die die Montage mittels des von uns
entwickelten Quick Mount Systems erläutert. Um neueste Produktinformationen zu
bekommen, besuchen Sie vor dem Einbau des Produktes am besten erst unsere
Webseite: www.cryorig.com. Scannen Sie die jeweiligen QR-Codes auf der Anleitung, um
eine interaktive Videoanleitung aufzurufen. Wir empfehlen das Mainboard aus dem
PC-Gehäuse zu entfernen, bevor Sie mit dem eigentlichen Einbau beginnen. Ziehen Sie
auch alle Strom- und Datenkabel ab, um eine sichere und einfache Montage zu
gewährleisten. Sollten Probleme während des Einbauprozesses auftreten, ziehen Sie bitte
den Produkt-FAQ zu Rate oder kontaktieren Sie den Service per E-Mail unter:
support@cryorig.com. Vergessen Sie nicht Ihr neues Produkt zu registrieren, damit Sie von
der verlängerten Garantie profitieren können. Wir wünschen viel Spaß mit dem Produkt!
DE
Dziękujemy za wybranie CRYORIG najbardziej wyrafinowanego i kompatybilnego chłodzenia
powietrzem na rynku! Poprowadzimy Cię teraz przez kilka prostych etapów instalacji
schładzacza CRYORIG z przełomowym systemem szybkiego montażu. Przed monta żem
sprawdź informacje na temat produktu na www.cryorig.com albo po Polsku na
www.proline.pl. Zeskanuj kod QR z opakowania aby otworzyć film instruktarzowy. Przed
instalacją wyłą
cz komputer, odepnij przewody zasilające oraz wyjmij płytę główn ą
z
obudowy. Ułatwi i przy ś
pieszy instalacj ę
. W razie problemów sprawd ź FAQ na stronie, albo
wy ś
lij email na support@cryorig.com lub pomoc@proline.pl. Zachęcamy również do
rejestracji produktu na stronie producenta w celu przedłużenia gwarancji CRYORIG. Mamy
nadziej ę, że będziesz doskonale wspominać czas spędzony z produktami CRYORIG, to
nasz cel!.
PL
Watch Video
Watch Video
Watch VideoWatch Video
Watch Video
Watch Video
Watch Video
Hexagon Pillars
Hexagon Pillars
Mounting Bar
Thumb
Screws Caps
AMD Mounting Plate
Thumb
Screws Caps
Backplate
Backplate
Mounting Plate Screws
JP
JP
EN
SIGN UP
If you’re already a CRYORIG VIP member please
enter your email and password to log in to your
account.
LOG IN
MY PRIMARY PC USAGE IS FOR
GENDER AGE
* COUNTRY OF RESIDENCE
* FULL NAME
* REPEAT PASSWORD
* PASSWORD
SIGN UP
* EMAIL
By clicking Sign up, you agree to Cryorig’s terms & privacy policy.
Already have a Registration account? Login Here.
Get product announcements and updatesand special offers.
PL
EN DE
Anleitung zur Produkt-Registrierung und dreijährigen Garantieverlängerung
Przewodnik rejestracji produktu dla 3 letniej rozszerzonej gwarancji producenta
Danke für Ihr Vertrauen in CRYORIG! Bei CRYORIG steht die Lieferung von Produkten mit höchster
Qualität, besten User-Experience und bestem Service im Vordergrund! Aus diesem Grund bieten wir
Ihnen an, VIP-Kunde zu werden und von der Garantieverlängerung für Ihr CRYORIG-Produkt zu
profitieren. Alles was Sie tun müssen, ist lediglich das erworbene CRYORIG-Produkt online zu
registrieren! Die Registrierung gewährt Ihnen als VIP-Kunden automatisch eine Verlängerung der
Garantiezeit! Nachfolgend können Sie Schritt für Schritt die Registrierung vollenden.
DE
Dzi
ękujemy za wybranie produktu CRYORIG! W CRYORIG wierzymy w dostarczanie produktów
najlepszej jakości oraz świadczenie jedynie doskonałego do świadczenia i usług dla naszych
użytkowników. Dlatego pragniemy dać Ci możliwość zostanie członkiem programu VIP oferując w ten
sposób rozszerzenie gwarancji na produkt CRYORIG! Wszystko co musisz zrobić to zarejestrowanie
si
ę na naszej stronie. Zarejestrowanie produktu automatycznie poświadczy przynależność do
programu VIP i rozszerzy jego gwarancję. Poniższa sekcja poprowadzi Cię krok po kroku przez
procedurę rejestracji produktu CRYORIG.
PL
Nutzen Sie ein mobiles Gerät, um den QR-CODE zu scannen und zur Registrationsseite zu gelangen.
Alternativ können Sie direkt auf www.CRYORIG.com gehen und dort auf REGISTER in der
Navigationsleiste klicken.
Login beim CRYORIG Registrationsbereich
DE
Wykorzystaj swój telefon do zeskanowania powyższego kodu QR Code aby przej
ść bezpośrednio do
obszaru rejestracji albo odwied
ź adres www.cryorig.com i kliknij na napis REGISTER w górnym menu.
Przejdź do obszaru rejestracji
PL
Geschlecht / Płeć Alter / Wiek
*Land / Kraj zamieszkania
*Voller Name / Imię i nazwisko
*Passwort wiederholen / Powtórz hasło
*Passwort / Hasło
*Email
Anmelden / Zapisz się
Mein primärer PC wird verwendet für /
Z komputera zwykle korzystam w celu
Anmeldung
DE
Füllen Sie alle Felder aus, die mit “*”
gekennzeichnet sind. Bitte unbedingt richtige
E-Mail-Adresse angeben, um die
Anmeldebestätigung zu erhalten. Nach dem
Ausfüllen aller Felder, klicken Sie auf
Anmelden.
Zarejestruj się
PL
Wypełnij wszystkie wymagane pola oznaczone
"*" i wpisz poprawny adres e-mail. Dzięki temu
mo ż
na otrzymać potwierdzenie rejestracji. Po
wypełnieniu wszystkich wymaganych
informacji kliknij na Zarejestruj się ("SIGN UP").
Jeden krok. Kliknij kontynuuj ("CONTINUE"),
aby kontynuowa ć.
Gratulacje jesteś członkiem VIP!
PL
Nur noch einmal Klicken, um weiter zu gehen.
Glückwunsch, VIP-Mitglied!
DE
Dieser Schritt ist freiwillig(optional) und kann
im Profil editiert werden. Tragen Sie alle
Informationen zu Ihrem System ein und
klicken Sie auf den Senden-Button.
Systeminformationen eintragen (optional)
DE
Ten krok jest opcjonalny. Zawsze mo ż
esz
pó źniej edytowa ć tą sekcję profilu VIP. Podaj
odpowiednie informacje o swoim komputerze i
kliknij Wy ślij ("SUBMIT") aby przej ść
do
nast ępnej strony.
Podaj informacje o swojej konfiguracji (opcjonalnie)
PL
Diese Seite zeigt Ihnen alle Informationen zu
den bereits registrierten Produkten. Hier
finden Sie auch Produktdetails, wie z.B.
Produkttyp, Produktnamen, Seriennummer,
Garantieablaufdatum und derzeitigen
Garantiestatus.
Informationen zur Produktanmeldung
Ta strona pokazuje informacje o rejestracji
produktu, w tym rodzaj produktu, nazwę
modelu, numerze seryjnym, dacie
wygaśnięcia gwarancji i aktualnym stanie
gwarancji.
Informacje o rejestracji produktu
Tragen Sie den 16-stelligen Code ein, der auf
der mitgelieferten Produkt-Registrierungskarte
zu finden ist. Klicken Sie dann auf weiter.
Code eintragen
DE
Na karcie rejestracyjnej znajduje si
ę 16-to
cyfrowy kod. Wpisz go w sekcji „CRYORIG
Product Registration Card” a nast
ę
pnie
naci
śnij przycisk “NEXT”.
Wprowadź swój kod
PL
Sofern Sie bereits einen CRYORIG VIP
Account haben, loggen Sie sich mit der
E-Mail-Adresse und dem Passwort ein.
Sollten Sie keinen CRYORIG Account haben,
können Sie sich anmelden.
Einloggen
DE
Jeżeli masz już konto CRYORIG VIP wpisz
swój adres e-mail i hasło aby si
ę zalogować.
Jeśli jesteś nowy w CRYORIG nast ępnie kliknij
„SIGN UP” na górze strony.
Zaloguj się do swojego konta
PL
W tym celu należy odkręcić śruby, co
pozwoli na wysuni ęcie płyty tylnej z płyty
głównej.
Usunąć starą płytę tylną spod gniazda
procesora AMD
PL
Schrauben Sie die AMD Bracket-Base ab
und entfernen Sie die Backplate.
Entfernen Sie die AMD Bracket-Base
DE
Product specificaties
| Merk: | Cryorig |
| Categorie: | Processorkoeler |
| Model: | M9i |
Heb je hulp nodig?
Als je hulp nodig hebt met Cryorig M9i stel dan hieronder een vraag en andere gebruikers zullen je antwoorden
Handleiding Processorkoeler Cryorig

9 Juli 2024
9 Juli 2024
Handleiding Processorkoeler
- Processorkoeler Asus
- Processorkoeler Antec
- Processorkoeler Nedis
- Processorkoeler Cooler Master
- Processorkoeler NZXT
- Processorkoeler SilverStone
- Processorkoeler Thermaltake
- Processorkoeler Corsair
- Processorkoeler Enermax
- Processorkoeler Noctua
- Processorkoeler LC-Power
- Processorkoeler CyberPower
- Processorkoeler Be Quiet!
- Processorkoeler Hiberg
- Processorkoeler Middle Atlantic
- Processorkoeler CoolerMaster
- Processorkoeler CM Storm
- Processorkoeler Scythe
Nieuwste handleidingen voor Processorkoeler

9 April 2025
9 April 2025
9 April 2025
27 Maart 2025
4 Maart 2025
25 Februari 2025
25 Februari 2025
25 Februari 2025
5 Februari 2025
10 December 2024