Sony CDX-F5500 Handleiding
Lees hieronder de 📖 handleiding in het Nederlandse voor Sony CDX-F5500 (160 pagina's) in de categorie Entertainment voor in de auto en op het water. Deze handleiding was nuttig voor 47 personen en werd door 2 gebruikers gemiddeld met 4.5 sterren beoordeeld
Pagina 1/160
Operating Instructions
Bedienungsanleitung
Mode d’emploi
Istruzioni per l’uso
Gebruiksaanwijzing
GB
DE
FR
IT
NL
3-261-932-11 (1)
Wichtig!
Bitte nehmen Sie sich etwas Zeit, um den Geräte-Pass vollständig
auszufüllen. Dieser befindet sich auf der hinteren Umschlagseite dieser
Bedienungsanleitung.
Si dichiara che l’apparecchio è stato fabbricato in conformità all’art. 2, Comma 1 del D.M. 28.08.
1995 n. 548.
CDX-F5500
For installation and connections, see the supplied installation/connections manual.
Zur Installation und zum Anschluss siehe die mitgelieferte Installations-/Anschlussanleitung.
En ce qui concerne l’installation et les connexions, consulter le manuel d’installation/
raccordement fourni.
Per l’installazione e i collegamenti, fare riferimento al manuale di istruzioni per
l’installazione e i collegamenti in dotazione.
Zie voor het monteren en aansluiten van het apparaat de bijgeleverde handleiding “Installatie
en aansluitingen”.
© 2004 Sony Corporation
FM/MW/LW Compact Disc Player
FM
/
MW
/
LW
Compact Disc Player

2
Welcome !
Thank you for purchasing this Sony Compact
Disc Player. You can enjoy its various features
even more with:
• MP3 file playback.
• CD-R/CD-RW which can have a session added
can be played (page 7).
• Discs recorded in Multi Session can be played,
depending on the recording method (page 7).
• Optional CD/MD units (both changers and
players)*1.
•ID3 tag*
2 version 1.0, 1.1, 2.2, 2.3 or 2.4
information (displayed when an MP3 file is
played).
• CD TEXT information (displayed when a CD
TEXT disc*3 is played).
•Supplied controller accessory
Card remote commander RM-X115
•Optional controller accessory
Rotary commander RM-X4S
*1 This unit works with Sony products only.
*2 ID3 tag is an MP3 file that contains information
about album name, artist name, track name, etc.
*3 A CD TEXT disc is an audio CD that includes
information such as the disc name, artist name,
and track names. This information is recorded on
the disc.
This label is located on the bottom of the
chassis.

3
Table of Contents
Location of controls . . . . . . . . . . . . . . . . . . . 4
Precautions . . . . . . . . . . . . . . . . . . . . . . . . . . 6
Notes on discs . . . . . . . . . . . . . . . . . . . . . . . . 6
About MP3 files . . . . . . . . . . . . . . . . . . . . . . 7
Getting Started
Resetting the unit. . . . . . . . . . . . . . . . . . . . . . 9
Detaching the front panel . . . . . . . . . . . . . . . 9
Setting the clock . . . . . . . . . . . . . . . . . . . . . 10
CD Player
CD/MD Unit (optional)
Playing a disc. . . . . . . . . . . . . . . . . . . . . . . . 11
Display items. . . . . . . . . . . . . . . . . . . . . . . . 12
Playing tracks repeatedly
— Repeat Play . . . . . . . . . . . . . . . . . . . . 13
Playing tracks in random order
— Shuffle Play . . . . . . . . . . . . . . . . . . . . 13
Labelling a CD
— Disc Memo*. . . . . . . . . . . . . . . . . . . . 14
Locating a disc by name
— List-up* . . . . . . . . . . . . . . . . . . . . . . . 15
* Functions available with optional CD/MD unit
Radio
Storing stations automatically
— Best Tuning Memory (BTM). . . . . . . 15
Receiving the stored stations. . . . . . . . . . . . 16
Storing only the desired stations . . . . . . . . . 16
RDS
Overview of RDS . . . . . . . . . . . . . . . . . . . . 17
Automatic retuning for best reception results
— AF (Alternative Frequencies) . . . . . . 17
Receiving traffic announcements
— TA (Traffic Announcement)/TP
(Traffic Programme) . . . . . . . . . . . . . . . 18
Presetting RDS stations with the AF and TA
setting. . . . . . . . . . . . . . . . . . . . . . . . . . . 19
Tuning in stations by programme type
— PTY (Programme types) . . . . . . . . . . 19
Setting the clock automatically
— CT (Clock Time). . . . . . . . . . . . . . . . 20
Other Functions
Using the rotary commander. . . . . . . . . . . . 21
Adjusting the sound characteristics . . . . . . 22
Quickly attenuating the sound . . . . . . . . . . 22
Changing the sound and display
settings . . . . . . . . . . . . . . . . . . . . . . . . . . 23
Setting the equalizer (EQ3). . . . . . . . . . . . . 24
Setting the Dynamic Soundstage Organizer
(DSO). . . . . . . . . . . . . . . . . . . . . . . . . . . 24
Additional Information
Maintenance . . . . . . . . . . . . . . . . . . . . . . . . 25
Removing the unit. . . . . . . . . . . . . . . . . . . . 26
Specifications . . . . . . . . . . . . . . . . . . . . . . . 27
Troubleshooting . . . . . . . . . . . . . . . . . . . . . 28
Error displays/Messages. . . . . . . . . . . . . . . 29

4
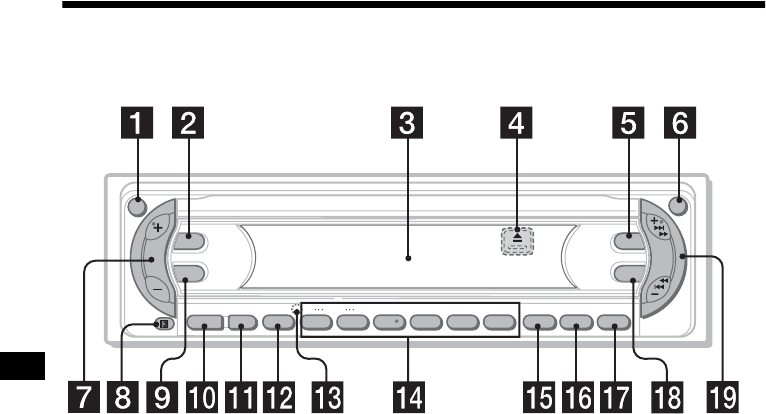
Location of controls
Refer to the pages listed for details.
aATT (attenuate) button 22
bDSPL (display mode change) button
10, 12, 14, 17
cDisplay window
dZ (eject) button (located on the front side
of the unit, behind the front panel) 11
eDSO button 24
fOPEN button 9, 11
gVolume +/– button
hReceptor for the card remote
commander
iSEL (select) button
To select items.
jSOURCE (Power on/Radio/CD/MD)
button
To select the source.
kMODE button
To change the operation.
lOFF (Stop/Power off) button* 9, 11
mRESET button (located on the front side of
the unit, behind the front panel) 9
nNumber buttons 23
Radio:
To store the desired station on each number
button.
CD (MP3 files)/MD:
(1): DISC (ALBUM) – 11
(2): DISC (ALBUM) + 11
(3): REP 13
(4): SHUF 13
oAF/TA button 17, 18, 19
pSENS/BTM button 15, 16, 19
qPTY (programme type)/LIST button
14, 15, 20
rEQ3 button 24
sSEEK +/– button
Radio:
To tune in stations automatically/find a
station manually.
CD (MP3 files)/MD:
To skip tracks/fast-forward, reverse a track.
*Warning when installing in a car without
an ACC (accessory) position on the
ignition switch
After turning off the ignition, be sure to press
and hold (OFF) on the unit until the display
disappears.
Otherwise, the display does not turn off and this
causes battery drain.
DSPL
SEL
DSO
EQ3
ATT
OPEN
SEEK
CDX-F5500
SOURCE MODE
OFF
1 2 3 4 5 6
AF/TA SENS PTY
–+
DISC REP SHUF BTM LIST

6
Precautions
• If your car has been parked in direct sunlight,
allow the unit to cool off before operating it.
• Power aerial will extend automatically while
the unit is operating.
If you have any questions or problems
concerning your unit that are not covered in this
manual, please consult your nearest Sony dealer.
Moisture condensation
On a rainy day or in a very damp area, moisture
condensation may occur inside the lenses and
display of the unit. Should this occur, the unit
will not operate properly. In such a case, remove
the disc and wait for about an hour until the
moisture has evaporated.
To maintain high sound quality
Be careful not to splash juice or other soft drinks
onto the unit or discs.
Notes on discs
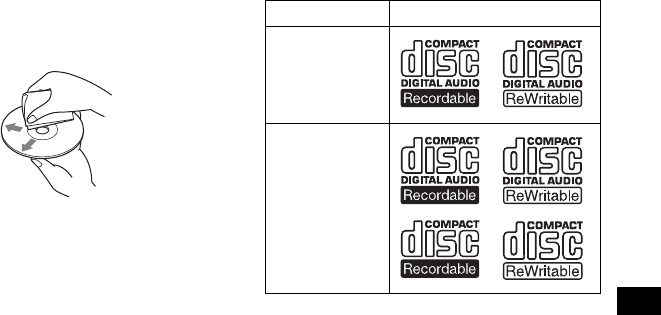
• To keep a disc clean, do not touch its surface.
Handle the disc by its edge.
• Keep your discs in their cases or disc
magazines when not in use.
• Do not subject discs to heat/high temperature.
Avoid leaving them in a parked car or on a
dashboard/rear tray.
• Do not attach labels, or use discs with sticky
ink/residue. Such discs may stop spinning
when used, causing a malfunction, or may ruin
the disc.
• Do not use any discs with labels or stickers
attached.
The following malfunctions may result from
using such discs:
– Inability to eject a disc (due to a label or
sticker peeling off and jamming the eject
mechanism).
– Inability to read audio data correctly (e.g.,
playback skipping, or no playback) due to
heat shrinking of a sticker or label causing a
disc to warp.
• Discs with non-standard shapes (e.g., heart,
square, star) cannot be played on this unit.
Attempting to do so may damage the unit. Do
not use such discs.
• You cannot play 8 cm CDs.

7
• Before playing, clean the discs with a
commercially available cleaning cloth. Wipe
each disc from the centre out. Do not use
solvents such as benzine, thinner, commercially
available cleaners, or antistatic spray intended
for analogue discs.
Music discs encoded with copyright
protection
This product is designed to play back discs that
conform to the Compact Disc (CD) standard.
Recently, various music discs encoded with
copyright protection are marketed by some
record companies. Please be aware that among
those discs, there are some that do not conform to
the CD standard and may not be playable by this
product.
Notes on CD-Rs (recordable CDs)/CD-
RWs (rewritable CDs)
This unit can play the following discs:
• Some CD-Rs/CD-RWs (depending on the
equipment used for its recording or the
condition of the disc) may not play on this unit.
• You cannot play a CD-R/CD-RW that is not
finalized*.
• You can play MP3 files recorded on CD-
ROMs, CD-Rs, and CD-RWs.
• A CD-R/CD-RW to which a session can be
added can be played.
*A process necessary for a recorded CD-R/CD-RW
disc to be played on the audio CD player.
About MP3 files
MP3 (MPEG 1 Audio Layer-3) is a standard
technology and format for compressing a sound
sequence. The file is compressed to about 1/10 of
its original size. Sounds outside the range of
human hearing are compressed while the sounds
we can hear are not compressed.
Notes on discs
You can play MP3 files recorded on CD-ROMs,
CD-Rs, and CD-RWs.
The disc must be in the ISO 9660*1 level 1 or
level 2 format, or Joliet or Romeo in the
expansion format.
You can use a disc recorded in Multi Session*2.
*1 ISO 9660 Format
The most common international standard for
the logical format of files and folders on a
CD-ROM.
There are several specification levels. In
Level 1, file names must be in the 8.3 format
(no more than 8 characters in the name, no
more than 3 characters in the extension
“.MP3”) and in capital letters. Folder names
can be no longer than 8 characters. There can
be no more than 8 nested folder levels. Level
2 specifications allow file names up to 31
characters long.
Each folder can have up to 8 trees.
For Joliet or Romeo in the expansion format,
make sure of the contents of the writing
software, etc.
*2 Multi Session
This is a recording method that enables
adding of data using the Track-At-Once
method. Conventional CDs begin at a CD
control area called the Lead-in and end at an
area called Lead-out. A Multi Session CD is a
CD having multiple sessions, with each
segment from Lead-in to Lead-out regarded
as a single session.
CD-Extra: The format which records audio
(audio CD data) as tracks on session 1, and
records data as tracks on session 2.
Mixed CD: In this format, data is recorded as
track 1, and audio (audio CD data) is recorded
as track 2.
Type of discs Label on the disc
Audio CD
MP3 files
continue to next page t
8
Notes
•With formats other than ISO 9660 level 1 and level 2,
folder names or file names may not be displayed
correctly.
•When naming, be sure to add the file extension
“.MP3” to the file name.
•If you put the extension “.MP3” to a file other than
MP3, the unit cannot recognize the file properly and
will generate random noise that could damage your
speakers.
•The following discs take a longer time to start
playback.
– a disc recorded with complicated tree structure.
– a disc recorded in Multi Session.
– a disc to which data can be added.
Cautions when playing a disc that is recorded in
Multi Session
•When the first track of the first session is audio CD
data:
Only audio CD data of the first track is played back.
Any data in subsequent session is skipped.
•When the first track of the first session is not audio
CD data:
– If an MP3 file is in the disc, only MP3 file(s) is
played back and other data is skipped. (Audio CD
data is not recognized.)
– If no MP3 file is in the disc, “NO MUSIC” is
displayed and nothing is played back. (Audio CD
data is not recognized.)
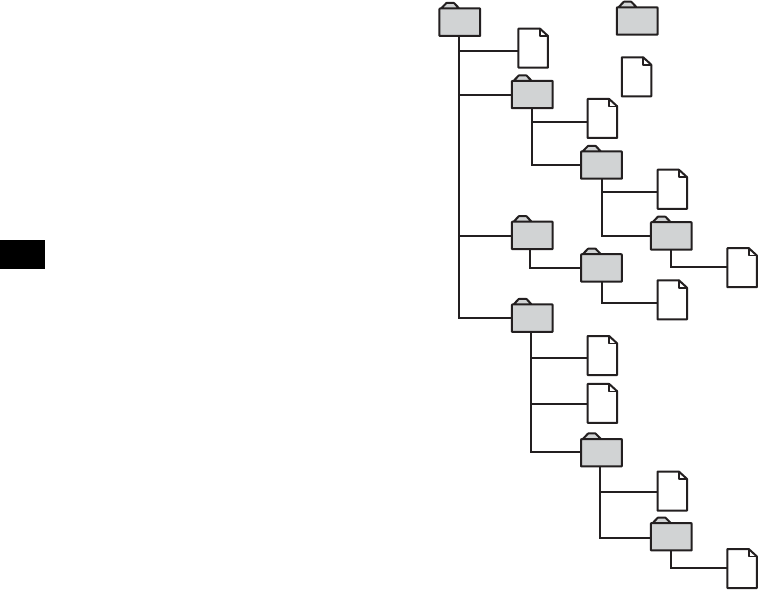
The playback order of the MP3 files
The playback order of the folders and files is as
follows:
Notes
•A folder that does not include an MP3 file is skipped.
•When you insert a disc with many trees, it takes a
longer time to start playback. We recommend that
you make only one or two trees for each disc.
•Maximum folder number: 150 (including root folder
and empty folders)
•The maximum number of MP3 files and folders that
can be contained in a disc: 300
When a file/folder name contains many characters,
this number may become less than 300.
Tip
To specify a desired playback order, before the folder
or file name, input the order by number (e.g., “01,”
“02”), then record contents onto a disc. (The order
differs depending on the writing software.)
1
2
6
3
5
7
1
2
6
7
4
8
3
5
8
4
9
Folder (album)
MP3 file (track)
Tree 1
(root) Tree 2 Tree 4 Tree 5
Tree 3

9
Getting Started
Resetting the unit
Before operating the unit for the first time, or
after replacing the car battery or changing the
connections, you must reset the unit.
Remove the front panel and press the RESET
button with a pointed object, such as a ballpoint
pen.
Note
Pressing the RESET button will erase the clock setting
and some stored contents.
Detaching the front panel
You can detach the front panel of this unit to
protect the unit from being stolen.
Caution alarm
If you turn the ignition switch to the OFF
position without removing the front panel, the
caution alarm will beep for a few seconds.
If you connect an optional amplifier and do not
use the built-in amplifier, the beep sound will be
deactivated.
1Press (OFF)*.
CD/MD playback or radio reception stops
(the key illumination and display remain on).
*If your car has no ACC (accessory) position on
the ignition switch, be sure to turn the unit off by
pressing (OFF) until the display disappears to
avoid car battery drain.
2Press (OPEN), then slide the front
panel to the right, and gently pull out
the left end of the front panel.
Notes
•If you detach the panel while the unit is still turned
on, the power will turn off automatically to prevent
the speakers from being damaged.
•Do not drop or put excessive pressure on the front
panel and its display window.
•Do not subject the front panel to heat/high
temperature or moisture. Avoid leaving it in a parked
car or on a dashboard/rear tray.
Tip
When carrying the front panel with you, use the
supplied front panel case.
RESET button
continue to next page t
1
2

11
CD Player
CD/MD Unit (optional)
In addition to playing a CD with this unit, you
can also control external CD/MD units.
Playing a disc
(With this unit)
1Press (OPEN) and insert the disc
(labelled side up).
2Close the front panel.
Playback starts automatically.
If a disc is already inserted, press (SOURCE)
repeatedly until “CD” appears to start playback.
*Available only when an MP3 file is played.
To skip tracks continuously, press (SEEK) (+) or
(SEEK) (–), then press again within 2 seconds
and hold.
Notes
•Before playing a track, this unit reads all track and
album information on the disc. Depending on the
track structure, it may take more than a minute
before playback begins. During this time, “READ” is
displayed. Play will automatically start when reading
is complete.
•Depending on the condition of the disc, it may not
play back (page 6, 7).
•While the first/last track on the disc is playing, if
(SEEK) (–) or (SEEK) (+) is pressed, playback skips
to the last/first track of the disc.
•When the last track on the disc is over, playback
restarts from the first track of the disc.
•If you play a high-bit rate MP3 file such as 320 kbps,
sound may be intermittent.
(With optional unit)
1Press (SOURCE) repeatedly to select
“CD” or “MD (MS*1).”
2Press (MODE) repeatedly until the
desired unit appears.
Playback starts.
*1 MS: MG Memory Stick System-up Player MGS-X1
*2 Available only when an MP3 file is played.
Cautions when connecting MGS-X1 and MD unit(s)
This unit recognizes MGS-X1 as an MD unit.
•When you want to play MGS-X1, press (SOURCE) to
select “MS” or “MD.” When “MS” appears in the
source display, MGS-X1 starts to play. When “MD”
appears in the source display, press (MODE) to
select “MS,” to start playback.
•When you want to play an MD unit, press (SOURCE)
to select “MD” or “MS.” If your desired MD unit
appears in the source display, it starts to play. If “MS”
or another MD unit appears in the source display,
press (MODE) to select your desired MD unit, to
start playback.
Note when playing back a disc with non-audio CD
data/MP3 file
If a disc with no MP3 files is inserted:
– in the case of this unit, “NO MUSIC” appears in the
display, and the display becomes the clock display
(CD playback stops).
– in the case of an optional MP3 compatible CD unit,
“NO MUSIC” appears in the display and playback of
the next disc starts.
– in the case of an optional CD unit, which is
incompatible with MP3, the disc will play back with
no sound.
Note
With optional unit connected, playback of the same
source will continue on to the optional CD/MD unit.
To Press
Stop playback (OFF)
Eject the disc (OPEN) then Z
Skip tracks
–Automatic
Music Sensor
(SEEK) (–/+)
(./>)
[once for each track]
Fast-forward/
reverse
–Manual Search
(SEEK) (–/+)
(m/M)
[hold to desired point]
Skip albums*
–Albums selection (1)(ALBUM–) or
(2)(ALBUM+)
To Press
Skip discs
–Disc selection (1)(DISC–) or
(2)(DISC+)
[once for each disc]
Skip albums*2
–Albums selection (1)(ALBUM–) or
(2)(ALBUM+)
[hold to desired album]

12
Display items
When the disc/album/track changes, any
prerecorded title*1 of the new disc/album/track is
automatically displayed. (If the A.SCRL (Auto
Scroll) function is set to “ON,” names exceeding
8 characters will be scrolled (page 23).)
*1 When pressing (DSPL), “NO NAME” indicates that
there is no Disc Memo (page 14) or prerecorded
name to display.
*2 Only for CD TEXT discs with the artist name.
*3 Only for MP3 files.
Only track name/artist name/album name in ID3
tag is displayed.
When pressing (DSPL), “NO ID3” indicates that
there is no ID3 tag to display.
Notes
•Some characters cannot be displayed.
•For some CD TEXT discs or ID3 tags with very
many characters, information may not scroll.
•This unit cannot display the artist name for each
track of a CD TEXT disc.
Notes on MP3
•ID3 tag applies only to version 1.0, 1.1, 2.2, 2.3 and
2.4.
•Some characters and signs cannot be displayed
(appear as “ *”). The maximum number of
displayable characters for an album (folder) name/
track (file) is 64 (Romeo) or 32 (Joliet); ID3 tag
30 characters (1.0, 1.1, 2.2 and 2.3) or
126 characters (2.4).
•In the following cases, elapsed playing time may not
be displayed accurately.
– when an MP3 file of VBR (variable bit rate) is
played.
– during fast-forward/reverse.
Tips
•When the A.SCRL (Auto Scroll) function is set to
“OFF” and the disc/album/track is changed, the disc/
album/track name or ID3 tag does not scroll.
•When an MP3 file is played and the album is
changed, the new album number is displayed.
To Press
Switch display item (DSPL)
Displayable items
• Track number/
Elapsed playing time
•Disc name*1/Artist name*2
• Album (folder) name*3
• Track (file) name*1*3
•ID3 tag*3
•Clock
Source

13
Playing tracks repeatedly
— Repeat Play
You can select:
• REP-TRACK — to repeat the current track.
•REP-ALBM*
1 — to repeat the tracks in the
current album.
•REP-DISC*
2 — to repeat the tracks in the
current disc.
*1 Available only when an MP3 file is played.
*2 Available only when one or more optional CD/MD
units are connected.
During playback, press (3) (REP)
repeatedly until the desired setting
appears in the display.
Repeat Play starts.
To return to normal play mode, select
“REP-OFF.”
Playing tracks in random
order
— Shuffle Play
You can select:
• SHUF-ALBM*1 — to play the tracks in the
current album in random order.
• SHUF-DISC — to play the tracks in the current
disc in random order.
• SHUF-CHGR*2 — to play the tracks in the
current optional CD (MD) unit in random
order.
• SHUF-ALL*3 — to play all the tracks in all
connected CD (MD) units (including this unit)
in random order.
*1 Available only when an MP3 file is played.
*2 Available only when one or more optional CD (MD)
units are connected.
*3 Available only when one or more optional CD units,
or two or more optional MD units are connected.
During playback, press (4) (SHUF)
repeatedly until the desired setting
appears in the display.
Shuffle Play starts.
To return to normal play mode, select
“SHUF-OFF.”
Note
“SHUF-ALL” will not shuffle tracks between CD units
and MD units.

14
Labelling a CD
— Disc Memo (For a CD unit with the
CUSTOM FILE function)
You can label each disc with a custom name
(Disc Memo). You can enter up to 8 characters
for a disc. If you label a CD, you can locate the
disc by name (page 15).
1Start playing the disc you want to label
in a CD unit with the CUSTOM FILE
function.
2Press (PTY) (LIST) for 2 seconds.
The unit will repeat the disc during the
labelling procedure.
3Enter the characters.
1Press the volume +/– button to
select the desired character.
A y B y C ... y 0 y 1 y 2 ...
y + y – y * ... y * y A
*(blank space)
2Press (SEL) after locating the
desired character.
The next character flashes.
3Repeat steps 1 and 2 to enter the
entire name.
4To return to normal play mode, press
(PTY) (LIST) for 2 seconds.
Tips
•Simply overwrite or enter “ ” to correct or erase a
character.
•You can label CDs on a unit without the CUSTOM
FILE function if that unit is connected along with a
CD unit that has the function. The Disc Memo will be
stored in the memory of the CD unit with the
CUSTOM FILE function.
Note
REP-TRACK/SHUF play is suspended until the name
edit is complete.
Viewing the Disc Memo
As a display item, the Disc Memo always takes
priority over any original CD TEXT information.
Tip
Other items can be displayed (page 12).
Erasing the Disc Memo
1Press (SOURCE) repeatedly to select
“CD.”
2Press (MODE) repeatedly to select the
CD unit storing the Disc Memo.
3Press (PTY) (LIST) for 2 seconds.
4Press (DSPL) for 2 seconds.
The stored names will appear.
5Press the volume +/– button
repeatedly to select the disc name you
want to erase.
6Press (SEL) for 2 seconds.
The name is erased.
Repeat steps 5 and 6 if you want to erase
other names.
7Press (PTY) (LIST) for 2 seconds.
The unit returns to normal play mode.
Notes
•When the Disc Memo for a CD TEXT disc is erased,
the original CD TEXT information is displayed.
•If you cannot find the Disc Memo you want to erase,
try selecting a different CD unit in step 2.
•If you have already erased all of the Disc Memo, the
unit returns to normal play mode in step 4.
To Press
View (DSPL) during CD/CD
TEXT disc playback

15
Locating a disc by name
— List-up (For a CD unit with the CD TEXT/
CUSTOM FILE function, or an MD unit)
You can use this function for discs that have been
assigned custom names*1 or for CD TEXT
discs*2.
*1 Locating a disc by its custom name: when you
assign a name for a CD (page 14) or an MD.
*2 Locating discs by the CD TEXT information: when
you play a CD TEXT disc on a CD unit with the CD
TEXT function.
1During playback, press (PTY) (LIST).
The name assigned to the current disc appears
in the display.
2Press (PTY) (LIST) repeatedly until
you find the desired disc.
3Press (SEEK) (+) or (SEEK) (–) to play
the disc.
Notes
•Once a disc name has been displayed for 5
seconds, the display goes back to its normal
playback mode.
•If there are no discs in the magazine, “NO DISC”
appears in the display.
•If a disc has not been assigned a custom file, “NO
NAME” appears in the display.
•If the disc information has not been read by the unit,
“NOT READ” appears in the display. To load the
disc, first press the number button, then choose the
disc that has not been loaded.
•The information appears only in upper case. There
are also some letters which cannot be displayed.
Radio
The unit can store up to 6 stations per band
(FM1, FM2, FM3, MW, and LW).
Caution
When tuning in stations while driving, use Best
Tuning Memory to prevent accidents.
Storing stations
automatically
— Best Tuning Memory (BTM)
The unit selects the stations with the strongest
signals within the selected band, and stores them
in the order of their frequency.
1Press (SOURCE) repeatedly to select
the radio.
2Press (MODE) repeatedly to select the
band.
3Press (SENS) (BTM) for 2 seconds.
The unit stores stations in the order of their
frequencies on the number buttons.
A beep sounds when the setting is stored.
Notes
•If only a few stations can be received due to weak
signals, some number buttons will retain their former
settings.
•When a number is indicated in the display, the unit
starts storing stations from the one currently
displayed.

16
Receiving the stored stations
1Press (SOURCE) repeatedly to select
the radio.
2Press (MODE) repeatedly to select the
band.
3Press the number button ((1) to (6))
on which the desired station is stored.
If preset tuning does not work
— Automatic tuning/Local Seek Mode
Automatic tuning:
Press (SEEK) (+) or (SEEK) (–) to
search for the station.
Scanning stops when the unit receives a
station. Repeat the operation until the desired
station is received.
Local Seek Mode:
If the automatic tuning stops too
frequently, press (SENS) (BTM)
repeatedly until “LOCAL-ON” appears.
Only the stations with relatively strong
signals will be tuned in.
To cancel the local seek mode, press (SENS)
(BTM) twice when receiving FM.
Note
When receiving MW or LW, to cancel the local seek
mode, press (SENS) (BTM) (“LOCAL-OFF” appears).
Tip
If you know the frequency of the station you want to
listen to, press and hold (SEEK) (+) or (SEEK) (–) to
locate the approximate frequency, then press
(SEEK) (+) or (SEEK) (–) repeatedly to fine adjust to
the desired frequency (manual tuning).
If FM stereo reception is poor
— Monaural Mode
During radio reception, press (SENS)
(BTM) repeatedly until “MONO-ON”
appears.
The sound improves, but becomes monaural
(“ST” disappears).
To return to normal radio reception mode, press
(SENS) (BTM) (“MONO-OFF” appears).
Tip
If FM broadcasts are difficult to hear, set DSO to
“OFF” (page 24).
Storing only the desired
stations
You can manually preset the desired stations on
any chosen number button.
1Press (SOURCE) repeatedly to select
the radio.
2Press (MODE) repeatedly to select the
band.
3Press (SEEK) (+) or (SEEK) (–) to tune
in the station that you want to store.
4Press the desired number button ((1)
to (6)) for 2 seconds until “MEM”
appears.
The number button indication appears in the
display.
Note
If you try to store another station on the same number
button, the previously stored station will be erased.
“LCL” indicator is displayed.
“MONO” indicator is displayed.

17
RDS
Overview of RDS
FM stations with Radio Data System (RDS)
service send inaudible digital information along
with the regular radio programme signal. For
example, one of the following will be displayed
upon receiving a station with RDS capability.
RDS services
RDS data offers you other conveniences, such as:
•Automatic retuning of a programme, helpful
during long-distance drives. — AF t page 17
• Receiving traffic announcements, even
when enjoying another programme/source.
— TA t page 18
• Selecting stations by the type of
programme. — PTY t page 19
• Automatic clock time setting.
— CT t page 20
Notes
•Depending on the country/region, not all of the RDS
functions are available.
•RDS will not work properly if the signal strength too
is weak or if the station you are tuned to is not
transmitting RDS data.
Automatic retuning for best
reception results
— AF (Alternative Frequencies)
The AF function allows the radio to always tune
into the area’s strongest signal for the station you
are listening to.
1Select an FM station (page 15).
2Press (AF/TA) repeatedly until “AF-
ON” appears.
The unit starts searching for an alternative
frequency with a stronger signal in the same
network.
If “NO AF” flashes, the currently tuned
station does not have an alternative frequency.
To cancel the AF function, select “AF, TA-OFF.”
Tips
•If “AF-ON” is selected, traffic announcements are
cancelled. To activate the traffic announcements
with the AF function, select “AF, TA-ON.”
•If you want to change the on/off setting while playing
a CD, press (AF/TA).
To Press
Switch Clock/
Station name (DSPL)
Displayable items
• Radio band
• Function
Displayable items
• Preset number/Station
name (frequency)
•Clock
• RDS data
continue to next page t
Frequencies change automatically.
98.5 MHz
Station
102.5 MHz
96.0 MHz

18
For stations without alternative
frequencies
Press (SEEK) (+) or (SEEK) (–) while
the station name is flashing (within 8
seconds).
The unit starts searching for another
frequency with the same PI (Programme
Identification) data (“PI SEEK” appears).
If the unit cannot find the same PI, the unit
returns to the previously selected frequency.
Staying with one regional programme
When the AF function is on: this unit’s factory
setting restricts reception to a specific region, so
you won’t be switched to another regional station
with a stronger frequency.
If you leave this regional programme’s reception
area or would like to take advantage of the whole
AF function, press (SEL) and (AF/TA)
simultaneously until “REG-OFF” appears.
Note
This function does not work in the United Kingdom
and in some other areas.
Local Link function
(United Kingdom only)
This function enables you to select other local
stations in the area, even if they are not stored on
your number buttons.
1Press the number button ((1) to (6))
that has a local station stored on it.
2Within 5 seconds, press the number
button of the local station again.
3Repeat this procedure until the
desired local station is received.
Receiving traffic
announcements
— TA (Traffic Announcement)/TP (Traffic
Programme)
By activating TA and TP, you can automatically
tune in an FM station broadcasting traffic
announcements. These settings function
regardless of the current FM programme/source,
CD/MD; the unit switches back to the original
source when the bulletin is over.
Press (AF/TA) repeatedly until “TA-
ON” appears.
The unit starts searching for traffic
information stations.
“TP” indicates reception of such stations, and
“TA” flashes during an actual traffic
announcement. The unit will continue
searching for stations available with TP if
“NO TP” is indicated.
To cancel all traffic announcements, select “AF,
TA-OFF.”
Tips
•If “TA-ON” is selected, the AF function is cancelled.
To activate the AF function with traffic
announcements, select “AF, TA-ON.”
•You can also cancel the current announcement by
pressing (SOURCE) or (MODE).
Presetting the volume of traffic
announcements
You can preset the volume level of the traffic
announcements so as not to miss hearing them.
1Press the volume +/– button to adjust
the desired volume level.
2Press (AF/TA) for 2 seconds.
“TA” appears and the setting is stored.
Receiving emergency announcements
If either AF or TA is on, the unit will switch to
emergency announcements, if one comes in
while listening to an FM station or CD/MD.
To Press
Cancel current
announcement (AF/TA)

19
Presetting RDS stations with
the AF and TA setting
When you preset RDS stations, the unit stores
each station’s AF/TA setting (on/off) as well as
its frequency. You can select a different setting
(for AF, TA, or both) for individual preset
stations, or the same setting for all preset
stations. If you preset stations with “AF, TA-ON”
the unit automatically stores stations with the
strongest radio signal.
Presetting the same setting for all
preset stations
1Select an FM band (page 15).
2Press (AF/TA) repeatedly to select
“AF-ON”, “TA-ON” or “AF, TA-ON.”
Note that selecting “AF, TA-OFF” applies to
non-RDS stations as well as RDS stations.
3Press (SENS) (BTM) until “BTM”
flashes.
Presetting different settings for each
preset station
1Select an FM band, and tune in the
desired station (page 15).
2Press (AF/TA) repeatedly to select
“AF-ON”, “TA-ON” or “AF, TA-ON.”
3Press the desired number button ((1)
to (6)) until “MEM” appears.
Repeat from step 1 to preset other stations.
Note
If you want to change the AF/TA setting while you are
playing a CD, press (AF/TA).
Tuning in stations by
programme type
— PTY (Programme types)
You can tune in a station by selecting the type of
programme you would like to listen to.
Note
You cannot use this function in some countries/regions
where no PTY data is available.
Programme types Display
News NEWS
Current Affairs AFFAIRS
Information INFO
Sports SPORT
Education EDUCATE
Drama DRAMA
Culture CULTURE
Science SCIENCE
Varied VARIED
Popular Music POP M
Rock Music ROCK M
Easy Listening EASY M
Light Classical LIGHT M
Classical CLASSICS
Other Music Type OTHER M
Weather WEATHER
Finance FINANCE
Children’s Programmes CHILDREN
Social Affairs SOCIAL A
Religion RELIGION
Phone In PHONE IN
Travel TRAVEL
Leisure LEISURE
Jazz Music JAZZ
Country Music COUNTRY
National Music NATION M
Oldies Music OLDIES
Folk Music FOLK M
Documentary DOCUMENT
continue to next page t
20
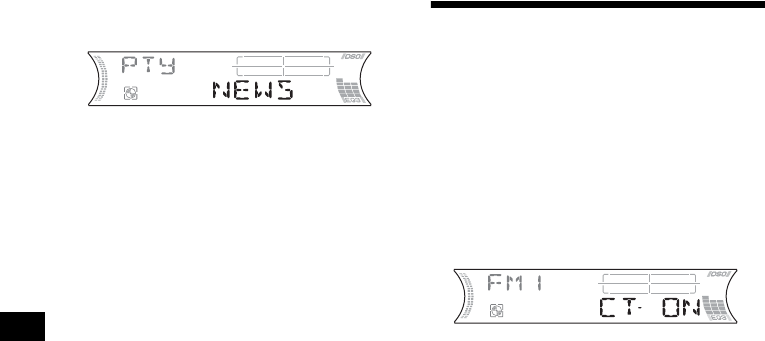
1Press (PTY) (LIST) during FM
reception.
The current programme type name appears if
the station is transmitting the PTY data.
“--------” appears if the received station is not
an RDS station, or if the RDS data is not
received.
2Press (PTY) (LIST) repeatedly until the
desired programme type appears.
The programme types appear in the order
shown in the table.
“NONE” appears if the programme type is
not specified in the RDS data.
3Press (SEEK) (+) or (SEEK) (–).
The unit starts searching for a station
broadcasting the selected programme type.
Setting the clock
automatically
— CT (Clock Time)
The CT data from the RDS transmission sets the
clock automatically.
Selecting “CT-ON”
During radio reception, press (SEL)
and (2) simultaneously.
The clock is set.
After one second, the display returns to
normal radio reception mode.
To select “CT-OFF,” press (SEL) and (2)
simultaneously again.
Notes
•The CT function may not work even though an RDS
station is being received.
•There might be a difference between the time set by
the CT function and the actual time.

21
Other Functions
You can also control the unit (and optional CD/
MD units) with a rotary commander (optional).
Using the rotary commander
First, attach the appropriate label depending on
how you want to mount the rotary commander.
The rotary commander works by pressing
buttons and/or rotating controls.
By pressing buttons
By rotating the control
Rotate and release to:
– Skip tracks.
To continuously skip tracks, rotate once and
rotate again within 2 seconds and hold the
control.
– Tune in stations automatically.
Rotate, hold, and release to:
– Fast-forward/reverse a track.
– Find a station manually.
By pushing in and rotating the control
Push in and rotate the control to:
– Receive preset stations.
– Change discs during CD (MD) playback*1.
– Change albums*3.
*1 Only if the corresponding optional equipment is
connected.
*2 If your car has no ACC (accessory) position on the
ignition key switch, after turning off the ignition, be
sure to press and hold (OFF) until the display
disappears.
*3 Available only when an MP3 file is played.
Press To
(SOURCE) Change the source
(Radio/CD/MD*1)/Power on
(MODE) Change operation
(Radio band/CD unit*1/MD
unit*1)
(ATT) Attenuate the sound
(OFF)*2Stop playback or radio
reception/Power off
(SEL) Adjust and select
(DSPL) Change the display item
SEL
DSPL
MODE
SEL
DSPL
MODE
OFF
(ATT)
(SEL)
(SOURCE)
(DSPL)
(MODE)
(OFF)
Rotate the VOL control
to adjust the volume.
continue to next page t
SEEK/AMS
control
PRESET/DISC
control

22
When an MP3 file is played, you can select an
album using the rotary commander.
(With this unit)
(With optional unit)
Changing the operative direction
The operative direction of controls is factory-set
as shown below.
If you need to mount the rotary commander on
the right hand side of the steering column, you
can reverse the operative direction.
Press (SEL) for 2 seconds while
pushing the VOL control.
Adjusting the sound
characteristics
You can adjust the balance, fader, low pass filter
and subwoofer volume.
1Press (SEL) repeatedly until “BAL,”
“FAD,” “LPF” or “SUB” appears.
Each time you press (SEL), the item changes
as follows:
LOW*1 t MID*1 t HI*1 t
BAL (left-right) t FAD (front-rear) t
LPF (low pass filter)*2*3 t
SUB (subwoofer volume)*2*4
*1 When EQ3 is activated (page 24).
*2 When “SUB” is selected (page 23).
*3 The cut off frequency is adjustable to 78 Hz,
125 Hz, or OFF.
*4 The volume level is adjustable between –10 to
+10 steps. (Below –10, “ATT” is displayed.)
2Press the volume +/– button to adjust
the selected item.
Note
Adjust within 3 seconds after selecting the item.
Quickly attenuating the
sound
Press (ATT).
After “ATT-ON” momentarily appears,
“ATT” appears in the display.
To restore the previous volume level, press
(ATT) again.
Tip
When the interface cable of a car telephone is
connected to the ATT lead, the unit decreases the
volume automatically when a telephone call comes in
(Telephone ATT function).
To Do this
Skip albums
–Album selection Push in and rotate [once for
each album] the control.
To continuously skip
albums, push in and rotate
(and hold) the control.
To Do this
Skip discs
–Disc selection Push in and rotate [once for
each disc] the control.
To continuously skip discs,
push in and rotate once and
rotate again within
2 seconds (and hold) the
control.
Skip albums
–Album selection 1To enter Album selection
mode, push in, then rotate
and hold the control.
Within 2 seconds,
proceed to step 2.
2Push in, then rotate
quickly and repeatedly, to
skip albums one by one.
To increase
To decrease

24
Setting the equalizer (EQ3)
You can select an equalizer curve for 7 music
types (XPLOD, VOCAL, CLUB, JAZZ, NEW
AGE, ROCK, CUSTOM, and OFF (equalizer
OFF)).
You can store a different equalizer setting for
each source.
Selecting the equalizer curve
1Press (SOURCE) to select a source
(Radio, CD or MD).
2Press (EQ3) repeatedly to select the
desired equalizer curve.
Each time you press (EQ3), the item
changes.
To cancel the equalizing effect, select “OFF.”
Adjusting the equalizer curve
You can store and adjust the equalizer settings
for different tone ranges.
1Press (SOURCE) to select a source
(Radio, CD or MD).
2Press (EQ3) repeatedly to select the
desired equalizer curve.
3Adjusting the equalizer curve.
1Press (SEL) repeatedly to select the
desired tone range.
Each time you press (SEL), the tone range
changes.
LOW t MID t HI (t BAL t FAD t
LPF t SUB)
2Press the volume +/– button
repeatedly to adjust to the desired
volume level.
The volume level is adjustable by 1 dB
steps from –10 dB to +10 dB.
3Repeat step 1 and 2 to adjust the
equalizer curve.
To restore the factory-set equalizer curve,
press (SEL) for 2 seconds.
After 1 second, the display returns to
normal play mode.
Note
When EQ3 is set to “OFF,” you cannot adjust the
equalizer settings.
Setting the Dynamic
Soundstage Organizer (DSO)
If your speakers are installed into the lower part
of the doors, the sound will come from below
and may not be clear.
The DSO (Dynamic Soundstage Organizer)
function creates a more ambient sound as if there
were speakers above the dashboard (virtual
speakers).
You can store the DSO setting for each source.
DSO mode and image of virtual speakers
*1 DSO-1
*2 DSO-2
*3 DSO-3
*4 DSO-OFF
1Press (SOURCE) to select a source
(Radio, CD or MD).
2Press (DSO) repeatedly until the
desired DSO setting appears.
Each time you press (DSO), the DSO setting
changes.
To cancel the DSO function, select “DSO-
OFF.” After 1 second, the display returns to
normal play mode.
Notes
•Depending on the type of car interior or type of
music, DSO may not have a desirable effect.
•If FM broadcasts are difficult to hear, set DSO to
“OFF”.
*3
*2
*1
*4
*4
*3
*2
*1

26
Removing the unit
1Remove the protection collar.
1Detach the front panel (page 9).
2Engage the release keys together
with the protection collar.
3Pull out the release keys to remove
the protection collar.
2Remove the unit.
1Insert both release keys together
until they click.
2Pull the release keys to unseat the
unit.
3Slide the unit out of the mounting.
Orient the release
key correctly.
Face the hook
inwards.

28
Troubleshooting
The following checklist will help you remedy
problems you may encounter with your unit.
Before going through the checklist below, check
the connection and operating procedures.
General
No sound.
• Press the volume + button to adjust the
volume.
• Cancel the ATT function.
• Set the fader control to the centre position for
a 2-speaker system.
• You tried to play back MP3 files with an
optional CD unit which is incompatible with
MP3.
tPlay back with a Sony MP3 compatible
CD unit, such as the CDX-T70MX.
The contents of the memory have been
erased.
• The RESET button has been pressed.
tStore again into the memory.
• The power lead or battery has been
disconnected.
• The power connecting lead is not connected
properly.
No beep sound.
• The beep sound is cancelled (page 23).
• An optional power amplifier is connected
and you are not using the built-in amplifier.
The display disappears from/does not
appear in the display window.
• The display disappears if you press and hold
(OFF).
tPress and hold (OFF) again until the
display appears.
• Remove the front panel and clean the
connectors. For details, see “Cleaning the
connectors” on page 25.
Stored stations and correct time are erased.
The fuse has blown.
Makes noise when the ignition key is in the
ON, ACC, or OFF position.
The leads are not matched correctly with the
car’s accessory power connector.
No power is being supplied to the unit.
• Check the connection. If everything is in
order, check the fuse.
• The car does not have an ACC position.
tPress (SOURCE) (or insert a disc) to turn
on the unit.
The power is continuously supplied to the
unit.
The car does not have an ACC position.
The power aerial does not extend.
The power aerial does not have a relay box.
CD/MD playback
A disc cannot be loaded.
• Another CD is already loaded.
• The CD has been forcibly inserted upside
down or in the wrong way.
Playback does not begin.
• Defective MD or dirty CD.
• CD-R/CD-RW that is not finalized.
• You tried to play back a CD-R/CD-RW not
designed for audio use.
• Some CD-Rs/CD-RWs may not play due to
its recording equipment or the disc
condition.
MP3 files cannot be played back.
• Recording was not performed according to
the ISO 9660 level 1 or level 2 format, or the
Joliet or Romeo in the expansion format.
• The file extension “.MP3” is not added to the
file name.
• Files are not stored in MP3 format.
MP3 files take longer to play back than
others.
The following discs take a longer time to start
playback.
–a disc recorded with complicated tree
structure.
–a disc recorded in Multi Session.
–a disc to which data can be added.
A disc is automatically ejected.
The ambient temperature exceeds 50°C.
The operation buttons do not function.
CD will not be ejected.
Press the RESET button.
The sound skips from vibration.
• The unit is installed at an angle of more than
45°.
• The unit is not installed in a sturdy part of
the car.
The sound skips.
Dirty or defective disc.
Cannot turn off the “--------” indication.
You entered the name edit mode.
tPress (PTY) (LIST) for 2 seconds.

29
Error displays/Messages
Radio reception
Preset tuning is not possible.
• Store the correct frequency in the memory.
• The broadcast signal is too weak.
The stations cannot be received.
The sound is hampered by noises.
• Connect a power aerial control lead (blue) or
accessory power supply lead (red) to the
power supply lead of a car’s aerial booster.
(Only when your car has built-in FM/MW/
LW aerial in the rear/side glass.)
• Check the connection of the car aerial.
• The auto aerial will not go up.
tCheck the connection of the power aerial
control lead.
• Check the frequency.
• When the DSO mode is on, the sound is
sometimes hampered by noises.
tSet the DSO mode to “OFF” (page 24).
Automatic tuning is not possible.
• The local seek mode is set to “ON.”
tSet the local seek mode to “OFF”
(page 16).
• The broadcast signal is too weak.
tPerform manual tuning.
The “ST” indication flashes.
• Tune in the frequency accurately.
• The broadcast signal is too weak.
tSet the monaural reception mode to
“ON” (page 16).
A programme broadcast in stereo is heard
in monaural.
The unit is in monaural reception mode.
tCancel monaural reception mode
(page 16).
RDS
The SEEK starts after a few seconds of
listening.
The station is non-TP or has weak signal.
tPress (AF/TA) repeatedly until “AF, TA-
OFF” appears.
No traffic announcements.
• Activate “TA.”
• The station does not broadcast any traffic
announcements despite being TP.
tTune in another station.
PTY displays “--------.”
• The current station is not an RDS station.
• RDS data has not been received.
Error displays
(For this unit and optional CD/MD changers)
The following indications will flash for about
5 seconds, and an alarm sound will be heard.
BLANK*1
No tracks have been recorded on an MD.*2
tPlay an MD with recorded tracks on it.
ERROR*1
• A CD is dirty or inserted upside down.*2
tClean or insert the CD correctly.
• A CD/MD cannot play because of some
problem.
tInsert another CD/MD.
FAILURE
The connection of speakers/amplifiers is
incorrect.
tSee the installation guide manual of this
model to check the connection.
HI TEMP
The ambient temperature is more than 50°C.
tWait until the temperature goes down
below 50°C.
NO DISC
No disc is inserted in the CD/MD unit.
tInsert discs in the CD/MD unit.
NO MAG
The disc magazine is not inserted in the CD
unit.
tInsert the magazine in the CD unit.
NO MUSIC
A CD which is not a music file is inserted in
the MP3 playable CD unit.
tInsert a music CD in the MP3 playable CD
unit.
NOTREADY
The lid of the MD unit is open or the MDs are
not inserted properly.
tClose the lid or insert the MDs properly.
OFFSET
There may be an internal malfunction.
tCheck the connection. If the error
indication remains on in the display,
consult your nearest Sony dealer.
RESET
The CD/MD unit cannot be operated because
of some problem.
tPress the RESET button on the unit.
continue to next page t

2
Willkommen!
Danke, dass Sie sich für diesen CD-Player von
Sony entschieden haben. Sie haben folgende
zusätzliche Möglichkeiten, um die vielfältigen
Funktionen des Geräts noch besser nutzen zu
können:
• Wiedergabe von MP3-Dateien.
• Wiedergabe von CD-Rs/CD-RWs, zu denen
eine Sitzung hinzugefügt werden kann
(Seite 7).
• Wiedergabe von Multi-Session-CDs je nach
Aufnahmeverfahren (Seite 8).
• Gesondert erhältliche CD/MD-Geräte
(Wechsler und Player)*1.
•ID3-Tag*
2-Informationen, Version 1.0, 1.1, 2.2,
2.3 oder 2.4 (werden bei der Wiedergabe einer
MP3-Datei angezeigt).
• CD TEXT-Informationen (werden bei der
Wiedergabe einer CD mit CD TEXT*3
angezeigt).
•Mitgeliefertes Bedienungszubehör
Kartenfernbedienung RM-X115
•Gesondert erhältliches
Bedienungszubehör
Joystick RM-X4S
*1 Dieses Gerät arbeitet nur zusammen mit Sony-
Produkten.
*2 Ein ID3-Tag ist eine MP3-Datei, die Informationen
wie die Namen von Alben, Interpreten, Titeln usw.
enthält.
*3 Eine CD mit CD TEXT ist eine Audio-CD, die
Informationen wie den Namen der CD, den Namen
des Interpreten und die Namen der Titel enthält.
Diese Daten sind auf der CD aufgezeichnet.
Dieses Etikett befindet sich an der Unterseite
des Gehäuses.

3
Inhalt
Lage und Funktion der Teile und
Bedienelemente . . . . . . . . . . . . . . . . . . . . 4
Sicherheitsmaßnahmen . . . . . . . . . . . . . . . . . 6
Hinweise zu CDs. . . . . . . . . . . . . . . . . . . . . . 6
MP3-Dateien . . . . . . . . . . . . . . . . . . . . . . . . . 8
Vorbereitungen
Zurücksetzen des Geräts . . . . . . . . . . . . . . . 10
Abnehmen der Frontplatte. . . . . . . . . . . . . . 10
Einstellen der Uhr . . . . . . . . . . . . . . . . . . . . 11
CD-Player
CD/MD-Gerät (gesondert erhältlich)
Wiedergeben einer CD . . . . . . . . . . . . . . . . 12
Informationen im Display . . . . . . . . . . . . . . 13
Wiederholtes Wiedergeben von Titeln
— Repeat Play . . . . . . . . . . . . . . . . . . . . 14
Wiedergeben von Titeln in willkürlicher
Reihenfolge
— Shuffle Play . . . . . . . . . . . . . . . . . . . . 15
Benennen einer CD
— Disc Memo*. . . . . . . . . . . . . . . . . . . . 15
Ansteuern einer CD/MD anhand des Namens
— List-up* . . . . . . . . . . . . . . . . . . . . . . . 17
*Funktionen, wenn ein zusätzlich erhältliches CD/
MD-Gerät angeschlossen ist
Radio
Automatisches Speichern von Radiosendern
— BTM (Best Tuning Memory). . . . . . . 17
Einstellen gespeicherter Sender. . . . . . . . . . 18
Speichern bestimmter Radiosender . . . . . . . 18
RDS
Übersicht über RDS . . . . . . . . . . . . . . . . . . 19
Automatisches Neueinstellen von Sendern für
optimale Empfangsqualität
— AF (Alternative Frequencies) . . . . . . 19
Empfangen von Verkehrsdurchsagen
— TA (Traffic Announcement)/TP
(Traffic Programme) . . . . . . . . . . . . . . . 20
Speichern von RDS-Sendern zusammen mit
der AF- und TA-Einstellung . . . . . . . . . 21
Einstellen von Sendern nach Programmtyp
— PTY (Programme Types) . . . . . . . . . 21
Automatisches Einstellen der Uhr
— CT (Clock Time). . . . . . . . . . . . . . . . 22
Weitere Funktionen
Der Joystick . . . . . . . . . . . . . . . . . . . . . . . . 23
Einstellen der Klangeigenschaften . . . . . . . 25
Schnelles Dämpfen des Tons . . . . . . . . . . . 25
Wechseln der Klang- und
Anzeigeeinstellungen. . . . . . . . . . . . . . . 25
Einstellen des Equalizers (EQ3) . . . . . . . . . 26
Einstellen der DSO-Funktion
(Dynamic Soundstage Organizer) . . . . . 27
Weitere Informationen
Wartung . . . . . . . . . . . . . . . . . . . . . . . . . . . 27
Ausbauen des Geräts. . . . . . . . . . . . . . . . . . 29
Technische Daten . . . . . . . . . . . . . . . . . . . . 31
Störungsbehebung. . . . . . . . . . . . . . . . . . . . 32
Fehleranzeigen/Meldungen. . . . . . . . . . . . . 34
4
Lage und Funktion der Teile und Bedienelemente
Näheres finden Sie auf den angegebenen Seiten.
aTaste ATT (Dämpfen des Tons) 25
bTaste DSPL (Ändern des
Anzeigemodus) 11, 13, 16, 19
cDisplay
dTaste Z (Auswerfen) (befindet sich an der
Vorderseite des Geräts hinter der Frontplatte)
12
eTaste DSO 27
fTaste OPEN 10, 12
gLautstärketaste +/–
hEmpfänger für die
Kartenfernbedienung
iTaste SEL (Auswählen)
Zum Auswählen von Optionen.
jTaste SOURCE (Einschalten/Radio/
CD/MD)
Zum Auswählen der Tonquelle.
kTaste MODE
Zum Wechseln des Betriebsmodus.
lTaste OFF (Stopp/Ausschalten)*
10, 12
mRücksetztaste (befindet sich an der
Vorderseite des Geräts hinter der Frontplatte)
10
nZahlentasten 26
Radio:
Zum Speichern der gewünschten Sender auf
den einzelnen Zahlentasten.
CD (MP3-Dateien)/MD:
(1): DISC (ALBUM) – 13
(2): DISC (ALBUM) + 13
(3): REP 14
(4): SHUF 15
oTaste AF/TA 19, 20, 21
pTaste SENS/BTM 17, 18, 21
qTaste PTY (Programmtyp)/LIST
15, 16, 17, 22
rTaste EQ3 26
sTaste SEEK +/–
Radio:
Zum automatischen/manuellen Einstellen
von Sendern.
CD (MP3-Dateien)/MD:
Zum Überspringen von Titeln/Vorwärts-
bzw. Rückwärtssuchen in einem Titel.
*Warnhinweis zur Installation des Geräts in
einem Auto mit Zündschloss ohne
Zubehörposition ACC oder I
Nachdem Sie die Zündung ausgeschaltet
haben, halten Sie am Gerät unbedingt (OFF)
gedrückt, bis die Anzeige ausgeblendet wird.
Andernfalls wird die Anzeige nicht ausgeschaltet
und der Autobatterie wird Strom entzogen.
DSPL
SEL
DSO
EQ3
ATT
OPEN
SEEK
CDX-F5500
SOURCE MODE
OFF
1 2 3 4 5 6
AF/TA SENS PTY
–+
DISC REP SHUF BTM LIST
7
• Reinigen Sie CDs vor dem Abspielen mit
einem handelsüblichen Reinigungstuch.
Wischen Sie dabei von der Mitte nach außen.
Verwenden Sie keine Lösungsmittel wie
Benzin oder Verdünner und keine
handelsüblichen Reinigungsmittel oder
Antistatiksprays für Schallplatten.
Musik-CDs mit
Urheberrechtsschutzcodierung
Dieses Gerät ist auf die Wiedergabe von CDs
ausgelegt, die dem Compact Disc-Standard (CD)
entsprechen. Seit neuestem bringen einige
Anbieter Musik-CDs mit Kopierschutz auf den
Markt. Beachten Sie bitte, dass einige dieser CDs
nicht dem CD-Standard entsprechen und mit
diesem Produkt möglicherweise nicht
wiedergegeben werden können.
Hinweise zu CD-Rs (bespielbare CDs)/
CD-RWs (wiederbeschreibbare CDs)
Folgende CDs können wiedergegeben werden:
• Je nach dem Gerät, mit dem die CD-R/CD-RW
bespielt wurde, oder dem Zustand der CD-R/
CD-RW selbst ist eine Wiedergabe mit diesem
Gerät nicht in jedem Fall möglich.
• Nicht abgeschlossene* CD-Rs/CD-RWs
können nicht wiedergegeben werden.
• Auf CD-ROMs, CD-Rs und CD-RWs
aufgezeichnete MP3-Dateien können
wiedergegeben werden.
• CD-Rs/CD-RWs, zu denen eine Sitzung
hinzugefügt werden kann, können
wiedergegeben werden.
*Dieser Vorgang ist notwendig, damit eine bespielte
CD-R/CD-RW auf einem Audio-CD-Player
abgespielt werden kann.
CD-Typ Markierung auf der CD
Audio-CD
MP3-Dateien

10
Vorbereitungen
Zurücksetzen des Geräts
Bevor Sie das Gerät zum ersten Mal benutzen
oder wenn Sie die Autobatterie ausgetauscht
haben oder die Verbindungen wechseln, müssen
Sie das Gerät zurücksetzen.
Nehmen Sie die Frontplatte ab und drücken Sie
die Taste RESET mit einem spitzen Gegenstand,
wie z. B. einem Kugelschreiber.
Hinweis
Wenn Sie die Taste RESET drücken, werden die
eingestellte Uhrzeit und einige weitere gespeicherte
Einstellungen gelöscht.
Abnehmen der Frontplatte
Um einem Diebstahl des Geräts vorzubeugen,
kann die Frontplatte abgenommen werden.
Warnton
Wenn Sie den Zündschlüssel in die Position OFF
stellen, ohne die Frontplatte abzunehmen, ertönt
einige Sekunden lang ein Warnton.
Wenn Sie einen gesondert erhältlichen Verstärker
anschließen und den integrierten Verstärker nicht
benutzen, wird der Signalton deaktiviert.
1Drücken Sie (OFF)*.
Die CD/MD-Wiedergabe bzw. der
Radioempfang wird beendet. Die
Tastenbeleuchtung und das Display bleiben
eingeschaltet.
*Wenn Ihr Fahrzeug nicht über ein Zündschloss
mit Zubehörposition (ACC oder I) verfügt, halten
Sie zum Ausschalten des Geräts unbedingt
(OFF) gedrückt, bis die Anzeige ausgeblendet
wird. Andernfalls wird der Autobatterie weiterhin
Strom entzogen.
2Drücken Sie (OPEN), schieben Sie
dann die Frontplatte nach rechts und
ziehen Sie sie an der linken Seite
vorsichtig heraus.
Hinweise
•Wenn Sie die Frontplatte bei eingeschaltetem Gerät
abnehmen, schaltet sich das Gerät automatisch aus,
um eine Beschädigung der Lautsprecher zu
vermeiden.
•Lassen Sie die Frontplatte nicht fallen und drücken
Sie nicht zu stark auf die Frontplatte und das
Display.
•Schützen Sie die Frontplatte vor Hitze bzw. hohen
Temperaturen und vor Feuchtigkeit. Lassen Sie sie
nicht in geparkten Autos, auf dem Armaturenbrett
oder auf der Hutablage liegen.
Tipp
Bewahren Sie die Frontplatte im mitgelieferten
Behälter auf, wenn Sie sie bei sich tragen.
Taste RESET
1
2

14
Hinweise
•Einige Zeichen können nicht angezeigt werden.
•Bei einigen CDs mit außergewöhnlich langem CD
TEXT oder ID3-Tags laufen die Informationen unter
Umständen nicht im Display durch und werden
daher nicht ganz angezeigt.
•Mit diesem Gerät kann der Name des Interpreten
nicht einzeln für jeden Titel einer CD mit CD TEXT
angezeigt werden.
Hinweise zu MP3
•ID3-Tags gibt es nur in Version 1.0, 1.1, 2.2, 2.3 und
2.4.
•Einige Zeichen und Symbole können nicht angezeigt
werden und erscheinen als „*“. Bei einem
Albumnamen (Ordnernamen) bzw. Titelnamen
(Dateinamen) können höchstens 64 (Romeo) bzw.
32 Zeichen (Joliet), bei einem ID3-Tag 30 Zeichen
(1.0, 1.1, 2.2 und 2.3) bzw. 126 Zeichen (2.4)
angezeigt werden.
•Die verstrichene Spieldauer wird in den folgenden
Fällen möglicherweise nicht korrekt angezeigt:
– Eine MP3-Datei mit variabler Bitrate wird
wiedergegeben.
– Ein schneller Vorlauf oder Rücklauf wird
ausgeführt.
Tipps
•Wenn die Funktion A.SCRL (Auto Scroll) auf „OFF“
gesetzt ist und die CD, das Album bzw. der Titel
wechselt, läuft der Name der CD, des Albums bzw.
des Titels oder das ID3-Tag nicht im Display durch.
•Wenn bei der Wiedergabe einer MP3-Datei das
Album gewechselt wird, wird die Nummer des neuen
Albums angezeigt.
Wiederholtes Wiedergeben
von Titeln
— Repeat Play
Sie haben folgende Möglichkeiten:
• REP-TRACK — zum wiederholten
Wiedergeben des aktuellen Titels.
• REP-ALBM*1 — zum wiederholten
Wiedergeben der Titel im aktuellen Album.
• REP-DISC*2 — zum wiederholten
Wiedergeben der Titel auf der aktuellen CD/
MD.
*1 Nur bei Wiedergabe einer MP3-Datei.
*2 Nur verfügbar, wenn mindestens ein gesondert
erhältliches CD/MD-Gerät angeschlossen ist.
Drücken Sie während der Wiedergabe
(3) (REP) so oft, bis die gewünschte
Einstellung im Display erscheint.
Repeat Play beginnt.
Wenn Sie wieder in den normalen
Wiedergabemodus schalten möchten, wählen Sie
„REP-OFF“.

17
Ansteuern einer CD/MD
anhand des Namens
— List-up (bei einem CD-Gerät mit CD TEXT-/
CUSTOM FILE-Funktion oder einem MD-
Gerät)
Sie können diese Funktion bei CDs/MDs
benutzen, für die Sie einen Namen eingegeben
haben*1, oder bei CDs mit CD TEXT*2.
*1 Ansteuern einer CD/MD anhand des
eingegebenen Namens: wenn ein Name für eine
CD (Seite 15) bzw. eine MD gespeichert wurde.
*2 Ansteuern von CDs anhand der CD TEXT-
Informationen: wenn Sie eine CD mit CD TEXT auf
einem CD-Gerät mit CD TEXT-Funktion
wiedergeben.
1Drücken Sie während der Wiedergabe
(PTY) (LIST).
Der Name der aktuellen CD/MD erscheint im
Display.
2Drücken Sie (PTY) (LIST) so oft, bis
die gewünschte CD/MD angezeigt
wird.
3Drücken Sie (SEEK) (+) oder
(SEEK) (–), um die Wiedergabe der CD/
MD zu starten.
Hinweise
•Der Name der CD/MD wird fünf Sekunden lang
angezeigt und danach erscheint im Display wieder
die Anzeige für den normalen Wiedergabemodus.
•Wenn sich keine CDs/MDs im Magazin befinden,
erscheint „NO DISC“ im Display.
•Wenn einer CD/MD kein Name zugewiesen wurde,
erscheint „NO NAME“ im Display.
•Wenn die CD/MD-Informationen vom Gerät nicht
eingelesen wurden, erscheint „NOT READ“ im
Display. Damit die CD/MD eingelesen wird, drücken
Sie die Zahlentaste und wählen Sie dann die
entsprechende CD/MD aus.
•Die Informationen werden ausschließlich in
Großbuchstaben angezeigt. Außerdem gibt es
einige Buchstaben, die nicht angezeigt werden
können.
Radio
Für jeden Frequenzbereich (FM1, FM2, FM3,
MW und LW) können Sie bis zu 6 Sender
speichern.
Achtung
Wenn Sie während der Fahrt Sender einstellen,
sollten Sie die BTM-Funktion verwenden.
Andernfalls besteht Unfallgefahr.
Automatisches Speichern
von Radiosendern
— BTM (Best Tuning Memory)
Das Gerät wählt im ausgewählten
Frequenzbereich die Sender mit den stärksten
Signalen aus und speichert diese in der
Reihenfolge ihrer Frequenzen.
1Drücken Sie mehrmals (SOURCE), um
das Radio auszuwählen.
2Drücken Sie mehrmals (MODE), um
den Frequenzbereich auszuwählen.
3Drücken Sie 2 Sekunden lang (SENS)
(BTM).
Das Gerät speichert die Sender in der
Reihenfolge ihrer Frequenzen auf den
Zahlentasten.
Ein Signalton ist zu hören und die Einstellung
wird gespeichert.
Hinweise
•Wenn aufgrund schwacher Signale nur wenige
Sender in guter Qualität zu empfangen sind, bleiben
auf einigen Stationstasten die vorher gespeicherten
Sender erhalten.
•Wird im Display eine Nummer angezeigt, beginnt
das Gerät beim Speichern von Sendern mit der
angezeigten Nummer.
Product specificaties
| Merk: | Sony |
| Categorie: | Entertainment voor in de auto en op het water |
| Model: | CDX-F5500 |
Heb je hulp nodig?
Als je hulp nodig hebt met Sony CDX-F5500 stel dan hieronder een vraag en andere gebruikers zullen je antwoorden
Handleiding Entertainment voor in de auto en op het water Sony

8 December 2022
7 December 2022
3 December 2022
27 November 2022
18 November 2022
13 November 2022
11 November 2022
6 November 2022
3 November 2022
1 November 2022
Andere handleidingen Sony
4 April 2025
4 April 2025
4 April 2025
4 April 2025
4 April 2025
3 April 2025
3 April 2025
3 April 2025
3 April 2025
3 April 2025