Olympia Omega 1630 Handleiding
Lees hieronder de 📖 handleiding in het Nederlandse voor Olympia Omega 1630 (138 pagina's) in de categorie Printer. Deze handleiding was nuttig voor 157 personen en werd door 2 gebruikers gemiddeld met 4.5 sterren beoordeeld
Pagina 1/138

Omega 1630 / 1632
User Manual


Contents
i
1 Introduction
1.1 We Want You to Be a Satisfied Customer ..................................1-2
1.2 SAFETY INFORMATION................................................................1-3
Warning and Precaution Symbols ..............................................1-3
Meaning of Symbols...................................................................1-3
WARNING ..................................................................................1-4
CAUTION ...................................................................................1-5
Precautions for Routine Use.......................................................1-6
1.3 Regulation Notices........................................................................1-7
CE Marking (Declaration of Conformity) .....................................1-7
For users in countries subject to Class B regulations.................1-7
For users in countries not subject to Class B regulations...........1-7
Laser Safety ...............................................................................1-7
Internal Laser Radiation .............................................................1-8
For European Users ...................................................................1-8
For Denmark Users ....................................................................1-9
For Finland, Sweden Users ........................................................1-9
For Norway Users.....................................................................1-10
Laser Safety Label....................................................................1-10
Ozone Release.........................................................................1-11
Acoustic Noise..........................................................................1-11
1.4 Explanation of Manual Conventions .........................................1-12
1.5 Explanation of Basic Concepts and Symbols ..........................1-13
Paper Feeding ..........................................................................1-13
“Width” and “Length”.................................................................1-14
Paper Orientation .....................................................................1-14
2 Precaution
2.1 Installation Precautions................................................................2-2
Installation Site ...........................................................................2-2
Power Source .............................................................................2-2
Space Requirements..................................................................2-3
2.2 Operation Precautions..................................................................2-4
Operating Environment...............................................................2-4
Proper Use .................................................................................2-4
Transporting the Machine...........................................................2-5
Care of Machine Supplies ..........................................................2-5
2.3 Legal Restrictions on Copying ....................................................2-6
3 Before Making Copies
3.1 Available Features ........................................................................3-2

Contents
ii
3.2 Components and Their Functions .............................................. 3-3
3.3 Parts Names and Their Functions .............................................. 3-4
Main Unit.................................................................................... 3-4
Inside the Machine..................................................................... 3-5
Adjusting the Angle of the Copy Tray ........................................ 3-6
Options....................................................................................... 3-7
3.4 Control Panel ................................................................................ 3-8
Names of Control Panel Parts and Their Functions................... 3-8
Display Indications ..................................................................... 3-9
3.5 Turning the Machine On/Off and the Initial Mode.................... 3-10
Turning the Machine On/Off..................................................... 3-10
When the Machine is Turned On ............................................. 3-10
Default Settings........................................................................ 3-11
3.6 Useful Functions ........................................................................ 3-12
Panel Resetting........................................................................ 3-12
Auto Panel Reset ..................................................................... 3-12
Energy Save Mode .................................................................. 3-12
Auto Copy Start........................................................................ 3-13
Auto Tray Switching ................................................................. 3-13
3.7 Copy Paper.................................................................................. 3-14
Paper Specifications ................................................................ 3-14
Precautions for Loading Paper ................................................ 3-14
Unsuitable Paper ..................................................................... 3-15
Loading Paper.......................................................................... 3-16
3.8 Loading Originals ....................................................................... 3-22
Two Ways of Loading the Original........................................... 3-22
Specific Types of Originals ...................................................... 3-22
Loading Originals in the Auto Document Feeder ..................... 3-22
Precautions for Loading Paper Into the Auto
Document Feeder .................................................................... 3-22
Placing the Original on the Original Glass ............................... 3-24
Precautions for Placing the Original on the Original Glass ...... 3-24
Positioning a Sheet Original..................................................... 3-25
Positioning Highly Transparent Originals................................. 3-26
3.9 Checking the Machine Status.................................................... 3-28
Checking the Machine Status .................................................. 3-28
3.10 Print Area .................................................................................... 3-30
4 Making Copies
4.1 Making a Basic Copy.................................................................... 4-2
4.2 Selecting the Paper ...................................................................... 4-4

Contents
iii
Manual Paper Selection .............................................................4-4
Selecting Manually Fed Paper....................................................4-4
4.3 Specifying the Zoom Ratio.........................................................4-10
Zoom Ratio Settings .................................................................4-10
4.4 Adjusting the Image Density......................................................4-12
Image Density Setting ..............................................................4-12
4.5 Making 2in1 Copies.....................................................................4-14
4.6 Finishing Copies .........................................................................4-15
5 Using the Utility Mode
5.1 Utility Mode....................................................................................5-2
5.2 Specifying the Machine Settings .................................................5-2
5.3 Setting Up the Paper Sources....................................................5-12
5.4 Specifying User Management Settings
(“USER MANAGEMENT” Menu).................................................5-17
5.5 Specifying Copy Settings...........................................................5-18
6 When a Message Appears
6.1 When the Message “PAPER EMPTY” Appears ..........................6-2
Loading Paper into Tray2 (Optional) ..........................................6-4
6.2 When the Message “TONER EMPTY” Appears..........................6-5
6.3 When the Message “D/C LIFE” Appears...................................6-10
6.4 When the Message “PAPER MISFEED” Appears ....................6-13
6.5 When the Message “PAPER JAM” Appears.............................6-16
6.6 When the Message “ORIGINAL DOC. JAM” Appears..............6-19
6.7 When the Message “PAPER SIZE ERROR” Appears ..............6-21
6.8 When the Message “MACHINE TROUBLE” Appears...............6-24
6.9 What Does Each Message Mean? .............................................6-25
6.10 When Incorrect Copies Are Produced ......................................6-26
6.11 The machine is not functioning as designed ...........................6-29
7 Miscellaneous
7.1 Specifications................................................................................7-2
Auto Document Feeder ..............................................................7-3
Paper Feed Cassette..................................................................7-3
7.2 Care of the Machine......................................................................7-4

Contents
iv
Cleaning..................................................................................... 7-4
7.3 Function Combination Matrix ...................................................... 7-6
Conditions for Combined Functions ........................................... 7-6
7.4 Paper Size and Zoom Ratio Tables............................................. 7-7
Paper Sizes................................................................................ 7-7
Zoom Ratios............................................................................... 7-8

Introduction Chapter 1
1
1Introduction

1.2 SAFETY INFORMATION 1
1-3
Introduction Chapter 1
1.2 SAFETY INFORMATION
This section contains detailed instructions on the operation and maintenance of this
machine. To achieve optimum use of this device, all operators should carefully read
and follow the instructions in this manual. Please keep this manual in a handy place
near the machine.
* Please note that some parts of the contents of this section may not correspond with the purchased
product.
Warning and Precaution Symbols
Meaning of Symbols
Please read the next section before using this device. It contains important information related to user
safety and preventing equipment problems.
Make sure you observe all of the precautions listed in this manual.
Ignoring this warning could cause serious injury or even death.
Ignoring this caution could cause injury or damage to property.
WARNING:
CAUTION:
A triangle indicates a danger against which you should take precaution.
This symbol warns against possible causes of burns.
A diagonal line indicates a prohibited course of action.
This symbol warns against dismantling the device.
A black circle indicates an imperative course of action.
This symbol indicates you must unplug the device.

11.2 SAFETY INFORMATION
1-4
Introduction Chapter 1
WARNING
• Do not modify this product, as a fire, electrical shock, or breakdown could result. If the
product employs a laser, the laser beam source could cause blindness.
• Do not attempt to remove the covers and panels which have been fixed to the product.
Some products have a high-voltage part or a laser beam source inside that could
cause an electrical shock or blindness.
• Use only the power cord supplied in the package. If a power cord is not supplied, only
use the power cord and plug that is specified in POWER CORD INSTRUCTION.
Failure to use this cord could result in a fire or electrical shock.
• Use the power cord supplied in the package only for this machine and NEVER use it
for any other product. Failure to observe this precaution could result in a fire or
electrical shock.
• Use only the specified power source voltage. Failure to do so could result in a fire or
electrical shock.
• Do not use a multiple outlet adapter to connect any other appliances or machines.
Exceeding a power outlet’s current rating could result in a fire or electrical shock.
Do not unplug or plug in the power cord with a wet hand, as an electrical shock could
result.
Plug the power cord all the way into the power outlet. Failure to do this could result in a
fire or electrical shock.
• Do not scratch, abrade, place a heavy object on, heat, twist, bend, pull on, or damage
the power cord. Use of a damaged power cord (exposed core wire, broken wire, etc.)
could result in a fire or breakdown.
Should any of these conditions be found, immediately turn off the machine, unplug
the power cord from the power outlet, and then call your authorized service
representative.
• Avoid using an extension cord. Use of an extension cord could cause a fire or
electrical shock. Contact your authorized service representative if an extension cord
is required.
Do not place a flower vase or other container that contains water, or metal clips or other
small metallic objects on this product. Spilled water or metallic objects dropped inside
the product could result in a fire, electrical shock, or breakdown.
Should a piece of metal, water, or any other similar foreign matter fall inside the product,
immediately turn off the machine, unplug the power cord from the power outlet, and then
call your authorized service representative.
• Do not continue using this product if it becomes unusually hot or if it emits smoke,
unusual odors or noise. Immediately turn off the machine, unplug the power cord from
the power outlet, and then call your authorized service representative. If you continue
using it in this condition, a fire or electrical shock could result.
• Do not continue using this product if it has been dropped or its cover is damaged.
Immediately turn off the machine, unplug the power cord from the power outlet, and
then call your authorized service representative. If you continue using it in this
condition, a fire or electrical shock could result.
Do not throw the toner cartridge or toner into an open flame. The hot toner may scatter
and cause burns or other damage.
Connect the power cord to an electrical outlet that is equipped with a grounding terminal.

1.2 SAFETY INFORMATION 1
1-5
Introduction Chapter 1
CAUTION
• Do not use flammable sprays, liquids, or gases near this product, as a fire could
result.
• Do not leave toner units or drum units within easy reach of children. Licking or
ingesting any of these items could be harmful to your health.
• Do not let any object plug the ventilation holes of this product. Heat could accumulate
inside the product, resulting in a fire or malfunction.
• Do not install this product at a site that is exposed to direct sunlight, or near an air
conditioner or heating apparatus. The resultant temperature changes inside the
product could cause a malfunction, fire, or electrical shock.
• Do not place the product in a dusty place, or a site exposed to soot or steam, near a
kitchen table, bath, or a humidifier. A fire, electrical shock, or breakdown could result.
• Do not place this product on an unstable or tilted bench, or in a location exposed to
excessive vibration and shock. It could drop or fall, causing personal injury or
mechanical breakdown.
• After installing this product, mount it on a secure base. If the unit moves or falls, it
may cause personal injury.
• Do not store toner units and PC drum units near a floppy disk or watch that are
susceptible to magnetism. They could cause these products to malfunction.
The inside of this product has areas subject to high temperature, which may cause
burns. When checking the inside of the unit for malfunctions such as a paper misfeed,
do not touch the areas (around the fusing unit, etc.) that are indicated by a “CAUTION
HOT” caution label.
Do not place any objects around the power plug as the power plug may be difficult to pull
out when an emergency occurs.
The power outlet should be installed near the machine and should be easily accessible
so that the power plug can easily be pulled out if an emergency occurs.
• Always use this product in a well-ventilated location. Operating the product in a poorly
ventilated room for an extended period of time could be harmful to your health.
Ventilate the room at regular intervals.
• When moving this product, be sure to disconnect the power cord and other cables.
Failure to do this could damage the cord or cable, resulting in a fire, electrical shock,
or breakdown.
• When moving this product, always hold it at the areas indicated in the User Manual
and other documents. If the unit falls, it may cause severe personal injuries or the
product may be damaged or malfunction.
• Remove the power plug from the outlet more than once a year and clean the area
between the plug terminals. Dust that accumulates between the plug terminals may
cause a fire.
• When unplugging the power cord, be sure to hold onto the plug. Pulling on the power
cord could damage the cord, resulting in a fire or electrical shock.

11.2 SAFETY INFORMATION
1-6
Introduction Chapter 1
Precautions for Routine Use
• Do not store toner units, PC drum units, and other supplies and consumables in a
place subject to direct sunlight and high temperature and humidity, as poor image
quality and malfunctions could result.
• Do not attempt to replace the toner unit and PC drum unit in a place exposed to direct
sunlight. If the PC drum is exposed to intense light, poor image quality could result.
• Do not unpack a toner unit or PC drum unit until it is to be used. Do not leave a unit
unpacked. Install it immediately, otherwise poor image quality could result.
• Do not keep toner units and PC drum units in an upright position or upside down, as
poor image quality could result.
• Do not throw or drop a toner unit or PC drum unit as poor image quality could result.
• Do not use this product in an area where ammonia or other gases or chemicals are
present. Failure to do so may shorten the service life of the product, cause damage
to it or decrease its performance.
• Do not use this product in an environment with a temperature outside the range
specified in the User Manual, as a breakdown or malfunction could result.
• Do not attempt to feed stapled paper, carbon paper or aluminum foil through this
product, as a malfunction or fire could result.
Do not touch or scratch the surface of the toner unit developing roller and the PC drum,
as poor image quality could result.
Use the supplies and consumables recommended by the dealer. Use of any supply or
consumable not recommended could result in poor image quality and machine
breakdown.

1.3 Regulation Notices 1
1-7
Introduction Chapter 1
1.3 Regulation Notices
CE Marking (Declaration of Conformity)
This product complies with the following EU directives:
89/336/EEC, 73/23/EEC and 93/68/EEC directives.
This declaration is valid for the region of the European Union.
This device must be used with shielded interface cables. The use of non-shielded
cable is likely to result in interference with radio communications and is prohibited
under EU directives.
For users in countries subject to Class B regulations
This device must be used with shielded interface cables. The use of non-shielded
cable is likely to result in interference with radio communications and is prohibited
under CISPR 22 rules and local rules.
For users in countries not subject to Class B regulations
WARNING
This is a Class A product. In a domestic environment, this product may cause radio
interference in which case the user may be required to take adequate measures.
This device must be used with shielded interface cables. The use of non-shielded
cable is likely to result in interference with radio communications and is prohibited
under CISPR 22 rules and local rules.
Laser Safety
This is a digital machine which operates using a laser. There is no possibility of
danger from the laser provided the machine is operated according to the
instructions in this manual.
Since radiation emitted by the laser is completely confined within a protective
housing, the laser beam cannot escape from the machine during any phase of user
operation.
This machine is certified as a Class 1 laser product. In other words, the machine
does not produce hazardous laser radiation.

11.3 Regulation Notices
1-8
Introduction Chapter 1
Internal Laser Radiation
Maximum Average Radiation Power: 36.903 µW at the laser aperture of the print
head unit.
Wavelength: 770-800 nm
This product employs a Class 3b laser diode that emits an invisible laser beam.
The laser diode and the scanning polygon mirror are incorporated in the print head
unit.
The print head unit is NOT A FIELD-SERVICEABLE ITEM.
Therefore, the print head unit should not be opened under any circumstances.
For European Users
This is a semiconductor laser. The maximum power of the laser diode is 15 mW and
the wavelength is 770-800 nm.
CAUTION
Use of controls, adjustments or performance of procedures other than those
specified in this manual may result in hazardous radiation exposure.
Print Head

1.3 Regulation Notices 1
1-9
Introduction Chapter 1
For Denmark Users
Dansk: Dette er en halvlederlaser. Laserdiodens højeste styrke er 15 mW og
bølgelængden er 770-800 nm.
For Finland, Sweden Users
Tämä on puolijohdelaser. Laserdiodin sunrin teho on 15 mW ja aallonpituus on 770-
800 nm.
Det här är en halvledarlaser. Den maximala effekten för laserdioden är 15 mW och
våglängden är 770-800 nm.
ADVARSEL
Usynlig laserstråling ved åbning, når sikkerhedsafbrydere er ude af funktion.
Undgå udsættelse for stråling. Klasse 1 laser produkt der opfylder IEC60825
sikkerheds kravene.
LOUKAN 1 LASERLAITE
KLASS 1 LASER APPARAT
VAROITUS!
Laitteen Käyttäminen muulla kuin tässä käyttöohjeessa mainitulla tavalla saattaa
altistaa käyttäjän turvallisuusluokan 1 ylittävälle näkymättömälle lasersäteilylle.
VARNING!
Om apparaten används på annat sätt än i denna bruksanvisning specificerats,
kan användaren utsättas för osynlig laserstrålning, som överskrider gränsen för
laserklass 1.
VARO!
Avattaessa ja suojalukitus ohitettaessa olet alttiina näkymättömälle
lasersäteilylle. Älä katso säteeseen.
VARNING!
Osynlig laserstrålning när denna del är öppnad och spärren är urkopplad.
Betrakta ej strålen.

11.3 Regulation Notices
1-10
Introduction Chapter 1
For Norway Users
Dette en halvleder laser. Maksimal effekt till laserdiode er 15 mW og bølgelengde
er 770-800 nm.
Laser Safety Label
A laser safety label is attached to the outside of the machine as shown below.
ADVERSEL
Dersom apparatet brukes på annen måte enn spesifisert i denne bruksanvisning,
kan brukeren utsettes for unsynlig laserstråling som overskrider grensen for laser
klass 1.

1.3 Regulation Notices 1
1-11
Introduction Chapter 1
Ozone Release
Acoustic Noise
For European Users
Machine Noise Regulation 3 GSGV, 18.01.1991 : The sound pressure level at the
operator position according to EN 27779 is equal to or less than 70dB(A).
NOTE
= Locate the Machine in a Well-Ventilated Room =
A negligible amount of ozone is generated during normal operation of this
machine. An unpleasant odor may, however, be created in poorly ventilated
rooms during extensive machine operations. For a comfortable, healthy, and safe
operating environment, it is recommended that the room be well ventilated.
REMARQUE
= Placer l’appareil dans une pièce largement ventilée =
Une quantité d’ozone négligable est dégagée pendant le fonctionnement de
l’appareil quand celui-ci est utilisé normalement. Cependant, une odeur
désagréable peut être ressentie dans les pièces dont l’aération est insuffisante et
lorsque une utilisation prolongée de l’appareil est effectuée. Pour avoir la
certitude de travailler dans un environnement réunissant des conditions de
confort, santé et de sécurité, il est préférable de bien aérer la pièce ou se trouve
l’appareil.
11.4 Explanation of Manual Conventions
1-12
Introduction Chapter 1
1.4 Explanation of Manual Conventions
The marks and text formats used in this manual are described below.
WARNING
Failure to observe instructions highlighted in this manner may result in fatal
or critical injuries.
§Observe all warnings in order to ensure safe use of the copier.
CAUTION
Failure to observe instructions highlighted in this manner may result in
serious injuries or property damage.
§Observe all cautions in order to ensure safe use of the copier.
Note*
(*May also appear as “Important” or “Tip”)
Text highlighted in this manner contains useful information and tips to ensure
safe use of the copier.
1The number 1 as formatted here indicates the
first step of a sequence of actions.
2Subsequent numbers as formatted here
indicate subsequent steps of a sequence of
actions.
?Text formatted in this style provides
additional assistance.
§Text formatted in this style describes the
action that will ensure the desired results are achieved.
[Copy] key
The names of keys on the control panel are written as shown above.
An illustration inserted here shows
what operations must be performed.

1.5 Explanation of Basic Concepts and Symbols 1
1-13
Introduction Chapter 1
1.5 Explanation of Basic Concepts and Symbols
The use of words and symbols in this manual are explained below.
Paper Feeding
During printing, paper is supplied from the right side of the copier and fed into the
Copy Tray on top with the printed surface of the page facing down. The paper feed
direction is shown by the arrows in the diagram below.

11.5 Explanation of Basic Concepts and Symbols
1-14
Introduction Chapter 1
“Width” and “Length”
Whenever paper dimensions are mentioned in
this manual, the first value always refers to the
width of the paper (shown as “A” in the
illustration) and the second to the length (shown
as “B”).
A: Width
B: Length
Paper Orientation
Lengthwise ( )
If the width (A) of the paper is shorter than the
length (B), the paper has a vertical or portrait
orientation, indicated by either “L” or .
Crosswise ( )
If the width (A) of the paper is longer than the
length (B), the paper has a horizontal or
landscape orientation, indicated by either “C” or
.

Precaution Chapter 2
2
2Precaution

22.1 Installation Precautions
2-2
Precaution Chapter 2
Observe the following precautions to maintain the machine in its best possible
condition.
2.1 Installation Precautions
Installation Site
To ensure utmost safety and prevent possible malfunctions, install the machine in
a location that meets the following requirements:
-A location away from curtains, etc. that may catch fire and burn easily
-A location that is not exposed to water or other liquids
-A location free from direct sunlight
-A location out of the direct airflow of an air conditioner or heater, and not
exposed to extremely high or low temperatures
-A well-ventilated location
-A location that is not exposed to high humidity
-A location that is not extremely dusty
-A location not subjected to undue vibrations
-A stable and level location
-A location where ammonia or other organic gases are not generated
-A location that does not put the operator in the direct airflow of exhaust from the
machine
-A location that is not near any kind of heating devices
Power Source
The power source requirements are as follows.
GVoltage Fluctuation: AC110 V -10%, AC127 V +6%, or AC220-240 V ±10%
GFrequency Fluctuation: Within ±3Hz
HUse a power source with as few voltage or frequency fluctuations as possible.

22.2 Operation Precautions
2-4
Precaution Chapter 2
2.2 Operation Precautions
Operating Environment
The environmental requirements for correct operation of the machine are as
follows:
GTemperature: 10°C to 30°C (50°F to 86°F) with fluctuations of no more than
10°C (50°F) within an hour
GHumidity: 15% to 85% with fluctuations of no more than 10% within an hour
Proper Use
To ensure the optimum performance of the machine, follow the precautions listed
below:
-Never place heavy objects on the Original Glass or subject it to shocks.
-Never open any machine doors or turn off the machine while it is making copies/
printing, as a paper misfeed could result.
-Never bring any magnetized object, or use flammable sprays or liquids, near the
machine.
Always make sure that the power plug is completely plugged into the electrical
output.
-Always make sure that the machine’s power plug is visible and not hidden by
the machine.
Always unplug the machine from the electrical outlet if the machine is not to be
used for a long period of time.
Always provide good ventilation when making a large number of continuous
copies/printed pages.
CAUTION
A negligible amount of ozone is generated during normal operation of this
machine. An unpleasant odor may, however, be detected in poorly ventilated
rooms during extensive machine operations.
§For a comfortable operating environment, it is recommended that the room be
well ventilated.

2.2 Operation Precautions 2
2-5
Precaution Chapter 2
CAUTION
The area around the Fusing Unit is extremely hot.
§In order to reduce the risk of burns, do not touch any area other than those
indicated in the manual. Be especially careful not to touch parts marked with
warning labels, and their surrounding areas.
Transporting the Machine
If you need to transport the machine over a long distance, consult your service
representative.
Care of Machine Supplies
Use the following precautions when handling the machine supplies (toner, paper,
etc.).
Store the supplies in a location that meets the following requirements:
Free from direct sunlight
Away from any heating apparatus
Not subjected to high humidity Not extremely dusty
Paper that has been removed from its wrapper but not loaded in the machine
should be stored in a sealed plastic bag in a cool, dark place.
-Use only toner that has been manufactured specifically for this machine. Never
use other types of toner.
-Keep all supplies out of the reach of children.
CAUTION
Be careful not to spill toner inside the machine or get toner on your clothes
or hands.
§If your hands become soiled with toner, immediately wash them with soap and
water.

22.3 Legal Restrictions on Copying
2-6
Precaution Chapter 2
2.3 Legal Restrictions on Copying
Certain types of documents must not be copied with the purpose or intent to pass
copies of such documents off as the originals.
The following is not a complete list, but is meant to be used as a guide to
responsible copying.
<Financial Instruments>
GPersonal checks
GTravelers checks
GMoney orders
GCertificates of deposit
GBonds or other certificates of indebtedness
GStock certificates
<Legal Documents>
GFood stamps
GPostage stamps (canceled or uncanceled)
GChecks or drafts drawn by government agencies
GInternal revenue stamps (canceled or uncanceled)
GPassports
GImmigration papers
GMotor vehicle licenses and titles
GHouse and property titles and deeds
<General>
GIdentification cards, badges, or insignias
GCopyrighted works without permission of the copyright owner
In addition, it is prohibited under any circumstances to copy domestic or foreign
currencies, or works of art, without permission of the copyright owner.
When in doubt about the nature of a document, consult with legal counsel.

Before Making Copies Chapter 3
3
3Before Making
Copies

33.1 Available Features
3-2
Before Making Copies Chapter 3
3.1 Available Features
The main copy settings available with this machine are listed below. For details on
their operation, refer to the pages indicated.
Copies
G1-sided copies (p. 4-2)
G2in1 copies (p. 4-14)
Zoom Ratio
GReduced/Full Size/Enlarged
(p. 4-10)
Finishing
GSort (p. 4-15)

33.3 Parts Names and Their Functions
3-4
Before Making Copies Chapter 3
3.3 Parts Names and Their Functions
Main Unit
2
1
3
9
10
11
13
12
4
5
7
8
6
14
No. Part Name Description
1 Original Cover Holds the original against the Original Glass.
2 Original Glass Place your original on this glass to allow the machine to scan it. The
original is to be placed face down. (p. 3-24)

3.3 Parts Names and Their Functions 3
3-5
Before Making Copies Chapter 3
Inside the Machine
3 Front Cover Open when replacing the Toner Cartridge or Drum Cartridge, or
clearing a paper misfeed. (p. 6-5)
4 Tray1 Holds up to 250 sheets of paper and easily adjusts to different paper
sizes.
Special paper can be used. (p. 3-14)
5 Bypass Tray Use for manual feeding of paper.
Holds up to 10 sheets of paper.
Special paper can be used. (p. 3-20)
6 Tray1 door If Legal-size paper is installed, open this door.
7 Copy Tray Holds copies fed out face down from the machine.
The Copy Tray can be adjusted to one of three angles. Adjust the Copy
Tray to the angle appropriate for its application. (p. 3-6)
8 Control Panel Use to start a copy cycle and make necessary settings. (p. 3-8)
9 Exposure Lamp This lamp irradiates the document when it is scanned. The time until the
exposure lamp goes off can be specified. For details on specifying the
setting, refer to “Selecting the “MACHINE SETTING” Menu” on
page 5-3.
10 Original Scales Use to align the original. (p. 3-24)
11 Power Switch Use to turn the machine on and off. (p. 3-10)
12 USB Port For details, refer to the User Manual for the printer controller.
13 Parallel Port For details, refer to the User Manual for the printer controller.
14 Fuser Cover Not used
No. Part Name Description
1
No. Part Name Description
1 Imaging Cartridge Generates the copy image.
The Imaging Cartridge is constructed of both the Drum Cartridge and
the Toner Cartridge set into place.

3.3 Parts Names and Their Functions 3
3-7
Before Making Copies Chapter 3
Options
Auto Document Feeder
Paper Feed Cassette
2
1
5
3
4
No. Part Name Description
1 Document Feeder Tray Load the originals to be scanned face up on this tray.
Up to 50 document sheets can be loaded at one time. (p. 3-23)
2 Document Feeder
Cover (Doc. Feed
Cover)
Open when clearing an original that has been misfed. (p. 6-19)
3 Document Guide Plate Slide the guide plate to the size of the originals. (p. 3-23)
4 Document Exit Tray Receives originals which have been scanned by the machine.
No. Part Name Description
5 Tray2 Holds up to 500 sheets of paper. (p. 3-21)

33.4 Control Panel
3-8
Before Making Copies Chapter 3
3.4 Control Panel
Names of Control Panel Parts and Their Functions
1 2 3 4 5 6 7 8
18 17 16 14 15 14 13 11 12 11 10 9
No. Part Name Description
1 [Utility] key Press to enter Utility mode.
For details, refer to “Using the Utility Mode” on page 5-1.
2 [Printer] key Press to enter Printer mode.
For details, refer to the User Manual for the printer controller.
3 Error lamp The indicator lights up in orange if an error or malfunction occurs.
For details, refer to “When a Message Appears” on page 6-1.
4 Display Shows the number of copies to be made, the zoom ratio, and other
setting date.
5 [No]/[C] key • Press to reset the number of copies to “1”.
• Press to clear the various settings.
• Press to return to the previous screen.
• Press to specify the various settings.
6 [Yes] key • Press to validate the setting just made.
• Press to specify the various settings.
7 10-Key Pad Use to type in the number of copies to be made and any other numeric
date.
8 [Stop] key • Press to stop a print cycle.
• Press to stop a scanning sequence.
• The indicator flashes in orange when the machine is paused or while
copying.
9 [Panel Reset] key Press to reset all copy functions and settings to their defaults.

33.5 Turning the Machine On/Off and the Initial Mode
3-10
Before Making Copies Chapter 3
3.5 Turning the Machine On/Off and the Initial Mode
Turning the Machine On/Off
To turn on the machine:
§Press the | (on) side of the Power
Switch.
To turn off the machine:
§Press the 2 (off) side of the Power
Switch.
Note
Do not turn off the machine while a copy cycle is being performed, as a paper
misfeed will result. Before attempting to turn off the machine, always be sure
that the current copy cycle has been completed.
Turning off the machine will initialize all settings except those for previously
programmed jobs and for the Utility mode.
The machine automatically enters the Energy Save mode 15 min after the last
operation is performed.
The time until the machine enters Energy Save mode can be specified from the
Utility mode. For details, refer to “Specifying the Setting for “ENERGY SAVE
MODE”” on page 5-5 in the chapter “Using the Utility Mode”.
When the Machine is Turned On
When the machine is turned on, the [Start] key indicator lights up in orange to
indicate that the machine is ready to begin copying.
At this time, the machine can be set for the Auto Copy Start function by loading a
document into the Auto Document Feeder or by placing a document on the Original
Glass, and pressing the [Start] key.
Pressing the [Start] key at this time will not immediately start the copy cycle. You
will have to wait for less than 25 seconds (at an ambient temperature of 23°C
(73.4°F)).

3.5 Turning the Machine On/Off and the Initial Mode 3
3-11
Before Making Copies Chapter 3
Default Settings
When the machine is turned on, the Initial mode screen appears in the Display of
the Control Panel. The Initial mode screen appears at the beginning of all
operations.
Factory default settings
GNumber of copies: 1
GImage density: TEXT Auto
GZoom ratio: 100% (full size)
GPaper: Tray1
GFinishing: Non-Sort
Tip
The default settings can be customized from the Utility mode. For details, refer
to “Using the Utility Mode” on page 5-1.
[A]

33.6 Useful Functions
3-12
Before Making Copies Chapter 3
3.6 Useful Functions
Panel Resetting
Press the [Panel Reset] key to return all modes and functions (zoom ratio, number
of copies, etc.) to their defaults. (All selected settings are canceled.)
Tip
The [Panel Reset] key comes in handy for canceling all selected settings at one
time.
To avoid accidentally using settings from the previous copy job, press the [Panel
Reset] key to return all functions and settings to their defaults before specifying
any settings for your current job.
Auto Panel Reset
Even if the [Panel Reset] key is not pressed, the machine automatically resets all
functions and settings to their defaults 1 min after a copy cycle has been completed
or a key operation is performed.
Tip
The length of time before the machine automatically resets itself can be set
between 1 min and 5 min in addition to 30 seconds. The Auto Panel Reset
function can even be disabled.
For details, refer to “Specifying the Setting for “AUTO PANEL RESET”” on
page 5-4.
Energy Save Mode
Instead of turning off the machine, it can be set into a standby state (Energy Save
mode).
If the machine is not used for a set length of time, it will automatically enter the
Energy Save mode. The default length of time is 15 min.
To cancel the Energy Save mode, press any key on the control panel.
Tip
The length of time before the machine enters the Energy Save mode can be set
between 1 min and 240 min.
For details, refer to “Specifying the Setting for “ENERGY SAVE MODE”” on
page 5-5.

3.6 Useful Functions 3
3-13
Before Making Copies Chapter 3
Auto Copy Start
If a document is loaded and the [Start] key is pressed during the period after the
machine has been turned on but before it is ready to make copies, the machine will
automatically start the copy cycle as soon as it completes the warm-up cycle.
Auto Tray Switching
If the tray runs out of paper while printing, the machine will automatically switch to
a different paper source and continue copying provided that the new tray contains
paper of the same type and size in the same orientation.
If the optional Paper Feed Cassette is installed, a maximum of 750 pages can be
continuously printed.
Tray1 → Tray2 (Paper Feed Cassette)
Tray2 (Paper Feed Cassette) → Tray1
Tip
Auto tray switching can be disabled. For details, refer to “Setting Up the Paper
Sources” on page 5-12.

33.7 Copy Paper
3-14
Before Making Copies Chapter 3
3.7 Copy Paper
Paper Specifications
The following table specifies the type and size of paper to be used with each tray
together with its capacity.
* Two tray types are available for Tray2. Select the desired tray type at the time of purchase.
Precautions for Loading Paper
GBe sure to observe the paper specifications (paper type, paper size, and
capacity) for each tray, otherwise a paper misfeed could result.
GWhen paper is loaded into the Bypass Tray, a message appears, indicating that
the paper size be specified. Specify the size and type of paper that is loaded.
Paper loaded into the Bypass Tray is given priority during feeding.
GThe size of FLS is preset to 330 mm × 210 mm. To change the FLS size, contact
a service representative.
Tray1 Specifications
Paper Type • Plain paper, recycled paper (60 g/m 2 to 90 g/m 2)
• Exclusive paper: card (91 g/m 2 to 163 g/m 2), OHP transparencies,
envelopes
Paper Size • A4 L, B5 L, A5 L, 16K L, Legal L, Letter L, Invoice L, FLS (210 mm ×
330 mm)
• Custom Size: Width: 90 mm to 216 mm; length: 140 mm to 356 mm
Capacity • Plain paper, recycled paper: 250 sheets (80 g/m 2)
• Exclusive paper: card; 10 sheets, OHP transparencies; 5 sheets,
envelopes; 1 sheet
Tray2 Specifications
Paper Type Plain paper, recycled paper (60 g/m 2 to 90 g/m 2)
Paper Size A4 L, Letter L*
Capacity 500 sheets (80 g/m 2)
Bypass Tray Specifications
Paper Type • Plain paper, recycled paper (60 g/m 2 to 90 g/m 2)
• Exclusive paper: card (91 g/m 2 to 163 g/m 2), OHP transparencies,
envelopes, label sheets
Paper Size • A4 L, B5 L, A5 L, 16K L, Legal L, Letter L, Invoice L, FLS (210 mm ×
330 mm)
• Custom Size: Width: 90 mm to 216 mm; length: 140 mm to 356 mm
Capacity • Plain paper, recycled paper: 10 sheets (80 g/m 2)
• Exclusive paper: card; 1 sheet, OHP transparencies; 1 sheet,
envelopes; 1 sheet

33.7 Copy Paper
3-16
Before Making Copies Chapter 3
Loading Paper
While loading paper, be sure to observe the following precautions.
GIf the paper is curled, flatten it
before loading it.
GDo not load so much paper that
the top of the stack is higher than
the Ä mark or exceeds the
specified number of sheets.
GPush the paper guides firmly up
against the edges of the paper.
GWhen loading additional paper,
remove any paper remaining in
the drawer, place it on top of the
new paper, and then align the
paper in the stack well before
loading it into the drawer.

33.7 Copy Paper
3-18
Before Making Copies Chapter 3
Loading Paper into Tray1
1Remove the Bypass Tray.
2Load the paper into the tray so that
the front side of the paper (the side
facing up when the package was
unwrapped) faces up.
3Slide the paper guides against the
edges of the paper.
HIf Legal-size paper is installed,
open the door of Tray1.
4Attach the Bypass Tray in its original position.
<When Legal-size paper is installed>

3.7 Copy Paper 3
3-19
Before Making Copies Chapter 3
Note
If paper with a different size or type is loaded, various settings must be specified
from the “PAPER SOURCE SETUP” menu in the Utility mode. If the settings are
not correctly specified, paper size error may occur. For details, refer to
“Specifying the Setting for “TRAY SETTING”” on page 5-16.

33.7 Copy Paper
3-20
Before Making Copies Chapter 3
Loading Paper into the Bypass Tray
1Load the paper so that the front
side of the paper (the side facing
up when the package was
unwrapped) faces up.
2Slide the paper guides against the
edges of the paper.
Note
When paper is loaded into the Bypass Tray, the paper size and type must be
specified, otherwise paper size error may occur. For details, refer to “Specifying
the Size and Type of Manually Fed Paper” on page 4-5.

3.7 Copy Paper 3
3-21
Before Making Copies Chapter 3
Loading Paper into Tray2 (Optional)
1Pull out the drawer for Tray2.
2Remove the drawer cover, and
then press down on the paper-
lifting plate until it locks into place.
3Load the paper into the drawer so
that the front side of the paper (the
side facing up when the package
was unwrapped) faces up.
4Attach the drawer cover, and then return the drawer for Tray2 to its original
position.

33.8 Loading Originals
3-22
Before Making Copies Chapter 3
3.8 Loading Originals
Two Ways of Loading the Original
The original may be loaded in the Auto Document Feeder or placed directly on the
Original Glass. Choose the appropriate method according to the type of the
original.
Specific Types of Originals
Loading Originals in the Auto Document Feeder
The Auto Document Feeder automatically feeds originals one page after another so
that the machine can scan the data on each page. After the machine finishes
scanning the data, the Auto Document Feeder ejects the page into the Exit Tray.
To ensure the best possible performance of the Auto Document Feeder, use only
originals of the specified type.
Precautions for Loading Paper Into the Auto Document Feeder
The following types of originals are not suitable for use in the Auto Document
Feeder, as a misfeed or damaged original could result. Place such types of
originals on the Original Glass.
GTyping paper, paraffin paper, and other thin paper
GCards
GOriginals larger than Legal L or smaller than Invoice
GOHP transparencies, translucent paper
GWrinkled, dog-eared, curled, or torn originals
GClipped or stapled originals
GCoated originals such as carbon-backed paper
GUp to 25 A4-size document pages can be scanned and stored in the memory at
one time. However, if the optional expansion memory is installed, up to 180
scanned pages can be stored.
Original Loading Original Type Original Size
Auto Document
Feeder
Sheet originals
Weight of originals: 35 g/m 2 to 128 g/m 2A4 L, B5 L, A5 L, Legal L to Invoice,
16K L, FLS
• Original width: 138 mm to 216 mm
• Original length: 130 mm to 356 mm
Original Glass Max. weight of sheet originals, books, or
three-dimensional objects: 3 kg
Maximum: Legal

3.8 Loading Originals 3
3-23
Before Making Copies Chapter 3
Loading Originals into the Auto Document Feeder
1Place the stack of originals face up
on the Document Feeder Tray.
Note
A maximum of 50 document
pages can be loaded.
Do not load so many pages that the top of the stack is higher than the ▼
mark.
Be sure to adjust the document guides ainst the edges of so that they are ag
the document, otherwise the document may not be fed in straight.
2Slide the front adjustable
Document Guide Plate to the size
of the originals.
3Specify the desired copy settings.
H“Making Copies” on page 4-1
4Press the [Start] key to start
feeding and copying the originals
from the top page.

3.8 Loading Originals 3
3-27
Before Making Copies Chapter 3
Positioning Books
When copying an open book or magazine, position the original as detailed below.
1Raise the Auto Document Feeder or Original Cover.
2Place the original face down on
the Original Glass.
Note
Do not place books weighing
more than 3 kg on the Original
Glass. In addition, do not press
down extremely hard on the
original, otherwise the
machine may be damaged.
3Position the original on the
Original Glass so that the corner of
the original aligns with the arrow in
the upper-left corner of the
Original Scales.
4Gently lower the Auto Document Feeder or Original Cover.
Note
While scanning a thick book or other three-dimensional object with the Auto
Document Feeder or Original Cover open, do not look directly at the bright
light that may shine through the Original Glass. Although the light that shines
through the Original Glass is bright, it is not a laser beam and, therefore, is
not as dangerous.
5Specify the desired copy settings.
H“Making Copies” on page 4-1
6Press the [Start] key to start the copy cycle.
3.9 Checking the Machine Status 3
3-29
Before Making Copies Chapter 3
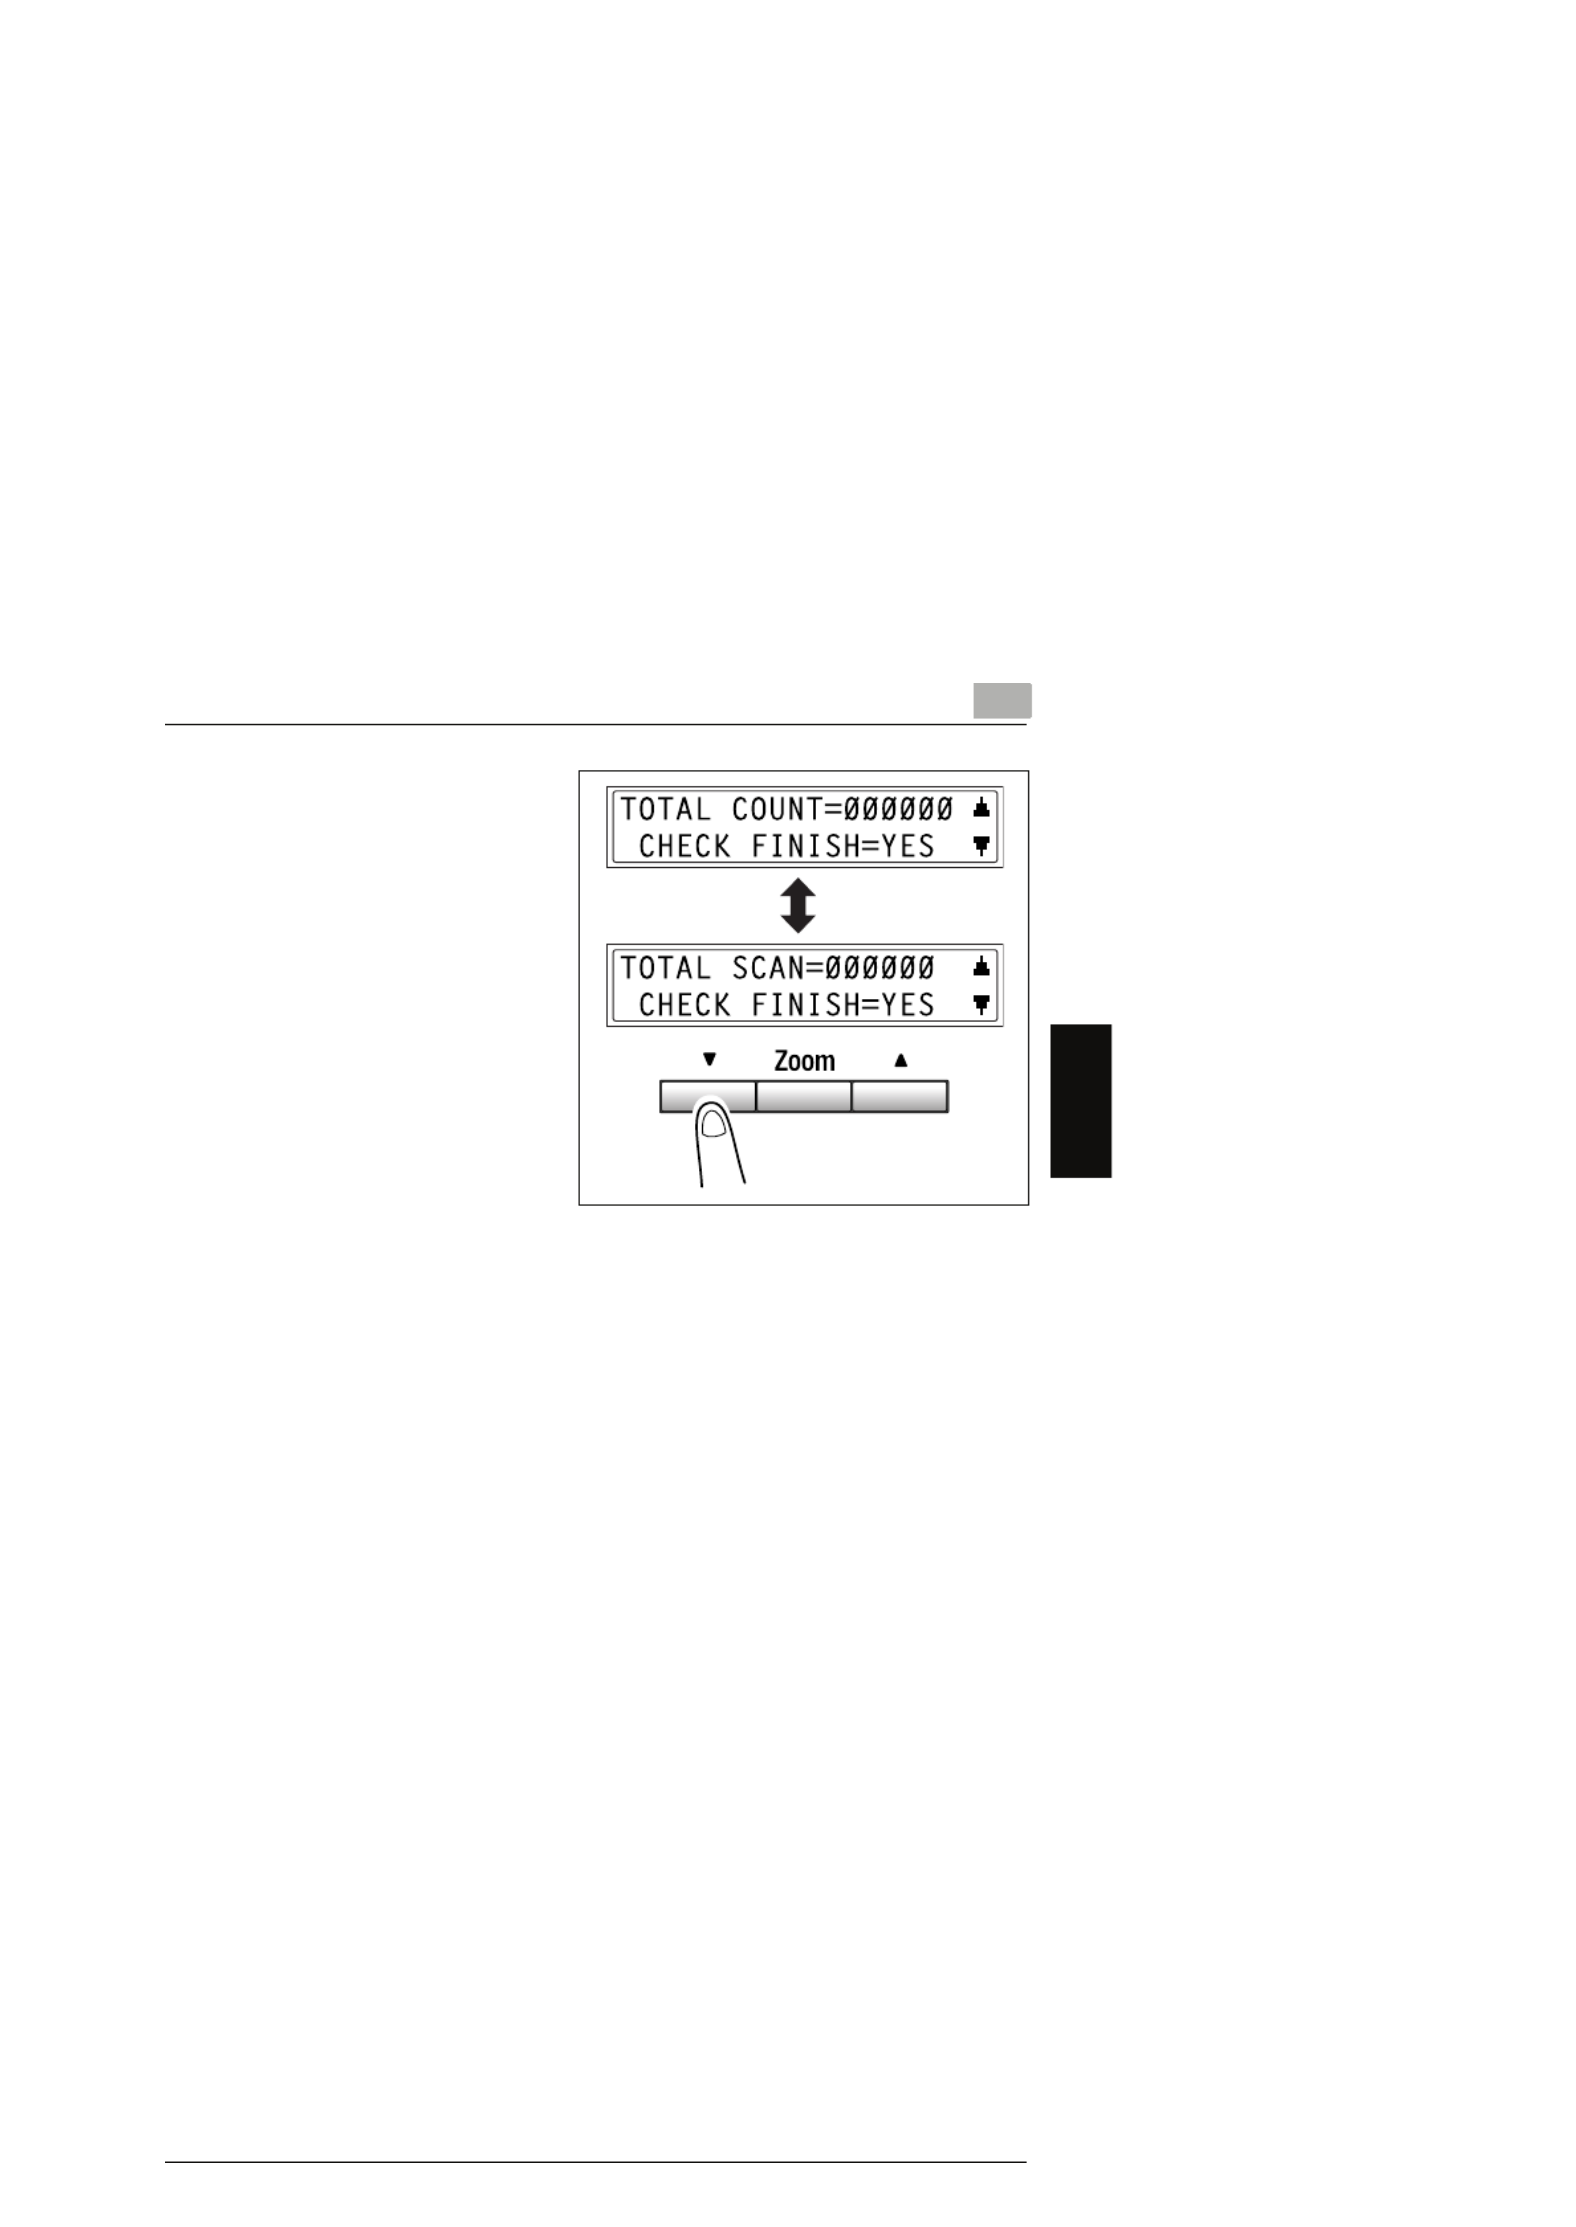
3Press the [▼ ▲] and [ ] keys to
check the “TOTAL COUNT” or
“TOTAL SCAN” values.

33.10 Print Area
3-30
Before Making Copies Chapter 3
3.10 Print Area
Any part of the image within the area indicated below is not copied.
GA margin 4 mm (at full size) from the leading edge of the paper (A)
GA margin 4 mm (at full size) from the trailing edge of the paper (B)
GA margin 4 mm (at full size) on both sides of the paper (C)
For details on using the copier to print from a computer when the printer controller
is installed, refer to the User Manual for the printer controller.
Paper output direction
A: 4 mm (at full size)
B: 4 mm (at full size)
C: 4 mm (at full size)

Making Copies Chapter 4
4
4Making Copies

44.2 Selecting the Paper
4-6
Making Copies Chapter 4
6Press the [ ] and [Ö ] keys or
press the [▼] key to select the size
of paper that is loaded. If
“CUSTOM” is not selected,
continue with step 10.
HIf “CUSTOM” is selected,
perform steps 7 through 10.
Note
If “OHP” was selected in step
4, the only paper sizes that can
be loaded are A4 and Letter.
Tip
Pressing the [ ] and [
Ö
] keys
moves “ ” to select the
paper size.
To return to the previous
message, press the [No] key.
A5
A5
A5
A5A5 B5
B5
B5
B5B5 A4
A4
A4
A4A4
Ö
Ö

44.2 Selecting the Paper
4-8
Making Copies Chapter 4
8Press the [Yes] key.
9Using the 10-Key Pad, enter the
length (Y) of the paper.
Note
The length can range from
140 mm to 356 mm.
10 Press the [Yes] key.
11 Make the other necessary settings.
H“Specifying the Zoom Ratio” on page 4-10
H“Adjusting the Image Density” on page 4-12
12 Using the 10-Key Pad, enter the
number of copies to be made, and
then press the [Start] key.
Tip
To change the number of
copies to be made, remove the
paper from the Bypass Tray and then reload it. Repeat steps 11 and 12.
Yes
140-356
Yes
4.3 Specifying the Zoom Ratio 4
4-11
Making Copies Chapter 4
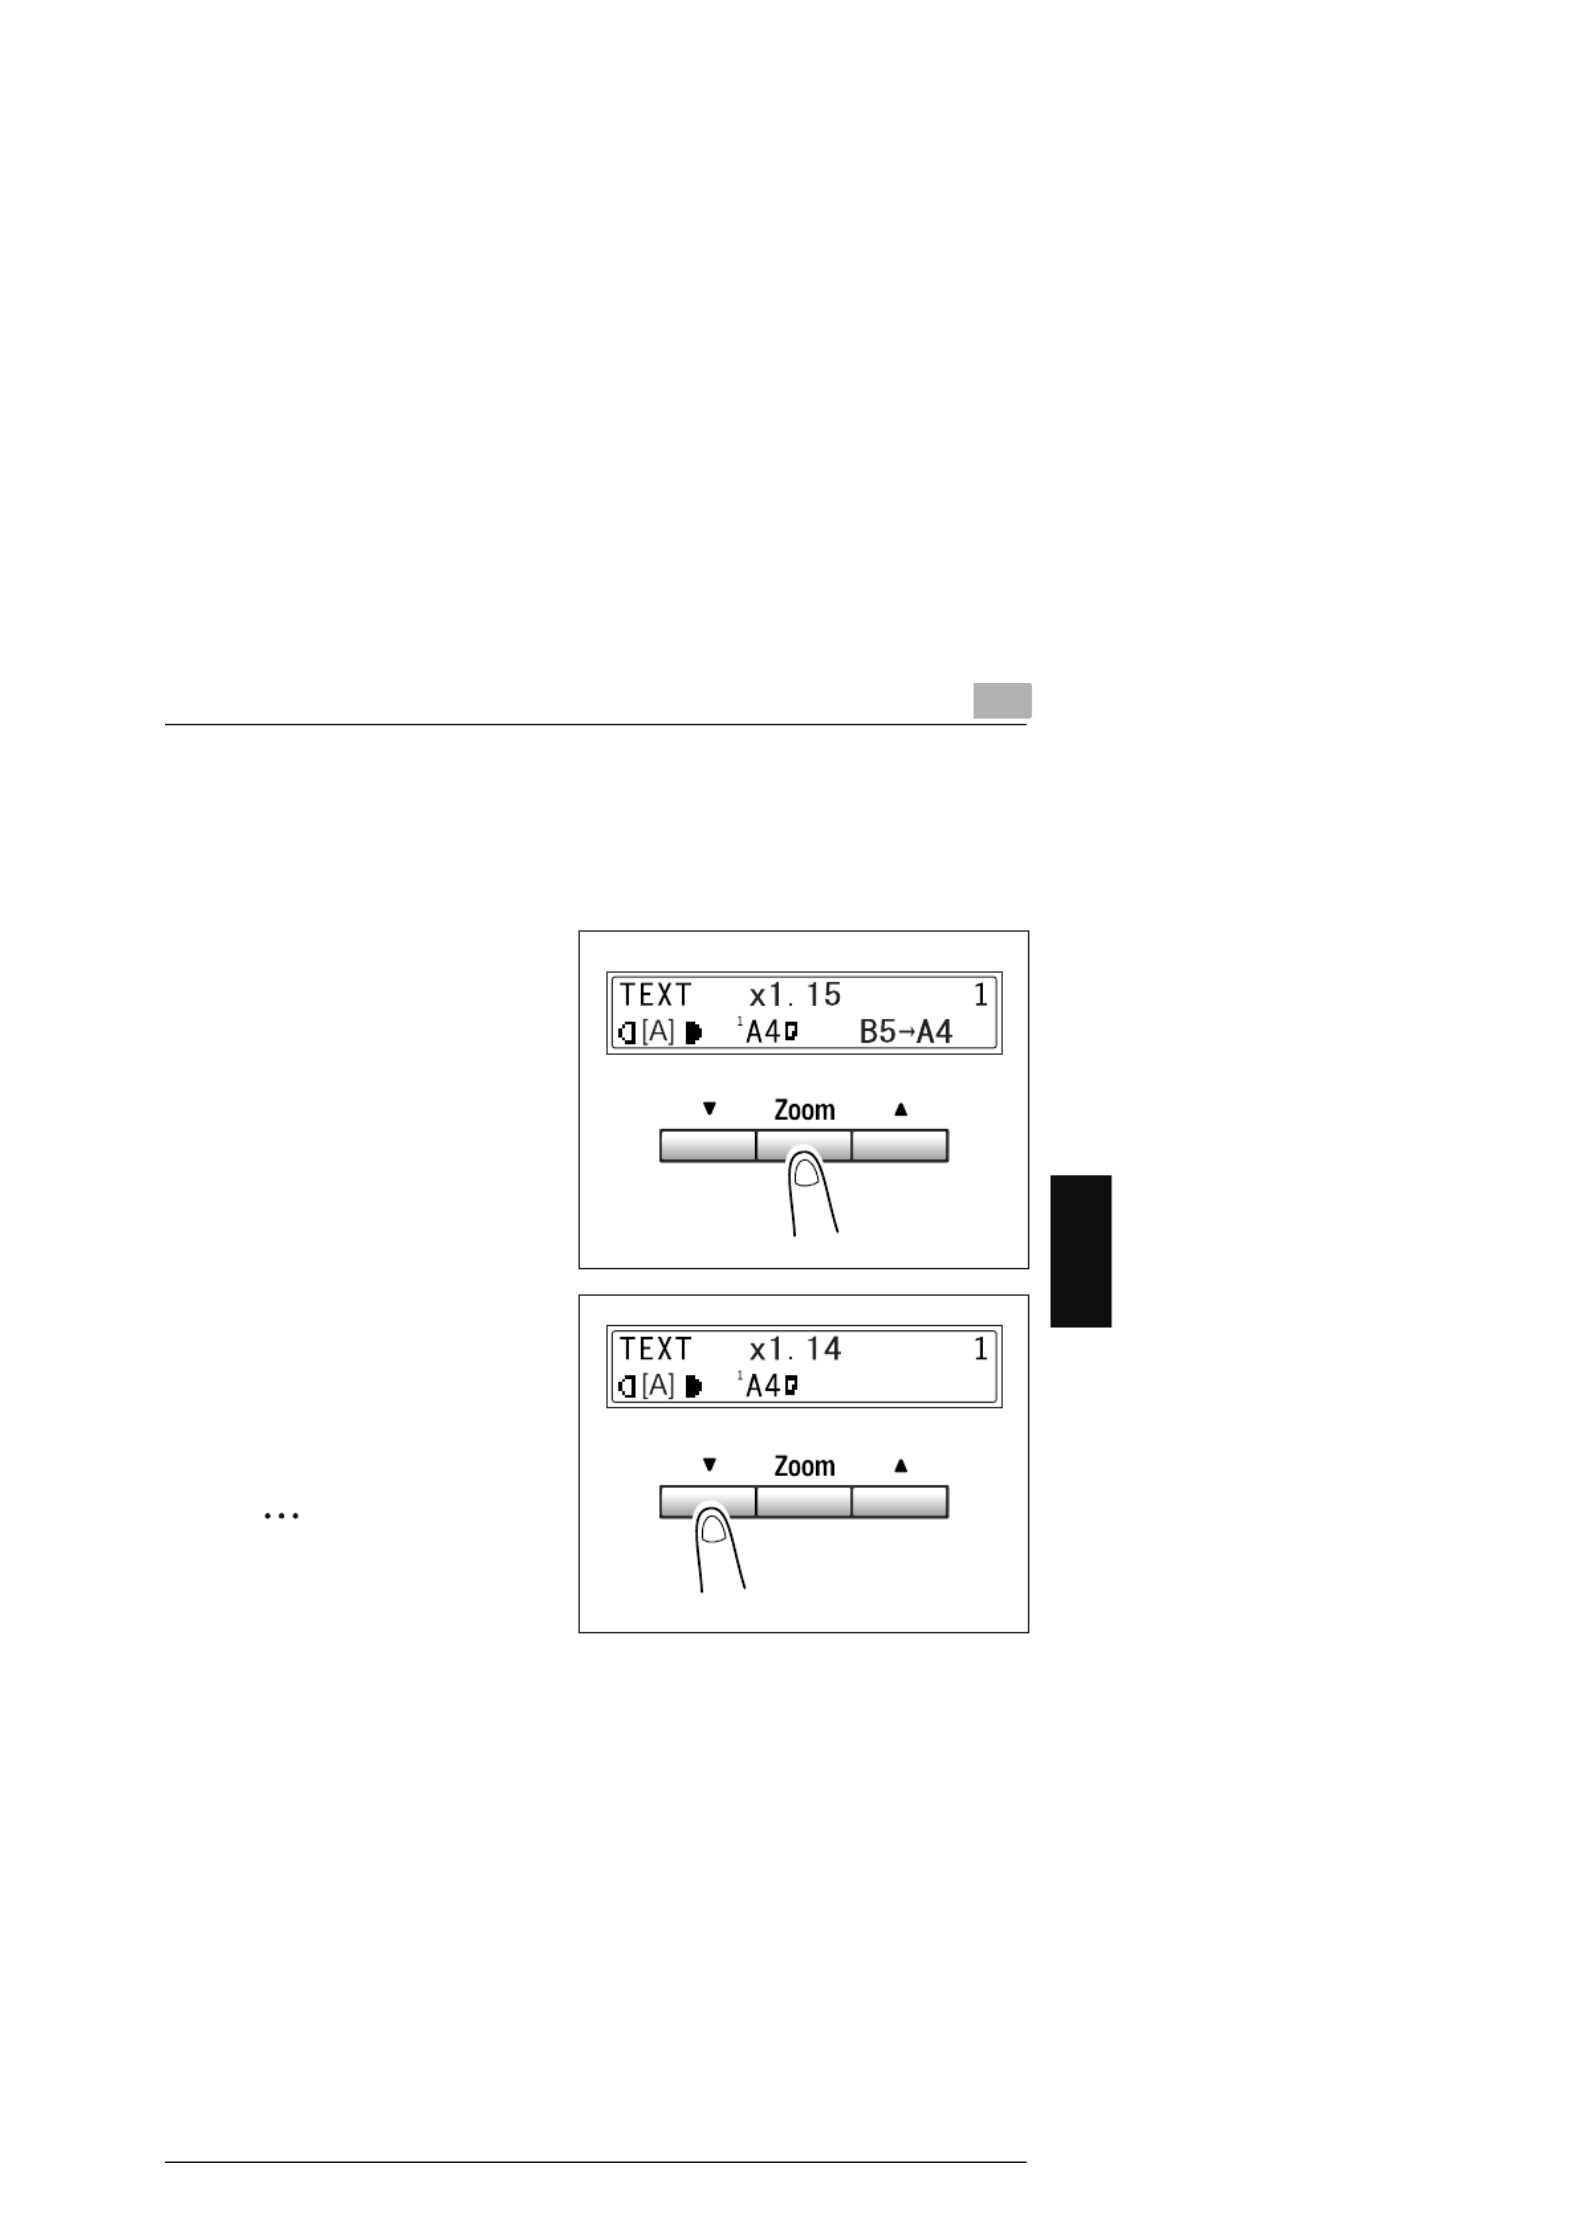
Setting the Zoom Ratio
1Position the original.
H“Loading Originals” on page 3-22
2Press the [Zoom] key until the
desired fixed ratio is selected.
HEach press of the [Zoom] key
changes the setting.
HTo specify a zoom ratio other
than a fixed ratio, press the [▼]
and [▲] keys until the desired
zoom ratio is specified.
Pressing these keys change
the ratio in 1% increments.
Tip
To quickly specify the desired
zoom ratio, select the nearest
fixed ratio, and then press the
[
▼
] and [
▲
] keys until the desired zoom ratio is specified.
3Make the other necessary settings.
H“Adjusting the Image Density” on page 4-12
4Using the 10-Key Pad, enter the number of copies to be made, and then press
the [Start] key.
Product specificaties
| Merk: | Olympia |
| Categorie: | Printer |
| Model: | Omega 1630 |
Heb je hulp nodig?
Als je hulp nodig hebt met Olympia Omega 1630 stel dan hieronder een vraag en andere gebruikers zullen je antwoorden
Handleiding Printer Olympia

29 Mei 2023
26 Mei 2023
24 Mei 2023
20 Mei 2023
Handleiding Printer
- Printer HP
- Printer Sony
- Printer Samsung
- Printer Xiaomi
- Printer Panasonic
- Printer Epson
- Printer LG
- Printer Huawei
- Printer Canon
- Printer Honeywell
- Printer Olympus
- Printer Toshiba
- Printer Xerox
- Printer Agfaphoto
- Printer AVM
- Printer Brother
- Printer Builder
- Printer D-Link
- Printer Dell
- Printer Digitus
- Printer Dymo
- Printer Epson 7620
- Printer Frama
- Printer Fujifilm
- Printer Fujitsu
- Printer Ibm
- Printer Intermec
- Printer Kern
- Printer Kodak
- Printer Kogan
- Printer Konica Minolta
- Printer Kyocera
- Printer Lenovo
- Printer Lexmark
- Printer Minolta
- Printer Mitsubishi
- Printer MSI
- Printer Nec
- Printer Paxar
- Printer Polaroid
- Printer Primera
- Printer Renkforce
- Printer Ricoh
- Printer Roland
- Printer Royal Sovereign
- Printer Sagem
- Printer Seiko
- Printer Sharp
- Printer Star
- Printer Thomson
- Printer Tomy
- Printer Toshiba TEC
- Printer Triumph-Adler
- Printer Velleman
- Printer Zebra
- Printer Oce
- Printer Oki
- Printer Olivetti
- Printer CSL
- Printer Argox
- Printer DTRONIC
- Printer Metapace
- Printer Citizen
- Printer Nilox
- Printer Approx
- Printer Ultimaker
- Printer Custom
- Printer Bixolon
- Printer Brady
- Printer GoDEX
- Printer Testo
- Printer EC Line
- Printer Sawgrass
- Printer Pantum
- Printer DNP
- Printer TSC
- Printer Equip
- Printer StarTech.com
- Printer Fichero
- Printer GG Image
- Printer Posiflex
- Printer ZKTeco
- Printer Star Micronics
- Printer Datamax-O'neil
- Printer Panduit
- Printer Dascom
- Printer HiTi
- Printer Vupoint Solutions
- Printer Elite Screens
- Printer Phoenix Contact
- Printer Videology
- Printer Colop
- Printer Raspberry Pi
- Printer Evolis
- Printer Unitech
- Printer Middle Atlantic
- Printer IDP
- Printer Fargo
- Printer Microboards
- Printer Mutoh
- Printer Tally Dascom
- Printer Nisca
Nieuwste handleidingen voor Printer
29 Maart 2025
29 Maart 2025

11 Maart 2025
11 Maart 2025
9 Maart 2025
4 Maart 2025
26 Februari 2025
26 Februari 2025
25 Februari 2025
25 Februari 2025