Olympia OC 1280P Handleiding
Olympia
Bewakingscamera
OC 1280P
Lees hieronder de 📖 handleiding in het Nederlandse voor Olympia OC 1280P (92 pagina's) in de categorie Bewakingscamera. Deze handleiding was nuttig voor 22 personen en werd door 2 gebruikers gemiddeld met 4.5 sterren beoordeeld
Pagina 1/92

OC 1280 P Outdoor Camera
Operating Manual
…easy to operate using the
"ProHomeIPC" app from Olympia
Version 03.2016
R


3
D
General Information 7. . . . . . . . . . . .
Intended Use 7....................
Unintended Use 7. . . . . . . . . . . . . . . . . . . . . .
Legal Notice 7....................
General Safety Information 8. . . . . . . .
General Overview 9. . . . . . . . . . . . . . .
Package Contents 9. . . . . . . . . . . . . . .
Notations Used in this Manual 9. . . . .
Connections and Operating Elements 10
General View 10. . . . . . . . . . . . . . . . . . . . . . . . .
Interfaces on the Connection Cable 11. . . . .
Receiver for Connection to Alarm System 11
Installing the Camera 12. . . . . . . . . . .
1. Connecting the Power Adapter 14.
Use With an Alarm System 14. . . . . . . . . . . . .
Use Without an Alarm System 16. . . . . . . . . .
2. Connecting the Network Cable 17. .
3. Installing the Camera App 17. . . . . .
4. Connecting the Camera App to
the Camera 18..................
5. Connecting the Camera
to the WLAN 19.................
6. Last Steps Prior to Assembly 20. . . .
7. What is the Correct Installation
Location for My Camera? 20. . . . . .
8. Installing the Camera 21. . . . . . . . . .
9. Assembling the Cable Box 22. . . . .
10. Final Steps 23. . . . . . . . . . . . . . . . . .
11. Aligning the Camera 24. . . . . . . . .

4D
Using the ProHomeIPC App 25. . . . .
Operating the Camera (iOS) 27. . . . .
Opening the Menu Bar 27. . . . . . . . . . .
Buttons in the Menu Bar 27. . . . . . . . . .
Snapshots 27. . . . . . . . . . . . . . . . . . . . . . . . . . .
Activating Night Vision 28. . . . . . . . . . . . . . . . .
Flipping the Image Section Horizontally 29. .
Flipping the Image Section Vertically 29. . . .
Changing the Resolution 30. . . . . . . . . . . . . . .
Adapting to Environmental Conditions 30. . .
Start Screen of the ProHomeIPC-App 31
Context Menu of the
ProHomeIPC-App 32. . . . . . . . . . . .
Camera List 33.....................
Event 34..........................
Add Camera 35....................
QR Code 36. . . . . . . . . . . . . . . . . . . . . . . . . . . .
Automatic Search 37. . . . . . . . . . . . . . . . . . . . .
Connecting Manually 38. . . . . . . . . . . . . . . . . .
Information 39.....................
Remove Camera 40. . . . . . . . . . . . . . . .
Edit Camera 41....................
Device Setting 42. . . . . . . . . . . . . . . . . . . . . . . .
Advanced Setting 46. . . . . . . . . . . . . . . .
Alarm Setting 51...................
Time Setting 57....................

6D
Other Important Information 88. . . . .
Guarantee 88......................
Regular Maintenance and Service 88.
Technical Modifications 88. . . . . . . . . . .
Information on Disposal 88. . . . . . . . . .
CE Mark 88........................
Technical Data 89. . . . . . . . . . . . . . . . . .
Troubleshooting 90. . . . . . . . . . . . . . . . .

General Information
7
D
General Information
Please read and observe the following
information and keep this operating
manual in a safe place for future reference!
Intended Use
The OC 1280 P Outdoor Camera (subsequently referred
to as camera) is designed to perform video surveillance
(CCTV) by day and night. When installing and selecting
the area of use of the camera, pay attention to the person
al rights of third-parties and that the respective, applicable
local laws and regulations are not violated.
Unintended Use
The camera is not suitable for use in potentially explosive
areas. The camera is not intended for use outside the per
missible ambient conditions stipulated in the Section
"Technical Data".
Monitoring of third-parties is not permitted without having
obtained the respective, explicit authorisation and could
have legal consequences.
Any use other than that described in Intended Use is con
sidered unintended use. Unauthorised modification
or reconstruction is not permitted.
Under no circumstances open the camera or accessories
or attempt to complete any repair work yourself.
Legal Notice
All the trademarks or brand names on the product and/or
accessories or which appear in this operating manual
serve solely for descriptive purposes and do not imply that
they are freely available. The trademarks and brand
names are the property of the respective proprietor of the
rights.

General Information
8D
General Safety Information
Observe the following safety instructions in order to pro
tect yourself from the possibility of personal injury and the
product from damage.
WARNING!
Risk of electric shock!
Never attempt to open and repair the device or acces
sories yourself. Never touch bare contacts with metallic
objects. Never plug-in or unplug the power cable when
your hands are wet. Never open the camera or compo
nents yourself. Repairs to this device may only be com
pleted by properly qualified service personnel.
WARNING!
Risk of suffocation!
Keep out of reach of children! Keep packaging materials
and protective foils out of reach of children. Keep the de
vice and any accessories out of reach of children.
Small children can swallow small parts. Seek medical at
tention immediately if a small part is swallowed.
ATTENTION!
Do not use the camera in prohibited areas!
Prohibited areas could include public buildings or spaces,
for example. Please observe local laws and regulations!
ATTENTION!
Protect the camera from chemicals, vapours, heat and
direct sunlight.
ATTENTION!
Only use original accessories.
Only connect accessories approved by the manufacturer
to the camera and only us the power adapter supplied.
ATTENTION!
Property damage is possible.
Only use properly installed, easily accessible power sock
ets.

General Overview
9
D
General Overview
This section provides information on the package contents
as well as the connections and operating elements on the
camera.
Package Contents
Unpack the camera and check that the package contents
are complete. The camera package contains the following
components:
Camera
Power adapter
Receiver
Cable box
Assembly material (3 screws, 3 dowels)
Network cable (RJ45/RJ45, Cat.5e)
Operating manual
Check for any visible signs of damage to the camera
packaging or the components supplied. If there are, do not
put the camera into operation.
Notations Used in this Manual
The section below explains the presentations and nota
tions used in this operating manual.
1. This indicates the first step in a set of instructions.
2. This indicates the next step in a set of instructions.
This symbol indicates useful information which will
help you to use the camera and .ProHomeIPC-App
Indicates a list.

General Overview
10 D
Connections and Operating Elements
Before installing the camera, familiarise yourself with the connections and operating elements on it.
General View
1 2 3 4
56789
1 6Connection cable (several interfaces) Infrared LEDs (night vision)
2 Device mounting bracket 7 Brightness sensor
3 8 LensUnion nut for mounting bracket
4 Antenna (for WLAN) 9 Interfaces (see Page 11)
5 Ball joint

General Overview
11
D
Interfaces on the Connection Cable
10
11 12 13 14
10 LEDs for network activity
11 Port (for network cable)
12 Port (for connection to the receiver)
13 Port (for power supply)
14 Reset button
Receiver for Connection to Alarm System
15
16
17
15 Plug (for power supply)
16 Port (for power supply)
17 Plug (for connection to camera)
18 Status LED (not illustrated here)
Installing the Camera
12 D
Installing the Camera
Observe the recommended sequence of working steps
when installing the camera.
To set-up and install your camera easily, we recommend
that you first connect the camera to the home network and
camera app before connecting it at the location of use.
This operating manual describes the sequence of working
steps recommended by us:
1. Connecting the Power Adapter
This section explains how to connect the power supply to
the camera and decide whether you want to use it in con
nection with an alarm system or not.
2. Connecting the Network Cable
This section explains how to define the camera, to be
used in your home network, to the router. This step is nec
essary in order to be able to integrate the camera in your
wireless home network (WLAN).
3. Installing the Camera App
This section explains how to install the relevant Olympia
camera app (ProHome IPC) on your smartphone or tablet
PC.
4. Connecting the Camera App to the
Camera
This section explains how to connect the camera to the
camera app and complete the first function test.
5. Connecting the Camera to the WLAN
This section explains how to connect the camera to the
wireless home network (WLAN).
6. Last Step Prior to Assembly
Before beginning with the installation at the site of use,
you must disconnect all the cable connections again.

Installing the Camera
13
D
7. What is the Correct Installation Location
for My Camera?
To ensure good results of the surveillance, there are a few
points to take into account when selecting a suitable in
stallation location. We can help you make the right deci
sion.
8. Installing the Camera
This section explains how to install the camera at the loca
tion of use.
9. Assembling the Cable Box
This section explains how to install the camera's cable box
at the location of use.
10. Final Steps
This section explains the final work which you must com
plete before you can align the camera and use it in con
nection with the camera app.
11. Aligning the Camera
This section explains how to align the viewing angle of the
camera optimally to the area to be monitored.

Installing the Camera
14 D
1. Connecting the Power Adapter
This section explains how to connect the camera to the
power supply and then decide whether the camera is to
be integrated in an existing alarm system.
Use With an Alarm System
If you want to integrate the camera in an alarm system
(Protect Series 6xxx / 9xxx alarm system from Olympia),
you must use the receiver supplied. If you do not want to
integrate the camera in an alarm system, skip this section
and continue with Use Without an Alarm System.
The receiver is connected directly to the camera and pow
er adapter of the camera. In this case, power is supplied
to the camera from the receiver.
1. Connect the plug (17) on the receiver to the port
(12) on the connection cable of the camera to enable
data exchange with the alarm system.
2. Connect the plug (15) on the receiver to the port
(13) on the connection cable of the camera to provide
the power supply.
3. Connect the power adapter supplied to the port
(16) on the receiver and a power socket.
The LEDs on the network connection port (10) signal
when power is being supplied and a connection exists
to the network (lights up orange) and data is being
transmitted (flashes green).
Registering the Receiver on the Alarm
System
The following section describes how to register the receiv
er on the alarm system.
1. Disconnect the power adapter from the power socket.
2. Select the Register menu on the alarm system
according to the relevant operating manual.
3. Connect the power adapter to the power socket.
4. When the message Siren followed by a number ap
pears in the alarm system display, registration on the
alarm system has been completed successfully.
5. The receiver is now registered on the alarm system.
6. You can alter the Siren entry to Camera or Video, for
example, according to the relevant operating manual.

Installing the Camera
15
D

Installing the Camera
16 D
Use Without an Alarm System
If you want to use the camera without an alarm system
(Protect Series 6xxx / 9xxx alarm system from Olympia),
you do not need the receiver supplied.
1. Connect the power adapter supplied to the
port (13) on the camera's connection cable and a pow
er socket.

Installing the Camera
17
D
2. Connecting the Network Cable
You must identify your camera in your network.
The camera must be assigned an unambiguous address
within your network so that you can access the camera
app on the camera later.
If you have not changed the default setting of your router,
the camera will be assigned an unambiguous address au
tomatically during connection to the router.
In the case of most routers, the DHCP function is acti
vated at the factory. More detailed information on the
DHCP function is provided in the operating manual
supplied with your router.
1. Connect the network cable to the port (11) on the con
nection cable and a free network connection port on
the router.
2. Wait about 60 seconds until the router has automati
cally assigned an unambiguous address to the cam
era.
3. Installing the Camera App
1. Download the ProHomeIPC-App from the App Store
(for iOS) or Google Play Store (for Android).
2. Enable the ProHomeIPC-App access to the camera
of your smartphone or tablet PC and mobile internet.
This simplifies connecting the camera and
ProHomeIPC-App and also provides remote access
to the camera via the smartphone or tablet PC.
You require access to the camera on your smartphone
or tablet PC when you want to scan the QR code as
described in Section Connecting the Camera App to
the Camera.
Access to the camera and mobile internet can also be
enabled or refused later in the setting options provided
by your smartphone or tablet PC. More detailed infor
mation is provided in the operating manual supplied
with your smartphone or tablet PC.

Installing the Camera
18 D
4. Connecting the Camera App to
the Camera
1. Connect your smartphone or tablet PC to the same
wireless network (WLAN) in which the camera is inte
grated.
2. Start the .ProHomeIPC-App
3. Touch Add Device or Click here to add camera.
4. Touch QRCode or .Scan
5. Scan the QR code on the rear of the camera using
your smartphone or tablet PC. The ProHomeIPC-App
automatically searches for all the cameras available in
the network.
6. When the smartphone or tablet PC is connected to the
same wireless network as the camera, the camera is
displayed.
7. Enter the camera's password. When the default set
ting are set, the password is .admin
8. Save the settings by touching Save or .OK
Your camera is now listed in the overview of cameras
available.
The first time you attempt to select your camera, you
will be requested to change the camera's password for
reasons of security. We urgently recommend that you
change the camera's password in order to prevent
unauthorised access to your camera, and thus your
privacy, by third parties.
Installing the Camera
19
D
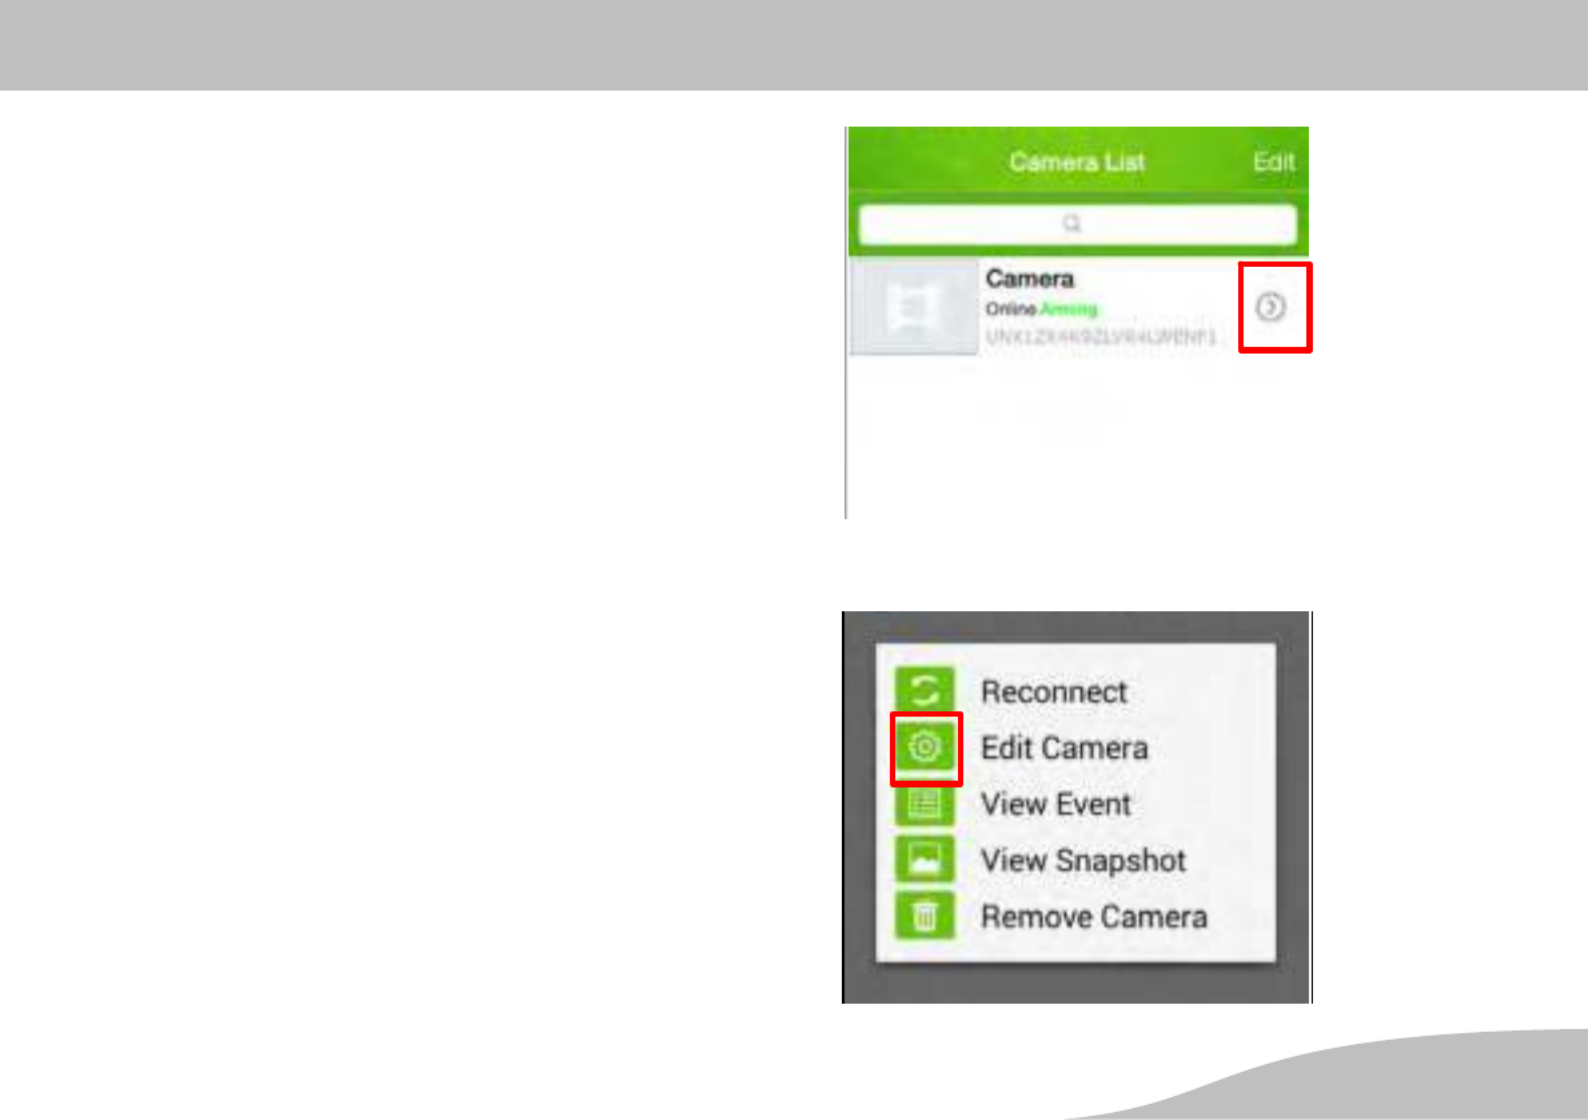
5. Connecting the Camera to the WLAN
The following section describes how to connect the cam
era to the wireless home network (WLAN).
1. Open the Advanced Setting menu. When using iOS,
touch the highlighted arrow on the right in the over
view of available cameras. When using Android, also
touch the arrow and then on the icon highlighted on
the right.
2. Touch the Advanced Setting option.
3. Touch the arrow beside the WiFi option to display a
list of wireless networks available.
4. Touch the wireless network to which you want to con
nect your camera.
5. Enter the WiFi password of the wireless network se
lected. For security reasons, the characters of the
password appear encrypted.
6. Save the settings by touching .OK
iOS
Android

Installing the Camera
20 D
6. Last Steps Prior to Assembly
Disconnect all the cable connections before beginning
with the installation work.
The settings for the connection between your camera and
the ProHomeIPC-App and the settings for your WiFi are
retained when the camera is disconnected from the power
supply.
1. Disconnect the power adapter from the power socket.
2. Disconnect the network cable from the port (11) on the
connection cable.
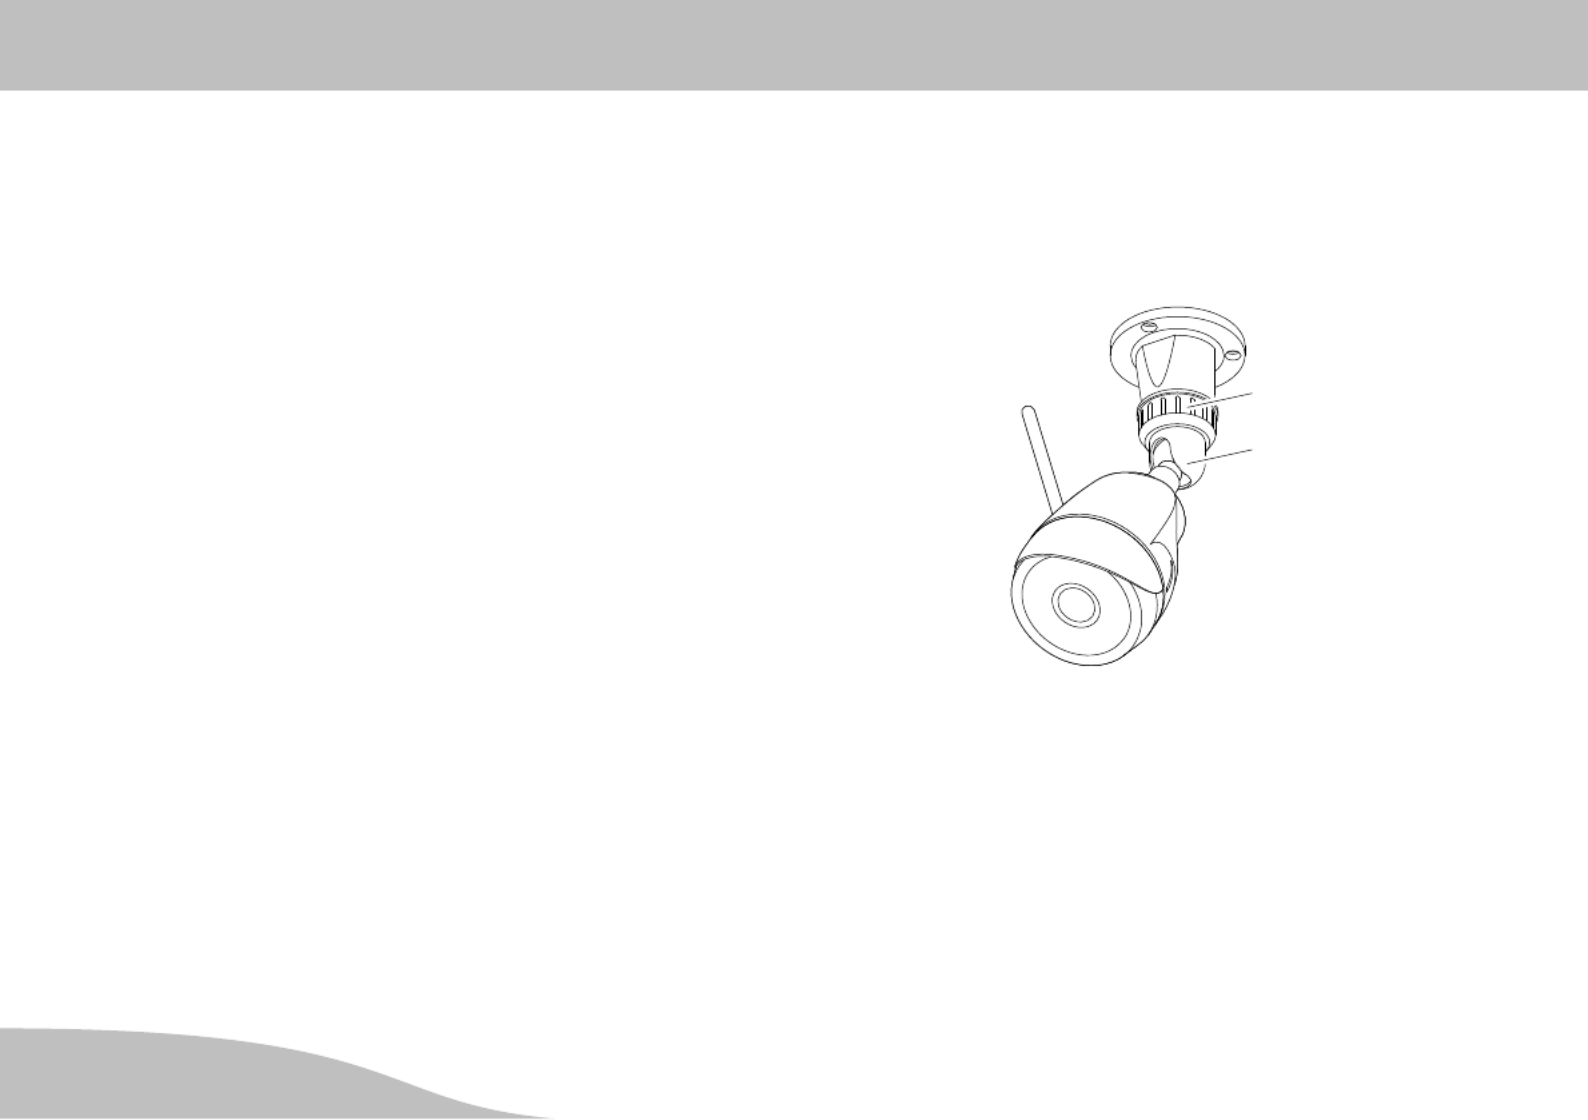
7. What is the Correct Installation
Location for My Camera?
You can install the camera at any installation location (e.g.
under a roof projection or on a ceiling) with the aid of the
device mounting bracket.
Observe the following points when selecting the installa
tion location.
The camera must be installed at a suitable height to
protect the camera and connection cable from any
unwanted manipulation, vandalism or other unautho
rised access.
The camera must be within the range of the wireless
network (WLAN).
There must be sufficient space to install the cable box
in the direct vicinity.
The power socket, which must be located indoors,
must be easily accessible.
(Option) The receiver must be within range of your
alarm system.

Installing the Camera
21
D
8. Installing the Camera
WARNING!
Risk of fatal injury through electric shock or gas
explosion!
During installation, pay attention to the possibility of
electrical cables and gas pipes running in the walls.
Pay attention that you do not damage electric cables
or gas pipes.
1. Use the holes in the mounting bracket (2) as a drilling
template and drill three sufficiently large holes in the
wall or ceiling.
We recommend the use of special dowels according
to the properties of the mounting surface.
2. Insert the respective dowels in the drill holes.
3. Lay the connection cable in the recess in the mounting
bracket.
4. Assemble the camera with the mounting bracket using
suitable screws.
2

Installing the Camera
22 D
9. Assembling the Cable Box
After assembling the camera, you can stow the connec
tion cable (1) and, if necessary, the receiver in the cable
box to protect excess lengths of cable from any unwanted
manipulation, vandalism or other unauthorised access.
Observe the following points when selecting the assembly
location.
The cable box must be in the direct vicinity of the
camera.
The power cable can be laid easily into the box.
(Option) The receiver must be within range of your
alarm system.
20
1
19
WARNING!
Risk of fatal injury through electric shock or gas
explosion!
During installation, pay attention to the possibility of
electrical cables and gas pipes running in the walls.
Pay attention that you do not damage electric cables
or gas pipes.
1. Use the holes in the cable box as a drilling template
and drill four suitable holes in the wall or ceiling.
2. Loosen the screws in the lid (19) of the cable box us
ing an appropriate screwdriver and remove the cable
box lid (19).
3. Drill another suitable hole in the wall or ceiling close to
the cable box through which to feed the power ca
ble (20) from indoors out to the cable box.
4. Insert the respective dowels in the drill holes for the
cable box.
5. Pay attention that the cable glands face downwards
and assemble the cable box using appropriate screws.

Installing the Camera
23
D
10. Final Steps
Now complete the final steps of the installation work.
Reconnect the two cable connections previously
disconnected.
Using a Receiver
1. Connect the plug (17) on the receiver to the
port (12) on the connection cable of the camera to en
able data exchange with the alarm system.
2. Connect the plug (15) on the receiver to the
port (13) on the connection cable of the camera to
provide the power supply.
3. Connect the plug on the power adapter to the port (16)
on the receiver.
4. Lay the connection cable (1) through the left-hand
cable gland into the cable box.
5. Position the receiver in the cable box as illustrated.
6. Lay the connection cable (1) in loops inside the cable
box.
7. Lay the power cable (20) through the hole drilled in
Step 3 and outdoors from the indoor area.
8. Feed the power cable (20) through the right-hand
cable gland into the cable box.
9. Place the lid (19) on the cable box and screw the
lid (19) in place using the screws provided.
10. Connect the power cable to a properly installed power
socket.
Installing the Camera
24 D
Without Receiver
1. Connect the plug on the power adapter directly to the
port (13) on the camera's connection cable to connect
the power supply.
2. Lay the connection cable (1) in loops inside the cable
box.
3. Lay the power cable (20) through the hole drilled in
Step 3 and outdoors from the indoor area.
4. Feed the power cable (20) through the right-hand
cable gland into the cable box.
5. Place the lid (19) on the cable box and screw the
lid (19) in place using the screws provided.
6. Connect the power cable to a properly installed, indoor
power socket.
11. Aligning the Camera
1. Use the ball joint (21) to align the camera horizontally
and vertically in respect of the area you want to moni
tor.
21
2
The camera has an angle of vision of 60°.
2. Check the monitoring position of the camera with the
camera app using the live image.
3. Fix the camera in the defined position using the union
nut (3).
4. The installation and set-up work for the camera is now
completed. You can now start to learn about our con
venient camera app, .ProHomeIPC-App

Using the ProHomeIPC App
25
D
Using the ProHomeIPC App
Familiarise yourself with how to use the
ProHomeIPC-App.
Swipe your finger in any direction over the display of your
smartphone or tablet PC to move the screen section dis
played.
Tap your finger on the display of your smartphone or
tablet PC to open the submenus and activate functions.

Using the ProHomeIPC App
26 D
Zoom the image displayed on the screen on the display of
your smartphone or tablet PC by touching the image sec
tion with two fingers and spreading them apart according
ly. Move your fingers in the opposite direction to reduce
the size of the image.
Rotate your smartphone or tablet PC on its side. The im
age then appears as a full screen display.
It may be necessary to activate the function to rotate
the screen contents in the Settings menu on the
smartphone or tablet PC. More detailed information is
provided in the operating manual supplied with your
smartphone or tablet PC.

Operating the Camera (iOS)
27
D
Operating the Camera (iOS)
Opening the Menu Bar
Touch your finger on the smartphone or tablet PC screen.
A menu bar opens at the bottom edge of the screen.
A function is assigned to each button in the menu bar.
Touch one of the buttons to activate the function or, if
necessary, define settings.
Buttons in the Menu Bar
This section provides information on which functions are
assigned to the buttons in the menu bar while a live pic
ture is on screen and what you can do with them.
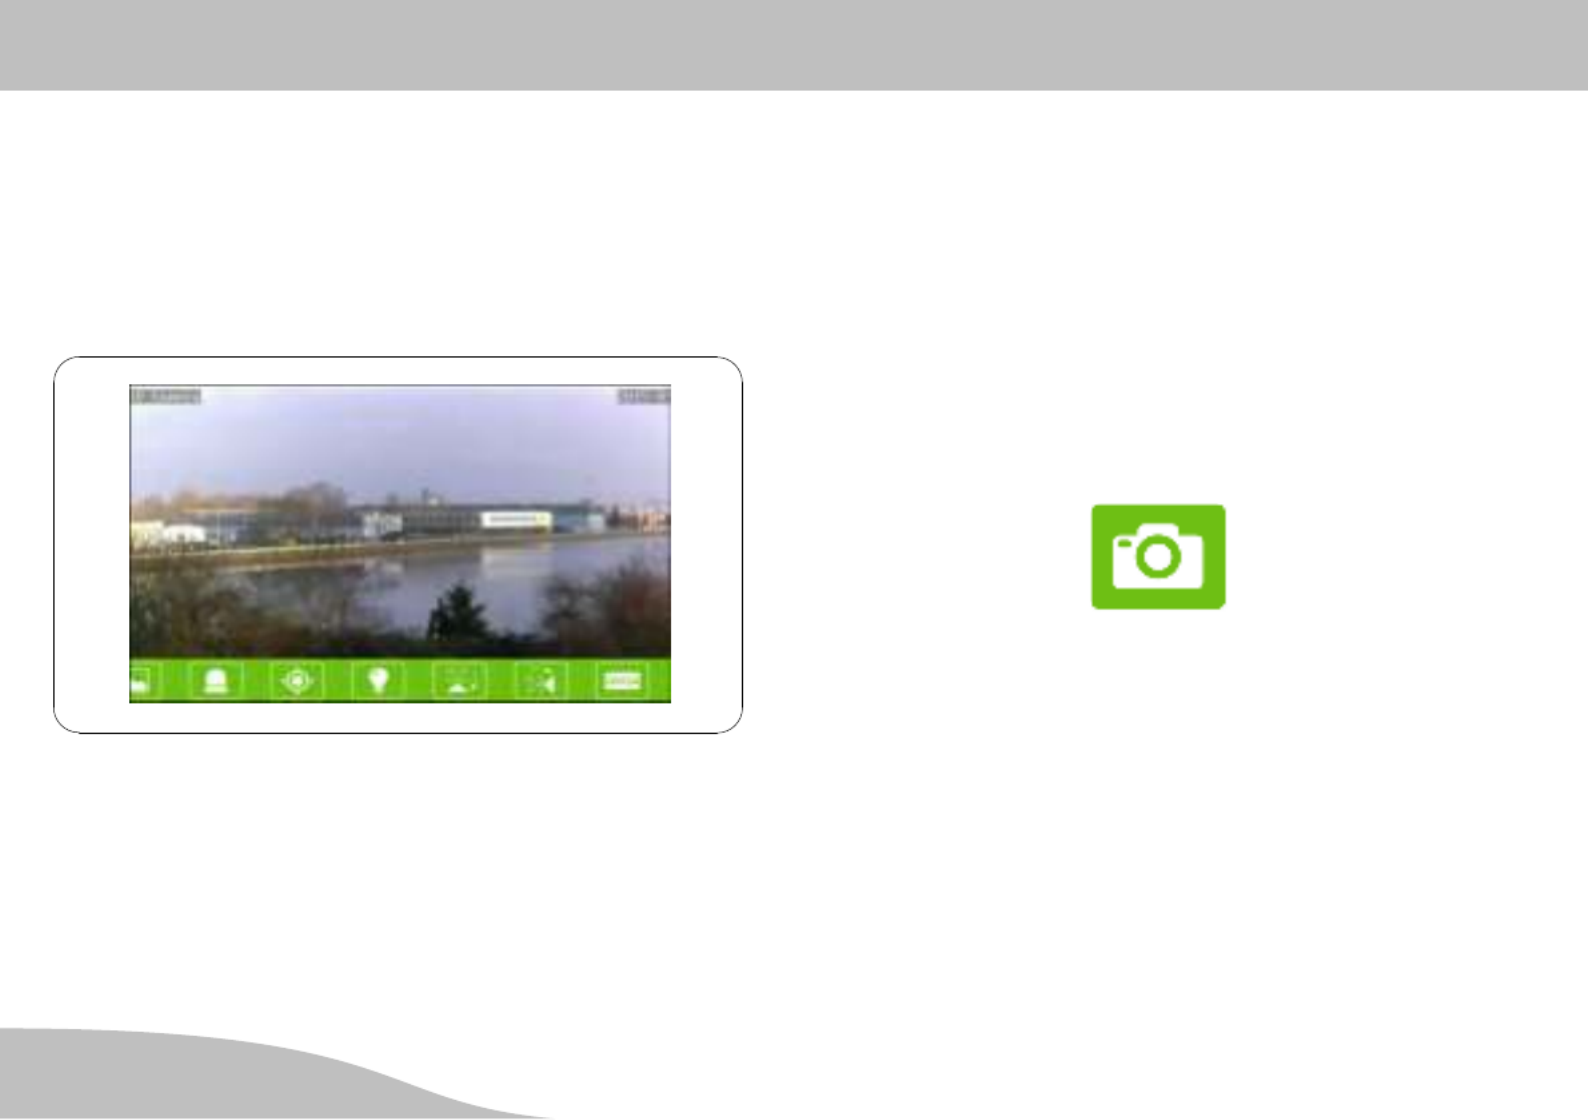
Snapshots
You can take a photo of the live image currently scanned
by the camera.
1. Touch the Snapshot button. The live image currently
displayed is saved as a snapshot. The Snapshot
saved message appears in the display.
When the default settings are set, the snapshots are
saved locally on the smartphone or tablet PC. You can
also save your snapshots on the camera. More detailed
information is provided in Section Recording on the SD
Card.

Operating the Camera (iOS)
28 D
2. Touch the button to open an overview of the snap
shots taken.
Activating Night Vision
If the brightness of the area being monitored falls below a
certain level, the infrared LEDs are automatically activat
ed.
The infrared LEDs serve as a residual light amplifier so
that the area monitored is illuminated sufficiently despite
the dark and can continue to be monitored. The live image
displayed appears in black and white.
1. Touch the IRLight Switch button.
2. Touch this button to activate automatic night vision.
3. Touch this button to deactivate automatic night vision.

Operating the Camera (iOS)
29
D
Flipping the Image Section Horizontally
You can flip (mirror) the live image displayed on the hori
zontal axis. This is useful, for example, if you want to
install your camera on a ceiling using the holding bracket.
1. Touch the Flip horizontal button. The current live
image displayed is flipped on the horizontal axis.
Flipping the Image Section Vertically
You can flip (mirror) the live image displayed on the verti
cal axis. This can be useful, for example, when the
camera is mounted in such a way that parts of the area
under surveillance lie in a blind spot.
1. Touch the Flip vertical button. The current live image
displayed is flipped on the vertical axis.

Operating the Camera (iOS)
30 D
Changing the Resolution
You can change the resolution of the camera. This can be
useful, for example, when there is a long delay regarding
data transmission; i.e. the camera takes a long time to
react to the movement commands you issue via the
ProHomeIPC-App. In such cases, it may be advanta
geous to reduce the resolution of the live image being
transmitted.
More detailed information on this subject is available
in Section What To Do When Problems Arise.
1. Touch the Video Quality button.
2. Touch the setting required.
Repeat this step until the camera reacts to the move
ment commands issued via the ProHomeIPC-App
without any delay.
Adapting to Environmental Conditions
You can adapt the camera settings to the environmental
conditions of the area under surveillance.
1. Touch the EnvironmentMode button.
2. Touch the required setting depending on whether the
area under surveillance is bright or dark.

Operating the Camera (iOS)
31
D
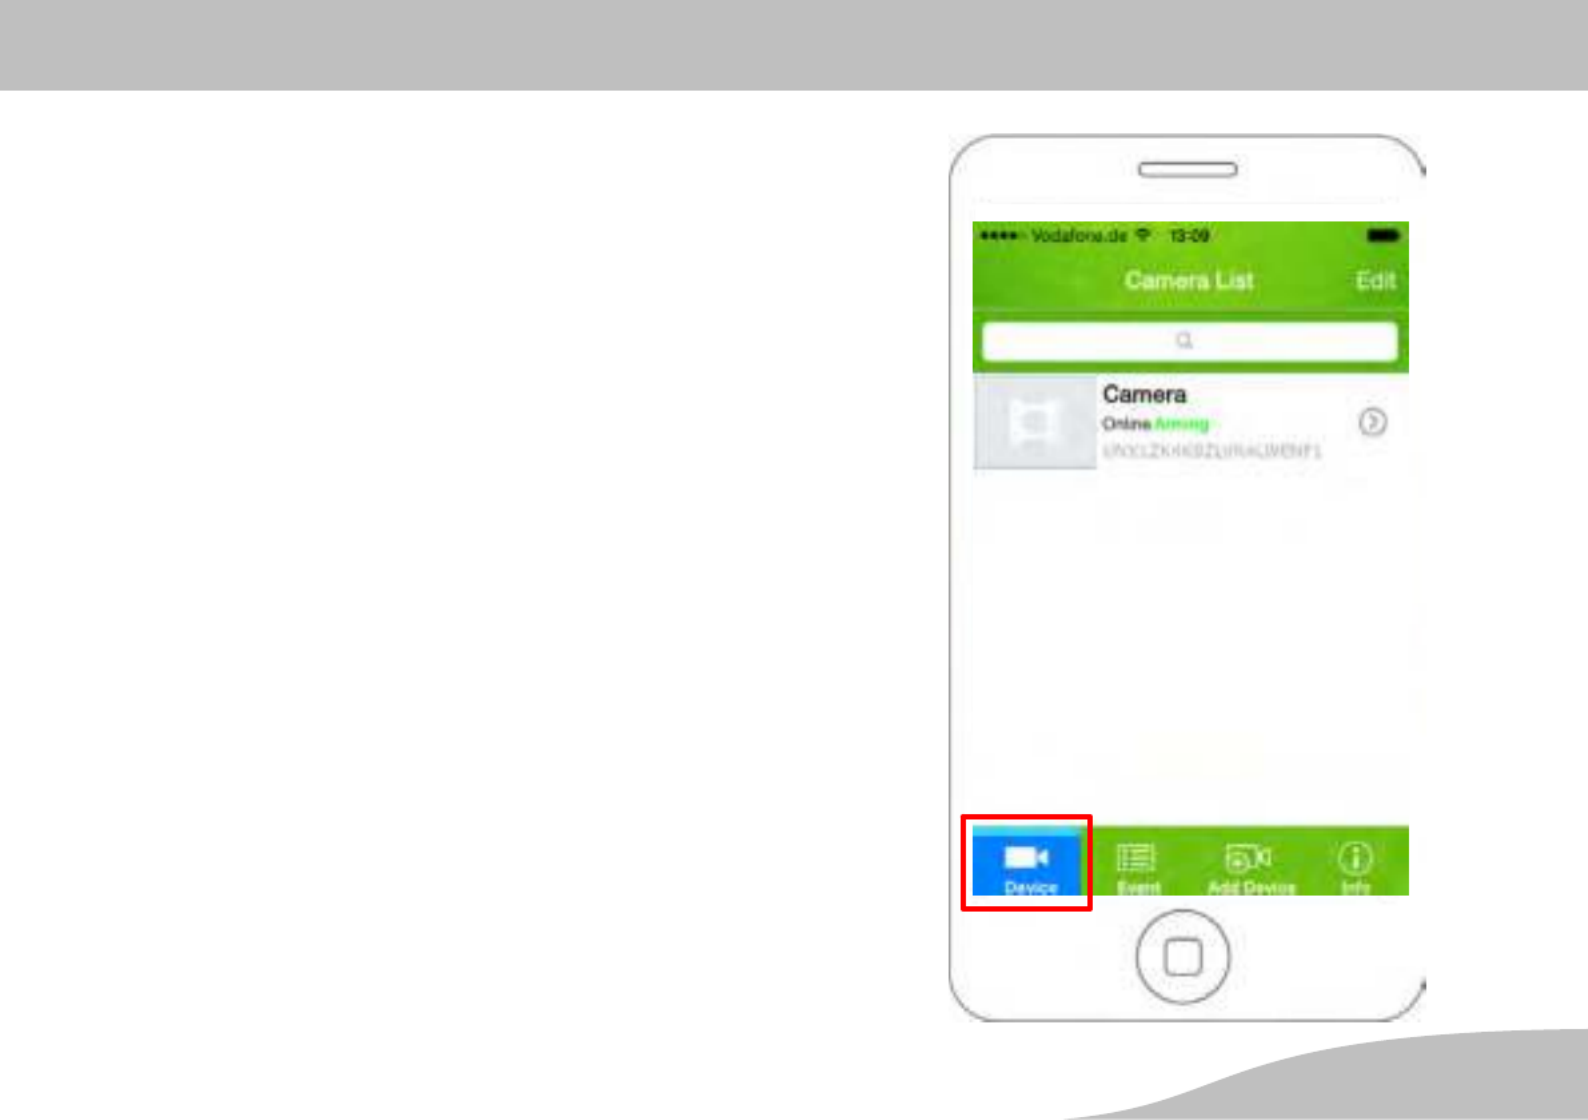
Start Screen of the ProHomeIPC-App
When a camera has been found and integrated success
fully in the , the corresponding cameraProHomeIPC-App
is displayed on the start screen.
All the cameras integrated in the ProHomeIPC-App are
displayed in this view.
We recommend that you assign each camera connected
an unambiguous name (refer to Section ).Names
You are provided with detailed information on
the unambiguous user identifier (UID) of the camera,
the name (designation) of the camera,
the monitoring status of the camera,
the alarm preset status of the camera.

Operating the Camera (iOS)
32 D
Context Menu of the ProHomeIPC-App
At the bottom edge of the start screen are four buttons
which can be used to complete different settings and func
tions.
Device
Event
Add Device
Info
1. Touch the respective button to define the setting or
start the function.
The settings or functions assigned to the individual but
tons are described in the following sections.
The following adjustments to the settings only affect the
camera selected. Information on particular, individual fea
tures is provided at the respective point.
Operating the Camera (iOS)
33
D
Camera List
The Device button is active when you open the
ProHomeIPC-App.
1. Touch Device. A list of all the cameras integrated in
your camera app is displayed.
If you touch one of the cameras listed, the live image from
the camera selected is displayed. You can use the buttons
in the menu bar (see Buttons in the Menu Bar).

Operating the Camera (iOS)
34 D
Event
This option enables you to display a list of events which
the camera has recorded and saved in chronological or
der.
1. Touch .Event
2. Touch the camera whose recorded events you want to
display.
If no event has (yet) been recorded, the No result found
message appears.
You can define specific periods of time in the chronologi
cal list of events in order to limit the events displayed to a
certain time range.
3. Touch .Search
4. Touch the period of the events which should be dis
played.
5. All the events related to the time period selected are
displayed.
Operating the Camera (iOS)
35
D
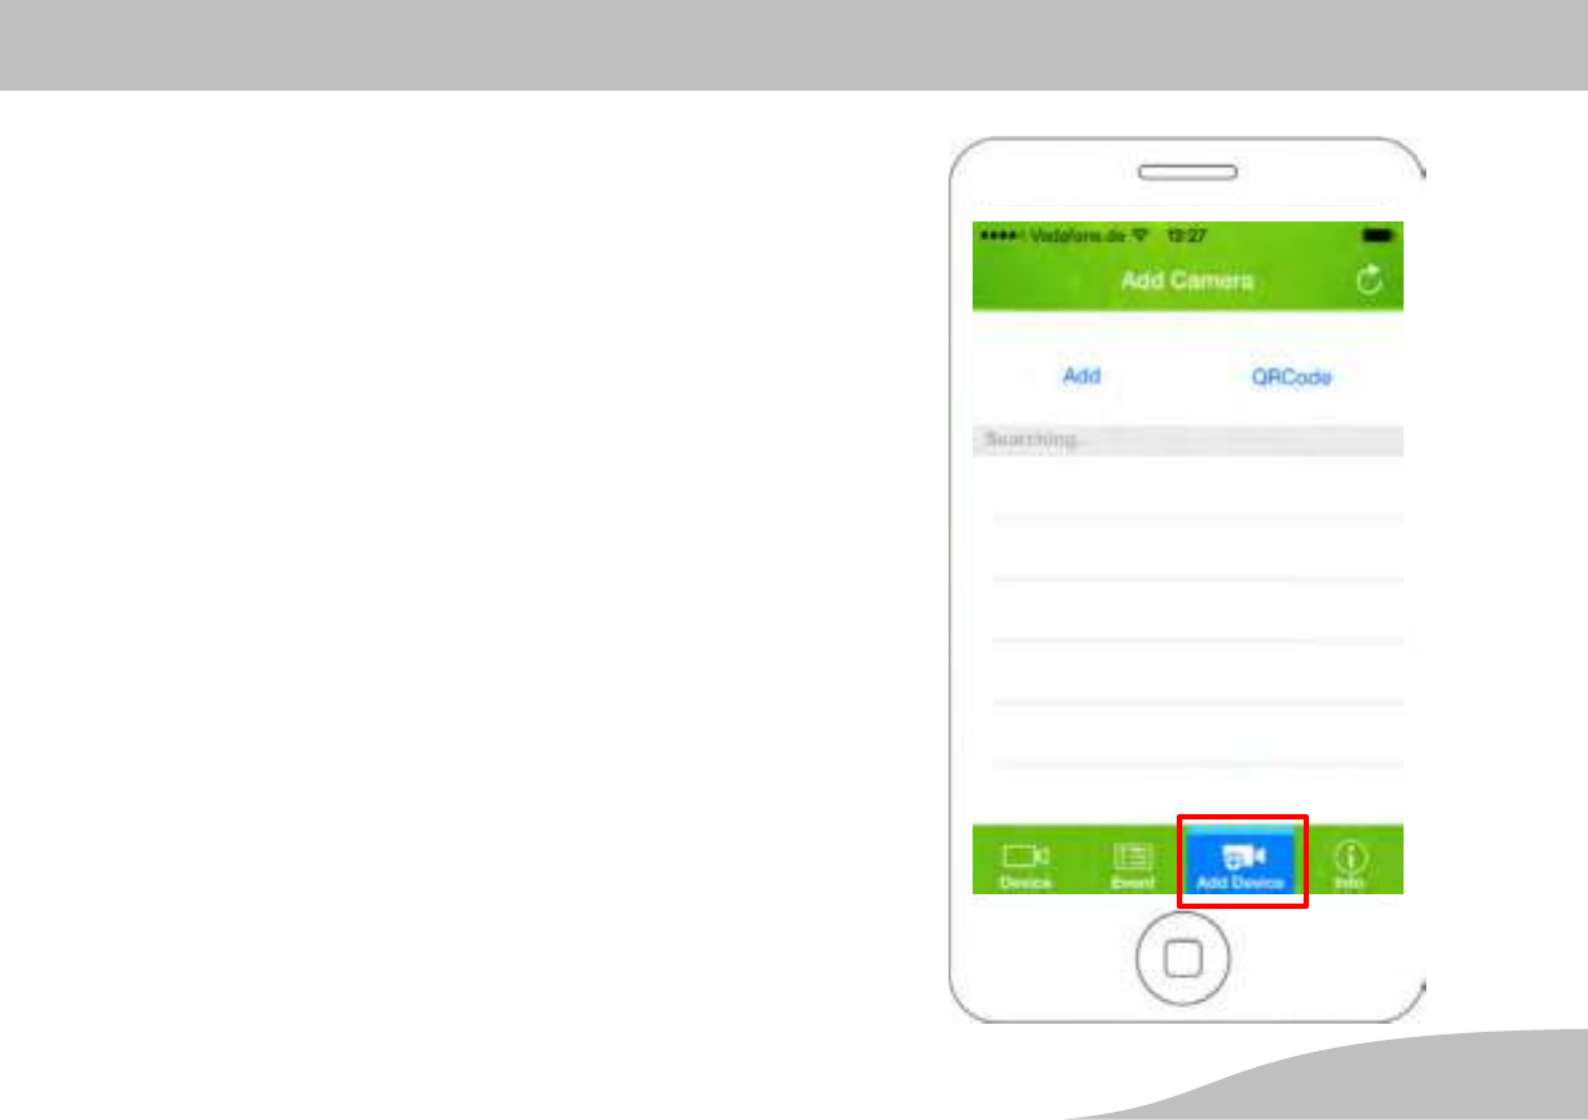
Add Camera
You have the possibility of connecting new cameras using
the .ProHomeIPC-App
All the cameras connected are displayed on the start
screen.
1. Touch Add Device.

Operating the Camera (iOS)
36 D
QR Code
1. Touch QRCode.
2. Scan the QR code on the rear of the camera using
your smartphone or tablet PC.
3. Enter the camera's password.
When the default settings are set, the password is
admin.
4. Save the settings by touching .Save
Your camera is now listed in the overview of cameras
available.
The first time you attempt to select your camera, you
will be requested to change the camera's password for
reasons of security. Change the camera's password in
order to prevent unauthorised access to your camera,
and thus your privacy, by third parties.

Operating the Camera (iOS)
37
D
Automatic Search
The ProHomeIPC-App automatically searches for all the
cameras available in the network. If your smartphone or
tablet PC is connected within the same network as the
camera, the camera is displayed (together with the unam
biguous user identifier (UID) and IP address).
1. Touch the camera displayed.
2. Enter the camera's password.
When the default settings are set, the password is
admin.
3. Save the settings by touching .Save
Your camera is now listed in the overview of cameras
available.
The first time you attempt to select your camera, you
will be requested to change the camera's password for
reasons of security. Change the camera's password in
order to prevent unauthorised access to your camera,
and thus your privacy, by third parties.

Operating the Camera (iOS)
38 D
Connecting Manually
You can also connect your camera to the
ProHomeIPC-App manually.
1. Touch .Add
The user identifier (UID), the name and password are on
the rear of the camera.
2. Enter the user identifier (UID), the name and pass
word of the camera.
Your camera is now listed in the overview of cameras
available.
The first time you attempt to select your camera, you
will be requested to change the camera's password for
reasons of security. Change the camera's password in
order to prevent unauthorised access to your camera,
and thus your privacy, by third parties.

Operating the Camera (iOS)
39
D
Information
It is possible to display detailed information on the version
of the .ProHomeIPC-App
The version information changes each time the app is up
dated.
1. Touch Info. Information on the current version of the
ProHomeIPC-App is displayed.
Operating the Camera (iOS)
40 D
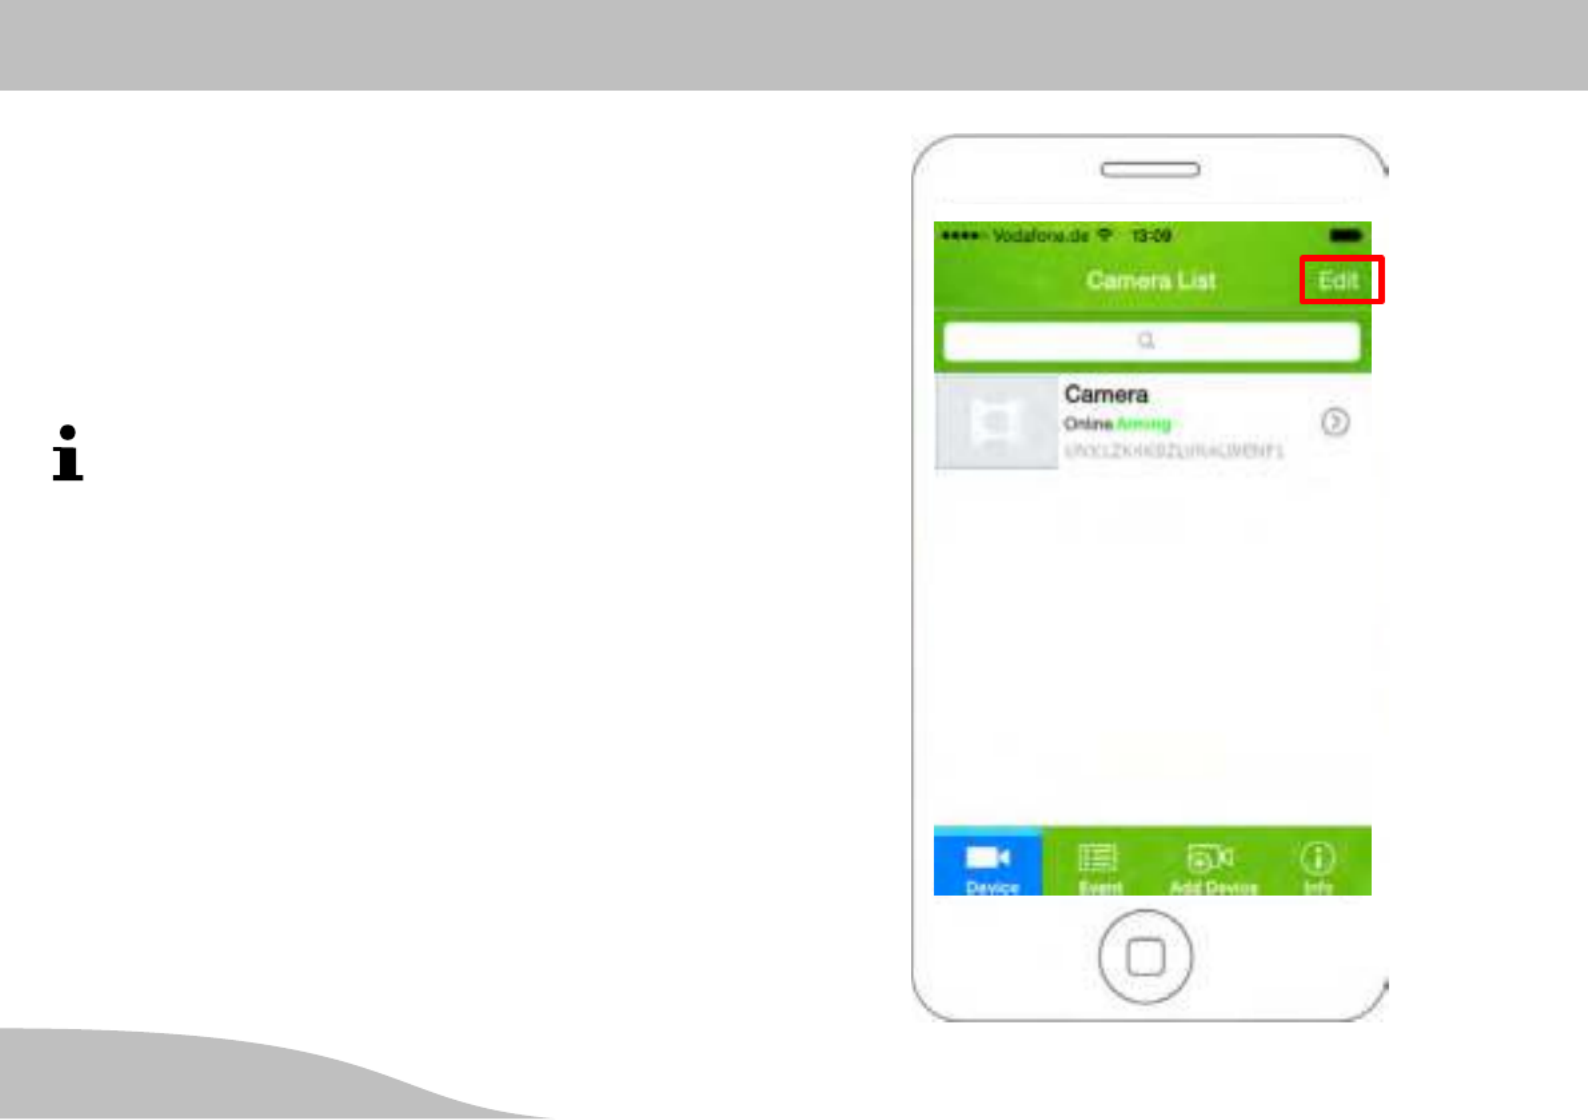
Remove Camera
It is possible to delete individual cameras from the
ProHomeIPC-App.
All personally defined settings are stored locally on the
camera. If you want to reconnect cameras deleted from
the list to your smartphone or tablet PC at a later point in
time, the personally defined settings are reactivated.
This does not apply if the settings have been defined
on another smartphone or tablet PC. The modified
settings are activated in such cases.
1. Touch .Edit
2. Touch the Delete icon and then the Delete option.
The camera selected is deleted.
3. Touch Done. The start screen reappears.
Operating the Camera (iOS)
41
D
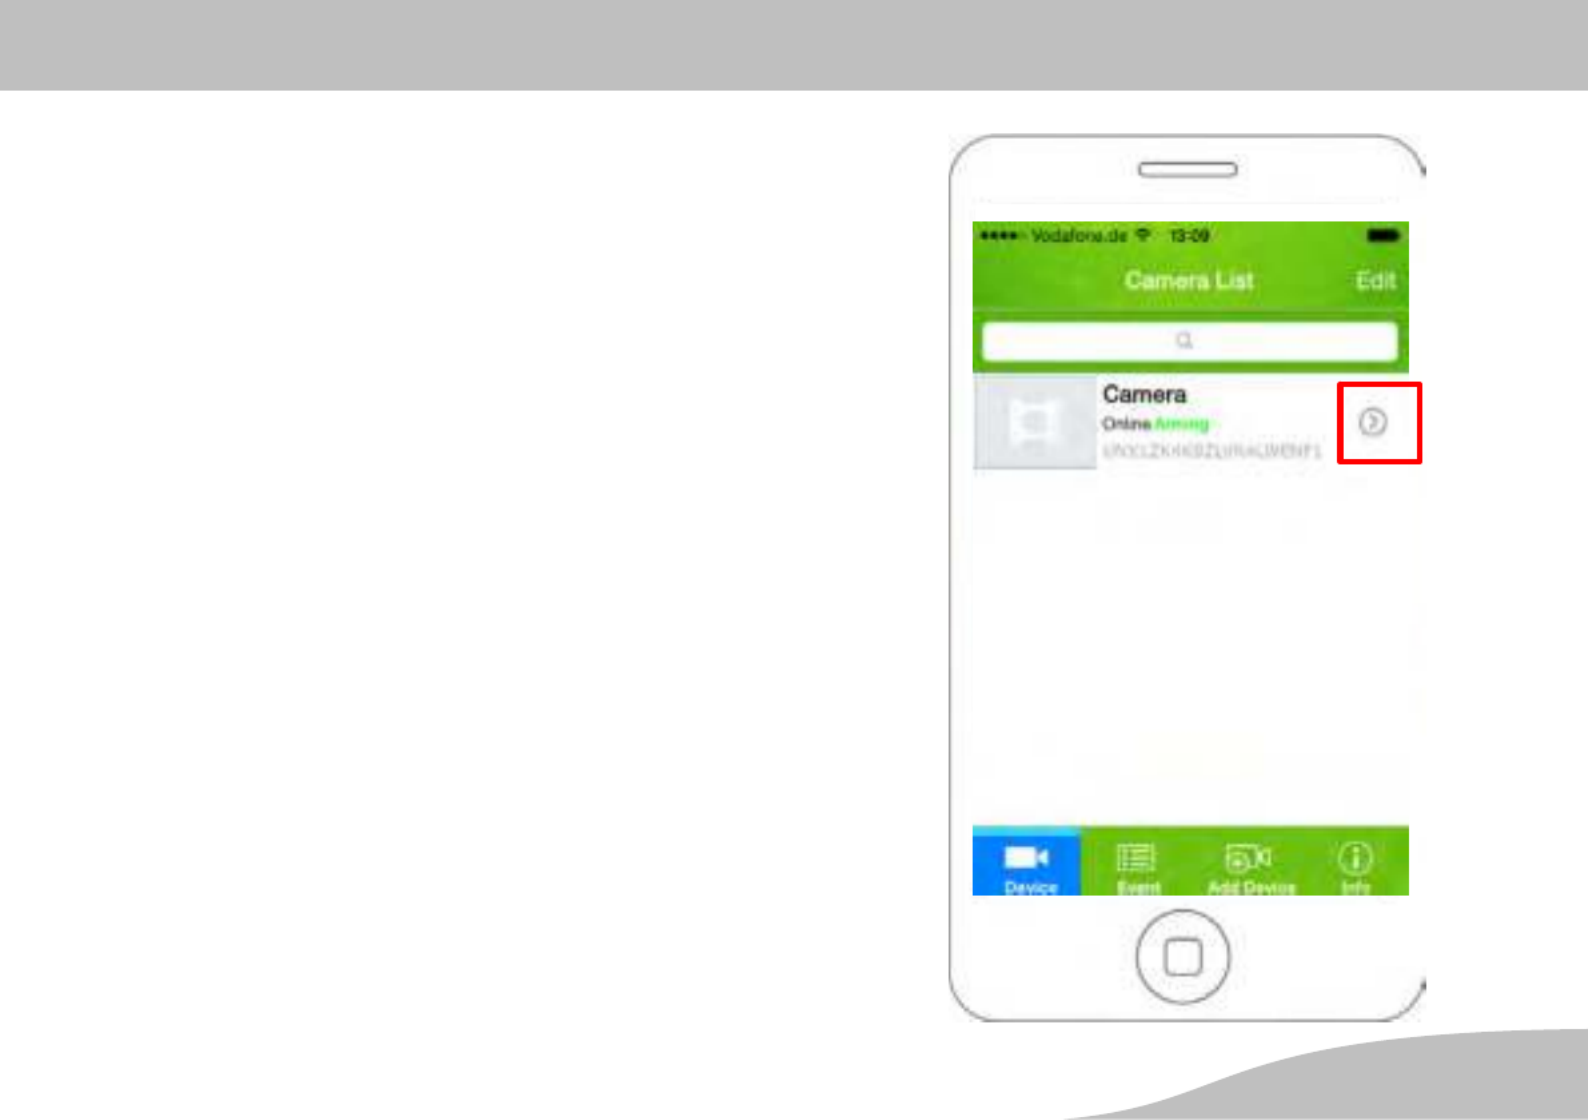
Edit Camera
You can use this menu to define the various functions and
settings which control the way in which the camera be
haves.
The Settings menu is arranged into four areas.
Device Setting
Advanced Setting
Alarm Setting
Time Setting
1. Touch the arrow to the right beside the required cam
era.
The following settings only affect the respective camera
selected. Information on particular, individual features is
provided at the respective point.
Some menus contain entries behind which is a small ar
row. If you touch this arrow, a list with various options
opens. Touch the required entry to select it.

Operating the Camera (iOS)
42 D
Device Setting
This menu option provides information on
the unambiguous user identifier ( ),UID
the name of the camera,
the camera's password.
Example Camera

Operating the Camera (iOS)
45
D
Password
The camera password protects the camera from access
by unauthorised third-parties.
For reasons of security, we recommend that you
change the camera's password when you put the
camera into operation for the first time (refer to Secu
rity Settings).
For reasons of security, the characters entered are en
crypted. Example Camera

Operating the Camera (iOS)
46 D
Advanced Setting
This option provides various functions and settings with
which you can define how the camera behaves according
to your own individual requirements.
The Advanced Setting menu is arranged into four areas.
Security Code
WiFi
SDCard
About Device
1. Touch Advanced Setting.
Example Camera

Operating the Camera (iOS)
47
D
Security Code
You have the option of changing your camera's security
code. The camera's security code protects the camera
data from access by unauthorised third-parties.
For reasons of security, we recommend that you
change the camera security code when you put the
camera into operation for the first time.
1. Touch Security Code in the Advanced Setting
menu.
2. Enter the existing security code.
When the default setting are set, the security code is
admin.
3. Enter the new security code.
4. Enter the new security code again.
5. Save the settings by touching .OK
TEST WLAN

Operating the Camera (iOS)
50 D
About Device
This menu provides detailed information on your camera.
This area displays
the name (designation) of the camera,
the firmware version on the camera,
the camera manufacturer,
the total memory capacity of the SD card,
the remaining memory capacity on the SD card.
1. Touch About Device in the Advanced Setting menu.
TEST WLAN

Operating the Camera (iOS)
51
D
Alarm Setting
Adapt the alarm settings of the camera and the
ProHomeIPC-App as required.
1. Touch Alarm Setting.
Your smartphone or tablet PC can be set-up to issue an
acoustic signal when the camera detects a movement. To
do this, activate the Push Notification option in the
ProHomeIPC-App in the settings options provided in
smartphone or tablet PC.
Example Camera

Operating the Camera (iOS)
52 D
Alarm Switch
This option is used to define whether surveillance by the
camera should be activated or not. If the surveillance
function is active, a recording is made of the area under
surveillance and you are alerted to an alarm situation by
an acoustic alarm and Push Notification on your smart
phone or tablet PC according to the settings defined.
1. Touch the Switch icon beside the Guard option. The
Switch icon indicates it is .ON
To avoid false alarms, we recommend deactivating
the guard when you are at home yourself or, accord
ing to your knowledge, other persons are permanently
in the area under surveillance.
TEST WLAN

Operating the Camera (iOS)
53
D
Motion Detection
You can select from the list how sensitive the camera
should react to movements in the area under surveillance.
In the case of a static image, we recommend the High
setting, in the case of possibly recurrent movements (such
as a pet or clouds), we recommend the Medium or Low
setting in order to prevent false alarms.
1. Touch Motion Detection in the list.
2. Touch the setting required. The setting is saved.
TEST WLAN
Operating the Camera (iOS)
54 D
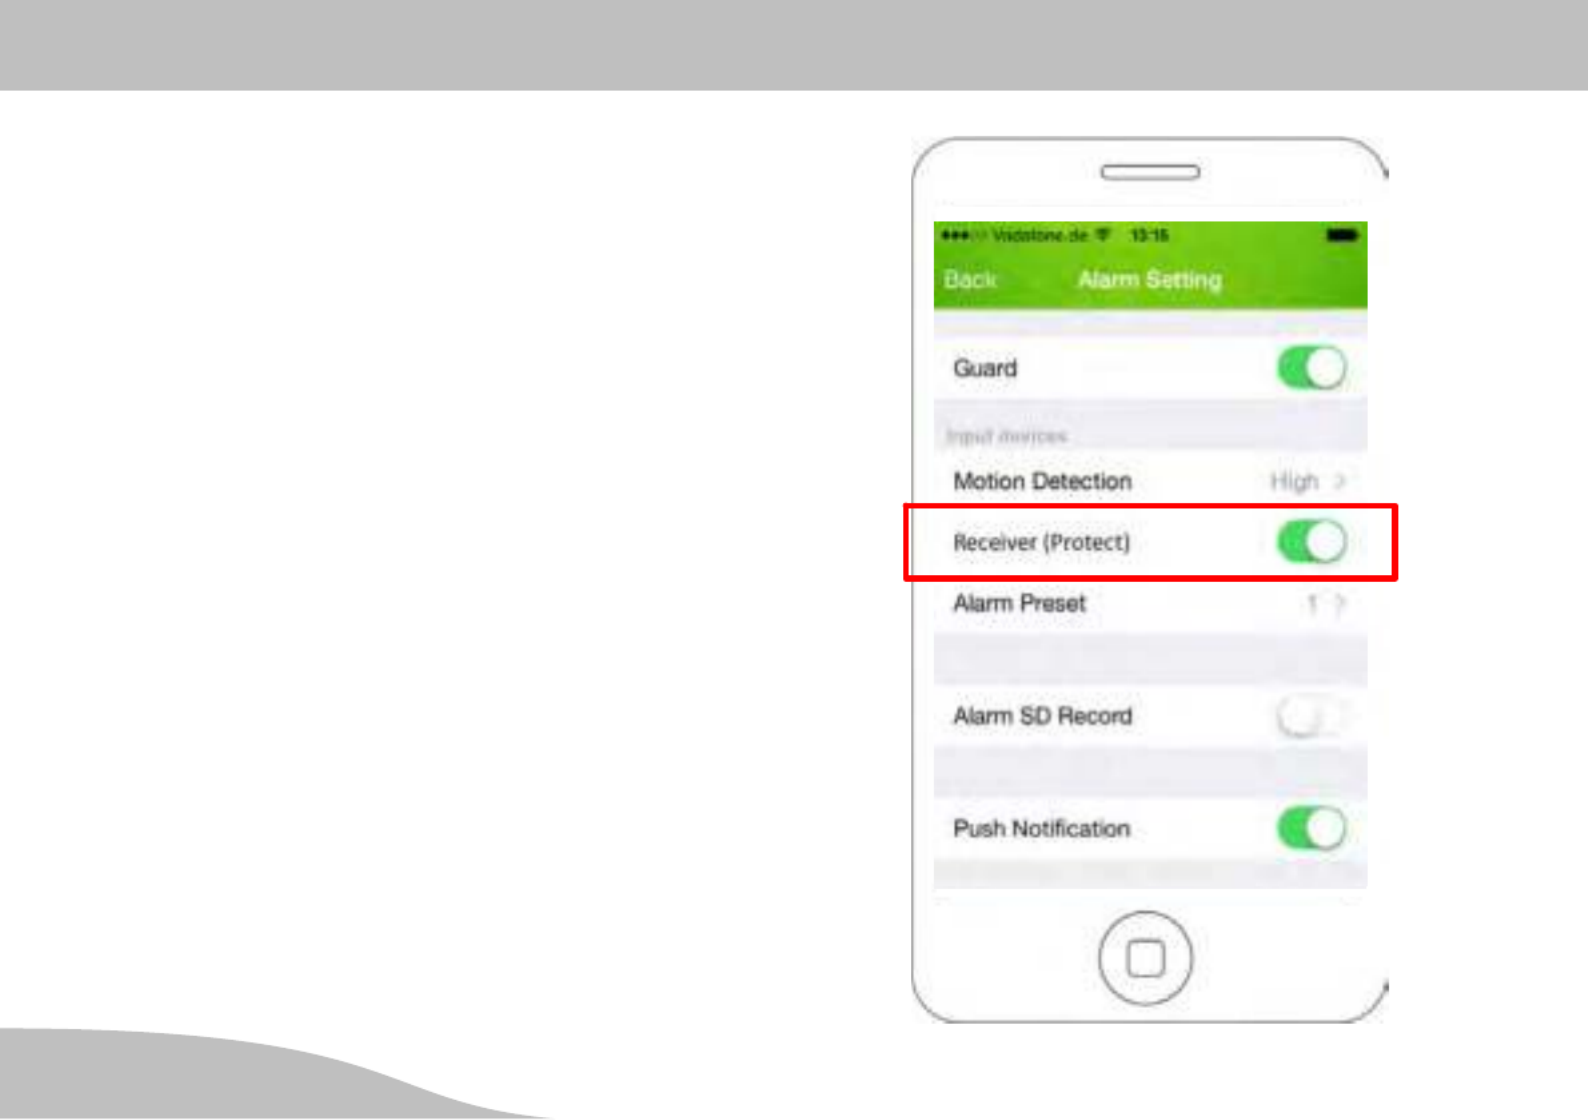
Receiver (Protect)
If you want to integrate the camera in an alarm system
(Protect Series 6xxx / 9xxx alarm system from Olympia),
you must use the receiver supplied.
When you want to activate the receiver, make sure the
receiver is connected to the camera and has been regis
tered on the alarm system (see Section Installing the
Camera).
1. Touch the Switch icon beside the Receiver (Protect)
option. The Switch icon indicates it is .ON
When this function is activated, the camera receives a
signal from the alarm system in the event of an alarm.
Your camera starts to make a video recording of the area
under surveillance and, at the same time, sends a push
notification to your smartphone or tablet PC.
TEST WLAN
Operating the Camera (iOS)
55
D
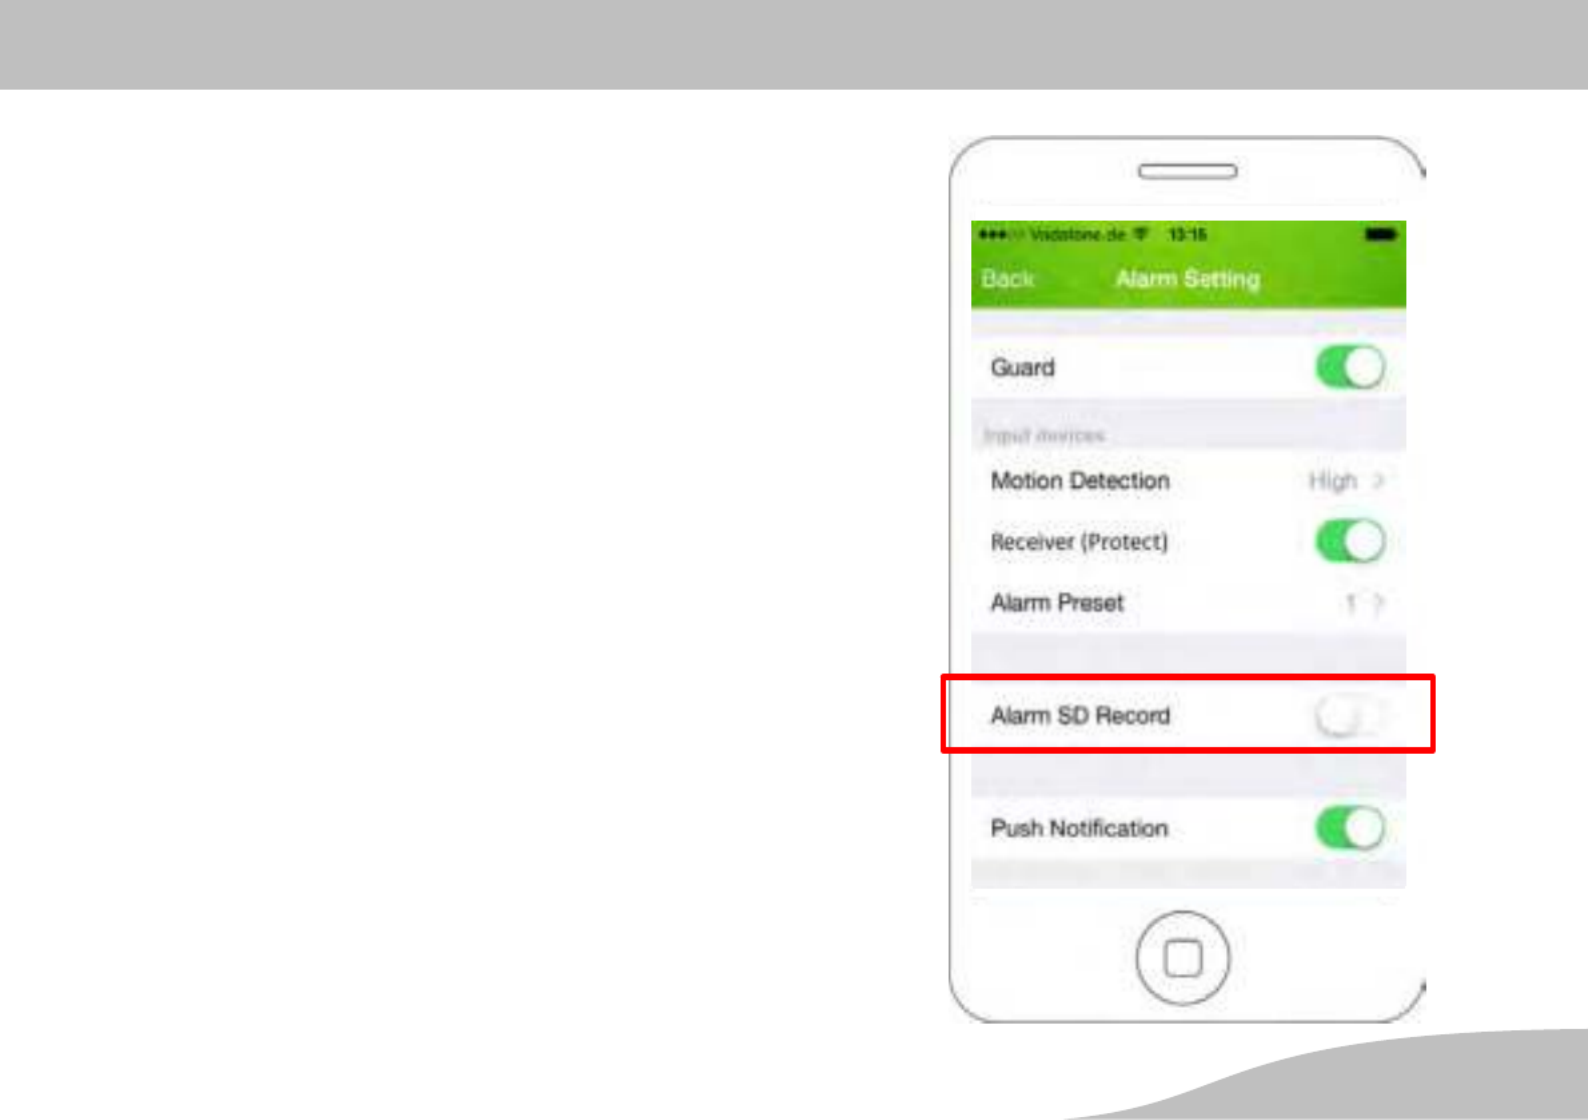
Recording on the SD Card
You can use this option to define whether your recordings
should be stored on the internal SD card.
1. Touch the Switch icon beside the Alarm SD Record
option. The Switch icon indicates it is .ON
TEST WLAN

Operating the Camera (iOS)
56 D
Push Notification
You can use this option to define whether the
ProHomeIPC-App push notifications should be sent to
your smartphone or tablet PC when the camera detects
movements or the alarm system connected is triggered.
A condition for the successful activation of this function is
that the transmission of push notifications has been en
abled in the system settings on the smartphone or tablet
PC. More detailed information is provided in the operating
manual supplied with your smartphone or tablet PC.
The transmission of push notifications also functions when
the ProHomeIPC-App is not running in the background
but has been terminated.
1. Touch the Switch icon beside the Push Notification
option. The Switch icon indicates it is .ON
TEST WLAN
Operating the Camera (iOS)
57
D
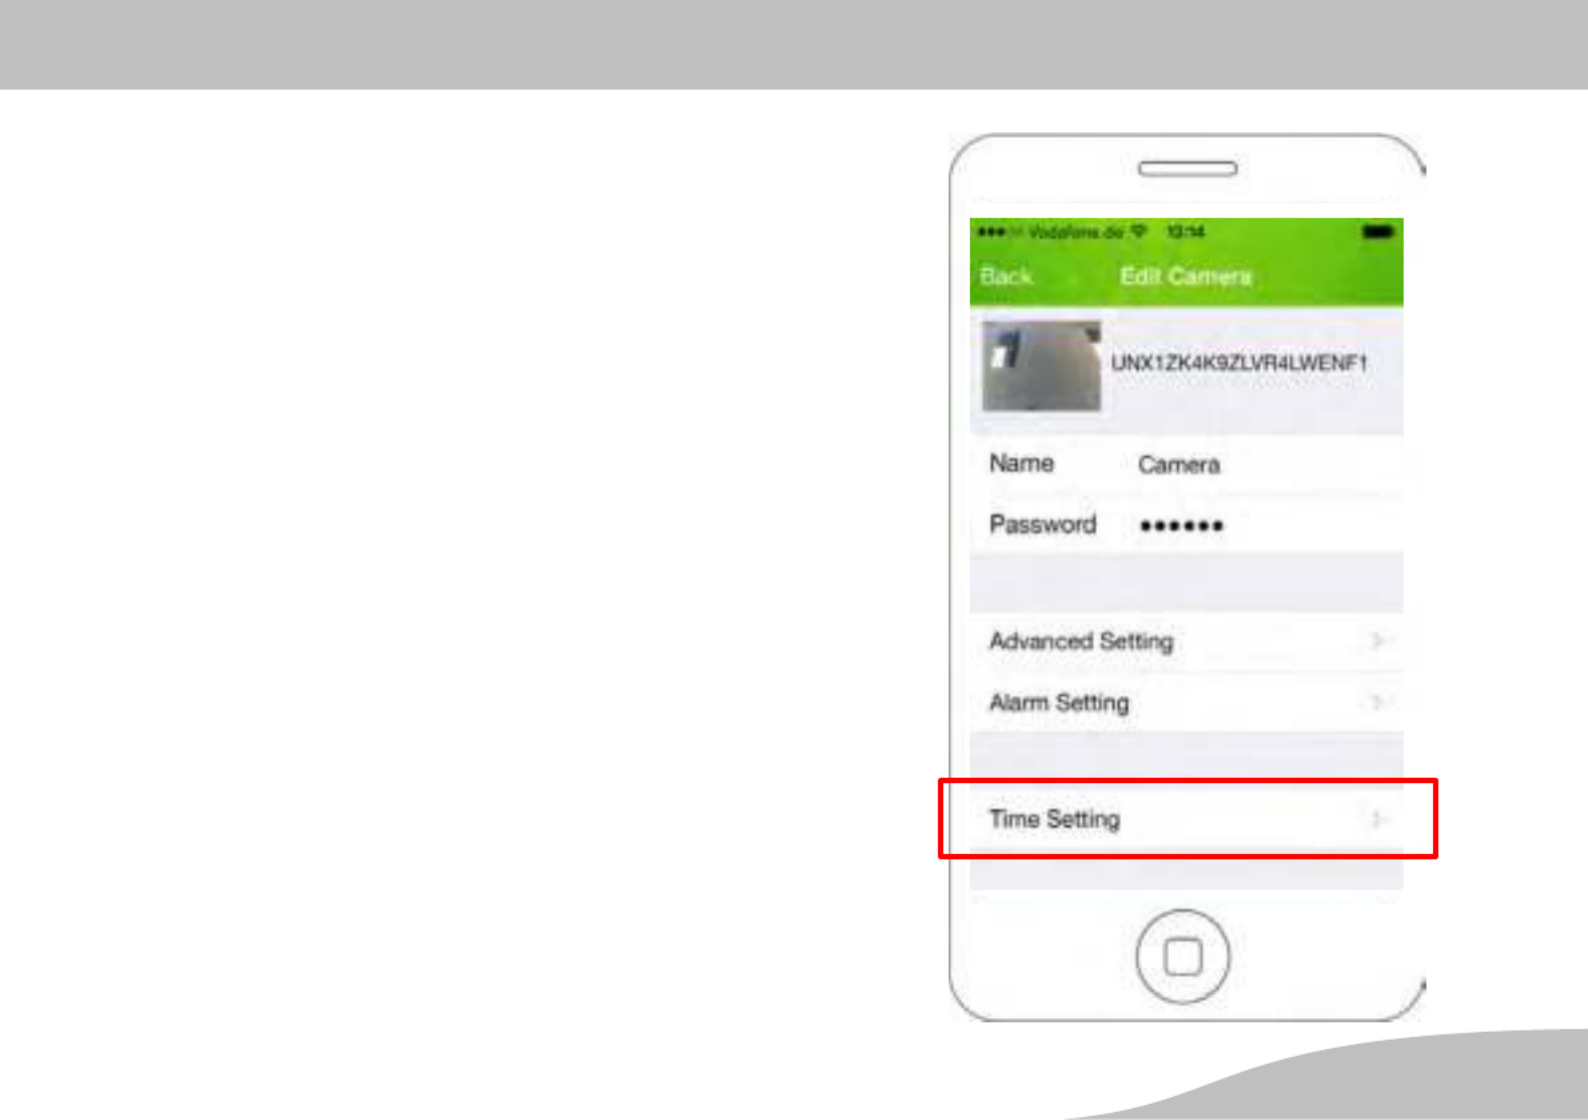
Time Setting
This option provides information and functions regarding
the time settings used.
1. Touch Settings in the Time Setting menu.
2. Define the respective settings as required.
When the default settings are active, the time and date
stamp displayed in the live image reflect the time and date
provided by the network connected. Example Camera
Operating the Camera (Android)
58 D
Operating the Camera (Android)
Opening the Menu Bar
Touch your finger on the smartphone or tablet PC screen.
A menu bar opens at the bottom edge of the screen.
A function is assigned to each button in the menu bar.
Touch one of the buttons to activate the function or, if
necessary, define settings.
Buttons in the Menu Bar
This section provides information on which functions are
assigned to the buttons in the menu bar while a live pic
ture is on screen and what you can do with them.
Snapshots
You can take a photo of the live image currently scanned
by the camera.
1. Touch the Snapshot button. The live image currently
displayed is saved as a snapshot. The Snapshot
succesfully message appears in the display.
When the default settings are set, the snapshots are
saved locally on the smartphone or tablet PC. You can
also save your snapshots on the camera. More detailed
information is provided in Section Recording on the SD
Card.

Operating the Camera (Android)
60 D
Flipping the Image Section Horizontally
You can flip (mirror) the live image displayed on the hori
zontal axis. This is useful, for example, if you want to in
stall your camera on a ceiling using the holding bracket.
1. Touch the Flip horizontal button. The current live
image displayed is flipped on the horizontal axis.
Flipping the Image Section Vertically
You can flip (mirror) the live image displayed on the verti
cal axis. This can be useful, for example, when the cam
era is mounted in such a way that parts of the area under
surveillance lie in a blind spot.
1. Touch the Flip vertical button. The current live image
displayed is flipped on the vertical axis.

Operating the Camera (Android)
61
D
Changing the Resolution
You can change the resolution of the camera. This can be
useful, for example, when there is a long delay regarding
data transmission; i.e. the camera takes a long time to
react to the movement commands you issue via the
ProHomeIPC-App. In such cases, it may be advanta
geous to reduce the resolution of the live image being
transmitted.
More detailed information on this subject is available
in Section What To Do When Problems Arise.
1. Touch the Video Quality button.
2. Touch the setting required.
Repeat this step until the camera reacts to the move
ment commands issued via the ProHomeIPC-App
without any delay.
Adapting to Environmental Conditions
You can adapt the camera settings to the environmental
conditions of the area under surveillance.
1. Touch the Environment Mode button.
2. Touch the required setting depending on whether the
area under surveillance is bright or dark.

Operating the Camera (Android)
62 D
Start Screen of the ProHomeIPC App
When a camera has been found and integrated success
fully in the , the corresponding cameraProHomeIPC-App
is displayed on the start screen.
All the cameras integrated in the ProHomeIPC-App are
displayed in this view.
We recommend that you assign each camera connected
an unambiguous name (refer to Section ).Names
You are provided with detailed information on
the unambiguous user identifier (UID)) of the camera,
the name (designation) of the camera,
the monitoring status of the camera,
the alarm preset status of the camera.
Operating the Camera (Android)
63
D
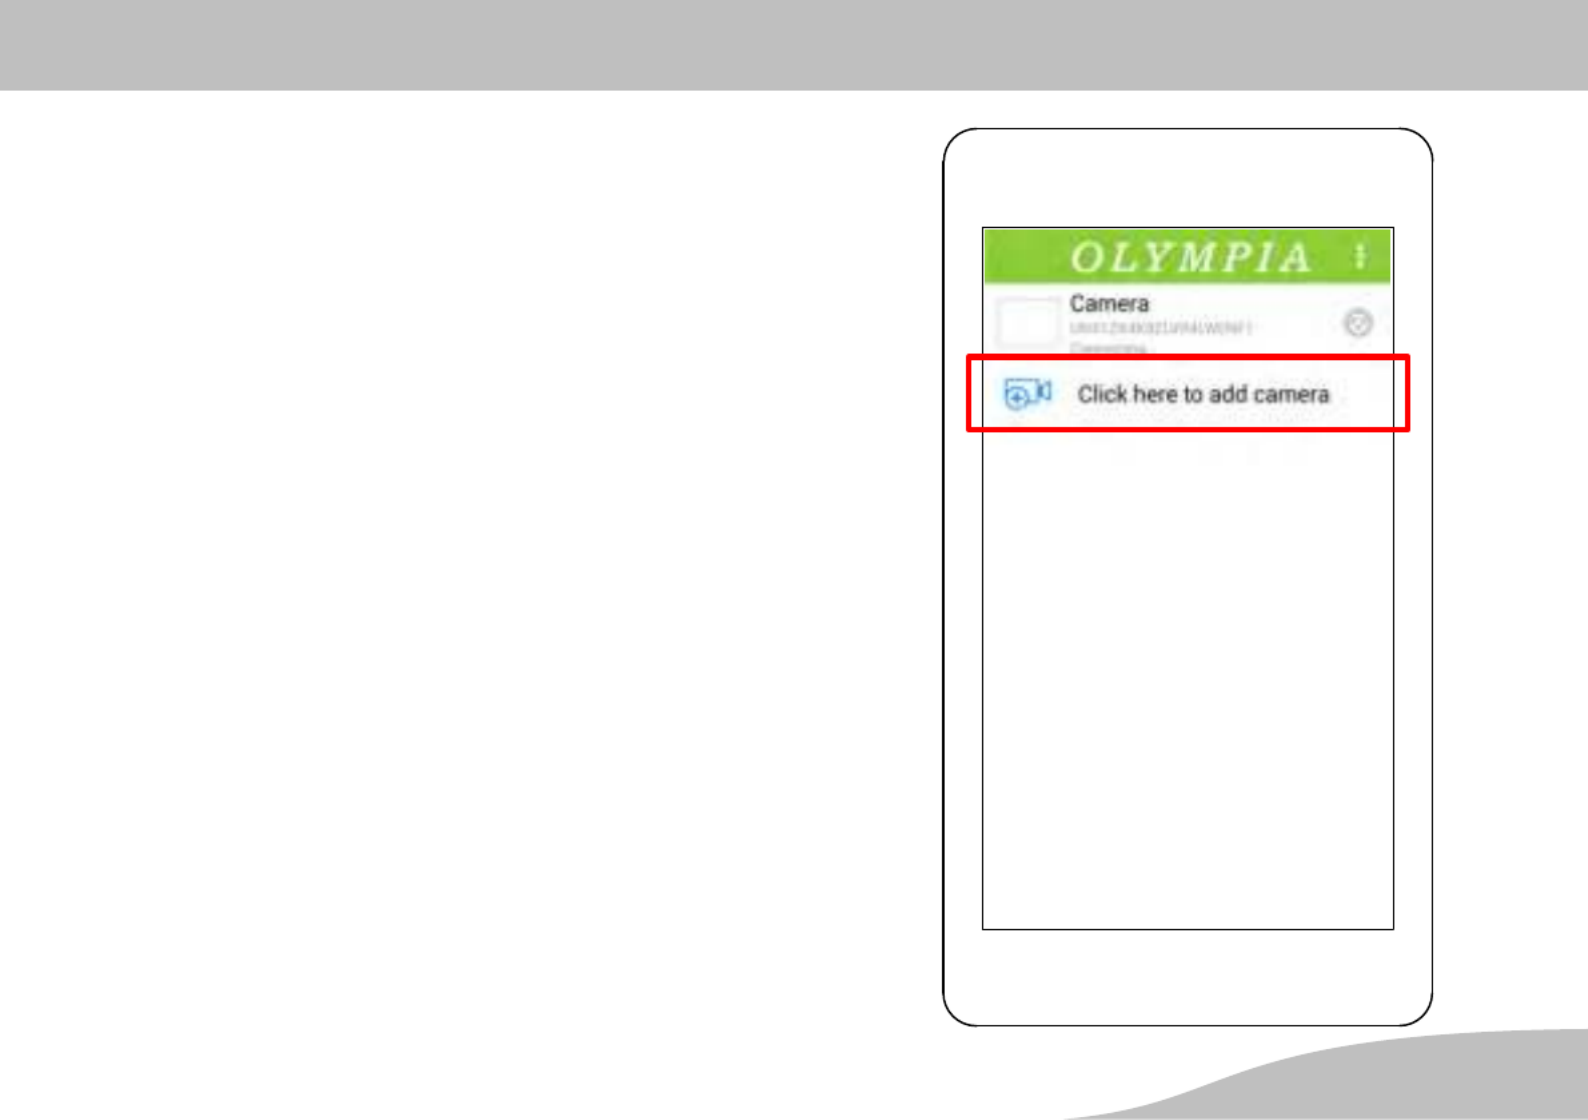
Add Device
You have the possibility of connecting more cameras by
means of different processes using the
ProHomeIPC-App.
All the cameras connected are displayed on the start
screen.
1. Touch Click here to add camera.
Operating the Camera (Android)
64 D
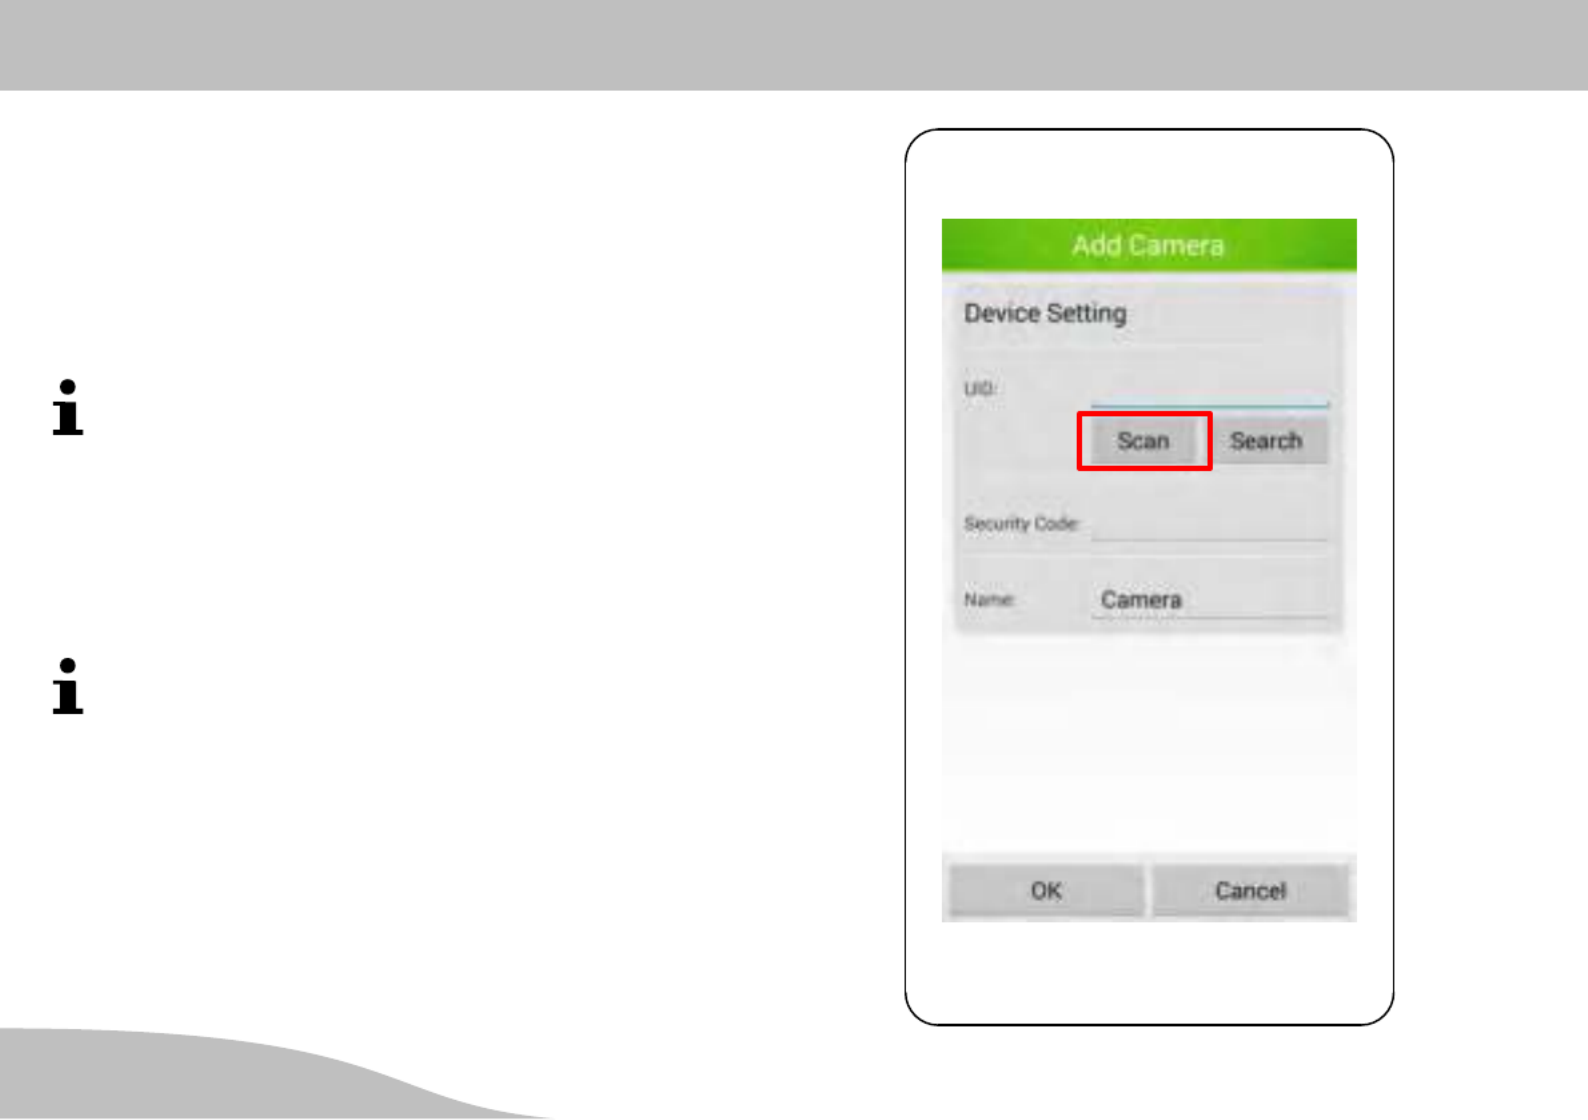
QR Code
1. Touch Scan.
2. Scan the QR code on the rear of the camera using
your smartphone or tablet PC.
3. Enter the camera's security code (password).
When the default setting are set, the security code is
admin.
4. Save the settings by touching .OK
Your camera is now listed in the overview of cameras
available.
The first time you attempt to select your camera, you
will be requested to change the camera's security
code for reasons of security. Change the camera's
security code in order to prevent unauthorised access
to your camera, and thus your privacy, by third par
ties.

Operating the Camera (Android)
65
D
Automatic Search
The ProHomeIPC-App automatically searches for all the
cameras available in the network. If your smartphone or
tablet PC is connected within the same network as the
camera, the camera is displayed (together with the unam
biguous user identifier (UID) and IP address).
1. Touch .Search
2. Touch the camera required.
3. Enter the camera's security code.
When the default setting are set, the security code is
admin.
4. Save the settings by touching .OK
Your camera is now listed in the overview of cameras
available.
The first time you attempt to select your camera, you
will be requested to change the camera's security
code for reasons of security. Change the camera's
security code in order to prevent unauthorised access
to your camera, and thus your privacy, by third par
ties.

Operating the Camera (Android)
66 D
Connecting Manually
You can also connect your camera to the
ProHomeIPC-App manually.
1. Enter the user identifier (UID), the security code and
name of the camera.
The user identifier (UID), name and security code are on
the rear of the camera.
2. Save the settings by touching .OK
Your camera is now listed in the overview of cameras
available.
The first time you attempt to select your camera, you
will be requested to change the camera's security
code for reasons of security. Change the camera's
security code in order to prevent unauthorised access
to your camera, and thus your privacy, by third par
ties.
Operating the Camera (Android)
68 D
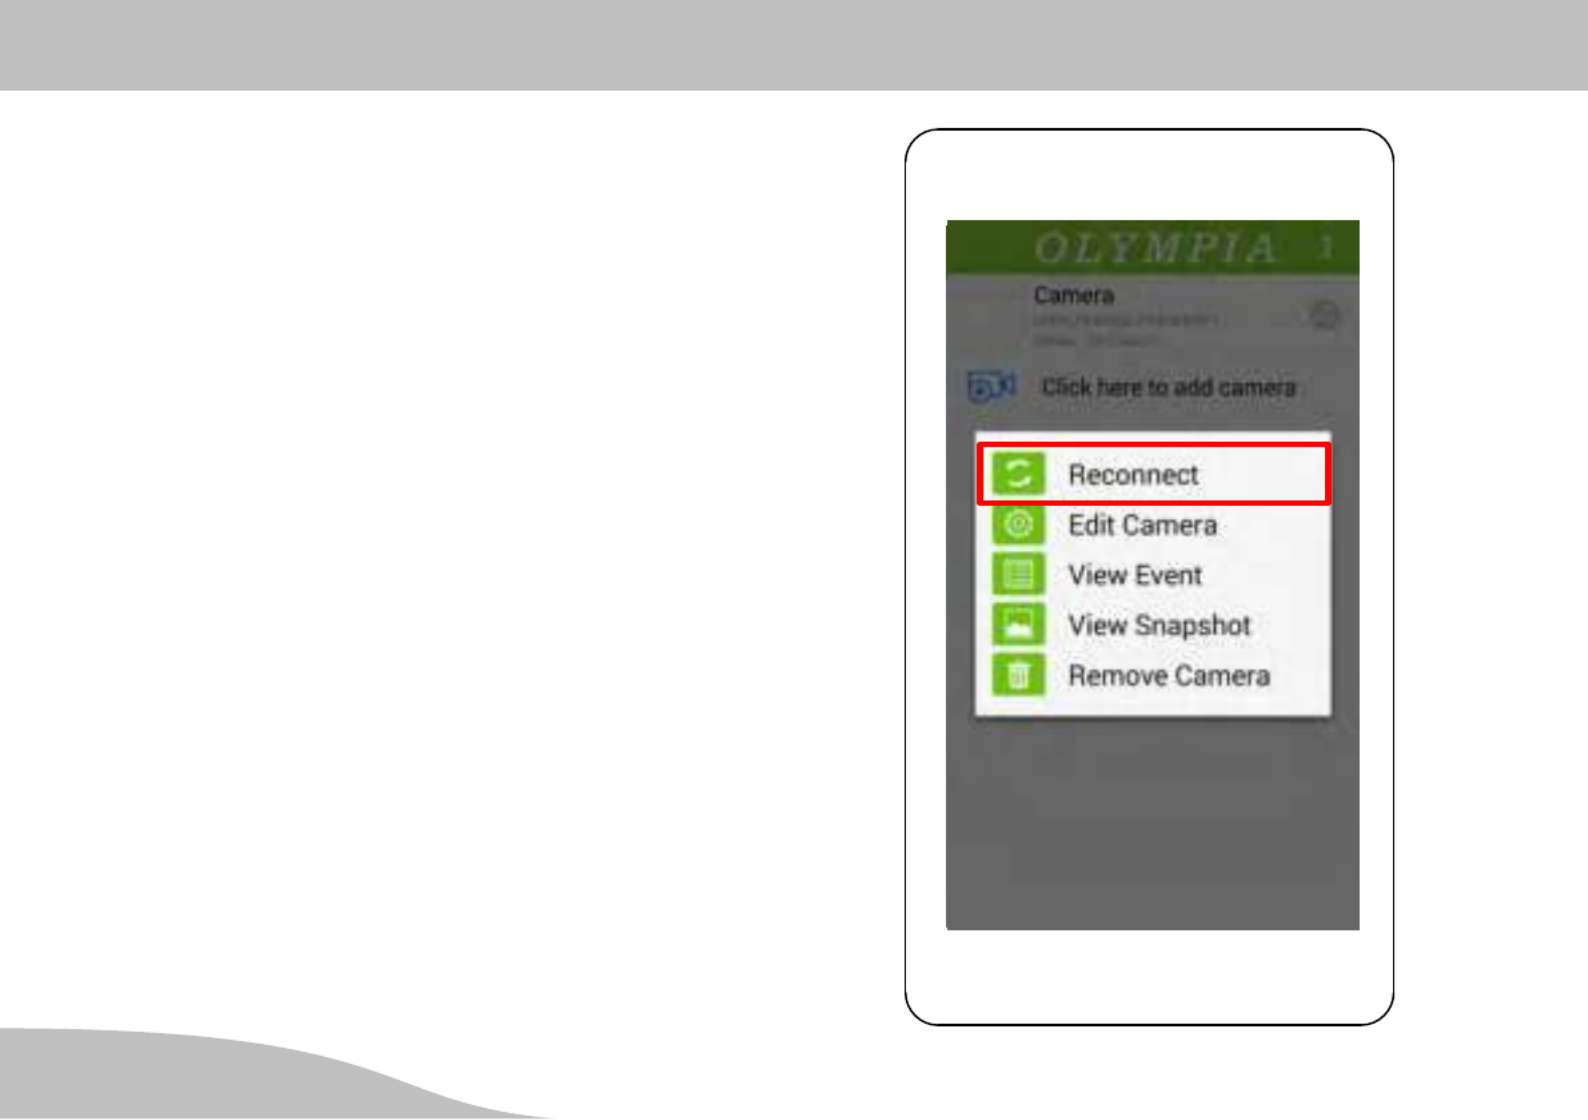
Reconnect
Should problems arise involving the connection, you can
connect the camera again using the .ProHomeIPC-App
1. Touch Reconnect. The camera selected is recon
nected.
You cannot access the camera while this process is in
progress.

Operating the Camera (Android)
69
D
View Event
This option enables you to display a list of events which
the camera has recorded and saved in chronological or
der.
1. Touch View Event.
If no event has (yet) been recorded, the No result found
message appears.
You can define specific periods of time in the chronologi
cal list of events in order to limit the events displayed to a
certain time range.
2. Touch the magnifying glass icon at the top right.
3. Touch the required time period for the events.
4. All the events related to the time period selected are
displayed.

Operating the Camera (Android)
71
D
Remove Camera
It is possible to delete individual cameras from the
ProHomeIPC-App.
All personally defined settings are stored locally on the
camera. If you want to reconnect cameras deleted from
the list to your smartphone or tablet PC at a later point in
time, the personally defined settings are reactivated.
This does not apply if the settings have been defined
on another smartphone or tablet PC. The modified
settings are activated in such cases.
1. Touch .Remove Camera
2. Confirm the prompt by touching OK.
The camera selected is deleted.

Operating the Camera (Android)
72 D
Edit Camera
You can use this menu to define the various functions and
settings which control the way in which the camera be
haves.
The Edit Camera menu is arranged into four areas.
Device Setting
Advanced Setting
Alarm Setting
Time Setting
The following settings only affect the respective camera
selected. Information on particular, individual features is
provided at the respective point.
Some menus contain entries behind which is a small ar
row. If you touch this arrow, a list with various options
opens. Touch the required entry to select it.
TEST WLAN

Operating the Camera (Android)
73
D
Device Setting
This menu option provides information on
the unambiguous user identifier ( ),UID
the camera's security code,
the name of the camera.
TEST WLAN

Operating the Camera (Android)
74 D
User Identifier (UID)
The camera's user identifier (UID) serves to identify the
camera unambiguously within the network.
The user identifier cannot be changed.
TEST WLAN

Operating the Camera (Android)
75
D
Security Code
The camera security code protects the camera from ac
cess by unauthorised third-parties.
For reasons of security, we recommend that you
change the camera's security code when you put the
camera into operation for the first time (refer to Secu
rity Settings).
For reasons of security, the characters entered are en
crypted.
TEST WLAN

Operating the Camera (Android)
76 D
Name
The name of the camera is displayed on the
ProHomeIPC-App start screen.
This enables you to simplify the assignment of your cam
era if you have connected several cameras to the
ProHomeIPC-App.
You should assign each camera an unambiguous
name, such as Living room, Office or .Workshop
1. Touch the field beside the Name option.
2. Change the name of the camera.
3. Save the settings by touching .OK
TEST WLAN

Operating the Camera (Android)
77
D
Advanced Setting
This option provides various functions and settings with
which you can define how the camera behaves according
to your own individual requirements.
The Advanced Setting menu is arranged into four areas.
Modify Security Code
Wi-Fi Setting
Device information.
1. Touch Advanced in the Advanced Setting menu.

Operating the Camera (Android)
79
D
Wi-Fi Setting
You can connect the camera to a wireless network.
If the camera is already connected to a wireless network
(WLAN), refer to the name of the connected network in
the middle of the marked area on the right. In this exam
ple, the name is .TEST-WLAN
1. Touch Manage Wi-Fi networks in the Wi-Fi Setting
menu.
2. Touch the arrow on the right to open a list containing
all the wireless networks available in the vicinity.
3. Touch the network to which you want to connect your
camera.
4. Enter the WiFi password of the network selected. For
security reasons, the characters of the password ap
pear encrypted.
If you select the checkbox beside Show password,
the characters entered are displayed.
5. Save the settings by touching .OK

Operating the Camera (Android)
80 D
Device Information
This menu provides detailed information on your camera.
This area displays
the name (designation) of the camera,
the firmware version on the camera,
the camera manufacturer,
the total memory capacity of the internal SD card,
the remaining memory capacity of the SD card.
No settings can be changed in this area.
TEST WLAN
Connected
Operating the Camera (Android)
81
D
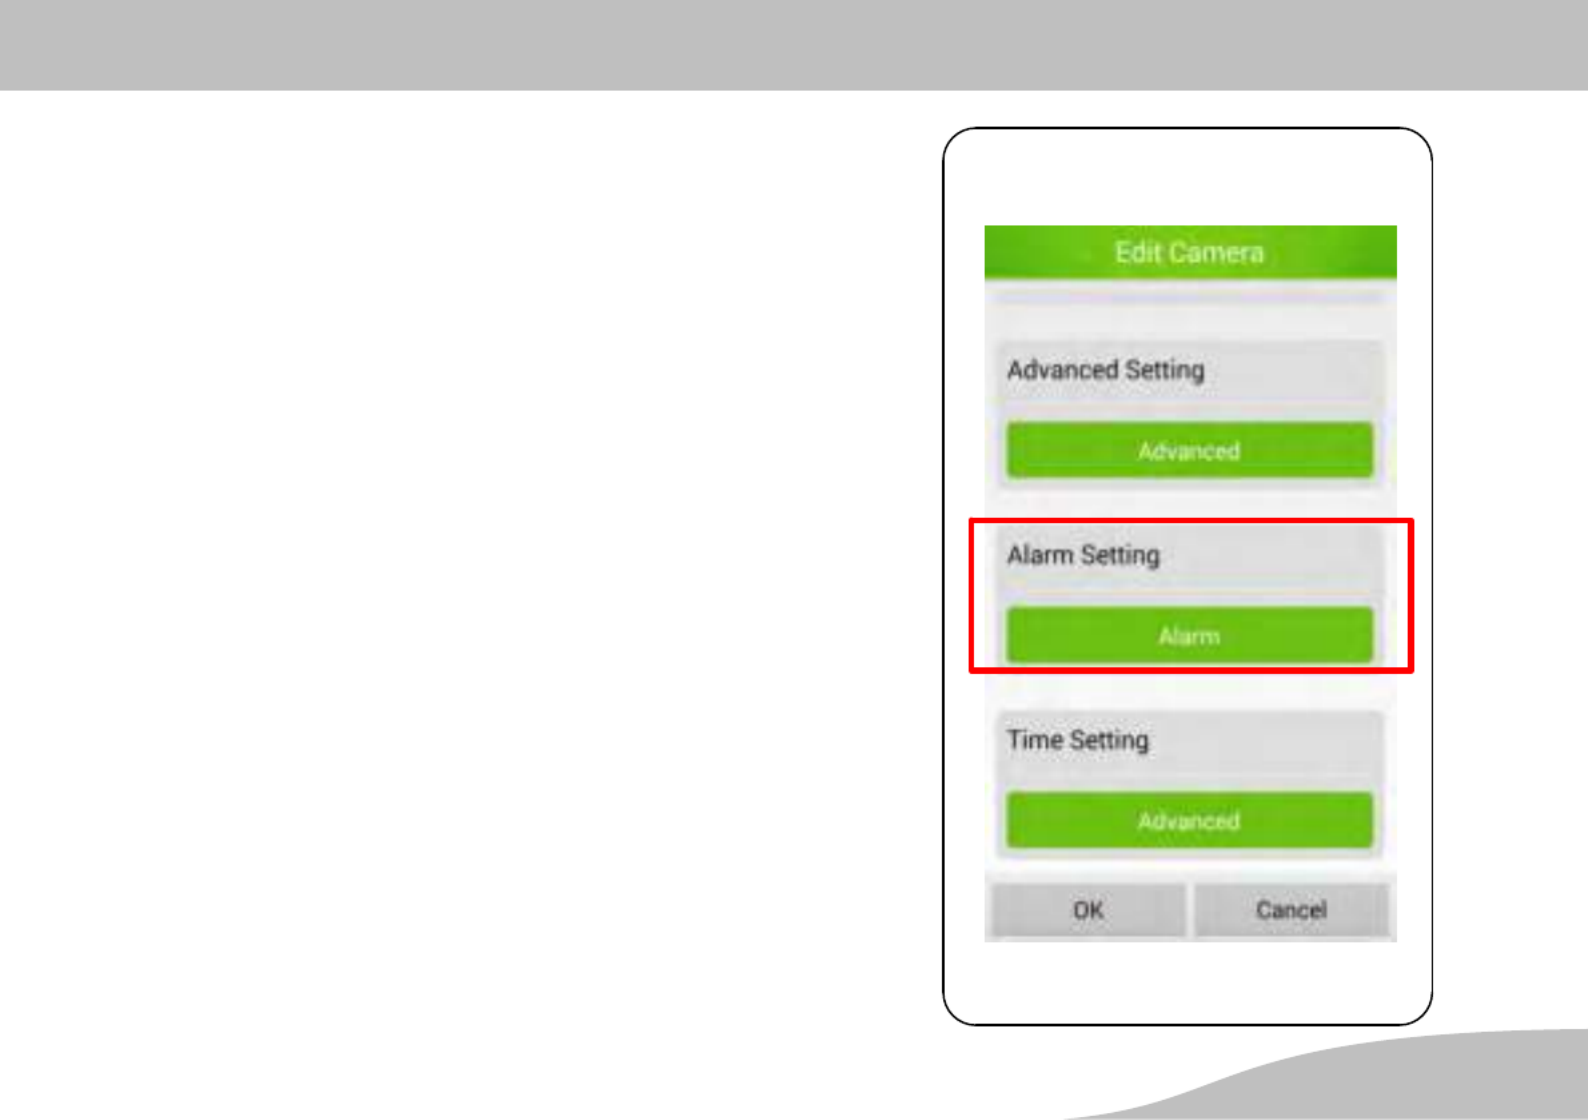
Alarm Setting
Adapt the alarm settings of the camera and the
ProHomeIPC-App as required.
1. Touch Alarm in the Alarm Setting menu.
Your smartphone or tablet PC can be set-up to issue an
acoustic signal when the camera detects a movement. To
do this, activate the Push Notification option in the
ProHomeIPC-App in the setting options provided in
smartphone or tablet PC.
Product specificaties
| Merk: | Olympia |
| Categorie: | Bewakingscamera |
| Model: | OC 1280P |
| Kleur van het product: | Wit |
| Gewicht: | 350 g |
| Diepte: | 175 mm |
| Gewicht verpakking: | 1090 g |
| Breedte verpakking: | 195 mm |
| Diepte verpakking: | 12 mm |
| Hoogte verpakking: | 245 mm |
| Soort: | IP-beveiligingscamera |
| Internationale veiligheidscode (IP): | IP65 |
| Ondersteunde mobiele besturingssystemen: | Android 4.0, Android 4.1, Android 4.2, Android 4.3, Android 4.4, Android 5.0, Android 5.1, iOS 7.0, iOS 7.1, iOS 7.2, iOS 8.0, iOS 8.1, iOS 8.2, iOS 8.3, iOS 8.4, iOS 9.0, iOS 9.1, iOS 9.2, iOS 9.3 |
| Wi-Fi-standaarden: | 802.11b, 802.11g, Wi-Fi 4 (802.11n) |
| Vormfactor: | Rond |
| Ondersteuning voor plaatsing: | Buiten |
| Connectiviteitstechnologie: | Bedraad en draadloos |
| Ethernet LAN: | Ja |
| Montagewijze: | Plafond/muur |
| Maximum resolutie: | 1280 x 720 Pixels |
| Videocompressieformaten: | H.264 |
| Diameter: | 65 mm |
| Stroomuitvoer (ampère): | 5 A |
| Minimale belichting: | 0.5 Lux |
| Field of view (FOV) hoek: | 60 ° |
| Aantal cameras: | 1 |
| Geïntegreerde geheugenkaartlezer: | Ja |
| Compatibele geheugenkaarten: | MicroSD (TransFlash) |
| Ingebouwde HDD: | Nee |
| Nachtvisie: | Ja |
| LED-type: | IR |
| Vaste focale lengte: | 3.6 mm |
| Video bewegings-detectie: | Ja |
| Omvang optische sensor: | 1/4 " |
| Type beeldsensor: | CMOS |
| Interface: | RJ-45/WLAN |
| Plug and play: | Ja |
| Ondersteunde beveiligingsalgoritmen: | WEP, WPA, WPA2 |
| Maximaal 30 frames per seconde: | 30 fps |
| Frequentie: | 868 MHz |
| Stroomverbruik: | 2500 mA |
| Flash memory: | 8000 MB |
| Ethernet interface type: | Fast Ethernet |
| Ondersteunde talen: | DEU, ENG |
| Power over Ethernet (PoE): | Nee |
| Weerbestendig: | Ja |
| Nachtkijker afstand: | 15 m |
| Aantal verlichtingen LEDS: | 21 |
| Infrarood (IR)-afsluitingsfilter: | Ja |
| Aantal talen: | 2 |
| (Buitenste) hoofdverpakking hoogte: | 280 mm |
| (Buitenste) hoofdverpakking breedte: | 630 mm |
| (Buitenste) hoofdverpakking brutogewicht: | 12250 g |
| (Buitenste) hoofdverpakking lengte: | 400 mm |
| Hoeveelheid per (buitenste) hoofdverpakking: | 10 stuk(s) |
| Wifi: | Ja |
| AC-ingangsspanning: | 100-240 V |
| AC-ingangsfrequentie: | 50 - 60 Hz |
| Bedrijfstemperatuur (T-T): | 0 - 55 °C |
| Relatieve vochtigheid in bedrijf (V-V): | 20 - 80 procent |
Heb je hulp nodig?
Als je hulp nodig hebt met Olympia OC 1280P stel dan hieronder een vraag en andere gebruikers zullen je antwoorden
Handleiding Bewakingscamera Olympia

9 December 2023
29 Juni 2023
19 Juni 2023
17 Juni 2023
17 Juni 2023
15 Juni 2023
12 Juni 2023
10 Juni 2023
9 Juni 2023
6 Juni 2023
Handleiding Bewakingscamera
- Bewakingscamera Braun
- Bewakingscamera Bosch
- Bewakingscamera Philips
- Bewakingscamera Sony
- Bewakingscamera Samsung
- Bewakingscamera Xiaomi
- Bewakingscamera Panasonic
- Bewakingscamera Asus
- Bewakingscamera Canon
- Bewakingscamera Garmin
- Bewakingscamera Grundig
- Bewakingscamera Gigaset
- Bewakingscamera Honeywell
- Bewakingscamera JVC
- Bewakingscamera Motorola
- Bewakingscamera Pioneer
- Bewakingscamera Toshiba
- Bewakingscamera VTech
- Bewakingscamera Abus
- Bewakingscamera ACME
- Bewakingscamera Acti
- Bewakingscamera Ag Neovo
- Bewakingscamera Airlive
- Bewakingscamera Aldi
- Bewakingscamera Alecto
- Bewakingscamera Allnet
- Bewakingscamera Aluratek
- Bewakingscamera Anker
- Bewakingscamera Apc
- Bewakingscamera Aqara
- Bewakingscamera Aritech
- Bewakingscamera Avanti
- Bewakingscamera AVTech
- Bewakingscamera Axis
- Bewakingscamera Beafon
- Bewakingscamera Belkin
- Bewakingscamera Blaupunkt
- Bewakingscamera Boss
- Bewakingscamera Brinno
- Bewakingscamera BRK
- Bewakingscamera Buffalo
- Bewakingscamera Burg-Wachter
- Bewakingscamera D-Link
- Bewakingscamera Dedicated Micros
- Bewakingscamera Denver
- Bewakingscamera Digitus
- Bewakingscamera DIO
- Bewakingscamera Dorr
- Bewakingscamera E-bench
- Bewakingscamera Ebode
- Bewakingscamera Edimax
- Bewakingscamera Ednet
- Bewakingscamera Elmo
- Bewakingscamera Elro
- Bewakingscamera Eminent
- Bewakingscamera Engenius
- Bewakingscamera Eufy
- Bewakingscamera EverFocus
- Bewakingscamera Extech
- Bewakingscamera Ezviz
- Bewakingscamera Ferguson
- Bewakingscamera First Alert
- Bewakingscamera Flamingo
- Bewakingscamera Flir
- Bewakingscamera Foscam
- Bewakingscamera Friedland
- Bewakingscamera Ganz
- Bewakingscamera Gembird
- Bewakingscamera Genius
- Bewakingscamera GeoVision
- Bewakingscamera Gira
- Bewakingscamera Google
- Bewakingscamera Grandstream
- Bewakingscamera Hama
- Bewakingscamera Hikvision
- Bewakingscamera Iget
- Bewakingscamera Iiquu
- Bewakingscamera Iluv
- Bewakingscamera Indexa
- Bewakingscamera InFocus
- Bewakingscamera Interlogix
- Bewakingscamera Ion
- Bewakingscamera Kerbl
- Bewakingscamera KlikaanKlikuit
- Bewakingscamera Kodak
- Bewakingscamera Kogan
- Bewakingscamera Konig
- Bewakingscamera Laserliner
- Bewakingscamera LevelOne
- Bewakingscamera Linksys
- Bewakingscamera Logilink
- Bewakingscamera Logitech
- Bewakingscamera Lorex
- Bewakingscamera Maginon
- Bewakingscamera Manhattan
- Bewakingscamera Marmitek
- Bewakingscamera Marquant
- Bewakingscamera Marshall
- Bewakingscamera Megasat
- Bewakingscamera Minox
- Bewakingscamera Mitsubishi
- Bewakingscamera Monacor
- Bewakingscamera Nedis
- Bewakingscamera Nest
- Bewakingscamera Netatmo
- Bewakingscamera Netgear
- Bewakingscamera Netis
- Bewakingscamera Notifier
- Bewakingscamera Perel
- Bewakingscamera Powerfix
- Bewakingscamera Profile
- Bewakingscamera Provision ISR
- Bewakingscamera Pyle
- Bewakingscamera Quantum
- Bewakingscamera Raymarine
- Bewakingscamera Renkforce
- Bewakingscamera Revo
- Bewakingscamera Ricoh
- Bewakingscamera Ring
- Bewakingscamera Rollei
- Bewakingscamera Sanyo
- Bewakingscamera Satel
- Bewakingscamera Schneider
- Bewakingscamera SecurityMan
- Bewakingscamera Siedle
- Bewakingscamera Sitecom
- Bewakingscamera Smartwares
- Bewakingscamera SMC
- Bewakingscamera Somfy
- Bewakingscamera Sonic Alert
- Bewakingscamera Stabo
- Bewakingscamera Strong
- Bewakingscamera Switel
- Bewakingscamera Synology
- Bewakingscamera Technaxx
- Bewakingscamera Tenda
- Bewakingscamera Thomson
- Bewakingscamera TP Link
- Bewakingscamera Trebs
- Bewakingscamera Trendnet
- Bewakingscamera Trust
- Bewakingscamera Uniden
- Bewakingscamera V-Tac
- Bewakingscamera Velleman
- Bewakingscamera Vitek
- Bewakingscamera Vivotek
- Bewakingscamera Waeco
- Bewakingscamera Western Digital
- Bewakingscamera Withings
- Bewakingscamera Woonveilig
- Bewakingscamera Xavax
- Bewakingscamera Y-cam
- Bewakingscamera Yale
- Bewakingscamera Zebra
- Bewakingscamera ZTE
- Bewakingscamera ZyXEL
- Bewakingscamera Jung
- Bewakingscamera Oplink
- Bewakingscamera Orion
- Bewakingscamera Overmax
- Bewakingscamera Clas Ohlson
- Bewakingscamera Caliber
- Bewakingscamera Exibel
- Bewakingscamera Monoprice
- Bewakingscamera Naxa
- Bewakingscamera Niceboy
- Bewakingscamera Schwaiger
- Bewakingscamera Steren
- Bewakingscamera Ubiquiti Networks
- Bewakingscamera EMOS
- Bewakingscamera Conceptronic
- Bewakingscamera Miniland
- Bewakingscamera Arlo
- Bewakingscamera Atlona
- Bewakingscamera Avidsen
- Bewakingscamera Hamlet
- Bewakingscamera Hive
- Bewakingscamera Imou
- Bewakingscamera INSTAR
- Bewakingscamera SereneLife
- Bewakingscamera Defender
- Bewakingscamera Trevi
- Bewakingscamera Adesso
- Bewakingscamera Broan
- Bewakingscamera DSC
- Bewakingscamera M-e
- Bewakingscamera Blow
- Bewakingscamera Genie
- Bewakingscamera ClearOne
- Bewakingscamera Chacon
- Bewakingscamera Swann
- Bewakingscamera Approx
- Bewakingscamera SPC
- Bewakingscamera Canyon
- Bewakingscamera Cisco
- Bewakingscamera EVOLVEO
- Bewakingscamera Whistler
- Bewakingscamera Delta Dore
- Bewakingscamera Furrion
- Bewakingscamera Comtrend
- Bewakingscamera Planet
- Bewakingscamera Blink
- Bewakingscamera Intellinet
- Bewakingscamera Aida
- Bewakingscamera Lindy
- Bewakingscamera AVerMedia
- Bewakingscamera Lumens
- Bewakingscamera Mobi
- Bewakingscamera Fortinet
- Bewakingscamera DataVideo
- Bewakingscamera Hombli
- Bewakingscamera Vaddio
- Bewakingscamera Adj
- Bewakingscamera Ikan
- Bewakingscamera Dahua Technology
- Bewakingscamera UniView
- Bewakingscamera Reolink
- Bewakingscamera Valueline
- Bewakingscamera EVE
- Bewakingscamera QSC
- Bewakingscamera Marshall Electronics
- Bewakingscamera Boyo
- Bewakingscamera IC Intracom
- Bewakingscamera CRUX
- Bewakingscamera POSline
- Bewakingscamera August
- Bewakingscamera Hawking Technologies
- Bewakingscamera Lanberg
- Bewakingscamera Nexxt
- Bewakingscamera Watec
- Bewakingscamera Moog
- Bewakingscamera Equip
- Bewakingscamera Crestron
- Bewakingscamera Chuango
- Bewakingscamera ORNO
- Bewakingscamera ETiger
- Bewakingscamera Videcon
- Bewakingscamera Advantech
- Bewakingscamera Moxa
- Bewakingscamera Digital Watchdog
- Bewakingscamera Brilliant
- Bewakingscamera Moen
- Bewakingscamera Kramer
- Bewakingscamera MEE Audio
- Bewakingscamera Brickcom
- Bewakingscamera Kwikset
- Bewakingscamera Linear PRO Access
- Bewakingscamera BirdDog
- Bewakingscamera AVer
- Bewakingscamera Summer Infant
- Bewakingscamera Topica
- Bewakingscamera Vimar
- Bewakingscamera Speco Technologies
- Bewakingscamera Verint
- Bewakingscamera ZKTeco
- Bewakingscamera Rostra
- Bewakingscamera Kguard
- Bewakingscamera Caddx
- Bewakingscamera Spyclops
- Bewakingscamera EKO
- Bewakingscamera Inovonics
- Bewakingscamera Surveon
- Bewakingscamera Hollyland
- Bewakingscamera Epcom
- Bewakingscamera AViPAS
- Bewakingscamera Lutec
- Bewakingscamera Hanwha
- Bewakingscamera ClearView
- Bewakingscamera VideoComm
- Bewakingscamera IMILAB
- Bewakingscamera InfiRay
- Bewakingscamera 3xLOGIC
- Bewakingscamera Pelco
- Bewakingscamera Leviton
- Bewakingscamera EtiamPro
- Bewakingscamera Inkovideo
- Bewakingscamera Pentatech
- Bewakingscamera Weldex
- Bewakingscamera CNB Technology
- Bewakingscamera Tapo
- Bewakingscamera Aigis
- Bewakingscamera Exacq
- Bewakingscamera Laxihub
- Bewakingscamera Securetech
- Bewakingscamera EFB Elektronik
- Bewakingscamera Ernitec
- Bewakingscamera NetMedia
- Bewakingscamera Videotec
- Bewakingscamera Illustra
- Bewakingscamera AVMATRIX
- Bewakingscamera Nivian
- Bewakingscamera Arenti
- Bewakingscamera Syscom
- Bewakingscamera Tecno
- Bewakingscamera Night Owl
- Bewakingscamera Guardzilla
- Bewakingscamera Astak
- Bewakingscamera Milestone Systems
- Bewakingscamera Zavio
- Bewakingscamera Campark
- Bewakingscamera IPX
- Bewakingscamera Promise Technology
- Bewakingscamera Annke
- Bewakingscamera Qoltec
- Bewakingscamera Digimerge
- Bewakingscamera Alfatron
- Bewakingscamera Feelworld
- Bewakingscamera KJB Security Products
- Bewakingscamera British Telecom
- Bewakingscamera Wisenet
- Bewakingscamera Ecobee
- Bewakingscamera BZBGear
- Bewakingscamera WyreStorm
- Bewakingscamera Infortrend
- Bewakingscamera Epiphan
- Bewakingscamera HiLook
- Bewakingscamera Mach Power
- Bewakingscamera Compro
- Bewakingscamera Ikegami
- Bewakingscamera Accsoon
- Bewakingscamera Vimtag
- Bewakingscamera Sonoff
- Bewakingscamera Gewiss
- Bewakingscamera Alula
- Bewakingscamera Insteon
- Bewakingscamera Costar
- Bewakingscamera ALC
- Bewakingscamera Security Labs
- Bewakingscamera American Dynamics
- Bewakingscamera Seneca
- Bewakingscamera Avigilon
- Bewakingscamera Vosker
- Bewakingscamera Sentry360
- Bewakingscamera Bea-fon
- Bewakingscamera Owltron
- Bewakingscamera Petcube
- Bewakingscamera Enabot
- Bewakingscamera Luis Energy
- Bewakingscamera Sir Gawain
- Bewakingscamera VisorTech
- Bewakingscamera Atlantis Land
- Bewakingscamera B & S Technology
- Bewakingscamera I3International
- Bewakingscamera IDIS
- Bewakingscamera Turing
- Bewakingscamera Qian
- Bewakingscamera Wasserstein
- Bewakingscamera Qolsys
- Bewakingscamera Control4
- Bewakingscamera Milesight
- Bewakingscamera GVI Security
- Bewakingscamera Conbrov
- Bewakingscamera HuddleCamHD
- Bewakingscamera Setti+
- Bewakingscamera Mobotix
- Bewakingscamera IOIO
- Bewakingscamera BIRDFY
- Bewakingscamera I-PRO
- Bewakingscamera DVDO
- Bewakingscamera TCP
- Bewakingscamera Bolin Technology
- Bewakingscamera Konyks
- Bewakingscamera Nextech
- Bewakingscamera Arecont Vision
- Bewakingscamera YoloLiv
Nieuwste handleidingen voor Bewakingscamera
2 April 2025
30 Maart 2025
29 Maart 2025
29 Maart 2025
29 Maart 2025
29 Maart 2025
29 Maart 2025
27 Maart 2025
27 Maart 2025
27 Maart 2025