Intenso Video Scooter Handleiding
Intenso
Mp3 speler
Video Scooter
Lees hieronder de 📖 handleiding in het Nederlandse voor Intenso Video Scooter (144 pagina's) in de categorie Mp3 speler. Deze handleiding was nuttig voor 6 personen en werd door 2 gebruikers gemiddeld met 4.5 sterren beoordeeld
Pagina 1/144

Seite 1 von 19 - DE
Version 1.0
Intenso Video Scooter
Bedienungsanleitung Seite 1-19 DE
Manual Page 1-17 GB
Istruzioni per l’uso Pagina 1-18 IT
Notice d’utilisation Page 1-18 FR
Instrucciones de uso Página 1-18 ES
Manual de instruções Página 1-18 PT
Instrukcja obsługi Strona 1-18 PL
инструкция по эксплуатации Стр. 1-18 RU

Seite 2 von 19 - DE
Inhalt
Hinweise ........................................................................................................................................................ 4
1. Geräteüberblick ......................................................................................................................................... 5
2. Packungsinhalt ........................................................................................................................................... 5
3. Verbinden mit einem Computer................................................................................................................ 6
a) Verbinden des Gerätes ......................................................................................................................... 6
b) Trennen des Gerätes ............................................................................................................................ 6
4. Der Akku .................................................................................................................................................... 7
a) Laden des Akkus: .................................................................................................................................. 7
b) Ladestatus: ........................................................................................................................................... 7
c) Nutzung während des Ladevorganges: ................................................................................................ 8
5. Bedienung .................................................................................................................................................. 9
a) Allgemeine Bedienung .......................................................................................................................... 9
(1) Ein- und Ausschalten des Players ......................................................................................................... 9
(2) Tastensperre ........................................................................................................................................ 9
(3) Das Hauptmenü .................................................................................................................................. 10
(4) Navigieren .......................................................................................................................................... 10
b) Musik .................................................................................................................................................. 11
(1) Wiedergabe ........................................................................................................................................ 11
(2) Ordnerübersicht ................................................................................................................................. 11
(3) A-B Schleife ........................................................................................................................................ 12
c) Video ................................................................................................................................................... 12
(1) Wiedergabe ........................................................................................................................................ 12
(2) Ordnerübersicht ................................................................................................................................. 13
d) Foto ..................................................................................................................................................... 13
(1) Wiedergabe ........................................................................................................................................ 13
(2) Ordnerübersicht ................................................................................................................................. 13
e) Aufnahmefunktion ............................................................................................................................. 14

Seite 3 von 19 - DE
(1) Aufnahme ........................................................................................................................................... 14
(2) Wiedergabe ........................................................................................................................................ 15
f) Datei Explorer ..................................................................................................................................... 15
g) Einstellungen ...................................................................................................................................... 16
(1) Musik .................................................................................................................................................. 16
i. Abspielmodus ...................................................................................................................... 16
ii. Zufällige Wiedergabe .......................................................................................................... 16
iii. Equalizer ............................................................................................................................ 16
(2) Aufnahme .................................................................................................................................... 17
(3) Foto .................................................................................................................................................... 17
(4) Display ................................................................................................................................................ 17
i. Dauer ................................................................................................................................... 17
ii. Helligkeit ............................................................................................................................. 17
iii. Eco Modus ......................................................................................................................... 17
(5) Sleep Timer ......................................................................................................................................... 17
(6) Sprache ............................................................................................................................................... 17
(7) System ................................................................................................................................................ 18
i. Information.......................................................................................................................... 18
ii. Werkseinstellungen ............................................................................................................ 18
6. Micro SD Karte ......................................................................................................................................... 18
7. Technische Daten .................................................................................................................................... 19

Seite 4 von 19 - DE
Hinweise
Lesen und beachten Sie die Bedienungsanleitung nebst Warnungen und Hinweisen vor der ersten
Nutzung des Produkts.
Vor der ersten Benutzung des Gerätes achten Sie bitte darauf, dass Sie den Akku vollständig aufladen.
Vermeiden Sie einen harten Aufprall des Gerätes.
Verwenden Sie das Gerät nicht in extrem kalten, heißen, feuchten oder staubigen Gebieten. Setzen Sie
es ebenfalls keinen direkten Sonnenstrahlen aus.
Stellen Sie keine offenen Lichtquellen, wie z.B. brennende Kerzen in die Nähe des Produkts.
Führen Sie häufiger Datensicherungen durch, um einen möglichen Datenverlust zu vermeiden.
Vermeiden Sie das Benutzen in stark magnetisierten Feldern.
Bedienen Sie dieses Gerät nicht mit nassen Händen.
Schützen Sie das Gerät vor Nässe. Wenn Feuchtigkeit in das Gerät eintritt, schalten Sie es bitte
unverzüglich aus, danach säubern und trocknen Sie bitte das Gerät.
Verwenden Sie bitte kein Wasser oder chemische Lösungen, um das Gerät zu säubern. Nutzen Sie dazu
bitte nur ein trockenes Tuch.
Wir sind nicht haftbar für Schäden oder Datenverlust bei einer Fehlfunktion, fehlerhafter Handhabung,
eigenhändiger Reparatur des Geräts oder eigenmächtigem Wechseln des Akkus.
Bitte zerlegen Sie das Gerät nicht in seine Einzelteile, und versuchen Sie bitte nicht, es selbst zu
reparieren, da die Garantie in diesem Fall erlischt.
Blockieren oder bedecken Sie die Öffnungen des Produkts nicht.
Dieses Produkt ist nur für den privaten Gebrauch vorgesehen und sollte nicht kommerziell oder
industriell genutzt werden.
Stecken Sie keine Gegenstände, die nicht für den Gebrauch vorgesehen sind, in die Öffnungen des
Produkts.
Schäden, die auf nicht sachgemäße Handhabung oder Missachtung der Warnungen oder Anweisungen
dieser Bedienungsanleitung zurückzuführen sind, werden nicht von der Garantie gedeckt.
WARNUNG: Eine verlängerte Belastung durch zu laut wiedergegebene Musik kann
zu temporären oder permanenten Gehörschäden oder Gehörverlust führen. Der
Gebrauch des Video Players ist im Straßenverkehr nicht empfohlen. Es kann dazu
führen, dass der Hörer unachtsamer gegenüber potenziellen Gefahren, wie sich
nähernden Fahrzeugen, reagiert.

Seite 5 von 19 - DE
1. Geräteüberblick
2. Packungsinhalt
Bitte überprüfen Sie den Packungsinhalt auf Vollständigkeit
Intenso Video Player
Stereo-Kopfhörer
Micro SD-Karte
CD mit Konvertierungssoftware (AVI-Format)
USB Kabel
Bedienungsanleitung
1. Ein / Aus Schalter
2. Pfeil-Zurück Taste
3. Lautstärke (+) Taste
4. Zurück Taste
5. Play / Pause Taste
6. Mini USB Anschluss
7. Kopfhörer Eingang
8. Lautstärke (-) Taste
9. Vorwärts Taste
10. M (Menü) Taste
11. Micro SD Steckplatz

Seite 6 von 19 - DE
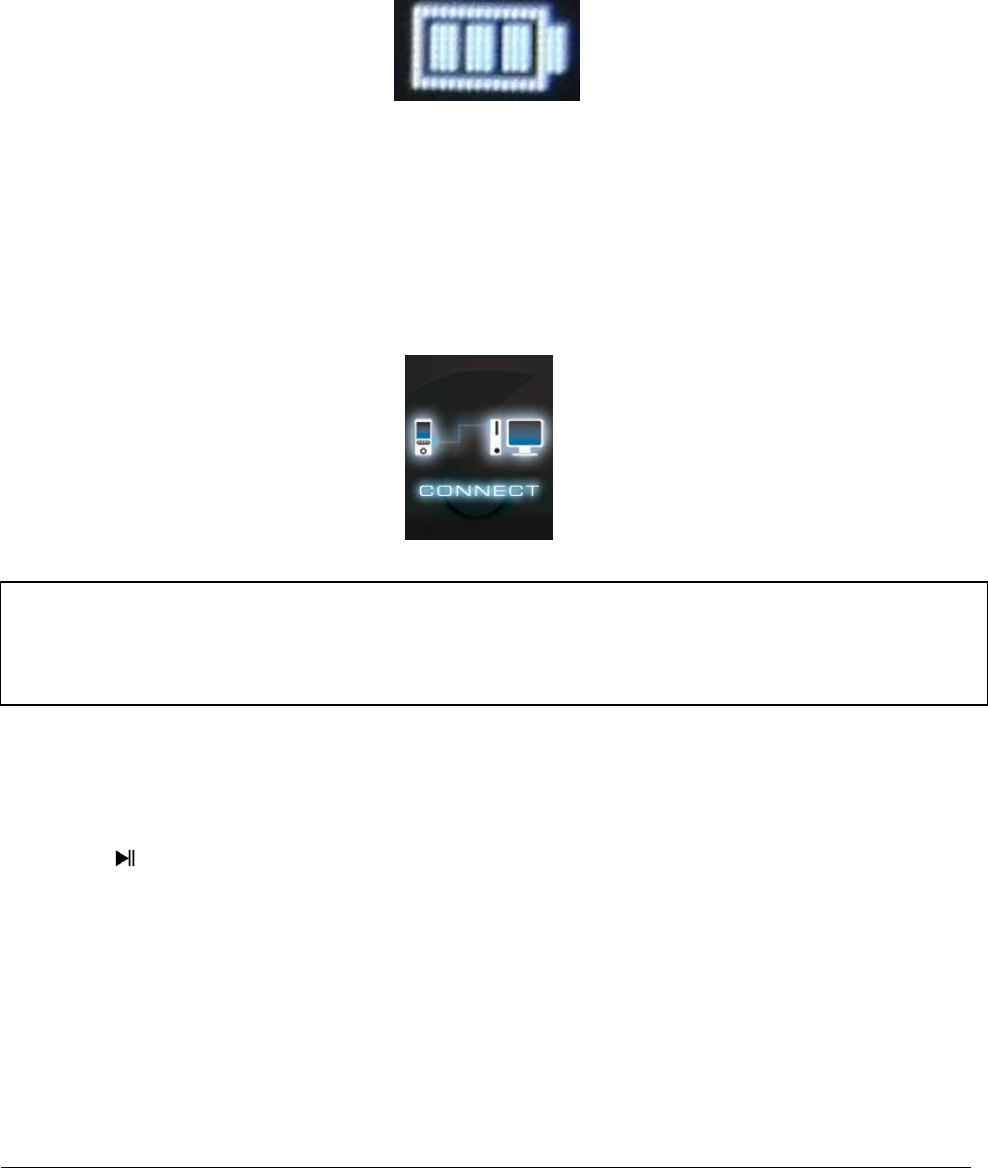
3. Verbinden mit einem Computer
Um Dateien zwischen Ihrem Player und einem Computer auszutauschen, können Sie
Ihren Player einfach mit Hilfe des beiliegenden USB Kabels mit Ihrem Computer
verbinden.
a) Verbinden des Gerätes
Um den Player mit einem Computer zu verbinden, stecken Sie den USB 2.0 Anschluss
des USB Kabels in einen freien USB Port des eingeschalteten Computers und verbinden
Sie den Mini-USB Anschluss des Kabels mit dem Player. Dieser wird nun als
Wechseldatenträger erkannt und ist für einen Datentransfer mit dem Computer bereit.
Sie können jetzt die gewünschten Dateien ganz einfach per “Drag and Drop” oder durch
„Kopieren und Einfügen“ von Ihrem Computer auf den Player (oder von Ihrem Player auf
den Computer) übertragen.
b) Trennen des Gerätes
Vor dem Abziehen des USB Kabels sollte unbedingt die Datenverbindung zwischen den
Geräten getrennt werden!
Halten Sie dazu die Taste für 1 - 2 Sekunden gedrückt. Das Display zeigt nun den
aktuellen Ladestatus an und die Datenverbindung wurde getrennt.
Sollten Sie einen Windows PC nutzen (XP oder höhere Version), kann der Player auch
direkt über den Computer ausgeworfen werden. Klicken Sie hierfür auf das „Hardware
sicher entfernen“ Symbol in der Windows Taskleiste. Wählen Sie nun den Video Scooter
aus und befolgen Sie gegebenenfalls den weiteren Anweisungen Ihres Computers, bis
dieser Ihnen den erfolgreichen Vorgang bestätigt.
Sollten Sie einen Mac benutzen, können Sie den Player einfach trennen, indem Sie das
Player Icon auf das Papierkorbsymbol ziehen.
Das USB Kabel kann anschließend sicher vom Player und Computer entfernt werden.
Hinweis: Entfernen Sie den Player nicht vom Computer, wenn noch Dateien zwischen den
Geräten übertragen werden. Dies kann zu Datenverlust und Beschädigung des
Datenträgers führen.
Seite 7 von 19 - DE
4. Der Akku
Der Player hat einen fest verbauten internen Akku. Vor der ersten Benutzung des Gerätes
achten Sie bitte darauf, dass Sie den Akku vollständig aufladen. Dieser Vorgang dauert in
der Regel bis zu 3 Stunden.
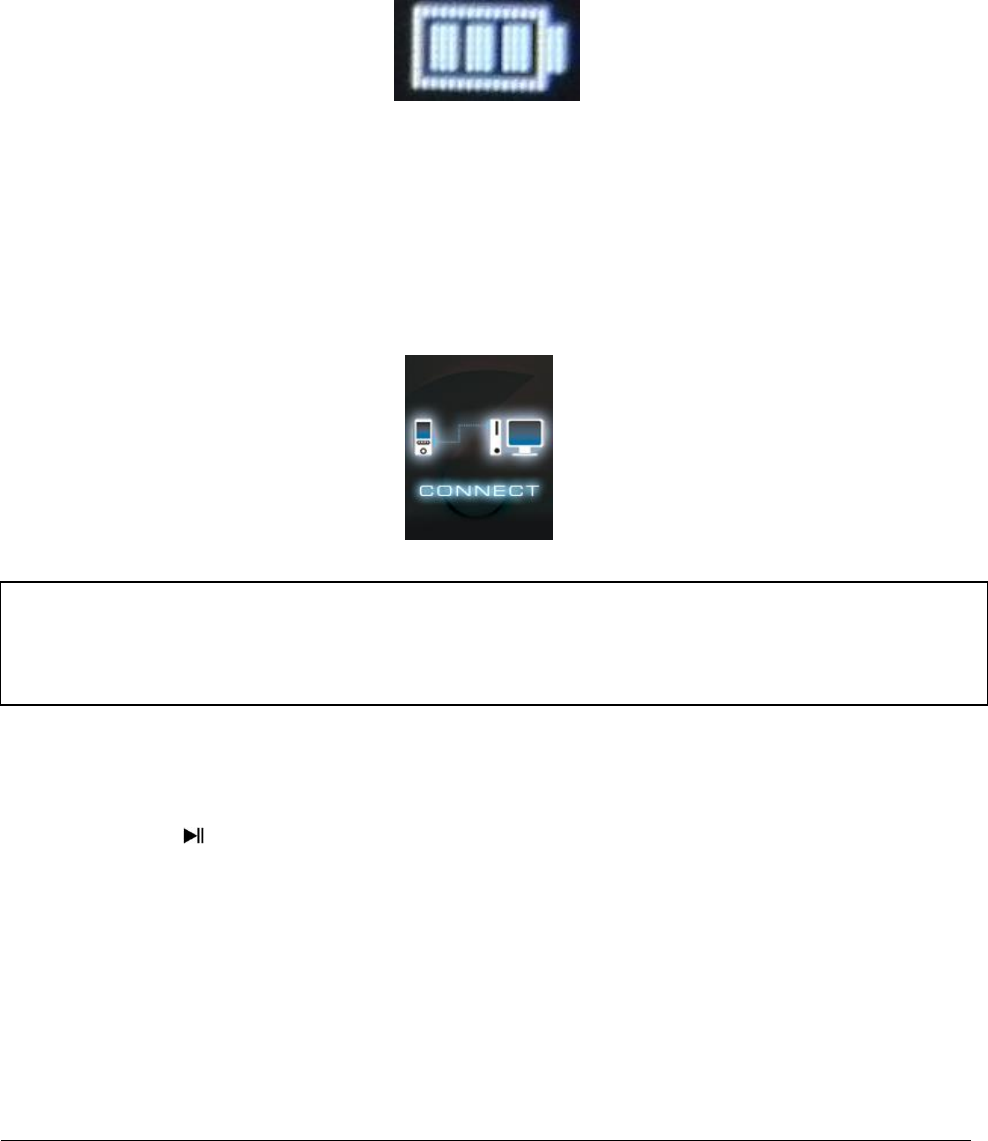
Akku vollständig geladen
a) Laden des Akkus:
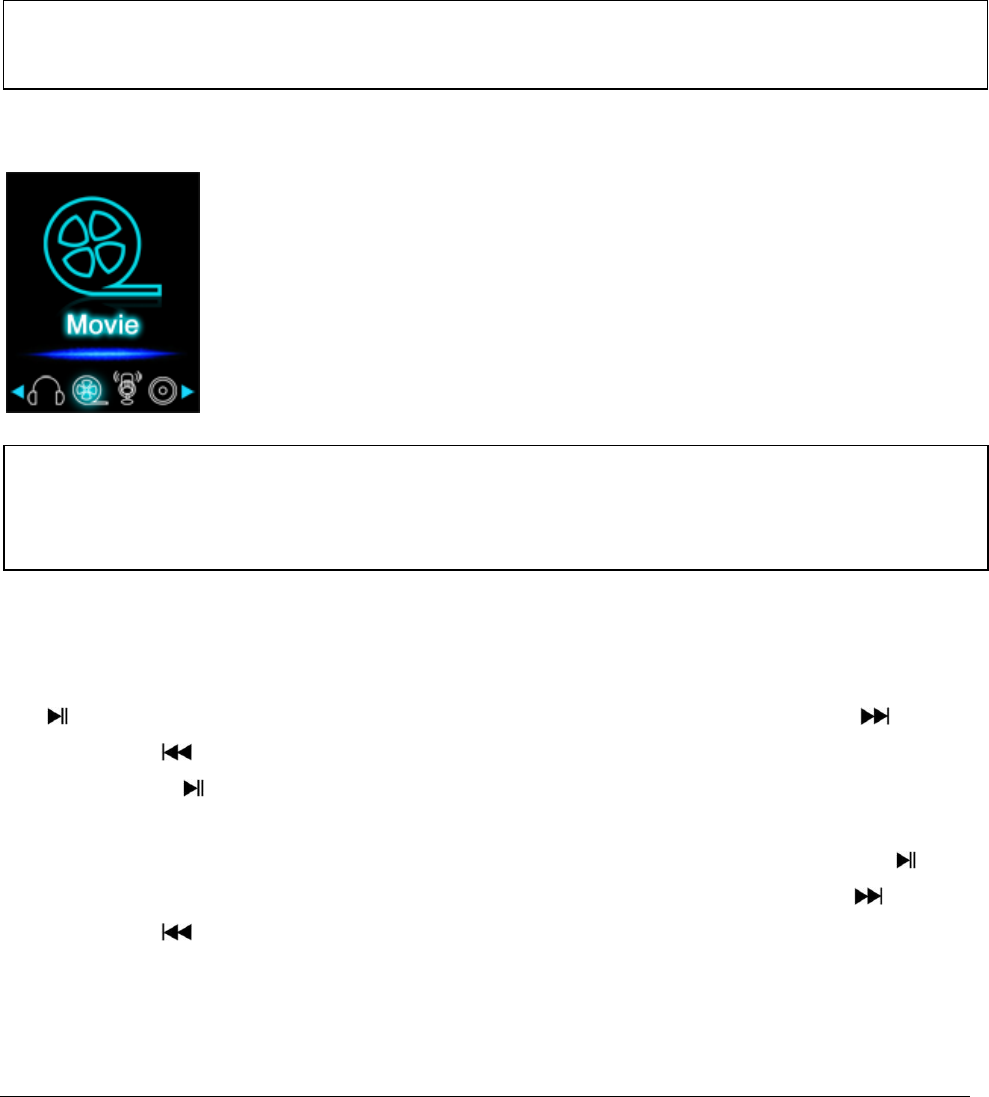
Der Akku wird über die USB- Verbindung mit Ihrem PC geladen. Um den Akku aufzuladen,
verbinden Sie daher bitte das Gerät über das USB-Kabel mit dem PC. Der Ladevorgang
startet automatisch. Es erscheint das Symbol für eine Verbindung (Connect) auf dem
Display des Gerätes.
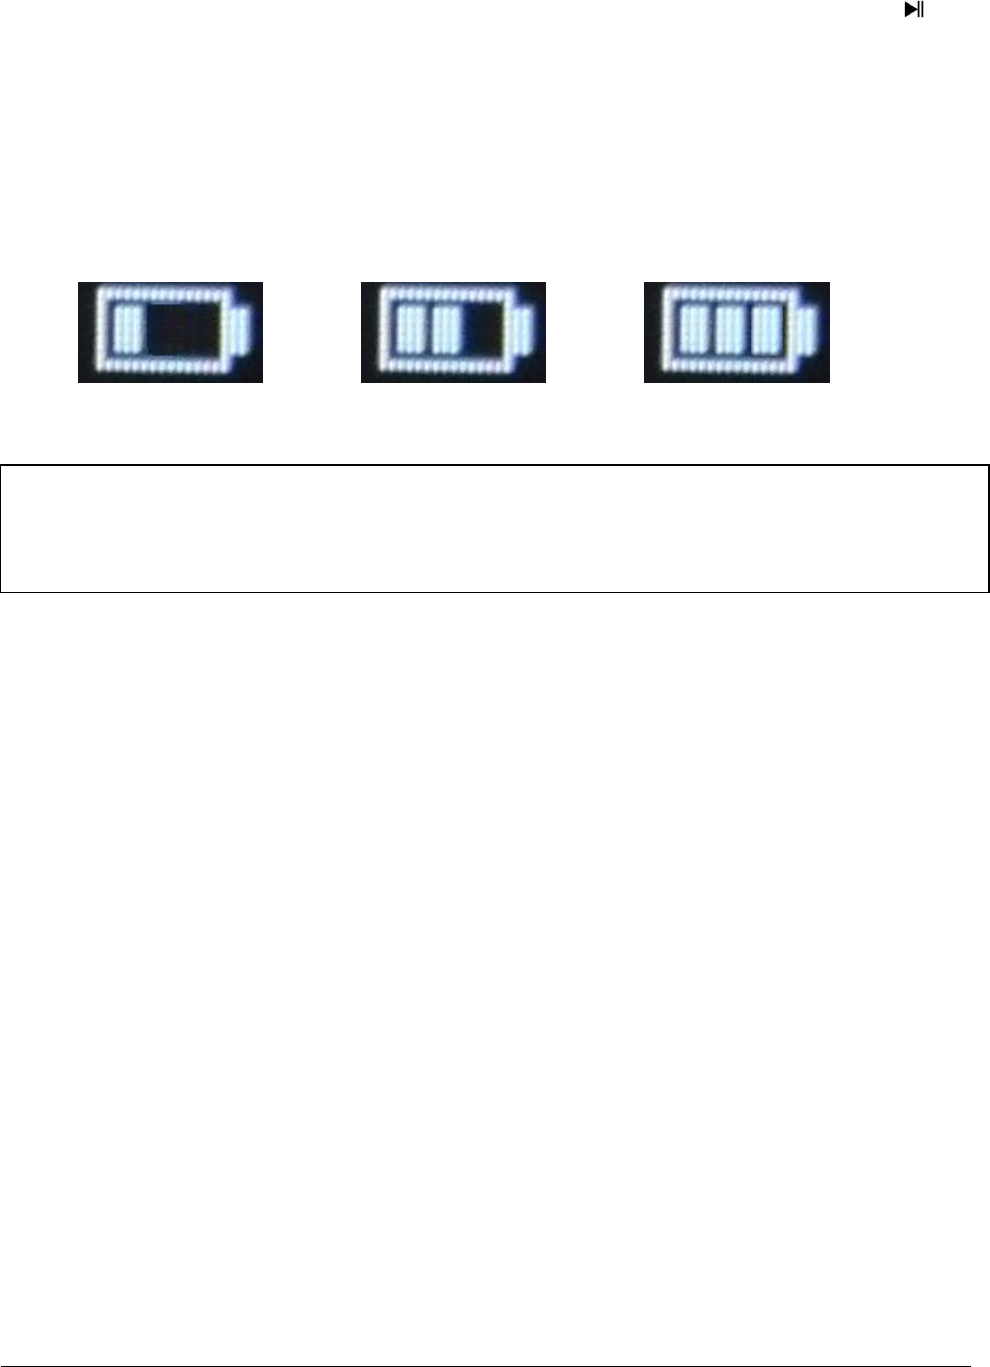
b) Ladestatus:
Drücken Sie die Play/Pause Taste für 1-2 Sekunden, um den aktuellen Ladestatus
angezeigt zu bekommen. Es erscheint nun ein Batteriesymbol auf dem Display. Ist der
Akku vollständig aufgeladen, wird Ihnen eine grüne Batterie angezeigt. Befindet sich der
Akku noch im Ladezustand, wird dies durch eine Ladeanimation dargestellt.
Hinweis: Für eine optimale Leistungsfähigkeit muss der Akku regelmäßig genutzt
werden. Sollte dies nicht der Fall sein, laden Sie den Akku mindestens einmal pro Monat
vollständig auf.

Seite 8 von 19 - DE
c) Nutzung während des Ladevorganges:
Sie können den Player während des Ladevorganges nutzen. Drücken Sie dazu einfach ein
weiteres Mal auf die Play/Pause Taste und das Gerät wechselt von der
Ladestatusanzeige in das Hauptmenü.
Auch während der Nutzung können Sie den aktuellen Ladestatus erkennen. In der oberen
rechten Ecke wird dieser beispielsweise während der Musikwiedergabe in 3 Stufen
angezeigt. Ist der Akku vollständig geladen, sind alle drei Felder fest eingeblendet.
Befindet sich der Akku noch im Ladezustand, wird auch hier eine Animation angezeigt.
0 – 33% 34 – 66 % 67 – 100 %
Hinweis: Wenn Sie in die Ladestatusanzeige wechseln, oder das am Computer
angeschlossene Gerät benutzen, ist kein Datenaustausch mit dem Computer mehr
möglich. Um wieder Dateien übertragen zu können, müssen Sie den Player erneut mit
dem Computer verbinden.

Seite 9 von 19 - DE
5. Bedienung
a) Allgemeine Bedienung
(1) Ein- und Ausschalten des Players
Schieben Sie den Ein-/ Ausschalter an der linken Seite des Geräts auf die “ON” Position.
Halten Sie danach die Play/Pause Taste für ca. 3 Sekunden gedrückt, um den Player
einzuschalten. Um das Gerät in den Standby-Modus zu versetzen, halten Sie die
Play/Pause Taste erneut für ca. 3 Sekunden gedrückt. Falls Sie den Player dauerhaft
ausschalten möchten, schieben Sie den Knopf auf der linken Seite des Players auf die
„OFF“ Position.
(2) Tastensperre
Um ungewollte Eingaben zu verhindern, verfügt der Player über eine Tastensperre. Drücken
Sie dazu einfach gleichzeitig die Play/Pause Taste und die M Taste. Zur Bestätigung wird
nun ein geschlossenes Schloss eingeblendet. Zum Entsperren drücken Sie einfach wieder
die Play/Pause Taste und die M Taste gleichzeitig. Es wird nun zur Bestätigung ein
geöffnetes Schloss eingeblendet.
Hinweis: Bitte achten Sie bitte darauf, dass eine Micro SD Karte im Player eingesetzt ist!
Hinweis: Dieser Player hat eine Energiespar Funktion. Das Gerät schaltet sich
automatisch aus, wenn es mehr als zehn Minuten nicht benutzt wird.

Seite 10 von 19 - DE
(3) Das Hauptmenü
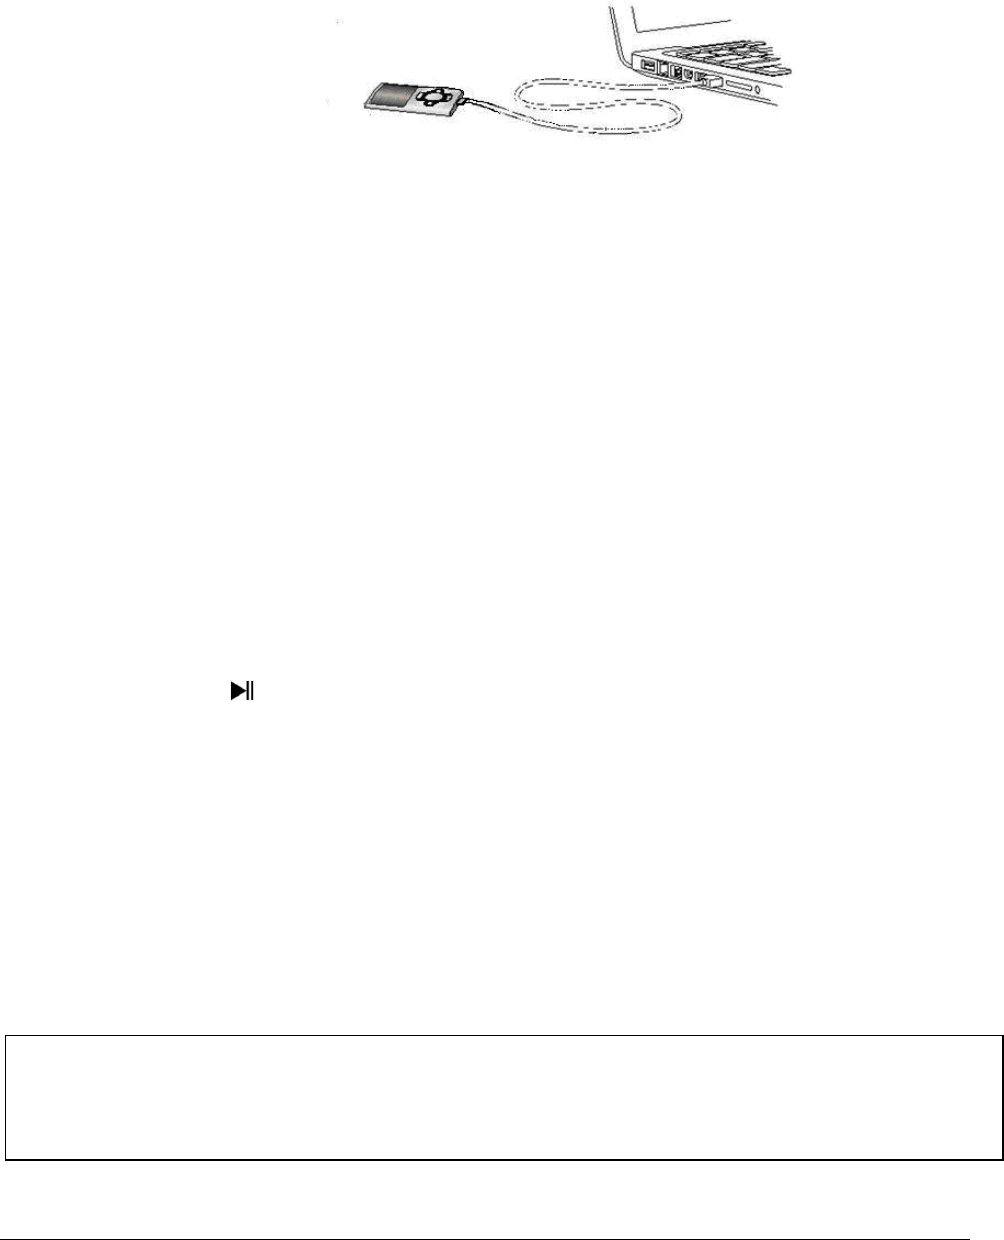
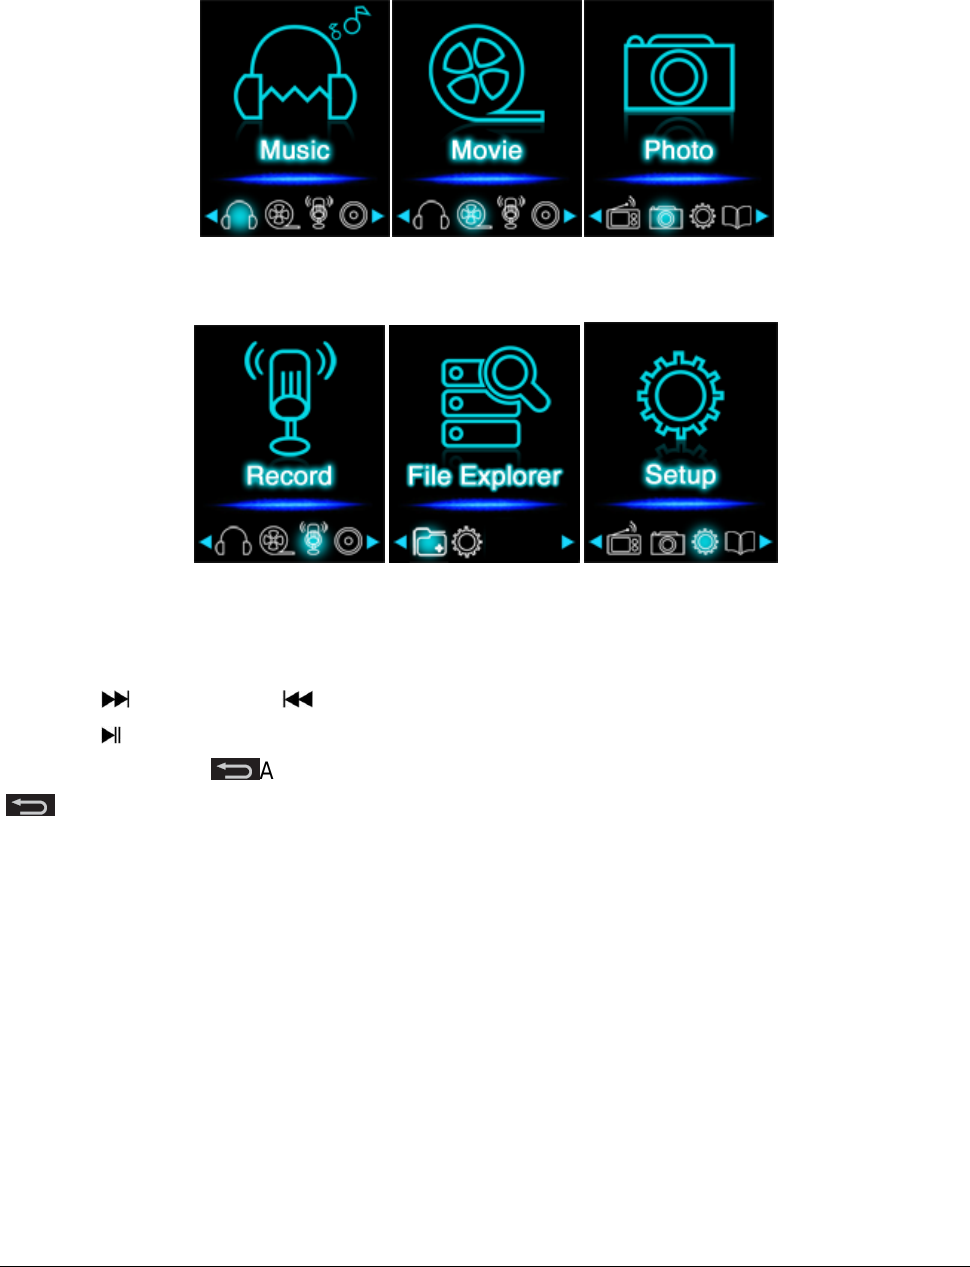
Nach Einschalten des Players erscheint das Hauptmenü. Dies besteht aus sechs
verschiedenen Menüpunkten (Musik, Video, Foto, Aufnahme, Datei-Explorer und
Einstellungen).
Musik Video Foto
Aufnahme Datei Einstellungen
(4) Navigieren
Mit der Vorwärts und Zurück Taste können Sie durch die verschiedenen Menüs
navigieren. Mit der Play/Pause Taste können Sie den gewünschten Menüpunkt öffnen
oder die gewünschte Funktion starten. Drücken Sie kurz die Pfeil-Zurück Taste, um
eine Ebene zurück zu gelangen. Halten Sie die Pfeil-Zurück Taste für 1 - 2 Sekunden
gedrückt, um direkt wieder in das Hauptmenü zu wechseln.

Seite 11 von 19 - DE
b) Musik
(1) Wiedergabe
Navigieren Sie im Hauptmenü zum Menüpunkt Music und bestätigen Sie Ihre Auswahl mit
der Play/Pause Taste. Es öffnet sich der Wiedergabebildschirm und die Wiedergabe
startet automatisch.
Um die Wiedergabe zu pausieren oder wieder fortzusetzen, drücken Sie jeweils die
Play/Pause Taste.
Um einen Titel vor- oder zurück zu springen, drücken Sie die Vorwärts oder Zurück
Taste. Um innerhalb eines Titels vor- oder zurück zu spulen, halten Sie diese einfach
gedrückt.
Drücken Sie (+) Taste oder (-) Taste, um die Lautstärke zu regulieren.
(2) Ordnerübersicht
Um aus dem Wiedergabebildschirm in die Ordnerübersicht zu gelangen, drücken Sie die
Pfeil-Zurück Taste. Navigieren Sie mit der Vorwärts oder Zurück Taste durch
die Dateien und Ordner. Bestätigen Sie mit der Play/Pause Taste eine Musikdatei, wird
diese wiedergegeben. Bestätigen Sie mit dieser Taste einen Ordner, wird dieser geöffnet.
Mit der Pfeil-Zurück Taste wechseln Sie in die nächst höhere Ebene Ihrer
Ordnerstruktur bis hin zurück zum Hauptmenü.
Um eine Datei zu löschen, navigieren Sie in der Ordnerübersicht zu der gewünschten
Datei und drücken Sie die M Taste. Bestätigen Sie nun den Vorgang mit der Play/Pause
Taste, um die Datei endgültig zu entfernen.
Seite 12 von 19 - DE
(3) A-B Schleife
Mit diesem Player ist es möglich, einen beliebigen Zeitabschnitt eines Musikstückes
auszuwählen und diesen in einer Schleife dauerhaft zu wiederholen.
Drücken Sie während der Wiedergabe des Musikstückes die M Taste, um den Startpunkt
(A) der Wiedergabeschleife zu bestimmen. Drücken Sie die M Taste erneut, um den
Endpunkt (B) festzulegen. Der ausgewählte Zeitabschnitt wird nun in einer
Wiedergabeschleife abgespielt.
c) Video
(1) Wiedergabe
Navigieren Sie im Hauptmenü zum Menüpunkt Movie und bestätigen Sie Ihre Auswahl mit
der Play/Pause Taste. Es öffnet sich die Ordnerübersicht. Wählen Sie mit der
Vorwärts oder Zurück Taste die abzuspielende Videodatei und bestätigen Sie Ihre
Auswahl mit der Play/Pause Taste. Das Video startet automatisch.
Um die Wiedergabe zu pausieren oder wieder fortzusetzen, drücken Sie jeweils die
Play/Pause Taste. Um einen Titel vor- oder zurück zu springen, drücken Sie die
Vorwärts oder Zurück Taste. Um innerhalb eines Titels vor- oder zurück zu spulen,
halten Sie diese einfach gedrückt.
Drücken Sie die (+) Taste oder (-) Taste, um die Lautstärke zu regulieren.
Hinweis: Für weitere Konfigurationsmöglichkeiten öffnen Sie bitte im Hauptmenü den
Menüpunkt Setup.
Hinweis: Um Videos auf diesem Player wiederzugeben, müssen diese mit der
beiliegenden Konvertierungssoftware in das für den Player angepasste AVI Format
umgewandelt werden.

Seite 13 von 19 - DE
(2) Ordnerübersicht
Um aus dem Wiedergabebildschirm in die Ordnerübersicht zu gelangen, drücken Sie die
Pfeil-Zurück Taste. Navigieren Sie mit der Vorwärts oder Zurück Taste durch
die vorhandenen Dateien und Ordner. Bestätigen Sie mit der Play/Pause Taste eine
Videodatei, wird diese wiedergegeben. Bestätigen Sie mit dieser Taste einen Ordner, wird
dieser geöffnet. Mit der Pfeil-Zurück Taste wechseln Sie in die nächst höhere Ebene
Ihrer Ordnerstruktur bis hin zurück zum Hauptmenü.
Um eine Datei zu löschen, navigieren Sie in der Ordnerübersicht zu der gewünschten
Datei und drücken Sie die M Taste. Bestätigen Sie nun den Vorgang mit der Play/Pause
Taste, um die Datei endgültig zu entfernen.
d) Foto
(1) Wiedergabe
Navigieren Sie im Hauptmenü zum Menüpunkt Photo und bestätigen Sie Ihre Auswahl mit
der Play/Pause Taste. Es öffnet sich die Ordnerübersicht. Wählen Sie mit der
Vorwärts oder Zurück Taste die wiederzugebende Bilddatei und bestätigen Sie Ihre
Auswahl mit der Play/Pause Taste. Das ausgewählte Bild wird Ihnen nun angezeigt.
Um eine automatische Bildwiedergabe zu starten, oder auch zu pausieren, drücken Sie
jeweils die Play/Pause Taste.
(2) Ordnerübersicht
Um aus dem Wiedergabebildschirm in die Ordnerübersicht zu gelangen, drücken Sie die
Pfeil-Zurück Taste. Navigieren Sie mit der Vorwärts oder Zurück Taste durch
die Dateien und Ordner. Bestätigen Sie mit der Play/Pause Taste eine Datei, wird diese
wiedergegeben. Wählen Sie mit dieser Taste einen Ordner, wird dieser geöffnet. Mit der
Pfeil-Zurück Taste wechseln Sie in die nächst höhere Ebene Ihrer Ordnerstruktur bis
hin zurück zum Hauptmenü.

Seite 14 von 19 - DE
Um eine Datei zu löschen, navigieren Sie in der Ordnerübersicht zu der gewünschten
Datei und drücken Sie die M Taste. Bestätigen Sie nun den Vorgang mit der Play/Pause
Taste, um die Datei endgültig zu entfernen.
e) Aufnahmefunktion
(1) Aufnahme
Navigieren Sie im Hauptmenü zum Menüpunkt Record und bestätigen Sie Ihre Auswahl
mit der Play/Pause Taste. Der Player ist nun bereit, eine Tonaufnahme über das
integrierte Mikrofon zu beginnen. Drücken Sie dazu einfach die Play/Pause Taste. Die
laufende Aufnahme wird Ihnen jetzt im Display angezeigt. Um die laufende Aufnahme zu
pausieren, oder wieder fortzusetzen, drücken sie erneut die Play/Pause Taste. Drücken
Sie während einer Aufzeichnung die M Taste, um die Aufnahme zu speichern. Mit der
Pfeil-Zurück Taste wechseln Sie wieder in das Hauptmenü; eine laufende Aufnahme wird
automatisch gespeichert.
Hinweis: Für weitere Konfigurationsmöglichkeiten öffnen Sie bitte im Hauptmenü den
Menüpunkt Setup.
Hinweis: Die aufgenommenen Dateien (.wav Format) finden Sie im Ordner „VOICE“ über
den Datei-Explorer. Steht nicht mehr genügend Speicherplatz für eine Aufnahme zur
Verfügung, weist Sie der Player mit der Meldung „Speicher voll!“ darauf hin.

Seite 15 von 19 - DE
(2) Wiedergabe
Navigieren Sie im Hauptmenü zum Menüpunkt File Explorer und bestätigen Sie Ihre
Auswahl mit der Play/Pause Taste. Wählen Sie nun den Ordner VOICE aus. Alle bisher
getätigten Aufnahmen werden Ihnen chronologisch angezeigt. Navigieren Sie jetzt zur
gewünschten Datei und starten Sie die Wiedergabe mit der Play/Pause Taste. Mit der
Pfeil-Zurück Taste wechseln Sie wieder in das Hauptmenü.
f) Datei Explorer
Navigieren Sie im Hauptmenü zum Menüpunkt File Explorer und bestätigen Sie Ihre
Auswahl mit der Play/Pause Taste. Es wird Ihnen nun das Hauptverzeichnis Ihrer
Speicherkarte angezeigt. Navigieren Sie mit der Vorwärts oder Zurück Taste durch
die Dateien und Ordner. Bestätigen Sie mit der Play/Pause Taste eine Datei, wird diese
wiedergegeben. Bestätigen Sie mit dieser Taste einen Ordner, wird dieser geöffnet. Mit der
Pfeil-Zurück Taste wechseln Sie in die nächst höhere Ebene Ihrer Ordnerstruktur bis
hin zurück zum Hauptmenü.
Um eine Datei zu löschen, navigieren Sie in der Ordnerübersicht zu der gewünschten
Datei und drücken Sie die M Taste. Bestätigen Sie nun den Vorgang mit der Play/Pause
Taste, um die Datei endgültig zu entfernen.
Hinweis: Für weitere Konfigurationsmöglichkeiten öffnen Sie bitte im Hauptmenü den
Menüpunkt Setup.
Hinweis: Informationen über den ungenutzten bzw. belegten Speicher sowie der
gesamten Speichergröße der eingesetzten Speicherkarte erhalten Sie im Setup unter
dem Menüpunkt System und dort unter Information.

Seite 16 von 19 - DE
g) Einstellungen
Navigieren Sie im Hauptmenü zum Menüpunkt Setup und bestätigen Sie Ihre Auswahl mit
der Play/Pause Taste.
(1) Musik
Im Menüpunkt Musik finden Sie folgende Einstellungsmöglichkeiten:
i. Abspielmodus
Legen Sie hier den gewünschten Abspielmodus fest.
Titel einmal
Spielt den gewählten Titel einmal ab und stoppt dann die
Wiedergabe.
Titel wiederholen
Der gewählte Titel wird wiederholt abgespielt.
Ordner einmal
Wiederholt die Titel in dem ausgewählten Ordner einmal und
stoppt dann die Wiedergabe.
Ordner
wiederholen
Wiederholt alle Titel aus dem aktuellen Ordner.
Alle einmal
Alle Lieder werden einmal abgespielt.
Alle wiederholen
Wiederholt alle gespeicherten Lieder.
Intro
Anspielen der einzelnen Lieder.
ii. Zufällige Wiedergabe
Hier können Sie die zufällige Wiedergabe aller Lieddateien aktivieren bzw. deaktivieren.
iii. Equalizer
Wählen Sie hier Ihren favorisierten Equalizer Modus aus. Zur Wahl stehen Normal, Rock,
Pop, Klassik, Bass und Jazz.

Seite 17 von 19 - DE
(2) Aufnahme
Im Menüpunkt Aufnahme können Sie die Aufnahmequalität festlegen. Sie haben die Wahl
zwischen normaler Qualität (32 KBPS) und hoher Qualität (64 KBPS). Beachten Sie, dass
die hohe Qualität mehr Speicherplatz beansprucht.
(3) Foto
Im Menüpunkt Foto können Sie die Anzeigedauer der automatischen Diaschau festlegen.
Sie haben die Wahl zwischen: 2 s, 4 s, 6 s, 8 s, und 10 s.
(4) Display
Im Menüpunkt Display finden Sie folgende Einstellungsmöglichkeiten:
i. Dauer
Hier können Sie festlegen, wie lange das Display beleuchtet sein soll. Sie haben die Wahl
zwischen 5 s, 10 s, 15 s, 20 s, 30 s und Immer an.
ii. Helligkeit
Hier können Sie die Helligkeit der Displaybeleuchtung in 5 Stufen festlegen.
iii. Eco Modus
Wenn Sie den Eco Modus aktivieren, schaltet sich das Display nach der voreingestellten
Zeit vollständig aus. Bei deaktiviertem Eco Modus bleibt das Display nach der
voreingestellten Zeit permanent auf geringster Stufe beleuchtet. Beachten Sie, dass dies
die Akkulaufzeit deutlich verringert.
(5) Sleep Timer
Im Menüpunkt Sleep Timer können Sie eine Zeitspanne festlegen, nach deren Ablauf sich
das Gerät automatisch ausschaltet. Sie haben die Wahl zwischen Aus (das Gerät schaltet
sich nicht automatisch ab), 10 min, 15 min, 30 min, 60 min, und 120 min.
(6) Sprache
Im Menüpunkt Sprache können Sie eine der acht vorinstallierten Sprachen auswählen. Sie
haben die Wahl zwischen Englisch, Spanisch, Französisch, Deutsch, Italienisch,
Portugiesisch, Polnisch und Russisch.

Seite 18 von 19 - DE
(7) System
Im Menüpunkt System haben Sie folgende Auswahlmöglichkeiten:
i. Information
Hier erhalten Sie Informationen über die Firmware Version des Players, den gesamt zur
Verfügung stehenden Speicherplatz, den genutzten Speicherplatz (U:) und den freien
Speicherplatz (F:) Ihrer Speicherkarte.
ii. Werkseinstellungen
Mit bestätigen dieser Option setzen Sie den Player wieder auf die Standardeinstellungen
zurück.
6. Micro SD Karte
Dieser Player besitzt keinen verwenbaren internen Speicher. Er wird mit einer
eingesetzten Speicherkarte, in der auf der Verpackung ausgewiesenen Größe,
ausgeliefert. Der Player wird bei bestehender USB Verbindung nur von einem Computer
erkannt, wenn eine Speicherkarte eingesetzt ist. Es werden Speicherkarten mit einer
Kapazität von bis zu 64 GB unterstützt.

Seite 19 von 19 - DE
7. Technische Daten
Dimensionen
88 mm (H) x 41 mm (B) x 9.0mm (T)
Gewicht
~30 gr.
LCD
4,4 cm (1.8 Zoll) Farbdisplay, Auflösung: 128 x 160 Pixel
PC Verbindung
USB 2.0 (PC) | mini USB Anschluss (Player)
Akku
Wiederaufladbarer Li-Polymer Akku, Kapazität: 150mAh
Musikwiedergabe: ~ 12 Stunden (MP3 Musik im Energiesparmodus)
Frequenzbereich
20Hz bis 20000Hz
SNR
> 70dB
Musik Format
MP3 / WMA 32 – 320kbps
Video Format
AVI 160 x 120 Pixel
Aufnahmeformat
WAV mit 32 oder 64 KBPS
Bildformat
JPEG / BMP
Betriebstemperatur
0 bis 40 Grad Celsius
Betriebssystem
Windows XP / Vista / Win7 / Win8, Mac 9.2 oder höher
Haftungsausschluss
Es können jederzeit ohne Ankündigung Veränderungen an der Firmware und / oder
Hardware vorgenommen werden. Aus diesem Grund ist es möglich, dass Teile der
Anleitung, technischen Daten und Bilder in dieser Dokumentation von dem Ihnen
vorliegenden Produkt leicht abweichen. Alle in dieser Anleitung beschriebenen Punkte
dienen nur dem Zweck der Verdeutlichung und müssen nicht zwangsläufig mit einer
bestimmten Situation übereinstimmen. Es können keine Rechtsansprüche auf Grund
dieser Anleitung geltend gemacht werden.
Entsorgung von Elektro-Altgeräten
Die mit diesem Symbol gekennzeichneten Geräte unterliegen der europäischen Richtlinie
2002/96/EC.
Alle Elektro- und Elektroaltgeräte müssen getrennt vom Hausmüll über die dafür
vorgesehenen staatlichen Stellen entsorgt werden.
Mit der ordnungsgemäßen Entsorgung von Elektro-Altgeräten vermeiden Sie
Umweltschäden.

Page 1 of 17 - EN
Table of Contents
Table of Contents .............................................................................................................................................. 1
Notes ............................................................................................................................................................. 3
1. Device overview......................................................................................................................................... 4
2. Package content ........................................................................................................................................ 4
3. Connecting to a computer ......................................................................................................................... 5
a. Connecting the device .......................................................................................................................... 5
b. Disconnecting the device ..................................................................................................................... 5
4. The rechargeable battery .......................................................................................................................... 6
a. Charging the battery: ............................................................................................................................ 6
b. Charging status: .................................................................................................................................... 6
c. Usage during the charging process: ..................................................................................................... 7
5. Operation ................................................................................................................................................... 8
a. General operation ................................................................................................................................ 8
(1) Switching the player on and off ..................................................................................................... 8
(2) Key lock .......................................................................................................................................... 8
(3) The main menu .............................................................................................................................. 9
(4) Navigation ...................................................................................................................................... 9
b. Music .................................................................................................................................................. 10
(1) Playback ....................................................................................................................................... 10
(2) Folder overview ........................................................................................................................... 10
(3) A-B loop ....................................................................................................................................... 11
c. Video ................................................................................................................................................... 11
(1) Playback ....................................................................................................................................... 11
(2) Folder overview ........................................................................................................................... 12
d. Photo .................................................................................................................................................. 12
(1) Playback ....................................................................................................................................... 12

Page 2 of 17 - EN
(2) Folder overview ........................................................................................................................... 12
e. Recording function ............................................................................................................................. 13
(1) Recording ..................................................................................................................................... 13
(2) Playback ....................................................................................................................................... 13
f. File Explorer ........................................................................................................................................ 14
g. Setup ................................................................................................................................................... 14
(1) Music ........................................................................................................................................... 15
i. Playback mode .................................................................................................................... 15
ii. Random playback ............................................................................................................... 15
iii. Equalizer ............................................................................................................................ 15
(2) Recording ..................................................................................................................................... 15
(3) Photo ........................................................................................................................................... 15
(4) Display ......................................................................................................................................... 15
i. Lighting duration ................................................................................................................. 15
ii. Brightness ........................................................................................................................... 15
iii. Eco mode ........................................................................................................................... 16
(5) Sleep Timer .................................................................................................................................. 16
(6) Language ...................................................................................................................................... 16
(7) System ......................................................................................................................................... 16
i. Information.......................................................................................................................... 16
ii. Factory settings .................................................................................................................. 16
6. Micro SD card .......................................................................................................................................... 16
7. Technical data .......................................................................................................................................... 17

Page 3 of 17 - EN
Notes
Read and observe the user manual including warnings and notes before the first activation of the product.
Please make sure before the first activation of the device that the rechargeable battery is fully charged.
Avoid hard collisions of the device.
Do not use the device in extremely cold, hot, wet or dusty areas. Also, do not expose it to direct sunlight.
Do not put naked light sources such as burning candles near the product.
Perform backups regularly to prevent possible data loss.
Avoid using it in strongly magnetized fields.
Protect the device against moisture. If moisture penetrates the device, please turn it off immediately and
then please clean and dry the device.
Do not use chemical solutions to clean the device. Only use a dry cloth.
We are not liable for damages or data loss upon a malfunction, improper handling, and unauthorised
repair of the device or changing of the battery.
Please do not disassemble the device into its components and please do not try and repair it on your
own, because otherwise the warranty expires.
Do not block or cover the openings of the product.
This product is only intended for private use and should not be used commercially or in industrial
environments.
Do not insert objects that are not intended for usage into the openings of the product.
Damages that are not attributable to improper handling or disregard of the warnings or instructions of this
user manual are not covered by the warranty.
WARNING: Prolonged exposure to excessively loud music can result in temporary or
permanent hearing damage or hearing loss. The use of the Video player in traffic is
not recommended. It can cause the listener to react disregardful towards potential
hazards such as approaching vehicles

Page 4 of 17 - EN
1. Device overview
2. Package content
Please check the package content for completeness
Intenso Video player
Stereo headphones
Micro SD card
CD with conversion software (AVI format)
USB cable
User manual
1. On / Off Switch
2. Arrow back button
3. Volume (+) button
4. back button
5. Play / pause button
6. Mini USB port
7. Headphohe jack
8. Volume (-) button
9. Forward button
10. M (Menu) button
11. Micro SD slot
Page 5 of 17 - EN
3. Connecting to a computer
In order to exchange files between your player and a computer, you can simply connect
your player to the computer using the provided USB cable.
a. Connecting the device
In order to connect the player to the computer, insert the USB 2.0 port of the USB cable
with a free USB port of the activated computer and connect the Mini USB port of the cable
with the player. It is now recognised as removable medium and is ready for data transfer
with the computer.
Now you can simply transfer the files from your computer to your player or vice versa
using “Drag and Drop” or by "Copy and Paste“.
b. Disconnecting the device
Before removing the USB cable you must make sure that the data connection between the
devices is separated!
To do that, press the button for 1 - 2 seconds. The display now shows the current
charging level and the data connection was separated.
If you are using a Windows PC (XP or higher version), the player can also be
disconnected via the computer. To do that, click on the “Remove hardware safely” symbol
in the Windows taskbar. Now select the Video Scooter and follow your computer’s
instructions, until it confirms the successful process.
If you are using a Mac you can simply disconnect the player by dragging the player icon
onto the trash symbol.
The USB cable can now be separated safely from the player and computer.
Note: Do not remove the player from the computer if the transfer of files between the
devices is not finished. This can result in data loss and damage the medium.
Page 6 of 17 - EN
4. The rechargeable battery
The player has an installed internal rechargeable battery. Make sure before activating the
device for the first time that the battery is fully charged. This process usually takes up to 3
hours.
Battery fully charged
a. Charging the battery:
The battery is charged via the USB connection with your PC. To charge the battery,
connect the device with the PC using the USB cable. The charging process starts
automatically. The symbol for a connection (Connect) appears on the screen of the device.
b. Charging status:
Press the Play/Pause button for 1-2 seconds to view the current charging status. A
battery symbol is now shown on the screen. If the battery is fully charged, a green battery
is shown. If the battery is still charging, a charging animation is displayed.
Note: For optimum performance, the battery must be used regularly. If this is not the
case, recharge the battery at least once a month.
Page 7 of 17 - EN
c. Usage during the charging process:
You can use the player during the charging process. Simply press once more on the
Play/Pause button and the device changes from the charging status display into the main
menu.
You can also view the current charging status during usage. In the upper right corner it is
shown in 3 stages, e.g. during playback of music. If the battery is fully charged, all three
fields are displayed. If the battery is still charging, the animation is shown here as well.
0 – 33% 34 – 66 % 67 – 100 %
Note: If you change into the charging status display or use the device connected to the
computer, data transfer with the computer is no longer possible. To be able to transfer files
again, you must reconnect the player to the computer.

Page 8 of 17 - EN
5. Operation
a. General operation
(1) Switching the player on and off
Slide the on / off switch on the left side of the device to the “ON” position. Then press the
Play/Pause button for approx. 3 seconds to switch on the player. To set the device into
standby mode, press the Play/Pause button again for approx. 3 seconds. If you wish to
deactivate the player permanently, slide the button on the left side of the player into “OFF”
position.
(2) Key lock
In order to prevent accidental entries, the player is equipped with a key lock. To activate it,
press Play/Pause button and the M button simultaneously. A closed lock is displayed for
confirmation now. To unlock, simply press the Play/Pause button and the M button again at
the same time. Now, an open lock is displayed for confirmation.
Note: This player has an energy-saving function. The device automatically switches off, if
it is not used for more than 10 minutes.
Note: Make sure that a Micro SD card is inserted into the player!
Page 9 of 17 - EN
(3) The main menu
After activating the player, the main menu appears. It consists of six different menu items
(Music, Video, Photo, Record, File Explorer and Setup).
Music Video Photo
Record File Setup
(4) Navigation
With the Forward and Back button, you can navigate through the different menus.
With the Play/Pause button you can open the desired menu item or start the desired
function. Press the Arrow Back button briefly to return to the previous level. Press the
Arrow Back button for 1 - 2 seconds to return to the main menu directly.

Page 10 of 17 - EN
b. Music
(1) Playback
Navigate from the main menu to the menu item Music and confirm your selection with the
Play/Pause button. A playback screen opens and playback starts automatically.
To pause the playback or continue it, press the Play/Pause button.
To jump one track forward or back, press the Forward or Back button respectively.
To fast forward or rewind within a track, simply keep it pressed.
Press the (+) button or (-) button to adjust the volume.
(2) Folder overview
To reach the folder overview from the playback screen, press the Arrow Back button.
Navigate with the Forward or Back button through the files and folders. If you
confirm a music file with the Play/Pause button, it is played back. If you confirm a folder
with this button it is opened. With the Arrow Back button you change into the next
higher level of your folder structure up to the main menu.
To delete a file, navigate in the folder overview to the desired file and press the M button.
Confirm this procedure with the Play/Pause button to delete this file permanently.

Page 11 of 17 - EN
(3) A-B loop
It is possible with this player to select any period of a musical piece and set it on repeat in
a loop.
Press the M button during playback of this musical piece to determine the starting point (A).
Press the M button again to determine the end (B). The selected period will now be played
in a playback loop.
c. Video
(1) Playback
Navigate in the main menu to the menu item Movie and confirm your selection with the
Play/Pause button. The folder overview opens. Select the video file to be played with the
Forward or Back button and confirm your selection with the Play/Pause button.
The video starts automatically.
To pause the playback or to continue it, press the Play/Pause button respectively. To
jump one track forward or back, press the Forward or Back button respectively. To
fast forward or rewind within a track, simply keep it pressed.
Press the (+) button or (-) button to adjust the volume.
Note: Please open the menu item Setup in the main menu for additional configuration
options.
Note: To playback videos on this player, they must be converted into the AVI format
adjusted to the player using the provided conversion software.

Page 12 of 17 - EN
(2) Folder overview
To reach the folder overview from the playback screen, press the Arrow Back button.
Navigate with the Forward or Back button through the existing files and folders. If
you confirm a video file with the Play/Pause button it is played back. If you confirm a
folder with this button it is opened. With the Arrow Back button you change into the
next higher level of your folder structure up to the main menu.
To delete a file, navigate in the folder overview to the desired file and press the M button.
Confirm this procedure with the Play/Pause button to delete this file permanently.
d. Photo
(1) Playback
Navigate from the main menu to the menu item Photo and confirm your selection with the
Play/Pause button. The folder overview opens. Select the image to be displayed with the
Forward or Back button and confirm your entry with the Play/Pause button.
To start automatic image rendition or to pause, press the Play/Pause button respectively.
(2) Folder overview
To reach the folder overview from the playback screen, press the Arrow Back button.
Navigate with the Forward or Back button through the files and folders. If you
confirm a file with the Play/Pause button, it is played back. If you confirm a folder with
this button it is opened. With the Arrow Back button you change into the next higher
level of your folder structure up to the main menu.
To delete a file, navigate in the folder overview to the desired file and press the M button.
Confirm this procedure with the Play/Pause button to delete this file permanently.
Note: Please open the menu item Setup in the main menu for additional configuration
options.

Page 13 of 17 - EN
e. Recording function
(1) Recording
Navigate from the main menu to the menu item Record and confirm your selection with the
Play/Pause button. The player is now ready to start an audio recording via the integrated
microphone. To do this, simply press the Play/Pause button. The current recording is
now displayed on the screen. To pause the current recording or to continue it, press the
Play/Pause button again. Press the M button during the recording to save the recording.
With the Arrow Back button you change back into the main menu; the current
recording is then saved automatically.
(2) Playback
Navigate from the main menu to the menu item File Explorer and confirm your selection
with the Play/Pause button. Now select the folder VOICE. All recordings previously
made will be displayed chronologically here. Navigate to the desired file and start the
playback with the Play/Pause button. With the Arrow Back button you change
back into the main menu.
Note: The recorded files (.wav format) can be found in the folder “VOICE” with the file
explorer. If there is not enough disk space available for a recording, the player will inform
you with the message “Disk space full!”.
Note: Please open the menu item Setup in the main menu for additional configuration
options.

Page 14 of 17 - EN
f. File Explorer
Navigate from the main menu to the menu item File Explorer and confirm your selection
with the Play/Pause button. Now, the main directory of your memory card is displayed.
Navigate with the Forward or Back button through the files and folders. If you
confirm a file with the Play/Pause button, it is played back. If you confirm a folder with
this button it is opened. With the Arrow Back button you change into the next higher
level of your folder structure up to the main menu.
To delete a file, navigate in the folder overview to the desired file and press the M button.
Confirm this procedure with the Play/Pause button to delete this file permanently.
g. Setup
Navigate in the main menu to the menu item Setup and confirm your selection with the
Play/Pause button.
Note: In the Setup under the menu item System under Information you can get
information about the unused or reserved disk space as well as the entire disk space of
the inserted memory card.

Page 15 of 17 - EN
(1) Music
In the menu item Music you can find the following setup options:
i. Playback mode
Define the desired playback mode here.
Track once
Plays back the selected track once and then stops the playback.
Repeat track
The selected track is played back repeatedly.
Folder once
Repeats the track in the selected folder once and then stops the
playback.
Repeat folder
Repeats all tracks in the current folder.
All once
All songs are played once.
Repeat all
Repeats all saved songs.
Intro
Intro of the individual songs.
ii. Random playback
Here you can activate or deactivate the random playback of all song files.
iii. Equalizer
Here you select your favourite Equalizer mode. You can choose between Normal, Rock,
Pop, Classic, Bass and Jazz.
(2) Recording
In the menu item Recording you can define the recording quality. You can choose between
normal quality (32 KBPS) and high quality (64 KBPS). Please note that the high quality
requires more disk space.
(3) Photo
In the menu item Photo you can define the display time of the automatic slide show. You
can choose between: 2 s, 4 s, 6 s, 8 s, and 10 s.
(4) Display
In the menu item Display you can find the following setup options:
i. Lighting duration
Here you can define how long the display is illuminated. You can choose between 5 s, 10 s,
15 s, 20 s, 30 s and always active.
ii. Brightness
Here you can define the brightness of the display lighting in 5 levels.

Page 16 of 17 - EN
iii. Eco mode
If you activate the Eco mode, the display switches off completely after the preset time. If
the Eco mode is deactivated, the display remains illuminated permanently on the lowest
level after the preset time. Please note that this significantly reduced the battery life.
(5) Sleep Timer
In the menu item Sleep Timer you can define a period of time after which the device
automatically switches off. You can choose between off (the device does not switch off
automatically), 10 min, 15 min, 30 min, 60 min, and 120 min.
(6) Language
In the menu item Language you can select one of the eight pre-installed languages. You
can choose between English, Spanish, French, German, Italian, Portuguese, Polish and
Russian.
(7) System
In the menu item System you have the following options:
i. Information
Here you can get information about the firmware version of the player, the total available
disk space, the reserved disk space (U:) and the free disk space (F:) of your memory card.
ii. Factory settings
By confirming this option you set the player back to the standard settings.
6. Micro SD card
This player does not have usable internal memory. It is provided with an inserted memory
card in the size displayed on the packaging. With an existing USB connection, the player is
only recognised by a computer, if a memory card is inserted. Memory cards with a capacity
of up to 64 GB are supported.
Page 17 of 17 - EN
7. Technical data
Dimensions
88 mm (H) x 41 mm (B) x 9.0mm (T)
Weight
~30gr.
LCD
4,4 cm (1.8 inch) colour display, resolution: 128 x 160 Pixel
PC connection
USB 2.0 (PC) | mini USB port (player)
Battery
Rechargeable Li-Polymer battery, capacity: 150mAh
Music playback: ~ 12 hours (MP3 music in energy-saving mode)
Frequency range
20Hz to 20000Hz
SNR
>70dB
Music format
MP3 / WMA 32 – 320kbps
Video format
AVI 160 x 120 pixels
Recording format
WAV with 32 or 64 KBPS
Image format
JPEG / BMP
Operating temperature
0 to 40° Celsius
Operating system
Windows XP / Vista / Win7 / Win8, Mac 9.2 or higher
Exclusion of liability
Changes to the firmware and / or hardware can be made at any time without prior
notification. For this reason it is possible that parts of the manual, technical data and
images in this documentation may deviate slightly from the product in your hand. All
products described in this manual are only for the purpose of clarification and must not
necessarily match any certain situation. No claims can be made based on this manual.
Disposal of used electric devices
Devices marked with this symbol are subject to the European Directive 2002/96/EC.
All electric and used electric devices must be separated from the household waste and
disposed of at the provided public locations.
With proper disposal of used electric devices you avoid damaging the environment.

Pagina 2 di 18 - IT
e. Funzione di registrazione ................................................................................................................... 13
(1) Registrazione .................................................................................................................................. 13
(2) Riproduzione .................................................................................................................................. 14
f. File Explorer ........................................................................................................................................ 14
g. Impostazioni ....................................................................................................................................... 15
(1) Musica ............................................................................................................................................ 15
i. Modalità di riproduzione ..................................................................................................... 15
ii. Riproduzione casuale ......................................................................................................... 15
iii. Equalizzatore ..................................................................................................................... 15
(2) Registrazione .................................................................................................................................. 16
(3) Foto ................................................................................................................................................ 16
(4) Display ............................................................................................................................................ 16
i. Durata dell’illum. ................................................................................................................. 16
ii. Luminosità .......................................................................................................................... 16
iii. Modalità ecologica ............................................................................................................ 16
(5) Sleep timer ..................................................................................................................................... 16
(6) Lingua ............................................................................................................................................. 16
(7) Sistema ........................................................................................................................................... 17
i. Informazioni ........................................................................................................................ 17
ii. Impostazioni di fabbrica ..................................................................................................... 17
6. Scheda micro SD ...................................................................................................................................... 17
7. Specifiche tecniche .................................................................................................................................. 18

Pagina 3 di 18 - IT
Indicazioni
Leggere e osservare le presenti istruzioni per l’uso, comprese le avvertenze e le indicazioni da seguire
prima del primo utilizzo del prodotto.
Prima del primo utilizzo del dispositivo, accertarsi che l’accumulatore sia completamente carico.
Evitare forti impatti sul dispositivo.
Non utilizzare il dispositivo in zone estremamente fredde, calde, umide o polverose. Non esporlo alla
luce diretta del sole.
Non collocare vicino al prodotto fonti di luce aperte, come ad es. candele.
Effettuare regolarmente il backup dei dati al fine di evitare un’eventuale perdita dei dati.
Evitare l’uso in campi fortemente magnetici.
Non utilizzare questo dispositivo con le mani bagnate.
Proteggere il dispositivo dall’acqua. Se l’umidità penetra nel dispositivo, spegnerlo immediatamente,
pulirlo e asciugarlo.
Non utilizzare acqua o soluzioni chimiche per pulire il dispositivo. Usare solo un panno asciutto.
Non siamo responsabili per eventuali danni o perdite di dati in caso di malfunzionamento, utilizzo errato,
riparazioni di propria mano o sostituzione arbitraria dell’accumulatore.
Non scomporre il dispositivo nelle sue componenti singole e non cercare di ripararlo autonomamente,
altrimenti la garanzia decadrebbe.
Non bloccare o coprire le aperture del prodotto.
Questo prodotto è previsto solo per l’uso privato e non dovrebbe essere usato a scopi commerciali o
industriali.
Non inserire oggetti inadeguati all’uso nelle aperture del prodotto.
Danni derivanti da un uso improprio o dal mancato rispetto delle avvertenze o delle indicazioni di queste
istruzioni per l’uso, non sono coperti dalla garanzia.
AVVERTENZA: un’esposizione prolungata all’ascolto di musica troppo
alta può causare danni temporanei o permanenti all’udito oppure
persino la perdita dell’udito. Non si consiglia di utilizzare il video player
nella circolazione stradale. Ciò può comportare che l’utente reagisca
con disattenzione a potenziali rischi, come ad esempio veicoli in
avvicinamento.

Pagina 4 di 18 - IT
1. Panoramica del dispositivo
2. Contenuto della confezione
Si prega di verificare la completezza del contenuto della confezione
Video player Intenso
Auricolari stereo
Scheda micro SD
CD con software di conversione (formato AVI)
Cavo USB
Istruzioni per l‘uso
1. Interruttore
2. Tasto freccia indietro
3. Tasto (+) volume
4. Tasto indietro
5. Tasto play / pausa
6. Porta mini USB
7. Ingresso auricolari
8. Tasto (-) volume
9. Tasto avanti
10. Tasto M (menù)
11. Slot micro SD

Pagina 5 di 18 - IT
3. Collegamento a un computer
Per trasferire i dati tra il player e un computer, è possibile collegare il player a un computer
semplicemente tramite il cavo USB fornito in dotazione.
a. Collegamento del dispositivo
Per collegare il player a un computer, inserire il connettore USB 2.0 del cavo USB in una
porta USB libera del computer acceso e collegare il connettore mini USB del cavo con il
player. Quest’ultimo verrà riconosciuto come dispositivo rimovibile e sarà pronto per il
trasferimento dei dati con il computer. È possibile trasferire i file desiderati dal computer al
player (o dal player al computer) semplicemente tramite la funzione “Drag & Drop” oppure
tramite il comando “copia e incolla”.
b. Scollegamento del dispositivo
Prima di estrarre il cavo USB, è assolutamente necessario interrompere il collegamento
tra i dispositivi!
A tale scopo premere il tasto per 1 o 2 secondi. Il display mostrerà lo stato di carica
attuale e il collegamento verrà interrotto.
Se si utilizza un PC Windows (XP o versioni successive), il player può anche essere
scollegato direttamente dal PC. A tale scopo cliccare sul simbolo “rimozione sicura
dell’hardware” sulla barra delle applicazioni Windows. Selezionare quindi il Video Scooter
e seguire le eventuali ulteriori istruzioni del computer fino a quando quest’ultimo
confermerà il processo andato a buon fine. Se si utilizza un MAC, è possibile scollegare il
player trascinando l’icona del player sul simbolo del cestino.
Infine è possibile scollegare il cavo USB dal player e dal computer in tutta sicurezza.
Nota: non scollegare il player dal computer se è ancora in corso un trasferimento dei dati.
Ciò può comportare la perdita dei dati o il danneggiamento del supporto.

Pagina 6 di 18 - IT
4. L’accumulatore
Il player ha un accumulatore interno fisso. Prima del primo utilizzo, accertarsi che
l’accumulatore sia completamente carico. Questo processo dura di norma fino a 3 ore.
Accumulatore completamente carico
a. Carica dell’accumulatore:
L’accumulatore si carica tramite il collegamento USB con il computer. Per caricare
l’accumulatore, collegare il dispositivo al PC tramite il cavo USB. Il processo di ricarica
inizia automaticamente. Comparirà il simbolo del collegamento (Connect) sul display del
dispositivo.
b. Stato di carica:
Per visualizzare lo stato di carica attuale, premere il tasto play/pausa per 1 o 2 secondi.
Comparirà sul display il simbolo della batteria. Se l’accumulatore è carico completamente,
verrà visualizzata una batteria verde. Se l’accumulatore si sta ancora caricando, verrà
visualizzata la rispettiva animazione.
Nota: per una funzionalità ottimale, l’accumulatore deve essere utilizzato regolarmente. In
caso contrario, caricarlo completamente almeno una volta al mese.

Pagina 7 di 18 - IT
c. Utilizzo durante il processo di ricarica:
È possibile utilizzare il player anche durante il processo di ricarica. Premere
semplicemente un’altra volta il tasto play/pausa e il dispositivo passerà dalla
visualizzazione dello stato di carica al menù principale.
Anche durante l’utilizzo è possibile consultare lo stato di carica attuale. Ad esempio,
durante la riproduzione di un file musicale, lo stato viene visualizzato in tre stadi
nell’angolo in alto a destra. Quando l’accumulatore è carico completamente, tutti e tre gli
stati sono accesi costantemente. Se l’accumulatore si sta ancora caricando, anche in
questo caso verrà visualizzata la rispettiva animazione.
0 – 33% 34 – 66 % 67 – 100 %
Nota: se si passa alla visualizzazione dello stato di carica o si utilizza il dispositivo
collegato al computer, non è più possibile uno scambio di dati con il computer. Per poter
trasferire nuovamente i dati, è necessario ricollegare il player al PC.

Pagina 8 di 18 - IT
5. Utilizzo
a. Utilizzo generale
(1) Accensione e spegnimento del player
Spostare l’interruttore collocato sul lato sinistro del dispositivo sulla posizione “ON”. Per
accendere il player, tenere quindi premuto il tasto play/pausa per ca. 3 secondi. Per
impostare il dispositivo nella modalità standby tenere di nuovo premuto il tasto play/pausa
per ca. 3 secondi. Se si desidera spegnere il player definitivamente, spostare il pulsante sul
lato sinistro del player nella posizione “OFF”.
(2) Blocco tasti
Per impedire la pressione involontaria dei tasti, il player dispone di una funzione blocco tasti.
Premere semplicemente allo stesso tempo il tasto play/pausa e il tasto M. Per confermare
l’azione, verrà visualizzato un lucchetto chiuso. Per sbloccare lo schermo, premere
semplicemente di nuovo il tasto play/pausa e il tasto M contemporaneamente. Come
conferma verrà visualizzato un lucchetto aperto.
Nota: si prega di accertarsi che nel player sia inserita una scheda micro SD
Nota: questo player è dotato di una funzione di risparmio energetico. Il dispositivo si
spegne automaticamente se non viene utilizzato per oltre dieci minuti.

Pagina 9 di 18 - IT
(3) Il menù principale
Dopo aver acceso il player, verrà visualizzato il menù principale, che consiste di sei voci
differenti (musica, video, foto, registrazione, file explorer e impostazioni).
Musica Video Foto
Registrazione File Impostazioni
(4) Navigazione
Con il tasto avanti e indietro è possibile navigare tra i vari menu. Con il tasto
play/pausa è possibile aprire la voce di menù desiderata o avviare la funzione desiderata.
Premere brevemente il tasto freccia indietro per tornare a un livello precedente. Per
tornare direttamente al menù principale, tenere premuto il tasto freccia indietro per 1
o 2 secondi.

Pagina 10 di 18 - IT
b. Musica
(1) Riproduzione
Navigare nel menù principale fino alla voce Music e confermare la scelta con il tasto
play/pausa. Si aprirà un’apposita schermata e la riproduzione inizierà automaticamente.
Per mettere in pausa e proseguire di nuovo la riproduzione, premere il tasto play/pausa.
Per passare a un titolo precedente o successivo, premere il tasto avanti o indietro .
Per tornare indietro o andare avanti all’interno di un titolo, tenere premuti i suddetti tasti.
Per regolare il volume, premere il tasto (+) o (-).
(2) Panoramica cartelle
Per passare dalla schermata della riproduzione musicale alla panoramica delle cartelle,
premere il tasto freccia indietro . Navigare tra i file e le cartelle con i tasti avanti o
indietro. Confermando un file musicale con il tasto play/pausa, esso verrà riprodotto.
Se si conferma con tale tasto una cartella, quest’ultima si aprirà. Con il tasto freccia
indietro è possibile passare al livello subito superiore nella struttura delle cartelle fino
a raggiungere il menù principale.
Per eliminare un file, navigare nella panoramica delle cartelle fino al file desiderato e
premere il tasto M. Per eliminarlo definitivamente, confermare il processo con il tasto
play/pausa.

Pagina 11 di 18 - IT
(3) Riproduzione ciclica tra due punti A-B di un brano
Con questo player è possibile selezionare un estratto di un pezzo musicale e riprodurlo in
modo ciclico.
Durante la riproduzione del pezzo musicale, premere il tasto M per determinare il punto
iniziale (A). Premere di nuovo il tasto M per stabilire il punto finale (B). Il pezzo selezionato
verrà quindi riprodotto in modo ciclico.
c. Video
(1) Riproduzione
Navigare nel menù principale fino alla voce Movie e confermare la scelta con il tasto
play/pausa. Si aprirà la panoramica delle cartelle. Selezionare il video da riprodurre tramite
i tasti avanti o indietro e confermare la scelta con il tasto play/pausa. Il video si
avvierà automaticamente. Per mettere in pausa e proseguire di nuovo la riproduzione,
premere il tasto play/pausa. Per passare a un titolo precedente o successivo, premere il
tasto avanti o indietro . Per tornare indietro o andare avanti all’interno di un titolo,
tenere premuti i suddetti tasti. Per regolare il volume, premere il tasto (+) o (-).
Nota: Per ulteriori possibilità di configurazione, aprire nel menù principale la voce Setup.
Nota: per riprodurre video su questo player, è necessario utilizzare il software di
conversione allegato per convertire i file nel formato AVI compatibile con il player.

Pagina 12 di 18 - IT
(2) Panoramica delle cartelle
Per passare dalla schermata della riproduzione musicale alla panoramica delle cartelle,
premere il tasto freccia indietro . Navigare tra i file e le cartelle presenti con i tasti
avanti o indietro. Confermando un file video con il tasto play/pausa, esso verrà
riprodotto. Se si conferma con tale tasto una cartella, quest’ultima si aprirà. Con il tasto
freccia indietro è possibile passare al livello subito superiore nella struttura delle
cartelle fino a raggiungere il menù principale.
Per eliminare un file, navigare nella panoramica delle cartelle fino al file desiderato e
premere il tasto M. Per eliminarlo definitivamente, confermare il processo con il tasto
play/pausa.
d. Foto
(1) Riproduzione
Navigare nel menù principale fino alla voce Photo e confermare la scelta con il tasto
play/pausa. Si aprirà la panoramica delle cartelle. Selezionare l’immagine da visualizzare
tramite i tasti avanti o indietro e confermare la scelta con il tasto play/pausa. La
foto selezionata verrà visualizzata. Per avviare una riproduzione automatica delle foto, o
anche per metterla in pausa, premere il tasto play/pausa.
(2) Panoramica delle cartelle
Per passare dalla schermata della riproduzione musicale alla panoramica delle cartelle,
premere il tasto freccia indietro . Navigare tra i file e le cartelle presenti con i tasti
avanti o indietro . Confermando un file con il tasto play/pausa, esso verrà
riprodotto. Se si conferma con tale tasto una cartella, quest’ultima si aprirà. Con il tasto
freccia indietro è possibile passare al livello subito superiore nella struttura delle
cartelle fino a raggiungere il menù principale.

Pagina 13 di 18 - IT
Per eliminare un file, navigare nella panoramica delle cartelle fino al file desiderato e
premere il tasto M. Per eliminarlo definitivamente, confermare il processo con il tasto
play/pausa.
e. Funzione di registrazione
(1) Registrazione
Navigare nel menù principale fino alla voce Record e confermare la scelta con il tasto
play/pausa. Il player è pronto per registrare un file audio tramite il microfono integrato. A
tale scopo, premere semplicemente il tasto play/pausa. L’avanzamento della
registrazione verrà visualizzato sul display. Per mettere in pausa o proseguire la
registrazione, premere nuovamente il tasto play/pausa.
Per salvare una registrazione, premere il tasto M. Con il tasto freccia indietro è
possibile tornare al menù principale; l’eventuale registrazione in corso verrà salvata
automaticamente.
Nota: Per ulteriori possibilità di configurazione, aprire nel menù principale la voce Setup.
Nota: i file registrati (in formato .wav) si trovano nella cartella “VOICE” tramite l’Explorer.
Se non è disponibile spazio sufficiente per una registrazione, il player visualizzerà la
notifica “memoria piena”.

Pagina 14 di 18 - IT
(2) Riproduzione
Navigare nel menù principale fino alla voce File Explorer e confermare la scelta con il tasto
play/pausa. Selezionare la cartella VOICE per visualizzare tutte le registrazioni
effettuate in ordine cronologico. Navigare quindi sul file desiderato e avviare la
riproduzione con il tasto tasto play/pausa. Con il tasto freccia indietro è possibile
tornare al menù principale.
f. File Explorer
Navigare nel menù principale fino alla voce File Explorer e confermare la scelta con il tasto
play/pausa. Verrà visualizzata la directory principale della scheda di memoria. Navigare
tra i file e le cartelle con i tasti avanti o indietro . Se si conferma un file con il tasto
play/pausa, quest’ultimo verrà riprodotto. Se si conferma con tale tasto una cartella,
quest’ultima si aprirà. Con il tasto freccia indietro è possibile passare al livello subito
superiore nella struttura delle cartelle fino a raggiungere il menù principale.
Per eliminare un file, navigare nella panoramica delle cartelle fino al file desiderato e
premere il tasto M. Per eliminarlo definitivamente, confermare il processo con il tasto
play/pausa.
Nota: Per ulteriori possibilità di configurazione, aprire nel menù principale la voce Setup.
Nota: informazioni sulla memoria non utilizzata e occupata nonché sulle dimensioni
complete della scheda di memoria in uso sono disponibili nel Setup alla voce Sistema e
quindi alla voce Informazioni.

Pagina 15 di 18 - IT
g. Impostazioni
Navigare nel menù principale fino alla voce Setup e confermare la scelta con il tasto
play/pausa.
(1) Musica
Alla voce Musica si trovano le seguenti opzioni di impostazione:
i. Modalità di riproduzione
Stabilire qui la modalità di riproduzione desiderata.
Titolo una volta
Il titolo selezionato viene riprodotto una volta e poi la
riproduzione viene interrotta.
Ripetere titolo
Il titolo scelto viene riprodotto ripetutamente.
Cartella una
volta
I titoli di una cartella selezionata vengono riprodotti una volta e
poi la riproduzione viene interrotta.
Ripetere cartella
Tutti i titoli della cartella attuale vengono riprodotti ripetutamente.
Tutti una volta
Tutti i brani vengono riprodotti una volta.
Riproduci tutti
Tutti i brani salvati vengono riprodotti ripetutamente.
Intro
Viene riprodotto l’inizio di singoli brani.
ii. Riproduzione casuale
Qui è possibile attivare o disattivare la riproduzione di tutti i file musicali.
iii. Equalizzatore
Selezionare la modalità di equalizzatore preferita: si può scegliere tra Normale, Rock, Pop,
Classica, Basso e Jazz.

Pagina 16 di 18 - IT
(2) Registrazione
Alla voce Registrazione è possibile stabilire la qualità di registrazione. Si può scegliere tra
qualità normale (32 KBPS) e alta qualità (64 KBPS). Tenere presente che un’elevata
qualità richiederà maggiore spazio di memoria.
(3) Foto
Alla voce Foto è possibile impostare la durata di visualizzazione dello slideshow. È
possibile scegliere tra: 2 s, 4 s, 6 s, 8 s, e 10 s.
(4) Display
Alla voce Display si trovano le seguenti opzioni di impostazione:
i. Durata dell’illum.
Qui è possibile impostare la durata di illuminazione del display. Si può scegliere tra 5 s, 10
s, 15 s, 20 s, 30 s e sempre.
ii. Luminosità
Qui è possibile impostare la luminosità del display in base a 5 livelli.
iii. Modalità ecologica
Se si attiva la modalità ecologica, il display si spegnerà completamente dopo la durata di
tempo preimpostata. Se la modalità ecologica è disattivata, il display rimarrà acceso con
luminosità minima dopo la durata di tempo preimpostata. Tenere presente che ciò riduce
notevolmente la durata dell’accumulatore.
(5) Sleep timer
Alla voce Sleep Timer è possibile programmare lo spegnimento automatico del dispositivo
dopo una certa durata. Si può scegliere tra Off (il display non si spegnerà
automaticamente), 10 min, 15 min, 30 min, 60 min, e 120 min.
(6) Lingua
Alla voce Lingua è possibile selezionare una delle otto lingue predefinite. Si può scegliere
tra inglese, spagnolo, francese, tedesco, italiano, portoghese, polacco e russo.

Pagina 17 di 18 - IT
(7) Sistema
Alla voce Sistema si trovano le seguenti opzioni di impostazione:
i. Informazioni
Qui si trovano informazioni riguardanti la versione del firmware del player, la memoria
totale disponibile, la memoria utilizzata (U:) e la memoria libera (F:) della scheda.
ii. Impostazioni di fabbrica
Confermando questa opzione, il player verrà impostato nuovamente in base alla
configurazione standard.
6. Scheda micro SD
Questo player non possiede una memoria interna utilizzabile. Viene fornito in dotazione
con una scheda di memoria le cui dimensioni sono indicate sulla confezione. Il player
viene riconosciuto dal computer a cui è collegato tramite USB solo se la scheda di
memoria è inserita. Il dispositivo supporta schede di memoria con una capacità fino a 64
GB.

Pagina 18 di 18 - IT
7. Specifiche tecniche
Dimensioni
88 mm (H) x 41 mm (B) x 9.0mm (T)
Peso
~30 gr.
LCD
4,4 cm (1.8 pollici) display a colori, risoluzione: 128 x 160 pixel
Collegamento PC
USB 2.0 (PC) | collegamento mini USB (player)
Accumulatore
Accumulatore ricaricabile ai polimeri di litio, capacità: 150mAh
Riproduzione musicale: ~ 12 ore (musica MP3 in modalità risparmio
energetico)
Ambito di frequenza
Da 20Hz a 20000Hz
SNR
> 70dB
Formato musicale
MP3 / WMA 32 – 320kbps
Formato video
AVI 160 x 120 pixel
Formato registrazione
WAV con 32 o 64 KBPS
Formato immagine
JPEG / BMP
Temperatura di
funzionamento
Da 0 a 40 gradi Celsius
Sistema operativo
Windows XP / Vista / Win7 / Win8, Mac 9.2 o successivi
Clausola di esonero dalla responsabilità
Possono subentrare modifiche al firmware e / o all’hardware in qualsiasi momento e senza
preavviso. Per questo motivo è possibile che parti delle istruzioni, delle specifiche tecniche
e delle immagini contenute in questa documentazione divergano leggermente dal presente
prodotto. Tutti i punti descritti in queste istruzioni hanno uno scopo chiarificatore e non
devono necessariamente coincidere con una determinata situazione. Non è possibile far
valere rivendicazioni legali sulla base di queste istruzioni.
Smaltimento di apparecchi elettrici usati
I dispositivi contrassegnati da questo simbolo sono soggetti alla direttiva europea
2002/96/EC.
Tutti i dispositivi elettrici ed elettronici usati devono essere smaltiti separatamente dai rifiuti
domestici tramite le sedi indicate dalla legge. Con uno smaltimento regolare dei dispositivi
elettrici ed elettronici usate, si evitano danni all’ambiente.

Page 1 de 18 - FR
Table des matières
Consignes ....................................................................................................................................................... 3
1. Présentation de l'appareil ....................................................................................................................... 4
2. Contenu de l'emballage .......................................................................................................................... 4
3. Connexion à un ordinateur ..................................................................................................................... 5
a. Raccordement de l'appareil ................................................................................................................. 5
b. Débranchement de l'appareil ............................................................................................................... 5
4. La batterie ............................................................................................................................................... 6
a. Charge de la batterie : .......................................................................................................................... 6
b. Etat de charge : ..................................................................................................................................... 6
c. Utilisation pendant le processus de charge : ....................................................................................... 7
5. Fonctionnement ...................................................................................................................................... 8
a. Fonctionnement general ...................................................................................................................... 8
(1) Activation et désactivation du lecteur ........................................................................................... 8
(2) Bouton de verrouillage .................................................................................................................. 8
(3) Il Le menu principal ....................................................................................................................... 9
(4) Navigation ...................................................................................................................................... 9
b. Musique .............................................................................................................................................. 10
(1) Lecture ......................................................................................................................................... 10
(2) Affichage des dossiers ................................................................................................................. 10
(3) Lecture en boucle entre deux points A-B d'une piste ................................................................. 11
c. Vidéo ................................................................................................................................................... 11
(1) Lecture ......................................................................................................................................... 11
(2) Aperçu des dossiers ..................................................................................................................... 12
d. Photo .................................................................................................................................................. 12
(1) Lecture ......................................................................................................................................... 12
(2) Aperçu des dossiers ..................................................................................................................... 12
e. Fonction d'enregistrement ................................................................................................................. 13

Page 2 de 18 - FR
(1) Enregistrement ............................................................................................................................ 13
(2) Lecture ......................................................................................................................................... 14
f. Explorateur de fichiers .......................................................................................................................... 14
g. Paramètres ......................................................................................................................................... 15
(1) Musique ....................................................................................................................................... 15
i. Mode de lecture .................................................................................................................. 15
ii. Lecture aléatoire ................................................................................................................ 15
iii. Égaliseur ............................................................................................................................ 15
(2) Enregistrement ............................................................................................................................ 15
(3) Photo ........................................................................................................................................... 16
(4) Affichage ...................................................................................................................................... 16
i. Durée d'éclairage................................................................................................................. 16
ii. Luminosité .......................................................................................................................... 16
iii. Mode Eco ........................................................................................................................... 16
(5) Mise en veille programmable ...................................................................................................... 16
(6) Langue ......................................................................................................................................... 16
(7) Système ....................................................................................................................................... 17
i. Informations ........................................................................................................................ 17
ii. Les réglages d'usine ............................................................................................................ 17
6. Carte Micro SD ...................................................................................................................................... 17
7. Caractéristiques ..................................................................................................................................... 18

Page 3 de 18 - FR
Consignes
Lisez et suivez ces instructions d'utilisation, y compris tous les avertissements et les instructions à suivre
avant la première utilisation du produit.
Avant la première utilisation de l'appareil, assurez-vous que la batterie est complètement chargée.
Éviter les chocs forts sur l'appareil.
Ne pas utiliser l'appareil dans des conditions de froid, de chaleur, d'humidité ou de poussière extrêmes.
Ne pas exposer à la lumière directe du soleil.
Ne pas placer le produit à proximité de sources de lumière directes, par exemple près de bougies.
Effectuez des sauvegardes régulières de vos données afin d'éviter toute perte de données.
Évitez l'utilisation dans de champs magnétiques élevés.
Ne pas utiliser cet appareil avec les mains mouillées.
Protégez l'appareil de l'eau. Si de l'humidité pénètre dans l'appareil, éteignez-le immédiatement,
nettoyez et laissez sécher.
Ne pas utiliser d'eau ou de solutions chimiques pour nettoyer l'appareil. Utilisez uniquement un chiffon
sec.
Nous ne sommes pas responsables des dommages ou des pertes de données en cas de
dysfonctionnement, d'utilisation abusive, de réparation ou de remplacement volontaire de votre batterie.
Ne pas démonter l'appareil et ses différents composants et ne pas essayer de réparer vous-même,
sinon la garantie sera annulée.
Ne pas obstruer ou recouvrir les ouvertures du produit.
Ce produit est destiné à un usage privé et ne doit pas être utilisé à des fins commerciales ou
industrielles.
Ne pas insérer d'objets inappropriés dans les ouvertures du produit.
La garantie ne couvre pas les dommages résultant d'une mauvaise utilisation ou du défaut de respect
des avertissements ou des instructions de ce manuel d'instructions.
Avertissement : L'exposition prolongée à l'écoute de la musique forte peut causer
des dommages auditifs temporaires ou permanents ou même la perte de l'audition. Il
n'est pas recommandé d'utiliser le lecteur vidéo sur la route. Cela peut signifier que
l'utilisateur réagisse sans faire attention aux risques potentiels, et ne pas voir les
véhicules qui approchent

Page 4 de 18 - FR
1. Présentation de l'appareil
2. Contenu de l'emballage
Vérifiez le contenu de l'emballage
Lecteur vidéo Intenso
Écouteurs stéréo
Carte Micro SD
CD avec logiciel de conversion (format AVI)
Câble USB
Mode d'emploi
1. Interrupteur
2. Bouton fléché de
retour
3. Bouton de volume (+)
4. Bouton de retour
5. Bouton de lecture/pause
6. Port mini USB
7. Port casque audio
8. Bouton volume (-)
9. Bouton d'avance
10. Bouton M (menu)
11. Fente carte micro SD

Page 5 de 18 - FR
3. Connexion à un ordinateur
Pour transférer des données entre le lecteur et un ordinateur, vous pouvez connecter le
lecteur à un ordinateur en utilisant simplement le câble USB fourni.
a. Raccordement de l'appareil
Pour connecter le lecteur à un ordinateur, branchez le connecteur USB du câble USB 2.0
à un port USB libre de votre ordinateur et branchez le connecteur mini-USB du câble au
lecteur. Ce dernier sera reconnu comme périphérique amovible et prêt pour le transfert de
données avec votre ordinateur. Vous pouvez transférer les fichiers souhaités à partir de
l'ordinateur vers le lecteur (ou du lecteur à l'ordinateur) en utilisant simplement la fonction
"glisser/déposer" ou en utilisant le «copier-coller».
b. Débranchement de l'appareil
Avant de retirer le câble USB, vous devez absolument rompre le lien entre les appareils !
Pour ce faire, appuyez sur le bouton pendant 1 ou 2 secondes. L'écran affiche l'état de
charge actuel et le lien sera déconnecté.
Si vous utilisez un PC sous Windows (XP ou version ultérieure), le lecteur peut également
être débranché du PC. Pour ce faire, cliquez sur "Déconnectez le matériel en toute
sécurité" sur la barre des tâches de Windows. Ensuite, sélectionnez le scooter vidéo et
suivez les instructions supplémentaires de l'ordinateur jusqu'à ce que ce dernier confirme
la réussite du processus. Si vous utilisez un Mac, vous pouvez déconnecter le lecteur en
faisant en faisant glisser l'icône du lecteur sur le symbole de la corbeille.
Enfin, vous pouvez débrancher le câble USB du lecteur et de l'ordinateur en toute sécurité.
Remarque: ne pas débrancher le lecteur du computeur pendant le transfer de données.
Cela peut entraîner la perte de données et endommager l'appareil.
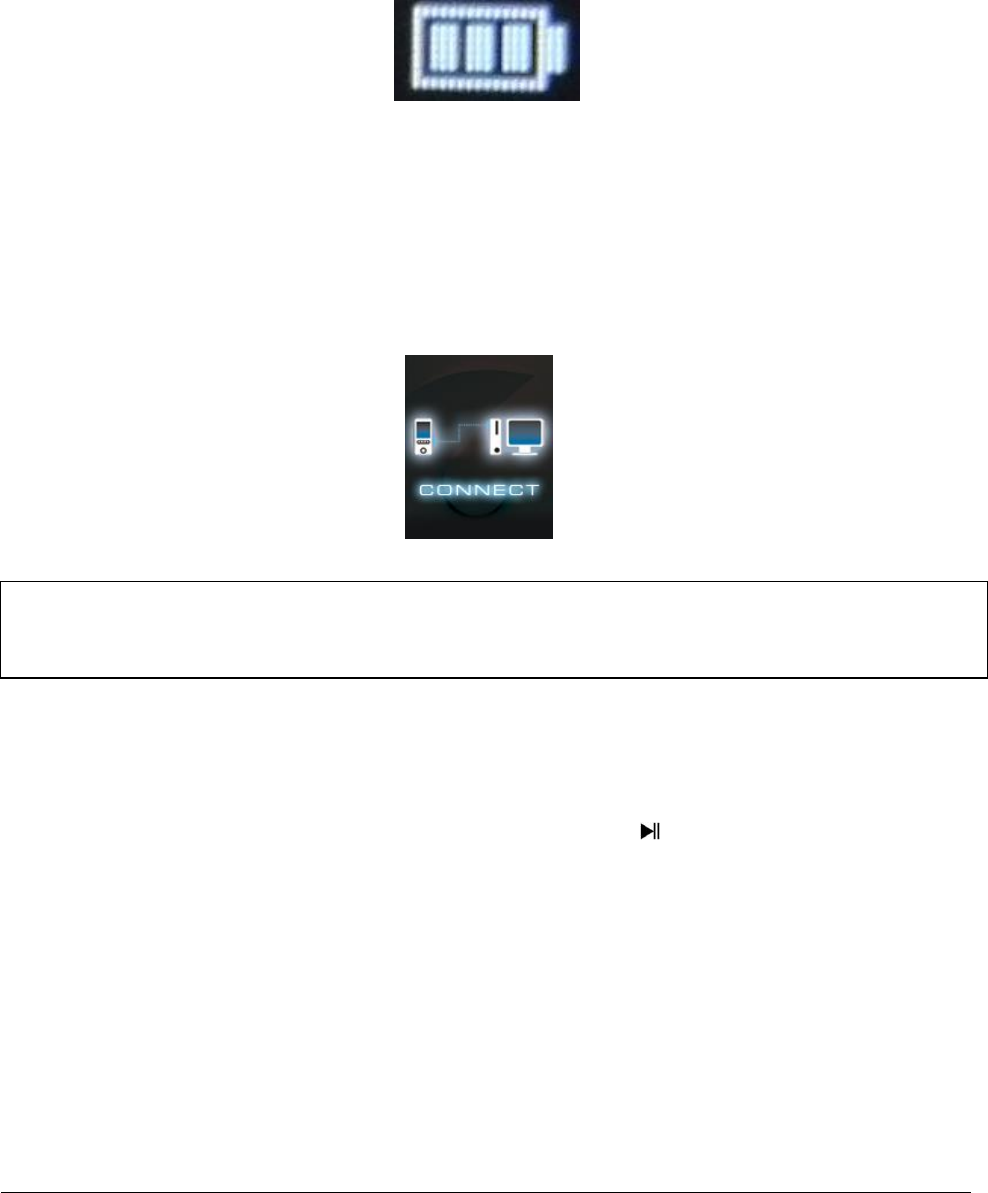
Page 6 de 18 - FR
4. La batterie
Le lecteur dispose d'une batterie interne fixe. Avant la première utilisation, assurez-vous
que la batterie est complètement chargée. Ce processus prend normalement 3 heures.
Batterie entièrement chargée
a. Charge de la batterie :
La batterie se recharge via la connexion USB avec votre ordinateur. Pour charger la
batterie, connectez l'appareil à l'ordinateur via le câble USB. Le processus de charge
commence automatiquement. Vous verrez le symbole de la connexion (Connect) sur
l'écran de l'appareil.
b. Etat de charge :
Pour afficher l'état de charge actuel, appuyez sur le bouton lecture / pause pendant 1 ou
2 secondes. L'affichage du symbole de la batterie apparaît à l'écran. Si la batterie est
complètement chargée, vous verrez une batterie verte. Si la batterie est toujours en
charge, vous pourrez voir l'animation correspondante.
Remarque: pour un fonctionnement optima, la batterie doit être utilisée régulièrement.
Dans le cas contraire, rechargez-la complètement au moins une fois par mois.

Page 7 de 18 - FR
c. Utilisation pendant le processus de charge :
Vous pouvez utiliser le lecteur pendant le processus de charge. Il suffit d'appuyer à
nouveau sur la touche lecture / pause et l'appareil passera de l'état de charge au menu
principal.
Même lorsque vous l'utilisez, vous pouvez voir l'état de charge actuel. Par exemple, lors
de la lecture d'un fichier musical, l'état est affiché en trois étapes dans le coin supérieur
droit. Lorsque la batterie est complètement chargée, tous les trois états sont allumés en
permanence. Si la batterie est toujours en charge, dans ce cas, vous verrez l'animation
correspondante.
0 – 33% 34 – 66 % 67 – 100 %
Remarque: si vous affichez l'état de charge de la batterie ou si vous utilisez l'appareil
connecté à l'ordinateur, il n'est plus possible d'échanger des données avec l'ordinateur.
Pour pouvoir transférer à nouveau des données, il faut reconnecter le lecteur au PC.

Page 8 de 18 - FR
5. Fonctionnement
a. Fonctionnement general
(1) Activation et désactivation du lecteur
Déplacer le commutateur situé sur le côté gauche de l'appareil sur la position «ON». Pour
allumer le lecteur, maintenez enfoncé le bouton lecture / pause pendant env. 3 secondes.
Pour configurer l'appareil en mode veille, appuyez et maintenez enfoncer le bouton lecture/
pause env. 3 secondes. Si vous voulez désactiver définitivement le lecteur, faites glisser le
bouton sur le côté gauche du lecteur dans la position «OFF».
(2) Bouton de verrouillage
Pour éviter la pression involontaire des touches, le lecteur dispose d'une fonction de
verrouillage du clavier. Il suffit d'appuyer en même temps sur le bouton Lecture/ pause et le
bouton M. Pour confirmer l'action, vous verrez un cadenas fermé. Pour déverrouiller l'écran,
appuyez à nouveau en même temps sur la touche lecture/pause et la touche M. En
confirmation, vous verrez un cadenas ouvert.
Remarque: sVeuillez vous assurer qu'une carte micro SD est insérée dans le lecteur
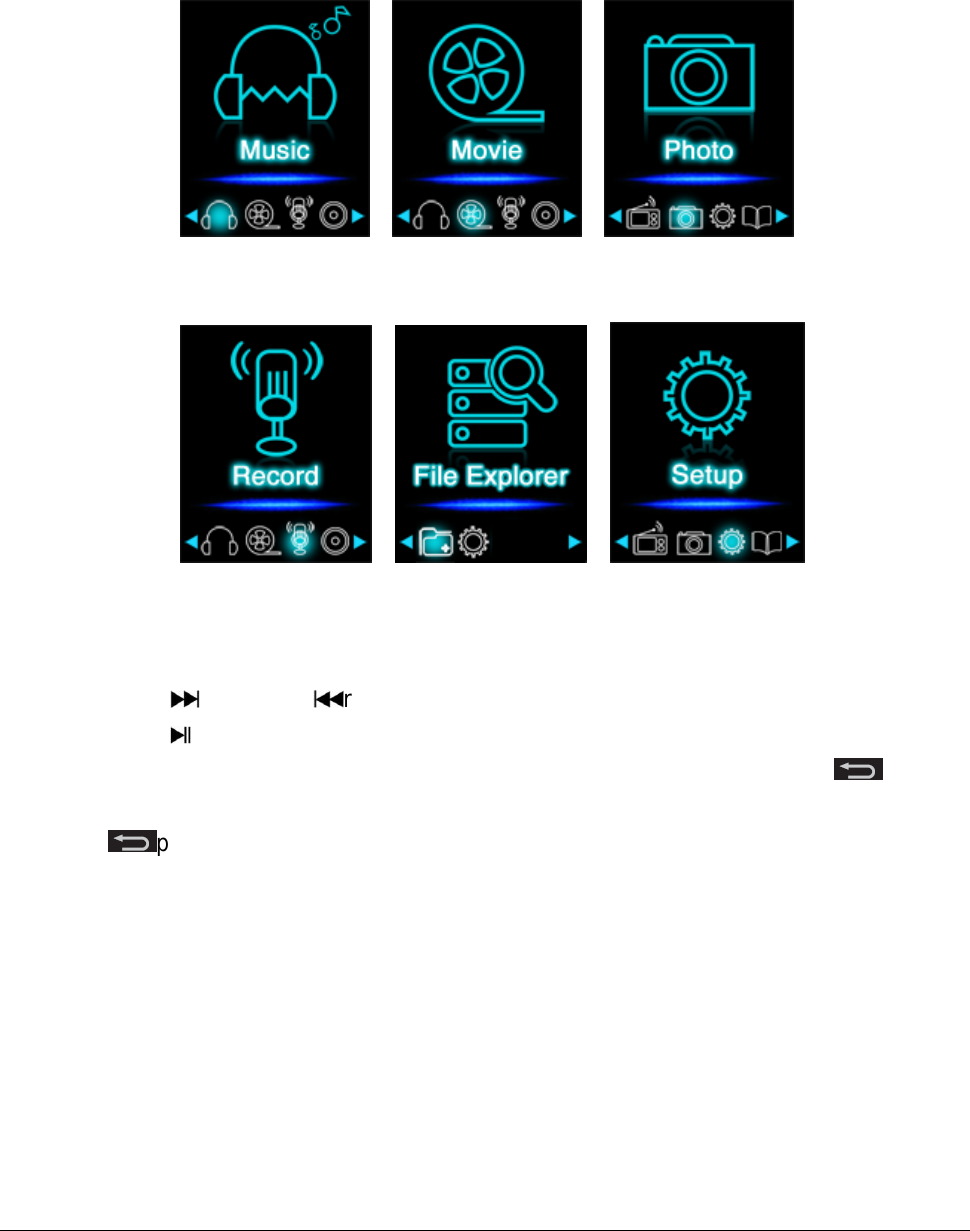
Page 9 de 18 - FR
(3) Il Le menu principal
Après avoir mis le lecteur sous tension, vous verrez le menu principal, qui se compose de
six options différentes (musique, vidéos, photos, enregistrements, explorateur de fichier et
paramètres).
Musique Vidéo Photo
Enregistrement Fichier paramètres
(4) Navigation
Avec le bouton avance et retour, vous pouvez naviguer dans les différents menus.
Avec le bouton Lecture / Pause, vous pouvez ouvrir l'option de menu souhaitée ou
activer la fonction désirée. Appuyez brièvement sur le bouton fléché de retour pour
revenir au niveau précédent. Pour revenir au menu principal, appuyez sur le bouton fléché
de retour pendant 1 ou 2 secondes.

Page 10 de 18 - FR
b. Musique
(1) Lecture
Naviguez dans le menu principal jusqu'à l'option Music et validez votre choix en appuyant
sur le bouton Lecture/pause. Ceci ouvrira un écran séparé, et la lecture commencera
automatiquement. Pour mettre en pause et reprendre la lecture, appuyez sur le bouton
Lecture/pause. Pour passer à un titre précédent ou suivant, appuyez sur le bouton avance
ou retour . Pour revenir en arrière ou aller en avant dans un titre, appuyez sur ces
touches en les maintenant enfoncées. Pour régler le volume, appuyez sur le bouton (+) ou
(-).
(2) Affichage des dossiers
Pour passer de l'écran de lecture musicale à la liste des dossiers, appuyez sur la flèche de
retour .Parcourir les fichiers et dossiers avec les touches d'avance ou retour.
En confirmant un fichier de musique en appuyant sur le bouton Lecture/pause, la lecture
commencera. Si vous confirmez un dossier avec ce bouton, ce dossier s'ouvrira. Avec la
touche fléchée de retour vous pouvez aller au niveau supérieur dans la structure du
dossier jusqu'à atteindre le menu principal.
Pour supprimer un fichier, accédez à la liste des dossiers jusqu'au fichier désiré et
appuyez sur la touche M. Pour le supprimer définitivement, confirmez le processus en
appuyant sur lecture/pause.
Product specificaties
| Merk: | Intenso |
| Categorie: | Mp3 speler |
| Model: | Video Scooter |
| Kleur van het product: | Roze |
| Gewicht: | 28 g |
| Breedte: | 42 mm |
| Diepte: | 9 mm |
| Hoogte: | 91 mm |
| Soort: | MP3 speler |
| LED-indicatoren: | Ja |
| Capaciteit van de accu/batterij: | 150 mAh |
| Beeldscherm: | LCD |
| Beeldschermdiagonaal: | 1.8 " |
| Resolutie: | 160 x 120 Pixels |
| Touchscreen: | Nee |
| Continue audio-afspeeltijd: | 8 uur |
| Ondersteund audioformaat: | MP3, WMA |
| Ondersteunde videoformaten: | AVI |
| Type aansluitplug: | 3,5 mm |
| Meegeleverde kabels: | USB |
| Geïntegreerde geheugenkaartlezer: | Ja |
| Compatibele geheugenkaarten: | MicroSD (TransFlash) |
| Ingebouwde luidsprekers: | Nee |
| Interface: | USB 2.0 |
| Ondersteund beeldformaat: | JPG |
| Ingebouwde camera: | Nee |
| Equalizer-instellingen: | Ja |
| Ondersteunt Windows: | Ja |
| Frequentiebereik koptelefoon: | 20 - 20000 Hz |
| Totale opslagcapaciteit: | 8 GB |
| Ondersteunt Mac-besturingssysteem: | Ja |
| Oplaadbaar: | Ja |
| Aantal banden equalizer: | 9 |
| MP3-bitsnelheden: | 32 - 320 Kbit/s |
| Koptelefoon: | Ja |
| Batterij-oplaadindicatie: | Ja |
| Batterij vol-indicatie: | Ja |
| WMA-bitsnelheden: | 32 - 320 Kbit/s |
| Opladen via USB: | Ja |
| Tweede camera: | Nee |
| Type opslagmedium: | Flashgeheugen |
| Videogeheugen capaciteit: | - uur |
| Wifi: | Nee |
| Bedrijfstemperatuur (T-T): | 0 - 40 °C |
| Batterijtechnologie: | Lithium-Polymeer (LiPo) |
Heb je hulp nodig?
Als je hulp nodig hebt met Intenso Video Scooter stel dan hieronder een vraag en andere gebruikers zullen je antwoorden
Handleiding Mp3 speler Intenso

8 Augustus 2023
8 Augustus 2023
10 April 2023
10 April 2023
10 April 2023
30 Oktober 2022
30 Oktober 2022
30 Oktober 2022
30 Oktober 2022
Handleiding Mp3 speler
- Mp3 speler Philips
- Mp3 speler Sony
- Mp3 speler Samsung
- Mp3 speler Panasonic
- Mp3 speler Epson
- Mp3 speler AEG
- Mp3 speler Grundig
- Mp3 speler JVC
- Mp3 speler Kenwood
- Mp3 speler Motorola
- Mp3 speler Medion
- Mp3 speler Olympus
- Mp3 speler Topcom
- Mp3 speler Toshiba
- Mp3 speler Xiron
- Mp3 speler Yarvik
- Mp3 speler Acer
- Mp3 speler Aiptek
- Mp3 speler Airis
- Mp3 speler Aiwa
- Mp3 speler Akai
- Mp3 speler Albrecht
- Mp3 speler American Audio
- Mp3 speler Apacer
- Mp3 speler Apart
- Mp3 speler Apple
- Mp3 speler Archos
- Mp3 speler Audiovox
- Mp3 speler Auna
- Mp3 speler Basetech
- Mp3 speler Becker
- Mp3 speler BenQ
- Mp3 speler Bigben
- Mp3 speler Boss
- Mp3 speler Brigmton
- Mp3 speler D-Jix
- Mp3 speler D-Link
- Mp3 speler Dane Elec
- Mp3 speler Denver
- Mp3 speler Difrnce
- Mp3 speler Emtec
- Mp3 speler Energy Sistem
- Mp3 speler Envivo
- Mp3 speler Fiio
- Mp3 speler Freecom
- Mp3 speler Geemarc
- Mp3 speler GPX
- Mp3 speler Haier
- Mp3 speler Hipstreet
- Mp3 speler Hitachi
- Mp3 speler Hyundai
- Mp3 speler Ices
- Mp3 speler Ingo
- Mp3 speler Insignia
- Mp3 speler Iriver
- Mp3 speler Konig
- Mp3 speler Konig Electronic
- Mp3 speler Lavod
- Mp3 speler Lenco
- Mp3 speler Lexibook
- Mp3 speler Logik
- Mp3 speler Loomax
- Mp3 speler Manta
- Mp3 speler Marquant
- Mp3 speler Maxfield
- Mp3 speler Media-tech
- Mp3 speler Memup
- Mp3 speler MiTone
- Mp3 speler MPIO
- Mp3 speler Mpman
- Mp3 speler Napa
- Mp3 speler Nikkei
- Mp3 speler Packard Bell
- Mp3 speler PENTAGRAM
- Mp3 speler Polaroid
- Mp3 speler Power Dynamics
- Mp3 speler Proline
- Mp3 speler Pure
- Mp3 speler Pyle
- Mp3 speler Q-BE
- Mp3 speler Qware
- Mp3 speler RCA
- Mp3 speler Renkforce
- Mp3 speler Ricatech
- Mp3 speler Rio
- Mp3 speler Roadstar
- Mp3 speler Sakar
- Mp3 speler SanDisk
- Mp3 speler Sanyo
- Mp3 speler Schaub Lorenz
- Mp3 speler Scott
- Mp3 speler Sencor
- Mp3 speler Sensation
- Mp3 speler Sharp
- Mp3 speler Sigmatek
- Mp3 speler Silvercrest
- Mp3 speler Sitecom
- Mp3 speler Soundmaster
- Mp3 speler Sunstech
- Mp3 speler Sweex
- Mp3 speler Sylvania
- Mp3 speler TakeMS
- Mp3 speler Tascam
- Mp3 speler Teac
- Mp3 speler Technaxx
- Mp3 speler Technisat
- Mp3 speler Terris
- Mp3 speler Tesco
- Mp3 speler Tevion
- Mp3 speler Thomson
- Mp3 speler Tom-tec
- Mp3 speler Tomtec
- Mp3 speler Transcend
- Mp3 speler Trekstor
- Mp3 speler Verbatim
- Mp3 speler Victory
- Mp3 speler Vieta
- Mp3 speler Visual Land
- Mp3 speler Woxter
- Mp3 speler Yakumo
- Mp3 speler Zipy
- Mp3 speler Zolid
- Mp3 speler JGC
- Mp3 speler Jobo
- Mp3 speler Odys
- Mp3 speler OK
- Mp3 speler OneConcept
- Mp3 speler Oregon Scientific
- Mp3 speler OXX Digital
- Mp3 speler Clas Ohlson
- Mp3 speler ECG
- Mp3 speler Bang And Olufsen
- Mp3 speler Creative
- Mp3 speler GoGEN
- Mp3 speler Naxa
- Mp3 speler NGS
- Mp3 speler Bush
- Mp3 speler Listo
- Mp3 speler Cresta
- Mp3 speler Irradio
- Mp3 speler Alba
- Mp3 speler Majestic
- Mp3 speler Trevi
- Mp3 speler Natec
- Mp3 speler Orava
- Mp3 speler Nilox
- Mp3 speler Aqprox
- Mp3 speler SPC
- Mp3 speler Cowon
- Mp3 speler Citronic
- Mp3 speler Coby
- Mp3 speler Finis
- Mp3 speler Native Union
- Mp3 speler IBasso
- Mp3 speler Ultra
- Mp3 speler Jaton
- Mp3 speler ZipyLife
- Mp3 speler Astell&Kern
- Mp3 speler HiFiMAN
- Mp3 speler Oracom
- Mp3 speler On-Hold Plus
- Mp3 speler Truly
- Mp3 speler JWIN
- Mp3 speler Onearz
Nieuwste handleidingen voor Mp3 speler
4 Maart 2025
25 Februari 2025
25 Februari 2025
25 Februari 2025
25 Februari 2025
25 Februari 2025
27 Januari 2025
27 Januari 2025

13 Januari 2025
13 Januari 2025