Fujifilm FinePix J30 Handleiding
Fujifilm
Fotocamera
FinePix J30
Lees hieronder de 📖 handleiding in het Nederlandse voor Fujifilm FinePix J30 (209 pagina's) in de categorie Fotocamera. Deze handleiding was nuttig voor 50 personen en werd door 2 gebruikers gemiddeld met 4.5 sterren beoordeeld
Pagina 1/209

Before You Begin
First Steps
Basic Photography and Playback
More on Photography
More on Playback
Movies
Connections
Menus
Technical Notes
Troubleshooting
Appendix
For information on related products, visit our website at
http://www.fujifilm.com/products/index.html
Owner’s Manual
Thank you for your purchase of this
product. This manual describes
how to use your FUJIFILM FinePix
J27, J28, J29, J30, J32, J37 or J38
digital camera and the supplied
software. Be sure that you have
read and understood its contents
before using the camera.
BL00881-201 EN


ii
Camera Q & A
Find items by task.
Camera Setup
Camera Setup
Camera Setup
Camera SetupCamera SetupCamera Setup
Question
Question
Question
QuestionQuestionQuestion Key
Key
Key
KeyKey phrase
phrase
phrase
phrase phraseKey phrase See page
See page
See page
See pageSee pageSee page
How do I set the camera clock? Date and time 13
Can I set the clock to local time when I travel? Time difference 77
How do I keep the monitor from turning off automatically? Auto power off 76
How do I stop the camera beeping and clicking? Silent mode 25
Operation and shutter volume 73
What are the parts of the camera called? Parts of the camera 2
What do the icons in the monitor mean? Monitor 3
How do I use the menus? Menus 56
What’s behind that flashing icon or error message in the monitor? Messages and displays 86
How much charge is left in the battery? Battery level 14
Ta
Ta
Ta
TaTak
k
k
kki
i
i
iin
n
n
nng
g
g
gg P
P
P
P Pi
i
i
iic
c
c
cct
t
t
ttu
u
u
uur
r
r
rre
e
e
ees
s
s
ssTaking Pictures
Question
Question
Question
QuestionQuestionQuestion Key
Key
Key
KeyKey phrase
phrase
phrase
phrase phraseKey phrase See page
See page
See page
See pageSee pageSee page
How many pictures can I take? Memory capacity 91
Is there a quick and easy way to take snapshots? k mode 14
How can I make good portraits? Intelligent Face Detection 19
Can the camera automatically select the most suitable mode? G mode 29
Is there a simple way to adjust settings for different scenes? Shooting mode 28
How do I shoot a panorama? W mode 30
How do I shoot close-ups? Macro mode (Close-ups) 23


iii
Camera Q & A
Question
Question
Question
QuestionQuestionQuestion Key
Key
Key
KeyKey phrase
phrase
phrase
phrase phraseKey phrase See page
See page
See page
See pageSee pageSee page
How do I keep the flash from firing?
Flash mode 24How do I stop my subjects’ eyes glowing red when I use the flash?
How do I “fill-in” shadows on back-lit subjects?
How do I take a group portrait that includes the photographer? Self-timer mode 26
How do I frame pictures with the subject off to one side? Focus lock 21
How do I shoot movies? Recording movies 39
Viewing Pi
Viewing Pi
Viewing Pi
Viewing PiViewing Pict
ct
ct
ctctures
ures
ures
uresuresViewing Pictures
Question
Question
Question
QuestionQuestionQuestion Key
Key
Key
KeyKey phrase
phrase
phrase
phrase phraseKey phrase See page
See page
See page
See pageSee pageSee page
How do I view my pictures? Single-frame playback 33
Is there a simple way to delete one image? Deleting pictures 18
How do I delete one or all images at once? Erase 37
Can I zoom in on pictures during playback? Playback zoom 34
How do I view a lot of pictures at once? Multi-frame playback 35
How do I view all pictures taken on the same day? Sort by date 36
Can I protect my pictures from accidental deletion? Protect 67
Can I hide the icons in the monitor when viewing my pictures? Choosing a display format 33
How do I view my pictures on TV? Viewing pictures on TV 42
Sharing Pictures
Sharing Pictures
Sharing Pictures
Sharing PicturesSharing PicturesSharing Pictures
Question
Question
Question
QuestionQuestionQuestion Key
Key
Key
KeyKey phrase
phrase
phrase
phrase phraseKey phrase See page
See page
See page
See pageSee pageSee page
Can I print pictures on my home printer? Printing pictures 43
Can I copy my pictures to my computer? Viewing pictures on a computer 49


iv
Camera Q & A ..................................................................................... ii
Camera Setup ............................................................................... ii
Taking Pictures ............................................................................. ii
Viewing Pictures .........................................................................iii
Sharing Pictures ..........................................................................iii
About This Manual ......................................................................... vi
Before Y
Before Y
Before Y
Before YBefore You Begin
ou Begin
ou Begin
ou Beginou BeginBefore You Begin
Introduction ....................................................................................... 1
Symbols and Conventions .......................................................... 1
Supplied Accessories ....................................................................1
Parts of the Camera .......................................................................2
The Monitor ................................................................................... 3
First St
First St
First St
First StFirst Steps
eps
eps
epsepsFirst Steps
Inserting the Battery...................................................................... 4
Charging the Battery ..................................................................... 6
Inserting a Memory Card ............................................................. 8
Turning the Camera on and Off .............................................. 12
Shooting Mode .............................................................................12
Playback Mode .............................................................................. 12
Basic Setup .......................................................................................13
Bas
Bas
Bas
BasBasic Phot
ic Phot
ic Phot
ic Photic Photogra
ogra
ogra
ograography and Playb
phy and Playb
phy and Playb
phy and Playbphy and Playback
ack
ack
ackackBasic Photography and Playback
Taking Pictures in k (Auto) Mode
........................................ 14
Viewing Pictures ............................................................................18
Mor
Mor
Mor
MorMore on Photo
e on Photo
e on Photo
e on Photoe on Photograp
grap
grap
grapgraphy
hy
hy
hyhyMore on Photography
Intelligent Face Detection ......................................................... 19
Focus Lock ........................................................................................21
L Macro mode (Close-ups) ......................................................23
K Using the Flash ...........................................................................24
J Using the Self-Timer ...............................................................26
a Shooting Mode .........................................................................28
Selecting a Shooting Mode......................................................28
Shooting Modes ...........................................................................29
G SCENE RECOGNITION ........................................................29
More on P
More on P
More on P
More on PMore on Playback
layback
layback
laybacklaybackMore on Playback
Single-Frame Playback ...............................................................33
Playback Zoom ..............................................................................34
Multi-Frame Playback .................................................................35
Sort by Date .....................................................................................36
A Deleting Pictures .....................................................................37
Movies
Movies
Movies
MoviesMoviesMovies
A Recording Movies ................................................................... 39
D Viewing Movies ....................................................................... 41
Conn
Conn
Conn
ConnConne
e
e
eec
c
c
ccti
ti
ti
tition
on
on
onons
s
s
ssConnections
Viewing Pictures on TV ............................................................... 42
Printing Pictures via USB ...........................................................43
Connecting the Camera ............................................................43
Printing Selected Pictures ........................................................43
Printing the DPOF Print Order ................................................44
Creating a DPOF Print Order ....................................................46
Viewing Pictures on a Computer ............................................ 49
Installing FinePixViewer ............................................................49
Installing FinePixViewer S: Windows .................................49
Installing FinePixViewer: Macintosh ..................................52
Connecting the Camera ............................................................54
Table of Contents


v
Table of Contents
Menus
Menus
Menus
MenusMenusMenus
The Shooting Menu ......................................................................56
Using the Shooting Menu .........................................................56
Shooting Menu Options ............................................................57
g ISO .............................................................................................58
k QUALITY ..................................................................................59
d EXP. COMPENSATION .........................................................60
e WHITE BALANCE ..................................................................61
c CONTINUOUS (Continuous shooting) .........................62
The Playback Menu.......................................................................63
Using the Playback Menu .........................................................63
Playback Menu Options .............................................................64
b RED EYE REMOVAL ..............................................................65
B SLIDE SHOW ..........................................................................66
E PROTECT .................................................................................67
F COPY.........................................................................................68
D IMAGE ROTATE ......................................................................70
H TRIMMING ..............................................................................71
The Setup Menu .............................................................................72
Using the Setup Menu ...............................................................72
Setup Menu Options ...................................................................73
a IMAGE DISP. .......................................................................... 74
b FRAME NO. ............................................................................74
c DIGITAL ZOOM ....................................................................75
a LCD POWER SAVE ...............................................................75
f PLAYBACK VOLUME ...........................................................75
g LCD BRIGHTNESS................................................................75
m FORMAT .................................................................................76
o AUTO POWER OFF ..............................................................76
p TIME DIFFERENCE ...............................................................77
T
T
T
TTec
ec
ec
ecechnic
hnic
hnic
hnichnical No
al No
al No
al Noal Notes
tes
tes
testesTechnical Notes
Optional Accessories ...................................................................78
Accessories from Fujifilm ..........................................................79
Tr
Tr
Tr
TrTro
o
o
oou
u
u
uub
b
b
bbl
l
l
lle
e
e
ees
s
s
ssh
h
h
hho
o
o
ooo
o
o
oot
t
t
tti
i
i
iin
n
n
nng
g
g
ggTroubleshooting
Troubleshooting ............................................................................80
Warning Messages and Displays ............................................86
Appe
Appe
Appe
AppeAppendix
ndix
ndix
ndixndixAppendix
Glossary .............................................................................................90
Internal Memory/Memory Card Capacity ..........................91
Specifications .................................................................................. 93
Caring for the Camera .................................................................98


vi
About This Manual
This manual is for use with the following FinePix cameras: the J27, J28, J29, J30, J32, J37 and J38. All
operations are identical; save where otherwise noted, the illustrations in this manual show the J30.
Model
Model
Model
ModelModelModel Effec
Effec
Effec
EffecEffective pixels
tive pixels
tive pixels
tive pixelstive pixelsEffective pixels Image size
Image size
Image size
Image sizeImage size (pixels
(pixels
(pixels
(pixels (pixels)
)
)
))Image size (pixels)
FinePix J27 / J28 / J29 10.2 million r rF/N/g
3 : 2
////onmp
FinePix J30 / J32 / J37 * / J38 12.2 million yF/ /yN!
3 : 2
/ / / /0nmp
* FinePix J37 has a 3.0-inch monitor and the others each have a 2.7-inch monitor.
Before using the camera, read this Owner’s Manual and the other supplied documents. For
information on specific topics, consult the sources below.
Memory Cards
Pictures can be stored in the camera’s internal memory or on optional SD and SDHC memory cards. In this
manual, SD memory cards are referred to as “memory cards.” For more information, see page 8.
✔
✔
✔
✔✔✔ T
T
T
T Troubleshooting
roubleshooting
roubleshooting
roubleshootingroubleshooting Troubleshooting ..............................................
..............................................
..............................................
.............................................. .............................................. ..............................................pg. 80
pg. 80
pg. 80
pg. 80pg. 80pg. 80
Having a specific problem with the camera?
Find the answer here.
✔
✔
✔
✔✔✔ Glossary
Glossary
Glossary
Glossary Glossary Glossary ..........................................................
..........................................................
..........................................................
.......................................................... .......................................................... ..........................................................pg. 90
pg. 90
pg. 90
pg. 90pg. 90pg. 90
The meanings of some technical terms may be
found here.
✔
✔
✔
✔✔✔
T
T
T
TTable of C
able of C
able of C
able of Cable of Contents
ontents
ontents
ontentsontents Table of Contents ..............................................
..............................................
..............................................
.............................................. .............................................. ..............................................pg. iv
pg. iv
pg. iv
pg. ivpg. ivpg. iv
The “Table of Contents” gives an overview of the
entire manual. The principal camera operations
are listed here.
✔
✔
✔
✔✔✔
Warning Me
Warning Me
Warning Me
Warning MeWarning Messages a
ssages a
ssages a
ssages assages and Disp
nd Disp
nd Disp
nd Dispnd Displays
lays
lays
layslays Warning Messages and Displays .......................
.......................
.......................
....................... ....................... .......................pg. 86
pg. 86
pg. 86
pg. 86pg. 86pg. 86
Find out what’s behind that flashing icon or
error message in the monitor.
✔
✔
✔
✔✔✔
Camera Q & A
Camera Q & A
Camera Q & A
Camera Q & ACamera Q & A Camera Q & A ....................................................
....................................................
....................................................
.................................................... .................................................... .................................................... pg. ii
pg. ii
pg. ii
pg. iipg. iipg. ii
Know what you want to do but don’t know the
name for it? Find the answer in “Camera Q & A.”
✔
✔
✔
✔✔✔
Restric
Restric
Restric
RestricRestrictions on Came
tions on Came
tions on Came
tions on Cametions on Camera Set
ra Set
ra Set
ra Setra Settings
tings
tings
tingstings Restrictions on Camera Settings
See another supplied document for restrictions
on the options available in each shooting mode.


1
Before You Begin
Introduction
Sy
Sy
Sy
SySymbols and Conv
mbols and Conv
mbols and Conv
mbols and Convmbols and Convent
ent
ent
ententions
ions
ions
ionsionsSymbols and Conventions
The following symbols are used in this manual:
C
Caution: This information should be read before use to ensure correct operation.
A
Note: Points to note when using the camera.
B
Tip: Additional information that may be helpful when using the camera.
Menus and other text in the camera monitor are shown in bold. In the illustrations in this manual, the
monitor display may be simplified for explanatory purposes.
Supplied Accessories
Supplied Accessories
Supplied Accessories
Supplied AccessoriesSupplied AccessoriesSupplied Accessories
The following items are included with the camera:
FinePix software CD
NP-45A rechargeable
battery
Strap USB cable
AC adapter
(The type of the plug
depends on the country
or region where you
purchased the camera.)
Attaching the Strap
Attach the strap as shown.
Owner’s Manual
(may be distributed
on CD in some
countries or regions)


2
Introduction
Part
Part
Part
PartParts of the Camera
s of the Camera
s of the Camera
s of the Cameras of the CameraParts of the Camera
For more information, refer to the page listed to the right of each item.
14 D (playback) button ............................33
15 Strap eyelet .................................................... 1
16 Battery-chamber cover .......................... 4
17 Tripod mount
18 Battery chamber ......................................... 4
19 Battery latch .................................................. 4
20 Memory card slot ....................................... 9
8 Monitor ............................................................. 3
9 button .......... 16, 33DISP (display)/BACK
( (silent mode) button ....................25
10 Indicator lamp ............................................17
11 (zoom out) button ..................... 15, 35W
12 T (zoom in) button ...........................15, 34
13 USB multi-connector ........6, 42, 43, 54
1 Shutter button ...................................16–17
2 ON/OFF button .............................................12
3 Flash ..................................................................24
4 Self-timer lamp ..........................................26
5 Lens and lens cover
6 Microphone .................................................39
7 Speaker ...........................................................41
1
5
3
4
2
6
8
17
7
16
910
11
12
13
14
15
20
19
18
Selector button
MENU/OK button
(pg. 13)
Move cursor left
L (macro)
button (pg. 23)
Move cursor right
K (flash) button
(pg. 24)
Move cursor up
o (monitor brightness)
button (see below)
I (delete) button (pg. 18)
Move cursor down
J (self-timer) button (pg. 26)
B Tip: Monitor Brightness
Pressing the o button briefly increases monitor brightness, making the display easier to see in bright light.
Normal brightness is restored when a photograph is taken.

3
Before You Begin
Introduction
The Monitor
The Monitor
The Monitor
The MonitorThe MonitorThe Monitor
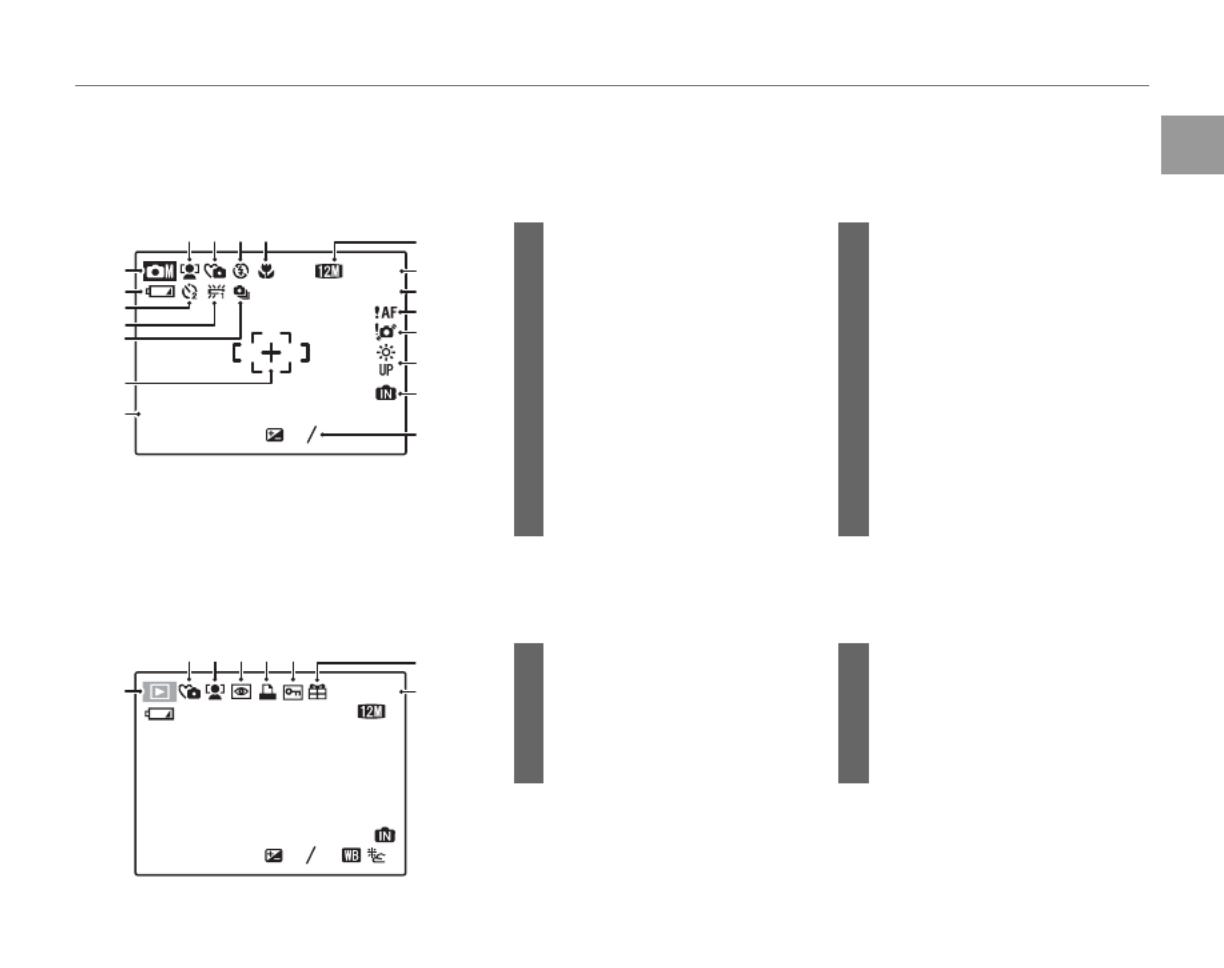
The following indicators may appear in the monitor during shooting and playback:
■
■
■
■■■ Shooting
Shooting
Shooting
Shooting Shooting
Shooting
11 Date and time...................................13
12 Quality ...........................................39, 59
13 Number of available frames ....91
14 Sensitivity ........................................... 58
15 Focus warning .................................16
16 Blur warning ......................................24
17 Bright monitor indicator ..............2
18 Internal memory indicator *
19 Exposure compensation .......... 60
10
10
10
1010 :
:
:
::00
00
00
00 00
AM
AM
AM
AMAM
10 : 00
AM
2
2
2
2223
3
3
333
-
-
-
--
1
1
1
11
-
1
ISO
ISO
ISO
ISOISO
100
100
100
100 100
ISO
100
N
N
N
NNN
9
9
9
999
12
12
12
1212 /
/
/
//31
31
31
3131 /
/
/
//2050
2050
2050
2050205012 / 31 / 2050
13
12
14
16
15
17
18
19
5
1234
6
7
8
10
9
11
1 Macro (close-up) mode............. 23
2 Flash mode.........................................24
3 Silent mode ......................................25
4 Intelligent Face Detection
indicator ............................................... 19
5 Shooting mode ...............................28
6 Battery level .......................................14
7 Self timer indicator ........................26
8 White balance ..................................61
9 Continuous mode .........................62
10 Focus frame .......................................16
* Indicates that no memory card is inserted and that pictures will be
stored in the camera’s internal memory (pg. 8).
■
■
■
■■■ Play
Play
Play
Play Playba
ba
ba
baback
ck
ck
ckck Playback
* This icon appears when playing back an image processed using the red-
eye removal function in the playback menu, although the camera does
not have the function in the shooting mode.
ISO
ISO
ISO
ISO ISO
100
100
100
100100
ISO
100
100-
100-
100-
100-100-0001
0001
0001
00010001
100-0001
12
12
12
1212 /
/
/
//31
31
31
3131 /
/
/
//2050
2050
2050
2050205012 / 31 / 205012 / 31 /2050
10
10
10
1010 :
:
:
::00
00
00
0000
AM
AM
AM
AM AM
10 : 00
AM
1/250
F
F
F
FF
3.3
3.3
3.3
3.33.3
F
3.3
N
N
N
NNN
2
2
2
2223
3
3
333
-
-
-
--
1
1
1
11
-
1
8
7
6
2 1345
1 Protected image .............................67
2 DPOF print indicator ................... 46
3 Red-eye removal indicator * ...65
4 Intelligent Face Detection
indicator ............................................... 19
5 Silent mode indicator ................. 25
6 Playback mode indicator ..........33
7 Gift image ...........................................33
8 Frame number .................................74


First Steps
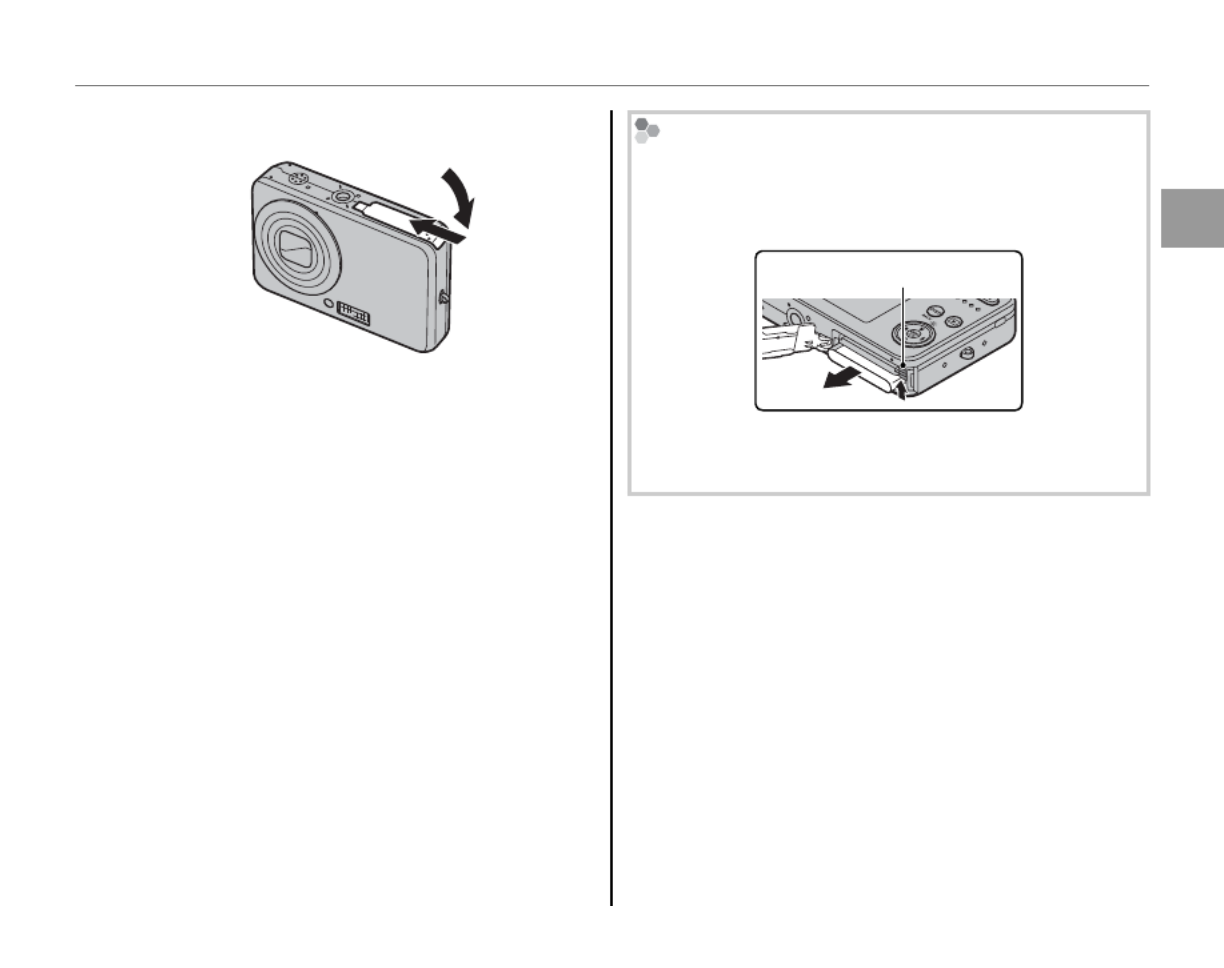
4
Inserting the Battery
The following explains how to insert the battery into the camera.
1 Open the battery-chamber cover.
A Note
Be sure the camera is off before opening the
battery-chamber cover.
C Cautions
• Do not open the battery-chamber cover
when the camera is on. Failure to observe this
precaution could result in damage to image
files or memory cards.
• Do not use excessive force when handling the
battery-chamber cover.
2 Insert the battery.
Face the gold contacts downward and
insert the battery into the battery-chamber
as shown by the marks , FB and E inside
the battery-chamber, pressing the battery
latch with the battery in the direction
shown below. Confirm that the battery is
securely latched.
FBE
Battery latch
C Caution
Insert the battery in the correct orientation. Do
NOT use force or attempt to insert the battery
upside down or backwards. The camera will not
function if the battery is inserted backwards or
upside down.

First Steps
5
Inserting the Battery
3 Close the battery-chamber cover. Removing the Battery
After turning the camera off, open the battery-
chamber cover, press the battery latch to the top,
and slide the battery out of the camera as shown.
Battery latch
C Caution
Turn the camera off before removing the battery.


6
Charging the Battery
The battery is not charged at shipment. Charge the battery before use.
1 Connect the supplied AC adapter into the
USB multi-connector.
Confirm that the camera is off.
2 Plug the AC adapter in.
Plug the AC adapter into a power outlet.
The Indicator Lamp will light up red (pg. 17).
The Indicator Lamp will turn off when the
battery is fully charged.
A Note
The camera operates in external power mode if you
plug the AC adapter in with the camera powered on.


First Steps
7
Charging the Battery
C Cautions: Caring for the Battery
• The only types of batteries you can use are NP-45A
(supplied) and NP-45 (optional).
• Use only the camera to charge NP-45A. Failure to
observe this precaution could result in product
malfunction.
• Do not affix stickers or other objects to the battery.
Failure to observe this precaution could make it
impossible to remove the battery from the camera.
• Do not short the battery terminals. The battery
could overheat.
• Do not remove the labels from the battery or
attempt to split or peel the outer casing.
• The battery gradually loses its charge when not in
use. Charge the battery one or two days before use.
• Read the supplied documentation for additional
cautions concerning battery use.
C Caution: Battery Life
A noticeable decrease in the length of time the
battery will hold a charge indicates that it has reached
the end of its service life and should be replaced.
C Cautions: Charging the Battery
• Remove dirt from the battery terminals with a clean,
dry cloth. Failure to observe this precaution could
prevent the battery from charging.
• Charging times increase at low temperatures.


8
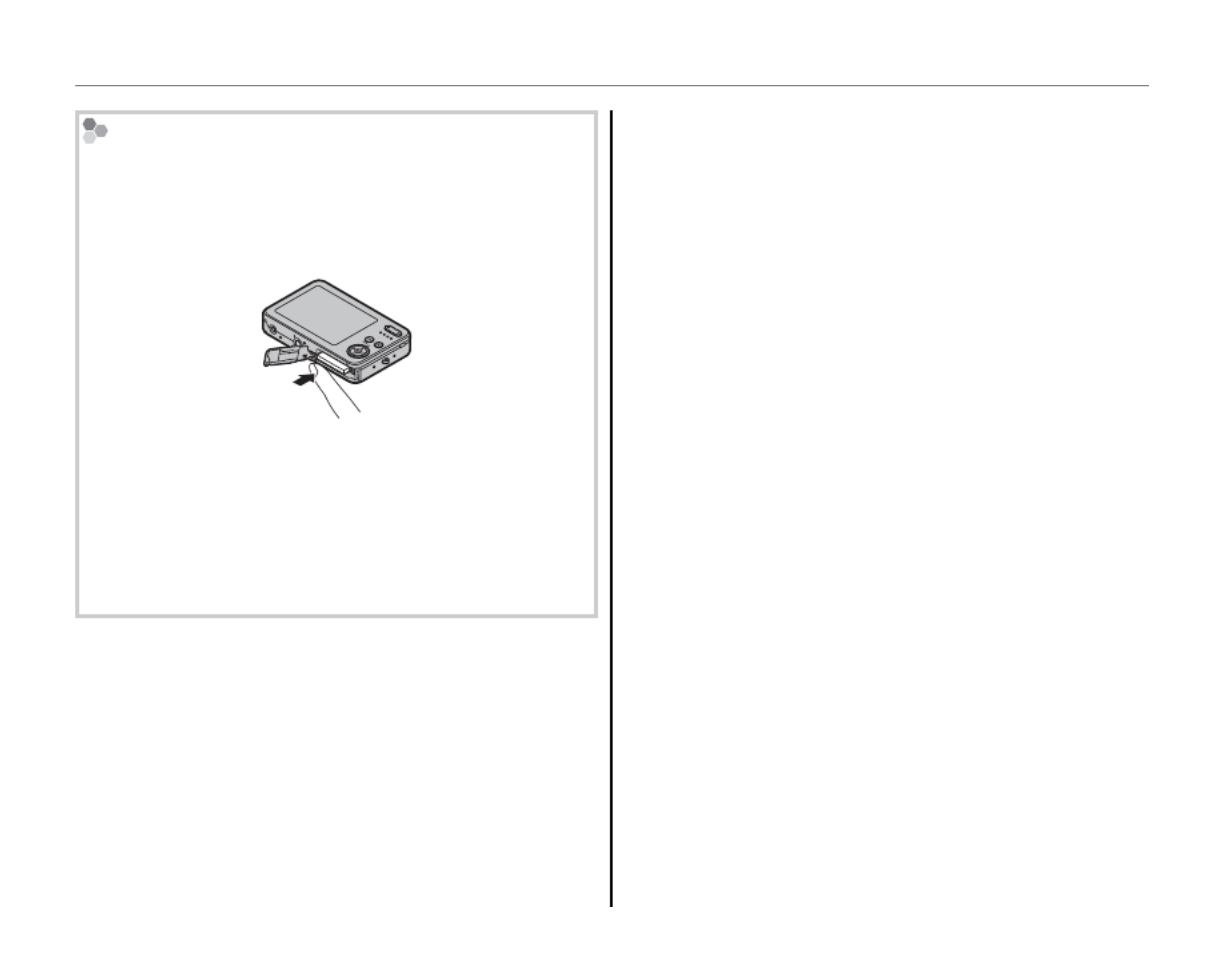
Inserting a Memory Card
Although the camera can store pictures in internal memory, SD memory cards (sold separately) can
be used to store additional pictures.
When no memory card is inserted, d appears in the monitor and internal memory is used for recording
and playback. Note that because camera malfunction could cause internal memory to become
corrupted, the pictures in internal memory should periodically be transferred to a computer and
saved on the computer hard disk or on removable media such as CDs or DVDs. The pictures in
internal memory can also be copied to a memory card (see page 68). To prevent internal memory
from becoming full, be sure to delete pictures when they are no longer needed.
When a memory card is inserted as described below, the card will be used for recording and playback.
■
■
■
■■■
Compatib
Compatib
Compatib
CompatibCompatible Memo
le Memo
le Memo
le Memole Memory Cards
ry Cards
ry Cards
ry Cardsry Cards Compatible Memory Cards
SanDisk SD and SDHC memory cards have been tested and approved for use in the camera. A
complete list of approved memory cards is available at http://www.fujifilm.com/products/digital_
cameras/index.html. Operation is not guaranteed with other cards. The camera can not be used with
MultiMediaCard (MMC) or xD-Picture cards.
C Caution
Memory cards can be locked, making it impossible to format the card or to record
or delete images. Before inserting a memory card, slide the write-protect switch to
the unlocked position.
Writ
Writ
Writ
WritWrite-protect switch
e-protect switch
e-protect switch
e-protect switche-protect switchWrite-protect switch


First Steps
9
Inserting a Memory Card
■
■
■
■■■
Inser
Inser
Inser
InserInserti
ti
ti
titing a Me
ng a Me
ng a Me
ng a Meng a Memor
mor
mor
mormory Card
y Card
y Card
y Cardy Card Inserting a Memory Card
1 Open the battery-chamber cover.
2 Insert the memory card.
Holding the memory card in the orientation
shown below, slide it all the way in.
Battery
CLICK
Be sure card is in correct
orientation; do not insert
at an angle or use force.
3 Close the battery-chamber cover.

10
Inserting a Memory Card
Removing Memory Cards
Be sure the camera is off before opening the
battery-chamber cover. Press the card in and then
release it slowly. The card can now be removed by
hand.
C Cautions
• The memory card may spring out if you remove
your finger immediately after pushing the card in.
• Memory cards may be warm to the touch after
being removed from the camera. This is normal
and does not indicate a malfunction.


First Steps
11
Inserting a Memory Card
C Cautions
• Format memory cards before first use, and be sure to reformat all memory cards after using them in a
computer or other device. For more information on formatting memory cards, see page 76.
• Memory cards are small and can be swallowed; keep out of reach of children. If a child swallows a memory
card, seek medical assistance immediately.
• Do not use miniSD or microSD adapters that expose the back of the card. Failure to observe
this precaution may cause damage or malfunction. Adapters that are larger or smaller than
the standard dimensions of an SD card may not eject normally; if the card does not eject,
take the camera to an authorized service representative. Do not forcibly remove the card.
• Do not turn the camera off or remove the memory card while the memory card is being formatted or data are
being recorded to or deleted from the card. Failure to observe this precaution could damage the card.
• Do not affix labels to memory cards. Peeling labels can cause camera malfunction.
• Movie recording may be interrupted with some types of memory card.
• The data in internal memory may be erased or corrupted when the camera is repaired. Please note that the
repairer will be able to view pictures in internal memory.
• Formatting a memory card or internal memory in the camera creates a folder in which pictures are stored.
Do not rename or delete this folder or use a computer or other device to edit, delete, or rename image
files. Always use the camera to delete pictures from memory cards and internal memory; before editing or
renaming files, copy them to a computer and edit or rename the copies, not the originals.

12
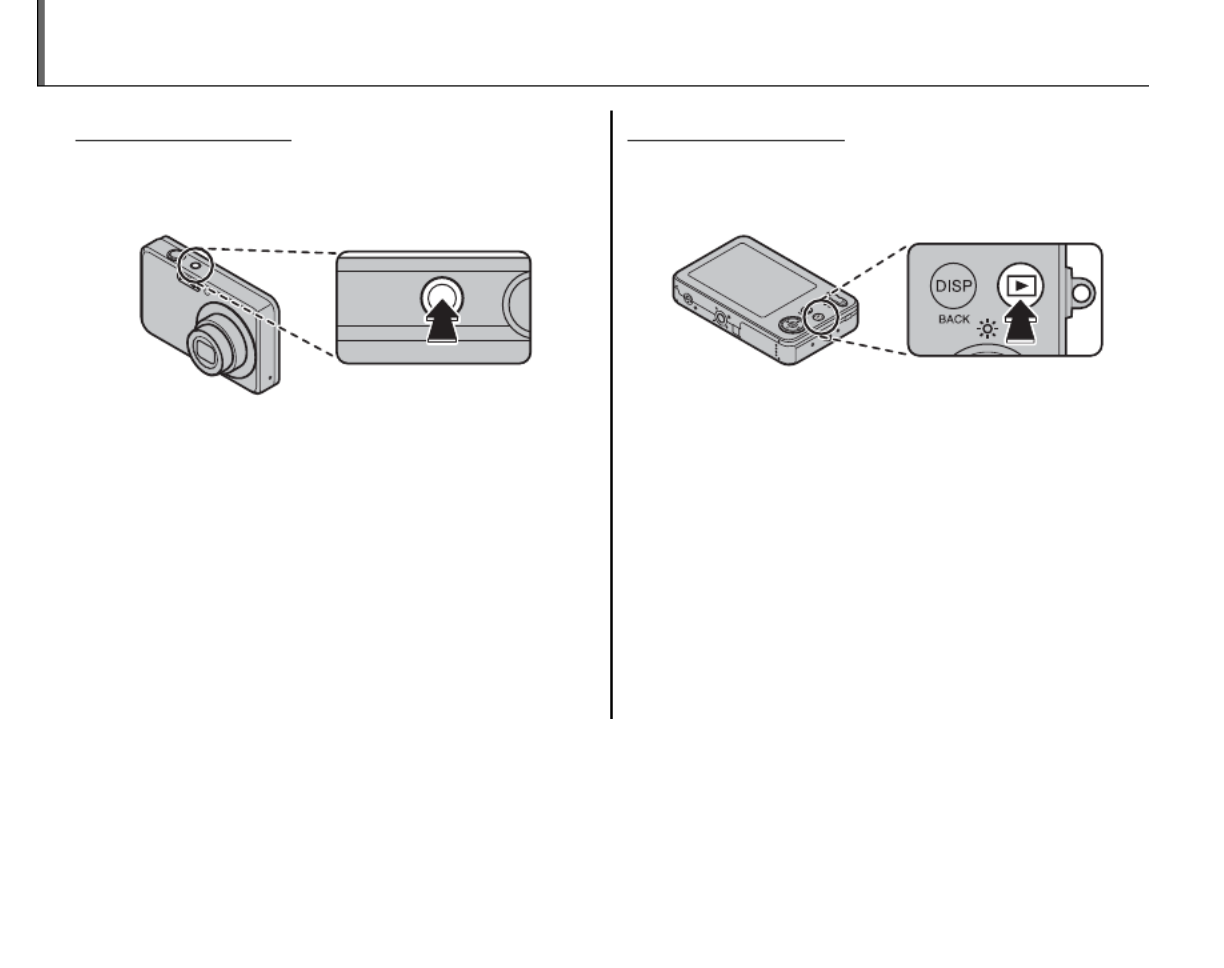
Turning the Camera on and Off
Shooting Mode
Shooting Mode
Shooting Mode
Shooting ModeShooting ModeShooting Mode
Press the n button to turn the camera on.
The lens will extend and the lens cover will open.
Press n again to turn the camera off.
B Tip: Switching to Playback Mode
Press the D button to start playback. Press the
shutter button halfway to return to shooting mode.
C Cautions
• Pictures can be affected by fingerprints and other
marks on the lens. Keep the lens clean.
• The n button does not completely disconnect
the camera from its power supply.
Playba
Playba
Playba
PlaybaPlayback
ck
ck
ckck Mod
Mod
Mod
Mod Mode
e
e
eePlayback Mode
To turn the camera on and begin playback, press
the D button for about a second.
Press the D button again to turn the camera off.
B Tip: Switching to Shooting Mode
To exit to shooting mode, press the shutter button
halfway. Press the D button to return to playback.
B Tip: Auto Power Off
The camera will turn off automatically if no operations are performed for the length of time selected in the
AUTO POWER OFF menu (see page 76).


First Steps
13
Basic Setup
A language-selection dialog is displayed the first time the camera is turned on. Set up the camera as
described below (for information on resetting the clock or changing languages, see page 72).
1 Choose a language.
SET
SET
SET
SET
SETSET
NO
NO
NO
NO
NONO
START
ST
ST
ST
STST
ART
ART
ART
ARTART MENU
MENU
MENU
MENU
MENU MENU
/ LANG.
/ LANG.
/ LANG.
/ LANG.
/ LANG./ LANG.
1.1 Press the selector up, down,
left, or right to highlight a
language.
1.2
Press
MENU/OK.
2 Set the date and time.
2011
2010
2008
2007
YY.MM.DD 1. 1 12
:
00
AM
DATE / TIME NOT SET
2009
SET NO
2.1 Press the selector left or right
to highlight the year, month,
day, hour, or minute and press
up or down to change. To change the
order in which the year, month, and day
are displayed, highlight the date format
and press the selector up or down.
2.2
Press
MENU/OK.
A Note
Go to the setup menu if you try to set the language and date again (pg. 72).
B Tip: The Camera Clock
If the battery is removed for an extended period, the camera clock will be reset when the camera is turned on.
If the battery has been left in the camera for about 2 hours or more, the battery can be removed for about 24
hours without resetting the clock.

14
Basic Photography and Playback
Taking Pictures in k (Auto) Mode
This section describes how to take pictures in mode.k
1 Turn the camera on.
Press the n button to turn the
camera on.
B Tip: Intelligent Face Detection
The first time the camera is turned on, Intelligent Face
Detection is automatically activated and the camera is
optimized for taking portrait photographs. For more
information on using Intelligent Face Detection, see
page 19.
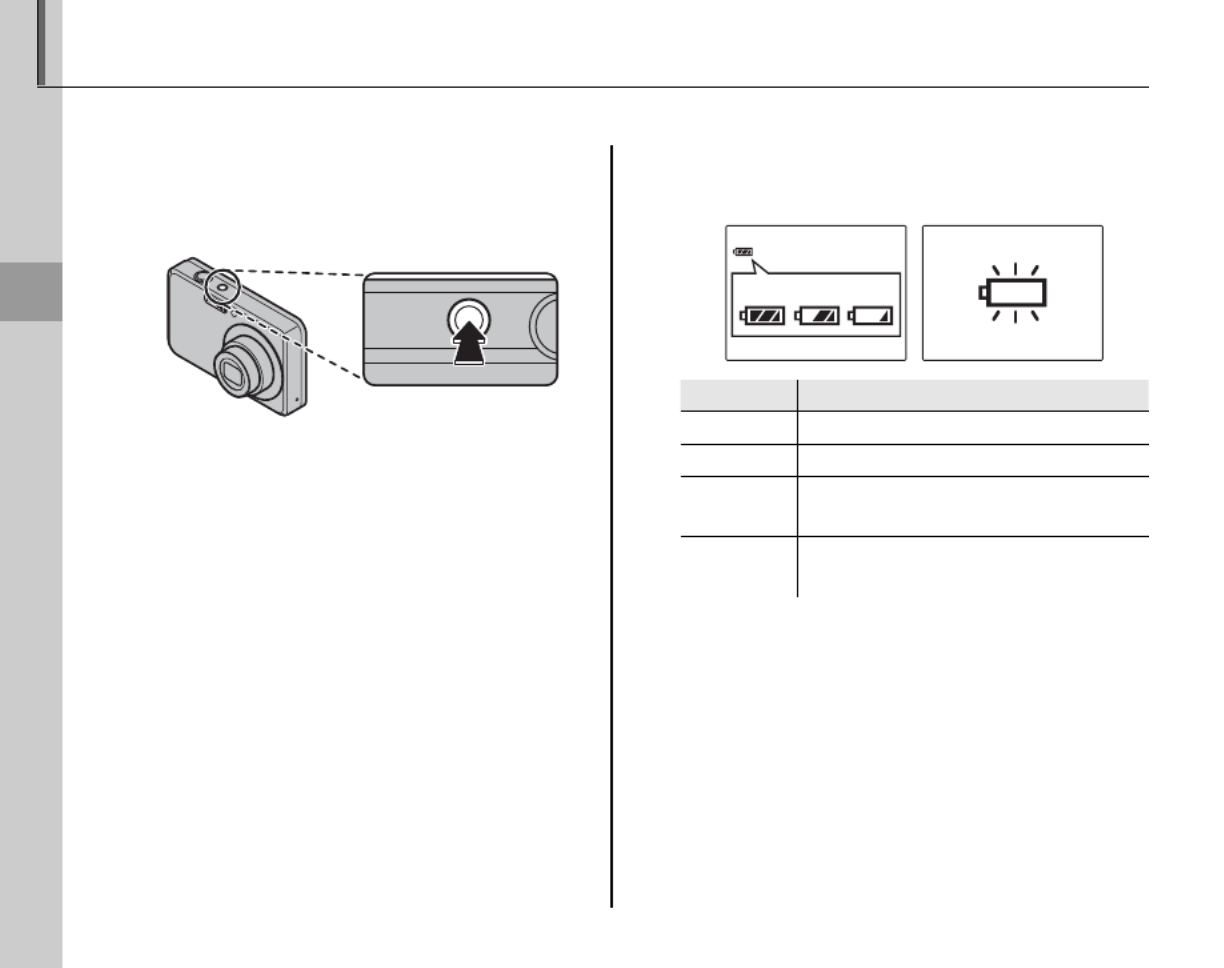
2 Check the battery level.
Check the battery level in the monitor.
q w e
r
Indic
Indic
Indic
IndicIndicator
ator
ator
atoratorIndicator Description
Description
Description
DescriptionDescriptionDescription
q(white) Battery partially discharged.
w(white) Battery more than half discharged.
e (red) Low battery. Charge as soon as
possible.
r (blinks red) Battery exhausted. Turn camera off
and charge battery.


15
Basic Photography and Playback
Taking Pictures in k (Auto) Mode
3 Frame the picture.
Position the main subject in the focus area
and use the zoom buttons to frame the
picture in the monitor.
Zoom in using optical
zoom, or use digital zoom
(pg. 75) to zoom in closer.
Press W to zoom out Press T to zoom in
Zoom indicator
Holding the Camera
Hold the camera steady
with both hands and brace
your elbows against your
sides. Shaking or unsteady
hands can blur your shots.
To prevent pictures that
are out of focus or too dark
(underexposed), keep your
fingers and other objects
away from the lens and
flash.
B Tip: Focus Lock
Use focus lock (pg. 21) to focus on subjects that are not in the focus frame.

16
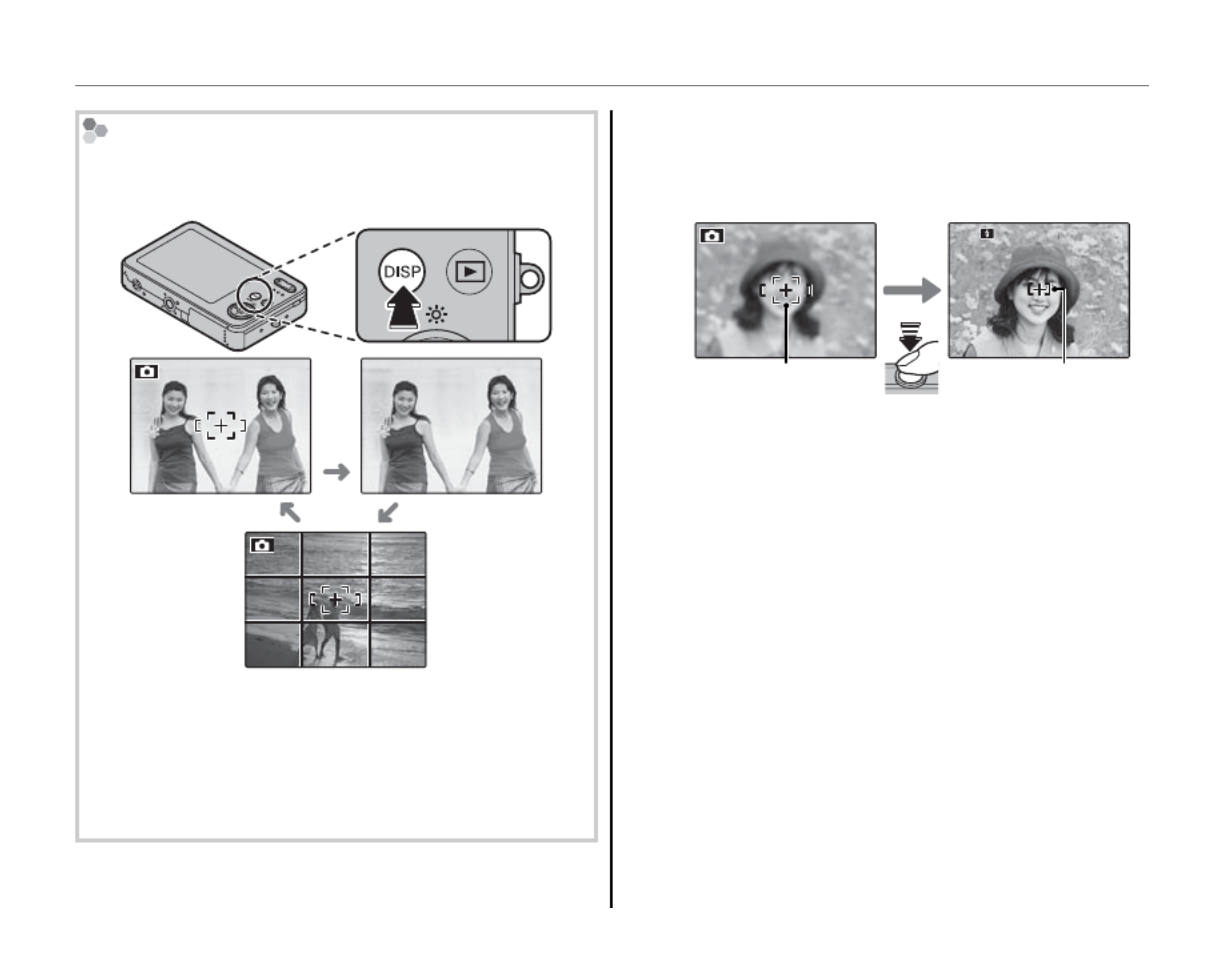
Taking Pictures in k (Auto) Mode
Framing Guideline
The images change as shown below if you press the
DISP/BACK button.
Indicators
displayed
Indicators
hidden
Best framing
To use the best framing, position the main subject
at the intersection of two lines or align one of the
horizontal lines with the horizon. Use focus lock (pg.
21) to focus on subjects that will not be in the center
of the frame in the final photograph.
4 Focus.
Press the shutter button halfway to focus on
the main subject in the focus frame.
250
250
250
250250250
F
F
F
FF
3.3
3.3
3.3
3.33.3
F
3.3
Focus frame
Press
halfway
Camera selects small
focus frame and
focuses on subject
If the camera is able to focus, it will beep twice
and the indicator lamp will glow green.
If the camera is unable to focus, the focus frame
will turn red, a R indicator will appear
in the monitor, and the indicator lamp will
blink green. Change the composition or
use focus lock (pg. 21).
A Note
The lens may make a noise when the camera focuses.
This is normal.


17
Basic Photography and Playback
Taking Pictures in k (Auto) Mode
5 Shoot.
Smoothly press the shutter
button the rest of the way down
to take the picture.
B Tip: The Shutter Button
The shutter button has
two positions. Pressing the
shutter button halfway (q)
sets focus and exposure;
to shoot, press the shutter
button the rest of the way
down (w).
A Note
If the subject is poorly lit, the flash may fire when the
picture is taken. To take pictures without the flash,
choose another flash mode (pg. 24).
The Indicator Lamp
Indicator lamp
The indicator lamp shows camera status as follows:
Indic
Indic
Indic
IndicIndicator lamp
ator lamp
ator lamp
ator lampator lampIndicator lamp Camera stat
Camera stat
Camera stat
Camera statCamera status
us
us
ususCamera status
Glows green Focus locked.
Blinks green Camera shake warning, AF warning,
or AE warning (ready to shoot)
Blinks green
and orange
Recording pictures. Additional
pictures can be taken.
Glows
orange
Recording pictures. No additional
pictures can be taken at this time.
Blinks orange Flash charging; flash will not fire
when picture is taken.
Glows red Battery charging while camera is off.
Blinks red Recording or lens error.
B Tip: Warnings
Detailed warnings appear in the monitor. See pages
86–89 for more information.
q w
CLICK
Double
beep
q w
CLICK
Double
beep


18
Viewing Pictures
Pictures can be viewed in the monitor. When taking important photographs, take a test shot and
check the results.
1 Press the D button.
The most recent picture will be displayed in
the monitor.
ISO
ISO
ISO
ISO ISO
100
100
100
100100
ISO
100
100-0001
100-0001
100-0001
100-0001100-0001
100-0001
12
12
12
1212 /
/
/
//31
31
31
3131 /
/
/
//2050
2050
2050
20502050
12 / 31 / 2050
10
10
10
1010 :
:
:
::00
00
00
0000
AM
AM
AM
AM AM
10: 00
AM
N
N
N
NN
N
1/
1/
1/
1/1/250
250
250
250250
1/250
F
F
F
FF
3.3
3.3
3.3
3.33.3
F
3.3
2 View additional pictures.
Press the selector right to view
pictures in the order recorded,
left to view pictures in reverse
order.
Press the shutter button to exit to shooting
mode.
Deleting Pictures
To delete the picture
currently displayed in
the monitor, press the
selector up (A). The
following dialog will be
displayed.
SET
ERASE OK?
OK CANCEL
To delete the picture, press the selector
left to highlight OK
and press
MENU/OK.
To exit without deleting the picture,
highlight CANCEL and press MENU/OK.
B Tip: The Playback Menu
Pictures can also be deleted from the playback
menu (pg. 37).


19
More on Photography
Intelligent Face Detection
Intelligent Face Detection allows the camera to automatically detect human faces and set focus and
exposure for a face anywhere in the frame for shots that emphasize portrait subjects. Choose for
group portraits to prevent the camera from focusing on the background.
1 Turn Intelligent Face Detection on.
1.1
Press
MENU/OK to display the
shooting menu.
SHOOTING MODE
FACE DETECTION
SHOOTING MENU
QUALITY
ISO
CONTINUOUS
AUTO
OFF
N
1.2 Press the selector up or
down to highlight c FACE
DETECTION.
1.3 Press the selector right
to display Intelligent Face
Detection options.
1.4 Press the selector up or down
to highlight the desired option.
1.5
Press
MENU/OK to select the
highlighted option and return
to shooting mode.
B icon appears in monitor
when Intelligent Face
Detection is on.
2 Frame the picture.
If a face is detected, it will
be indicated by a green
border. If there is more
than one face in the
frame, the camera will
select the face closest
to the center; other faces are indicated by
white borders.
Green borderGreen border


20
Intelligent Face Detection
3 Focus.
Press the shutter button halfway
to set focus and exposure for the
subject in the green border.
C Cautions
• If no face is detected when the shutter button
is pressed halfway (pg. 82), the camera will
focus on the subject at the center of the
monitor.
• In each shooting mode, the camera will detect
and focus on faces but exposure will be
optimized for the entire scene rather than the
selected portrait subject.
4 Shoot.
Press the shutter button all the
way down to shoot.
C Caution
If the subject moves as the shutter button
is pressed, their face may not be in the area
indicated by the green border when the picture
is taken.
Intelligent Face Detection
Intelligent Face Detection is
recommended when using the
self-timer for group- or self-
portraits (pp. 26–27).
7
7
7
7
77
7
7
7
77
• The camera can zoom in on pictures taken with
Intelligent Face Detection during slide shows (pg.
66).
• Red-eye removal (b) is available in the playback
menu (pg. 65).


21
More on Photography
Focus Lock
To compose photographs with off-center subjects:
1 Position the subject in the focus frame.
2 Focus.
Press the shutter button halfway to set
focus and exposure. Focus and exposure
will remain locked while the shutter button
is pressed halfway (AF/AE lock).
250
250
250
250250
250
F
F
F
FF
3.3
3.3
3.3
3.33.3
F
3.3
Press
halfway
Repeat steps 1 and 2 as desired to refocus
before taking the picture.
3 Recompose the picture.
Keeping the shutter button pressed
halfway, recompose the picture.
250
250
250
250250
250
F
F
F
FF
3.3
3.3
3.3
3.33.3
F
3.3
4 Shoot.
Press the shutter-release button the rest of
the way down to take the picture.
Press the rest of
the way down


23
More on Photography
L Macro mode (Close-ups)
To select macro mode, press the selector left (L).
L icon appears in monitor when
camera is in macro mode
When macro mode is in effect, the camera focuses on subjects near the center of the monitor. Use
the zoom buttons to frame pictures.
To exit macro mode, press the selector left (L). Macro mode can also be cancelled by turning the
camera off or selecting another shooting mode.
A Note
Use of a tripod is recommended to prevent blur caused by camera shake.


25
More on Photography
( Silent Mode
In situations in which camera sounds or light from
the flash may be unwelcome, press the DISP/BACK
button until ( is displayed in the monitor.
The camera speaker, shooting indicator, flash, and
indicator and self-timer lamps turn off. Flash and
volume settings (pg. 75) can not be adjusted while
silent mode is in effect. To restore normal operation,
press the DISP/BACK button until the ( icon is no
longer displayed.
K Using the Flash

27
More on Photography
The self-timer lamp on the front of the camera will
blink immediately before the picture is taken. If
the two-second timer is selected, the self-timer
lamp will blink as the timer counts down.
Intelligent Face Detection
Because it ensures that the faces of portrait subjects will be in focus, Intelligent Face Detection (pg. 19) is
recommended when using the self-timer for group portraits or self-portraits. To use the self-timer with
Intelligent Face Detection, set the timer as described in Step 1 and then press the shutter button all the way
down to start the timer. The camera will detect faces while the timer is counting down and adjust focus
and exposure immediately before the shutter is released. Be careful not to move until the picture has been
recorded.
J Using the Self-Timer


30
k
k
k
kkk AUT
AUT
AUT
AUT AUTO
O
O
OO AUTO
Choose for crisp, clear snapshots (pg. 14). This
mode is recommended in most situations.
p
p
p
ppp BABY MOD
BABY MOD
BABY MOD
BABY MOD BABY MODE
E
E
EE BABY MODE
Choose for natural skin tones when taking
portraits of infants. The flash turns off
automatically.
C
C
C
CCC PIC
PIC
PIC
PIC PICTUR
TUR
TUR
TURTURE ST
E ST
E ST
E STE STABI
ABI
ABI
ABIABILIZA
LIZA
LIZA
LIZALIZATION
TION
TION
TIONTION PICTURE STABILIZATION
Choose this mode for fast shutter speeds that
reduce blur caused by camera shake or subject
movement.
U
U
U
UUU PORTR
PORTR
PORTR
PORTR PORTRAIT
AIT
AIT
AITAIT PORTRAIT
Choose this mode for soft-toned portraits with
natural skin tones.
K
K
K
KKK LAN
LAN
LAN
LAN LAND
D
D
DDSCA
SCA
SCA
SCASCAPE
PE
PE
PEPE LANDSCAPE
Choose this mode for crisp, clear daylight shots
of buildings and landscapes.
W
W
W
WWW PA
PA
PA
PA PAN
N
N
NNO
O
O
OOR
R
R
RRA
A
A
AAM
M
M
MMA
A
A
AA PANORAMA
In this mode, you can take up to three pictures
and join them together to form a panorama.
Use of a tripod is recommended to assist in
composing overlapping shots.
1 Select W.
2 Press the selector up to select a
frame, and press the selector left
or right to highlight a pan direction
and press MENU/OK.
2
2
2
22
1
1
1
11 3
3
3
33 2
2
2
22
3
3
3
33 1
1
1
11
3 Take a photograph.
Exposure and white balance for the
panorama are set with the first shot.
a Shooting Mode


34
Single-Frame Playback
Playba
Playba
Playba
PlaybaPlayback
ck
ck
ckck Zoom
Zoom
Zoom
Zoom ZoomPlayback Zoom
Press T to zoom in on images
displayed in single-frame
playback; press W to zoom out.
Press Press W to zoom out T to zoom in
Zoom indicator
When the picture is zoomed in, the
selector can be used to view areas of
the image not currently visible in the
display.
Navigation window shows
portion of image currently
displayed in monitor
Press DISP/BACK to exit zoom.
A Note
The maximum zoom ratio varies with image size.
Playback zoom is not available with pictures taken at
an image size of p.
Product specificaties
| Merk: | Fujifilm |
| Categorie: | Fotocamera |
| Model: | FinePix J30 |
| Kleur van het product: | Blauw |
| Breedte: | 92 mm |
| Diepte: | 20 mm |
| Hoogte: | 55.9 mm |
| Beeldscherm: | LCD |
| Beeldschermdiagonaal: | 2.7 " |
| Ondersteunde videoformaten: | AVI |
| Video recording: | Ja |
| Compatibele geheugenkaarten: | sd, sdhc |
| Brandpuntbereik: | 5.7 - 17.1 mm |
| Ondersteund aantal accu's/batterijen: | 1 |
| USB-versie: | 2.0 |
| Megapixels: | 12.2 MP |
| Maximale beeldresolutie: | 4000 x 3000 Pixels |
| Type beeldsensor: | CCD |
| Beeldsensorformaat: | 1/2.3 " |
| Cameratype: | Compactcamera |
| Digitale zoom: | 5.7 x |
| Optische zoom: | 3 x |
| Digitale SLR: | Nee |
| 35 mm cameralens equivalent: | 32 - 96 mm |
| Camera sluitertijd: | 1/4 - 1/1400 s |
| Ingebouwde flitser: | Ja |
| Videomogelijkheid: | Ja |
| Interface: | USB 2.0 |
| Macro focusing bereik (wijd): | 0.1 - 0.7 m |
| Flits-bereik (wijd): | 0.6 - 3.5 m |
| Flits-bereik (tele): | 0.6 - 2 m |
| Flitser-modi: | Auto |
| Maximale videoresolutie: | 640 x 480 Pixels |
| Framerate Motion JPEG: | 30 fps |
| Beeldschermresolutie (numeriek): | 230000 Pixels |
| Intern geheugen: | 10 MB |
| Scene modes: | Children, Documents, Fireworks, Night, Panorama, Portrait, Sports, Landscape (scenery) |
| Macro focusing bereik (tele): | 0.35 - 0.7 m |
| Scherpstellen: | Auto |
| Afmetingen (B x D x H): | 92 x 20 x 55.9 mm |
| Batterijtechnologie: | Lithium-Ion (Li-Ion) |
| Type batterij: | NP-45A |
Heb je hulp nodig?
Als je hulp nodig hebt met Fujifilm FinePix J30 stel dan hieronder een vraag en andere gebruikers zullen je antwoorden
Handleiding Fotocamera Fujifilm

24 Februari 2025
27 Januari 2025
14 December 2024
14 December 2024
14 December 2024
14 December 2024
11 Juni 2024
27 November 2023
12 Mei 2023
8 Juli 2023
Handleiding Fotocamera
- Fotocamera Braun
- Fotocamera Philips
- Fotocamera HP
- Fotocamera Sony
- Fotocamera Samsung
- Fotocamera Casio
- Fotocamera Panasonic
- Fotocamera Nikon
- Fotocamera Epson
- Fotocamera Canon
- Fotocamera Daewoo
- Fotocamera JVC
- Fotocamera Medion
- Fotocamera Olympus
- Fotocamera VTech
- Fotocamera Acer
- Fotocamera Agfa
- Fotocamera Agfaphoto
- Fotocamera Alpine
- Fotocamera Anker
- Fotocamera Argus
- Fotocamera Avaya
- Fotocamera BenQ
- Fotocamera Blaupunkt
- Fotocamera Bresser
- Fotocamera Brinno
- Fotocamera Bushnell
- Fotocamera D-Link
- Fotocamera Daitsu
- Fotocamera Denver
- Fotocamera Dorr
- Fotocamera Easypix
- Fotocamera Elmo
- Fotocamera Emerson
- Fotocamera Eufy
- Fotocamera EverFocus
- Fotocamera Ezviz
- Fotocamera Flir
- Fotocamera Fluke
- Fotocamera Foscam
- Fotocamera Fuji
- Fotocamera GE
- Fotocamera Gembird
- Fotocamera General Electric
- Fotocamera GoPro
- Fotocamera Hasselblad
- Fotocamera Hikvision
- Fotocamera Hitachi
- Fotocamera HOLGA
- Fotocamera Kodak
- Fotocamera Kogan
- Fotocamera Konica
- Fotocamera Konica Minolta
- Fotocamera Konig
- Fotocamera Kyocera
- Fotocamera Kyocera Yashica
- Fotocamera Laserliner
- Fotocamera Leica
- Fotocamera Leitz Focomat IIc
- Fotocamera Lenco
- Fotocamera Lenovo
- Fotocamera Lexibook
- Fotocamera Logitech
- Fotocamera Lorex
- Fotocamera Maginon
- Fotocamera Mamiya
- Fotocamera Meade
- Fotocamera Minolta
- Fotocamera Minox
- Fotocamera Moto Mods (Motorola)
- Fotocamera Nedis
- Fotocamera Nest
- Fotocamera Netgear
- Fotocamera Pentax
- Fotocamera Polaroid
- Fotocamera Powerfix
- Fotocamera Praktica
- Fotocamera Pyle
- Fotocamera Ricoh
- Fotocamera Ring
- Fotocamera Rollei
- Fotocamera Sanyo
- Fotocamera SeaLife
- Fotocamera Sigma
- Fotocamera Silvercrest
- Fotocamera Sinji
- Fotocamera SJCAM
- Fotocamera Spypoint
- Fotocamera Sygonix
- Fotocamera Technaxx
- Fotocamera TP Link
- Fotocamera Traveler
- Fotocamera Trust
- Fotocamera Velleman
- Fotocamera Viewsonic
- Fotocamera Vivitar
- Fotocamera Voigtlander
- Fotocamera Yashica
- Fotocamera ZeissIkon
- Fotocamera Joy-it
- Fotocamera Optoma
- Fotocamera Oregon Scientific
- Fotocamera Ozito
- Fotocamera Creative
- Fotocamera Zenit
- Fotocamera Cobra
- Fotocamera Celestron
- Fotocamera Levenhuk
- Fotocamera Aplic
- Fotocamera Arlo
- Fotocamera Imou
- Fotocamera SereneLife
- Fotocamera Akaso
- Fotocamera Trevi
- Fotocamera Intel
- Fotocamera Contax
- Fotocamera Scosche
- Fotocamera Swann
- Fotocamera SPC
- Fotocamera ARRI
- Fotocamera Bauhn
- Fotocamera Prixton
- Fotocamera RunCam
- Fotocamera FIMI
- Fotocamera Ansco
- Fotocamera Cosina
- Fotocamera Exakta
- Fotocamera Zorki
- Fotocamera Aida
- Fotocamera AVerMedia
- Fotocamera Lumens
- Fotocamera Dahua Technology
- Fotocamera UniView
- Fotocamera Reolink
- Fotocamera EVE
- Fotocamera Azden
- Fotocamera Marshall Electronics
- Fotocamera Ergoguys
- Fotocamera Burris
- Fotocamera Liiv360
- Fotocamera Watec
- Fotocamera Silvergear
- Fotocamera Digital Watchdog
- Fotocamera Fantasea Line
- Fotocamera Vimar
- Fotocamera Getac
- Fotocamera Speco Technologies
- Fotocamera Z CAM
- Fotocamera General
- Fotocamera Strex
- Fotocamera Berger & Schröter
- Fotocamera AViPAS
- Fotocamera Syrp
- Fotocamera Hanwha
- Fotocamera Videology
- Fotocamera InfiRay
- Fotocamera Pelco
- Fotocamera Videotec
- Fotocamera Cambo
- Fotocamera Kobian
- Fotocamera Red Digital Cinema
- Fotocamera Alfatron
- Fotocamera Aquapix
- Fotocamera BZBGear
- Fotocamera Seek Thermal
- Fotocamera Ikegami
- Fotocamera MuxLab
- Fotocamera Ikelite
- Fotocamera Adeunis
- Fotocamera Hoppstar
- Fotocamera IOptron
- Fotocamera Moultrie
- Fotocamera PatrolEyes
- Fotocamera Camouflage
- Fotocamera HuddleCamHD
- Fotocamera AquaTech
- Fotocamera PTZ Optics
- Fotocamera Linhof
- Fotocamera GoXtreme
- Fotocamera KanDao
- Fotocamera Kraken Sports
Nieuwste handleidingen voor Fotocamera

1 April 2025
29 Maart 2025
29 Maart 2025
27 Maart 2025
27 Maart 2025
26 Maart 2025
12 Maart 2025
12 Maart 2025
10 Maart 2025

25 Februari 2025