AVPro Edge AC-MX1616-AUHD-GEN2 Handleiding
AVPro Edge
Router
AC-MX1616-AUHD-GEN2
Lees hieronder de 📖 handleiding in het Nederlandse voor AVPro Edge AC-MX1616-AUHD-GEN2 (33 pagina's) in de categorie Router. Deze handleiding was nuttig voor 45 personen en werd door 2 gebruikers gemiddeld met 4.5 sterren beoordeeld
Pagina 1/33

AC-MX1616-AUHD-GEN2
AC-MX1616-AUHD-GEN2
AC-MX1616-AUHD-GEN2
AC-MX1616-AUHD-GEN2AC-MX1616-AUHD-GEN2
16
16
16
16 16 HDMI
HDMI
HDMI
HDMI HDMI
Port
Port
Port
Port Port Matrix
Matrix
Matrix
Matrix Matrix Switch
Switch
Switch
SwitchSwitch
AC-MX1616-AUHD-GEN2
Page 1

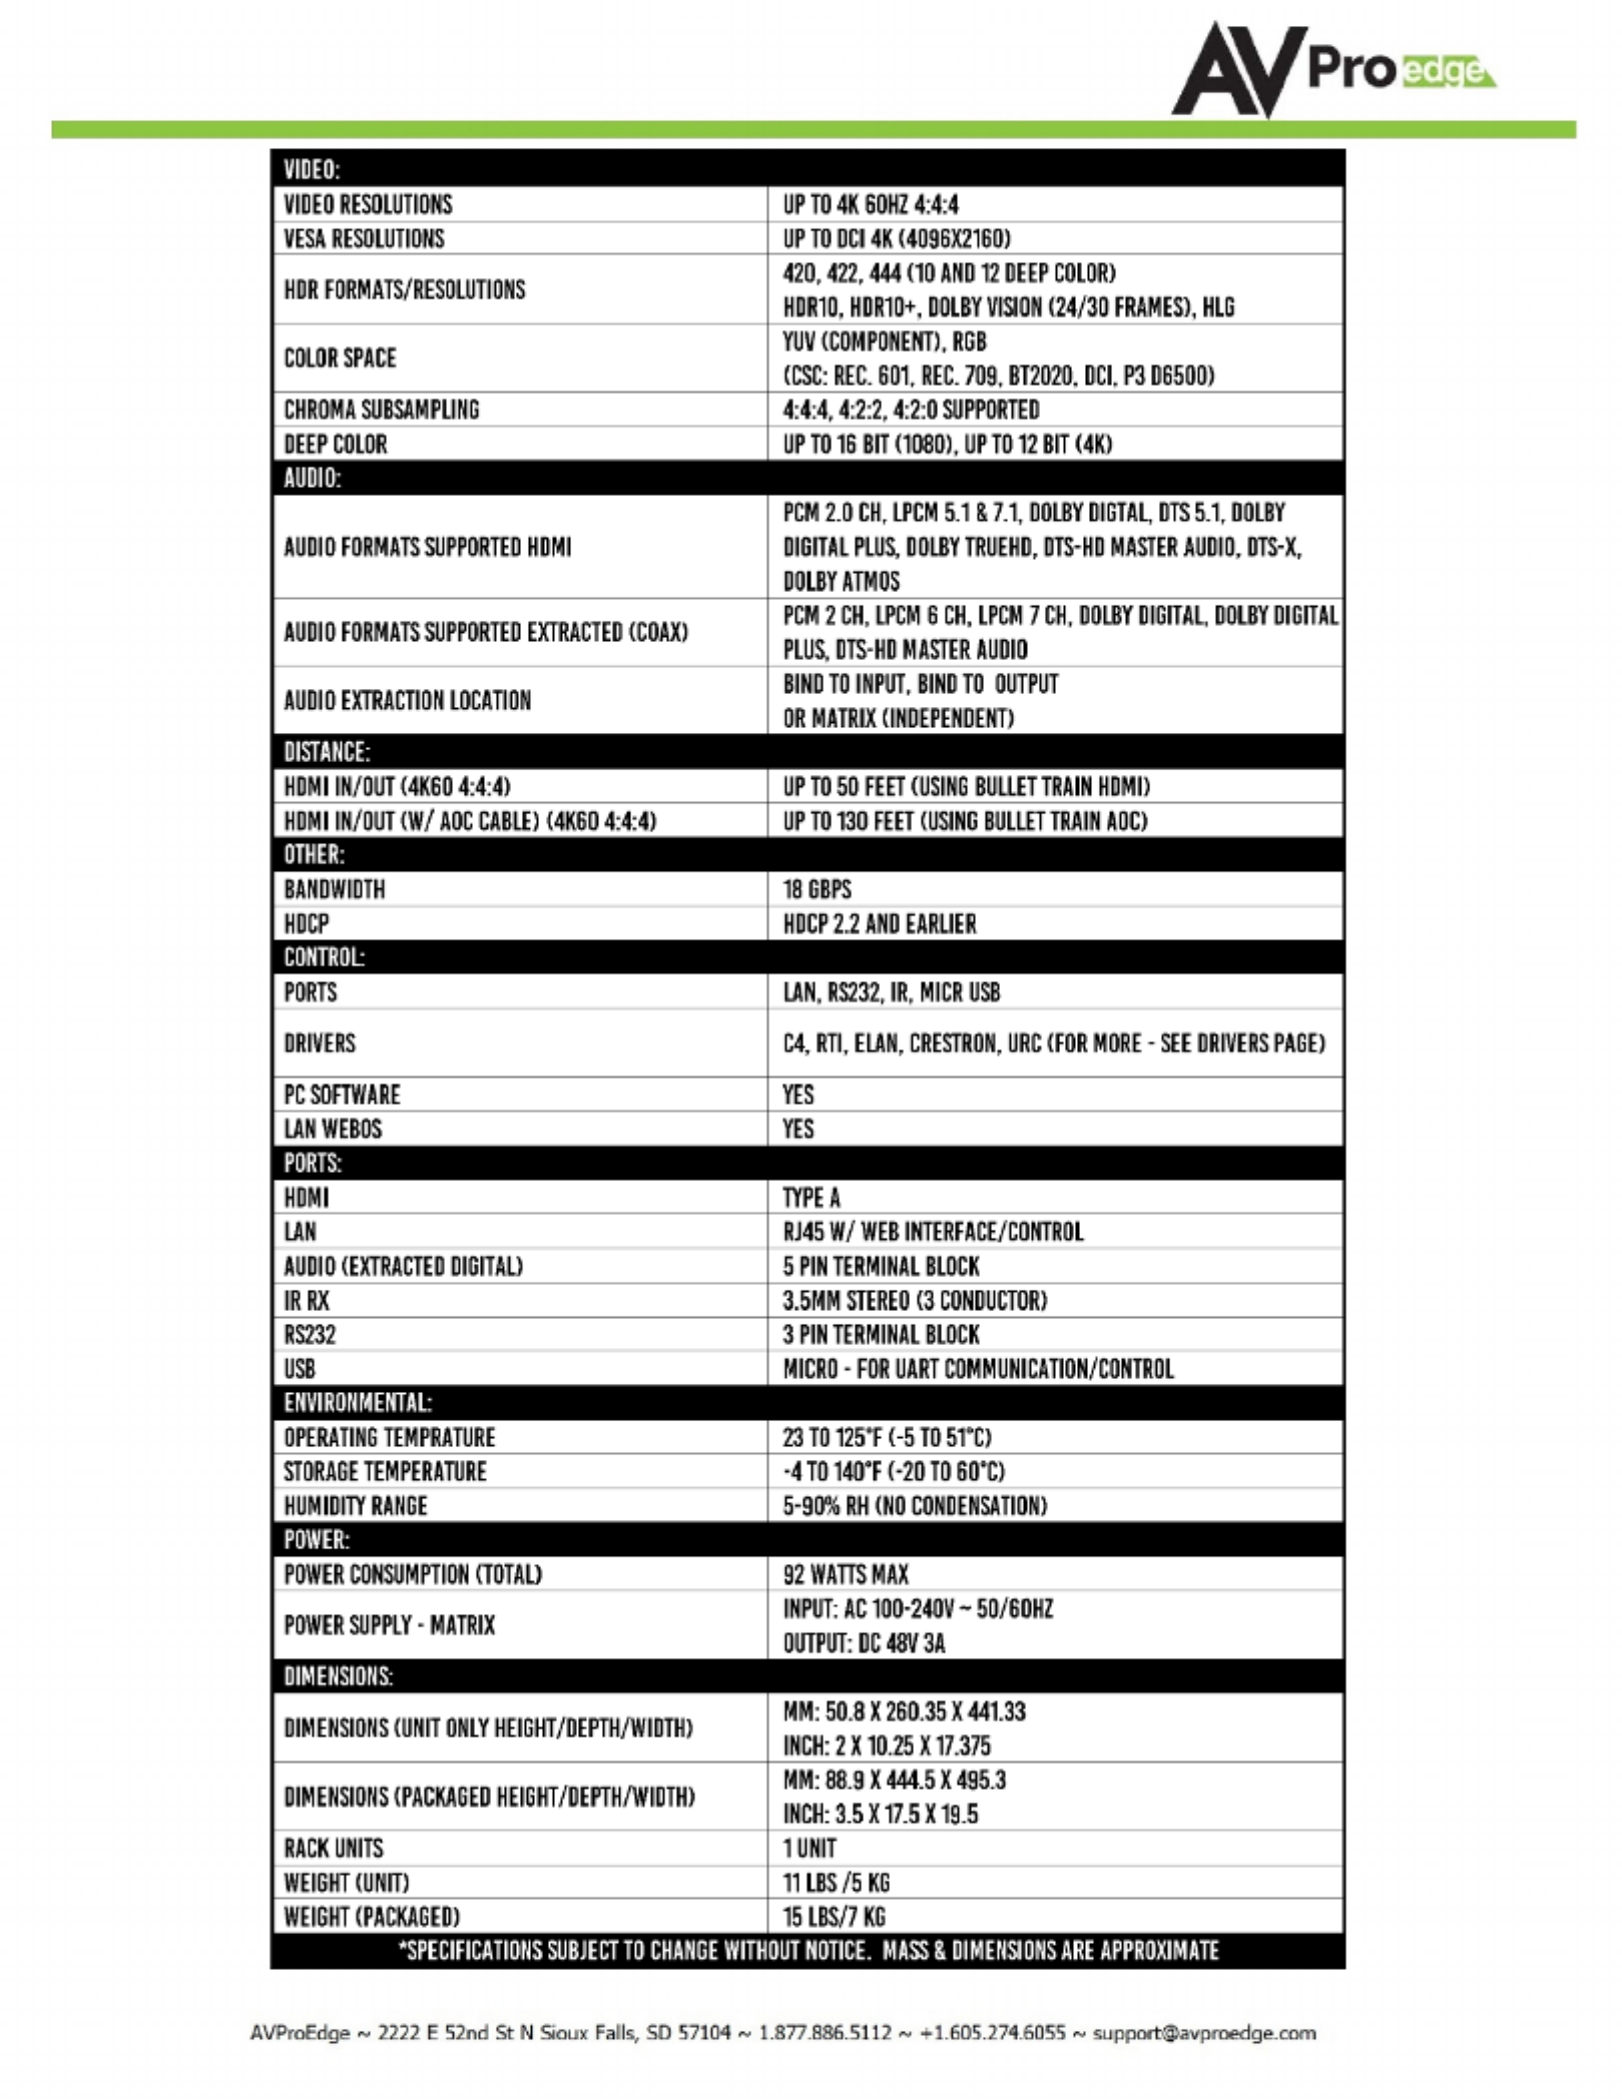
The AC-MX1616-AUHD-GEN2 is a true high bandwidth powerhouse. Supporting the full HDMI 2.0a/b specification and
supporting every flavor of HDR, this matrix will ensure you can get the most out of any system. This unit supports
uncompressed HDR formats Including HDR, HDR10, HDR10+, Dolby Vision, HLG, BBC and NHK. All of them are
supported in up to 4K 60Hz and up to 12 Bit Deep Color. All color space compression is compatible.
Our unique design has allowed us to improve high bandwidth switching speeds. Average speeds of less than 3
seconds – this is an industry best for this advanced level of actual uncompressed, high bandwidth w/ HDR switching.
Maximum compatibility and speed improve the customer experience immensely.
The sleek, low-profile and high-density design make for a sleek machine that saves you valuable space in the rack
room. This combined with a OLED setup screen on the front that makes setup and management a breeze will make
this a staple in your large demanding installations!
Features:
Features:
Features:
Features: Features:
•HDMI 2.0(a/b)
•18Gbps Bandwidth Support
•4K60 4:4:4 Support
•Ultimate HDR Support (HDR 10 & 12 Bit)
•Dolby Vision, HDR10+ and HLG Support
•HDCP 2.2 (and all earlier versions supported)
•Simple setup with front panel control screen
•WebOS for simple connectivity and control/
management
•Ultra-Low Profile (1U)
•Fast Switching
•Advanced EDID Management
•IR, RS-232 and LAN Control Options
•Digital Coax Audio Out (6CH PCM, DD, DTS)
•Driver Support for Crestron, C4, RTI, ELAN and more!!!
•Extracted Audio Now Has 3 Operating Modes. Bound to
Input, Bound to Output, or Independent Matrix
Easy to use:
Easy to use:
Easy to use:
Easy to use: Easy to use:
•
Feature rich
•
Fast Switching
•
Setup screen
•
IR Remote
•
IR & RS-232
Control
•
LAN Control
In The Box:
In The Box:
In The Box:
In The Box: In The Box:
•
AC-MX1616-AUHD-GEN2
Matrix
•
IR Remote Control
•
IR Extension Cable
•
12V/5A Power Supply
•
Mounting Brackets
•
5 pin terminal connectors
for extracted Audio
AC-MX1616-AUHD-GEN2
Page 2
AC-MX1616-AUHD-GEN2
Page 3

AC-MX1616-AUHD-GEN2
Page 4
Table of Contents
Table of Contents
Table of Contents
Table of ContentsTable of Contents

Device Feature Overview:
Device Feature Overview:
Device Feature Overview:
Device Feature Overview:Device Feature Overview:
Uncompressed ~ Uncompressed base-band video means that what you put in it what comes out. This allows
the integrator ultimate control to use any infrastructure they want. Use pure fiber like Cleerline, Bullet Train
Cables (Long Haul, Shout Haul), or 18Gbps HDBaseT Extenders (AC-EX40-444) to get the full bandwidth and
full picture!
Ultimate HDR Support ~ This matrix supports all flavors of HDR in all formats. Including HDR, HDR10, HDR10+,
Dolby Vision, HLG, BBC and NHK. All of them are supported in up to 4K 60Hz and up to 12 Bit Deep Color. All
color space compression are compatible.
Extreme EDID Management ~ With 29 on board EDID's, including HDR EDID’s, not getting a picture is simply
a thing of the past. You can manage the input side of the switch by selecting a preloaded EDID. It also has the
ability to INSTANTLY read an EDID from any connected display and apply it to the desired input, all with the
push of a button. Goodbye EDID problems...
Front Panel Screen ~ Make setup a breeze! The front panel allows you to do basic setup including; EDID,
Audio, Matrixing and network. All without connecting a PC or hooking anything up. This additional mode of
control is a welcome resource on the job site.
WebOS~ Full matrix control is available on the internal WebOS - Simply plug the matrix into the network and
punch in the default IP (192.168.1.239) or use DHCP to connect to a full control system! The WebOS is
designed with mobile devices in mind, so feel free to use you phone or tablet for real-time control.
Fast Switching ~ Our unique design has allowed us to improve high bandwidth switching speeds. Average
speeds of less than 3 seconds – this is an industry best for this advanced level of actual uncompressed, high
bandwidth w/ HDR switching.
Audio De-Embedding ~ Our unique Audio De-Embedding allows 3 modes - Bind to Input, Bind to Output, or
Matrix.
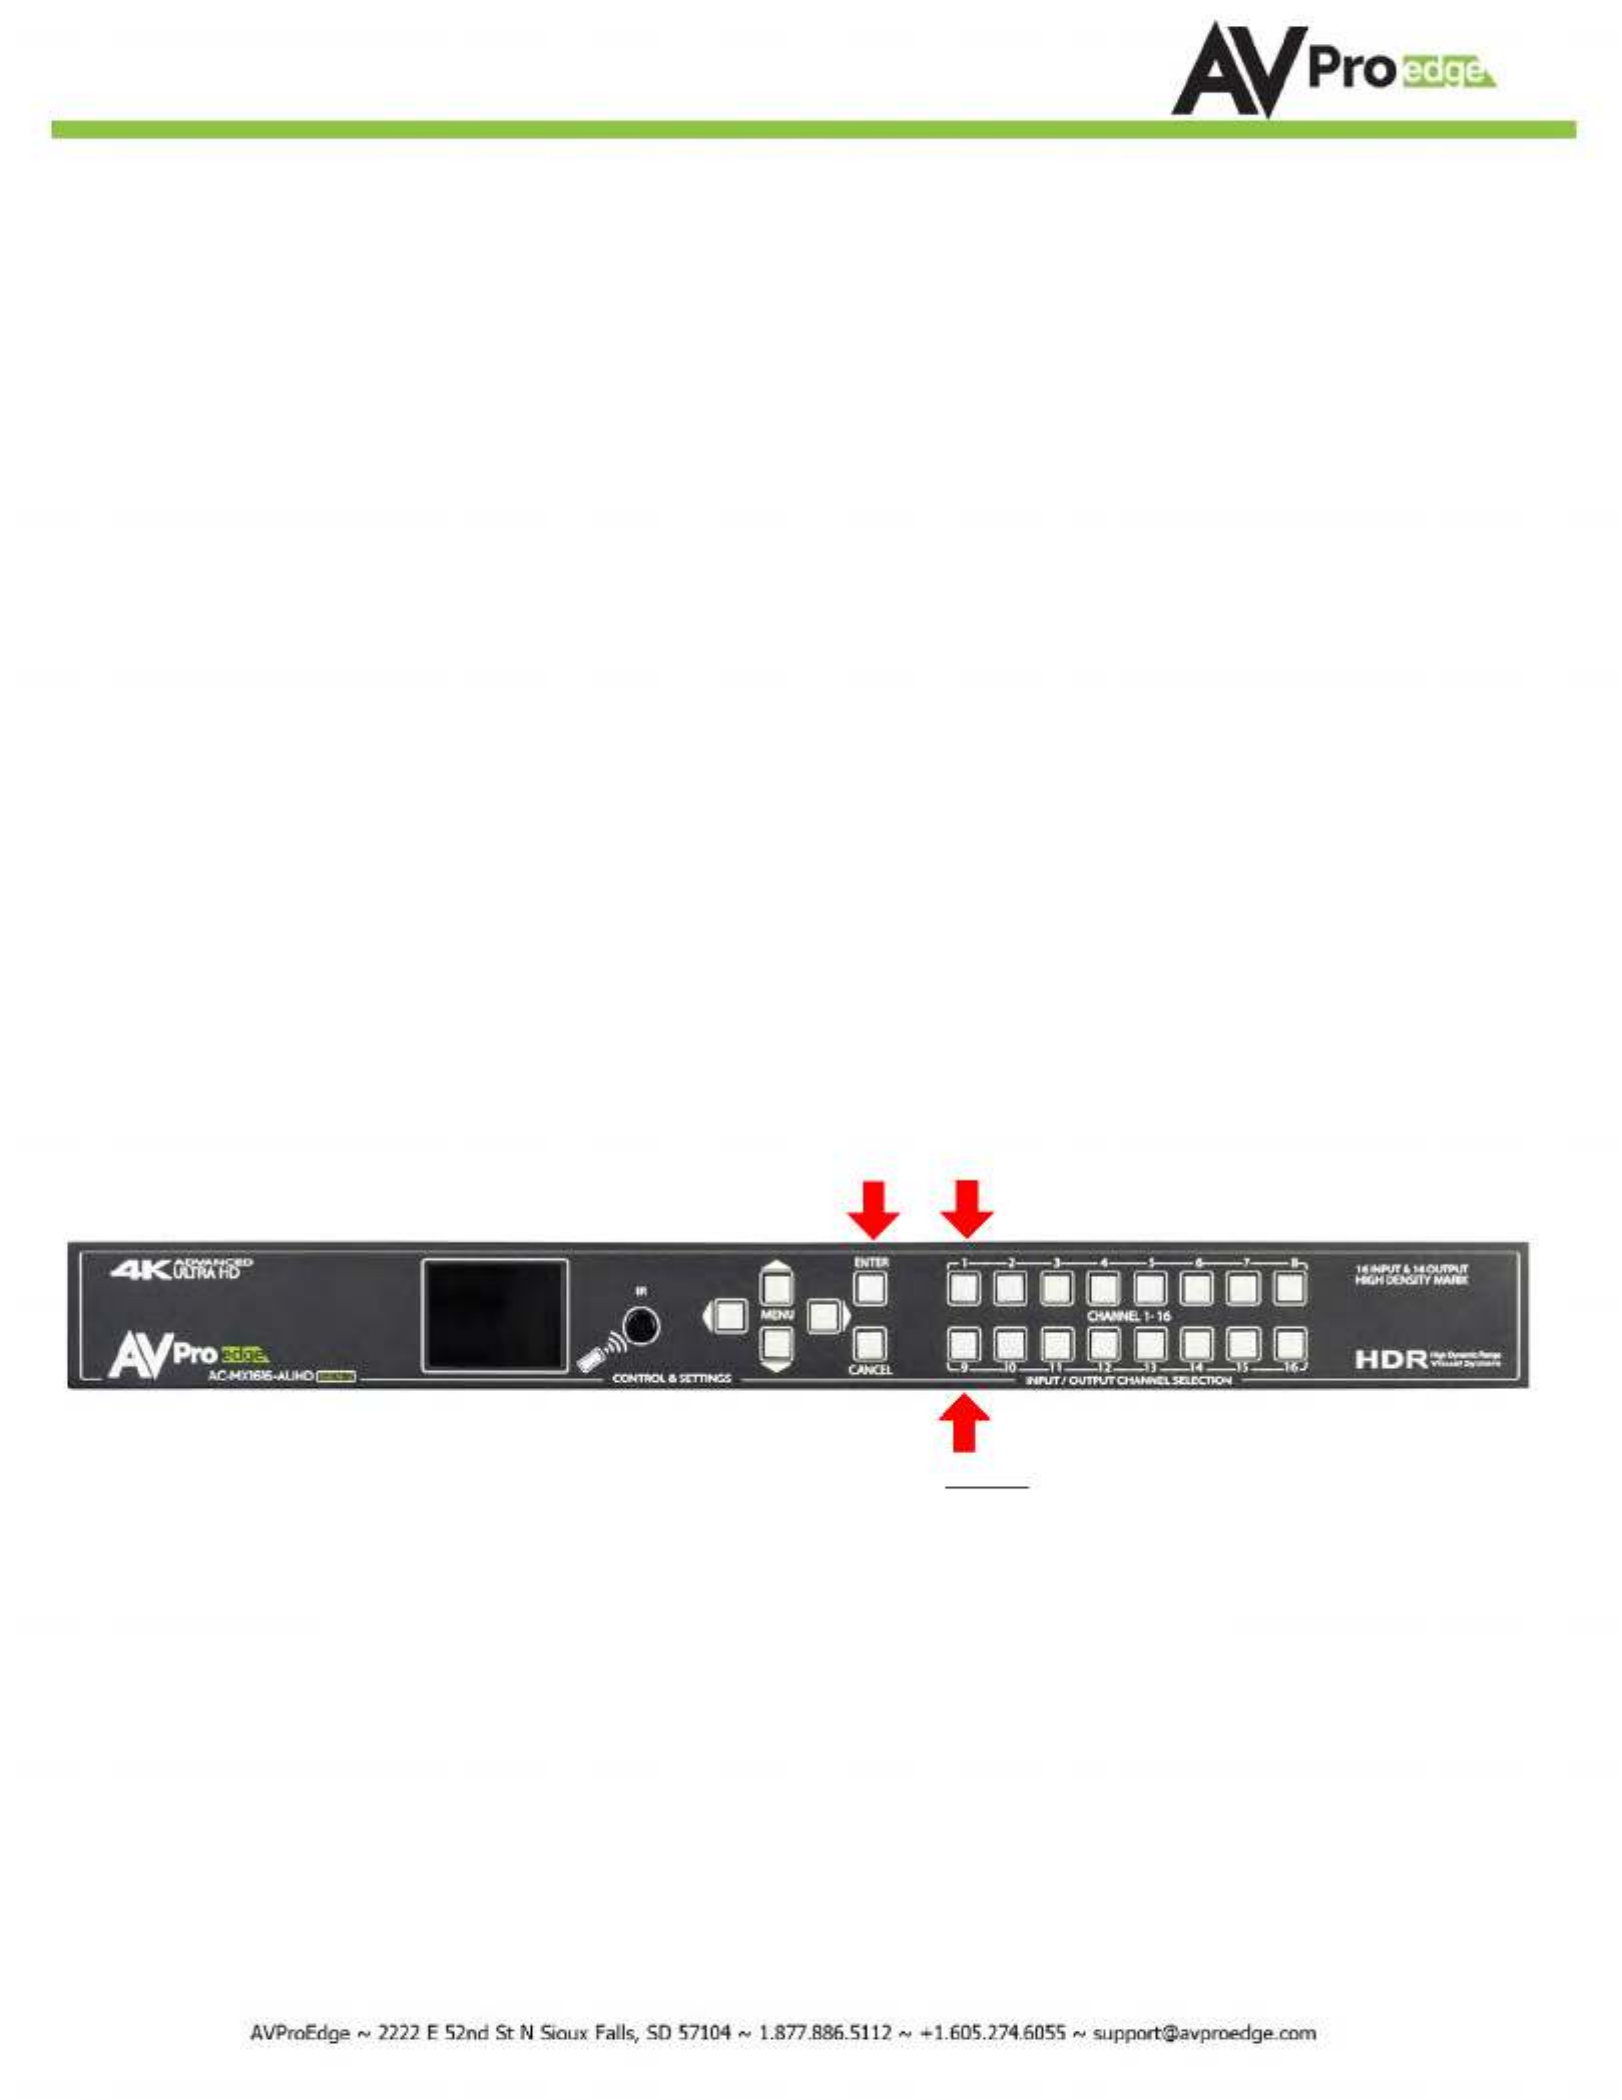
Control
Screen
IR
Receiver
For Switch
Control
Control Pad
Used with
Control
Screen
Input (Source) & Output (Sink)
Select (Choose Output, press
Enter, choose Input)
HDMI OutputsHDMI Inputs
AC-MX1616-AUHD-GEN2
Page 5
1.
Connect the input HDMI sources (Blu-ray, Set Top Box, etc...) to -MX1616-AUHD-GEN2the AC
2.
Connect the HDMI output devices (AVR, Display, Distribution Amplifier, to the AC-MX1616-Extender)
AUHD-GEN2
3.
Power on the sources
4.
Connect the power supply's into the AC-MX1616-AUHD-GEN2 (You need to plug in both supply's)
5.
Turn on output devices/displays
6.
You may now use panel controls, supplied IR switch.the front remote or free PC software to control the
Front
Front
Front
Front Front Panel Control
Panel Control
Panel Control
Panel Control Panel Control
Switching:
The AC-MX1616-AUHD be switched the front :-GEN2 can from panel by selecting the OUTPUT, Press ENTER, the then select INPUT
1. Press the 16) or Sink Device) you would like to abutton (1 through that corresponds with the OUTPUT (Display, send
source.
2. Press ENTER
3.
Now select the desired INPUT on (1 through 16)
4.
The route is now set.
5.
You may also navigate to the "Switch" Menu on the Control Screen to manage the routes (See "Switch
Routing" below)
Switching with the front panel controls.
Switching with the front panel controls.
Switching with the front panel controls.
Switching with the front panel controls. Switching with the front panel controls.
NOTE: Select the OUTPUT, press ENTER, and then select the INPUT
NOTE: Select the OUTPUT, press ENTER, and then select the INPUT
NOTE: Select the OUTPUT, press ENTER, and then select the INPUT
NOTE: Select the OUTPUT, press ENTER, and then select the INPUT NOTE: Select the OUTPUT, press ENTER, and then select the INPUT
Basic Setup:
Basic Setup:
Basic Setup:
Basic Setup:Basic Setup:
Quick Setup:
STEP 1:
STEP 1:
STEP 1:
STEP 1:STEP 1: Select the desired OUTPUT
STEP 3:
STEP 3:
STEP 3:
STEP 3:STEP 3:
Select the desired INPUT
STEP 2:
STEP 2:
STEP 2:
STEP 2:STEP 2: Press ENTER
AC-MX1616-AUHD-GEN2
Page 6

Navigating the Control Screen:
Navigating the Control Screen:
Navigating the Control Screen:
Navigating the Control Screen:Navigating the Control Screen:
You can use the control screen to setup/control several key features including:
•Matrix Switch Routing
Matrix Switch Routing
Matrix Switch Routing
Matrix Switch RoutingMatrix Switch Routing ~ Control switching or view the current routing
•EDID Management
EDID Management
EDID Management
EDID Management EDID Management ~ View, adjust EDID Configuration
•Audio Setup & Routing
Audio Setup & Routing
Audio Setup & Routing
Audio Setup & Routing Audio Setup & Routing ~ Set the default extracted audio mode to Bind
to Input, Bind to Output or Matrix - When in Matrix, audio route can be
selected.
•Network Setup
Network Setup
Network Setup
Network Setup Network Setup ~ View/Setup IP Address (Host/device, Gateway, Subnet),
Toggle DHCP, set port number and view MAC Address
To navigate the control screen you have a 6-button control panel that control the "Control" Screen.
•"Menu"
"Menu"
"Menu"
"Menu""Menu" area consists of UP, DOWN, LEFT and RIGHT - These are your navigation buttons. Press these
buttons to move through them menus to your desired selections. Your desired selection will be bordered
or highlighted
•"Enter"
"Enter"
"Enter"
"Enter" "Enter" Selects the highlighted item and advances to the next set of options or sets your selection
•"Cancel"
"Cancel"
"Cancel"
"Cancel""Cancel" Stops what you are doing and takes you back one menu or to the home screen.
Home Screen
Control Screen
Control Screen
Navigation
Buttons
Control Screen - Switch Routing:
Control Screen - Switch Routing:
Control Screen - Switch Routing:
Control Screen - Switch Routing:Control Screen - Switch Routing:
Once you select the "Matrix" option, you have 2 primary functions:
•View the current rout settings so you can verify that your system is working properly and the routes
are correct
•Set new matrix routes. You can change the matrix routes here as well, this is good for demonstrating
switching. NOTE: When setting a new route, select OUTPUT first then INPUT
Select Output First
Then Choose Input
Select
"Matrix"
AC-MX1616-AUHD-GEN2
Page 7
Control Screen - EDID Management:
Control Screen - EDID Management:
Control Screen - EDID Management:
Control Screen - EDID Management:Control Screen - EDID Management:
Instantly and EDID easily set and manage screen. EDID functions right from the front management get will help you
the right signal from the source device adding additional security that nothing will be mistakenly fed into unsupported
the system.
EDID effectively tells the source what the system is capable of handling, devices without robust EDID control just have
to hope the source behaves how we want it to. With the AC-MX1616-AUHD you control the sources:
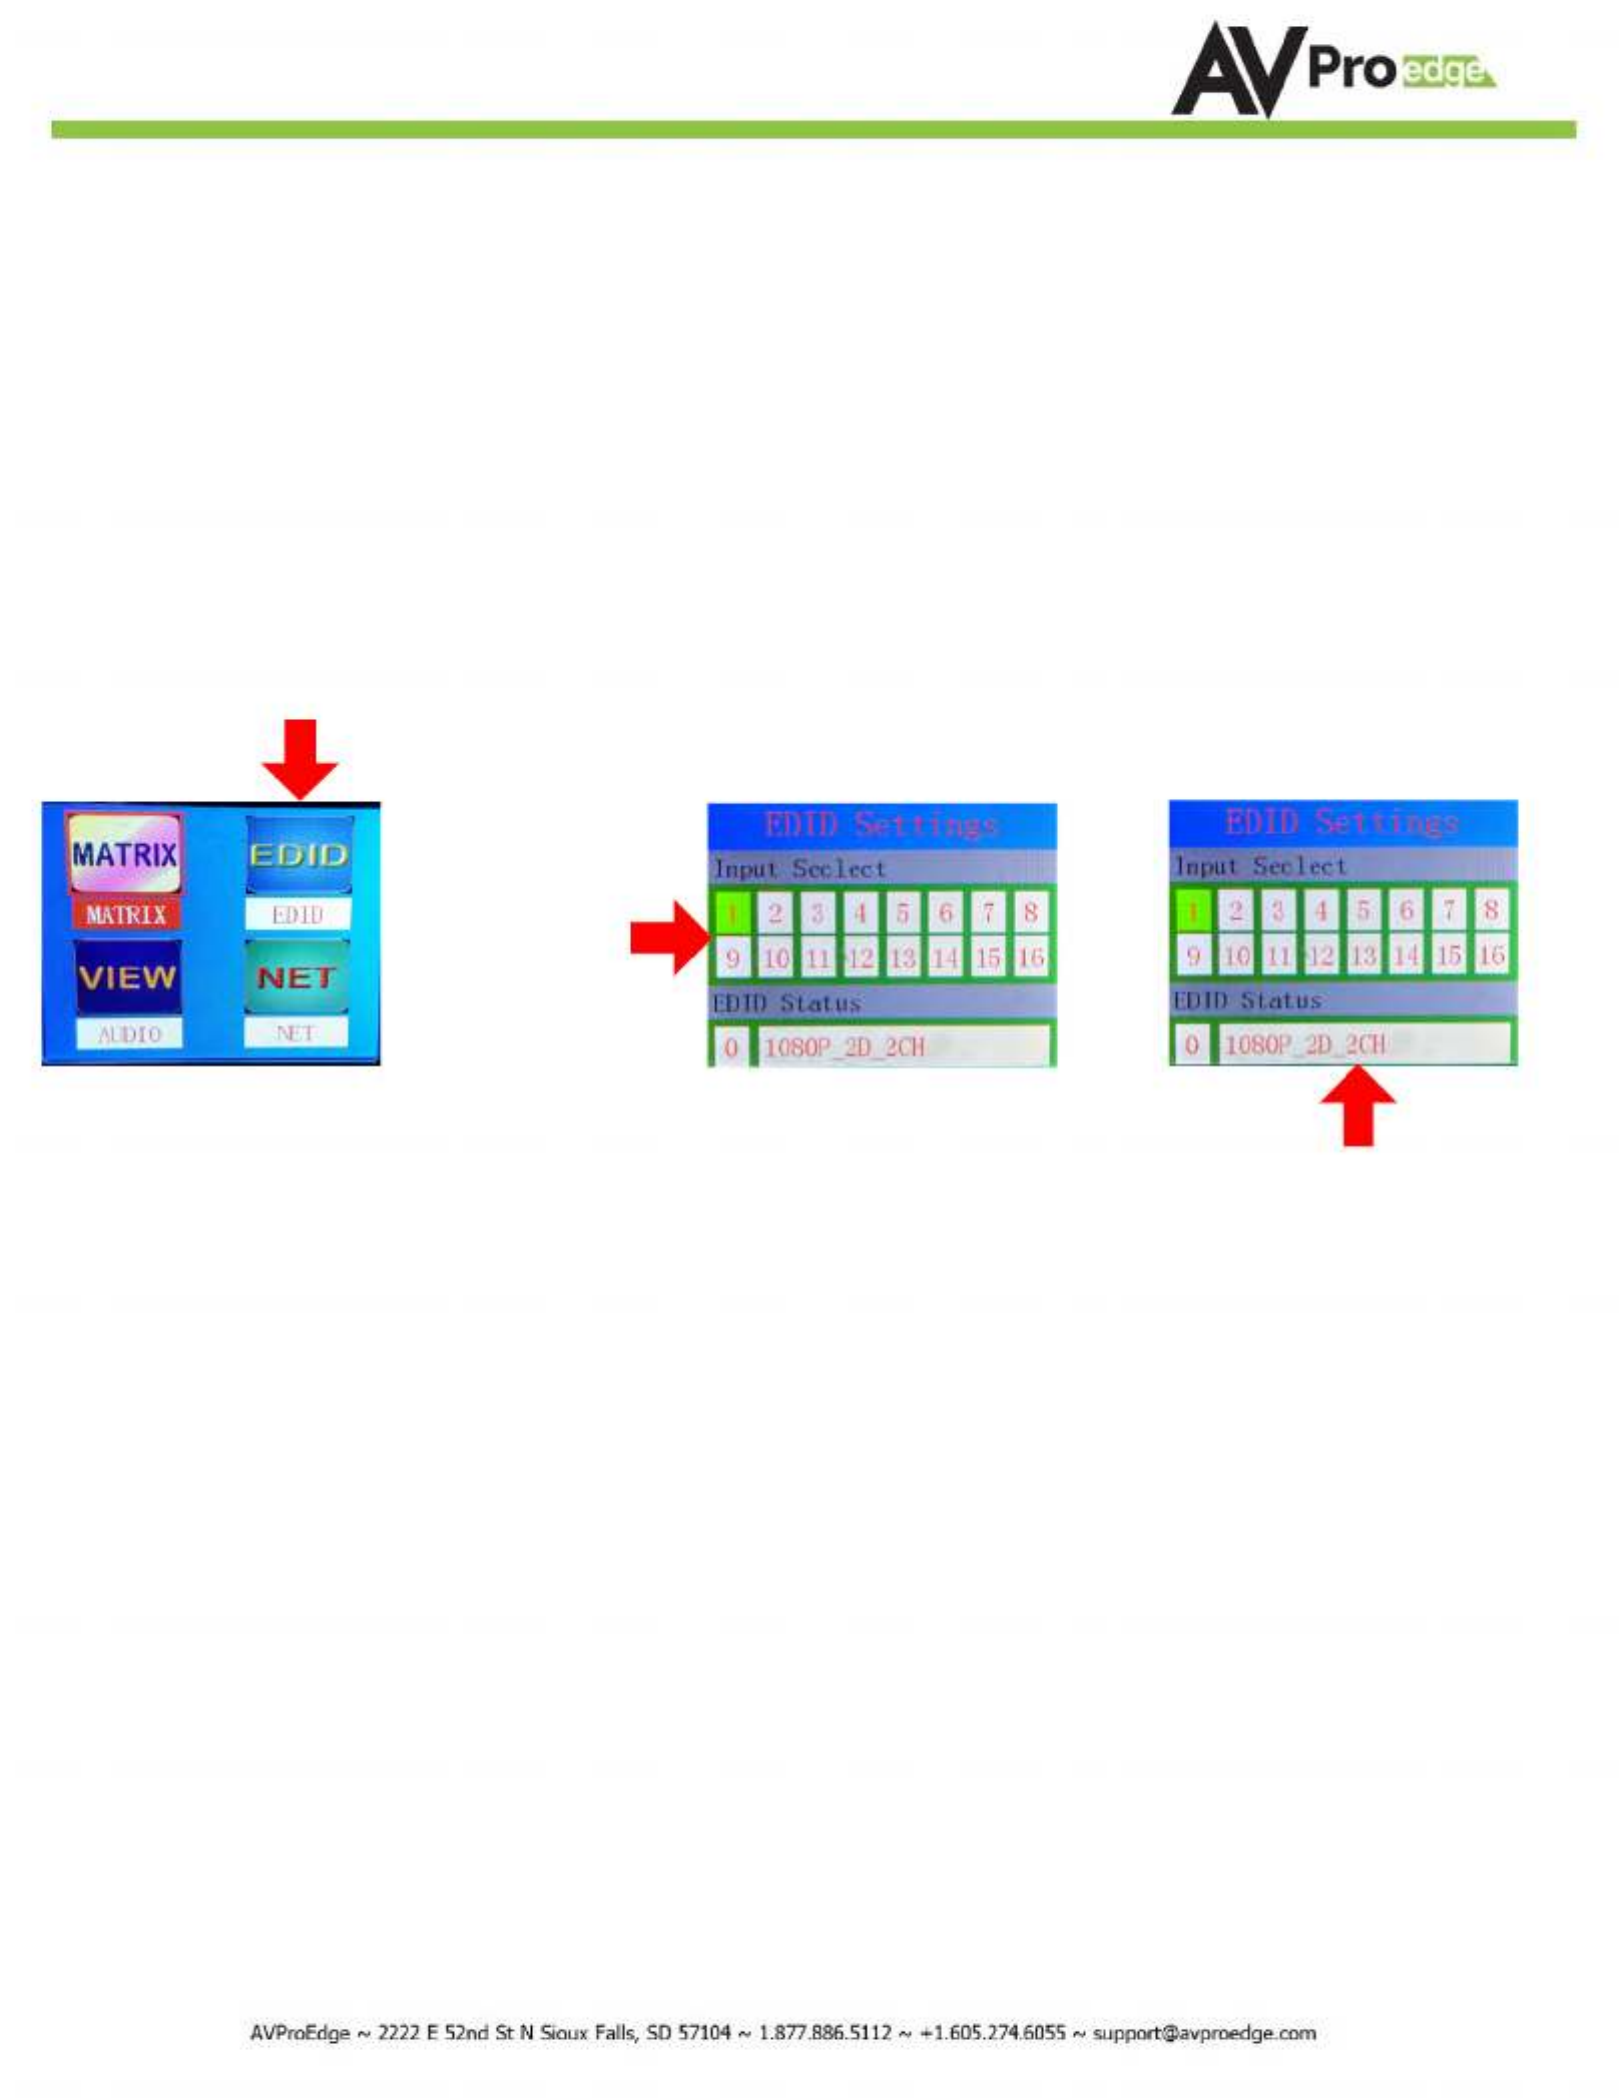
To Set the EDID, just choose EDID from the "Home Screen" and then select the INPUT you want to set. Finally toggle
through the EDIDs until you get the one you want. For the most plug and play compatibility, we recommend using
"1080P 2CH" (Which is the default setting). This is ideal for bars, restaurants, and homes. There is also the ability to
upload a custom EDID is desired (Has to be done in Serial Control Software).
Available EDID options are listed below. Additionally, you can copy an EDID from a display using Serial (more later in
this manual) - This is recommended for advanced users doing HDR distribution.
Select "EDID"
Choose Input
to apply EDID
to
Select the desired EDID
Available EDID's:
Available EDID's:
Available EDID's:
Available EDID's:Available EDID's:
1.
1080P_2CH
2.
1080P_6CH
3.
1080P_8CH
4.
1080P_3D_2CH
5.
1080P_3D_6CH
6.
1080P_3D_8CH
7.
4K30HZ_3D_2CH
8.
4K30HZ_3D_6CH
9.
4K30HZ_3D_8CH
10.
4K60HzY420_3D_2CH
11.
4K60HzY420_3D_6CH
12.
4K60HzY420_3D_8CH
13.
4K60HZ_3D_2CH
14.
4K60HZ_3D_6CH
15.
4K60HZ_3D_8CH
16.
1080P_2CH_HDR
17.
1080P_6CH_HDR
17.
1080P_8CH_HDR
18.
1080P_3D_2CH_HDR
19.
1080P_3D_6CH_HDR
20.
1080P_3D_8CH_HDR
21.
4K30HZ_3D_2CH_HDR
22.
4K30HZ_3D_6CH_HDR
23.
4K30HZ_3D_8CH_HDR
24.
4K60HzY420_3D_2CH_HDR
25.
4K60HzY420_3D_6CH_HDR
26.
4K60HzY420_3D_8CH_HDR
27.
4K60HZ_3D_2CH_HDR
28.
4K60HZ_3D_6CH_HDR
29.
4K60HZ_3D_8CH_HDR
30.
User EDID 1
31.
User EDID 2
32.
User EDID 3
AC-MX1616-AUHD-GEN2
Page 8

Control Screen - Audio Settings
Control Screen - Audio Settings
Control Screen - Audio Settings
Control Screen - Audio SettingsControl Screen - Audio Settings
Audio Settings has two functions:
Function 1
Function 1
Function 1
Function 1Function 1
- Set the default extracted audio mode. There are three options:
•Bind to output (extracted audio witches with the video, this is the default mode)
•Bind to input (extracted audio is fixed to the corresponding input by the same number)
•Independent/Matrix (extracted audio can be routed however you like and there are commands to allow it to
function as a separate matrix)
Highlight this area and press
Highlight this area and press
Highlight this area and press
Highlight this area and press Highlight this area and press
"ENTER". You can now toggle
"ENTER". You can now toggle
"ENTER". You can now toggle
"ENTER". You can now toggle "ENTER". You can now toggle
up and down to select the
up and down to select the
up and down to select the
up and down to select the up and down to select the
mode.
mode.
mode.
mode. mode.
Choose "VIEW AUDO"
Function 2
Function 2
Function 2
Function 2 Function 2
- View/Route Extracted Audio Matrix. (NOTE: you can only route the audio if "MATRIX" mode
is selected above. To route audio, follow the same logic as video switching in this menu:
1. Select the extracted audio OUTPUT first by pressing the number or navigating to it
2. Press ENTER to set the selection
3. Select the desired INPUT by toggling to it with UP/DOWN or simply selecting the number on the
keypad.
4. Press ENTER (This only applies if you used up/down to toggle to your desired input)
Press the desired numberINPUT
Choose "VIEW
AUDO"
Press the desired
extracted audio
OUTPUT number
Make sure this
area says
MATRIX
Press Enter
AC-MX1616-AUHD-GEN2
Page 9

Control Screen -
Control Screen -
Control Screen -
Control Screen - Control Screen - (IP) Setting
(IP) Setting
(IP) Setting
(IP) Setting(IP) Setting
Network
Network
Network
Network Network
Here you can setup the Matrix with your preferred network settings. From the front panel you can:
•View the current IP Settings and MAC address
•Set static Route IP (Default is 192.168.001.001)
•Set static Device IP (Device Default is 192.168.001.239)
(Device Default is 192.168.001.239)
(Device Default is 192.168.001.239)
(Device Default is 192.168.001.239)(Device Default is 192.168.001.239)
•Set Static Net Mask (Default is 255.255.255.0)
•Change the TCP/IP Port (Default is Port 23)
•Toggle DHCP (Default condition is DHCP OFF) (0=OFF, 1=ON)
To navigate the IP Setting Screen:
1. Navigate up and down to select (Use Enter Button) the option you want to address (RIP, IP, Mask, TCP.IP,
DHCP)
2. Once selected you can use up and down to to change the first number or press enter to skip it and continue
to the next.
3. Once you set the last possible number (Or complete the IP) it will back you to the main screen to make
another selection
Route IP
Route IP
Route IP
Route IPRoute IP
Device IP Address
Device IP Address
Device IP Address
Device IP AddressDevice IP Address
Subnet Mask
Subnet Mask
Subnet Mask
Subnet MaskSubnet Mask
TCP/IP Port
TCP/IP Port
TCP/IP Port
TCP/IP PortTCP/IP Port
MAC Address
MAC Address
MAC Address
MAC AddressMAC Address
DHCP Toggle
DHCP Toggle
DHCP Toggle
DHCP ToggleDHCP Toggle
(0=OFF, 1=ON)
(0=OFF, 1=ON)
(0=OFF, 1=ON)
(0=OFF, 1=ON)(0=OFF, 1=ON)
NOTE: You can send commands to the machine by IP, the commands are the same commands used for RS232 listed in the
Telnet
Telnet
Telnet
Telnet Telnet
"Command List"
AC-MX1616-AUHD-GEN2
Page 10

IR Details:
IR Details:
IR Details:
IR Details:IR Details:
IR IN on this machine is for controlling the AC-MX1616-AUHD, RS232 or IP Control are the recommended
methods, but IR can be used in some circumstances. The IR INPUT is for an IR Receiver EYE only. The IR
Receiver Eye below can plug into the IR Ext. port.
IR Remote Control:
IR Remote Control:
IR Remote Control:
IR Remote Control:IR Remote Control:
The Matrix can be switched with IR Commands (Remote or other) in several ways:
1. Use the supplied IR Remote (Pictured) and select the OUTPUT then INPUT
2. Lear IR Codes from the supplied remote
3. Use discreet NEC/HEX IR Codes to program a 3rd party control system or IR
remote. Check www.avproedge.com for discreet IR codes, or contact us to get
them.
AC-MX1616-AUHD-GEN2
Page 11

RS-232
RS-232
RS-232
RS-232RS-232 and TCP/IP
and TCP/IP
and TCP/IP
and TCP/IP and TCP/IP Commands:
Commands:
Commands:
Commands: Commands:
The AC-MX - can be controlled with either RS-232 or TCP/IP commands. Certain switching or format 1616 AUHD-GEN2
configurations can only be done using these commands. We recommend using either the MyUART (RS-232 - free) or
Hercules (TCP/IP - free) apps as they are very easy to use for sending commands to the machine.
For TCP/IP control commands use Telnet Port 23.
For TCP/IP control commands use Telnet Port 23.
For TCP/IP control commands use Telnet Port 23.
For TCP/IP control commands use Telnet Port 23.For TCP/IP control commands use Telnet Port 23.
For RS-232, use a null modem serial cable adapter and set the serial communications to: 57600,n,8,1 (baud: 57600,
no parity, 8 data bits and 1 stop bit) with no handshaking.
Please add a return (Enter key) after each command when using direct commands.
The unified command list (ASCII) is listed below.
AC-MX1616-AUHD-GEN2
Page 12

1. Connect your computer to one of the control ports (Micro USB/3pin Terminal)
2. Open up MyUart and verify the correct settings
a. Baudrate: 57600, no parity, 8 data bits and 1 stop bit) with no handshaking.
3. On MyUart c Port>> lick Search (you will see a red indicator once connected)
a. You can verify the COM port by using Windows Device Manger. Both USB
and 3pin connections should show up as a COM .#
4. and hit Enter/Return on keyboardSend "GET DHCP" with a carriage return (no " " ).
a. (0=Off, 1=On)Default is OFF so the return message should be DHCP 0" "
5. Send "SET DHCP 1", the return message should read DHCP 1" "
a. This will also return the current IP Settings. If there is no connection it will
reply with the Default Settings.
6. You can now connect to the WebUI by typing in the HIP address into a web
browser. There you can alter the IP address of the Matrix to one of your choosing.
7. You can also set the address of the matrix by sending the following command
a. (SET HIP 192.168.1.143)"SET HIP xxx.xxx.xxx.xxx"
8. configuredOnce it is recommended to turn DHCP back off so the settings are set
to Static and will not change (this can also be done from the WebUI).
a. "SET DHCP 0"
9. You can verify the settings by getting the status of the matrix
a. "GET STA"
RS-232
RS-232
RS-232
RS-232RS-232 and TCP/IP
and TCP/IP
and TCP/IP
and TCP/IP and TCP/IP Commands:
Commands:
Commands:
Commands: Commands:
The can be controlled with either RS-232 or TCP/IP commands. Certain switching or format configurations can Matrix
only be done using these commands. We recommend using either the MyUART (RS-232 - free) or Hercules (TCP/IP - free)
apps as they are very easy to use for sending commands to the machine.
For TCP/IP control commands use Telnet Port 23.
For TCP/IP control commands use Telnet Port 23.
For TCP/IP control commands use Telnet Port 23.
For TCP/IP control commands use Telnet Port 23.For TCP/IP control commands use Telnet Port 23.
For RS-232, use a null modem serial cable adapter and set the serial communications to:
57600,n,8,1 (baud: 57600, no parity, 8 data bits and 1 stop bit) with no handshaking.
57600,n,8,1 (baud: 57600, no parity, 8 data bits and 1 stop bit) with no handshaking.
57600,n,8,1 (baud: 57600, no parity, 8 data bits and 1 stop bit) with no handshaking.
57600,n,8,1 (baud: 57600, no parity, 8 data bits and 1 stop bit) with no handshaking.57600,n,8,1 (baud: 57600, no parity, 8 data bits and 1 stop bit) with no handshaking.
Please add a return (Enter key) after each command when using direct commands. The
unified command list (ASCII) is listed . on the next page
Command Example: DHCP and setting the IP Address
Command Example: DHCP and setting the IP Address
Command Example: DHCP and setting the IP Address
Command Example: DHCP and setting the IP AddressCommand Example: DHCP and setting the IP Address
AC-MX1616-AUHD-GEN2
Page 13

RS
RS
RS
RSRS-232
-232
-232
-232 -232
and
and
and
and and
TCP/IP
TCP/IP
TCP/IP
TCP/IP TCP/IP
Commands:
Commands:
Commands:
Commands:Commands:
AC-MX1616-AUHD-GEN2
Page 14

Command List cont:
Command List cont:
Command List cont:
Command List cont:Command List cont:
Settings: Baud Rate 57600, Data Bits 8, No Parity, 1 Stop Bit
NOTE - Visit www.avproedge.com to get the
Notepad version of the command list for easy
copy/past access.
AC-MX1616-AUHD-GEN2
Page 15

Using Multiple Units In One System:
Using Multiple Units In One System:
Using Multiple Units In One System:
Using Multiple Units In One System:Using Multiple Units In One System:
Device Addresses When Using Serial Communication:
Device Addresses When Using Serial Communication:
Device Addresses When Using Serial Communication:
Device Addresses When Using Serial Communication:Device Addresses When Using Serial Communication:
NOTE: Only set device address when cascading multiple units together and using RS232 as
your control method! You also have to send the device address when doing advanced routing
while sending commands by serial (next page) even if it is default "A00". You NEVER use device
addresses when using IP control or TELNET
When using serial communication it is good to be aware of the devices "Address" You will want to
know the device address as this will determine which AC-MX1616-AUHD will receive a command.
All of the drivers are built so that if you use serial communication you will use ONE instance of the
driver and select the size. i.e 9x18, 9x27 etc...
All AC-MX1616-AUHD are address "A00" by default and if you are using just one device you do not
need to place this in front of the serial command.
EX1: If you have a standalone unit and are using serial control you can just send a command
without the address:
"SET OUT5 VS IN3"
"SET OUT5 VS IN3"
"SET OUT5 VS IN3"
"SET OUT5 VS IN3""SET OUT5 VS IN3" ----This will set Output 5 to Input 3
EX2: If you have two units in a system you have to label them A01 and A02, so a command will look
like:
"A02SET OUT5 VS IN3"
"A02SET OUT5 VS IN3"
"A02SET OUT5 VS IN3"
"A02SET OUT5 VS IN3""A02SET OUT5 VS IN3" ----This will set Output 5 to Input 3 ON SWITCH TWO. Also, please note that
there is no "space" between the address and the command
To set and device address you can use the PC Control Software or send the command "SET ADDR
xx" (xx = 01 through 99)
Cascading with IP Control:
Cascading with IP Control:
Cascading with IP Control:
Cascading with IP Control:Cascading with IP Control:
With IP you have to have a direct IP connection to each unit, and regard them as individual
matrices. So for a 9 units in a system with IP control, you have to connect Ethernet to all 9 matrices.
If you are using a 3rd party control driver, install 9 instances of the drivers, and regard them all as
individual 16x16 matrices.
When using IP DO NOT use serial system addresses, as the IP addresses will serve the same purpose
While it can be done if one so desires, it complicates the programming.
A best practice is to set a static IP address for each unit, rather than DHCP.
AC-MX1616-AUHD-GEN2
Page 16
Extracted Audio:
Extracted Audio:
Extracted Audio:
Extracted Audio:Extracted Audio:
The extracted audio ports have distinct operating modes. Your desired mode can be set to suite your particular
installation. The 3 modes are:
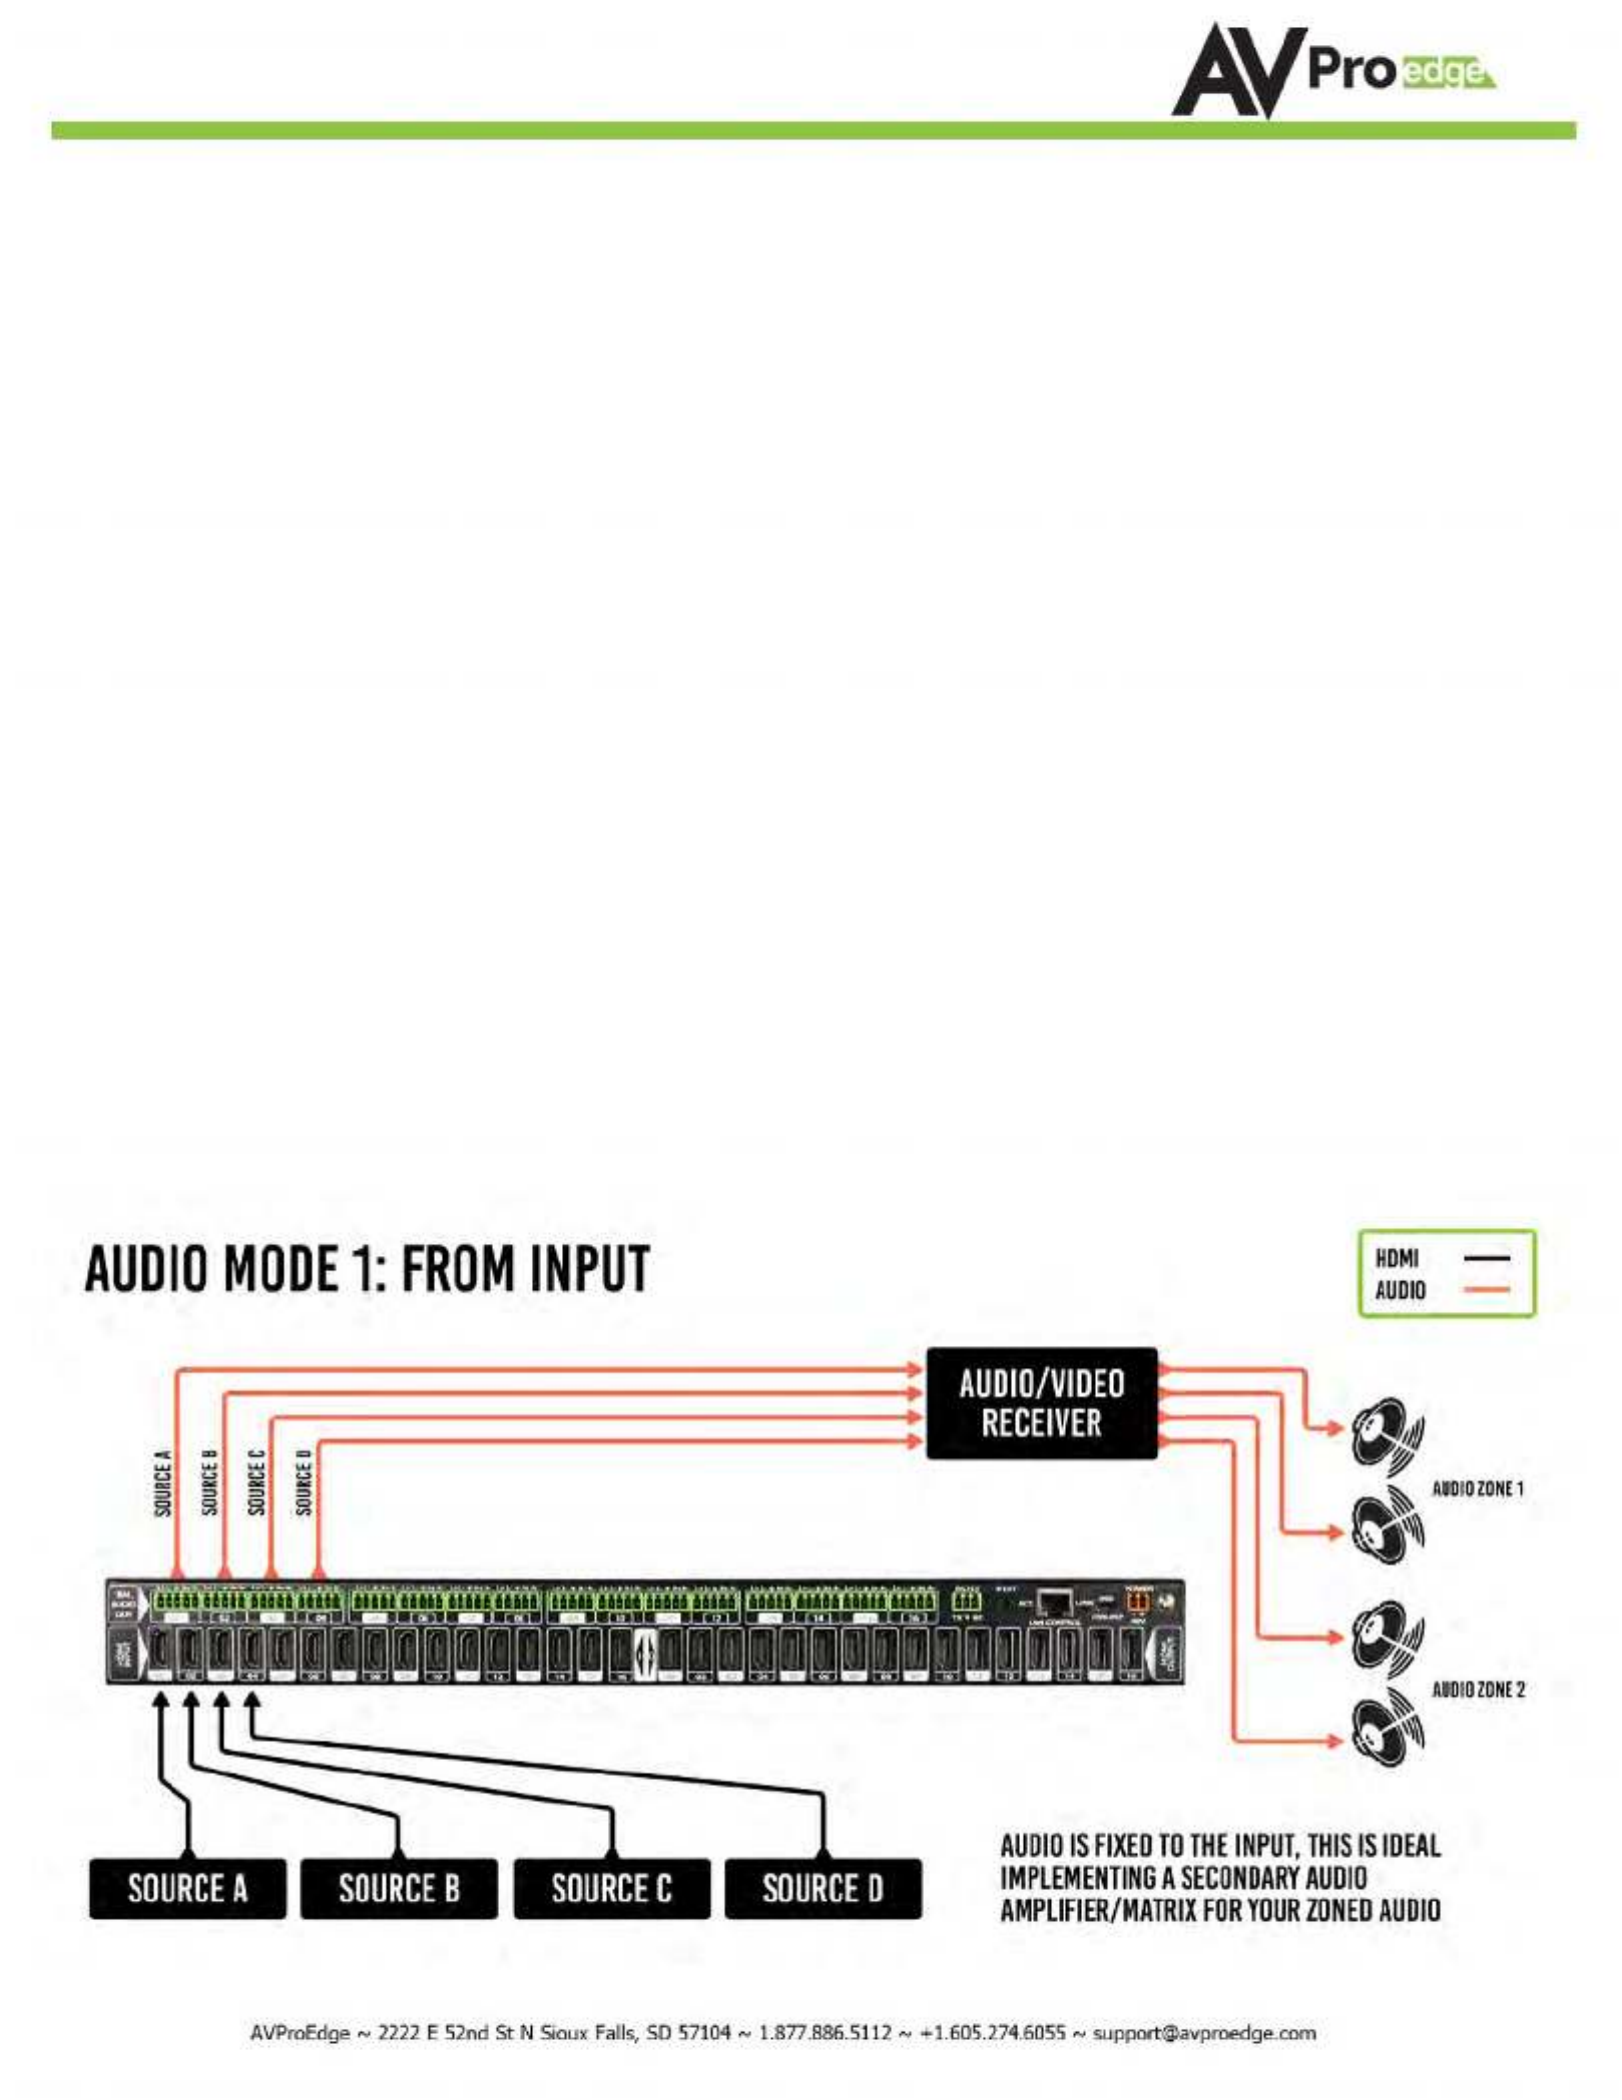
From Input
From Input
From Input
From InputFrom Input ~ This is the default configuration. In this mode the audio port number corresponds to the INPUT
signal. This is ideal for systems where audio is matrixed separately in a zoned amplifier.
From Output
From Output
From Output
From OutputFrom Output ~ This configuration will automatically have the audio follow OUTPUT, so the audio from the
extracted port always matches the HDMI output. This is ideal for systems that use local AVR's for some of the
zones.
Independent/Matrix
Independent/Matrix
Independent/Matrix
Independent/MatrixIndependent/Matrix ~ This mode allows you matrix the extracted audio outputs independent of HDMI. In this
mode a new set of commands becomes available to be able to route audio however you want. This can be used
as a separate zoned audio matrix with only using an amplifier.
Setting up Extracted Audio Routing:
Setting up Extracted Audio Routing:
Setting up Extracted Audio Routing:
Setting up Extracted Audio Routing:Setting up Extracted Audio Routing:
You can set up Extracted Audio Routing in the PC Software, Driver or by sending the following command:
SET EXA MODEy
SET EXA MODEy
SET EXA MODEy
SET EXA MODEySET EXA MODEy -- Where (y=0-2) 0=From Input, 1=From Output, 2=Independent.
If you set to "Independent" a new set of commands is available to you to matrix the ports:
SET OUTx EAS INy
SET OUTx EAS INy
SET OUTx EAS INy
SET OUTx EAS INySET OUTx EAS INy -- Where (x=0-16) 0=ALL, 1-16=Desired Output & (y=1-16) 1-16=Desired Input
NOTE: Extracted Audio Ports are PCM 2CH audio up to LPCM 6 CH, Dolby Digital 5.1 & DTS. No down-mix.
AC-MX1616-AUHD-GEN2
Page 17

Extracted Audio cont:
Extracted Audio cont:
Extracted Audio cont:
Extracted Audio cont:Extracted Audio cont:
Audio Diagrams:
Audio Diagrams:
Audio Diagrams:
Audio Diagrams:Audio Diagrams:
AC-MX1616-AUHD-GEN2
Page 18

PC Control Software - Side Bar:
PC Control Software - Side Bar:
PC Control Software - Side Bar:
PC Control Software - Side Bar:PC Control Software - Side Bar:
Note: PC Control Software can be used when connected to the RS232 or Mini USB Port.
Connection
Connection
Connection
Connection Connection Area
Area
Area
AreaArea - Use the drop down to select the COM Port or press
"Search Machine" to search your computer for open COM Ports. The
light will be red if there is a successful connection.
Select/Manage Addresses
Select/Manage Addresses
Select/Manage Addresses
Select/Manage AddressesSelect/Manage Addresses - Use the drop down to select the Address of
the device you want to control (If cascading multiple units). Press
"Address Management" to set the Addresses. View "Address
Management' Tab later for more.
AC-MX1616-AUHD-GEN2
Page 19

PC Control Software - Matrix Tab (OUTPUT 1-8):
PC Control Software - Matrix Tab (OUTPUT 1-8):
PC Control Software - Matrix Tab (OUTPUT 1-8):
PC Control Software - Matrix Tab (OUTPUT 1-8):PC Control Software - Matrix Tab (OUTPUT 1-8):
Note: PC Control Software can be used when connected to the RS232 or Mini USB Port.
Switching
Switching
Switching
SwitchingSwitching - Simply choose the INPUT radio button you want to see on each output.
AC-MX1616-AUHD-GEN2
Page 20

PC Control Software - Matrix Tab (OUTPUT 9-16):
PC Control Software - Matrix Tab (OUTPUT 9-16):
PC Control Software - Matrix Tab (OUTPUT 9-16):
PC Control Software - Matrix Tab (OUTPUT 9-16):PC Control Software - Matrix Tab (OUTPUT 9-16):
Note: PC Control Software can be used when connected to the RS232 or Mini USB Port.
Switching
Switching
Switching
SwitchingSwitching - Simply choose the INPUT radio button you want to see on each output.
AC-MX1616-AUHD-GEN2
Page 21

PC Control Software - EDID Tab:
PC Control Software - EDID Tab:
PC Control Software - EDID Tab:
PC Control Software - EDID Tab:PC Control Software - EDID Tab:
Note: PC Control Software can be used when connected to the RS232 or Mini USB Port.
Read EDID and save as file
Read EDID and save as file
Read EDID and save as file
Read EDID and save as fileRead EDID and save as file- Select
the Output from the drop-down
and click the button to save the
EDID as a file, you can upload the
EDID later and apply it to one of
the "USER" EDIDs. You can then
apply that USER EDID to one or
more of the inputs.
Set
Set
Set
Set Set EDID
EDID
EDID
EDID EDID -
-
-
-- Choose the EDID you
want to use from the drop down
and press
"Apply to Input x" to set it.
EDID Information- This box shows basic
EDID information from the output chosen
in the drop-down on the left.
Load EDID
Load EDID
Load EDID
Load EDIDLoad EDID-
This allows you to
load a previously
saved EDID
File and Store it to
a "User" memory
AC-MX1616-AUHD-GEN2
Page 22

PC Control Software - IP Config Tab:
PC Control Software - IP Config Tab:
PC Control Software - IP Config Tab:
PC Control Software - IP Config Tab:PC Control Software - IP Config Tab:
Note: PC Control Software can be used when connected to the RS232 or Mini USB Port.
Save Settings
Save Settings
Save Settings
Save SettingsSave Settings
Toggle
Toggle
Toggle
Toggle Toggle
DHCP
DHCP
DHCP
DHCP DHCP
Set IP
Set IP
Set IP
Set IP Set IP
Settings
Settings
Settings
SettingsSettings
AC-MX1616-AUHD-GEN2
Page 23

Web Interface: Sense Switch
Web Interface: Sense Switch
Web Interface: Sense Switch
Web Interface: Sense SwitchWeb Interface: Sense Switch
To access the Web Interface, simply type in the IP address of the device. The default IP address 192.168.001.239,
if you have setup a different IP or are not sure simply view the "Net" section on the control screen on the front
panel. If you enable DHCP, you will want to find the IP address by looking on the setup screen.
The Sense Switch page is the main page of the Web Interface. Here you can easily control switching of the matrix.
NOTE: The inputs and outputs can be labeled in the "System Config" Tab.
AC-MX1616-AUHD-GEN2
Page 24

Web Interface:
Web Interface:
Web Interface:
Web Interface: Web Interface: Matrix
Matrix
Matrix
MatrixMatrix
Audio
Audio
Audio
Audio Audio
The Audio Setting tab allows to:
1 - Select the Ex-Audio Matrix Mode
1 - Select the Ex-Audio Matrix Mode
1 - Select the Ex-Audio Matrix Mode
1 - Select the Ex-Audio Matrix Mode1 - Select the Ex-Audio Matrix Mode:
•Bind To Output (Default) ~ Extracted audio will switch with the corresponding HDMI Output of the
same number
•Bind To Input ~ Extracted audio will be fixed to the corresponding HDMI Input of the same number
(Audio will never switch)
•Matrix ~ Extracted audio can be routed independently of the HDMI Matrix (NOTE: You can only use
the "Audio Matrix" control grid when this mode is selected.
2 - Audio Matrix
2 - Audio Matrix
2 - Audio Matrix
2 - Audio Matrix 2 - Audio Matrix ~ This grid allows you to control the extracted audio route independently of the HDMI route.
This function is only available if the Ex-Audio Mode is "Matrix".
3 - Audio Status ~
3 - Audio Status ~
3 - Audio Status ~
3 - Audio Status ~ 3 - Audio Status ~ You can turn each extracted audio port ON or OFF (Mute)
AC-MX1616-AUHD-GEN2
Page 25
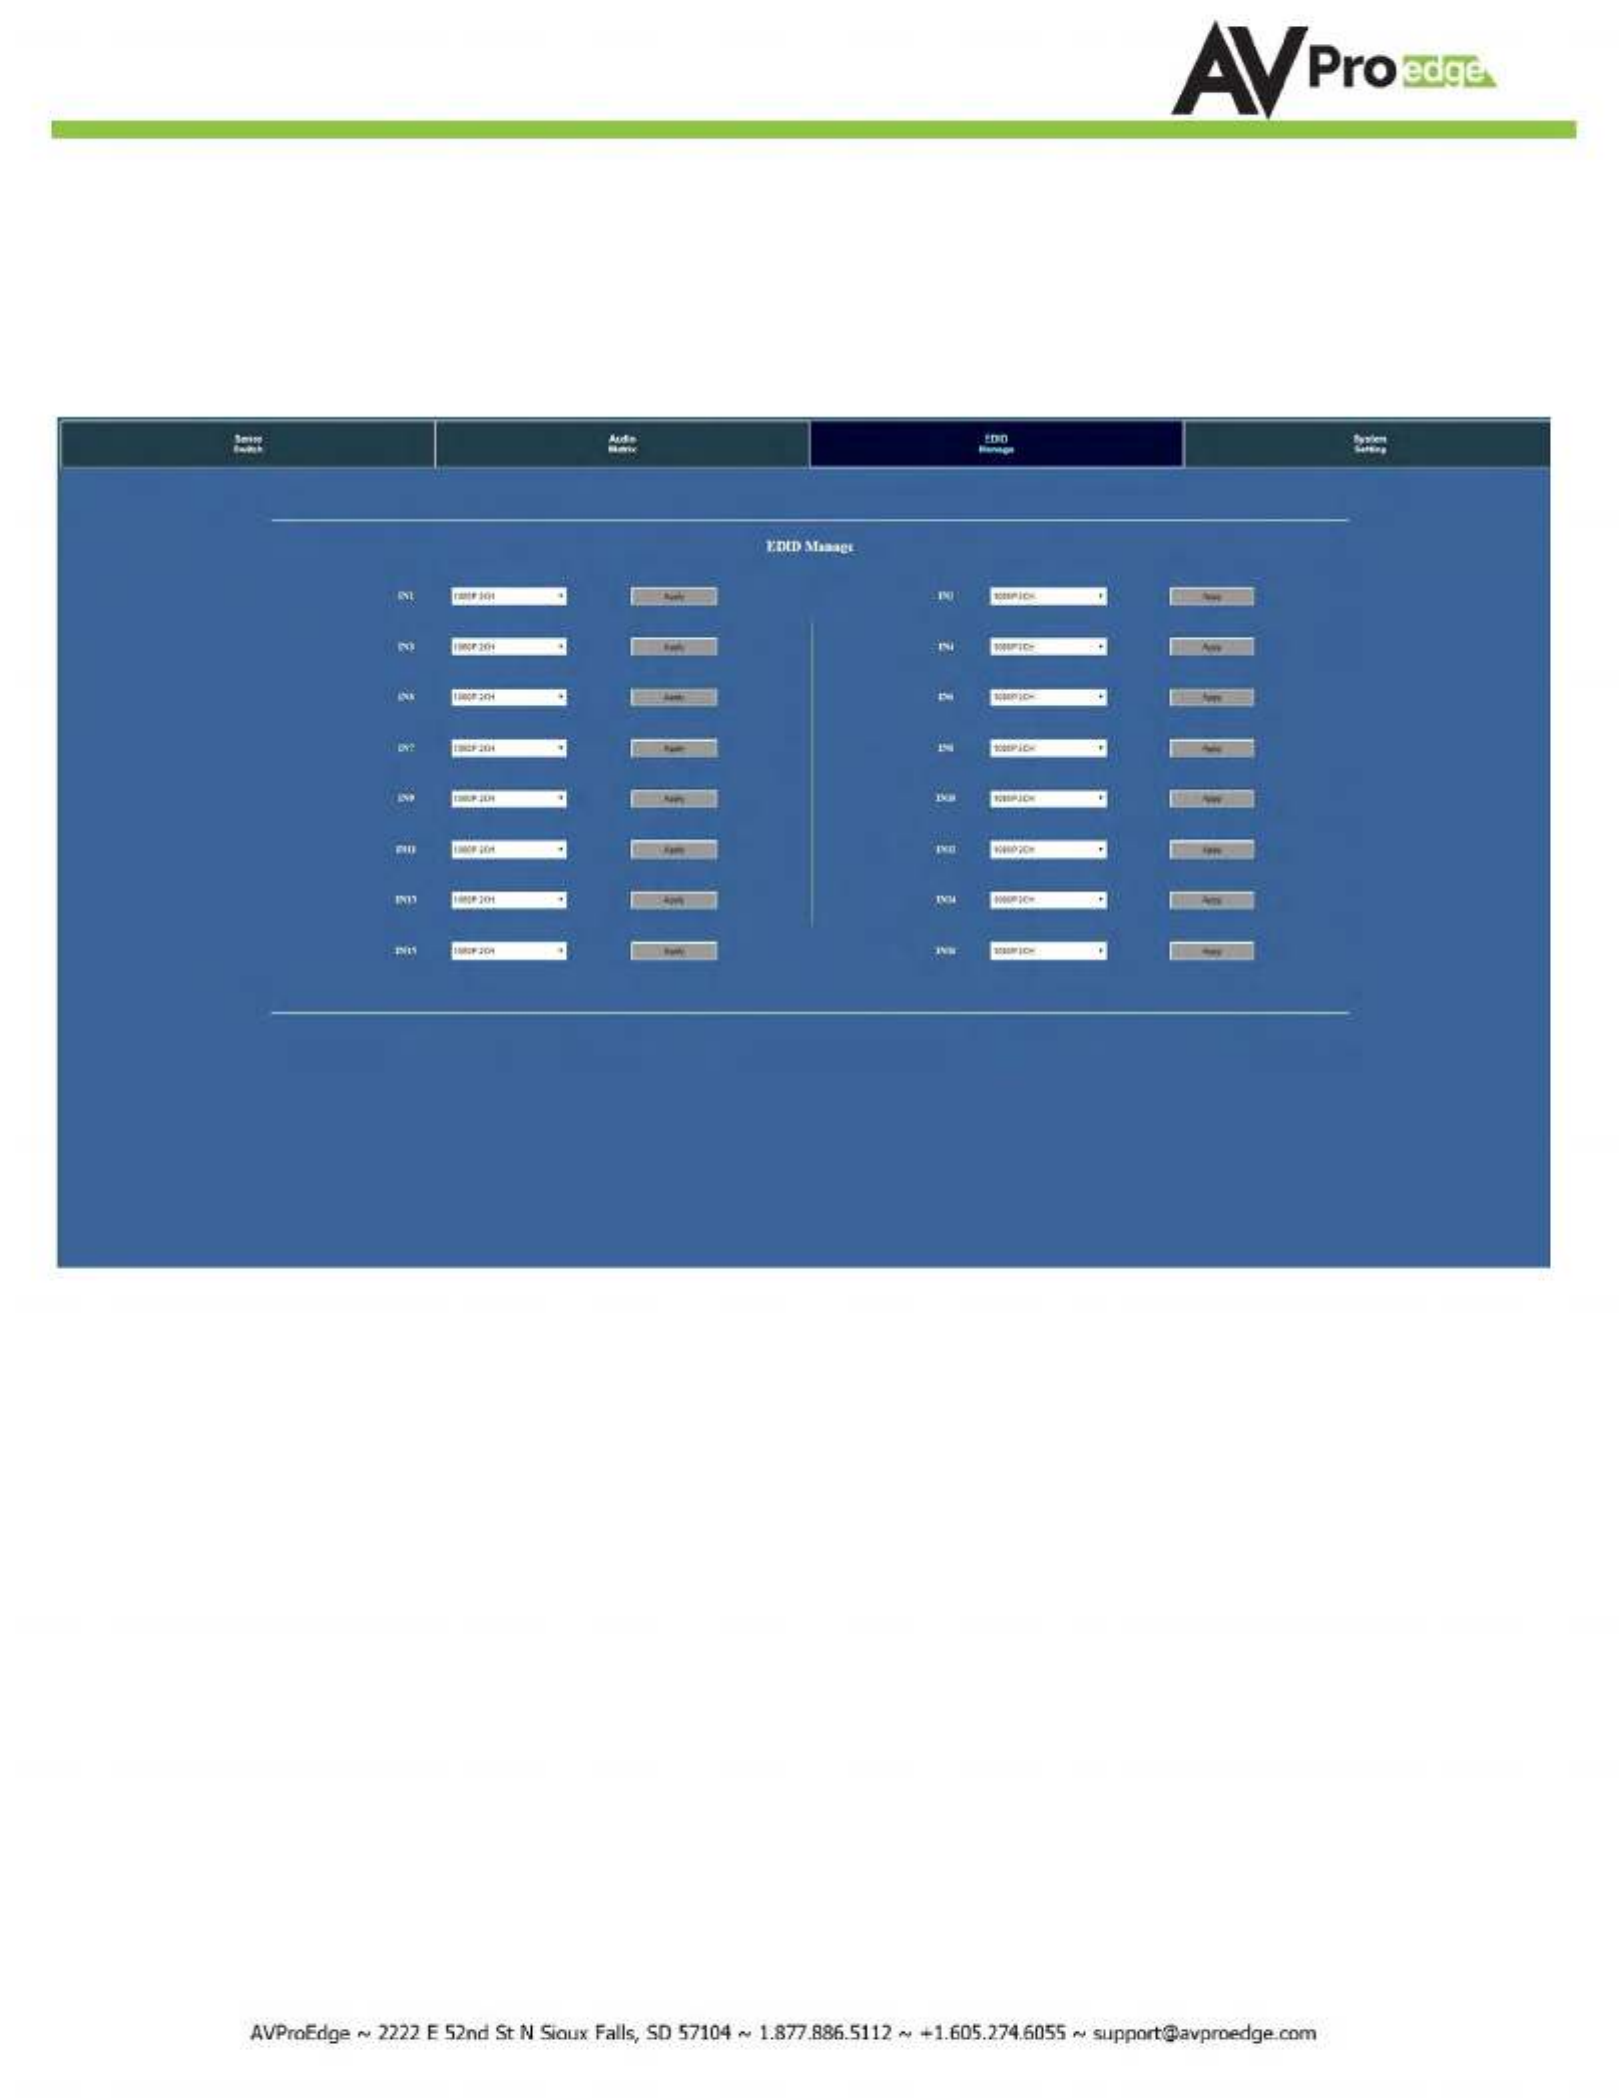
Web Interface: EDID Manage
Web Interface: EDID Manage
Web Interface: EDID Manage
Web Interface: EDID ManageWeb Interface: EDID Manage
The EDID Manage tab allows you to set the EDID for each input. To set the EDID:
1. Select the desired EDID form the drop down menu of
the input you want.
2. Press Apply
Available EDID's:
Available EDID's:
Available EDID's:
Available EDID's:Available EDID's:
0. 1080P_2CH
1. 1080P_6CH
2. 1080P_8CH
3. 1080P_3D_2CH
4. 1080P_3D_6CH
5. 1080P_3D_8CH
6. 4K30HZ_3D_2CH
7. 4K30HZ_3D_6CH
8. 4K30HZ_3D_8CH
9. 4K60HzY420_3D_2CH
10. 4K60HzY420_3D_6CH
11. 4K60HzY420_3D_8CH
12. 4K60HZ_3D_2CH
13. 4K60HZ_3D_6CH
14. 4K60HZ_3D_8CH
15. 1080P_2CH_HDR
16. 1080P_6CH_HDR
17.
1080P_8CH_HDR
18.
1080P_3D_2CH_HDR
19.
1080P_3D_6CH_HDR
20.
1080P_3D_8CH_HDR
21.
4K30HZ_3D_2CH_HDR
22.
4K30HZ_3D_6CH_HDR
23.
4K30HZ_3D_8CH_HDR
24.
4K60HzY420_3D_2CH_HDR
25.
4K60HzY420_3D_6CH_HDR
26.
4K60HzY420_3D_8CH_HDR
27.
4K60HZ_3D_2CH_HDR
28.
4K60HZ_3D_6CH_HDR
29.
4K60HZ_3D_8CH_HDR
30.
User EDID 1
31.
User EDID 2
32.
User EDID 3
AC-MX1616-AUHD-GEN2
Page 26
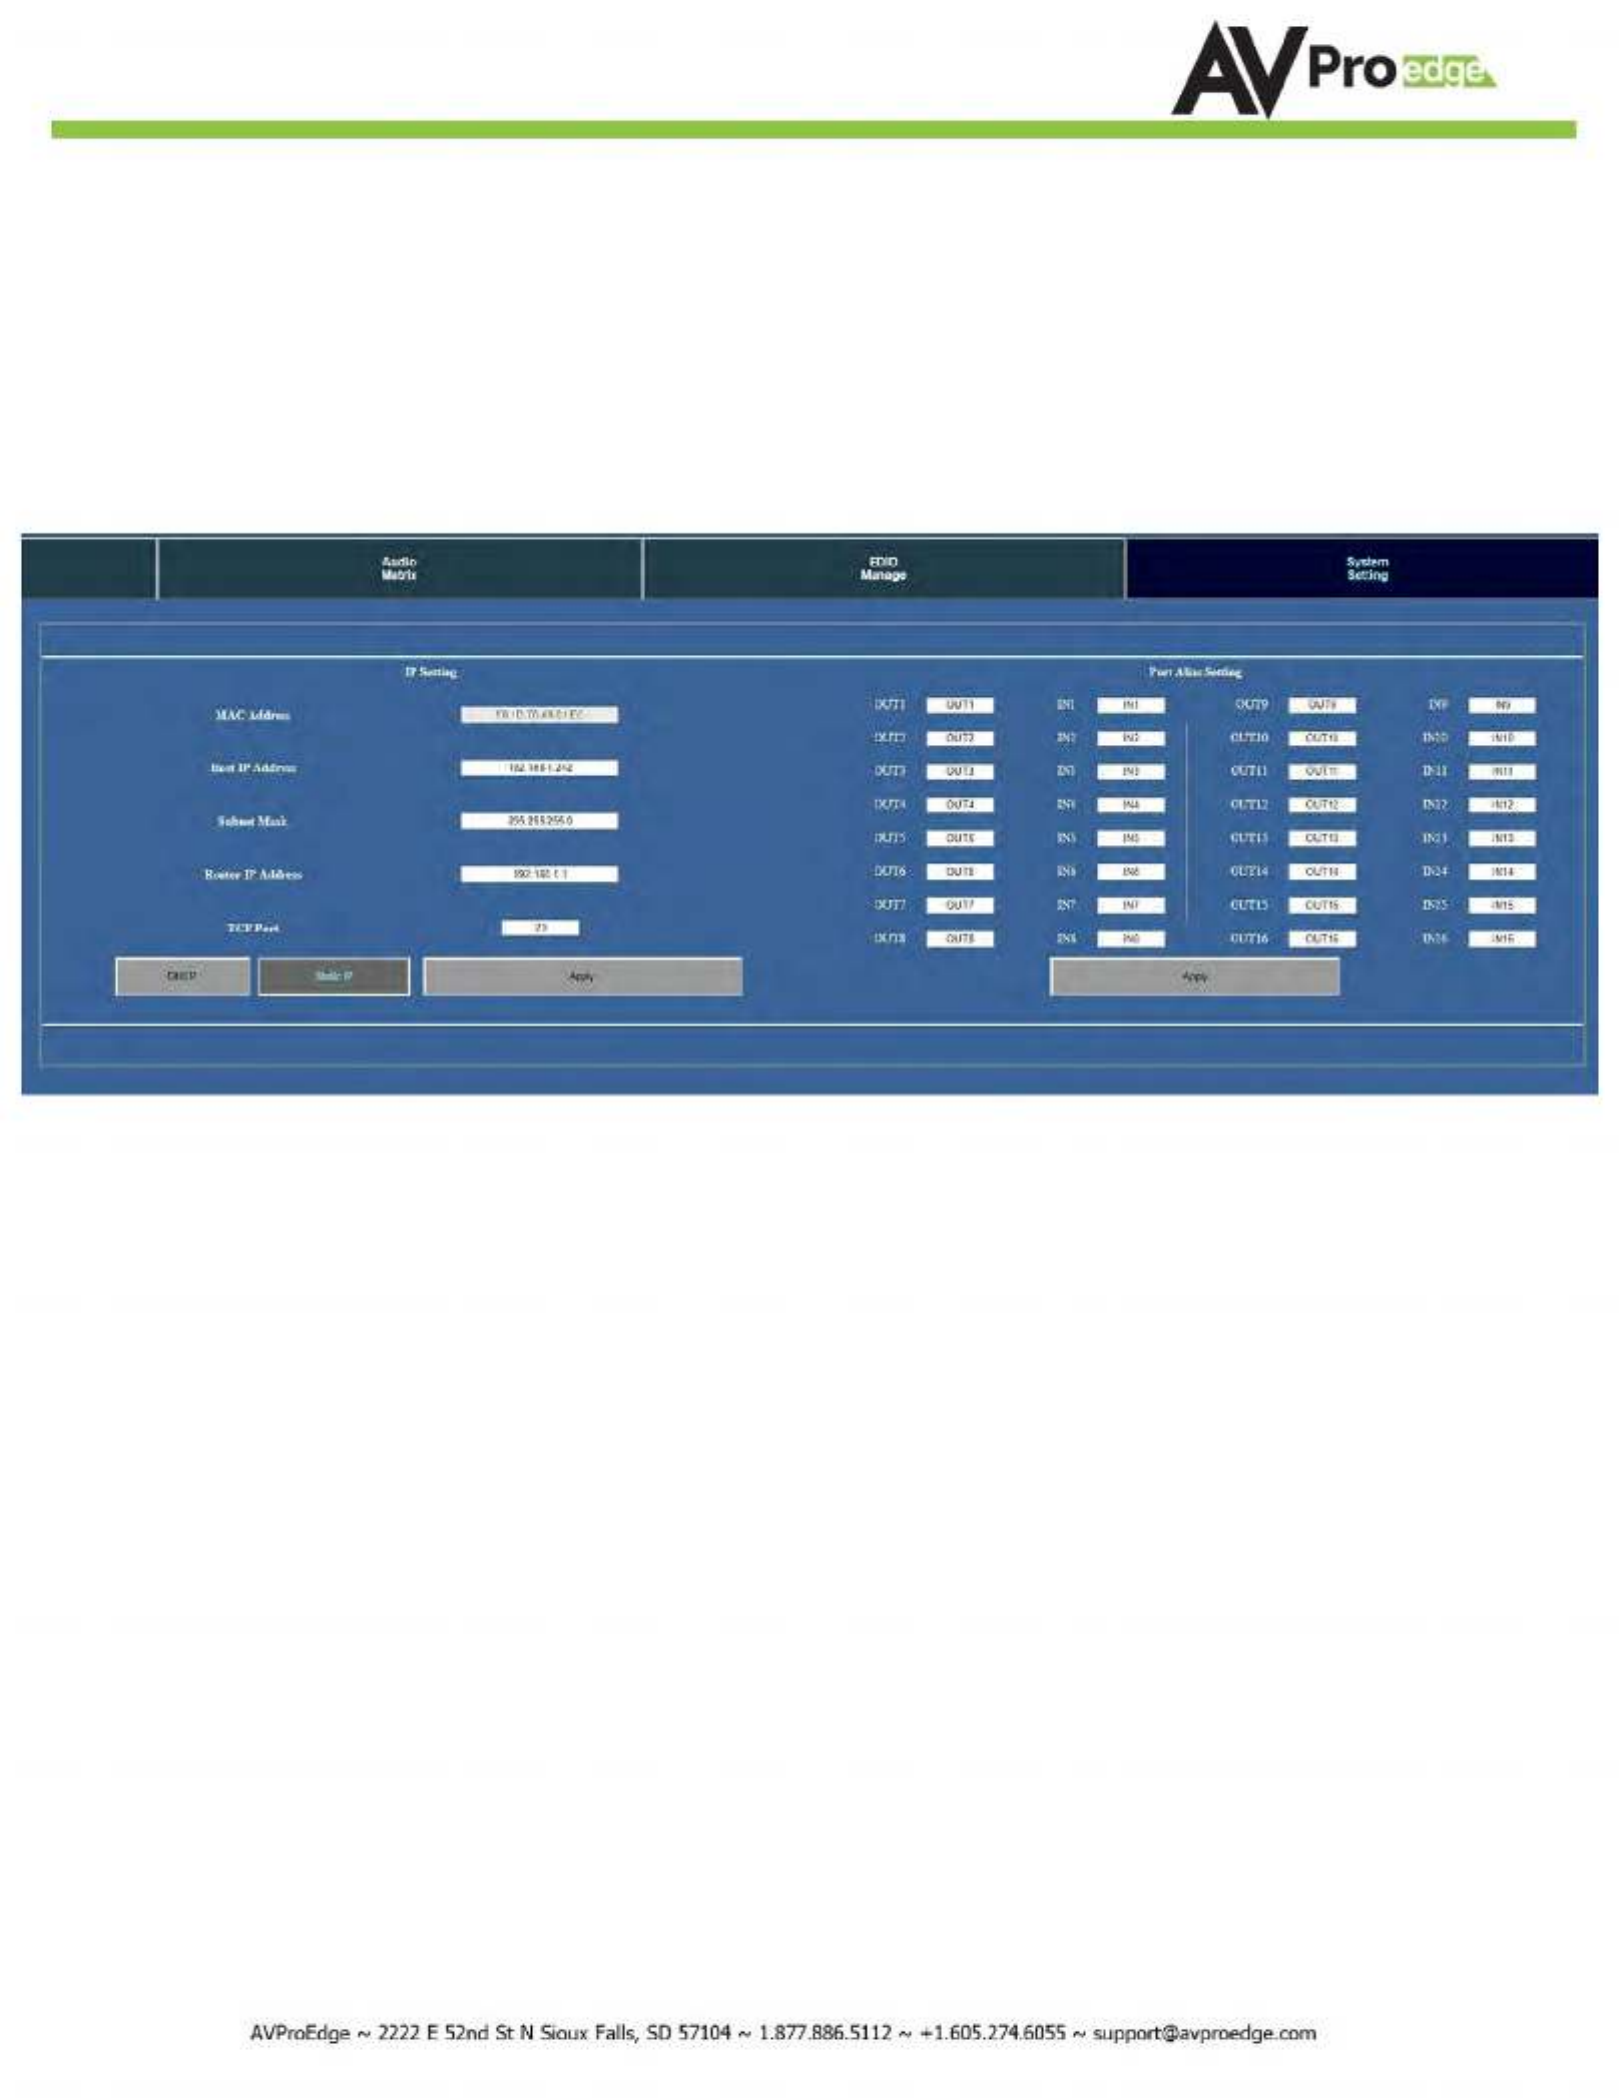
Web Interface: System Config
Web Interface: System Config
Web Interface: System Config
Web Interface: System ConfigWeb Interface: System Config
The System Config tab let you achieve two functions.
1. Setting up your network (IP) settings
2. Labeling the Inputs and Outputs for the "Sense Switch" Tab
AC-MX1616-AUHD-GEN2
Page 27
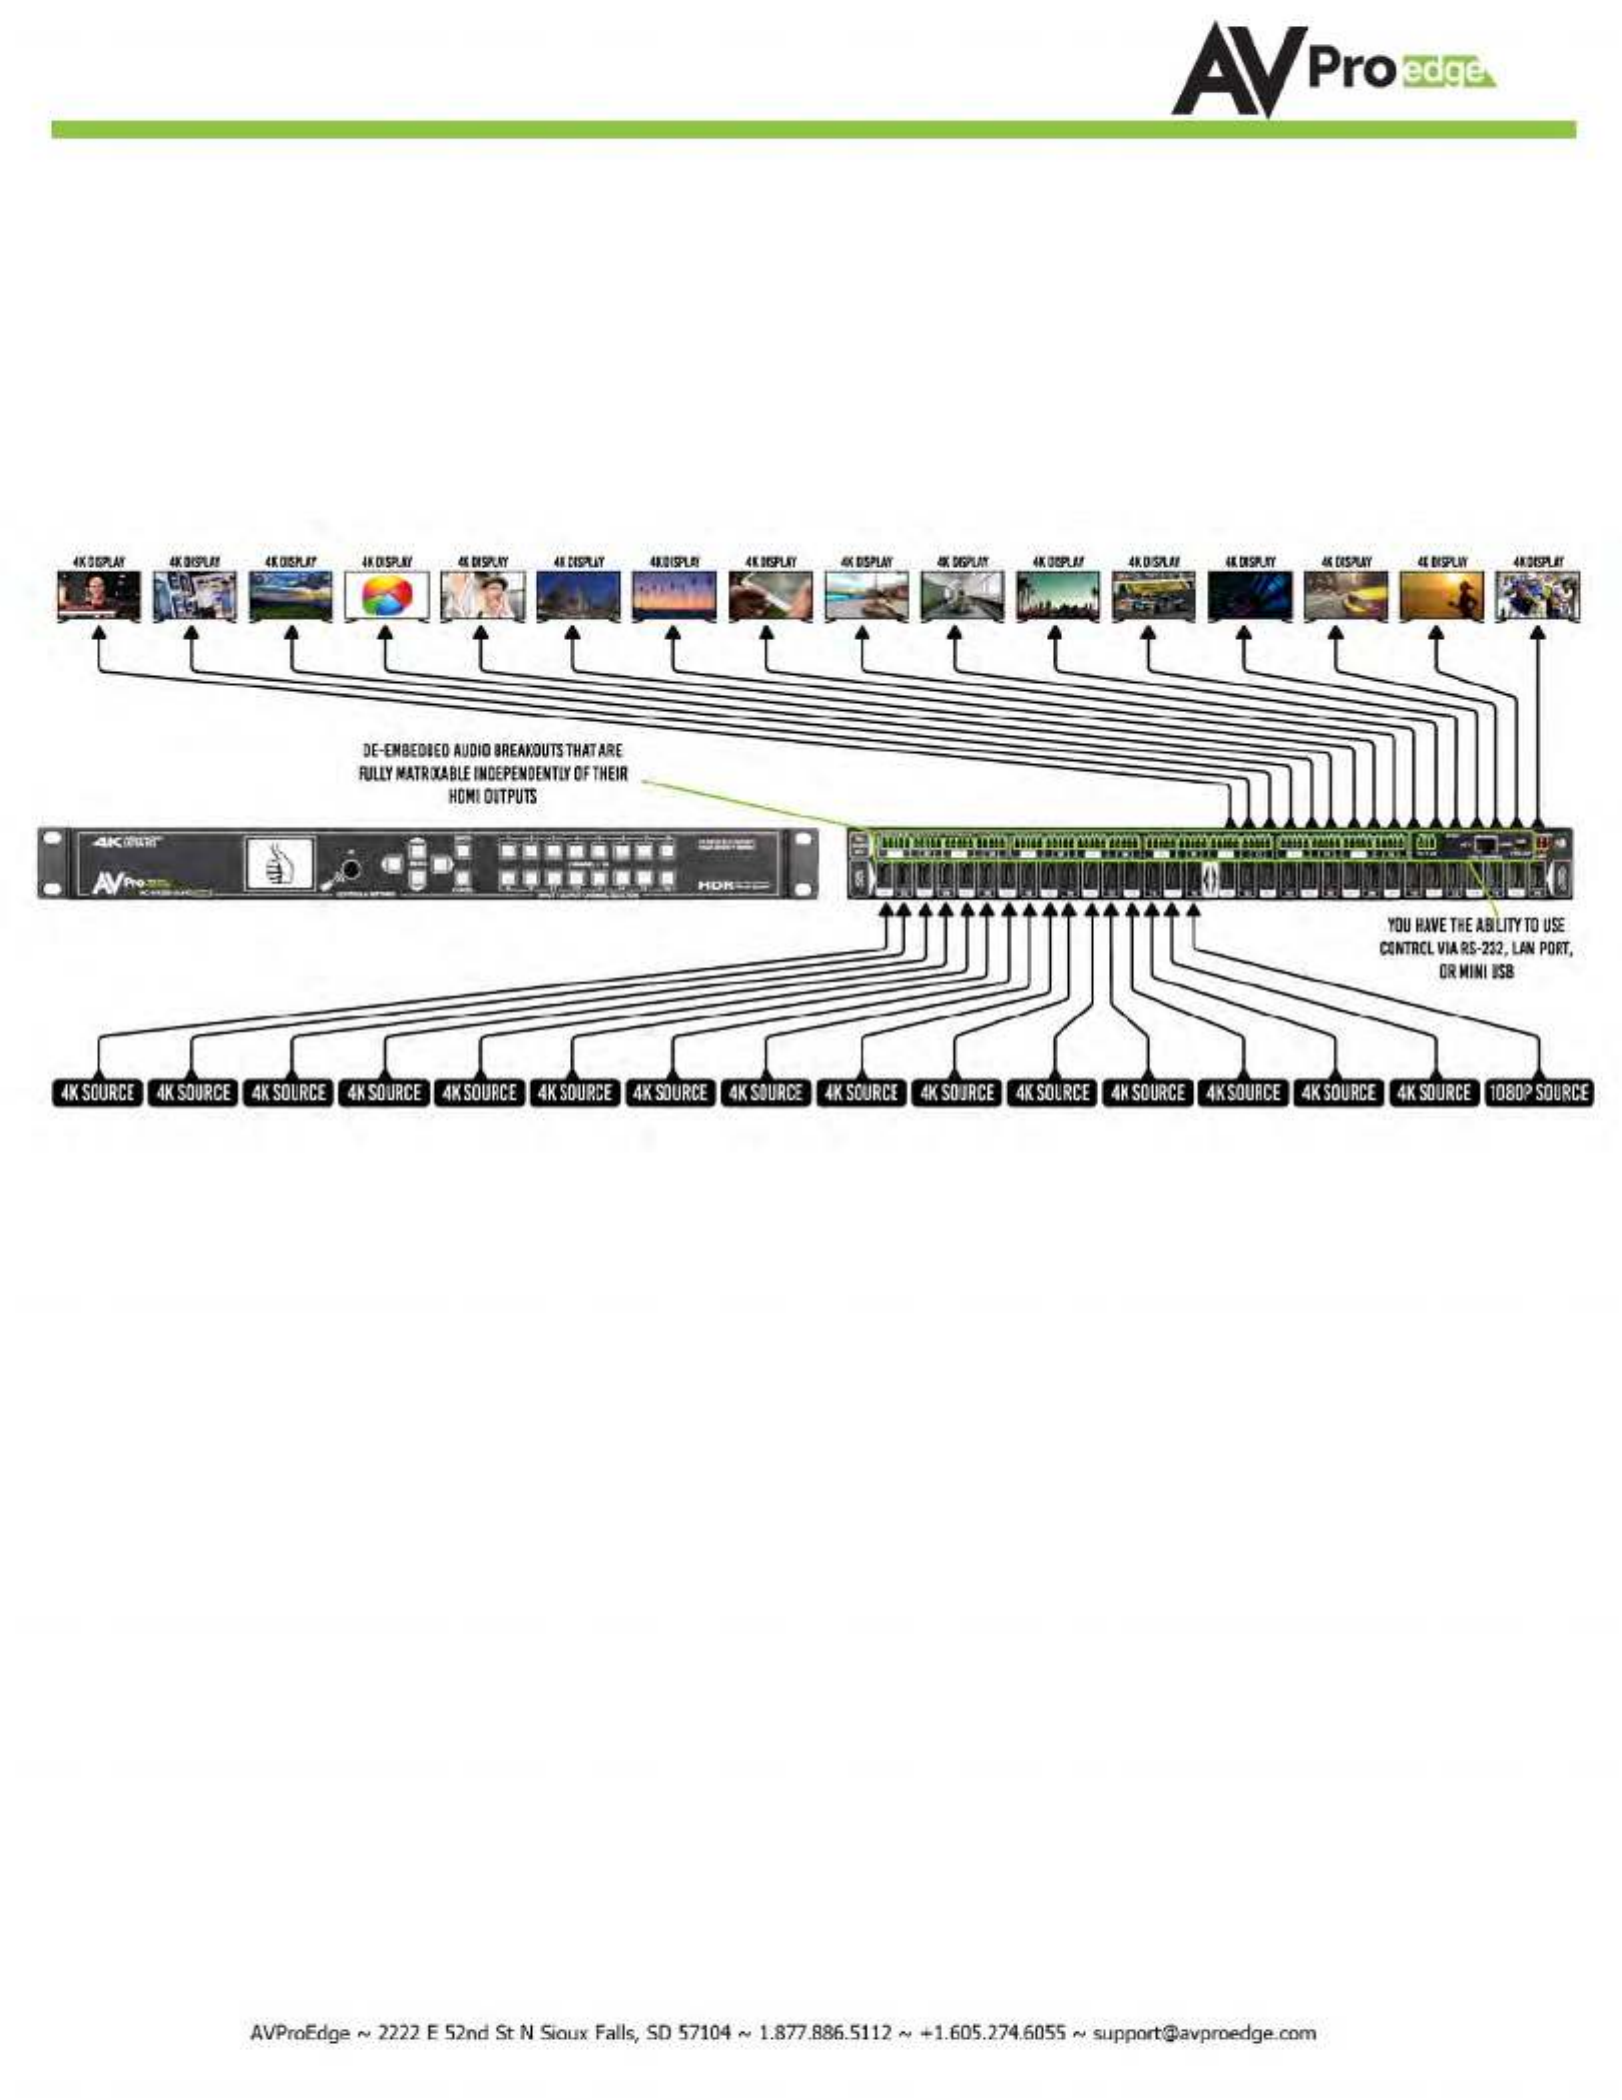
Common Usage Diagram
Common Usage Diagram
Common Usage Diagram
Common Usage DiagramCommon Usage Diagram
AC-MX1616-AUHD-GEN2
Page 28

•Use the power ies ternate suppl provi alded. If an supply is required, check voltage,
polari and i has suffici to suppl the devi i i connected to.ty that t ent power y ce t s
•Do not operate products outsi the specifi temperature humidithese de ed and ty
range gi the specifications.ven in above
•Ensure there is on adequate ventilati to allow thi product to operate efficiently. s
•Repai of equi shoul onl be carri qualified professional asr the pment d y ed out by s
these contai sensiti that be byproducts n ve components may damaged any
mistreatment.
•Onl this i dry envi all liquids harmfuly use product n a ronment. Do not ow any or
chemicals into with products.to come contact these
•Cl thi unit a so dry clot N al paint thinner toean s with ft, h. ever use cohol, or benzene
cl thi unit.ean s
Maintenance & Support
Maintenance & Support
Maintenance & Support
Maintenance & SupportMaintenance & Support
To ensure reliable operation of this product as well as protecting the safety of
any person using or handling this device while powered, please observe the
following instructions.
•The AC has DC power suppl or y cord adaptor been damaged
•Objects liqui have i the unitor ds gotten nto
•The unit has been exposed rain to
•The unit does operate or not normally exhibits a marked change in
performance
•The unit been dropped has or the ng housi damaged
Damage Requiring Service
Damage Requiring Service
Damage Requiring Service
Damage Requiring ServiceDamage Requiring Service
The unit should be serviced by qualified service personnel if:
AC-MX1616-AUHD-GEN2
Page 29

Support
Support
Support
SupportSupport
Should you experience any problems while using this product, first, refer to the Troubleshooting
section of this manual before contacting Technical Support. When calling, the following
information should be provided:
•Pro name model numberduct and
•Pro serial numberduct
•Detail of t i and conditions whi the i iss he ssue any under ch ssue
occurring
Warranty
Warranty
Warranty
WarrantyWarranty
If your product does not work properly because of a defect in materials or
workmanship, AVProEdge (referred to as “the warrantor”) will, for the length of the period
indicated as below, (Parts/Labor (10) Years), which starts with the date of original purchase
(“Limited Warranty period”), at its option either (a) repair your product with new or refurbished
parts, or (b) replace it wit new or a refurbished product. The decision to repair or replace will be
made by the warrantor. During the “Labor” Limited Warranty period there will be no charge for
labor. During the “Parts” warranty period, there will be no charge for parts. You must mail-in your
product during the warranty period. This Limited Warranty is extended only to the original
purchaser and only covers product purchased as new. A purchase receipt or other proof of original
purchase date is required for Limited Warranty service.
This warranty extends to products purchased directly from AVPro or an authorized dealer. AVPro is
not liable to honor this warranty if the product has been used in any application other than that for
which it was intended, has been subjected to misuse, accidental damage, modification or improper
installation procedures, unauthorized repairs or is outside of the warranty period. Please direct any
questions or issues you may have to your local dealer before contacting AVPro.
AC-MX1616-AUHD-GEN2
Page 30

AC-MX1616-AUHD-GEN2
Page 31
Product specificaties
| Merk: | AVPro Edge |
| Categorie: | Router |
| Model: | AC-MX1616-AUHD-GEN2 |
Heb je hulp nodig?
Als je hulp nodig hebt met AVPro Edge AC-MX1616-AUHD-GEN2 stel dan hieronder een vraag en andere gebruikers zullen je antwoorden
Handleiding Router AVPro Edge

12 Maart 2024
4 September 2023
4 September 2023
28 Juni 2023
23 Juni 2023
23 Juni 2023
Handleiding Router
- Router Bosch
- Router HP
- Router Samsung
- Router Xiaomi
- Router Huawei
- Router Asus
- Router AEG
- Router DeWalt
- Router Motorola
- Router Medion
- Router Nokia
- Router Siemens
- Router Topcom
- Router UPC
- Router VTech
- Router Acer
- Router Actiontec
- Router Airlive
- Router Alcatel
- Router Alfa
- Router Allied Telesis
- Router Allnet
- Router Anker
- Router Apple
- Router Arcadyan
- Router Arris
- Router AVM
- Router Barco
- Router Beafon
- Router Belkin
- Router BenQ
- Router Billion
- Router BT
- Router Buffalo
- Router D-Link
- Router Davolink
- Router Dell
- Router Devolo
- Router Digi
- Router Digiconnect
- Router Digitus
- Router Draytek
- Router Edimax
- Router Einhell
- Router Eminent
- Router Engenius
- Router Envivo
- Router Ezviz
- Router Festool
- Router Foscam
- Router Gembird
- Router Gigabyte
- Router Google
- Router Gude
- Router Hama
- Router Hercules
- Router Hikoki
- Router Hikvision
- Router Hitachi
- Router Holzmann
- Router ICIDU
- Router Kathrein
- Router Kogan
- Router Konig
- Router KPN
- Router Kyocera
- Router Lancom
- Router Leoxsys
- Router LevelOne
- Router Linksys
- Router Logilink
- Router Makita
- Router Manhattan
- Router Media-tech
- Router Mercku
- Router Metabo
- Router Mikrotik
- Router Milwaukee
- Router MSI
- Router Nec
- Router Nest
- Router Netgear
- Router Netis
- Router Patton
- Router PENTAGRAM
- Router Phicomm
- Router Powerplus
- Router Proximus
- Router QNAP
- Router Razer
- Router Renkforce
- Router Roland
- Router Sagem
- Router Sagemcom
- Router Schneider
- Router Sigma
- Router Silverline
- Router Sitecom
- Router Skil
- Router SMC
- Router Sonos
- Router Strong
- Router Sweex
- Router Synology
- Router T-com
- Router T-Mobile
- Router TCL
- Router Technicolor
- Router Tele 2
- Router Telstra
- Router Teltonika
- Router Tenda
- Router Thomson
- Router Thrustmaster
- Router Toolcraft
- Router TP Link
- Router Trendnet
- Router Trust
- Router Ubee
- Router United Telecom
- Router Verizon
- Router Vivanco
- Router Vodafone
- Router Western Digital
- Router Wisetiger
- Router Zebra
- Router Zolid
- Router Zoom
- Router ZTE
- Router ZyXEL
- Router Jung
- Router On Networks
- Router Clas Ohlson
- Router Black And Decker
- Router Rosewill
- Router Peak
- Router Ubiquiti Networks
- Router Conceptronic
- Router Cotech
- Router Atlona
- Router Hamlet
- Router Porter-Cable
- Router Techly
- Router SIIG
- Router 7inova
- Router AT&T
- Router Evolution
- Router Nilox
- Router Approx
- Router Milan
- Router Cisco
- Router Gefen
- Router 3Com
- Router Amped Wireless
- Router Comtrend
- Router CradlePoint
- Router Dovado
- Router Juniper
- Router Planet
- Router Intellinet
- Router Predator
- Router I-Tec
- Router NetComm
- Router Lindy
- Router IOGEAR
- Router Black Box
- Router IFM
- Router Totolink
- Router AJA
- Router Dahua Technology
- Router Mercusys
- Router Aruba
- Router Kasda
- Router Marshall Electronics
- Router Blackmagic Design
- Router ATen
- Router RGBlink
- Router RAVPower
- Router Hawking Technologies
- Router Kopul
- Router Nexxt
- Router Kraun
- Router LTS
- Router StarTech.com
- Router SPL
- Router Advantech
- Router Moxa
- Router Smart-AVI
- Router Eero
- Router Xantech
- Router Kramer
- Router KanexPro
- Router Intelix
- Router Blustream
- Router ModeCom
- Router Vimar
- Router Ocean Matrix
- Router Sixnet
- Router Cudy
- Router F-Secure
- Router Digicom
- Router Sabrent
- Router AVMATRIX
- Router Readynet
- Router OneAccess
- Router Accelerated
- Router Nexaira
- Router FSR
- Router Alfatron
- Router Key Digital
- Router Cambium Networks
- Router Avenview
- Router BZBGear
- Router WyreStorm
- Router Rocstor
- Router Ruckus Wireless
- Router Mach Power
- Router MuxLab
- Router StarIink
- Router EXSYS
- Router Premiertek
- Router Bea-fon
- Router GL.iNet
- Router A-NeuVideo
- Router Shinybow
- Router Edgewater
- Router Atlantis Land
- Router Lantronix
- Router Lumantek
- Router Keenetic
- Router Starlink
- Router Keewifi
- Router Milesight
- Router PulseAudio
- Router Comprehensive
- Router Digitalinx
- Router Luxul
- Router DVDO
- Router Silentwind
- Router Keezel
- Router VigilLink
- Router Digital Forecast
Nieuwste handleidingen voor Router
30 Maart 2025
30 Maart 2025
29 Maart 2025
29 Maart 2025
29 Maart 2025
25 Februari 2025
20 Februari 2025
20 Februari 2025
20 Februari 2025
20 Februari 2025