TP Link Archer C21 Handleiding
Lees hieronder de 📖 handleiding in het Nederlandse voor TP Link Archer C21 (103 pagina's) in de categorie Router. Deze handleiding was nuttig voor 17 personen en werd door 2 gebruikers gemiddeld met 4.5 sterren beoordeeld
Pagina 1/103

REV1.0.0 1910012716
User Guide
AC750 Dual-Band Wi-Fi Router
Archer C24

Contents
About This Guide . . . . . . . . . . . . . . . . . . . . . . . . . . . . . . . . . . . . . . . . . . . . . . . . . . . . .1
Chapter 1. Get to Know About Your Router . . . . . . . . . . . . . . . . . . . . . . . . . . .3
1. 1. Product Overview. . . . . . . . . . . . . . . . . . . . . . . . . . . . . . . . . . . . . . . . . . . . . . . . . . . . . . . . . . . . 4
1. 2. Appearance . . . . . . . . . . . . . . . . . . . . . . . . . . . . . . . . . . . . . . . . . . . . . . . . . . . . . . . . . . . . . . . . . 4
1. 2. 1. Top Panel . . . . . . . . . . . . . . . . . . . . . . . . . . . . . . . . . . . . . . . . . . . . . . . . . . . . . . . . . . . . . 4
1. 2. 2. The Back Panel. . . . . . . . . . . . . . . . . . . . . . . . . . . . . . . . . . . . . . . . . . . . . . . . . . . . . . . . 5
Chapter 2. Connect to the Internet . . . . . . . . . . . . . . . . . . . . . . . . . . . . . . . . . . . 6
2. 1. Position Your Router . . . . . . . . . . . . . . . . . . . . . . . . . . . . . . . . . . . . . . . . . . . . . . . . . . . . . . . . . 7
2. 2. Connect to the Internet . . . . . . . . . . . . . . . . . . . . . . . . . . . . . . . . . . . . . . . . . . . . . . . . . . . . . . 8
2. 2. 1. Wireless Router Mode . . . . . . . . . . . . . . . . . . . . . . . . . . . . . . . . . . . . . . . . . . . . . . . . . 8
2. 2. 2. Access Point Mode. . . . . . . . . . . . . . . . . . . . . . . . . . . . . . . . . . . . . . . . . . . . . . . . . . . 10
2. 2. 3. Range Extender Mode. . . . . . . . . . . . . . . . . . . . . . . . . . . . . . . . . . . . . . . . . . . . . . . . 12
Chapter 3. Log In to the Router . . . . . . . . . . . . . . . . . . . . . . . . . . . . . . . . . . . . . 14
Chapter 4. Configure the Router in Wireless Router Mode . . . . . . . . . . 16
4. 1. Operation Mode . . . . . . . . . . . . . . . . . . . . . . . . . . . . . . . . . . . . . . . . . . . . . . . . . . . . . . . . . . . . 17
4. 2. Network . . . . . . . . . . . . . . . . . . . . . . . . . . . . . . . . . . . . . . . . . . . . . . . . . . . . . . . . . . . . . . . . . . . . 17
4. 2. 1. Status. . . . . . . . . . . . . . . . . . . . . . . . . . . . . . . . . . . . . . . . . . . . . . . . . . . . . . . . . . . . . . . . 17
4. 2. 2. Internet . . . . . . . . . . . . . . . . . . . . . . . . . . . . . . . . . . . . . . . . . . . . . . . . . . . . . . . . . . . . . . 19
4. 2. 3. MAC Clone . . . . . . . . . . . . . . . . . . . . . . . . . . . . . . . . . . . . . . . . . . . . . . . . . . . . . . . . . . . 25
4. 2. 4.LAN . . . . . . . . . . . . . . . . . . . . . . . . . . . . . . . . . . . . . . . . . . . . . . . . . . . . . . . . . . . . . . . . . . 26
4. 2. 5.IPTV . . . . . . . . . . . . . . . . . . . . . . . . . . . . . . . . . . . . . . . . . . . . . . . . . . . . . . . . . . . . . . . . . 26
4. 2. 6. DHCP Server. . . . . . . . . . . . . . . . . . . . . . . . . . . . . . . . . . . . . . . . . . . . . . . . . . . . . . . . . 27
4. 2. 7. Dynamic DNS . . . . . . . . . . . . . . . . . . . . . . . . . . . . . . . . . . . . . . . . . . . . . . . . . . . . . . . . 29
4. 2. 8. Static Routing . . . . . . . . . . . . . . . . . . . . . . . . . . . . . . . . . . . . . . . . . . . . . . . . . . . . . . . . 30
4. 3. Wireless . . . . . . . . . . . . . . . . . . . . . . . . . . . . . . . . . . . . . . . . . . . . . . . . . . . . . . . . . . . . . . . . . . . . 31
4. 3. 1. Wireless Settings . . . . . . . . . . . . . . . . . . . . . . . . . . . . . . . . . . . . . . . . . . . . . . . . . . . . 31
4. 3. 2. Guest Network . . . . . . . . . . . . . . . . . . . . . . . . . . . . . . . . . . . . . . . . . . . . . . . . . . . . . . . 33
4. 3. 3. Wireless Schedule . . . . . . . . . . . . . . . . . . . . . . . . . . . . . . . . . . . . . . . . . . . . . . . . . . . 34
4. 3. 4.WPS . . . . . . . . . . . . . . . . . . . . . . . . . . . . . . . . . . . . . . . . . . . . . . . . . . . . . . . . . . . . . . . . . 35
4. 3. 5. Additional Wireless Settings. . . . . . . . . . . . . . . . . . . . . . . . . . . . . . . . . . . . . . . . . . 37
4. 4. NAT Forwarding. . . . . . . . . . . . . . . . . . . . . . . . . . . . . . . . . . . . . . . . . . . . . . . . . . . . . . . . . . . . . 38
4. 4. 1. Port Forwarding . . . . . . . . . . . . . . . . . . . . . . . . . . . . . . . . . . . . . . . . . . . . . . . . . . . . . . 38

4. 4. 2. Port Triggering . . . . . . . . . . . . . . . . . . . . . . . . . . . . . . . . . . . . . . . . . . . . . . . . . . . . . . . 40
4. 4. 3.DMZ . . . . . . . . . . . . . . . . . . . . . . . . . . . . . . . . . . . . . . . . . . . . . . . . . . . . . . . . . . . . . . . . 41
4. 4. 4.UPnP . . . . . . . . . . . . . . . . . . . . . . . . . . . . . . . . . . . . . . . . . . . . . . . . . . . . . . . . . . . . . . . . 42
4. 5. Parental Controls . . . . . . . . . . . . . . . . . . . . . . . . . . . . . . . . . . . . . . . . . . . . . . . . . . . . . . . . . . . 43
4. 6. QoS . . . . . . . . . . . . . . . . . . . . . . . . . . . . . . . . . . . . . . . . . . . . . . . . . . . . . . . . . . . . . . . . . . . . . . . . 45
4. 7. Security . . . . . . . . . . . . . . . . . . . . . . . . . . . . . . . . . . . . . . . . . . . . . . . . . . . . . . . . . . . . . . . . . . . . 46
4. 7. 1. Firewall. . . . . . . . . . . . . . . . . . . . . . . . . . . . . . . . . . . . . . . . . . . . . . . . . . . . . . . . . . . . . . . 47
4. 7. 2. Access Control. . . . . . . . . . . . . . . . . . . . . . . . . . . . . . . . . . . . . . . . . . . . . . . . . . . . . . . 47
4. 7. 3. IP & MAC Binding. . . . . . . . . . . . . . . . . . . . . . . . . . . . . . . . . . . . . . . . . . . . . . . . . . . . . 49
4. 8. ALG (Application Layer Gateway) . . . . . . . . . . . . . . . . . . . . . . . . . . . . . . . . . . . . . . . . . . . . 51
4. 9. IPv6 . . . . . . . . . . . . . . . . . . . . . . . . . . . . . . . . . . . . . . . . . . . . . . . . . . . . . . . . . . . . . . . . . . . . . . . . 51
4. 9. 1. IPv6 Status. . . . . . . . . . . . . . . . . . . . . . . . . . . . . . . . . . . . . . . . . . . . . . . . . . . . . . . . . . . 51
4. 10. System . . . . . . . . . . . . . . . . . . . . . . . . . . . . . . . . . . . . . . . . . . . . . . . . . . . . . . . . . . . . . . . . . . . . . 55
4. 10. 1. Firmware Upgrade . . . . . . . . . . . . . . . . . . . . . . . . . . . . . . . . . . . . . . . . . . . . . . . . . . 55
4. 10. 2. Backup & Restore . . . . . . . . . . . . . . . . . . . . . . . . . . . . . . . . . . . . . . . . . . . . . . . . . . . 55
4. 10. 3. Change Password. . . . . . . . . . . . . . . . . . . . . . . . . . . . . . . . . . . . . . . . . . . . . . . . . . . 56
4. 10. 4. Local Management . . . . . . . . . . . . . . . . . . . . . . . . . . . . . . . . . . . . . . . . . . . . . . . . . 57
4. 10. 5. Remote Management . . . . . . . . . . . . . . . . . . . . . . . . . . . . . . . . . . . . . . . . . . . . . . . 58
4. 10. 6. System Log. . . . . . . . . . . . . . . . . . . . . . . . . . . . . . . . . . . . . . . . . . . . . . . . . . . . . . . . . 59
4. 10. 7. Diagnostic . . . . . . . . . . . . . . . . . . . . . . . . . . . . . . . . . . . . . . . . . . . . . . . . . . . . . . . . . . 60
4. 10. 8. Time Settings . . . . . . . . . . . . . . . . . . . . . . . . . . . . . . . . . . . . . . . . . . . . . . . . . . . . . . . 61
4. 10. 9. Reboot . . . . . . . . . . . . . . . . . . . . . . . . . . . . . . . . . . . . . . . . . . . . . . . . . . . . . . . . . . . . . 63
4. 10. 10. LED Control . . . . . . . . . . . . . . . . . . . . . . . . . . . . . . . . . . . . . . . . . . . . . . . . . . . . . . . 63
Chapter 5. Configure the Router in Access Point Mode . . . . . . . . . . . . . 65
5. 1. Operation Mode . . . . . . . . . . . . . . . . . . . . . . . . . . . . . . . . . . . . . . . . . . . . . . . . . . . . . . . . . . . . 66
5. 2. Firmware Upgrade . . . . . . . . . . . . . . . . . . . . . . . . . . . . . . . . . . . . . . . . . . . . . . . . . . . . . . . . . . 66
5. 3. Backup & Restore. . . . . . . . . . . . . . . . . . . . . . . . . . . . . . . . . . . . . . . . . . . . . . . . . . . . . . . . . . . 67
5. 4. Administration . . . . . . . . . . . . . . . . . . . . . . . . . . . . . . . . . . . . . . . . . . . . . . . . . . . . . . . . . . . . . . 68
5. 4. 1. Change Password . . . . . . . . . . . . . . . . . . . . . . . . . . . . . . . . . . . . . . . . . . . . . . . . . . . . 68
5. 4. 2. Local Management. . . . . . . . . . . . . . . . . . . . . . . . . . . . . . . . . . . . . . . . . . . . . . . . . . . 68
5. 5. System Log. . . . . . . . . . . . . . . . . . . . . . . . . . . . . . . . . . . . . . . . . . . . . . . . . . . . . . . . . . . . . . . . . 69
5. 6. Diagnostic. . . . . . . . . . . . . . . . . . . . . . . . . . . . . . . . . . . . . . . . . . . . . . . . . . . . . . . . . . . . . . . . . . 70
5. 7. Time Settings. . . . . . . . . . . . . . . . . . . . . . . . . . . . . . . . . . . . . . . . . . . . . . . . . . . . . . . . . . . . . . . 71
5. 8. Reboot . . . . . . . . . . . . . . . . . . . . . . . . . . . . . . . . . . . . . . . . . . . . . . . . . . . . . . . . . . . . . . . . . . . . . 73
5. 9. LED Control . . . . . . . . . . . . . . . . . . . . . . . . . . . . . . . . . . . . . . . . . . . . . . . . . . . . . . . . . . . . . . . . 73
Chapter 6. Configure the Router in Range Extender Mode . . . . . . . . . . 75
6. 1. Operation Mode . . . . . . . . . . . . . . . . . . . . . . . . . . . . . . . . . . . . . . . . . . . . . . . . . . . . . . . . . . . . 76
6. 2. Firmware Upgrade . . . . . . . . . . . . . . . . . . . . . . . . . . . . . . . . . . . . . . . . . . . . . . . . . . . . . . . . . . 76

6. 3. Backup & Restore. . . . . . . . . . . . . . . . . . . . . . . . . . . . . . . . . . . . . . . . . . . . . . . . . . . . . . . . . . . 77
6. 4. Administration . . . . . . . . . . . . . . . . . . . . . . . . . . . . . . . . . . . . . . . . . . . . . . . . . . . . . . . . . . . . . . 78
6. 4. 1. Change Password . . . . . . . . . . . . . . . . . . . . . . . . . . . . . . . . . . . . . . . . . . . . . . . . . . . . 78
6. 4. 2. Local Management. . . . . . . . . . . . . . . . . . . . . . . . . . . . . . . . . . . . . . . . . . . . . . . . . . . 78
6. 5. System Log. . . . . . . . . . . . . . . . . . . . . . . . . . . . . . . . . . . . . . . . . . . . . . . . . . . . . . . . . . . . . . . . . 79
6. 6. Time Settings. . . . . . . . . . . . . . . . . . . . . . . . . . . . . . . . . . . . . . . . . . . . . . . . . . . . . . . . . . . . . . . 80
6. 7. Reboot . . . . . . . . . . . . . . . . . . . . . . . . . . . . . . . . . . . . . . . . . . . . . . . . . . . . . . . . . . . . . . . . . . . . . 81
6. 8. LED Control . . . . . . . . . . . . . . . . . . . . . . . . . . . . . . . . . . . . . . . . . . . . . . . . . . . . . . . . . . . . . . . . 82
FAQ. . . . . . . . . . . . . . . . . . . . . . . . . . . . . . . . . . . . . . . . . . . . . . . . . . . . . . . . . . . . . . . . . 84

1
About This Guide
This guide is a complement of Quick Installation Guide. The Quick Installation Guide
instructs you on quick internet setup, and this guide provides details of each function
and shows you the way to configure these functions appropriate to your needs.
When using this guide, please note that features available of the router may vary by
model and software version. Router‘s availability may also vary by region or ISP. All
images, steps, and descriptions in this guide are only examples and may not reflect
your actual experience.
Conventions
In this guide the following conventions are used:
Convention Description
Underlined Underlined words or phrases are hyperlinks. You can click to redirect to a
website or a specific section.
Teal Contents to be emphasized and texts on the web page are in teal, including the
menus, items, buttons, etc.
>
The menu structures to show the path to load the corresponding page.
For example, Advanced > Wireless > MAC Filtering means the MAC Filtering
function page is under the Wireless menu that is located in the Advanced tab.
Note: Ignoring this type of note might result in a malfunction or damage to the device.
Tips: Indicates important information that helps you make better use of your device.
Symbols on the web
page
• Click to edit the corresponding entry.
• Click to delete the corresponding entry.
• Click to enable or disable the corresponding entry.
• Click to view more information about items on the page.
*Maximum wireless signal rates are the physical rates derived from IEEE Standard 802.11
specifications. Actual wireless data throughput and wireless coverage are not guaranteed and
will vary as a result of network conditions, client limitations, and environmental factors, including
building materials, obstacles, volume and density of traffic, and client location.

2
More Info
• The latest software, management app and utility can be found at Download Center at
https://www.tp-link.com/support.
• The Quick Installation Guide can be found where you find this guide or inside the
package of the router.
• Specifications can be found on the product page at https://www.tp-link.com.
• A TP-Link Community is provided for you to discuss our products at
https://community.tp-link.com.
• Our Technical Support contact information can be found at the Contact Technical
Support https://www.tp-link.com/support page at .

Chapter 1
Get to Know About Your
Router
This chapter introduces what the router can do and shows its appearance.
It chapter contains the following sections:
• Product Overview
• Appearance

4
Chapter 1 Get to Know About Your Router
1. 1. Product Overview
The TP-Link router is designed to fully meet the need of Small Office/Home Office
(SOHO) networks and users demanding higher networking performance. The powerful
antennas ensure continuous Wi-Fi signal to all your devices while boosting widespread
coverage throughout your home, and the built-in Ethernet ports supply high-speed
connection to your wired devices.
Moreover, it is simple and convenient to set up and use the TP-Link router due to its
intuitive web interface and the powerful Tether app.
1. 2. Appearance
1. 2. 1. Top Panel
The router’s LEDs (view from left to right) are located on the front. You can check the
router’s working status by following the LED Explanation table.
LED Explanation:
LED Status Indication
(Power)
On Power is on.
Blinking
Blinking slowly: The system is starting up or firmware upgrade is in
progress.
Blinking quickly: WPS connection is in progress.
Off Power is off.
(2.4GHz
Wireless)
On The 2.4GHz wireless band is enabled.
Off The 2.4GHz wireless band is disabled.

5
Chapter 1 Get to Know About Your Router
LED Status Indication
(5GHz
Wireless)
On The 5GHz wireless band is enabled.
Off The 5GHz wireless band is disabled.
(LAN)
On At least one powered-on device is connected to the router’s LAN
port.
Off No powered-on device is connected to the router’s LAN port.
(Internet)
Green On
Router Mode: Internet is available.
Access Point Mode: The WAN port is connected.
Range Extender Mode: The router is connected to the host network.
Orange On The WAN port is connected, but internet is not available.
Off
Router Mode: The WAN port is not connected.
Access Point Mode: The WAN port is not connected.
Range Extender Mode: The router is not connected to the host
network.
1. 2. 2. The Back Panel
The following parts (view from left to right) are located on the back panel.
Button and Port Explanation
Item Description
Power Port For connecting the router to a power socket via the provided power adapter.
WAN Port For connecting to a DSL/Cable modem, or an Ethernet jack.
LAN Ports (1/2/3/4) For connecting your PC or other wired devices to the router.
WPS/RESET Button
Press the button for 1 second, and immediately press the WPS button on
your client to start the WPS process.
Press and hold the button until all LEDs turn off to reset the router to its
factory default settings.
Antennas Used for wireless operation and data transmit. Upright them for the best
Wi-Fi performance.

Chapter 2
Connect to the Internet
This chapter contains the following sections:
• Position Your Router
• Connect to the Internet
7
Chapter 2 Connect to the Internet
2. 1. Position Your Router
With the router, you can access your network from anywhere within the wireless network
coverage. However, the wireless signal strength and coverage vary depending on the
actual environment of your router. Many obstacles may limit the range of the wireless
signal, for example, concrete structures or thick walls.
For your security and best Wi-Fi performance, please:
• Do NOT locate the router in a place where it will be exposed to moisture or excessive
heat.
• Keep away from the strong electromagnetic radiation and the device of
electromagnetic sensitive.
• Place the router in a location where it can be connected to the various devices as
well as to a power source.
• Make sure the cables and power cord are safely placed out of the way to avoid a
tripping hazard.
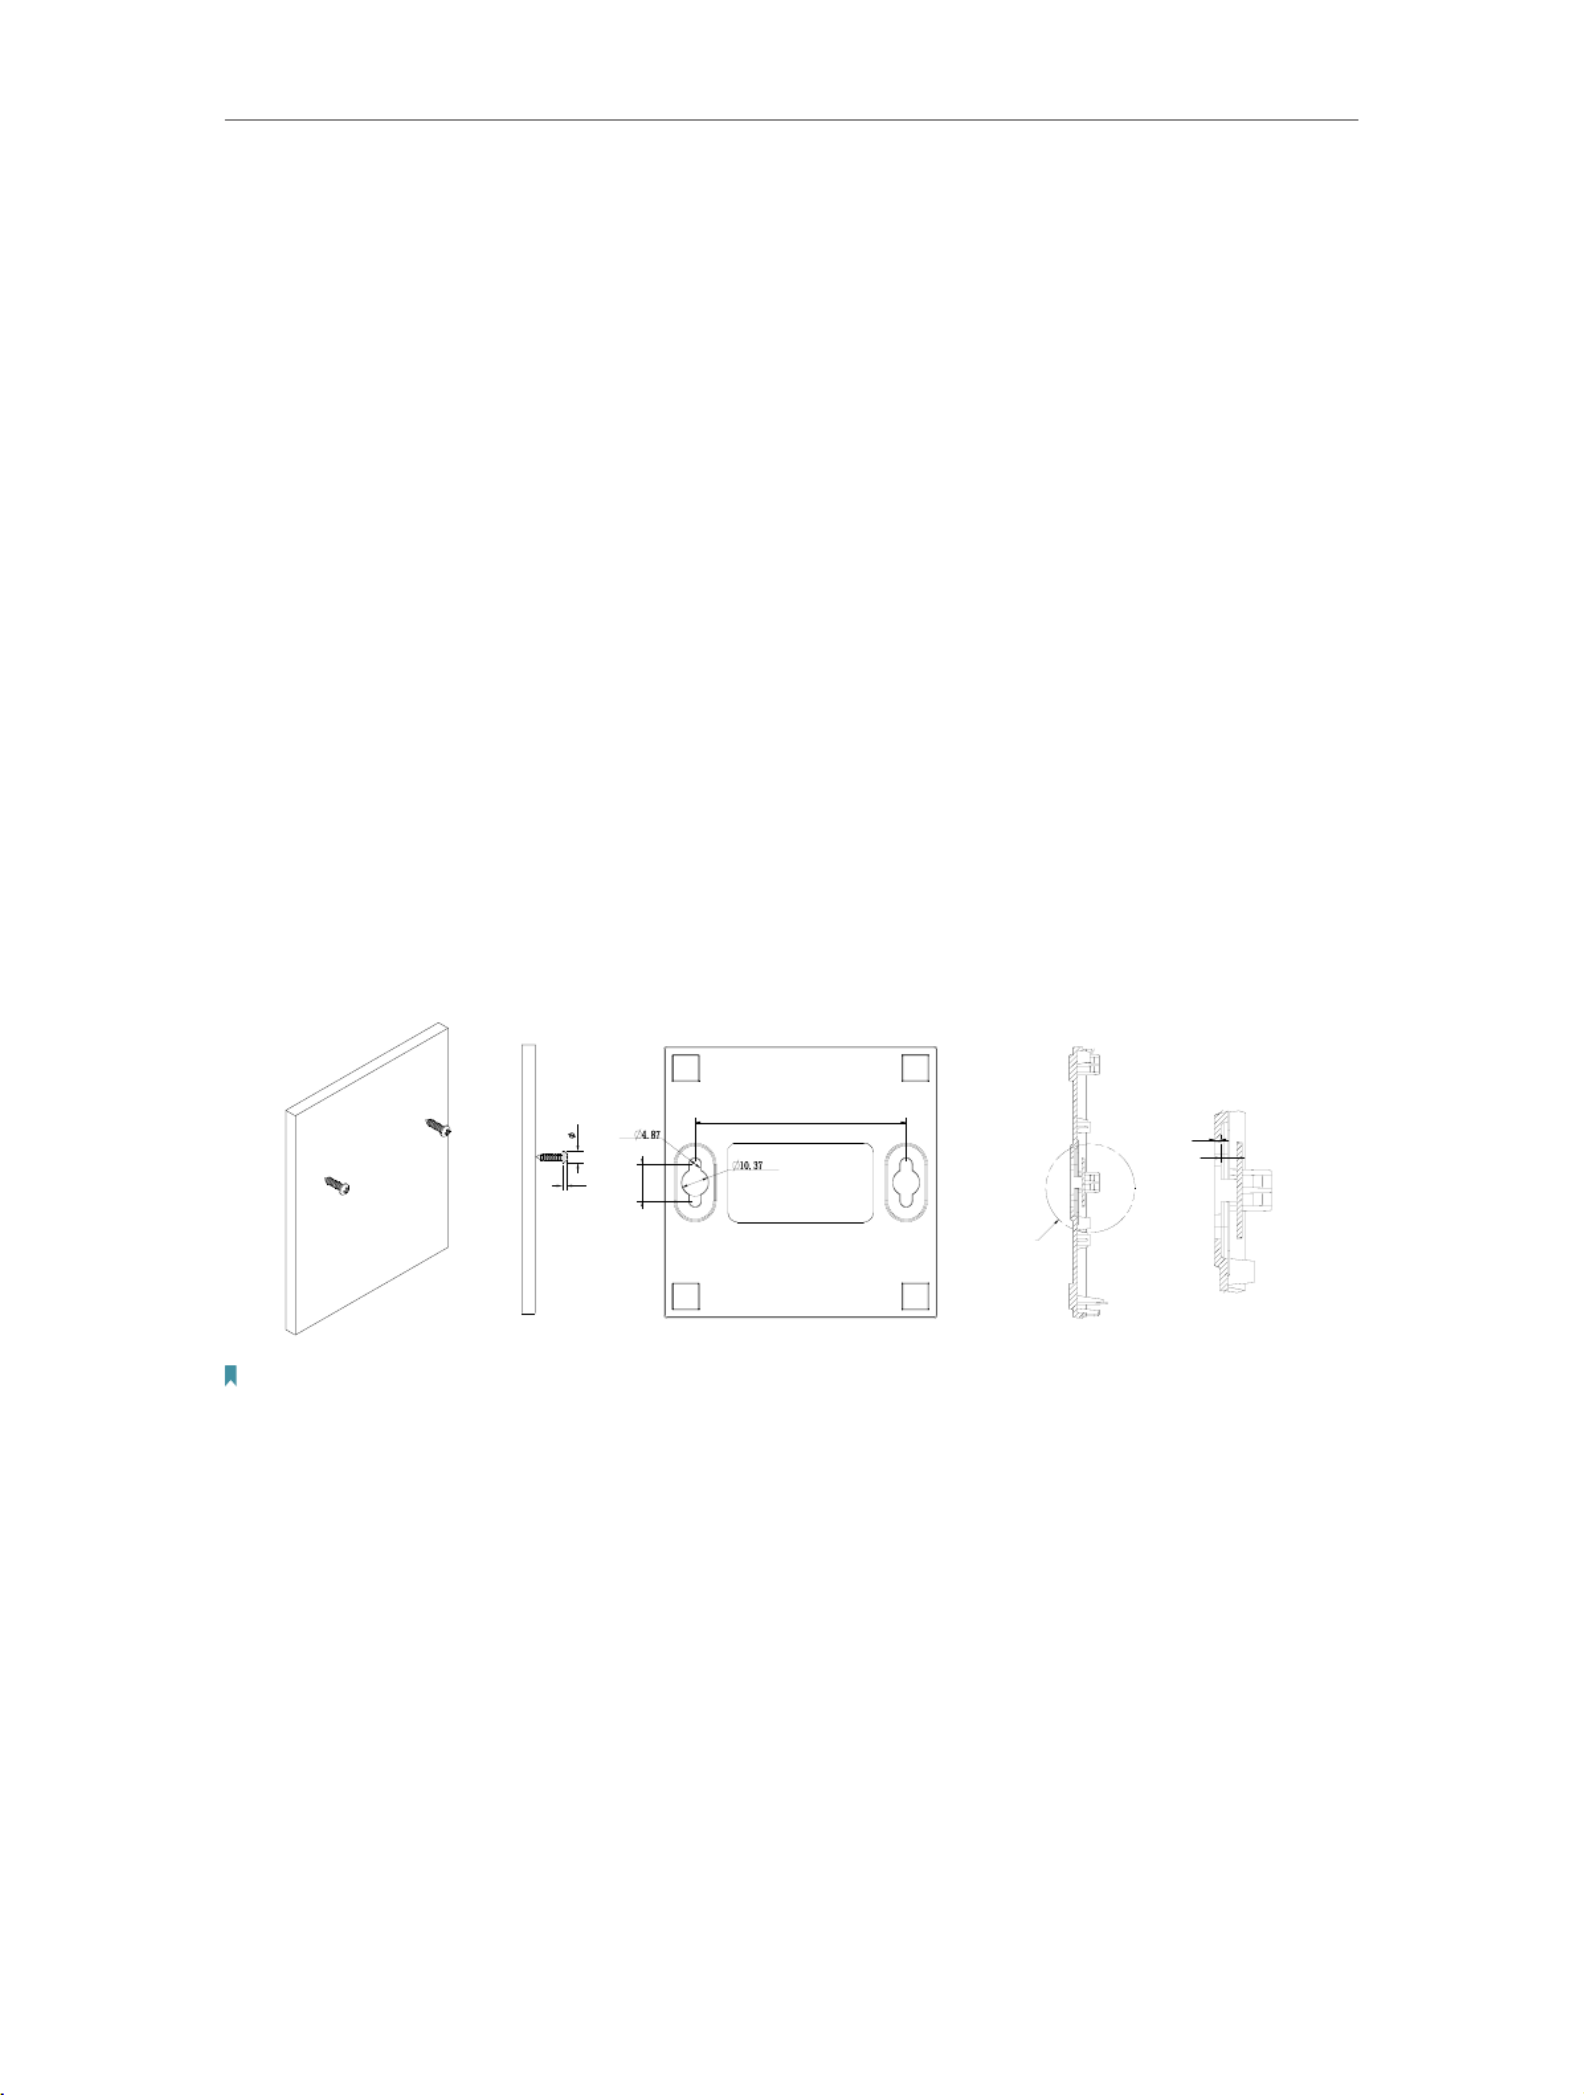
Generally, the router is placed on a horizontal surface, such as on a shelf or desktop.
The device also can be mounted on the wall as shown in the following figure.
80
14
1. 2
3
A
A(2/1)
D
NOTE:
4.87 10.37<D< mm
H
H<3mm
Note:
The diameter of the screw, 4.87mm<D<10.37mm, and the distance of two screws is 80mm. The screw that project from
the wall need around 4mm based, and the length of the screw need to be at least 20mm to withstand the weight of the
product.
Product specificaties
| Merk: | TP Link |
| Categorie: | Router |
| Model: | Archer C21 |
Heb je hulp nodig?
Als je hulp nodig hebt met TP Link Archer C21 stel dan hieronder een vraag en andere gebruikers zullen je antwoorden
Handleiding Router TP Link

13 November 2024
26 September 2024
11 September 2024
31 Juli 2024
7 Mei 2024
4 Mei 2024
26 Maart 2024
26 Maart 2024
5 Maart 2024
4 Maart 2024
Handleiding Router
- Router Bosch
- Router HP
- Router Samsung
- Router Xiaomi
- Router Huawei
- Router Asus
- Router AEG
- Router DeWalt
- Router Motorola
- Router Medion
- Router Nokia
- Router Siemens
- Router Topcom
- Router UPC
- Router VTech
- Router Acer
- Router Actiontec
- Router Airlive
- Router Alcatel
- Router Alfa
- Router Allied Telesis
- Router Allnet
- Router Anker
- Router Apple
- Router Arcadyan
- Router Arris
- Router AVM
- Router Barco
- Router Beafon
- Router Belkin
- Router BenQ
- Router Billion
- Router BT
- Router Buffalo
- Router D-Link
- Router Davolink
- Router Dell
- Router Devolo
- Router Digi
- Router Digiconnect
- Router Digitus
- Router Draytek
- Router Edimax
- Router Einhell
- Router Eminent
- Router Engenius
- Router Envivo
- Router Ezviz
- Router Festool
- Router Foscam
- Router Gembird
- Router Gigabyte
- Router Google
- Router Gude
- Router Hama
- Router Hercules
- Router Hikoki
- Router Hikvision
- Router Hitachi
- Router Holzmann
- Router ICIDU
- Router Kathrein
- Router Kogan
- Router Konig
- Router KPN
- Router Kyocera
- Router Lancom
- Router Leoxsys
- Router LevelOne
- Router Linksys
- Router Logilink
- Router Makita
- Router Manhattan
- Router Media-tech
- Router Mercku
- Router Metabo
- Router Mikrotik
- Router Milwaukee
- Router MSI
- Router Nec
- Router Nest
- Router Netgear
- Router Netis
- Router Patton
- Router PENTAGRAM
- Router Phicomm
- Router Powerplus
- Router Proximus
- Router QNAP
- Router Razer
- Router Renkforce
- Router Roland
- Router Sagem
- Router Sagemcom
- Router Schneider
- Router Sigma
- Router Silverline
- Router Sitecom
- Router Skil
- Router SMC
- Router Sonos
- Router Strong
- Router Sweex
- Router Synology
- Router T-com
- Router T-Mobile
- Router TCL
- Router Technicolor
- Router Tele 2
- Router Telstra
- Router Teltonika
- Router Tenda
- Router Thomson
- Router Thrustmaster
- Router Toolcraft
- Router Trendnet
- Router Trust
- Router Ubee
- Router United Telecom
- Router Verizon
- Router Vivanco
- Router Vodafone
- Router Western Digital
- Router Wisetiger
- Router Zebra
- Router Zolid
- Router Zoom
- Router ZTE
- Router ZyXEL
- Router Jung
- Router On Networks
- Router Clas Ohlson
- Router Black And Decker
- Router Rosewill
- Router Peak
- Router Ubiquiti Networks
- Router Conceptronic
- Router Cotech
- Router Atlona
- Router Hamlet
- Router Porter-Cable
- Router Techly
- Router SIIG
- Router 7inova
- Router AT&T
- Router Evolution
- Router Nilox
- Router Approx
- Router Milan
- Router Cisco
- Router Gefen
- Router 3Com
- Router Amped Wireless
- Router Comtrend
- Router CradlePoint
- Router Dovado
- Router Juniper
- Router Planet
- Router Intellinet
- Router Predator
- Router I-Tec
- Router NetComm
- Router Lindy
- Router IOGEAR
- Router Black Box
- Router IFM
- Router Totolink
- Router AJA
- Router Dahua Technology
- Router Mercusys
- Router Aruba
- Router Kasda
- Router Marshall Electronics
- Router Blackmagic Design
- Router ATen
- Router RGBlink
- Router RAVPower
- Router Hawking Technologies
- Router Kopul
- Router Nexxt
- Router Kraun
- Router LTS
- Router StarTech.com
- Router SPL
- Router Advantech
- Router Moxa
- Router Smart-AVI
- Router Eero
- Router Xantech
- Router Kramer
- Router KanexPro
- Router Intelix
- Router Blustream
- Router ModeCom
- Router Vimar
- Router Ocean Matrix
- Router Sixnet
- Router AVPro Edge
- Router Cudy
- Router F-Secure
- Router Digicom
- Router Sabrent
- Router AVMATRIX
- Router Readynet
- Router OneAccess
- Router Accelerated
- Router Nexaira
- Router FSR
- Router Alfatron
- Router Key Digital
- Router Cambium Networks
- Router Avenview
- Router BZBGear
- Router WyreStorm
- Router Rocstor
- Router Ruckus Wireless
- Router Mach Power
- Router MuxLab
- Router StarIink
- Router EXSYS
- Router Premiertek
- Router Bea-fon
- Router GL.iNet
- Router A-NeuVideo
- Router Shinybow
- Router Edgewater
- Router Atlantis Land
- Router Lantronix
- Router Lumantek
- Router Keenetic
- Router Starlink
- Router Keewifi
- Router Milesight
- Router PulseAudio
- Router Comprehensive
- Router Digitalinx
- Router Luxul
- Router DVDO
- Router Silentwind
- Router Keezel
- Router VigilLink
- Router Digital Forecast
Nieuwste handleidingen voor Router
8 April 2025
8 April 2025

8 April 2025
30 Maart 2025
30 Maart 2025
29 Maart 2025
29 Maart 2025
29 Maart 2025
25 Februari 2025
20 Februari 2025