Sunstech 22SUN19D Handleiding
Lees hieronder de 📖 handleiding in het Nederlandse voor Sunstech 22SUN19D (74 pagina's) in de categorie Televisie. Deze handleiding was nuttig voor 22 personen en werd door 2 gebruikers gemiddeld met 4.5 sterren beoordeeld
Pagina 1/74


Table Of Contents
1
This user manual for reference only
Safety Information.................................................................................................................2
Preparations Guide
Important Safety Precautions.................................................................................................3
Installed And Connected TV
TV Bracket assemble.............................................................................................................4
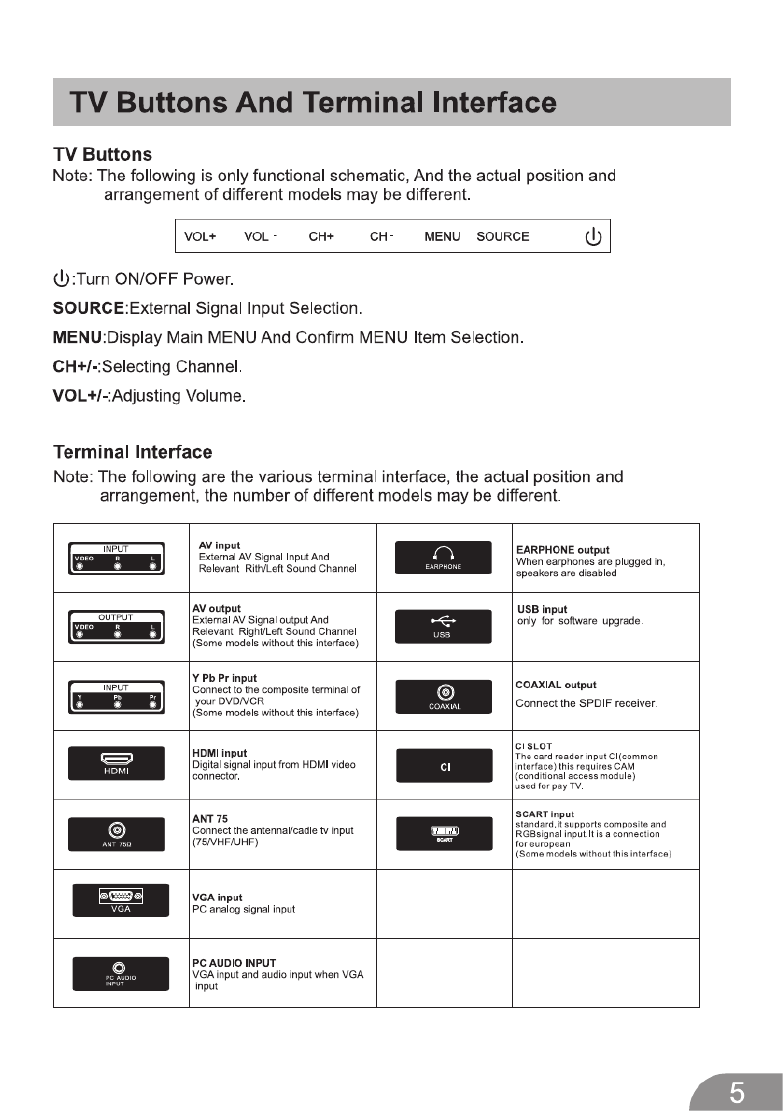
TV Buttons And Terminal Interface........................................................................................ 5
External device connection diagram........................ ........................................... 6
Install And Connect TV...........................................................................................................7
TV Stand installation Instructions.......................................................................7
Remote Control
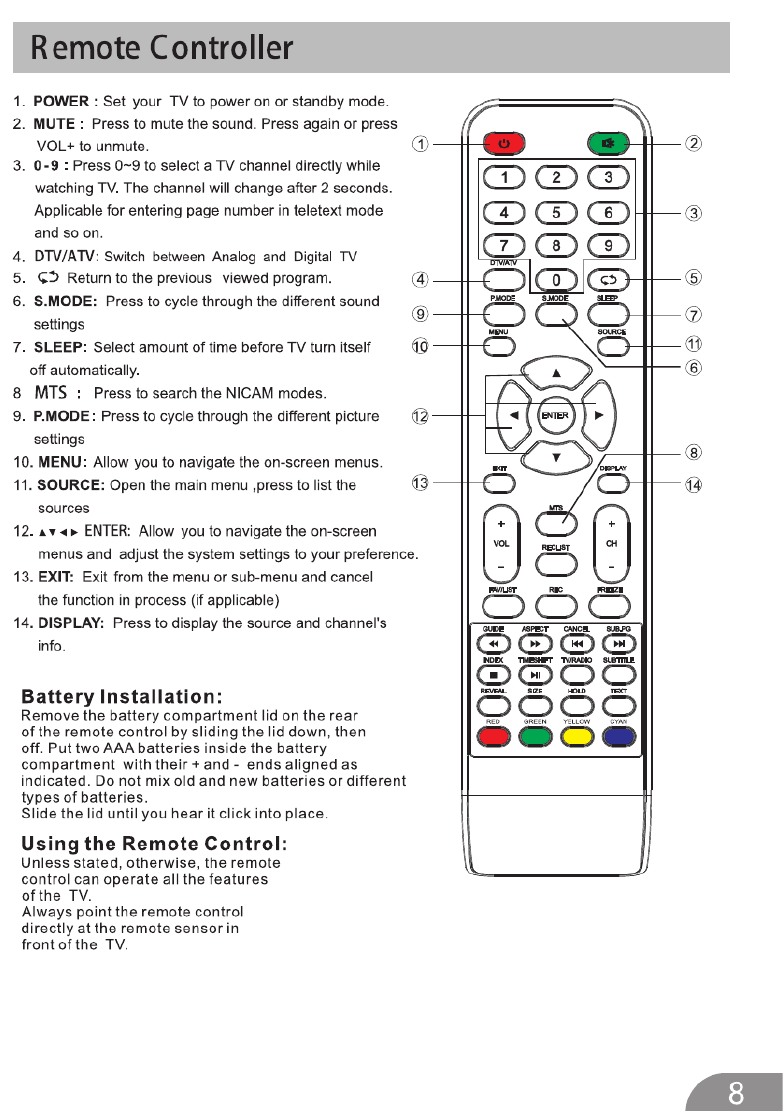
Remote Control....................................................................................................................8
Setup Menu.... ..................... ...................... ..................... ...................... ..........
Picture ...........................................................................................................................10Menu
DTV MENU
Sound Menu...........................................................................................................................11
Channel Menu....................................................................................................................... 15
Look System Menu...............................................................................................................21
EPG Menu ... ... ... ... .. .. .. .. .................................................................................................. 27
23
....
Time shift..............................................................................................................................29
Other Information
Help......................................................................................................................................35
Specifications.......................................................................................................................36
PC Setting ...................................................................................................................30Menu
Music.....................................................................................................................................32
Movie.................................................................................................................................... 33
Text.......................................................................................................................................35
USB OPERATION
PC

Safety Information
2
High voltages are used in the operation of
this product.to reduce the risk of electric
shock,do not remove cover of the cabinet,
refer servicing to qualified service personal
If the TV any changes or coarse adjustment, electric shocks
to be hurt, do not attempt to open a machine-maintenance,
customer contact centres needed overhaul.
The exclamation point within an equilateral
triangle is intended to alert the user to the
presence of important operting in the
literature accompanying the appliance.
Warning
The lightning flash with arrowhead symbol
within an equilateral triangle,is inten ded to
alert the user to the presence of uninsulated
dangerous voltage within the products
enclosure that may be of sufficient magnitude
to constitute a risk of electric shock to persons.

3
TV Bracket assemble
SOURCEMENUCH+ -CH-VOLVOL+
Fix the TV on the wall
1.First,put the TV on the table smoothly and put some soft cloth on the table to avoid
scratching the screen.
2.User the screw driver to take off the screws which are fixed on the bottom stand
(the direction of the arrow, refer to the ptoto1).And take off the bottom stand(please
take off the screws and bottom stand carefully).
3.Make one bracket which can fix on the wall according to the size of arrow direction
of photo2 and photo3.
4.Drill four holes properly on the wall (the size only for reference) and put into four
screws.(optional parts) Drill four holes properly on the wall (the size only for reference)
and put into four screws.(optional parts)
5.according to the step 4,use the screwdriver to lock the screw on the back of the TV.
then hang the TV on the wall.
1 2
3 4
Note:
1.The bracket fixed on the wall is optional part.
2.when you assemble the TV, there should be no other articles on the around and front
and please keep the distance from other articles.
3.When assemble the TV, please ask the career man to fix in order to avoid the danger.
4.The fixing picture is only for reference.
5.Please follow the use manual about bracket assemble to fix the TV.
6.Attach the mounting bracket from the VESA compatible wall mounting kit.

4
Important Safety Precautions

External device connection diagram
Set-top boxes
HDMI
VIDEO R L
OUTPUT
HDMI input connection
VIDEO R L
INPUT
AV input connection
AV output connection
VIDEO R L
INPUT
Y Pb Pr
INPUT
AV input connection
USB connection
TV connection
6
AV input connection

Install And Connect TV
7
TV ANTFM ANT
TV signal output
Set your TV
To put your TV in a firm place which can
bear the weight of the TV.
To avoid danger, please don’t expose the
TV near water or heating place (such as
light, candle, heating machine),do not block
the ventilation at the back of TV.
Connect antenna and power
1.Connect the antenna cable to the antenna
socket on the back of the TV.
2.To plug the power cord of TV (AC 100-
240V~ 50/60Hz).
1
3
Turn on TV
3.Press the power button of the TV the
indication light will turn to green. if it is
on standby mode (the light is red),press
the power button on the remote control
to turn on the TV.
Note:
Picture for reference purposes only.
2
TV Stand Installation Instructions
damage
Clip base on card slot as the direction of
arrow shown.
1.


10
Picture Menu
Pre ss button to display the main menu.MENU
.ress to ente r
Press / butt on select in the main menu,t hen p◄ ► PIC TURE ENTER / ▼
1. Pre ss / butt on to select th e opti on that you want to adjust in th e menu.▼ ▲ PIC T URE
2. Press / butt on to adjust.En te r/ ◄ ►
3. Aft er fi nishing your adjustm ent, Press butt on to re tu rn back to the pre vious menu. MENU
DTV Menu

Pre ss butt on to display th e main menu.MENU
.ress to enter
Press / butt on select in th e main menu,t hen p◄ ► SOUND ENTER / ▼
1. Press / butt on to select th e opti on th at you want to adjust in the menu.▼ ▲ SOUND
2. Press / butt on to adjust.Ente r/ ◄ ►
3. Aft er finishing your adjustment, Press butt on to re tu rn back to th e pre vious menu. MENU
Sound Menu
11
DTV Menu

12
Pic ture MODE
Pre ss / butt on to select Picture Mode, then press / butt on to select.▼ ▲ ◄ ►
TIPS: You can pre ss butt on to change th e Pictu re Mode directly.PMODE
Brightness/Contrast/ Sharpness/Saturation/Hue
Pres utton to select option, then pres utton to adjust.s ▼ / ▲ b s ◄ / ► b
Brightness Adjust the visual perception output of the entire picture,
it will effect the iuminousness of the picture.
Contrast Adjust the highlight intensity of the picture, but the shadow of the picture is invariable.
Adjust the peaking in the detail of the picture.Sharpness
Adjust the saturation of the color based on your own like.Saturation
Use in compensating color changed with the transmission in the NTSC mode. Hue
Color Temp
Change the overall color cast of the picture.
Color TempPress / button to select , then press utton to select Standard/Cool/Warm.▼ ▲ ◄ / ► b
Standard Produces a vivid image.
Cool Produces a gentle blue-hued image.
Warm Produces a red-hued image.
Aspect Ratio
Press / button to select Aspect Ratio, then press utton to select.▼ ▲ ◄ / ► b
Fu ll/4 3 /Zoom1/Zoom2: To select the available display format.
Advanced Settin gs
Adjust advanced video fe atures to fi ne tu ne the picture .
Advanced Sett ings
NR
Set opti ons to reduce video noise.
NR
Pre ss / butt on to select , th en pre ss / butt on to enter sub-m enu.▼ ▲ Ente r ►
Pre ss / butt on to select , th en pre ss / butt on to select .▼ ▲ ◄ ►
Off Select to tu rn off video noise dete cti on.
Weak Dete ct and re duce low video noise.
Medium Dete ct and reduce moderate video noise.
Stro ng Dete ct and reduce enhanced video noise.
Dynamic Contrast
Press / button to select , then press utton to select .▼ ▲ ◄ / ► b
Automatically adjust picture detail and brightness.
Dynamic Contrast
DTV Menu

Sound Mode
Audio ModePress / button to select , then press utton to select.▼ ▲ ◄ / ► b
TIPS: You can press button on the remote control to change the Sound Mode directly.SMODE
Treble/Bass/Balance
Press / button to select option, then pres utton to adjust.s ◄ / ► b
Treble Adjust the treble effect.Increases or decreases high-pitched sounds.
Bass Adjust the bass effect.Increases or decreases lower-pitched sounds.
Balance Adjust the balance between left and right speakers to adapt to your
listening position.
Surround Sound
Press / button to select Surr▼ ▲ ound Sound, then press utton to select On or Off.◄ / ► b
Press ▼ ▲ / button to select , then press button to enter sub-menu.Enter / ►
▼ ▲
EQ Setting
EQ Setting
Adjust the curve of 7 bands equalizer.
Standard Produces a balanced sound in all environments.
Music Preserves the original sound.Good for musical programs.
Personal Select to customize picture settings.
Movie Enhances treble and bass for a rich sound experience.
AVL
Automatically reduces sudden volume changes,for example,when switching beween
the channels.
Press / button to select AVL, then press utton to select On or Off.▼ ▲ ◄ / ► b
SPDIF
Press / button to select Digital Output, then pres utton to select Off / Auto/PCM .s ◄ / ► b▼ ▲
13
DTV Menu

Audio Descrip tio n
Audio Descripti on
Pre ss / button to select , then pre ss / butt on to enter ▼ ▲ Enter ►
sub-m enu.
Mode
Pre ss / button to select , then pre ss / butt on to select On or Off.▼ ▲ Mode ◄ ►
When the mode is can be adjust by usersOn,Volu me .
Sound Type
Pre ss / butt on to select Sound Type, then pre ss / butt on to select.▼ ▲ ◄ ►
NOTE:
Balance:
AVL:
This item can adjust the speaker’s output, it enables you to listen
to best at your position.
This item uses for reducing the difference between channel and
program’s volume automatically.
it made the overall water to be even. This function will also reduce the
fluctuation of the sound.
14
DTV Menu

Pre ss button to display the main menu.MENU
ress to ente r .
P ress / butt on to select in the main menu,t hen p .◄ ► CHANNEL ENTER / ▼
1. Pre ss / butt on to select the option that you want to select in the menu.▼ ▲ CHANNEL
2. Pre ss button to ente r sub-menu.Ente r
3. Pre ss butt on to re turn back to the pre vious menu. MENU
Tuner Type
Auto Scan
Auto Scan
Pre ss / butt on to select Tuner , then press / butt on to select Ante nna or Cable.▼ ▲ ◄ ►
Pre ss / butt on to select , then press / button to ente r sub-menu.▼ ▲ Ente r ►
Tuner ty pe is Tuner ty pe is Ante nna Cable
Type
Channel Menu
15
DTV Menu

e
e
e
Country
Pre ss / button to select country◄ ►
Mode
Press / button to select Mode:◄ ► DTV+ATV, DTV, ATV.
Scan Type
Press / button to select Scan Type:◄ ► Advanced,Quick,Full .
Netw ork ID
Auto or Pre ss / button to select Netw ork ID :◄ ► nte r digita l numbers .
Frequency
Pre ss / butto◄ ► n to select Fre quency: nte r digita l numbers . Auto or
Symbol Rate
Symbol Rate Auto or Pre ss / button to select ◄ ► : nte r digita l numbers .
Start
.
.
Press button to start the auto searching. / ►Enter
It will search digital channels first,then analog channels.
Before execute auto channel search,please confirm your antenna type is
Antenna or Cable.
Wrong setting of Signal Type maybe cause finding no channel.
16
DTV Menu

Manual Scan
Manual Scan
Searc h fo r the channels manually.
Pre ss / butt on to select , then pre ss / butt on to ente r sub-m enu.▼ ▲ En te r ►
Digital Manual Scan
Press / button to select , then press button to enter sub-menu.▼ ▲ Digital Manual Scan Enter / ►
Network ID
Pres utton to select Network ID:s ◄ / ► b Auto or
Frequency
Pres utton to select Frequency: nter digital numbers. s ◄ / ► b Auto or
Symbol Rate
Pres utton to select Symbol Rate: nter digital numbers.s ◄ / ► b Auto or
Modulation
Pres utton to select Modulas ◄ / ► b tion:Auto,16QAM,32QAM,64QAM,128QAM,256QAM.
Start
Press button to start the channel searching. Enter / ►
e
e
e
nter digital numbers.
Tuner type is Tuner type is Antenna Cable
17
DTV Menu
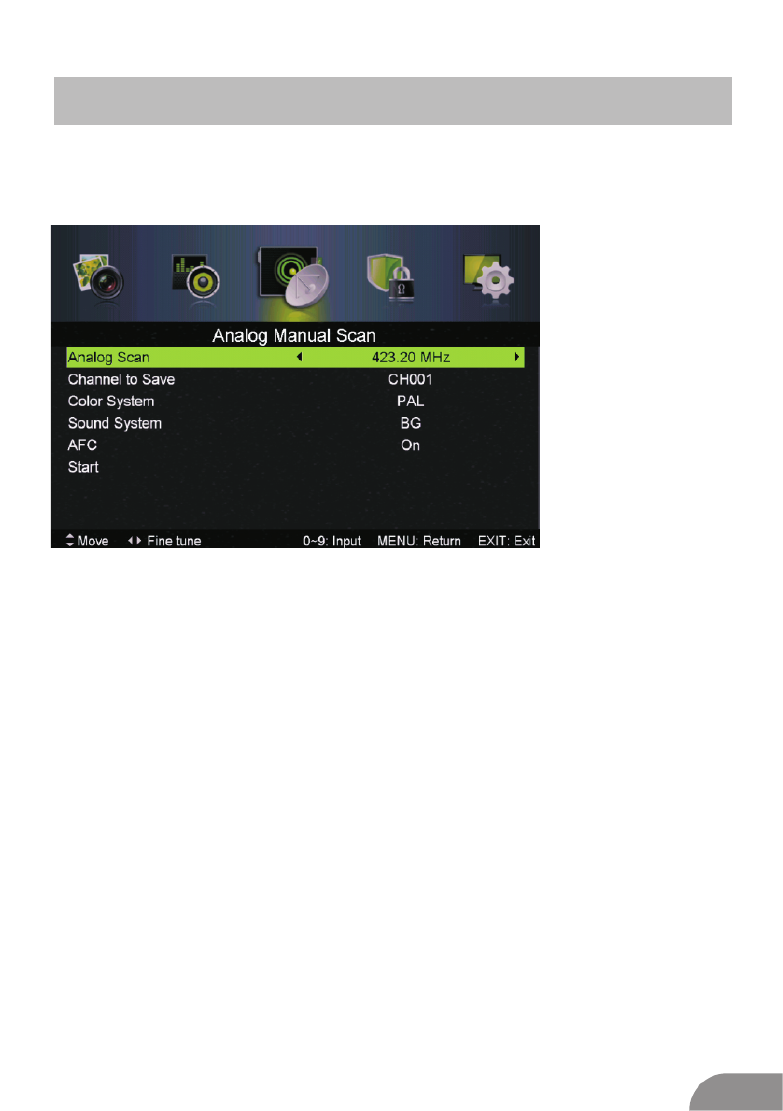
Analog Manual Scan
Press / button to select , then press button▼ ▲ Analog Manual Scan Enter / ►
to enter sub-menu.
Analog Scan
Pres utton to select Analog Scan.s ◄ / ► b
Channel to Save
Pres utton to select Channel to Saves ◄ / ► b .
Color System
Pres utton to select Color System:Auto,PAL or SECAM.s ◄ / ► b
Sound System
Pres utton to select Sound System :Auto,DK,BG,I or L.s ◄ / ► b
AFC
press utton to select On or Off.◄ / ► b
Start
Press button to start the channel searching. Enter / ►
Auto Frequency control.
18
DTV Menu

20
Signal Information
Press / button to select Signal Information, then press the ▼ ▲ Enter
button to see the detail information
about the signal. Only available when there is signal under DTV.
DTV Menu

Lock System Menu
Pre ss button to display the main menu.MENU
.ress to ente r
Press / butt on select in the main menu,t hen p◄ ► LOCK SYSTEM
ENTER / ▼
1. Press / butt on to select th e opti on that you want to adjust in th e menu.▼ ▲ LOCK SYSTEM
2. Pre ss / butt on to adjust.Ente r/◄ ►
3. After fi nishing your adjustment, Pre ss button to re turn back to th e pre vious menu. MENU
Default password is 0000, and if forget what you set, please call the service center.
21
DTV Menu

P ,
Channel Locks,Parental Rating Lock Keypad and are
Channal Locks
Channal Locks
Lock Keypad
Set to prevent it from being used by young children,or other unexpected
usage.
Lock Keypad ,
ress / button to select Enable then press utton to select On ▼ ▲ ◄ / ► b
or Off.
available when
Enable is .On
Press / button to select , then press button ▼ ▲ Enter / ►
to enter sub-menu.
Press / button to select then press utton to ▼ ▲ ◄ / ► b
select On or Off.
Parental Rating
Parental RatingPress / button to select , then press utton to ▼ ▲ ◄ / ► b
select.
Clear Lock
Press ▼ ▲ / button to select Clear Lock.
Enable
New Password
Press / button to select New Password nter a 4-digital number ▼ ▲
you want to set twice.
,then e
22
DTV Menu
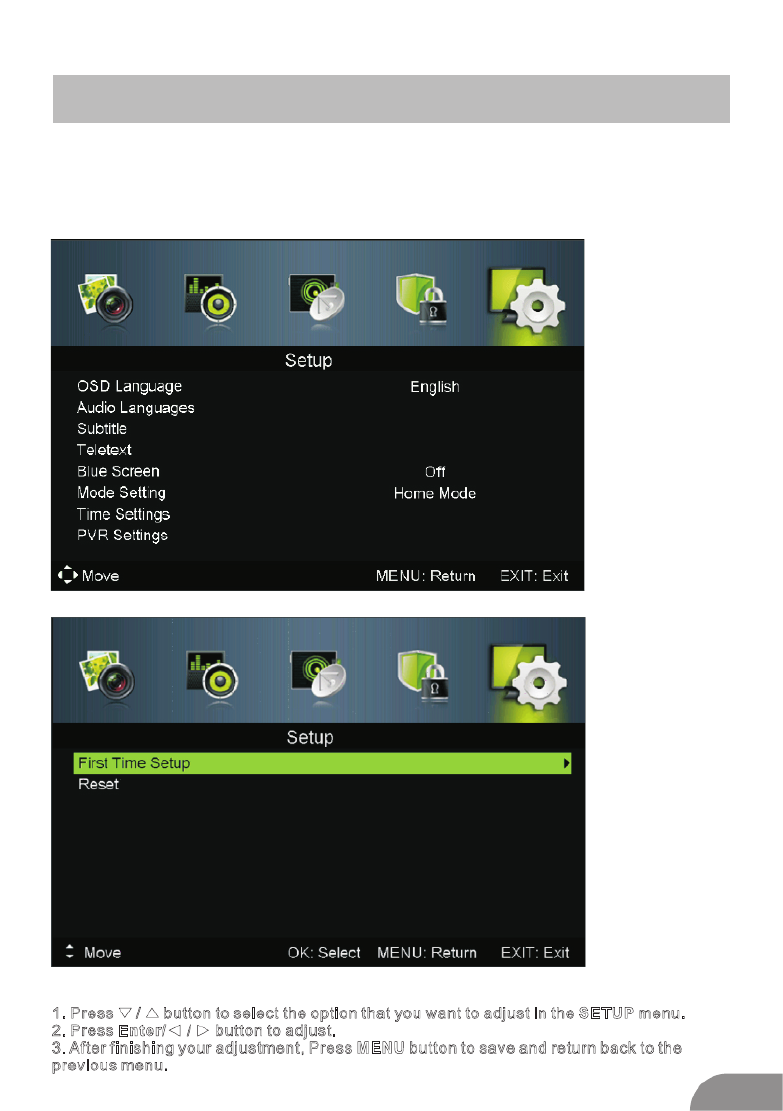
Setup Menu
Pre ss button to display the main menu.MENU
.ress to enter
Press / butt on select in the main menu,t hen p◄ ► SETUP
ENTER / ▼
1. Press / button to select the option that you want to adjust in the menu.▼ ▲ SETUP
2. Press / button to adjust.Enter/◄ ►
3. After finishing your adjustment, Press button to save and return back to the MENU
p revious menu.
23
DTV Menu

Press / butt on to select OSD Language, then press / butt on to select.◄ ►
Audio Languages
Select an audio language can be displayed.D efa ult English is selecte d as audio language.
Press / butt on to select Audio Languages, then press butt on to enter sub-menu.▼ ▲ Enter
Press / / / button to select th e Audio Primary Language and Audio Secondary Language.▼ ▲ ◄ ►
▼ ▲
Subtitl e
Select a subtitl e language can be displayed.Default English is selected as subti tl e language.
Pre ss / butt on to select Subtitle, then press button to enter sub-m enu.▼ ▲ Enter
OSD Language
Select an OSD menu language can be displayed.Defa ult English is selected as menu
language.
Mode
Press / button to select then press utton to select On or Off.▼ ▲ Mode ◄ / ► b,
Press button to select the Subtitle Language Subtitle▼ ▲
Language.
/ / Primary and Secondary ◄ / ►
Hearing Impaired
Press / button to select , then pres utton to select On or Off.s ◄ / ► b▼ ▲ Hearing Impaired
24
DTV Menu

Mode Settin g
.Mode Setting
Pre ss / button to select ▼ ▲
Teletext
Adjust Teletext settings. Only available under DTV ,ATV,AV, SV an d SCART source .
Teletext
Press / button to select , then press button to enter sub-menu.▼ ▲ Enter / ►
Under DTV
Under ATV,AV, SV and SCART source,press
source,press ◄ / ► button to select Digital Teletext Language and Decoding Page Language.
◄ / ► button to select Decoding Page Language.
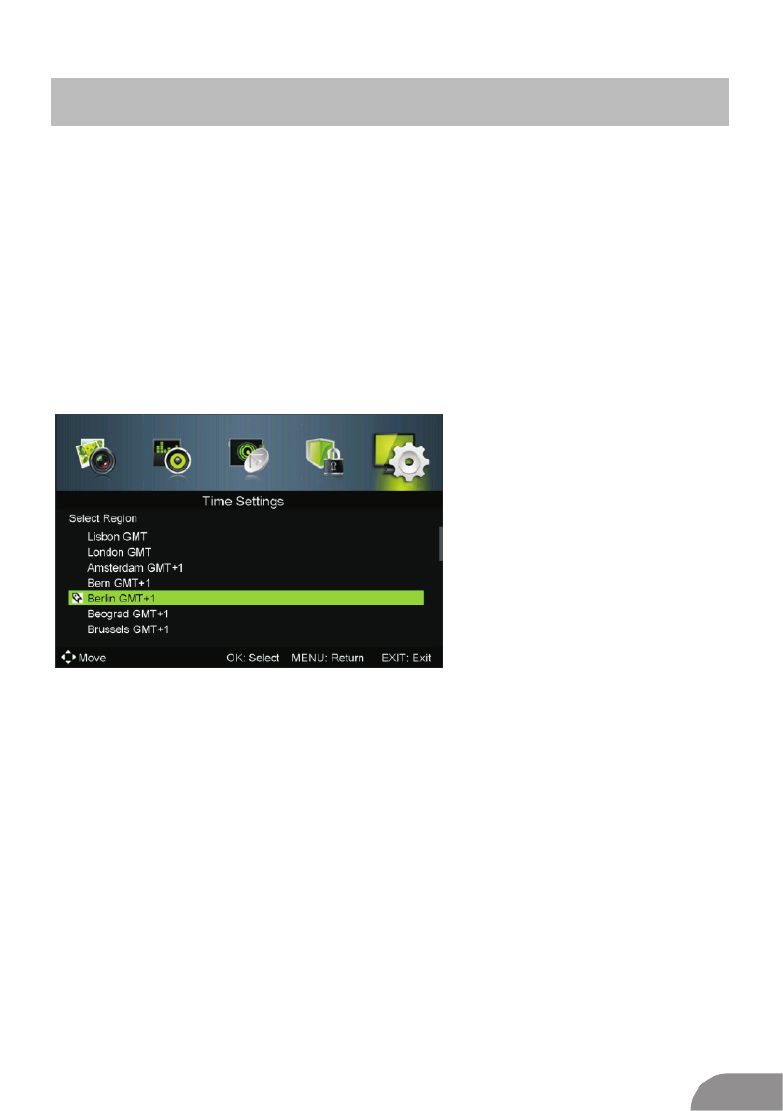
Time Settings
Time Settings Press / button to select , then press button to enter sub-menu.▼ ▲ Enter / ►
25
DTV Menu
Sleep Timer
Set a timer for the TV to turn off automatically.
Sleep Timer
( Sleep Timer:Off ,5mins, 15mins, 30mins, 60mins, 90mins, 120mins, 240mins).
Select your time zone.
Press / button to select , res utton to select.▼ ▲ s ◄ / ► b
Available
Auto Sleep
Press / button to select Auto Sleep , res utton to select Off,3 hours,4hours or 5 hours.▼ ▲ s ◄ / ► b
Press / button to select ▼ ▲ then press button to enter sub-menu.Enter / ►
p
p
Time Zone
Time Zone,
OSD Time
OSD Time
( OSD Time:Off,10seconds,20seconds,30seconds,60seconds).
Press ▼ ▲ / button to select , res utton to select.s ◄ / ► b
Available
p
Time
Press / button to select ▼ ▲ then press button to enter sub-menu.Enter / ►
Set Auto Sync to Off,then you can set the time manually .
Note: In the case of loss of power, the clock setting will be lost.
Time ,
26
DTV Menu

PVR Settings
Press / button to select , then press button to .Enter
It will check the USB .
▼ ▲ PVR Settings enter sub-menu
Press ◄ / ► button to select File Manager,then press button to enterEnter sub-menu.
Press Device List,◄ / ► button to select then press button to enter sub-menu.Enter
27
DTV Menu
First Time Setup
▼ ▲ Enter
to enter.
Press / button to select First time Setup, then press button
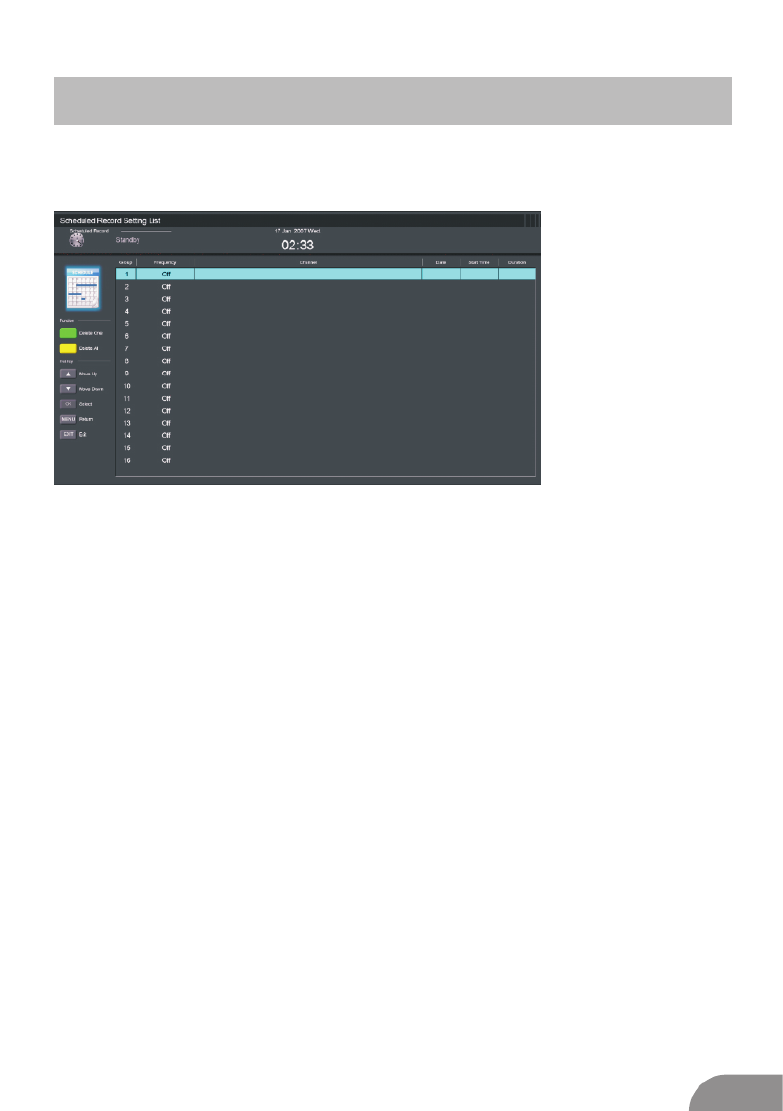
Press Scheduled Record,
enter sub-menu.
◄ / ► button to select then press button to Enter
Reset
▼ ▲ EnterReset
sub-menu.
Press / button to select , then press button to enter
If you are sure to reset,press to reset.Yes
28
DTV Menu

EPG Menu
Press the button EPG in the remote control to enter EPG menu.
Press the button to display previous date.
Press the button to display next date.
Press the button to see the setting you have done before.
Press the button to set the time you want to remind the program you want to see.
RED
GREEN
YELLOW
BLUE
Timeshift
Press Pause key when the program is playing under the DTV Source to start Timeshift.
The white bar indicated the recording progress.
The blue bar indicated the playback progress.
29
DTV Menu

PC Setting Menu
Press button to select .
Press button to display the main menu.MENU
INPUT PCon the remote control
on the remote control
Press / button on the remote control to select in the main menu.◄ ► PC SETTING
1. Press / button on the remote control to select the option that you want to adjust in the ▼ ▲
PC SETTING menu.
2. Press button on the remote control to adjust.Enter
3. After finishing your adjustment, Press button to return back to the previous menu.MENU
Auto Adjust
Press button to adjust the screen automatically to the optimal position of the picture.Enter/ ►
H Position.
V Position.
Phase
Clock
Adjust the horizontal position of the picture.
Adjust the vertical position of the picture.
Adjust the horizontal interfering lines.
Adjust the vertical interfering lines.
*Notes:
1. Sharpness,Saturation and Advanced Settings in PICTURE are invalid.
2. Audio Description and Sound Type in SOUND menu are invalid.
3. Channel Locks and Parental Rating in LOCK menu is invalid.
4. Audio Languages, Subtitle,Teletext and PVR Settings in SETUP menu is invalid.
5. mode has no CHANNEL menu.
menu
PC
30
PC

Note: Before operating menu,Plug in USB device, then press button to set the Input Source to USB INPUT USB .
Press ◄ / ► button to select USB Enterin the Source menu, then press button to enter.
Press ◄ / ► button to select the option you want to adjust in the main menu, USB
then press button to enter. Enter
Photo
Press ◄ / ► button to select PHOTO in the main menu, then press button to enter. Enter
Press button to select drive disk you want to watch, then press button to enter. ▼ ▲ / Enter
Press button to select return option to back to the previous menu. ▼ ▲ /
31
USB OPERATION
USB

Press ◄ / ► button to select MUSIC in the main menu, then press button to enter. Enter
Music
Press button to select drive disk you want to watch, then press button to enter. ▼ ▲ / Enter
Press button to select return option to back to the previous menu. ▼ ▲ /
When highlighting the option you select, the file information will appear on the right.
Pres se.s to play or pau
Pres re s s .s to play the p viou ong
Pres ex .s to play the n t song
Pres r .s to play backwa d
Pres s er.s to play fa t
Pres .s to stop
Pr es H + e r e ee e L s e r.s C /- to switch op ation focus b tw n Fil i t and Play
32
USB

Press button to select drive disk you want to watch, then press button to enter.▼ ▲ / Enter
Press button to select return option to back to the previous menu.▼ ▲ /
Movie
Press ◄ / ► button to select MOVIE in the main menu, then press button to enter. Enter
Press to play or pause.
Press to view the previous movie.
Press to view the next movie.
Press to play backward.
Press to play faster.
Press to stop and back to the previous folder.
33
USB

Press ◄ / ► button to select TEXT in the main menu, then press button to enter. Enter
Text
Press button to select drive disk you want to watch, then press button to enter.▼ ▲ / Enter
Press button to select return option to back to the previous menu.▼ ▲ /
When highlighting the option you select, the file information will appear on the right.
34
USB

Help
35

Machine Technical Specifications
36
LIFE TIM : 60,000 HrsE
39 40
power Consumption
24W
30W/36W
36W/48W
36W
56W/65W/100W
60W/70W/76W
67W/70W/95W/100W
65W/80W
100W/108W/135W
100W/135W/140W/160W
159W/165W/195W
30W/36W
Screen Size
16
20
22
24
32
42
43
50
55
65
Main accessories
User s manual x1'
Remote controller x1
Power cord x1
AAA Batteries x2
28


ÍNDICE
TABLA DE CONTENIDOS
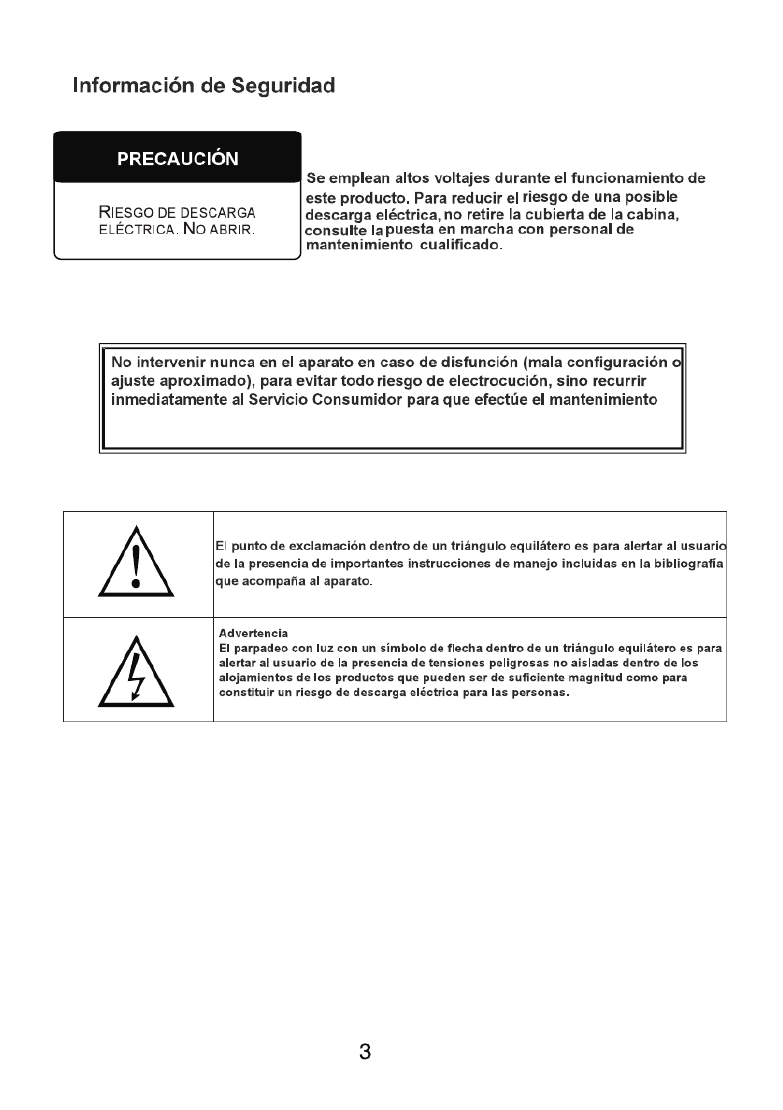
Información de Seguridad… … … … ……… … … … ……… …..…. ……… …… …… ……… ……… …… …… ……… …… 3
Precauciones Importantes de Se ridad…… … … … … … ……… …… gu …… ……… ……… …… …… ……… ……… 4
INSTALACIÓN Y CONEXIÓN DEL TELEVISOR
Instalación Soporte……………………………………………………………………………………………….… 5
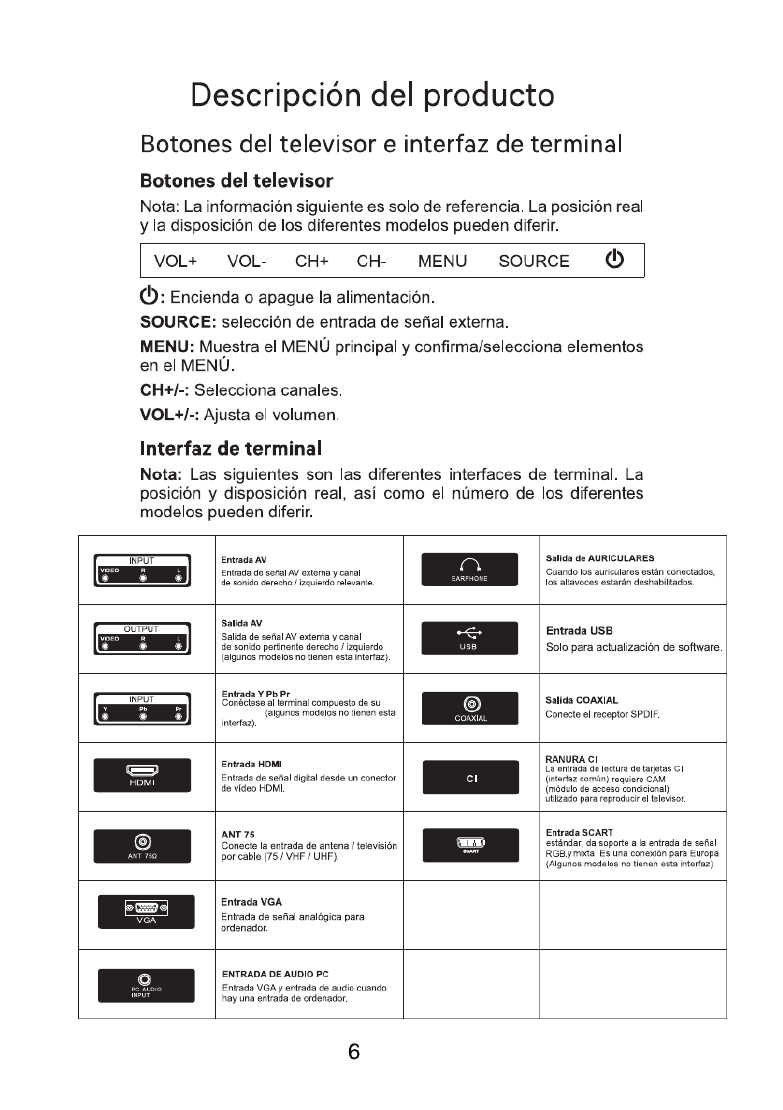
Botones e interfaz del levisor . . . . .......................................................... Te ........ ... ... ... ... 6
Diagrama de Conexión de Disposi s Externos……………………………………………………… vo 7
Instalación y Conexión del Televisor……………………………………………………………………… .. 8
Instalación Peanas……………………………………………………………………………………….…………. 8
MANDO A DISTANCIA
Mando a distancia………………… …….……………….…………… ………… 9
MENÚ
Menú Imagen…………………………………………………………………………………………….………… 11
Menú Sonido…………………………………………………………………………………………………….….
14
Menú Canal…………………………………………………………………………………………………………. 16
Menú Bloqueo…………………………………………………………………………………………………….…20
Menú C uración…………………………………………………………………………………………… onfig .. 23
Menú EPG (Guía Electrónica Programas)………………………………………………………………
29
PC
Menú Ajustes PC… ……… ……..………………..……………… …… ………… 30
MODO USB
Foto ……………………………………………………………………………………………………………….……. 31
Música……………………………………………………………………………………………………………………
32
Video…………………………………………………………………………………..…………………………………
32
Texto………………………………………………………………………………………………………………………
33
INFORMACIÓN COMPLEMENTARIA
Ayuda…………………………………………………………………………………………………………………… 34
Especi caciones……….……………………………………………………………………………………………fi36


DV D/ VI D E O


1.Abra el embalaje y retire el televisor, los accesorios
y las peanas laterales (Algunos modelos no tienen dichas peanas)
2.Para evitar daños o arañazos en el televisor, cúbralo con un paño y
colóquelo sobre una mesa con el panel apoyado en la misma pero
protegido con el paño.
3.Las peanas laterales si fijan con un “click” una vez colocadas en sus
correspondientes ranuras según la dirección de la flecha .
4.Tras estos sencillos pasos, la instalación queda finalizada

Product specificaties
| Merk: | Sunstech |
| Categorie: | Televisie |
| Model: | 22SUN19D |
| Kleur van het product: | Zwart |
| Breedte: | 510 mm |
| Diepte: | 75 mm |
| Hoogte: | 307 mm |
| Breedte verpakking: | 578 mm |
| Diepte verpakking: | 123 mm |
| Hoogte verpakking: | 382 mm |
| Energie-efficiëntieklasse (oud): | A |
| Type verpakking: | Doos |
| Aan/uitschakelaar: | Ja |
| Beeldschermdiagonaal: | 22 " |
| Resolutie: | 1920 x 1080 Pixels |
| Ondersteunde videoformaten: | H.264 |
| USB-poort: | Ja |
| Type aansluitplug: | 3,5 mm |
| Type stroombron: | Sigarettenaansteker |
| Geïntegreerde geheugenkaartlezer: | Nee |
| Aantal HDMI-poorten: | 1 |
| Ingebouwde luidsprekers: | Ja |
| Gemiddeld vermogen: | 6 W |
| Stroomverbruik (in standby): | - W |
| Aantal luidsprekers: | 2 |
| Hoofdtelefoonuitgangen: | 1 |
| HD type: | Full HD |
| 3D: | Nee |
| Display technologie: | LED |
| VESA-montage: | Ja |
| Paneelmontage-interface: | 100 x 100 mm |
| Beeldverhouding: | 16:9 |
| Diepte ( zonder voet ): | 75 mm |
| Hoogte (zonder voet ): | 307 mm |
| Breedte ( zonder voet ): | 510 mm |
| Gewicht (zonder voet): | - g |
| Plug and play: | Ja |
| Soort tuner: | Digitaal |
| Formaat digitaal signaal: | DVB-C, DVB-T |
| Breedte apparaat (met standaard): | 510 mm |
| Diepte apparaat (met standaard): | 176 mm |
| Hoogte apparaat (met standaard): | 340 mm |
| Gewicht (met standaard): | 2000 g |
| Bureaustandaard: | Ja |
| Aantal per verpakking: | 1 stuk(s) |
| Teletext: | Ja |
| On Screen Display (OSD): | Ja |
| Auto channel search: | Ja |
| AV-uitgang: | Ja |
| Op afstand bedienbaar: | Ja |
| Ouderlijk toezicht: | Ja |
| Afstandsbediening inbegrepen: | Ja |
| Type product: | Draagbare tv |
Heb je hulp nodig?
Als je hulp nodig hebt met Sunstech 22SUN19D stel dan hieronder een vraag en andere gebruikers zullen je antwoorden
Handleiding Televisie Sunstech

9 Januari 2024
9 Januari 2024
9 Januari 2024
9 Januari 2024
9 Januari 2024
9 Januari 2024
9 Januari 2024
9 Januari 2024
9 Januari 2024
9 Januari 2024
Handleiding Televisie
- Televisie Electrolux
- Televisie Philips
- Televisie Sony
- Televisie Samsung
- Televisie Xiaomi
- Televisie Casio
- Televisie Panasonic
- Televisie LG
- Televisie AEG
- Televisie BEKO
- Televisie Daewoo
- Televisie Grundig
- Televisie JVC
- Televisie Medion
- Televisie Nokia
- Televisie Pioneer
- Televisie Siemens
- Televisie Toshiba
- Televisie Xiron
- Televisie Yamaha
- Televisie Abus
- Televisie Acer
- Televisie Ag Neovo
- Televisie Airis
- Televisie Aiwa
- Televisie Akai
- Televisie Albrecht
- Televisie Alden
- Televisie Aldi
- Televisie Allview
- Televisie Alphatronics
- Televisie AOC
- Televisie Apex
- Televisie Arcelik
- Televisie Aristona
- Televisie Audiosonic
- Televisie Avtex
- Televisie Bang Olufsen
- Televisie Belson
- Televisie BenQ
- Televisie Blaupunkt
- Televisie Bluesky
- Televisie Brandt
- Televisie Daitsu
- Televisie Dell
- Televisie Denver
- Televisie Difrnce
- Televisie Digihome
- Televisie Dual
- Televisie Durabase
- Televisie Dyon
- Televisie E-motion
- Televisie Emerson
- Televisie Energy Sistem
- Televisie Engel
- Televisie Fantec
- Televisie Ferguson
- Televisie Finlux
- Televisie Fujitsu
- Televisie Funai
- Televisie GPX
- Televisie Graetz
- Televisie Haier
- Televisie Hannspree
- Televisie Hisense
- Televisie Hitachi
- Televisie HKC
- Televisie Hoher
- Televisie Horizon
- Televisie Humax
- Televisie Hyundai
- Televisie Icy Box
- Televisie Iiyama
- Televisie ILive
- Televisie Innoliving
- Televisie Insignia
- Televisie Intenso
- Televisie ITT
- Televisie Kogan
- Televisie Kuppersbusch
- Televisie Lenco
- Televisie Lenovo
- Televisie Lexibook
- Televisie Loewe
- Televisie Logik
- Televisie Luxor
- Televisie Magnavox
- Televisie Magnum
- Televisie Manhattan
- Televisie Manta
- Televisie Marantz
- Televisie Marquant
- Televisie Megasat
- Televisie Metz
- Televisie Mitsubishi
- Televisie Mpman
- Televisie MT Logic
- Televisie Muse
- Televisie Mx Onda
- Televisie Nabo
- Televisie Nec
- Televisie Nedis
- Televisie Newstar
- Televisie Nextbase
- Televisie Nikkei
- Televisie Nordmende
- Televisie Packard Bell
- Televisie Peaq
- Televisie Philco
- Televisie Polar
- Televisie Polaroid
- Televisie Premier
- Televisie Proline
- Televisie Pyle
- Televisie Qilive
- Televisie RCA
- Televisie Reflex
- Televisie Reflexion
- Televisie Rm 2000
- Televisie Roadstar
- Televisie Saba
- Televisie Sagem
- Televisie Salora
- Televisie Sanyo
- Televisie Sbr
- Televisie Schaub Lorenz
- Televisie Schneider
- Televisie Seg
- Televisie Selfsat
- Televisie Sencor
- Televisie Sharp
- Televisie Silvercrest
- Televisie Sogo
- Televisie Soundmaster
- Televisie Strong
- Televisie Sunny
- Televisie Superior
- Televisie Sweex
- Televisie Sylvania
- Televisie TCL
- Televisie Teac
- Televisie TechLine
- Televisie Technika
- Televisie Technisat
- Televisie Techwood
- Televisie Tele 2
- Televisie Teleco
- Televisie Telefunken
- Televisie Terris
- Televisie Tesla
- Televisie Tevion
- Televisie Thomson
- Televisie Time
- Televisie Tve
- Televisie Uniden
- Televisie United
- Televisie Vestel
- Televisie Viewpia
- Televisie Viewsonic
- Televisie Vision Plus
- Televisie Vivax
- Televisie Vivo
- Televisie Vizio
- Televisie Voxx
- Televisie Walker
- Televisie Westinghouse
- Televisie Wharfedale
- Televisie Woxter
- Televisie Xoro
- Televisie XS4ALL
- Televisie Yasin
- Televisie Zalman
- Televisie Ziggo
- Televisie Jay-tech
- Televisie Jensen
- Televisie JGC
- Televisie JTC
- Televisie Odys
- Televisie OK
- Televisie Oki
- Televisie Online
- Televisie Onn
- Televisie Opera
- Televisie Oppo
- Televisie Optoma
- Televisie Orion
- Televisie Oyster
- Televisie Changhong
- Televisie Clatronic
- Televisie Continental Edison
- Televisie ECG
- Televisie Palsonic
- Televisie Vox
- Televisie Bang And Olufsen
- Televisie GoGEN
- Televisie Krüger And Matz
- Televisie Naxa
- Televisie Proscan
- Televisie Voxicon
- Televisie Kunft
- Televisie Aspes
- Televisie AYA
- Televisie Bush
- Televisie High One
- Televisie Infiniton
- Televisie Kernau
- Televisie Nevir
- Televisie Orima
- Televisie Svan
- Televisie Grunkel
- Televisie SereneLife
- Televisie Zenith
- Televisie Citizen
- Televisie Kubo
- Televisie Smart Brand
- Televisie Alba
- Televisie Edenwood
- Televisie Elbe
- Televisie Majestic
- Televisie Trevi
- Televisie Cello
- Televisie NPG
- Televisie Orava
- Televisie Star-Light
- Televisie Videocon
- Televisie Cecotec
- Televisie Bauhn
- Televisie MBM
- Televisie Furrion
- Televisie Coby
- Televisie Doffler
- Televisie DGM
- Televisie Planar
- Televisie Chiq
- Televisie Monster
- Televisie Antarion
- Televisie Felson
- Televisie SEIKI
- Televisie SunBriteTV
- Televisie Tucson
- Televisie CGV
- Televisie LTC
- Televisie Caratec
- Televisie Séura
- Televisie AudioAffairs
- Televisie Element
- Televisie Peerless-AV
- Televisie XD Enjoy
- Televisie Inovia
- Televisie DirecTV
- Televisie Telesystem
- Televisie Kemo
- Televisie EKO
- Televisie Mitsai
- Televisie V7
- Televisie ISymphony
- Televisie Pantel
- Televisie ATYME
- Televisie HCI
- Televisie Inno-Hit
- Televisie Lin
- Televisie Elements
- Televisie Englaon
- Televisie Astar
- Televisie Visco
- Televisie Tivax
- Televisie H&B
- Televisie Norcent
- Televisie TELE System
- Televisie TIM
- Televisie Kivi
- Televisie Mach Power
- Televisie Axing
- Televisie FFalcon
- Televisie Smart Tech
- Televisie Mitzu
- Televisie JTC24
- Televisie Coocaa
- Televisie SYLVOX
- Televisie RevolutionHD
- Televisie FOX Electronics
- Televisie QBell Technology
- Televisie Aconatic
- Televisie Mitchell & Brown
- Televisie Mystery
- Televisie Linsar
Nieuwste handleidingen voor Televisie

9 April 2025
9 April 2025

9 April 2025
9 April 2025
9 April 2025
9 April 2025
9 April 2025
9 April 2025
9 April 2025

8 April 2025