Speco Technologies N8NRT Handleiding
Lees hieronder de 📖 handleiding in het Nederlandse voor Speco Technologies N8NRT (133 pagina's) in de categorie Videorecorder. Deze handleiding was nuttig voor 37 personen en werd door 2 gebruikers gemiddeld met 4.5 sterren beoordeeld
Pagina 1/133

N8NRT
User Manual
Please read this manual carefully before operating the unit and keep it for further reference

Notes
Please read this user manual carefully to ensure that you can use the device correctly and
safely.
There may be several technically incorrect places or printing errors in this manual. The
updates will be added into the new version of this manual. The contents of this manual are
subject to change without notice.
This device should be operated only from the type of power source indicated on the
marking label. The voltage of the power must be veried before using the same. Kindly
remove the cables from the power source if the device is not to be used for a long period of
time.
Do not install this device near any heat sources such as radiators, heat registers, stoves or
other devices that produce heat.
Do not install this device near water. Clean only with a dry cloth.
Do not block any ventilation openings and ensure proper ventilation around the machine.
Do not power o the device at normal recording condition.
This machine is for indoor use only. Do not expose the machine in rain or moist
environment. case any solid liquid get inside the In or machine’s case, please turn o the
device immediately and get it checked by a qualied technician.
Do not try to repair the device by yourself without technical aid or approval.
When this product is in use, the relevant contents of Microsoft, Apple and Google will be
involved in. The pictures and screenshots in this manual are only used to explain the usage of
our product. The ownerships of trademarks, logos and other intellectual properties related to
Microsoft, Apple and Google shall belong to the above-mentioned companies.
It is recommended to back up and clear the personal data stored in the device before the
device is returned to us for repair or replacement except those data that are essential for
purposes of repair or replacement. The device will be restored to the default factory settings
and all personal data will be cleared after repair or replacement. Our company ensures that the
customer’s data is not made available to third parties if the device is exchanged.
This manual is suitable for many models. All examples and pictures used in the manual are
from one of the models for reference purpose.
The local language versions of this manual will be provided to users in the corresponding
regions and countries.
Disclaimer
With regard to the product with internet access, the use of product shall be wholly at your
own risks. Our company shall be irresponsible for abnormal operation, privacy leakage or other
damages resulting from cyber attack, hacker attack, virus inspection, or other internet security
risks; however, our company will provide timely technical support if necessary.
Surveillance laws vary from country to country. Check all laws in your local region before
using this product for surveillance purposes. We shall not take the responsibility for any
consequences resulting from illegal operations.

The storage period of the personal data depends on the capacity of the storage devices the
users use and all data stored in the device shall be handled by themselves. Our company shall
not be responsible for the data loss.
Cybersecurity Recommendations
Change passwords and use strong passwords. At least 8 characters or a combination of
characters, numbers, and upper and lower case letters should be used in your password.
The system will automatically check the latest rmware version once a day. Once the
latest version is checked, you’d better update it to ensure the system is current with the latest
security patches and fixes.
Regularly change the passwords of your devices to ensure that only authorized users can
access the system.
Change default ports (like HTTP, data port) to reduce the risk of outsiders being able to
access.
It recommended set the rewall is to of your router. But note that some important ports
cannot be closed (like 80, 443, 6036).
Regulatory Information
FCC Information
1.
FCC compliance
The products have be tested and found in compliance with the council FCC rules and
regulations part 15 subpart B. These limits are designed to provide reasonable protection
against harmful interference. This equipment generates uses and can radiate radio frequency
energy and, if not installed and used in accordance with the instruction manual, may cause
harmful interference to radio communication. However, there is no guarantee that interference
will not occur in a particular installation. The user will be required to correct the interface at
his own expense in case the harmful interference occurs.
2.
FCC conditions:
Operation of this product is subject the following two conditions: (1) this device may not
cause harmful interface, and (2) this device must accept any interference received, including
interference that may cause undesired operation.
CE Information
The products have been manufactured to comply with the following directives.
EMC Directive 2014/30/EU

RoHS
The products have designed and manufactured in accordance with Directive EU RoHS
Directive 2011/65/EU and its amendment Directive EU 2015/863 on the restriction of the use
of certain hazardous substances in electrical and electronic equipment.
2012/19/EU (WEEE directive): The Directive on waste electrical and electronic
equipment (WEEE Directive). To improve the environmental management of WEEE,
the improvement of collection, treatment and recycling of electronics at the end of
their life is essential. Therefore, the product marked with this symbol must be
disposed of in a responsible manner.
Directive 94/62/EC: The Directive aims at the management of packaging and packaging waste
and environmental protection. The packaging and packaging waste of the product in this manual
refers to must be disposed of at designated collection points for proper recycling and
environmental protection.
REACH(EC1907/2006): REACH concerns the Registration, Evaluation, Authorization and
Restriction of Chemicals, which aims to ensure a high level of protection of human health and
the environment through better and earlier identication of the intrinsic properties of chemical
substances. The product in this manual refers to conforms to the rules and regulations of
REACH. For more information of REACH, please refer to DG GROWTH or ECHA websites.

SMT User Manual
Table of Contents
Table of Contents
1
Introduction ................................................................................................................... 1
1.1 Summary ....................................................................................................................... 1
1.2 Features ......................................................................................................................... 1
1.3 Front Panel Descriptions ............................................................................................... 4
1.4 Rear Panel Descriptions ................................................................................................ 5
1.5 Connections ................................................................................................................... 8
2
Basic Operation Guide ................................................................................................ 10
2.1 Startup & Shutdown .................................................................................................... 10
2.1.1 Startup .............................................................................................................. 10
2.1.2 Shutdown .......................................................................................................... 10
2.2 Remote Controller ....................................................................................................... 10
2.3 Mouse Control ............................................................................................................. 12
2.4 Text-input Instruction .................................................................................................. 12
2.5 Common Button Operation ......................................................................................... 13
3
Wizard & Main Interface ........................................................................................... 14
3.1 Startup Wizard ............................................................................................................ 14
3.2 Main Interface ............................................................................................................. 18
3.2.1 Main Interface Introduction .............................................................................. 18
3.2.2 Setup Panel ....................................................................................................... 20
3.2.3 Main Functions ................................................................................................. 21
4
Camera Management .................................................................................................. 23
4.1 Add/Edit Camera ......................................................................................................... 23
4.1.1 Add Camera ...................................................................................................... 23
4.1.2 Edit Camera ...................................................................................................... 24
5
Live View Introduction ............................................................................................... 26
5.1 Live View Interface Introduction ................................................................................ 26
5.2 Preview Image Conguration ...................................................................................... 29
5.2.1 OSD Settings .................................................................................................... 29
5.2.2 Image Settings .................................................................................................. 30
5.2.3 Image Adjustment ............................................................................................30
6
People Management .................................................................................................... 34
7
Attendance Management ............................................................................................ 39
7.1 Attendance Rule Settings ............................................................................................ 39
7.2 Leave and Business Trip Settings ................................................................................ 39
7.3 Attendance Search ....................................................................................................... 41
8
Statistics ....................................................................................................................... 43

SMT User Manual
Table of Contents
8.1 Real-Time Statistics .................................................................................................... 43
8.2 Historical Statistics ...................................................................................................... 43
9
Record & Disk Management ...................................................................................... 45
9.1 Record Conguration .................................................................................................. 45
9.1.1 Mode Conguration ......................................................................................... 45
9.1.2 Advanced Conguration ................................................................................... 47
9.2 Enc Parameters Settings ode ........................................................................................ 47
9.3 Schedule Settings ........................................................................................................ 48
9.3.1 Add Schedule ................................................................................................... 48
9.3.2 Record Schedule Conguration ....................................................................... 50
9.4 Record Mode ............................................................................................................... 51
9.4.1 Manual Recording ............................................................................................ 51
9.4.2 Timing Recording ............................................................................................. 51
9.4.3 Motion Based Recording .................................................................................. 51
9.4.4 Sensor Based Recording ................................................................................... 51
9.4.5 Intelligence Recording ..................................................................................... 51
9.5 Disk ............................................................................................................................. 52
9.5.1 Disk Management ............................................................................................ 52
9.5.2 Storage Mode Conguration ............................................................................ 52
9.5.3 View Disk and S.M.A.R.T. Information ........................................................... 53
10
Playback & Backup ..................................................................................................... 55
10.1 Instant Playback ........................................................................................................ 55
10.2 Playback Interface Introduction ................................................................................ 55
10.3 Record Search, Playback & Backup .......................................................................... 58
10.3.1 Pass-Through Record Search .......................................................................... 58
10.3.2 Search, Playback & Backup by Time-sliced Image ........................................ 61
10.3.3 Search, Playback & Backup by Time ................................................................. 62
10.3.4 Search, Playback & Backup by Event ............................................................ 63
10.3.5 Search & Playback Tag by ....................................................................................... 64
10.3.6 Image Management ........................................................................................ 65
10.3.7 View Backup Status ........................................................................................ 65
11
AI/Event Management ................................................................................................ 66
11.1 Body Temperature Settings ....................................................................................... 66
11.2 Mask Settings ............................................................................................................ 66
11.3 Sensor Alarm ............................................................................................................. 67
11.4 Motion Alarm ............................................................................................................ 68
11.4.1 Motion Conguration ..................................................................................... 68
11.4.2 Motion Alarm Handling Conguration ..........................................................69
11.5 Combination Alarm ................................................................................................... 70
11.6 Exception Alarm ........................................................................................................ 71
11.6.1 IPC Oine Settings ....................................................................................... 71

SMT User Manual
Table of Contents
11.6.2 Exception Handling Settings .......................................................................... 71
11.7 Alarm Event Notication .......................................................................................... 71
11.7.1 Alarm- out ....................................................................................................... 71
11.7.2 E-mail ............................................................................................................. 72
11.7.3 Display ........................................................................................................... 72
11.7.4 Buzzer ............................................................................................................. 72
11.7.5 APP Push Message ......................................................................................... 73
11.8 Manual Alarm ............................................................................................................ 73
11.9 View Alarm Status ..................................................................................................... 73
12
Account & Permission Management ......................................................................... 75
12.1 Account Management ................................................................................................ 75
12.1.1 Add User ........................................................................................................ 75
12.1.2 Edit User ......................................................................................................... 76
12.2 User Login & Logout ................................................................................................ 78
12.3 Permission Management ........................................................................................... 78
12.3.1 Add Permission Group ................................................................................... 78
12.3.2 Edit Permission Group ................................................................................... 79
12.4 Block and Allow List ................................................................................................. 79
12.5 Preview Logout On ................................................................................................... 80
12.6 Network Security ...................................................................................................... 80
12.7 Password Security ..................................................................................................... 81
12.8 View Online User ...................................................................................................... 81
13
Device Management .................................................................................................... 82
13.1 Network Conguration ............................................................................................. 82
13.1.1 TCP/IP Conguration ..................................................................................... 82
13.1.2 Port Conguration .......................................................................................... 83
13.1.3 PPPoE Conguration ...................................................................................... 85
13.1.4 DDNS Conguration ...................................................................................... 85
13.1.5 E-mail Conguration ...................................................................................... 86
13.1.6 UPnP Conguration ....................................................................................... 87
13.1.7 802.1X ............................................................................................................ 88
13.1.8 NAT Conguration ......................................................................................... 88
13.1.9 FTP Conguration .......................................................................................... 89
13.1.10 SNMP ........................................................................................................... 90
13.1.11 View Network Status .................................................................................... 90
13.2 Basic Conguration ................................................................................................... 90
13.2.1 Common Conguration .................................................................................. 90
13.2.2 Date and Time Conguration ......................................................................... 91
13.2.3 PoE Power Managment .................................................................................. 92
13.2.4 Recorder OSD Settings ................................................................................... 92
13.3 Factory Default .......................................................................................................... 92

SMT User Manual
Table of Contents
13.4 Device Software Upgrade ......................................................................................... 93
13.5 Backup and Restore ................................................................................................... 93
13.6 Restart Automatically ................................................................................................ 94
13.7 View Log ................................................................................................................... 94
13.8 View System Information .......................................................................................... 95
14
Remote Surveillance .................................................................................................... 96
14.1 Mobile Client Surveillance ........................................................................................ 96
14.2 Web LAN Access ...................................................................................................... 96
14.3 Web WAN Access ...................................................................................................... 97
14.4 Web Remote Control ................................................................................................. 98
14.4.1 Live View via Web Client ............................................................................... 99
14.4.2 People Management via Web Client ............................................................. 101
14.4.3 Attendance Management via Web Client ...................................................... 101
14.4.4 Face Greeting ............................................................................................... 101
14.4.5 Playback via Web Client ............................................................................... 103
14.4.6 Search and Backup via Web Client ............................................................... 104
14.4.7 Settings via Web Client ................................................................................ 104
14.4.8 Upgrade via Web Client ................................................................................ 105
Appendix A FAQ ...............................................................................................................................106
Appendix B Calculate Recording Capacity ...................................................................... 112
Appendix C Compatible Device List ................................................................................. 114

SMT User Manual
Introduction
1
1.1
Summary
1 Introduction
The smart management terminal (SMT) series is specially designed and developed for AI
application management, like body temperature measurement management, time attendance,
access control, etc. It supports real-time face capture display, temperature display and alarm out,
statistics, video preview, search and playback.
1.2
Features
Basic Functions
Support network device access including facial panel, AI camera, IP camera, attendance
terminal, etc.
Support the H.265 and H.264 IP cameras
Support standard ONVIF protocol
Support dual stream recording of each camera
Support IP cameras to be added quickly or manually
Support collective or individual configuration of the cameras’ OSD, video parameters,
motion and so on
Support a maximum of 8 user permission groups including Administrator, Advanced and
Ordinary which are the default permission groups of the system
Support a maximum of 16 users to be created, multiple web clients login by using one
username at the same time and the user’s permission control to be enabled or disabled
Support a maximum of 10 web clients login at the same time
Live View
Support 4K×2K/1920×1080/1280×1024 HDMI and 1920×1080/1280×10 24 VGA high
denition synchronous display(depending on models)
Support multi-screen modes such as 1/4/6/8/9/13/16 (depending on models)
Real-time display of all abnormal data, including abnormal temperature, mask off, block
list, etc.
Real-time face capture view, face match view, body temperature view.
Real-time personal information display, including name, area, temperature, mask on/o,
company, etc.
Support auto adjustment of the camera’s image display proportion
Support audio monitoring of the camera to be enabled or disabled
Support manual snapshot of the preview camera
Support quick tool bar operation of the preview window
Support motion detection
Support image and lens adjustment (only available for some cameras)
Support quick camera adding in the camera window of the live preview interface
Support precise face recognition with masks
AI Functions

SMT User Manual
Introduction
3
Support record to be backed up through USB (U disk, mobile HDD)
Support record to be backed up by time/event/image search
Support record cutting for backing up when playing back
Support a maximum of 10 backup tasks in background and backup status viewing
Alarm Management
Support alarm schedule setting
Support enabling or disabling of the motion detection, external sensor alarm input,
combination alarm and exception alarms including IP address conict alarm, disk IO error
alarm, disk full alarm, no disk alarm, illegal access alarm, network disconnection alarm, IPC
oine alarm and so on, alarm linkage conguration supportable
Support IPC oine alarm linkage conguration of snap, pop-up video, etc.
Support event notication modes of alarm-out, pop-up video, pop-up message box, buzzer,
e-mail and so on
The snapped images can be attached into the e-mail when alarm linkage is triggered
Support alarm status view of alarm-in, alarm-out, motion detection and exception alarm
Support alarm to be triggered and cleared manually
Support system auto reboot when exception happens
Network Functions
Support TCP/IP and PPPoE, DHCP, DNS, DDNS, UPnP, NTP, SMTP protocol and so on
Support allow and block list function and the IP address/IP segment/MAC address can be
allowed or blocked.
Support multiple browsers including IE8/9/10/11, Firefox, Opera, Chrome (available only
for the versions lower than 45) and Safari in MAC system
Support remote preview, conguration, import and export of the SMT parameters and
other system maintenance operations including remote upgrading and system restart
Support remote camera conguration of the SMT including video parameters, image
quality and so on
Support remote search, playback and backup of the SMT
Support manual alarm to be triggered and cleared remotely
The auto-focusing camera can be adjusted through web client (support zoom in/out, but
one key focus is not currently supported)
Support NVMS or other platform management software to access the SMT and manage it
Support NAT function and QRCode scanning by mobile phones and tablets
Support mobile surveillance by phones or tablets with iOS or Android OS
Support SMT to be accessed remotely through telnet and the telnet function can be
enabled or disabled
If one camera recording is enabled or disabled manually through web client, it will be
simultaneously enabled or disabled in the SMT
Other Functions
The SMT can be controlled and operated by the buttons on the front panel, the remote
controller and the mouse
Setting interfaces can be switched to one another conveniently by clicking the main menus

SMT User Manual
Introduction
5
Name
Descriptions
Manually record
Play/Pause
Speed down
Speed up
1-9
Input digital number and select camera
0/--
Input number 0, the number above 10
Direction Key
Change direction
Multi-Screen Switch
Change the screen mode
Enter
Conrm selection
USB
To connect external USB device like USB mouse or USB
ash

SMT User Manual
Introduction
6
1.4
Rear Panel Descriptions
No. Name Descriptions
1 Power Supply DC48V power supply interface
2 PoE ports 8 PoE network ports; connect to 8 PoE IP
cameras/panel

SMT User Manual
Introduction
7
No. Name Descriptions
3 LAN Network port
4 VGA Connect to monitor
5 HDMI Connect to 1920×1080 high denition display device
6 USB USB3.0 interface, connect USB storage device or
USB mouse
7 AUDIO IN Audio input; connect to audio input device, like
microphone, pickup, etc
8 AUDIO OUT Audio output; connect to sound box
9 RS485 A/B interface Connect to a keyboard. A is TX+; B is TX-
10 RS485 Y/Z interface Connectors for speed dome. Y is TX+, Z is TX-
(This interface of some models is unavailable.)
11 ALARM OUT Relay output; connect to external alarm
12 ALARM IN Alarm inputs for connecting sensors
13 GND Grounding
SMT User Manual
Introduction
8
1.5
Connections
Video Connections
Video Output: Supports VGA/HDMI video output. You can connect to monitor through these
video output interfaces simultaneously or independently.
Audio Connections
Audio Input: Connect to microphone, pickup, etc.
Audio Output: Connect to headphone, sound box or other audio output devices.
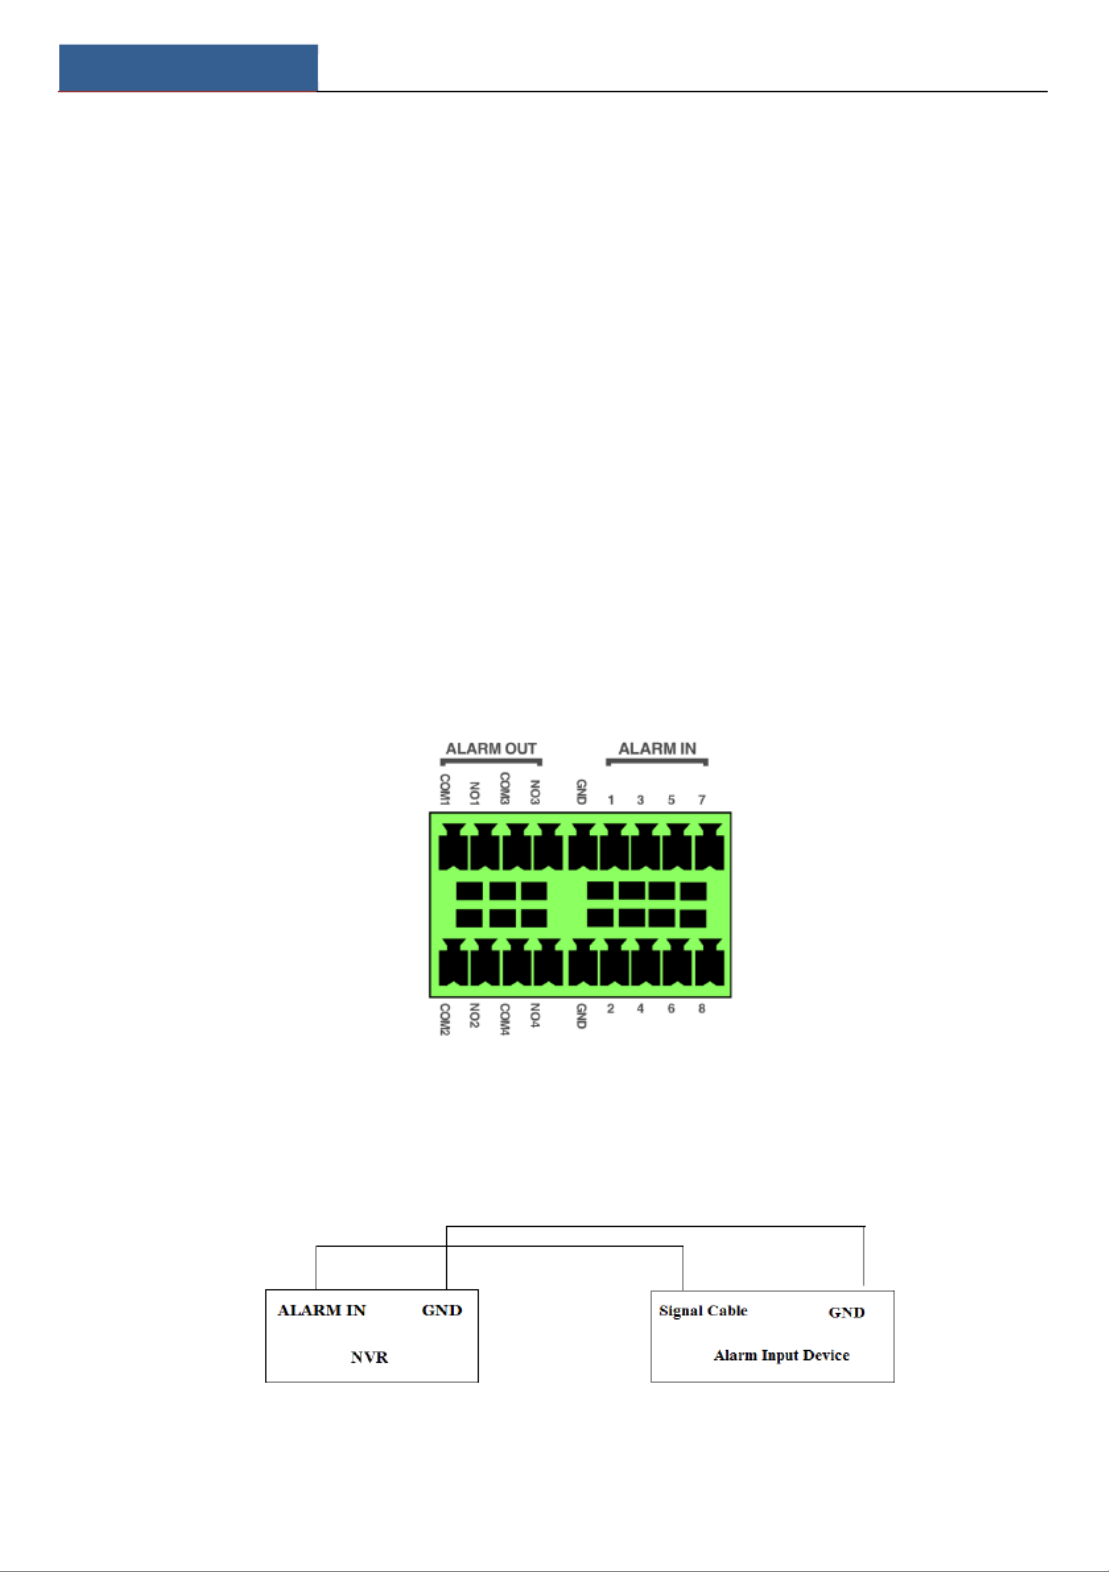
Alarm Connections
Some models may not support this function. Take 8CH alarm inputs and 4CH alarm output for
example.
Alarm Input:
Alarm IN 1~8 are 8 CH alarm input interfaces. There are no type requirements for sensors. NO
type and NC type are both available.
The way to connect sensor and the device is as shown below:
The alarm input is an open/closed relay. If the input is not an open/closed relay, please refer to
the following connection diagram:

SMT User Manual
Basic Operation Guide
11
SMT User Manual
Basic Operation Guide
12
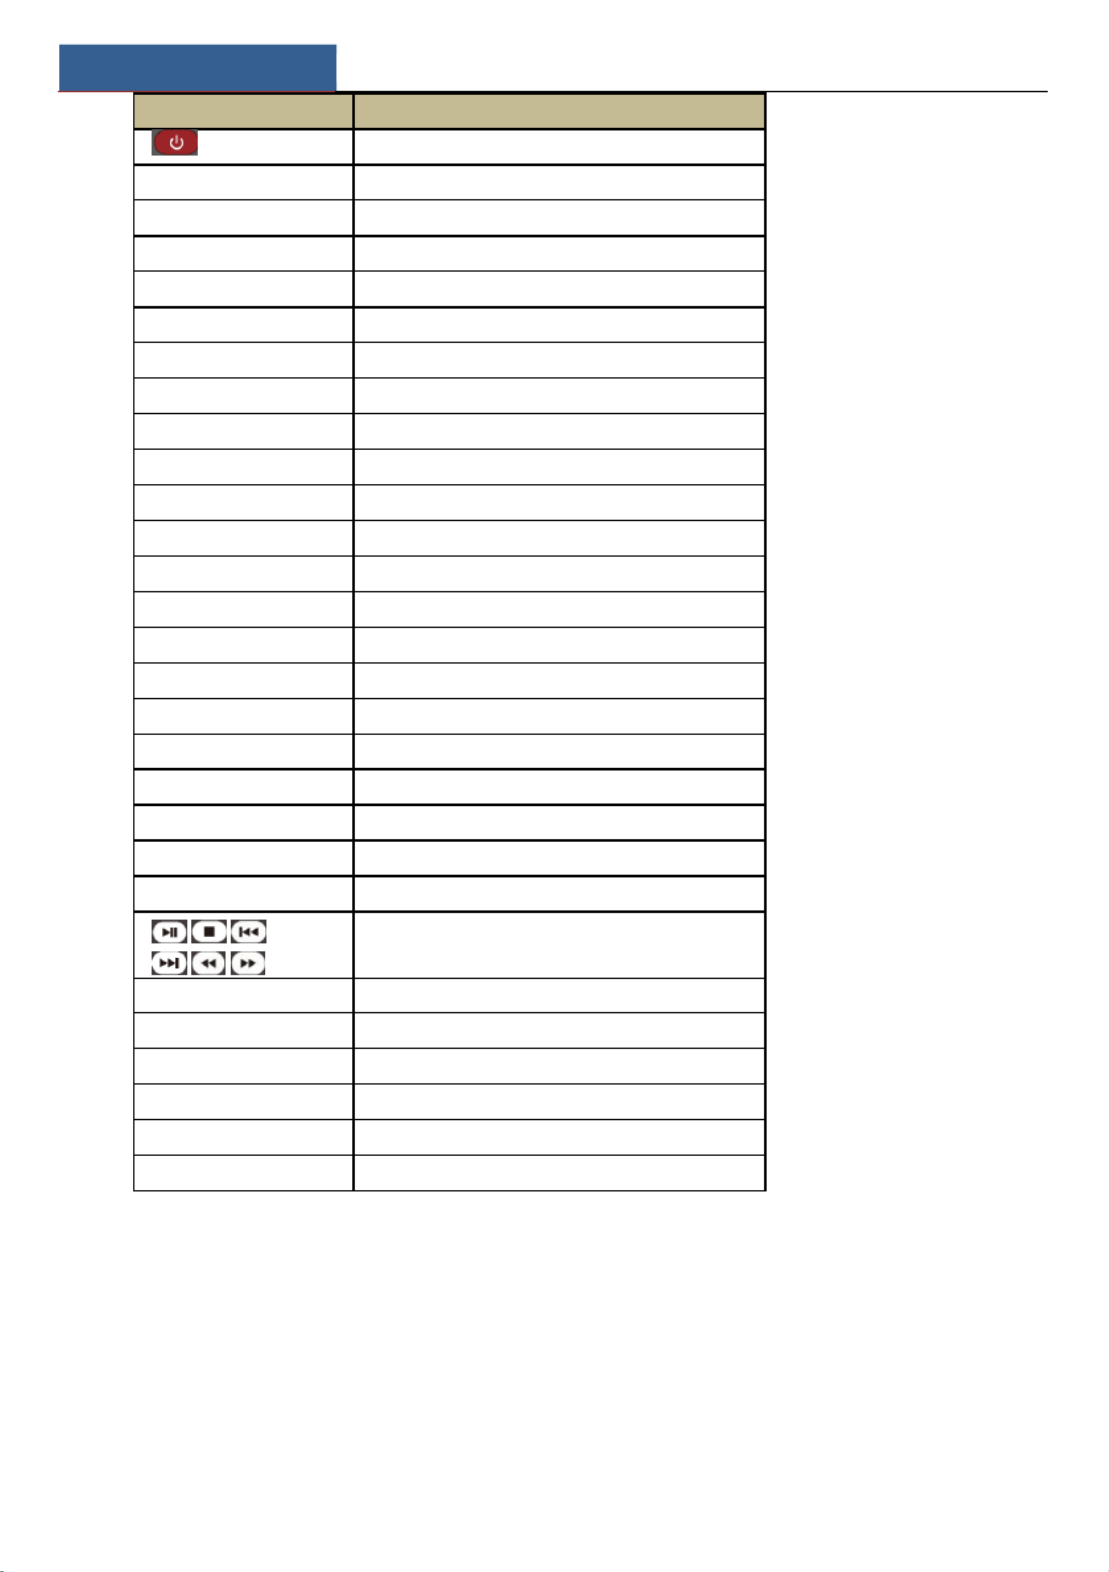
Button
Function
Power Button
Switch off to stop the device —
Record Button
To start recording
-/ -9 -- /0
Input number or choose camera
Fn1 Button
Unavailable temporarily
Multi Button
To choose multi screen display mode
Next Button
To switch the live image
SEQ
To go to sequence view mode
Audio
To enable audio output in live mode
Switch
No function temporarily
Direction button
To move cursor in setup or pan/title PTZ
Enter Button
To conrm the choice or setup
Menu Button
To go to menu
Exit Button
To exit the current interface
Focus/IRIS/Zoom/PTZ
To control PTZ camera
Preset Button
To enter into preset setting in PTZ mode
Cruise Button
To go to cruise setting in PTZ mode
Track Button
No track function temporarily
Wiper Button
No function temporarily
Light Button
No function temporarily
Clear Button
No function temporarily
Fn2 Button
No function temporarily
Info Button
Get information about the device
To control playback. Play(Pause)/Stop/Previous
Frame/Next Frame/Speed Down/Speed Up
Snap Button
To take snapshots manually
Search Button
To go to search mode
Cut Button
No function temporarily
Backup Button
To go to backup mode
Zoom Button
To zoom in the images
PIP Button
No function temporarily

SMT User Manual
Basic Operation Guide
13
Note:
You shall press P.T.Z button to enter PTZ setting mode, choose a channel and press P.T.Z button again to
hide the P.T.Z control panel. Then you can press preset, cruise, track, wiper or light button to enable the
relevant function.

SMT User Manual
Basic Operation Guide
14

SMT User Manual
Basic Operation Guide
15
2.3
Mouse Control
Mouse control in Live Display & Playback interface
In the live display & playback interface, double click on any camera window to show the
window in single screen mode; double click the window again to restore it to the previous size.
In the live display & playback interface, if the interfaces display in full screen, move the mouse
to the bottom of the interface to pop up a tool bar. The tool bar will disappear automatically
after you move the mouse away from it for some time; move the mouse to the right side of the
interface to pop up a panel and the panel will disappear automatically after you move the
Button
Function
REC
Record manually
Search
To enter search mode
MENU
To enter menu
Exit
To exit the current interface
ENTER
To confirm the choice or setup
Direction button
To move cursor in setup
ZOOM
To zoom in
PIP
No function temporarily
To control playback. Play(Pause)/Next Frame/Speed
Up/Stop/Previous Frame/Speed Down
Multi
To choose multi screen display mode
Next
To switch the live image
SEQ
To go to sequence view mode
INFO
Get information about the device

SMT User Manual
Basic Operation Guide
16
mouse away from it.
Mouse control in text-input
Move the mouse to the text-input box and then click the box. The input keyboard will pop up
automatically.
2.4
Text-input Instruction
Note: Mouse is the default tool for all operations unless an exception as indicated.
SMT User Manual
Wizard & Main Interface
14
3 Wizard & Main Interface
3.1
Startup Wizard
The disk icon wil be shown on the top of the startup interface. You can view the numbe and s l r
status of each disk quickly and conveniently through these icons ( no disk unavailable : ; :
disk; RW available disk). :
You can quickly configure the by wizard setup to make the VR work normally. You195 1
mu configure the wizard if you sta the Dst rt V fo the f time (o click “Skip” to cance the R r irst r l
wizard nex time). Maybe differen version have differen wizard step The following wizard t t s t s.
steps are fo reference only. r
①Choose the language and locality as needed if it is the first time for you to use the wizard
and then read the privacy statement, checkmark “I have read and agree” and click “OK”.
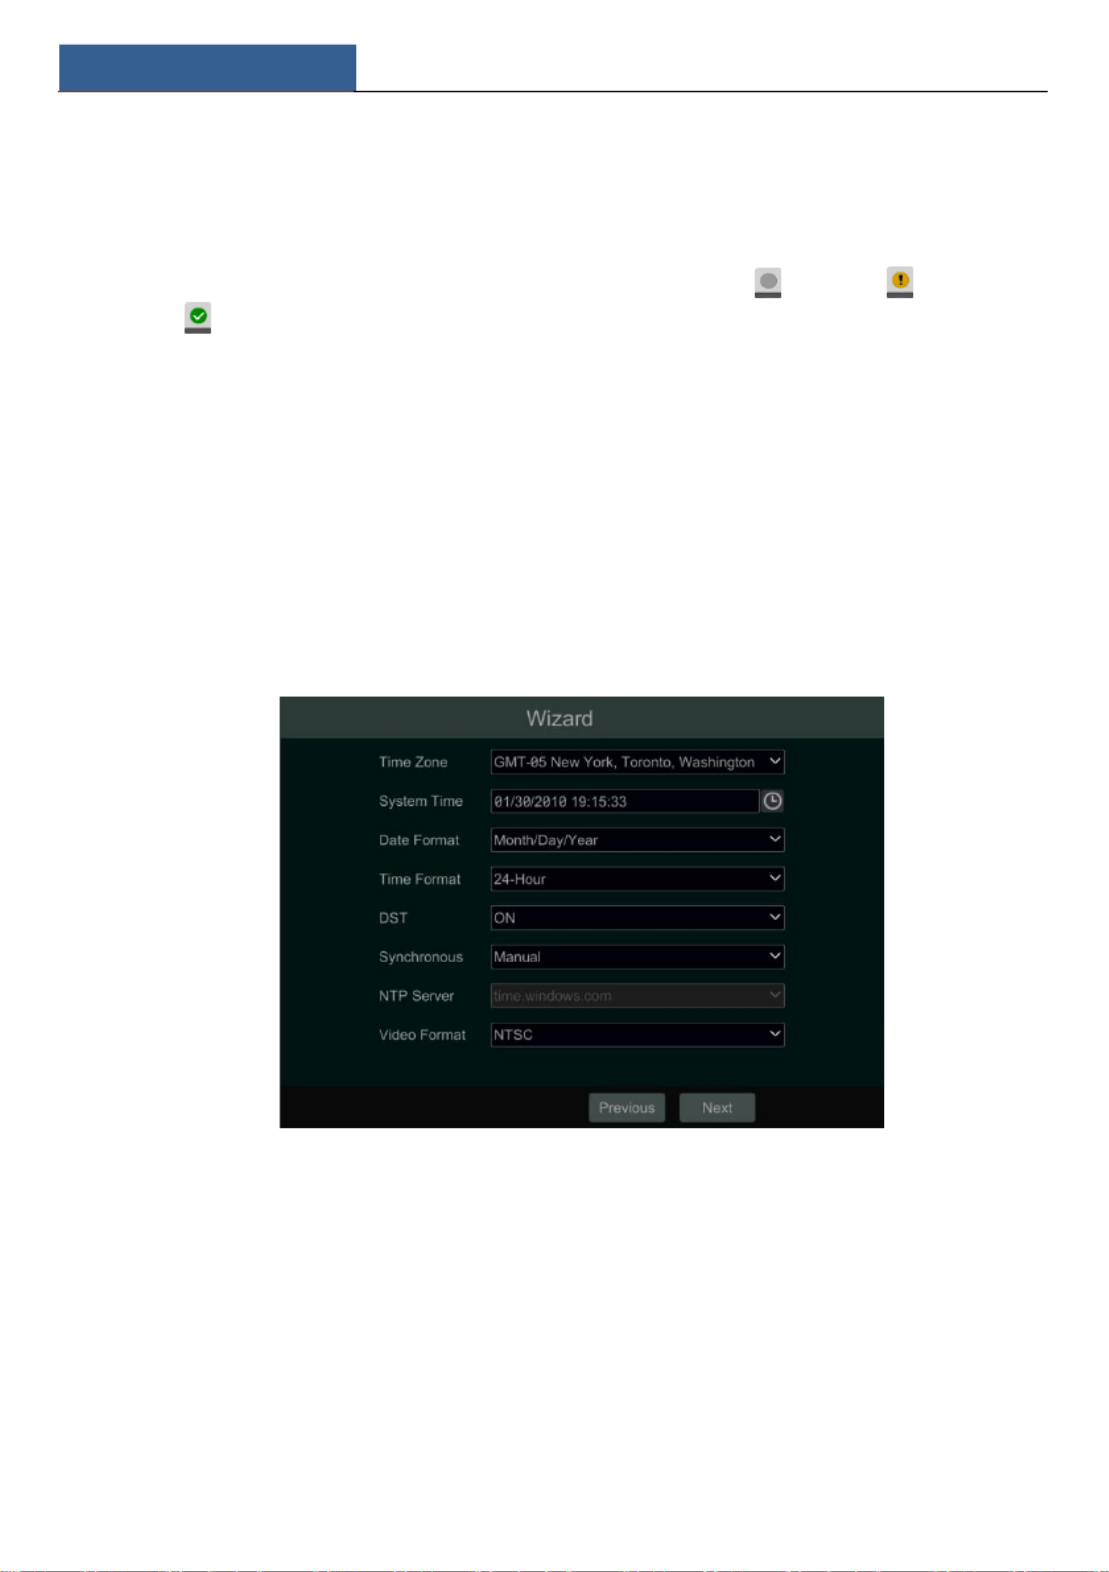
②Date and Time Configuration. The date and time of the system need to be set up if you
use the wizard for the first time. Refer to the following figure. Set the time zone, system time,
date format, time format and video format. The DST will be enabled by default if the time zone
selected includes DST. Click “Next” to continue.
③System Login. Set your own password or use the default when you use the wizard for the
first time (the default username of the system is select the login username and enter admin );
the corresponding password next time.

SMT User Manual
Wizard & Main Interface
15
Enable pattern lock and click “Edit” to set the pattern lock.
Click “Next” to set questions and answers for password security of admin. If you forget the
password, please refer to Q4 in Appendix A FAQ for details.
Click “Next” to continue.
④Disk Settings. You view the disk number, disk capacity can of the SMT and serial number,
R&W status of the disk. Click “Format” to format the disk. Click “Next” to continue. Then
click “Wizard Setup”.
⑤Network Settings. Check “Obtain an IP address automatically” and “Obtain DNS
automatically” to get the IP address and DNS automatically (the DHCP function of the router
in the same LAN should also be enabled), or manually enter them. Enter the HTTP port, RTSP
port and Server port (please see 13.1.2 Port Configuration for details). Click “Next” to
continue.

SMT User Manual
Wizard & Main Interface
16
Note:
If you use the SMT with the PoE network ports, the online state of the internal Ethernet
port will be shown on the interface. Refer to the picture below. Please refer to 13.1.1 TCP/IP
Configuration for detail introduction of the internal Ethernet port.
⑥Add Camera. Click “Refresh” to refresh the list of online IP cameras which are in the
same local network with SMT and then click to add the searched camera. Click “Add
All” to add all the cameras in the list. Click to delete the added camera. Click “Delete All”
to delete all the added cameras.

SMT User Manual
Wizard & Main Interface
17
Click to edit the searched IP camera as shown on the below left. Enter the new IP
address, subnet mask, gateway, username and the password of the camera. Click “OK” to save
the settings.
Click to edit the added camera as shown on the above right. Enter the new camera name,
IP address, port, username and the password of the camera. You can check “Sync to IPC” to
modify the IP address of the IPC via different network segments for being in the same network
segment with the SMT. Then click “Test” to test the connection. Click “OK” to save the
settings. You can change the IP camera name only when the added camera is online. Click
“Next” to continue.
⑦Record Settings. Two record modes are available: auto and manual.
Auto: Select one auto mode in the interface as shown below and then click the “Next” to save
the settings. Click “Advanced” to self-define record mode. See 9.1.1 Mode Configuration for
details.

SMT User Manual
Wizard & Main Interface
18
Manual: Set the “Sensor Record”, “Motion Record” and “Schedule Record” of each camera.
Click “OK” to save the settings. See 9.1.1 Mode Configuration for details.
⑧QRCode. Enable the NAT function in the interface or set it in the network configuration
after exiting the wizard (please refer to 13.1.8 NAT Configuration for details). You can scan the
QRCode through mobile client which is installed in the mobile phone or tablet PC to log in the
mobi c nt inle lie
sta
ntly.
P
lea
se
refer 14 to .1
M
ob Client ile
S
urve ance for details. Cliill ck
“
OK
”
to save the settings.
3.2
Main Interface
3.2.1 Main Interface Introduction

SMT User Manual
Wizard & Main Interface
19
The buttons in area are introduced in the table below. ①
Button
Meaning
Start button. Click it to pop up area . ③
Live Display
Click it to display the live image.
Statistics
Click it to enter the statistics interface, including over temperature statistics,
non-mask detection statistics, attendance statistics, personal records and
statistics.
Full screen button. Click it to show full screen; click it again to exit the full
screen.
Screen mode button.
Click it to enable OSD; click again to disable OSD.
Click to set the default playback time before starting instant playback
(10.1 Instant Playback) or going to the playback interface for playback
operations (10.2 Playback Interface Introduction); click to go to the
playback interface. For instance, you choose minutes the default if “5 ago” as
playback time, you can playback the record from the past five minutes.
Manual record button. Click it to enable/disable record.
Manual alarm button. Click it to trigger or clear the alarm-out manually in the
popup window.
Record status button. Click it to view the record status.
Alarm status button. Click it to view the alarm status.

SMT User Manual
Wizard & Main Interface
20
Button
Meaning
Disk status button. Click it to view the disk status.
Network status button. Click it to view the network status.
Information button. Click it to view system information.
Introduction of area : ②
Icon / Button
Meaning
It shows the current login user.
Click it to go to the attendance configuration and search interface.
Click it to go to the people management interface, see 6 People
Management for details.
Click it to go to record search and backup interface, see 10.3 Record
Search, Playback & Backup for details.
Click it to go to playback interface (click on the tool bar at the
bottom of the live preview interface to set the default playback time),
see 10.2 Playback Interface Introduction for details.
Click it to pop up the setup panel, see 3.2.2 Setup Panel for details.
Click it to log out the system.
Click it and then select “Logout”, “Reboot” or “Shutdown” in the
popup window.
Introduction of area
③/④/⑤
:
Area : Captured face picture display area. If the added device is a temperature ③
measurement and face recognition terminal, the body temperature will be displayed under the
captured face picture.
Area : Real-time statistical information display area. The statistical information includes ④
total pass-by counts, over temperature counts, mask off counts, block list counts, stranger
counts and VIP counts
Area : Camera list/real-time warning/intelligent detection display area. ⑤
3.2.2 Setup Panel
Click Start Settings to bring up the setup panel as shown below.

SMT User Manual
Wizard & Main Interface
21
The setup panel includes seven modules. Each module provides some function entries with
links for convenient operation.
Here we take module as an example. The module provides convenient links Camera Camera
such as “Add Camera”, “Edit Camera”, “Image Settings” and Click “Motion”. Camera to to go
the camera management interface as shown below.
Click the main menus on the top of the camera management interface to go to corresponding
interfaces. Refer to the picture below. For instance, you can go to system setup interface by
clicking “System” tag.
3.2.3 Main Functions
Camera
The module covers the functions such as (see Chapter 4 Camera Camera Management
Management for details), Image Settings (see 5.2 Preview Image Configuration for details) and
Motion (see 11.4 Motion Configuration for details)
Record
The module covers the functions such as Encode Parameters and Record Schedule and so on.
Please see Chapter 9 Record & Disk Management for details.
AI/Event
The module covers the functions such as Body Temperature Settings, Mask Settings,
Combination Alarm, Exception, Sensor and Motion Alarm
and
Alarm Out Settings
. Please
see Chapter 11 AI/Event Management for details.

SMT User Manual
Wizard & Main Interface
22
Disk
The module covers the functions such as and Disk Management, Storage Mode Disk
Information and so on. Please see Chapter 9 Record & Disk Management for details.
Network
The module covers the functions such as and TCP/IP, , DDNS Port, E-mail Network Status
and so on. Please see 13.1 Network Configuration for details.
Account and Authority
The module covers the functions such as (see 12.1 Account Account Management
Management for details) and Permission Management (see 12.3 Permission Management for
details) and so on.
System
The module covers the functions such as (see 13.2 Basic Configuration Basic Configuration
for details), (see 13.8 View System Information for details), Device Information Log
Information (see 13.7 View Log for details) and Configuration File Import&Export (see 13.5
Backup and Restore for details) and so on.

SMT User Manual
Camera Management
24
Add Manually
1.
Select the terminal type according to the device you want to add.
IP Panel: four terminal types can be selectable. Facial panel or attendance terminal is
suggested.
Facial IPC: The IPC which supports face recognition can choose this one.
2.
Enter the IP address/domain, port, device name, username and password.
3.
Click “Add” to add the camera/panel.
4.1.2 Edit Camera
Click the setup panel the interface shown below. Click “Edit Camera” in to go to as to

SMT User Manual
Camera Management
25
view the live image of the camera in the popup window. Click to edit the camera (see
Add camera in 3.1 Startup Wizard for details). Click
to delete the camera. Click
in
the “Operation” header line and then click “Modify IPC Password” to pop up a window(check
the IPCs in the window, set the new password and then click “OK”; only the online IPCs’
passwords can be modified and a batch of IPCs’ passwords can be modified at the same time).
Click to upgrade an online IPC ( or click click in the “Upgrade” header line and then
“IPC Batch Upgrade” to upgrade a batch of IPCs), select the device which stores the upgrade
file in the “Device Name” item of the popup window and the upgrade file in the list(you should
select the upgrade IPC model in the window if a batch of IPCs’ passwords need to be modified)
and then click “Upgrade” to start upgrading(the IPC will restart automatically after the upgrade
is completed successfully).
Note:
If you use the SMT with the PoE network ports, the IP cameras/panels (with PoE function)
which are directly connected to the PoE port of the SMT will be displayed automatically in the
camera list. Refer to the picture below. The IP camera/panel which occupies the PoE resource
has a prefix shown before its camera name. The prefix consists of PoE plus PoE port number.
The IP camera which connects to the PoE port cannot be deleted from the camera list manually.
The IP camera directly connected to the PoE port of the SMT through private protocol will
be shown automatically in the camera list.
One of the two conditions must be met if the IP camera/panel which is directly connected
to the PoE port of the SMT through ONVIF protocol should be shown automatically in the
camera list.
The IP camera/panel which is directly connected to the PoE port is in the same
network segment with the internal Ethernet port.
The DHCP (obtain an IP address automatically) of the IP camera/panel which is
directly connected to the PoE port is enabled.
If the IP camera which is connected to the PoE port cannot be displayed automatically in the
camera list, please refer to Q6 in Appendix A FAQ for details.
Product specificaties
| Merk: | Speco Technologies |
| Categorie: | Videorecorder |
| Model: | N8NRT |
Heb je hulp nodig?
Als je hulp nodig hebt met Speco Technologies N8NRT stel dan hieronder een vraag en andere gebruikers zullen je antwoorden
Handleiding Videorecorder Speco Technologies

23 Juni 2023
20 Juni 2023
17 Juni 2023
13 Juni 2023
12 Juni 2023
12 Juni 2023
10 Juni 2023
9 Juni 2023
8 Juni 2023
5 Juni 2023
Handleiding Videorecorder
- Videorecorder Bosch
- Videorecorder Philips
- Videorecorder Sony
- Videorecorder Samsung
- Videorecorder Panasonic
- Videorecorder LG
- Videorecorder Canon
- Videorecorder Daewoo
- Videorecorder Grundig
- Videorecorder JVC
- Videorecorder Motorola
- Videorecorder Medion
- Videorecorder Toshiba
- Videorecorder A.C.Ryan
- Videorecorder Abus
- Videorecorder Acti
- Videorecorder Airlive
- Videorecorder Aiwa
- Videorecorder Aristona
- Videorecorder Axis
- Videorecorder Bang Olufsen
- Videorecorder Blaupunkt
- Videorecorder D-Link
- Videorecorder Digitus
- Videorecorder Dual
- Videorecorder Elro
- Videorecorder Evga
- Videorecorder Ezviz
- Videorecorder Foscam
- Videorecorder GeoVision
- Videorecorder Grandstream
- Videorecorder Hikvision
- Videorecorder Hitachi
- Videorecorder LevelOne
- Videorecorder Linksys
- Videorecorder Lorex
- Videorecorder Magnavox
- Videorecorder Magnum
- Videorecorder Monacor
- Videorecorder Navitel
- Videorecorder Provision ISR
- Videorecorder QNAP
- Videorecorder Seagate
- Videorecorder Skytronic
- Videorecorder Sylvania
- Videorecorder Synology
- Videorecorder Technaxx
- Videorecorder Tenda
- Videorecorder TP Link
- Videorecorder Trendnet
- Videorecorder Vivotek
- Videorecorder Zoom
- Videorecorder Kunft
- Videorecorder Ubiquiti Networks
- Videorecorder Imou
- Videorecorder Tripp Lite
- Videorecorder Planet
- Videorecorder DataVideo
- Videorecorder Dahua Technology
- Videorecorder UniView
- Videorecorder Reolink
- Videorecorder Blackmagic Design
- Videorecorder Moxa
- Videorecorder Digital Watchdog
- Videorecorder AVer
- Videorecorder DirecTV
- Videorecorder Vimar
- Videorecorder Hanwha
- Videorecorder Inkovideo
- Videorecorder Pentatech
- Videorecorder Ernitec
- Videorecorder HiLook
- Videorecorder Mach Power
- Videorecorder Avigilon
- Videorecorder IDIS
- Videorecorder Milesight
Nieuwste handleidingen voor Videorecorder
2 April 2025
29 Maart 2025
12 Maart 2025
12 Maart 2025
25 Februari 2025
25 Februari 2025
13 Februari 2025
13 Februari 2025
11 Februari 2025
11 Februari 2025