Sony Bravia KDL-32R300B Handleiding
Lees hieronder de 📖 handleiding in het Nederlandse voor Sony Bravia KDL-32R300B (68 pagina's) in de categorie Televisie. Deze handleiding was nuttig voor 76 personen en werd door 2 gebruikers gemiddeld met 4.5 sterren beoordeeld
Pagina 1/68

KDL-40R380B / 40R350B / 32R330B / 32R300B
Television
Téléviseur
Sony Customer Support
U.S.A.:
http://www.sony.com/tvsupport
Canada:
http://www.sony.ca/support
United States Canada
1.800.222.SONY 1.877.899.SONY
Please Do Not Return
the Product to the Store
Service à la clientèle Sony
Canada :
http://support.sony.ca/fr
États-Unis :
http://www.sony.com/tvsupport
Canada États-Unis
1.877.899.SONY 1.800.222.SONY
Ne retournez pas le produit au magasin
Operating Instructions US
(Setup Guide)
Mode d’emploi FR
(Guide d’installation)

2US
CAUTION
To prevent electric shock and blade exposure, do not use this polarized
AC plug with an extension cord, receptacle or other outlet unless the
blades can be fully inserted.
Location of the identification label
Labels for the TV Model No., Power Supply rating (in accordance with
applicable safety regulation) and Manufacturing date are located on
the rear of the TV.
Note:
• The illustrations of the remote control used in this manual are of the
RM-YD092 unless otherwise stated.
• The illustrations used in this manual may differ depending on your
TV model.
Cleaning
When cleaning, be sure to unplug the power cord to avoid any chance
of electric shock.
• Wipe the LCD screen gently with a soft cloth.
• Stubborn stains may be removed with a cloth slightly moistened
with a solution of mild soap and warm water.
• If using a chemically pretreated cloth, please follow the instruction
provided on the package.
• Never use strong solvents such as a thinner, alcohol or benzine for
cleaning.
• See the supplied Safety Booklet for additional information.
Owner’s Record
The model and serial numbers are located at the side and rear
of the TV. Record these numbers in the spaces provided below.
Refer to them whenever you call upon your Sony dealer
regarding this TV.
Model Name
Serial No.
The 32 class has a 31.5 inch viewable image size (measured
diagonally).

3US
US
Table of Contents
Introducing Your New BRAVIA®
Getting Started
Checking the Accessories. . . . . . . . . . . . . . . . 6
Inserting Batteries into the
Remote Control . . . . . . . . . . . . . . . . . . . . . . . . 6
Setting Up Your TV . . . . . . . . . . . . . . . . . . . . . 7
Attaching the Table-Top Stand . . . . . . . . . . . 7
Connecting the TV . . . . . . . . . . . . . . . . . . . . . 8
Cable System or VHF/UHF Antenna System . . . 8
Cable System and VHF/UHF Antenna
System . . . . . . . . . . . . . . . . . . . . . . . . . . . . . . . . . 8
HD Cable Box/HD Satellite Box . . . . . . . . . . . . . 9
Securing the TV . . . . . . . . . . . . . . . . . . . . . . . 10
Preventing the TV from Toppling. . . . . . . . . . . 10
Recommended Measures to
Secure the TV. . . . . . . . . . . . . . . . . . . . . . . . . . . 10
Running Initial Setup . . . . . . . . . . . . . . . . . . .11
Parts and Controls
TV . . . . . . . . . . . . . . . . . . . . . . . . . . . . . . . . . . 12
Remote Control . . . . . . . . . . . . . . . . . . . . . . . 13
Watching TV
Changing the Viewing Style. . . . . . . . . . . . . 15
Changing the Wide Mode . . . . . . . . . . . . . . . . .15
Setting Scene Select . . . . . . . . . . . . . . . . . . . . . .15
Navigating through Home Menu
Favorites . . . . . . . . . . . . . . . . . . . . . . . . . . . . 16
Applications . . . . . . . . . . . . . . . . . . . . . . . . . 16
Using the TV as a Photo Frame . . . . . . . . . . . . 16
Media. . . . . . . . . . . . . . . . . . . . . . . . . . . . . . . .17
Playing back Photo/Music/Video via USB . . . .17
Settings . . . . . . . . . . . . . . . . . . . . . . . . . . . . . 18
Preferences . . . . . . . . . . . . . . . . . . . . . . . . . . . . 18
Customer Support. . . . . . . . . . . . . . . . . . . . . . . 25
Viewing Pictures from Connected
Equipment
Connection Diagram. . . . . . . . . . . . . . . . . . . 26
Using Audio and Video Equipment. . . . . . . 27
Additional Information
Using a Wall-Mount Bracket . . . . . . . . . . . . 28
Installing the TV Against a Wall or
Enclosed Area . . . . . . . . . . . . . . . . . . . . . . . . 28
Troubleshooting . . . . . . . . . . . . . . . . . . . . . . 29
Picture . . . . . . . . . . . . . . . . . . . . . . . . . . . . . . . . 29
Sound . . . . . . . . . . . . . . . . . . . . . . . . . . . . . . . . . 29
Channels . . . . . . . . . . . . . . . . . . . . . . . . . . . . . . 29
General. . . . . . . . . . . . . . . . . . . . . . . . . . . . . . . . 30
Specifications . . . . . . . . . . . . . . . . . . . . . . . . 30
Safety Information . . . . . . . . . . . . . . . . . . . . 32

4US
Customer Support
United States
http://www.sony.com/tvsupport
Canada
http://www.sony.ca/support
On-line Registration
United States
http://productregistration.sony.com
Canada
http://www.sony.ca/registration

5US
US
Welcome to the World of BRAVIA®
Thank you for choosing this Sony BRAVIA® high-
definition television. Use the documentation listed
below to get the most out of your TV.
Please take a moment to register your TV at:
U.S.A.: http://productregistration.sony.com
Canada: http://www.sony.ca/registration
Experiencing Stunning HD with Your BRAVIA
TV
To experience the stunning detail of your new
BRAVIA TV, you need access to high-definition (HD)
programming. Your BRAVIA TV can receive and
display HD programming from:
Over-the-air broadcasting via HD-quality antenna
HD cable subscription
HD satellite subscription
Blu-ray Disc™ player or other HD compatible
external equipment
Contact your cable, satellite or HD service provider
for information on upgrading to HD programming.
The Four Steps to a Full HD Experience
Set, Sound, Source, and Setup
Along with your BRAVIA TV set, a complete HD
system requires an HD sound system, a source of
HD programming and a proper connection setup.
Refer to the Quick Setup Guide, enclosed
separately, for connecting optional equipment.
Introducing Your New BRAVIA®
Safety Booklet
Contains precautionary measures to
keep you and your TV safe. Read this
information prior to setting up your TV.
Operating Instructions
Provides the most detailed information
to operate your TV.
Quick Setup Guide
Provides TV setup information with
sample connection diagrams.

6US
Checking the Accessories
Remote control (1)*1
Size AAA batteries (2)
AC power cord (1)
Table-Top Stand (1)
Fixing screws for Table-Top Stand (M4 × 18) (4)
Operating Instructions (1)
Quick Setup Guide (1)
Safety and Regulatory Booklet (1)
Software License (1)
Stand Installation Guide (1)
*1 Please refer to the model name printed on the remote
control.
Inserting Batteries into the
Remote Control
1Remove the protection sheet.
2Push and slide the cover to open.
Guidelines for Remote Control
Point your remote control directly at the IR sensor
located on your TV.
Make sure that no objects are blocking the path
between the remote control and the IR sensor on
your TV.
Fluorescent lamps can interfere with your remote
control; try turning off the fluorescent lamps.
If you are having problems with the remote
control, reinsert or replace your batteries and
make sure that they are correctly inserted.
Getting Started

7US
US
Setting Up Your TV
Some TV models are packaged with a detached
Table-Top Stand so you can mount your TV to a wall
right away. If you are not mounting the TV to a wall,
you will need to attach the Table-Top Stand. You will
need a Phillips screwdriver (not supplied) and the
supplied screws to complete the task. Look for the
supplied Table-Top Stand instruction leaflet.
Be sure to consider the following while setting up
your TV:
Disconnect all cables when carrying the TV.
Carry the TV with the adequate number of
people; larger size TVs require two or more
people.
Correct hand placement while carrying the TV is
very important for safety and to avoid damage.
Do not put stress on the LCD panel or the frame
around the screen.
Ensure your TV has adequate ventilation, see
page 28.
For best picture quality, do not expose the screen
to direct illumination or sunlight.
Avoid installing the TV in a room with reflective
wall and floor materials.
Avoid moving the TV from a cold area to a warm
area. Sudden room temperature changes may
cause moisture condensation. This may cause the
TV to show poor picture and/or poor color. Should
this occur, allow moisture to evaporate
completely before powering the TV on.
Ensure that there are no objects in front of the TV.
Attaching the Table-Top Stand
Note
• If using an electric screwdriver, set the tightening torque
at approximately 1.2N·m {12kgf·cm}.
• When detaching the Table-Top Stand, reverse the
attaching procedure.
• Be sure the TV is vertical before turning on. To avoid
uneven picture uniformity do not power on the TV with
the LCD panel facing down.
• When attaching the Table-Top Stand again, be sure to
fasten the screws (previously removed) to the original
holes on the rear of the TV.
KDL-40R380B/40R350B
IR Sensor

8US
KDL-32R330B/32R300B
Connecting the TV
You can enjoy high-definition and standard-
definition digital programming (if available in your
area) along with standard-definition analog
programming.
This TV is capable of receiving unscrambled digital
programming for both cable (QAM and 8VSB) and
external VHF/UHF antenna (ATSC).
Cable or VHF/UHF (or VHF only)
Note
• It is strongly recommended that you connect the CABLE/
ANTENNA input using a 75-ohm coaxial cable to receive
optimum picture quality. A 300-ohm twin lead cable can
easily be affected by radio frequency interference,
resulting in signal degradation.
Use an optional A-B RF switch (not supplied) to
switch between the cable and over-the-air antenna
programming, as indicated below.
Note
• Be sure to set the Signal Type setting to Cable or
Antenna found under the Channel settings for your input
signal (page 20).
Cable System or VHF/UHF Antenna System
Cable System and VHF/UHF Antenna
System
75-ohm
coaxial cable
CABLE/ANTENNA
Rear of TV
B
A
A/B RF Switch
Cable
Antenna
Rear of TV
CABLE/ANTENNA

9US
US
You can enjoy high-definition programming by
subscribing to a high-definition cable service or a
high-definition satellite service. For the best
possible picture, make sure you connect this
equipment to your TV via the HDMI or component
video (with audio) input located on the back of your
TV.
Shown with HDMI Connection
Shown with Component Connection
HD Cable Box/HD Satellite Box
Rear of TV
Set Top Box
Rear of TV
Set Top Box
10US
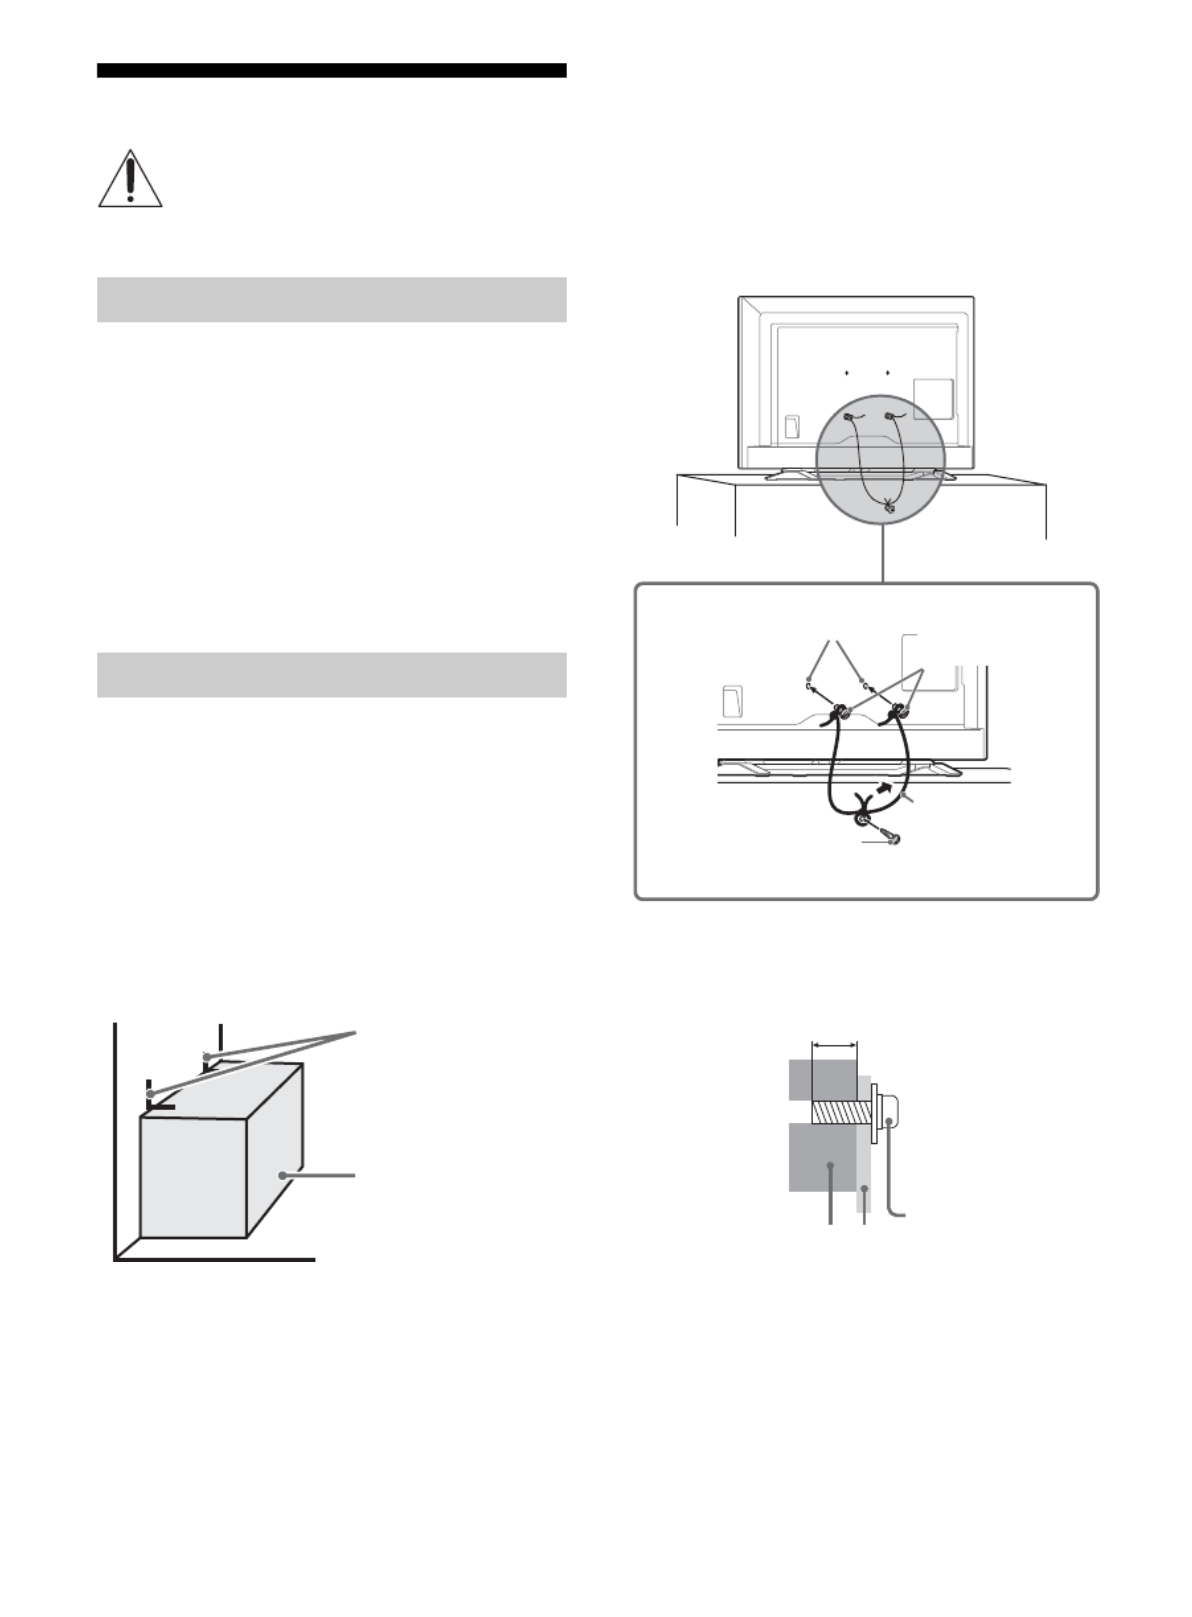
Securing the TV
Secure the TV to a wall and/or stand.
Do not allow children to play or climb on furniture
and TV sets.
Avoid placing or hanging items on the TV.
Never install the TV on:
slippery, unstable and/or uneven surfaces.
furniture that can easily be used as steps, such
as a chest of drawers.
Install the TV where it cannot be pulled, pushed,
or knocked over.
Route all AC power cords and connecting cables
so that they are not accessible to curious children.
Consider the following measures when securing
your TV to a TV stand (not supplied).
1Secure the stand for the TV.
Make sure the TV stand can adequately support
the weight of the TV. Use two angle braces (not
supplied) to secure the stand.
For each angle brace use the appropriate
hardware to:
Attach one side of the angle brace to the wall
stud.
Attach the other side to the TV stand.
2Secure the TV to the stand.
Use the optional hardware listed below (not
supplied):
M4 machine screw (screwed into the screw
hole of the TV).
A screw or similar (attach it to the TV stand).
Rope or chain (strong enough to support the
weight of the TV). Make sure that there is no
excess slack in the rope or chain.
The length of the M4 machine screw differs
depending on the rope or chain diameter. Please
refer to below illustration.
Sony strongly recommends taking
measures to prevent the TV from toppling
over. Unsecured TVs may topple and result
in property damage, serious bodily injury
or even death.
Preventing the TV from Toppling
Recommended Measures to Secure the TV
Angle braces
(not supplied)
Stand
Screw
(not supplied)
Rope or chain
(not supplied)
Screw hole of the TV M4 machine screw
(not supplied)
9-13 mm
Screw M4
Rope or chainTV

11US
US
3Anchor the TV to the wall by using bolts, wall
anchor and chain (or rope).
Note
• Your TV is shipped with screws attached to the rear of the
TV depending on the TV model. (They are fastened in the
screw holes for wall mounting.) Be sure to remove the
upper two screws prior to anchoring the TV to a wall.
• Securing the TV to the stand without securing the TV and
the stand to the wall provides minimum protection
against the TV toppling over. For further protection, be
sure to follow the three measures recommended.
Running Initial Setup
1Complete your cable connections before
proceeding with the Initial Setup. Refer to
the Quick Setup Guide (supplied) for
sample connection diagrams.
Note
• When the TV is in standby mode (the LED indicator
does not light up), press POWER on the remote
control to turn on the TV.
2Press / / / to select an item, then
press .
Follow the instructions on the screen.
Note
• You can also tune channels manually.
• Select Home from Location for the best TV settings
to use the TV in the home.
Wall-mount
holes
Rope or chain
(not supplied)
Anchor bolts
(not
supplied)
Wall-anchor
(not supplied)
Welcome! Please select a language.
¡Bienvenido! Seleccione el idioma.
Bienvenue! Sélectionner la langue.
12US
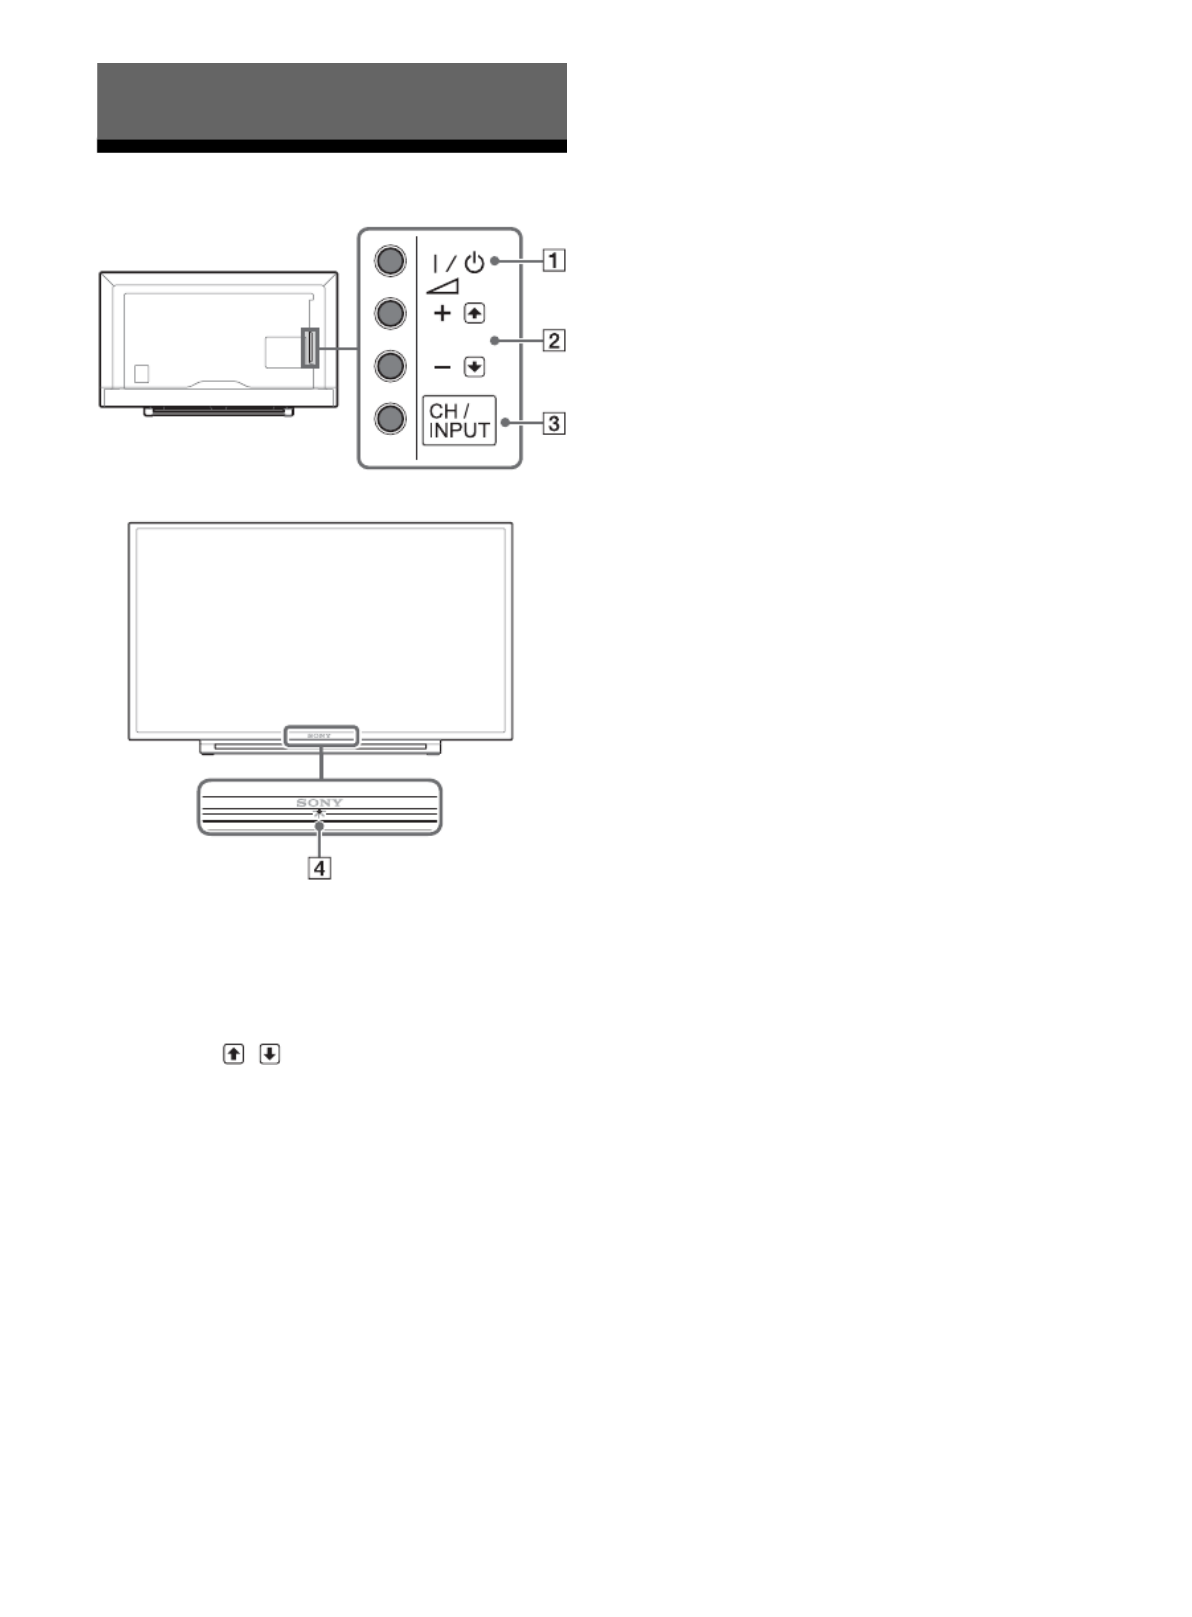
TV
/ (Power)
Turns the TV on or to switch to standby mode.
Note
• To disconnect the TV from the AC power completely,
pull the plug from the AC power outlet.
+ / – / /
• Increases/decreases the volume, or selects
the next (+) or previous (–) channel when the
CH Up/Down notification is displayed by
pressing the CH/INPUT button.
• Moves the selected input source up/down
when the input select menu is displayed by
pressing the CH/INPUT button.
CH/INPUT
Switches between the CH Up/Down screen and
the input select screen.
(Sensors/LED indicator)
• Receives signals from the remote control.
Do not put anything over the sensor.
Doing so may affect its function.
• Lights up in amber when the Sleep Timer/On
Timer is set (page 23), or the TV is in Photo
Frame Mode (page 16).
• Lights up in green when Power Saving is set
to Picture Off (page 25).
• Lights up in green when the TV is turned on.
• Does not light up when the TV is in standby
mode.
• Flashes while the remote is being operated.
Note
• Make sure that the TV is completely turned off before
unplugging the AC power cord.
Hint
• The + button has a tactile dot. Use it as a reference
when operating the TV.
Parts and Controls

13US
US
Remote Control
INPUT
Displays and selects the input source (page 27).
SYNC MENU
Press to display the BRAVIA Sync Menu and
then select connected HDMI/MHL equipment
from Device Selection.
The following options can be selected from
BRAVIA Sync Menu.
Device Control:
Use the Device Control to operate equipment
that is compatible with BRAVIA Sync Control.
Select options from Home (Menu), , Options
Content List and Power Off to operate the
equipment.
Speakers:
Select TV Speakers or Audio System to output
the TV’s sound from the TV speakers or
connected audio equipment.
TV Control:
Use the TV Control menu to operate the TV
from the Home (Menu) or Options menu.
Return to TV:
Selects this option to return to TV programme.
PIC OFF
Press to turn picture off, and sound remains on.
0-9
Select channels. For channel numbers 10 and
above, enter the next digit quickly.
Use with
0-9
to select digital channels.
For example, to enter 2.1, press , ,
and .
Color buttons
Display operation guide (when coloured
buttons are available).
SLEEP
Press repeatedly until the TV displays the time
in minutes Off/15/30/45/60/90/120 that you
want the TV to remain on before shutting off. To
cancel the sleep timer, press SLEEP repeatedly
until Off appears.
////
• Select or adjust items.
• Confirm selected items.
RETURN
• Returns to the previous screen of any
displayed menu.
• Stops playback when playing photo/music/
video file.
HOME
Displays or cancels the menu.
VOL +/–
Adjusts volume.
(fastreverse)/ (PLAY)/ (fast
forward)/ (PREV)/ (PAUSE)/
(STOP)/ (NEXT)
• Operates the connected BRAVIA Sync-
compatible equipment.
• These keys can also be used to operate USB
media playback.

14US
POWER
Turns the TV on or switches to standby mode.
WIDE
Adjusts the screen display. Press repeatedly to
select the desired wide mode (page 15).
CC/SUBTITLE
Changes the subtitle setting (page 22).
DISPLAY
Displays information. Press once to display
information about the program/input you are
viewing. Press again to remove the display from
the screen.
OPTIONS
Press to display a list that contains shortcuts to
some setting menus.
The listed options vary depending on the
current input and content.
JUMP
Returns to the previous channel or input viewed
more than 15 seconds.
CH +/–
Select the next (+) or previous (–) channel.
MUTING
Mutes the sound. Press again to restore the
sound.
Hint
• The number 5, and CH + buttons have a tactile dots.
Use the tactile dots as references when operating the TV.

15US
US
1Press / on the TV or POWER on the
remote control to turn on the TV.
2Press PIC OFF to turn picture off, and sound
remains on.
3Press the number buttons or CH +/– to
select a TV channel.
4Press VOL +/– to adjust the volume.
Changing the Viewing Style
1Press WIDE repeatedly to select the wide
mode.
For HDMI PC Input (PC timing)
1Press OPTIONS.
2Press / . then to select Scene Select
When you select the desired scene option, the
optimum sound and picture quality for selected
scene are automatically set. The options you
can select may vary. Unavailable options are
greyed out.
Watching TV
Changing the Wide Mode
Wide Zoom*Normal
Full Zoom*
* Parts of the top and bottom of the picture may
be cut off.
Normal Full 1
Full 2
Setting Scene Select

17US
US
Media
You can enjoy photo/music/video files stored in a
Sony digital still camera or camcorder through a
USB cable or USB storage device on your TV.
1Connect a supported USB device to the TV.
2Press HOME.
3Press / . then to select Media
4Press / then to select Photo, Music or
Video.
If a Card Reader is connected, press the yellow
button to select Playback Method then Device
Selection to select the appropriate USB device.
5Press / / / then to select a file or
folder.
Playback Method
Press the yellow color button to display list of USB
playback settings.
To adjust the picture quality of USB video
1Press OPTIONS during video playback.
2Press / then to select Picture
Adjustments.
3Press / / / then to select and adjust
an item.
To play a photo as a slideshow (Photo)
1Press the blue button in thumbnail view to
start slideshow.
To set Slideshow Effect and Slideshow
Speed, press OPTIONS Playback
Method.
To stop a slideshow, press RETURN.
Note
• While the TV is accessing the data on a USB device,
observe the following:
Do not turn off the TV.
Do not disconnect the
USB
cable.
Do not remove the
USB
device.
The data on the USB device may be damaged.
• Sony will not be held liable for any damage to, or loss of,
data on the recording media due to a malfunction of any
connected devices or the TV.
• USB Auto Start shows photo files in the newest digital still
camera folder (DCF-compliant, highest-numbered “DCIM”
folder).
• USB Auto Start may not work automatically when some
digital still cameras are connected.
• When you connect a Sony digital still camera, set the
camera’s USB connection mode to “Auto” or “Mass
Storage.” For more information about USB connection
mode, refer to the instructions supplied with your digital
camera.
• Use a USB storage device that is compliant with USB Mass
Storage Class standards.
• The file system on the USB device supports FAT16, FAT32
and NTFS.
• The file name and folder name may not display correctly
in some cases.
• If a selected file has incorrect container information, or is
incomplete, it cannot be played back.
Playing back Photo/Music/Video via USB

18US
USB Video format
USB Music format
• LPCM (.wav)
• MPEG1, audio layer3 (.mp3)
• WMA v8 (.wma)
USB Photo format
• JPEG (.jpg, .jpeg)
Note
• Playback of the above file formats is not guaranteed.
Settings
Note
• The options you can adjust vary depending on the
situation. Unavailable options are greyed out or not
displayed.
• AVI (.avi)
Video Codec: MPEG1, MPEG2 MP, XviD, MPEG-4
SP/ASP, H.264 BP/MP/HP, Motion
JPEG
Audio Codec: PCM, MPEG1 Layer1/2, MPEG2
AAC (2ch), MPEG4 AAC (2ch),
MPEG4 HE-AAC (2ch), Dolby
Digital (2ch), WMA v8
• ASF (.wmv, .asf)
Video Codec: WMV v9, XviD, VC-1
Audio Codec: MP3, WMA v8
• MP4 (.mp4, .mov, .3gp)
Video Codec: MPEG-4 SP/ASP, H.264
BP/MP/HP, H.263, Motion JPEG
Audio Codec: MPEG1 Layer1/2, MP3, MPEG2
AAC, MPEG4 AAC, MPEG4
HE-AAC
• MKV (.mkv)
Video Codec: WMV v9, MPEG-4 SP/ASP, H.264
BP/MP/HP, VC-1, VP8
Audio Codec: PCM, MPEG1 Layer1/2, MP3,
MPEG2 AAC (2ch), MPEG4 AAC
(2ch), MPEG4 HE-AAC (2ch),
Dolby Digital (2ch), WMA v8, DTS,
DTS 2.0, VORBIS
• WebM (.webm)
Video Codec: VP8
Audio Codec: VORBIS
• PS (.mpg, .mpeg, .vro, .vob)
Video Codec: MPEG1, MPEG2 MP
Audio Codec: MPEG1 Layer1/2, MP3, Dolby
Digital (2ch), DTS, DTS 2.0
• TS (.ts, .m2ts)
Video Codec: MPEG2 MP, H.264 BP/MP/HP,
VC-1
Audio Codec: MPEG1 Layer1/2, MP3, MPEG2
AAC, MPEG4 AAC, MPEG4
HE-AAC, Dolby Digital (2ch), DTS,
DTS 2.0
Preferences
Picture
Picture Mode
Sets a picture mode.
The options that can be selected differ
depending on the Scene Select settings.
Reset
Resets all the Picture settings except Picture
Mode to the default settings.
Backlight
Adjusts the brightness of the backlight.
Picture
Increases or decreases picture contrast.
Brightness
Brightens or darkens the picture.
Color
Increases or decreases color intensity.
Hue
Increases or decreases the green tones and
red tones.
Sharpness
Sharpens or softens the picture.
Color Temperature
Adjusts the whiteness of the picture.
Noise Reduction
Reduces the picture noise (snowy picture) in a
weak broadcast signal.
MPEG Noise Reduction
Reduces the picture noise in MPEG-
compressed video.

19US
US
CineMotion
Provides improved picture movement when
playing BD (Blu-ray Disc), DVD or VCR images
taken on film, reducing picture blur and
graininess. Select Auto to represent original
film-based content as it is.
Note
• If the image contains irregular signals or too much
noise, CineMotion is automatically turned off even
if Auto is selected.
Advanced Settings
Sets Picture settings in more detail.
Reset: Resets all the advanced settings to
the factory settings.
Adv. Contrast Enhancer: Automatically
adjusts Backlight and Picture to the
most suitable settings judging from the
brightness of the screen. This setting is
especially effective for dark images
scenes, and will increase the contrast
distinction of the darker picture scenes.
Black Corrector: Enhances black areas of
the picture for stronger contrast.
Gamma: Adjusts the balance between
bright and dark areas of the picture.
Clear White: Emphasises white colors.
Live Color: Makes colors more vivid.
LED Motion Mode: Reduces blur in movies
by controlling the LED backlight source,
but the brightness decreases.
Sound
Sound Mode
Select according to content you want to
enjoy.
Reset
Resets all the Sound settings except Sound
Mode, MTS Audio and Alternate Audio to
the default settings.
Equalizer
Adjusts sound frequency settings.
Sound Booster
Produces a fuller sound for more impact, by
emphasising the bass sounds.
Clear Voice
Makes voices sound clearer.
Steady Sound
Select On to stabilize the volume across all
programs and commercials.
Select Off to disable this function.
Balance
Emphasizes left or right speaker balance.
Volume Offset
Adjusts the volume level of the current input
relative to other inputs.
MTS Audio
Enjoy stereo, bilingual and mono programs.
Stereo: Select for stereo reception when
viewing a program broadcast in stereo.
Auto SAP: Select to automatically switch
the TV to second audio programs when
a signal is received. If no SAP signal is
present, the TV remains in Stereo mode.
Mono: Select for mono reception. Use to
reduce noise during weak stereo
broadcasts.
Alternate Audio
Digital channels only.
Select among the available options to
switch among the alternate audio
streams. The program you are tuned to
may be broadcasted in a different
language in the alternate audio streams.
Screen
Wide Mode
For details about wide mode, see page 15.
Auto Wide
Automatically changes the wide mode
according to the input signal from an external
equipment. To keep your setting, select Off.
Hint
• Even if Auto Wide is set to On or Off, you can
always modify the format of the screen by pressing
WIDE repeatedly.
4:3 Default
Sets the default Wide Mode for a 4:3 input
signal.

20US
Auto Display Area
Select On to automatically adjusts the display
area based upon the content or Off to choose
from the Display Area options.
Display Area
Adjusts the picture display area.
Horizontal Center
Adjusts the horizontal position of the picture.
Vertical Center
Adjusts the vertical position of the picture.
PC Settings
Selects screen mode or adjust the display
position of the picture when receiving PC
input signal.
Channel
Signal Type
Cable: Select if you are receiving cable
channels via Cable TV provider.
Antenna: Select if you are using an
antenna.
Auto Program
Automatically sets up the channel list on the
TV for all receivable channels.
Select Auto Program.
Select OK to start Auto Program.
Add Digital Channels
Select Add Digital Channels.
Select OK to add digital channels.
Show/Hide Channels
Allows you to show or hide channels that
appear when you use the CH +/– buttons.
Press / to scroll through the channels until
you find the channel you want to show or
hide. Then press to select it.
Press / to determine if the channel will be
shown or hidden. Then press to select it.
Edit Channel Labels
Allows you to assign labels (such as station
call letters) to channel numbers.
Press / to scroll through the channel
numbers. Then press to select the channel
number that you want to assign a label.
Press / to scroll through the label
characters (A-Z, 0-9, etc.). Press to move to
the next character. Repeat the previous steps
to add up to seven characters to the label.
When finished, press .
Analog Fine Tune
Allows you to fine-tune the selected analog
channel manually if you feel that a slight
tuning adjustment may improve picture
quality. Select Auto to adjust to the most
appropriate analog channel.
Audio Filter
Select On to improve the sound of individual
channels when distortion occurs in mono
broadcasts.
Parental Lock
Password
Sets up TV to block channel or external input.
Use 0-9 on the remote to enter a four-digit
password.
Change Password
Select to change your password.
Country
U.S.A.: Select to use U.S.A. ratings
(page 21).
Canada: Select to use Canadian ratings
(page 22).

21US
US
Rating
Off: Turn Parental Lock off. No programs
are blocked from viewing.
Child: Maximum ratings permitted are:
U.S.: TV-Y, TV-G, G
Canada: C, G, TV-Y
Youth: Maximum ratings permitted are:
U.S.: TV-PG, PG
Canada: C8+, PG, 8 ans+, TV-PG
Young Adult: Maximum ratings permitted
are:
U.S.: TV-14, PG-13
Canada: 14+, 13 ans+, TV-14
Custom: Select to set ratings manually.
U.S.: See page 21 for details.
Canada: See page 22 for details.
Downloadable U.S. Rating
(Available only in U.S.A. where advanced
ratings exist)
Off: Turn Downloadable U.S. Rating off.
No programs that contain downloadable
ratings are blocked from viewing.
Custom: Select to block programs based
on downloadable ratings.
Clear All: Select to clear the entire
downloadable rating system.
Unrated
(Available only when Country is set to U.S.A.)
Allow: Allows programs and movies that
are broadcasted without a rating.
Block: Blocks all programs and movies that
are broadcasted without a rating.
Channel Block
Allows you to block channels regardless of
program ratings.
To View a Blocked Channel
Press when tuned to the blocked channel
then enter the password.
External Input Block
Locks an external input from being watched.
To view a blocked external input, select
Unblocked.
Note
• Entering the correct password for blocked channel
or external input will temporarily deactivates the
Parental Lock feature. To reactivate the Parental
Lock settings, turn off and on the TV.
• Selecting Clear All will delete the current
Downloadable U.S. Rating menu and the menu
will no longer be available until the TV is tuned to a
channel that contains downloadable ratings.
Hint
• If you lost your password, see page 30.
US Models: Selecting Custom Parental
Lock Rating Options
To select custom rating options for the U.S.,
select U.S.A. in the Country setting (page 20).
Movie Rating
G: All children and general audience.
PG: Parental guidance suggested.
PG-13: Parental guidance for children
under 13.
R: Restricted viewing, parental guidance is
suggested for children under 17.
NC-17 and X: No one 17 or under allowed.
TV Rating
Block programs by their rating, content or
both
Age-Based Ratings
TV-Y: All children.
TV-Y7: Directed to children age 7 and older.
TV-G: General audience.
TV-PG: Parental guidance suggested.
TV-14: Parents strongly cautioned.
TV-MA: Mature audience only.
Content-Based Ratings
FV: Fantasy violence.
D: Suggestive dialog.
L: Strong language.
S: Sexual situations.
V: Violence.
22US
Canadian Models: Selecting Custom
Parental Lock Rating Options
To select custom rating options for Canada,
select Canada in the Country setting
(page 20).
English Rating
C: All children.
C8+: Children 8 years and older.
G: General programming.
PG: Parental guidance.
14+: Viewers 14 and older.
18+: Adult programming.
French Rating
G: General programming.
8 ans+: Not recommended for young
children.
13 ans+: Not recommended for ages under
13.
16 ans+: Not recommended for ages under
16.
18 ans+: Programming restricted to adults.
U.S.A. Rating
See “US Models” on page 21 for details.
Setup
Photo Frame Settings
Display Mode: Allows you to select the
display mode. Select from Image and
Clock, Full Screen Image and Full
Screen Clock.
Clock Display: Allows you to select the
clock display.
Audio Application: Sets Music or Off as
audio application.
Image Selection: Select image.
Music Selection: Select music.
Slideshow Setting: Select from showing
slideshow mode or single view photo.
Music Playback Setting: Select from
listening to all tracks or a single music
track.
Duration: Select the time period (1 h, 2 h,
4 h or 24 h) after which the TV
automatically switches to standby
mode.
First day of the week: Set Sunday or
Monday as the first day of the week on
the calendar.
USB Auto Start
When USB device is connected to the USB
port, select On to automatically view the
thumbnail of the last played Photo/Music/
Video.
Closed Captions (CC)
Allows you to select from several closed
caption modes (for programs that are
broadcast with closed captioning).
CC Display:
On
Closed Captions (CC) is turned on.
Off
Closed Captions (CC) is turned off.
On when Muting
Closed Captions (CC) is turned on when
the TV is muted.
Analog CC: Allows you to select basic
analog (EIA-608) closed caption options.
CC1, CC2, CC3, CC4
Displays a printed version of the dialog or
sound effects of a program. (Should be set
to CC1 for most programs.)
Text1, Text2, Text3, Text4
Displays network/station information
presented using either half or the whole
screen (if available).
Digital CC: When the digital closed caption
service is available, select from the
Service 1-6 or CC1-4.
Digital CC Options: Allows you to make
additional settings for digital closed
caption options. Select As Broadcast or
Custom Custom. The option is available
on the Digital CC setting.

23US
US
Custom: Allows you to customize the
following settings:
Character Size
Small, Standard, Large
Character Style
Style 1-7
Character Color
Color 1-8
Character Opacity
Solid, Translucent
Edge Type
None, Raised, Depressed, Outline, Left
Shadow, Right Shadow
Edge Color
Color 1-8
Background Color
Color 1-8
Background Opacity
Solid, Translucent
Window Color
None, Color 1-8
Window Opacity
Solid, Translucent
Audio Description
Provides an audio description (narration) of
visual information, when available.
Info Banner
Displays the information related to the input
signal you are watching. Select Small to
display minimal channel and program title or
select Large to display detailed channel and
program information along with the TV icon if
you are viewing the TV. Select Hidden to hide
information about the TV channel or program.
This information will appear if it is available
from the broadcaster. Info Banner appears
on the screen each time the channel and
external inputs are changed or when
DISPLAY on the remote control is pressed.
Clock/Timers
Sets the timer and clock.
Sleep Timer: Set the time in minutes that
you would like the TV to remain on
before shutting off automatically.
On Timer: Turns on the TV from standby
mode at a time you set, and tuned to a
channel or input of your preference or
photo frame mode. Before setting this
function, make sure you set the correct
current Time.
Current Time: You can set the current time
and date. This feature also can be set
from initial setup.
Initial Setup
Starts the initial setup procedure. This option
allows you to retune the TV after moving
house, or to search for new channels that
have been launched by broadcasters.
Language
Select the language in which the menus are
displayed.
Startup Logo
Select On to display the logo when the TV is
turned on. Select Off to disable it.
LED Indicator
Select On to light up the LED indicator. Select
Off to disable it.
AV Setup
Manage Inputs: Assigns name to external
equipment input.
Select Always to display names, or Off
to disable input.
Video/Component Selection: Select Auto
to have the TV detect and switch
between the component video jack
or the video jack when component
video jack or video jack is
connected.
Note
• You cannot use the component video jack and
the video jack at the same time
Speakers: Select sound output from the TV
speakers or external audio equipment.
Headphone/Audio Out: Sets the sound
output to headphones, external audio
systems or Active Subwoofer connected
to the TV. Disconnect headphones from
the TV when you select Audio Out or
Subwoofer.
Headphone Speaker Link: Switches the
TV’s internal speakers on/off when you
connect headphones to the TV.

24US
Headphone Volume: Adjusts the volume
of the headphones.
Note
• This option is not available, when Headphone/
Audio Out is set to Audio Out.
Audio Out:
Variable: When using an external audio
system, volume output from audio out can
be controlled using the TV’s remote.
Fixed: The audio output of the TV is fixed.
Use your audio receiver’s volume control to
adjust the volume (and other audio
settings) through your audio system.
Digital Audio Out: Sets the audio signal
that is output by connecting using
digital audio output (optical) cable or
HDMI (ARC) cable. Set to Auto, when
connecting equipment compatible with
Dolby Digital or DTS. Set to PCM, when
connecting equipment not compatible
with Dolby Digital or DTS.
BRAVIA Sync Settings
Allows the TV to communicate with
equipment that is compatible with the
BRAVIA Sync Control function, and connected
to the HDMI/MHL jacks of the TV. Note that
communication settings must also be made
on the connected equipment.
BRAVIA Sync Control: Sets whether or not
to link the operations of the TV and the
connected equipment that is compatible
with BRAVIA Sync Control. When set to
On, the following functions are
available.
If the specific Sony equipment that is
compatible with BRAVIA Sync Control is
connected, this setting is applied to the
connected equipment automatically.
Device Auto Power Off: When this is set to
On, the connected equipment that is
compatible with BRAVIA Sync Control
turns off when your TV goes to standby
mode.
TV Auto Power On: When this is set to On,
the TV turns on when you turn on the
connected equipment that is compatible
with BRAVIA Sync Control (except in MHL
mode).
Auto Input Change (MHL): When this is set
to On, MHL device is switched to MHL
input automatically.
If the TV is in standby mode, it will not
switch automatically. Select Off to
disable it. The availability of Auto Input
Change (MHL) depends on whether the
MHL-compatible device can support this
feature.
BRAVIA Sync Device List: Displays a list of
connected equipment that is compatible
with BRAVIA Sync Control.
Selects Enable to update the BRAVIA
Sync Device List.
Device Control Keys: Select button
functions of the TV’s remote control to
operate the connected equipment.
None
Deactivates the control by the TV’s remote.
Normal
For basic operations, such as navigation
buttons (up, down, left or right, etc).
Tuning Keys
For basic operations and operation of
channel-related buttons, such as CH +/– or
(0-9), etc. Useful when you control a tuner
or set-top box, etc; via the remote control.
Menu Keys
For basic operations and operation of the
HOME/OPTIONS buttons. Useful when you
select menus of a BD player, etc; via the
remote control.
Tuning and Menu Keys
For basic operations and operation of
channel-related buttons and HOME/
OPTIONS button.
Note
• You cannot use BRAVIA Sync Control if the TV
operations are linked to the operations of an
audio system that is compatible with BRAVIA
Sync Control.
• Some equipment with BRAVIA Sync Control
does not support the Device Control feature.
Picture Adjustments Lock
Select Lock so no adjustment can be made to
items grayed out, except Picture Mode and
CineMotion.
Select Unlock to allow adjustment to any of
the Picture settings.

25US
US
Customer Support
Provide information of your TV’s model,
software, and others. For details, see page 25.
Eco
Reset
Resets the current Eco settings to the default
values.
Power Saving
Reduces power consumption of the TV by
adjusting the backlight.
When you select Picture Off, the picture is
switched off. The sound remains unchanged.
Idle TV Standby
Turns the TV off after it has been kept idle for
the preset length of time.
Auto Shut Off
Select On to automatically power off the TV
when no input signal is detected for a certain
period of time. Select Off to disable this
function.
Customer Support
Model Name
Displays the model name of your TV.
Software Version
Displays the current software version of your TV.
TV
Selects Signal Diagnostic to display system
information of your TV.
External Inputs
View Manage Inputs: Allows you to view or
manage the TV and external inputs.
Picture Check
View Test Picture: Allow you to check the
picture condition on the display.
Software Update
Select to perform system update.
Initial Setup
Resets all settings to factory settings. After
completing this process, the initial set-up screen is
displayed.
Note
• Be sure not to turn the TV off during this period (it takes
about 30 seconds) or press any buttons.
Contact Sony
Displays your TV’s product information.
26US
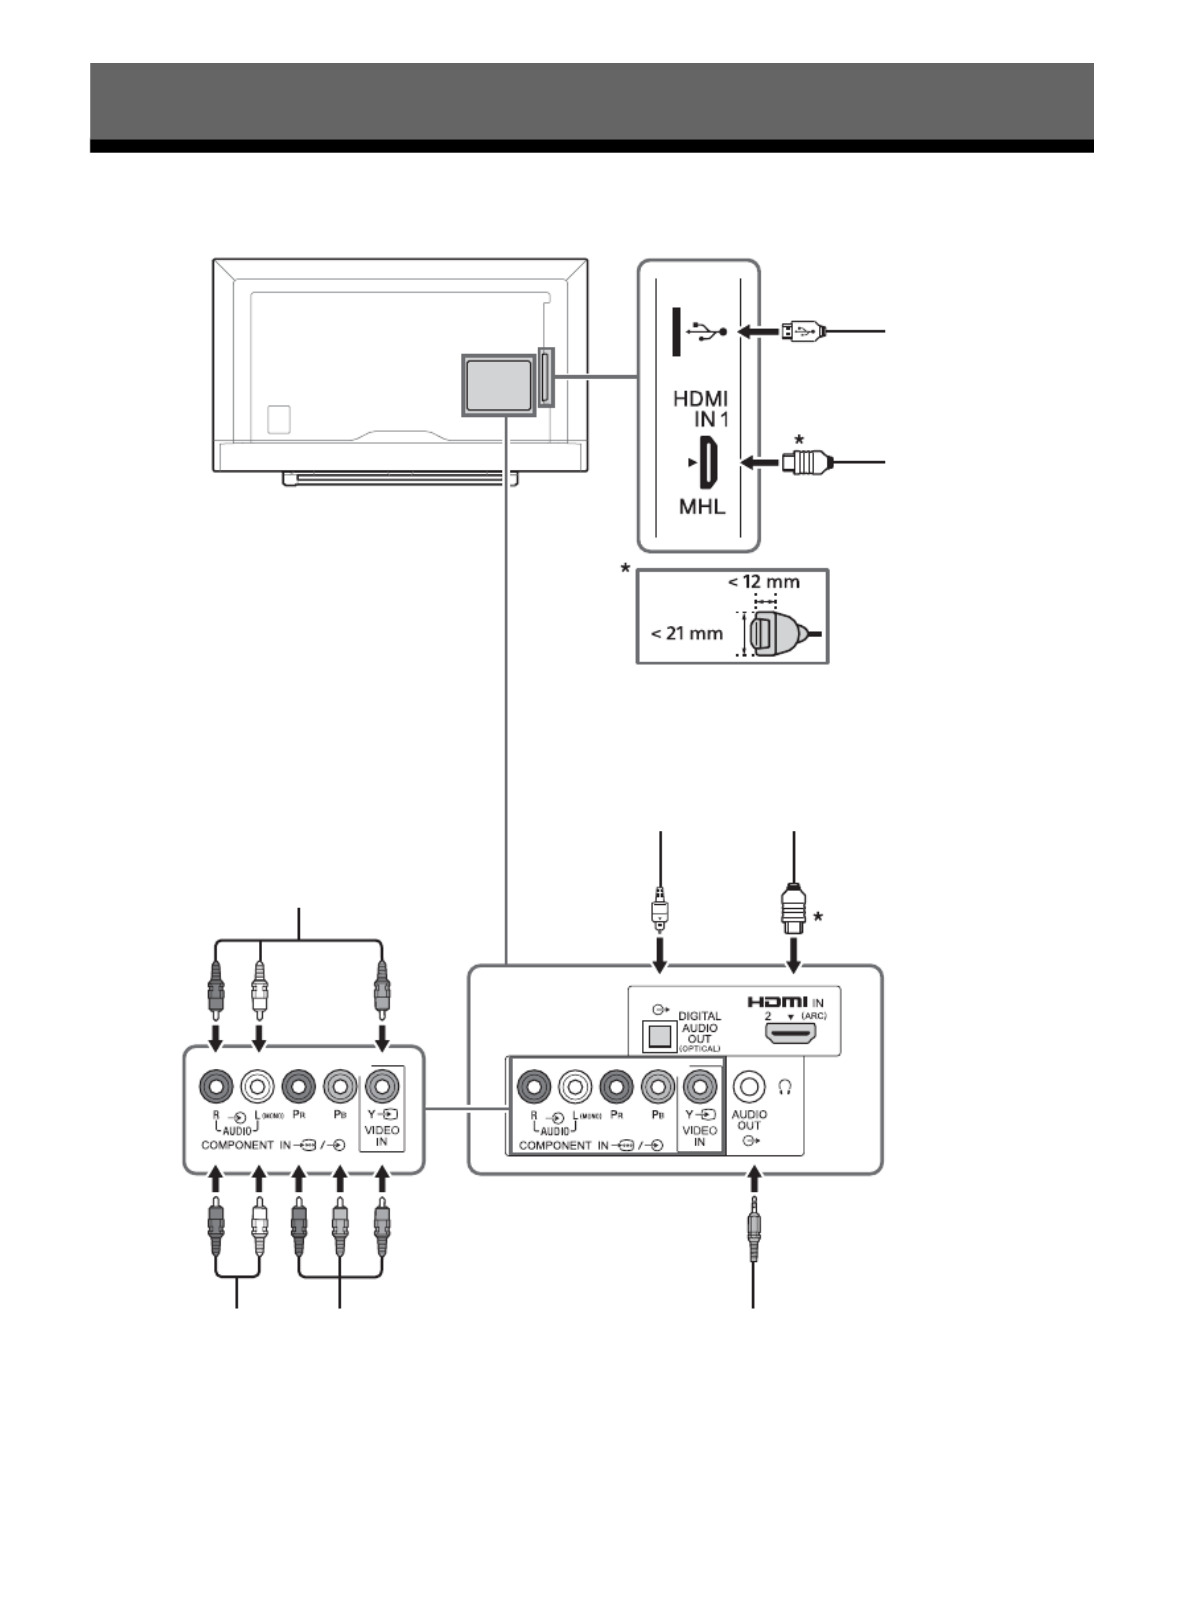
Connection Diagram
You can connect a wide range of optional equipment to your TV.
Viewing Pictures from Connected Equipment
Headphones/Home
Audio System/Subwoofer
DVD player with
component output
Home Audio System
Optical Input
VCR/Video game equipment/DVD
player/S VHS/Hi8/DVC camcorder
Digital still camera/
Camcorder/
USB storage media
HDMI/MHL Device
Home Audio System
with ARC/HDMI

27US
US
Using Audio and Video
Equipment
1Turn on the connected equipment.
2Press INPUT to display the input source.
3Press / then to select the desired
input source.
The highlighted item is selected if 2 seconds
pass without any operation.
Note
• When connecting a digital audio system not compatible
with Audio Return Channel (ARC) technology using an
HDMI cable, you need to connect an optical audio cable to
the DIGITAL AUDIO OUT (OPTICAL) to output digital
sound.
• When connecting with an HDMI cable, be sure to use
HighSpeed HDMI Cable with Cable Type Logo
(Recommended SONY Cable).
• When connecting mono equipment, connect the audio
cable to the L (mono) jack.
• When connecting a device that has DVI output, connect
the DVI HDMI video cable to the HDMI IN 2 (ARC).
To use MHL device
Use an authorized MHL 2 CABLE with MHL logo (not
supplied).
The TV simultaneously charges the
MHL-compatible connected device while playing
photo/music/video files.
To use BRAVIA Sync devices
When connecting the TV to BRAVIA Sync
compatible equipment, you can control them
together.
Be sure to perform the necessary settings in
advance. The BRAVIA Sync Control settings must be
set on both the TV and the connected equipment.
See BRAVIA Sync Settings (page 24) for the
settings on the TV side. Refer to the connected
equipment operating instructions for the settings
on the connected equipment side.

28US
Using a Wall-Mount Bracket
Your TV can be mounted on a wall using a Wall-
Mount Bracket (not supplied) out of the box as
packaged. If the Table-Top Stand is attached to the
TV, the TV may require detaching the Table-Top
Stand.
Prepare the TV for the Wall-Mount Bracket before
making cable connections.
Sony does not supply the Wall-Mount Bracket or
the installation service. For product protection
and safety reasons, Sony strongly recommends
that installation of your TV on the wall be
performed by qualified professionals. Do not
attempt to install it yourself.
Follow the instruction guide provided with the
Wall-Mount Bracket for your model. Sufficient
expertise is required in installing this TV,
especially to determine the strength of the wall
for withstanding the TV’s weight.
The length of the screw for Wall-Mount Bracket
differs depending on the mounting hook
thickness. Please see below illustration.
Be sure to store the unused screws and Table-Top
Stand in a safe place until you are ready to attach
the Table-Top Stand. Keep the screws away from
small children.
Note
• Read the supplied Safety Booklet for additional safety
information.
Installing the TV Against a Wall or
Enclosed Area
Make sure that your TV has adequate ventilation.
Allow enough space around the TV as shown
below.
Installed with stand
Installed on the wall
Never install the TV set as follows:
Note
• Inadequate ventilation can lead to overheating of the TV
and may cause TV damage or cause a fire.
Additional Information
Hook attachment on rear of TV set
Mounting Hook
Screw
8 - 10 mm
11 7/8 inches
(30 cm)
4 inches
4 inches
Leave at least this much space around the set.
(10 cm) (6 cm)
2
3
/
8
inches
(10 cm)
4 inches
(10 cm)
Leave at least
this much
space around
the set.
4 inches
(10 cm)
11 7/8 inches
(30 cm)
4 inches
(10 cm)
Air circulation is blocked. Air circulation is blocked.
Wall Wall

29US
US
Troubleshooting
Picture
No picture (screen is dark) and no sound
Check the cable/antenna connection.
Connect the TV to the AC power outlet, and press /
on the TV or POWER on the remote control.
No picture or no menu information from
equipment connected to the video input jack
appears on the screen
Press INPUT to display the connected equipment list,
then select the desired input.
Check the connection between the optional
equipment and the TV.
Double images or ghosting
Check the cable/antenna connection, location or
direction.
Only snow and noise appear on the screen
Check if the antenna is broken or bent.
Check if the antenna has reached the end of its
serviceable life (three to five years in normal use, one
to two years at the seaside).
Distorted picture (dotted lines or stripes)
Keep the TV away from electrical noise sources such
as cars, motorcycles, hair-dryers or optional
equipment.
When installing optional equipment, leave some
space between the optional equipment and the TV.
Check the cable/antenna connection.
Keep the antenna cable away from other connecting
cables.
Picture or sound noise when viewing a TV
channel
Make sure that the antenna is connected using a
75-ohm coaxial cable (not supplied).
Keep the antenna cable away from other connecting
cords.
To avoid TV interference, make sure to use an
undamaged antenna cable.
Tiny black points and/or bright points appear on
the screen
The picture of a display unit is composed of pixels.
Tiny black points and/or bright points (pixels) on the
screen do not indicate a malfunction.
Picture contours are distorted
Change the current setting of CineMotion to other
settings (page 19).
No color on programmes
Select Reset (page 18).
No color or irregular color when viewing a signal
from the Y, PB R, P jacks of /
Check the connection of the Y, PB, PR jacks of /
and check if each jacks are firmly seated in their
respective jacks.
No picture from the connected equipment
appears on the screen
Turn the connected equipment on.
Check the cable connection.
Press INPUT to display the connected equipment list,
then select the desired input.
Correctly insert the memory card or other storage
device in the digital still camera.
Use a digital still camera memory card or other
storage device that has been formatted according to
the instruction manual supplied with the digital still
camera.
Operations are not guaranteed for all USB devices.
Also, operations differ depending on the features of
the USB device and the video being played.
Cannot select the connected equipment on the
menu or cannot switch the input
Check the cable connection.
Sound
No sound, but good picture
Press VOL +/- or MUTING.
Check if Speakers in AV Setup is set to TV Speakers
(page 23).
Check if the headphone plug is connected to the TV.
No sound or noisy sound
Check if the TV system setting is appropriate
(page 19).
Channels
The desired channel cannot be selected
Switch between digital and analogue mode and
select the desired digital/analog channel.
Some channels are blank
The channel is for scrambled/subscription service
only. Subscribe to a pay TV service.
Channel is used only for data (no picture or sound).
Contact the broadcaster for transmission details.
Digital channels are not displayed
Contact a local installer to find out if digital
transmissions are provided in your area.
Upgrade to a higher gain aerial.

30US
General
The TV turns off automatically (the TV enters
standby mode)
Check if the Sleep Timer is activated (page 23).
Check if the Duration is activated by On Timer
(page 23) or Photo Frame Settings (page 22).
Check if the Idle TV Standby is activated (page 25).
Some input sources cannot be selected
Select Manage Inputs and select Always of the input
source (page 23).
The remote control does not function
Replace the batteries.
HDMI/MHL equipment does not appear on
BRAVIA Sync Device List
Check that your equipment is compatible with
BRAVIA Sync Control.
Cannot select Off in BRAVIA Sync Control
If you have connected any audio system that is
compatible with BRAVIA Sync Control, you cannot
select Off in this menu. To change the audio output
to the TV speaker, select TV Speakers in the
Speakers menu (page 23).
The Parental Lock password has been forgotten
Press HOME and select Settings Preferences
Parental Lock Password then enter 4357 for the
password.
Store Display Mode or Promoting Feature Logo
appears on the screen
On the remote control, press RETURN then press
HOME and select Settings Preferences Setup
Initial Setup. Be sure to select Home in Location.
Specifications
System
Television system
NTSC: American TV standard
ATSC (8VSB terrestrial): ATSC compliant 8VSB
QAM on cable: ANSI/SCTE 07 2000 (Does not include
CableCARD functionality)
Channel coverage
Analog terrestrial: 2 - 69 / Digital terrestrial: 2 - 69
Analog Cable: 1 - 135 / Digital Cable: 1 - 135
Panel system
LCD (Liquid Crystal Display) Panel, LED Backlight
Speaker output
8 W + 8 W (KDL-40R380B/40R350B)
5 W + 5 W (KDL-32R330B/32R300B)
Input/Output jacks
CABLE/ANTENNA
75 ohms external terminal for RF inputs
COMPONENT IN/ VIDEO IN
COMPONENT IN
Supported formats: 1080p (60 Hz), 1080i (60 Hz),
720p (60 Hz), 480p, 480i
Y: 1.0 Vp-p, 75 ohms unbalanced, sync negative
PB: 0.7 Vp-p, 75 ohms
PR: 0.7 Vp-p, 75 ohms
Video input (phono jack)
COMPONENT IN
Audio input (phone jacks)
HDMI IN 1/MHL, HDMI IN 2 (ARC)
HDMI Video: 1080/24p, 1080p (30, 60 Hz),
1080i (60 Hz), 720p (30, 60 Hz), 720/24p, 480p, 480i
MHL Video: 1080/24p, 1080p (30 Hz), 1080i (60 Hz),
720p (30, 60 Hz), 720/24p, 480p, 480i
PC input:
(Resolution, Horizontal frequency, Vertical frequency)
For KDL-40R380B/40R350B
640 x 480, 31.5 kHz, 60 Hz
800 x 600, 37.9 kHz, 60 Hz
1,024 x 768, 48.4 kHz, 60 Hz
1,280 x 768, 47.4 kHz, 60 Hz
1,280 x 768, 47.8 kHz, 60 Hz
1,360 x 768, 47.7 kHz, 60 Hz
1,280 x 1024, 64.0 kHz, 60 Hz
*1,920 x 1080, 67.5 kHz, 60 Hz
* The 1080p timing when applied to the HDMI input will
be treated as a video timing and not PC timing
For KDL-32R330B/32R300B
640 x 480, 31.5 kHz, 60 Hz
800 x 600, 37.9 kHz, 60 Hz
1,024 x 768, 48.4 kHz, 60 Hz
1,280 x 768, 47.4 kHz, 60 Hz
1,280 x 768, 47.8 kHz, 60 Hz
1,360 x 768, 47.7 kHz, 60 Hz
Audio: Two channel linear PCM 32, 44.1 and 48 kHz,
16, 20 and 24bits, Dolby Digital

31US
US
ARC (Audio Return Channel) (HDMI IN 2 only)
AUDIO OUT/
Audio output, Headphone (minijack), Subwoofer
DIGITAL AUDIO OUT (OPTICAL)
PCM/Dolby Digital optical signal
USB port: supply capacity 5V, 500 mA (maximum)
Power and others
Power requirement
Rating: Input 120 V AC, 60 Hz
Power consumption
in use:
89 W (KDL-40R380B/40R350B)
63 W (KDL-32R330B/32R300B)
in standby:
Less than 0.5 W
Screen size* (measured diagonally) (inches)
KDL-40R380B/40R350B: 39.5 (40 Class)
KDL-32R330B/32R300B: 31.5 (32 Class)
Display resolution
KDL-40R380B/40R350B: 1,920 dots (horizontal) ×
1,080 lines (vertical)
KDL-32R330B/32R300B: 1,366 dots (horizontal) × 768
lines (vertical)
Speaker/Full range (2)
34 × 132 mm ( 1.3 × 5.2 inches)
Dimensions*
with stand (mm)/(inches)
KDL-40R380B/40R350B: 904 × 546 × 214 /
35 5/8 × 21 1/2 × 8 1/2
KDL-32R330B/32R300B: 727 × 455 × 168 /
28 5/8 × 18 × 6 5/8
without stand (mm)/(inches)
KDL-40R380B/40R350B: 904 × 512 × 77 /
35 5/8 × 20 1
/4 × 3 1
/8
KDL-32R330B/32R300B: 727 × 425 × 77 /
28 5/8 × 16 3/4 × 3 1/8
wall-mount hole pattern (mm)
KDL-40R380B/40R350B: 200 × 200
KDL-32R330B/32R300B: 100 × 100
wall-mount screw size (mm)
M4 (length: refer to diagram on page 10)
Mass*
with stand (kg)/(lb.)
KDL-40R380B/40R350B: 7.8 / 17.2
KDL-32R330B/32R300B: 5.1 / 11.2
without stand (kg)/(lb.)
KDL-40R380B/40R350B: 7.4 / 16.3
KDL-32R330B/32R300B: 5.0 / 11.0
Optional accessories
MHL Cable: DLC-MB10/DLC-MB20/DLC-MC20
* Dimensions and mass are approximate values.
• Optional accessories availability depends on countries/
region/TV model/stock.
• Design and specifications are subject to change without
notice.
• This TV set incorporates MHL 2.
Licensing Information
• The terms HDMI and HDMI High-Definition
Multimedia Interface, and the HDMI Logo are
trademarks or registered trademarks of HDMI
Licensing LLC in the United States and other
countries.
• Fergason Patent Properties, LLC:
U.S. Patent No. 5,717,422
U.S. Patent No. 6,816,141
• Manufactured under license from Dolby
Laboratories.
Dolby and the double-D symbol are
trademarks of Dolby Laboratories.
• “BRAVIA” y , S-Force, Motionflow,
BRAVIA Sync y son marcas comerciales o
marcas registradas de Sony Corporation.
• MHL, Mobile High-Definition Link and the MHL
Logo are trademarks or registered trademarks
of MHL Licensing, LLC.
• “PlayStation” is a registered trademark and
“PS3” is a trademark of Sony Computer
Entertainment Inc.
• For DTS patents, see http://patents.dts.com.
Manufactured under license from DTS
Licensing Limited. DTS, the Symbol, & DTS and
the Symbol together are registered
trademarks, and DTS 2.0+ Digital Out is a
trademark of DTS, Inc. © DTS, Inc. All Rights
Reserved.

32US
Your BRAVIA TV is ENERGY STAR®
qualified in the default mode.
It meets strict energy efficiency
guidelines set by the U.S.
Environmental Protection Agency
and Department of Energy.
ENERGY STAR is a joint program of these
government agencies, designed to promote
energy efficient products and practices.
Changes to certain features, settings, and
functionalities (when available) of this TV (i.e.
Picture/Sound, Light Sensor, Power Savings,
Picture Scene/Mode, Auto Display, Shop Front
Display Settings) can increase or change the
power consumption.
The “Auto” and “General” picture scenes are
default settings optimized for the input signal
selected. Your BRAVIA TV is tested in these
settings for ENERGY STAR qualification.
Depending upon such changed settings, the
power consumption may exceed the limits
required for the ENERGY STAR qualification in
the default mode.
Safety Information
FCC Related Information
This equipment has been tested and found to
comply with the limits for a Class B digital device,
pursuant to Part 15 of the FCC Rules. These limits
are designed to provide reasonable protection
against harmful interference in a residential
installation. This equipment generates, uses and
can radiate radio frequency energy and, if not
installed and used in accordance with the
instructions, may cause harmful interference to
radio communications. However, there is no
guarantee that interference will not occur in a
particular installation. If this equipment does cause
harmful interference to radio or television
reception, which can be determined by turning the
equipment off and on, the user is encouraged to try
to correct the interference by one or more of the
following measures:
Reorient or relocate the receiving antenna.
Increase the separation between the equipment
and receiver.
Connect the equipment into an outlet on a circuit
different from that to which the receiver is
connected.
Consult the dealer or an experienced radio/TV
technician for help.
Declaration of Conformity
Trade Name: SONY
Model: KDL-40R380B/KDL-40R350B/KDL-
32R330B/KDL-32R300B
Responsible Party: Sony Electronics Inc.
Address: 16530 Via Esprillo,
San Diego, CA 92127 U.S.A.
Telephone Number: 858-942-2230
This device complies with part 15 of the FCC rules.
Operation is subject to the following two
conditions: (1) This device may not cause harmful
interference, and (2) this device must accept any
interference received, including interference that
may cause undesired operation.
Pursuant to FCC regulations, you are cautioned
that any changes or modifications not expressly
approved in this manual could void your
authority to operate this equipment.

33US
US
Note
This television includes a QAM demodulator which should
allow you to receive unscrambled digital cable television
programming via subscription service to a cable service
provider. Availability of digital cable television
programming in your area depends on the type of
programming and signal provided by your cable service
provider.

2FR
ATTENTION
Pour prévenir les chocs électriques et l’exposition des broches, ne pas
utiliser cette fiche CA polarisée avec une rallonge, une prise de courant
ou une autre sortie de courant, sauf si les broches peuvent être
insérées jusqu’au fond.
Emplacement de l'étiquette d'identification
Les étiquettes indiquant le numéro de modèle de téléviseur, les
caractéristiques nominales de l’alimentation (selon la réglementation
de sécurité en vigueur) et la date de fabrication se trouvent à l’arrière
du téléviseur.
Remarque :
• Les illustrations de la télécommande apparaissant dans ce manuel
représentent le modèle RM-YD092, sauf indication contraire.
• Les illustrations utilisées dans le présent mode d’emploi peuvent
différer de l’apparence de votre appareil, selon le modèle du
téléviseur.
Nettoyage
Lors du nettoyage, assurez-vous de débrancher le cordon électrique
afin d’éviter tout risque de choc électrique.
• Essuyez l’écran ACL délicatement à l’aide d’un chiffon doux.
• Les taches tenaces peuvent être enlevées à l’aide d’un chiffon
légèrement imbibé d’une solution de savon doux et d’eau tiède.
• Si vous utilisez un chiffon prétraité avec un produit chimique, suivez
bien les directives indiquées sur l’emballage.
• N’utilisez jamais de solvants corrosifs tels qu’un diluant, de l’alcool
ou du benzène pour nettoyer l’appareil.
• Consultez le Feuillet de consignes d’utilisation et de sécurité fourni
pour plus de renseignements.
Fiche d’identification
Les numéros de modèle et de série sont indiqués à l’arrière et
sur le côté du téléviseur. Inscrivez ces numéros dans les
espaces ci-dessous. Faites-y référence chaque fois que vous
appelez votre détaillant Sony au sujet de ce téléviseur.
Nom du modèle
N° de série
La taille d'image visualisable de la classe 32 est de 31,5 pouces
(mesurées en diagonale).

3FR
FR
Table des matières
Présentation de votre nouveau
BRAVIA®
Pour commencer
Vérifier les Accessoires . . . . . . . . . . . . . . . . . . 6
Insérer les Piles dans la Télécommande. . . . 6
Installer le téléviseur. . . . . . . . . . . . . . . . . . . . 7
Fixer le support de table . . . . . . . . . . . . . . . . 7
Raccorder le téléviseur . . . . . . . . . . . . . . . . . . 8
Système de câblodistribution ou d’antenne
VHF/UHF . . . . . . . . . . . . . . . . . . . . . . . . . . . . . . . 8
Système de câblodistribution et d’antenne
VHF/UHF . . . . . . . . . . . . . . . . . . . . . . . . . . . . . . . 8
Décodeur de câblodistribution HD/Récepteur
satellite HD. . . . . . . . . . . . . . . . . . . . . . . . . . . . . . 9
Fixer le téléviseur . . . . . . . . . . . . . . . . . . . . . 10
Prévenir le basculement du téléviseur . . . . . . 10
Mesures recommandées pour fixer solidement
le téléviseur . . . . . . . . . . . . . . . . . . . . . . . . . . . . 10
Exécuter la configuration initiale. . . . . . . . . .11
Pièces et commandes
Téléviseur. . . . . . . . . . . . . . . . . . . . . . . . . . . . 12
Télécommande . . . . . . . . . . . . . . . . . . . . . . . 13
Regarder la télévision
Modification du Mode d’image . . . . . . . . . . 15
Modification du Mode cinéma . . . . . . . . . . . . . .15
Réglage de Sélection de scène . . . . . . . . . . . . .15
Naviguer à travers le Menu
d’accueil
Préférés . . . . . . . . . . . . . . . . . . . . . . . . . . . . . 16
Applications . . . . . . . . . . . . . . . . . . . . . . . . . 16
Utilisation du téléviseur comme
Cadre photo . . . . . . . . . . . . . . . . . . . . . . . . . . . . 16
Média. . . . . . . . . . . . . . . . . . . . . . . . . . . . . . . .17
Lecture de Photos/Musique/Vidéos via
USB . . . . . . . . . . . . . . . . . . . . . . . . . . . . . . . . . . . .17
Réglages . . . . . . . . . . . . . . . . . . . . . . . . . . . . 18
Préférences . . . . . . . . . . . . . . . . . . . . . . . . . . . . 18
Service à la clientèle . . . . . . . . . . . . . . . . . . . . . 26
Visualisation d’images à partir
d’appareils connectés
Diagramme de branchement . . . . . . . . . . . 27
Utilisation des appareils audio et vidéo . . . 28
Information complémentaire
Utiliser un support de fixation murale . . . . 29
Installation du téléviseur contre un mur ou
dans un endroit fermé . . . . . . . . . . . . . . . . . 29
Dépannage . . . . . . . . . . . . . . . . . . . . . . . . . . 30
Image . . . . . . . . . . . . . . . . . . . . . . . . . . . . . . . . . 30
Son . . . . . . . . . . . . . . . . . . . . . . . . . . . . . . . . . . . 30
Canales. . . . . . . . . . . . . . . . . . . . . . . . . . . . . . . . 30
Généralités. . . . . . . . . . . . . . . . . . . . . . . . . . . . . .31
Spécifications . . . . . . . . . . . . . . . . . . . . . . . . 31
Consignes de sécurité . . . . . . . . . . . . . . . . . 34

4FR
Service à la clientèle
États-Unis
http://www.sony.com/tvsupport
Canada
http://www.sony.ca/support
Enregistrementen ligne
États-Unis
http://productregistration.sony.com
Canada
http://www.sony.ca/registration

5FR
FR
Bienvenue au monde de BRAVIA®
Merci d’avoir choisi ce téléviseur haute définition
Sony BRAVIA®. Utilisez la documentation ci-dessous
pour profiter au maximum de votre téléviseur
Prenez quelques instants pour compléter
l’enregistrement de votre téléviseur à l’adresse
suivante :
Canada : http://www.sony.ca/fr/registration
États-Unis : http://productregistration.sony.com
Faites l’expérience d’une incroyable haute
définition avec votre téléviseur BRAVIA
Pour faire l’expérience du niveau de détail
incroyable qu’offre votre nouveau téléviseur
BRAVIA, vous devez vous abonner au service de
télévision haute définition (HD). Votre téléviseur
BRAVIA peut recevoir et afficher le service de
télévision HD à partir de :
Émission sans fil par l’intermédiaire d’une
antenne HD
Abonnement câble HD
Abonnement satellite HD
Lecteur Blu-ray Disc™ ou tout autre appareil
externe compatible HD
Contactez votre fournisseur de services par câble,
satellite ou HD pour obtenir des informations sur la
mise à niveau pour la programmation HD.
Les quatre éléments d’une expérience
haute définition complète
Le téléviseur, le son, la source et la
configuration
Outre votre téléviseur BRAVIA, un système HD
complet requiert un système audio HD, une source
de programmation HD et une configuration de
connexion correcte. Reportez-vous au Guide
d’installation rapide en annexe pour le
raccordement des équipements optionnels.
Présentation de votre nouveau
BRAVIA®
Feuillet de consignes d’utilisation et de
sécurité
Contient des mesures de précaution
pour votre protection et celle de votre
téléviseur. Lisez ces informations avant
d’installer votre téléviseur.
Mode d’emploi
Fournit les informations les plus
détaillées pour l’utilisation de votre
téléviseur.
Guide d’installation rapide
Fournit les informations de configuration
du téléviseur avec un exemple des
schémas de branchement.

7FR
FR
Installer le téléviseur
Avec certains modèles de téléviseur, le support de
table n’est pas fixé afin de vous permettre de
monter directement le téléviseur au mur. Si vous ne
comptez pas installer le téléviseur au mur, vous
devez installer le support de table. Vous aurez
besoin d'un tournevis Phillips (non fourni) et des vis
fournies pour compléter cette tâche. Reportez-vous
au feuillet d’instructions du support de table fourni.
Tenez compte de ce qui suit pendant l’installation
du téléviseur :
Débranchez tous les câbles avant de transporter
le téléviseur.
Transportez le téléviseur avec le nombre de
personnes approprié; un téléviseur de grande
taille doit être transporté par au moins deux
personnes.
Lors du transport du téléviseur, le bon
emplacement des mains est très important pour
votre sécurité, ainsi que pour éviter de causer des
dommages.
N’appliquez pas de pression sur l’écran ACL ou sur
le cadre entourant l’écran.
Assurez-vous que le téléviseur est entouré d’une
ventilation adéquate; reportez-vous à la page 29.
Pour obtenir une qualité d’image optimale,
n’exposez pas l’écran à la lumière directe d’une
lampe ou du soleil.
Évitez d’installer le téléviseur dans une pièce dont
le sol et les murs sont d’un matériau réfléchissant.
Évitez de déplacer le téléviseur d’un endroit froid
à un endroit chaud. Un changement soudain de
température peut provoquer de la condensation.
Ce phénomène peut affecter la qualité de l’image
et/ou des couleurs affichées par le téléviseur. Si
cela se produit, laissez la condensation s’évaporer
complètement avant de mettre le téléviseur sous
tension.
Assurez-vous qu’aucun objet ne se trouve devant
le téléviseur.
Fixer le support de table
Remarque
• Si vous utilisez un tournevis électrique, réglez le couple de
serrage à environ 1,2 N·m (12 kgf·cm).
• Pour retirer le support de table, suivez la procédure de
fixation dans le sens inverse.
• Assurez-vous que le téléviseur est en position verticale
avant de l’allumer. Pour éviter des irrégularités de
l’uniformité de l’image, ne pas allumer le téléviseur avec
l’écran ACL vers le bas.
• Pour fixer de nouveau le support de table, veillez à utiliser
les vis (que vous avez enlevées précédemment) dans les
mêmes orifices à l’arrière du téléviseur.
KDL-40R380B/40R350B
Capteur infrarouge

8FR
KDL-32R330B/32R300B
Raccorder le téléviseur
Vous pouvez profiter de la programmation
numérique en haute définition et en définition
standard (si disponible dans votre région) ainsi que
de la programmation analogique en définition
standard.
Ce téléviseur est capable de recevoir la
programmation numérique en clair pour câble
(QAM et 8VSB) et antenne externe VHF/UHF (ATSC).
Câble ou VHF/UHF (ou VHF uniquement)
Remarque
• Il est fortement recommandé de connecter l’entrée
CABLE/ANTENNA au moyen d’un câble coaxial de
75 ohms afin d’obtenir une qualité d’image optimale. Un
câble de 300 ohms bifilaire peut être facilement affecté
par les interférences de fréquence radio, susceptible
d’entraîner une dégradation du signal.
Utilisez un commutateur RF A-B (non fourni) pour
basculer entre la programmation du câble et de
l’antenne sans fil, comme indiqué ci-dessous.
Remarque
• Assurez-vous de configurer le réglage Type de signal sur
Câble ou Antenne dans les réglages de Canal pour votre
signal d’entrée (page 20).
Système de câblodistribution ou
d’antenne VHF/UHF
Système de câblodistribution et d’antenne
VHF/UHF
Câble coaxial
de 75 ohms
CABLE/ANTENNA
Arrière du
téléviseur
B
A
Commutateur RF A/B
Câble
Antenne
Arrière du téléviseur
CABLE/ANTENNA

9FR
FR
Vous pouvez profiter de la programmation en haute
définition en vous abonnant à un service par câble
haute définition ou à un service par satellite haute
définition. Pour la meilleure qualité possible,
assurez-vous de connecter cet appareil à votre
téléviseur via la prise HDMI ou vidéo composante
(avec audio) située à l’arrière de votre téléviseur.
Schéma avec connexion HDMI
Schéma avec connexion Composante
Décodeur de câblodistribution HD/
Récepteur satellite HD
Arrière du téléviseur
Décodeur
Arrière du téléviseur
Décodeur

10FR
Fixer le téléviseur
Fixer solidement le téléviseur à un mur et/ou à un
support.
Ne pas laisser les enfants jouer ou monter sur les
meubles et les téléviseurs.
Éviter de placer ou d’accrocher des objets sur le
téléviseur.
Ne jamais installer le téléviseur sur :
des surfaces glissantes, instables et/ou
inégales.
un meuble qui peut facilement servir d’escalier,
comme une commode à tiroirs.
Installez le téléviseur où il ne peut pas être tiré,
poussé ou renversé.
Acheminez les cordons d’alimentation CA et les
cordons connecteurs afin qu’ils ne soient pas
accessibles aux enfants curieux.
Tenez compte des mesures suivantes lorsque vous
fixez votre téléviseur à un socle de téléviseur (non
fourni).
1Fixer solidement la base du téléviseur.
Assurez-vous que le socle de téléviseur peut
supporter adéquatement le poids du téléviseur.
Utiliser deux attaches angulaires (non fournies)
pour fixer solidement la base.
Avec chaque attache angulaire, utiliser la
quincaillerie appropriée pour :
Fixer un côté de l’attache angulaire au poteau
mural.
Fixer l’autre côté au socle de téléviseur.
2Fixer solidement le téléviseur à la base.
Utiliser la quincaillerie optionnelle mentionnée
ci-dessous (non fournie) :
Vis à métal M4 (vissé dans l’orifice de vis du
téléviseur).
Une vis ou l’équivalent (fixé au socle de
téléviseur).
Une corde ou une chaîne (assez solide pour
supporter le poids du téléviseur). Vous assurer
qu’il n’y a pas de mou excessif dans la corde ou
la chaîne.
La longueur des vis à métal M4 diffère selon le
diamètre de la corde ou de la chaîne. Reportez-
vous à l’illustration ci-dessous.
Sony recommande fortement de prendre
les mesures nécessaires pour prévenir le
basculement du téléviseur. Des
téléviseurs qui ne sont pas fixés
solidement peuvent basculer et entraîner
des dommages matériels, des blessures
corporelles graves ou même mortelles.
Prévenir le basculement du téléviseur
Mesures recommandées pour fixer
solidement le téléviseur
Attache angulaire
(non fournies)
Base
Vis
(non fournie)
Corde ou chaîne
(non fournie)
Orifice de vis du téléviseur Vis à métal M4
(non fournie)
9-13 mm
Vis M4
Corde ou chaîneTéléviseur

11FR
FR
3
Fixez le téléviseur au mur avec des boulons, un
dispositif d’ancrage au mur et une chaîne (ou
une corde).
Remarque
• À la livraison de votre téléviseur, selon le modèle, les vis
sont fixées à l’arrière du téléviseur. (Elles sont fixées dans
les orifices servant au montage mural.) Veillez à retirer les
2 vis du haut avant de fixer le téléviseur à un mur.
• La mesure 2 fournit une protection minimale contre le
basculement du téléviseur. Pour une protection
additionnelle, suivre toutes les trois mesures
recommandées ci-dessus.
Exécuter la configuration initiale
1Terminez vos branchements de câbles
avant de commencer la Configuration
initiale. Reportez-vous au Guide
d’installation rapide (fourni) pour des
exemples des schémas de branchement.
Remarque
• Lorsque le téléviseur est en mode veille (l’indicateur
LED ne s’allume pas), appuyez sur la touche POWER
de la télécommande pour allumer le téléviseur.
2Appuyez sur / / / pour sélectionner
un élément, puis appuyez sur .
Suivez les instructions à l’écran.
Remarque
• Vous pouvez également syntoniser les chaînes
manuellement.
• Sélectionnez Maison dans Emplacement pour savoir
comment régler au mieux le téléviseur pour un usage
à la maison.
Trous de
montage au
mur
Corde ou
chaîne (non
fournie)
Boulons
d’ancrage
(non fourni)
Dispositif
d’ancrage au mur
(non fourni)
Welcome! Please select a language.
¡Bienvenido! Seleccione el idioma.
Bienvenue! Sélectionner la langue.

12FR
Téléviseur
/ (Alimentation)
Met le téléviseur sous tension ou le fait passer
en mode veille.
Remarque
• Pour débrancher complètement le téléviseur de la
prise de courant, débranchez la fiche de la prise
d’alimentation CA.
+ / – / /
• Permet d’augmenter/de diminuer le volume,
ou de sélectionner le canal suivant (+) ou
précédent (–) lorsque la notification Canal
Haut/Bas est affiché en appuyant sur la
touche CH/INPUT.
• Déplace la source d’entrée sélectionnée vers
le haut/bas lorsque le menu de sélection
d’entrée est affiché en appuyant sur la touche
CH/INPUT.
CH/INPUT
Bascule entre l’écran CA. Haut/Bas et l’écran de
sélection d’entrée.
(Capteurs/Voyant à DEL)
• Reçoit des signaux de la télécommande.
Ne placez rien sur le capteur.
Cela pourrait altérer le fonctionnement.
• S’allume en ambre lorsque le Minuterie de
veille/Marche programmée est activé
(page 24) ou quand le téléviseur est en Mode
cadre photo (page 16).
• S’allume en vert lorsque Écono. d’énergie est
réglé sur Sans image (page 26).
• S’allume en vert lorsque le téléviseur est
allumé.
• Ne s’allume pas lorsque le téléviseur se
trouve en mode veille.
• Clignote lorsque la télécommande est
utilisée.
Remarque
• Veillez à ce que le téléviseur soit complètement éteint
avant de débrancher le cordon d’alimentation CA.
Astuce
• La touche + dispose d’un point tactile. Utilisez-le
comme référence lors de l’utilisation du téléviseur.
Pièces et commandes

14FR
(retour rapide)/ (PLAY)/ (avance
rapide)/ (PREV)/ (PAUSE)/ (STOP)/
(NEXT)
• Fait fonctionner les appareils compatibles
BRAVIA Sync connectés.
• Ces touches peuvent également être utilisées
pour opérer la lecture de supports USB.
POWER
Allume le téléviseur ou le fait passer en mode
veille.
WIDE
Ajuste l'affichage à l'écran. Appuyez plusieurs
fois pour sélectionner le mode cinéma souhaité
(page 15).
CC/SUBTITLE
Modifie le réglage des sous-titres (page 23).
DISPLAY
Affiche les informations. Appuyez une fois pour
afficher les informations concernant le
programme/entrée que vous regardez.
Appuyez de nouveau pour retirer l’affichage de
l’écran.
OPTIONS
Appuyez pour afficher une liste contenant des
raccourcis vers certains menus de réglage.
Les options énumérées varient en fonction de
l’entrée et du contenu en cours.
JUMP
Retourne à l’entrée ou au canal précédent
visionné pendant plus de 15 secondes.
CH +/–
Sélectionne le canal suivant (+) ou précédent (–).
MUTING
Coupe le son. Appuyez de nouveau pour
restaurer le son.
Astuce
• Les touches numéro 5, et CH + ont des points tactiles.
Utilisez les points tactiles comme référence lors de
l’utilisation du téléviseur.
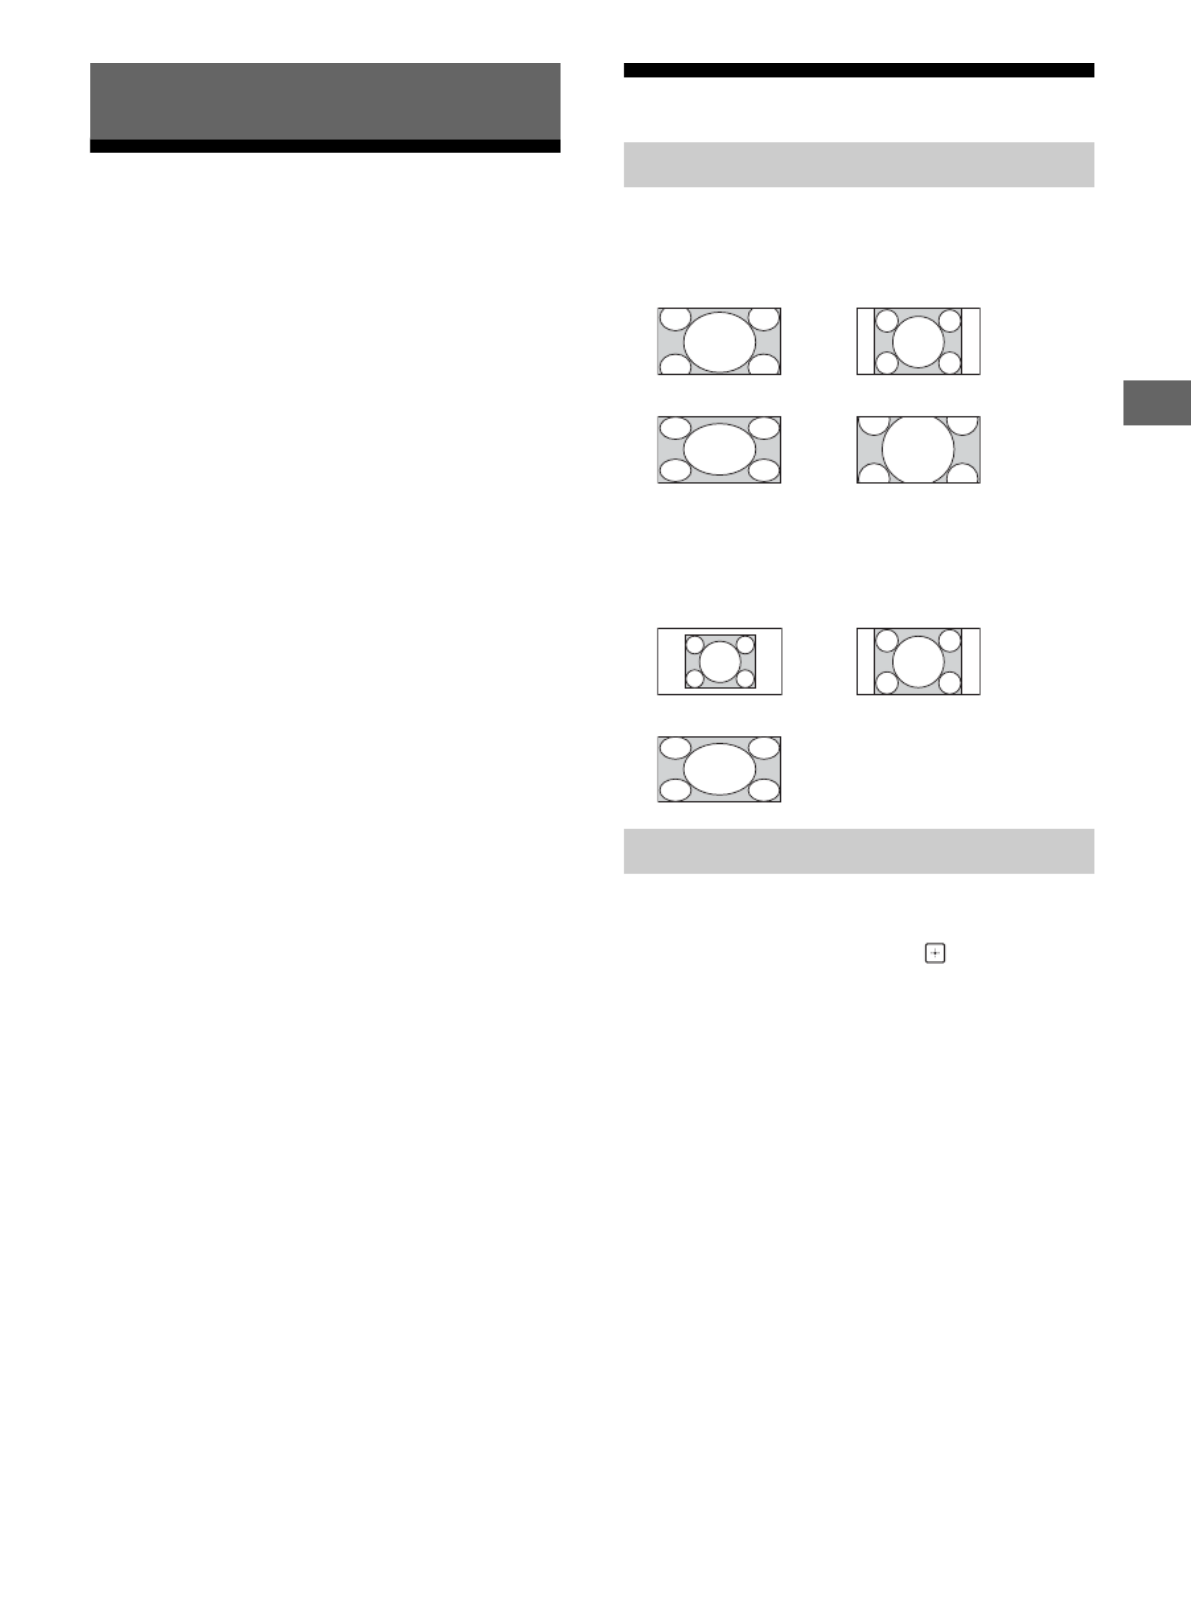
15FR
FR
1Appuyez sur la touche / du téléviseur ou
POWER de la télécommande pour allumer
le téléviseur.
2Appuyez sur PIC OFF cette touche pour
éteindre l’image tout en maintenant le son
actif.
3Appuyez sur les touches numériques ou
CH +/– pour sélectionner un canal télévisé.
4Appuyez sur VOL +/– pour ajuster le
volume.
Modification du Mode d’image
1Appuyez plusieurs fois sur WIDE pour
sélectionner le mode cinéma.
Pour l’entrée ordinateur HDMI
(synchronisation d’ordinateur)
1Appuyez sur OPTIONS.
2Appuyez sur / puis sur pour
sélectionner Type de scène.
Lorsque vous sélectionnez l’option de scène
désirée, la qualité de son et d’image optimale
pour la scène sélectionnée est
automatiquement réglée. Les options que vous
pouvez sélectionner peuvent varier. Les options
non disponibles sont grisées.
Regarder la télévision
Modification du Mode cinéma
Grand zoom*Normal
Plein écran Zoom*
* Les parties du haut du bas de l’image risquent
d’être rognées.
Normal Plein écran 1
Plein écran 2
Réglage de Sélection de scène

16FR
La touche HOME vous permet d’accéder à une
variété de réglages et de fonctions du téléviseur.
1Appuyez sur HOME.
2Appuyez sur / pour sélectionner une
option, puis appuyez sur .
Préférés
1Appuyez sur HOME.
2Appuyez sur / puis sur pour
sélectionner Préférés.
3Appuyez sur /// puis sur pour
sélectionner un programme.
Applications
Le Cadre photo affiche l’horloge et le calendrier
tout en affichant une photo et en permettant
d’écouter de la musique.
1Appuyez sur HOME.
2Appuyez sur / puis sur pour
sélectionner Applications.
3Appuyez sur / puis sur pour
sélectionner Mode Cadre photo.
Pour sélectionner des photos ou de la
musique à partir d’une clé USB
1Appuyez sur OPTIONS pendant la lecture
d’un fichier photo ou musique.
2Appuyez sur / puis sur pour
sélectionner le Mode Cadre photo pour
démarrer le Cadre photo.
Pour sélectionner le Mode d’affichage
Vous pouvez changer l’affichage du cadre photo en
sélectionnant le Mode d’affichage dans les
Réglages du cadre photo (page 22).
Pour sélectionner le mode d’affichage de
l’horloge
Vous pouvez choisir parmi trois modes d’affichage
de l'horloge en sélectionnant Affichage de
l’horloge dans les Réglages du cadre photo
(page 22).
Remarque
• Ce téléviseur ne dispose pas d’une sauvegarde à piles
pour l’horloge. Par conséquent, si une panne de courant
se produit ou si vous débranchez le cordon
d’alimentation, assurez-vous de régler la date et l’heure
actuelles.
Naviguer à travers le Menu d’accueil
Utilisation du téléviseur comme Cadre
photo

17FR
FR
Durée
Pour économiser de l’énergie, le téléviseur effectue
la lecture en continu du mode cadre photo pendant
24 heures avant de s’éteindre automatiquement.
Après la mise hors tension automatique, n'utilisez
pas le Mode cadre photo pendant une heure au
moins afin d’éviter la surchauffe de l’écran.
Vous pouvez modifier le réglage de la Durée dans
les Réglages du cadre photo (page 23).
Pour éviter la surchauffe de l’écran, la position
de la photo, de l’horloge et du calendrier
change automatiquement toutes les heures.
Média
Vous pouvez profiter sur votre téléviseur des
fichiers photo/musique/vidéo stockés dans un
appareil photo ou un caméscope Sony via un câble
USB ou une clé USB.
1Connexion d’un périphérique USB
compatible avec le téléviseur.
2Appuyez sur HOME.
3Appuyez sur / puis sur pour
sélectionner Média.
4Appuyez sur / puis sur pour
sélectionner Photo, Musique ou Vidéo.
Si un lecteur de cartes est connecté, appuyez
sur la touche jaune pour sélectionner Méthode
de lecture puis Sél. de périphérique pour
sélectionner le périphérique USB approprié.
5Appuyez sur / / / puis sur pour
sélectionner un fichier ou un dossier.
Méthode de lecture
Appuyez sur la touche de couleur jaune pour
afficher la liste des réglages de lecture USB.
Pour ajuster la qualité de l’image d’une
vidéo USB
1Appuyez sur OPTIONS pendant la lecture
de la vidéo.
2Appuyez sur / puis sur pour
sélectionner Réglages d’image.
3Appuyez sur / / / puis sur pour
sélectionner et ajuster un élément.
Pour lire une photo en diaporama (Photo)
1Appuyez sur la touche bleue dans la vue
vignette pour lancer le diaporama.
Pour régler Effet du diaporama et Vitesse
diaporama, appuyez sur OPTIONS
Méthode de lecture.
Pour arrêter un diaporama, appuyez sur
RETURN.
Remarque
• Pendant que le téléviseur accède aux données stockées
sur un périphérique USB, respectez les consignes
suivantes :
Ne pas éteindre le téléviseur.
Ne pas déconnecter le câble USB.
Ne pas retirer le périphérique USB.
Les données sur le périphérique USB pourraient être
endommagées.
• Sony ne sera pas tenu responsable de tout dommage ou
perte de données sur le support d’enregistrement en
raison d’un dysfonctionnement de l’un des appareils
connectés au téléviseur.
• Le Démarrage automatique USB affiche les fichiers
d’image dans le dossier d’appareil photo numérique le
plus récent (dossier conforme DCF portant le numéro
« DCIM » le plus élevé).
• Le Démarrage automatique USB ne se déclenchera pas
automatiquement tant qu’un appareil photo numérique
n’est pas connecté.
• Lorsque vous connectez un appareil photo numérique
Sony, réglez le mode de connexion USB de l’appareil
photo sur « Auto » ou « Stockage de masse ». Pour plus
d’informations sur le mode de connexion USB, reportez-
vous aux instructions fournies avec votre appareil photo
numérique.
• Utilisez un périphérique de stockage USB conforme aux
normes des périphériques de stockage de masse USB.
• Le système de fichiers du périphérique USB est
compatible FAT16, FAT32 et NTFS.
• Le nom du fichier et le nom du dossier peuvent ne pas
s’afficher correctement dans certains cas.
• Si in fichier sélectionné contient des informations de
conteneurs incorrectes ou incomplètes il ne pourra pas
être lu.
Lecture de Photos/Musique/Vidéos via
USB
Product specificaties
| Merk: | Sony |
| Categorie: | Televisie |
| Model: | Bravia KDL-32R300B |
Heb je hulp nodig?
Als je hulp nodig hebt met Sony Bravia KDL-32R300B stel dan hieronder een vraag en andere gebruikers zullen je antwoorden
Handleiding Televisie Sony

12 Maart 2025
12 Maart 2025
18 December 2024
22 November 2024
22 November 2024
22 November 2024
3 September 2024
6 Augustus 2024
6 Augustus 2024
6 Augustus 2024
Handleiding Televisie
- Televisie Electrolux
- Televisie Philips
- Televisie Samsung
- Televisie Xiaomi
- Televisie Casio
- Televisie Panasonic
- Televisie LG
- Televisie AEG
- Televisie BEKO
- Televisie Daewoo
- Televisie Grundig
- Televisie JVC
- Televisie Medion
- Televisie Nokia
- Televisie Pioneer
- Televisie Siemens
- Televisie Toshiba
- Televisie Xiron
- Televisie Yamaha
- Televisie Abus
- Televisie Acer
- Televisie Ag Neovo
- Televisie Airis
- Televisie Aiwa
- Televisie Akai
- Televisie Albrecht
- Televisie Alden
- Televisie Aldi
- Televisie Allview
- Televisie Alphatronics
- Televisie AOC
- Televisie Apex
- Televisie Arcelik
- Televisie Aristona
- Televisie Audiosonic
- Televisie Avtex
- Televisie Bang Olufsen
- Televisie Belson
- Televisie BenQ
- Televisie Blaupunkt
- Televisie Bluesky
- Televisie Brandt
- Televisie Daitsu
- Televisie Dell
- Televisie Denver
- Televisie Difrnce
- Televisie Digihome
- Televisie Dual
- Televisie Durabase
- Televisie Dyon
- Televisie E-motion
- Televisie Emerson
- Televisie Energy Sistem
- Televisie Engel
- Televisie Fantec
- Televisie Ferguson
- Televisie Finlux
- Televisie Fujitsu
- Televisie Funai
- Televisie GPX
- Televisie Graetz
- Televisie Haier
- Televisie Hannspree
- Televisie Hisense
- Televisie Hitachi
- Televisie HKC
- Televisie Hoher
- Televisie Horizon
- Televisie Humax
- Televisie Hyundai
- Televisie Icy Box
- Televisie Iiyama
- Televisie ILive
- Televisie Innoliving
- Televisie Insignia
- Televisie Intenso
- Televisie ITT
- Televisie Kogan
- Televisie Kuppersbusch
- Televisie Lenco
- Televisie Lenovo
- Televisie Lexibook
- Televisie Loewe
- Televisie Logik
- Televisie Luxor
- Televisie Magnavox
- Televisie Magnum
- Televisie Manhattan
- Televisie Manta
- Televisie Marantz
- Televisie Marquant
- Televisie Megasat
- Televisie Metz
- Televisie Mitsubishi
- Televisie Mpman
- Televisie MT Logic
- Televisie Muse
- Televisie Mx Onda
- Televisie Nabo
- Televisie Nec
- Televisie Nedis
- Televisie Newstar
- Televisie Nextbase
- Televisie Nikkei
- Televisie Nordmende
- Televisie Packard Bell
- Televisie Peaq
- Televisie Philco
- Televisie Polar
- Televisie Polaroid
- Televisie Premier
- Televisie Proline
- Televisie Pyle
- Televisie Qilive
- Televisie RCA
- Televisie Reflex
- Televisie Reflexion
- Televisie Rm 2000
- Televisie Roadstar
- Televisie Saba
- Televisie Sagem
- Televisie Salora
- Televisie Sanyo
- Televisie Sbr
- Televisie Schaub Lorenz
- Televisie Schneider
- Televisie Seg
- Televisie Selfsat
- Televisie Sencor
- Televisie Sharp
- Televisie Silvercrest
- Televisie Sogo
- Televisie Soundmaster
- Televisie Strong
- Televisie Sunny
- Televisie Sunstech
- Televisie Superior
- Televisie Sweex
- Televisie Sylvania
- Televisie TCL
- Televisie Teac
- Televisie TechLine
- Televisie Technika
- Televisie Technisat
- Televisie Techwood
- Televisie Tele 2
- Televisie Teleco
- Televisie Telefunken
- Televisie Terris
- Televisie Tesla
- Televisie Tevion
- Televisie Thomson
- Televisie Time
- Televisie Tve
- Televisie Uniden
- Televisie United
- Televisie Vestel
- Televisie Viewpia
- Televisie Viewsonic
- Televisie Vision Plus
- Televisie Vivax
- Televisie Vivo
- Televisie Vizio
- Televisie Voxx
- Televisie Walker
- Televisie Westinghouse
- Televisie Wharfedale
- Televisie Woxter
- Televisie Xoro
- Televisie Yasin
- Televisie Zalman
- Televisie Ziggo
- Televisie Jay-tech
- Televisie Jensen
- Televisie JGC
- Televisie JTC
- Televisie Odys
- Televisie OK
- Televisie Oki
- Televisie Online
- Televisie Onn
- Televisie Opera
- Televisie Oppo
- Televisie Optoma
- Televisie Orion
- Televisie Oyster
- Televisie Changhong
- Televisie Clatronic
- Televisie Continental Edison
- Televisie ECG
- Televisie Palsonic
- Televisie Vox
- Televisie Bang And Olufsen
- Televisie GoGEN
- Televisie Krüger And Matz
- Televisie Naxa
- Televisie Proscan
- Televisie Voxicon
- Televisie Kunft
- Televisie Aspes
- Televisie AYA
- Televisie Bush
- Televisie High One
- Televisie Infiniton
- Televisie Kernau
- Televisie Nevir
- Televisie Orima
- Televisie Svan
- Televisie Grunkel
- Televisie SereneLife
- Televisie Zenith
- Televisie Citizen
- Televisie Kubo
- Televisie Smart Brand
- Televisie Alba
- Televisie Edenwood
- Televisie Elbe
- Televisie Majestic
- Televisie Trevi
- Televisie Cello
- Televisie NPG
- Televisie Orava
- Televisie Star-Light
- Televisie Videocon
- Televisie Cecotec
- Televisie Bauhn
- Televisie MBM
- Televisie Furrion
- Televisie Coby
- Televisie Doffler
- Televisie DGM
- Televisie Planar
- Televisie Chiq
- Televisie Monster
- Televisie Antarion
- Televisie Felson
- Televisie SEIKI
- Televisie SunBriteTV
- Televisie Tucson
- Televisie CGV
- Televisie LTC
- Televisie Caratec
- Televisie Séura
- Televisie AudioAffairs
- Televisie Element
- Televisie Peerless-AV
- Televisie XD Enjoy
- Televisie Inovia
- Televisie DirecTV
- Televisie Telesystem
- Televisie Kemo
- Televisie EKO
- Televisie Mitsai
- Televisie V7
- Televisie ISymphony
- Televisie Pantel
- Televisie ATYME
- Televisie HCI
- Televisie Inno-Hit
- Televisie Lin
- Televisie Elements
- Televisie Englaon
- Televisie Astar
- Televisie Visco
- Televisie Tivax
- Televisie H&B
- Televisie Norcent
- Televisie TELE System
- Televisie TIM
- Televisie Kivi
- Televisie Mach Power
- Televisie Axing
- Televisie FFalcon
- Televisie Smart Tech
- Televisie Mitzu
- Televisie JTC24
- Televisie Coocaa
- Televisie SYLVOX
- Televisie RevolutionHD
- Televisie FOX Electronics
- Televisie QBell Technology
- Televisie Aconatic
- Televisie Mitchell & Brown
- Televisie Mystery
- Televisie Linsar
Nieuwste handleidingen voor Televisie

28 Maart 2025
27 Maart 2025
27 Maart 2025
25 Maart 2025

18 Maart 2025
18 Maart 2025

12 Maart 2025
12 Maart 2025
12 Maart 2025
12 Maart 2025