Ricoh MP7000 Handleiding
Lees hieronder de 📖 handleiding in het Nederlandse voor Ricoh MP7000 (60 pagina's) in de categorie Printer. Deze handleiding was nuttig voor 51 personen en werd door 2 gebruikers gemiddeld met 4.5 sterren beoordeeld
Pagina 1/60

Ricoh Product Line Segment 2 thru 6
www.ricoh-usa.com
MP/5000/5001, MP C5000/C6000/C6501, MP7000/8000, MP6001/7001, MP8001/9001, MP907EX
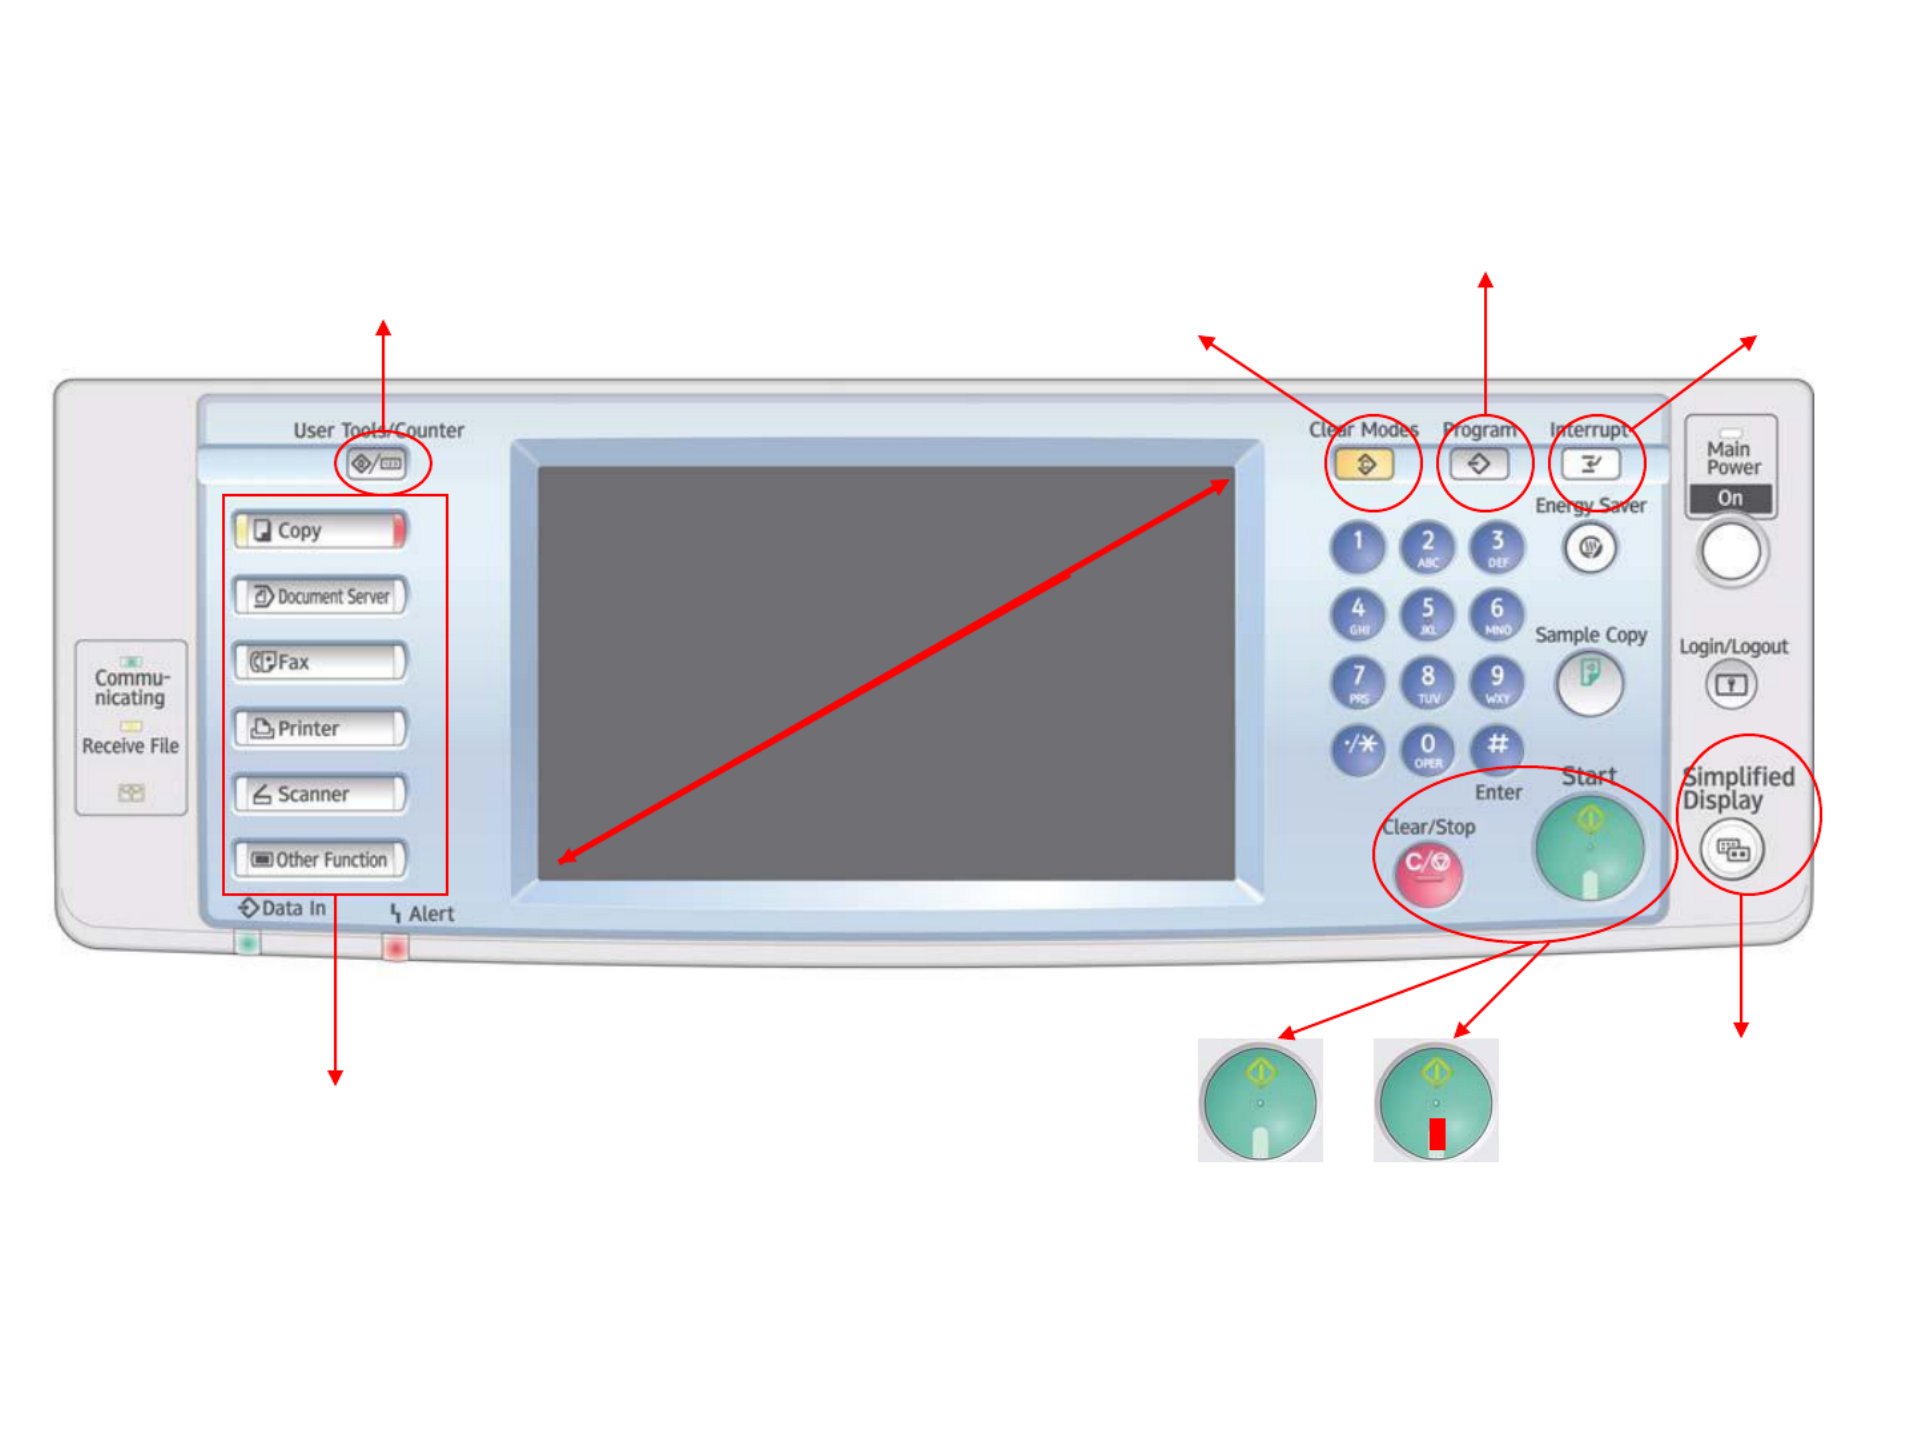
Hard function
keys have
Red/Yellow
status LEDs
To access system administrator tools and
counter information
Ready Not Ready
Simplified display magnifies fonts
for easy viewing. See page 2 for
example
Understanding Your Ricoh Control Panel
The program button allows you to store
frequently used job settings and screen
display defaults
Clears screen to default
settings
Allows user to
interrupt job in
progress for new job
8.5” Full Color W-VGA Screen
Color Copier Display Panel
Simplified Display
Key color is only
available in simplified
display mode.
Paper tray status.
Frequently used
reduce/enlarge ratios. These
can be adjusted to suit users
needs.
Finishing options. Sort, Stack,
Staple and punch.
Short cut
keys. Register
keys in user
tools “General
Settings”
Batch & Mixed
Originals.
Extended feature options including; margins, stamps,
page numbering, covers & slip sheets.
Specify color mode
and quality. Confirm current settings.
Black & White Display
Finishing options may be added to this screen.
Copying Documents
Place Originals in the document
Feeder
Adjust paper guides
Remove paperclips, staples or other loose objects before placing originals in feeder. Be sure to
straighten bent or curled edges If using the Glass Platen, Lift the lid and place documents face
down on the glass at the position of arrow regardless of size
Select any additional copy settings
Press original document type, i.e. Text, Text/Photo, Photo, etc.
Press [sort] to collate document (if not highlighted)
Enter any finishing options
Enter desired number of copies
Press [Sample Copy] copier will print one completed set and
prompt you [Suspend] to cancel job or change settings
[Continue] if job is correct to complete remaining copy sets
Or press START [Sample Copy]to skip
Note: When copying from the glass and requesting multiple copies,
press the # key after feeding your last original to release the
additional copies

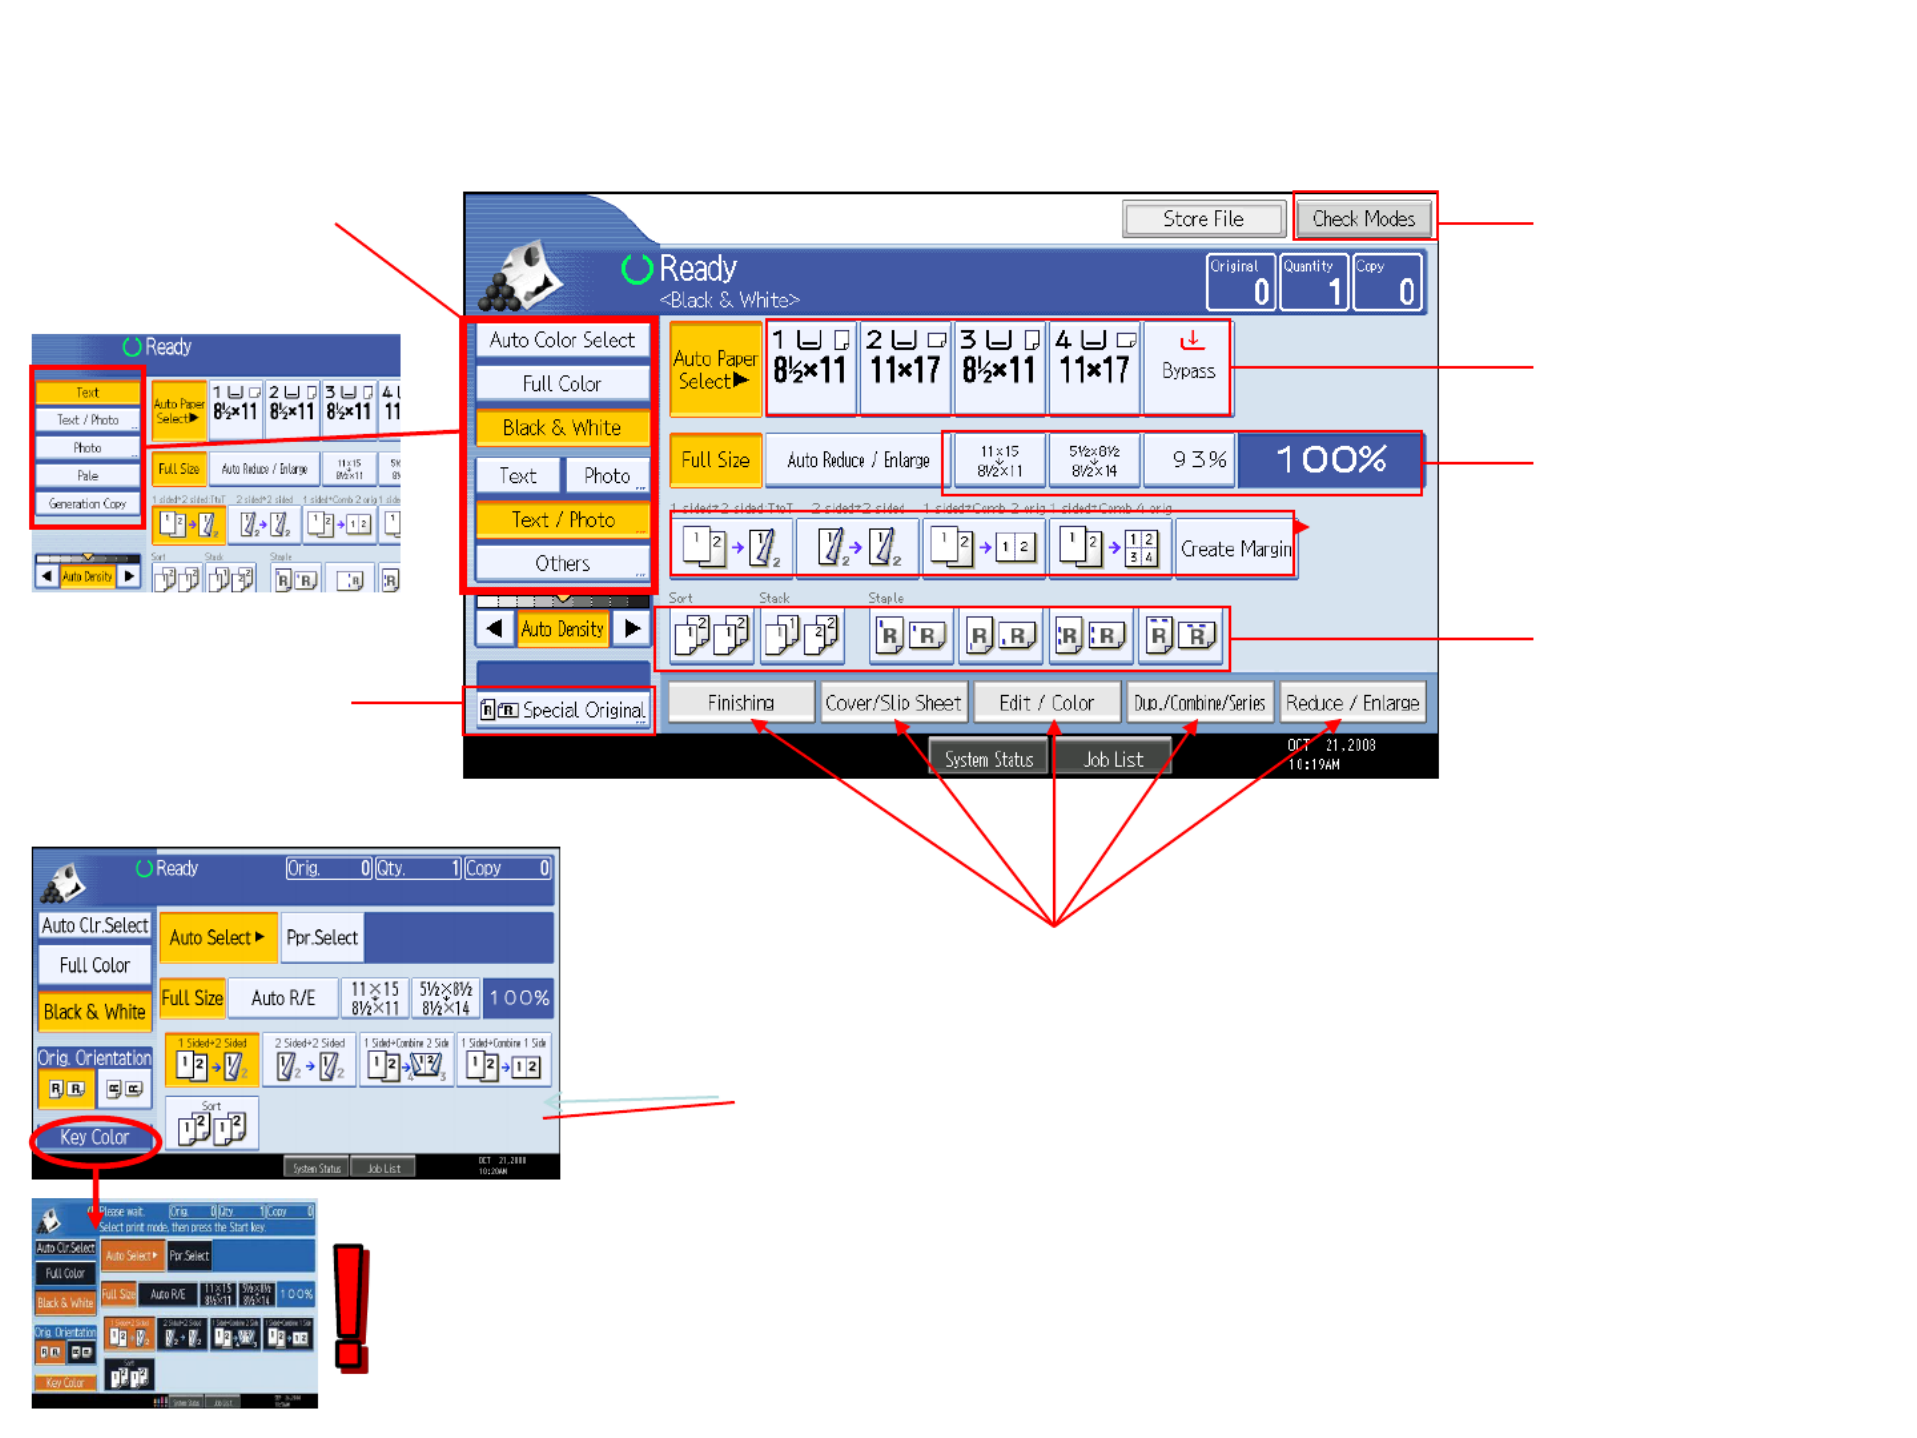
Copy Enhancements
Select an original type that is suitable for your originals to
enhance
your copies.
There are five original types available:
Text
Text
Text
TextText
For originals that contain mainly text or printed characters.
Text / Photo
Text / Photo
Text / Photo
Text / PhotoText / Photo
For originals that contain both text and photographs or
pictures.
Photo
Photo
Photo
PhotoPhoto
For Photographs or pictures choose from the following types.
•Glossy Photo
Glossy Photo
Glossy Photo
Glossy PhotoGlossy Photo:
•Use when copying developed photographs
•Printed Photo
Printed Photo
Printed Photo
Printed PhotoPrinted Photo:
•Use when copying photographs or pictures that are
printed on
•paper e.g. magazines)
•Copied Photo
Copied Photo
Copied Photo
Copied PhotoCopied Photo:
•Use when copying copies or originals generated by color
copiers
Pale
Pale
Pale
PalePale
For originals that have lighter lines written in pencil, or faintly
copied slips.
Generation Copy
Generation Copy
Generation Copy
Generation CopyGeneration Copy
For originals that are copied repeatedly. The copy image can
be reproduced sharply and clearly
Auto Image Density is highlighted
Press the Right or Left arrow to lighten or darken
document
Press [] or [] to adjust the image density
Select your Original document type
You may also select the [Auto Density] option
to further lighten or darken your document
settings.

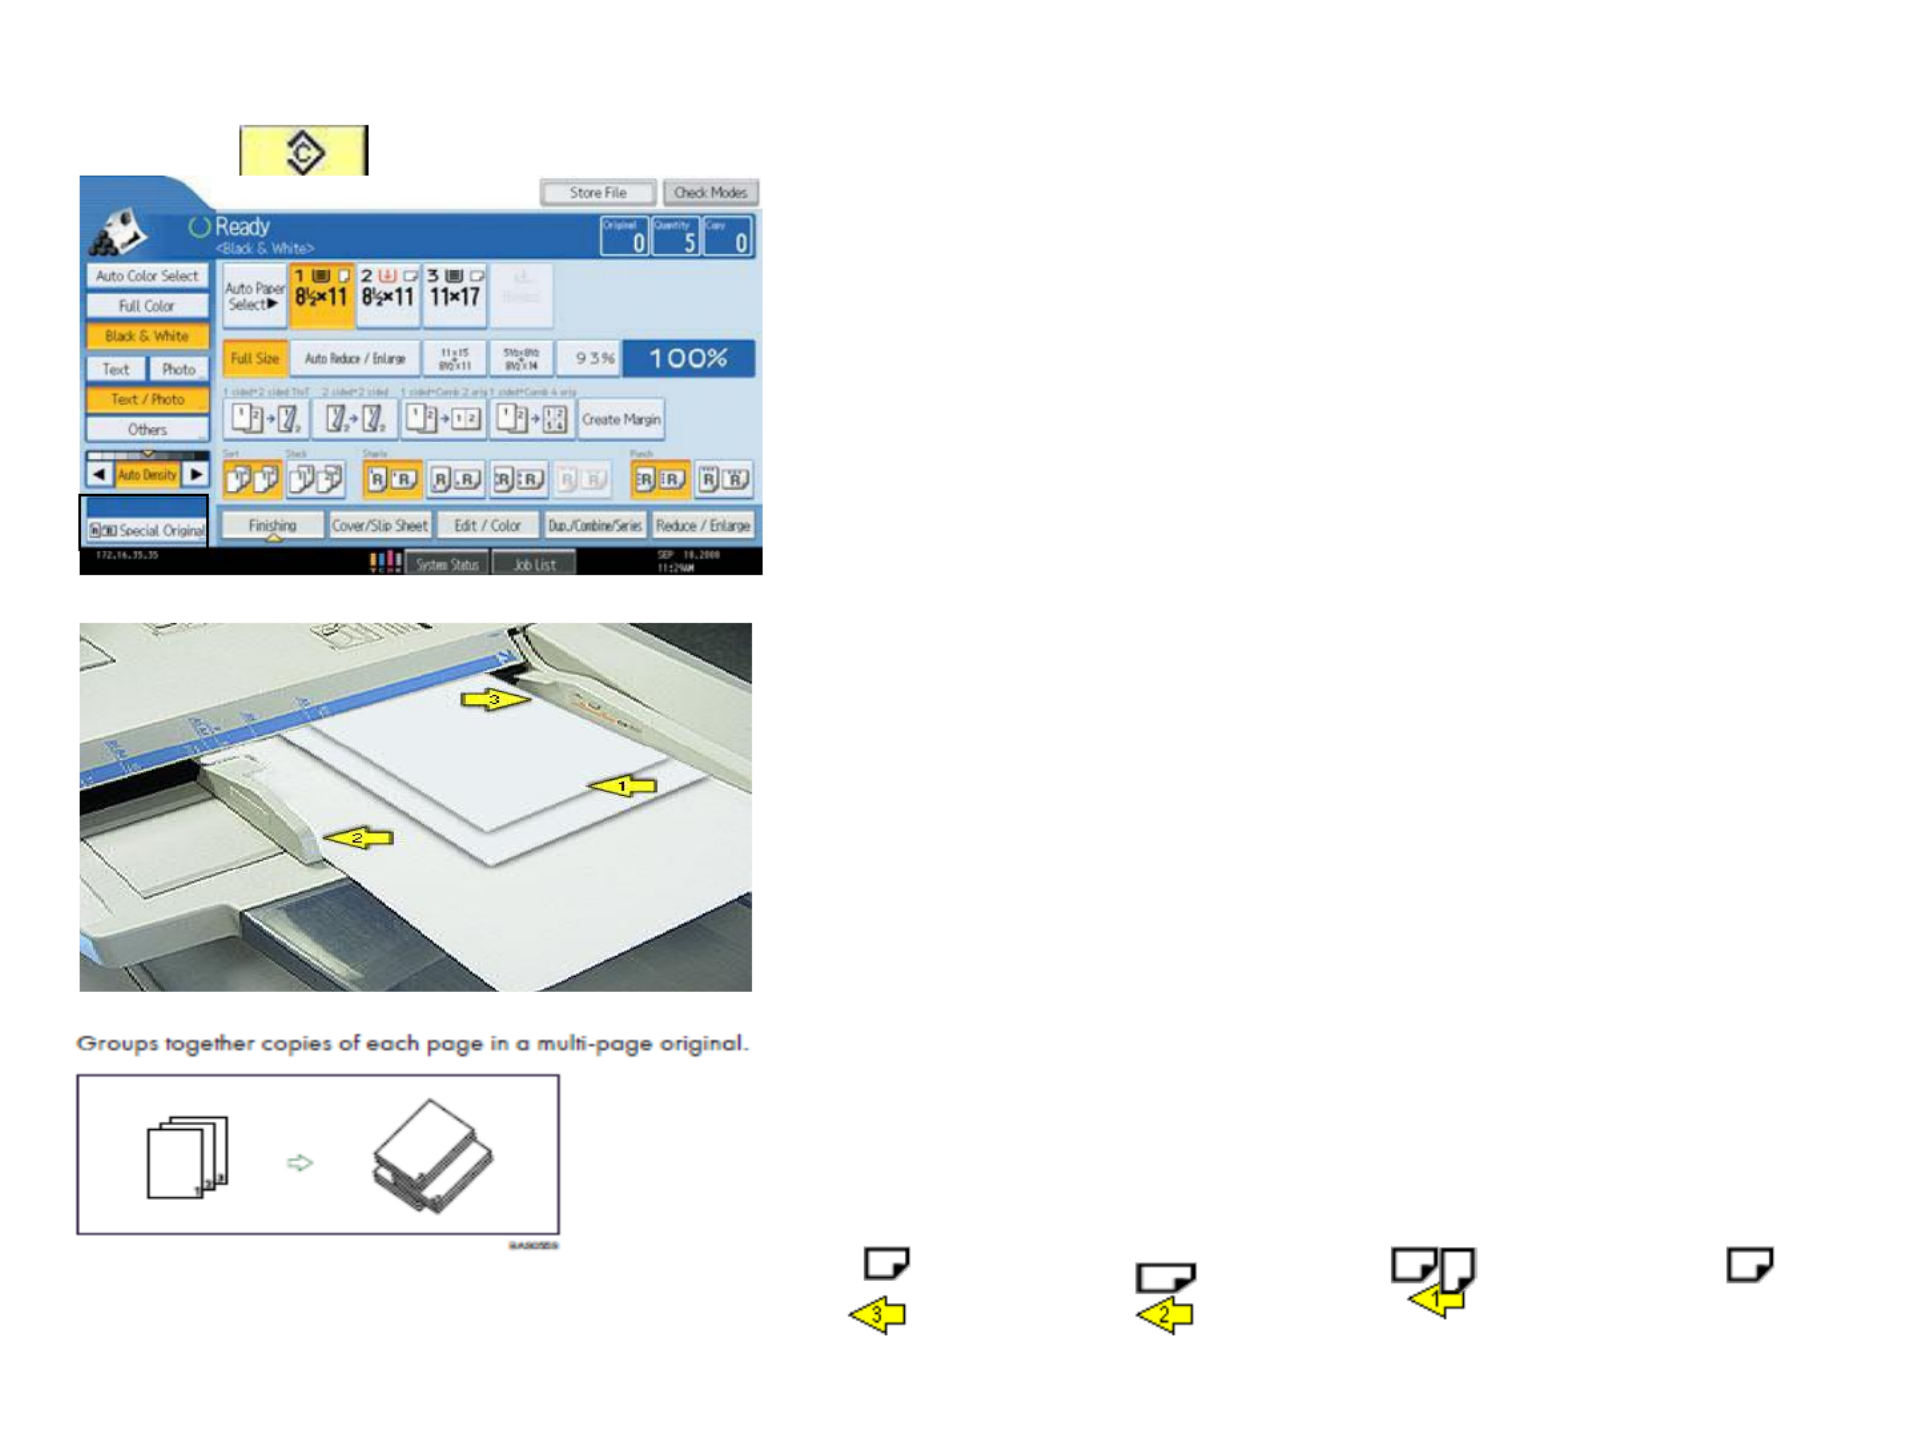
Sort/Stack & Rotate Sort Output
SORT Rotate/Sort –the machine assembles copies as sets in sequential order. Use when [Sort]
placing multiple page document to maintain page order - Same as [Collate]. When a finisher is installed
with the device the machine will output the document in the Sort/Shift Sort order, separating the first set
from the next set.
STACK –groups together copies of each page in a multi-page
original. Use Stack when setting multiple pages in the document
feeder and requiring the same copy number count per page to be
stacked.
ROTATE SORT–Use Rotate Sort when your machine does not have
a finisher to keep jobs separated . To use this option you must have
one paper tray loaded with 8.5x11 paper in landscape orientation and
the other tray loaded with 11x8.5 portrait and select this option from
the finishing mode or from the short cut menu on copier screen.
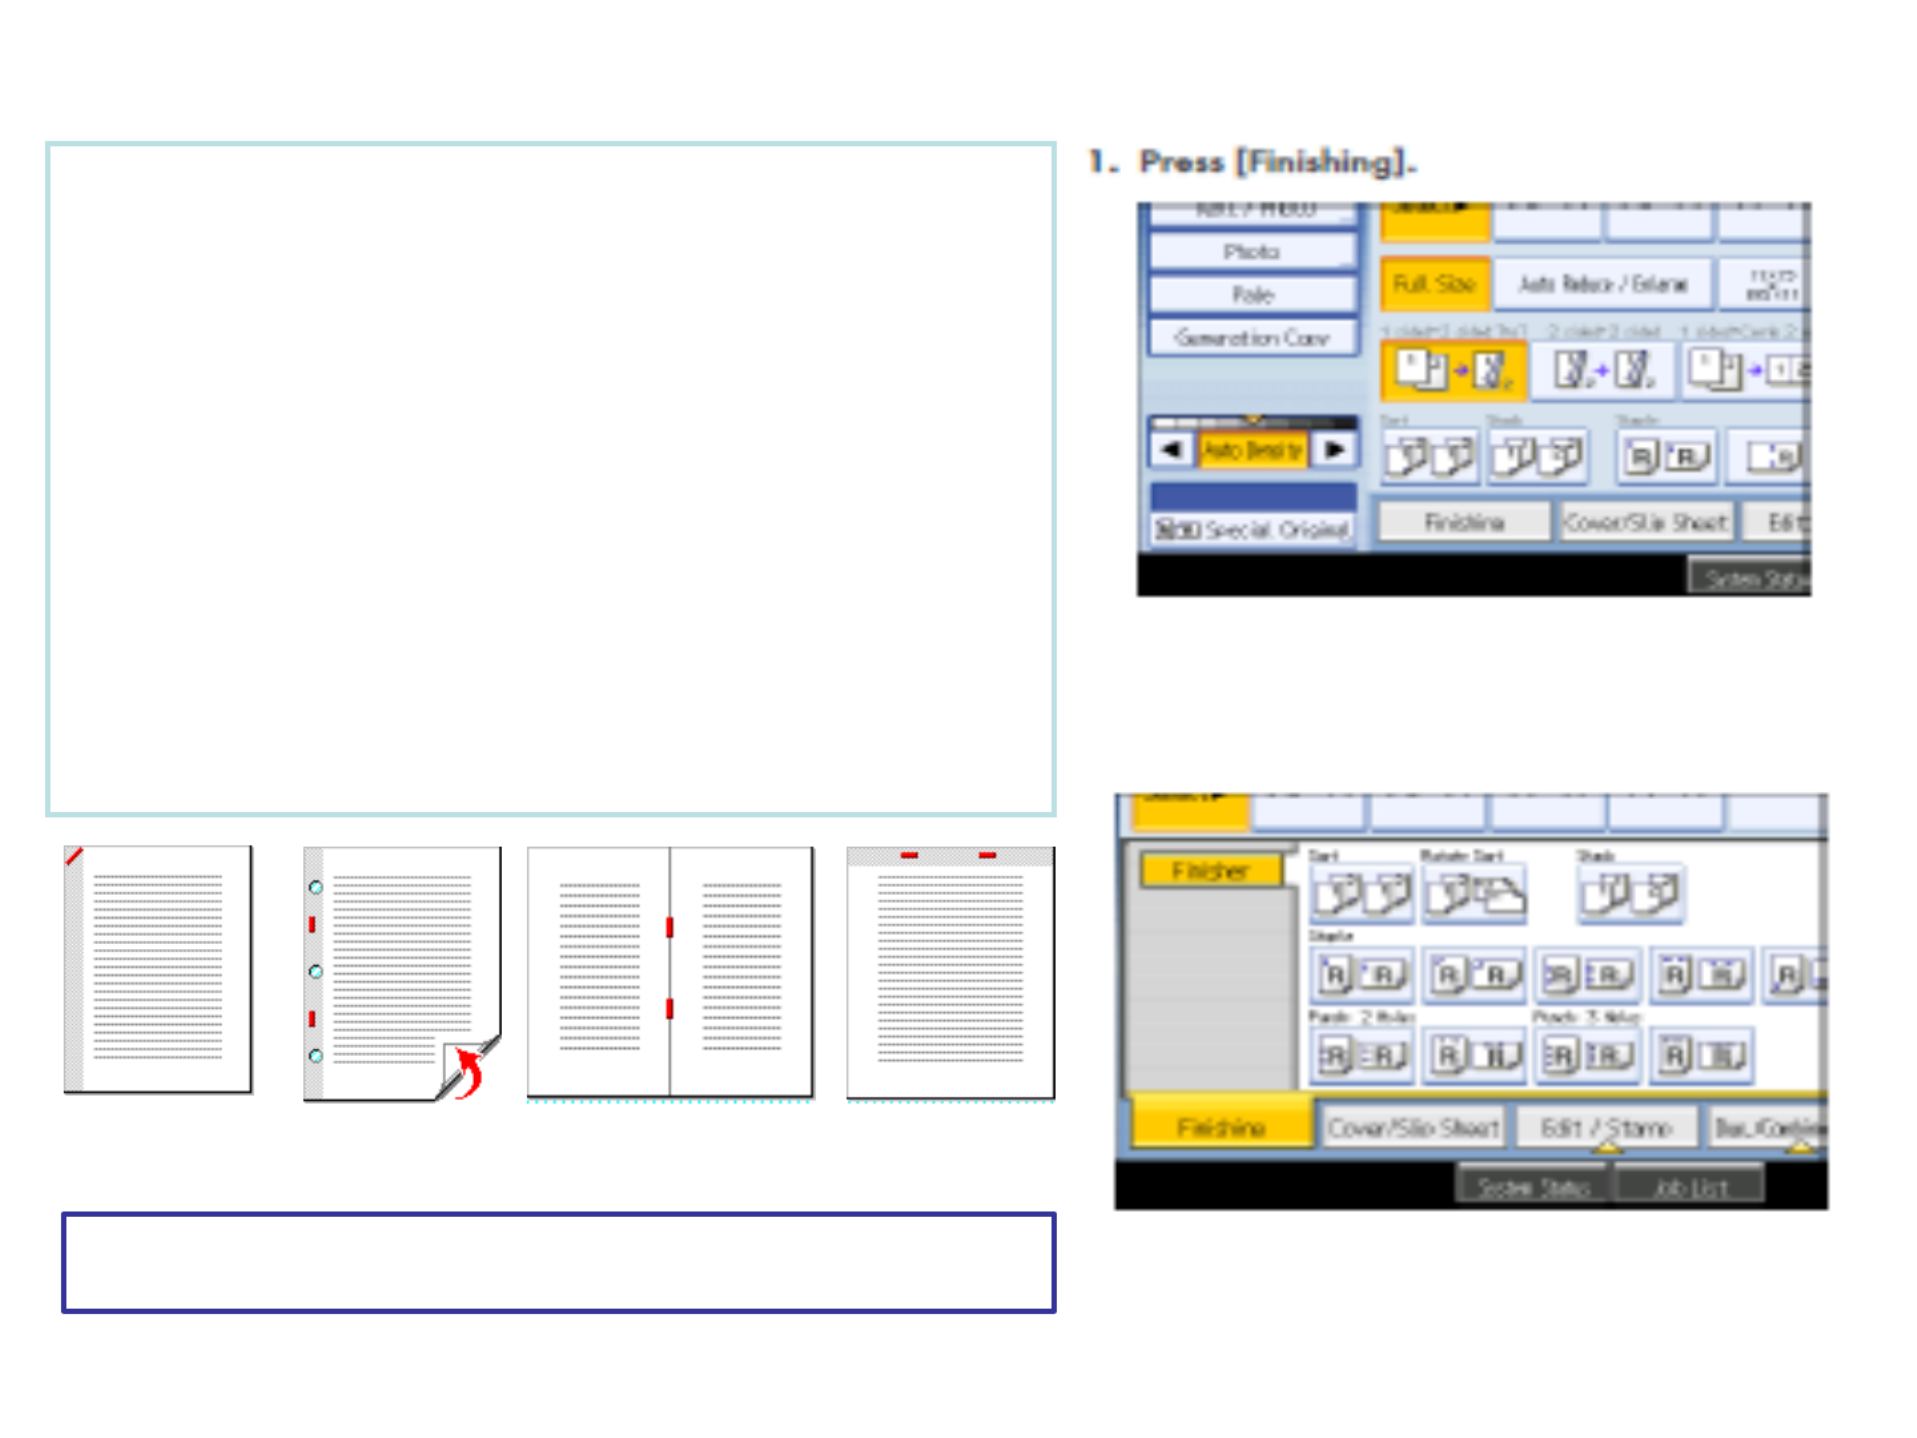
Stapling Documents
1. Place Documents in the document Feeder
2. On bottom of touch screen - select the staple
position that match your job output.
–Select Top Left (straight)
–Top Left Slant
–Bottom Left (for landscape documents fed through
feeder in portrait orientation)
–Double Staple Left (portrait Orientation)
–Double Staple Top (landscape orientation)
–Booklet stapling (for booklet folded at center
stapling)
3. Press [OK]
4. Press [Start]
2. Select desired staple position
3. Press [OK]
4. Place documents in feeder
5. Press [START]
Note: The number of pages stapled and stapling positions will vary by
machine model type and type of finisher installed.
Single Slant Top Double LTR BOOKLET CENTER
SADDLESTICH
Double Ledger

2 & 3 Hole Punch
Copying Mixed Originals
1. Place Originals in the Document Feeder
Place the smaller sizes at the top of the stack as shown in the image
Adjust the Side Guide flush against the largest original.
Ensure that the right edges of all the sheets are aligned against the
right side guide .
Ensure that all originals are lying face up.
2. Check the condition of the paper stack:
All sheets should lie flat, with no curled or bent edges,
Paper should be clean and feel dry to the touch,
Attachments such as staples, tags or tapes must be removed.
3. Press [Special Original]
4. Press then touch [Mixed Sizes] [OK]
5. Select any additional options
3. If there are multiple paper sizes you must either have all the
sizes in different paper trays, or select the size paper you want
them all to be or they will output al the default auto paper select.
6. Enter desired number of copies
7. Press [Start]
8. Press key when you have [Clear Modes]
finished.
Selecting Duplexing must all be output on the same size.
This will return the document feeder to normal copy mode ready for the
next user.
Acceptable sizes in Inch:11" x 8½" x14" 8½" x 11" 5½" x 8½" 17“ ; ; ;

Create Margin
•Reduces the image to 93% of its original size and places the reduced image at
the center By combining it with the Reduce / Enlarge functions, you can further
increase a margin.
•1. Press [Create Margin].
•2. Select the reproduction ratio, if necessary.
3. Press START
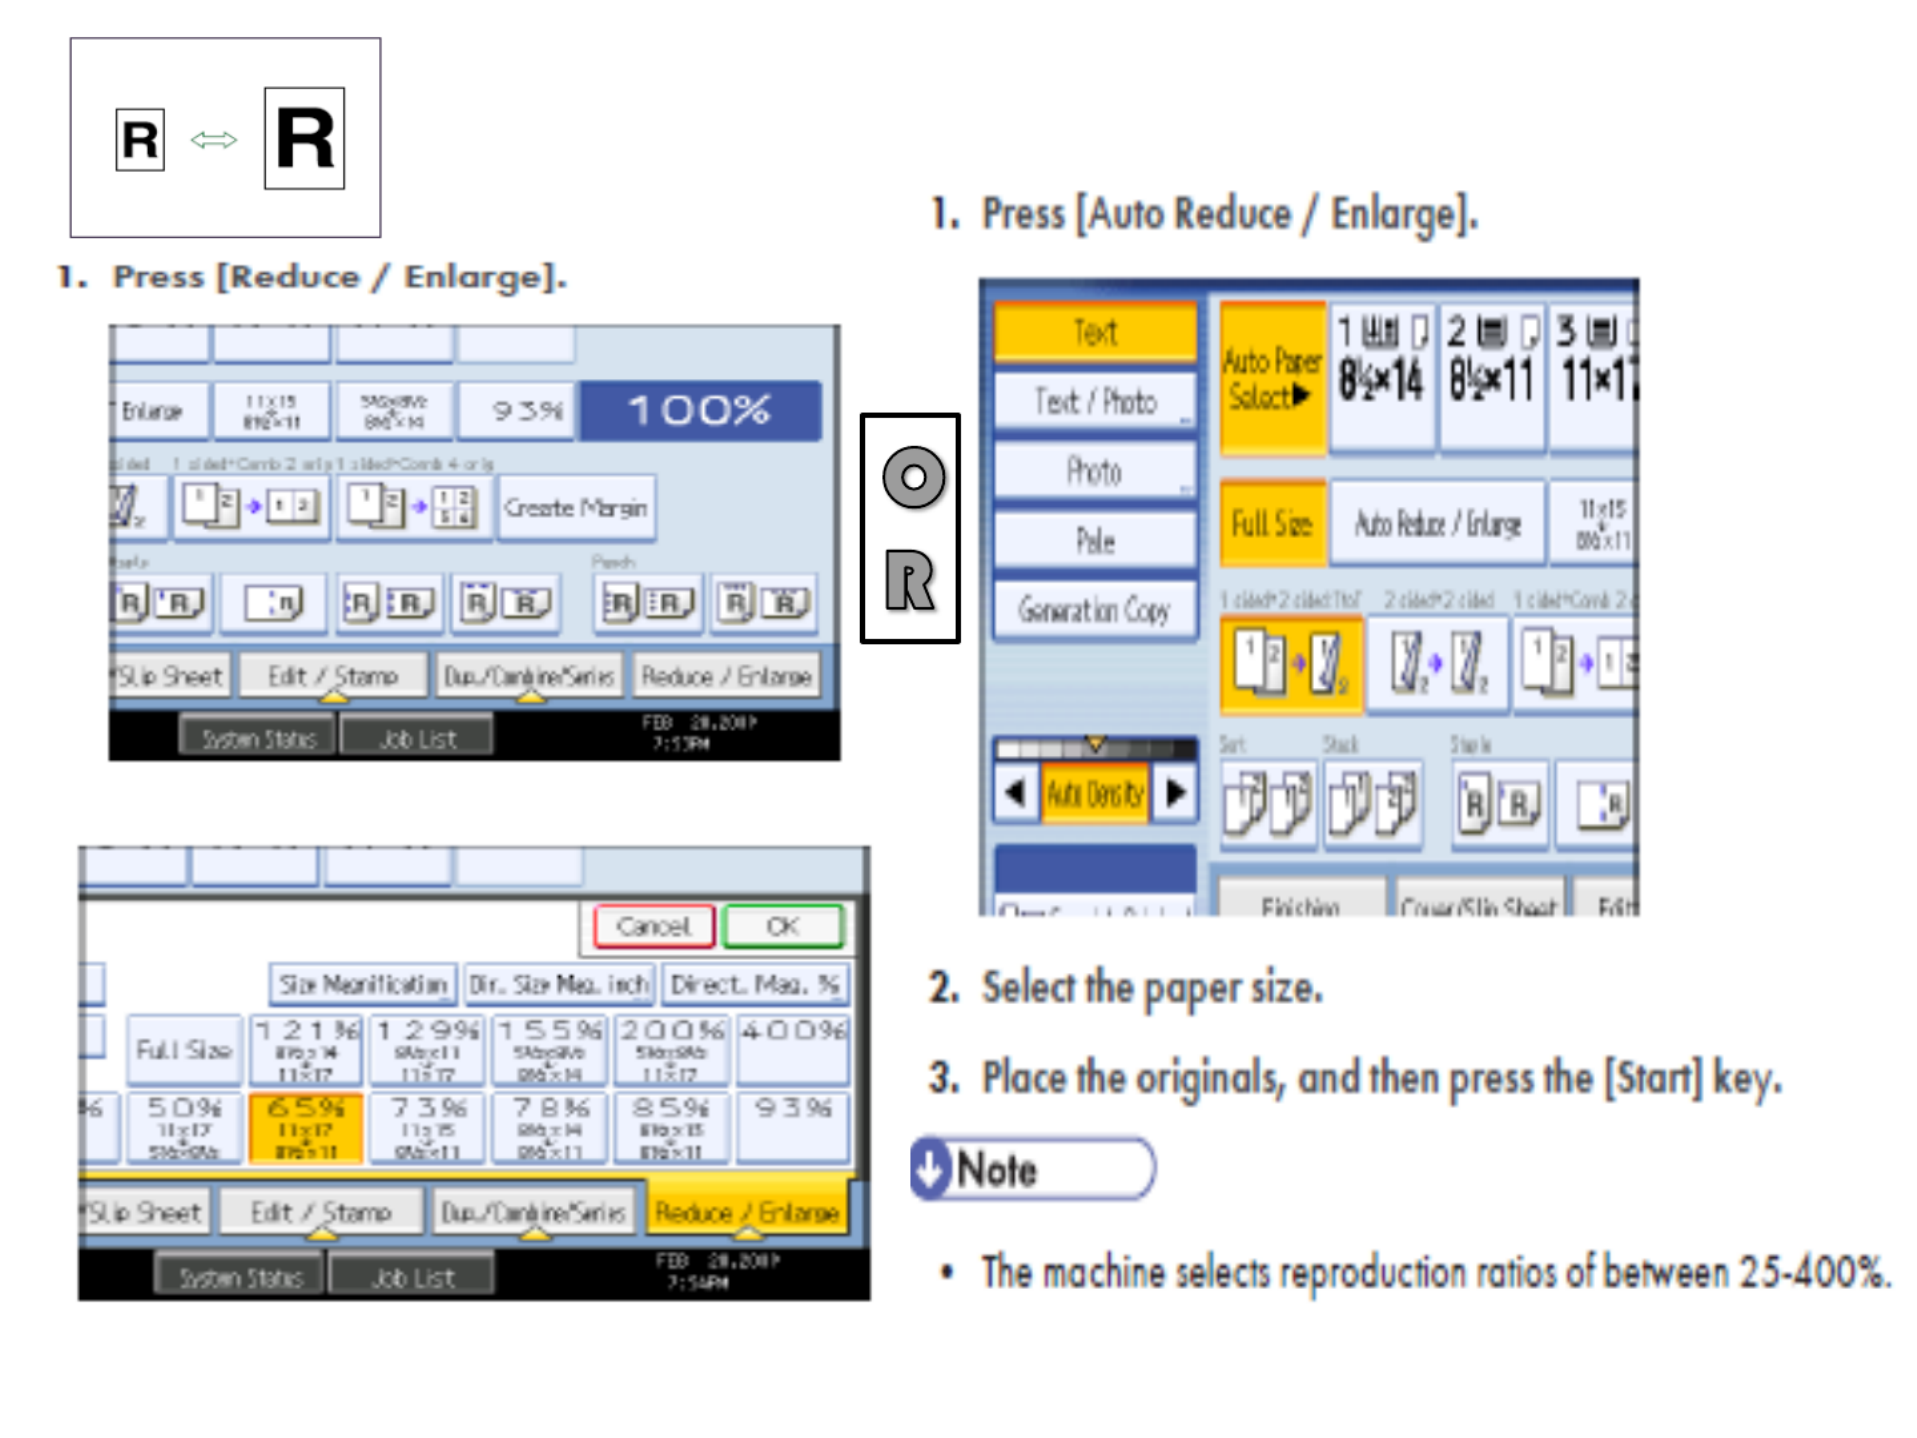
Reduction/Enlargement
Select the option that matches your output
Place originals, Press START
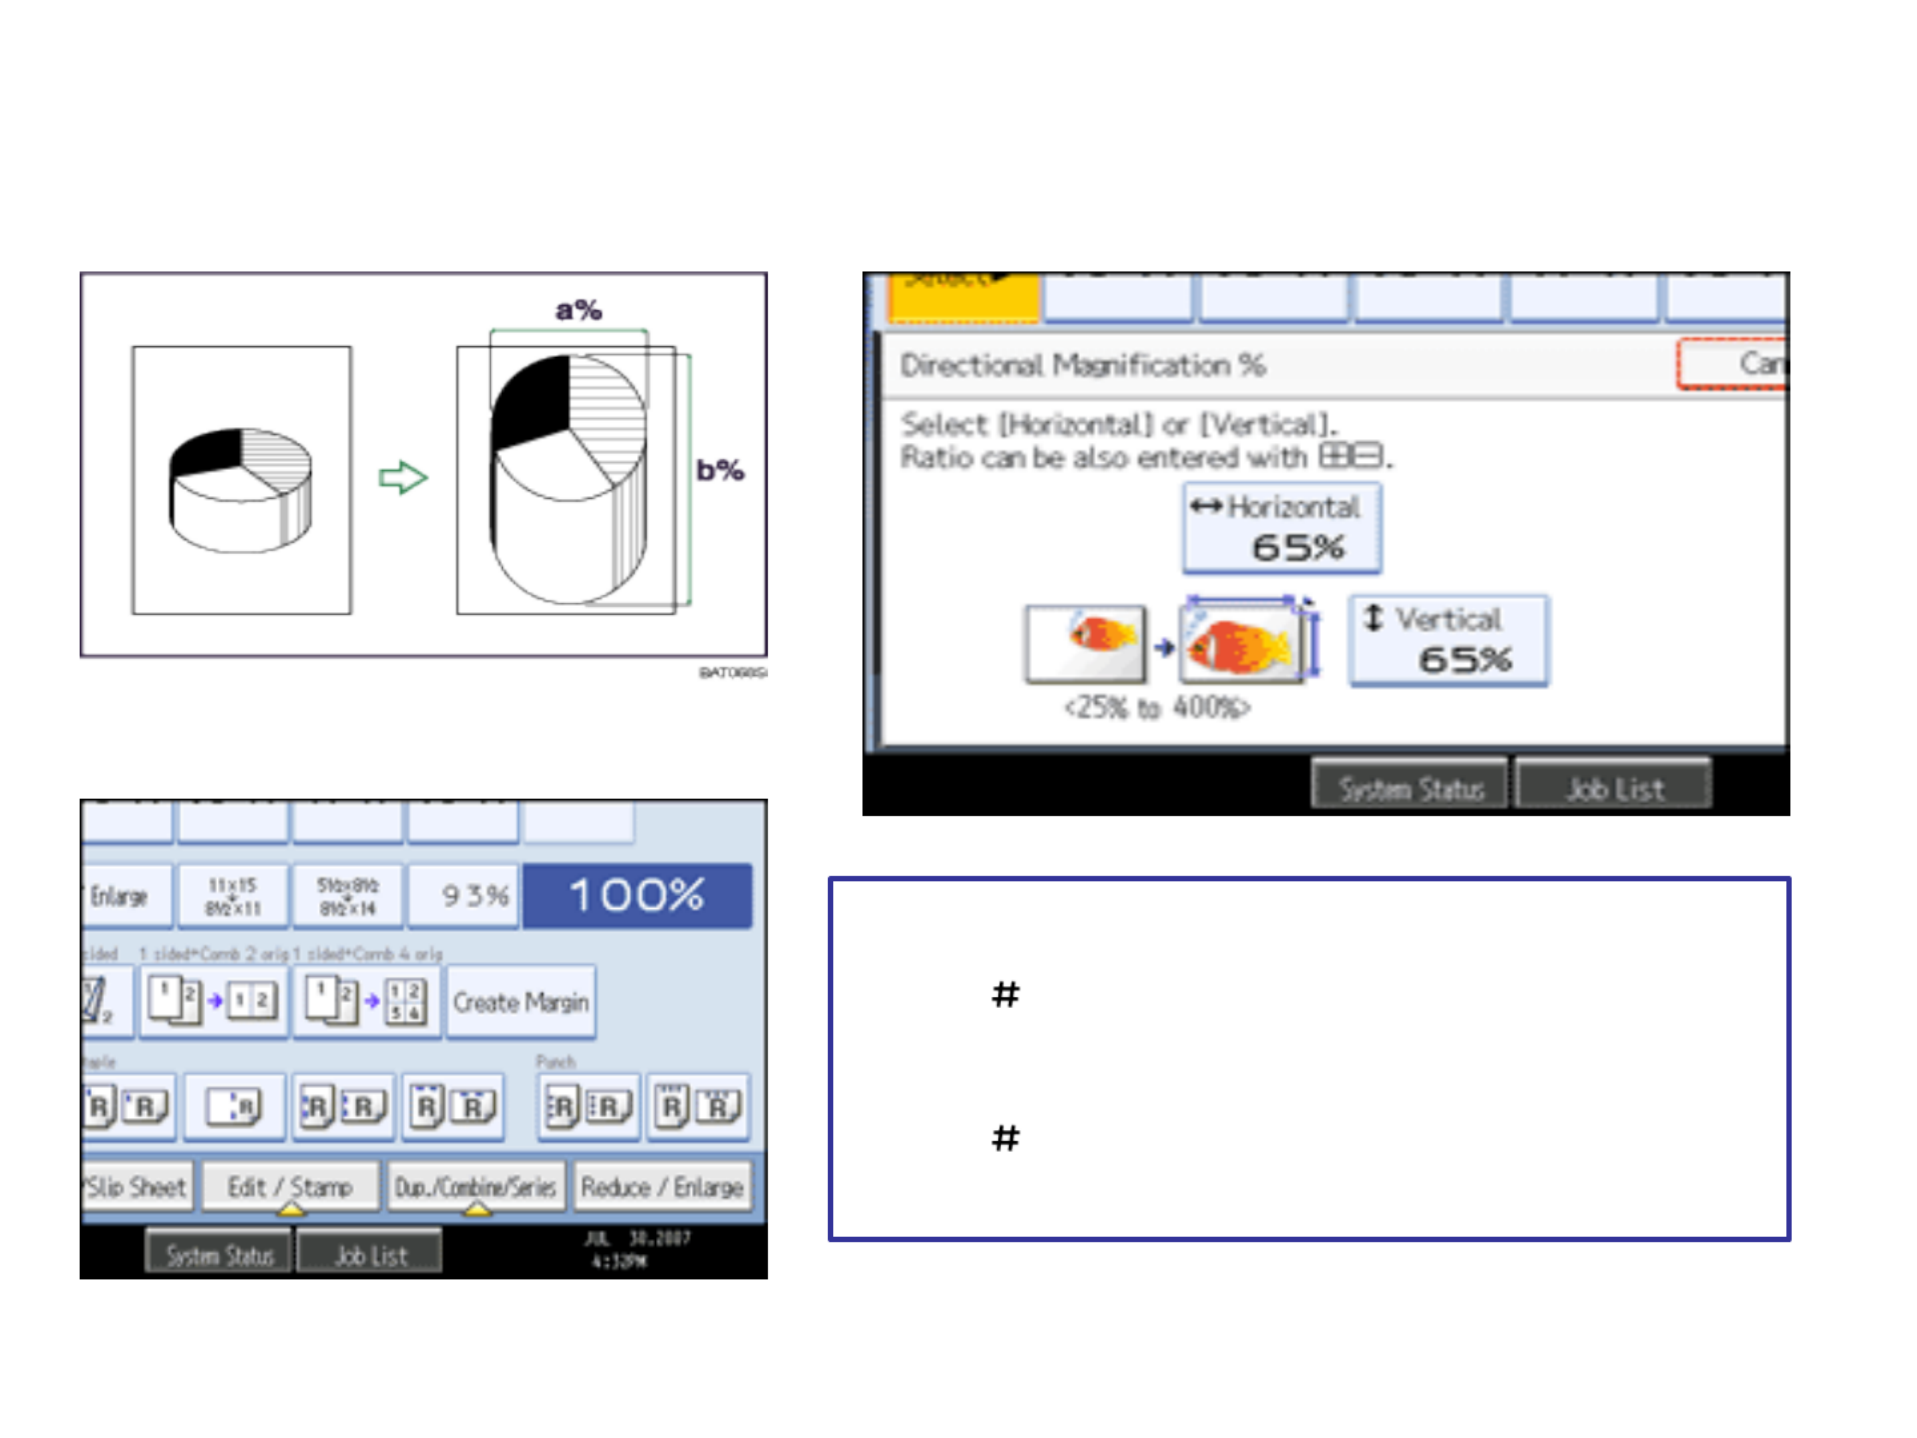
Directional Size Magnification%
Use this feature to enlarge a document by placing percentage proportions in the horizontal and
vertical fields.
Place document on platen glass
Press [Reduce/Enlarge]
Press [Direct. Mag. %].
Press [Horizontal)
Enter the desired ratio with the number keys, and then
press [ ].
Press [Vertical].
Enter the desired ratio with the number keys, and then
press [ ].
Press [OK] twice.
Place the originals, and then press the [Start] key.

Edit/Stamp or Edit/Color Tab
Options
Vary by machine type and hard drive installed
Edit Color –
erase color, change or adjust color
Scan Position -
Used for moving copy image up or down on page
Margin Adjustments –
used to move margins for hole-punching, stapling or
binding
Stamps –
used for background numbering, page numbering,
watermarks, date stamping
Erase –
used for cleaning edges and borders, page centers
Edit Image –
used to replicate images, center images, invert images or
duplicate images
Copy Quality –
used to adjust contrast and image background

Designate
Use this function to have certain pages of your original copied onto designation sheets or to insert a
designation sheet for each page specified. Before using this option you must set up the paper trays under
paper tray settings.
Copy Blank
Press [Cover/Slip Sheet].
Press [Designate / Chapter].
Select to copy designated [Designate: Copy]
page on the designated number page or
Press Not to copy [Designate: Blank].
anything on the specified page.
Press the key to select the chapter number.
Enter the page number of the first
chapter using the numbers key, and then
press the key.[#]
You can continue to specify additional
page location numbers, up the 20
locations may be selected.
After making all settings, press [OK]
twice.
Press or [Start] [Sample Copy].

Preset Stamp
Allows users to place a watermark on documents being copied. Users
Can choose stamp option, placement, size and density. Users and also
choose to place on first page only or on all pages being copied. If using
A color unit, these options may be printed in color, on units with
60+ page speeds have the option to create a desired stamp.
(Options may vary by machine types)

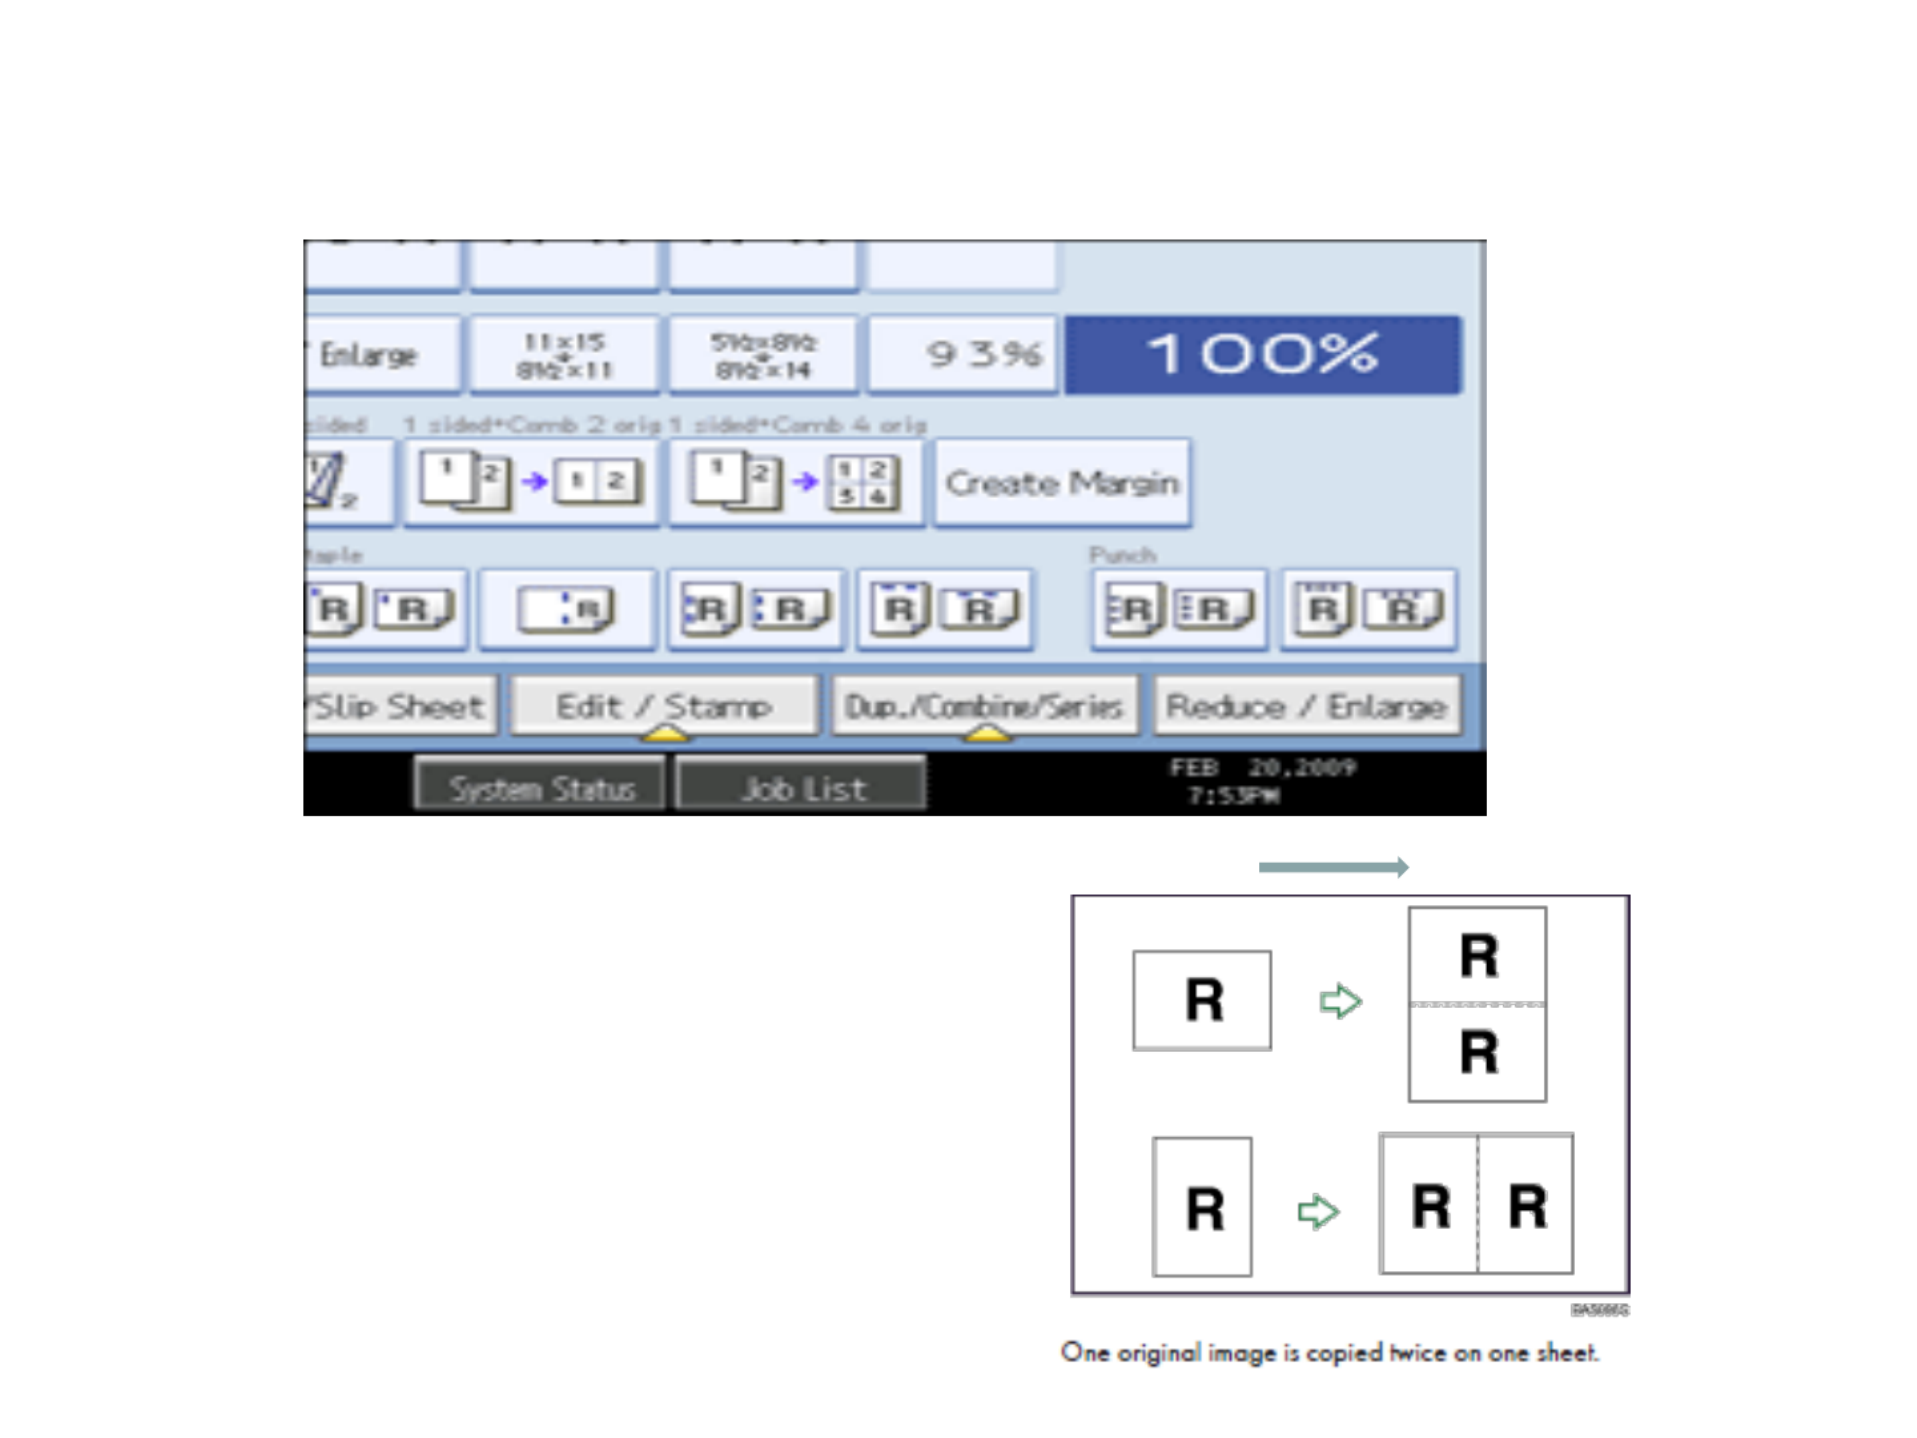
Image Repeat
Allows users place a single page on the glass and have the
image repeated multiple times on a single page
Place image on glass
Press [Edit/Stamp]
Press [Edit Image]
Press [Image Repeat]
Press [OK]
Press [Reduce/Enlarge]
Press [Numbers Key]
Enter the reproduction ratio
Press [OK]
Select the paper size
Press [Start]
4 Repeats (50%)
8 Repeats (35%)
16 Repeats (25%)

Image Repeat
Original:,51/2× 81/2/Copy paper: 81/2× 11 , or Original: 51/2× 81/2/Copy paper: 81/2× 11 Original: 51/2×
81/2/Copy paper: 81/2× 11, or Original: 51/2× 81/2/ Copy paper: 81/2× 11
This feature allow you to take an original image and copy the image repeatedly on the same page.
Select the size of copy paper and the reproduction ratio.
Press Key[Edit/Stamp]
Press key[Edit Image]
Press [Image Repeat] key
Press [OK]
Press [Reduction/Enlargement]
Enter the Percentage amounts to repeat the image on
the page.
See examples for original sizes below:-
4 repeats 50%
8 35%repeats
25 repeats 35%

Margin Adjustment
Allows users to move the margins of a document being copied
for better placement of documents being copied, i.e. used to
move the margins to the top, bottom, right or left of the page. When
using this option, the system does not reduce the image being copied
Therefore users must have adequate blank space when moving
Images.

Document Centering
Note:
You cannot use the bypass tray
with this function.
You can make copies with the image moved to the center of the copy paper.
Place the document
Select the paper size.
Press [Edit / Stamp].
Press [Edit Image].
Press [Centering].
Press [OK].
Double Copies
•Press [Edit / Stamp].
•Press [Edit Image].
•Press [Double Copies].
•Press [OK].
•Select the paper size.
•Enter desired number of copies
•Press [Start]
Place Original in Document or lift the lid and place face down on Glass Platen
Original Feed Copy Output orientation

Edit/Stamp [Scan Position]
Allows users adjust image (books) beingto
copied the glass for better imageon
placement output without moving the document.
Use directional arrows move the image theto in
Desired Direction. users can elect moveto
image both sides a page.on of
Place image on Glass
Press [Start]
Review output but do not move
image
Press [Edit/Stamp]
Press [Scan Position]
Using directional arrows, move the
image in the desired direction and
them press [Start]
Repeat as necessary until desired
placement is made.
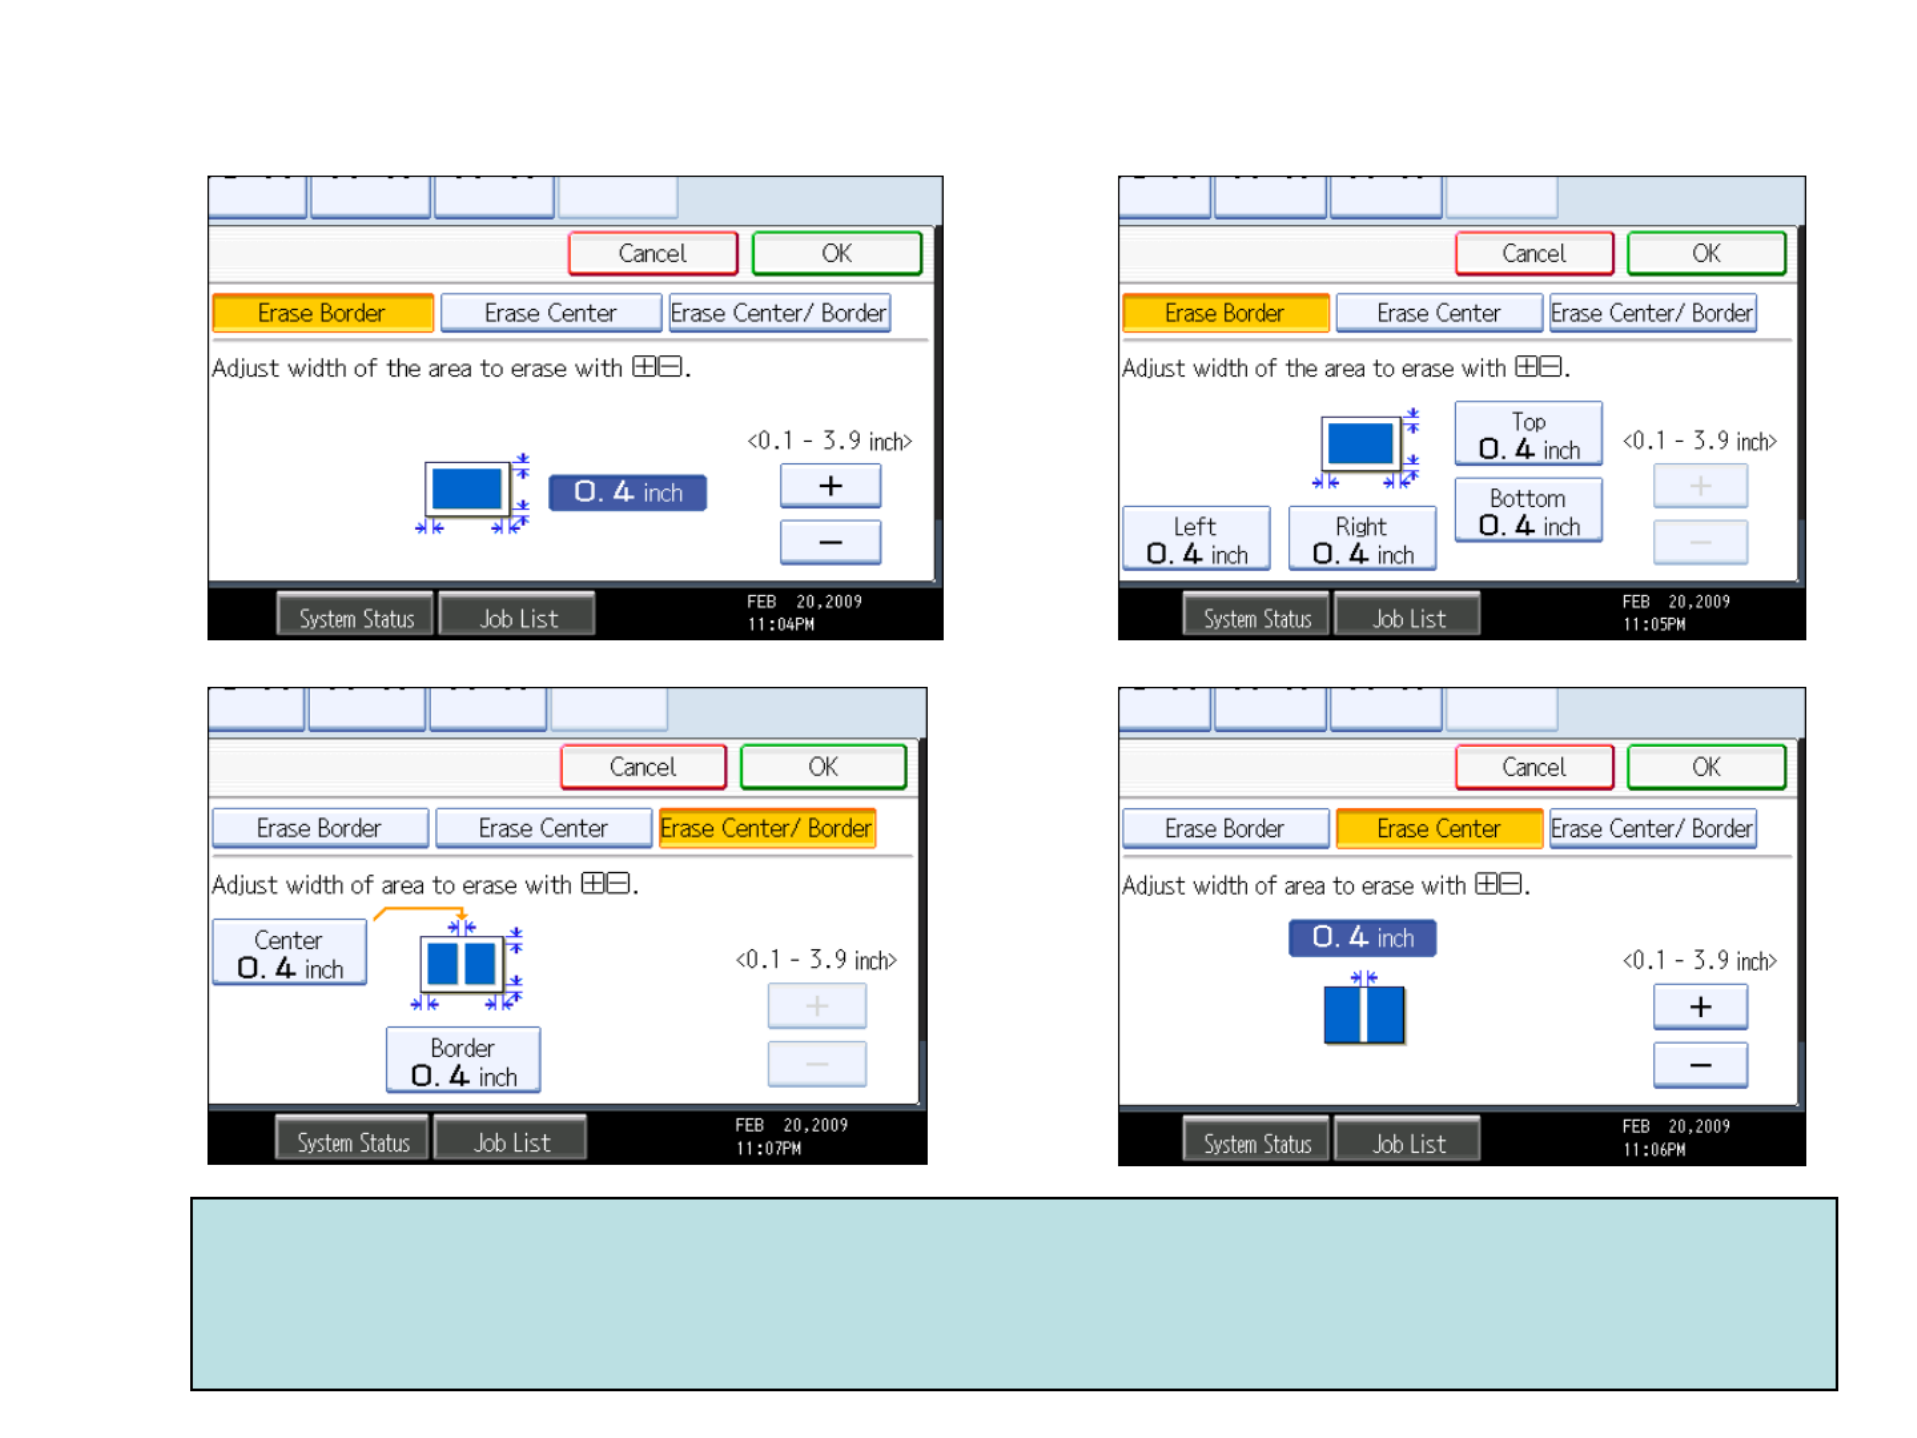
Edit Stamp/Edit Color [Erase]
Allows users to clean edges, borders, centers of documents being copied.
Users can use feature to clean single or multiple pages. Single or multiple
Edges may also be selected for a cleaner output of your documents
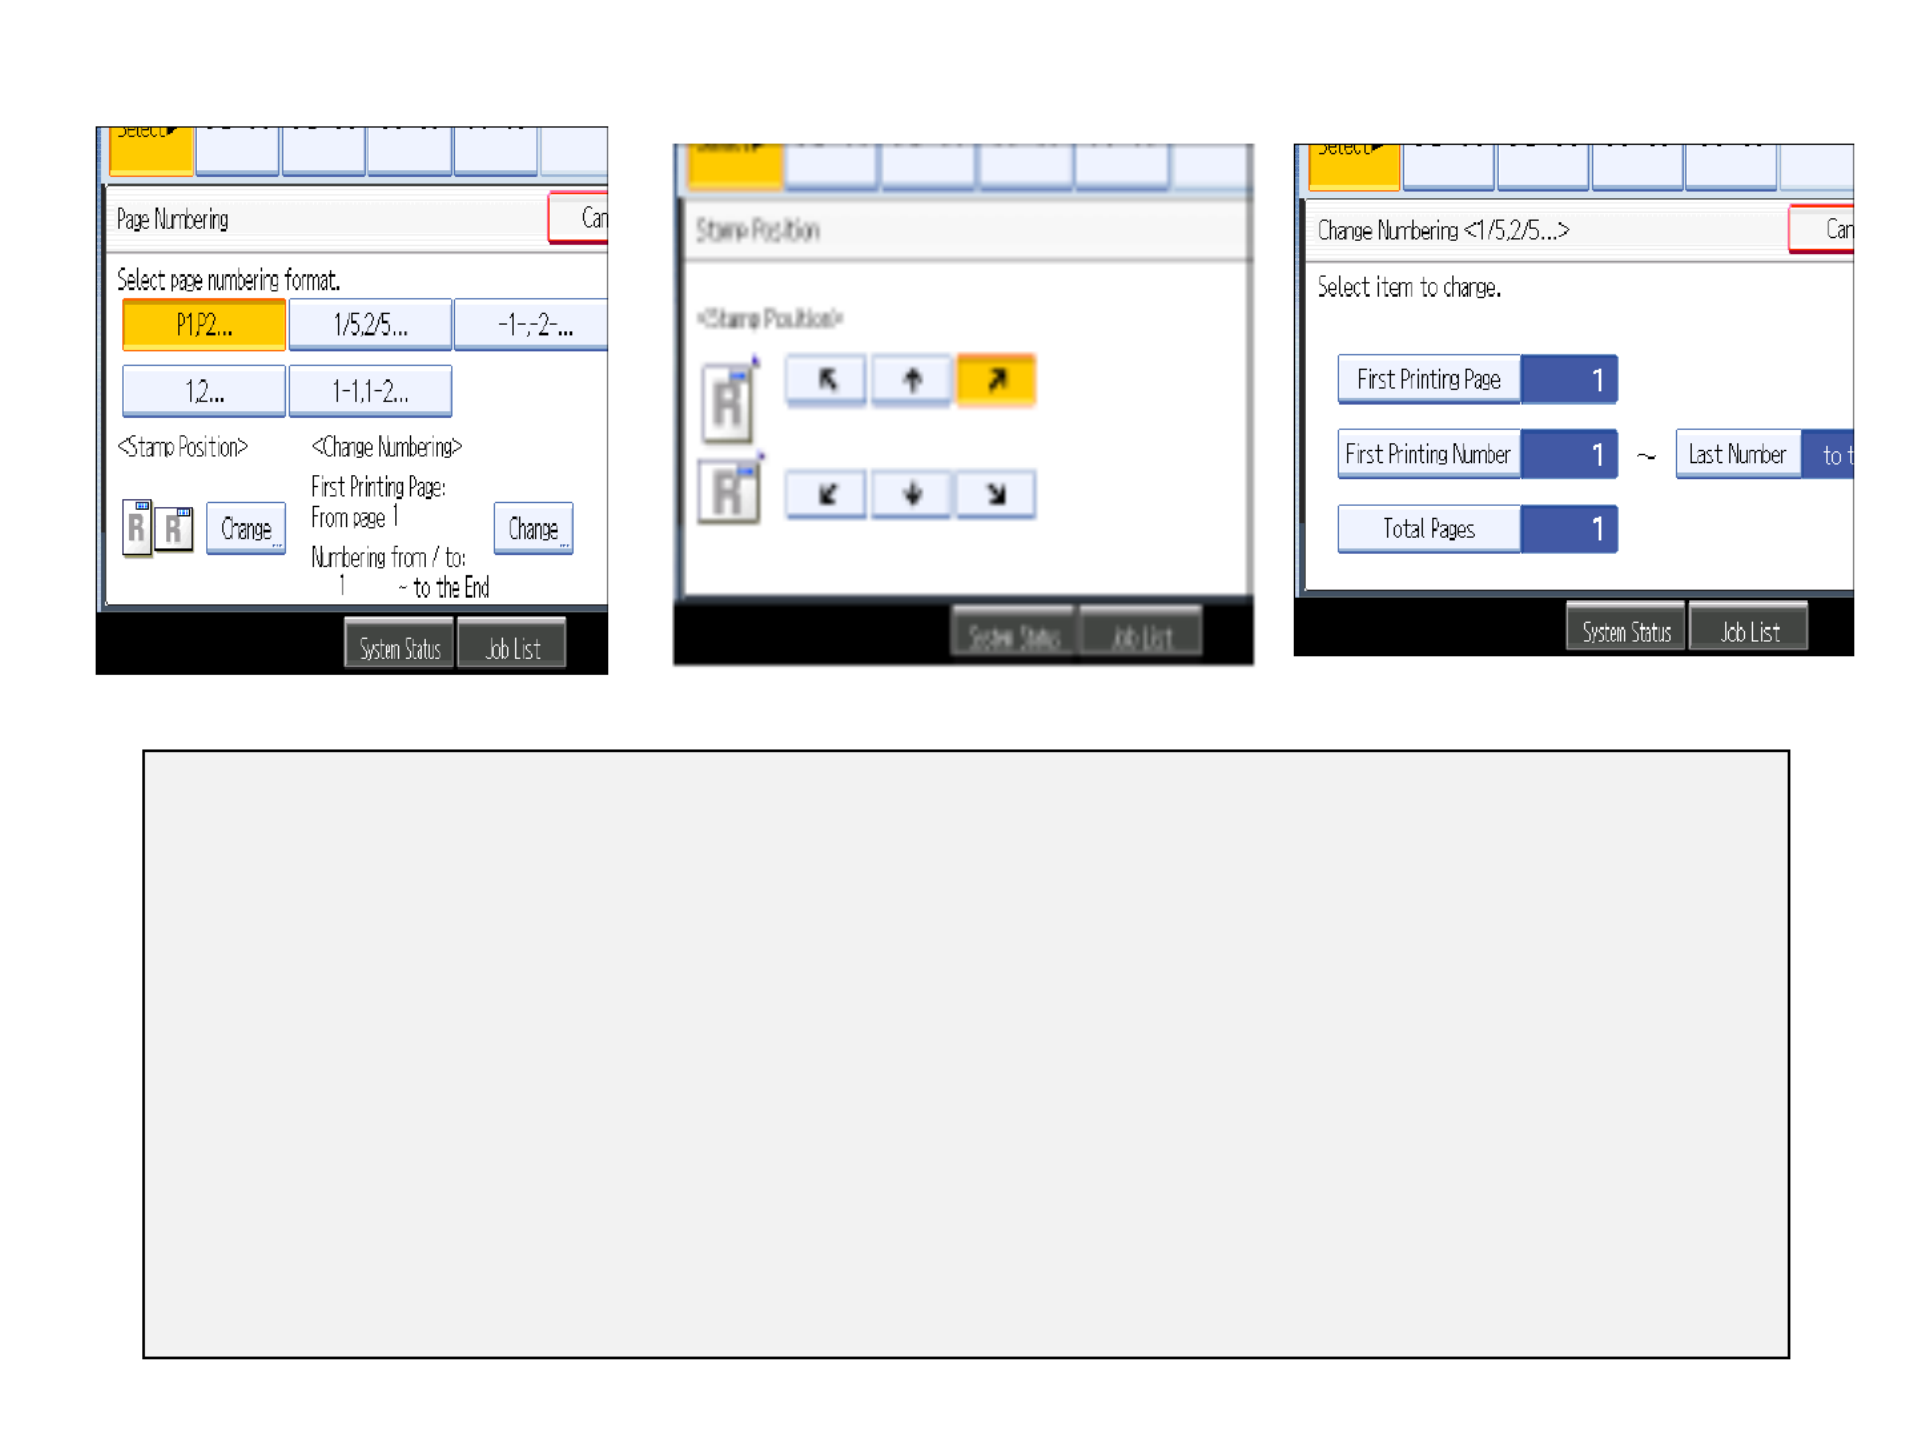
Page Numbering
Allows users to keep track of documents being copied for projects, etc. Users can choose numbering
Sequence and position of placement of numbers.
Place Documents in Feeder
Press [Edit /Stamp]
Select [Stamp]
Select [Page Numbering]
Press [ >Select Format>Change] [Page Numbering] OK
Press Change (opposite side) Select Page Number Placement>OK
Touch [ >indicate page to start number sequenceFirst Printing Page]
Touch [Last Number]>Enter information
Touch First >enter information[Printing Number]
Touch [Total Pages] >enter information
Select any other finishing options including the desired number of copies
Press [SAMPLE COPY] [Start]or
Page Number Format Number Page Position Starting Page, Starting Number
and Ending number,

Date Stamp
Place documents in feeder or on glass platen
Press [Edit Stamp] or [Edit color]
Press [Stamp]
Press [Change Format], select desired format,
Press [OK]
Press [Change] Select desired stamp placement,
Press [OK]
Select [First Page Only] or
Select [All Pages],
Press [OK]
Press [Start]
Allows users to date stamp documents being copied for time sensitive documents, e.g. projects, deliver tickets, etc.
Users can select different formats, stamp placement and if stamp should be place on front page ONLY or all pages
.

Dup./Combine/Series
Full menu for short cuts on panel
Duplex –1 sided+2 Sided
2 Sided+ 2 Sided
Combine –Combine multiple pages on single pages
with options for 2 sided or single sided output and options
of placing 2, 4, 8 or pages on a single page. Users can choose
different size pager for output.
Series –output documents from 2 Sided to 1 Sided
Copy 2 face forwarding pages of a book to 2 single pages.
Book –Create a magazine output (use booklet for 4 page output) use
Magazine for 5 or more pages. When the booklet finisher is installed,
Users can choose to have the job stapled and folded.
Use to copy 2 face forwarding pages of a book as a duplex output.
Default Screen
Settings

Combine Pages
Some of these options are available from
the main copier panel. You cannot use
the Bypass tray with this option.
Use this option to combine multiple single pages or 2 sided pages for multiple pages copied on each side of a
page. Originals can be copied in portrait or landscape orientation.

Cover/Slip Sheets
Allows users to add covers, slip sheets, chaptering of documents and page inserts
of different color paper. Users can choose to insert blank pages or copy info on pages.

Adding Covers
To set the Bypass tray as the
cover paper source:-
Press "User Tools"
Select "System Settings"
Select the "Paper Size" Settings" tab
Select "Bypass"
Select "Display"
Select "Cover"
Select "Mode Selected"
Select "OK"
Press "User Tools" again to exit
On the main screen:-
Select "Cover/Slip sheet"
Select "Front Cover"
Select "Blank" or "Copy"
Press "OK"
Set the paper for the cover sheet on the bypass tray
For 2 sided covers select "Duplex"
Set the originals on the document feeder
Select any additional options
Enter desired number of copies
Press Sample Copy
Press “Continue” if sample set is correct.
To change between 1 and 2
sided covers:-
Press "User Tools"
Select "Copy Features"
Select "Page Format"
Select "Cover Mode"
Select 1 or 2 sided covers
Select "OK"
Press "User Tools" to exit

Odd sized books may require some manual adjustments
Book Copying
Place open Book on Glass Platen
Press [Dup./Combine/Series ]button
Select [ buttonSERIES]
Press [Book - 1 sided] for single pages
Outputs 2 single pages for the right and left pages
Press [OK]
OR
Press the [ ]buttonBOOK
•Select [BOOK TO 2 SIDED]
–Copies the left and right pages and place front and back to a single page
–Press [OK]
Press Page size Paper tray
Enter desired sets
Press [Start]
•
Book 1-Sided
Book 2-Sided

Booklets & Magazine Modes
1. Place all originals in ADF face up, portrait orientation or Landscape orientation
2. Select [Dup./Combine/Series]
3. Select [Book]
4. Select [Magazine] *
4. 1 - Sided for Simplex originals or
5. Magazine 2 - Sided for Duplexed originals
5. Touch [ twiceOK]
6. Select [Edit/Stamp]
7. Select [Centering]
8. Select [OK]
9. Select the [Paper size] for output
10. Enter desired number of sets
11. Press [Start]
Optional
Press [Sample Copy] to preview job before running multiple sets
14
2 3
12
3
12
5 6
34
7 8
4
Use mode for 4 page originals[*Booklet]
Use [*Magazine] Mode for 5 or more page originals
1
4

TAB Copying
Set tab stock so that it will
be fed from the side without
the tab edges first.
Adjust the back fence
position so that the tab sheet
holder will fit the tab stock.
To Copy Tabs
Place the Tab Copy Originals in the Document Feeder
Select the Paper Tray containing the Tab Paper (tray 2 or tray 3)
Press START

Using INTERUPT Option
Use the INTERUPT function when you want to interrupt a long copy job, to make urgently needed
copies.

Sample Copy
Screen settings will change and display “continue” or Suspend.
Use this option to check the copy settings before making a
long copy run.
Place originals
Select any other necessary functions for copy job
Enter number of desire copies
Instead of [START] press [Sample Copy] key
-One set is delivered as a sample
If Sample Copy is acceptable, press [Continue]
-The number of copies made is the number of copies
requested minus the proof copy.
If you press after checking the results, return [Suspend]
to step 1 to adjust the copy settings as necessary.
-Depending on the combination of functions, you may
not be able to change some settings.
You can press [Sample Copy] again or press [Start] to
output the job
Note: This feature can only be used when [sort] is
selected. This feature is not available from the
[Simplified screen].
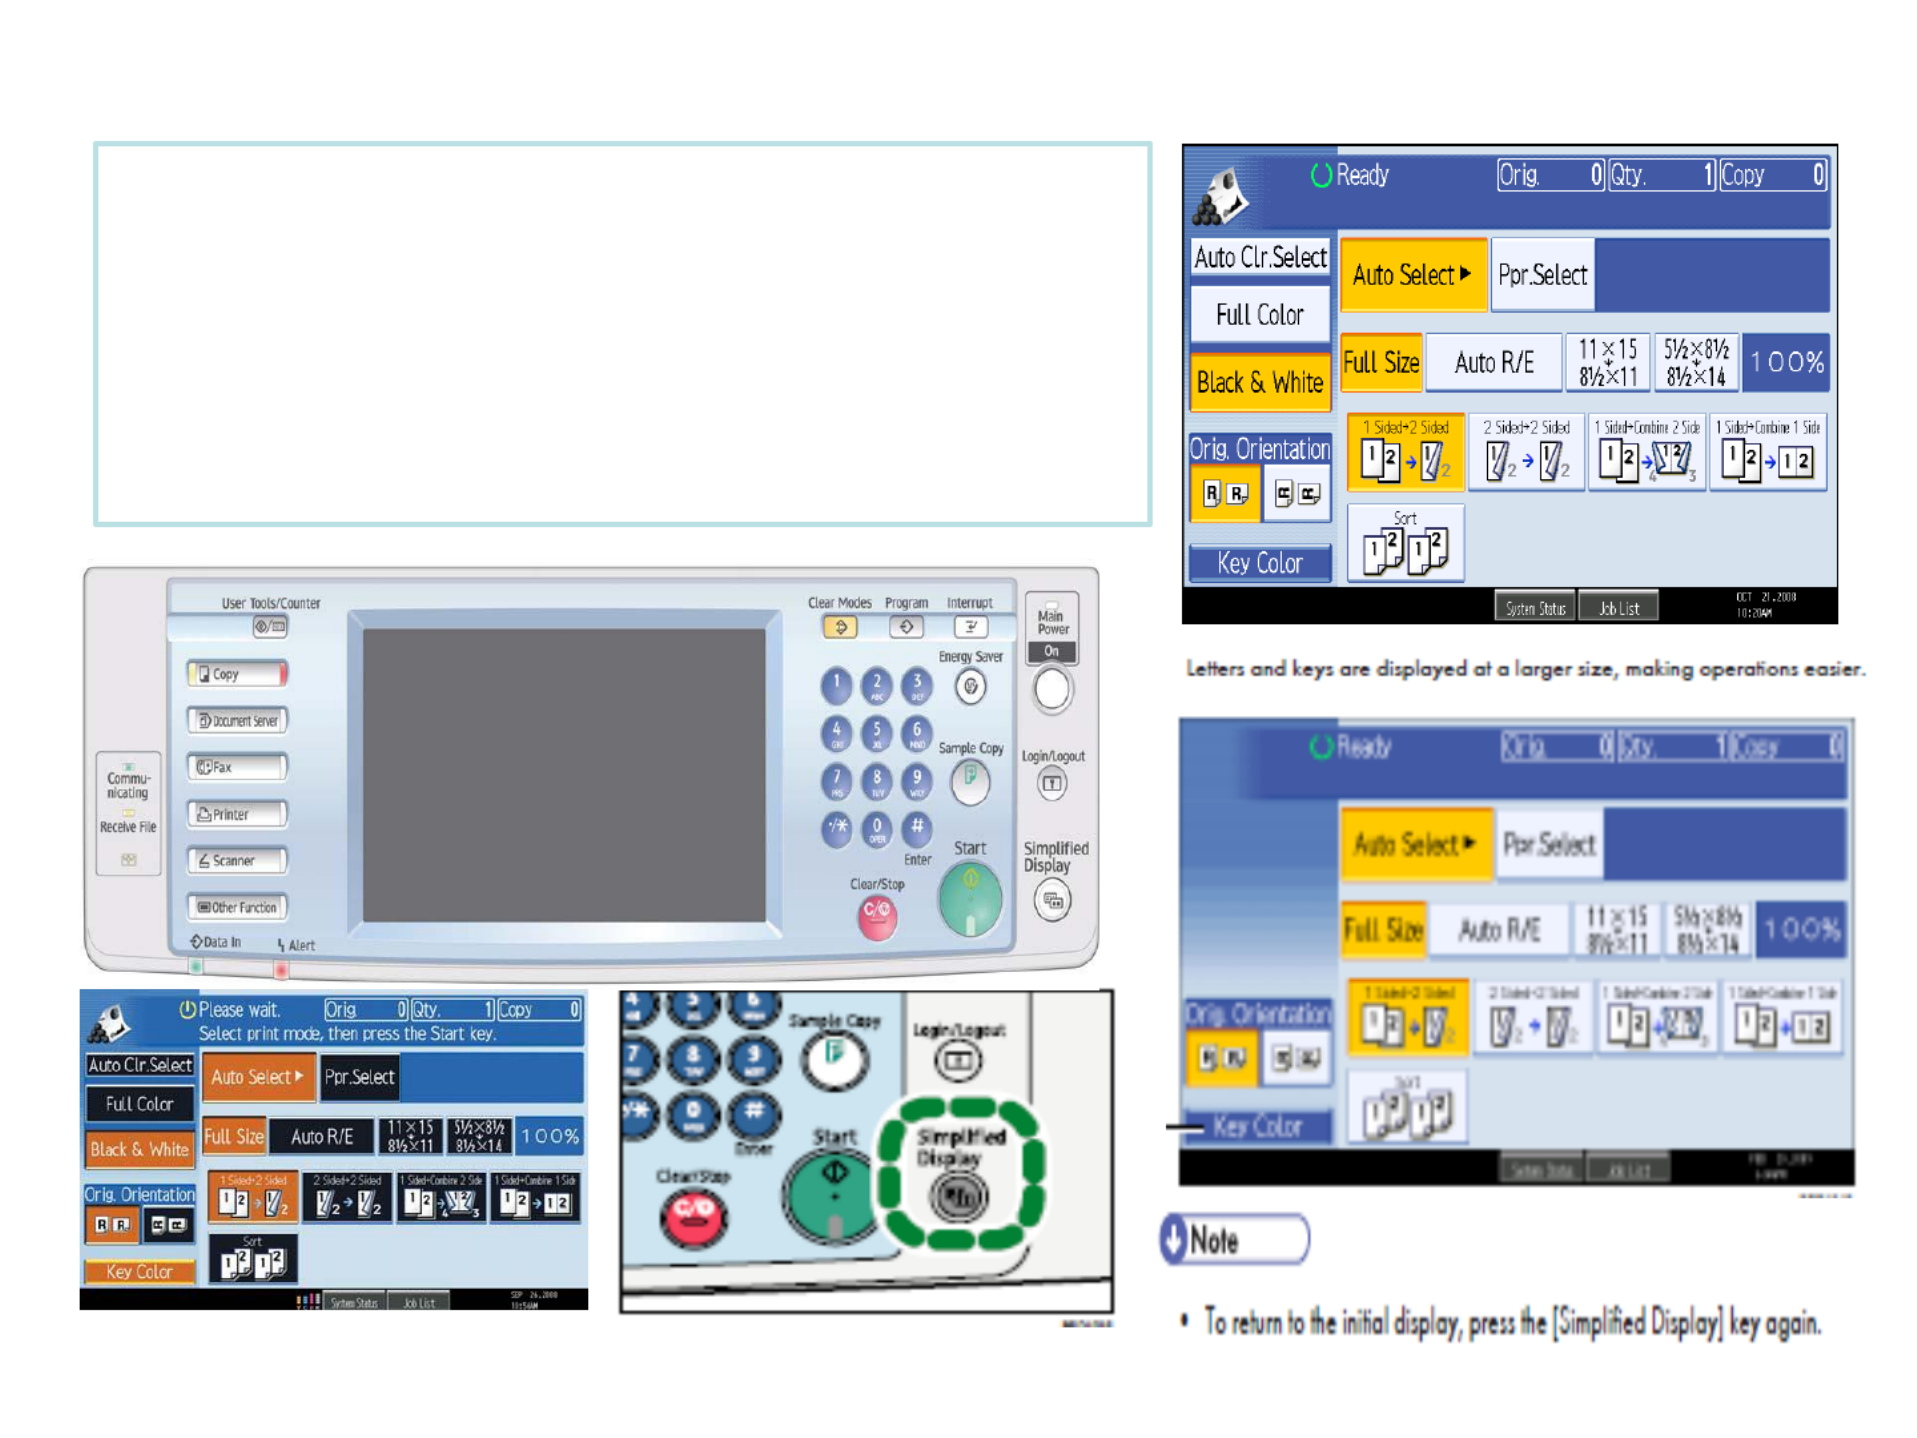
Simplified Display
Pressing the Simplified Display button will cause letters and
keys to be displayed at a larger size, making operations
easier.
To access the [Simplified Display]
Press the Simplified Display on the Main Screen
Display s the basic copier functions
Finishing options may be added to this screen for ease of
use. Not all functions are available with this screen.
Key color is only available in simplified display mode.

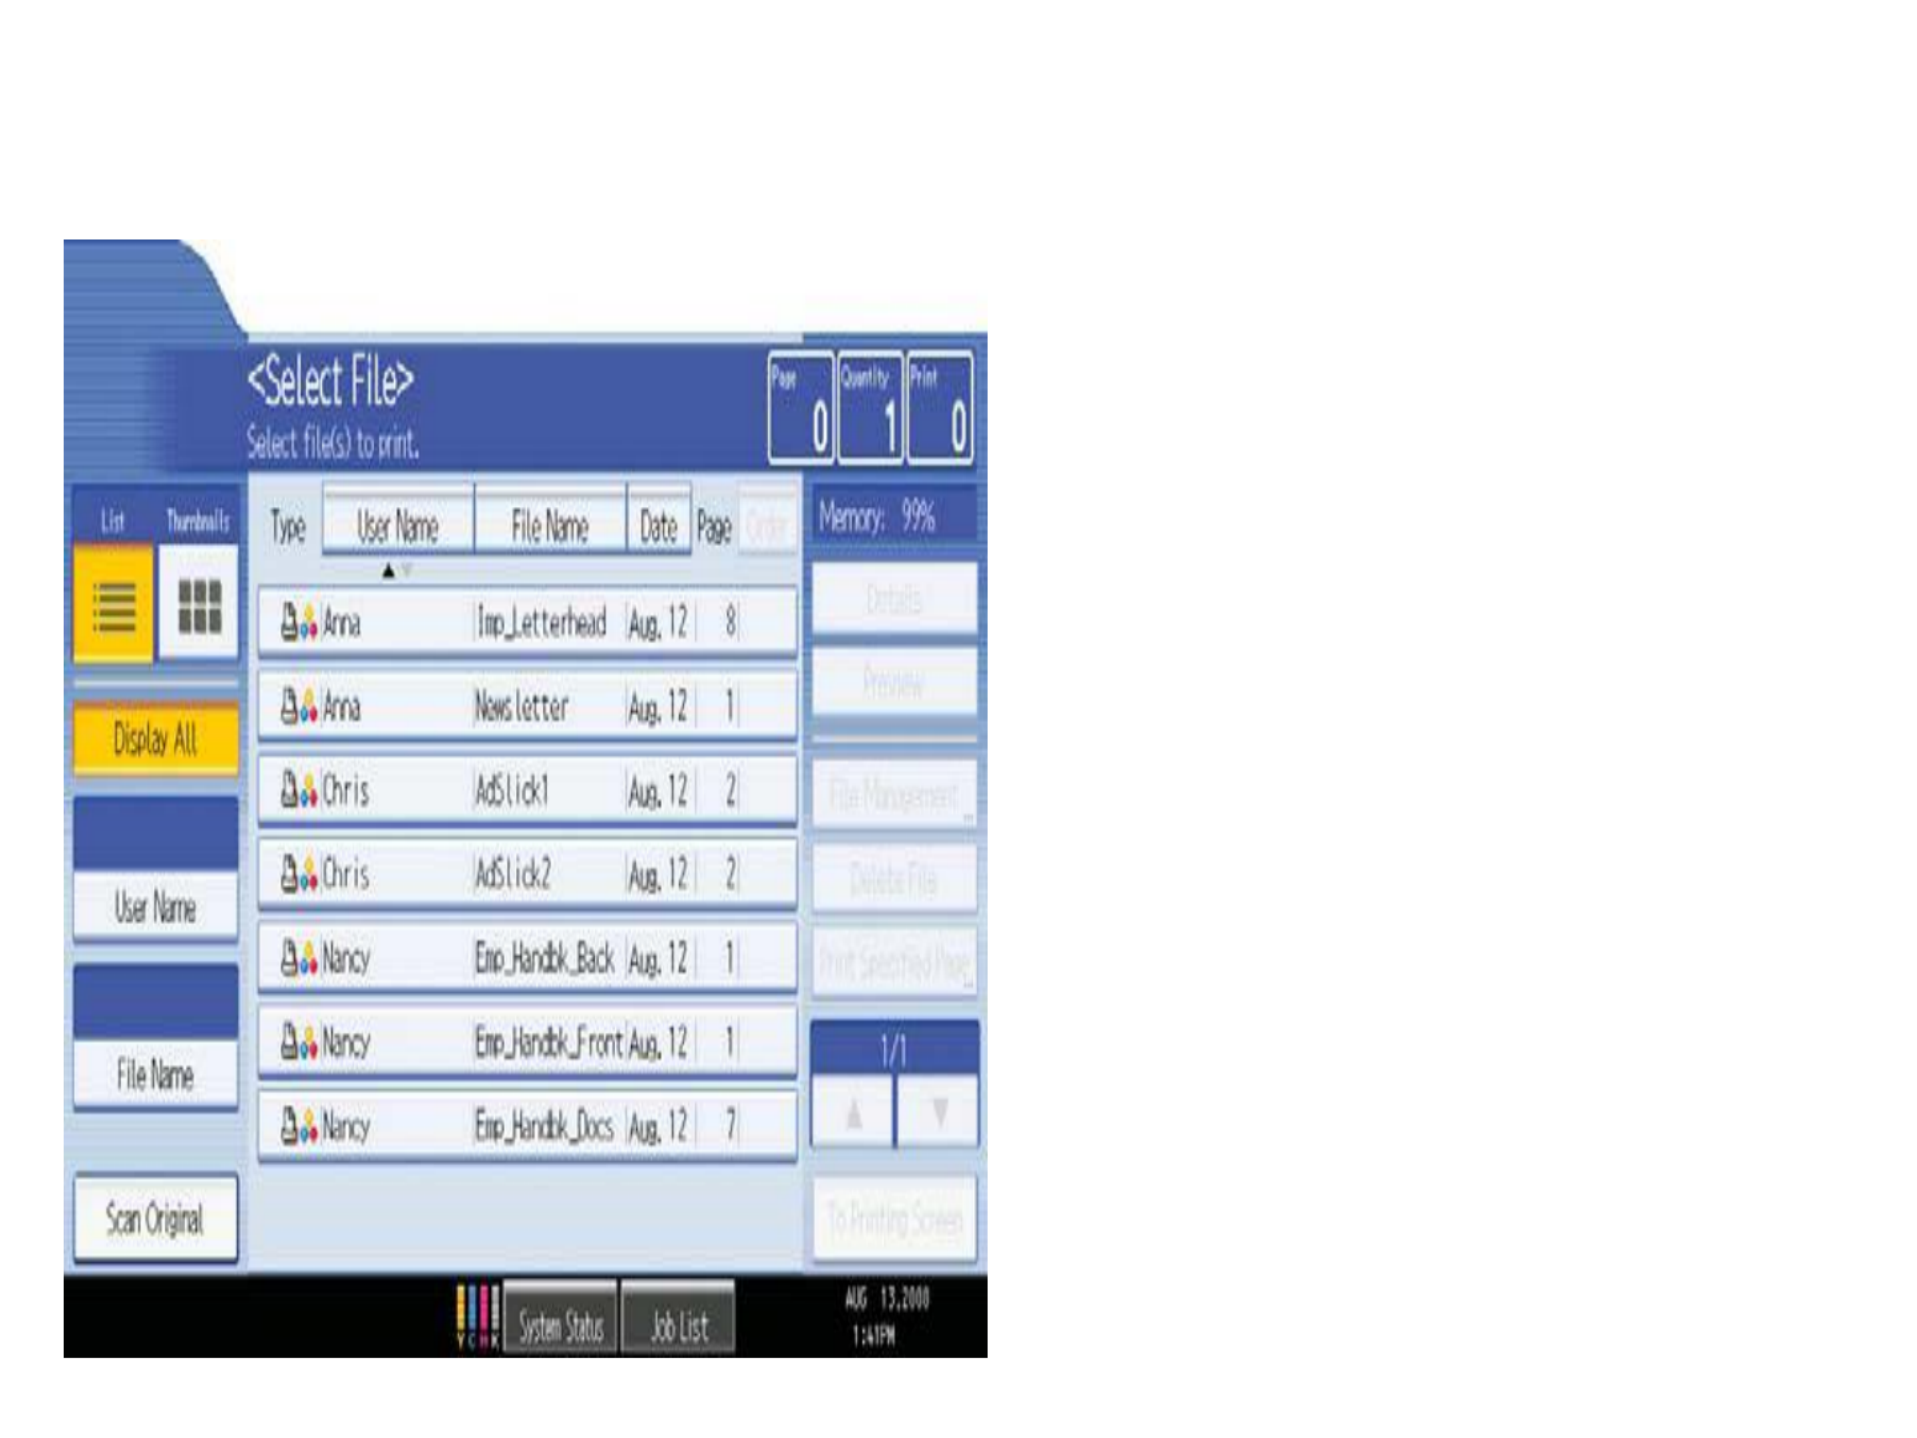
Accessing Document Server
From Copy Panel Select Document Server Option–
Used for storing documents for easy access, confidential printing etc.
Document Server Usage
Documents may be scanned or
Printed to Document Server for:
-Confidential Printing
-Print and Hold
-Sample Printing
-Forms printing
-File Merge (different types)
-Electronic Distribution
-HIPPA Compliancy
-Label Printing
-Cost Savings

Document Server Displays
List view Preview document
Edit user & file Info
Print one or multiple pages
of a stored document
Search by user name
Search by file name
Displays scan options
Displays printing options of a
stored file
Preview
File Management
Delete File
Print Specified Page
Details
To Printing Screen
Product specificaties
| Merk: | Ricoh |
| Categorie: | Printer |
| Model: | MP7000 |
Heb je hulp nodig?
Als je hulp nodig hebt met Ricoh MP7000 stel dan hieronder een vraag en andere gebruikers zullen je antwoorden
Handleiding Printer Ricoh

18 Juni 2024
18 Juni 2024
7 Juni 2024
16 Mei 2024
16 Mei 2024
20 Juli 2023
20 Juli 2023
27 Juli 2023
16 Juni 2023
13 Juni 2023
Handleiding Printer
- Printer HP
- Printer Sony
- Printer Samsung
- Printer Xiaomi
- Printer Panasonic
- Printer Epson
- Printer LG
- Printer Huawei
- Printer Canon
- Printer Honeywell
- Printer Olympus
- Printer Toshiba
- Printer Xerox
- Printer Agfaphoto
- Printer AVM
- Printer Brother
- Printer Builder
- Printer D-Link
- Printer Dell
- Printer Digitus
- Printer Dymo
- Printer Epson 7620
- Printer Frama
- Printer Fujifilm
- Printer Fujitsu
- Printer Ibm
- Printer Intermec
- Printer Kern
- Printer Kodak
- Printer Kogan
- Printer Konica Minolta
- Printer Kyocera
- Printer Lenovo
- Printer Lexmark
- Printer Minolta
- Printer Mitsubishi
- Printer MSI
- Printer Nec
- Printer Paxar
- Printer Polaroid
- Printer Primera
- Printer Renkforce
- Printer Roland
- Printer Royal Sovereign
- Printer Sagem
- Printer Seiko
- Printer Sharp
- Printer Star
- Printer Thomson
- Printer Tomy
- Printer Toshiba TEC
- Printer Triumph-Adler
- Printer Velleman
- Printer Zebra
- Printer Oce
- Printer Oki
- Printer Olivetti
- Printer Olympia
- Printer CSL
- Printer Argox
- Printer DTRONIC
- Printer Metapace
- Printer Citizen
- Printer Nilox
- Printer Approx
- Printer Ultimaker
- Printer Custom
- Printer Bixolon
- Printer Brady
- Printer GoDEX
- Printer Testo
- Printer EC Line
- Printer Sawgrass
- Printer Pantum
- Printer DNP
- Printer TSC
- Printer Equip
- Printer StarTech.com
- Printer Fichero
- Printer GG Image
- Printer Posiflex
- Printer ZKTeco
- Printer Star Micronics
- Printer Datamax-O'neil
- Printer Panduit
- Printer Dascom
- Printer HiTi
- Printer Vupoint Solutions
- Printer Elite Screens
- Printer Phoenix Contact
- Printer Videology
- Printer Colop
- Printer Raspberry Pi
- Printer Evolis
- Printer Unitech
- Printer Middle Atlantic
- Printer IDP
- Printer Fargo
- Printer Microboards
- Printer Mutoh
- Printer Tally Dascom
- Printer Nisca
Nieuwste handleidingen voor Printer

29 Maart 2025
29 Maart 2025

11 Maart 2025
11 Maart 2025
9 Maart 2025
4 Maart 2025
26 Februari 2025
26 Februari 2025
25 Februari 2025
25 Februari 2025