Panasonic SX-KC611 Handleiding
Lees hieronder de 📖 handleiding in het Nederlandse voor Panasonic SX-KC611 (52 pagina's) in de categorie Keyboard. Deze handleiding was nuttig voor 57 personen en werd door 2 gebruikers gemiddeld met 4.5 sterren beoordeeld
Pagina 1/52
QQTG0588AENGLISH
SX-KC611
KEYBOARD

(For the types as shown in figures A
and B)
For your safety, please read the following text care-
fully.
This appliance is supplied with a moulded three pin
mains plug for your safety and convenience. A 5-
ampere fuse is fitted in this plug. Should the fuse
need to be replaced please ensure that the replace-
ment fuse has a rating of 5-ampere and that it is
approved by ASTA or BSI to BS1362. Check for the
ASTA mark or the BSI mark on the body
of the fuse.
If the plug contains a removable fuse cover you must
ensure that it is refitted when the fuse is replaced.
If you lose the fuse cover the plug must not be used
until a replacement cover is obtained.
A replacement fuse cover can be purchased from
your local dealer.
If a new plug is to be fitted please observe the wiring
code as stated below. If in any doubt please consult
a qualified electrician.
IMPORTANT
The wires in this mains lead are coloured in accor-
dance with the following code:
Blue: Neutral, Brown: Live.
As these colours may not correspond with the col-
oured markings identifying the terminals in your
plug, proceed as follows:
The wire which is coloured Blue must be connected
to the terminal which is marked with the letter N or
coloured Black or Blue.
The wire which is coloured Brown must be con-
nected to the terminal which is marked with the letter
L or coloured Brown or Red.
WARNING: DO NOT CONNECT EITHER WIRE TO
THE EARTH TERMINAL WHICH IS MARKED WITH
THE LETTER E, BY THE EARTH SYMBOL OR
COLOURED GREEN OR GREEN/ YELLOW.
THIS PLUG IS NOT WATERPROOF
—KEEP DRY.
Before use
Remove the connector cover.
How to replace the fuse
The location of the fuse differ according to the type
of AC mains plug (figures A and B). Confirm the AC
mains plug fitted and follow the instructions below.
Illustrations may differ from actual AC mains plug.
1.Open the fuse cover with a screwdriver.
2.Replace the fuse and close or attach the fuse
cover.
CAUTION!
IF THE FITTED MOULDED PLUG IS
UNSUITABLE FOR THE SOCKET OUTLET IN
YOUR HOME THEN THE FUSE SHOULD BE
RE-MOVED AND THE PLUG CUT OFF AND
DIS-POSED OF SAFELY. THERE IS A
DANGER OF SEVERE ELECTRICAL SHOCK
IF THE CUT OFF PLUG IS INSERTED INTO
ANY 13-AMPERE SOCKET.
Figure A
Figure B
Figure A
Figure B
Fuse
(5 ampere)
Fuse
(5 ampere)
Fuse cover
Caution for AC Mains Lead
2
QQTG0588

Caution
Voltage (except North America, Mexico, Europe, Australia, New Zealand, China and
Russia)
Be sure the voltage adjuster located on the AC adaptor is in accordance with local voltage
in your area before using this unit. Use a screwdriver to set the voltage adjuster to the local
voltage.
WARNING: TO REDUCE THE RISK OF FIRE OR ELECTRIC SHOCK, DO NOT
EXPOSE THIS PRODUCT TO RAIN OR MOISTURE.
BEFORE YOU PLAY, PLEASE READ THE CAUTIONARY COPY APPEARING ON
PAGE 4.
Before you play
For long and pleasurable use of this instrument, and to gain a thorough understanding of your KC611
Keyboard, it is strongly recommended that you read through this Owner’s Manual once.
The Owner’s Manual is comprised of the following parts.
BASIC FUNCTIONS
This part includes an explanation of basic procedures and points you should be aware of for
proper operation of your instrument.
PRACTICAL APPLICATIONS
This part comprises a detailed explanation of sound, effect, rhythm, Recording, Disk Drive and
Setting functions.
REFERENCE GUIDE (separate booklet)
Reference guide for the contents of the Sound List, Drum Kits, MIDI Implementation Chart.
OWNER’S MANUAL
CAUTION:
TO PREVENT ELECTRIC SHOCK MATCH
WIDE BLADE OF PLUG TO WIDE SLOT,
FULLY INSERT.
(for Canada)
3
QQTG0588

Cautions for safest use of this unit
Installation location
1. A well-ventilated place.
Take care not to use this unit in a place where it
will not receive sufficient ventilation, and not to per-
mit the ventilation holes to be covered by curtains,
or any similar materials.
2. Place away from direct sunlight and excessive heat
from heating equipment.
3. A place where humidity, vibration and dust are min-
imized.
Power source
1. For the power source, use ONLY the included AC
adaptor. Use of a different AC adaptor may result in
malfunction or even damage to the equipment.
2. If the unit is not to be used for some time, remove
the AC adaptor from the wall socket.
Handling the power cord
1. Never touch the power cord, or its plug, with wet
hands.
2. Don’t pull the power cord.
Metal items inside the unit may result in elec-
tric shock or damage.
Do not permit metal articles to get inside the unit.
Be especially careful with regard to this point if child-
ren are near this unit. They should be warned never
to try to put anything inside.
If, nevertheless, some such article does get inside, dis-
connect the power cord plug from the electrical outlet,
and contact the store where the unit was purchased.
If water gets into the unit
Disconnect the power cord plug from the electrical out-
let, and contact the store where it was purchased.
As a precaution, it is suggested that flower vases and
other containers which hold liquids not be placed on
the top of this unit.
If operation seems abnormal
Immediately turn off the power, disconnect the power
cord plug from the electrical outlet, and contact the
store where it was purchased.
Discontinue using the unit at once. Failure to do so
may result in additional damage or some other unex-
pected damage or accident.
•Because the power source is located inside the unit,
it is normal for the cabinet to become warm.
A word about the power cord
If the power cord is scarred, is partially cut or broken,
or has a bad contact, it may cause a fire or serious
electrical shock if used. NEVER use a damaged
power cord for any appliance. Moreover, the power
cord should never be forcibly bent.
Don’t touch the inside parts of this unit.
Some places inside this unit have high voltage poten-
tial. Never try to remove the top or back panels of this
unit, or to touch inside parts by hand or with tools.
Contact someone who is qualified in order to inspect
the inside, or to replace a fuse, if such becomes nec-
essary. Never attempt to do these things yourself.
Maintenance
The following suggestions will assist you in keeping
the unit in top condition.
•Be sure to switch the instrument off after use, and
do not switch the unit on and off in quick succes-
sion, as this places an undue load on the electronic
components.
•To keep the luster of the surface and buttons,
simply use a clean, damp cloth; polish with a soft,
dry cloth. Polish may be used but do not use thin-
ners or petro-chemical-based polishes.
•A wax-based polish may be used on the cabinet, al-
though you will find that rubbing with a soft cloth will
suffice.
SERVICE MUST BE CARRIED OUT BY DEALER
OR OTHER QUALIFIED PERSON
Marking sign is located on bottom of the unit.
4
QQTG0588

Contents
Cautions for safest use of this unit . . . . . . . . . . . . . . . . . . . . . . . . . . . . . . . . . . . . . . . . 4
Controls and functions . . . . . . . . . . . . . . . . . . . . . . . . . . . . . . . . . . . . . . . . . . . . . . . . . . 6
BASIC FUNCTIONS
Getting started . . . . . . . . . . . . . . . . . . . . . . . . . . . . . . . . . . . . . . . . . . . . . . . . 8
Playing . . . . . . . . . . . . . . . . . . . . . . . . . . . . . . . . . . . . . . . . . . . . . . . . . . . . . . 9
Listen to the demonstration . . . . . . . . . . . . . . . . . . . . . . . . . . . . . . . . . . . . 11
Add an automatic accompaniment . . . . . . . . . . . . . . . . . . . . . . . . . . . . . . 12
Play back the included Song Disk . . . . . . . . . . . . . . . . . . . . . . . . . . . . . . . 14
Record your performance . . . . . . . . . . . . . . . . . . . . . . . . . . . . . . . . . . . . . .15
Beat Master . . . . . . . . . . . . . . . . . . . . . . . . . . . . . . . . . . . . . . . . . . . . . . . . . 16
PRACTICAL APPLICATIONS
About the display . . . . . . . . . . . . . . . . . . . . . . . . . . . . . . . . . . . . . . . . . . . . . 19
Part I Sounds and effects
Sound . . . . . . . . . . . . . . . . . . . . . . . . . . . . . . . . . . . . . . . . . . . . . . . . . . . . . . 20
Conductor . . . . . . . . . . . . . . . . . . . . . . . . . . . . . . . . . . . . . . . . . . . . . . . . . . 21
Solo Piano . . . . . . . . . . . . . . . . . . . . . . . . . . . . . . . . . . . . . . . . . . . . . . . . . . 22
Effects . . . . . . . . . . . . . . . . . . . . . . . . . . . . . . . . . . . . . . . . . . . . . . . . . . . . .22
Transpose . . . . . . . . . . . . . . . . . . . . . . . . . . . . . . . . . . . . . . . . . . . . . . . . . . 23
Harmony . . . . . . . . . . . . . . . . . . . . . . . . . . . . . . . . . . . . . . . . . . . . . . . . . . . . 24
Part II Playing the rhythm
Rhythm . . . . . . . . . . . . . . . . . . . . . . . . . . . . . . . . . . . . . . . . . . . . . . . . . . . . .25
Synchro Start . . . . . . . . . . . . . . . . . . . . . . . . . . . . . . . . . . . . . . . . . . . . . . . . 26
Tempo . . . . . . . . . . . . . . . . . . . . . . . . . . . . . . . . . . . . . . . . . . . . . . . . . . . . .26
Rhythm performance . . . . . . . . . . . . . . . . . . . . . . . . . . . . . . . . . . . . . . . . . 27
Auto Play Chord . . . . . . . . . . . . . . . . . . . . . . . . . . . . . . . . . . . . . . . . . . . . . 28
One Touch Play . . . . . . . . . . . . . . . . . . . . . . . . . . . . . . . . . . . . . . . . . . . . . . 30
Panel Memory . . . . . . . . . . . . . . . . . . . . . . . . . . . . . . . . . . . . . . . . . . . . . . . 31
Party Pads . . . . . . . . . . . . . . . . . . . . . . . . . . . . . . . . . . . . . . . . . . . . . . . . . . 32
Part III Recording
Record your performance . . . . . . . . . . . . . . . . . . . . . . . . . . . . . . . . . . . . . .33
Playing back your recorded song . . . . . . . . . . . . . . . . . . . . . . . . . . . . . . .34
Store a chord progression . . . . . . . . . . . . . . . . . . . . . . . . . . . . . . . . . . . . . 34
Part IV Disk Drive
Parts of the floppy disk drive . . . . . . . . . . . . . . . . . . . . . . . . . . . . . . . . . . .36
Playing the included Song Disk . . . . . . . . . . . . . . . . . . . . . . . . . . . . . . . . . 36
Playback of commercial disks (Direct Play) . . . . . . . . . . . . . . . . . . . . . . .37
Save your recorded song . . . . . . . . . . . . . . . . . . . . . . . . . . . . . . . . . . . . . . 38
Part V Menu
Outline of the procedure . . . . . . . . . . . . . . . . . . . . . . . . . . . . . . . . . . . . . . .41
Setting menus . . . . . . . . . . . . . . . . . . . . . . . . . . . . . . . . . . . . . . . . . . . . . . . 42
Symptoms which appear to be signs of trouble . . . . . . . . . . . . . . . . . . . . . . . . . . . . 45
Connections . . . . . . . . . . . . . . . . . . . . . . . . . . . . . . . . . . . . . . . . . . . . . . . . . . . . . . . . . . . 46
Separately sold option . . . . . . . . . . . . . . . . . . . . . . . . . . . . . . . . . . . . . . . . . . . . . . . . . . 46
Index . . . . . . . . . . . . . . . . . . . . . . . . . . . . . . . . . . . . . . . . . . . . . . . . . . . . . . . . . . . . . . . . . 47
Specifications . . . . . . . . . . . . . . . . . . . . . . . . . . . . . . . . . . . . . . . . . . . . . . . . . . . . . . . . . 48
Demo Performance List . . . . . . . . . . . . . . . . . . . . . . . . . . . . . . . . . . . . . . . . . . . . . . . . . 49
Supplied accessories
Please check the supplied accessories.
Music stand
AC adaptor
SONG BOOK
SONG DISK
5
QQTG0588

Controls and functions
SONG
Record and play back
your performance. (Refer
to page 33.)
PARTY PADS/BEAT MASTER
Just press a pad button to add a fun sound effect to
your playing. You can also tap the pad buttons in
time with the beat. (Refer to pages 16, 32.)
BEAT MASTER
A fun way to develop your sense
of rhythm. (Refer to page 16.)
ONE TOUCH PLAY
An appropriate combination of sounds,
etc. for your selected rhythm are
automatically set up for the automatic
accompaniment. (Refer to page 30.)
BEAT MASTER
TRAINING
BEAT MASTER
CHALLENGE
PARTY PADS
BANK
FILL IN 1
RESET
TEMPO
PROGRAM
CHORD
FINDER
AUTO PLAY
CHORD
APC/SONG
VOLUME
RECPLAY
SONG
DEMO
e
PLAY
OFF/ON
MAIN VOLUME
UP
PARTY PADS / BEAT MASTER
DOWN
XBC
APC
COUNT
INTRO/ENDING
SYNCHRO
ONE TOUCH PLAY
1 2 3 4
3.5 inch
Disk Drive
AUTO PLAY CHORD
An automatically accompaniment is
added to your playing merely by
specifying a chord. (Refer to page 28.)
6
QQTG0588
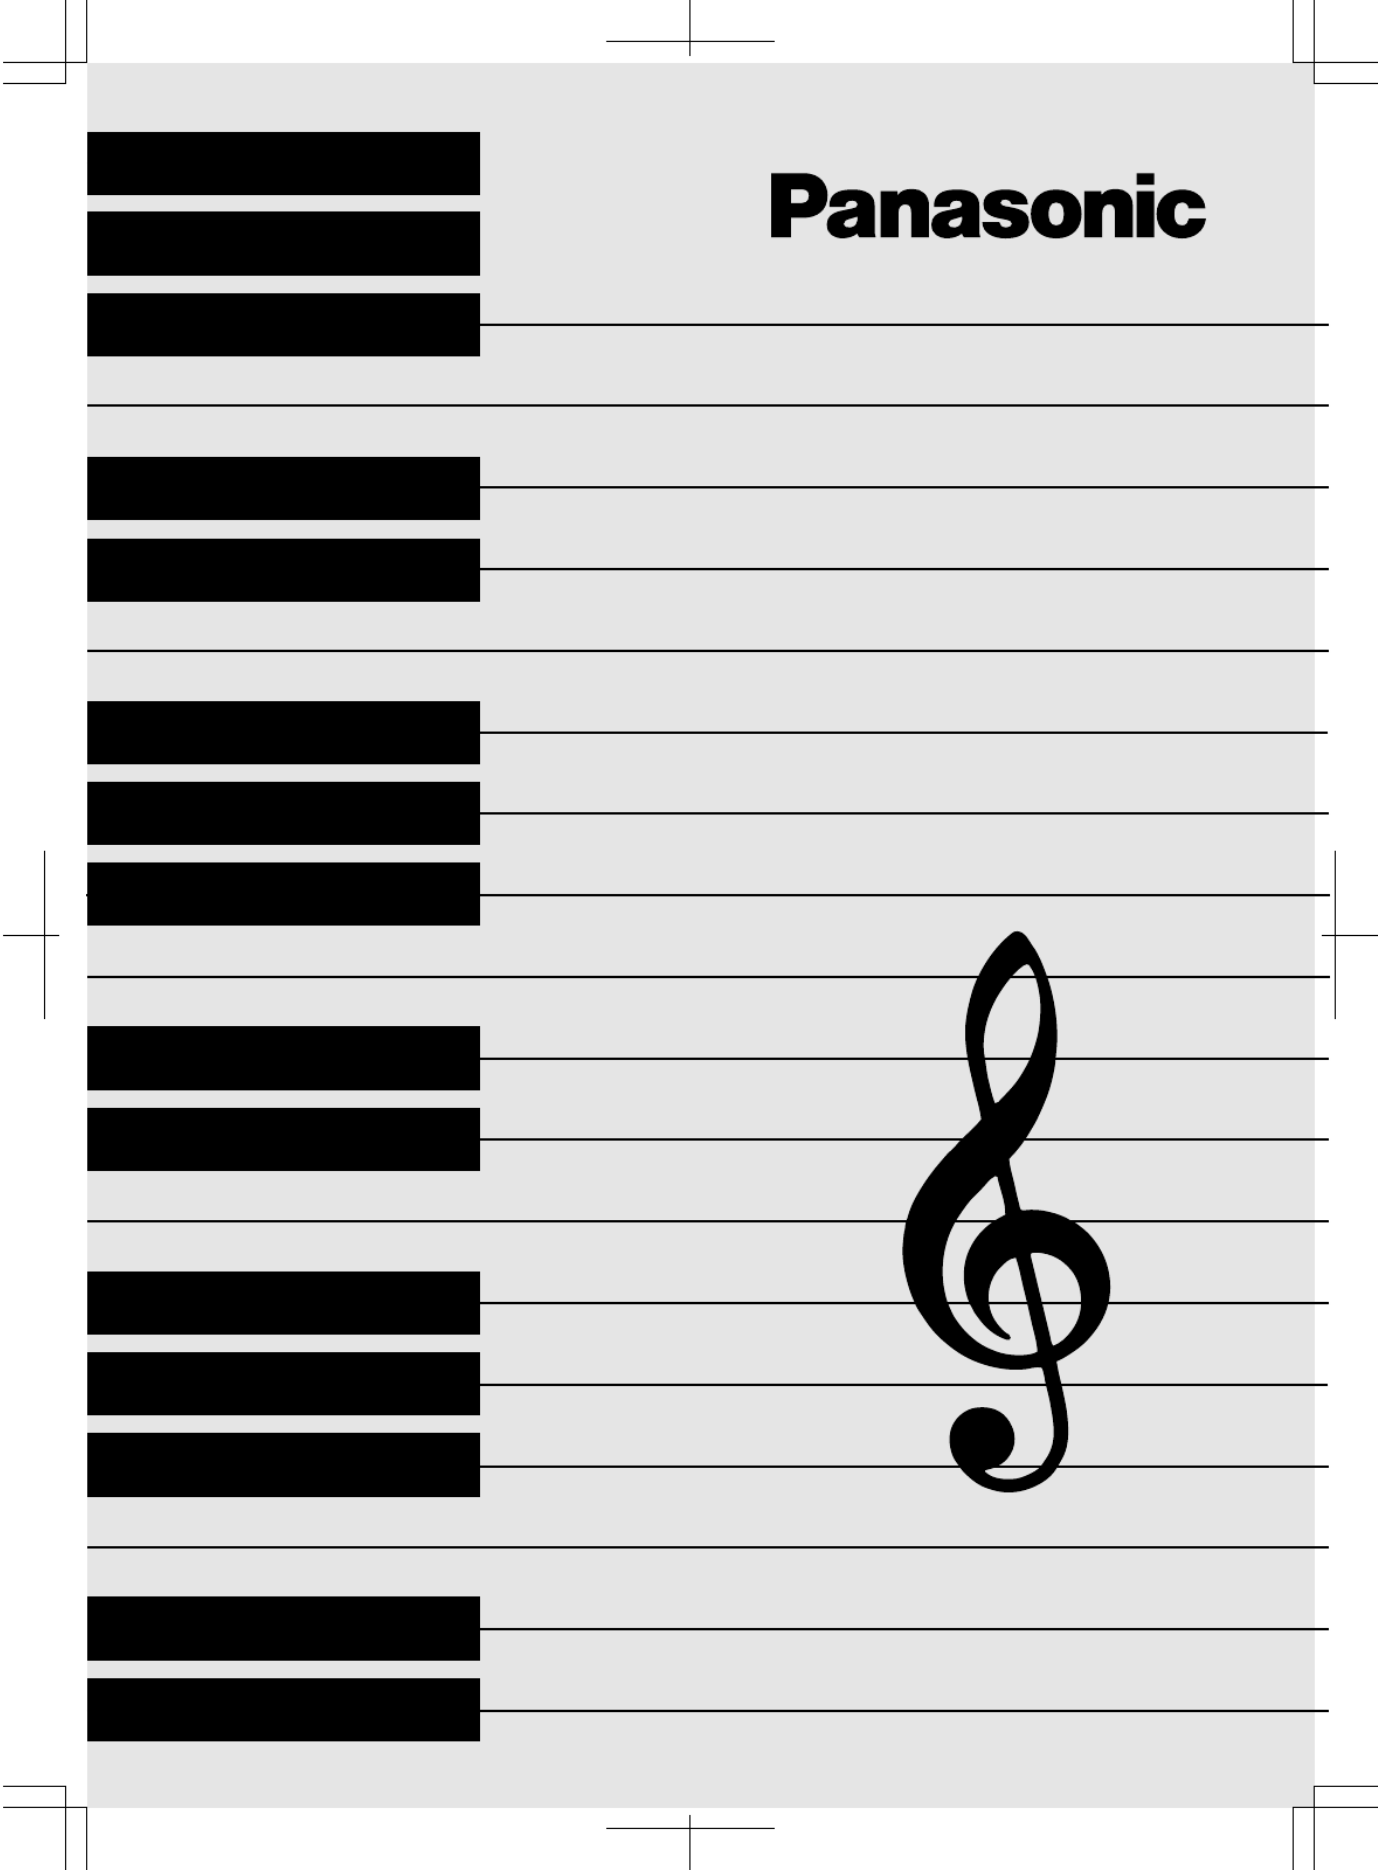
Getting started
1Connect the AC adaptor (included).
•Do not disconnect and connect the AC adap-
tor when the PLAY button is on, as doing so
may cause the the programmed settings and
recorded contents to be deleted.
2Affix the music stand as shown.
•The unit is in the standby condition when the AC
adaptor is connected. The primary circuit is always
“live” as long as the AC adaptor is connected to an
electrical outlet.
•When leaving the product unused for a long time,
turn off the PLAY button of the unit and pull the AC
adaptor out of the socket for power saving. (The pro-
duct consumes a power of 2 W even with the PLAY
button of the unit turned off.)
FOOT
SW
OUT
MIDI
IN
AUX IN
DC IN
12V
PHONES/
LINE OUT
L
R
(Rear panel)
8
QQTG0588

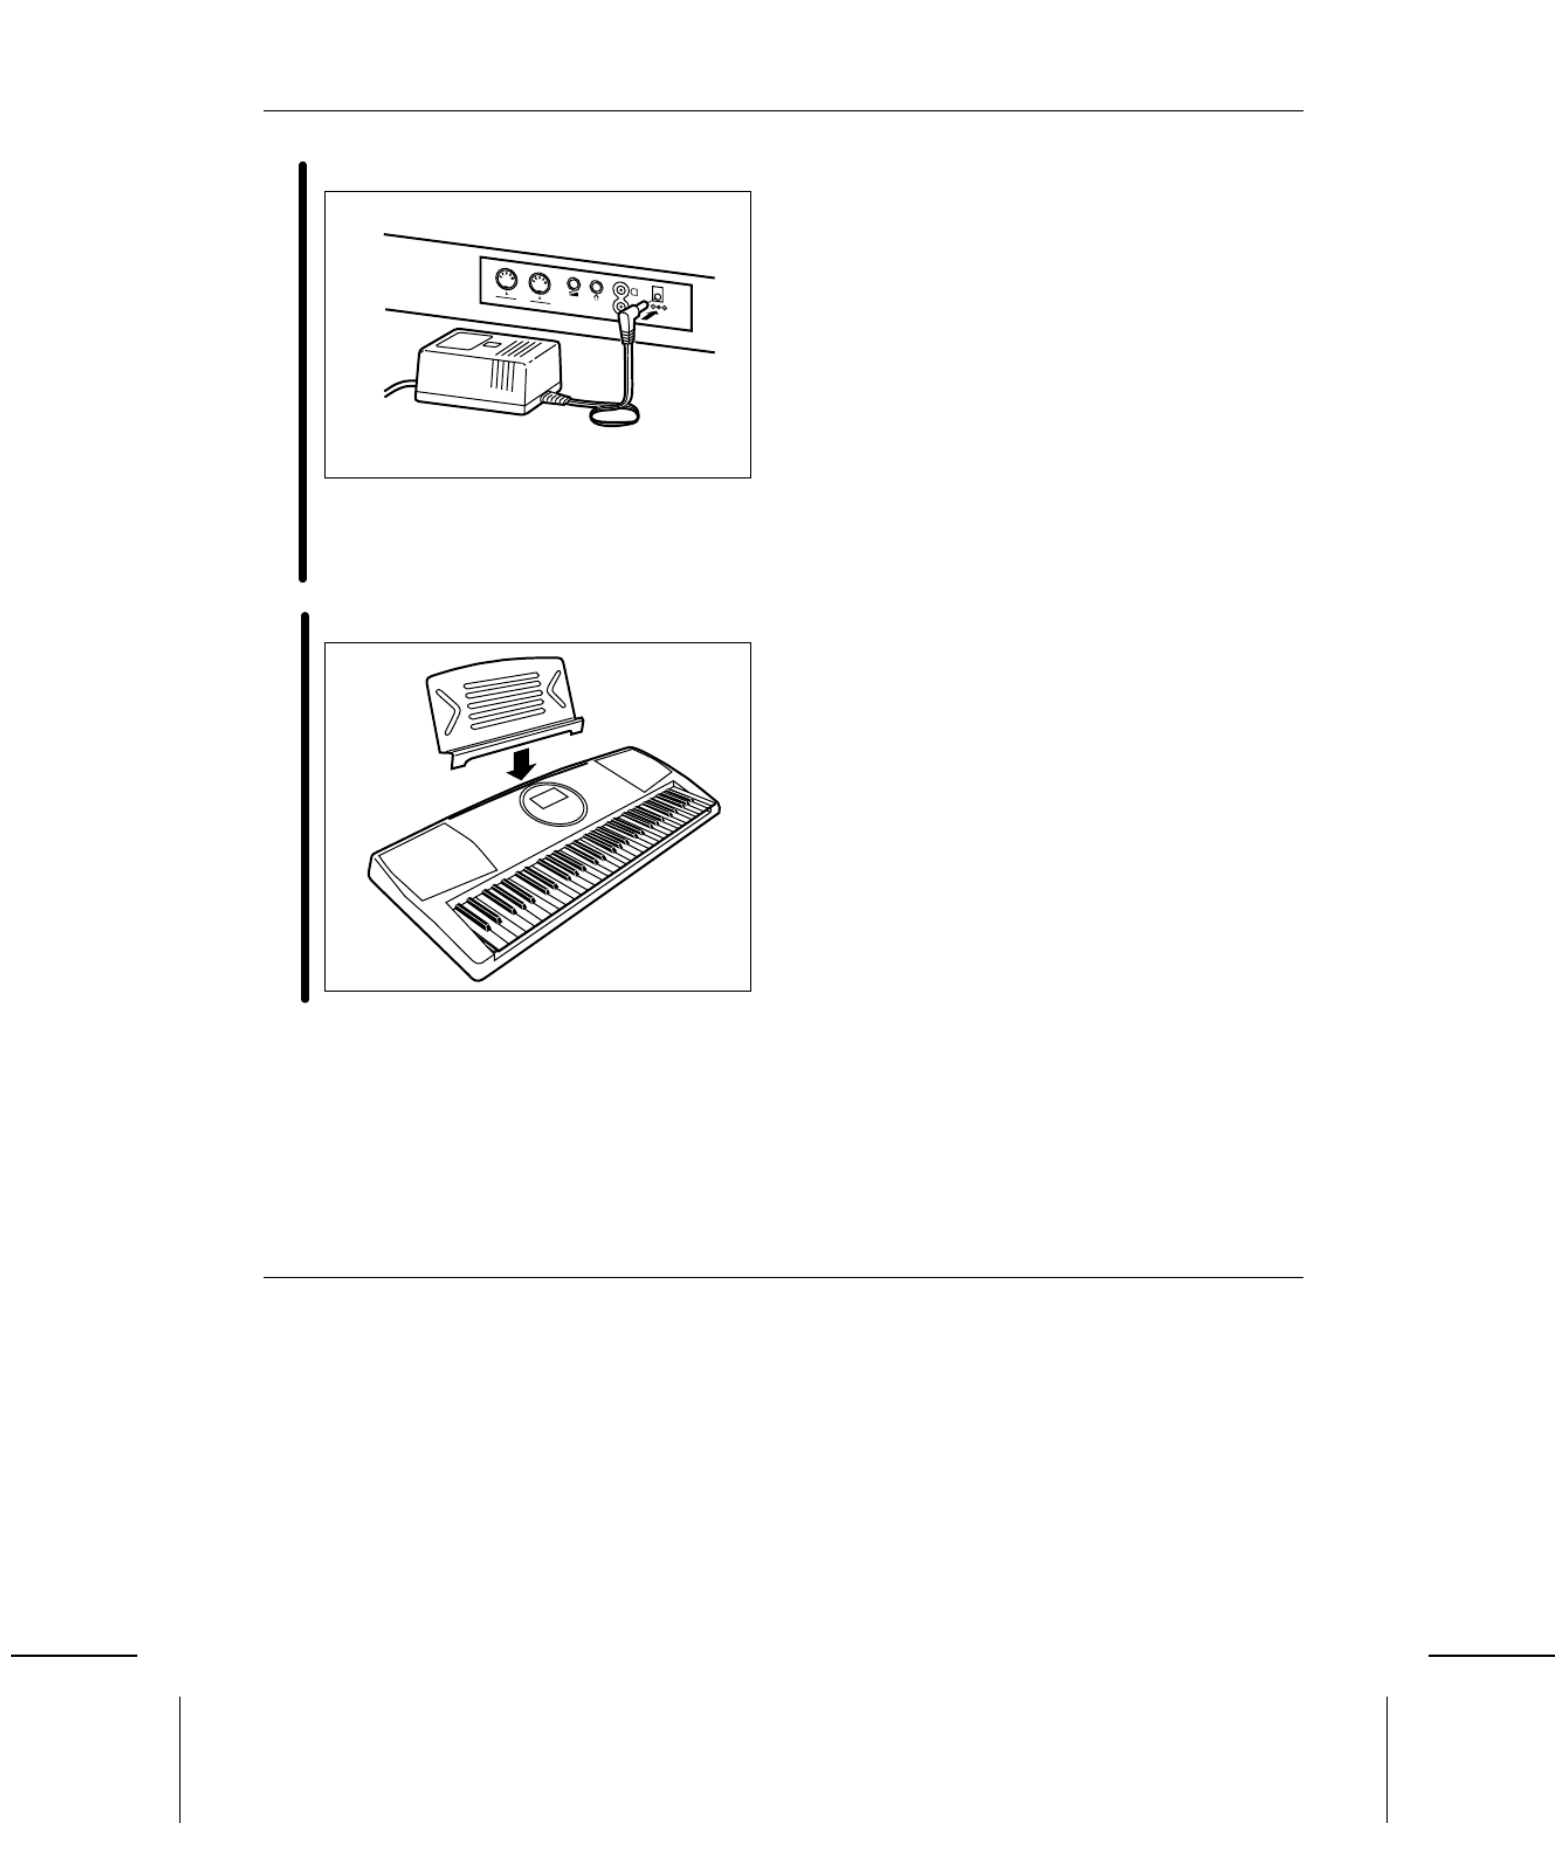
Playing
1Press the PLAY button to turn it on.
2Press the RIGHT 1 button in the CONDUCTOR.
•The CONDUCTOR status is shown on the dis-
play like this:
3Press the SOUND button, and use the number
buttons to select a sound number (three digits).
•The list of SOUNDS is found near the right
side of the panel.
•The name and number of the selected sound
are shown on the display.
4Play the keyboard.
5Set the MAIN VOLUME to an appropriate level.
•The volume setting is shown on the display.
•Each graduation represents two degrees of
volume change.
1 5 4 3 2
PLAY
OFF/ON
LEFT RIGHT 2
RIGHT 1
CONDUCTOR
CONDUCTOR
R1
MENU
VARIATION
SOUND
RHYTHM
0123
+ 4 5 6
— 7 8 9
CANCEL
GENERAL
SOUND
MAIN VOLUME
UP
DOWN
VOLUME
Volume setting
9
QQTG0588

PARTY PADS
APress one of the PARTY PAD buttons while
you play.
•Each of the buttons plays a fun sound effect.
SOLO PIANO
BPress the SOLO PIANO button.
•The instrument settings automatically change
to those appropriate for performing with piano
sounds.
•Have fun with more sound effects by selecting
another PARTY PAD bank. (Refer to page 32.)
•The pitch of this instrument can be adjusted, for ex-
ample, when playing with other instruments. (Refer
to page 44.)
•For detailed information about selecting sounds,
refer to page 20.
A B
PARTY PADS / BEAT MASTER
1 2 3 4
SOLO
PIANO
10
QQTG0588
Listen to the demonstration
1Press the DEMO button.
•The demonstration performance begins.
•The two demo tunes are playing continuously.
2When you are finished listening to the demon-
stration performances, press the DEMO button
again.
•Some of the buttons do not work during the demon-
stration performance.
1 2
DEMO
e
11
QQTG0588

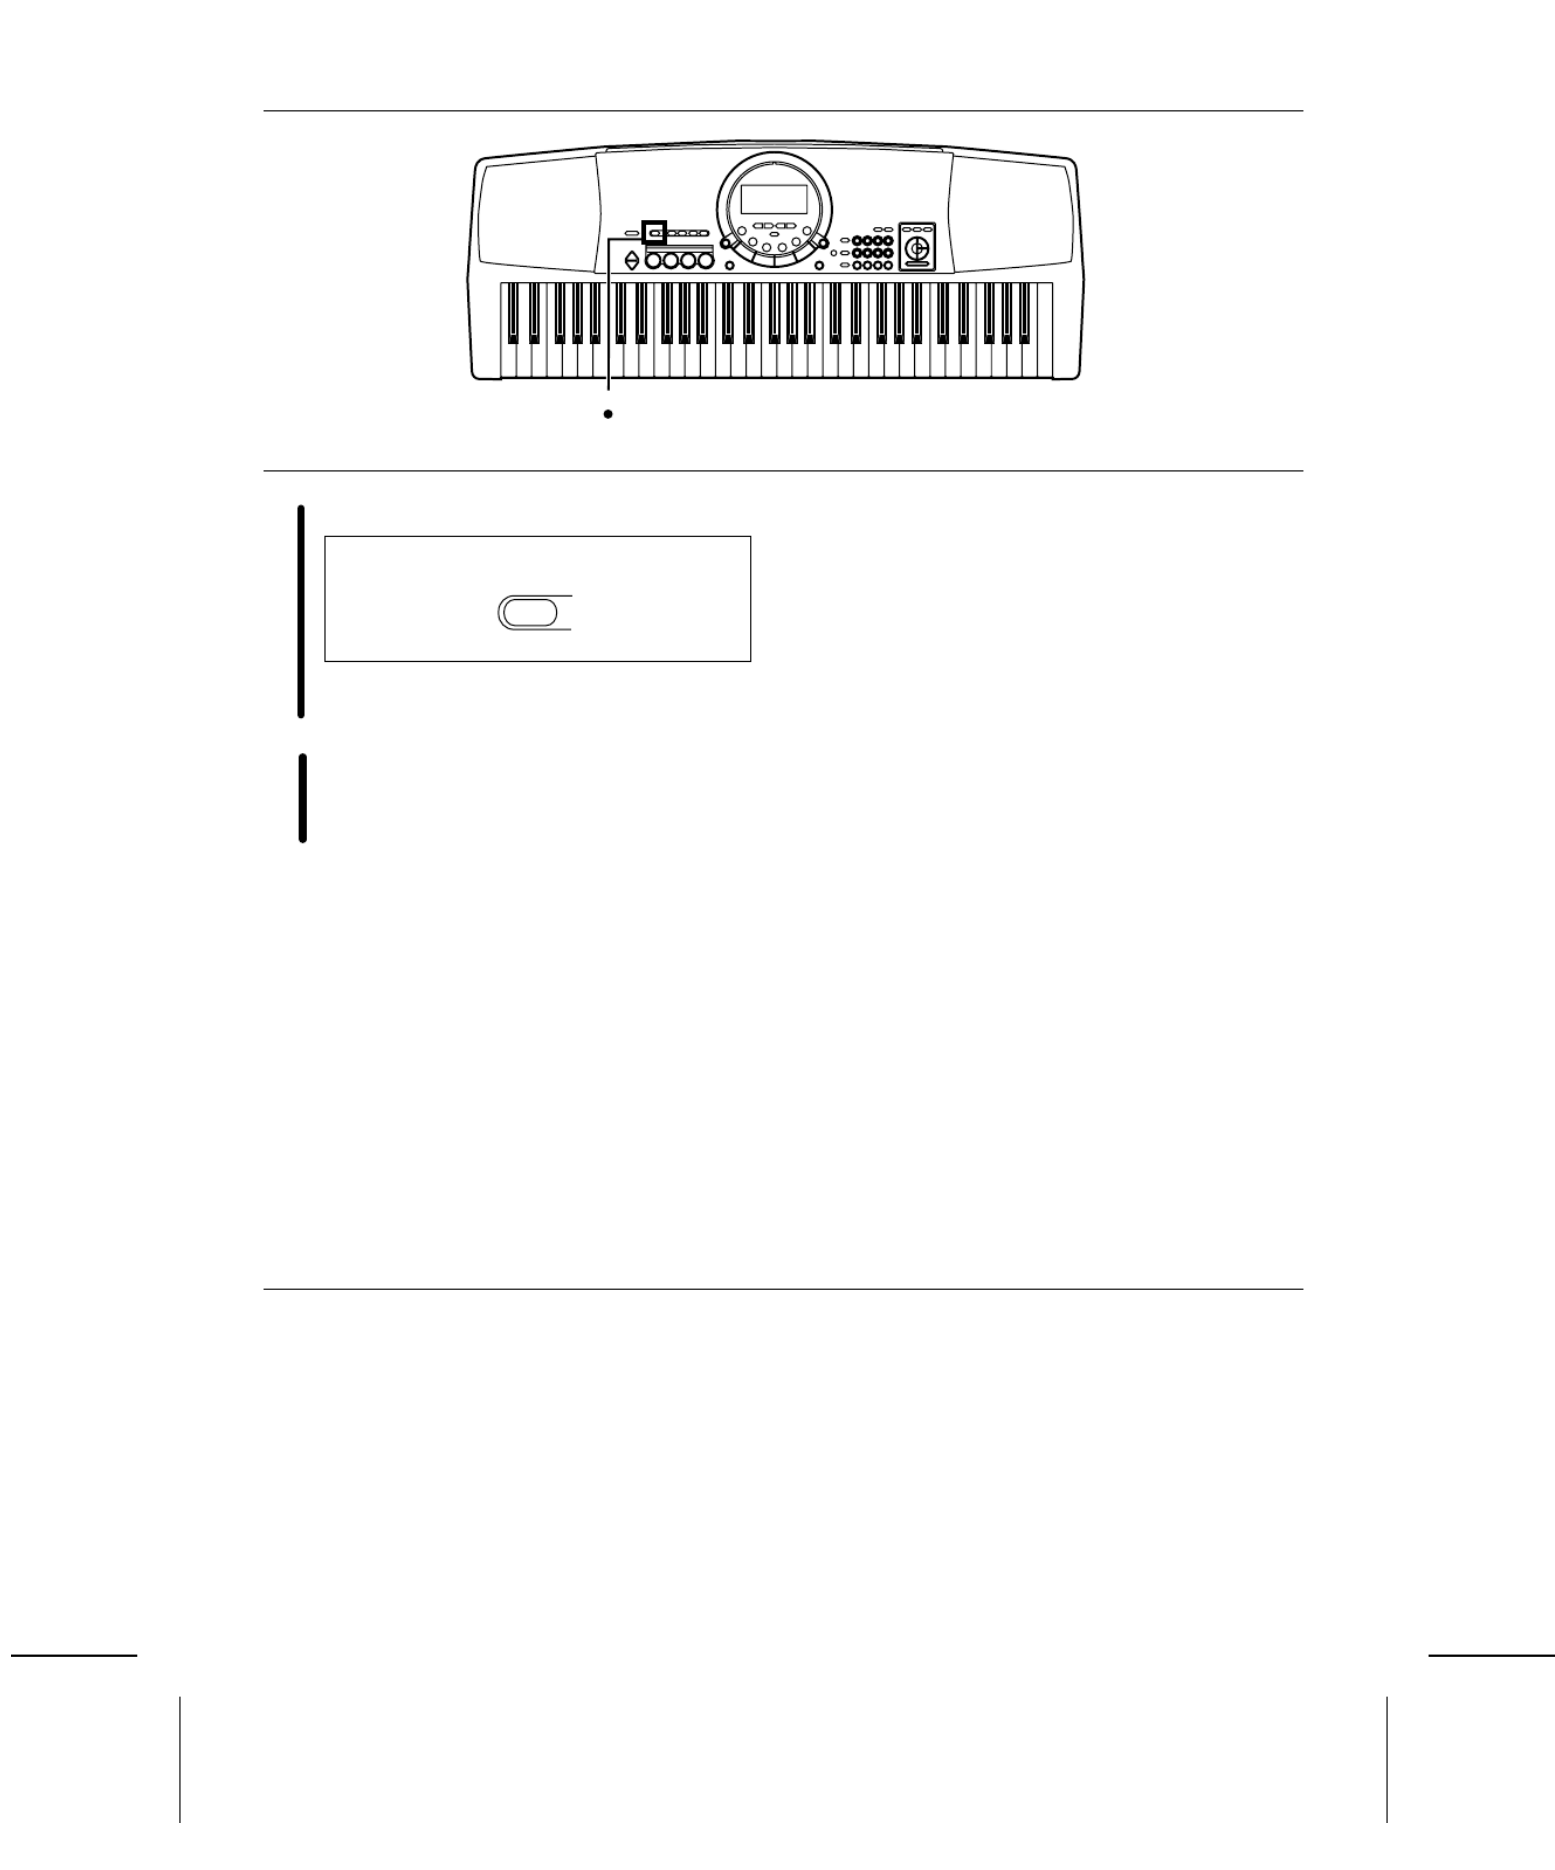
Add an automatic accompaniment
1Press the RHYTHM button, and use the number
buttons to select a rhythm number (three digits).
•The list of RHYTHMS is shown near the left
end of the panel.
•The rhythm number and name are shown on
the display.
2Press the AUTO PLAY CHORD button.
3Use the TRANSPOSE/PROGRAM buttons to
show “1 Finger” on the display.
•Perform this operation while the PROGRAM in-
dication is flashing on the display.
4Press the ONE TOUCH PLAY button.
•The sounds, etc. appropriate for the selected
rhythm are automatically set up.
2 14 3
C F G
7
C
C F G
7
C
MENU
VARIATION
SOUND
RHYTHM
0123
+ 4 5 6
— 7 8 9
CANCEL
GENERAL
RHYTHM
AUTO PLAY
CHORD
TRANSPOSE
PROGRAM
TEMPO
CONDUCTOR
TRANSPOSE
VOLUME
R1 R2
L C
TOUCH
REVERB
CHORUS
HARMONY
SUSTAIN
XBS
N
TRO / ENDING
SYNCHRO
APC
COUNT
GENERAL
CHORD
R1
PROGRAM
ONE TOUCH PLAY
12
QQTG0588
5Play the chord with your left hand, and the
melody with your right hand.
•When you play the keyboard with your left
hand, the automatic accompaniment starts
(SYNCHRO START).
•For example, when you press a C key, an
automatic accompaniment in the C major
chord begins to play.
6When you are finished playing the song, press
the START/STOP button.
•The automatic accompaniment stops.
•To end your performance with the automatic
accompaniment, press the AUTO PLAY
CHORD button again.
•For information about selecting rhythms, refer to
page 25.
•For information about the automatic accompaniment,
refer to page 28.
5 6
Chord Melody
C3
START/STOP
PLAY/PAUSE
C chord F chordG7 chord
13
QQTG0588
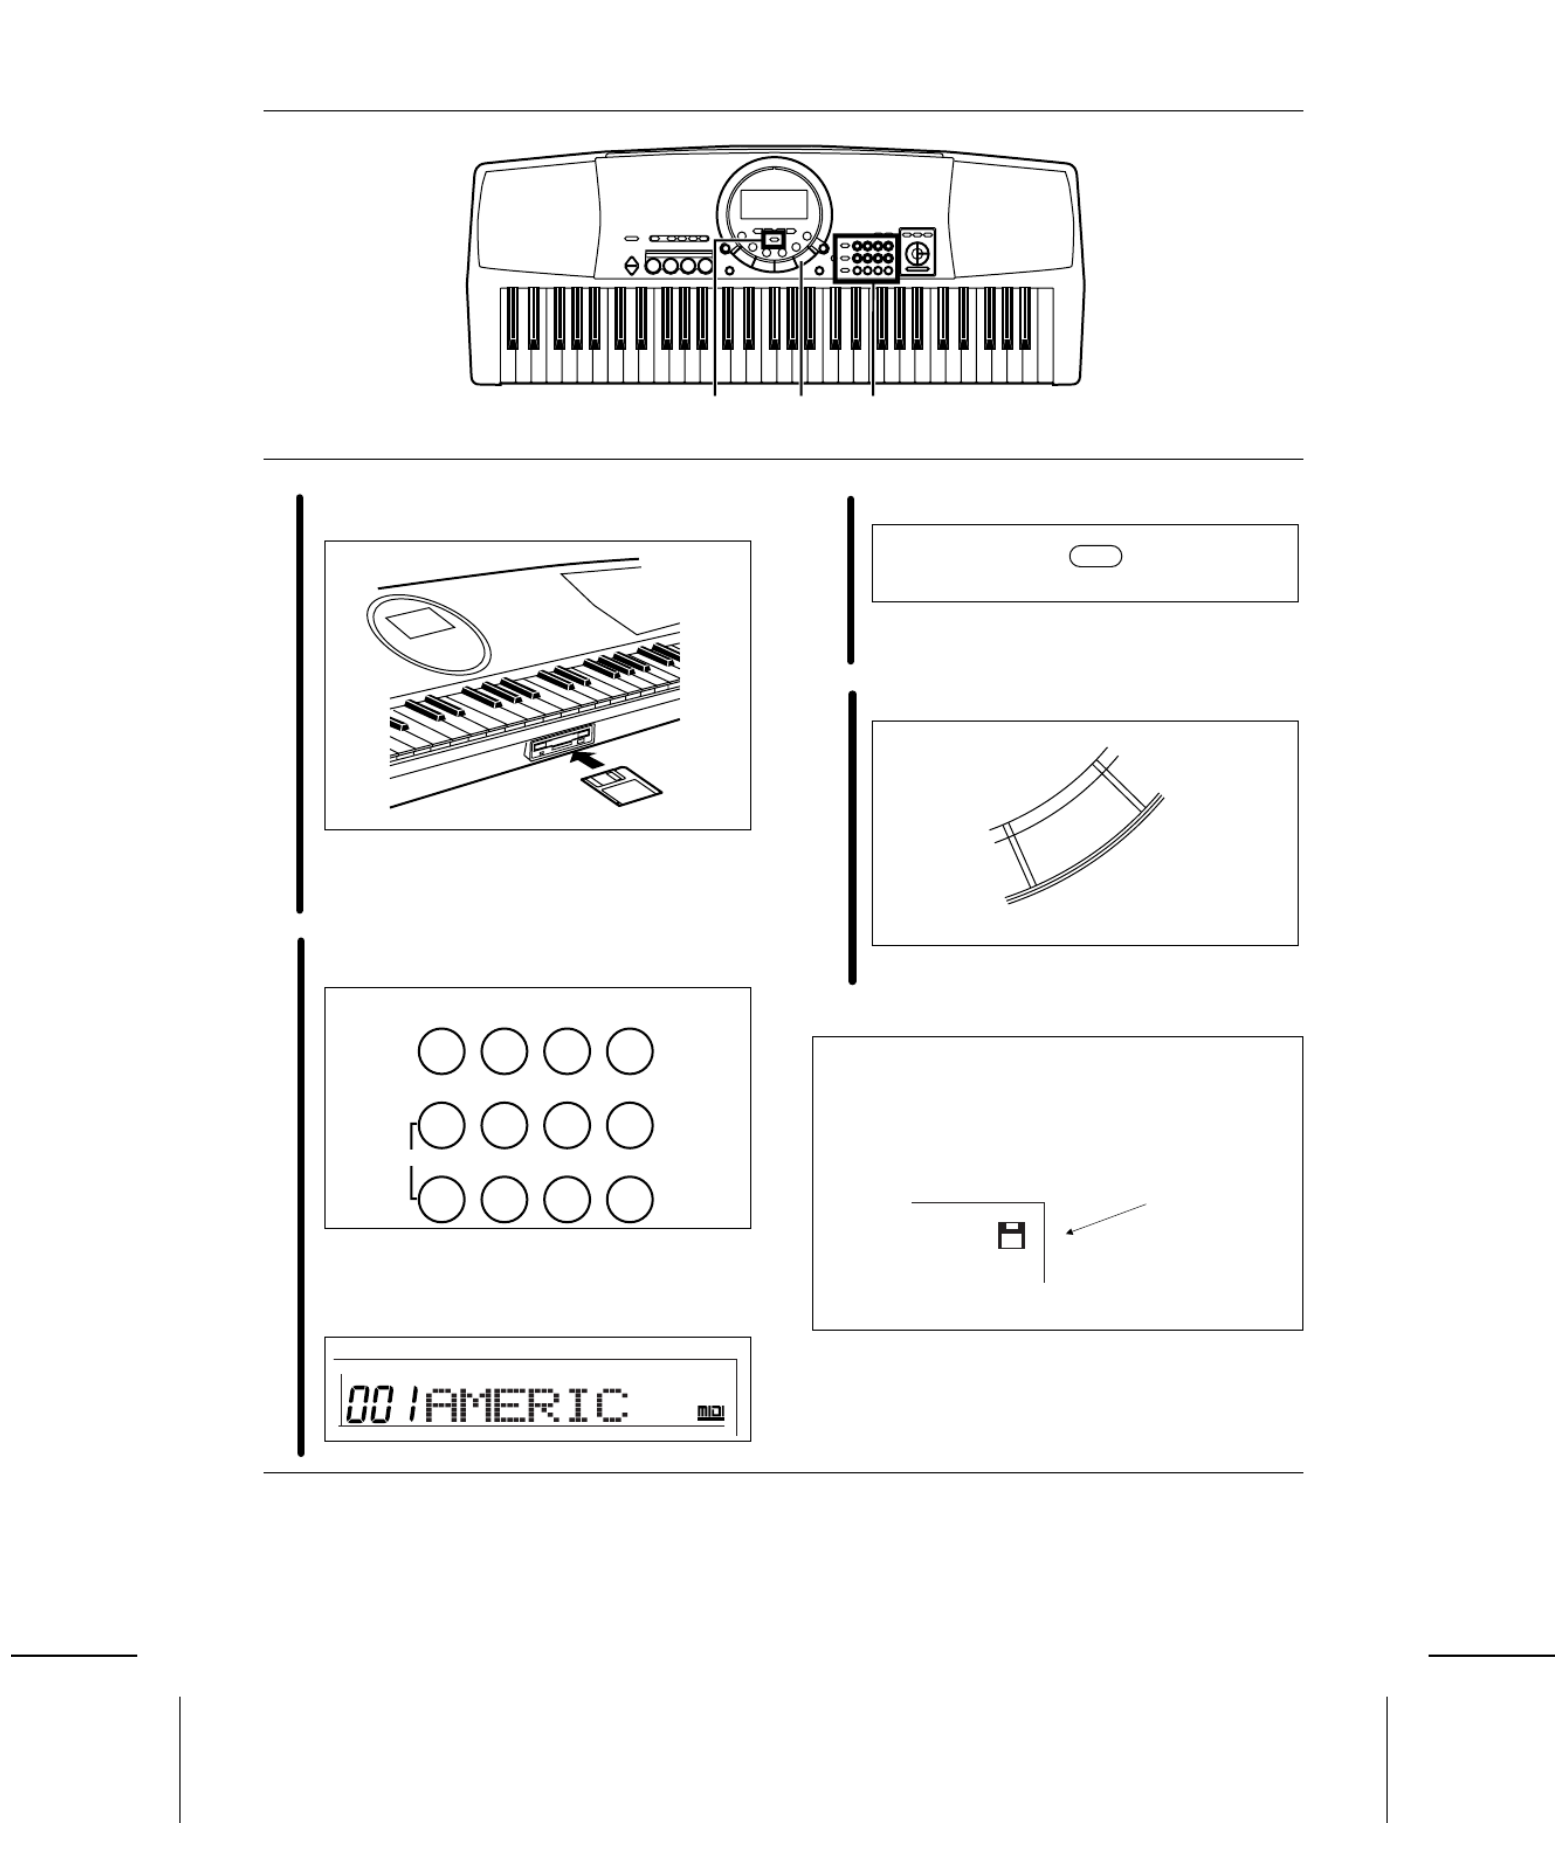
Play back the included Song Disk
1 Insert the included SONG DISK into the Disk
Drive slot.
•Insert the floppy disk correctly oriented with
the label side up. Push it all the way in until it
clicks into place.
2Use the number buttons to select a song num-
ber (3 digits).
•The song numbers can be found on the sepa-
rate music score provided.
•The selected song number and abbreviated
song name are shown on the display.
3Press the EXECUTE button.
•When the data has been loaded to this instru-
ment, “COMPLETE” appears on the display.
4Press the PLAY/PAUSE (START/ STOP) button.
•The selected song is played back.
•For playing back commercial song disks, refer to
page 37.
•For detailed information about playing back the
SONG DISK, refer to page 36.
3 4 2
0 1 2 3
+ 4 5 6
— 7 8 9
CANCEL
GENERAL
SONG
EXECUTE
START/STOP
PLAY/PAUSE
An illustration of a floppy disk appears on the dis-
play when data is being loaded from or saved to a
disk. To prevent data loss, do not remove the disk
from the Disk Drive or turn off the power while this
illustration is shown.
Disk illustration
14
QQTG0588

Record your performance
1Select the desired sounds and rhythm.
•You can also record a performance that has
an automatic accompaniment.
2In the SONG section, press the REC button.
3Use the TRANSPOSE/PROGRAM buttons to
select EASY REC.
4Press the EXECUTE button.
•All the previously recorded contents are
erased.
5Play the song on the keyboard.
6When your performance is finished, press the
REC button, in the SONG section, again.
•The recording can also be ended by pressing
the START/STOP button.
7Press the PLAY/PAUSE (START/ STOP) button.
•Your recorded performance is played back.
• •For more information about SONG, refer to page 33. To play a normal rhythm performance after playing
back your recorded performance, press the PLAY
button in the SONG section to turn it off.
2 6 34 7 5
RECPLAY
SONG
TRANSPOSE
PROGRAM
TEMPO
CONDUCTOR
TRANSPOSE
VOLUME
R1 R2
L C
TOUCH
REVERB
CHORUS
HARMONY
SUSTAIN
XBS
N
TRO / ENDING
SYNCHRO
APC
COUNT
GENERAL
CHORD
R1
SOUND
EXECUTE PROGRAM
REC
EXECUTE
START/STOP
PLAY/PAUSE
15
QQTG0588

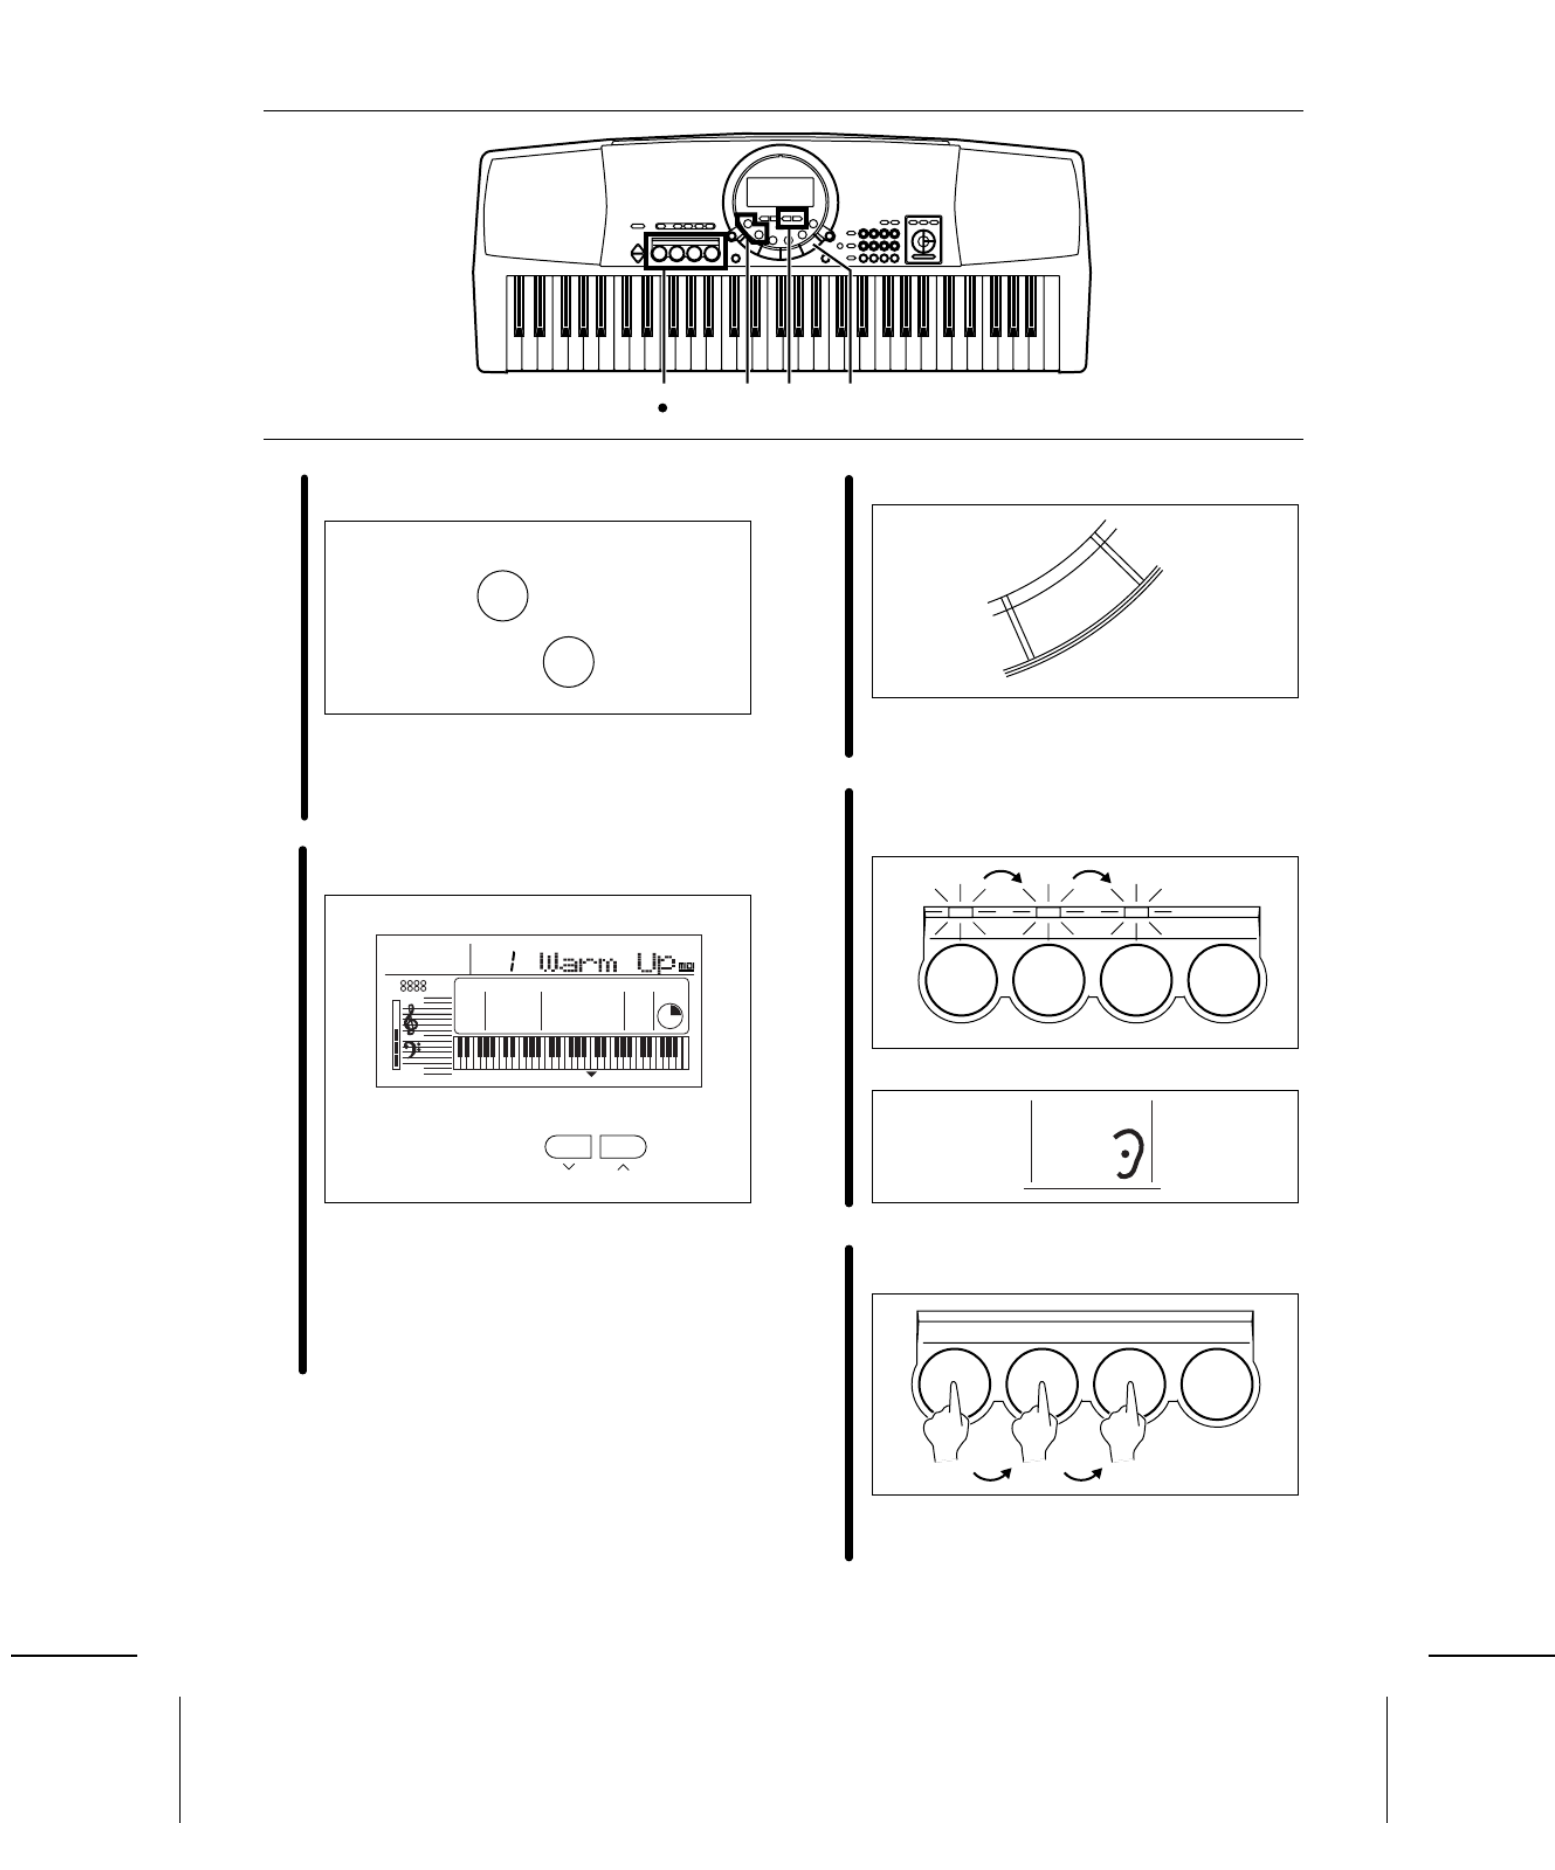
Beat Master
BEAT MASTER is a fun feature that helps you develop your sense of rhythm while you enjoy playing, just like com-
peting with a friend in a game.
Think of yourself as the student, and the instrument your teacher. First, the teacher “claps” out the rhythm, and
then you try to mimic it.
Your rhythm lesson uses the four pad buttons. As the instrument models the rhythm, the corresponding pad indica-
tors light. Then you try to tap the same pad buttons, with your fingers, using the same timing.
But it’s more than just a rhythm lesson—as you tap the pad buttons, a melody is played in time with your rhythm!
With BEAT MASTER you play a game of musical Questions & Answers with the instrument.
The BEAT MASTER has two levels to choose from: TRAINING (beginner) and CHALLENGE (advanced).
To learn how to use the BEAT MASTER, begin with the TRAINING song “1:Warm Up”. The structure of this song is
shown below, so take a minute to look it over before starting the lesson (following).
Number: Pad number
Note: Beat timing
Teacher
Student
Teacher
Student
LISTEN PLAY
Melody
LISTEN LISTEN
PLAY PLAY
INTRO
PHRASE 1 PHRASE 2
LISTEN LISTEN
PLAY PLAY
PHRASE 3 PHRASE 4
ENDING
Evaluation of
your
performance
16
QQTG0588
1Press the BEAT MASTER TRAINING or CHAL-
LENGE button.
•Select TRAINING if you are a beginner, or
CHALLENGE to improve your skill.
•A BGM is heard and the pad indicators light
up.
2Use the TRANSPOSE/PROGRAM buttons to
select a song number.
•Select a number from 1 to 4 (TRAINING)/C1
to C7 (CHALLENGE). The higher the number,
the more difficult the tune.
•Use the CHALLENGE button to select number
C8 to play back a song loaded from the disk.
If data has not been loaded from a disk,
“EMPTY” is shown on the display.
3Press the START/STOP button.
•The tune begins to play.
•Listen to the intro.
4The Question phrase is played. Watch the
timing of the pad indicators and try to remem-
ber it.
•During this time, the display looks like this:
5Mimic the Question phrase by tapping the same
pad buttons in the same order and timing.
•An evaluation of each phrase you reproduce
is shown as “Bravo!”, “Good”,“Poor.”
21 34 5
BEAT MASTER
TRAINING
BEAT MASTER
CHALLENGE
TRANSPOSE
PROGRAM
TEMPO
CONDUCTOR
TRANSPOSE
VOLUME
R1 R2
L C
TOUCH
REVERB
CHORUS
HARMONY
SUSTAIN
XBS
N
TRO / ENDING
SYNCHRO
APC
COUNT
GENERAL
CHORD
R1
SONG
BEAT MASTER
PROGRAM
START/STOP
PLAY/PAUSE
1 2 3 4
BEAT MASTER
LISTEN
1 2 3 4
17
QQTG0588

•During this time, the display looks like this:
6The next Question phrase is then played. Conti-
nue in the same manner.
7After the ending plays, you will see an evalua-
tion of your performance on the display.
•Your total performance is assessed as
“Master!”, “Good”, “Fair” or “Practice.”
•To try the same lesson again, press the
START/STOP button. Or you can try an
another song.
8To turn off the , press the sameBEAT MASTER
BEAT MASTER button that you selected in
step 1.
Playback of BEAT MASTER
songs on the disk
•BEAT MASTER songs are recorded on the included
disk.
(1) Insert the disk with the BEAT MASTER song data
into the Disk Drive.
(2) Press either BEAT MASTER button.
(3) Press the DISK SONG button.
(4) Use the TRANSPOSE/PROGRAM button to
specify the file number to load from the disk.
•Note that the current SONG data is deleted when
the BEAT MASTER data has been loaded.
(5) Press the EXECUTE button.
•When the data has been loaded to this instrument,
“COMPLETE” appears on the display.
(6) Press the START/STOP button.
•If the tempo is too fast, use the TEMPO buttons
below the display to adjust it.
•Note that in some songs the Question and Answer
phrases are one measure long and in others they
are two measures long. Enjoy the challenge!
•There is an INTERLUDE (bridge) section (when
there are no Question and Answers) in the middle of
the songs so you can catch your breath! (Some
songs have no INTERLUDE section.)
86 7
BEAT MASTER
18
QQTG0588

About the display
The display shows the status of this instrument, the played keys, etc., and is also used for setting the various functions.
Normal display
•A or mark next to the function name to the
left or right of the display indicates that the correspond-
ing button is ON. (In the example above, the XBS
function is On.)
•The readability (LCD CONTRAST) of the display can
be adjusted. (Refer to pages 41 and 44.)
Setting display example
Example: PART VOLUME
The TRANSPOSE/PROGRAM buttons and
TEMPO/PROGRAM buttons below the display, as well
as the number buttons and + and – buttons, are used to
select the various functions and specify values, etc.
•When the TRANSPOSE/PROGRAM buttons or
TEMPO/PROGRAM buttons are used to set a function,
the corresponding PROGRAM indication flashes.
•The number buttons are convenient for entering num-
bers directly, and the TRANSPOSE/ PROGRAM but-
tons or the + and – number buttons are convenient for
selecting the modes, etc. while viewing the display.
EXECUTE
When it is necessary to confirm that you wish to execute
a function, press the EXECUTE button.
•If necessary, the EXECUTE indication on the display
will flash.
•At this time if you wish to cancel the procedure instead
of executing it, press the button that you to select the
function (MENU button or button, etc.).DISK MENU
•The display illustrations used throughout this manual
are for purposes of explanation and may differ from the
actual display you see when you are using your instru-
ment.
TEMPO
CONDUCTOR
TRANSPOSE
VOLUME
R1 R2
LC
TOUCH
REVERB
CHORUS
HARMONY
SUSTAIN
XBS
INTRO / ENDING
SYNCHRO
APC
COUNT
GENERAL
CHORD
R1
m
SOUND
7
Volume
Tempo
Sound number Sound name
Chord name
Performance data
CONDUCTOR status
▲
▼
TEMPO
PROGRAM
TRANSPOSE
PROGRAM
EXECUTE
TEMPO
CONDUCTOR
TRANSPOSE
VOLUME
R1 R2
LC
TOUCH
REVERB
CHORUS
HARMONY
SUSTAIN
XBS
INTRO / ENDING
SYNCHRO
APC
COUNT
GENERAL
CHORD
R1
MENU
PROGRAM PROGRAM
TEMPO
CONDUCTOR
TRANSPOSE
VOLUME
R1 R2
L C
TOUCH
REVERB
CHORUS
HARMON
Y
SUSTAIN
XBS
INTRO / ENDING
SYNCHRO
APC
COUNT
GENERAL
CHORD
R1
EXECUTE
19
QQTG0588

There are 250 different sounds permanently stored in this instrument to enhance your playing enjoyment.
Sound
Select the sounds for the three parts you can play on the keyboard.
1.In the CONDUCTOR, select a part (RIGHT 1, RIGHT
2 or LEFT).
•The CONDUCTOR indication on the display shows the
selected part(s).
2.Press the SOUND button. Use the number buttons to
select a sound number (three digits).
•The list of SOUNDS is printed on the upper right portion
of the panel.
•The selected sound number and sound name are
shown on the display.
•Enter three digits to specify the sound. For example,
for sound number 003, press 0, 0, 3. For sound number
030, press 0, 3, 0.
3.Play the keyboard.
•Non-pitched (percussion) sounds are also available.
•For DRUM KITS sounds, percussion instrument
sounds corresponding to the illustration are played
with the keyboard keys.
•You can use the to assign differentCONDUCTOR
parts to the keyboard.
About the number buttons
The number buttons are convenient for selecting func-
tions with assigned numbers, such as sounds and
rhythms, MENU functions, disk songs, etc.
•The + and – buttons can be used to increase or
decrease the number. When a button is pressed and
held, the numbers change quickly.
•If you wish to cancel the number you are in the midst
of entering, press the and + – buttons at the same
time. If you pause in the midst of entering a number,
the entry may automatically be canceled after a few
seconds.
LEFT RIGHT 2
RIGHT 1
CONDUCTOR
CONDUCTOR
R1
MENU
VARIATION
SOUND
RHYTHM
0123
+ 4 5 6
— 7 8 9
CANCEL
GENERAL
SOUND
Part I Sounds and effects
20
QQTG0588

Solo Piano
Press the SOLO PIANO button for a solo piano performance without having to make complicated settings.
⇒Press the SOLO PIANO button. •The appropriate settings for a piano performance is
automatically set.
•Note that the settings that were in effect immediately
before this button is pressed will be lost.
Effects
Add various effects to give expression to the sounds.
CHORUS
This effect gives the sound richness and breadth.
1.Use the CONDUCTOR buttons to select the part to
which this effect will be applied.
2.Press the CHORUS button to turn it on.
•The mark next to the CHORUS indication on the
right side of the display indicates that this effect is on.
•The display looks similar to the following.
•If necessary, use the TEMPO/PROGRAM buttons to
adjust the depth of the effect (0–99).
•Perform this operation while the PROGRAM indication
is flashing on the display. After a few seconds, the
display returns to the previous display.
•This effect can be set to on or off for each part.
SUSTAIN
SUSTAIN is the gradual fading out of musical tones after
the key is released.
1.Use the CONDUCTOR buttons to select the part to
which this effect will be applied.
2.Press the SUSTAIN button to turn it on.
•The mark next to the SUSTAIN indication on the
right side of the display indicates that this effect is on.
•This effect can be set to on or off for each part.
SOLO
PIANO
CHORUS
▼
TEMPO
CONDUCTOR
TRANSPOSE
VOLUME
R1 R2
L C
TOUCH
REVERB
CHORUS
HARMONY
SUSTAIN
XBS
I
NTRO / ENDING
SYNCHRO
APC
COUNT
GENERAL
CHORD
R1
PROGRAM
SUSTAIN
▼
Part I Sound and effects
22
QQTG0588
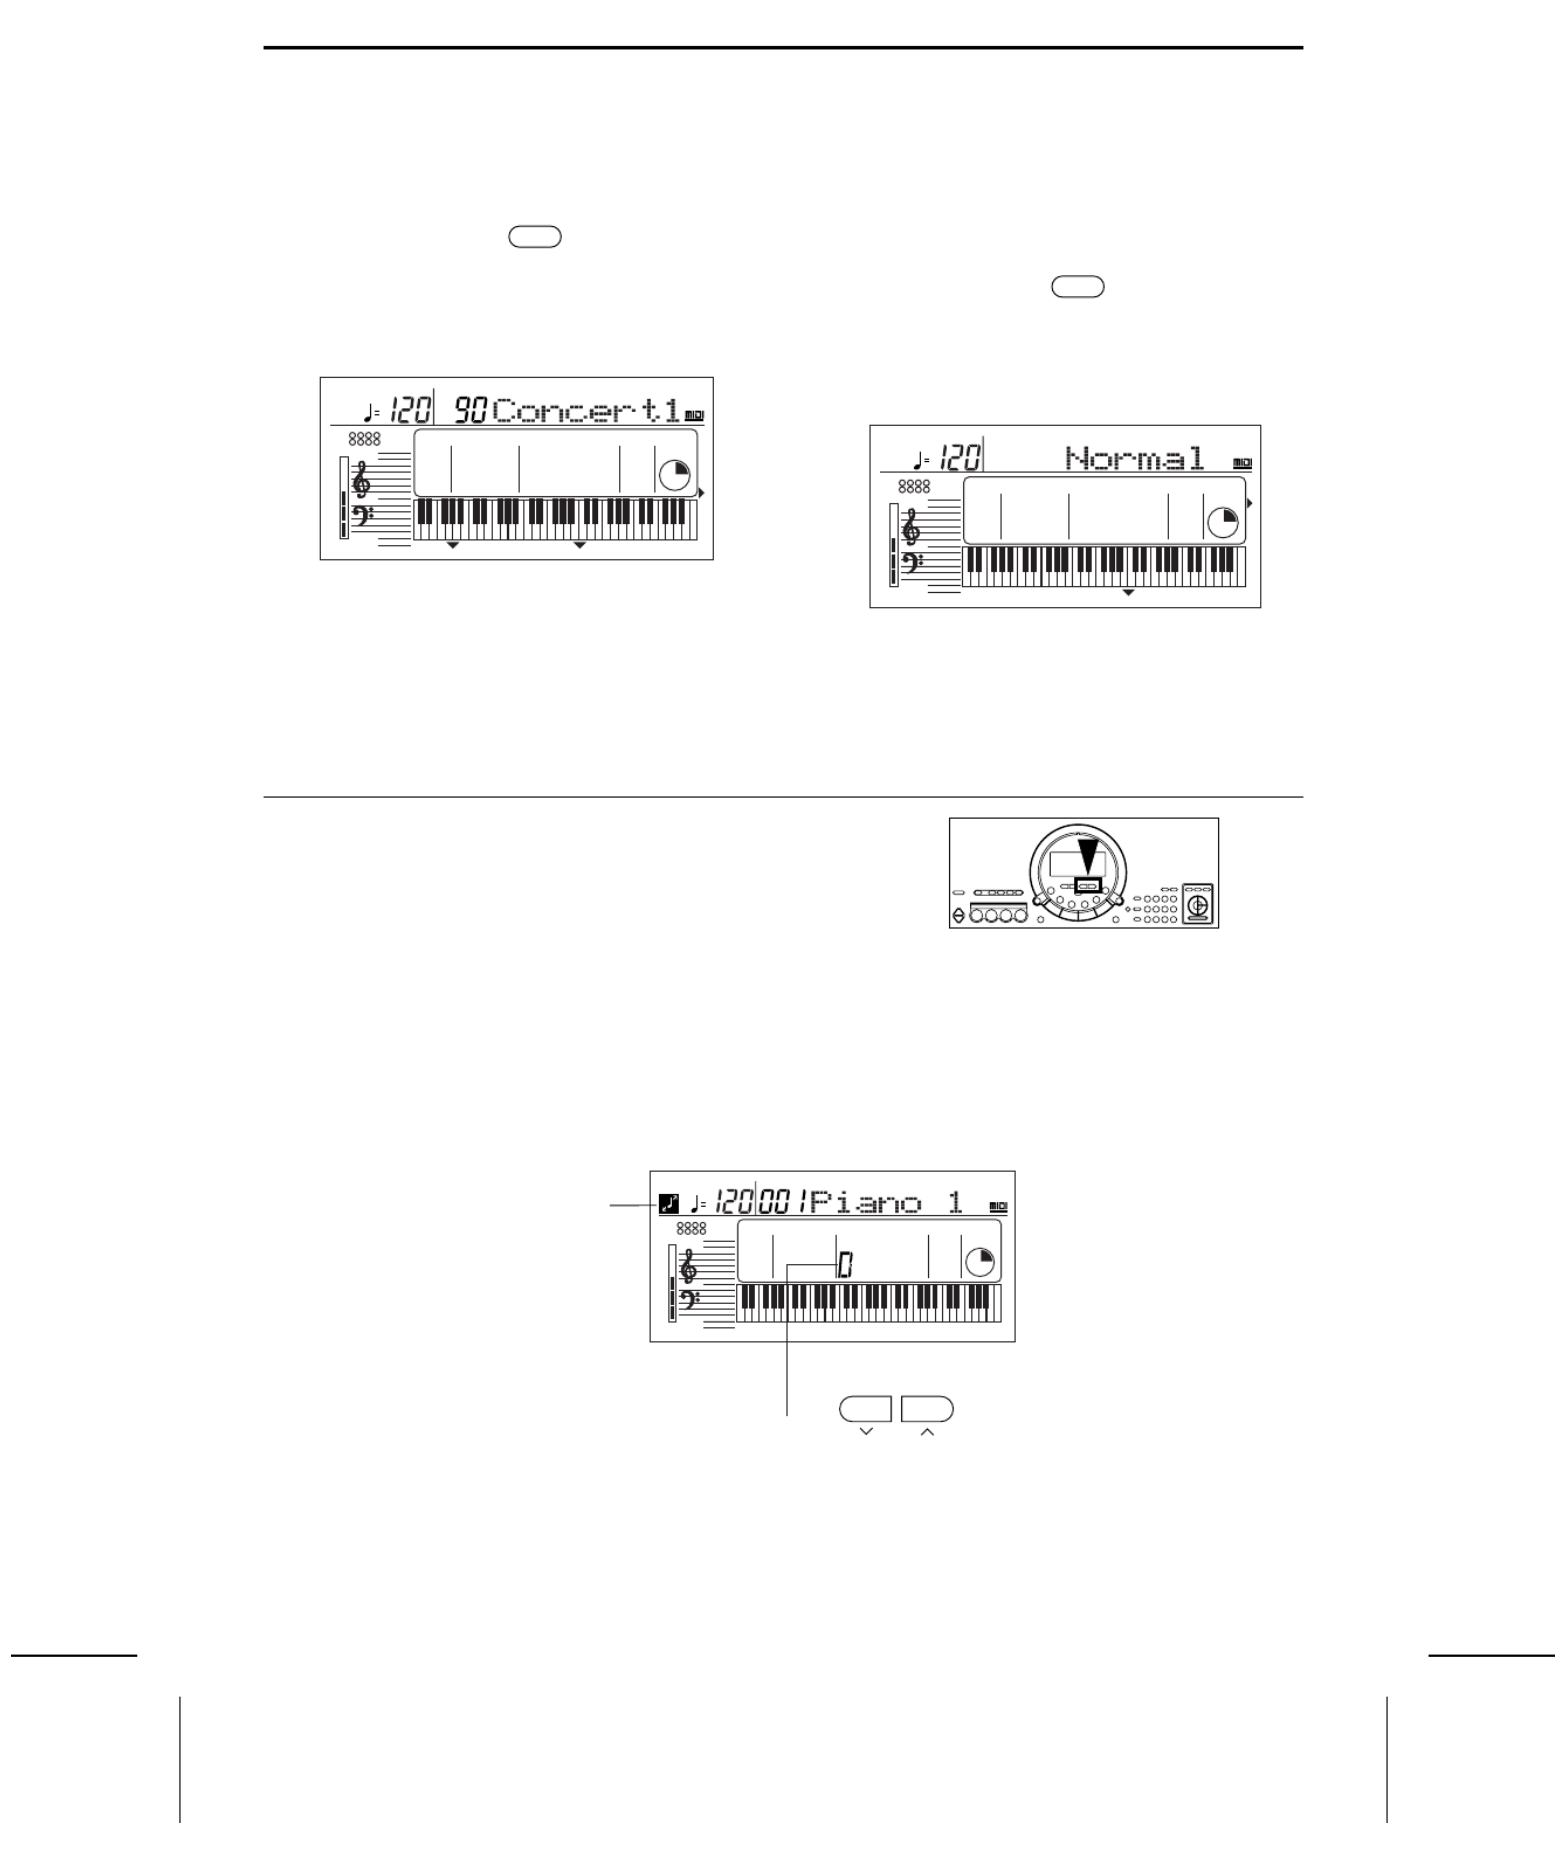
REVERB
REVERB applies a reverberation effect to the sound.
⇒Press the REVERB button to turn it on.
•The mark next to the REVERB indication on the
right side of the display indicates that this effect is on.
•The display looks similar to the following.
•If necessary, use the TEMPO/PROGRAM buttons to
adjust the depth of the effect (0–99), and the TRANS-
POSE/PROGRAM buttons to select the type of reverb
(Room1, 2, Plate 1, 2, Concert 1, 2).
•Perform this operation while the PROGRAM indication
is flashing on the display. The display returns to the
previous display a few seconds after you have
changed the setting.
TOUCH
You can add dynamics to the sound by varying the key-
board touch.
•The initialized setting is ON.
⇒Press the TOUCH button to turn it on.
•The mark next to the TOUCH indication on the
right side of the display indicates that this effect is on.
•The display looks similar to the following.
•If necessary, the TRANSPOSE/PROGRAM buttons
can be used to to select the mode (Heavy, Normal,
Light).
•Perform this operation while the PROGRAM indication
is flashing on the display. After a few seconds, the
display returns to the previous display.
Transpose
The TRANSPOSE buttons are used to change the key of the entire instrument in semitone steps across an entire
octave.
Suppose you learn to play a song—in the key of C, for example—and decide you want to sing it, only to find that it’s
either too high or too low for your voice. Your choice is to either learn the song all over again in a different key, or to
use the TRANSPOSE feature.
⇒Adjust the key with the TRANSPOSE ∧ ∨ and buttons.
REVERB
▼
TEMPO
CONDUCTOR
TRANSPOSE
VOLUME
R1 R2
L C
TOUCH
REVERB
CHORUS
HARMONY
SUSTAIN
XBS
INTRO / ENDING
SYNCHRO
APC
COUNT
GENERAL
CHORD
R1
PROGRAM PROGRAM
TOUCH
▼
TEMPO
CONDUCTOR
TRANSPOSE
VOLUME
R1 R2
L C
TOUCH
REVERB
CHORUS
HARMONY
SUSTAIN
XBS
INTRO / ENDING
SYNCHRO
APC
COUNT
GENERAL
CHORD
R1
PROGRAM
TRANSPOSE
PROGRAM
TEMPO
CONDUCTOR
TRANSPOSE
VOLUME
R1 R2
L C
TOUCH
REVERB
CHORUS
HARMONY
SUSTAIN
XBS
INTRO / ENDING
SYNCHRO
APC
COUNT
GENERAL
R1
SOUND
Key
Transpose illustration
Part I Sound and effects
23
QQTG0588

•Each press of the ∧ button raises the key in semitone
steps, and each press of the ∨ button lowers the key
in semitone steps (G – C – F
#
).
•If the two buttons are pressed at the same time, the
key returns to C.
•When the TRANSPOSE function is active, the trans-
pose illustration is shown on the display.
•When PROGRAM is shown on the display above the
buttons, these buttons are used for various settings
and cannot be used for TRANSPOSE. To access the
TRANSPOSE function in this case, first exit the setting
mode.
<Example: transposed to D>
Harmony
This function automatically adds harmony to the single-note melody you play in the right part, based on the chord you
specify in the left part.
1.Split the keyboard into right and left sections. (Refer
to page 21.)
2.Press the HARMONY button to turn it on.
•The mark next to the HARMONY indication on the
right side of the display indicates that this effect is on.
•The display looks similar to the following.
•If necessary, the TRANSPOSE/PROGRAM buttons
can be used to select the type of harmony.
•If the “Octave”, “Hard Rock” or “Fanfare” type is
selected, HARMONY is added even when you do not
specify the chords.
•Perform this operation while the PROGRAM indication
is flashing on the display. After a few seconds, the
display returns to the previous display.
Played keys: C major
Notes that sound: D major
HARMONY
▼
TEMPO
CONDUCTOR
TRANSPOSE
VOLUME
R1 R2
L C
TOUCH
REVERB
CHORUS
HARMONY
SUSTAIN
XBS
INTRO / ENDING
SYNCHRO
APC
COUNT
GENERAL
CHORD
R1
PROGRAM
Part I Sound and effects
24
QQTG0588
There are 100 rhythms stored in the memory of this instrument. An additional VARIATION patterns for each rhythm is
available.
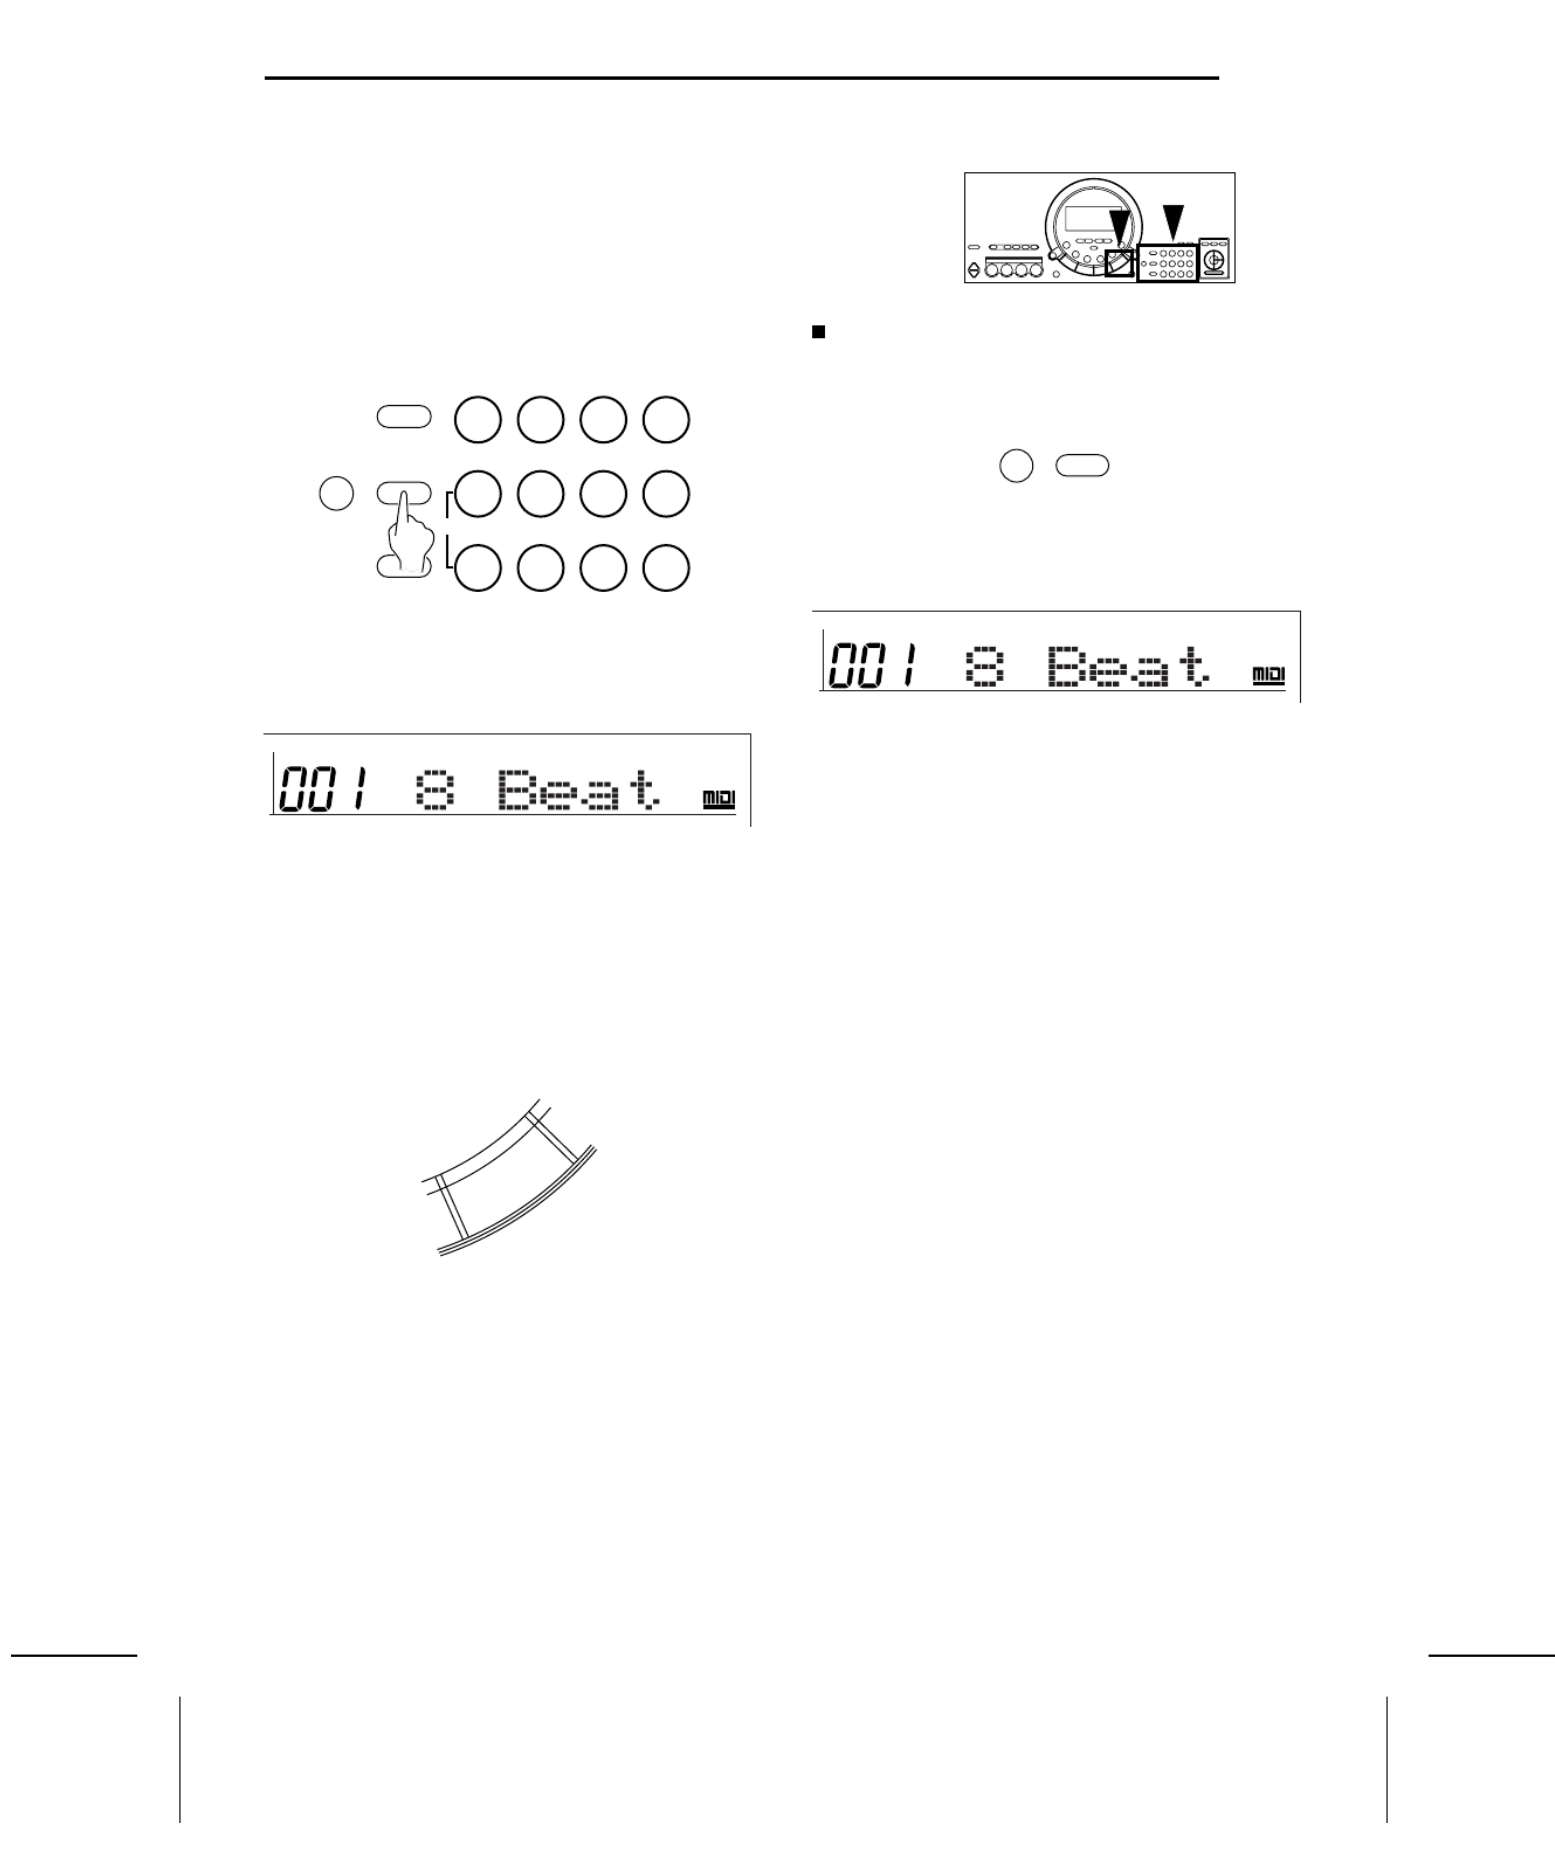
Rhythm
1.Press the RHYTHM button. Use the number buttons
to select a rhythm number (three digits).
• The list of RHYTHMS is shown near the left end of
the panel.
• The rhythm number and name are shown on the dis-
play.
• Enter three digits to specify the rhythm. For example,
for rhythm number 003, press 0, 0, 3. For rhythm
number 030, press 0, 3, 0.
• The + and – buttons can be used to increase or
decrease the number. When a button is pressed and
held, the numbers change quickly.
• To cancel a number you are entering, press the + and
– buttons at the same time (CANCEL).
2.Press the START/STOP button.
• The selected rhythm pattern begins to play.
• You can stop the rhythm by pressing the START/STOP
button again to turn it off.
• Since there is no DRUM part for the 091 CLASSIC
BALLAD rhythm, the pattern does not sound unless
the AUTO PLAY CHORD is used.
VARIATION
When you press the VARIATION button, the rhythm
changes to the variation pattern for the selected rhythm.
• “VARI” is shown on the display when the variation
pattern is selected.
• During a rhythm performance, you can switch between
the normal pattern and the variation pattern by
pressing the VARIATION button.
• There is no VARIATION pattern for the METRONOME
rhythm.
MENU
VARIATION
SOUND
RHYTHM
0123
+ 4 5 6
— 7 8 9
CANCEL
GENERAL
RHYTHM
START/STOP
PLAY/PAUSE
VARIATION
RHYTHM
GENERAL
RHYTHM
VARI
Part II Playing the rhythm
25
QQTG0588

Synchro Start
With the synchronized start feature, the rhythm pattern begins to play when you press a key on the keyboard.
1.Select a rhythm.
2.Press the SYNCHRO START button to turn it on.
• The mark next to the SYNCHRO indication on the
left side of the display indicates that this function is
on.
3.Play a key to the left of the keyboard split point.
• The rhythm pattern begins to play.
• You can use the synchronized start feature even when
the keyboard is not divided into left and right sections.
To start the rhythm, press a key to the left of the
specified split point (C3 in the initialized state).
Tempo
The tempo of the rhythm pattern is adjusted with the TEMPO buttons.
⇒Press the right button for a faster tempo, and the left
button for a slower tempo (q=40 – 300).
• Press both buttons at the same time to reset the tempo
to the standard q=120.
• The tempo is shown on the display.
• The beat is indicated above the displayed tempo.
• When “PROGRAM” appears on the display above the
buttons, these buttons are used for various settings
and cannot be used to adjust the TEMPO. To adjust
the TEMPO in this case, you must first exit the setting
mode.
SYNCHRO START
▲
TEMPO
PROGRAM
TEMPO
CONDUCTOR
TRANSPOSE
VOLUME
R1 R2
LC
TOUCH
REVERB
CHORUS
HARMONY
SUSTAIN
XBS
INTRO / ENDING
SYNCHRO
APC
COUNT
GENERAL
CHORD
R1
RHYTHM
Tempo indication
Beat indication
Part II Playing the rhythm
26
QQTG0588

Auto Play Chord
Simply by playing a chord on the keyboard, the AUTO PLAY CHORD function automatically plays an accompaniment
pattern which matches perfectly the selected rhythm. With a real accompaniment as a background, you can concentrate
on playing the melody.
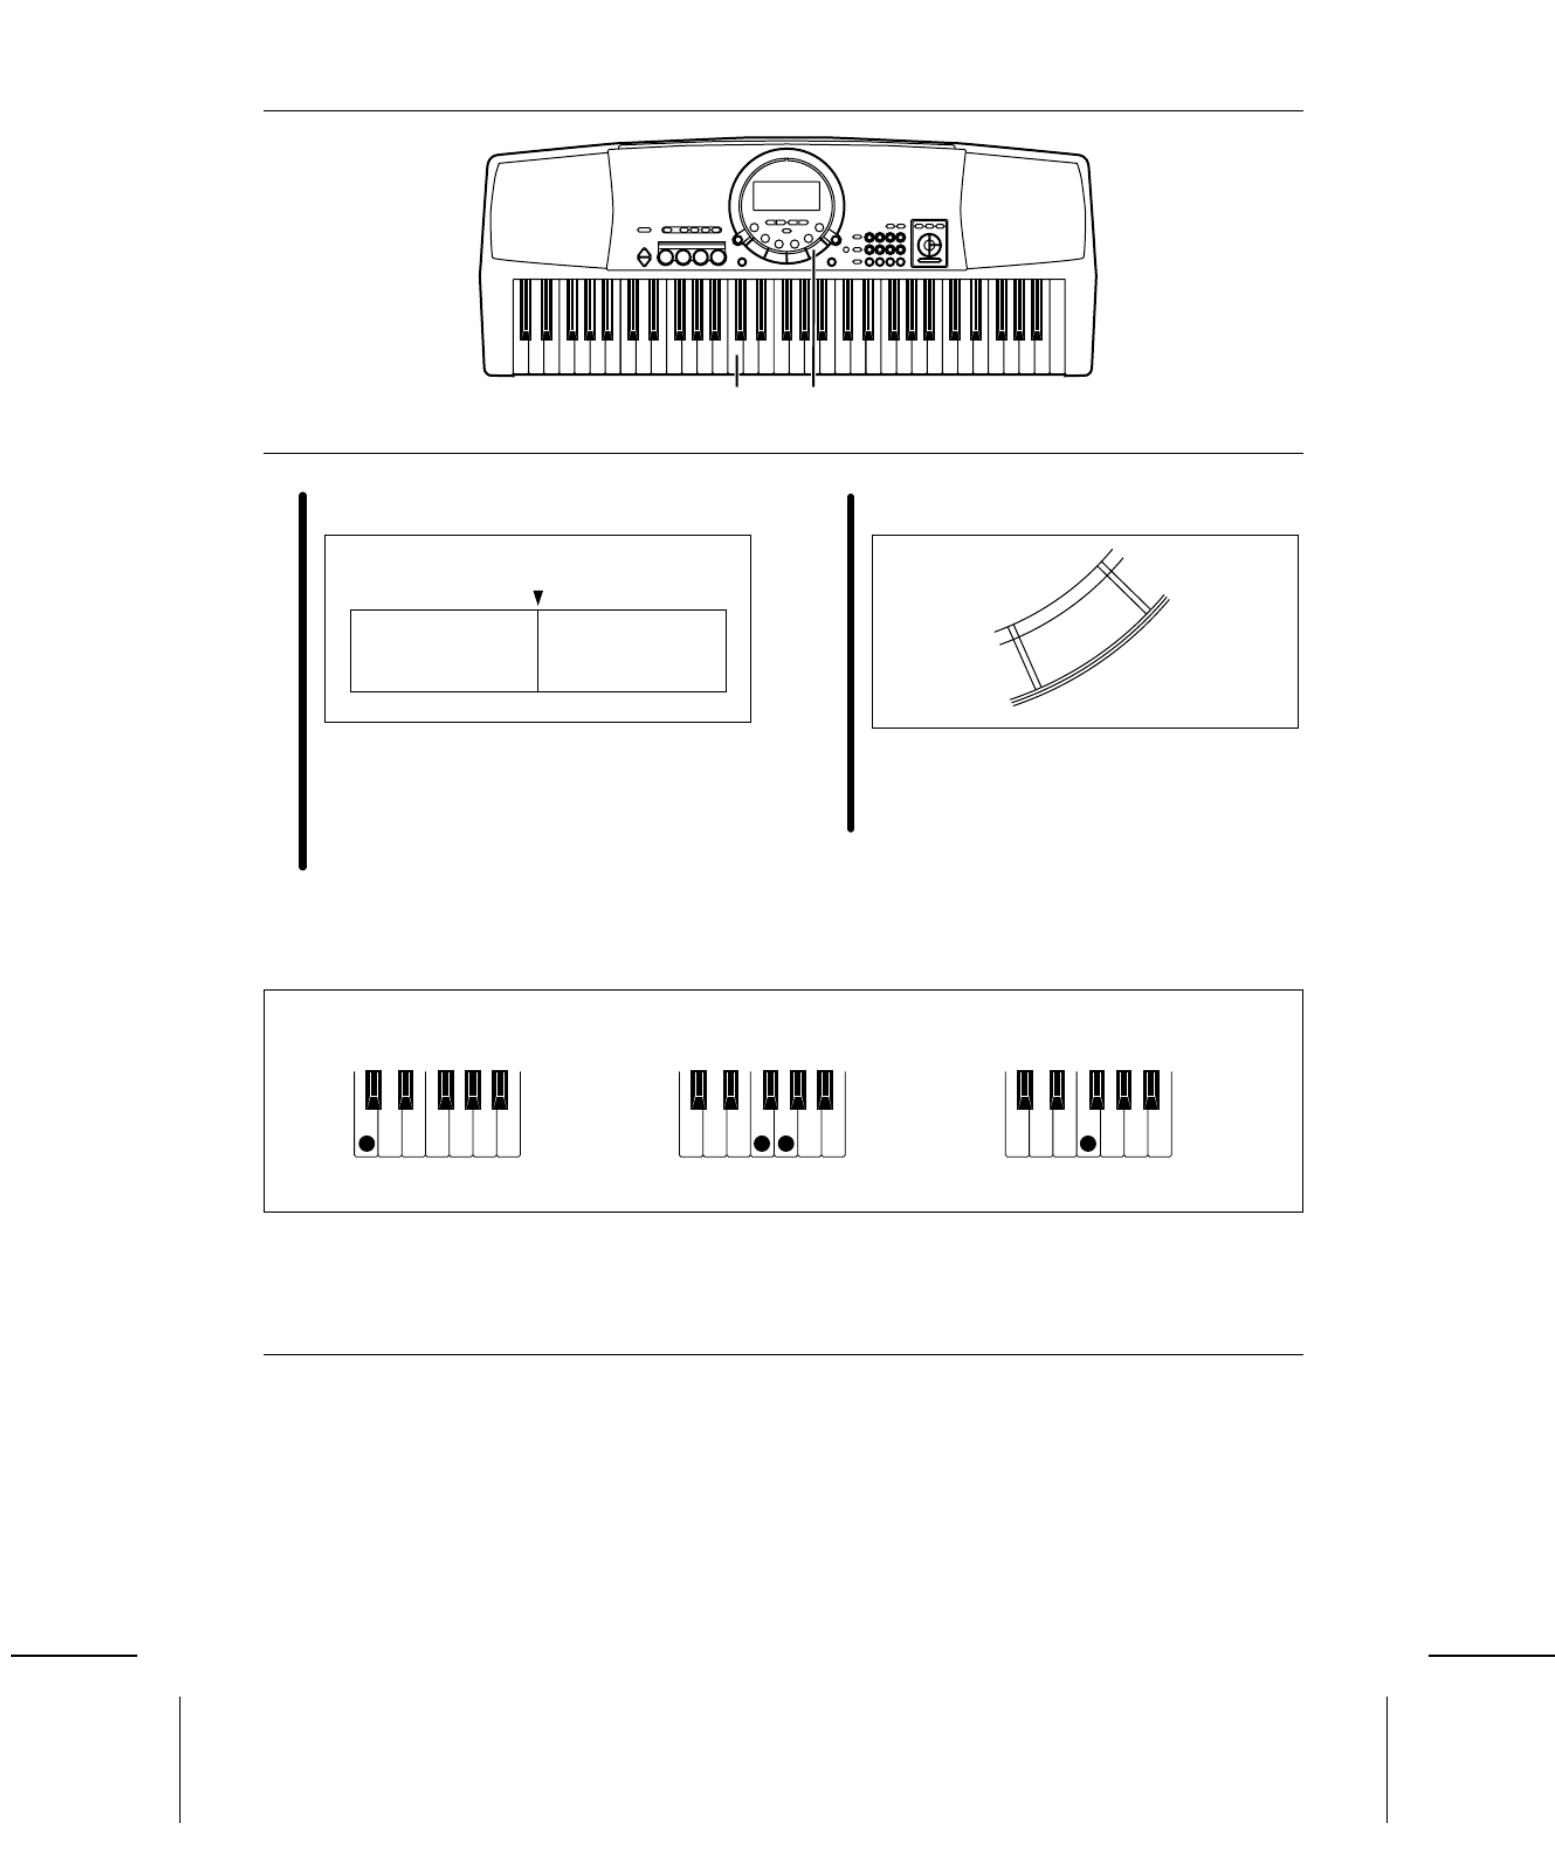
⇒Choose from three ways of playing chords.
One Finger (1 Finger) mode
In the One Finger mode, a major chord can be played
just by pressing the key for its root note.
Minor, seventh and minor seventh chords are also easily
produced.
Fingered mode
In the Fingered mode, you specify the chord by playing
all the notes in the chord.
• Play at least three notes to specify the chord.
• If the CHORD FINDER procedure is used, you can
see the types of chords that can be specified and the
keys you press to play them. (Refer to page 30.)
Pianist mode
In the Pianist mode, the entire keyboard can be used to
specify chords (Fingered mode) for the automatic accom-
paniment; a RIGHT part is assigned to all the keys, and
the keyboard does not split.
• If the CHORD FINDER procedure is used, you can
see the types of chords that can be specified and the
keys you press to play them. (Refer to page 30.)
• When specifying chords, if you press a key a perfect
5th or more below the lowest note of the chord, the
BASS part becomes a pattern based on that note.
Example: C chord
minor chord seventh chord minor seventh chord
Play the root note plus a black key
to the left of it.
Play the root note plus a white key
to the left of it.
Play the root note plus a black key
and a white key to the left of it.
Example: Cm Example: C7 Example: Cm7
Part II Playing the rhythm
28
QQTG0588

How to use the AUTO PLAY CHORD
1.Select the desired rhythm and sound(s), and set the
tempo.
2.Press the AUTO PLAY CHORD button to turn it on.
•The mark next to the APC indication on the left
side of the display indicates that this function is on.
•The display looks similar to the following.
3.Use the TRANSPOSE/PROGRAM buttons to select
the chord mode (1 Finger, Fingered, Pianist).
•Perform this operation while the PROGRAM indication
is flashing on the display. After a few seconds, the
display returns to the previous display.
4.Start the rhythm.
5.Specify a chord.
•If the 1 Finger or Fingered mode was selected, specify
the chord on the keyboard section to the left of the
split point (C3).
•The split point can be changed. (Refer to pages 41
and 44.)
•An accompaniment pattern in the specified chord is
automatically played.
•The specified chord is shown in the CHORD section
on the display.
•When you use the fill-in, intro and ending patterns, the
automatic accompaniment is also used in these pat-
terns.
•Once a chord is specified, it continues to play even
when the keys are released, until you specify another
chord.
6.To stop the automatic accompaniment, press the
START/STOP button.
•The AUTO PLAY CHORD is comprised of five parts
(ACCOMP [ACP] 1, 2 and 3, BASS and DRUMS), the
volume balance for each of which can be adjusted with
the PART VOLUME function. (Refer to pages 41 and
42.)
•In the 1 Finger or Fingered mode, if you specify a
chord without starting the rhythm, the root bass note
(R.BS) and the chord notes (CHRD) will sound. The
volumes of these parts can be adjusted with the PART
VOLUME function. (Refer to pages 41 and 42.)
•There is no automatic accompaniment pattern for the
METRONOME rhythm.
APC/SONG VOLUME
You can lower the volume of the automatic accompani-
ment to balance it with the volume of the sounds you
play.
•This setting also functions for the song playback
volume.
1.Press the APC/SONG VOLUME button to turn it on.
•The display looks similar to the following.
2.Use the TEMPO/PROGRAM buttons to adjust the
volume (0 to 10).
•A setting of 10 is the normal volume.
•Perform this operation while the PROGRAM indication
is flashing on the display. After a few seconds, the
display returns to the previous display.
•After the volume setting is changed, the volumes of
all the parts other than the one you are playing (for
example, BEAT MASTER, etc.) are also changed.
AUTO PLAY
CHORD
▲
GENERAL
TRANSPOSE
PROGRAM
APC/SONG
VOLUME
GENERAL
Part II Playing the rhythm
29
QQTG0588

CHORD FINDER
This feature shows you the keys to press for a specific
chord. You may find this convenient when you don’t know
how to play certain chords indicated in the sheet music.
1.Select the chord mode. (Refer to page 29.)
•Select Fingered or Pianist.
2.Press the CHORD FINDER button to turn it on.
•The display looks similar to the following.
3.Use the TEMPO/PROGRAM buttons to specify the
chord’s root note, and the TRANSPOSE/PROGRAM
buttons to specify the chord type.
•On the display, the keys you press to play the specified
chord are indicated on the keyboard illustration.
•If you press the EXECUTE button, the selected chord
will sound.
4.Press the CHORD FINDER button again to turn this
function off.
One Touch Play
ONE TOUCH PLAY automatically sets the sounds, etc. that match your chosen rhythm. Just by pressing a button you
can immediately perform using the automatic accompaniment.
•Note that when the automatic settings are executed, the previous settings are canceled.
1.With the rhythm stopped, select a rhythm pattern.
2.Press the ONE TOUCH PLAY button.
•Sounds and effects, tempo, etc. that match your
selected rhythm are automatically set, and the AUTO
PLAY CHORD and SYNCHRO START are turned on.
3.Play the keyboard.
•When you specify a chord, the automatic rhythm
begins to play immediately.
CHORD
FINDER
TEMPO
CONDUCTOR
TRANSPOSE
VOLUME
R1 R2
L C
TOUC
H
REVER
CHOR
U
HARM
O
SUSTA
XBS
INTRO / ENDING
SYNCHRO
APC
COUNT
GENERAL
CHORD
R1
M
7
PROGRAM PROGRAM
FINDER
ONE TOUCH PLAY
Part II Playing the rhythm
30
QQTG0588
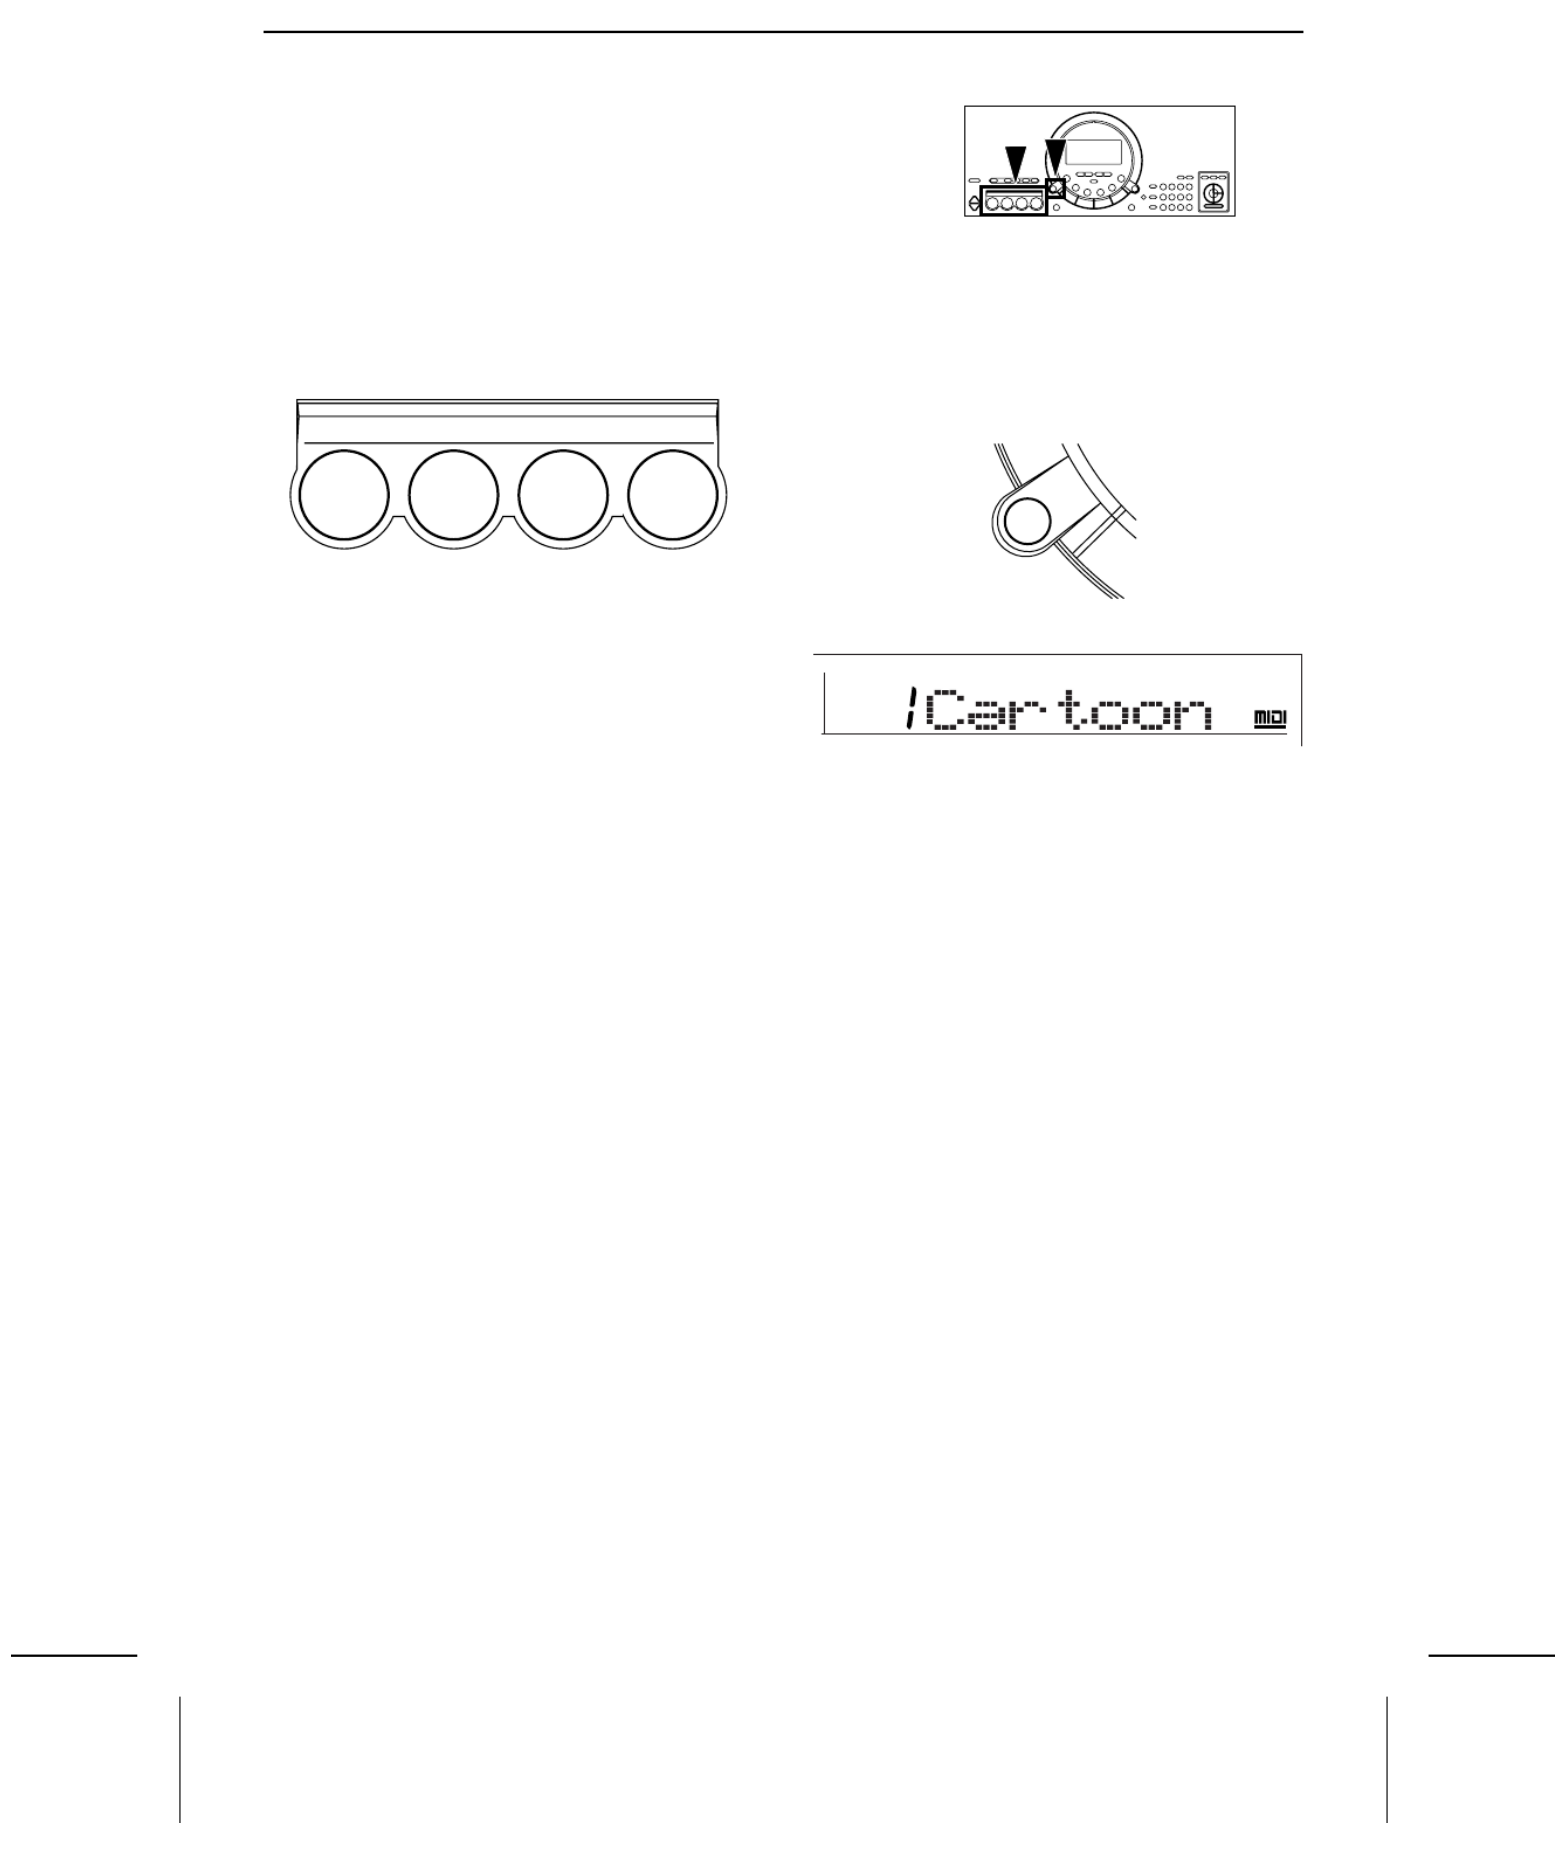
Party Pads
You can insert fun sound-effects just by pressing the pad buttons.
Pad performance
You can use the four pad buttons to produce four different
sound effects.
•Playback will stop if you press the same pad button
again.
Select a bank
Four banks have been prepared so that you can play
sound effects that match the selected theme.
⇒Press the PARTY PADS BANK button to select the
desired bank on the display.
•The display looks similar to the following.
•Each time the button is pressed, the bank number
changes in order from 1 to 4.
•The list of PARTY PADS BANKS is found on the panel
above the pad buttons.
•After a few seconds, the display returns to the previous
display.
•Each pad produces a phrase that matches the selected
bank.
PARTY PADS / BEAT MASTER
1 2 3 4
PARTY PADS
BANK
GENERAL
MENU
Part II Playing the rhythm
32
QQTG0588

Use the SONG function to record your performance.
Record your performance
Record your performance just as you played it on the keyboard.
1.Set the sounds, effects, rhythms, etc. for the parts you
are going to record.
•In the CONDUCTOR, turn on the parts that you want
to record.
2.In the SONG section, press the REC button.
•The display looks similar to the following.
3.Use the TRANSPOSE/PROGRAM buttons to select
the recording mode.
1 EASY REC: Your performance, including the automatic
accompaniment, is recorded.
•All the previously recorded contents are erased.
2 MELODY: Your performance of those parts selected in
the CONDUCTOR is recorded.
3 APC REAL: The automatic accompaniment (specified
chords) only is recorded.
•Be sure to turn on the AUTO PLAY CHORD button
before beginning recording. Also note that recording
in this mode should be completed before starting to
record in the MELODY mode.
4 APC STEP: The chord progression is recorded one
chord at a time. (Refer to page 34.)
4.Press the EXECUTE button.
•On the display, a flashing ● mark in the REC line
indicates the part that you selected to record.
•A flashing ● mark in both the REC line and the PLAY
line means that you have selected a part that has
already been recorded. If you record this part again,
the previous contents will be overwritten (deleted).
5.Press the START/STOP button.
•The recording begins. Play the keyboard to record your
performance.
•If you record a performance without the rhythm, begin
your performance without pressing the START/STOP
button. Recording begins immediately when you play
the keyboard.
•The measure number is shown on the display.
6.When you have finished recording, press the
START/STOP button.
•On the display, a ● mark in the PLAY line indicates
the part that you recorded.
•If you press the START/STOP button at this time, your
recorded performance will be played back.
RECPLAY
SONG
GENERAL
SOUND
TEMPOTRANSPOSE
R1 R2
LC
XBS
REC
REC indication
START/STOP
PLAY/PAUSE
TEMPOTRANSPOSE
R1 R2
L C
XBS
REC
measure number
TEMPOTRANSPOSE
R1 R2
L C
XBS
PLAY
PLAY indication
You can record your performance using four tracks—
RIGHT 1 (R1), RIGHT 2 (R2), LEFT (L) and CHORD
(C).
Part III Recording
33
QQTG0588

Multiplex recording
Multiplex recording of the MELODY mode and APC
REAL mode is possible by repeating steps 1 to 6.
•In multiplex recording, recording cannot be started by
playing the keyboard. You must press the
START/STOP button to begin recording.
Playing back your recorded song
1. In the SONG section, press the PLAY button.
•This step is not necessary if the PLAY indication al-
ready appears on the display.
2.Press the PLAY/PAUSE (START/STOP) button.
•Your recorded performance is played back.
•For information about the function of each button
during playback, refer to page 37.
•If you wish to play back the rhythm, turn the PLAY
button off.
Store a chord progression
Store the chord progression for the AUTO PLAY CHORD in the track for the CHORD part. Then, when the AUTO
PLAY CHORD is used during playback, even if you do not specify the chords with your left hand, the chords change
automatically.
•The chord length is specified with the CHORD STEP RECORD keys on the keyboard.
•Note that executing this procedure will delete the recorded data.APC REAL
RECPLAY
SONG
Note value keys
wWhole note
h.Dotted half-note
hHalf-note
q.Dotted quarter-note
qQuarter-note
eEighth-note
Reset key
Press to begin storing from the beginning.
Correction keys
Move back one step.
Move forward one step.
Repeat key
Press to end the chord-storing procedure and
to specify automatic repeat playback of the
stored progression.
End key
Press after the whole chord progression has
been stored.
DELETE key
DELETE Press to erase data.
•To erase all the data from the current track, while
pressing the DELETE key, press the End key
( ).
wh.hq.e q
&
DELETE
&
▲
▼
Part III Recording
34
QQTG0588

A 3.5 inch disk drive is built into this instrument, so you can play back the included disk and commercially sold song
disks, as well as store your recorded performances on floppy disks and play them back.
Parts of the floppy disk drive
•An illustration of a floppy disk appears on the display
when data is being loaded from or saved to a disk. To
prevent data loss, do not remove the disk from the
Disk Drive or turn off the power while this illustration
is shown.
Playing the included Song Disk
Data for 100 songs is stored on the included SONG DISK for you to enjoy. These songs correspond to the separate
music score provided.
•Note that recorded song data in the instrument memory will be deleted when a song on the disk is played back.
1.Insert the SONG DISK into the Disk Drive.
•Insert the floppy disk correctly oriented with the label
side up. Push it all the way in until it clicks into place.
•The display changes to show the song name. If it does
not change, press the DISK SONG button.
2.Use the number buttons to select a song number (3
digits).
•The song numbers can be found on the separate music
score provided.
•The selected song number and abbreviated song name
are shown on the display.
•The TRANSPOSE/PROGRAM buttons and the + and
– buttons can also be used to select the song.
•If 000 MEDLEY is selected, the entire contents of the
disk are played back repeatedly.
Disk slot
Eject button
Press to remove the disk
from the Disk Drive.
Lights when the power is on
DISK
SONG
0 1 2 3
+ 4 5 6
— 7 8 9
CANCEL
GENERAL
SONG
Disk illustration
Part IV Disk Drive
36
QQTG0588
Product specificaties
| Merk: | Panasonic |
| Categorie: | Keyboard |
| Model: | SX-KC611 |
Heb je hulp nodig?
Als je hulp nodig hebt met Panasonic SX-KC611 stel dan hieronder een vraag en andere gebruikers zullen je antwoorden
Handleiding Keyboard Panasonic

21 Juni 2021
19 Juni 2021
18 Juni 2021
15 Juni 2021
Handleiding Keyboard
- Keyboard Philips
- Keyboard HP
- Keyboard Casio
- Keyboard Asus
- Keyboard JVC
- Keyboard Yamaha
- Keyboard Acer
- Keyboard Akai
- Keyboard Alesis
- Keyboard Anker
- Keyboard Arturia
- Keyboard Behringer
- Keyboard BlueBuilt
- Keyboard Boss
- Keyboard Dell
- Keyboard Digitech
- Keyboard Elgato
- Keyboard Evga
- Keyboard Fender
- Keyboard Fujitsu
- Keyboard Gembird
- Keyboard General Music
- Keyboard GeoVision
- Keyboard Gigabyte
- Keyboard Hammond
- Keyboard Hohner
- Keyboard Icon
- Keyboard ID-Tech
- Keyboard Ion
- Keyboard Kawai
- Keyboard Ketron
- Keyboard Korg
- Keyboard Lenovo
- Keyboard Logik
- Keyboard Logilink
- Keyboard Logitech
- Keyboard M-Audio
- Keyboard Manhattan
- Keyboard Medeli
- Keyboard Microsoft
- Keyboard MSI
- Keyboard Native
- Keyboard Nedis
- Keyboard Nord Electro
- Keyboard Novation
- Keyboard Pyle
- Keyboard Razer
- Keyboard Roccat
- Keyboard Roland
- Keyboard Samson
- Keyboard Schubert
- Keyboard Stagg
- Keyboard Steelseries
- Keyboard Targus
- Keyboard Technics
- Keyboard Trust
- Keyboard Veho
- Keyboard Verbatim
- Keyboard Viper
- Keyboard Vivanco
- Keyboard Zebra
- Keyboard Essentiel B
- Keyboard Genesis
- Keyboard Cooler Master
- Keyboard Msonic
- Keyboard Adesso
- Keyboard Rapoo
- Keyboard Corsair
- Keyboard Cougar
- Keyboard Techly
- Keyboard Bakker Elkhuizen
- Keyboard Brydge
- Keyboard Cherry
- Keyboard KeySonic
- Keyboard Penclic
- Keyboard Savio
- Keyboard Seal Shield
- Keyboard Sven
- Keyboard Patriot
- Keyboard EVOLVEO
- Keyboard HyperX
- Keyboard NUX
- Keyboard Thomann
- Keyboard Havis
- Keyboard CME
- Keyboard Xcellon
- Keyboard IOGEAR
- Keyboard Black Box
- Keyboard Tiptop Audio
- Keyboard Native Instruments
- Keyboard PreSonus
- Keyboard IK Multimedia
- Keyboard Speed-Link
- Keyboard Millenium
- Keyboard 4ms
- Keyboard CTA Digital
- Keyboard Ducky
- Keyboard Man & Machine
- Keyboard Krom
- Keyboard Vorago
- Keyboard Moog
- Keyboard X9 Performance
- Keyboard Erica Synths
- Keyboard Keith MCmillen
- Keyboard Gamdias
- Keyboard Matias
- Keyboard Contour Design
- Keyboard Kingston
- Keyboard MaxMusic
- Keyboard ModeCom
- Keyboard Laney
- Keyboard X-keys
- Keyboard Gravity
- Keyboard PIXMY
- Keyboard Hanwha
- Keyboard Kurzweil
- Keyboard Pelco
- Keyboard Studiologic
- Keyboard Nektar
- Keyboard ASM
- Keyboard Dexibell
- Keyboard Genovation
- Keyboard Rii
- Keyboard Sequenz
- Keyboard Redragon
- Keyboard Gamesir
- Keyboard Nord
- Keyboard The Box
- Keyboard Startone
- Keyboard K&M
- Keyboard Perixx
- Keyboard Roadworx
- Keyboard Keychron
- Keyboard Kanex
- Keyboard DeepCool
- Keyboard Groove Synthesis
- Keyboard CoolerMaster
- Keyboard Royal Kludge
- Keyboard CM Storm
- Keyboard Xtrfy
- Keyboard Polyend
- Keyboard On-Stage
- Keyboard Carlsbro
- Keyboard MK
- Keyboard Xuma
Nieuwste handleidingen voor Keyboard

4 April 2025
4 April 2025
4 April 2025
4 April 2025
4 April 2025
30 Maart 2025
30 Maart 2025
29 Maart 2025
29 Maart 2025
28 Maart 2025