Omron HJA-312 Handleiding
Omron
Sporthorloge
HJA-312
Lees hieronder de 📖 handleiding in het Nederlandse voor Omron HJA-312 (40 pagina's) in de categorie Sporthorloge. Deze handleiding was nuttig voor 92 personen en werd door 2 gebruikers gemiddeld met 4.5 sterren beoordeeld
Pagina 1/40

Instruction Manual
Activity Monitor
Model HJA-312

TABLE OF CONTENTS
Before Using the Unit
Introduction ......................................................1
Important Safety Information ..........................3
Getting to Know Your Unit ..............................5
Know Your Unit ...............................................7
Settings .............................................................9
Operating Instructions
Attaching the Unit .......................................... 14
Using the Unit .................................................15
Reviewing Your Data .....................................19
Viewing Your Data .........................................23
Battery Life and Replacement .......................26
Deleting All Results And Settings .................28
Care and Maintenance
Maintenance and Storage ...............................29
Optional Accessory and Transferring Data ...30
Trouble shooti ng .............................................. 31
FCC Statement ................................................34
Limited Warranty ...........................................35
Specifications .................................................36
Be

1
Before Using the Unit
INTRODUCTION
Thank you for purchasing the HJA-312 Activity Monitor.
Your HJA-312 Activity Monitor comes with the following
components:
Main unit
Holder
Strap
Clip
Lithium Battery (CR2032×1 included)
Screwdriver
Instruction Manual
Fill-in for future reference:
DATE PURCHASED:
• Staple your purchase receipt here
• Register your product on-line at
www.register-omron.com
This monitor uses OMRON’s proprietary “Active Engine 2”
technology to measure your physical activities, including
household chores, desk work and walking. It then calculates
the number of calories you have burned in a day. This
monitor is an everyday tool that can help you find a healthy
b
alance between diet and exercise.
SAVE THESE INSTRUCTIONS

2
INTRODUCTION
This activity monitor cannot measure the
amount of calories you have consumed. If you
have failed to achieve your weight reduction
target, you may have consumed more calories
than you have burned.
The weight reduction target is a guideline. It
is not guaranteed you will lose this amount of
weight.
y
y

3
IMPORTANT SAFETY INFORMATION
To assure the correct use of the product basic
safety measures should always be followed
including the warnings and cautions listed in this
instruction manual.
SAFETY SYMBOLS USED IN THIS INSTRUCTION MANUAL
WARNING
Indicates a potentially hazardous
situation which, if not avoided,
could result in death or serious
injury.
CAUTION
Indicates a potentially hazardous
situation which, if not avoided,
may result in minor or moderate
injury to the user or patient or
damage to the equipment or other
property.
OPERATING THE DEVICE
Contact your doctor or healthcare provider
before beginning a weight reduction or
exercise program.
Keep the unit or battery out of the reach of
young children. If a child swallows any small
piece, immediately consult a doctor.
Do not throw the battery into fi re because it
may explode.

4
IMPORTANT SAFETY INFORMATION
Dispose of the device, battery, and
components according to applicable local
regulations. Unlawful disposal may cause
environmental pollution.
Read all information in the instruction
manual and any other literature included in
the box before using the unit. Operate the unit
only as intended. Do not use for any other
purpose.
Do not insert the battery with the polarities in
the wrong direction.
Always use the type of battery indicated.
CARE AND MAINTENANCE
Do not disassemble or modify the unit.
Changes or modifi cations not approved
by Omron Healthcare will void the user
warranty.
Do not subject the unit to strong shocks, such
as dropping the unit on the fl oor.
Do not submerge the unit or any of the
components in water.

5
GETTING TO KNOW YOUR UNIT
WEEKLY CALORIES BURNED GOAL
TRACKER
When you set how much weight you want to
lose in the next four weeks (weight reduction
target), the activity monitor calculates the
target amount in terms of activity calories
you should burn in a week and supports your
weight reduction goals.
The weekly target of activity calories is
displayed as 100%.
The value for your usual activity calories is
updated every four weeks according to your
activities. However, the fi rst few days will
display the average value calculated from your
personal data.
Week starts on Sunday.
If you set your target on any day other than
Sunday, it is not displayed until the next Sunday.
Displayed values
The display shows a guideline for the amount of
activity time per day required to achieve your
weekly target* and a percentage for the week.
The activity period is calculated on the assumption that
all of your activities involve walking (2.5 mile/hour).
However, running or other vigorous activities will
reduce it faster.
y
y
y
y
*
■
*
6
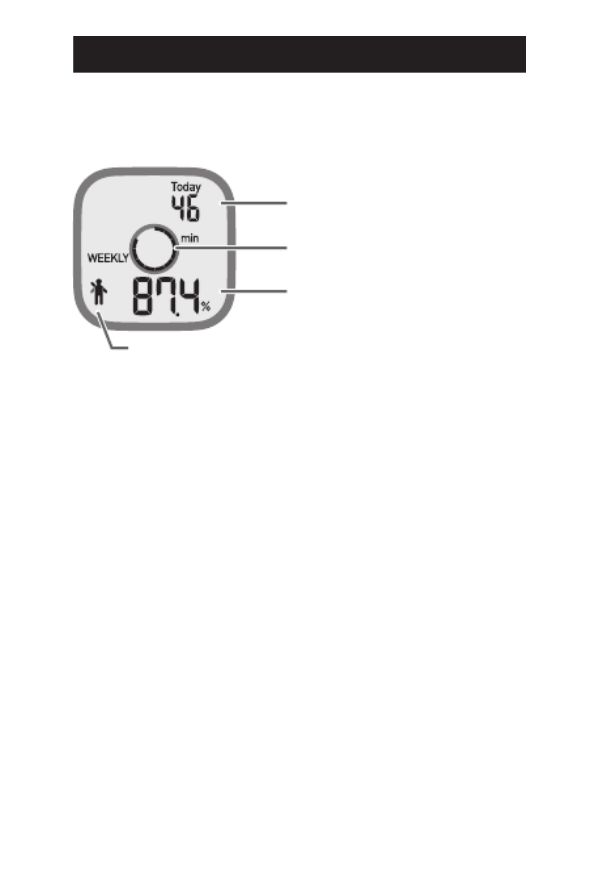
GETTING TO KNOW YOUR UNIT
Today’s target amount of activity time changes
depending on the activities you performed on
previous days.
Today’s target amount
of activity time
Congratulations mark
Achievement level of the
weekly target
Achievement level indicator
Achievement level indicator
This indicator shows how much of your weekly
target has been achieved.
Congratulations mark
This mark is displayed when you have achieved
your weekly target. When you have almost
achieved your weekly target, the mark raises one
hand to encourage you.
WORKOUT
This term generally refers to exercise or training
conducted to improve health or fitness. However,
in this manual, it refers to one running training
session that you perform.
■
■
7
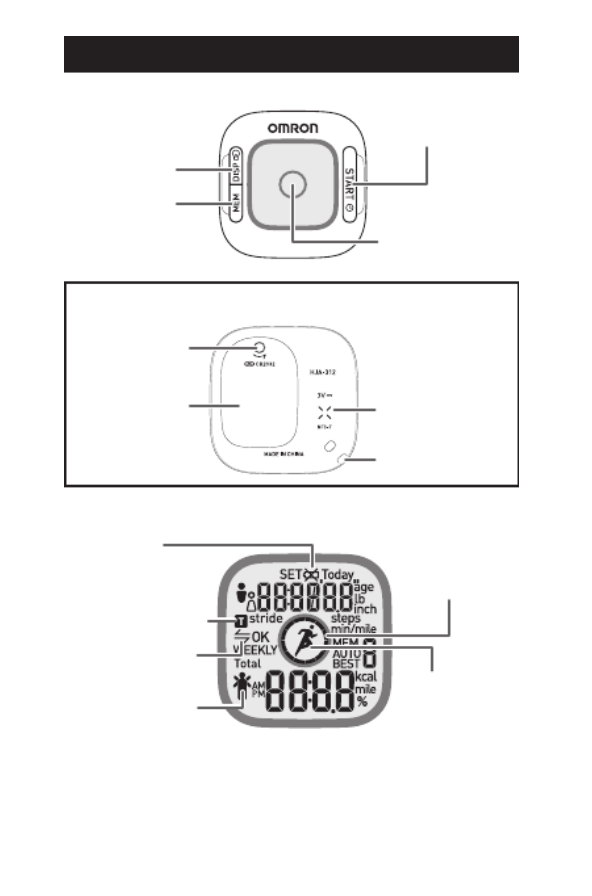
KNOW YOUR UNIT
MAIN UNIT
START button
Display
MEM button
DISP button
(Back of the main unit)
Battery cover
Battery cover
screw
Strap eyelet
Communication
area mark
DISPLAY
Battery low
indicator Achievement
level indicator
Workout mark
Transfer indicator
Communication
indicator
Congratulations
mark

8
KNOW YOUR UNIT
Assembling the strap
1. Attach the strap to the unit.
2. Attach the clip to the strap.
3. Open the clip, hook the clip on your clothes, and
close it.
1 2 3
Holder
Attach/remove the holder
as illustrated below.
NOTE: Press the clip open to remove the unit.
Depending on the material, the clip may
cause damage to your clothes if it is
attached or removed roughly.
9
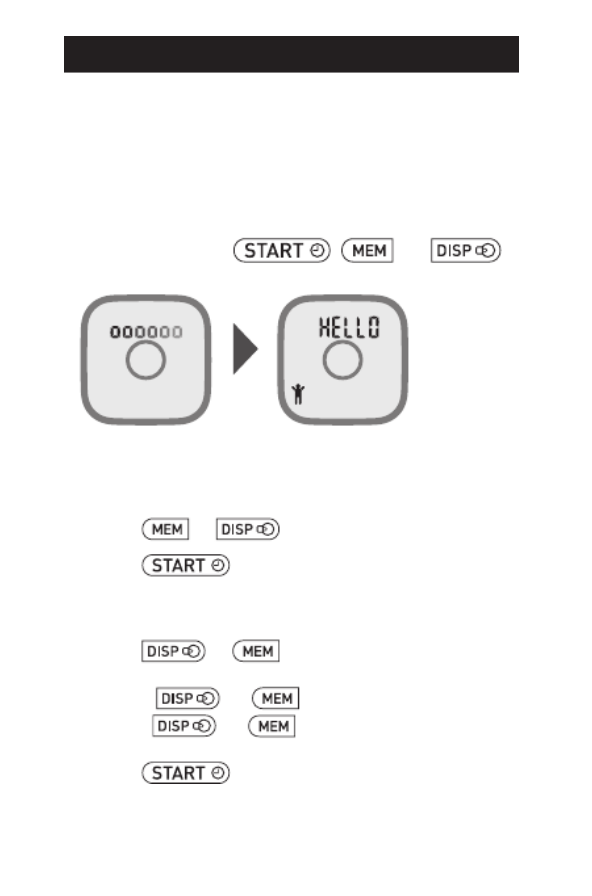
SETTINGS
SETTING THE PERSONAL DATA, WEEKLY
CALORIES BURNED GOAL TRACKER,
DATE AND TIME
When you use the unit for the first time, follow
the steps below.
1. Hold down the , , or
button until “HELLO” is displayed.
The gender fl ashes on the display.
2. Setting the gender.
(1) Press
or
to select the gender.
(2) Press to confirm the setting.
3. Setting the age.
(1) Press
or
to select the desired value
for a setting.
Press (or ) to advance (go back).
Hold (or ) down to advance (go
back) rapidly.
(2) Press to confirm the setting.
•
•

10
SETTINGS
4. To set the weight, repeat steps (1) to (2) in
step 3 above.
5. To set the height, repeat steps (1) to (2) in
step 3 above.
6. To set the WALK stride length, repeat steps
(1) to (2) in step 3 above.
7. To set the JOG stride length, repeat steps (1)
to (2) in step 3 above.
Stride length
The value blinking on the display is a reference
value calculated according to the height you set.
Adjust your stride length by considering your
walking style and physical size.
To calculate your stride length more accurately, walk
or run about 10 steps and then measure the length of
one step (from toe to toe or from heel to heel).
The unit automatically differentiates between
walking and running and separately measures the
distances based on the respective stride lengths and
step counts.
For this reason, you need to set your walking stride
length for the WALK stride length, and running
stride length for the JOG stride length.
■
y
y
y

11
SETTINGS
8. To set the Weekly Calories Burned Goal
Tracker, repeat steps (1) to (2) in step 3
above.
To turn on the Weekly Calories Burned
Goal Tracker
Set how much weight you want to lose (target
weight reduction amount) in the next four weeks.
The upper limit is [Weight x 0.04] lb.
If you want to keep your current weight, set 0.0 lb.
IMPORTANT:
Reset the target weight reduction amount and
your current weight every four weeks. Reckless
weight reduction may do harm to your health. We
recommend that you keep your weight if your BMI*
is 18.5 or less. Although users who are 17 years old
or younger can set a target weight reduction amount,
we do not recommend these users engage in weight
reduction activities.
*
BMI = weight (lb) / height (inches) / height (inches) × 703
To turn off the Weekly Calories Burned
Goal Tracker
Select “OFF”.
9. To set the year, repeat steps
(1) to (2) in step 3 above.
10. To set the month, repeat steps (1) to (2) in
step 3 above.
y
y

12
SETTINGS
11. To set the day, repeat steps (1) to (2) in step 3
above.
12. To set the hour, repeat steps (1) to (2) in
step 3 above.
13. To set the minute, repeat steps (1) to (2) in
step 3 above.
The previous workout time a nd dist a nce
display appears.
This completes the setup.
NOTES:
If no setting is made for more than 15 minutes, the
default settings will be restored.
If you hold down while making a setting, the
display returns to the gender setting.
Be sure to correctly set the items. Incorrect settings may
lead to incorrect measurement results.
For setting range details refer to “SPECIFICATIONS” on
page 36.
•
•
•
*

13
SETTINGS
CHANGING THE CURRENT SETTINGS
Hold down and until the gender
setting is displayed.
Use the procedures described in “Setting the
Personal Data, Weekly Calories Burned Goal
Tracker, Date and Time” from step 2 on page 9 to
change the settings.
NOTE:
If no setting is made for more than fi ve minutes, your
changes are not applied and the display returns to the
display of the previous workout.
For setting range details refer to “SPECIFICATIONS” on
page 36.
•
*
Operating Instructions

14
ATTACHING THE UNIT
The unit accurately measures activity in your
pocket, or anywhere you want to put it. The unit
maybe placed in the upper front pocket of your
clothing, in the front pocket of your pants, or
attached to your belt or pants.
The unit may not measure your activity
correctly in the following conditions:
1. The unit moves irregularly.
When the unit is placed in a bag and a bag
moves irregularly.
When the unit swings from your belt, the top
of your pants or a bag.
2. Walking at an inconsistent pace.
When you shuffl e or wear sandals.
Starting and stopping or other forms of
inconsistent walking.
3. Up and down movement.
Standing up and/or sitting down movement.
Playing sports other than walking and
running.
Ascending or descending movement on stairs or
on a steep slope.
When you are engaged in an upper-body
workout.
4. Vibrations from a moving vehicle.
Such as riding a bicycle, automobile, train or bus.
5. Walking extremely slowly.
6. Running or walking with the unit held in
your hand.
y
y
y
y
y
y
y
y
y

15
USING THE UNIT
WORKOUT MODE
Use if you want to separately track activity
during a workout.
Start Workout mode
NOTE: During a workout, you cannot view any
data other than workout time, distance,
pace, and calories.
1. Press and hold .
Hold down the button until all segments of the
achievement level indicator light up.
The unit starts to record workout time,
distance, pace, and calories.
NOTE: The achievement level indicator
rotates during a workout. Start your
workout after checking that the
indicator is lit up.

16
USING THE UNIT
Screen displayed during a workout
Workout mark
Lights up while a workout record is
displayed.
Achievement level indicator
Changes during a workout.
Workout time
Displays the amount of time since the
current workout started.
Workout distance
Displays the distance you have
achieved since the current workout
started.
Workout pace
Displays the pace measured from the
start of the workout to the present
time.
Workout calories
Displays the number of activity calories
burned since the current workout
started.
■
17
USING THE UNIT
Stop Workout mode
1. Press and hold .
Hold down the button until all segments of the
achievement level indicator turn off.
IMPORTANT:
The pace that is displayed is the average measured
from the beginning to the end.
For accurate measurement, immediately hold down
when ending the workout.
NOTES:
A workout automatically ends 24 hours after
it was started.
If you have walked or run for more than 30
minutes during a workout, the “Good Job”
message scrolls on the display after you
fi nish workout mode.
•
•

18
USING THE UNIT
Automatic workout system
This activity monitor has a function that
automatically starts recording even if you do not
start a workout.
If you have been running for over
five minutes, this function starts
recording on a retroactive basis.
“AUTO” lights up when the
Automatic workout system is
active.
It stops recording if you do not walk or run for
over one minute.
NOTE: This function may automatically start
recording when you walk quickly even if
you do not consider it a workout.
■

19
REVIEWING YOUR DATA
Press to view the data.
Previous workout
time/distance display
(Refer to page 20)
Previous workout
pace/calories display
(Refer to page 21)
Weekly calories burned goal
tracker display
(Refer to page 22)
* Displayed only when the weekly
calories burned goal tracker
function is turned on.
Total calories burned display
(Refer to page 21)
Steps/distance display
(Refer to page 22)

20
REVIEWING YOUR DATA
ABOUT THE DISPLAYS
Battery saving mode (sleep mode)
In order to save energy, the display will be turned
off if no buttons are pressed for more than five
minutes.
The display does not turn off during a workout.
When you touch any button, the display restarts.
The main unit continues measurement even when
the display is turned off.
Backlight
When you hold down , the backlight
lights up for five seconds. The backlight keeps
during holding down and goes off
five seconds later, after stopping holding down
. The backlight does not turn on when the
battery low indicator appears continuously on the
display.
Date/time display
When you press , the date and time
are displayed for approximately two seconds.
Previous workout time/distance display
The time and distance of the previous workout
are displayed.
Previous workout time
Previous workout distance
■
■
■

21
REVIEWING YOUR DATA
Previous workout pace/calories display
The pace and calories burned in the previous
workout are displayed.
Previous workout pace
Previous workout
calories burned
Total calories burned display
The amount of total calories burned from
midnight to the present time (resting metabolism
+ activity calories) is displayed. The amount
includes the number of calories burned through
workouts.
NOTE: Even if the unit is not worn, it
automatically calculates the number of
calories burned during your rest period
in order to display the total amount.
Total calories burned

22
REVIEWING YOUR DATA
Steps/distance display
The number of steps and distance, including those
you traveled during the workout, are displayed.
Distance
Steps
Counting the steps
In order to avoid counting steps that are not part
of a walk, the unit does not display the step count
for the first 4 seconds of walking. If you continue
walking for more than 4 seconds, it displays
the step count for the first 4 seconds and then
continues to count.
Weekly calories burned goal tracker
display
The display shows a guideline for the amount of
activity time per day required to achieve your
weekly target and a percentage indicating the
level of achievement.
For more information, see “Weekly Calories
Burned Goal Tracker” on page 5.
To turn this function on or off, see “Changing the
Current Settings” on page 13.
■

23
VIEWING YOUR DATA
The measurement results for one day are
automatically stored in memory and reset to 0 at
midnight (12:00 AM) each day.
1. Press .
Each time you press , the past
measurement results are displayed.
When you press , the date and time
are displayed and the screen returns to the
present display.
Memory function
Measurement results stored in memory are
displayed in three groups: “Workout”, “Weekly
Calories Burned Goal Tracker”, and “Total
calories burned, step counts and distances”. To
switch the memory display from one group to
another, follow the steps below.
1. Press or to return to the
present display.
2. Press to select the group you want
to check, then press to display the past
measurement results.
[Workout]
With each press of , you can view the
BEST record and the measurement values for
up to 9 previous times.
* The unit stores up to 14 workout times.
•
•
•

24
VIEWING YOUR DATA
You can also press to select the type of
workout display (time/distance or pace/calories)
while viewing the previous results.
BEST record
Besides the records for the recent
nine workouts stored in memory,
the data on the workout in which
you have achieved the longest ever
distance is displayed as the “BEST”
record.
[Weekly Calories Burned Goal Tracker]
With each press of , you can view the
measurement values for up to 8 previous weeks.
•
■
•

25
VIEWING YOUR DATA
[Total calories burned, step counts and distances]
With each press of , you can view the
measurement values for up to 7 previous days.
*
The unit stores up to 14 days of data on the unit.
You can also press to select the type of
display (Total calories burned or step counts/
distances) while viewing the previous results.
NOTE: If no buttons are pressed for more than
one minute, the display returns to the
present display.
Transfer Indicator
When the blinks / lights up, please transfer the
measurement record immediately.
Blinks: indicates more than 10 days of
measurement results or more than 10 workout
results.
Lights up: indicates 14 days of measurement
results or 14 workout results. The oldest
measurement results will be deleted orderly.
Please transfer the measurement results immediately.
NOTE: The transfer indicator does not blink
or light up unless the communication
process is conducted at least once.
To transfer the data, refer to
“OPTIONAL ACCESSORY AND
TRANSFERRING DATA” on page 30.
•
•

26
BATTERY LIFE AND REPLACEMENT
When “ ” blinks, replace the battery with a
new one (CR2032).
Blinking Battery power is low.
Appears
continuously
Battery is exhausted.
The unit stops measurement.
Data cannot be transferred.
The backlight does not light up.
NOTES:
Do not replace the battery around 12 midnight.
Doing so may cause erroneous measurement
results.
The measurement results are automatically
stored in memory at the top of the hour (e.g. at
12:00 AM, 1:00 AM, 2:00 AM, ... 11:00 PM).
The measurement results from the top of the
hour until the time the battery is replaced will be
deleted for that day.
Set the date and time after inserting a new
battery (refer to “Setting the Personal Data,
Weekly Calories Burned Goal Tracker, Date
and Time” on page 9).
The measurement records stored in memory
and the settings you have made are not deleted.
The battery that comes with the unit is for
initial use. The battery may run out within 5
months.
•
•
•
•
•

27
BATTERY LIFE AND REPLACEMENT
REPLACING THE BATTERY
1. Remove the battery cover.
Loosen the screw using
the supplied screwdriver
or a small screwdriver, and
remove the battery cover.
2. Remove the battery.
Remove the battery using a
thin, sturdy object (such as a
toothpick) that will not break
easily.
NOTE: Do not use metal
tweezers or a
screwdriver.
3. Insert a new battery.
Insert the battery
from the side
indicated by the
arrows in the diagram
with the positive (+)
side face up.
4. Close the battery cover.
Replace the battery
cover by sliding the
catch in fi rst, then
tighten the screw.

28
DELETING ALL RESULTS AND SETTINGS
To clear all of the set values and past
measurement results, do the following:
1. Press and hold and .
Hold down the buttons until the gender setting
is displayed.
2. Press and hold and again.
Hold down the buttons until
“Clr” is displayed. Then, the
gender setting is displayed.
Now, you have cleared all set
values and past measurement
results.
To continue using the unit,
reset the personal data,
weekly calories burned goal
tracker, date and time (refer to
“SETTINGS” on page 9).
NOTE: If you leave the date setting screen
for more than 15 minutes, the display
disappears and the default settings will
be restored.
Care and Maintenance

29
MAINTENANCE AND STORAGE
To keep the unit in the best condition and protect the
unit from damage follow the directions listed below:
CAUTION
Do not disassemble or modify the unit.
Changes or modifications not approved by Omron
Healthcare will void the user warranty.
Clean the unit with a soft dry cloth.
Do not use any abrasive or volatile
cleaners.
Do not immerse the unit in water.
This unit is drip-proof. It is resistant
to light rain. However, do not wash
it or touch it with wet hands. Be careful that water
does not get into the unit.
Store the unit in a safe and dry location.
Avoid the unit being exposed to direct sunlight, high
temperatures, high humidity, water and/or dust.
Do not subject the unit to strong shock, drop, or
step on it.
Replace a worn battery with a new one
immediately.
Remove the battery if the unit will not be used for
three months or longer.
Use of the unit must be consistent with the
instructions provided in this manual.

30
OPTIONAL ACCESSORY AND TRANSFERRING DATA
● OMRON NFC Communication Tray
To track your progress and reach your goals
this device connects to an online dashboard at
omronfitness.com.
The data can be transferred to a computer
simply by using the OMRON NFC
Communication Tray.
To purchase this optional accessory needed to
download the data to your computer, please
visit Omronfitness.com and refer to the
product information tab. The OMRON NFC
Communication Tray is available for sale at this
site.

31
TROUBLESHOOTING
Phenomenon
Cause Rectifi cation
blinks. Battery power is low. Replace the battery
with a new 3V lithium
battery type CR2032
(refer to “Replacing the
Battery” on page 27.)
lights
up. Battery is exhausted.
Nothing is
displayed.
Battery saving mode
(sleep mode) is
active.
Press either
, or .
Battery polarity
is incorrect.
Insert the battery in the
correct polarity.
(Refer to page 27)
Battery is exhausted.
Replace the battery
with a new 3V lithium
battery type CR2032
(refer to “Replacing the
Battery” on page 27.)
Displayed
values are
incorrect.
The unit is attached
incorrectly.
See “ATTACHING
THE UNIT”.
(Refer to page 14)
Irregular movement.
Inconsistent pace.
Up and down
movement.
Refer to “The unit
may not measure your
activity correctly in the
following conditions:”
in “ATTACHING THE
UNIT” on page 14.

32
TROUBLESHOOTING
Phenomenon
Cause Rectifi cation
Displayed
values are
incorrect.
Settings are
incorrect.
Correct the current
settings (refer to
“Changing the Current
Settings” on page 13).
Error is
displayed.
A malfunction has
occurred.
Remove the battery,
and insert it again.
(Refer to page 27)
blinks
or lights
up.
Measurement results
were not transferred.
Transfer data.
(Refer to “ Transfer
Indicator” on page 25.)
Data
cannot be
transferred.
There is a problem
with the online
application.
Please visit
Omronfi tness.com for
information on ensuring
the application has been
downloaded correctly
(refer to “OPTIONAL
ACCESSORY AND
TRANSFERRING
DATA” on page 30).
The activity monitor
is not placed
correctly on the NFC
Communication Tray.
Place the activity
monitor on the NFC
Communication Tray
properly.
The communication
area mark of activity
monitor does not
match the mark of
NFC communication
tray, or the distance
is too long.
Match the mark of
activity monitor with
the mark of NFC
communication tray or
shorten the distance to
enable communication.

33
TROUBLESHOOTING
Phenomenon
Cause Rectifi cation
Data
cannot be
transferred.
Workout mode is on.
Please stop Workout
mode.
(Refer to page 17)
Data has been
transferred near an
object that emits
intense magnetic
force or radio waves.
Please try transferring
the data in a location
where radio waves are
not present.
Error is
displayed
during data
transfer.
Communication
indicator
Communication
error.
Check the display on
your PC and follow the
instruction provided.
NOTE:
If the error still occurs
after trying the above,
contact Omron’s
Customer Support.
The display is abnormal or
buttons do not operate correctly.
Remove the battery,
and insert it again.
(Refer to page 27)
NOTE: If a malfunction has occurred and you
need to repair your unit, all settings and
measurement results are deleted. We
recommend you record your measurement
results prior to repairing your unit.

34
FCC STATEMENT
NOTE:
POTENTIAL FOR RADIO/TELEVISION INTERFERENCE (for
U.S.A. only)
This product has been tested and found to comply with the limits for a
Class B digital device, pursuant to part 15 of the FCC rules.
These limits are designed to provide reasonable protection against
harmful interference in a residential installation. The product
generates, uses, and can radiate radio frequency energy and, if not
installed and used in accordance with the instructions, may cause
harmful interference to radio communications.
However, there is no guarantee that interference will not occur in a
particular installation. If the product does cause harmful interference
to radio or television reception, which can be determined by turning
the product on and off, the user is encouraged to try to correct the
interference by one or more of the following measures:
• Reorient or relocate the receiving antenna.
• Increase the separation between the product and the receiver.
• Connect the product into an outlet on a circuit different from that
to which the receiver is connected.
• Consult the dealer or an experienced radio/TV technician for
help.
POTENTIAL FOR RADIO/TELEVISION INTERFERENCE
(for Canada only)
This digital apparatus does not exceed the Class B limits for radio
noise emissions from digital apparatus as set out in the interference-
causing equipment standard entitled “Digital Apparatus”, ICES-003
of the Canadian Department of Communications.
Cet appareil numérique respecte les limites de bruits radioeléctriques
applicables aux appareils numériques de Clase B prescrites dans la
norme sur le materiel brouilleur:
“Appareils Numériques”, ICES-003 édictée par le minister des
communications.
Changes or modifications not expressly approved by the party
responsible for compliance could void the user’s authority to operate
the equipment.
Product specificaties
| Merk: | Omron |
| Categorie: | Sporthorloge |
| Model: | HJA-312 |
| Kleur van het product: | Zwart |
| Gewicht: | - g |
| Beeldscherm: | LCD |
| Memory-functie: | Ja |
| Pedometer type: | Elektronisch |
Heb je hulp nodig?
Als je hulp nodig hebt met Omron HJA-312 stel dan hieronder een vraag en andere gebruikers zullen je antwoorden
Handleiding Sporthorloge Omron

12 Oktober 2022
Handleiding Sporthorloge
- Sporthorloge Xiaomi
- Sporthorloge Casio
- Sporthorloge Epson
- Sporthorloge Huawei
- Sporthorloge Asus
- Sporthorloge Garmin
- Sporthorloge Motorola
- Sporthorloge Medion
- Sporthorloge ACME
- Sporthorloge Ade
- Sporthorloge Adidas
- Sporthorloge Amazfit
- Sporthorloge Apple
- Sporthorloge Asics
- Sporthorloge Beurer
- Sporthorloge Brigmton
- Sporthorloge Bryton
- Sporthorloge Bushnell
- Sporthorloge Denver
- Sporthorloge Diesel
- Sporthorloge Echowell
- Sporthorloge Ematic
- Sporthorloge Fen
- Sporthorloge Fitbit
- Sporthorloge Fossil
- Sporthorloge Geonaute
- Sporthorloge Guardo
- Sporthorloge Hama
- Sporthorloge Honor
- Sporthorloge Krontaler
- Sporthorloge Lamax
- Sporthorloge Livoo
- Sporthorloge Medisana
- Sporthorloge Mio
- Sporthorloge Misfit
- Sporthorloge Mondaine
- Sporthorloge Nedis
- Sporthorloge NGM
- Sporthorloge Polar
- Sporthorloge Pyle
- Sporthorloge Runtastic
- Sporthorloge Sanitas
- Sporthorloge Sigma
- Sporthorloge Silva
- Sporthorloge Silvercrest
- Sporthorloge Slazenger
- Sporthorloge Soehnle
- Sporthorloge Sportline
- Sporthorloge Sunstech
- Sporthorloge Suunto
- Sporthorloge TFA
- Sporthorloge Ticwatch
- Sporthorloge Timex
- Sporthorloge TomTom
- Sporthorloge Ventus
- Sporthorloge Withings
- Sporthorloge Oppo
- Sporthorloge Oregon Scientific
- Sporthorloge Clas Ohlson
- Sporthorloge Crivit
- Sporthorloge Naxa
- Sporthorloge Proscan
- Sporthorloge Umidigi
- Sporthorloge Lezyne
- Sporthorloge Cresta
- Sporthorloge Kubo
- Sporthorloge Prologue
- Sporthorloge Trevi
- Sporthorloge Cateye
- Sporthorloge Scosche
- Sporthorloge Crane
- Sporthorloge IZZO Golf
- Sporthorloge Ronstan
- Sporthorloge Soleus
- Sporthorloge Billow
- Sporthorloge SPC
- Sporthorloge EVOLVEO
- Sporthorloge Prixton
- Sporthorloge Cressi
- Sporthorloge Cubot
- Sporthorloge CicloSport
- Sporthorloge Wahoo Fitness
- Sporthorloge Celly
- Sporthorloge GolfBuddy
- Sporthorloge Coros
- Sporthorloge Kikos
- Sporthorloge Swami
- Sporthorloge Goodis
- Sporthorloge Ciclo
- Sporthorloge Bitween
- Sporthorloge Cmee
- Sporthorloge Abyx
Nieuwste handleidingen voor Sporthorloge

10 Maart 2025
10 Maart 2025
10 Maart 2025
10 Maart 2025
20 Februari 2025
20 Februari 2025
14 December 2024
7 December 2024
6 December 2024

1 December 2024