Oki ML5591 Handleiding
Lees hieronder de 📖 handleiding in het Nederlandse voor Oki ML5591 (96 pagina's) in de categorie Printer. Deze handleiding was nuttig voor 21 personen en werd door 2 gebruikers gemiddeld met 4.5 sterren beoordeeld
Pagina 1/96

ML5590/91
user s gui e’d

PREFACE > 2
PREFACE
Every effort has been made to ensure that the information in this
document is complete, accurate, and up-to-date. The manufacturer
assumes no responsibility for the results of errors beyond its control.
The manufacturer also cannot guarantee that changes in software and
equipment made by other manufacturers and referred to in this guide
will not affect the applicability of the information in it. Mention of
software products manufactured by other companies does not
necessarily constitute endorsement by the manufacturer.
While all reasonable efforts have been made to make this document
as accurate and helpful as possible, we make no warranty of any kind,
expressed or implied, as to the accuracy or completeness of the
information contained herein.
The most up-to-date drivers and manuals are available from the Oki
Europe website:
http://www.okieurope.com
Copyright © 2003. All rights reserved.
Oki and Microline are registered trademarks of Oki Electric Industry
Company, Ltd.
Hewlett-Packard, HP, and LaserJet are registered trademarks of
Hewlett-Packard Company.
Microsoft, MS-DOS and Windows are registered trademarks of
Microsoft Corporation.
Other product names and brand names are registered trademarks or
trademarks of their proprietors.
As an Energy Star Program Participant, the manufacturer
has determined that this product meets the Energy Star
guidelines for energy efficiency.
This product complies with the requirements of the
Council Directives 89/336/EEC (EMC) and 73/23/EEC
(LVD) as amended where applicable on the
approximation of the laws of the member states relating
to electromagnetic compatibility and low voltage.

CONTENTS > 3
CONTENTS
Preface . . . . . . . . . . . . . . . . . . . . . . . . . . . . . . . . . . . . . . . . . . . . . 2
Introduction . . . . . . . . . . . . . . . . . . . . . . . . . . . . . . . . . . . . . . . . . 6
Features / Tips . . . . . . . . . . . . . . . . . . . . . . . . . . . . . . . . . . . . 6
Printer Drivers. . . . . . . . . . . . . . . . . . . . . . . . . . . . . . . . . . . . . . . . 9
Emulations . . . . . . . . . . . . . . . . . . . . . . . . . . . . . . . . . . . . . . . 9
Printer Drivers. . . . . . . . . . . . . . . . . . . . . . . . . . . . . . . . . . . . . 9
Installing the driver. . . . . . . . . . . . . . . . . . . . . . . . . . . . . . 9
Using a Compatible Driver . . . . . . . . . . . . . . . . . . . . . . . 10
Interfaces - General. . . . . . . . . . . . . . . . . . . . . . . . . . . . . 10
Connecting the USB Cable . . . . . . . . . . . . . . . . . . . . . . . 11
Using your printer . . . . . . . . . . . . . . . . . . . . . . . . . . . . . . . . . . . 13
Components: Rear Feed (Continuous Forms) . . . . . . . . . . . 13
Components: Top Feed (Single Sheets) . . . . . . . . . . . . . . . 13
Top of Form (TOF) . . . . . . . . . . . . . . . . . . . . . . . . . . . . . . . . . 14
Forms Tear-Off . . . . . . . . . . . . . . . . . . . . . . . . . . . . . . . . . . . 15
Setting Top of Form (TOF) . . . . . . . . . . . . . . . . . . . . . . . . . . . 16
Temporarily Changing the Top of Form . . . . . . . . . . . . . . . . 18
Resetting Top of Form to the Factory Default . . . . . . . . . . . 18
Forms Tear-Off Feature. . . . . . . . . . . . . . . . . . . . . . . . . . . . . 18
Potential issues with software packages . . . . . . . . . . . 19
Changing the Forms Tear-Off Setting . . . . . . . . . . . . . . . . . 20
Manual Forms Tear-Off . . . . . . . . . . . . . . . . . . . . . . . . . . . . . 20
Paper Park. . . . . . . . . . . . . . . . . . . . . . . . . . . . . . . . . . . . . . . 21
Changing Paper Paths . . . . . . . . . . . . . . . . . . . . . . . . . . . . . 21
Continuous Forms to Single Sheets. . . . . . . . . . . . . . . . 21
Single Sheets to Continuous Forms. . . . . . . . . . . . . . . . 22
Printhead Gap. . . . . . . . . . . . . . . . . . . . . . . . . . . . . . . . . . . . 24
Print Quality . . . . . . . . . . . . . . . . . . . . . . . . . . . . . . . . . . . . . 25
Character Pitch . . . . . . . . . . . . . . . . . . . . . . . . . . . . . . . . . . . 26
Printer Reset . . . . . . . . . . . . . . . . . . . . . . . . . . . . . . . . . . . . . 27
Emulations. . . . . . . . . . . . . . . . . . . . . . . . . . . . . . . . . . . . 27
Menu Mode. . . . . . . . . . . . . . . . . . . . . . . . . . . . . . . . . . . . . . . . . 29
Menu Mode Keys . . . . . . . . . . . . . . . . . . . . . . . . . . . . . . . . . 29
Entering and Exiting Menu Mode . . . . . . . . . . . . . . . . . . 30
Resetting the Menu to the Factory Defaults . . . . . . . . . 30
Printing the Menu Settings. . . . . . . . . . . . . . . . . . . . . . . 30

NOTES, CAUTIONS AND WARNINGS > 5
NOTES, CAUTIONS AND WARNINGS
NOTE
A note appears in this manual like this. A note provides additional
information to supplement the main text which may help you to use and
understand the product.
CAUTION!
A caution appears in this manual like this. A caution provides
additional information which, if ignored, may result in equipment
malfunction or damage.
WARNING!
A warning appears in this manual like this. A warning provides
additional information which, if ignored, may result in a risk of
personal injury.

INTRODUCTION > 6
INTRODUCTION
>Extremely reliable, durable operation: 20,000 hours Mean
Time Between Failures (MTBF) at 25% duty cycle and 35%
page density.
>Advanced paper handling, with built-in rear push tractor and
zero-tear forms capability.
>Very high print speeds:
>High Speed Draft (HSD) Mode: 420 cps
>Utility Mode: 315 to 472.5 cps
>Letter Quality (NLQ) Mode: 105 to 210 cps
>This rugged 24-pin printer can meet the needs of harsh and
demanding environments.
FEATURES / TIPS
Forms Tear-Off
The Forms Tear-Off feature allows a printed continuous forms page to
be torn off without wasting paper or adjusting the printer.
When printing stops, Forms Tear-Off automatically moves the paper to
align the perforation with the tear bar (located under the access
cover), after a time interval which you select through the menu.
Paper remains in the tear-off position until the printer receives more
data. Then, the paper moves back down for printing.
This feature has to be enabled.
Paper Park
Your printer’s Paper Park feature allows you to print a single sheet
(cut-sheet) page without removing continuous feed paper from the
printer.
For more information, see “Paper Park” in “Using your Printer”.

INTRODUCTION > 7
Top of Form (TOF)
Top of Form (TOF) sets the print start position. The factory default is 1"
from the top.
The TOF can be changed in increments of 1/144", for a single print job
or set to a new default. The overall amount of adjustment is limited to
avoid paper jams.
The first line prints at the red line of the plastic paper shield (1) on the
printhead.
For more information, see “Top of Form (TOF)” in “Using your Printer.
Turning the Platen Knob
Always turn the printer off before turning the platen knob! If you turn
the platen knob when the printer is on, the Top of Form will misalign.
NOTE
The Forms Tear-Off and the Top of Form settings interact. For more
information, see “Top of Form (TOF) and Forms Tear-Off” in “Using your
Printer”.
1

INTRODUCTION > 8
Controlling Access to the Printer
>You can control access to the printer by changing the setting
for the Operator Panel Function in the Menu from Full
Operation (the factory default) to Limited Operation.
>When Limited Operation is selected, the PRINT QUALITY and
CHARACTER PITCH keys don’t work. This prevents these
settings from being changed from the control panel when
several people are using the printer.
For more information, see “Changing the Menu Settings” in “Using your
Printer”.

PRINTER DRIVERS > 9
PRINTER DRIVERS
EMULATIONS
The factory default emulation for your printer is Epson LQ.
If you wish to change to one of the IBM emulations, see “Using your
Printer”.
PRINTER DRIVERS
The Oki driver for your printer is provided on the CD included with the
printer. You can either load the Oki driver or select one of the
compatible drivers listed below in your software application.
1. Insert the CD into your CD-ROM drive.
2. Select your Language.
3. When the Menu Installer window appears, click the Driver
Installation button.
4. Follow the on-screen instructions.
INSTALLING THE DRIVER
1. When the [Add Printer] window appears, click [Next].
2. Select the directory on the CD where the drivers are located.
on the Oki CD they are situated in:
X:\Drivers\WinVer\CodePage
where
X:
is CD drive letter;
NOTE
If the CD does not AutoPlay, click Start → Run → Browse, then browse
to your CD-ROM drive, double-click Install.exe and click OK.
NOTE
Installation of the Oki USB driver is only required for Windows 98. You
may be called upon for your original Windows 98 CD. Please have this
available.
USING YOUR PRINTER > 17
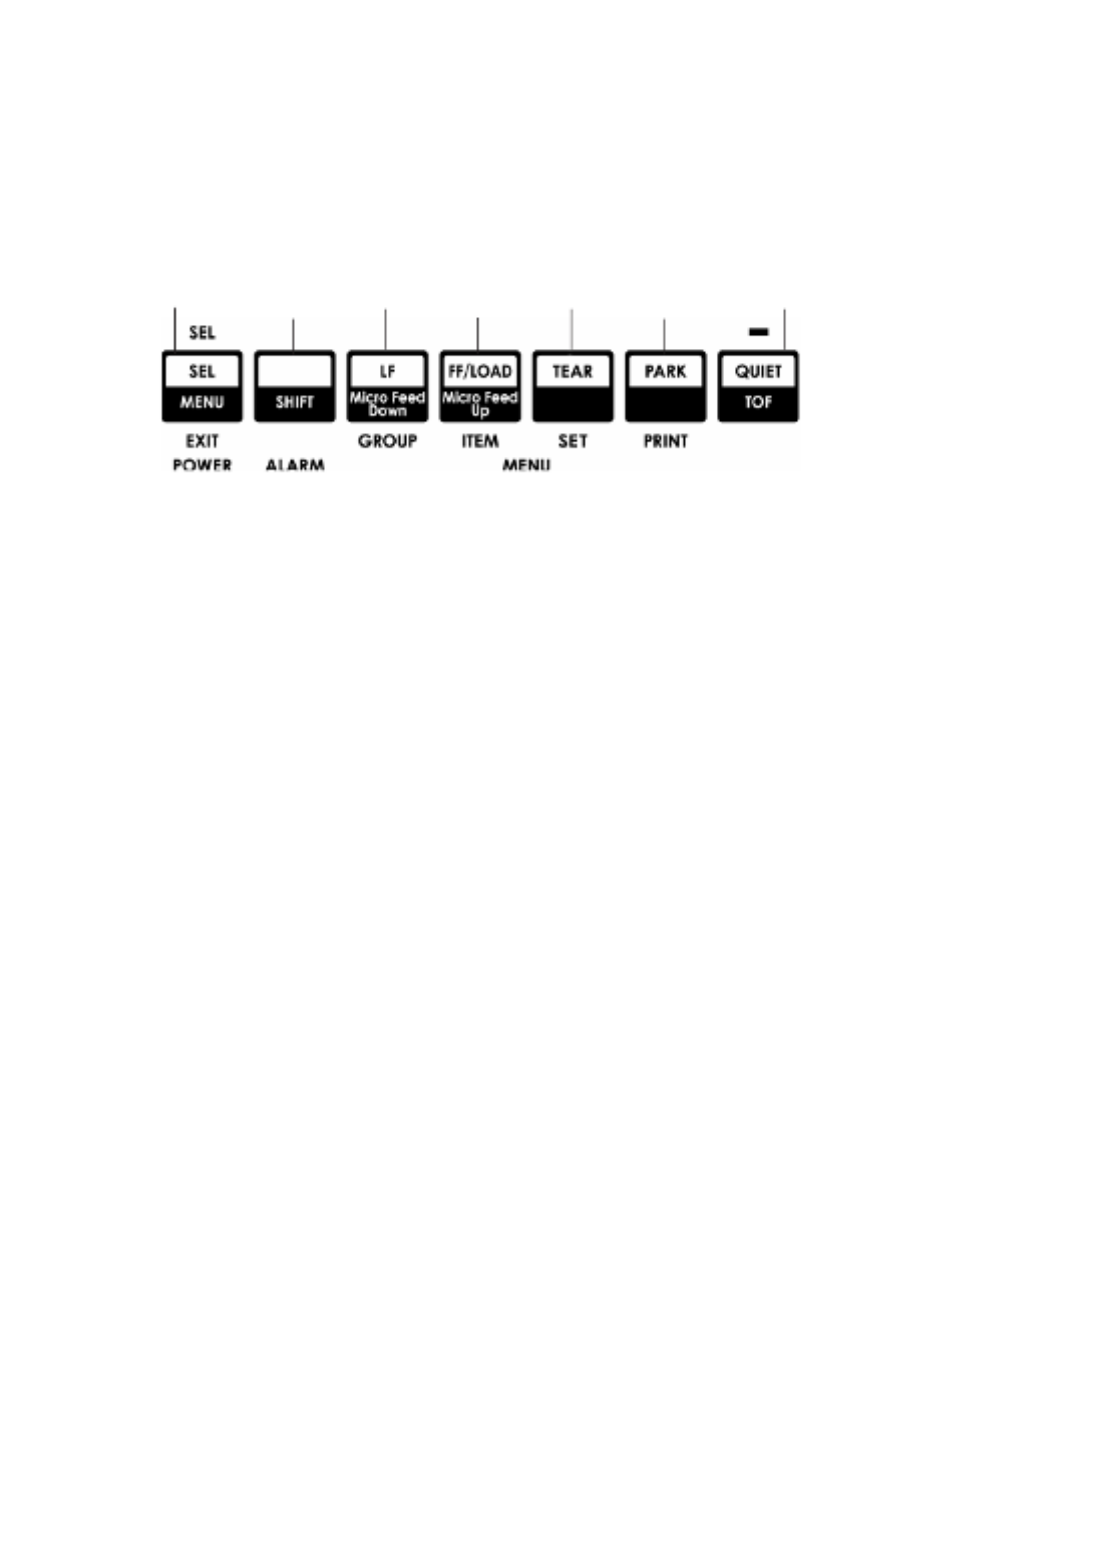
Forms Tear-Off set to ON
With paper loaded and the printer ON and selected:
1. Press PARK (6) to park the paper.
The SEL light goes off and the red alarm light comes on.
2. Press FF | LOAD (4) to load the paper.
3. Wait briefly until the paper moves up to the tear position, then
press and hold TEAR (5).
The paper moves to the current TOF and the SEL light is
illuminated.
4. If the printer is ON line, press SEL |MENU (1) to take the
printer OFF line.
The SEL light goes out.
5. Press and Hold SHIFT, then:
lPress LF | Micro Feed Down (3) to set the TOF higher (the
paper moves down).
lPress FF/LOAD | Micro Feed Up (4) to set the TOF lower
(the paper moves up).
(When you begin pressing the Micro Feed key, the printhead will move
to the right).
6. Press SEL | MENU (1) to save the setting and place the printer
back on line.
To reset the Top of Form to the factory default, see the next page.
1234675

USING YOUR PRINTER > 21
PAPER PARK
Paper park allows you to switch to single sheet printing without
removing continuous feed paper from the printer.
When you wish to print single sheets, simply press PARK (6) to retract
the continuous form paper from the paper path, then lift the sheet
guide, load the sheet and send the print job.
CHANGING PAPER PATHS
CONTINUOUS FORMS TO SINGLE SHEETS
1. Tear off any printed pages, then press PARK.
2. Raise the sheet guide (1) to the single sheet feed position.
3. Pivot the wire feed guide into the sheet guide.
CAUTION!
Never park labels.
1
Product specificaties
| Merk: | Oki |
| Categorie: | Printer |
| Model: | ML5591 |
Heb je hulp nodig?
Als je hulp nodig hebt met Oki ML5591 stel dan hieronder een vraag en andere gebruikers zullen je antwoorden
Handleiding Printer Oki

4 Mei 2023
4 Mei 2023
4 Mei 2023
4 Mei 2023
18 Juni 2023
4 Mei 2023
4 Mei 2023
4 Mei 2023
17 Juni 2023
14 Juni 2023
Handleiding Printer
- Printer HP
- Printer Sony
- Printer Samsung
- Printer Xiaomi
- Printer Panasonic
- Printer Epson
- Printer LG
- Printer Huawei
- Printer Canon
- Printer Honeywell
- Printer Olympus
- Printer Toshiba
- Printer Xerox
- Printer Agfaphoto
- Printer AVM
- Printer Brother
- Printer Builder
- Printer D-Link
- Printer Dell
- Printer Digitus
- Printer Dymo
- Printer Epson 7620
- Printer Frama
- Printer Fujifilm
- Printer Fujitsu
- Printer Ibm
- Printer Intermec
- Printer Kern
- Printer Kodak
- Printer Kogan
- Printer Konica Minolta
- Printer Kyocera
- Printer Lenovo
- Printer Lexmark
- Printer Minolta
- Printer Mitsubishi
- Printer MSI
- Printer Nec
- Printer Paxar
- Printer Polaroid
- Printer Primera
- Printer Renkforce
- Printer Ricoh
- Printer Roland
- Printer Royal Sovereign
- Printer Sagem
- Printer Seiko
- Printer Sharp
- Printer Star
- Printer Thomson
- Printer Tomy
- Printer Toshiba TEC
- Printer Triumph-Adler
- Printer Velleman
- Printer Zebra
- Printer Oce
- Printer Olivetti
- Printer Olympia
- Printer CSL
- Printer Argox
- Printer DTRONIC
- Printer Metapace
- Printer Citizen
- Printer Nilox
- Printer Approx
- Printer Ultimaker
- Printer Custom
- Printer Bixolon
- Printer Brady
- Printer GoDEX
- Printer Testo
- Printer EC Line
- Printer Sawgrass
- Printer Pantum
- Printer DNP
- Printer TSC
- Printer Equip
- Printer StarTech.com
- Printer Fichero
- Printer GG Image
- Printer Posiflex
- Printer ZKTeco
- Printer Star Micronics
- Printer Datamax-O'neil
- Printer Panduit
- Printer Dascom
- Printer HiTi
- Printer Vupoint Solutions
- Printer Elite Screens
- Printer Phoenix Contact
- Printer Videology
- Printer Colop
- Printer Raspberry Pi
- Printer Evolis
- Printer Unitech
- Printer Middle Atlantic
- Printer IDP
- Printer Fargo
- Printer Microboards
- Printer Mutoh
- Printer Tally Dascom
- Printer Nisca
Nieuwste handleidingen voor Printer

9 April 2025

8 April 2025
2 April 2025
2 April 2025
1 April 2025

1 April 2025

29 Maart 2025
29 Maart 2025

11 Maart 2025