Oki C821dn Handleiding
Lees hieronder de 📖 handleiding in het Nederlandse voor Oki C821dn (104 pagina's) in de categorie Printer. Deze handleiding was nuttig voor 24 personen en werd door 2 gebruikers gemiddeld met 4.5 sterren beoordeeld
Pagina 1/104

C800 Series
User’s Guide
C801
C810
C821
C830
Preface > 2
P
REFACE
Every effort has been made to ensure that the information in this document is complete,
accurate, and up-to-date. The manufacturer assumes no responsibility for the results of
errors beyond its control. The manufacturer also cannot guarantee that changes in software
and equipment made by other manufacturers and referred to in this guide will not affect
the applicability of the information in it. Mention of software products manufactured by
other companies does not necessarily constitute endorsement by the manufacturer.
While all reasonable efforts have been made to make this document as accurate and helpful
as possible, we make no warranty of any kind, expressed or implied, as to the accuracy or
completeness of the information contained herein.
The most up-to-date drivers and manuals are available from:
http://www.okiprintingsolutions.com
07094301 Iss. 2; Copyright © 2010. All rights reserved.
Oki is a registered trademark of Oki Electric Industry Company, Ltd.
Oki Printing Solutions is a trademark of Oki Data Corporation.
Energy Star is a trademark of the United States Environmental Protection Agency.
Microsoft, MS-DOS and Windows are registered trademarks of Microsoft Corporation.
Apple, Macintosh, Mac and Mac OS are trademarks of Apple Inc.
Other product names and brand names are registered trademarks or trademarks of their
proprietors.
As an Energy Star Program Participant, the manufacturer has determined that
this product meets the Energy Star guidelines for energy efficiency.
This product complies with the requirements of the Council Directives 2004/
108/EC (EMC), 2006/95/EC (LVD), 1999/5/EC (R&TTE) and 2009/125/EC
(EuP) as amended where applicable, on the approximation of the laws of the
member states relating to electromagnetic compatibility, low voltage, radio &
telecommunications terminal equipment and energy using products.
The following cables were used to evaluate this product to achieve EMC directive
2004/108/EC compliance and configurations other than this may affect that compliance.
Please note that Microsoft Windows XP was used to produce all screenshots in this manual.
These screenshots may vary if you are using any other operating system, but the principle
is the same.
CABLE TYPE LENGTH
(METRE)
CORE SHIELD
Power 2.0 ✘ ✘
USB 5.0 ✘✔
LAN 15.0 ✘ ✘
Parallel 1.8 ✘✔

Emergency first aid > 3
E
MERGENCY
FIRST
AID
Take care with toner powder:
If swallowed, give small amounts of cold water and seek medical
attention. DO NOT attempt to induce vomiting.
If inhaled, move the person to an open area for fresh air. Seek medical
attention.
If it gets into the eyes, flush with large amounts of water for at least
15 minutes keeping eyelids open. Seek medical attention.
Spillages should be treated with cold water and soap to help reduce
risk of staining skin or clothing.
M
ANUFACTURER
Oki Data Corporation,
4-11-22 Shibaura, Minato-ku,
Tokyo 108-8551,
Japan
I
MPORTER
TO
THE
EU/
AUTHORISED
REPRESENTATIVE
Oki Europe Limited (trading as Oki Printing Solutions)
Oki Europe Limited
Blays House
Wick Road
Egham
Surrey TW20 0HJ
United Kingdom
For all sales, support and general enquiries contact your local distributor.
E
NVIRONMENTAL
I
NFORMATION

Contents > 4
C
ONTENTS
Preface . . . . . . . . . . . . . . . . . . . . . . . . . . . . . . . . . . . . . . . . . . . . . . . . . . .2
Emergency first aid . . . . . . . . . . . . . . . . . . . . . . . . . . . . . . . . . . . . . . . . . .3
Manufacturer. . . . . . . . . . . . . . . . . . . . . . . . . . . . . . . . . . . . . . . . . . . . . . .3
Importer to the EU/authorised representative. . . . . . . . . . . . . . . . . . . . .3
Environmental Information. . . . . . . . . . . . . . . . . . . . . . . . . . . . . . . . . . . .3
Contents . . . . . . . . . . . . . . . . . . . . . . . . . . . . . . . . . . . . . . . . . . . . . . . . . .4
Notes, cautions and warnings . . . . . . . . . . . . . . . . . . . . . . . . . . . . . . . . . .7
Introduction . . . . . . . . . . . . . . . . . . . . . . . . . . . . . . . . . . . . . . . . . . . . . . .8
Printer overview . . . . . . . . . . . . . . . . . . . . . . . . . . . . . . . . . . . . . . . . . . 9
Front view . . . . . . . . . . . . . . . . . . . . . . . . . . . . . . . . . . . . . . . . . . . . 9
Rear view . . . . . . . . . . . . . . . . . . . . . . . . . . . . . . . . . . . . . . . . . . . . .10
Changing the display language . . . . . . . . . . . . . . . . . . . . . . . . . . . . . . . .10
Paper recommendations . . . . . . . . . . . . . . . . . . . . . . . . . . . . . . . . . . . . .11
Cassette trays. . . . . . . . . . . . . . . . . . . . . . . . . . . . . . . . . . . . . . . . . . . .12
Multi purpose tray . . . . . . . . . . . . . . . . . . . . . . . . . . . . . . . . . . . . . . . . .12
Face down stacker. . . . . . . . . . . . . . . . . . . . . . . . . . . . . . . . . . . . . . . . .12
Face up stacker. . . . . . . . . . . . . . . . . . . . . . . . . . . . . . . . . . . . . . . . . . .13
Duplex unit. . . . . . . . . . . . . . . . . . . . . . . . . . . . . . . . . . . . . . . . . . . . . .13
Loading paper . . . . . . . . . . . . . . . . . . . . . . . . . . . . . . . . . . . . . . . . . . . . .14
Cassette trays. . . . . . . . . . . . . . . . . . . . . . . . . . . . . . . . . . . . . . . . . . . .14
Multi purpose tray . . . . . . . . . . . . . . . . . . . . . . . . . . . . . . . . . . . . . . . . .16
Operation . . . . . . . . . . . . . . . . . . . . . . . . . . . . . . . . . . . . . . . . . . . . . . . .18
C801 and C810 . . . . . . . . . . . . . . . . . . . . . . . . . . . . . . . . . . . . . . . . . .18
C821 and C830 . . . . . . . . . . . . . . . . . . . . . . . . . . . . . . . . . . . . . . . . . .18
Printing settings in Windows (C801 and C810 only) . . . . . . . . . . . . . . .19
Printing preferences in windows applications . . . . . . . . . . . . . . . . . . . . . .19
Setup tab . . . . . . . . . . . . . . . . . . . . . . . . . . . . . . . . . . . . . . . . . . . . .19
Job options tab . . . . . . . . . . . . . . . . . . . . . . . . . . . . . . . . . . . . . . . . .20
Colour tab . . . . . . . . . . . . . . . . . . . . . . . . . . . . . . . . . . . . . . . . . . . .21
Setting from windows control panel . . . . . . . . . . . . . . . . . . . . . . . . . . . . .22
General tab . . . . . . . . . . . . . . . . . . . . . . . . . . . . . . . . . . . . . . . . . . .22
Advanced tab . . . . . . . . . . . . . . . . . . . . . . . . . . . . . . . . . . . . . . . . . .22
Printing settings in Mac OS X (C801 and C810 only) . . . . . . . . . . . . . . .24
Setting printing options . . . . . . . . . . . . . . . . . . . . . . . . . . . . . . . . . . . . .24
Setting printing options - saving driver settings . . . . . . . . . . . . . . . . . . . .25
Changing the default printer and paper size . . . . . . . . . . . . . . . . . . . . . . .25
Page setup options . . . . . . . . . . . . . . . . . . . . . . . . . . . . . . . . . . . . . . . .25
Print options . . . . . . . . . . . . . . . . . . . . . . . . . . . . . . . . . . . . . . . . . . . . .26
Copies & pages . . . . . . . . . . . . . . . . . . . . . . . . . . . . . . . . . . . . . . . . .26
Layout . . . . . . . . . . . . . . . . . . . . . . . . . . . . . . . . . . . . . . . . . . . . . . .26
Scheduler. . . . . . . . . . . . . . . . . . . . . . . . . . . . . . . . . . . . . . . . . . . . .27
Paper handling . . . . . . . . . . . . . . . . . . . . . . . . . . . . . . . . . . . . . . . . .27
ColorSync. . . . . . . . . . . . . . . . . . . . . . . . . . . . . . . . . . . . . . . . . . . . .28
Cover page . . . . . . . . . . . . . . . . . . . . . . . . . . . . . . . . . . . . . . . . . . . .28
Duplex . . . . . . . . . . . . . . . . . . . . . . . . . . . . . . . . . . . . . . . . . . . . . . .28
Paper source. . . . . . . . . . . . . . . . . . . . . . . . . . . . . . . . . . . . . . . . . . .29
Print quality . . . . . . . . . . . . . . . . . . . . . . . . . . . . . . . . . . . . . . . . . . .29
Colour . . . . . . . . . . . . . . . . . . . . . . . . . . . . . . . . . . . . . . . . . . . . . . .30
Printer setup options . . . . . . . . . . . . . . . . . . . . . . . . . . . . . . . . . . . . . . .31
Printer options . . . . . . . . . . . . . . . . . . . . . . . . . . . . . . . . . . . . . . . . .31
Print control . . . . . . . . . . . . . . . . . . . . . . . . . . . . . . . . . . . . . . . . . . .32
Summary . . . . . . . . . . . . . . . . . . . . . . . . . . . . . . . . . . . . . . . . . . . . .32

Contents > 5
Colour printing (C801 and C810 only) . . . . . . . . . . . . . . . . . . . . . . . . . .33
Factors that affect the appearance of prints . . . . . . . . . . . . . . . . . . . . . . .33
Tips for printing in colour . . . . . . . . . . . . . . . . . . . . . . . . . . . . . . . . . . . .34
Printing photographic images . . . . . . . . . . . . . . . . . . . . . . . . . . . . . . .34
Printing from Microsoft Office applications . . . . . . . . . . . . . . . . . . . . . .34
Printing specific colours (e.g. a company logo) . . . . . . . . . . . . . . . . . . .34
Adjusting the brightness or intensity of a print . . . . . . . . . . . . . . . . . . .34
Accessing the colour matching options. . . . . . . . . . . . . . . . . . . . . . . . . . .34
Setting the colour matching options . . . . . . . . . . . . . . . . . . . . . . . . . . . .35
Using the colour swatch feature . . . . . . . . . . . . . . . . . . . . . . . . . . . . . . .35
Using the colour correct utility . . . . . . . . . . . . . . . . . . . . . . . . . . . . . . . .36
Menu functions - C801 and C810 . . . . . . . . . . . . . . . . . . . . . . . . . . . . . .37
Operator Panel . . . . . . . . . . . . . . . . . . . . . . . . . . . . . . . . . . . . . . . . . . .37
How to change the settings - User. . . . . . . . . . . . . . . . . . . . . . . . . . . . . .37
How to change the settings - Administrator . . . . . . . . . . . . . . . . . . . . . . .38
Menus . . . . . . . . . . . . . . . . . . . . . . . . . . . . . . . . . . . . . . . . . . . . . . . . .39
Information menu . . . . . . . . . . . . . . . . . . . . . . . . . . . . . . . . . . . . . . .39
Shutdown menu . . . . . . . . . . . . . . . . . . . . . . . . . . . . . . . . . . . . . . . .39
Print menu . . . . . . . . . . . . . . . . . . . . . . . . . . . . . . . . . . . . . . . . . . . .39
Media menu . . . . . . . . . . . . . . . . . . . . . . . . . . . . . . . . . . . . . . . . . . .40
Colour menu . . . . . . . . . . . . . . . . . . . . . . . . . . . . . . . . . . . . . . . . . . .42
System configuration menu . . . . . . . . . . . . . . . . . . . . . . . . . . . . . . . .42
Network menu . . . . . . . . . . . . . . . . . . . . . . . . . . . . . . . . . . . . . . . . .43
Maintenance menu . . . . . . . . . . . . . . . . . . . . . . . . . . . . . . . . . . . . . .44
Usage menu . . . . . . . . . . . . . . . . . . . . . . . . . . . . . . . . . . . . . . . . . . .44
Administrator (Boot) menu . . . . . . . . . . . . . . . . . . . . . . . . . . . . . . . . .45
Print statistics menu . . . . . . . . . . . . . . . . . . . . . . . . . . . . . . . . . . . . .47
Menu functions - C821 and C830 . . . . . . . . . . . . . . . . . . . . . . . . . . . . . .48
Operator panel . . . . . . . . . . . . . . . . . . . . . . . . . . . . . . . . . . . . . . . . . . .48
How to change the settings - User. . . . . . . . . . . . . . . . . . . . . . . . . . . . . .49
How to change the settings - Administrator . . . . . . . . . . . . . . . . . . . . . . .49
Configuration menu . . . . . . . . . . . . . . . . . . . . . . . . . . . . . . . . . . . . . .50
Print information menu . . . . . . . . . . . . . . . . . . . . . . . . . . . . . . . . . . .51
Print secure job. . . . . . . . . . . . . . . . . . . . . . . . . . . . . . . . . . . . . . . . .52
Menus . . . . . . . . . . . . . . . . . . . . . . . . . . . . . . . . . . . . . . . . . . . . . . .53
Shutdown menu . . . . . . . . . . . . . . . . . . . . . . . . . . . . . . . . . . . . . . . .55
Admin setup . . . . . . . . . . . . . . . . . . . . . . . . . . . . . . . . . . . . . . . . . . .56
Calibration . . . . . . . . . . . . . . . . . . . . . . . . . . . . . . . . . . . . . . . . . . . .65
Administrator (boot) menu . . . . . . . . . . . . . . . . . . . . . . . . . . . . . . . . .66
Print statistics menu . . . . . . . . . . . . . . . . . . . . . . . . . . . . . . . . . . . . .69
Maintenance . . . . . . . . . . . . . . . . . . . . . . . . . . . . . . . . . . . . . . . . . . . . . .70
Replacing consumable items . . . . . . . . . . . . . . . . . . . . . . . . . . . . . . . . . .70
Toner cartridge replacement . . . . . . . . . . . . . . . . . . . . . . . . . . . . . . . .70
Image drum replacement . . . . . . . . . . . . . . . . . . . . . . . . . . . . . . . . . .73
Transfer belt replacement. . . . . . . . . . . . . . . . . . . . . . . . . . . . . . . . . .76
Fuser replacement. . . . . . . . . . . . . . . . . . . . . . . . . . . . . . . . . . . . . . .78
Cleaning. . . . . . . . . . . . . . . . . . . . . . . . . . . . . . . . . . . . . . . . . . . . . . . .80
...the unit casing . . . . . . . . . . . . . . . . . . . . . . . . . . . . . . . . . . . . . . . .80
...the LED head . . . . . . . . . . . . . . . . . . . . . . . . . . . . . . . . . . . . . . . . .80
...the paper feed rollers . . . . . . . . . . . . . . . . . . . . . . . . . . . . . . . . . . .81
Installing upgrades . . . . . . . . . . . . . . . . . . . . . . . . . . . . . . . . . . . . . . . . .82
Duplex unit. . . . . . . . . . . . . . . . . . . . . . . . . . . . . . . . . . . . . . . . . . . . . .83
Memory upgrade (C821 and C830) . . . . . . . . . . . . . . . . . . . . . . . . . . . . .84
Hard disk drive (C821 and C830) . . . . . . . . . . . . . . . . . . . . . . . . . . . . . .87
Additional paper tray(s) . . . . . . . . . . . . . . . . . . . . . . . . . . . . . . . . . . . . .89
Storage cabinet. . . . . . . . . . . . . . . . . . . . . . . . . . . . . . . . . . . . . . . . . . .89

Contents > 6
Adjusting printer drivers. . . . . . . . . . . . . . . . . . . . . . . . . . . . . . . . . . . . .90
Windows . . . . . . . . . . . . . . . . . . . . . . . . . . . . . . . . . . . . . . . . . . . . .90
Mac OS X . . . . . . . . . . . . . . . . . . . . . . . . . . . . . . . . . . . . . . . . . . . . .90
Troubleshooting . . . . . . . . . . . . . . . . . . . . . . . . . . . . . . . . . . . . . . . . . . .92
Major printer components and paper path . . . . . . . . . . . . . . . . . . . . . . . .92
Paper sensor error codes . . . . . . . . . . . . . . . . . . . . . . . . . . . . . . . . . . . .93
Clearing paper jams . . . . . . . . . . . . . . . . . . . . . . . . . . . . . . . . . . . . . . .93
Dealing with unsatisfactory printing. . . . . . . . . . . . . . . . . . . . . . . . . . . . .99
Specifications . . . . . . . . . . . . . . . . . . . . . . . . . . . . . . . . . . . . . . . . . . . .101
Index . . . . . . . . . . . . . . . . . . . . . . . . . . . . . . . . . . . . . . . . . . . . . . . . . . .102
Oki contact details. . . . . . . . . . . . . . . . . . . . . . . . . . . . . . . . . . . . . . . . .103

Notes, cautions and warnings > 7
N
OTES
,
CAUTIONS
AND
WARNINGS
For the protection of your product, and in order to ensure that you benefit from its full
functionality, this model has been designed to operate only with genuine original toner
cartridges. Any other toner cartridge may not operate at all, even if it is described as
“compatible”, and if it does work, your product's performance and print quality may be
degraded.
Non-genuine original products may invalidate your warranty.
Specifications subject to change without notice. All trademarks acknowledged.
NOTE
A note provides additional information to supplement the main text.
CAUTION!
A caution provides additional information which, if ignored, may
result in equipment malfunction or damage.
WARNING!
A warning provides additional information which, if ignored, may
result in a risk of personal injury.

Introduction > 8
I
NTRODUCTION
Congratulations on choosing this colour printer. Your new printer is designed with advanced
features to give you clear, vibrant colour prints and crisp black and white pages at high
speed on a range of print media for the office.
Your printer includes these features:
>Compact A3 desktop footprint;
>ProQ2400 multi-level technology produces subtler tones and smoother graduations
of colour to lend photographic quality to your documents;
>600 x 600, 1200 x 600 dpi (dots per inch) and ProQ2400 print resolution for high
quality image production showing the finest detail;
>Single Pass colour Digital LED technology for high speed processing of your printed
pages;
>Profile Assistant utility allows you to download ICC profiles to the hard disc (Hard
Disc Drive required) (C821 and C830);
>PostScript 3, PCL 5C, PCL 6 and Epson FX emulations for industry standard operation
and wide compatibility with most computer software (C821 and C830);
>Secure encrypted printing (C821 and C830) - allows you to print confidential
documents on printers that are shared with other users in a network environment;
>10Base-T and 100Base-TX network connection lets you share this valuable resource
among users on your office network;
>Photo Enhance mode to improve printouts of photographic images (not available on
PS drivers).
>“Ask Oki” – a user-friendly function for Windows that gives a direct link from your
printer driver screen to a dedicated web site specific to the exact model you are
using. This is where you’ll find all the advice, assistance and support you could need
to help you get the best possible results from your Oki printer;
>Template Manager utility for Windows enables the design and print of Business
cards, banners, labels with ease;
Additionally, the following optional features are also available:
>Automatic two-sided (duplex) printing for economical use of paper and compact
printing of larger documents (standard on dn models);
>Additional paper trays for loading a further 530/1060 sheets to minimise operator
intervention, or different paper stocks for letterhead stationery, alternative paper
sizes or other print media;
>Additional memory allows printing of more complex pages. For example, high
resolution banner printing (C821 and C830);
>Internal hard disk drive for Secure printing, storage of overlays, macros and
downloadable fonts, and automatic collation of multiple copies of multipage
documents and the download of ICC Profiles (C821 and C830);
>Storage cabinet.
Introduction > 9
P
RINTER
OVERVIEW
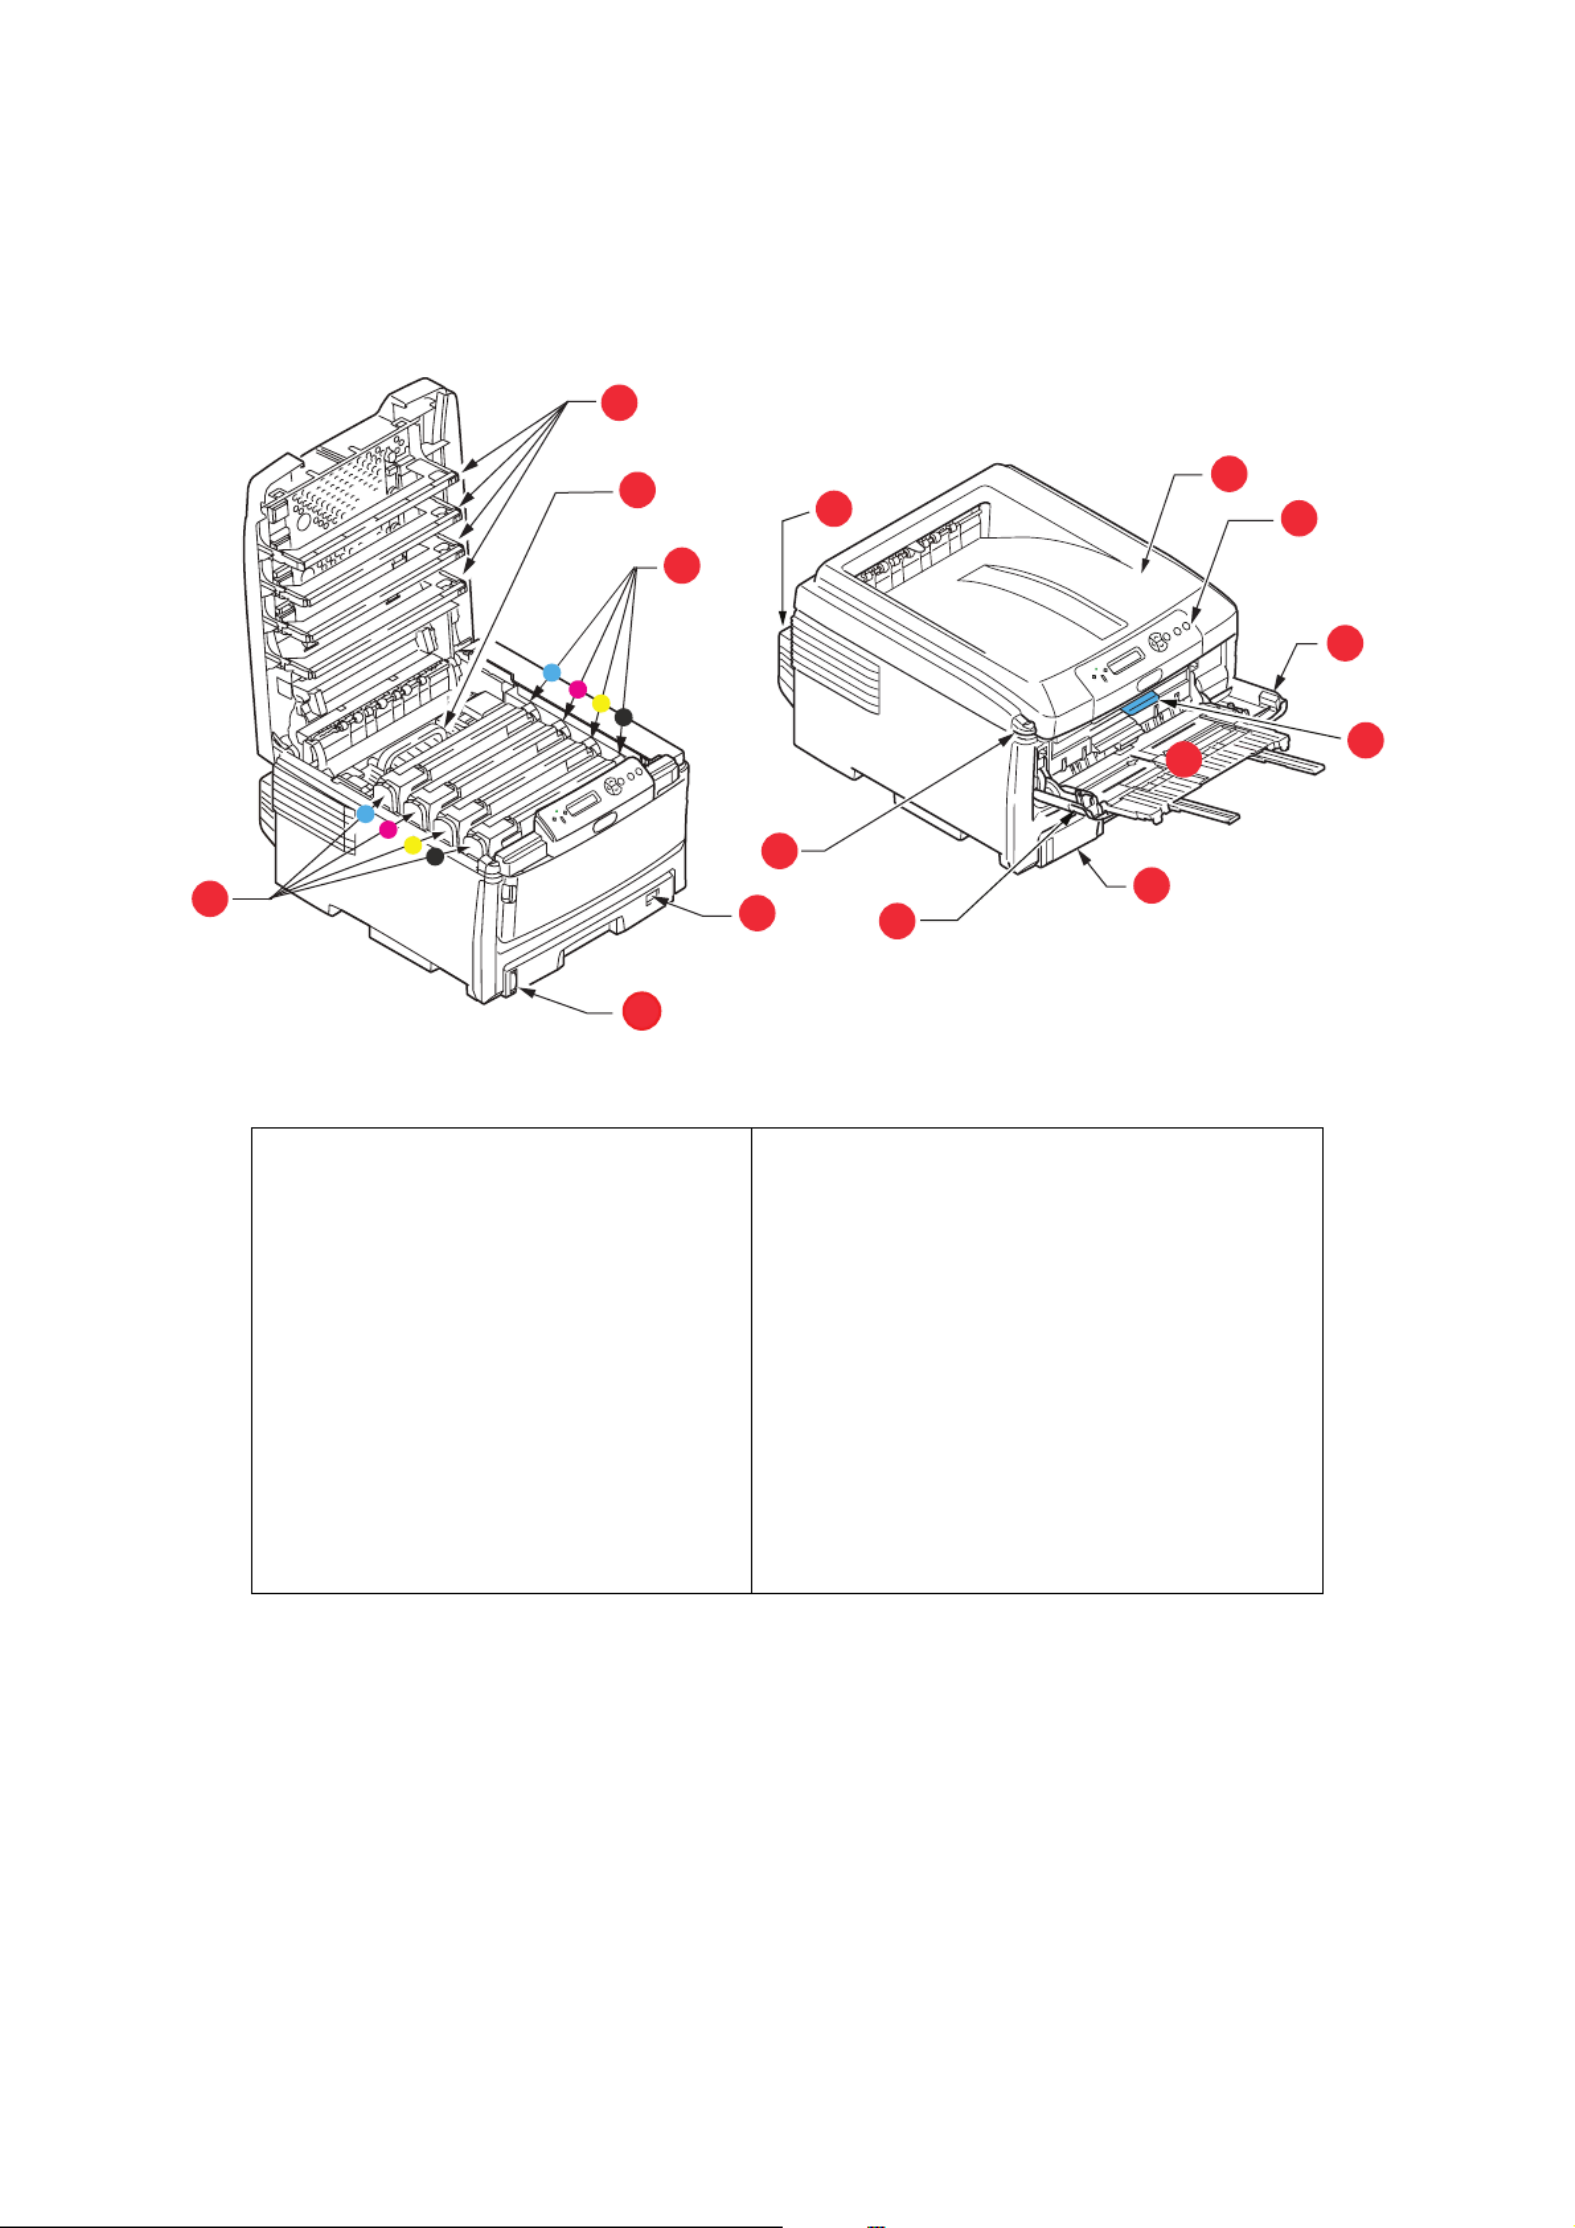
F
RONT
VIEW
The LCD display language can be changed to show different languages. (See “Changing the
display language” on page 10.)
1. Output stacker (face down).
Standard printed copy delivery point.
Holds up to 250 sheets at 80g/m².
2. Operator panel.
Menu driven operator controls and LCD
display panel.
3. Paper tray.
Standard blank paper tray. Holds up to
300 sheets of 80g/m² paper.
4. Multi purpose tray.
Used for feeding heavier paper stocks,
envelopes and other special media. Also
for manual feeding of single sheets
when required.
5. Front cover release lever.
6. Multi-purpose tray release lever
7. Top cover release button.
8. LED heads
9. Fuser
10.Toner cartridges (C,M,Y,K).
11.ID units (C,M,Y,Y).
12.Duplex Unit (optional).
13.Paper size dial.
14.Paper level gauge.
5
1
2
3
6
9
11
10
13
12
7
14
8
6
4
Introduction > 10
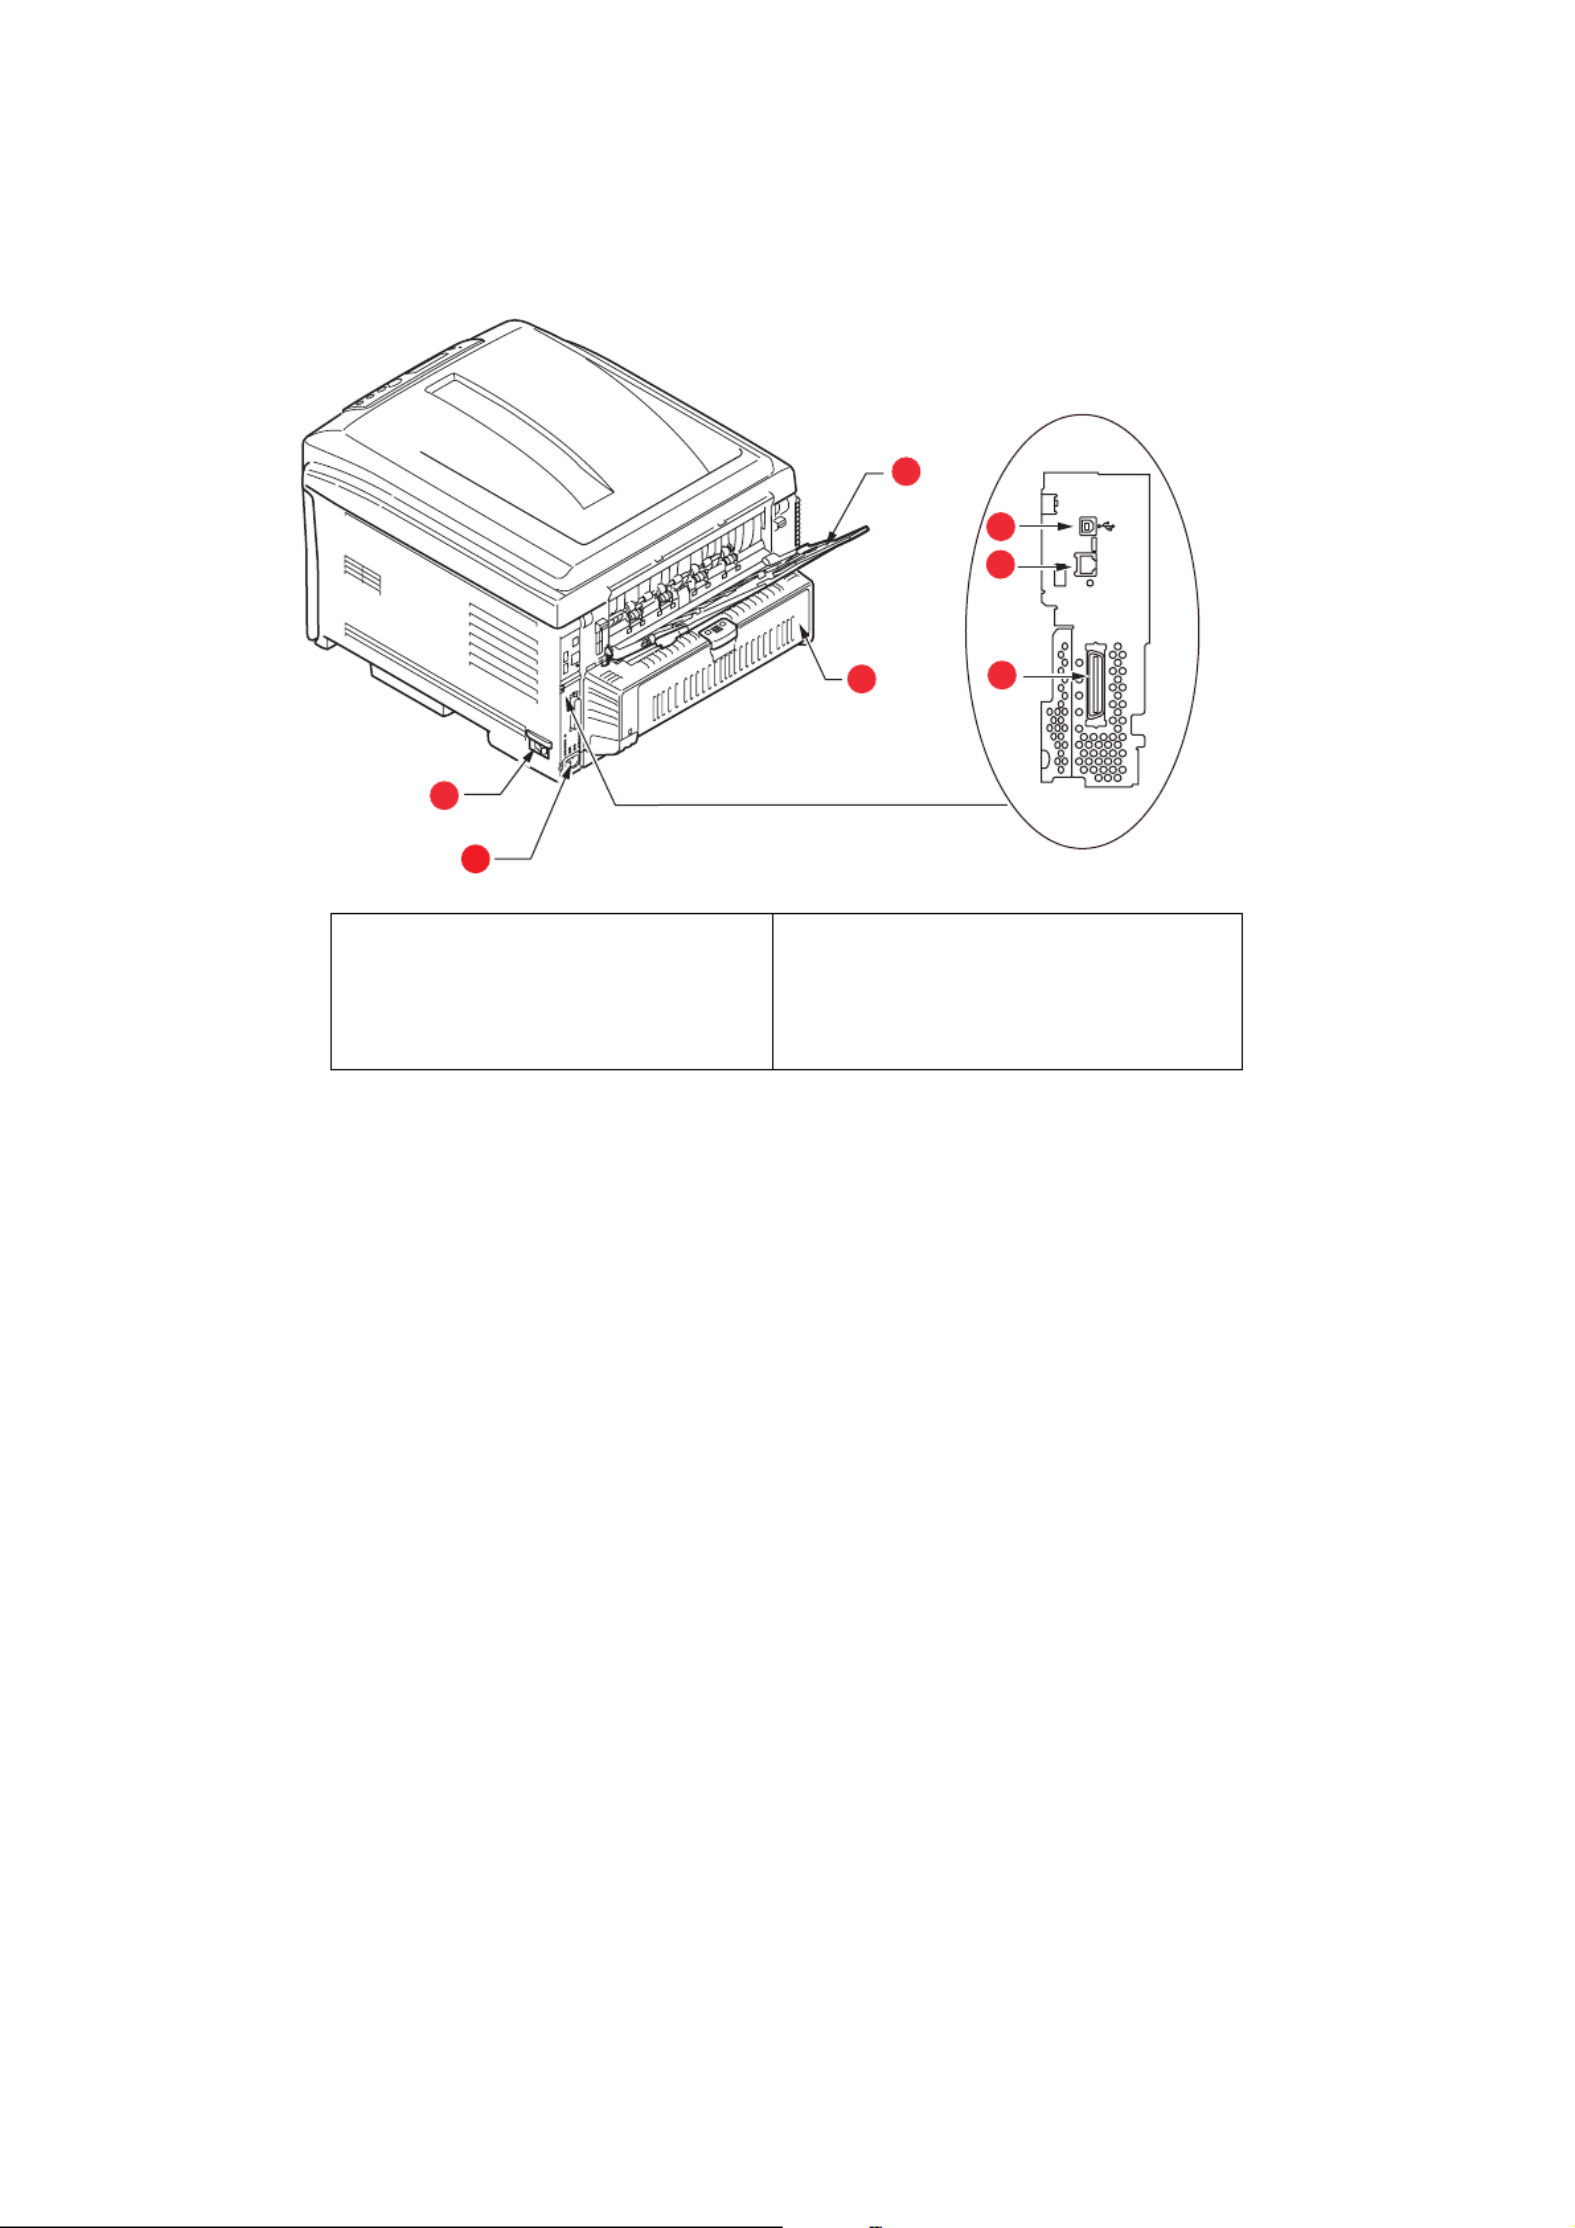
R
EAR
VIEW
This view shows the connection panel, the rear output stacker and the location of the
optional duplex (two-sided printing) unit.
When the rear paper stacker is folded down paper exits the printer through the rear of the
printer and is stacked here face up. This is mainly used for heavy print media. When used
in conjunction with the multi purpose feed tray, the paper path through the printer is
essentially straight. This avoids bending the paper around curves in the paper path and
enables feeding of up to 220g/m² media.
C
HANGING
THE
DISPLAY
LANGUAGE
The default language used by your machine for display messages is English. If required,
this can be changed using the Panel Language Set-up utility.
1. ON/OFF switch.
2. AC power socket.
3. USB interface.
4. Network interface.
1
1. The Network Interface may have a protective “plug” which must be
removed before connection can be made.
5. Duplex unit (when fitted).
6. Rear, face up, 100 sheet stacker.
7. Parallel Port.2
2. C821 and C830.
1
2
5
6
3
4
7

Paper recommendations > 11
P
APER
RECOMMENDATIONS
Your printer will handle a variety of print media, including a range of paper weights and
sizes, transparencies and envelopes. This section provides general advice on choice of
media, and explains how to use each type.
The best performance will be obtained when using standard 75~90g/m² paper designed
for use in copiers and laser printers.
Use of heavily embossed or very rough textured paper is not recommended.
Pre-printed stationery
Envelopes
Envelopes should be handled by the Multi Purpose tray.
Transparencies
Transparencies should be handled by the Multi Purpose tray.
Labels
Labels should be handled by the Multi Purpose tray.
CAUTION!
Pre-printed stationery can be us st not offset ed, but the ink mu
when exposed to the high fuser temperatures used in the printing
process.
Continued use of pre-printed stationery may cause the paper feed
performance to degrade over time and paper jams may occur.
Clean the paper feed rollers as described on page 81.
CAUTION!
Envelopes should be free from twist, curl or other deformations.
They should also be of the rectangular “peel and seal” type, with
glue that remains intact when subjected to hot roll pressure fusing
used in this type of printer. Window envelopes are not suitable.
CAUTION!
Transparencies should be of the type designed for use in copiers
and laser printers. In particular, avoid office transparencies
designed for use by hand with marker pens. These will melt in the
fuser and cause damage.
CAUTION!
Labels should also be of the type recommended for use in copiers
and laser printers, in which the base carrier page is entirely
covered by labels. Other types of label stock may damage the
printer due to the labels peeling off during the printing process.

Paper recommendations > 12
C
ASSETTE
TRAYS
If you have identical paper stock loaded in another tray (2nd/3rd tray if you have one, or
multi purpose tray) you can have the printer automatically switch to the other tray when
the current tray runs out of paper. When printing from Windows applications, this function
is enabled in the driver settings. When printing from other systems, this function is enabled
in the Print Menu.
If fitted, tray 2/3 may be removed and replenished while the machine is being fed from tray
1. Tray 1 cannot be removed while the machine is being fed from tray 2/3, because parts
of tray 1 are used to guide paper fed from tray 2. This also applies to tray 2 when paper is
being fed from tray 3.
M
ULTI
PURPOSE
TRAY
The multi purpose tray can handle the same sizes as the cassette trays but in weights up
to 220g/m². For very heavy paper stock use the face up (rear) paper stacker. This ensures
that the paper path through the printer is almost straight.
The multi purpose tray can feed paper widths as small as 64mm and lengths up to 1321mm
(banner printing).
For paper lengths exceeding 431.8mm use paper stock up to 128g/m² and the face up
(rear) paper stacker.
Use the multi purpose tray for printing on envelopes and transparencies. Up to 50 sheets
of transparencies or 10 envelopes can be loaded at one time, subject to a maximum
stacking depth of 10mm.
Paper or transparencies should be loaded print side up and top edge into the printer. Do
not use the duplex (two-sided printing) function.
F
ACE
DOWN
STACKER
The face down stacker on the top of the printer can hold up to 250 sheets of 80g/m²
standard paper, and can handle paper stocks up to 128g/m². Pages printed in reading order
(page 1 first) will be sorted in reading order (last page on top, facing down).
SIZE DIMENSIONS WEIGHT (G/M²)
A6 (Tray 1 only) 105 x 148mm
Light 64-82g/m²
Medium light 83- 90g/m²
Medium 91-105g/m²
Heavy 106-128g/m²
Ultra heavy1 129-203g/m²
Ultra heavy2 204-220g/m²
(> 176g/m² - MP Tray only)
A5 148 x 210mm
B5 182 x 257mm
Executive 184.2 x 266.7mm
A4 210 x 297mm
B4 250 x 353mm
A3 420 x 297mm
Letter 215.9 x 279.4mm
Legal 13in. 216 x 330mm
Legal 13.5in. 216 x 343mm
Legal 14in. 216 x 356mm

Paper recommendations > 13
F
ACE
UP
STACKER
The face up stacker at the rear of the printer should be opened and the tray extension
pulled out when required for use. In this condition paper will exit via this path, regardless
of driver settings.
The face up stacker can hold up to 100 sheets of 80g/m² standard paper, and can handle
stocks up to 220g/m².
Always use this stacker and the multi purpose feeder for paper stocks heavier than
128g/m².
D
UPLEX
UNIT
This option provides automatic two-sided printing on the same range of paper sizes as
tray 2/3 (i.e. all cassette sizes except A6), using paper stocks from 64-105g/m².
NOTE:
The duplex unit comes as standard with dn & cdtn models.

Loading paper > 14
L
OADING
PAPER
C
ASSETTE
TRAYS
1. Remove the paper tray from the printer.
2.
Fan the paper to be loaded at the edges (1) and in the middle (2) to ensure that all
sheets are properly separated, then tap the edges of the stack on a flat surface to
make it flush again (3).
3. Load paper long edge feed (LEF) (letter headed paper - face down and top edge
towards the right of the printer) (1) up to mark (a).
1
2
3
a
2
1
3

Loading paper > 15
4. Adjust the rear stopper, paper guides (2) and cassette tray roller (3) to the size and
orientation of paper being used. For A6 paper, remove and re-install in the A6
position.
5. Close the paper tray gently.
If you have two trays and you are printing from the 1st (upper) tray, you can pull out
the 2nd (lower) tray during printing to reload it. However, if printing from the 2nd
(lower) tray, do not pull out the 1st (upper) tray. This will cause a paper jam.
If 3 trays are fitted this applies to trays 1 & 2 if printing from the 3rd (lower) tray.
For face down printing, make sure the face up (rear) stacker (3) is closed (the paper
exits from the top of the printer). Stacking capacity is approximately 250 sheets,
depending on paper weight.
For face up printing, make sure the face up (rear) stacker (3) is open and the paper
support (4) is extended. Paper is stacked in reverse order and tray capacity is
approximately 100 sheets, depending on paper weight.
Always use the face up (rear) stacker for heavy paper (card stock etc.).
CAUTION!
>IMPORTANT: Set paper size dial (3) to the size and orientation of
paper being used (A4 LEF in the above example).
>C801 and C810: GDI printers use the
printer settings defined by the host
(PC).
If the paper is oriented long-edge, the
Long Edge Feed (LEF) checkbox must be
enabled in the printer driver.
If the paper is oriented short-edge, the
Long Edge Feed checkbox must be
disabled in the printer driver.
If the driver setting doesn't match the paper orientation, the
printer will display an error message indicating that a mismatch
has occurred.
CAUTION!
Do not open or close the rear paper exit while printing as it may
result in a paper jam.

Loading paper > 16
To prevent paper jams:
>Do not leave space between the paper and the guides and rear stopper.
>Do not overfill the paper tray. Capacity depends on the type of paper stock.
>Do not load damaged paper.
>Do not load paper of different sizes or types at the same time.
>Do not pull the paper tray out during printing (except as described above for the
2nd tray).
M
ULTI
PURPOSE
TRAY
1. Open the multi purpose tray (1).
2. Fold out the paper supports (2).
3. Press gently down on the paper platform (3) to ensure it is latched down.
4. Load the paper and adjust the paper guides (4) to the size of paper being used.
>For single-sided printing on A4 headed paper load the paper into the multi
purpose tray with pre-printed side up and left hand edge (LEF), top edge (SEF)
into the printer.
>For two-sided (duplex) printing on A4 headed paper load the paper with pre-
printed side down and left hand edge (LEF), top edge (SEF) away from the
printer. (Optional duplex unit must be installed for this function.)
>Envelopes should be loaded face up with top edge to the left and short edge into
the printer. Do not select duplex printing on envelopes.
>Do not exceed the paper capacity of about 100 sheets or 10 envelopes. Maximum
stacking depth is 10mm.
2
4
4
3
1

Loading paper > 17
5. Press the tray latch button (5) inwards to release the paper platform, so that the
paper is lifted and gripped in place.
6. Set the correct paper size for the multi purpose tray in the Media Menu (see “Menu
Functions”).
5

Operation > 18
O
PERATION
C801 and C810
For full details of how to use the machine and any optional accessories to print jobs
efficiently and effectively, please refer to the following chapters:
>“Printing settings in Windows (C801 and C810 only)” on page 19
>“Printing settings in Mac OS X (C801 and C810 only)” on page 24
>“Colour printing (C801 and C810 only)” on page 33
C821 and C830
For full details of how to use the machine and any optional accessories to print jobs
efficiently and effectively, please refer to the Printing Guide and the Barcode Guide.
For full details of how to access and use the printer security features, please refer to the
Security Guide.

Printing settings in Windows (C801 and C810 only) > 19
P
RINTING
SETTINGS
IN
W
INDOWS
(C801
AND
C810
ONLY
)
Your printer’s operator panel menus provide access to many options.
The Windows printer driver also contains settings for many of these items. Where items in
the printer driver are the same as those in the operator panel menus, and you print
documents from Windows, the settings in the Windows printer driver will override those
items in the operator panel menus.
The illustrations in this chapter show Windows XP. Other Windows versions may appear
slightly different, but the principles are the same.
P
RINTING
PREFERENCES
IN
WINDOWS
APPLICATIONS
When you choose to print your document from a Windows
application program a print dialogue box appears. This
dialogue usually specifies the name of the printer on which
you will print your document. Next to the printer name is a
Properties button.
When you click Properties a new window opens which
contains a short list of the printer settings available in the
driver, which you can choose for this document.
The settings available from within your application are only those which you may want to
change for specific applications or documents. Settings you change here will usually only
last for as long as the particular application program is running.
S
ETUP
TAB
When you click the Properties button from your application’s Print dialogue, the driver
window opens to allow you to specify your printing preferences for the current document.
1. Paper size should be the same as the page size of your document (unless you wish
to scale the printout to fit another size), and should also be the same as the size of
paper you will feed into the printer.
2. You can choose the source of the paper to feed, which may be Tray 1 (the standard
paper tray) or the multi purpose feeder. You can also click on the appropriate part of
the screen graphic to select your preferred tray.
3. The setting for paper weight should match the type of paper on which you intend to
print.
4. A variety of document finishing options can be selected, such as normal one page
per sheet, or N-up (where N can be any number up to 16) for printing scaled down
pages at more than one page per sheet. Booklet printing prints two pages per sheet
on each side of the paper so that when folded they make up a booklet.
Poster printing will print large pages as tiles spread over multiple sheets.
1
2
4
5
6
7
3

Printing settings in Windows (C801 and C810 only) > 20
5. For two-sided printing, you can choose to flip the page by the long edge or the short
edge.
6. If you have changed some printing preferences before and saved them as a set, you
can recall them to avoid having to set them individually each time you need them.
7. A single on-screen button restores the default settings.
J
OB
OPTIONS
TAB
1. The output resolution of the printed page can be set as follows.
>The ProQ2400 setting prints at 600 x 600dpi x 2 bit. This option requires the most
printer memory and takes the longest to print.
>The Fine/Detail setting prints at 1200 x 600dpi and is adequate for all but the
most discerning applications.
>The Normal setting prints at 600 x 600dpi and is suitable for most draft
documents, where print quality is less critical.
2. You can print watermark text behind the main page image. This is useful for marking
documents as draft, confidential, etc.
3. You can select up to 999 copies to print consecutively, although you will need to top
up the paper tray during such a long print run.
4. Page orientation can be set to either portrait (tall) or landscape (wide).
5. The printed pages can be scaled to fit larger or smaller stationery.
6. Clicking the Advanced button gives you access to further settings. For example,
you can elect to have black areas printed using 100%K toner (a more matte
appearance).
7. A single on-screen button restores the default settings.
8. The quality of photographic images can be improved.

Printing settings in Windows (C801 and C810 only) > 21
C
OLOUR
TAB
1. Control over the colour output of your printer may be performed automatically, or
for advanced control, by manual adjustment. The automatic setting will be
appropriate in most cases. The other options in this window only become visible
when you select a choice other than Auto.
2. You can choose from a range of colour matching options, depending on the image
source for your document. For example, a photograph taken on a digital camera
might require different colour matching to a business graphic created in a
spreadsheet application. Again, for most general purpose use, automatic is the best
choice.
3. Printed output may be made lighter or darker, or the colours made more saturated
and vibrant as required.
4. Black areas may be printed using cyan, magenta and yellow (composite black),
giving a more glossy appearance, or using only black toner (true black), giving a
more matte appearance. Choosing the automatic setting allows the driver to make
the most appropriate choice depending on image content.
5. A single on-screen button restores the default settings.
1
5
4
2
3

Printing settings in Windows (C801 and C810 only) > 22
S
ETTING
FROM
WINDOWS
CONTROL
PANEL
When you open the driver properties window directly from Windows, rather than from
within an application program, a somewhat more extensive range of settings is provided.
Changes made here will generally affect all documents you print from Windows
applications, and will be remembered from one Windows session to the next.
G
ENERAL
TAB
1. This area lists some of the main features of your printer.
2. This button opens the same windows as described earlier for items which can be set
from within application programs. Changes you make here, however, will become
the new default settings for all Windows applications.
3. This button prints a test page to ensure that your printer is working.
A
DVANCED
TAB
1. You can specify which times of day your printer will be available.
2. Indicates current priority, from 1 (lowest) to 99 (highest). Highest priority
documents will print first.
3. Specifies that documents should be spooled (stored in a special print file) before
being printed. The document is then printed in the background, allowing your
application program to become available more quickly.
4. This specifies that printing should not start until the last page has been spooled. If
your application program needs a lot of time for further computation in the middle of
1
2 3
1
2
3
54
6
7
98
10
11

Printing settings in Windows (C801 and C810 only) > 23
printing, causing the print job to pause for more than a short period, the printer
could prematurely assume that the document has finished. Selecting this option
would prevent that situation, but printing will be completed a little later, as the start
is delayed.
5. This is the opposite choice to the one above. Printing starts as soon as possible after
the document begins spooling.
6. This specifies that the document should not be spooled, but printed directly. Your
application will not normally be ready for further use until the print job is complete.
This requires less disk space on your computer, since there is no spool file.
7. Directs the spooler to check the document setup and match it to the printer setup
before sending the document to print. If a mismatch is detected, the document is
held in the print queue and does not print until the printer setup is changed and the
document restarted from the print queue. Mismatched documents in the queue will
not prevent correctly matched documents from printing.
8. Specifies that the spooler should favour documents which have completed spooling
when deciding which document to print next, even if completed documents are lower
priority than documents which are still spooling. If no documents have completed
spooling, the spooler will favour larger spooling documents over shorter ones. Use
this option if you want to maximise printer efficiency. When this option is disabled
the spooler chooses documents based only on their priority settings.
9. Specifies that the spooler should not delete documents after they are completed.
This allows documents to be re submitted to the printer from the spooler instead of
printing again from the application program. If you use this option frequently it will
require large amounts of disk space on your computer.
10. Specifies whether advanced features, such as booklet printing, page order and
pages per sheet, are available, depending on your printer. For normal printing keep
this option enabled. If compatibility problems occur you can disable the feature.
However, these advanced options may then not be available, even though the
hardware might support them.
11. This button provides access to the same setup windows as when printing from
applications. Changes made via the Windows Control Panel become the Windows
default settings.

Printing settings in Mac OS X (C801 and C810 only) > 24
P
RINTING
SETTINGS
IN
M
AC
OS X (C801
AND
C810
ONLY
)
The information in this section is based on Mac OS X Tiger (10.4). Other versions may
appear slightly different, but the principles are the same.
S
ETTING
PRINTING
OPTIONS
You can choose your printer and select options for how you want your documents to print
from the Print dialog box.
To set your printer options:
1. Open the document you want to print.
2. To change the paper size or page orientation, select File > Page Setup. For a
description of each option, see “Page setup options” on page 25.
3. Close the Page Setup dialog box.
4. Select File > Print.
5. Select your printer from the Printer drop-down menu.
6. To change any printer driver settings, select the required options from the Settings
drop-down menu. You can select more options from the Copies & Pages menu. For a
description of these options, see “Print options” on page 26.
7. Click the Print button.

Printing settings in Mac OS X (C801 and C810 only) > 25
S
ETTING
PRINTING
OPTIONS
-
SAVING
DRIVER
SETTINGS
You can save a set of printer driver options to use for future documents.
1. Open the document you want to print.
2. To change the paper size or page orientation, select File > Page Setup.
3. Select Save As Default from the Settings drop-down menu.
4. Select File > Print.
5. To save the current printer driver settings as a preset, select Save As from the
Preset menu.
6. Enter a name for your preset and click OK.
C
HANGING
THE
DEFAULT
PRINTER
AND
PAPER
SIZE
The following steps describe how to change your default printer and the paper size options.
1. Select Apple menu > System Preferences.
2. Click the Print & Fax icon.
3. Select your printer in the Selected Printer in Print Dialog drop-down menu.
4. Select your required paper size in the Default Size in Page Setup drop-down menu.
P
AGE
SETUP
OPTIONS
This section provides a description of the page setup options available to you.
Page Attributes
You can select Save As Default to use the current Page Setup settings as a standard for
all documents.
Format for
Allows you to select your printer model before changing options such as Paper size and
Orientation.

Printing settings in Mac OS X (C801 and C810 only) > 26
Paper Size
Select a paper size to match your document and the paper loaded in the printer. The paper
margin is 4.2mm at all edges. To specify your own paper sizes, select Manage Custom
Sizes...
Scale
You can scale documents up or down to fit onto different paper sizes. To fit your document
on a specific paper size, select Options in the Paper Handling drop-down menu in the
Print Options dialog box (see “Print options” on page 26).
Orientation
You can select a portrait or landscape option. When using landscape, you can rotate the
document 180 degrees.
P
RINT
OPTIONS
C
OPIES
&
PAGES
Copies
This option allows you to enter the number of copies to print. If you select Collate, all
pages of the document will print before the next copy prints.
Pages
You can select whether to print all pages of a document or just a section of it.
L
AYOUT
Pages per sheet
You can shrink multiple pages and print them on a single sheet of paper. For example,
choosing 4-up will tile four of your document's pages across a single sheet of paper.
You can control the order in which the documents are tiled and also choose to surround
each document page with a border.

Printing settings in Mac OS X (C801 and C810 only) > 27
Two-sided
You cannot use the two sided printing options in this panel. Use the options in the Duplex
panel instead. Refer to “Duplex” on page 28.
S
CHEDULER
This option lets you choose whether to print your document immediately, or defer printing
until later. You can also assign a priority to a print job.
These features are useful if you are printing large documents that take a long time to print.
P
APER
HANDLING
Page order
You can choose to print your document in the normal page order (1,2,3..) or reverse order
(..3,2,1).
Print
This option allows you to choose whether to print only odd or even numbered pages. This
is useful if you are using manual duplex for which you first print all odd pages, re-insert the
paper in the printer and then print all even pages.
Destination paper size
Scale documents to fit on the size of paper in your printer. For example, you can take a
document formatted for A3 and print it on A4 paper using an A4 printer.

Printing settings in Mac OS X (C801 and C810 only) > 28
C
OLOR
S
YNC
Color conversion
For Color Conversion, Standard is the only option available for your printer model.
Quartz Filter
Choose a Quartz filter if you wish to apply a special effect to your print job, such as Sepia
or Blue Tone.
C
OVER
PAGE
Choosing a cover page may help you to identify your printed document in a large pile of
paper. This is useful in a busy office with many people sharing the printer.
D
UPLEX
Choosing duplex allows you to print on both sides of the paper, to save paper, weight, bulk
and cost.
Long-Edge Binding prints pages that read like a normal book.
Short-Edge Binding prints pages that read like a notepad.

Printing settings in Mac OS X (C801 and C810 only) > 29
P
APER
SOURCE
This option allows you to select the paper tray to use for your print job.
P
RINT
QUALITY
Print quality
Use this option to select the print resolution. The ProQ2400 setting produces the best
graphic images, but these images can take longer to print.
Photo Enhance
Use Photo Enhance to significantly improve quality when printing images. The printer
driver analyses any photographic images and processes them to improve the overall
appearance. This setting cannot be used together with the “ProQ2400” print quality setting.
Toner Saving
Toner saving uses less toner when printing your document. This is best suited to draft text
documents as it lightens the print significantly.

Printing settings in Mac OS X (C801 and C810 only) > 30
C
OLOUR
Colour mode
Color matching
Black Finish
Use this option to control the way black is printed in colour documents. Select Composite
Black (CMYK) to use all 4 toner colours to represent black. This option is recommended
for color photos. Select True Black (K) to use 100% black toner to represent black. This
option is recommended for text and business graphics.
Brightness / Saturation
This option allows you to increase brightness for a lighter print. Modify saturation to change
the strength (or purity) of a colour.
COLOUR MODE DESCRIPTION
Advanced Colour The driver selects the most appropriate color
settings.
Manual Allows you to manually adjust colour and black
and white settings or select.
Grayscale Convert all colours to shades of grey.
COLOUR DESCRIPTION
Monitor (6500K) Perceptual Optimised for printing photos. Colours are
printed with emphasis on saturation.
Monitor (6500K) Vivid Optimised for printing photos, but with
even more saturated colours.
Monitor (9300K) Optimised for printing graphics from
applications such as Microsoft Office.
Colours are printed with emphasis on
Lightness.
Digital Camera Results will vary depending on the subject
and conditions the image was taken.
sRGB The printer reproduces the sRGB colour
space. This might be useful if colour
matching from an sRGB input device such
as a scanner or digital camera.

Printing settings in Mac OS X (C801 and C810 only) > 31
If the printed colours are too strong, reduce saturation and increase brightness. As a
general rule, reduce saturation by the same amount as you increase brightness. For
example, if you reduce saturation by 10, increase brightness by 10 to compensate.
P
RINTER
SETUP
OPTIONS
P
RINTER
OPTIONS
Media weight
Select the thickness or type of paper in the printer. It is important to set this correctly as
it affects the temperature at which the toner is fused to the paper. For example, if you are
printing on normal A4 paper, do not select Labels or Transparency as this may cause toner
smearing and paper jams.
Auto tray switch
If the printer runs out of paper in the current tray, Auto Tray Switch automatically changes
to a tray that has the same type of paper and continues printing.
Paper size check
Select Paper Size check if you want the printer to warn you when the document paper size
is different from the paper in the printer.
A warning message is displayed and printing continues when you load the correct paper in
the paper tray and press . When this option is deselected, the printer uses the ONLINE
paper loaded in the selected tray regardless of the document size.
Feed manually from Multipurpose Tray
Select this option if you want the printer to wait until you press the ONLINE button when
feeding from the Multipurpose Tray. This can be useful if printing on envelopes.
Always create 100% black (K) toner
Select this option if you want the printer to always use only black (K) toner when printing
pure black (RGB = 0,0,0). This is effective even when Composite Black (CMYK) is selected
in the colour options.
Run maintenance cycle before printing
Depending on printing habits and usage patterns, running the maintenance cycle before
printing may ensure the best possible print quality. This feature uses the printer's image
drums and transfer belt. The life of these printer consumables may be shortened if the
printer runs a maintenance cycle frequently.

Printing settings in Mac OS X (C801 and C810 only) > 32
P
RINT
CONTROL
If you are using the Windows Print Control Server software to manage printers, enter your
assigned user name and ID. This information is sent to the printer with your print job and
is recorded by the printer.
S
UMMARY
This option displays a summary of all selected print options for the current job.

Colour printing (C801 and C810 only) > 33
C
OLOUR
PRINTING
(C801
AND
C810
ONLY
)
The printer drivers supplied with your machine provide several controls for changing the
colour output. For general use the automatic settings will suffice, providing reasonable
default settings that will produce good results for most documents.
Many applications have their own colour settings, and these may override the settings in
the printer driver. Please refer to the documentation for your software application for
details on how that particular program’s colour management functions.
F
ACTORS
THAT
AFFECT
THE
APPEARANCE
OF
PRINTS
If you wish to manually adjust the colour settings in your printer driver, please be aware
that colour reproduction is a complex topic, and there are many factors to take into
consideration. Some of the most important factors are listed below.
Differences between the range of colours
a monitor or printer can reproduce
>Neither a printer nor a monitor is capable of reproducing the full range of colours
visible to the human eye. Each device is restricted to a certain range of colours. In
addition to this, a printer cannot reproduce all of the colours displayed on a monitor,
and vice versa.
>Both devices use very different technologies to represent colour. A monitor uses
Red, Green and Blue (RGB) phosphors (or LCDs), a printer uses Cyan, Magenta,
Yellow and Black (CMYK) toner or ink.
>A monitor can display very vivid colours such as intense reds and blues and these
cannot be easily produced on any printer using toner or ink. Similarly, there are
certain colours, (some yellows for example), that can be printed, but cannot be
displayed accurately on a monitor. This disparity between monitors and printers is
often the main reason that printed colours do not match the colours displayed on
screen.
Viewing conditions
A print can look very different under different lighting conditions. For example, the colours
in a print may look different when viewed standing next to a sunlit window, compared to
how they look under standard office fluorescent lighting.
Printer driver colour settings
The driver settings for Manual colour can change the appearance of a print. There are
several options available to help match the printed colours with those displayed on screen.
Monitor settings
The brightness and contrast controls on your monitor can change how your document looks
on-screen. Additionally, your monitor’s colour temperature influences how “warm” or “cool”
the colours look.
There are several settings found on a typical monitor:
>5000k Warmest; yellowish lighting, typically used in graphic art environments.
>6500k Cooler; approximates daylight conditions.
>9300k Cool; the default setting for many monitors and television sets.
(k = degrees Kelvin, a measurement of temperature.)

Colour printing (C801 and C810 only) > 34
How your software application displays colour
Some graphics applications such as Corel Draw or Adobe Photoshop may display colour
differently from “Office” applications such as Microsoft Word. Please see your application’s
on-line help or user manual for more information.
Paper type
The type of paper used can also significantly affect the printed colour. For example, a
printout on recycled paper can look duller than one on specially formulated glossy paper.
T
IPS
FOR
PRINTING
IN
COLOUR
The following guidelines may help you to achieve good colour output from your printer.
P
RINTING
PHOTOGRAPHIC
IMAGES
Use the Monitor (6500k) Perceptual setting.
If the colours look too dull, try the Monitor (6500k) Vivid or Digital Camera settings.
P
RINTING
FROM
M
ICROSOFT
O
FFICE
APPLICATIONS
Use the Monitor (9300k) setting. This may help if you are having problems with specific
colours from applications such as Microsoft Excel or Microsoft Powerpoint.
P
RINTING
SPECIFIC
COLOURS
(
E
.
G
.
A
COMPANY
LOGO
)
There are 2 utilities on your DVD-ROM that can help match specific colours:
>Colour Correct Utility
>Colour Swatch Utility
A
DJUSTING
THE
BRIGHTNESS
OR
INTENSITY
OF
A
PRINT
If the print is too light/dark, you can use the Brightness control to adjust it.
If the colours are too intense/not intense enough, use the Saturation control.
A
CCESSING
THE
COLOUR
MATCHING
OPTIONS
The colour matching options in the printer driver can be used to help match your printed
colours to the ones displayed on your monitor or from some other source, such as a digital
camera.
To open colour matching options from the Windows Control Panel:
1. Open the Printers window (called “Printers and Faxes” in
Windows XP).
2. Right-click the printer name and choose Properties.
3. Click the Printing Preferences button (1).
To open colour matching options from within a Windows application:
1. Choose File > Print… from the application’s menu bar.
2. Click the Properties button next to the printer name.
1

Colour printing (C801 and C810 only) > 35
S
ETTING
THE
COLOUR
MATCHING
OPTIONS
1. On the Colour tab select Advanced Colour (1) for colour matching.
2. Choose the Manual colour setting (2) and select from the following options:
(a) Monitor (6500k) Perceptual
Optimised for printing photographs. Colours are printed with emphasis on
saturation.
(b) Monitor (6500k) Vivid
Optimised for printing photographs, but with even more saturated colours than
the Monitor (6500k) Perceptual setting.
(c) Monitor (9300k)
Optimised for printing graphics from applications such as Microsoft Office.
Colours are printed with emphasis on Lightness.
(d) Digital Camera
Optimised for printing photographs taken with a digital camera.
Your results will vary depending on the subject and the conditions under which
the photograph was taken.
(e) sRGB
The printer will try to reproduce the sRGB colour space. This may be useful if
colour matching from an sRGB input device such as a scanner or digital camera.
U
SING
THE
COLOUR
SWATCH
FEATURE
To use the Colour Swatch feature, you must install the Colour Swatch Utility. This is
supplied on the DVD-ROM that you received with your printer.
The Colour Swatch function prints charts which contain a range of sample colours. Note that
this is not the full range of colours that the printer can produce. Listed on each sample
colour are the corresponding RGB (Red, Green, Blue) values. This can be used to pick
specific colours in applications that allow you to choose your own RGB values. Simply click
the Colour Swatch button (1) and choose from the options available.
1
2
1
2
WINDOWS MAC
1

Colour printing (C801 and C810 only) > 36
An example of using the Colour Swatch function:
You wish to print a logo in a particular shade of red. The steps you would follow are:
1. Print a colour swatch, then select the shade of red that best suits your needs.
2. Take a note of the RGB value for the particular shade that you liked.
3. Using your program’s colour picker, enter these same RGB values, and change the
logo to that colour.
The RGB colour displayed on your monitor may not necessarily match what was printed on
the colour swatch. If this is the case, it is probably due to the difference between how your
monitor and printer reproduce colour. Here, it is unimportant since your primary objective
is to print the required colour.
U
SING
THE
COLOUR
CORRECT
UTILITY
The Oki Colour Correct Utility is provided on your DVD-ROM.
The Colour Correct utility has the following features:
>Office palette colours can be individually adjusted. This is useful if you want to
change how a specific colour is printed.
>Colours can be adjusted by changing Hue, Saturation and Gamma. This is useful if
you wish to change the overall colour output.
Once these colour adjustments have been made, the new settings can be selected from the
printer driver Colour tab.
To select adjustments made with the Colour Correct Utility:
1. From your application program, click File and point to Print.
2. Click Properties. This displays the printer driver options.
3. Click the Colour tab.
4. Click Advanced Colour.
5. Click User Defined.
Select the colour adjustment you made with the Colour Correct Utility.

Menu functions - C801 and C810 > 37
M
ENU
FUNCTIONS
- C801
AND
C810
This section lists the menus accessed via the controls on the printer’s operator panel and
displayed in the LCD window.
O
PERATOR
P
ANEL
H
OW
TO
CHANGE
THE
SETTINGS
- U
SER
It should be noted that many of these settings can be, and often are, overridden by settings
in the Windows printer drivers. However, several of the driver settings can be left at
“Printer Setting”, which will then default to the settings entered in these printer menus.
Where applicable, factory default settings are shown in bold type in the following tables.
In the normal operating condition, known as “standby,” the printer’s LCD window will show
“ONLINE.” In this condition, to enter the menu system, press the +/– buttons on the
operator panel to move up and down through the list of menus until the menu you wish to
view is displayed. Then proceed as follows:
1. Press ENTER to enter the menu.
1. Ready LED ON:Ready to receive data.
Blinking:Processing data.
OFF: Offline.
2. Display Displays the printer status and any
error messages.
3. Menu Button Enters the Menu mode. In
Menu mode, forwards or
reverses the menu item
displayed.
Press for 2 secs. or longer to
fast forward or reverse.
4. On Line Button Switches between ONLINE and
OFFLINE.
Exits the menu and goes ONLINE
when pressed in the Menu mode.
Scrolls the HELP screen.
Forces printing on the paper
currently loaded when pressed with
“WRONG PAPER” or “WRONG PAPER
SIZE” displayed.
5. Attention LED ON: A warning occurs.
Printing is possible.
Blinking: An error occurs.
Printing not possible.
OFF: Normal condition.
6. Back Button Returns to the previous higher level
menu item.
7. Enter Button In the ONLINE or OFFLINE
mode: enters the Menu
mode.
In the Menu mode:
determines the setting
selected.
8. Cancel Button Deletes the data being printed or
received when pressed for two
seconds or longer.
Deletes the data when pressed for
two seconds or longer with WRONG
PAPER SIZE, RUN OUT OF PAPER,
TRAY 1 IS OPEN, or TRAY 1 IS NOT
FOUND is displayed.
1
6
5
MENU
3
BACK ENTER
7 4 8
O LN INE CANCEL
READY
ATTENTION C M Y K
2

Menu functions - C801 and C810 > 38
2. Use the up or down Menu buttons to move up and down through the items in the
menu. When the item you want to change is displayed, press Enter to edit that
item. An asterisk (*) appears next to the setting currently in effect.
3. Use the up or down Menu buttons to move up and down through the available
settings for this item, and press Enter when the setting you want is displayed. An
asterisk (*) will appear next to the setting, indicating that this setting is now in
effect.
4. Press BACK to move back to the list of menu items.
5. Do one of the following:
>Press BACK again to move up to the list of menus;
or…
>Press ON LINE to exit from the menu system and return to standby.
H
OW
TO
CHANGE
THE
SETTINGS
- A
DMINISTRATOR
You can set whether to ENABLE or DISABLE each category in the user menu.
Disabled categories are not displayed in the User’s menu.
Only a system administrator can change these settings.
1. Turn OFF the printer.
2. Turn ON the printer while pressing the Enter button.
When the Admin Menu appears, take your finger off the button.
3. Press the Enter button.
4. When Enter Password appears, press the up or down Menu button several times
to display the 1st line of the password and then press the Enter button.
Enter your 4- to 9-digit password.
(The default password is “aaaaaa”).
5. Press the Enter button.
6. Press the up or down Menu button until the “category” you want to change is
displayed.
7. When it is, press the Enter button.
8. Press the up or down Menu button until the “item” you want to change is displayed.
9. When it is, press the Enter button.
10. Initialization of the flash memory prompts with the message ARE YOU SURE?.
Confirm whether the change may be executed or not.
11. To execute it, press the up or down Menu button to display YES and then press the
Enter button. The printer automatically reboots.
12. When PLEASE POW OFF/SHUTDOWN COMP is displayed, turn the printer OFF/ON
13. Press the up or down MENU button until the settingyou want is displayed.
14. Press the Enter button to enter [*] on the right side of the setting selected.
15. Press the On Line button to switch the printer online.
NOTE:
When you have changed any settings in the USB MENU, turn the printer OFF,
then ON again.

Menu functions - C801 and C810 > 39
M
ENUS
I
NFORMATION
MENU
This menu provides a quick method of listing various items stored within the printer.
S
HUTDOWN
MENU
P
RINT
MENU
This menu provides adjustment of various print job related functions.
ITEM ACTION EXPLANATION
PRINT MENU MAP EXECUTE Prints complete menu listing with current settings
shown.
NETWORK EXECUTE Prints Network configuration information.
DEMO1 EXECUTE Prints demonstration page containing graphics and text
in colour and monochrome.
USAGE REPORT EXECUTE Prints a report of total impressions and supply
replacements.
ITEM ACTION EXPLANATION
SHUTDOWN START EXECUTE Starts the power off sequence (this protects the filing
system).
ITEM SETTINGS EXPLANATION
COPIES 1-999 Enter the number of copies of a document to be printed
from 1 to 999.
PAPER FEED TRAY1
TRAY2
MP TRAY
Selects the default tray for paper feed, Tray 1 (upper),
Tray 2 (lower, if installed) or MP Tray (multi purpose
tray).
AUTO TRAY SWITCH ON
OFF
If two trays contain identical paper, the printer can
switch to an alternative source when the current tray
runs out in the middle of a print job.
TRAY SEQUENCE DOWN
UP
PAPER FEED TRAY
Determines tray sequence order when automatically
switching.
MP TRAY USAGE DO NOT USE
WHEN MISMATCH
If a document to be printed demands a paper size not
installed in the selected tray, the printer can
automatically feed from the multi purpose tray instead.
If this function is not enabled, the printer will stop and
request the correct size of paper to be loaded.
MEDIA CHECK ENABLE
DISABLE
Determines whether the printer check the size of paper
loaded matches that required for the document sent to
print.

Menu functions - C801 and C810 > 40
M
EDIA
MENU
This menu provides adjustment to suit a wide range of print media.
MONO-PRINT SPEED AUTO SPEED
MONO 32PPM
COLOR SPEED
MIXED SPEED
If the first page of a print job is black and white, the
printer runs at 32ppm (pages per minute). When a
colour page is detected the printer slows down to
30ppm (C810) or 26ppm (C801) for the rest of that
job.
This setting operates in the same way as AUTO SPEED,
except that the printer runs at 32ppm until a colour
page is detected. To achieve this speed the printer
requires an additional time to warm up and cool down
when switching to 30ppm (C810) or 26ppm (C801) for
colour pages. This setting is therefore most appropriate
when the majority of print jobs are entirely black and
white.
The printer runs at 30ppm (C810) or 26ppm (C801) for
all print jobs. This setting is most appropriate when the
majority of print jobs are in colour.
The printer runs at 26 ppm (C810) or 22ppm (C801)
for colour pages and 30 ppm (C810) or 26ppm (C801)
for mono pages.
ITEM SETTINGS EXPLANATION
TRAY1 PAPERSIZE CASSETTE SIZE
CUSTOM
Selects the size of paper loaded in Tray 1 (upper tray if
both trays installed). For CUSTOM setting see X-
DIMENSION and Y-DIMENSION later in this table.
TRAY1 MEDIATYPE PLAIN
LETTERHEAD BOND
RECYCLED
CARD STOCK
GLOSSY
ROUGH
Selects the type of media loaded in this tray. This will
help the printer to adjust its internal operating
parameters, such as engine speed and fusing
temperature, to better accommodate the media to be
fed. For example, letterhead may benefit from a slightly
lower fusing temperature to ensure that its ink does not
offset.
TRAY1 MEDIAWEIGHT LIGHT
MEDIUM LIGHT
MEDIUM
HEAVY
Adjusts the printer for the weight of paper stock loaded
in this tray.
TRAY2 PAPERSIZE CASSETTE SIZE
CUSTOM
Selects the size of paper loaded in Tray 2 (lower) if
installed. For CUSTOM setting see X-DIMENSION and Y-
DIMENSION in this table.
TRAY2 MEDIATYPE PLAIN
LETTERHEAD
BOND
RECYCLED
CARD STOCK
GLOSSY
ROUGH
Selects the type of media loaded in this tray (if
installed). (see notes above for tray 1).
TRAY2 MEDIAWEIGHT LIGHT
MEDIUM LIGHT
MEDIUM
HEAVY
Adjusts the printer for the weight of paper stock loaded
in this tray (if installed).
TRAY3 PAPERSIZE CASSETTE SIZE
CUSTOM
Selects the size of paper loaded in Tray 3 (lower) if
installed.
ITEM SETTINGS EXPLANATION

Menu functions - C801 and C810 > 41
TRAY3 MEDIATYPE PLAIN
LETTERHEAD
TRANSPARENCY
BOND
RECYCLED
CARD STOCK
GLOSSY
ROUGH
Selects the type of media loaded in this tray (if
installed). (see notes above for tray 1).
TRAY3 MEDIAWEIGHT LIGHT
MEDIUM LIGHT
MEDIUM
HEAVY
Adjusts the printer for the weight of paper stock loaded
in this tray (if installed).
MPT PAPERSIZE A3
A4 SEF
A4 LEF
A5 SEF
A6
B4
B5 SEF
B5 LEF
LEGAL 14
LEGAL 13.5
LEGAL 13
TABLOID
LETTER SEF
LETTER LEF
EXECUTIVE
CUSTOM
COM-10
ENVELOPE
DL ENVELOPE
C5 ENVELOPE
C4 ENVELOPE
Selects the size of paper to be fed from the multi
purpose tray. For CUSTOM setting see X-DIMENSION
and Y-DIMENSION later in this table.
MPT MEDIATYPE PLAIN
LETTERHEAD
TRANSPARENCY
LABELS
CARD STOCK
GLOSSY
BOND
RECYCLED
ROUGH
Selects the type of media to be fed from the multi
purpose tray so that the printer can adjust its internal
parameters to better accommodate the selected type of
media.
MPT MEDIAWEIGHT LIGHT
MEDIUM LIGHT
MEDIUM
HEAVY
ULTRA HEAVY1
ULTRA HEAVY2
Selects the media weight to be fed from the multi
purpose tray.
UNIT OF MEASURE MILLIMETRE
INCH
Selects the unit of measure for the next two items.
ITEM SETTINGS EXPLANATION

Menu functions - C801 and C810 > 42
C
OLOUR
MENU
The printer automatically adjusts colour balance and density at appropriate intervals,
optimising the printed output for bright white paper viewed in natural daylight conditions.
The items on this menu provide a means of changing the default settings for special or
particularly difficult print jobs. Settings revert to their default values when the next print
job is complete.
S
YSTEM
CONFIGURATION
MENU
This menu adjusts general printer settings to suit the way you prefer to work.
ITEM SETTINGS EXPLANATION
DENSITY CONTROL AUTO
MANUAL
Selecting this will permit automatic adjustment of the
colour density.
ADJUST DENSITY EXECUTE Image density will be automatically adjusted at power
on, when a new image drum or toner cartridge is
installed, and at intervals of 100, 300 and 500 drum
counts. If a 500 drum count interval occurs during a
print job it will occur at the end of that job, and will
take up to 55 seconds.
AJST REGSTRATION EXECUTE Performs automatic colour registration adjustment.
Normally this is done on power on and when the top
cover is opened and then closed. This process
accurately aligns the cyan, magenta and yellow images
to the black image.
C REG FINE ADJ
M REG FINE ADJ
Y REG FINE ADJ
-3~0~+3
-3~0~+3
-3~0~+3
Performs fine adjustment of image timing in relation to
the black image component.
ITEMS SETTINGS EXPLANATION
POW SAVE DELAY 1
3
5
15
30
60
240
Adjusts the idling time before the printer automatically
switches into power saving mode. In this mode power
consumption is reduced to a low level required to just
keep the printer operating and ready to receive data.
When a job is sent the printer will require a warm-up
time of up to 1 minute before printing can begin.
CLRABLE WARNING ONLINE
JOB
When ONLINE, non-critical warnings, such as requests
for a different paper size, can be cleared by pressing
the ON LINE button. When set to JOB, they are
cleared when the print job resumes.
MANUAL TIMEOUT OFF
30
60
Specifies how many seconds the printer will wait for
paper to be fed before cancelling the job.
WAIT TIMEOUT OFF~90~300 Specifies how many seconds the printer will wait when
received data pauses before forcing a page eject. In
PostScript Emulation mode the job will be cancelled if
timeout occurs.
TONER LOW CONTINUE CONTINUE
STOP
Specifies whether the printer should continue printing
even after a low toner condition is detected.
JAM RECOVERY ON
OFF
Specifies whether the printer should perform jam
recovery after a paper jam has occurred. If ON, the
printer will attempt to print again any pages lost due to
a paper jam once the jam has been cleared.
ERROR REPORT ON
OFF
Sets whether an error report is printed when an
internal fault occurs.

Menu functions - C801 and C810 > 43
USB
MENU
This menu controls the operation of the printer’s USB data interface.
N
ETWORK
MENU
This menu controls the operation of the printer’s 10Base-T/100Base-TX network interface.
ITEM SETTINGS EXPLANATION
SOFT RESET ENABLE /
DISABLE
Enables or disables the SOFT RESET command.
SPEED 12 / 480 Mps Selects the interface speed.
SERIAL NUMBER ENABLE / DISABLE Specifies whether to ENABLE or DISABLE a USB serial
number.
The USB serial number is used to identify the USB device
connected to your PC.
NOTE:
When you have changed any settings in the USB MENU, turn the printer OFF,
then ON again.
ITEM SETTINGS EXPLANATION
TCP/IP ENABLE /
DISABLE
Enables or disables this network protocol.
NETBEUI ENABLE /
DISABLE
Enables or disables this network protocol.
IP ADDRESS SET AUTO / MANUAL Specifies whether IP address allocation is automatic
(DHCP) or manually assigned.
IP ADDRESS xxx.xxx.xxx.xxx Current assigned IP address. To change, press ENTER and
use up or down buttons to increment 1st octet, then press
ENTER again to move on to next octet. When 4th octet
has been set, press ENTER again to register new address.
SUBNET MASK xxx.xxx.xxx.xxx Current assigned subnet mask. To change, proceed as
above.
GATEWAY ADDRESS xxx.xxx.xxx.xxx Current assigned gateway address. To change, proceed as
above.
WEB ENABLE /
DISABLE
Enables or disables Web config. facility.
TELNET ENABLE /
DISABLE
Enables or disables Telnet config. facility.
FTP ENABLE /
DISABLE
Enables or disables communication via FTP.
SNMP ENABLE /
DISABLE
Enables or disables SNMP protocol.
NETWORK SCALE NORMAL / SMALL Selects network size.
HUB LINK SETTING AUTO
NEGOTIATE
100BASE-TX FULL
100BASE-TX HALF
10BASE-T FULL
10BASE-T HALF
Sets full or half duplex for communication via a network
hub.
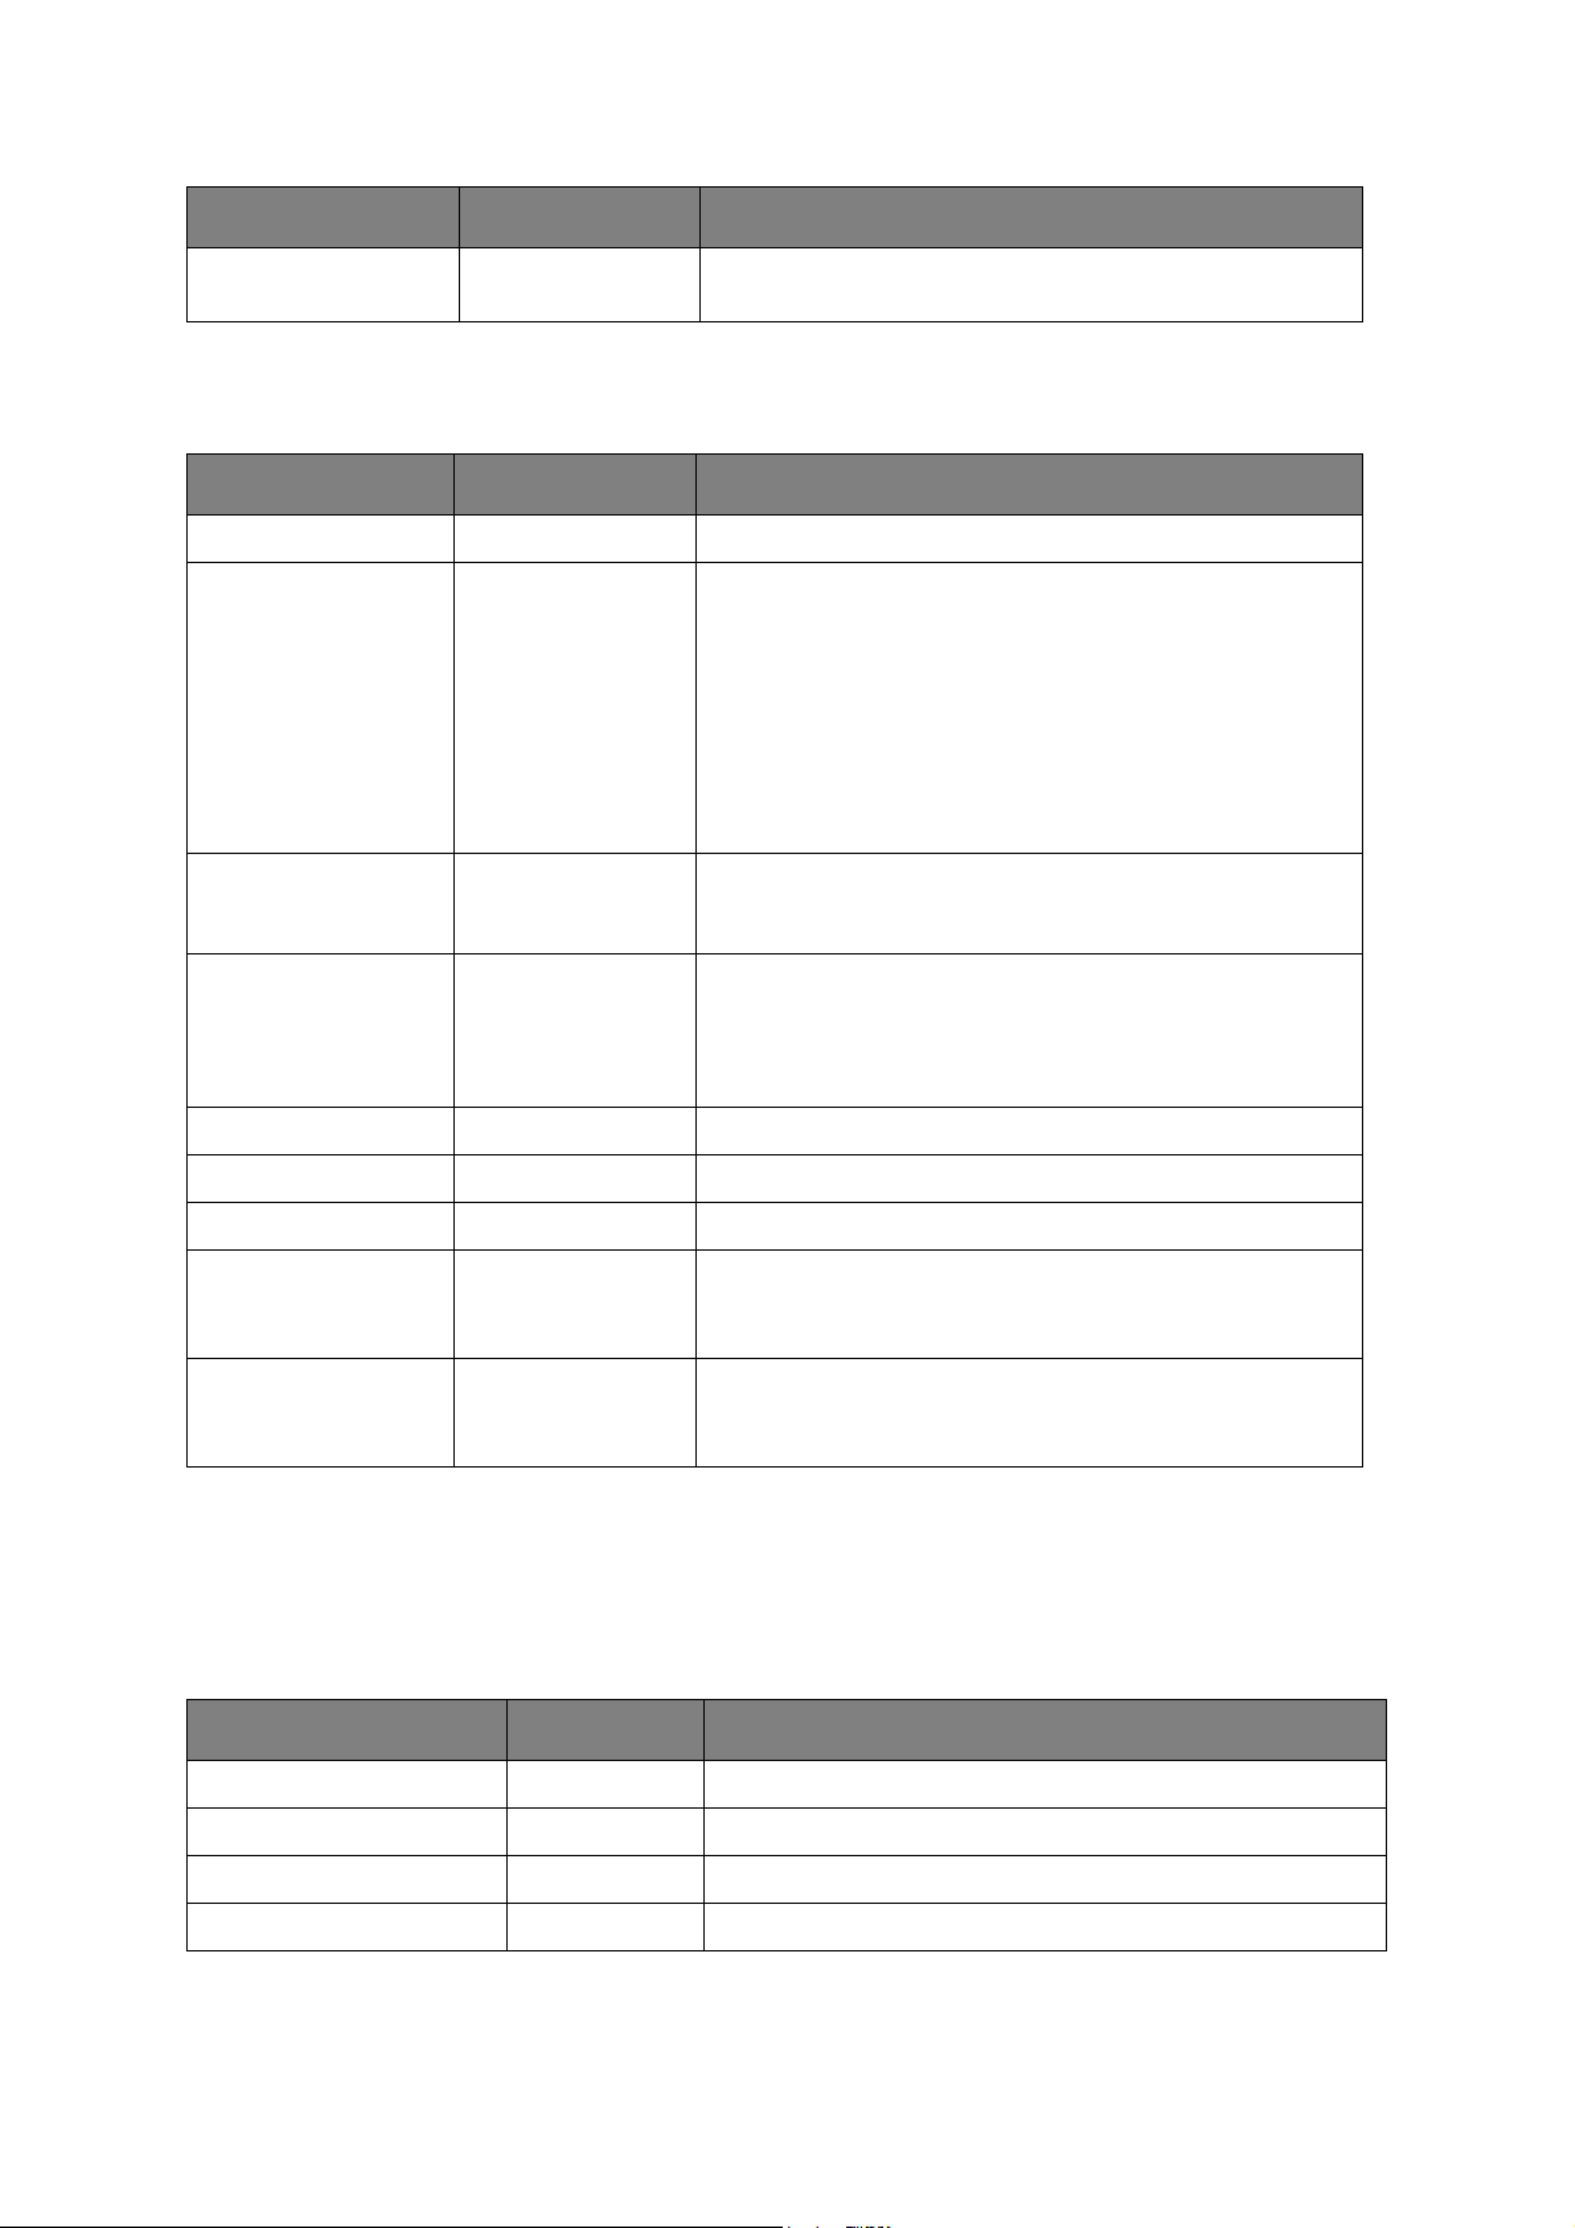
Menu functions - C801 and C810 > 44
M
AINTENANCE
MENU
This menu provides access to various printer maintenance functions.
U
SAGE
MENU
This menu is for information only, and provides an indication of total usage of the printer
and the expected life left in its consumable items. This is particularly useful if you do not
have a full set of replacement consumables to hand and you need to know how soon you
will need them.
FACTORY DEFAULTS
ENABLE
EXECUTE Reloads the settings present when the unit was setup by
the manufacturer.
ITEM SETTINGS EXPLANATION
MENU RESET EXECUTE Resets menus to default settings.
SAVE MENU EXECUTE Saves the current menu settings. The last menu executed
is saved and the menu previously saved is overwritten and
erased.
When you press the ENTER button, the following
confirmation message is displayed.
“DO YOU WANT TO EXECUTE THIS FUNCTION?” YES/NO
If you select NO, the display returns to the previous menu.
If you select YES, the current menu settings are stored and
the menu is exited.
POWER SAVE ENABLE / DISABLE Enables or disables automatic power save mode.Delay
before entering this mode is set in the SYSTEM
CONFIGURATION menu.
PAPER BLACK SET –2~0~+2 Used for small adjustment when you experience faded print
or light specks / streaking in monochrome printing on white
paper. Select a higher value to reduce fading, or a lower
value to reduce specks or streaking in high density print
areas.
PAPER COLOR SET –2~0~+2 As above, but for colour printing.
TRNSPR BLACK SET –2~0~+2 As above but for mono printing on transparencies.
TRNSPR COLOR SET –2~0~+2 As above but for colour printing on transparencies.
SMR SETTING –3~0~+3 Compensates for print variations caused by differences in
temperature, humidity, and printing density/frequency.
Change the value when the image quality is uneven.
BG SETTING –3~0~+3 Compensates for print variations caused by differences in
temperature, humidity and printing density/frequency.
Change the value when the background density is high.
ITEM DISPLAY EXPLANATION
TRAY1 COUNT nnnnnn The total number of pages fed from tray 1.
TRAY2 COUNT nnnnnn The total number of pages fed from tray 2 (if fitted).
TRAY3 COUNT nnnnnn The total number of pages fed from tray 3 (if fitted).
MPT COUNT nnnnnn The total number of pages fed from the multi purpose tray.
ITEM SETTINGS EXPLANATION

Menu functions - C801 and C810 > 45
A
DMINISTRATOR
(B
OOT
)
MENU
This menu should only be changed by the System Administrators. In order to gain access
to this menu, follow the instructions in “How to change the settings - Administrator” on
page 38.
This menu is in ENGLISH only (default settings in bold type).
K DRUM LIFE
C DRUM LIFE
M DRUM LIFE
Y DRUM LIFE
REMAINING
nnnnnn
Percentage of life remaining in these consumable items.
BELT LIFE REMAINING
nnnnnn
Percentage of belt life remaining.
FUSER LIFE REMAINING
nnnnnn
Percentage of fuser life remaining.
K TONER
C TONER
M TONER
Y TONER
REMAINING
nnnnnn
Cartridge size and current toner level.
ITEM SUB-MENU SETTINGS EXPLANATION
Enter Password xxxxxxxxxxxx Enter a password to gain entry to the Admin menu.
Password should be from 6 to 12 digits of alpha/
numeric characters (or mix)
The default value is "aaaaaa"
The printer will restart after the Boot Menu.
OP Menu
ALL CATEGORY ENABLE/
DISABLE
Enables/Disables all categories in the USERS MENU.
If DISABLE is selected, only the PRINT JOB MENU
will appear.
INFORMATION
MENU
ENABLE/
DISABLE
Enables/disables the information menu. If DISABLE
is selected, the information menu will not appear.
SHUTDOWN
NENU
ENABLE/
DISABLE
Enables/disables the shutdown menu. If DISABLE is
selected, this menu will not appear.
PRINT MENU ENABLE/
DISABLE
Enables/disables the print menu. If DISABLE is
selected, this menu will not appear.
MEDIA MENU ENABLE/
DISABLE
Enables/disables the media menu. If DISABLE is
selected, this menu will not appear.
COLOR MENU ENABLE/
DISABLE
Enables/disables the color menu. If DISABLE is
selected, this menu will not appear.
SYS CONFIG
MENU
ENABLE/
DISABLE
Enables/disables the system configuration menu. If
DISABLE is selected, this menu will not appear.
USB MENU ENABLE/
DISABLE
Enables/disables the USB menu. If DISABLE is
selected, this menu will not appear.
NETWORK
MENU
ENABLE/
DISABLE
Enables/disables the network menu. If DISABLE is
selected, this menu will not appear.
MEMORY MENU ENABLE/
DISABLE
Enables/disables the memory menu. If DISABLE is
selected, this menu will not appear.
SYS ADJUST
MENU
ENABLE/
DISABLE
Enables/disables the system adjust menu. If
DISABLE is selected, this menu will not appear.
ITEM DISPLAY EXPLANATION

Menu functions - C801 and C810 > 46
MAINTENANCE
MENU
ENABLE/
DISABLE
Enables/disables the maintenance menu. If
DISABLE is selected, this menu will not appear.
USAGE MENU ENABLE/
DISABLE
Enables/disables the usage menu. If DISABLE is
selected, this menu will not appear.
Config Menu
NEARLIFE
STATUS
ENABLE/
DISABLE
Enables/disables the LED control when NearLife
warning of a toner, drum, fuser, or belt occurs.
Attention LED is lighted when enabled, not lighted
when disabled. (Displays LCD message).
The status (Life warning) of temporay recovery by
opening and closing of the cover is not included.
NEARLIFE LED ENABLE/
DISABLE
PEAK POW
CONTROL
NORMAL/LOW Sets level of peak power control.
FILE SYS MAINT1
FLASH
INITIALIZE
EXECUTE Initializes the resident flash memory.
The following message appears when pressing the
enter button.
ARE YOU SURE?
YES/NO
If NO is selected, the printer will go back to the
source menu. If YES is selected, the printer will be
automatically rebooted and initialize the flash
memory.
FILE SYS MAINT2
INITIAL LOCK YES/NO If YES is selected ADMIN MENU will not appear -
FILE SYS MAINT !
LANGUAGE MENU
LANG
INITIALIZE
EXECUTE Initializes the message file loaded in flash memory.
The following message for confirmation will appear
by pressing the enter button.
ARE YOU SURE?
YES/NO
If NO is selected, the printer will go back to the
source menu. The procedure for clearing disk will
start immediately after the menu is rebooted
CHANGE PASSWORD
NEW
PASSWORD
********** Set a new password for entering administrator’s
menu.
From 4 to 12 alpha/numerical digits can be entered.
VERIFY
PASSWORD
********** Verifies the new password set above.
ITEM SUB-MENU SETTINGS EXPLANATION

Menu functions - C801 and C810 > 47
P
RINT
STATISTICS
MENU
This menu should only be changed by the System Administrators. In order to gain access
to this menu, follow the instructions in “How to change the settings - Administrator” on
page 38 but hold down the MENU UP button instead of the Enter button.
This menu is in ENGLISH only (default settings in bold type).
ITEM SETTINGS EXPLANATION
Enter Password XXXX Enters a password to enter Print Statistics menu.
The default value is "0000".
The password for entry to Print Statistics is different
from the password for entry to Functions-Admin Setup.
"Print Statistics" category is not shown when Print
Statistics function is not supported.
Usage Report Enable/Disable Enables/Disables the printing of the Usage Report.
When changing a setting value, the printer is rebooted.
Group Counter Enable/Disable Specifies if the Group counter is displayed in the Usage
Report Print.
Enable: Displayed.
Disable: Not displayed.
Conditions for display:
Enable must be selected in Functions/Print Statistics/
Usage Report.
Supplies Report Enable/Disable Enebles/disables the Supplies Report.
Enable must be selected in Functions/Print Statistics/
Usage Report.
Reset Main Counter Execute Resets the main counter to zero.
When executing this menu, resets the main counter to
zero and exits from the menu.
Enable must be selected in Functions/Print Statistics/
Usage Report.
Reset Supplies
Counter
Execute Resets the Supplies counter to zero.
Change
Password
Changes the password.
Enable must be selected in Functions/Print Statistics/
Usage Report
New
Password
xxxx Sets a new password to enter Print Statistics menu.
Verify
Password
xxxx Re-enter new password set to enter Print Statistics set in
New Password for confirmation.

Menu functions - C821 and C830 > 48
M
ENU
FUNCTIONS
- C821
AND
C830
This section lists the menus accessed via the controls on the printer’s operator panel and
displayed in the LCD window.
O
PERATOR
PANEL
1. Ready LED ON: Ready to receive data.
BLINKING: Processing data.
OFF: Offline.
2. Display Displays the printer status and
any error messages.
3. Menu Buttons Enters the mode. In Menu
Menu mode, forwards or
reverses the menu item
displayed.
Press for 2 secs. or longer to
fast forward or reverse.
4. On Line Button Switches between ONLINE and
OFFLINE.
Exits the menu and goes
ONLINE when pressed in the
Menu mode.
Forces printing on the paper
currently loaded when pressed
with “WRONG PAPER” or
“WRONG PAPER SIZE” displayed.
5. Attention LED ON: A warning occurs.
Printing not possible (e.g
empty toner).
BLINKING: An error occurs.
Printing may be possible
(e.g. toner low).
OFF: Normal condition.
6. Back Button Returns to the previous higher
level menu item or exits menu &
returns printer to “Ready to
Print”.
7. Enter Button In the ONLINE or OFFLINE
mode: enters the Menu
mode.
In the Menu mode:
determines the setting
selected. Advances through
the menu structure.
8. Cancel Button Deletes the data being printed or
received when pressed for two
seconds or longer.
Deletes the data when pressed
for two seconds or longer with,
e.g., WRONG PAPER SIZE
displayed.
Exits the menu and goes ONLINE
when pressed in the Menu mode.
9. Help Button Provides advice when an
error such as incorrect paper
size occurs
10. Shut Down/Restart
Button
When held for a few seconds
carries out the correct shutdown/
restart procedure to prevent
possible machine damage
1
6
5
9
10
MENU
3
BACK ENTER
7 4 8
O LN INE CANCEL
C M Y K
Ready To Print
Power Save
2
HELP
S DHUT OWN
/RESTART
READY
ATTENTION
Toner
Product specificaties
| Merk: | Oki |
| Categorie: | Printer |
| Model: | C821dn |
| Gewicht: | 40000 g |
| Stroomvoorziening: | AC 220 - 240V@50/60Hz |
| Kleur: | Ja |
| Frequentie van processor: | 700 MHz |
| Processormodel: | PowerPC750CL |
| Stroomverbruik (in standby): | 200 W |
| Intern geheugen: | 256 MB |
| Aansluitingen: | 1x USB 2.0, \n1x RJ-45, \n1x IEEE-1284 |
| Stroomverbruik (PowerSave): | 17 W |
| Temperatuur bij opslag: | -10 - 43 °C |
| Compatibele besturingssystemen: | Microsoft Windows 2000/XP Home/XP Professional/Server 2003/Server 2008/Server 2008 R2/Vista/7, Mac OS X 10.3.9 to 10.6.3 |
| Luchtvochtigheid bij opslag: | 10 - 90 procent |
| Mac-compatibiliteit: | Ja |
| Netwerkfuncties: | Fast Ethernet |
| Maximale resolutie: | 600 x 1200 DPI |
| Papierlade mediatypen: | Envelopes, Labels |
| Opwarmtijd: | 90 s |
| Printsnelheid (zwart, standaardkwaliteit, A4/US Letter): | 32 ppm |
| Printsnelheid (kleur, standaard, A4/US Letter): | 22 ppm |
| Duplex printen: | Ja |
| Gebruiksindicatie (maximaal): | 75000 pagina's per maand |
| Totale invoercapaciteit: | 300 vel |
| Maximum invoercapaciteit: | 1460 vel |
| Totale uitvoercapaciteit: | 250 vel |
| Maximale ISO A-series papierformaat: | A3 |
| ISO A-series afmetingen (A0...A9): | A3, A4, A5, A6 |
| Tijdsduur tot de eerste pagina (zwart, normaal): | 9.5 s |
| Tijdsduur tot de eerste pagina (kleur, normaal): | 11.5 s |
| Netwerkgereed: | Ja |
| Gemiddeld stroomverbruik tijdens printen: | 570 W |
| Maximaal intern geheugen: | 750 MB |
| ISO B-series afmetingen (B0...B9): | B4, B5 |
| Afmetingen enveloppen: | C5, DL |
| Aanbevolen temperatuur bij gebruik: | 17 - 27 °C |
| Aanbevolen gebruiksindicatie: | 5000 pagina's per maand |
| Multifunctionele ladecapaciteit: | 100 vel |
| Multifunctionele lade: | Ja |
| Afmetingen (B x D x H): | 485 x 634 x 345 mm |
| Printsnelheid (zwart, standaard, A3): | 17 ppm |
| Printsnelheid (kleur, standaard, A3): | 12 ppm |
| Papierlade 2 invoercapaciteit: | 530 vel |
| Inclusief lettertypes: | Ja |
| Mediagewicht lade 1: | 64 - 120 g/m² |
| Mediatype en capaciteit, lade 2: | A3, A4, A5, B4, B5 |
| Bedrijfstemperatuur (T-T): | 10 - 32 °C |
| Relatieve vochtigheid in bedrijf (V-V): | 20 - 80 procent |
| Ondersteund mediagewicht, duplex printen (aanbevolen gr/m²): | 64 - 105 g/m² |
| Printerlettertypen: | Barcode, Bitmap, PCL, PostScript |
| PCL®-fonts: | 87 |
| PostScript®-fonts: | 136 |
| Multifunctionele lade papiergewicht: | 64 - 220 g/m² |
| Bitmap fonts: | OCR-A, OCR-B |
| Mediagewicht lade 2: | 64 - 176 g/m² |
Heb je hulp nodig?
Als je hulp nodig hebt met Oki C821dn stel dan hieronder een vraag en andere gebruikers zullen je antwoorden
Handleiding Printer Oki

4 Mei 2023
4 Mei 2023
4 Mei 2023
4 Mei 2023
18 Juni 2023
4 Mei 2023
4 Mei 2023
4 Mei 2023
17 Juni 2023
14 Juni 2023
Handleiding Printer
- Printer HP
- Printer Sony
- Printer Samsung
- Printer Xiaomi
- Printer Panasonic
- Printer Epson
- Printer LG
- Printer Huawei
- Printer Canon
- Printer Honeywell
- Printer Olympus
- Printer Toshiba
- Printer Xerox
- Printer Agfaphoto
- Printer AVM
- Printer Brother
- Printer Builder
- Printer D-Link
- Printer Dell
- Printer Digitus
- Printer Dymo
- Printer Epson 7620
- Printer Frama
- Printer Fujifilm
- Printer Fujitsu
- Printer Ibm
- Printer Intermec
- Printer Kern
- Printer Kodak
- Printer Kogan
- Printer Konica Minolta
- Printer Kyocera
- Printer Lenovo
- Printer Lexmark
- Printer Minolta
- Printer Mitsubishi
- Printer MSI
- Printer Nec
- Printer Paxar
- Printer Polaroid
- Printer Primera
- Printer Renkforce
- Printer Ricoh
- Printer Roland
- Printer Royal Sovereign
- Printer Sagem
- Printer Seiko
- Printer Sharp
- Printer Star
- Printer Thomson
- Printer Tomy
- Printer Toshiba TEC
- Printer Triumph-Adler
- Printer Velleman
- Printer Zebra
- Printer Oce
- Printer Olivetti
- Printer Olympia
- Printer CSL
- Printer Argox
- Printer DTRONIC
- Printer Metapace
- Printer Citizen
- Printer Nilox
- Printer Approx
- Printer Ultimaker
- Printer Custom
- Printer Bixolon
- Printer Brady
- Printer GoDEX
- Printer Testo
- Printer EC Line
- Printer Sawgrass
- Printer Pantum
- Printer DNP
- Printer TSC
- Printer Equip
- Printer StarTech.com
- Printer Fichero
- Printer GG Image
- Printer Posiflex
- Printer ZKTeco
- Printer Star Micronics
- Printer Datamax-O'neil
- Printer Panduit
- Printer Dascom
- Printer HiTi
- Printer Vupoint Solutions
- Printer Elite Screens
- Printer Phoenix Contact
- Printer Videology
- Printer Colop
- Printer Raspberry Pi
- Printer Evolis
- Printer Unitech
- Printer Middle Atlantic
- Printer IDP
- Printer Fargo
- Printer Microboards
- Printer Mutoh
- Printer Tally Dascom
- Printer Nisca
Nieuwste handleidingen voor Printer

9 April 2025

8 April 2025
2 April 2025
2 April 2025
1 April 2025

1 April 2025

29 Maart 2025
29 Maart 2025

11 Maart 2025