LevelOne WBR-3470A Handleiding
Lees hieronder de 📖 handleiding in het Nederlandse voor LevelOne WBR-3470A (78 pagina's) in de categorie Router. Deze handleiding was nuttig voor 37 personen en werd door 2 gebruikers gemiddeld met 4.5 sterren beoordeeld
Pagina 1/78

WBR-3470
ADSL2+ VoIP Router 1W 4L
Quick Installation Guide
English Português
Deutsch 繁體中文
繁體中文
繁體中文
繁體中文繁體中文
Français 한국어
Español 日本語
Nederlands Русский
Danish ไทย
ไทย
ไทย
ไทยไทย
Italiano ﻲﺑﺮﻋ
Ελληνικά
1

Front LED
LED Description
1 PWR:
:
:
:: Lights when the power is ON.
2 SYS:
:
:
:: Lights when the system is ready.
3-6 LAN Port
1-4:
:
:
::
Steady glow when connected to an Ethernet device.
Glows green for 100Mbps; Orange for 10Mbps.
Blinking light when data is Transmitted / Received.
7 WLAN:
:
:
:: Lit green when the wireless connection is established.
Flashes when sending/receiving data.
8-9 Phone:
:
:
:: Lit green when the phone is off-hook.
10 LINE:
:
:
:: Lit when the inbound and outbound calls transmitted
through PSTN.
11 VoIP:
:
:
:: Lit when SIP registration is OK.
12 PPP:
:
:
:: Steady glow when there is a PPPoA / PPPoE connection.
13 ADSL:
:
:
:: Lights when successfully connected to an ADSL DSLAM
(linesync).
2

Rear Ports
8 7 6 5 1 2 4 3
Port Description
1 Power
Switch Power ON/OFF switch.
2 PWR Connect the supplied power adapter to this jack.
3 RESET
After the router is powered on, press this recessed button using
the end of paper clip or other small pointed object to reset the
router or to restore it to factory default settings.
1. Recovery procedures for non-working routers (e.g. after a
failed firmware upgrade flash):
2. Recovery procedures for a lost web interface password:
4 LAN Connect a UTP Ethernet cable (Cat-5 or Cat-5e) to one of the
four LAN ports when connecting to a PC or an office/home
network of 10Mbps or 100Mbps.
5 Phone Connect RJ-11 cable to this port when connecting to an analog phone
set.
6 LINE Connect RJ-11 cable to this port when connecting to the telephone
wall jack
7 ADSL Connect the supplied RJ-11 (“telephone”) cable to this port when
connecting to the ADSL/telephone network.
8 Antenna Connect the detachable antenna to this port.
3

Package Contents
3 WBR-3470
3 AC-DC Power Adapter (12VDC, 1.2A)
3 RJ-11 ADSL/telephone Cable
3 Cat.5 Cable
3 CD Manual
3 Quick Installation Guide
Note
For more detailed instructions on configuring and using the ADSL2+ VoIP
Router, please refer to the User Manual
Warning
Do not use the WBR-3470 in high humidity or high temperatures.
Do not use the same power source for the WBR-3470 as other equipment.
Do not open or repair the case yourself. If the WBR-3470 is too hot, turn
off the power immediately and have it repaired at a qualified service
center.
Avoid using this product and all accessories outdoors.
Attention
Place the WBR-3470 on a stable surface.
Only use the power adapter that comes with the package. Using a
different voltage rating power adaptor may damage the router.
4

Connecting ADSL2+ VoIP Router
1. Connect the Router to a LAN (Local Area Network) and the ADSL/telephone (LINE) network.
2. Power on the device.
3. Make sure the PWR and SYS LEDs are lit steadily and that the relevant LED is lit. LAN
4. Connect an RJ11 cable to VoIP port when connecting to an analog phone set.
5. Connect an RJ11 cable to LINE port when connecting to the telephone wall jack
5

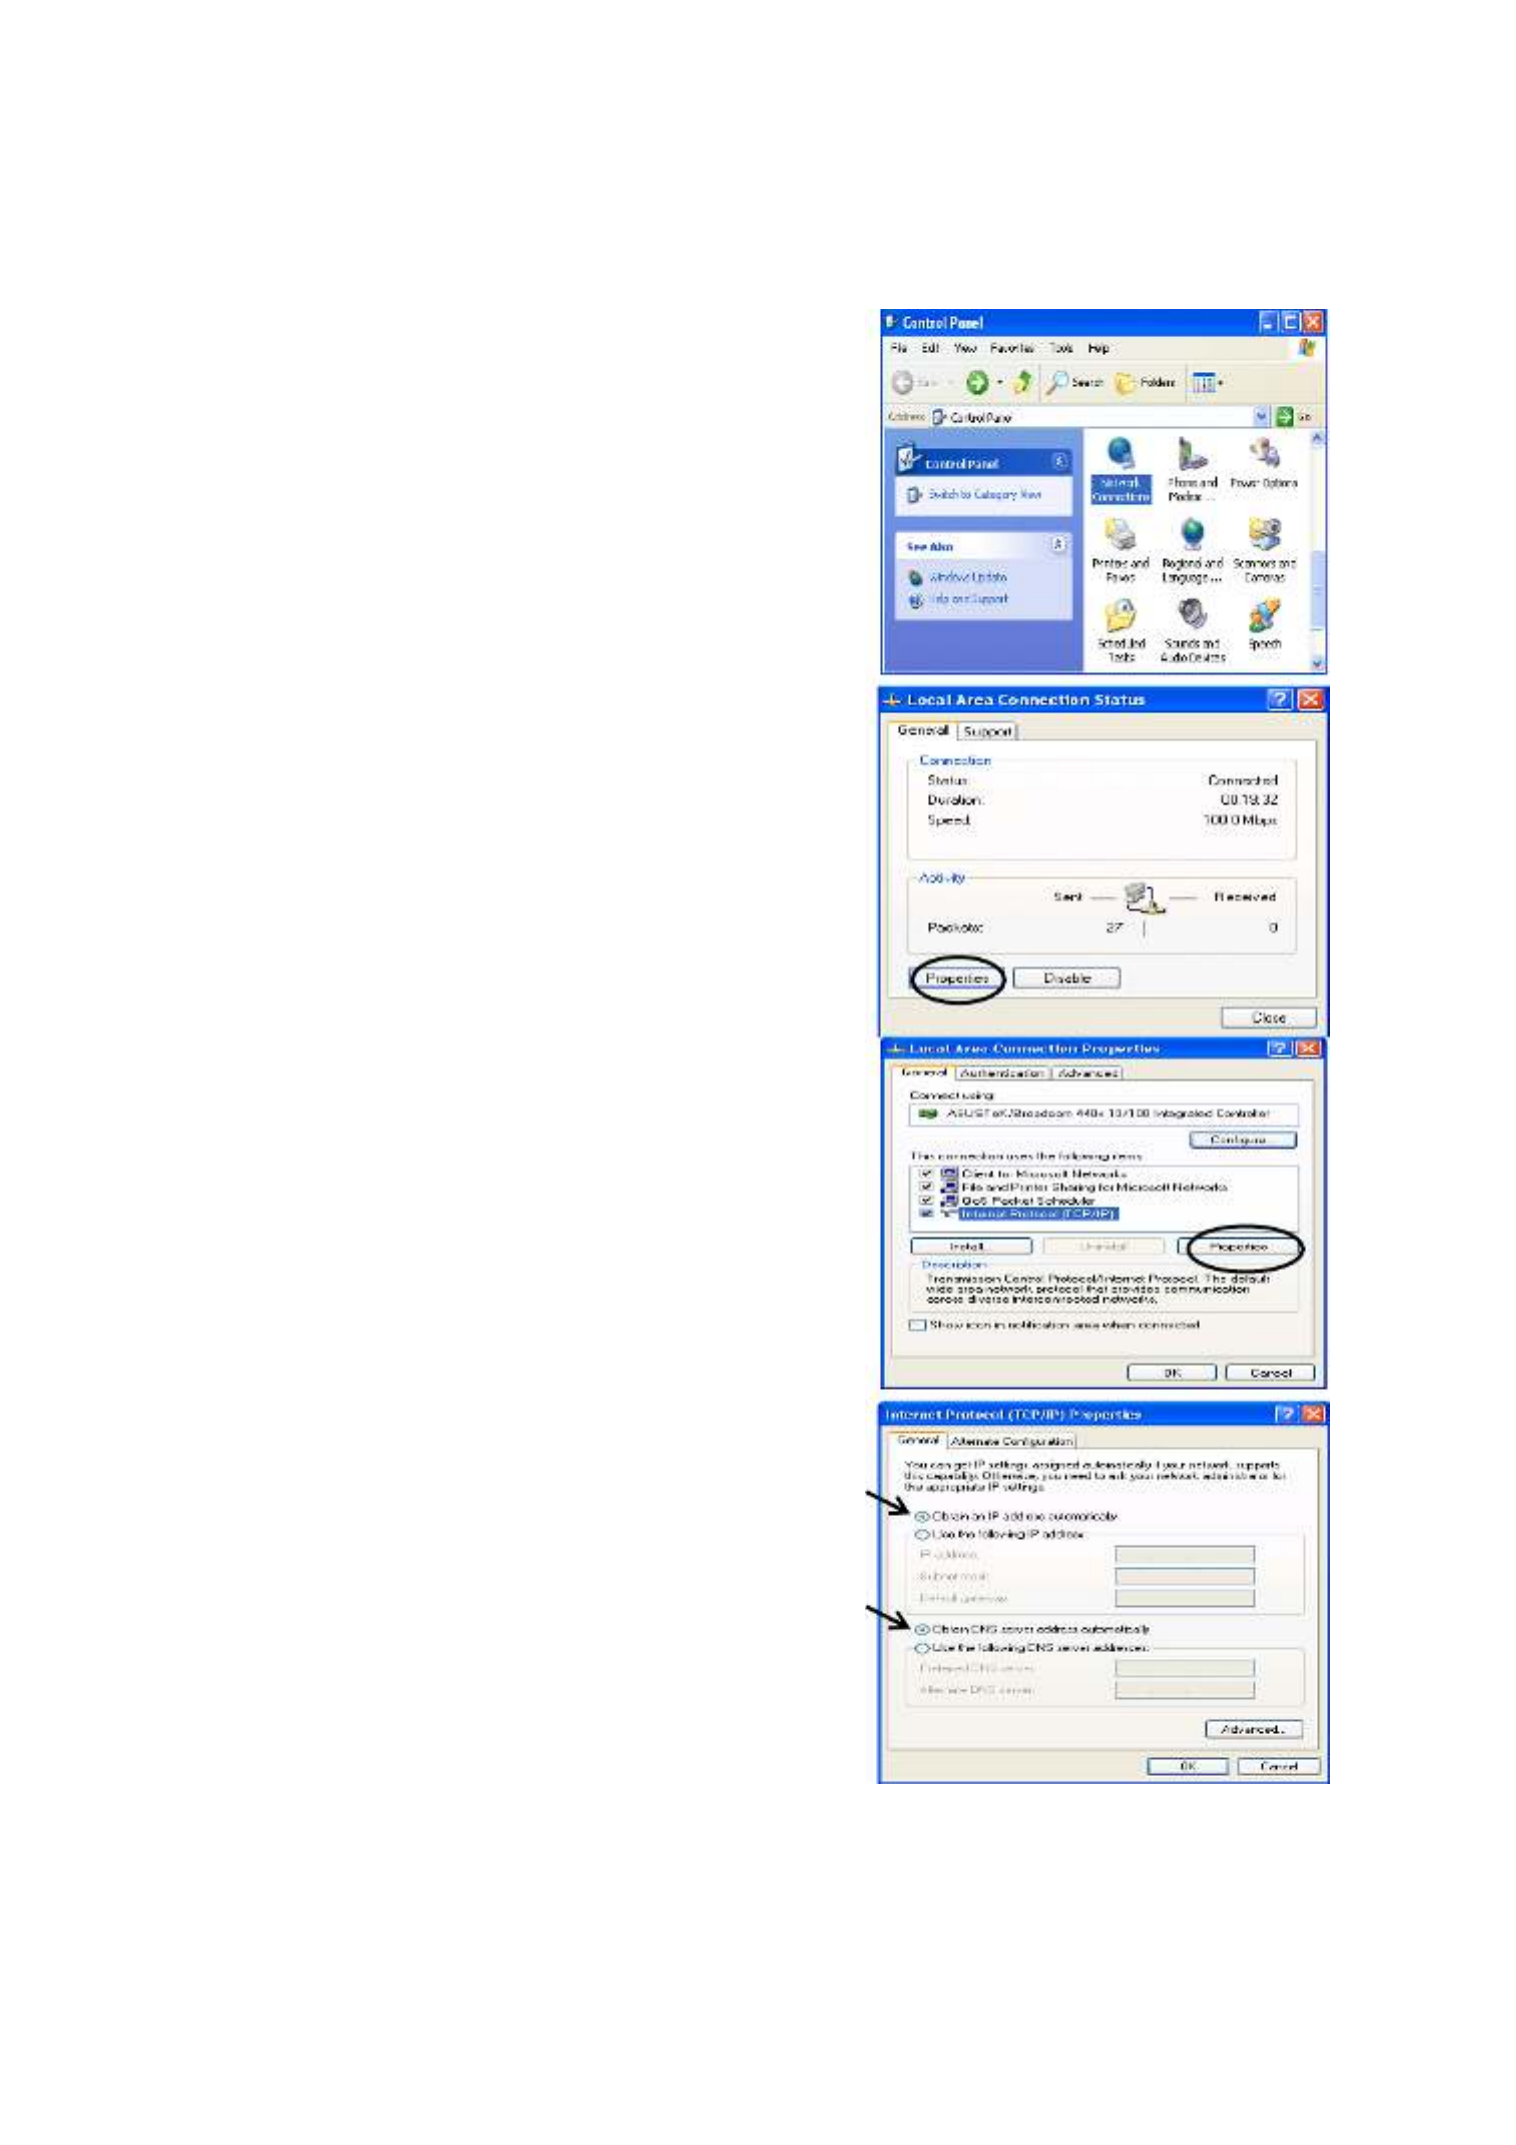
Configuring the Network Properties
Configuring PC in Windows XP
1. Go to Start / Control Panel (in Classic
View). In the Control Panel, double-click on
Network Connections
2. Double-click Local Area Connection.
3. In the Local Area Connection Status
window, click Properties.
4. Select Internet Protocol (TCP/IP) and click
Properties.
5. Select the Obtain an IP address
automatically and the Obtain DNS server
address automatically radio buttons.
6. Click OK to finish the configuration.
6

Configuring Your ADSL2+ VoIP Router
Note
To configure this device, you must have IE 5.0 / Netscape 4.5 or above
installed
1. Open the web browser and type
http://192.168.1.254 in the browser’s
address box. This number is the default IP
address for this router. Press Enter.
2. A username and password window will
appear. The default username and
password are admin and admin. Press
OK to proceed.
3. You will get a status report on web page.
7

Verifying Your Local Network Connection with the Device
To see if this ADSL Router is
visible on the local network, go
to Start / Run. In the Run dialog
box, type “ping 192.168.1.254”
then presses OK.
A command prompt window will
pop out. If your ping is
successful which means your
local network is able to reach to
the device, then the command
prompt window will close up
automatically.
Connection fails, when you see
“Request timed out” in the
command prompt window. You
may need to check your set up.
8

DE
Lieferumfang
3 WBR-3470
3 Netzteil (12 V Gleichspannung; 1,2 A)
3 RJ-11-ADSL/Telefonkabel
3 Cat.5-Kabel
3 Anleitung auf CD
3 Schnell-Installationsanleitung
Hinweis
Detailliertere Hinweise zur Konfiguration und zum Einsatz des
ADSL2+-VoIPs/Routers finden Sie in der Bedienungsanleitung.
Warnung
Verwenden Sie das Gerät nicht an feuchten oder heißen Orten.
Schließen Sie das Gerät an eine eigene Stromquelle an.
Öffnen Sie nicht das Gehäuse, versuchen Sie nicht, das Gerät selbst zu
reparieren. Falls sich das Gerät überhitzen sollte, schalten Sie sofort den
Strom ab und lassen das Gerät in einem qualifizierten Servicecenter
reparieren.
Setzen Sie das Produkt und sämtliche Zubehörteile nicht im Freien ein.
Achtung
Stellen Sie das Produkt auf einem stabilen Untergrund auf.
Verwenden Sie ausschließlich das mitgelieferte Netzteil. Bei Verwendung
eines Netzteils mit abweichenden Ausgangswerten kann der Router
beschädigt werden.
9

ADSL2+ VoIP-Router anschließen
1. Verbinden Sie den Router mit dem LAN (lokales Netzwerk) und dem
(A)DSL/Telefon-Netzwerk (LINE).
2. Schalten Sie das Gerät ein.
3. Überzeugen Sie sich davon, dass die LEDs PWR und SYS sowie die entsprechende
LAN-LED dauerhaft leuchten.
4. Verbinden Sie den VoIP-Anschluss über ein RJ11-Kabel mit einem Analogtelefon.
5. Verbinden Sie den LINE-Anschluss über ein RJ11-Kabel mit der Telefonsteckdose.
10

Netzwerkeinstellungen konfigurieren
PC unter Windows XP konfigurieren
1. Rufen Sie (in der klassischen Ansicht)
Start / Control Panel (Start / Einstellungen
/ Systemsteuerung) auf. In der
Systemsteuerung doppelklicken Sie auf
Network Connections
(Netzwerkverbindungen).
2. Doppelklicken Sie auf Local Area
Connection (LAN oder
Hochgeschwindigkeitsinternet).
3. Im Fenster Local Area Connection Status
(Status von LAN-Verbindung) klicken Sie
auf Properties (Eigenschaften).
4. Wählen Sie Internet Protocol
(Internetprotokoll) (TCP/IP) aus und klicken
Sie auf Properties (Eigenschaften).
5. Wählen Sie Obtain an IP address
automaticall (IP-Adresse automatisch
beziehen) und Obtain DNS server address
automatically (DNS-Serveradresse
automatisch beziehen).
6. Klicken Sie zum Abschluss der Konfiguration
auf OK.
11

So konfigurieren Sie Ihr ADSL2+-VoIP/Router
Hinweis
Zur Konfiguration des Gerätes muss Internet Explorer 5.0/Netscape 4.5 oder
eine jeweils aktuellere Version installiert sein.
1. Öffnen Sie den Webbrowser und geben Sie
http://192.168.1.254 in das Adresse-Feld
des Browsers ein. Diese Adresse ist die
Standard-IP-Adresse des Routers.
Drücken Sie Enter.
2. Ein Fenster zur Eingabe von
Benutzername und Kennwort wird
eingeblendet. Standard-Benutzername
und Standard-Kennwort lauten
„admin“ und „admin“. Klicken Sie zum
Fortfahren auf OK.
3. Ein Statusbericht wird in Form einer
Webseite angezeigt.
12

Lokale Netzwerkverbindung mit dem Gerät überprüfen
Um zu überprüfen, ob Ihr
ADSL-Router im Netzwerk
angesprochen werden kann,
klicken Sie auf Start / Run
(Start/Ausführen). Im
Ausführen-Dialogfenster geben
Sie ping 192.168.1.254 ein und
klicken dann auf OK.
Ein Befehlsfenster
(„DOS-Fenster“) öffnet sich.
Sofern der Ping erfolgreich war,
kann das Gerät im lokalen
Netzwerk erreicht werden. Das
Befehlsfenster schließt sich nach
kurzer Zeit von selbst.
Bei einem Verbindungsfehler
wird Request timed out
(Zeitüberschreitung der
Anforderung) angezeigt. In
diesem Falle sollten Sie Ihre
Einstellungen noch einmal
überprüfen.
13

FR
Contenu de l’emballage
3 WBR-3470
3 Adaptateur d'alimentation (12VDC, 1.2A)
3 Câble RJ-11 ADSL/téléphone
3 Câble Cat.5
3 Manuel CD
3 Guide d'Installation Rapide
Note
Pour des instructions plus détaillées sur la configuration et l’utilisation du
VoIP routeur ADSL2+, veuillez vous référer au Manuel d’utilisation
Avertissement
N’utilisez pas le WBR-3470 dans des environnements dont l’humidité ou
la température est élevée.
N’utilisez pas la même source d’alimentation pour le WBR-3470 et
d’autres appareils.
N’ouvrez pas et ne réparez pas le boîtier par vous-même. Si le WBR-3470
est trop chaud, éteignez immédiatement l’alimentation et faites le réparer
dans un centre de maintenance agréé.
Evitez d'utiliser ce produit et ses accessoires en extérieur.
Attention
Placez le WBR-3470 sur une surface stable.
N’utilisez que l’adaptateur d’alimentation livré dans l’emballage.
L’utilisation d’un adaptateur avec une tension nominale différent peut
endommager le routeur.
14

Connexion du routeur ADSL2+ VoIP
1. Connectez le routeur à un réseau local LAN (Local Area Network) et au réseau
téléphonique/ADSL (LIGNE).
2. Allumez l'appareil.
3. Assurez-vous que les LED PWR et SYS sont allumées en continu et que la LED LAN
correspondante est allumée.
4. Connectez un câble RJ11 sur le port VoIP lorsque vous connectez à un combiné
téléphonique analogique.
5. Connectez un câble RJ11 sur le port LIGNE lorsque vous connectez à une prise murale
téléphonique
15

Configurer les propriétés réseau
Configurer le PC sous Windows XP
1. Allez dans Start / Control Panel (Démarrer /
Panneau de configuration) (en vue
Classique). Dans le pannesau de
configuration, double cliquez sur
Connexions réseau
2. Double cliquez sur Local Area Connection
(Connexion au réseau local).
3. Dans la fenêtre d’état de la Local Area
Connection Status (Connexion au réseau
local), cliquez sur Properties (Propriétés).
4. Sélectionnez Internet Protocol (Protocole
Internet) (TCP/IP) et cliquez sur Properties
(Propriétés).
5. Sélectionnez les boutons radio Obtain an IP
address automatically (Obtenir une
adresse IP automatiquement) et Obtain
DNS server address automatically
(Obtenir une adresse serveur DNS
automatiquement).
6. Cliquez sur OK pour terminer la
configuration.
16

Configuration de votre VoIP/routeur ADSL2+
Note
Pour configurer cet appareil, vous devez avoir installé IE 5.0 / Netscape 4.5
ou supérieur
1. Ouvrez le navigateur Web et tapez
http://192.168.1.254 dans sa barre
d’adresse. Ce numéro est l’adresse IP par
défaut de ce routeur. Appuyez sur Enter
(Entrée).
2. Une fenêtre de nom d’utilisateur et de mot
de passe apparaît. Les nom d’utilisateur
et mot de passe par défaut sont admin
et admin. Appuyez sur OK pour
continuer.
3. Vous obtenez un rapport d’état sur une
page Web.
17

Vérifier votre connexion entre le réseau local et l’appareil
Pour voir si le routeur ADSL est
visible sur le réseau local, allez
dans Start/Run (Démarrer /
Exécuter. Dns la boîte de
dialogue d’exécution, tapez
“ping 192.168.1.254” puis
appuyez sur OK.
Un fenêtre d’invite de
commande apparaît. Si le ping
aboutit, ce qui signifie que votre
réseau local est capable
d’atteindre le périphérique, alors
la fenêtre d’invite de commande
se ferme automatiquement.
Lorsque la connexion échoue,
l’invite de commande affiche
“Request time out (Délai
d'attente de la demande
dépassé.) ”. Vous devez vérifier
à nouveau votre installation.
18

ES
Contenidos de la caja
3 WBR-3470
3 Adaptador de alimentación (12 VCC, 1,2 A)
3 Cable ADSL o de teléfono RJ-11
3 Cable de categoría 5
3 Manual en CD
3 Guía de instalación rápida
Nota
Para más información sobre la configuración y el uso del Módem Enrutador
ADSL2+, consulte el Manual del usuario
Advertencia
No utilice el equipo WBR-3470 en entornos de alta humedad o altas
temperaturas.
No utilice la misma fuente de alimentación del WBR-3470 también para
otro equipo.
No abra ni repare la carcasa usted mismo. Si el equipo WBR-3470 se
calienta demasiado, desactive la alimentación inmediatamente y solicite
su reparación a un centro de servicio cualificado.
Evite utilizar este producto y todos sus accesorios en exteriores.
Atención
Coloque el equipo WBR-3470 sobre una superficie estable.
Utilice únicamente el adaptador de alimentación que incluye la caja. Si
utiliza un adaptador de alimentación de otro voltaje podría dañar el
enrutador.
19

Conectar el enrutador VoIP ADSL2+
1. Conecte el enrutador a una red de área local (LAN, Local Area Network) y a la red ADSL o de
teléfono (LÍNEA).
2. Encienda el dispositivo.
3. Asegúrese de que los LED PWR y SYS (alimentación y sistema) están encendidos
permanentemente y de que el LED LAN correspondiente también lo está.
4. Conecte un cable RJ11 al puerto VoIP cuando realice la conexión con un equipo telefónico
analógico.
5. Conecte un cable RJ11 al puerto LÍNEA cuando realice la conexión con la toma mural del
teléfono
20
Configuración de las propiedades de red
Configuración de PC en Windows XP
1. Diríjase a Start/Control Panel (Inicio /
Panel de control) (en la Vista Clásica). Una
vez en el Panel de control, haga doble clic en
Network Connection (Conexiones de red).
2. Haga doble clic en Local Area Connection
(Conexión de área local).
3. En la ventana Local Area Connection
Status (Estado de conexión de área local),
haga clic en Properties (Propiedades).
4. Seleccione Internet Protocol (Protocolo
Internet) (TCP/IP) y haga clic en
Properties (Propiedades).
5. Seleccione las opciones Obtain an IP
address automatically (Obtener una
dirección IP automáticamente) y Obtain
DNS server address automatically
(Obtener una dirección de servidor DNS
automáticamente).
6. Haga clic en OK (Aceptar) para finalizar la
configuración.
21
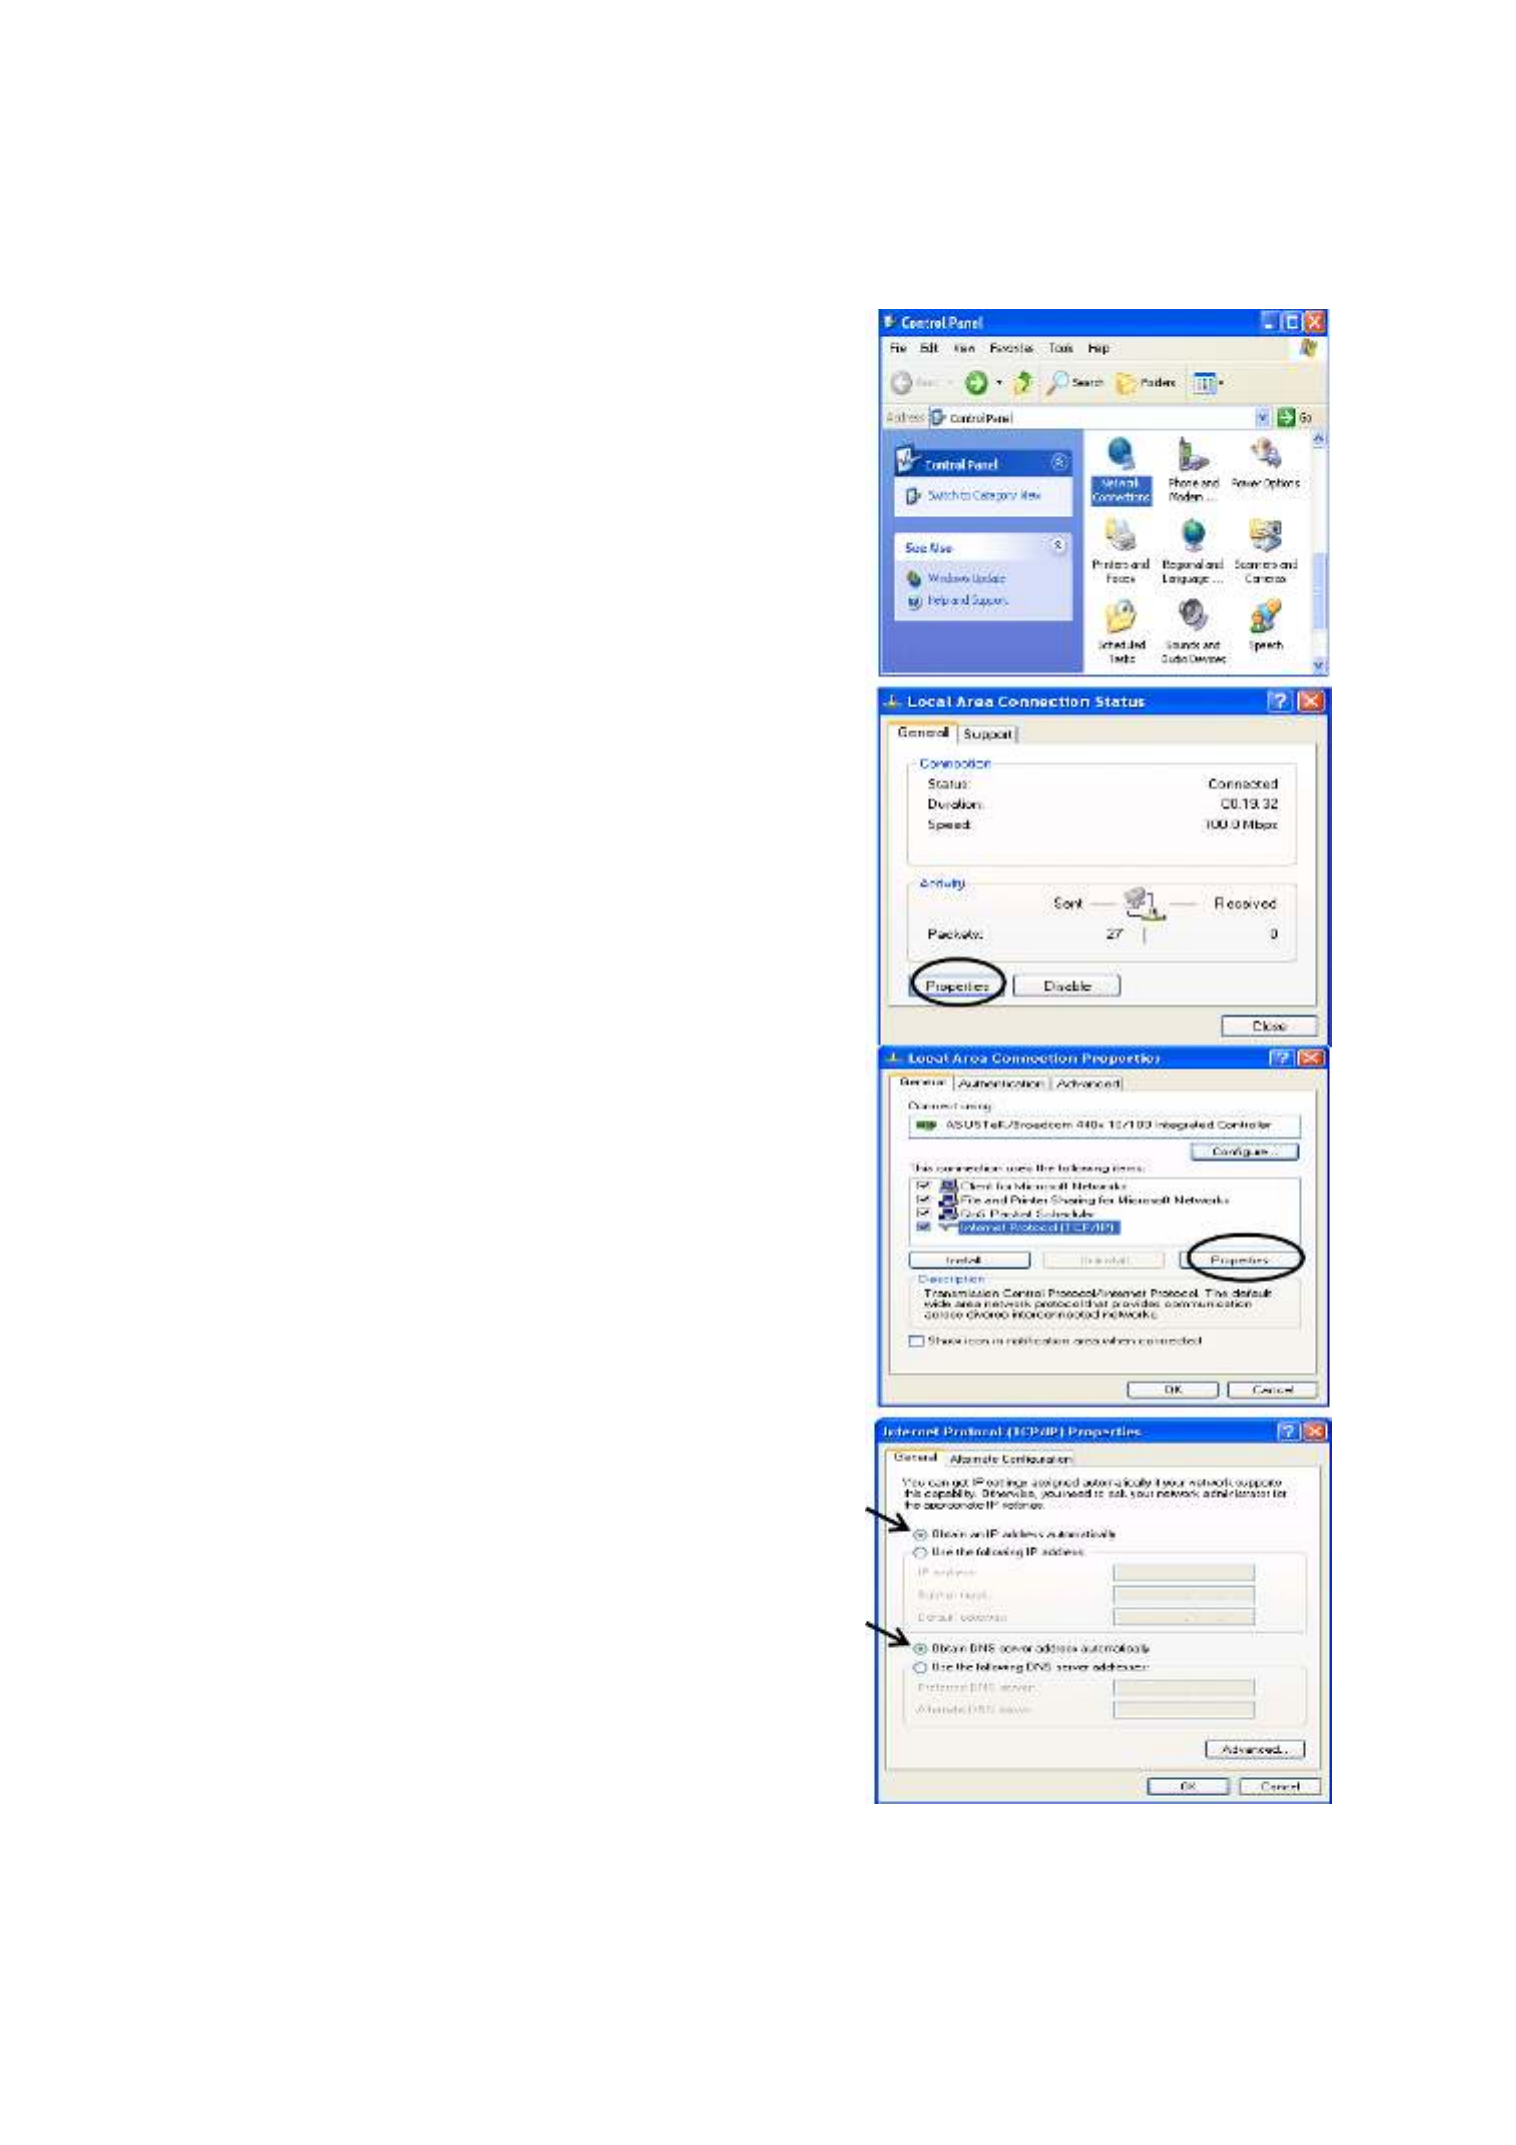
De netwerkeigenschappen configureren
De computer configureren onder Windows XP
1. Ga naar Start / Control Panel
(Configuratiescherm) (in Klassieke
weergave). Dubbelklik in het
Configuratiescherm op Network
Connections (Netwerkverbindingen)
2. Dubbelklik op Local Area Connection
(LAN-verbinding).
3. Klik in het venster Local Area Connection
Status (Status van LAN-verbinding) op
Properties (Eigenschappen).
4. Selecteer Internet Protocol (TCP/IP) en klik
op Properties (Eigenschappen).
5. Selecteer Obtain an IP address
automatically (Automatisch een IP-adres
laten toewijzen) en Obtain DNS server
address automatically (Automatisch een
DNS-serveradres laten toewijzen).
6. Klik op OK om de configuratie te voltooien.
26

De locale netwerkverbinding van het apparaat controleren
Om te zien of deze ADSL-router
zichtbaar is op het locale
netwerk, gaat u naar Start / Run
(Uitvoeren) . Typ in het
dialoogvenster Run (Uitvoeren)
“ping 192.168.1.254” en klik op
OK.
Er verschijnt een DOS-venster.
Is de ping geslaagd, dan weet u
dat het locale netwerk het
apparaat kan bereiken. Het
venster wordt automatisch
gesloten.
De verbinding is mislukt als u
“Request timed out (Time-out
bij opdracht)” in het
DOS-venster zit verschijnen. Het
kan nodig zijn de hardware te
controleren.
28

DK
Emballagen indeholder
3 WBR-3470
3 Effektforsyning (12VDC, 1.2A)
3 RJ-11 ADSL/telefonledning
3 Cat.5 Kabel
3 CD Manual
3 Lyn guide til installation
Bemærk!
Læs brugervejledningen nøje med hensyn til detaljerede oplysninger om
konfigurering og anvendelse af ADSL2+ VoIP-routeren.
Advarsel!
FBR-116-udstyret må ikke anvendes i omgivelser med høj luftfugtighed
eller høje temperaturer.
Samme strømkilde må ikke anvendes til FBR-116-udstyret som til andet
udstyr.
Kabinettet må ikke åbnes eller repareres. Sluk omgående for strømmen
til WBR-3470-udstyret, hvis det bliver for varmt, og få det repareret hos et
autoriseret servicecenter.
Det udstyr med alle tilhørende dele må ikke anvendes udendørs.
Vær forsigtig!
Placer WBR-3470-udstyret på et stabilt underlag.
Anvend kun den medfølgende lysnetadapter. Anvendelse af en
lysnetadapter med anden spænding kan nemlig forårsage skade på
routeren.
29

Forbindelse af ADSL2+ VoIP Router
1. Forbind Routeren til et LAN (Lokalnetværk) og til ADSL/telefon (LINE) netværk.
2. Tænd for enheden.
3. Forvis dig om at PWR og SYS LED lyser konstant og at den relevante LED lyser. LAN
4. Forbind et RJ11 kabel til VoIP porten, når der forbindes til en analog telefon.
5. Forbind et RJ11 kabel til LINE porten, når der forbindes til et telefonstik i væggen.
30

IT
Contenuti della confezione
3 WBR-3470
3 Adattatore di corrente (12V CC, 1,2A)
3 Cavo RJ-11 ADSL/telefono
3 Cavo Cat. 5
3 Manuale su CD
3 Guida all’installazione rapida
Nota
Per altre istruzioni dettagliate sulla configurazione e sull’uso di ADSL2+ VoIP
Router, fare riferimento al Manuale utente.
Avviso
Non usare WBR-3470 in ambienti soggetti ad alta percentuale d’umidità
ed alte temperature.
Non usare la stessa presa di corrente per alimentare WBR-3470 ed altre
attrezzature.
Non aprire o riparare da sé il dispositivo. Se WBR-3470 è troppo caldo,
scollegarlo immediatamente dall’alimentazione e farlo riparare presso un
centro assistenza qualificato.
Evitare di usare il prodotto e tutti i suoi accessori in esterni.
Attenzione
Collocare WBR-3470 su una superficie stabile.
Usare solamente l'adattatore di corrente fornito in dotazione. L’uso di
adattatori di corrente con potenza diversa può danneggiare il router.
34

Configurazione delle proprietà di rete
Configurazione del PC con Windows XP
1. Andare su Start / Control Panel (Pannello
di controllo) (in visualizzazione classica).
Nel Pannello di controllo fare doppio clic su
Network Connections (Rete e connessioni
Internet e poi su Connessioni di rete).
2. Fare doppio clic su Local Area Connection
(Connessione alla rete locale (LAN)).
3. Fare clic col tasto destro del mouse sull’icona
Local Area Connection (Connessione alla
rete locale (LAN)), poi selezionare
Properties (Proprietà) nel menu a
comparsa.
4. Selezionare Internet Protocol (TCP/IP)
(Protocollo Internet (TCP/IP)) e fare clic su
Properties (Proprietà).
5. Selezionare i pulsanti d’opzione Obtain an IP
address automatically (Ottieni
automaticamente un indirizzo IP) e Obtain
DNS server address automatically (Ottieni
indirizzo server DNS automaticamente).
6. Fare clic su OK per terminare la
configurazione.
36
Product specificaties
| Merk: | LevelOne |
| Categorie: | Router |
| Model: | WBR-3470A |
Heb je hulp nodig?
Als je hulp nodig hebt met LevelOne WBR-3470A stel dan hieronder een vraag en andere gebruikers zullen je antwoorden
Handleiding Router LevelOne

1 April 2023
1 April 2023
1 April 2023
1 April 2023
20 Mei 2023
1 April 2023
1 April 2023
9 Mei 2023
1 April 2023
1 April 2023
Handleiding Router
- Router Bosch
- Router HP
- Router Samsung
- Router Xiaomi
- Router Huawei
- Router Asus
- Router AEG
- Router DeWalt
- Router Motorola
- Router Medion
- Router Nokia
- Router Siemens
- Router Topcom
- Router UPC
- Router VTech
- Router Acer
- Router Actiontec
- Router Airlive
- Router Alcatel
- Router Alfa
- Router Allied Telesis
- Router Allnet
- Router Anker
- Router Apple
- Router Arcadyan
- Router Arris
- Router AVM
- Router Barco
- Router Beafon
- Router Belkin
- Router BenQ
- Router Billion
- Router BT
- Router Buffalo
- Router D-Link
- Router Davolink
- Router Dell
- Router Devolo
- Router Digi
- Router Digiconnect
- Router Digitus
- Router Draytek
- Router Edimax
- Router Einhell
- Router Eminent
- Router Engenius
- Router Envivo
- Router Ezviz
- Router Festool
- Router Foscam
- Router Gembird
- Router Gigabyte
- Router Google
- Router Gude
- Router Hama
- Router Hercules
- Router Hikoki
- Router Hikvision
- Router Hitachi
- Router Holzmann
- Router ICIDU
- Router Kathrein
- Router Kogan
- Router Konig
- Router KPN
- Router Kyocera
- Router Lancom
- Router Leoxsys
- Router Linksys
- Router Logilink
- Router Makita
- Router Manhattan
- Router Media-tech
- Router Mercku
- Router Metabo
- Router Mikrotik
- Router Milwaukee
- Router MSI
- Router Nec
- Router Nest
- Router Netgear
- Router Netis
- Router Patton
- Router PENTAGRAM
- Router Phicomm
- Router Powerplus
- Router Proximus
- Router QNAP
- Router Razer
- Router Renkforce
- Router Roland
- Router Sagem
- Router Sagemcom
- Router Schneider
- Router Sigma
- Router Silverline
- Router Sitecom
- Router Skil
- Router SMC
- Router Sonos
- Router Strong
- Router Sweex
- Router Synology
- Router T-com
- Router T-Mobile
- Router TCL
- Router Technicolor
- Router Tele 2
- Router Telstra
- Router Teltonika
- Router Tenda
- Router Thomson
- Router Thrustmaster
- Router Toolcraft
- Router TP Link
- Router Trendnet
- Router Trust
- Router Ubee
- Router United Telecom
- Router Verizon
- Router Vivanco
- Router Vodafone
- Router Western Digital
- Router Wisetiger
- Router Zebra
- Router Zolid
- Router Zoom
- Router ZTE
- Router ZyXEL
- Router Jung
- Router On Networks
- Router Clas Ohlson
- Router Black And Decker
- Router Rosewill
- Router Peak
- Router Ubiquiti Networks
- Router Conceptronic
- Router Cotech
- Router Atlona
- Router Hamlet
- Router Porter-Cable
- Router Techly
- Router SIIG
- Router 7inova
- Router AT&T
- Router Evolution
- Router Nilox
- Router Approx
- Router Milan
- Router Cisco
- Router Gefen
- Router 3Com
- Router Amped Wireless
- Router Comtrend
- Router CradlePoint
- Router Dovado
- Router Juniper
- Router Planet
- Router Intellinet
- Router Predator
- Router I-Tec
- Router NetComm
- Router Lindy
- Router IOGEAR
- Router Black Box
- Router IFM
- Router Totolink
- Router AJA
- Router Dahua Technology
- Router Mercusys
- Router Aruba
- Router Kasda
- Router Marshall Electronics
- Router Blackmagic Design
- Router ATen
- Router RGBlink
- Router RAVPower
- Router Hawking Technologies
- Router Kopul
- Router Nexxt
- Router Kraun
- Router LTS
- Router StarTech.com
- Router SPL
- Router Advantech
- Router Moxa
- Router Smart-AVI
- Router Eero
- Router Xantech
- Router Kramer
- Router KanexPro
- Router Intelix
- Router Blustream
- Router ModeCom
- Router Vimar
- Router Ocean Matrix
- Router Sixnet
- Router AVPro Edge
- Router Cudy
- Router F-Secure
- Router Digicom
- Router Sabrent
- Router AVMATRIX
- Router Readynet
- Router OneAccess
- Router Accelerated
- Router Nexaira
- Router FSR
- Router Alfatron
- Router Key Digital
- Router Cambium Networks
- Router Avenview
- Router BZBGear
- Router WyreStorm
- Router Rocstor
- Router Ruckus Wireless
- Router Mach Power
- Router MuxLab
- Router StarIink
- Router EXSYS
- Router Premiertek
- Router Bea-fon
- Router GL.iNet
- Router A-NeuVideo
- Router Shinybow
- Router Edgewater
- Router Atlantis Land
- Router Lantronix
- Router Lumantek
- Router Keenetic
- Router Starlink
- Router Keewifi
- Router Milesight
- Router PulseAudio
- Router Comprehensive
- Router Digitalinx
- Router Luxul
- Router DVDO
- Router Silentwind
- Router Keezel
- Router VigilLink
- Router Digital Forecast
Nieuwste handleidingen voor Router
30 Maart 2025
30 Maart 2025
29 Maart 2025
29 Maart 2025
29 Maart 2025
25 Februari 2025
20 Februari 2025
20 Februari 2025
20 Februari 2025
20 Februari 2025