Intermec CV41A Handleiding
Lees hieronder de 📖 handleiding in het Nederlandse voor Intermec CV41A (150 pagina's) in de categorie Kassa. Deze handleiding was nuttig voor 71 personen en werd door 2 gebruikers gemiddeld met 4.5 sterren beoordeeld
Pagina 1/150
CV41
Vehicle Mount Computer
(Windows Embedded Standard)
CV41W
User Manual

ii CV41 Vehicle Mount Computer (Windows Embedded Standard) User Manual
Intermec Technologies Corporation
Worldwide Headquarters
6001 36th Ave.W.
Everett, WA 98203
U.S.A.
www.intermec.com
The information contained herein is provided solely for the purpose of allowing customers to
operate and service Intermec-manufactured equipment and is not to be released, reproduced, or
used for any other purpose without written permission of Intermec Technologies Corporation.
Information and specifications contained in this document are subject to change without prior
notice and do not represent a commitment on the part of Intermec Technologies Corporation.
© 2013 by Intermec Technologies Corporation. All rights reserved.
The word Intermec, the Intermec logo, Norand, ArciTech, Beverage Routebook, CrossBar,
dcBrowser, Duratherm, EasyADC, EasyCoder, EasySet, Fingerprint, i-gistics, INCA (under license),
Intellitag, Intellitag Gen2, JANUS, LabelShop, MobileLAN, Picolink, Ready-to-Work, RoutePower,
Sabre, ScanPlus, ShopScan, Smart Mobile Computing, SmartSystems, TE 2000, Trakker Antares,
and Vista Powered are either trademarks or registered trademarks of Intermec Technologies
Corporation.
There are U.S. and foreign patents as well as U.S. and foreign patents pending.

Contents
CV41 Vehicle Mount Computer (Windows Embedded Standard) User Manual iii
Contents
Before You Begin. . . . . . . . . . . . . . . . . . . . . . . . . . . . . . . . . . . . . . . . . . . . . . . . . . . . . . . . . . . . . . . . . ix
Safety Information . . . . . . . . . . . . . . . . . . . . . . . . . . . . . . . . . . . . . . . . . . . . . . . . . . . . . . . ix
Global Services and Support . . . . . . . . . . . . . . . . . . . . . . . . . . . . . . . . . . . . . . . . . . . . . . ix
Warranty Information. . . . . . . . . . . . . . . . . . . . . . . . . . . . . . . . . . . . . . . . . . . . ix
Web Support . . . . . . . . . . . . . . . . . . . . . . . . . . . . . . . . . . . . . . . . . . . . . . . . . . . . ix
Send Feedback. . . . . . . . . . . . . . . . . . . . . . . . . . . . . . . . . . . . . . . . . . . . . . . . . . . . x
Telephone Support . . . . . . . . . . . . . . . . . . . . . . . . . . . . . . . . . . . . . . . . . . . . . . . x
Related Documents . . . . . . . . . . . . . . . . . . . . . . . . . . . . . . . . . . . . . . . . . . . . . . . . . . . . . . . x
Patent Information . . . . . . . . . . . . . . . . . . . . . . . . . . . . . . . . . . . . . . . . . . . . . . . . . . . . . . xi
1About the Computer . . . . . . . . . . . . . . . . . . . . . . . . . . . . . . . . . . . . . . . . . . . . . . . . . . . . 1
About the CV41 Vehicle Mount Computer . . . . . . . . . . . . . . . . . . . . . . . . . . . . . . . . . . . . . . . . . . 2
Overview of the Features. . . . . . . . . . . . . . . . . . . . . . . . . . . . . . . . . . . . . . . . . . . . . . . . . . . 4
About the Power Supply Options. . . . . . . . . . . . . . . . . . . . . . . . . . . . . . . . . . . . . . . . . . . . . . . . . . . 5
About the Smart Dock . . . . . . . . . . . . . . . . . . . . . . . . . . . . . . . . . . . . . . . . . . . . . . . . . . . . . . . . . . . . 5
Attach the CV41 to the Smart Dock . . . . . . . . . . . . . . . . . . . . . . . . . . . . . . . . . . . . . . . . 6
Remove the CV41 from the Smart Dock . . . . . . . . . . . . . . . . . . . . . . . . . . . . . . . . . . . . 8
Secure the CV41 . . . . . . . . . . . . . . . . . . . . . . . . . . . . . . . . . . . . . . . . . . . . . . . . . . . . . . . . . . . . . . . . . . 9
About the CV41 Startup Behavior . . . . . . . . . . . . . . . . . . . . . . . . . . . . . . . . . . . . . . . . . . . . . . . . . 10
Select a Startup Behavior . . . . . . . . . . . . . . . . . . . . . . . . . . . . . . . . . . . . . . . . . . . . . . . . .10
About the LEDs. . . . . . . . . . . . . . . . . . . . . . . . . . . . . . . . . . . . . . . . . . . . . . . . . . . . . . . . . . . . . . . . . .11
About the Internal UPS Battery . . . . . . . . . . . . . . . . . . . . . . . . . . . . . . . . . . . . . . . . . . . . . . . . . . .14
Maximize the Internal UPS Battery Usage . . . . . . . . . . . . . . . . . . . . . . . . . . . . . . . . . .14
About the Backup Battery . . . . . . . . . . . . . . . . . . . . . . . . . . . . . . . . . . . . . . . . . . . . . . . . . . . . . . . . 15
Insert an SD Card . . . . . . . . . . . . . . . . . . . . . . . . . . . . . . . . . . . . . . . . . . . . . . . . . . . . . . . . . . . . . . . .16
About the Touch Screen . . . . . . . . . . . . . . . . . . . . . . . . . . . . . . . . . . . . . . . . . . . . . . . . . . . . . . . . . . 17
Protect the Touch Screen . . . . . . . . . . . . . . . . . . . . . . . . . . . . . . . . . . . . . . . . . . . . . . . . . 17
Calibrate the Screen . . . . . . . . . . . . . . . . . . . . . . . . . . . . . . . . . . . . . . . . . . . . . . . . . . . . .17
Adjust the Screen Brightness . . . . . . . . . . . . . . . . . . . . . . . . . . . . . . . . . . . . . . . . . . . . . .18
Enable Automatic Screen Brightness. . . . . . . . . . . . . . . . . . . . . . . . . . . . . . . . . . . . . . .18
Set the Screen Backlight . . . . . . . . . . . . . . . . . . . . . . . . . . . . . . . . . . . . . . . . . . . . . . . . . .19
Rotate the Screen . . . . . . . . . . . . . . . . . . . . . . . . . . . . . . . . . . . . . . . . . . . . . . . . . . . . . . . .19

Contents
iv CV41 Vehicle Mount Computer (Windows Embedded Standard) User Manual
Enable the Defroster . . . . . . . . . . . . . . . . . . . . . . . . . . . . . . . . . . . . . . . . . . . . . . . . . . . . . 20
Change the Volume . . . . . . . . . . . . . . . . . . . . . . . . . . . . . . . . . . . . . . . . . . . . . . . . . . . . . . . . . . . . . . 20
About the CV41 Radio Antennas . . . . . . . . . . . . . . . . . . . . . . . . . . . . . . . . . . . . . . . . . . . . . . . . . . 20
Connect an External Antenna . . . . . . . . . . . . . . . . . . . . . . . . . . . . . . . . . . . . . . . . . . . . . 21
About the Keypad . . . . . . . . . . . . . . . . . . . . . . . . . . . . . . . . . . . . . . . . . . . . . . . . . . . . . . . . . . . . . . . . 23
Remap the Power Button . . . . . . . . . . . . . . . . . . . . . . . . . . . . . . . . . . . . . . . . . . . . . . . . . 24
Enter Characters on the Keypad . . . . . . . . . . . . . . . . . . . . . . . . . . . . . . . . . . . . . . . . . . . 24
CV41 Options and Accessories . . . . . . . . . . . . . . . . . . . . . . . . . . . . . . . . . . . . . . . . . . . . . . . . . . . . 25
2Understand the User Interface and Intermec Applications . . . . . . . . 27
About the User Interface. . . . . . . . . . . . . . . . . . . . . . . . . . . . . . . . . . . . . . . . . . . . . . . . . . . . . . . . . . 28
About the Desktop Screen . . . . . . . . . . . . . . . . . . . . . . . . . . . . . . . . . . . . . . . . . . . . . . . . 28
About Screen Gestures . . . . . . . . . . . . . . . . . . . . . . . . . . . . . . . . . . . . . . . . . . . . . . . . . . . 29
Use Pop-Up Menus. . . . . . . . . . . . . . . . . . . . . . . . . . . . . . . . . . . . . . . . . . . . . . . . . . . . . . . 29
Set the Date and Time. . . . . . . . . . . . . . . . . . . . . . . . . . . . . . . . . . . . . . . . . . . . . . . . . . . . . . . . . . . . 30
About Intermec Applications . . . . . . . . . . . . . . . . . . . . . . . . . . . . . . . . . . . . . . . . . . . . . . . . . . . . . 30
Applications Available On the Computer. . . . . . . . . . . . . . . . . . . . . . . . . . . . . . . . . . . 30
Applications You Can Download For the Computer . . . . . . . . . . . . . . . . . . . . . . . . 32
About Intermec Launcher . . . . . . . . . . . . . . . . . . . . . . . . . . . . . . . . . . . . . . . .32
About Features Demo . . . . . . . . . . . . . . . . . . . . . . . . . . . . . . . . . . . . . . . . . . . . 32
About SmartSystems . . . . . . . . . . . . . . . . . . . . . . . . . . . . . . . . . . . . . . . . . . . . . 32
3Manage the Computer . . . . . . . . . . . . . . . . . . . . . . . . . . . . . . . . . . . . . . . . . . . . . . . . . 35
About Managing the Computer in Your Network . . . . . . . . . . . . . . . . . . . . . . . . . . . . . . . . . . . 36
Manage the Computer Using SmartSystems Foundation . . . . . . . . . . . . . . . . . . . . 36
Install Applications Onto the Computer . . . . . . . . . . . . . . . . . . . . . . . . . . . . . . . . . . . . . . . . . . . 37
Install Applications Using SmartSystems Foundation Console. . . . . . . . . . . . . . . 37
Install Applications Using an SD Card . . . . . . . . . . . . . . . . . . . . . . . . . . . . . . . . . . . . . 37
Install Applications Using a USB Storage Device. . . . . . . . . . . . . . . . . . . . . . . . . . . . 38
Update the System Software . . . . . . . . . . . . . . . . . . . . . . . . . . . . . . . . . . . . . . . . . . . . . . . . . . . . . . 38
Update System Software Using SmartSystems Foundation . . . . . . . . . . . . . . . . . . 38
Update Individual Computers Using a USB Storage Device . . . . . . . . . . . . . . . . . . 39

Contents
CV41 Vehicle Mount Computer (Windows Embedded Standard) User Manual v
4
Configure the Computer . . . . . . . . . . . . . . . . . . . . . . . . . . . . . . . . . . . . . . . . . . . . . . . 41
How to Configure the Computer . . . . . . . . . . . . . . . . . . . . . . . . . . . . . . . . . . . . . . . . . . . . . . . . . . 42
Use Intermec Settings on the Computer. . . . . . . . . . . . . . . . . . . . . . . . . . . . . . . . . . . . . . . . . . . . 42
Start Intermec Settings . . . . . . . . . . . . . . . . . . . . . . . . . . . . . . . . . . . . . . . . . . . . . . . . . . . 43
About the Structure of Intermec Settings . . . . . . . . . . . . . . . . . . . . . . . . . . . . . . . . . . 43
Navigate in Intermec Settings . . . . . . . . . . . . . . . . . . . . . . . . . . . . . . . . . . . . . . . . . . . . .48
Restore Default Settings . . . . . . . . . . . . . . . . . . . . . . . . . . . . . . . . . . . . . . . . . . . . . . . . . . 49
Hide Menu Items in Intermec Settings . . . . . . . . . . . . . . . . . . . . . . . . . . . . . . . . . . . . . 50
Use Intermec Settings Remotely With SmartSystems Foundation . . . . . . . . . . . . . . . . . . . . 50
About Network Communications . . . . . . . . . . . . . . . . . . . . . . . . . . . . . . . . . . . . . . . . . . . . . . . . . 51
Configure 802.11a/b/g/n (Wi-Fi) Radio Communications . . . . . . . . . . . . . . . . . . . 51
About Bluetooth Communications. . . . . . . . . . . . . . . . . . . . . . . . . . . . . . . . . . . . . . . .52
Connect to a Bluetooth Scanner. . . . . . . . . . . . . . . . . . . . . . . . . . . . . . . . . . . 52
Connect to a Bluetooth Printer. . . . . . . . . . . . . . . . . . . . . . . . . . . . . . . . . . . . 53
About Serial and USB Communications . . . . . . . . . . . . . . . . . . . . . . . . . . . . . . . . . . . 54
Connect the Intermec SR30 or SR61T USB Scanner. . . . . . . . . . . . . . . . . 54
Connect to a Serially Tethered Scanner . . . . . . . . . . . . . . . . . . . . . . . . . . . . 56
About Wireless Security . . . . . . . . . . . . . . . . . . . . . . . . . . . . . . . . . . . . . . . . . . . . . . . . . . . . . . . . . . 57
Choose Between Microsoft and Wireless Security . . . . . . . . . . . . . . . . . . . . . . . . . . .58
Select Microsoft Security as Your Security Choice. . . . . . . . . . . . . . . . . . . 59
Select Wireless Security as Your Security Choice . . . . . . . . . . . . . . . . . . . . 63
Select a Wireless Security Profile . . . . . . . . . . . . . . . . . . . . . . . . . . . . . . . . . . 64
Load a Certificate . . . . . . . . . . . . . . . . . . . . . . . . . . . . . . . . . . . . . . . . . . . . . . . . . . . . . . . .69
5Use WWAN and GPS Communications . . . . . . . . . . . . . . . . . . . . . . . . . . . . . . 71
About WWAN Communications . . . . . . . . . . . . . . . . . . . . . . . . . . . . . . . . . . . . . . . . . . . . . . . . . .72
About the Status Buttons and Icons . . . . . . . . . . . . . . . . . . . . . . . . . . . . . . . . . . . . . . .72
Activate UMTS Communications . . . . . . . . . . . . . . . . . . . . . . . . . . . . . . . . . . . . . . . . . 73
Activate CDMA Communications . . . . . . . . . . . . . . . . . . . . . . . . . . . . . . . . . . . . . . . . . 75
About GPS . . . . . . . . . . . . . . . . . . . . . . . . . . . . . . . . . . . . . . . . . . . . . . . . . . . . . . . . . . . . . . . . . . . . . . 76
Test the GPS Receiver . . . . . . . . . . . . . . . . . . . . . . . . . . . . . . . . . . . . . . . . . . . . . . . . . . . . 76
Configure WWAN Settings . . . . . . . . . . . . . . . . . . . . . . . . . . . . . . . . . . . . . . . . . . . . . . . . . . . . . . .76
Create a Profile . . . . . . . . . . . . . . . . . . . . . . . . . . . . . . . . . . . . . . . . . . . . . . . . . . . . . . . . . .77
About the OneClick Internet PIN Number . . . . . . . . . . . . . . . . . . . . . . . . . . . . . . . . .77
Activate or Deactivate a PIN Number . . . . . . . . . . . . . . . . . . . . . . . . . . . . . .77
Change the PIN Number . . . . . . . . . . . . . . . . . . . . . . . . . . . . . . . . . . . . . . . . . 78

Contents
vi CV41 Vehicle Mount Computer (Windows Embedded Standard) User Manual
Configure Network Connections . . . . . . . . . . . . . . . . . . . . . . . . . . . . . . . . . . . . . . . . . .78
AutoLaunch the OneClick Internet Application . . . . . . . . . . . . . . . . . . . . . . . . . . . . 79
Connect to WWAN Automatically On Startup. . . . . . . . . . . . . . . . . . . . . . . . . . . . . . 79
Reconnect to WWAN Automatically . . . . . . . . . . . . . . . . . . . . . . . . . . . . . . . . . . . . . . .79
About Data Roaming . . . . . . . . . . . . . . . . . . . . . . . . . . . . . . . . . . . . . . . . . . . . . . . . . . . .80
Enable or Disable Data Roaming . . . . . . . . . . . . . . . . . . . . . . . . . . . . . . . . . .80
Enable Roaming Alerts . . . . . . . . . . . . . . . . . . . . . . . . . . . . . . . . . . . . . . . . . . .80
View WWAN Network Statistics . . . . . . . . . . . . . . . . . . . . . . . . . . . . . . . . . . . . . . . . . . . . . . . . . . . 80
View All Current Network Statistics . . . . . . . . . . . . . . . . . . . . . . . . . . . . . . . . . . . . . . . 81
View Used Data History . . . . . . . . . . . . . . . . . . . . . . . . . . . . . . . . . . . . . . . . . . . . . . . . . . 81
6Enable Screen Blanking. . . . . . . . . . . . . . . . . . . . . . . . . . . . . . . . . . . . . . . . . . . . . . . . 83
About Screen Blanking . . . . . . . . . . . . . . . . . . . . . . . . . . . . . . . . . . . . . . . . . . . . . . . . . . . . . . . . . . . 84
Install the Hardware for Screen Blanking. . . . . . . . . . . . . . . . . . . . . . . . . . . . . . . . . . . . . . . . . . .84
Before You Install the Switch. . . . . . . . . . . . . . . . . . . . . . . . . . . . . . . . . . . . . . . . . . . . . . 84
Tools You Need . . . . . . . . . . . . . . . . . . . . . . . . . . . . . . . . . . . . . . . . . . . . . . . . . . . . . . . . . 85
Create a Custom Serial Cable . . . . . . . . . . . . . . . . . . . . . . . . . . . . . . . . . . . . . . . . . . . . .85
Install Switch for Screen Blanking . . . . . . . . . . . . . . . . . . . . . . . . . . . . . . . . . . . . . . . . . 86
Enable Screen Blanking. . . . . . . . . . . . . . . . . . . . . . . . . . . . . . . . . . . . . . . . . . . . . . . . . . . 86
7Troubleshoot and Maintain the Computer. . . . . . . . . . . . . . . . . . . . . . . . . . . 89
Troubleshoot Your Computer . . . . . . . . . . . . . . . . . . . . . . . . . . . . . . . . . . . . . . . . . . . . . . . . . . . . . 90
Troubleshoot the Wi-Fi Connection . . . . . . . . . . . . . . . . . . . . . . . . . . . . . . . . . . . . . . . 90
Troubleshoot 802.1x Security . . . . . . . . . . . . . . . . . . . . . . . . . . . . . . . . . . . . . . . . . . . . . 91
Check 802.11 Network Status . . . . . . . . . . . . . . . . . . . . . . . . . . . . . . . . . . . . . . . . . . . . .92
Troubleshoot Reading Bar Codes. . . . . . . . . . . . . . . . . . . . . . . . . . . . . . . . . . . . . . . . . .93
Troubleshoot Operating the Computer . . . . . . . . . . . . . . . . . . . . . . . . . . . . . . . . . . . . 96
Call Product Support. . . . . . . . . . . . . . . . . . . . . . . . . . . . . . . . . . . . . . . . . . . . . . . . . . . . . . . . . . . . . 97
Find Your Configuration Number . . . . . . . . . . . . . . . . . . . . . . . . . . . . . . . . . . . . . . . . . 98
Find Your Operating System Version . . . . . . . . . . . . . . . . . . . . . . . . . . . . . . . . . . . . . . 98
View WWAN Settings . . . . . . . . . . . . . . . . . . . . . . . . . . . . . . . . . . . . . . . . . . . . . . . . . . . .98
Reset the Computer . . . . . . . . . . . . . . . . . . . . . . . . . . . . . . . . . . . . . . . . . . . . . . . . . . . . . . . . . . . . . .98
Restart or Shut Down the Computer . . . . . . . . . . . . . . . . . . . . . . . . . . . . . . . . . . . . . . 98
Disconnect the UPS Battery. . . . . . . . . . . . . . . . . . . . . . . . . . . . . . . . . . . . . . . . . . . . . . . 99
Replace the Fuse . . . . . . . . . . . . . . . . . . . . . . . . . . . . . . . . . . . . . . . . . . . . . . . . . . . . . . . . . . . . . . . .100

Contents
viii CV41 Vehicle Mount Computer (Windows Embedded Standard) User Manual

Before You Begin
x CV41 Vehicle Mount Computer (Windows Embedded Standard) User Manual
Visit the Intermec technical knowledge base (Knowledge Central) at
www.intermec.com and click Support > Knowledge Central to
review technical information or to request technical support for your
Intermec product.
Send Feedback
Your feedback is crucial to the continual improvement of our
documentation. To provide feedback about this manual, please
contact the Intermec Technical Communications department directly
at TechnicalCommunications@intermec.com.
Telephone Support
In the U.S.A. and Canada, call 1-800-755-5505.
Outside the U.S.A. and Canada, contact your local Intermec
representative. To search for your local representative, from the
Intermec website, click About Us > Contact Us.
Related Documents
This is a list of related Intermec documents.
•Intermec Settings Command Reference Manual
•Intermec Developer Library (IDL) Resource Kit Developer’s Guide
The Intermec website at www.intermec.com contains our documents
(as PDF files) that you can download for free.
To download documents
1Visit the Intermec website at www.intermec.com.
2Click the Products tab.
3Using the Products menu, navigate to your product page. For
example, to find the CV41 computer product page, click
Computers > Fixed Vehicle Computers > CV41.
4Click the Manuals tab.
If your product does not have its own product page, click Support >
Manuals. Use the Product Category, the Product Family, and
Product to find your documentation.

xii CV41 Vehicle Mount Computer (Windows Embedded Standard) User Manual

1
1
About the Computer
This chapter introduces the CV41 Vehicle Mount Computer
with Windows® Embedded Standard operating system. Use
this chapter to learn about the basic features and available
accessories.

Chapter 1 — About the Computer
2 CV41 Vehicle Mount Computer (Windows Embedded Standard) User Manual
About the CV41 Vehicle Mount Computer
The rugged CV41 Vehicle Mount Computer is designed for real-time
data collection applications in warehousing, distribution,
work-in-process, time and attendance, and stationary applications.
The CV41 is highly configurable and runs on the Microsoft®
Windows® Embedded Standard (WES) operating system.
Additionally, the CV41 supports terminal emulation applications,
browser-based applications, and custom applications.
The CV41 is used with the smart dock. The dock installs onto a vehicle
and provides conditioned power to the CV41. All peripheral
connections are also made on the dock. With the CV41 design, you can
easily remove the CV41 from the smart dock and attach it to another
vehicle that is equipped with a dock.
CV41 Front View
Speakers
Power
button
Microphone

Chapter 1 — About the Computer
CV41 Vehicle Mount Computer (Windows Embedded Standard) User Manual 3
CV41 Back View with Quick Mount Smart Dock
CANBUS/audio
connector
USB connector
COM2
COM1
Strain relief
clamps
WWAN
antenna
plug
GPS
antenna
plug
Wi-Fi (aux)
antenna
plug
Wi-Fi
antenna
plug

Chapter 1 — About the Computer
CV41 Vehicle Mount Computer (Windows Embedded Standard) User Manual 5
About the Power Supply Options
To operate the computer, you must provide power to the computer
through the DC power cable that is provided or through one of the
following power supply options:
•External 6-96 DC/DC Power Converter
•External AC/DC Power Supply
Contact your local Intermec representative to order one of the power
supply options listed. For installation instructions, see the CV41
Vehicle Mounting Kit Reference Guide.
About the Smart Dock
The smart dock is secured to a forklift using a RAM mounting kit and
provides conditioned power to the computer. The computer can then
be connected or removed from the smart dock at any time. With this
unique system, you can easily move the computer from one vehicle
equipped with the smart dock to another. The smart dock includes:
•a USB port.
•two COM ports.
•a CANBUS/audio port.
•strain relief cable mounts.
To connect any accessory such as a tethered scanner, an audio headset,
or a USB flash drive, you need to purchase the correct accessory cables.
For more information, contact your local Intermec representative.
Make sure the smart dock is powered off before you connect any
cables to it.

Chapter 1 — About the Computer
6 CV41 Vehicle Mount Computer (Windows Embedded Standard) User Manual
Attach the CV41 to the Smart Dock
After you secure the smart dock and connected it to power, you can
attach the computer to the smart dock.
1Press the Power button . The computer turns off.
2Locate the protruding lip on the rear of the computer.
3Place the lip of the computer over the top of the dock.
4Slide the CV41 from side-to-side until the computer is seated into
the smart dock.
5Push down onto the smart dock until you hear click.
6If necessary, adjust the viewing angle by adjusting the pivot arm on
the RAM mount.
Chapter 1 — About the Computer
CV41 Vehicle Mount Computer (Windows Embedded Standard) User Manual 7
7Press the Power button on the smart dock to turn on the dock.
8Press the Power button on the CV41 to turn on the CV41.

Chapter 1 — About the Computer
CV41 Vehicle Mount Computer (Windows Embedded Standard) User Manual 9
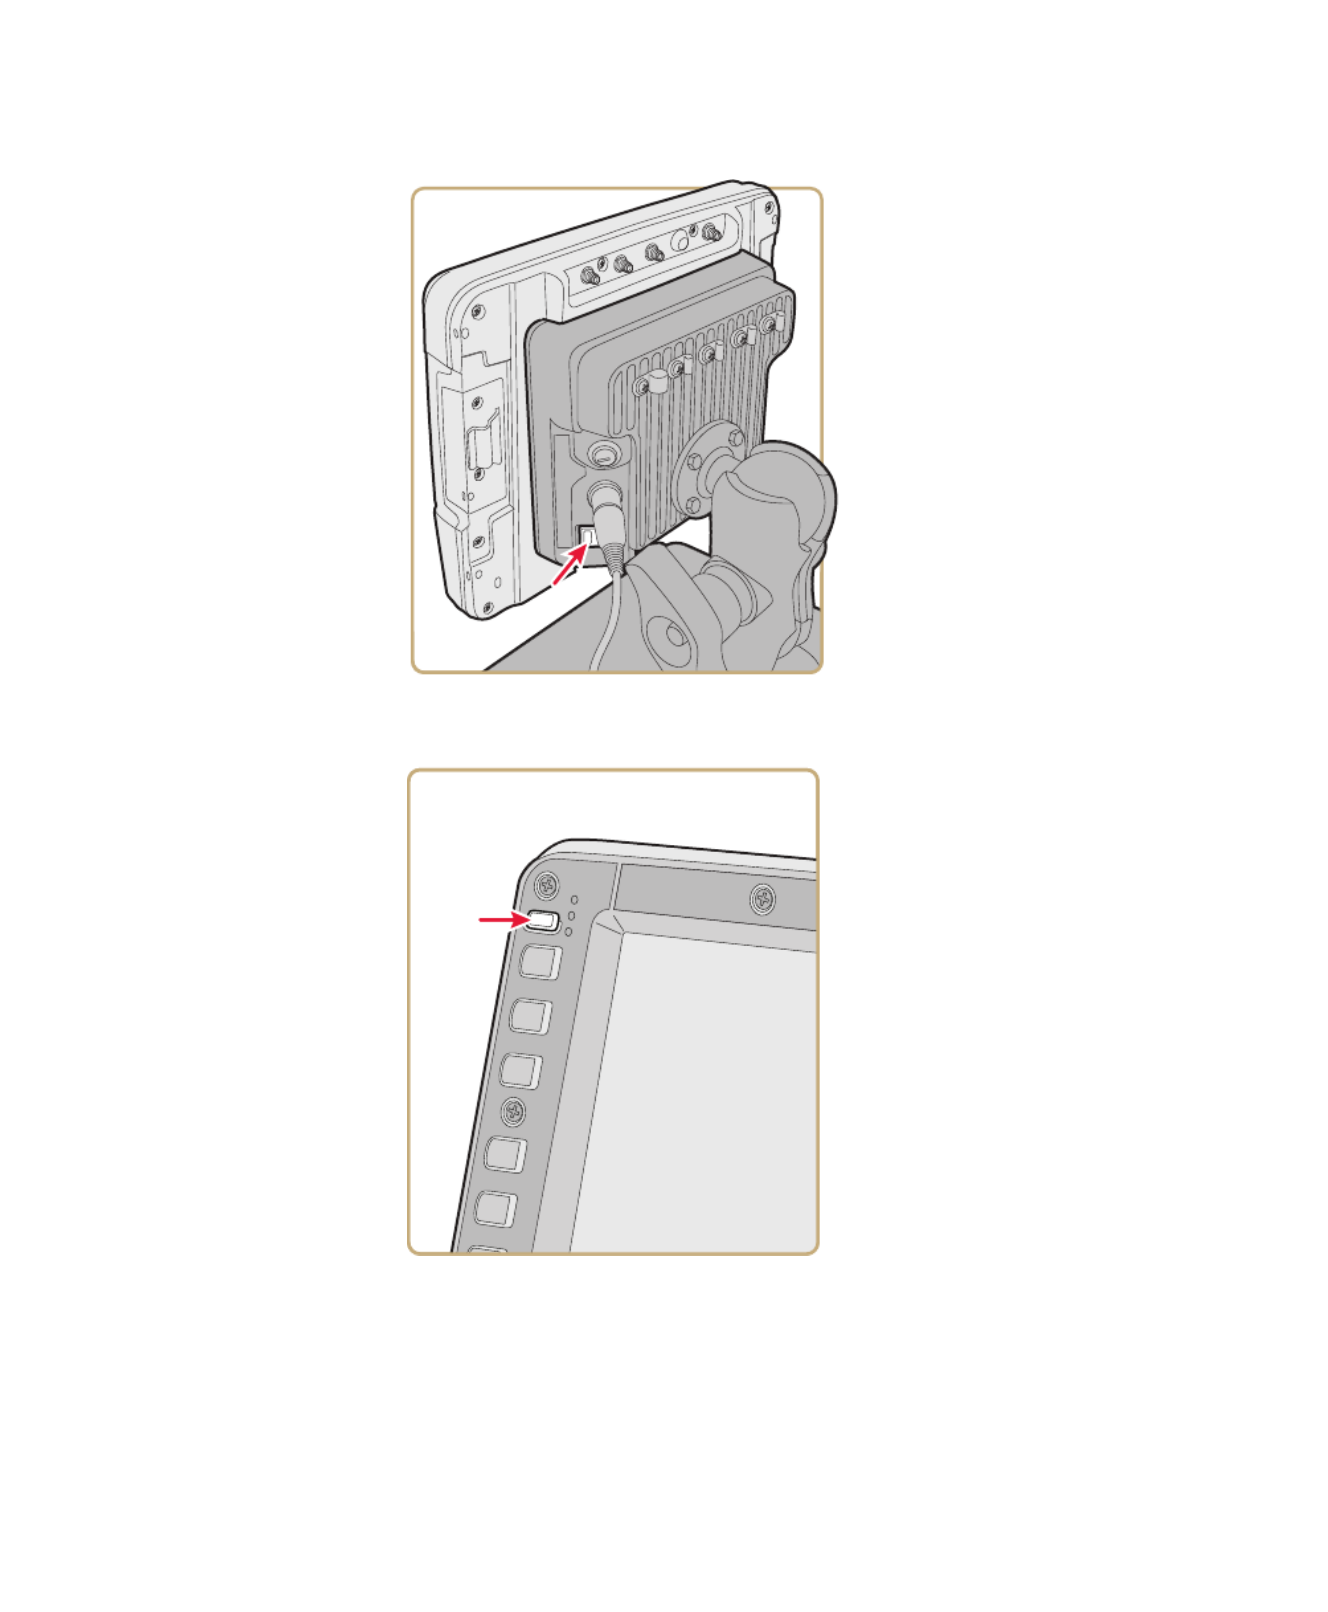
Secure the CV41
Use either a padlock or a laptop security provision to keep your
computer safe.
Padlock Provision Location
Laptop Security Provision Location

Chapter 1 — About the Computer
10 CV41 Vehicle Mount Computer (Windows Embedded Standard) User Manual
About the CV41 Startup Behavior
Change the startup behavior so that the computer can be turned on
and off through the ignition input signal of a vehicle or when power is
applied to the smart dock. For more information about the startup
behavior, see the following table.
Select a Startup Behavior
By default the computer startup behavior is set to standard. If you
intend to startup your computer using ignition control or auto-on,
make sure you wire the ignition input wire according to the CV41
Vehicle Mounting Kit Reference Guide.
1Tap Start > Control Panel > AutoOn. The Ignition and Auto-On
Properties screen appears
2Select the startup behavior.
3Tap OK.
CV41 Startup Behavior Descriptions
Startup Behavior Description
Standard The computer is turned on and off manually using the
Power button on the computer.
Ignition control When vehicle power is applied, the computer turns on.
Make sure that the:
•power switch on the smart dock is on.
•the ignition input wire is connected.
Auto-On The computer is turned on when power is applied:
•power switch on the smart dock is on.
•the ignition input wire is connected.
You must wire the ignition input wire before enabling ignition
control or auto-on.
Chapter 1 — About the Computer
CV41 Vehicle Mount Computer (Windows Embedded Standard) User Manual 11
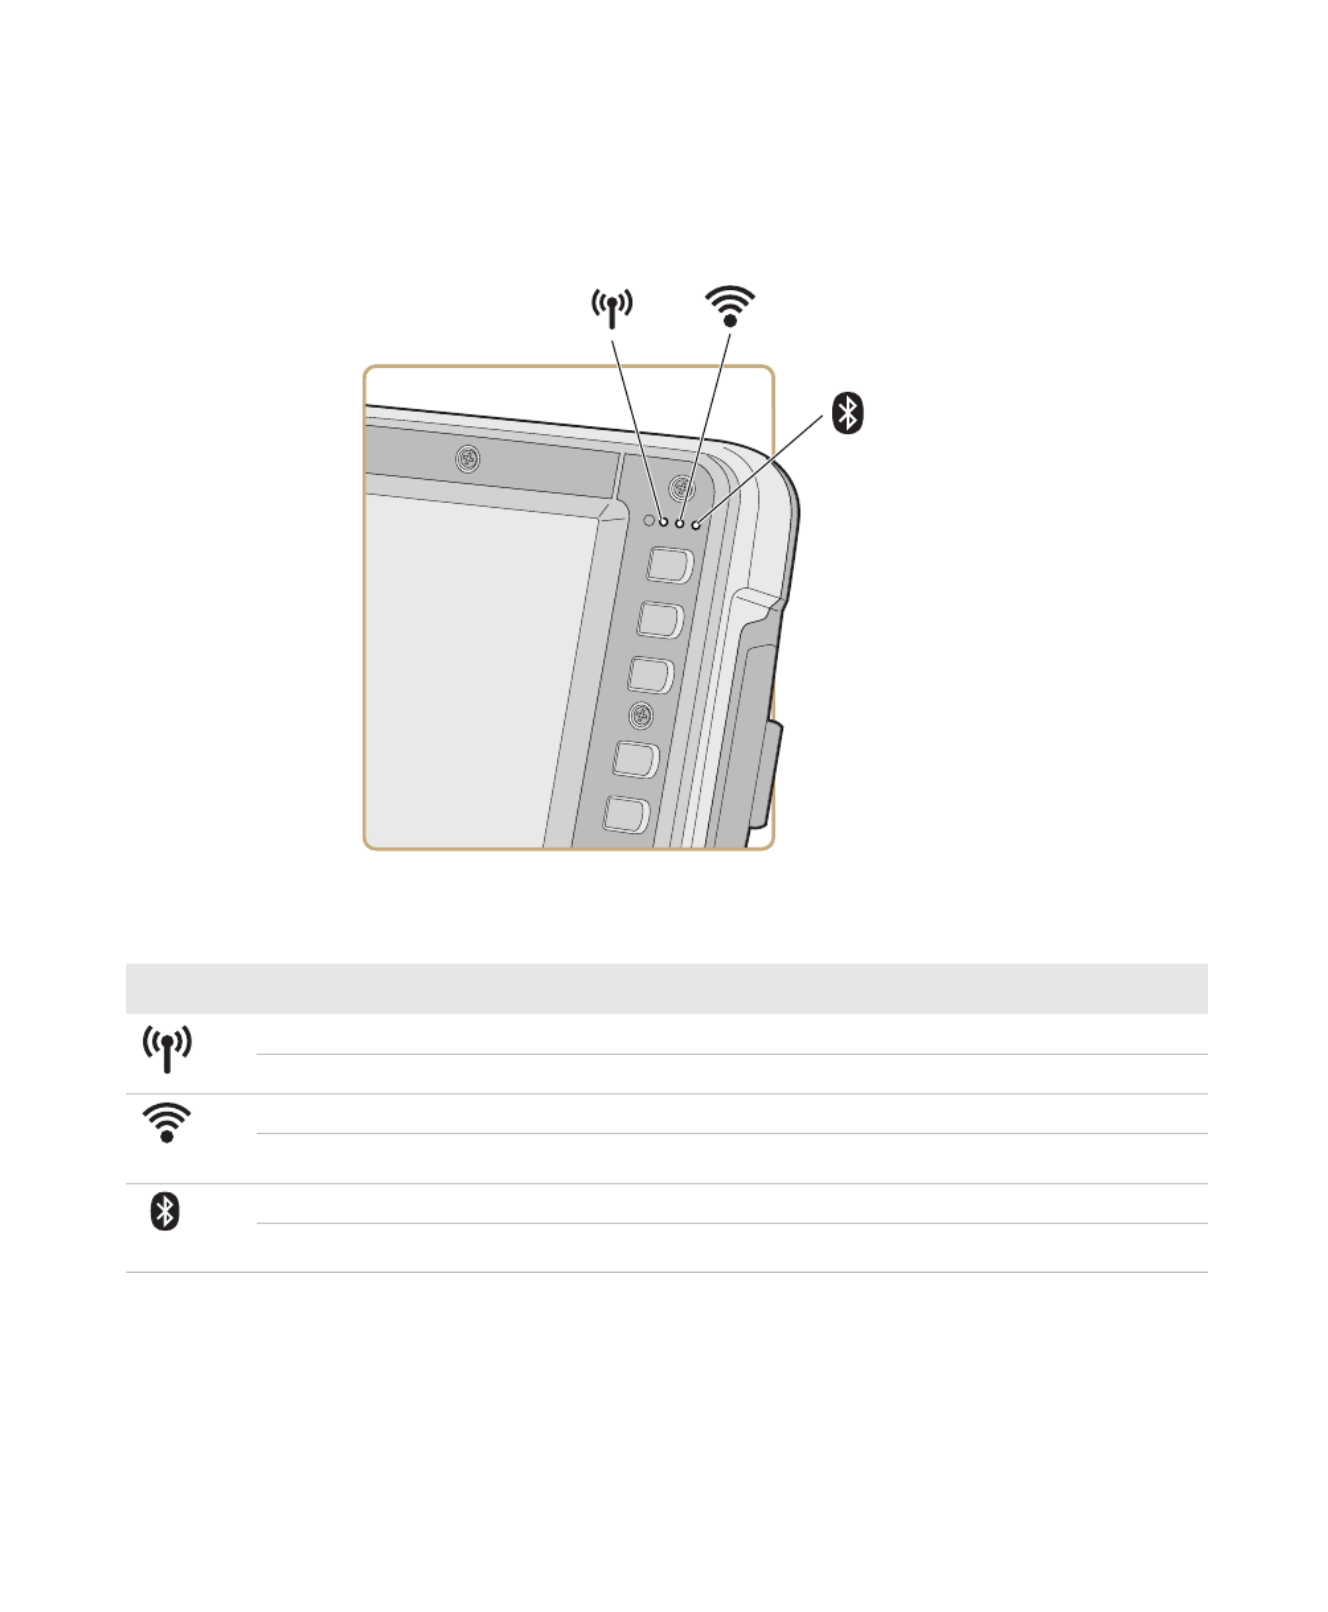
About the LEDs
The LEDs on the computer indicates the state of the computer.
Connection LEDs
Connection LED Status Descriptions
LED State Description
On The computer is connected to WWAN.
Off The computer is not connected to WWAN.
On The computer is connected to Wi-Fi.
Off The computer is not connected to Wi-Fi.
On Bluetooth is turned on.
Off Bluetooth is turned off.

Chapter 1 — About the Computer
12 CV41 Vehicle Mount Computer (Windows Embedded Standard) User Manual
System LEDs
UPS
System LED Status Descriptions
LED State Description
Solid green •The computer is on.
•The computer is on but the display or backlight may
be off.
Blinking green every 1.5
seconds
•The computer is in suspend mode.
•External power is not present.
•You need to move the computer to a warmer
environment.
Blinking green every 4.5
seconds
•The computer is in suspend mode.
•External power is not present.
•You need to move the computer to a warmer
environment.
Off The computer is off.

Chapter 1 — About the Computer
16 CV41 Vehicle Mount Computer (Windows Embedded Standard) User Manual
Insert an SD Card
You can use an SD card to increase file storage and install software.
The computer supports SD cards up to 32 GB.
1 Remove the computer from the smart dock.
2 Press the Power button. The computer turns off.
3 Using a small Phillips screwdriver, remove the two screws that
secure the SD card access panel.
4 Insert the SD card into the SD card slot.
5 Reattach the SD card access panel and screw to a torque value of
4-5 in/lbs.
6 Reattach the CV41 to the smart dock.
7 Press the button to turn on the computer.Power
SD card

Chapter 1 — About the Computer
CV41 Vehicle Mount Computer (Windows Embedded Standard) User Manual 19
Set the Screen Backlight
By default, the screen turns off when there is no activity with the
computer. Use this section to learn how to configure the time that the
screen backlight turns off.
1Tap Start > Control Panel > Power Options. The Power Option
Properties screen appears.
2In the Power Schemes tab, select the time you want the screen
backlight to turn off in the Turn off monitor drop-down menus.
3Tap OK to save your settings.
Rotate the Screen
Rotate the screen to change the screen orientation of the computer.
1Tap Start > Control Panel > Screen Rotation.
2In the drop-down menu, select the orientation you want.
3Tap OK to rotate your screen.
Product specificaties
| Merk: | Intermec |
| Categorie: | Kassa |
| Model: | CV41A |
| Kleur van het product: | Zwart |
| Gewicht: | 2100 g |
| Breedte: | 268 mm |
| Diepte: | 66 mm |
| Hoogte: | 214 mm |
| Beeldscherm: | LED |
| Beeldschermdiagonaal: | 8 " |
| Resolutie: | 800 x 480 Pixels |
| Touchscreen: | Ja |
| Frequentie van processor: | 1.6 GHz |
| Processorfamilie: | Atom |
| Processormodel: | Z530 |
| Wi-Fi-standaarden: | 802.11a,802.11b,802.11g |
| Inclusief besturingssysteem: | Windows CE 6.0 |
| Ethernet LAN: | Nee |
| Compatibele geheugenkaarten: | SD |
| Helderheid: | 400 cd/m² |
| Aantal USB 2.0-poorten: | 1 |
| Certificering: | UL 60950-1, CSA C22.2 no. 60950-1, EN 60950-1, IEC 60950-1\r\nFCC Part 15, subpart B, class A; EN 55022, Class A (CISPR22); AS/NZS 3548, Class A (CISPR22); GB9254\r\nEN 55024:1998; GB 9254-2008\r\nFCC Part 15, subpart C; IC RSS210, 102; EN 300 328\r\nRoHS |
| Intern geheugen: | 2 GB |
| RS-232 port: | 2 |
| Intern geheugentype: | SDRAM |
| Temperatuur bij opslag: | -30 - 60 °C |
| Processor cache: | 0.512 MB |
| Touchscreen technologie: | Resistief |
| Front-side bus processor: | 533 MHz |
| Wifi: | Ja |
| Bedrijfstemperatuur (T-T): | -30 - 50 °C |
Heb je hulp nodig?
Als je hulp nodig hebt met Intermec CV41A stel dan hieronder een vraag en andere gebruikers zullen je antwoorden
Handleiding Kassa Intermec

19 Mei 2023
5 April 2023
7 Januari 2023
Handleiding Kassa
- Kassa HP
- Kassa Samsung
- Kassa Casio
- Kassa Miele
- Kassa Toshiba
- Kassa AOpen
- Kassa Royal Sovereign
- Kassa Sharp
- Kassa Vectron
- Kassa Zebra
- Kassa Olivetti
- Kassa Olympia
- Kassa Barska
- Kassa Acropaq
- Kassa SAM4s
- Kassa Approx
- Kassa Custom
- Kassa IZettle
- Kassa VeriFone
- Kassa EC Line
- Kassa ELO
- Kassa ATen
- Kassa Equip
- Kassa Crestron
- Kassa J2 Retail Systems
- Kassa Newland
- Kassa Advantech
- Kassa Flytech
- Kassa Posiflex
- Kassa Cambro
- Kassa Colormetrics
- Kassa Qian
- Kassa MyPOS
Nieuwste handleidingen voor Kassa
19 Februari 2025
19 Februari 2025
19 Februari 2025
18 December 2024
18 December 2024
18 December 2024
18 December 2024
18 December 2024
18 December 2024
18 December 2024