Intermec CN4NI Handleiding
Intermec
Smartphone
CN4NI
Lees hieronder de 📖 handleiding in het Nederlandse voor Intermec CN4NI (145 pagina's) in de categorie Smartphone. Deze handleiding was nuttig voor 30 personen en werd door 2 gebruikers gemiddeld met 4.5 sterren beoordeeld
Pagina 1/145

CN4
Mobile Computer
CN4, CN4e, CN4NI
User’s Manual
ii CN4 Mobile Computer User’s Manual
Intermec Technologies Corporation
Worldwide Headquarters
6001 36th Ave.W.
Everett, WA 98203
U.S.A.
www.intermec.com
The information contained herein is provided solely for the purpose of allowing customers to
operate and service Intermec-manufactured equipment and is not to be released, reproduced, or
used for any other purpose without written permission of Intermec Technologies Corporation.
Information and specifications contained in this document are subject to change without prior
notice and do not represent a commitment on the part of Intermec Technologies Corporation.
© 2009-2011 by Intermec Technologies Corporation. All rights reserved.
The word Intermec, the Intermec logo, Norand, ArciTech, Beverage Routebook, CrossBar,
dcBrowser, Duratherm, EasyADC, EasyCoder, EasySet, Fingerprint, i-gistics, INCA (under license),
Intellitag, Intellitag Gen2, JANUS, LabelShop, MobileLAN, Picolink, Ready-to-Work, RoutePower,
Sabre, ScanPlus, ShopScan, Smart Mobile Computing, SmartSystems, TE 2000, Trakker Antares,
and Vista Powered are either trademarks or registered trademarks of Intermec Technologies
Corporation.
There are U.S. and foreign patents as well as U.S. and foreign patents pending.
Wi-Fi is a registered certification mark of the Wi-Fi Alliance.
Microsoft, Windows, and the Windows logo are registered trademarks of Microsoft Corporation
in the United States and/or other countries.
Bluetooth is a trademark of Bluetooth SIG, Inc., U.S.A.
This product includes software developed by the OpenSSL Project for use in the OpenSSL Toolkit
(www.openssl.org).
This product includes cryptographic software written by Eric Young (EAY@cryptsoft.com).
miniSD is a trademark of the SD Card Association. The SD logo is a trademark.
This product uses Regex++, Index software during its operational phases. The owner of Regex++
has granted use of the software to anyone provided such use is accompanied by the following
copyright and permission notice:
Regex++, Index. (Version 3.31, 16th Dec 2001)
Copyright © 1998-2001 Dr John Maddock
Permission to use, copy, modify, distribute and sell this software and its documentation for any
purpose is hereby granted without fee, provided that the above copyright notice appear in all
copies and that both that copyright notice and this permission notice appear in supporting
documentation. Dr John Maddock makes no representations about the suitability of this software
for any purpose. It is provided “as is” without express or implied warranty.

CN4 Mobile Computer User’s Manual iii
Document Change Record
This page records changes to this document. The document was
originally released as Revision 001.
Version
Number Date Description of Change
003 10/2011 Revised to add information on sending feedback
about this manual and to correct the clean booting
procedure.
002 08/2010 Revised to support the CN4NI Mobile Computer
and the EA11 area imager.
iv CN4 Mobile Computer User’s Manual
Contents
CN4 Mobile Computer User’s Manual v
Contents
Before You Begin. . . . . . . . . . . . . . . . . . . . . . . . . . . . . . . . . . . . . . . . . . . . . . . . . . . . . . . . . . . . . . . . . ix
Safety Information . . . . . . . . . . . . . . . . . . . . . . . . . . . . . . . . . . . . . . . . . . . . . . . . . . . . . . . ix
Global Services and Support . . . . . . . . . . . . . . . . . . . . . . . . . . . . . . . . . . . . . . . . . . . . . . ix
Warranty Information. . . . . . . . . . . . . . . . . . . . . . . . . . . . . . . . . . . . . . . . . . . . ix
Web Support . . . . . . . . . . . . . . . . . . . . . . . . . . . . . . . . . . . . . . . . . . . . . . . . . . . . . x
Send Feedback. . . . . . . . . . . . . . . . . . . . . . . . . . . . . . . . . . . . . . . . . . . . . . . . . . . . x
Telephone Support . . . . . . . . . . . . . . . . . . . . . . . . . . . . . . . . . . . . . . . . . . . . . . . x
Service Location Support . . . . . . . . . . . . . . . . . . . . . . . . . . . . . . . . . . . . . . . . . . x
Who Should Read This Manual . . . . . . . . . . . . . . . . . . . . . . . . . . . . . . . . . . . . . . . . . . . xi
Related Documents . . . . . . . . . . . . . . . . . . . . . . . . . . . . . . . . . . . . . . . . . . . . . . . . . . . . . . xi
Patent Information . . . . . . . . . . . . . . . . . . . . . . . . . . . . . . . . . . . . . . . . . . . . . . . . . . . . . . xii
1 Using the CN4. . . . . . . . . . . . . . . . . . . . . . . . . . . . . . . . . . . . . . . . . . . . . . . . . . . . . . . . . . . . 1
Introducing the CN4 Series Mobile Computers . . . . . . . . . . . . . . . . . . . . . . . . . . . . . . . . . . . . . . 2
What’s New in This Release . . . . . . . . . . . . . . . . . . . . . . . . . . . . . . . . . . . . . . . . . . . . . . . . . . . . . . . . 3
Using the Battery . . . . . . . . . . . . . . . . . . . . . . . . . . . . . . . . . . . . . . . . . . . . . . . . . . . . . . . . . . . . . . . . . 3
Charging the Battery . . . . . . . . . . . . . . . . . . . . . . . . . . . . . . . . . . . . . . . . . . . . . . . . . . . . . .4
Changing the Battery. . . . . . . . . . . . . . . . . . . . . . . . . . . . . . . . . . . . . . . . . . . . . . . . . . . . . . 4
Checking the Battery Status . . . . . . . . . . . . . . . . . . . . . . . . . . . . . . . . . . . . . . . . . . . . . . . 6
Maximizing Battery Life . . . . . . . . . . . . . . . . . . . . . . . . . . . . . . . . . . . . . . . . . . . . . . . . . . . 8
Managing Power on the CN4 . . . . . . . . . . . . . . . . . . . . . . . . . . . . . . . . . . . . . . . . . . . . . . 8
Choosing a Power Management Profile . . . . . . . . . . . . . . . . . . . . . . . . . . . . . 9
Customizing Power Timeouts. . . . . . . . . . . . . . . . . . . . . . . . . . . . . . . . . . . . . 10
Using the Keypad . . . . . . . . . . . . . . . . . . . . . . . . . . . . . . . . . . . . . . . . . . . . . . . . . . . . . . . . . . . . . . . . 12
Using the Color-Coded Keys . . . . . . . . . . . . . . . . . . . . . . . . . . . . . . . . . . . . . . . . . . . . . . 13
Entering Characters on the Alphabetic and QWERTY Keypads. . . . . . . . . . . . . . . 13
Using Caps Lock . . . . . . . . . . . . . . . . . . . . . . . . . . . . . . . . . . . . . . . . . . . . . . . . . 13
Entering Characters on the Numeric Keypads . . . . . . . . . . . . . . . . . . . . . . . . . . . . . .14
Using the Green Key Lock Feature . . . . . . . . . . . . . . . . . . . . . . . . . . . . . . . . .14
Using the Windows Mobile Application Keys . . . . . . . . . . . . . . . . . . . . . . . . . . . . . . .14
Using the Power Button . . . . . . . . . . . . . . . . . . . . . . . . . . . . . . . . . . . . . . . . . . . . . . . . . .15
Understanding the Audio Features . . . . . . . . . . . . . . . . . . . . . . . . . . . . . . . . . . . . . . . . . . . . . . . .15
Using the CN4 as a Cell Phone . . . . . . . . . . . . . . . . . . . . . . . . . . . . . . . . . . . . . . . . . . . .15
Adjusting the Volume of the Rear Speaker. . . . . . . . . . . . . . . . . . . . . . . . . . . . . . . . . . 17
Enabling the Vibrate Mode . . . . . . . . . . . . . . . . . . . . . . . . . . . . . . . . . . . . . . . . . . . . . . . 18
Using the Screen . . . . . . . . . . . . . . . . . . . . . . . . . . . . . . . . . . . . . . . . . . . . . . . . . . . . . . . . . . . . . . . . .18
Contents
vi CN4 Mobile Computer User’s Manual
Using the Stylus . . . . . . . . . . . . . . . . . . . . . . . . . . . . . . . . . . . . . . . . . . . . . . . . . . . . . . . . . 19
Understanding the Screen Icons. . . . . . . . . . . . . . . . . . . . . . . . . . . . . . . . . . . . . . . . . . . 20
Aligning the Touch Screen . . . . . . . . . . . . . . . . . . . . . . . . . . . . . . . . . . . . . . . . . . . . . . . .21
Configuring the Backlight . . . . . . . . . . . . . . . . . . . . . . . . . . . . . . . . . . . . . . . . . . . . . . . .22
Understanding the Status LEDs . . . . . . . . . . . . . . . . . . . . . . . . . . . . . . . . . . . . . . . . . . . . . . . . . . . 23
Using the Imager. . . . . . . . . . . . . . . . . . . . . . . . . . . . . . . . . . . . . . . . . . . . . . . . . . . . . . . . . . . . . . . . .24
Reading Bar Codes . . . . . . . . . . . . . . . . . . . . . . . . . . . . . . . . . . . . . . . . . . . . . . . . . . . . . . .25
Improving Imager Performance . . . . . . . . . . . . . . . . . . . . . . . . . . . . . . . . . . .28
Capturing Images . . . . . . . . . . . . . . . . . . . . . . . . . . . . . . . . . . . . . . . . . . . . . . . . . . . . . . . .29
Using the Image Capture Application. . . . . . . . . . . . . . . . . . . . . . . . . . . . . .29
Configuring the Image Capture Application. . . . . . . . . . . . . . . . . . . . . . . . 30
Copying Images to Your Desktop PC . . . . . . . . . . . . . . . . . . . . . . . . . . . . . . 31
Integrating Image Capture Into Your Application . . . . . . . . . . . . . . . . . .32
Capturing Signatures . . . . . . . . . . . . . . . . . . . . . . . . . . . . . . . . . . . . . . . . . . . . . . . . . . . . 32
Capturing Documents (EA21 only) . . . . . . . . . . . . . . . . . . . . . . . . . . . . . . . . . . . . . . . .32
Using the Color Camera . . . . . . . . . . . . . . . . . . . . . . . . . . . . . . . . . . . . . . . . . . . . . . . . . . . . . . . . . . 35
Installing a miniSD or SIM Card . . . . . . . . . . . . . . . . . . . . . . . . . . . . . . . . . . . . . . . . . . . . . . . . . .37
Setting Up GPS on Your CN4 . . . . . . . . . . . . . . . . . . . . . . . . . . . . . . . . . . . . . . . . . . . . . . . . . . . . . 39
Using the GPSID Installed on the CN4 . . . . . . . . . . . . . . . . . . . . . . . . . . . . . . . . . . . . 39
Learning About Additional GPS Options for the CN4. . . . . . . . . . . . . . . . . . . . . . . 42
2 Connecting and Configuring the CN4 . . . . . . . . . . . . . . . . . . . . . . . . . . . . . . . . 43
Managing the CN4 With SmartSystems Foundation . . . . . . . . . . . . . . . . . . . . . . . . . . . . . . . . 44
Connecting to a PC . . . . . . . . . . . . . . . . . . . . . . . . . . . . . . . . . . . . . . . . . . . . . . . . . . . . . . . . . . . . . . 45
Configuring the Phone . . . . . . . . . . . . . . . . . . . . . . . . . . . . . . . . . . . . . . . . . . . . . . . . . . . . . . . . . . . 46
Activating the CDMA Phone . . . . . . . . . . . . . . . . . . . . . . . . . . . . . . . . . . . . . . . . . . . . . . 46
Activating the GSM/EDGE Phone. . . . . . . . . . . . . . . . . . . . . . . . . . . . . . . . . . . . . . . . .48
Making a Phone Call . . . . . . . . . . . . . . . . . . . . . . . . . . . . . . . . . . . . . . . . . . . . . . . . . . . . .48
Turning the Phone On and Off. . . . . . . . . . . . . . . . . . . . . . . . . . . . . . . . . . . . . . . . . . . . 48
Configuring the CN4 Parameters. . . . . . . . . . . . . . . . . . . . . . . . . . . . . . . . . . . . . . . . . . . . . . . . . .48
Using Intermec Settings Remotely With SmartSystems Foundation . . . . . . . . . .49
Using Intermec Settings Directly On the CN4 . . . . . . . . . . . . . . . . . . . . . . . . . . . . . . 50
Hiding Menu Items in Intermec Settings . . . . . . . . . . . . . . . . . . . . . . . . . . . . . . . . . . .52
Configuring the CN4 for Your Network. . . . . . . . . . . . . . . . . . . . . . . . . . . . . . . . . . . . . . . . . . . . 52
Configuring 802.11b/g Radio Communications . . . . . . . . . . . . . . . . . . . . . . . . . . . . 53
Contents
CN4 Mobile Computer User’s Manual vii
Configuring Ethernet Communications . . . . . . . . . . . . . . . . . . . . . . . . . . . . . . . . . . .53
Configuring Bluetooth Communications . . . . . . . . . . . . . . . . . . . . . . . . . . . . . . . . . . 54
Connecting to a Bluetooth Scanner. . . . . . . . . . . . . . . . . . . . . . . . . . . . . . . . 55
Connecting to a Bluetooth Printer. . . . . . . . . . . . . . . . . . . . . . . . . . . . . . . . . 56
Connecting to a Bluetooth Audio Device. . . . . . . . . . . . . . . . . . . . . . . . . . . 57
Using Serial and USB Communications. . . . . . . . . . . . . . . . . . . . . . . . . . . . . . . . . . . . 57
Managing Network Connections With iConnect. . . . . . . . . . . . . . . . . . . . . . . . . . . .58
Configuring Wireless Security. . . . . . . . . . . . . . . . . . . . . . . . . . . . . . . . . . . . . . . . . . . . . . . . . . . . .59
Choosing Between Microsoft and Funk Security . . . . . . . . . . . . . . . . . . . . . . . . . . . .60
Selecting a Funk Security Profile . . . . . . . . . . . . . . . . . . . . . . . . . . . . . . . . . .61
Selecting Microsoft as Your Security Choice. . . . . . . . . . . . . . . . . . . . . . . .65
Loading a Certificate . . . . . . . . . . . . . . . . . . . . . . . . . . . . . . . . . . . . . . . . . . . . . . . . . . . . .68
Disabling Security . . . . . . . . . . . . . . . . . . . . . . . . . . . . . . . . . . . . . . . . . . . . . . . . . . . . . . .70
3 Developing and Installing Applications . . . . . . . . . . . . . . . . . . . . . . . . . . . . . 71
Developing Applications for the CN4 . . . . . . . . . . . . . . . . . . . . . . . . . . . . . . . . . . . . . . . . . . . . . .72
Packaging Your Application . . . . . . . . . . . . . . . . . . . . . . . . . . . . . . . . . . . . . . . . . . . . . .72
Choosing a Target Location for the Application . . . . . . . . . . . . . . . . . . . . . . . . . . . .72
Installing Applications on the CN4 . . . . . . . . . . . . . . . . . . . . . . . . . . . . . . . . . . . . . . . . . . . . . . . .73
Installing Applications Using SmartSystems Foundation Console. . . . . . . . . . . .73
Installing Applications Using Microsoft ActiveSync . . . . . . . . . . . . . . . . . . . . . . . . . 74
Installing Applications Using a Storage Card . . . . . . . . . . . . . . . . . . . . . . . . . . . . . . .74
Installing Applications Using the FTP Server . . . . . . . . . . . . . . . . . . . . . . . . . . . . . . .75
Launching an Application Automatically . . . . . . . . . . . . . . . . . . . . . . . . . . . . . . . . . . . . . . . . . .75
Integrating Image Capture . . . . . . . . . . . . . . . . . . . . . . . . . . . . . . . . . . . . . . . . . . . . . . . . . . . . . . . .76
Calling Image Capture From Your Application . . . . . . . . . . . . . . . . . . . . . . . . . . . . . 76
Creating and Editing the Image Capture XML File . . . . . . . . . . . . . . . . . . . . . . . . . .77
Image Capture XML Example . . . . . . . . . . . . . . . . . . . . . . . . . . . . . . . . . . . . . 80
Freeing Up Virtual Memory for Applications . . . . . . . . . . . . . . . . . . . . . . . . . . . . . . . . . . . . . . .80
Upgrading the System Software . . . . . . . . . . . . . . . . . . . . . . . . . . . . . . . . . . . . . . . . . . . . . . . . . . .82
Locating Upgrade Files . . . . . . . . . . . . . . . . . . . . . . . . . . . . . . . . . . . . . . . . . . . . . . . . . . .83
Upgrading the CN4 Using SmartSystems Foundation. . . . . . . . . . . . . . . . . . . . . . .84
Upgrading the CN4 Using a miniSD Card. . . . . . . . . . . . . . . . . . . . . . . . . . . . . . . . . . 85
Contents
viii CN4 Mobile Computer User’s Manual
4 Troubleshooting and Maintaining the CN4 . . . . . . . . . . . . . . . . . . . . . . . . . 87
Calling Product Support. . . . . . . . . . . . . . . . . . . . . . . . . . . . . . . . . . . . . . . . . . . . . . . . . . . . . . . . . .88
Troubleshooting the CN4 . . . . . . . . . . . . . . . . . . . . . . . . . . . . . . . . . . . . . . . . . . . . . . . . . . . . . . . . 89
Checking 802.11 Network Status . . . . . . . . . . . . . . . . . . . . . . . . . . . . . . . . . . . . . . . . . . 94
Resetting the CN4 . . . . . . . . . . . . . . . . . . . . . . . . . . . . . . . . . . . . . . . . . . . . . . . . . . . . . . . . . . . . . . .97
Warm Booting the CN4 . . . . . . . . . . . . . . . . . . . . . . . . . . . . . . . . . . . . . . . . . . . . . . . . . . 98
Cold Booting the CN4. . . . . . . . . . . . . . . . . . . . . . . . . . . . . . . . . . . . . . . . . . . . . . . . . . . .98
Clean Booting the CN4. . . . . . . . . . . . . . . . . . . . . . . . . . . . . . . . . . . . . . . . . . . . . . . . . . .99
Cleaning the CN4 . . . . . . . . . . . . . . . . . . . . . . . . . . . . . . . . . . . . . . . . . . . . . . . . . . . . . . . . . . . . . . .100
A Specifications and Default Settings. . . . . . . . . . . . . . . . . . . . . . . . . . . . . . . . 101
Physical and Environmental Specifications. . . . . . . . . . . . . . . . . . . . . . . . . . . . . . . . . . . . . . . .102
Accessories . . . . . . . . . . . . . . . . . . . . . . . . . . . . . . . . . . . . . . . . . . . . . . . . . . . . . . . . . . . . . . . . . . . . .109
Default Settings . . . . . . . . . . . . . . . . . . . . . . . . . . . . . . . . . . . . . . . . . . . . . . . . . . . . . . . . . . . . . . . .110
Data Collection . . . . . . . . . . . . . . . . . . . . . . . . . . . . . . . . . . . . . . . . . . . . . . . . .110
Communications . . . . . . . . . . . . . . . . . . . . . . . . . . . . . . . . . . . . . . . . . . . . . . .113
GPS . . . . . . . . . . . . . . . . . . . . . . . . . . . . . . . . . . . . . . . . . . . . . . . . . . . . . . . . . . .115
Device Monitor . . . . . . . . . . . . . . . . . . . . . . . . . . . . . . . . . . . . . . . . . . . . . . . . .115
Core Messaging Service. . . . . . . . . . . . . . . . . . . . . . . . . . . . . . . . . . . . . . . . . .115
B Keypads and Keystrokes. . . . . . . . . . . . . . . . . . . . . . . . . . . . . . . . . . . . . . . . . . . . . 117
Standard Characters . . . . . . . . . . . . . . . . . . . . . . . . . . . . . . . . . . . . . . . . . . . . . . . . . . . . . . . . . . . .118
Other Available Characters. . . . . . . . . . . . . . . . . . . . . . . . . . . . . . . . . . . . . . . . . . . . . . . . . . . . . . .121
Language-Specific Characters . . . . . . . . . . . . . . . . . . . . . . . . . . . . . . . . . . . . . . . . . . . . . . . . . . . .123
I Index . . . . . . . . . . . . . . . . . . . . . . . . . . . . . . . . . . . . . . . . . . . . . . . . . . . . . . . . . . . . . . . . . . . . 127

Before You Begin
CN4 Mobile Computer User’s Manual ix
Before You Begin
This section provides you with safety information, technical support
information, and sources for additional product information.
Safety Information
Your safety is extremely important. Read and follow all warnings and
cautions in this document before handling and operating Intermec
equipment. You can be seriously injured, and equipment and data can
be damaged if you do not follow the safety warnings and cautions.
This section explains how to identify and understand warnings,
cautions, and notes that are in this document.
Global Services and Support
Warranty Information
To understand the warranty for your Intermec product, visit the
Intermec website at www.intermec.com and click Support >
Returns and Repairs > Warranty.
Disclaimer of warranties: The sample code included in this document
is presented for reference only. The code does not necessarily
represent complete, tested programs. The code is provided “as is with
all faults.” All warranties are expressly disclaimed, including the
implied warranties of merchantability and fitness for a particular
purpose.
A warning alerts you of an operating procedure, practice,
condition, or statement that must be strictly observed to avoid
death or serious injury to the persons working on the equipment.
A caution alerts you to an operating procedure, practice,
condition, or statement that must be strictly observed to prevent
equipment damage or destruction, or corruption or loss of data.
Note: Notes either provide extra information about a topic or contain
special instructions for handling a particular condition or set of
circumstances.
Before You Begin
CN4 Mobile Computer User’s Manual xi
Who Should Read This Manual
This manual is written for the person who is responsible for
installing, configuring, and maintaining the CN4, CN4e, and CN4NI
Mobile Computers.
This manual provides you with information about the features of the
mobile computer and how to install, configure, operate, maintain,
and troubleshoot it.
Before you work with the mobile computer, you should be familiar
with your network and general networking terms, such as IP address.
Related Documents
This list contains related Intermec documents and their part
numbers.
•Intermec Settings Command Reference Manual
•Intermec Developer Library (IDL) Resource Kit Developer’s Guide
The Intermec website at www.intermec.com contains our documents
(as PDF files) that you can download for free.
To download documents
1Visit the Intermec website at www.intermec.com.
2Click the Products tab.
3Using the Products menu, navigate to your product page. For
example, to find the CN4 computer product page, click
Computers > Handheld Computers > CN4.
4Click the Manuals tab.
If your product does not have its own product page, click Support >
Manuals. Use the Product Category, the Product Family, and
Product to help find your documentation.
Before You Begin
xii CN4 Mobile Computer User’s Manual
Patent Information
Product is covered by one or more of the following patents:
4882476; 4894523; 4953113; 4961043; 4970379; 4988852; 5019699;
5021642; 5038024; 5081343; 5095197; 5144119; 5144121; 5182441;
5187355; 5187356; 5195183; 5216233; 5216550; 5195183; 5195183;
5218191; 5227614; 5233172; 5241488; 5243602; 5258606; 5278487;
5288985; 5308966; 5322991; 5331136; 5331580; 5342210; 5349678;
5359185; 5371858; 5373478; 5389770; 5397885; 5410141; 5414251;
5416463; 5442167; 5464972; 5468947; 5468950; 5477044; 5486689;
5488575; 5500516; 5502297; 5504367; 5508599; 5514858; 5530619;
5534684; 5536924; 5539191; 5541419; 5548108; 5550362; 5550364;
5565669; 5567925; 5568645; 5572007; 5576529; 5592512; 5594230;
5598007; 5608578; 5616909; 5619027; 5627360; 5640001; 5657317;
5659431; 5671436; 5672860; 5684290; 5719678; 5729003; 5742041;
5761219; 5764798; 5777308; 5777309; 5777310; 5786583; 5793604;
5798509; 5798513; 5804805; 5805807; 5811776; 5811777; 5818027;
5821523; 5828052; 5831819; 5834753; 5834749; 5837987; 5841121;
5842070; 5844222; 5854478; 5862267; 5869840; 5873070; 5877486;
5878395; 5883492; 5883493; 5886338; 5889386; 5892971; 5895906;
5898162; 5902987; 5902988; 5912452; 5923022; 5936224; 5949056;
5969321; 5969326; 5969328; 5979768; 5986435; 5987192; 5987499;
5992750; 6003775; 6012640; 6016960; 6018597; 6024289; 6034379;
6036093; 6039252; 6064763; 6075340; 6095422; 6097839; 6102289;
6102295; 6109528; 6119941; 6128414; 6138915; 6149061; 6149063;
6152370; 6155490; 6158661; 6164542; 6164545; 6173893; 6195053;
6234393; 6234395; 6244512; 6249008; 6328214; 6330975; 6345765;
6356949; 6367699; 6375075; 6375076; 6375344; 6431451; 6435411;
6484944; 6488209; 6497368; 6532152; 6538413; 6539422; 6621942;
6641046; 6681994; 6687403; 6688523; 6732930
There may be other U.S. and foreign patents pending.

1
1
Using the CN4
This chapter introduces the CN4 and CN4e Mobile
Computers with Windows® Mobile® 6.1. It also contains
hardware and software configuration information to assist
you in getting the most out of your computer. This chapter
contains these topics:
•Introducing the CN4 Series Mobile Computers
•What’s New in This Release
•Using the Battery
•Using the Keypad
•Understanding the Audio Features
•Using the Screen
•Understanding the Status LEDs
•Using the Imager
•Using the Color Camera
•Installing a miniSD or SIM Card
•Setting Up GPS on Your CN4

Chapter 1 — Using the CN4
2 CN4 Mobile Computer User’s Manual
Introducing the CN4 Series Mobile Computers
The Intermec CN4 and CN4e Mobile Computers are ergonomically
designed mobile computers built on the Microsoft Windows Mobile®
6.1 operating system. They are lightweight, easy-to-use, and run most
software developed for the Windows Mobile platform, including
standalone, client-server, and browser-based applications.
The CN4 and CN4e support similar feature sets. The CN4e offers
extended environmental specifications and larger keys for data
intensive applications. The CN4NI (both the CN4 and CN4e) is
certified for use in non-incendive environments. Throughout this
manual, all versions of the computer are referred to as the CN4 Series
Mobile Computer or CN4.
CN4e and CN4 Mobile Computers
The CN4 Series Mobile Computer with an IEEE 802.11b/g radio installed is
Wi-Fi® certified for interoperability with other 802.11b/g wireless LAN
devices.

Chapter 1 — Using the CN4
CN4 Mobile Computer User’s Manual 3
Standard CN4 features include:
•GPS, 802.11b/g, Bluetooth®, and WWAN radios. For WWAN,
choose from one of these options:
•UMTS/HSDPA
•CDMA/1xRTT/EV-DO Rev A
•IP64 seal rating and 1.8 m (6 ft) drop specification
•a 2-megapixel color camera with LED flash, EA21 Area Imager, or
EA11 Area Imager.
•128 MB RAM.
•a numeric, QWERTY (CN4), or alphabetic (CN4e) keypad.
Use this manual to understand how to use the features and options
available on the CN4. For information about the Windows Mobile
applications installed on the CN4, see the online help.
What’s New in This Release
This version of the manual has been updated to:
•add information on sending feedback about this manual. For
more information, see “Send Feedback” on page x.
•correct the clean booting procedure. For more information, see
“Clean Booting the CN4” on page 99.
Using the Battery
The CN4 uses the following Intermec batteries as a main power
source. All have been certified to meet the IEEE 1725 standard for
rechargeable batteries.
Standard and Extended Batteries for CN4 and CN4e
Computer Uses This Standard Battery Uses This Extended Battery
CN4 AB8 or AB15 AB9 or AB16
CN4e N/A AB9 or AB16
CN4NI N/A AB28

Chapter 1 — Using the CN4
4 CN4 Mobile Computer User’s Manual
Standard batteries have 8.1 Watt hours capacity and extended
batteries have 14.8 Watt hours capacity. You must fully charge the
battery before you can use the CN4.
Dispose of used batteries promptly. Keep away from children. Contact
your Intermec representative for replacement batteries.
Charging the Battery
The battery pack should be fully charged before you use the CN4 for
the first time. If battery temperatures are within the battery charging
range of 0 °C to 40 °C (32 °F to 104 °F), the standard battery pack
takes up to four hours to charge. The extended battery pack takes up
to five hours.
The battery is fully charged when the battery status LED shows a
steady green.
To charge the battery
•Insert the battery into a quad battery charger, a single dock, or a
multidock, or attach external power to the CN4 with the battery
installed. For information on these accessories, see “Accessories”
on page 109.
Changing the Battery
When you remove the battery from the CN4, an internal super
capacitor maintains your status, memory, and real-time clock for up
to five minutes. To maximize this time, suspend the CN4 before
changing the battery.
The battery used in this device may present a fire or chemical
burn hazard if it is mistreated. Do not disassemble it, heat it
above 100 °C (212 °F) or incinerate it.
If you fail to replace the low battery immediately, you may lose
important data or applications.
If the CN4 is not on external power and you remove the battery
pack, you need to install a charged battery within 5 minutes, or
the CN4 resets and you could lose data.
Chapter 1 — Using the CN4
CN4 Mobile Computer User’s Manual 5
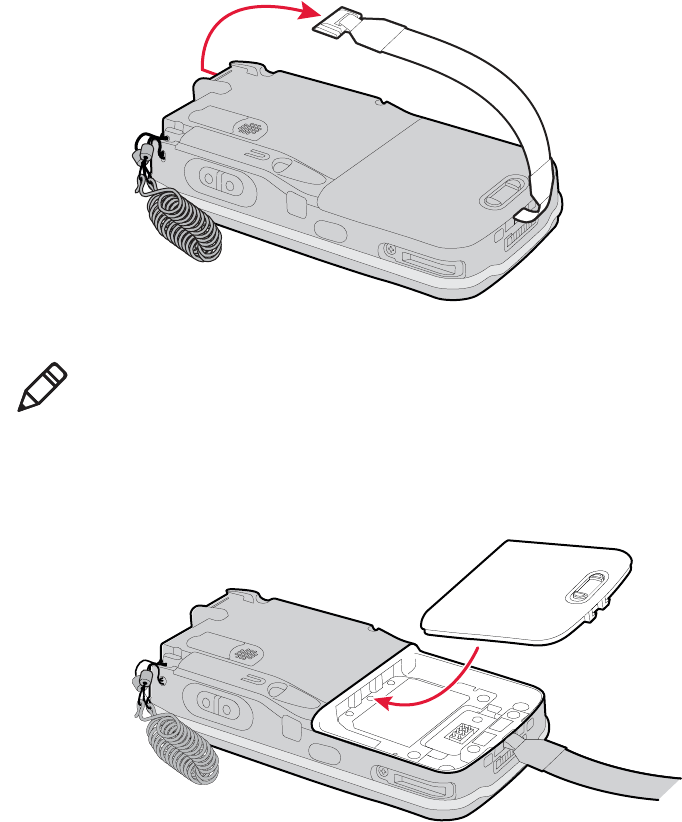
To change the battery
1Press and release the Power button to suspend the CN4.
2Unsnap the top end of the handstrap.
3Slide the tab on the battery to release it from the CN4.
4Place the end of the battery into the battery compartment as
shown in the next illustration, and press down on the other end of
the battery until it clicks into place.
5Snap the top of the handstrap into place.
Note: For the CN4NI, use a Phillips screwdriver to loosen and
tighten the battery set screw.

Chapter 1 — Using the CN4
6 CN4 Mobile Computer User’s Manual
Checking the Battery Status
A quick way to check the status of your battery is to look at the
battery icon on the CN4 Status bar.
The Battery Status LED indicates the charging status.
Battery Icon Status
Icon Status
Battery is fully charged.
Battery has a medium charge. You should be able to work for several
more hours before changing batteries.
Battery is low. You need to replace or charge the battery soon.
Battery is critically low. You need to replace or charge the battery now.
Battery is charging.
Understanding the Battery Status LED
Battery Status Description
Steady green The battery is more than 95% charged and CN4 is
on a charger.
Blinking red The battery is low. CN4 goes into Suspend mode.
Charge or replace the battery.
Steady red and the CN4
is attached to external
power.
The battery is charging.
Steady red and the CN4
is not attached to
external power.
The CN4 firmware is not working properly. Cold
boot the CN4 as described in “Cold Booting the
CN4” on page 98.
Battery status LED
Chapter 1 — Using the CN4
CN4 Mobile Computer User’s Manual 7
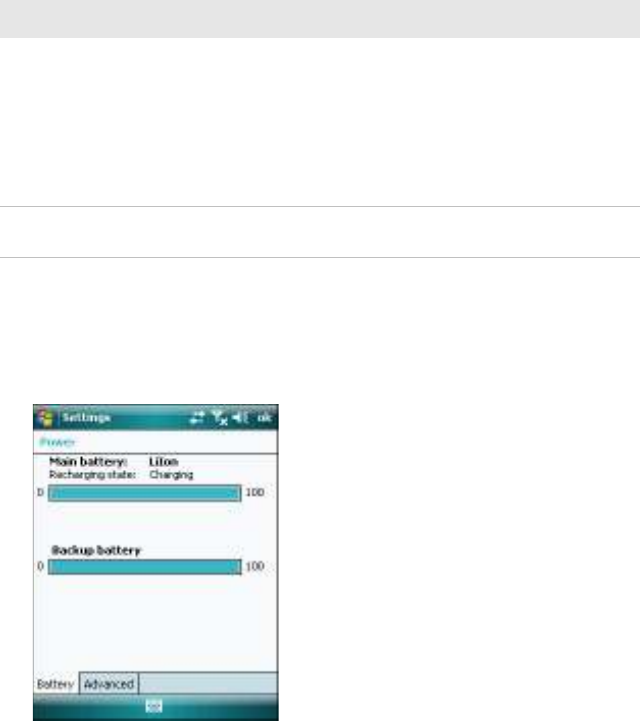
You can also check the battery status by using the Power application.
To check the battery status
•Tap Start > Settings > the System tab > Power > the Battery tab.
Steady amber The battery is missing or is unable to charge.
If the battery will not charge, it may be because the
temperature is outside of the charging range, or
you may be using a battery not approved by
Intermec. You need to use one of the battery
models specified in “Standard and Extended
Batteries for CN4 and CN4e” on page 3.
Off The CN4 is not on external power and the battery
is operating normally.
Understanding the Battery Status LED (continued)
Battery Status Description

Chapter 1 — Using the CN4
8 CN4 Mobile Computer User’s Manual
Maximizing Battery Life
Batteries are chemical devices. If the batteries are left sitting on a shelf
for long periods of time outside the CN4, the batteries slowly
discharge, eventually to zero if left uncharged. The battery chemistry
resists normal degradation if you store the battery in a charger as
opposed to leaving the battery in a discharged state. See the following
table for tips you can do to maximize the life of your battery.
Managing Power on the CN4
Several factors determine the life of your battery such as extreme
temperatures, input devices, and your usage.
By default, the CN4 goes into a lower power mode or turns off after
two minutes of inactivity. Press the Power button to resume activity
at any time.
Battery Conservation Tips
When You Want To: Do This to Save Battery Power:
Operate the CN4 and the
Low Battery status icon
appears or the Battery light
comes on.
Press the Power button to turn off the CN4.
Remove the battery and insert another fully
charged battery within five minutes or you may
lose data. Or, you can connect the CN4 to an
external power source.
Stop using the CN4 for five
minutes or longer.
Make sure the low battery icon is not on the
screen and that the Battery light is not turned
on. Press the Power button to turn off the
CN4.
Store the CN4 for more
than a day.
If you are storing the CN4 for a few days, like
over the weekend, install the charged battery or
attach the CN4 to a power source.
If you are storing the CN4 for longer, remove
and charge the battery, then store both the
battery and the CN4 in a cool location.
If the battery in storage is not used in several
months, you should recharge the battery to
keep it at its performance peak.
Store the battery outside
the CN4.
Store the batteries in a charger.

Chapter 1 — Using the CN4
CN4 Mobile Computer User’s Manual 9
There are several ways you can manage power:
•You can set the amount of time that the screen stays on, or the
amount of time the CN4 stays on after the screen turns off. For
help, see “Customizing Power Timeouts” on page 10.
•You can change the amount of time the screen backlight stays on.
For help, see “Configuring the Backlight” on page 22.
•You can choose a Power Management Profile to manage power
based on the way you use your CN4. Each profile turns off the
screen and the CN4 at preset times, and maintains data
connections differently. For help, see the next section.
Choosing a Power Management Profile
1Tap Start > Settings > the System tab > Power Profiler.
2From the drop-down list, select Windows Mobile Classic,
Windows Mobile Standard, or Windows Mobile Phone. If the
list is grayed out, uncheck the Enable Advanced Settings check
box.
For more information, see the next section, “About Power
Management Profiles.”
3Tap ok in the upper right corner to save your changes.

Chapter 1 — Using the CN4
10 CN4 Mobile Computer User’s Manual
Power Profiler also provides advanced settings that allow you to fine-
tune the power usage. You can choose to have the Power button turn
off the screen or turn off the device.
About Power Management Profiles
Use the Windows Mobile Standard profile (default) for applications
that power off infrequently, such as inventory management or
terminal emulation. If the CN4 does not have any activity, the screen
turns off, but WAN, LAN, or Bluetooth radio connections are
maintained in a low power state. If there continues to be no activity,
the CN4 eventually turns off LAN and Bluetooth data connections
and goes into Suspend mode. The CN4 maintains its WAN
connection during Suspend mode, and still receives incoming phone
calls or other data. To wake up the CN4 and restore other
connections, press the Power or Scan button.
Use the Windows Mobile Classic profile for systems that batch data
and upload it several times a day. This profile does not support
constant data connections over LAN or Bluetooth. It can only
maintain data connections when the CN4 is on and all peripherals are
enabled. If the screen is off, you do not have any LAN, or Bluetooth
connections, but the CN4 maintains its WAN connection and still
receives incoming phone calls or other data. To wake up the CN4 and
restore other connections, press the Power or Scan button.
Use the Windows Mobile Phone profile when you have a system that
requires network wake-up or you need the CN4 to always be
connected to the network. Although the connections are maintained
at a low power mode, this setting typically consumes the most power.
If the screen turns off, the radios continue to maintain the network
connections. To turn the screen back on, press the Power or Scan
button.
Customizing Power Timeouts
Note: You can also configure all of the settings in Power Profiler using
Intermec Settings. For help with Intermec Settings, see “Configuring
the CN4 Parameters” on page 48.
Note: When you set timeout values this way, you override values used
by the Power Management Profiles.
Chapter 1 — Using the CN4
CN4 Mobile Computer User’s Manual 11
To customize power timeout values
1Tap Start > Settings > System tab > Power Profiler.
2In the Power Profile tab, tap Enable Advanced Settings.
3Tap the Screen Settings tab to change screen timeout values:
•Check the Enable Screen Off check box to be able to turn off
the screen independently of the CN4.
•To change the amount of inactivity time before the screen
turns off, move the Battery Power or External Power sliders.
For battery power, choose from 1 to 6 minutes. For external
power, choose from 1, 2, 5, 10, or 15 minutes, or disable this
feature.
4Tap the Device Settings tab to change power timeout values:
•Check the Enable Device Off check box to be able to turn off
the CN4 by pressing the Power button. This feature is enabled
by default unless you are using the Windows Mobile Phone
power profile.
•To change the amount of inactivity time before the CN4 turns
off and goes into Suspend mode, move the Battery Power or
External Power sliders.
For battery power, choose from 1 to 6 minutes. For external
power, choose from 1, 2, 5, 10, or 15 minutes, or disable this
feature.
5Tap the Power Button tab to change what happens when you
press the Power button:
•Choose Turn off the Device to put the CN4 in Suspend mode
when you press the Power button. In Suspend mode, data
connections (except for WAN) are turned off. To restore data
connections, you need to press the Power button to wake up
the CN4.
•Choose Turn off the Screen if you want to leave the CN4 on
but with the screen turned off when you press the Power
button. This mode uses more power than Suspend mode, but
maintains all data connections. Press the Power button to turn
the screen on.

Chapter 1 — Using the CN4
12 CN4 Mobile Computer User’s Manual
Using the Keypad
The CN4 comes with either a QWERTY keypad or a numeric keypad.
The CN4e comes with either an alphabetic keypad or a numeric
keypad.
The QWERTY and alphabetic keypads are for applications that
require mainly alphabetic data. The numeric keypads are for
applications requiring mainly numeric data.
CN4 QWERTY Keypad CN4 Numeric Keypad
CN4e Alphabetic Keypad CN4e Numeric Keypad
Note: Some available characters are not printed on the keypad
overlays. For a complete list of available characters, see Appendix B,
“Keypads and Keystrokes.”

Chapter 1 — Using the CN4
CN4 Mobile Computer User’s Manual 13
Using the Color-Coded Keys
All keypads include color-coded modifier keys for characters, symbols,
and functions printed on the keypad overlay. The numeric keypads
include an orange b modifier key and a green c modifier key. The
alphanumeric keypads include an orange b modifier key.
Entering Characters on the Alphabetic and QWERTY Keypads
Press the key for the character to type that character. To type a
character or access a function printed on the keypad overlay, press b
and then press the key for the character or function you want.
To type a single uppercase letter on the QWERTY and alphabetic
keypads, press ] and then the letter key.
Using Caps Lock
To type only uppercase letters, press b ] to enable the Caps Lock
feature. Press the same key sequence to disable Caps Lock. When Caps
Lock is enabled, the Caps Lock LED turns on.
While Caps Lock is enabled, you can still type orange characters by
pressing b and then the key for that character. Caps Lock remains
enabled until you press b ].
Using the Color-Coded Keys
To Do This Press Example
Use an orange character or
function printed above a key.
b key (LED illuminates) and
then the key with the
character or function printed
above it (LED turns off).
On the QWERTY keypad, press
b and then Q to type the @
character.
Use a green character or
function printed above a key.
c key (LED illuminates) and
then the key with the
character or function printed
above it (LED turns off).
On the numeric keypad, press c
and then 2 to type a lowercase
a.
Lock the orange or green key to
stay on.
b or c twice. On the numeric keypad, press c
twice and the green LED
illuminates and stays on.
Unlock a green or orange key. b or c once. Press the b or c once to unlock
the key and turn off the LED.

Chapter 1 — Using the CN4
16 CN4 Mobile Computer User’s Manual
Microphone and Front Speaker Locations
To adjust the volume of the front speaker
1Tap the Volume icon ( ) at the top of the screen.
2In the Volume adjust box, tap On.
3Move the volume slider for the phone.
Front speaker
Microphone
Phone volume
slider

Chapter 1 — Using the CN4
CN4 Mobile Computer User’s Manual 17
Adjusting the Volume of the Rear Speaker
The rear speaker is used for all other computer audio. You can set the
volume to off, very low, low, medium (default), high, and very high.
Location of the Rear Speaker and Volume Control
Choose one of these methods to change the rear speaker volume.
•Use the Volume slider to change the rear speaker volume:
aTap the Volume icon ( ) at the top of the screen.
bIn the Volume adjust box, tap On.
cUse your stylus to move the volume slider for the rear speaker.
•Press the side volume button to change the volume:
•Press the top to turn the volume up.
•Press the bottom to turn the volume down.
•Use Intermec Settings to set the default volume. For help, see
“Configuring the CN4 Parameters” on page 48.
Rear speaker
Volume up/down
Rear speaker
volume slider

Chapter 1 — Using the CN4
18 CN4 Mobile Computer User’s Manual
Enabling the Vibrate Mode
You can enable the vibrate mode when audio is difficult to hear, such
as in a high noise environment. When enabled, the CN4 vibrates when
the scanner performs a good read or when the phone receives a call.
To enable the vibrate feature
1Tap the Volume icon ( ) at the top of the screen.
2Tap Vibrate.
Using the Screen
The CN4 has a 3.5" diagonal, 240 x 320 pixel (QVGA) transflective
TFT-LCD 64K color display.
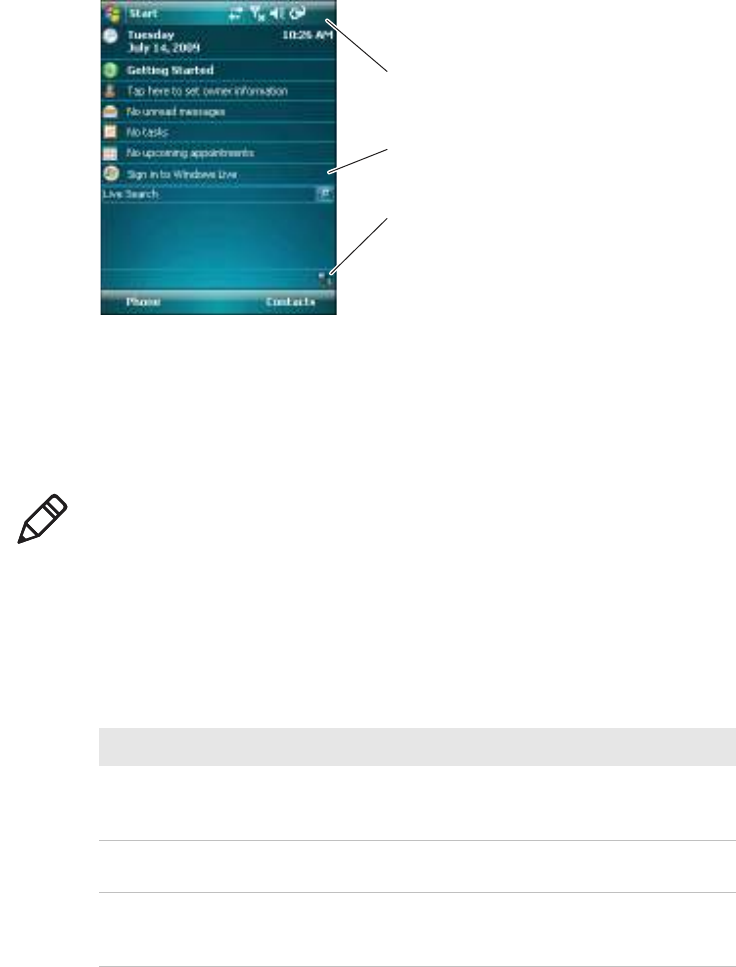
•The Status bar displays the Start flag, connectivity icons, the
Volume icon, and the time and next appointment.
•The Today screen displays shortcuts to some of the applications
installed on the CN4 and important information for the day.
The Command bar displays the onscreen keyboard icon, Windows
Mobile 6.1 links, and icons to any applications that are running, but
are hidden from view.
Note: The Volume icon in the Navigation bar changes to look like a
vibrating CN4 ( ) when the Vibrate feature is enabled.
Chapter 1 — Using the CN4
CN4 Mobile Computer User’s Manual 19
The Windows Mobile Today Screen
To turn the screen backlight on and off:
•For all keypads except the QWERTY keypad, press b ..
•For the QWERTY keypad, press g.
Using the Stylus
The CN4 has a stylus for selecting items and entering information on
the touch screen.
Status bar
Today screen
Command bar
Note: To help conserve battery power, you can change the amount of
time that the screen backlight stays on. For help, see “Configuring
the Backlight” on page 22.
Functions You Can Perform With the Stylus
Action Description
Tap Touch the screen once with the stylus to select options,
open or close applications, or launch menus from the
Command bar.
Drag Hold the stylus on the screen and drag across the screen to
select text and images.
Tap and hold Tap and hold the stylus on an item to see a menu of actions
available for that item. On the pop-up menu that appears,
tap the action you want to perform.

Chapter 1 — Using the CN4
20 CN4 Mobile Computer User’s Manual
Understanding the Screen Icons
The screen icons on the Status bar and Command bar indicate battery
charge levels, network connections, and so on. Some standard
Microsoft icons are included in this table.
Computer Screen Icons
Icon Description
The battery is full.
The battery is low. You need to replace or charge the battery very
soon.
The CN4 is on external power and the battery is charging.
The volume is turned off. To turn the volume back on, tap this
icon and choose your setting.
The computer is connected to the network.
The computer is not connected to the network.
The 802.11b/g radio is connected to the wireless network.
The phone is connected to your WAN network.
The computer is connected through the USB port to your
desktop PC.
The iConnect application icon. Tap it to set up Ethernet or
Wireless settings.
No SIM card is installed.

Chapter 1 — Using the CN4
CN4 Mobile Computer User’s Manual 23
Understanding the Status LEDs
The status LEDs above the display show the following information:
.
The Ready-to-Work indicator (blue light) is for SmartSystems
Foundation, which is part of a wireless network using all Intermec
devices. Selected application software programs may also use the
indicator for other purposes. For more information, see “Managing
the CN4 With SmartSystems Foundation” on page 44.
Understanding the LEDs
LED Color Description
Notification Orange The CN4 is notifying you of a pending alarm
or message. For more information on the
Battery Status LED, see “Understanding the
Battery Status LED” on page 6.
Good Read Green The CN4 has successfully decoded a bar code.
Ready-to-Work™
indicator
Blue The CN4 is suspending or resuming with the
display turned off.
Intermec Terminal Emulator (ITE) is running
and connected to the host.
Blinking
blue
ITE is running but not connected to the host.
Off ITE is not installed or not running.
Notification LED
Battery status LED
Good Read LED and
Intermec Ready-to-Work indicator
Note: The blue light may stay on for up to 30 seconds, but will usually
turn off after less than 10 seconds. During this time, do not toggle the
CN4 on or off and do not remove the battery. If the computer seems
to behave erratically, first try warm booting and then cold booting the
CN4 as described in “Resetting the CN4” on page 97.

Chapter 1 — Using the CN4
24 CN4 Mobile Computer User’s Manual
Using the Imager
The CN4 has two available area imagers: EA11 and EA21. The EA11
provides a “laser-like” aimer and is optimized for a scan-intensive
environment. The EA21 provides a laser framer and is optimized for
document imaging. Both area imagers can scan 1D and 2D bar codes.
The following table shows the minimum bar code size supported by
each imager.
The area imager in the CN4 can perform multiple tasks:
•Reading bar codes, including 1D, 2D, and composite symbologies
and postal codes. For more information, see the next section,
“Reading Bar Codes.”
•Capturing images. Use the imager like a digital camera to take
high-quality, grayscalegrayscale pictures. For more information,
see “Capturing Images” on page 29.
•Capturing signatures. Use the imager to “photograph” signatures
on business forms, or to capture onscreen signatures or line
drawings. For more information, see “Capturing Signatures” on
page 32.
•EA21 only: Document imaging of full business forms such as bills
of lading or invoices. For more information, see “Capturing
Documents (EA21 only)” on page 32.
Minimum Bar Code Sizes
Imager 1D 2D
EA11 5 mil 5 mil
EA21 6 mil 10 mil

Chapter 1 — Using the CN4
CN4 Mobile Computer User’s Manual 25
Reading Bar Codes
The CN4 imager can scan 1D and 2D bar code symbologies,
composite symbologies, and postal codes. You can position the CN4
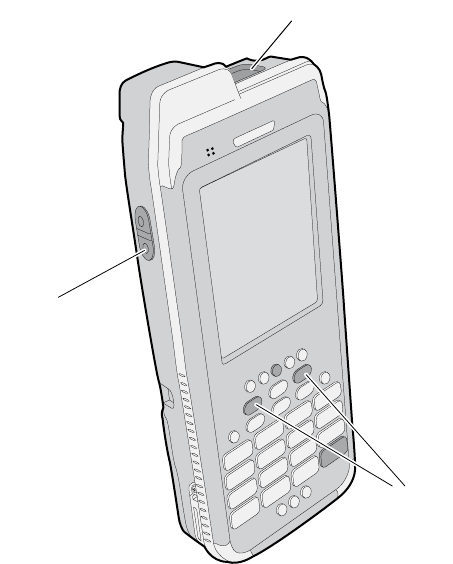
in almost any orientation to scan a bar code label.
CN4 Imager and Scan Button Locations
Imager window
Side scan
button
Front scan
button
Chapter 1 — Using the CN4
26 CN4 Mobile Computer User’s Manual
CN4e Imager and Scan Button Locations
To read bar codes
1Press the Power button to turn on the CN4, point the scanner
window a few inches from the bar code label, and hold steady.
2Press and hold the Scan button. A laser pointer, illumination
beam, and aiming frame turn on.
Imager window
Side scan
button
Front scan
buttons

Chapter 1 — Using the CN4
CN4 Mobile Computer User’s Manual 27
3Center the pointer over the bar code label and move the CN4 so
the bar code fills the aiming frame.
4When a bar code label is successfully read, the CN4 makes a high
beep and the Good Read LED lights briefly.
5Release the Scan button.
By default, these bar code symbologies are enabled on the CN4:
•Code 39
•Code 128/GS1-128
•DataMatrix
•EAN-8
•EAN-13
•PDF417
•UPC-A
•UPC-E
Laser pointer

Chapter 1 — Using the CN4
28 CN4 Mobile Computer User’s Manual
If you are using bar code labels that are encoded in a different
symbology, you need to enable the symbology on the computer. Use
Intermec Settings to enable and disable symbologies. For help, see
“Configuring the CN4 Parameters” on page 48.
Improving Imager Performance
If you experience problems reading bar codes, try some of these tips to
improve the imager performance.
•Keep your hand as steady as possible while scanning a label.
•Position the imager as close to the bar code as possible while still
being able to capture the entire bar code.
•Enable only the bar code symbologies that you need to use every
day.
You can also choose a predefined mode that optimizes imager settings
for different needs or environments.
To choose a predefined mode for the imager
1Start Intermec Settings. For help, see “Configuring the CN4
Parameters” on page 48.
2Tap Data Collection > Internal Scanner > Imager Settings >
General and then choose an option from the Predefined Modes
list:
3Save your settings.
Predefined Mode Select If You Are Scanning:
1D Only 1D labels.
1D and 2D Standard (Default) All types of bar code labels.
1D and 2D Bright
Environment
In high ambient light, such as outdoors in the
sunshine.
1D and 2D
Reflective Surface
Glossy labels.
Custom In conditions that require customized settings.
For complete information about these settings,
commands, and parameters, see the
Intermec Settings Command Reference Manual.
Product specificaties
| Merk: | Intermec |
| Categorie: | Smartphone |
| Model: | CN4NI |
Heb je hulp nodig?
Als je hulp nodig hebt met Intermec CN4NI stel dan hieronder een vraag en andere gebruikers zullen je antwoorden
Handleiding Smartphone Intermec

18 April 2023
24 Maart 2023
23 Februari 2023
16 Januari 2023
6 Januari 2023
3 Januari 2023
31 Oktober 2022
Handleiding Smartphone
- Smartphone Philips
- Smartphone HP
- Smartphone Sony
- Smartphone Samsung
- Smartphone Xiaomi
- Smartphone Panasonic
- Smartphone Brondi
- Smartphone LG
- Smartphone Huawei
- Smartphone Asus
- Smartphone AEG
- Smartphone Fysic
- Smartphone Garmin
- Smartphone Gigaset
- Smartphone Honeywell
- Smartphone Motorola
- Smartphone Medion
- Smartphone Nokia
- Smartphone Toshiba
- Smartphone Wiko
- Smartphone Yarvik
- Smartphone Acer
- Smartphone Aiwa
- Smartphone Albrecht
- Smartphone Alcatel
- Smartphone Alcatel-Lucent
- Smartphone Alecto
- Smartphone Aligator
- Smartphone Allview
- Smartphone Amazon
- Smartphone Amplicom
- Smartphone Amplicomms
- Smartphone Androidtech
- Smartphone Apple
- Smartphone AQISTON
- Smartphone Archos
- Smartphone AT Telecom
- Smartphone Audioline
- Smartphone Auro
- Smartphone Avus
- Smartphone Beafon
- Smartphone Benefon
- Smartphone BenQ
- Smartphone Binatone
- Smartphone Blackberry
- Smartphone Blaupunkt
- Smartphone Blu
- Smartphone Bluebird
- Smartphone BQ
- Smartphone Brigmton
- Smartphone Bury
- Smartphone Danew
- Smartphone Dell
- Smartphone Denver
- Smartphone Doogee
- Smartphone Doro
- Smartphone Easypix
- Smartphone Echo
- Smartphone Ecom
- Smartphone Emporia
- Smartphone Energizer
- Smartphone Energy Sistem
- Smartphone Fairphone
- Smartphone Fero
- Smartphone Garmin-Asus
- Smartphone Geemarc
- Smartphone General Mobile
- Smartphone Gigabyte
- Smartphone Gionee
- Smartphone Goclever
- Smartphone Google
- Smartphone GreatCall
- Smartphone Haier
- Smartphone Hammer
- Smartphone Handheld
- Smartphone Hannspree
- Smartphone Hisense
- Smartphone HomTom
- Smartphone Honor
- Smartphone HTC
- Smartphone Hyundai
- Smartphone I.safe Mobile
- Smartphone Iget
- Smartphone Infinix
- Smartphone InFocus
- Smartphone Intex
- Smartphone Itel
- Smartphone ITT
- Smartphone Kazam
- Smartphone Klipad
- Smartphone Kodak
- Smartphone Kogan
- Smartphone KPN
- Smartphone Kurio
- Smartphone Kyocera
- Smartphone Lava
- Smartphone Leagoo
- Smartphone Lenovo
- Smartphone Leotec
- Smartphone Lexibook
- Smartphone Logicom
- Smartphone Lumigon
- Smartphone Manta
- Smartphone Maxcom
- Smartphone Maxx
- Smartphone Media-tech
- Smartphone Meizu
- Smartphone Micromax
- Smartphone Microsoft
- Smartphone Mio
- Smartphone Mitsubishi
- Smartphone Mobistel
- Smartphone Mpman
- Smartphone Mustang
- Smartphone Nec
- Smartphone Nedis
- Smartphone Neffos
- Smartphone NGM
- Smartphone Nordmende
- Smartphone NTech
- Smartphone NUU Mobile
- Smartphone Palm
- Smartphone Pantech
- Smartphone Phicomm
- Smartphone Polaroid
- Smartphone Prestigio
- Smartphone Profoon
- Smartphone Razer
- Smartphone RCA
- Smartphone Realme
- Smartphone RugGear
- Smartphone Sagem
- Smartphone Sanyo
- Smartphone Sencor
- Smartphone Sharp
- Smartphone Silvercrest
- Smartphone Sonim
- Smartphone Sony Ericsson
- Smartphone Spice
- Smartphone Storex
- Smartphone Sunny
- Smartphone Sunstech
- Smartphone Swissvoice
- Smartphone Switel
- Smartphone T-Mobile
- Smartphone TCL
- Smartphone Tecdesk
- Smartphone Telefunken
- Smartphone Telme
- Smartphone Telstra
- Smartphone Tesla
- Smartphone Thomson
- Smartphone Tiptel
- Smartphone TP Link
- Smartphone Trekstor
- Smartphone Ulefone
- Smartphone UMi
- Smartphone UTStarcom
- Smartphone Vestel
- Smartphone Vivax
- Smartphone Vivo
- Smartphone Vodafone
- Smartphone Wileyfox
- Smartphone Wolder
- Smartphone Wolfgang
- Smartphone Xtreamer
- Smartphone Yota
- Smartphone Zipy
- Smartphone ZTE
- Smartphone O2
- Smartphone OK
- Smartphone Olympia
- Smartphone OnePlus
- Smartphone Oppo
- Smartphone Overmax
- Smartphone CSL
- Smartphone Krüger And Matz
- Smartphone NGS
- Smartphone Umidigi
- Smartphone Facom
- Smartphone Bush
- Smartphone Infiniton
- Smartphone Nevir
- Smartphone Aplic
- Smartphone Alba
- Smartphone Majestic
- Smartphone Trevi
- Smartphone XD
- Smartphone AT&T
- Smartphone Billow
- Smartphone SPC
- Smartphone EVOLVEO
- Smartphone Lark
- Smartphone BGH
- Smartphone CAT
- Smartphone Coolpad
- Smartphone Crosscall
- Smartphone Custom
- Smartphone EStar
- Smartphone Freeman
- Smartphone Karbonn
- Smartphone Keneksi
- Smartphone Konrow
- Smartphone M3 Mobile
- Smartphone Maxwest
- Smartphone Mediacom
- Smartphone ORA
- Smartphone Oukitel
- Smartphone Piranha
- Smartphone Plum
- Smartphone TAG Heuer
- Smartphone Tremay
- Smartphone Cubot
- Smartphone JCB
- Smartphone Aspera
- Smartphone CRUX
- Smartphone Casper
- Smartphone Unnecto
- Smartphone MyPhone
- Smartphone Primux
- Smartphone ToughGear
- Smartphone Komu
- Smartphone Verykool
- Smartphone Senifone
- Smartphone Syco
- Smartphone Pharos
- Smartphone ITTM
- Smartphone Cyrus
- Smartphone Posh Mobile
- Smartphone THL
- Smartphone NGM-Mobile
- Smartphone Nothing
- Smartphone Tecno
- Smartphone Olitech
- Smartphone Mobiola
- Smartphone TIM
- Smartphone Nubia
- Smartphone LeEco
- Smartphone Best Buy
- Smartphone GSmart
- Smartphone Bea-fon
- Smartphone Opticon
- Smartphone Saiet
- Smartphone Jitterbug
- Smartphone POCO
- Smartphone HMD
- Smartphone Opis
- Smartphone Krüger&Matz
- Smartphone Volla
- Smartphone Nothing Tech
- Smartphone Kalley
Nieuwste handleidingen voor Smartphone
2 April 2025

29 Maart 2025
9 Maart 2025
25 Februari 2025
25 Februari 2025
25 Februari 2025

25 Februari 2025
25 Februari 2025
25 Februari 2025
25 Februari 2025