Intenso PhotoManager Handleiding
Intenso
Digitaal fotolijstje
PhotoManager
Lees hieronder de 📖 handleiding in het Nederlandse voor Intenso PhotoManager (218 pagina's) in de categorie Digitaal fotolijstje. Deze handleiding was nuttig voor 67 personen en werd door 2 gebruikers gemiddeld met 4.5 sterren beoordeeld
Pagina 1/218

Intenso Photo-Manager
V 0 1.

Bedienungsanleitung
Intenso Photo-Manager

i
Inhaltsverzeichnis
EINFÜHRUNG ............................................................................................................................................................................................................. 1
ALLGEMEINE PRODUKT MERKMALE .................................................................................................................................................................... 2
ÜBERSICHT ................................................................................................................................................................................................................ 3
FERNBEDIENUNG ..................................................................................................................................................................................................... 4
EINSETZEN DER BATTERIE IN DIE FERNBEDIENUNG ........................................................................................................................................ 5
BEFESTIGUNG DES STANDFUßES ......................................................................................................................................................................... 5
ERSTE SCHRITTE ...................................................................................................................................................................................................... 6
NUTZUNG VON SPEICHERKARTEN ....................................................................................................................................................................... 7
BETRACHTEN EINER DIASHOW ............................................................................................................................................................................. 8
HAUPTMENÜ .............................................................................................................................................................................................................. 9
BETRACHTEN VON FOTOS ................................................................................................................................................................................... 10
Abspielen einer Diashow ...................................................................................................................................................................................... 10
Anzeige eines einzelnen Bildes ............................................................................................................................................................................ 12
Ändern des Anzeigemodus ................................................................................................................................................................................... 13
Nutzung des OSD Menüs ..................................................................................................................................................................................... 14

ii
SETUP MENÜ ........................................................................................................................................................................................................... 16
Datum und Uhrzeit einstellen ................................................................................................................................................................................ 18
Aktivieren des automatischen Ein- und Ausschaltens .......................................................................................................................................... 19
Anzeige des Kalenders ......................................................................................................................................................................................... 20
HÄUFIG GESTELLTE FRAGEN .............................................................................................................................................................................. 21
PRODUKT SPEZIFIKATIONEN ............................................................................................................................................................................... 24
PFLEGE UND WARTUNG ........................................................................................................................................................................................ 25

DE - 1
Wir sind nicht haftbar für Schäden oder Datenverlust bei einer Fehlfunktion,
fehlerhafter Handhabung oder eigenhändiger Reparatur de
Gerätes. Bitte zerlegen Sie das Gerät nicht in Einzelteile, und versuchen Sie bitte nicht, es selbst zu reparieren, da die Garantie in
diesem Fall
erlischt. Die Software, Hardware oder
Bedienungsanleitung kann Änderungen unterliegen. Hierüber werden wir nicht informieren. Wir behalte
uns alle Rechte dazu vor.
EINFÜHRUNG
Danke, dass Sie sich für den DIGITALEN FOTORAHMEN ( DF ) von Intenso entschieden haben.
Bevor Sie dieses Gerät nutzen, lesen Sie bitte diese Bedienungsanleitung gründlich durch und beachten Sie alle Warnhinweise.
Wir empfehlen eine sichere Aufbewahrung dieser Anleitung, um etwaig auftretende Fragen selbstständig beantworten zu können.
Der Inhalt dieser Anleitung ist so gestaltet, dass Sie die gesamten Funktionen des DF sicher nutzen können.
Der DF ermöglicht es Ihnen, digitale Fotos direkt von der Speicherkarte Ihrer Kamera zu betrachten. Sie können Ihre Fotos durch
die vom Bilderrahmen bereitgestellte Diashowfunktion anschauen. Der DF ist mit folgenden Kartenformaten kompatibel: SD ™
(Secure Digital), SDHC (Secure Digital High Capacity), MMC (Multimedia Card), MS (Memory Stick) und USB-Stick. ™ ™ ™

DE - 2
ALLGEMEINE PRODUKT MERKMALE
Dekorative Erscheinung, gute Qualität
Anzeige von Fotos (JPEG) ohne einen Computer
Automatische Diashow mit verschiedenen Übergangseffekten und individueller Anzeigedauer
Kalender Funktion
Timer Funktion
Kompatibel mit SD / MMC und MS Karten
USB Steckplatz für den Anschluss von USB Massenspeichern
2 Wege der Steuerung: 7 Tasten auf dem Digitalen Fotorahmen, Infrarot Fernbedienung

DE - 3
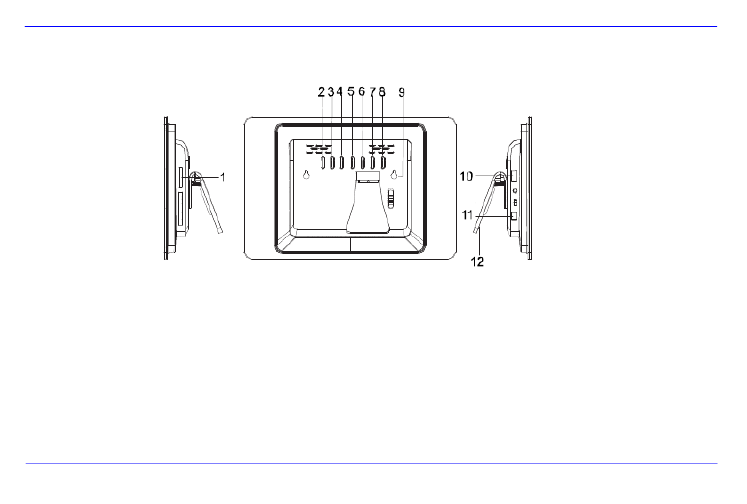
ÜBERSICHT
1 (SD/MMC/MS) 3-in-1 CardReader
2 Abwärts/Vorwärts [ ] Taste
3 Aufwärts/Zurück [ ] Taste
4 Links [ ] Taste
5 Rechts [ ] Taste
6 STOP/ENDE [ ] Taste
7 MENÜ [M] Taste
8 PLAY/ENTER/ZOOM [ ] Taste
9 Power On / Off
10 USB Port: USB 2.0 Host
11 Netzteil Anschluss 5V 1A
12 Standfuß
DE - 4
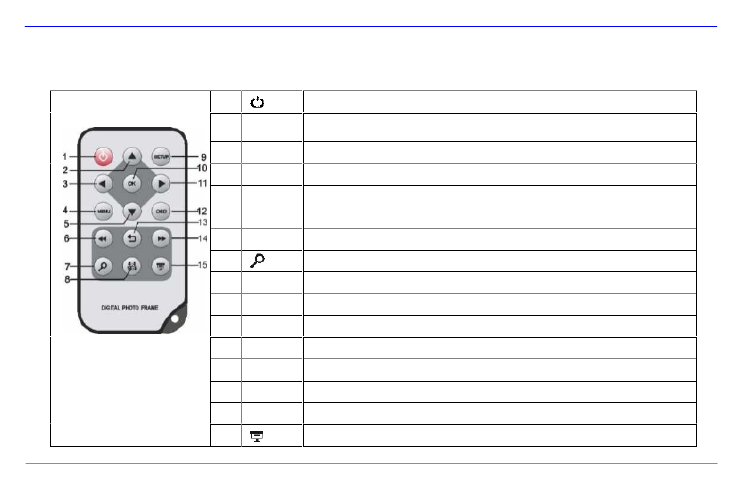
FERNBEDIENUNG
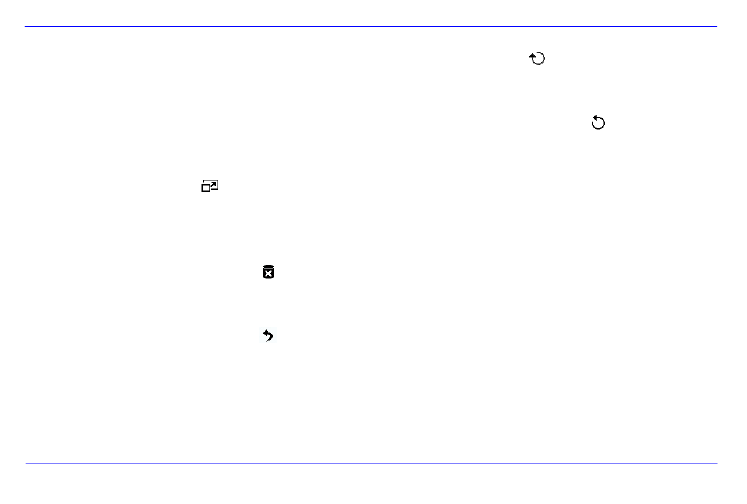
1 Power On/ Off
2 Bewegt den Cursor aufwärts im Auswahlmenü
Kippt das Bild im Uhrzeigersinn um 90 Grad im Diashow Modus.
3 Bewegt den Cursor nach links im Auswahlmenü oder zurück zum vorherigen Bild im Diashow-Modus
4 MENU Aufrufen des Hauptmenüs
5 Bewegt den Cursor abwärts im Auswahlmenü
Kippt das Bild im Diashow Modus um 90 Grad gegen den Uhrzeigersinn.
6 Rücksprung zum vorherigen Foto in der Diashow oder zurück zur vorherigen Seite im Bilder-Vorschaumenü
7 Zoom In Vergrößert einen Bildausschnitt
8 4:3/ 16:9 Auswahl der Bildanzeige: 4:3 , 16:9
9 SETUP Aufrufen des Setup Menüs
10 OK Bestätigen der Auswahl. Start/Pause der Diashow
11
Bewegt den Cursor nach rechts im Auswahlmenü oder Sprung zum nächsten Bild im Dia Show Modus
12 OSD Anzeige des On-Screen-Displays (OSD) während der Diashow
13
Rücksprung zum vorherigen Menü
14
Vorsprung zum nächsten Foto in der Diashow oder Sprung zur nächsten Seite im Bilder-Vorschaumenü
15 Start der Diashow
DE - 5
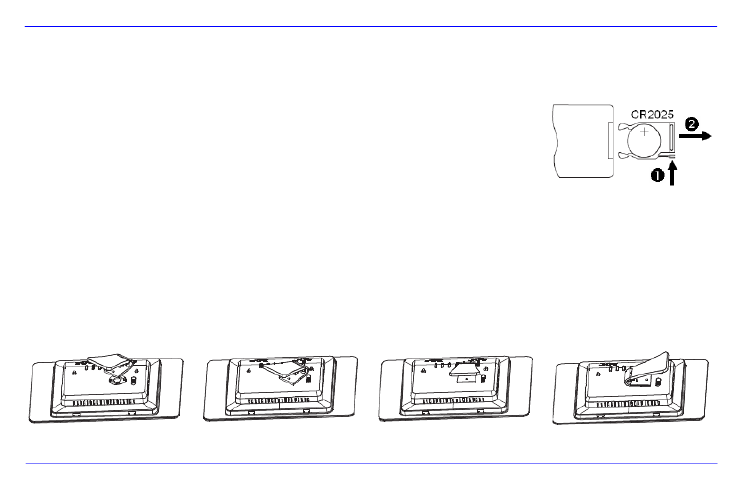
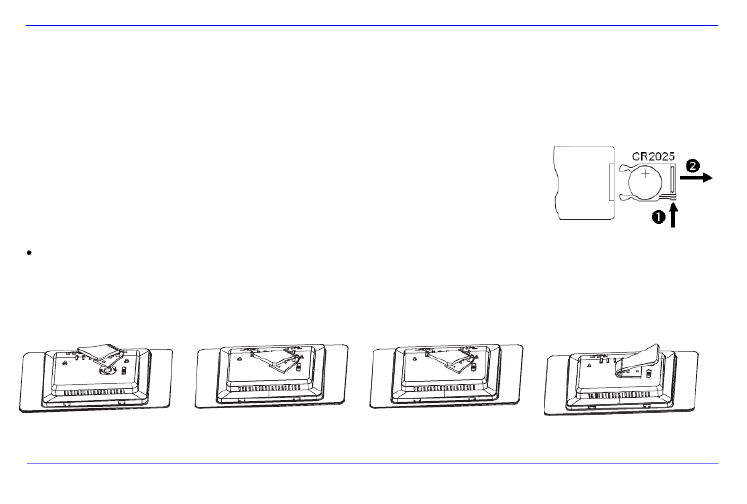
EINSETZEN DER BATTERIE IN DIE FERNBEDIENUNG
Platzieren Sie die Fernbedienung mit den Tasten nach unten.
Drücken Sie die Feder links neben dem Batteriefach nach rechts und ziehen Sie gleichzeitig
das Batteriefach heraus.
Setzen Sie eine CR2025 Lithium Batterie mit dem Plus Symbol nach oben in das Batteriefach ein.
Schieben Sie das Batteriefach wieder vollständig in das Gehäuse der Fernbedienung.
Bitte beachten Sie: Bitte stellen Sie eine Batterieentsorgung sicher, die den gesetzlichen
Bestimmungen entspricht.
BEFESTIGUNG DES STANDFUßES
Drehen Sie den Standfuß gegen den Uhrzeigersinn, um die sog. Landschafts-
oder Portrait- Position auszuwählen.

DE - 6
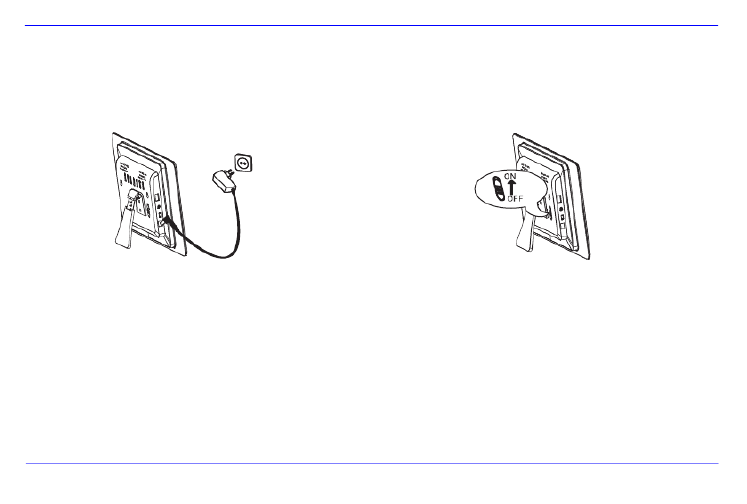
ERSTE SCHRITTE
Befestigen Sie den Standfuß am DIGITALEN FOTORAHMEN ( DF ).
Verbinden Sie das mitgelieferte Netzteil mit dem DF. Stecken Sie das andere Ende des mitgelieferten Netzteils in die Steckdose.
Schieben Sie den Regler des DF in die ON Position. „ “
Für die erste Inbetriebnahme wählen Sie bitte nach dem ersten Einschalten die Sprache in dem erscheinenden Fenster mittels der Tasten
auf der Rückseite oder der Fernbedienung aus. Bestätigen Sie Ihre Auswahl mit der [ ] Taste auf der Rückseite oder der Taste auf OK –
der Fernbedienung.

DE - 7
NUTZUNG VON SPEICHERKARTEN
Setzen Sie SD / MMC / MS Karten mit den Kontakten in Richtung des Display schauend in den 3-in-1 Karten Slot ein.
Verbinden Sie USB Speichermedien mit dem DIGITALEN FOTORAHMEN durch Einsetzen der Medien in den USB Steckplatz (USB Host).
Hinweis:
Bitte setzen Sie Speicherkarten nicht mit Gewalt ein.
Das 3-in-1 Kartenlesegerät kann immer nur eine Karte zur gleichen Zeit auslesen.
Bitte verbinden Sie immer nur eine SD / MMC oder MS Karte zeitgleich mit dem Photo Frame.
Um verbundene Karten vom DIGITALEN FOTORAHMEN zu trennen, ziehen Sie diese vorsichtig aus dem Kartenslot heraus. (Hinweis:
SD und MMC Karten verfügen über eine Einkerbung in Querrichtung der Karte. Hier kann ein Fingernagel eingreifen, um das
Herausziehen aus dem Slot zu vereinfachen )

DE - 8
BETRACHTEN EINER DIASHOW
Nach dem Einschalten gelangen Sie direkt in das Hauptmenü.
Wenn Sie eine Speicherkarte oder einen USB Stick mit dem DF verbunden haben, startet die Diashow direkt nach dem Einschalten.
Drücken Sie die Taste auf der Rückseite des DF S oder auf der Fernbedienung und MENU ’
anschließend die [ ],[ ] Tasten auf der Rückseite des DF oder die , Tasten auf der ▲ ▼
Fernbedienung, um das verbundene Speichermedium, das Setup oder den Kalender
aufzurufen.
Hinweis:
Wenn ein Speichermedium in den DF eingesteckt wurde startet die Diashow automatisch nach dem Einschalten.
Wenn mehrere Speichermedien mit dem Photo Frame verbunden sind, liest der nach dem Einschalten immer zuerst die Bilder DF
aus der SD / MMC oder MS Karte.
DE - 9
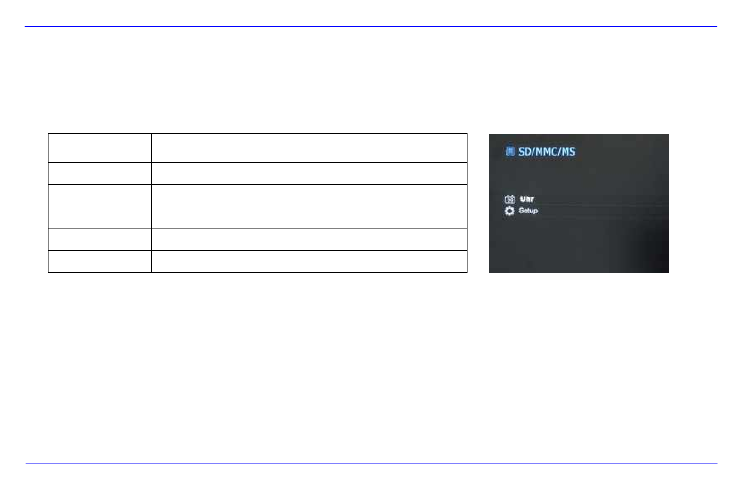
HAUPTMENÜ
Im Hauptmenü haben Sie die Auswahl zwischen den verbundenen Speichermedien, dem Kalender und dem Setup.
1. Drücken Sie die MENU -Taste auf der Rückseite des DF oder auf der Fernbedienung, um das Hauptmenü aufzurufen.
Menü Beschreibung
USB Erscheint, wenn ein USB Medium verbunden ist.
SD/MMC/MS Erscheint, wenn eine SD, MS oder MMC Karte
verbunden ist.
Uhr Anzeige des Kalenders und der Uhrzeit
Setup Menü, um individuelle Einstellungen vorzunehmen.
2. Drücken Sie die [ ],[ ] Tasten auf dem DF oder die , Tasten auf der ▲ ▼
Fernbedienung, um ein Speichermedium oder ein Menü auszuwählen.
3. Bestätigen Sie Ihre Auswahl durch Drücken der [ ] Taste auf dem DF oder der
OK-Taste auf der Fernbedienung.

DE -
10
BETRACHTEN VON FOTOS
Abspielen einer Diashow
Sie können in jedem Menü die [ ] Taste auf der Fernbedienung zum Starten der Diashow nutzen, Sie beginnt jeweils mit dem erste
Zum Anhalten der Diashow und zum Anzeigen eines einzelnen Fotos drücken Sie die Taste auf dem DF oder die -Taste a[ ] OK
Fernbedienung. Durch erneutes Drücken der Taste auf dem DF oder der -Taste auf der Fernbedienung wird die Diashow fortges[ ] OK
Drücken Sie die [ ] Taste auf der Fernbedienung oder auf dem , um die Diashow zu verlassen und zum Bilder-Vorschaum
DF
gelangen.
Drücken Sie die -Taste auf der Fernbedienung oder auf dem zum Verlassen der Diashow, um in das HauptmMENU DF
gelangen.
Hinweis:
Wird beim Abspielen einer Diashow ein weiteres Speichermedium eingesetzt, so springt die Diashow automatisch zum ersten Bild des
neuen Speichermediums und beginnt die Diashow ab diesem Bild.
Sind gleichzeitig eine SD/MMC/MS-Karte und ein USB Medium an den DF angeschlossen, so werden bei der Diashow immer nur alle
Bilder des ausgewählten Mediums kontinuierlich wiedergegeben. Die einzelnen Speichermedien werden nicht automatisch
nacheinander in der Diashow wiedergegeben.

DE - 11
Bilder-Vorschaumenü
Bilder-Vorschaumenü
Die Bilder auf dem ausgewählten Speichermedium werden als Miniaturbilder dargestellt. Es
können bis zu 15 Bilder gleichzeitig angezeigt werden.
1. Wählen Sie im Hauptmenü ein Speichermedium (USB, SD/MMC/MS) aus und
drücken Sie auf dem DF oder der Fernbedienung die -Taste. OK
2. Zum Navigieren zwischen den Miniaturbildern nutzen Sie die [ ],[ ],[ ],[ ] Tasten
auf dem DF oder die , , , Tasten auf der Fernbedienung. Um direkt zur
nächsten Vorschauseite zu gelangen, nutzen Sie bitte die oder Taste auf der
Fernbedienung.
Hinweis:
Sie gelangen ebenfalls durch das Drücken der [
] Taste auf der Fernbedienung oder auf dem DF während einer Diashow oder d
Bilder Einzelansicht in das Bilder-Vorschaumenü.

DE -
12
Anzeige eines einzelnen Bildes
Sie können ein einzelnes Bild auswählen.
1. Wählen Sie im Bilder-Vorschaumenü ein Bild aus und drücken Sie die [ ] Taste auf dem DF oder die OK-Taste auf der Fernbed
Das Bild wird nun im Vollbildmodus angezeigt. Betätigen Sie jetzt innerhalb der gewählten Anzeigedauer nochmals die [ ] Ta
dem DF oder die -Taste auf der Fernbedienung. Sie sehen nun das Symbol in der linken unteren Ecke des Bildschirms. FOK
gewählte Hinweiszeit (siehe Seite 17).
Zum Anzeigen des vorherigen oder nächsten Fotos drücken Sie [ ], [ ] Tasten auf dem DF oder die , Tasten auf der
Fernbedienung.
Zum Rotieren des Bildes drücken Sie die [], [ ] Tasten auf dem DF oder die , Tasten auf der Fernbedienung.
Um ein Bild vergrößert anzuzeigen, drücken Sie wiederholt die Taste auf der Fernbedienung. Wenn ein Bild verg
angezeigt wird, können Sie mit den [ ], [ ], [ ], [ ] Tasten auf dem DF oder den , , , Tasten auf der
Fernbedienung den dargestellten Bildausschnitt variieren.
2. Um zum Bilder-Vorschaumenü zurückzukehren, drücken Sie die [ ] Taste.
3. Drücken Sie die [ ] Taste auf dem DF oder die -Taste auf der Fernbedienung, um die Diashow, beginnend mit dem ausgew OK
Foto, zu starten.

DE -
13
Ändern des Anzeigemodus
Während des Betrachtens eines Bildes oder während der Diashow können Sie durch mehrmaliges Drücken der [ ] Taste a4:3/16:9
Fernbedienung den Anzeigemodus wechseln.
4:3: Bei dieser Auswahl wird ein Bild, welches im 16:9 oder einem größeren Format gespeichert ist, gestreckt un
Vollbild angezeigt.
16:9: Bei dieser Auswahl wird ein Bild, welches im 16:9 oder einem größeren Format gespeichert ist, im Originalfor
schwarzem Balken am oberen und unteren Rand angezeigt.
Hinweis:
Ein Foto, welches im 4:3 Format abgespeichert wurde, kann auch nur im Format 4:3 dargestellt werden.
Diese Funktion ist nicht aktiv bei Fotos mit einer geringeren Auflösung als 800X600 Pixel.
DE -
14
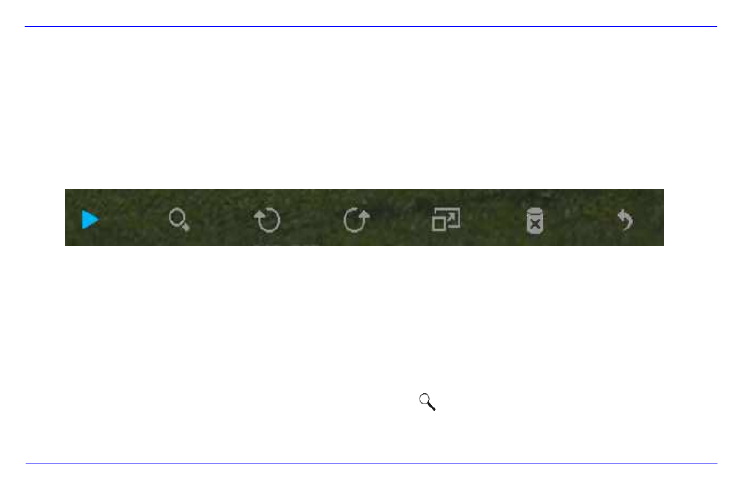
Nutzung des OSD Menüs
Sie können das OSD Menü nutzen, um die nachfolgenden Aktionen auszuführen.
1. Drücken Sie die [ ] Taste auf der Fernbedienung während des Betrachtens eines Bildes oder einer Diashow. Das OSD OSD
erscheint auf dem Display und die Diashow wird gestoppt.
2. Drücken Sie die [ ], [ ] Tasten auf dem DF oder die , Tasten auf der Fernbedienung, um zwischen den Funktionen z
navigieren.
Zum Stoppen oder Fortsetzen der Diashow wählen Sie bitte das Symbol aus und drücken [ ] auf dem DF oder auf OK
Fernbedienung. Das (Play) Symbol im OSD-Menü wird durch das (Pause) Symbol ersetzt .
Um das Foto zu vergrößern, wählen Sie bitte das Symbol und drücken Sie [ ] auf dem DF oder auf OK
Fernbedienung. Wenn ein Bild vergrößert angezeigt wird, können Sie mit den [ ],[ ],[ ],[ ] Tasten auf dem DF oder den
, , Tasten auf der Fernbedienung den dargestellten Bildausschnitt variieren.
DE -
15
Um das Foto um 90 Grad im Uhrzeigersinn zu drehen, wählen Sie bitte das Symbol und drücken Sie [ ] auf dem DF
oder auf der Fernbedienung. OK
Um das Foto um 90 Grad gegen den Uhrzeigersinn zu drehen, wählen Sie bitte das Symbol und drücken Sie
auf dem DF oder OK auf der Fernbedienung.
Durch das Symbol wird die Umschaltung zwischen 4:3 / 16:9 ausgewählt. Durch drücken von [ ] auf dem DF ode
auf der Fernbedienung wird die Umschaltung des Formates durchgeführt.
Siehe auch unter: „Ändern des Anzeigemodus (Seite13)"
Durch die Auswahl des Symbols und drücken von [ ] auf dem DF oder auf der Fernbedienung wird das angezeig OK
Bild vom Datenträger gelöscht. ( ACHTUNG: Es erfolgt keine zusätzliche Sicherheitsabfrage vor dem Löschen !! )
Durch die Auswahl des Symbols und drücken von [ ] auf dem DF oder auf der Fernbedienung setzt der DF die OK
Diashow fort.

DE -
16
SETUP MENÜ
Sie können die Systemeinstellungen des DIGITALEN FOTORAHMENS ( DF ) individuell einstellen.
1. Wählen Sie im Hauptmenü den Menüpunkt aus und bestätigen Sie Ihre SETUP
Auswahl mit der [ ] Taste auf dem DF oder der -Taste auf der Fernbedienung. OK
Sie gelangen außerdem durch Drücken der [SETUP] Taste auf der Fernbedienung
direkt in dieses Menü.
2. Um eine Einstellung auszuwählen, drücken Sie die [ ], [ ] Tasten auf dem DF
oder , Tasten auf der Fernbedienung.
3. Zum Ändern der jeweiligen Einstellung drücken Sie die [ ], [ ] oder [ ] Taste auf
dem DF, alternativ die , oder Taste auf der Fernbedienung und bestätigen OK
Sie Ihre Auswahl durch Drücken der [ ] Taste auf dem DF oder der -Taste auf OK
der Fernbedienung.
4. Zum Verlassen des Menüs drücken Sie die [ ] Taste auf der Fernbedienung oder
auf dem DF.

DE -
17
Einstellmöglichkeiten Beschreibung
Anzeigedauer Wählen Sie aus, wie lange ein Bild während einer Diashow angezeigt werden soll.
Einstellmöglichkeiten: 3 Sek., 5 Sek., 15 Sek., 1 Min., 15 Min.
Bildübergänge Wählen Sie zwischen zufälligen und einem kontinuierlichen Bildübergang
Uhr Einstellung Wählen Sie die die Anzeigeform für Ihren Kalender / Uhr aus. Einstellmöglichkeiten: Monatskalen
Digitaluhr, Analoguhr
Zeit Einstellung Einstellen der Uhrzeit.
Datum Einstellung Einstellen des Kalenders
Sprache Wählen Sie Ihre gewünschte Sprache aus.
Helligkeit Einstellen der Helligkeit des TFT Displays. Einstellmöglichkeiten: -3, -2, -1, 0, 1, 2, 3.
Kontrast Einstellen des Kontrastes des TFT Displays. Einstellmöglichkeiten: -3, -2, -1, 0, 1, 2, 3.
Farbsättigung Einstellen der Farbsättigung des TFT Displays. Einstellmöglichkeiten: -3, -2, -1, 0, 1, 2, 3.
Hinweiszeit
Wählen Sie aus, wie lange der Hinweis auf die Funktionen der Tasten im Modus Diashow, sowie der Sta
(Pause) bzw. (Play) im unteren Bild eingeblendet werden soll. Einstellmöglichkeiten: 0 Sek., 5 Sek.,
10 Sek., 20Sek.
autom. Einschalten Aktivieren des automatischen Einschaltens. Einmal / Täglich.
autom. Ausschalten Aktivieren des automatischen Ausschaltens. Einmal / Täglich.
Werkseinstellung Gerät wird auf die Werkseinstellungen zurückgesetzt.

DE -
18
Datum und Uhrzeit einstellen
Stellen Sie die Uhrzeit auf dem Intenso DF ein:
1. Wählen Sie im Hauptmenü den Menüpunkt aus. SETUP
2. Drücken Sie die [ ], [ ] Tasten auf dem DF oder die , Tasten auf der Fernbedienung, um den Eintrag Uhrzeit auszuwählen.
3. Drücken Sie die [ ], [ ] Tasten auf dem DF oder die , Tasten auf der Fernbedienung, um das nächste oder vorherige Elemen
auszuwählen ( Stunde, Minute). Drücken Sie die [ ], [ ] Tasten auf dem DF oder die , Tasten auf der Fernbedienung, um die
gewünschten Werte einzustellen.
4. Zur Bestätigung Ihrer Eingaben drücken Sie [ ] Taste auf der Rückseite des DF oder die OK-Taste auf der Fernbedienung.
Stellen Sie das Datum auf dem Intenso DF ein:
1. Drücken Sie die [ ], [ ] Tasten auf dem DF oder die , Tasten auf der Fernbedienung, um den Eintrag auszuwählen. Datum
2. Drücken Sie die [ ], [ ] Tasten auf dem DF oder die , Tasten auf der Fernbedienung, um das nächste oder vorherige Elemen
auszuwählen (Monat, Tag, Jahr ). Drücken Sie die [ ], [ ] Tasten auf dem DF oder die , Tasten auf der Fernbedienung, um die
gewünschten Werte einzustellen.
3. Zur Bestätigung Ihrer Eingaben drücken Sie [ ] Taste auf der Rückseite des DF oder die OK-Taste auf der Fernbedienung.

DE -
19
Aktivieren des automatischen Ein- und Ausschaltens
Sie können den DIGITALEN FOTORAHMEN von Intenso zu einer von Ihnen gewünschten Uhrzeit automatisch ein- und ausschalten l
Hinweis: Für diese Funktion muss im Vorfeld die korrekte Uhrzeit eingegeben werden.
1. Wählen Sie im Hauptmenü den Menüpunkt aus. SETUP
2. Drücken Sie die [ ], [ ] Tasten auf dem DF oder die , Tasten auf der Fernbedienung, um den Menüpunkt oder Einschalten
Ausschalten auszuwählen.
3. Drücken Sie die [ ], [ ] Tasten auf dem DF oder die , Tasten auf der Fernbedienung, um das nächste oder vorherige Elemen
auszuwählen (Stunde, Minute). Drücken Sie die [ ], [ ] Tasten auf dem DF oder die , Tasten auf der Fernbedienung, um die
gewünschten Werte und den Zeitplan einzustellen.
Aus: Deaktivieren Ein- und Ausschaltens.
Ein: Der DIGITALE FOTORAHMEN stellt sich zur voreingestellten Zeit an und/oder aus.
4. Zur Bestätigung Ihrer Eingaben drücken Sie [ ] Taste auf dem DF oder die -Taste auf der Fernbedienung. OK

DE -
22
Warum werden einige Bilder schneller geladen als andere?
Bilder mit einer höheren Auflösung benötigen länger bis sie angezeigt werden können. Um die Anzeigegeschwindigk
erhöhen, nutzen Sie bitte Bilder mit einer niedrigeren Auflösung.
Hinweis: Der Photo Frame unterstützt eine Auflösung bis 8000*8000 Pixel.
Warum startet die Software nicht, obwohl die Stromversorgung gegeben ist und Power auf On steht? “ ”
Wahrscheinlich liegt ein Systemfehler vor. Bitte starten Sie die Software neu, indem Sie für ein paar Sekunden
Stromversorgung unterbrechen.
Warum wird auf dem Display nicht das Hauptmenü angezeigt?
Bitte überprüfen Sie, ob der DF ordnungsgemäß mit einer Steckdose verbunden ist und der Power Schalter auf On steht. “ ”
Kann ich Bilder auf dem Display rotieren lassen?
Ja, nutzen Sie dazu die Pfeiltasten [ ], [ ] auf dem DF oder die , Tasten auf der Fernbedienung.
Bitte beachten Sie: Das rotierte Bild wird bei einer erneuten Anzeige wieder in der normalen Ansicht angezeigt.
Kann ich die Farben der Bilder anpassen?
Nein. Alle Farbeinstellungen werden während der Aufnahme der Fotos vorgenommen. Sie können aber die Helligkeit un
Kontrast des Displays anpassen.

DE -
23
In welcher Auflösung sollten Bilder sein, um optimal auf dem Display dargestellt werden zu können?
Die beste Auflösung für diesen DF ist 800*600 Pixel.
Warum funktionieren die Funktionen: Automatisches Einschalten / Ausschalten nicht, obwohl ich sie aktiviert habe?
Stellen Sie sicher, dass Sie die korrekte Uhrzeit eingestellt haben. Wenn die eingestellte Uhrzeit in der Vergangenheit liegt
die Funktion zum ersten Mal am nächsten Kalendertag aktiviert.
Bitte schieben Sie den Schalter an der Rückseite des DF nicht in die POWER OFF Position. Versetzen Sie den DF ledigl
den Standby Modus.

DE -
24
PRODUKT SPEZIFIKATIONEN
Anzeige
Digitales TFT LCD
Display Größe: 8 Zoll ”
Anzeigemodus: 4:3
Auflösung: 800*600 Pixel
Netzteil Input: 100~240V AC, 50/60Hz
Output: 5V 1A DC
USB port USB Host 2.0
Unterstützt USB Speichermedien
Unterstützte
Speicherkarten SD (Secure Digital Card), MMC (MultiMedia Card), MS (Memory Stick) ™ ™ ™
Unterstütztes Bildformat JPEG, Maximale Auflösung:8000*8000 pixels
Betriebstemperatur -10°C ~ +40°C
Abmessungen 33*184*225 mm
Gewicht 500 gr
Zubehör Fernbedienung (inkl. Batterie), Standfuß, Netzgerät, mehrsprachige Bedienungsanleitung

DE -
25
PFLEGE UND WARTUNG
Pflege
Um die Gefahr von elektrischen Stromstößen zu vermeiden, entfernen Sie bitte weder die Schrauben noch das Gehäuse.
Benutzen Sie dieses Gerät nicht in der Nähe von Wasser. Setzen Sie dieses Gerät weder Regen noch Feuchtigkeit aus. Stellen
keine Gegenstände in der Nähe des Gerätes ab, die Wasser oder andere Flüssigkeiten speichern.
Installieren Sie diesen Bilderrahmen nicht in der Nähe von Heizungen, Öfen oder anderen Wärme abgebenden Geräten.
Öffnen Sie das Gehäuse nicht. Versuchen Sie bitte keine eigene Reparatur. Überlassen Sie dieses dem Fachpersonal.
Vermeiden Sie die Benutzung auf sandigen Plätzen.
Bitte stecken Sie den Netzteil-Anschluss-Stecker komplett in die vorhandene Öffnung des DF. Nur so können Sie elektrostat
Aufladung vermeiden.
Verbinden Sie alle Anschlüsse korrekt und sicher.
Bitte drücken Sie nicht auf das Display. Schützen Sie das Display vor starker Sonneneinstrahlung.
Der Bilderrahmen spielt nur kompatible Dateiformate ab.
Bilder können durch Rechte Dritter geschützt sein. Das Abspielen ohne Lizenz kann Copyright Rechte verletzen.
Bitte berühren Sie den DF während des Betriebes nicht mit metallischen Gegenständen.
Bitte vermeiden Sie die Benutzung auf Kissen, Sofas oder anderen Wohngegenständen, die eine Wärmeentwicklung unterstü
da die Gefahr einer Überhitzung des Gerätes besteht.
Bitte entfernen Sie keine Speicherkarten während des Lesevorganges. Anderenfalls kann es zu Systemabstürzen oder Datenver
kommen.
Bitte stellen Sie das Gerät nicht während einer laufenden Diashow aus.
Bitte verpacken Sie das Gerät nicht direkt nach einem längeren Gebrauch. Stellen Sie eine ausreichende Abkühlung siche
besteht sonst die Gefahr der Überhitzung.
Um einen besseren Service zu gewährleisten, kann es zu Änderungen in der Betriebsanleitung kommen.

DE -
26
Wartung des Gerätes
DAS GERÄT MUSS AUSGESCHALTET SEIN.
SPRÜHEN ODER TRAGEN SIE NIEMALS EINE FLÜSSIGKEIT DIREKT AUF DAS DISPLAY ODER GEHÄUSE AUF.
Säuberung des Displays / Gehäuses / Rahmens
Wischen Sie Gehäuse, Rahmen und LCD Display vorsichtig mit einem weichen, fussel- und chemikalienfreien Tuc
Verwenden Sie nur Reinigungsmittel, die speziell für LCD-Displays bestimmt sind.
Entsorgung von Elektro-Altgeräten
Die mit diesem Symbol gekennzeichneten Geräte unterliegen der europäischen Richtlinie 2002/96/EC.
Alle Elektro- und Elektroaltgräte müssen getrennt vom Hausmüll über die dafür vorgesehenen staatlichen Stellen entsorgt werden.
Mit der ordnungsgemäßen Entsorgung von Elektro-Altgeräten vermeiden Sie Umweltschäden.

i
Table of Contents
INTRODUCTION .............................................................................................................................................................................................
GENERAL PRODUCT CHARACTERISTICS ..............................................................................................................................................
OVERVIEW .....................................................................................................................................................................................................
REMOTE CONTROL ......................................................................................................................................................................................
REMOTE CONTROL ......................................................................................................................................................................................
INSERTING BATTERIES INTO REMOTE CONTROL ...............................................................................................................................
FASTENING THE FRAME BASE ..................................................................................................................................................................
FIRST STEPS....................................................................................................................................................................................................
USING MEMORY CARDS .............................................................................................................................................................................
WATCHING A SLIDE SHOW .........................................................................................................................................................................
MAIN MENU ....................................................................................................................................................................................................
WATCHING PHOTOS .....................................................................................................................................................................................
Starting a Slide Show ....................................................................................................................................................................................
Displaying Individual Pictures ......................................................................................................................................................................
Changing the Display Mode ..........................................................................................................................................................................

ii
Using the OSD Menu ....................................................................................................................................................................................
SETUP MENU ..................................................................................................................................................................................................
Adjusting Date and Time ...............................................................................................................................................................................
Activating Automatic Power On/Off .............................................................................................................................................................
CALENDAR DISPLAY ................................................................................................................................................................................
FAQs..................................................................................................................................................................................................................
PRODUCT SPECIFICATIONS........................................................................................................................................................................
SERVICE AND MAINTENANCE ..................................................................................................................................................................

GB - 2
GENERAL PRODUCT CHARACTERISTICS
Decorative appearance, excellent quality
Shows pictures (JPEG) without requiring a computer
Automatic slide show with various transition effects and individual display duration
Calendar function
Timer function
Compatible with SD / MMC and MS cards
USB slot to connect USB flash drives
2-way control: 7 buttons on the digital photo frame, infrared remote control

GB - 3
OVERVIEW
1 (SD/MMC/MS) 3- -1 CardReader in
2 Down/next [ ] button
3 Up/back [ ] button
4 Left [ ] button
5 Right [ ] button
6 STOP/END [ ] button
7 MENU [M] button
8 PLAY/ PAUSE/ ENTER [ ] button
9 Power on/off
10 USB port: USB 2.0 Host
11 Mains adapter 5V 1A
12 Frame base

GB - 4
REMOTE CONTROL
1
Power On/ Off
2
Moves the cursor upwards in the selection menu
Tilts the picture in clockwise direction by 90 degree in the slide show mode.
3
Moves the cursor to the left in the selection menu or back to the previous picture in the slide show mode
4
MENU
Starts the main menu
5
Moves the cursor downwards in the selection menu
Tilts the picture in the slide show mode by 90 degree in anti-clockwise direction.
6
Leaps back to the previous picture in the slide show or back to the previous page in the picture preview menu
7
Zoom in Magnifies picture details
8
4:3/ 16:9
Selection of display screen: 4:3 , 16:9
9
SETUP
Starts the setup menu
10
OK
Confirms the selection. Start/pause of slide show
11
Moves the cursor to the right in the selection menu or leaps to the next picture in the slide show menu
12
OSD
Displays the On-Screen-Display (OSD) during slide show
13
Leaps back to the previous menu
14
Leaps to the next picture in the slide show or to the next page in the picture preview menu
15
Start of slide show
GB - 5
INSERTING BATTERIES INTO REMOTE CONTROL
Turn your remote control upside down with the buttons facing down.
There is a spring on the left side of the battery compartment. Hold it to the right and simultaneously pull out the battery compartme
Insert a CR2025 Lithium battery to the battery compartment with the Plus symbol facing upwards.
Reinsert the battery compartment into the housing of the remote control.
Please note: Please dispose batteries according to legal regulations.
FASTENING THE FRAME BASE
Turn the frame base in anticlockwise direction to select the so-called scenery or portrait position.
GB - 6
FIRST STEPS
Connect the frame base to the DIGITAL PHOTO FRAME ( DF ).
Connect the mains adapter provided with the DF. Plug the other end of the provided mains adapter into the power outlet.
Move the slider of the DF into “ON” position.
Using the device for the first time please select the in the appearing window by use of the keys on the rear side or the rLanguage
control. Confirm your selection with the [ ] button on the rear side or the button on the remote control. OK –

GB - 7
USING MEMORY CARDS
Insert SD / MMC / MS cards into the 3- -1 card slot with the contacts facing the displayin . USB storage mediums can be connected wit
DIGITAL PHOTE FRAME by inserting these mediums into the USB port (USB host).
Please note:
Please do not insert memory cards by use of force.
The 3- -1 card reader can only read one card at a time. in
Thus, please connect only one SD / MMC or MS card with the photo frame at a time.
To disconnect inserted cards from the DIGITAL PHOTO FRAME remove them carefully from the card slot. (Please note: SD an
cards have a small notch in cross direction. By use of your finger nail you can remove the card from the slot).

GB - 8
WATCHING A SLIDE SHOW
After power-on you will be guided directly to the main menu.
If a memory card or a USB memory stick is connected to the DF, the slide show will start directly after power on.
Press the button on the rear side of the DF or on the remote control and theMENU
[],[] buttons on the rear side of the DF or the ▲, ▼ buttons on the remote contro
start the storage medium connected, the setup menu or the calendar.
Please note:
If a storage medium is connected to the DF the slide show will start automatically after power on.
If more than one storage medium is connected with the photo frame, after power on the will at first read the pictures from the SD / DF
MMC or MS cards.

GB - 9
MAIN MENU
In the main menu you can select the storage mediums connected, the setup menu and the calendar.
1. 1. Press the MENU -button on the rear side of the DF or on the remote control to access the main menu.
Menu
Description
USB
Displayed if a USB medium is connected.
SD/MMC/MS
Displayed if a SD, MS or MMC card is connected.
Clock
Display of calendar or time
Setup
Menu to make individual settings.
2. Press the [ ], [ ] buttons on the DF or the ▲,▼ buttons on the remote control to
select a storage medium or a menu item.
3. Confirm your selection by pressing the [ ] button on the DF or the button on OK –
the remote control.

GB - 10
WATCHING PHOTOS
Starting a Slide Show
In each menu you can use the [ ] button on the remote control to start the slide show, starting with the first photo. To stop the slide show and
to display individual photos please press the button on the DF or the -button on the remote control. By repeatedly pressing the [] OK []
button on the DF or the -button on the remote control you can proceed with the slide show. OK
Press the [ utton on the remote control or on the to leave the slide show and to access the picture preview menu.
] b DF
Press the MENU-button on the remote control or on the to leave the slide show and to access the main menu. DF
Please note:
If an additional storage medium is inserted when watching a slide show, the slide show will automatically leap to the first pictu
new storage medium and the slide show will start with this picture.
If a SD/MMC/MS-card and a USB drive are connected to the DF at the same time, only the pictures selected on the relevant med
will be continuously played during the slide show. The individual storage mediums are not automatically played one after the oth
the slide show.

GB - 11
Picture Preview Menu
Picture Preview Menu
The pictures on the storage medium selected are depicted as thumbnails. It is possib
display up to 15 pictures at a time.
1. In the main menu please select a storage medium (USB, SD/MMC/MS) and
the -button on the DF or on the remote control. OK
2. To navigate within the thumbnails please use the [ ] ] ] ] buttons on the D ,[ ,[ ,[
or the buttons on the remote control. To directly access the next , , ,
preview page please use the or button on the remote control.
Please note:
During a slide show or the picture single view mode you can also access the picture preview menu by pressing the [
] button on the
remote control or on the DF.

GB - 12
Displaying Individual Pictures
You can select individual pictures without starting a slide show.
1. In the picture preview menu please select a picture and press the [ ] button on the DF or the -button on the remote contro OK
picture is now displayed in full screen mode. Now please press the [ ] button on the DF or the -button on the remote contro OK
the selected display time. Now you will see the ner. For the selected notification time (seesymbol in the screen’s lower left cor
17).
To display previous or following pictures please press the [ ], [ ] buttons on the DF or the buttons on the remot ,
control.
To rotate pictures please press the [ ] ] buttons on the DF or the buttons on the remote control. , [ ,
To display a picture with a magnification, please repeatedly press the button on the remote control. If the pict
displayed as a magnified version, you can vary the depicted display window by using the [ ], [ ], [ ], [ ] buttons on the
or the buttons on the remote control. , , ,
2. To return to the picture preview menu please press the [ ] button.
3. Press the [ ] button on the DF or the button on the remote control to start the slide show, starting with the selected photo. OK-

GB - 13
Changing the Display Mode
While watching a picture or during the slide show you can change the display mode by repeatedly pressing the [ ] button on the4:3/16:9
control.
4:3: With this selection a picture which is saved in the 16:9 or a larger format is stretched and displayed as full s
picture.
16:9: With this selection a picture which is saved in the 16:9 or a larger format is displayed in its original format with
bar at the upper and lower margin.
Please note:
A photo which is saved in the 4:3 format can only be depicted in the format 4:3.
This function is not possible with photos whose resolution is lower than 800X600 pixels.

GB - 14
Using the OSD Menu
You can use the OSD menu carry out the following functions.
1. Press the [ ] button on the remote control when watching a picture or a slide show. The OSD menu will appear on the dispOSD
the slide show will be stopped.
2. Press the [ ] buttons on the DF or the buttons on the remote control to navigate between the functions. ], [ ,
To stop or continue the slide show please select the symbol and press [ ] on the DF or on the remote control. The OK
(Play) symbol in the OSD-menu will be replaced by the (Pause) symbol .
To enlarge the picture please select the symbol and press the [ ] button on the DF or on the remote control. If OK
picture is displayed as magnified version, you can vary the depicted display window using the [ ], [ ], [ ], [ ] buttons on
DF or the buttons on the remote control. , , ,
To rotate the picture by 90 degrees in clockwise direction please select the symbol and press the [ ] button on the D
OK on the remote control.

GB - 15
To rotate the picture by 90 degrees in anti-clockwise direction please select the symbol and press the [ ] button on th
or on the remote control. OK
By use of the symbol you can change between the 4:3 or 16:9. By pressing [ ] on the DF or on the remote contro OK
can confirm the format change.
See also at: “Changing the Display Mode (page 13)”
By selecting the symbol and pressing [ ] on the DF or on the remote control the displayed picture will be deleted OK
removed from the data medium. ( PLEASE NOTE: Prior to deleting there will be no security query !! )
By selecting the symbol and pressing [ ] on the DF or on the remote control the DF will continue with the slide s OK

GB - 16
SETUP MENU
You can individually adjust the configuration of the DIGITAL PHOTFRAME ( DF ).
1. In the main menu please select the menu item SETUP and confirm your sele
with the [ ] button on the DF or the -button on the remote control. You can OK
access this menu by pressing the [ ] button on the remote control. SETUP
2. To select a menu item please press the [ ], [ buttons on the DF or the ] ,
buttons on the remote control.
3. To change the relevant setting please press the [ ], [ ] buttons or the [ ] butto
on the DF, alternatively the buttons on the remote control and confirm y,
selection by pressing the [ button on the DF or the -button on the rem] OK
control.
4. To leave the menu please press the [ ] button on the remote control or on the D

GB - 17
Settings
Description
Display duration
Select how long a picture is displayed during a slide sh
Settings: 3 sec., 5 sec., 15 sec., 1 min., 15 min.
Picture transitions
Select from random and continuous transition modes
Clock settings
Select the display mode of your calendar / clock. Options: Monthly calendar, digital clock, analogu
Time settings
Adjusting the time.
Date settings
Adjusting the calendar
Language
Select your preferred language.
Brightness
Adjusts the brightness of the TFT display. Options: -3, -2, -1, 0, 1, 2, 3.
Contrast
Adjusts the contrast of the TFT display. Options: -3, -2, -1, 0, 1, 2, 3.
Colour saturation
Adjusts the colour saturation of the TFT display. Options: -3, -2, -1, 0, 1, 2, 3.
Display time
Specify how long the notification window of the key’s functions is displayed in the slide show mod
status (pause) or (play) in the lower picture. Options: 0 sec., 5 sec., 10 sec., 20 sec.
Autom. Power-on
Enables automatic power-on. Once / daily.
Autom. Power-off
Enables automatic power-off. Once / daily.
Default setting
Device is reset to factory settings.

GB - 18
Adjusting Date and Time
How to adjust date and time on the Intenso DF:
1. In the main menu select the menu item . SETUP
2. Press the [ ] buttons on the DF or the buttons on the remote control to select the menu item . ], [ , Time
3. Press the [ ], [ ] buttons on the DF or the buttons on the remote control to select the next or previous element (hour, minute ,
Press the [ ] buttons on the DF or the buttons on the remote control to adjust the desired values. ], [ ,
4. To confirm your entries please press the button [ ] on the rear side of the DF or the -button on the remote control. OK
How to adjust the date on the Intenso DF:
1. Press the [ ] buttons on the DF or the buttons on the remote control to select the menu item . ], [ , Date
2. Press the [ ], [ ] buttons on the DF or the buttons on the remote control to select the next or previous element (month, da ,
year). Press the [ ] buttons on the DF or the buttons on the remote control to adjust the desired values. ], [ ,
3. To confirm your entries please press the button [ ] on the rear side of the DF or the -button on the remote control. OK

GB - 19
Activating Automatic Power On/Off
You can have Intenso’s DIGITAL PHOTO FRAME switch on/off automatically at a preset time.
Please note: This function requires setting the correct time in advance.
1. In the main menu select the menu item SETUP.
2. Press the [ ], [ ] buttons on the DF or the buttons on the remote control to select the menu item or , autom. power-on autom.
power-off.
3. Press the [ ], [ ] buttons on the DF or the buttons on the remote control to select the next or previous element (hour, minute ,
Press the [ ] buttons on the DF or the buttons on the remote control to adjust the desired values and the time. ], [ ,
Off: Disables automatic power-on/off.
On: The DIGITAL PHOTO FRAME switches on and/or off at the preset time.
4. To confirm your entries please press the button [ ] on the DF or the -button on the remote control. OK

GB - 20
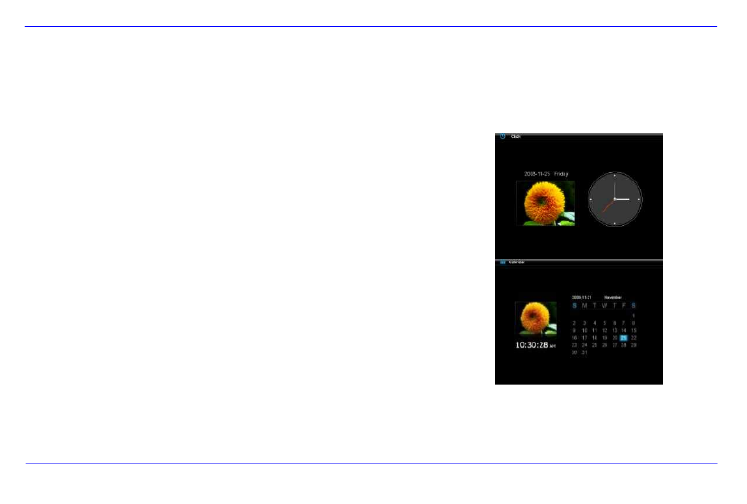
CALENDAR DISPLAY
The calendar mode displays the current date, the current time and a slide show with thumbnails in the background.
1. In the main menu select the menu item . CLOCK
2. To leave the calendar mode please press the [ ] button.
Please note:
Date and time can only be set in the menu. Setup
By pressing the button on the rear side of the DF or [ ]
the -button on the remote control the display can show the Monthly CalendaOK
the Digital Clock or the Analogue Clock.
By pressing the buttons on the rear side of the DF or [ ]], [
, the buttons on the remote control the calendar
can show the next months or leap back to the previous one.

GB - 21
FAQs
Why is the actual capacity of a memory card less than specified on the packaging?
The storage capacity of a flash storage medium is specified according to capacity specifications for hard drives and is subj
the SI regulations (International System of Units). This system does not use the binary system, which converts 1024 MB in
1 GB. The SI standard uses the powers of 1000, where 1000 Megabyte make 1 Gigabyte. Due to this different way of calcu
capacity specification might be different.
Why does the DF not display some pictures of my memory card?
Some not so widespread storage mediums are not compatible with the DF. Please use a compatible card. Please bear in m
that this photo frame can only play photos with the file format “JPEG”.
A memory card is inserted but the DF cannot read this card. What can I do?
At first please check if this card is actually compatible with Intenso's DIGITAL PHOTOFRAME.
Then, please check if the card is properly inserted into the card slot. Please bear in mind that only th e file format „JPE
supported.
Please note: Some digital cameras do not save pictures by use of the standard format JPEG. In such a case please refer to t
operating manual of your camera.

GB - 22
Why are some pictures loaded faster than others?
Pictures with a high resolution need longer times to be displayed. To increase the loading speed please use pictures with a l
resolution.
Please note: The photo frame supports a resolution of up to 8000*8000 pixels.
Why does the software not start although pow er supply is ensured and the power switch is in “On” position?
This might be a system error. Please reset the software by cutting off power supply for a few seconds.
Why is the main menu not displayed?
Please check if the DF is properly connected to the power outlet and the power switch is in “On” position.
Can I rotate pictures on the display?
Yes, please use your arrow keys [ ] on the DF or the buttons on the remote control. ], [ ,
Please note: With a new start the rotated picture will be displayed in normal mode again.
Can I adjust the colours of pictures?
No. All colours are set when the picture is being taken. However, you can adjust the brightness and the contrast of the dis
However, you can adjust the brightness and the contrast of the display.

GB - 23
What is the ideal resolution to display pictures on the DF?
The ideal resolution for this DF is 800*600 pixels.
Why do the functions: Automatic power-on / off not work although I have enabled them?
Please make sure your time settings are correct. If the set time is in the past, the function will be enabled on the next cal endar
day for the first time.
Please do not move the slider on the rear side of the DF into POWER OFF position. Only change t he status of the DF into
standby.

GB - 24
PRODUCT SPECIFICATIONS
Display
Digital TFT LCD
Display size: 8 ” inch
Display modus: 4:3
Resolution: 800*600 pixels
Mains adapter
Input: 100~240V AC, 50/60Hz
Output: 5V 1A DC
USB port
USB Host 2.0
Supports USB storage mediums
Memory ca rds
supported
SD™ (Secure Digital Card), MMC™ (MultiMedia Card), MS™ (Memory Stick)
Picture size supported
JPEG, max. resolution:8000*8000 pixels
Operating te mperature
-10°C ~ +40°C
Dimensions
33*184 25 mm *2
Weight
500 g
Accessory
Remote contro l (incl. battery), foot, mains adapter, multi-lingual operating instruction

GB - 25
SERVICE AND MAINTENANCE
Service
To avoid risks of electric shocks please do not remove screws or the housing.
Do not use the device in the vicinity of water. Do not expose the device to rain or moisture. Do not place any objects in the vicinity of
the device that store water or any other liquids.
Do not install this picture frame in the vicinity of heating systems, ovens or other heat emitting devices.
Do not open the housing. Do not try to repair the device yourself. Leave any repairs to speci alised personnel only.
Avoid using your devi ce on sandy places.
Please do properly connect the plug of the mains adaptor to the existing openi ng of the DF. Thus, you can avoid e lectro-static
charge.
Plug in all connections correctly and safely.
Please do not touch the display. Do not expose the display to direct sunlight.
The picture frame only plays compatible file formats.
Pictures might be protected by copyright law of third parties. Playing such pictures without licences might represent an infringement
of such copyright laws.
Please do not touch the DF with metallic object during operation.
Please avoid operation on pill ows, sofas or any other heat emitting home appliances sin ce the device might overheat in such cases.
Please do not remove memory cards while the device is reading. Otherwise this might result in abnormal system ends or loss of
data.
Please do not switch off the device with the slide show running.
Please do not directly wrap the device after longer operating hours. Please make sure the device has cooled down properly.
Otherwise the device might overheat.
To guarantee better service this operating instruction is subject to alterations.

Mode d emploi ’
Intenso Photo-Manager

ii
MENU SETUP ........................................................................................................................................................................................................... 16
Régler la date et l heure ........................................................................................................................................................................................ 18’
Activer la mise en marche et hors marche automatique ...................................................................................................................................... 19
INDICATION DU CALENDRIER ........................................................................................................................................................................... 20
QUESTIONS FREQUEMMENT POSEES ................................................................................................................................................................ 21
SPECIFICATIONS DU PRODUIT ............................................................................................................................................................................. 24
SOIN ET ENTRETIEN ............................................................................................................................................................................................... 25

FR - 1
Nou s d éc lin on s tou te respons ab ilité en ca s d endo mmagement o u d e per te de d onn ée s à c au se d un dysfonctionnement, d un ma nie m’ ’ ’
ent fautif
ou d une ré paration auto graphe de l a ppare il. Ne mett ez pa s l ap pareil en pièces dé taché es et n essaye z p as de le ré p’ ’ ’ ’
arer, s il vous plaît. Dan s c e’
cas, la garan tie e xpire. Le log ici el, le ma tériel o u l e mode d emplo i peu ve nt être soumis à des changeme nts. Nou s ne vo us en ’
informerons p as.
Tous dro its ré se rv és.
INTRODUCTION
Nous vous remercions d avoir choisi le Cadre Photo Numérique (CPN) d Intenso. ’ ’
Avant d utiliser cet appareil, lisez ce mode d emploi attentivement et respectez tous les avertissements, s il vous plaît. Nous vous ’ ’ ’
recommandons d archiver cette instruction afin de pouvoir répondre indépendamment à des questions survenant éventuellement ’
plus tard. Le contenu de cette instruction vous permet de profiter de toutes les fonctions du CPN.
Le CPN vous permet de regarder des photos numériques directement de la carte de mémoire de votre appareil photo. Vous avez la
possibilité de regarder les photos par la fonction de diaporama du cadre de photo. Le CPN est compatible avec les formats de carte
suivants : SD (Secure Digital), SDHC (Secure Digital High Capacity), MMC (Multimedia Card), MS (Memory Stick) et clé ™ ™ ™ ™
USB.

FR - 2
CARACTERISTIQUES GENERALES DU PRODUIT
Apparence décorative, bonne qualité
Visualisation de photos (JPEG) sans ordinateur
Diaporama automatique avec de différents effets de transition et une durée d affichage individuelle ’
Fonction Calendrier
Fonction Réveil
Compatible avec cartes SD / MMC et MS
Slot USB pour la connexion de mémoires de masse USB
2 possibilités de navigation : 7 touches sur le CPN, télécommande infrarouge
FR - 3
APERÇU
1 Lecteur carte 3 en 1 (SD/MMC/MS)
2 Touche En aval/En avant [ ]
3 Touche En amont/Retour [ ]
4 Touche Gauche [ ]
5 Touche Droite [ ]
6 Touche Stop/Fin []
7 Touche Menu [M]
Touche Play/Pause/Entrée [ 8 ]
Power On / Off 9
10 Slot USB 2.0 Host
11 Connexion d alimentation 5V 1A ’
12 Support

FR - 5
METTRE LA PILE DANS LA TELECOMMANDE
Placez la télécommande à tel point que les touches montrent vers le bas.
Pousser le ressort à la côté gauche du compartiment à piles à droite et dégagez
le compartiment en même temps.
Mettez une pile de lithium CR2025 dans le compartiment, le symbole « + » montre vers le haut.
Poussez le compartiment à piles dans le boîtier de la télécommande.
Attention : Assurez une mise en rebut conforme à la législation en vigueur, s il vous plaît. ’
FIXATION DU SUPPORT
Tournez le support en sens antihoraire pour choisir la position de paysage ou de portrait.

FR - 7
UTILISATION DE CARTES DE MEMOIRE
Mettez les cartes SD / MMC / MS dans la fente trois en un, les contacts montrant vers l écran. ’
Connectez le module de mémoire au CPN en mettant les modules dans le slot USB Host.
Remarques :
Ne mettez pas les cartes de mémoire avec trop de force, s il vous plaît. ’
Le lecteur de carte trois en un ne peut lire qu une carte à la fois. ’
Ne connectez qu une carte SD / MMC ou MS au CPN en même temps, s il vous plaît. ’ ’
Pour déconnecter des cartes du CPN, dégagez-les prudemment de la fente de carte. (Nota : Les cartes SD et MMC disposent d une ’
entaille en direction transversale de la carte. Un ongle peut y intervenir pour simplifier le dégagement.)

FR - 8
REGARDER UN DIAPORAMA
Après la mise en marche, le menu principal sera affiché.
Si vous avez connecté une carte de mémoire ou une clé USB au CPN, le diaporama sera lancé automatiquement après la mise en marche.
Appuyez sur la touche à l arrière du CPN ou de la télécommande et ensuite sur les MENU ’
touches [ ],[ ] à l arrière du CPN ou sur les touches , de la télécommande pour ’▲ ▼
appeler le module de mémoire connecté, le setup ou le calendrier.
Remarques :
Si un module de mémium a été mis dans le CPN, le diaporama sera lancé automatiquement après la mise en marche.
S il y a plusieurs modules de mémoire qui sont connectés au CPN, le ’CPN commence toujours à lire les images de la carte SD / MMC
ou MS en premier.

FR - 9
MENU PRINCIPAL
Dans le menu principal, vous avez le choix entre les modules de mémoire connectés, le calendrier et le setup.
1. Appuyez sur la touche à l MENU ’arrière du CPN ou de la télécommande pour appeler le menu principal.
Menu Description
USB Apparaît quand un module USB est connecté.
SD/MMC/MS Apparaît quand une carte SD, MS ou MMC
Est connectée.
Horloge Indication du calendrier et de l heure ’
Setup Menu pour les paramètres individuels
2. Appuyez sur les touches [ ],[ ] du CPN ou sur les touches , de la ▲ ▼
télécommande pour choisir un moduel de mémoire ou un menu.
3. Validez votre choix en appuyant sur la touche [ ] du CPN ou sur la touche OK de la
télécommande.

FR - 10
REGARDER DES PHOTOS
Passer un diaporama
Dans tous les menu, vous pouvez appuyez sur la touche [ ] de la télécommande pour lancer le diaporama. Celui-ci commence respectivement
avec la première photo. Pour stopper le diaporama et afficher une seule photo, appuyez sur la touche du CPN ou sur la touche de la [ ] OK
télécommande. En appuyant sur la touche du CPN ou sur la touche de la télécommande de nouveau, le diaporama continuera. [ ] OK
Appuyez sur la touche [
] de la télécommande ou du CPN pour quitter le diaporama et pour accéder au menu d aperçu d images. ’ ’
Appuyez sur la touche de la télécommande ou du pour quitter le diaporama et pour accéder au menu principal. MENU CPN
Remarques :
Quand vous passez un diaporama et un autre module de mémoire sera connecté, la première image du nouveau module de mémoire
sera affiché automatiquement et le diaporama continue avec les images de celui-ci.
Quand une carte SD/MMC/MS et un module USB sont connectés au CPN en même temps, les images du module choisi seront
successivement affichiché dans le diaporama. Les images des modules de mémoire respectifs ne seront pas automatiquement affichées
de façon successive dans le diaporama.

FR - 11
Menu d aperçu d images’ ’
Menu d aperçu d images ’ ’
Les images du module de mémoire choisi sont affichées comme des miniatures. 15 images
peuvent être affichées en même temps.
1. Choisissez un module de mémoire (USB, SD/MMC/MS) dans le menu principal et
appuyez sur la touche du CPN ou de la télécommande. OK
2. Pour naviger entre les miniatures, appuyez sur les touches [ ],[ ],[ ],[ ] du CPN
ou sur les touches , , , de la télécommande. Pour accéder directement à
l aperçu d images, appuyez sur la touche ou ’ ’ de la télécommande, s’il vous plaît.
Remarque :
En appuyant sur la touche [
] de la télécommande ou du CPN pendant le diaporama ou la visualisation d une seule image, vous accé’
également au menu d aperçu d images. ’ ’

FR - 12
Visualisation d une seule image ’
Vous pouvez choisir une image.
1. Choisissez une image dans le menu d ’aperçu d images et appuyez sur la touche [ ] du CPN ou sur la touche de la télécomma’ OK
L’image sera donc affichée comme plein écran. Maintenant, appuyez encore une fois sur la touche [ ] du CPN ou sur la touche OK
télécommande en l espace de la durée d affichage choisie. Ensuite, vous voyez le symbole dans le coin gauche en bas de l éc’ ’ ’
Pour la durée d affichage choisie (confer page 17). ’
Pour afficher les photos précédentes ou les prochaines photos, appuyez sur les touches [], [ ] du CPN ou sur les touches
de la télécommande.
Pour tourner l’image, appuyez sur les touches [], [ ] du CPN ou sur les touches , de la télécommande.
Pour afficher une image d une manière agrandie, appuyez plusieurs fois sur la touche de la télécommande. Quand une im’
est affichée d une manière agrandie, vous pouvez choisir le fragement d image à l aide des touches [ ], [ ], [ ], [ ] du CPN ’ ’ ’
des touches , , , de la télécommande.
2. Pour revenir au menu d aperçu d images, appuyez sur la touche [ ’ ’
], s il vous plaît. ’
3. Appuyez sur la touche [ ] du CPN ou sur la touche de la télécommande afin de lancer le diaporama commençant avec la p OK
choisie.

FR - 14
Utilisation du menu OSD
Vous pouvez le menu OSD pour effectuer les actions suivantes.
1. Appuyez sur la touche [ ] de la télécommande pendant l affichage d une image ou le diaporama. Le menu OSD appara OSD ’ ’
l écran en l’ ’espace de la durée d affichage choisie et le diaporama sera stoppé. ’
2. Appuyez sur les touches [ ], [ ] du CPN ou sur les touches , de la télécommande pour naviger entre les fonctions.
Pour stopper ou continuer le diaporama, choisissez le symbole et appuyez sur la touche [ ] du CPN ou sur la touche OK
la télécommande, s il vous plaît. Le symbole (Play) dans le menu OSD sera remplacé par le symbole (Pause)’ .
Pour agrandir l’image, choisissez le symbole et appuyez sur la touche [] du CPN ou sur la touche OK de la télécomma
s il vous plaît. Quand une image est affichée d une manière agrandie, vous pouvez choisir le fragment d image à l ai’ ’ ’ ’
touches [ ],[ ],[ ],[ ] du CPN ou des touches , , , de la télécommande.

FR - 15
Pour tourner la photo dans le sens horaire de 90°, choisissez le symbole et appuyez sur la touche [ ] du CPN ou sur la
touche de la télécommande. OK
Pour tourner la photo en sens antihoraire de 90°, choisissez le symbole et appuyez sur la touche [ ] du CPN ou sur la tou
OK de la télécommande.
Par le symbole , vous pouvez choisir entre les formats 4:3 / 16:9. En appuyant sur la touche [ ] du CPN ou sur la touche
de la télécommande, le choix du format sera validé.
Confer : « Changer le mode d affichage » (Page 13) ’
En choisissant le symbole et en appuyant sur la touche [ ] du CPN ou sur la touche OK de la télécommande, l image affi’
sera supprimée du support de données (ATTENTION : Il n y a pas de demande de confirmation avant que l image soit ’ ’
supprimée !)
En choisissant le symbole et en appuyant sur la touche [ ] du CPN ou sur la touche de la télécommande, le diapora OK
continuera.

FR - 17
Paramètres Description
Durée d affichage ’ Choisissez une durée pour l affichage d une image dans le diaporama.’ ’
Possibilités de choix : 3 sec., 5 sec., 15 sec., 1 min., 15 min.
Transition d images Choisissez entre une transition d images successive ou accidentelle. ’ ’
Réglagle de l horloge ’ Choisissez la forme d affichage pour votre calendrier/horloge. ’
Possibilités de choix : clendrier par mois, horloge numérique, horloge analogue
Réglage de l’heure Réglez l heure. ’
Réglage de la date Réglez le calendrier.
Langue Choisissez la langue souhaitée.
Clarté Réglez la clarté de l écran TFT. Possibiltés de choix : -3, -2, -1, 0, 1, 2, 3. ’
Contraste Réglez le contraste de l écran TFT. Possibilités de choix : -3, -2, -1, 0, 1, 2, 3. ’
Saturation Réglez la saturation de l’écran TFT. Possibilités de choix : -3, -2, -1, 0, 1, 2, 3.
Affichage de remarque
Choisissez une durée pour l affichage de la remarque concernant les fonctions des touches dans le ’
mode de diaporama et pour l affichage du statut ’ (Pause) ou bien (Play) en bas. Possibilités de
choix : 0 sec., 5 sec., 10 sec, 20 Sec.
Mise en marche automatique Activez la mise en marche automatique. Une fois par jour.
Mise hors marche automatique Activez la mise hors marche automatique. Une fois par jour.
Configuration d usine ’ La configuration d’usine de l appareil sera rétablie. ’

FR - 18
Régler la date et l heure ’
Régler l heure du CPN d Intenso : ’ ’
1. Choisissez l option de menu dans le menu principal. ’ SETUP
2. Appuyez sur les touches [ ], [ ] du CPN ou sur les touches , de la télécommande afin de choisir l ’entrée . Heure
3. Appuyez sur les touches [ ], [ ] du CPN ou sur les touches , de la télécommande afin de choisir l'élément précédent ou le procha
élément (heure, minute). Appuyez sur les touches [ ], [ ] du CPN ou sur les touches , de la télécommande afin de choisir les
valeurs souhaitées.
4. Pour valider votre choix, appuyez sur la touche [ ] à l ’arrière du CPN ou sur la touche de la télécommande. OK
Régler la date du CPN d Intenso : ’
1. Appuyez sur les touches [ ], [ ] du CPN ou sur les touches , de la télécommande afin de choisir l ’entrée . Date
2. Appuyez sur les touches [ ], [ ] du CPN ou sur les touches , de la télécommande afin de choisir l élément précédent ou le procha’
élément (mois, jour, an). Appuyez sur les touches [ ], [ ] du CPN ou sur les touches , de la télécommande afin de choisir les
valeurs souhaitées.
3. Pour valider votre choix, appuyez sur la touche [ ] à l ’arrière du CPN ou sur la touche de la télécommande. OK

FR - 19
Activer la mise en marche et hors marche automatique
Vous avez la possibilité d activer la mise en marche et hors marche automatique du CPN d Intenso à une heure précise. ’ ’
Remarque : Pour cette fonction, l heure correcte doit être entrée au préalable. ’
1. Choisissez l option de menu dans le menu principal. ’ SETUP
2. Appuyez sur les touches [ ], [ ] du CPN ou sur les touches , de la télécommande afin de choisir l entrée ’ Mise en marche ou Mise
hors marche.
3. Appuyez sur les touches [ ], [ ] du CPN ou sur les touches , de la télécommande afin de choisir l élément précédent ou le procha’
élément (heure, minute). Appuyez sur les touches [ ], [ ] du CPN ou sur les touches , de la télécommande afin de choisir les
valeurs souhaitée et régler l’horaire.
Off : Déactiver la mise en marche et hors marche automatique.
On : Le CPN sera mis en marche ou hors marche à l’heure choisie.
4. Pour valider votre choix, appuyez sur la touche [ ] du CPN ou sur la touche OK de la télécommande.
FR - 20
INDICATION DU CALENDRIER
Dans le mode de calendrier, la date, l’heure et un diaporama des images disponibles sont affichés.
1. Choisissez l option de menu dans le menu principal. ’ Horloge
2. Pour quitter le mode de calendrier, appuyez sur la touche [ ].
Remarques :
La date et l’heure ne peuvent être réglées que dans le menu . Setup
En appuyant sur la touche à l arrière du CPN ou sur la touche [ ] ’ OK
de la télécommande, vous pouvez choisir entre l indication du calendrier par mois, de ’
l horloge digitale ou de l horloge analogue. ’ ’
En appuyant sur les touches du CPN ou sur les touches [ ], [ ] ,
de la télécommande, le calendrier peut afficher les mois précédents ou les prochains
mois.

FR - 21
QUESTIONS FREQUEMMENT POSEES
Pourquoi la capaacité d une carte de mémoire est inférieure à la valeur indiquée sur l emballage ? ’ ’
L’indication de la capacité de mémoire d’un module de mémoire Flash doit être analogue à l indication de capacité d un disque dur et es’ ’
aux directives du SI (Système International d’Unités). Ce sysème n est pas basé sur le système binaire dans lequel 1024 MB correspond’
1 GB. Dans le standard SI, 1000 MB correspondent à 1 GB. A cause des ces calculs différents, il y a une différence entre les indications
capacité.
Pourquoi quelques images de ma carte de mémoire ne sont pas affichées par le CPN ?
Quelques modules de mémoire peu usités ne sont pas compatibles avec le CPN. Utilisez une carte compatible, s il vous ’
Prenez en considération que le cadre ne peut afficher que des photos au format « JPEG », s il vous plaît. ’
Une carte de mémoire est engagée. Le CP ne peut pas la lire. Que puis-je faire ?
D abord, vous vérifiez si la carte est compatible avec le CPN, s il vous plaît. ’ ’
Ensuite, vous vérifiez si la carte a été engagée correctement.
Prenez également en considération que le format « JPEG » est le seul à être supporté.
Prenez en compte : Quelques appareils photo numériques n enregistrent pas les images au format « JPEG ». Dans ce cas, lis’
le mode d emploi de votre appareil photo, s il vous plaît. ’ ’

FR - 22
Pourquoi quelquels images sont chargées plus rapidement que d autres ?’
Le chargement d images avec une haute résolution dure longtemps. Pour diminuer la durée, utilisez des images avec une résol’
plus basse, s il vous plaît. ’
Remarque : Le cadre photo numérique peut afficher des photos avec une résolution de 8000*8000 pixels au maximum.
Pourquoi le logiciel n est pas lancé bien que l appareil soit alimenté en courant électrique et mis en marche ? ’ ’
Il existe probablement une erreur de système. Lancez le logiciel de nouveau en coupant l alimentation en courant électrique’
quelques secondes.
Pourquoi le menu principal n est pas affiché sur l écran ? ’ ’
Vérifiez si le CPN est connecté correctement à une prise de courant et si le régulateur Power est poussé vers la position « O
Est-ce que je peux tourner les images sur l écran ? ’
Oui. Pour cela, utilisez les touches [ ], [ ] du CPN ou les touches , de la télécommande.
Prenez en compte : La prochaine fois, l image tournée sera affiché comme avant. ’
Est-ce que je peux adapter les couleurs des images ?
Nein. Tous les paramètres de couleurs sont faits avant la prise des photos. Par contre, vous pouvez adapter la clarté et le contr
de l éctran. ’

FR - 23
Quelle résolution est optimale pour l affichage sur l écran ? ’ ’
Une résolution de 800*600 pixels est optimale pour ce CPN.
Pourquoi les fonctions « Mise en marche/hors marche automatique » ne marche pas bien que je les aie activées ?
Assurez que vous avez régler l heure correctement. Si l heure réglée est au passé, la fonction sera activée le lendemain po’ ’
première fois.
Ne poussez pas le régulateur Power à l arrière du CPN vers la position « Off ». Choisissez juste le mode stand-by. ’

FR - 24
SPECIFICATIONS DU PRODUIT
Affichage
Ecran TFT LCD digital
Ecran de 8 pouces
Affichage : 4:3
Résolution : 800*600 pixels
Netzteil Input: 100~240V AC, 50/60Hz
Output: 5V 1A DC
Slot USB USB Host 2.0
Supporte modules de mémoire USB
Cartes de mémoire
supportées SD (Secure Digital Card), MMC (MultiMedia Card), MS (Memory Stick) ™ ™ ™
Format d image’
supporté JPEG, résolution maximale :8000*8000 pixels
Température de
fonctionnement -10°C ~ +40°C
Dimensions 33*184*225 mm
Poids 500 gr
Accessoires Télécommande (pile comprise), support, adapteur secteur, manuel d utilisation multilingue ’

FR - 26
Entretien de l appareil ’
L APPAREIL DOIT ETRE MIS HORS MARCHE. ’
NE METTEZ PAS DE LIQUIDE DIRECTEMENT SUR L ECRAN OU SUR LE BOÎTIER. ’
Nettoyage de l écran du boîtier et du cadre ’
Nettoyez le boîtier, le cadre et l écran LCD prudemment avec un chiffon tendre, sans peluches et sans produits chimi’
N utilisez que des détergents qui sont destinés à l écran LCD. ’ ’
Mise en rebut de vieux appareils électro
Les appareils marqués avec ce symbole sont soumis à la directive européenne 2002/96/EC.
Tous les vieux appareils électro doivent être mis en rebut séparément du déchet domestique dans les poubelles prévues par l État. ’
Avec la mise en rebut correcte de vieux appareils électro, vous évitez la pollution de l’environnment.

Istruzioni d'uso
Intenso Photo-Manager

i
Indice
INTRODUZIONE .............................................................................................................................................................................................
CARATTERISTICHE GENERALI DEL PRODOTTO ..................................................................................................................................
RIEPILOGO ......................................................................................................................................................................................................
TELECOMANDO ............................................................................................................................................................................................
INSERIMENTO DELLA BATTERIA NEL TELECOMANDO .....................................................................................................................
FISSAGGIO DEL PIEDINO ............................................................................................................................................................................
I PRIMI PASSI ..................................................................................................................................................................................................
USO DI SCHEDE DI MEMORIA ....................................................................................................................................................................
GUARDARE UN DIASHOW ..........................................................................................................................................................................
MENU PRINCIPALE .......................................................................................................................................................................................
GUARDARE FOTO .........................................................................................................................................................................................
Visualizzare un diashow................................................................................................................................................................................
Visualizzazione di una singola immagine .....................................................................................................................................................
Modificare il modo di visualizzazione..........................................................................................................................................................
Uso di menu OSD .........................................................................................................................................................................................

ii
MENU SETUP ..................................................................................................................................................................................................
Impostare data e orario ..................................................................................................................................................................................
Attivare accensione e spegnimento automatici ............................................................................................................................................
VISUALIZZAZIONE DEL CALENDARIO ...............................................................................................................................................
DOMANDE FREQUENTI ...............................................................................................................................................................................
SPECIFICAZIONI DEL PRODOTTO .............................................................................................................................................................
CURA E MANUTENZIONE ...........................................................................................................................................................................

IT - 1
Non siamo parecchiatura. responsabili per i danni o la perdita di dati nel caso di un malfunzionamento, un uso scorretto o riparazioni proprie dell‟ap
non smontare l‟apparecchiatura in componenti singole e di non cercare di ripararla visto che in ques to caso la garanzia viene annullata. Il software
istruzioni d‟uso possono essere soggetti a modifiche. Non daremo informazioni a riguardo. Ci riserviamo tutti i diritti in questo senso.
INTRODUZIONE
Grazie di aver deciso di acquistare una CORNICE DI FOTO DIGITALE ( CF ) di Intenso.
Prima di utilizzare quest‟apparecchiatura, La preghiamo di leggere a fondo queste istruzioni d‟uso e di attenersi alle avvertenze.
Raccomandiamo di conservare in un luogo sicuro queste istruzioni al fine di poter rispondere in modo indipendente a eventuali domand
contenuto di queste istruzioni è strutturato in modo tale che Lei possa utilizzare in modo sicuro tutte le funzioni della CF.
La CF Le permette di guardare le foto digitali direttamente dalla scheda di memoria della Sua videocamera Può guardare le Sue foto m.
la funzione diashow messa a disposizione dalla Sua cornice di foto. Der a CF è compatibile con i seguenti formati di schede: SD™ (Se
Digital), SDHC™ (Secure Digital di alta capacità), MMC™(scheda multimediale), MS™ (chiave di memoria) e chiave USB.

IT - 11
Menu anteprima immagini
Menu anteprima immagini
Le immagini del mezzo di memoria selezionato vengono rappresentate quali im
miniatura. Si possono visualizzare fino a 15 immagini in contemporanea.
1. Nel menu principale selezioni un mezzo di memoria (USB, SD/MMC/MS), pr
dunque il tasto sulla CF o sul telecomando. OK
2. Per navigare tra le immagini miniatura, utilizzi i tasti [ ] ] ] ] sulla CF opp ,[ ,[ ,[
i tasti , del telecomando. Per giungere direttamente alla prossima , ,
pagina di anteprima, La preghiamo di utilizzare i tasto o del telecomando.
Avviso:
Anche premendo il tasto [
] sul telecomando oppure sulla CF durante il diashow o la riproduzione delle immagini in visualizza
singola, raggiunge il menu di anteprima delle immagini.

IT - 12
Visualizzazione di una singola immagine
Può selezionare un‟unica immagine.
1. Scelga un‟immagine nel menu di anteprima delle immagini e prema il tasto [] sulla CF oppure il tasto sul telecoOK
L‟immagine viene visualizzata nel modo di immagine completa. Riattivi dunque, entro la durata di visualizzazione selezionat
[ ] sulla CF oppure il tasto del telecomando. Vede ora il simbolo feriore sinistro dello schermo. Per il tem OK nell‟angolo in
avviso selezionato (vedi pagina 17).
Per visualizzare le foto precedenti o successive, prema i tasti [ ] ] sulla CF oppure i tasti , del telecomando. , [
Per ruotare l‟immagine prema i tasti [ ] ] sulla CF oppure i tasti del telecomando. , [ ,
Per visualizzare un‟immagine ingrandita prema ripetutamente il tasto sul telecomando. Se un‟immagine viene visu
ingrandita, con i tasti [ ], [ ], [ ], [ ] sulla CF oppure i tasti , del telecomando Lei può variare la sezione , ,
dell‟immagine rappresentata.
2. Per ritornare al menu di anteprima immagini prema il tasto [
].
3. Prema il tasto [ ] sulla CF o il tasto del telecomando per avviare il diashow a partire dalla foto selezionata. OK

IT - 15
Per ruotare la foto di 90 gradi in senso antiorario La preghiamo di selezionare il simbolo e di premere [ ] sulla CF o
OK sul telecomando.
Mediante il simbolo si seleziona il passaggio tra 4:3 / 16:9. Premendo [ ] sulla CF oppure sul telecomando si es OK
il passaggio da un formato all‟altro.
Cfr. tra l‟altro: “Modificare il modo di visualizzazione (pagina13)"
Selezionando il simbolo e premendo [ ] sulla CF oppure OK sul telecomando, l‟immagine visualizzata viene eliminat
supporto dei dati. (ATTENZIONE: Non si ha nessuna richiesta di sicurezza aggiuntiva prima dell„eliminazione!!)
Selezionando il simbolo e premendo [] sulla CF oppure sul telecomando, la CF continua il diashow. OK

IT - 18
Impostare data e orario
Imposti l‟orario sulla CF di Intenso:
1. Selezioni il punto del menu nel menu principale. SETUP
2. Prema i tasti [ ] sulla CF oppure i tasti , ], [ sul telecomando per selezionare l‟inserimento dell„orario.
3. Prema i tasti [ ], [ ] sulla CF oppure i tasti sul telecomando per selezionare il prossimo elemento o quello precedente (ora, ,
minuto). Prema i tasti [ ], [ ] sulla CF oppure i tasti , sul telecomando per impostare i valori desiderati.
4. Per confermare i Suoi inserimenti prema il tasto [ ] sul retro della CF oppure il tasto del telecomando. OK
Imposti la data sulla CF di Intenso:
1. Prema i tasti [ ] sulla CF oppure i tasti , ], [ sul telecomando per selezionare l‟inserimento della data.
5. Prema i tasti [ ], [ ] sulla CF oppure i tasti sul telecomando per selezionare il prossimo elemento o quello precedente (mese, ,
giorno, anno ). Prema i tasti [ ] sulla CF oppure i tasti , sul telecomando per impostare i valori desiderati. ], [
2. Per confermare i Suoi inserimenti prema il tasto [ ] sul retro della CF oppure il tasto del telecomando. OK

ii
Índice
INTRODUCCIÓN ......................................................................................................................................................................................................... 1
CARACTERÍSTICAS GENERALES DEL PRODUCTO ............................................................................................................................................ 2
DESCRIPCIÓN GENERAL ......................................................................................................................................................................................... 3
MANDO A DISTANCIA ............................................................................................................................................................................................... 4
COLOCAR LAS PILAS EN EL MANDO A DISTANCIA ............................................................................................................................................ 5
FIJACIÓN DEL SOPORTE ......................................................................................................................................................................................... 5
PRIMEROS PAS OS .................................................................................................................................................................................................... 6
UTILIZACIÓN DE LAS TARJETAS DE MEMORIA ................................................................................................................................................... 7
PRESENTACIÓN DE DIAPOSITIVAS ........................................................................................................................................................................ 8
MENÚ PRINCIPAL ...................................................................................................................................................................................................... 9
CONTEMPLAR FOTOS ............................................................................................................................................................................................ 10
Reproducir presentación de diapositivas .............................................................................................................................................................. 10
Mostrar una imagen .............................................................................................................................................................................................. 12
Cambiar el modo de visualización ........................................................................................................................................................................ 13
Empleo del menú OSD ......................................................................................................................................................................................... 14
Product specificaties
| Merk: | Intenso |
| Categorie: | Digitaal fotolijstje |
| Model: | PhotoManager |
| Kleur van het product: | Zwart |
| Beeldscherm: | LCD |
| Beeldschermdiagonaal: | 8 " |
| Resolutie: | 800 x 600 Pixels |
| Type stroombron: | AC |
| Compatibele geheugenkaarten: | Memory Stick (MS), MMC, SD, SDHC |
| Typische contrastverhouding: | 400:1 |
| Zoomcapaciteit: | Ja |
| Agenda: | Ja |
| Aantal USB 2.0-poorten: | 1 |
| Interface: | USB 2.0 |
| Ondersteund beeldformaat: | JPG |
| Beeldverhouding: | 4:3, 16:9 |
| Miniaturen: | Ja |
| Instelling voor diapresentatie: | Ja |
| Afstandsbediening inbegrepen: | Ja |
Heb je hulp nodig?
Als je hulp nodig hebt met Intenso PhotoManager stel dan hieronder een vraag en andere gebruikers zullen je antwoorden
Handleiding Digitaal fotolijstje Intenso

8 Augustus 2023
8 Augustus 2023
8 Augustus 2023
8 Augustus 2023
8 Augustus 2023
8 Augustus 2023
8 Augustus 2023
8 Augustus 2023
8 Augustus 2023
8 Augustus 2023
Handleiding Digitaal fotolijstje
- Digitaal fotolijstje Braun
- Digitaal fotolijstje Philips
- Digitaal fotolijstje Sony
- Digitaal fotolijstje Motorola
- Digitaal fotolijstje Medion
- Digitaal fotolijstje Agfa
- Digitaal fotolijstje Agfaphoto
- Digitaal fotolijstje Akai
- Digitaal fotolijstje Aluratek
- Digitaal fotolijstje Binatone
- Digitaal fotolijstje Braun Phototechnik
- Digitaal fotolijstje Brigmton
- Digitaal fotolijstje Denver
- Digitaal fotolijstje Difrnce
- Digitaal fotolijstje Dorr
- Digitaal fotolijstje Energy Sistem
- Digitaal fotolijstje GPX
- Digitaal fotolijstje Hama
- Digitaal fotolijstje Hannspree
- Digitaal fotolijstje Hitachi
- Digitaal fotolijstje Ices
- Digitaal fotolijstje IHome
- Digitaal fotolijstje Kodak
- Digitaal fotolijstje Kogan
- Digitaal fotolijstje Lenco
- Digitaal fotolijstje Lexibook
- Digitaal fotolijstje Logik
- Digitaal fotolijstje Marquant
- Digitaal fotolijstje Maxell
- Digitaal fotolijstje Nedis
- Digitaal fotolijstje Netgear
- Digitaal fotolijstje Qmedia
- Digitaal fotolijstje Ricatech
- Digitaal fotolijstje Rollei
- Digitaal fotolijstje Sagem
- Digitaal fotolijstje Salora
- Digitaal fotolijstje Sencor
- Digitaal fotolijstje Sigma
- Digitaal fotolijstje Sweex
- Digitaal fotolijstje Sylvania
- Digitaal fotolijstje Telefunken
- Digitaal fotolijstje TFA
- Digitaal fotolijstje Transcend
- Digitaal fotolijstje Veho
- Digitaal fotolijstje Viewsonic
- Digitaal fotolijstje Xoro
- Digitaal fotolijstje Jobo
- Digitaal fotolijstje Clas Ohlson
- Digitaal fotolijstje ECG
- Digitaal fotolijstje Palsonic
- Digitaal fotolijstje GoGEN
- Digitaal fotolijstje Naxa
- Digitaal fotolijstje Proscan
- Digitaal fotolijstje Majestic
- Digitaal fotolijstje Trevi
- Digitaal fotolijstje SIIG
- Digitaal fotolijstje Sungale
- Digitaal fotolijstje Coby
- Digitaal fotolijstje XD Enjoy
- Digitaal fotolijstje Facebook
- Digitaal fotolijstje NIX
- Digitaal fotolijstje Nixplay
- Digitaal fotolijstje Promate
- Digitaal fotolijstje InLine
- Digitaal fotolijstje Micca
- Digitaal fotolijstje Digital Foci
- Digitaal fotolijstje Vankyo
Nieuwste handleidingen voor Digitaal fotolijstje
2 April 2025
30 Maart 2025
10 Maart 2025
19 Februari 2025
12 Februari 2025
10 Februari 2025
23 December 2024
20 December 2024
20 December 2024
20 December 2024