Huawei G5000 Handleiding
Lees hieronder de 📖 handleiding in het Nederlandse voor Huawei G5000 (41 pagina's) in de categorie Gsm. Deze handleiding was nuttig voor 90 personen en werd door 2 gebruikers gemiddeld met 4.5 sterren beoordeeld
Pagina 1/41

Copyright © Huawei Technologies Co., Ltd. 2012. All
rights reserved.
Trademarks and Permissions
, , and are trademarks or
registered trademarks of Huawei Technologies Co., Ltd.
Other trademarks, product, service and company names mentioned
are the property of their respective owners.
NO WARRANTY
THE CONTENTS OF THIS MANUAL ARE PROVIDED “AS IS”. EXCEPT
AS REQUIRED BY APPLICABLE LAWS, NO WARRANTIES OF ANY
KIND, EITHER EXPRESS OR IMPLIED, INCLUDING BUT NOT LIMITED
TO, THE IMPLIED WARRANTIES OF MERCHANTABILITY AND FITNESS
FOR A PARTICULAR PURPOSE, ARE MADE IN RELATION TO THE
ACCURACY, RELIABILITY OR CONTENTS OF THIS MANUAL.
TO THE MAXIMUM EXTENT PERMITTED BY APPLICABLE LAW, IN NO
CASE SHALL HUAWEI TECHNOLOGIES CO., LTD BE LIABLE FOR ANY
SPECIAL, INCIDENTAL, INDIRECT, OR CONSEQUENTIAL DAMAGES,
OR LOST PROFITS, BUSINESS, REVENUE, DATA, GOODWILL OR
ANTICIPATED SAVINGS.

i
Content
1 Get
1 Get
1 Get
1 Get1 Getting
ting
ting
tingting to Kno
to Kno
to Kno
to Kno to Know Y
w Y
w Y
w Yw Your P
our P
our P
our Pour Phone
hone
hone
honehone
....................................................
....................................................
....................................................
.................................................... ....................................................
1
1
1
11
Your Phone .......................................................................... 1
Keys and Functions ............................................................... 2
Screen Icons ......................................................................... 5
2 Ge
2 Ge
2 Ge
2 Ge2 Gettin
ttin
ttin
ttintting S
g S
g S
g Sg Start
tart
tart
tarttarted
ed
ed
ed ed ........................................................................
........................................................................
........................................................................
........................................................................ ........................................................................
6
6
6
66
Installing the SIM Cards and the Battery ................................ 6
Removing the Battery and the SIM Cards .............................. 6
Installing the microSD Card ................................................... 7
Charging the Battery ............................................................ 7
Navigating the Main Menu ................................................... 7
Phone Lock .......................................................................... 8
PIN and PUK ........................................................................ 8
Locking and Unlocking the Keypad ....................................... 9
My Files ............................................................................... 9
3 V
3 V
3 V
3 V3 Voic
oic
oic
oicoice Ser
e Ser
e Ser
e Sere Services
vices
vices
vicesvices
..........................................................................
..........................................................................
..........................................................................
.......................................................................... ..........................................................................
9
9
9
99
Making a Call ....................................................................... 9
Answering a Call ................................................................ 10
SOS.................................................................................... 11
Name 1/2 ........................................................................... 11
4 T
4 T
4 T
4 T4 Text I
ext I
ext I
ext Iext Input
nput
nput
nputnput
..............................................................................
..............................................................................
..............................................................................
.............................................................................. ..............................................................................
12
12
12
1212
Changing the Text Input Mode ........................................... 12
Entering a Word ................................................................. 12
Entering a Digit .................................................................. 13
Entering a Symbol .............................................................. 13
5 Mes
5 Mes
5 Mes
5 Mes5 Message
sage
sage
sagesages...............................................................................
s...............................................................................
s...............................................................................
s............................................................................... s...............................................................................
13
13
13
1313
Writing and Sending a Text Message .................................. 13

ii
Writing and Sending a Multimedia Message ....................... 14
6 Con
6 Con
6 Con
6 Con6 Contac
tac
tac
tactacts
ts
ts
ts ts
................................................................................
................................................................................
................................................................................
................................................................................ ................................................................................ 15
15
15
1515
Creating a Contact ............................................................. 15
Searching for a Contact ...................................................... 15
7 Mul
7 Mul
7 Mul
7 Mul7 Multim
tim
tim
timtimedia
edia
edia
ediaedia
............................................................................
............................................................................
............................................................................
............................................................................ ............................................................................ 16
16
16
1616
FM Radio ........................................................................... 16
Camera .............................................................................. 16
Image Album ..................................................................... 17
Audio Player ....................................................................... 17
Video Recorder .................................................................. 18
Video Player ....................................................................... 18
Sound Recorder.................................................................. 18
8 C
8 C
8 C
8 C8 Care
are
are
are are As
As
As
AsAssis
sis
sis
sissistant
tant
tant
tanttant
........................................................................
........................................................................
........................................................................
........................................................................ ........................................................................ 1
1
1
119
9
9
99
Relative Call........................................................................ 19
Magnifier ........................................................................... 19
9 Blu
9 Blu
9 Blu
9 Blu9 Blueto
eto
eto
etoetooth (
oth (
oth (
oth (oth (Opt
Opt
Opt
OptOption
ion
ion
ionional)
al)
al)
al) al)
...............................................................
...............................................................
...............................................................
............................................................... ............................................................... 20
20
20
2020
Connecting a Bluetooth Headset to Your Phone .................. 20
Transferring Data ................................................................ 20
10 W
10 W
10 W
10 W10 WAP
AP
AP
APAP
....................................................................................
....................................................................................
....................................................................................
.................................................................................... .................................................................................... 2
2
2
221
1
1
11
Network Settings................................................................ 21
Connecting to a Network ................................................... 22
11 W
11 W
11 W
11 W11 Warnin
arnin
arnin
arninarnings an
gs an
gs an
gs angs and Pr
d Pr
d Pr
d Prd Preca
eca
eca
ecaecaution
ution
ution
utionutions
s
s
s s
.....................................................
.....................................................
.....................................................
..................................................... .....................................................
22
22
22
2222

1
1 Getting to Know Your Phone
Your Phone
The following figure shows the appearance of your phone.
1
2
3
4
5
6
11
7
8
9
10
13
14
15
16
12
17
1 Torch 10 Microphone
2 Earpiece 11 Number keys
3 Charger jack 12 End/Power key
4 Screen 13 Name 2 key
5 Volume/Scroll key 14 Confirm key
6 Navigation keys 15 Keypad lock key
7 Name 1 key 16 Torch key

2
8 SOS key 17 Headset
9 Call/Answer key
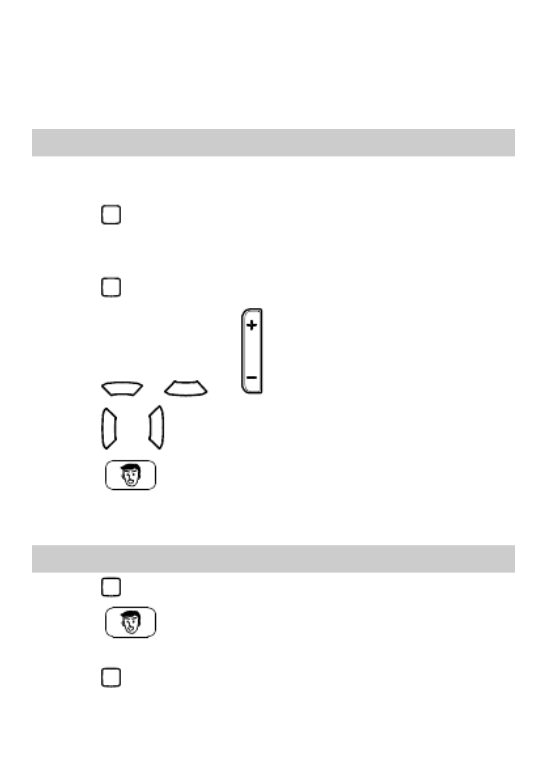
Keys and Functions
Press…
To…
Make a call from the Subscriber Identity Module
(SIM) card.
Answer a call.
Access All calls
All calls
All calls
All callsAll calls in standby mode.
Power the phone on or off (press and hold this key
for about 3 seconds).
End or reject a call.
Return to standby mode.
Select the option displayed in the lower left corner of
the screen.
Access Name 1
Name 1
Name 1
Name 1Name 1 in standby mode.
Select the option displayed in the lower right corner
of the screen.
Access Name 2
Name 2
Name 2
Name 2Name 2 in standby mode.
Access the main menu in standby mode.
Confirm a selection.

4
Press…
To…
through
Enter numbers, letters, and symbols.
Call voicemail in standby mode (press and hold this
key for about 3 seconds).
Speed-dial phone numbers in standby mode (press
and hold one of the number keys from
through for about 3 seconds).
Select an option labeled with the corresponding
number.
Enter *
*
*
* * (press this key once), +
+
+
+ + (press this key twice),
P
P
P
P P (press this key three times), and W
W
W
WW (press this key
four times) in standby mode.
Display the symbol list in editing mode.
Access FM Radio
FM Radio
FM Radio
FM Radio FM Radio in standby mode (press and hold
this key for about 3 seconds).
Enter #
#
#
##.
Switch between text input methods in editing mode.

5
Screen Icons
Icon Indicates…
Signal strength.
General Packet Radio Service (GPRS) signal.
Ring only
Ring only
Ring only
Ring onlyRing only enabled.
Vib. only
Vib. only
Vib. only
Vib. onlyVib. only enabled.
Vib. and ring
Vib. and ring
Vib. and ring
Vib. and ringVib. and ring enabled.
Vib. then ring
Vib. then ring
Vib. then ring
Vib. then ringVib. then ring enabled.
Silence
Silence
Silence
SilenceSilence profile activated.
Headset
Headset
Headset
HeadsetHeadset profile activated.
Missed call(s).
Call forwarding enabled.
New text message(s).
New multimedia message(s).
Alarm(s) enabled.
Keypad locked.
Battery level.
Bluetooth activated.

6
2 Getting Started
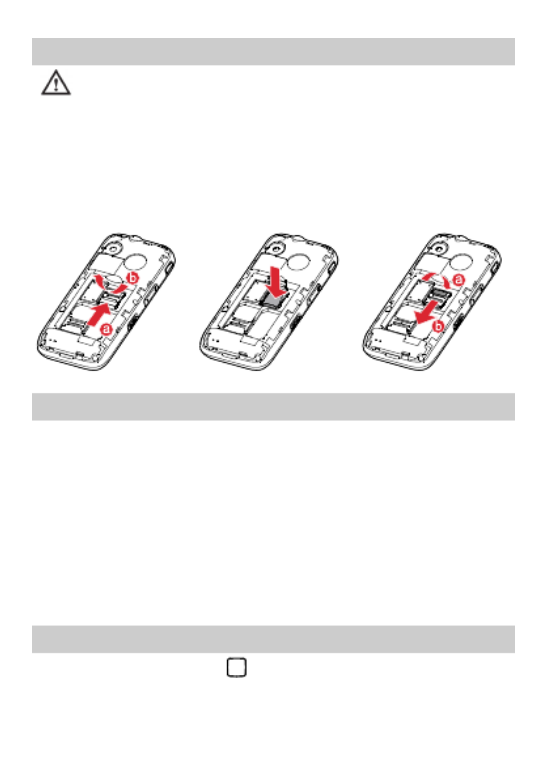
Installing the SIM Cards and the Battery
When installing the subscriber identity module (SIM) card, ensure
that the gold contact area faces down, and that the beveled edge of
the SIM card aligns with that of the SIM card slot.
Removing the Battery and the SIM Cards
Before removing the battery and the SIM cards, ensure that your
phone is powered off.
7
Installing the microSD Card
Before installing or removing a microSD card, power the
phone off. When the phone is powered back on, it indicates
whether the microSD card has been installed correctly.
You can expand your phone's memory capacity by installing a
microSD card. When installing a microSD card, ensure that the gold
contact area faces down.
Charging the Battery
1. Connect the small end of the USB cable to the phone's charger
jack and the large end to the charger.
2. Connect the charger to a power socket.
3. Wait until the battery is completely charged.
During the charging process, the charging icon is displayed in
animation. When the charging icon becomes static, the battery is
fully charged.
4. Unplug the charger from the power socket and the USB cable
from the phone.
Navigating the Main Menu
1. In standby mode, press to access the main menu.

8
2. Press to scroll to the desired application and press
(OK
OK
OK
OKOK) or to access the application.
3. Press or to scroll to the desired option, and press
(OK
OK
OK
OKOK) or to access the option.
4. Press (Back
Back
Back
BackBack) to return to the previous menu, or press
to return to standby mode.
Phone Lock
The phone lock protects your phone from unauthorized use. By
default, the phone lock is disabled. Once the phone lock is enabled,
you must enter the phone unlock code each time you power on the
phone. The preset phone unlock code is 1234
1234
1234
12341234. You can change this
code into any numeric string between four and eight digits.
If you forget the phone unlock code, contact your service provider.
PIN and PUK
The personal identification number (PIN) protects your SIM card from
unauthorized use. The PIN unblocking key (PUK) unlocks a blocked
PIN. Both the PIN and the PUK are provided with the SIM card. For
details, contact your service provider.
To enable the PIN lock:
1. Press and select Sett
Sett
Sett
SettSettings
ings
ings
ingsings > Security setti
Security setti
Security setti
Security settiSecurity settings
ngs
ngs
ngs ngs > SIM securi
SIM securi
SIM securi
SIM securiSIM security
ty
ty
ty ty >
PIN lo
PIN lo
PIN lo
PIN loPIN lock
ck
ck
ckck.
2. Enter the PIN and press (OK
OK
OK
OKOK) or .
If you enter the incorrect PIN a specified number of times, the phone
prompts you to enter the PUK.

9
If you enter the incorrect PUK a specified number of times, the SIM
card will become permanently invalid. If this occurs, contact your
service provider for a new SIM card.
Locking and Unlocking the Keypad
To lock the keypad, slide upwards or downwards in standby
mode. To unlock the keypad, slide in the opposite direction.
If the Auto
Auto
Auto
AutoAuto keypad lock
keypad lock
keypad lock
keypad lockkeypad lock function is enabled and the phone is in
standby mode for a preset period, the phone automatically locks the
keypad.
When the keypad is locked, you can press to answer
a call or make an emergency call.
My Files
My File
My File
My File
My FileMy Files
s
s
ss manages multimedia files stored on the phone and its
microSD card. Using My Files
My Files
My Files
My FilesMy Files, you can view the size and create date
of images or audio clips, and open multimedia files.
3 Voice Services
Making a Call
1. In standby mode, enter the phone number.

11
SOS
You can access SOS in any mode by pushing upwards. After
the alarm goes off for 13 senconds, the phone will automatically
send a message to the first number contained in your relative
number list. The default message will display the following: Please
Please
Please
Please Please
help me, SOS automatically sent.
help me, SOS automatically sent.
help me, SOS automatically sent.
help me, SOS automatically sent. help me, SOS automatically sent. After the message is sent, the
phone automatically calls the relative’s number. If the first number
cannot be reached, the phone will dial the next number in your
relative number list. The phone will continue to dial numbers in your
relative number list sequentially until a call is connected.
Push the SOS key upwards and the phone generates an
alarm. The alarm will last for 13 seconds, but can be
stopped at any time manually.
Name 1/2
In standby mode, press the Name 1 or Name 2 key and press to
select Relative Call N
Relative Call N
Relative Call N
Relative Call NRelative Call Number
umber
umber
umberumber > Add
Add
Add
AddAdd > Enter number
Enter number
Enter number
Enter numberEnter number / Add from
Add from
Add from
Add from Add from
contact
contact
contact
contactcontact.
After selecting the desired number, press to save the
settings.
To set Relative Call Number
Relative Call Number
Relative Call Number
Relative Call NumberRelative Call Number, press
and select Care
Care
Care
Care Care
Assistant
Assistant
Assistant
AssistantAssistant > Relative Call
Relative Call
Relative Call
Relative CallRelative Call > Relative Call Number
Relative Call Number
Relative Call Number
Relative Call NumberRelative Call Number > Add
Add
Add
AddAdd > Enter
Enter
Enter
Enter Enter
number
number
number
numbernumber / Add from contact
Add from contact
Add from contact
Add from contact Add from contact.

12
4 Text Input
Changing the Text Input Mode
The current text input mode indicator is displayed in the upper left
corner of the screen. Press to switch between text input
modes.
Indicator Text Input Mode
ABC
ABC
ABC
ABCABC , abc
abc
abc
abc abc and Ab
Ab
Ab
AbAbc
c
c
cc Multi-tap input modes
s ABC
s ABC
s ABC
s ABC s ABC , s abc
s abc
s abc
s abc s abc and s Abc
s Abc
s Abc
s Abcs Abc Predictive input modes
123
123
123
123 123 Number input mode
Press (Clear
Clear
Clear
ClearClear) once to delete the last character
entered, or press and hold (Clear
Clear
Clear
ClearClear) for about 3
seconds to delete all the characters.
In input modes other than the number and predictive input
modes, press once to enter a space and twice
to enter 0
0
0
00.
Entering a Word
To enter a word in multi-tap input mode, press the keys labeled
with the letters that spell the word repeatedly until the desired
letters are entered.
To enter a word in predictive input mode:

13
1. Press each key once according to the spelling sequence of the
desired word.
The phone displays words associated with the sequence entered.
2. Press the navigation keys to scroll to the desired word.
3. Press to enter the word.
Entering a Digit
In number input mode, press the number key labeled with the
desired digit.
Entering a Symbol
1. Press to display the symbol list.
2. Press to scroll to the desired symbol.
3. Press to enter the symbol.
5 Messages
Writing and Sending a Text Message
1. Press and select Messages
Messages
Messages
Messages Messages > Write message
Write message
Write message
Write message Write message >SMS
SMS
SMS
SMSSMS.
2. Write the message.
3. Press (Optio
Optio
Optio
OptioOptions
ns
ns
nsns), select Send to
Send to
Send to
Send toSend to, and enter the
recipient's phone number or add a recipient from Cont
Cont
Cont
ContContacts
acts
acts
actsacts.
To add multiple recipients, repeat this step.
4. Scroll to the desired recipient and press (Option
Option
Option
OptionOptions
s
s
ss) for
the following options:

14
Send
Send
Send
SendSend: sends the message to the recipient.
Edit recipi
Edit recipi
Edit recipi
Edit recipiEdit recipient
ent
ent
entent: allows you to change the recipient.
Remove recipient
Remove recipient
Remove recipient
Remove recipientRemove recipient:
removes the recipient of the message.
Remove all recipie
Remove all recipie
Remove all recipie
Remove all recipieRemove all recipients
nts
nts
ntsnts: removes all recipients of the message.
Save to Drafts
Save to Drafts
Save to Drafts
Save to DraftsSave to Drafts: saves the message to Drafts
Drafts
Drafts
DraftsDrafts.
Writing and Sending a Multimedia Message
1. Press and select Messages
Messages
Messages
Messages Messages > Write message
Write message
Write message
Write message Write message > MMS
MMS
MMS
MMSMMS.
2. Edit the content of the message.
You can add images, audio clips, and attachments to the
message. You can also preview the message, add slides to the
message, and set the playing interval between two slides.
3. Press (Optio
Optio
Optio
OptioOptions
ns
ns
nsns), select Send to
Send to
Send to
Send toSend to, and enter the
recipient's phone number or add a recipient from Con
Con
Con
ConContacts
tacts
tacts
tactstacts.
To add multiple recipients, repeat this step.
4. Scroll to the desired recipient and press (Option
Option
Option
OptionOptions
s
s
ss) for
the following options:
Send
Send
Send
SendSend: sends the message to the recipient.
Send options
Send options
Send options
Send optionsSend options: allows you to set the sending options.
Edit recipi
Edit recipi
Edit recipi
Edit recipiEdit recipient
ent
ent
entent: allows you to change the recipient.
Remove recipient
Remove recipient
Remove recipient
Remove recipientRemove recipient:
removes the recipient of the message.
Remove all recipie
Remove all recipie
Remove all recipie
Remove all recipieRemove all recipients
nts
nts
ntsnts: removes all recipients of the message.
Change to CC:
Change to CC:
Change to CC:
Change to CC: Change to CC: copies the message to the recipient.
Change to Bcc:
Change to Bcc:
Change to Bcc:
Change to Bcc:Change to Bcc: blind copies the message to the recipient.
Save to Drafts
Save to Drafts
Save to Drafts
Save to DraftsSave to Drafts: saves the message to Drafts
Drafts
Drafts
DraftsDrafts.

15
Contact your service provider to determine the availability
of the Multimedia Messaging Service (MMS) and how to
subscribe to this service.
Open multimedia messages with caution. Objects in
multimedia messages may contain viruses and malicious
software that can damage your phone.
To configure the network settings provided by your service
provider, press and select Network Services
Network Services
Network Services
Network ServicesNetwork Services > Data
Data
Data
Data Data
account
account
account
account account > Add acco
Add acco
Add acco
Add accoAdd account
unt
unt
untunt, and then select Messages
Messages
Messages
Messages Messages >
Message sett
Message sett
Message sett
Message settMessage settings
ings
ings
ings ings > >
MMS
MMS
MMS
MMS MMS Data account
Data account
Data account
Data account Data account > OK
OK
OK
OKOK.
6 Contacts
Creating a Contact
1. Press and select Contacts
Contacts
Contacts
ContactsContacts > Add new
Add new
Add new
Add newAdd new conta
conta
conta
conta contact
ct
ct
ctct.
2. Select To
To
To
ToTo S
S
S
S SI
I
I
IIM
M
M
MM or To
To
To
ToTo p
p
p
p ph
h
h
hho
o
o
oon
n
n
nne
e
e
ee
to save the contact.
3. Edit the contact information.
4. Press or (Ye
Ye
Ye
YeYes
s
s
ss) to save the contact.
Searching for a Contact
1. Press and select Contacts
Contacts
Contacts
ContactsContacts.
2. Enter the first letter of the contact name in the search bar.
Contacts whose names start with this letter will be displayed.
16
7 Multimedia
FM Radio
Your phone comes with a built-in antenna, and you can listen to the
radio without a headset.
1. Press and select Multimedia
Multimedia
Multimedia
MultimediaMultimedia > FM
FM
FM
FMFM Radio
Radio
Radio
Radio Radio to access the
frequency modulation (FM) radio.
2. On the FM Radio screen:
Press to turn the FM radio on or off.
Press , or to adjust the volume.
Press or to switch to the previous or next channel.
Press (Optio
Optio
Optio
OptioOptions
ns
ns
nsns) for options such as Channel list
Channel list
Channel list
Channel listChannel list, Manual
Manual
Manual
Manual Manual
input
input
input
inputinput, Au
Au
Au
AuAuto
to
to
toto sear
sear
sear
sear search
ch
ch
chch, ,
Settings
Settings
Settings
SettingsSettings Sound
Sound
Sound
SoundSound Record
Record
Record
RecordRecorder
er
er
erer, Append
Append
Append
AppendAppend, and File
File
File
FileFile
list
list
list
listlist.
Camera
1. Press and select Multimedia
Multimedia
Multimedia
MultimediaMultimedia > Camera
Camera
Camera
CameraCamera to launch the camera.
2. Press (Optio
Optio
Optio
OptioOptions
ns
ns
nsns) to view images or configure relevant
settings.
3. Press to take a picture.

17
4. Press (Option
Option
Option
OptionOptions
s
s
ss) to send or delete the picture, or press
(Back
Back
Back
BackBack) to save the picture.
Image Album
1. Press and select Multime
Multime
Multime
MultimeMultimedia
dia
dia
dia dia > Image Al
Image Al
Image Al
Image Al Image Album
bum
bum
bumbum to launch the
image album.
2. Press to view images.
3. Press (Option
Option
Option
OptionOptions
s
s
ss) for options such as View
View
View
ViewView, Image
Image
Image
Image Image
information
information
information
informationinformation, Send
Send
Send
SendSend, Use as
Use as
Use as
Use asUse as, ,
Rename
Rename
Rename
RenameRename Delete
Delete
Delete
DeleteDelete, Sort by
Sort by
Sort by
Sort bySort by, Delete all
Delete all
Delete all
Delete allDelete all,
and Stor
Stor
Stor
StorStorage
age
age
ageage.
Audio Player
1. Press and select Multime
Multime
Multime
MultimeMultimedia
dia
dia
diadia > Audio
Audio
Audio
AudioAudio Playe
Playe
Playe
Playe Player
r
r
rr.
2. Select an audio clip.
3. Press to play the clip.
When the clip is being played:
Press to pause or continue.
Press or to adjust the volume.
Press and hold or to rewind or fast-forward the clip.
Press or to go back to the previous clip or advance to the
next one.
4. If Background play
Background play
Background play
Background playBackground play is enabled, press (Back
Back
Back
BackBack) to exit the
audio player screen and play the audio clip in the background.
Product specificaties
| Merk: | Huawei |
| Categorie: | Gsm |
| Model: | G5000 |
Heb je hulp nodig?
Als je hulp nodig hebt met Huawei G5000 stel dan hieronder een vraag en andere gebruikers zullen je antwoorden
Handleiding Gsm Huawei

28 Juni 2021
24 Juni 2021
24 Juni 2021
24 Juni 2021
23 Juni 2021
23 Juni 2021
19 Juni 2021
18 Juni 2021
18 Juni 2021
17 Juni 2021
Handleiding Gsm
Nieuwste handleidingen voor Gsm

18 September 2023
18 September 2023

23 Juni 2021
17 Juni 2021

16 Juni 2021
15 Juni 2021
14 Juni 2021
10 Juni 2021
9 Juni 2021