HP Color LaserJet Managed E85055dn Handleiding
Lees hieronder de 📖 handleiding in het Nederlandse voor HP Color LaserJet Managed E85055dn (184 pagina's) in de categorie Printer. Deze handleiding was nuttig voor 40 personen en werd door 2 gebruikers gemiddeld met 4.5 sterren beoordeeld
Pagina 1/184

www.hp.com/videos/LaserJet
www.hp.com/support/colorljE85055
HP Color LaserJet Managed E85055
User Guide


HP Color LaserJet Managed E85055
User Guide

Copyright and License
Copyright and License
Copyright and License
Copyright and LicenseCopyright and License
© Copyright 2019 HP Development Company,
L.P.
Reproduction, adaptation, or translation without
prior written permission is prohibited, except as
allowed under the copyright laws.
The information contained herein is subject to
change without notice.
The only warranties for HP products and
services are set forth in the express warranty
statements accompanying such products and
services. Nothing herein should be construed as
constituting an additional warranty. HP shall not
be liable for technical or editorial errors or
omissions contained herein.
Edition 1, 10/2019
Trademark Credits
Trademark Credits
Trademark Credits
Trademark CreditsTrademark Credits
Adobe®, Adobe Photoshop®, Acrobat®, and
PostScript® are trademarks of Adobe Systems
Incorporated.
Apple and the Apple logo are trademarks of
Apple Inc., registered in the U.S. and other
countries.
macOS is a trademark of Apple Inc., registered in
the U.S. and other countries.
AirPrint is a trademark of Apple Inc., registered
in the U.S. and other countries.
Google™ is a trademark of Google Inc.
Microsoft®, Windows®, Windows® XP, and
Windows Vista® are U.S. registered trademarks
of Microsoft Corporation.
UNIX® is a registered trademark of The Open
Group.

T
T
T
TTable o
able o
able o
able oable of c
f c
f c
f cf conten
onten
onten
ontenontents
ts
ts
tsts
1 Printer overview ........................................................................................................................................................................................
1 Printer overview ........................................................................................................................................................................................
1 Printer overview ........................................................................................................................................................................................
1 Printer overview ........................................................................................................................................................................................1 Printer overview ........................................................................................................................................................................................ 1
1
1
1 1
Warning icons ............................................................................................................................................................................ 1
Potential shock hazard ............................................................................................................................................................ 2
Printer views .............................................................................................................................................................................. 4
Printer front view ................................................................................................................................................. 4
Printer back view .................................................................................................................................................. 5
Interface ports ...................................................................................................................................................... 5
Control-panel view ............................................................................................................................................... 7
How to use the touchscreen control panel ................................................................................. 8
Printer ............................................................................................................................................................. 10specications
Technical .................................................................................................................................... 10specications
Supported operating systems ......................................................................................................................... 11
Printer dimensions ............................................................................................................................................ 13
Power consumption, electrical and acoustic emissions ................................................... 15specications,
Operating-environment range ........................................................................................................................ 15
Printer hardware setup and software installation ............................................................................................................ 15
2 Paper trays
2 Paper trays
2 Paper trays
2 Paper trays2 Paper trays ..............................................................................................................................................................................................
..............................................................................................................................................................................................
..............................................................................................................................................................................................
.............................................................................................................................................................................................. .............................................................................................................................................................................................. 17
17
17
17 17
Introduction ............................................................................................................................................................................. 17
Load paper to Tray 1 (multipurpose tray) .......................................................................................................................... 19
Load Tray 1 (multipurpose tray) ..................................................................................................................... 19
Tray 1 paper orientation ................................................................................................................................... 20
Use alternative letterhead mode .................................................................................................................... 26
Enable Alternative Letterhead Mode by using the printer control-panel menus ............... 26
Load paper to Tray 2 ............................................................................................................................................................. 27
Load Tray 2 ......................................................................................................................................................... 27
Tray 2 paper orientation ................................................................................................................................... 29
Use alternative letterhead mode .................................................................................................................... 33
Enable Alternative Letterhead Mode by using the printer control-panel menus ............... 33
Load paper to the 550-sheet paper tray ........................................................................................................................... 34
Load paper to the 550-sheet paper tray ....................................................................................................... 34
550-sheet paper tray paper orientation ....................................................................................................... 36
ENWW iii

Use alternative letterhead mode .................................................................................................................... 40
Enable Alternative Letterhead Mode by using the printer control-panel menus ............... 40
Load paper to the 2 x 550-sheet paper trays ................................................................................................................... 41
Load paper to the 2 x 550-sheet paper trays .............................................................................................. 41
2 x 550-sheet paper tray paper orientation ................................................................................................. 43
Use alternative letterhead mode .................................................................................................................... 47
Enable Alternative Letterhead Mode by using the printer control-panel menus ............... 47
Load paper to the 2,700-sheet high-capacity input paper trays ................................................................................... 48
Load paper to the 2,700-sheet high-capacity input paper trays .............................................................. 48
2,700-sheet HCI paper tray paper orientation ............................................................................................. 49
Use alternative letterhead mode .................................................................................................................... 53
Enable Alternative Letterhead Mode by using the printer control-panel menus ............... 53
Load and print envelopes ..................................................................................................................................................... 54
Print envelopes .................................................................................................................................................. 54
Envelope orientation ......................................................................................................................................... 54
Load and print labels ............................................................................................................................................................. 56
Manually feed labels ......................................................................................................................................... 56
Label orientation ............................................................................................................................................... 56
3 Supplies, accessories, and parts ..........................................................................................................................................................
3 Supplies, accessories, and parts ..........................................................................................................................................................
3 Supplies, accessories, and parts ..........................................................................................................................................................
3 Supplies, accessories, and parts ..........................................................................................................................................................3 Supplies, accessories, and parts .......................................................................................................................................................... 59
59
59
59 59
Order supplies, accessories, and parts ............................................................................................................................... 60
Ordering .............................................................................................................................................................. 60
Replace the toner cartridges ................................................................................................................................................ 61
Toner-cartridge information ............................................................................................................................ 61
Remove and replace the cartridges ............................................................................................................... 62
Replace the toner-collection unit ........................................................................................................................................ 64
Toner-collection unit information ................................................................................................................... 64
Remove and replace the toner-collection unit ............................................................................................. 64
4 Print ..........................................................................................................................................................................................................
4 Print ..........................................................................................................................................................................................................
4 Print ..........................................................................................................................................................................................................
4 Print ..........................................................................................................................................................................................................4 Print .......................................................................................................................................................................................................... 67
67
67
67 67
Print tasks (Windows) ............................................................................................................................................................ 68
How to print (Windows) .................................................................................................................................... 68
Automatically print on both sides (Windows) ............................................................................................... 68
Manually print on both sides (Windows) ........................................................................................................ 69
Print multiple pages per sheet (Windows) .................................................................................................... 69
Select the paper type (Windows) .................................................................................................................... 70
Additional print tasks ........................................................................................................................................ 71
Print tasks (macOS) ............................................................................................................................................................... 72
How to print (macOS) ........................................................................................................................................ 72
Automatically print on both sides (macOS) ................................................................................................... 72
Manually print on both sides (macOS) ........................................................................................................... 73
iv ENWW

Print multiple pages per sheet (macOS) ........................................................................................................ 73
Select the paper type (macOS) ........................................................................................................................ 73
Additional print tasks ........................................................................................................................................ 74
Store print jobs on the printer to print later or print privately ........................................................................................ 75
Introduction ........................................................................................................................................................ 75
Create a stored job (Windows) ........................................................................................................................ 75
Create a stored job (macOS) ............................................................................................................................ 76
Print a stored job ............................................................................................................................................... 77
Delete a stored job ............................................................................................................................................ 78
Delete a job that is stored on the printer .................................................................................. 78
Change the job storage limit ....................................................................................................... 78
Information sent to printer for Job Accounting purposes ........................................................................... 78
Mobile printing ........................................................................................................................................................................ 79
Introduction ........................................................................................................................................................ 79
Wi-Fi, Wi-Fi Direct Print, NFC, and BLE printing ............................................................................................ 80
Enable wireless printing ............................................................................................................... 80
Change the Wi-Fi Direct name .................................................................................................... 80
HP ePrint via email ............................................................................................................................................ 81
AirPrint ................................................................................................................................................................. 81
Android embedded printing ............................................................................................................................. 82
Print from a USB ash drive ................................................................................................................................................. 83
Enable the USB port for printing ..................................................................................................................... 84
Method one: Enable the USB port from the printer control panel ........................................ 84
Method two: Enable the USB port from the HP Embedded Web Server (network-
connected printers only) .............................................................................................................. 84
Print USB documents ........................................................................................................................................ 84
Print using high-speed USB 2.0 port (wired) ..................................................................................................................... 86
Method one: Enable the high-speed USB 2.0 port from the printer control panel menus ................... 86
Method two: Enable the high-speed USB 2.0 port from the HP Embedded Web Server
(network-connected printers only) ................................................................................................................. 86
5 Manage the printer .................................................................................................................................................................................
5 Manage the printer .................................................................................................................................................................................
5 Manage the printer .................................................................................................................................................................................
5 Manage the printer .................................................................................................................................................................................5 Manage the printer ................................................................................................................................................................................. 87
87
87
87 87
Advanced with the HP Embedded Web Server (EWS) ............................................................................. 88conguration
Introduction ........................................................................................................................................................ 88
How to access the HP Embedded Web Server (EWS) .................................................................................. 88
HP Embedded Web Server features ............................................................................................................... 90
Information tab ............................................................................................................................. 90
General tab .................................................................................................................................... 90
Print tab .......................................................................................................................................... 91
Supplies tab ................................................................................................................................... 92
Troubleshooting tab ..................................................................................................................... 92
ENWW v

Security tab .................................................................................................................................... 92
HP Web Services tab .................................................................................................................... 93
Networking tab .............................................................................................................................. 93
Other Links list ............................................................................................................................... 95
Congure IP network settings .............................................................................................................................................. 96
Printer sharing disclaimer ................................................................................................................................ 96
View or change network settings ................................................................................................................... 96
Rename the printer on a network .................................................................................................................. 96
Manually IPv4 TCP/IP parameters from the control panel ........................................................ 97congure
Manually IPv6 TCP/IP parameters from the control panel ........................................................ 97congure
Link speed and duplex settings ...................................................................................................................... 98
Printer security features ..................................................................................................................................................... 100
Introduction ...................................................................................................................................................... 100
Security statements ....................................................................................................................................... 100
Assign an administrator password ............................................................................................................... 101
Use the HP Embedded Web Server (EWS) to set the password ......................................... 101
Provide user access credentials at the printer control panel .............................................. 101
IP Security ......................................................................................................................................................... 102
Encryption support: HP High Performance Secure Hard Disks ............................................................... 102
Lock the formatter .......................................................................................................................................... 102
Energy-conservation settings ........................................................................................................................................... 103
Set the sleep timer and the printer to use 1 watt or less of power ...................................... 103congure
Set the sleep schedule ................................................................................................................................... 103
Set the idle settings ........................................................................................................................................ 104
HP Web Jetadmin ................................................................................................................................................................. 104
6 Solve pr
6 Solve pr
6 Solve pr
6 Solve pr6 Solve problems .....................................................................................................................................................................................
oblems .....................................................................................................................................................................................
oblems .....................................................................................................................................................................................
oblems .....................................................................................................................................................................................oblems ..................................................................................................................................................................................... 105
105
105
105 105
Customer support ................................................................................................................................................................ 105
Control panel help system ................................................................................................................................................. 106
Reset factory settings ......................................................................................................................................................... 107
Introduction ...................................................................................................................................................... 107
Method one: Reset factory settings from the printer control panel ....................................................... 107
Method two: Reset factory settings from the HP Embedded Web Server (network-connected
printers only) .................................................................................................................................................... 107
A “Cartridge is low” or “Cartridge is very low” message displays on the printer control panel .............................. 107
Printer does not pick up paper or misfeeds .................................................................................................................... 109
Introduction ...................................................................................................................................................... 109
The printer does not pick up paper .............................................................................................................. 109
The printer picks up multiple sheets of paper ............................................................................................ 112
Clear paper jams .................................................................................................................................................................. 116
Introduction ...................................................................................................................................................... 116
vi ENWW

Paper jam locations ........................................................................................................................................ 116
Auto-navigation for clearing paper jams ..................................................................................................... 117
Experiencing frequent or recurring paper jams? ....................................................................................... 117
Clear paper jams in Tray 1 (13.A1) ............................................................................................................... 117
Clear paper jams in Tray 2 (13.A2) ............................................................................................................... 122
Clear paper jams in the fuser (13.B9, 13.B2, 13.FF) ................................................................................. 128
Clear paper jams in the output bin (13.E1) ................................................................................................. 133
Clear paper jams in the duplex area (13.D3) .............................................................................................. 135
Clear paper jams in the 550-sheet trays (13.A3, 13.A4) .......................................................................... 140
Clear paper jams in the 2 x 550 paper trays (13.A4, 13.A5) .................................................................... 147
Clear paper jams in the 2,700-sheet high-capacity input paper trays (13.A3, 13.A4, 13.A5,
13.A7) ................................................................................................................................................................ 154
Resolving color print quality problems ............................................................................................................................ 162
Introduction ...................................................................................................................................................... 162
Troubleshoot print quality ............................................................................................................................. 163
Update the printer ..................................................................................................... 163rmware
Print from a software program ................................................................................ 163dierent
Check the paper-type setting for the print job ...................................................................... 164
Check the paper type setting on the printer ..................................................... 164
Check the paper type setting (Windows) ........................................................... 164
Check the paper type setting (macOS) ............................................................... 164
Check toner-cartridge status .................................................................................................... 165
Step one: Print the Supplies Status Page .......................................................... 165
Step two: Check supplies status .......................................................................... 165
Print a cleaning page ................................................................................................................. 165
Visually inspect the toner cartridge or cartridges ................................................................. 166
Check paper and the printing environment ............................................................................ 167
Step one: Use paper that meets HP .......................................... 167specications
Step two: Check the environment ....................................................................... 167
Step three: Set the individual tray alignment .................................................... 167
Try a print driver ......................................................................................................... 168dierent
Solve wired network problems .......................................................................................................................................... 169
Introduction ...................................................................................................................................................... 169
Poor physical connection ............................................................................................................................... 169
The computer is unable to communicate with the printer ....................................................................... 169
The printer is using incorrect link and duplex settings for the network ................................................ 170
New software programs might be causing compatibility problems ...................................................... 170
The computer or workstation might be set up incorrectly ...................................................................... 170
The printer is disabled, or other network settings are incorrect ............................................................. 170
Index ...........................................................................................................................................................................................................
Index ...........................................................................................................................................................................................................
Index ...........................................................................................................................................................................................................
Index ...........................................................................................................................................................................................................Index ........................................................................................................................................................................................................... 171
171
171
171 171
ENWW vii

viii ENWW

1
1
1
11 Printer o
Printer o
Printer o
Printer oPrinter overview
verview
verview
verviewverview
Review the location of features on the printer, the physical and technical of the printer, and where specications
to locate setup information.
●Warning icons
●Potential shock hazard
●Printer views
●Printer specications
●Printer hardware setup and software installation
For video assistance, see www.hp.com/videos/LaserJet.
The following information is correct at the time of publication. For current information, see www.hp.com/
support/colorljE85055.
For more inf
For more inf
For more inf
For more infFor more information:
ormation:
ormation:
ormation:ormation:
HP's all-inclusive help for the printer includes the following information:
●Install and congure
●Learn and use
●Solve problems
●Download software and updatesrmware
●Join support forums
●Find warranty and regulatory information
W
W
W
WWarning icons
arning icons
arning icons
arning iconsarning icons
Use caution if you see a warning icon on your HP printer, as indicated in the icon denitions.
●Caution: Electric shock
ENWW 1

●Caution: Hot surface
●Caution: Keep body parts away from moving parts
●Caution: Sharp edge in close proximity
●Warning
P
P
P
PPoten
oten
oten
otenotential shock hazard
tial shock hazard
tial shock hazard
tial shock hazardtial shock hazard
Review this important safety information.
2 Chapter 1 Printer overview ENWW

●Read and understand these safety statements to avoid an electrical shock hazard.
●Always follow basic safety precautions when using this product to reduce risk of injury from or electric re
shock.
●Read and understand all instructions in the user guide.
●Observe all warnings and instructions marked on the product.
●Use only a grounded electrical outlet when connecting the product to a power source. If you do not know
whether the outlet is grounded, check with a electrician.qualied
●Do not touch the contacts on any of the sockets on the product. Replace damaged cords immediately.
●Unplug this product from wall outlets before cleaning.
●Do not install or use this product near water or when you are wet.
●Install the product securely on a stable surface.
●Install the product in a protected location where no one can step on or trip over the power cord.
ENWW Potential shock hazard 3

Printer views
Printer views
Printer views
Printer viewsPrinter views
Identify certain parts of the printer and the control panel.
●Printer front view
●Printer back view
●Interface ports
●Control-panel view
Printer fr
Printer fr
Printer fr
Printer frPrinter front view
ont view
ont view
ont viewont view
Locate features on the front of the printer.
1
2
5
6
7
9
8
11
10
4
3
Number
Number
Number
NumberNumber Description
Description
Description
DescriptionDescription
1 Output bin
2 Control panel
3 Hardware integration pocket for connecting accessory and third-party devices
4 Easy-access USB port
Insert a USB drive for printing without a computer or to update the printer ash rmware.
NO
NO
NO
NONOTE:
TE:
TE:
TE:TE: An administrator must enable this port before use.
5 Upper-right door (access to clear jams)
6 Right door (access to the fuser and to clear jams)
7 Tray 1
8 buttonOn/o
9 Model name
4 Chapter 1 Printer overview ENWW

Number
Number
Number
NumberNumber Description
Description
Description
DescriptionDescription
10 Tray 2
11 Front door (access to the toner cartridges, imaging drums, and waste toner collection unit)
Printer back view
Printer back view
Printer back view
Printer back viewPrinter back view
Locate features on the back of the printer.
1
2
4
5
3
6
Number
Number
Number
NumberNumber Description
Description
Description
DescriptionDescription
1 Formatter cover
2 Slot for a cable-type security lock
3 Formatter (contains the interface ports)
4 Left door (access to the toner-collection unit)
NO
NO
NO
NONOTE:
TE:
TE:
TE:TE: The front door also must be open in order to access the toner-collection unit.
5 Power connection
6 Serial number and product number label
Interface ports
Interface ports
Interface ports
Interface portsInterface ports
Locate the interface ports on the printer formatter.
ENWW Printer views 5

2
1
3
Number
Number
Number
NumberNumber Description
Description
Description
DescriptionDescription
1 USB ports for connecting external USB devices (these ports might be covered)
NO
NO
NO
NONOTE:
TE:
TE:
TE:TE: For easy-access USB printing, use the USB port near the control panel.
2 Local area network (LAN) Ethernet 10/100/1000 network port
3 Hi-Speed USB 2.0 printing port
6 Chapter 1 Printer overview ENWW
Con
Con
Con
ConContr
tr
tr
trtrol
ol
ol
olol-panel view
-panel view
-panel view
-panel view-panel view
Use the touchscreen control panel to obtain printer and job status information and to the printer.congure
●How to use the touchscreen control panel
NO
NO
NO
NONOTE:
TE:
TE:
TE:TE: Tilt the control panel for easier viewing.
Return to the Home screen at any time by selecting the Home button at the bottom of the printer control
panel.
NO
NO
NO
NONOTE:
TE:
TE:
TE:TE: For more information about the printer-control-panel features, go to www.hp.com/support/
colorljE85055. Select , and then select .
Manuals
Manuals
Manuals
ManualsManuals General reference
General reference
General reference
General referenceGeneral reference
NO
NO
NO
NONOTE:
TE:
TE:
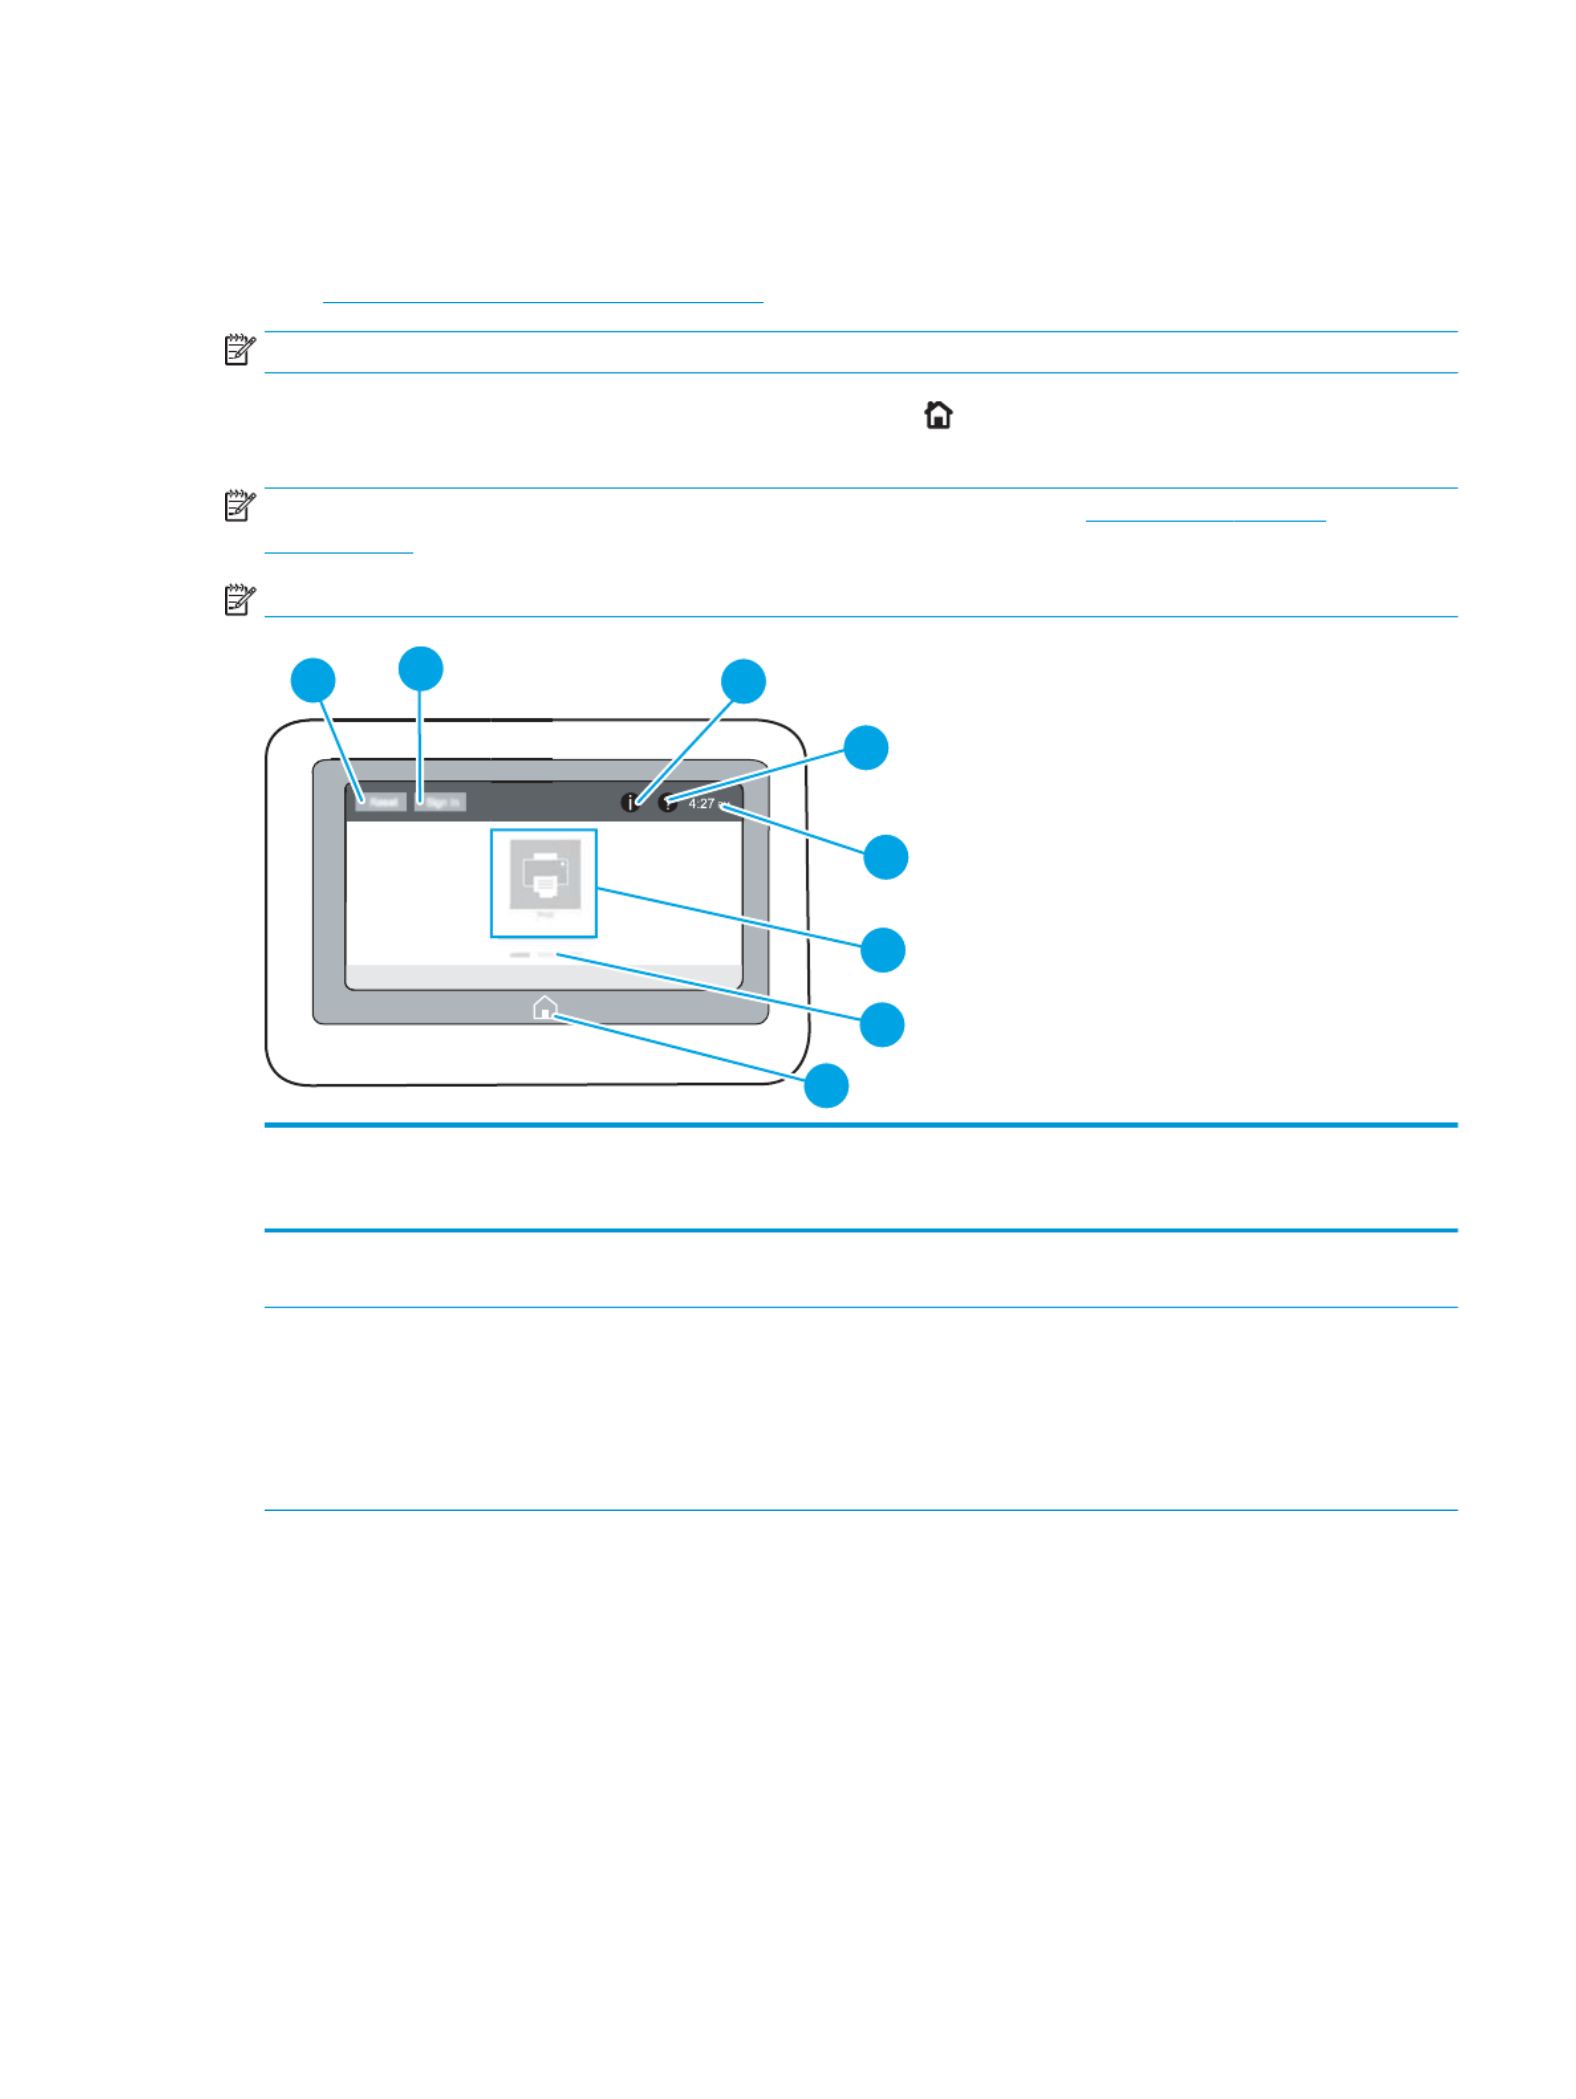
TE:TE: The features that appear on the Home screen can vary, depending on the printer conguration.
4
6
7
5
8
23
1
Nu
Nu
Nu
NuNu
mbe
mbe
mbe
mbembe
r
r
r
rr Item
Item
Item
ItemItem Description
Description
Description
DescriptionDescription
1 button Select the button to clear changes, release the printer from a paused state, display hidden Reset Reset
errors, and restore the default settings (including the language and keyboard layout).
2 or button Select the button to open the Sign In screen.Sign In Sign Out Sign In
Select the button to sign out of the printer. The printer restores all options to the default Sign Out
settings.
NO
NO
NO
NONOTE:
TE:
TE:
TE:TE: This button displays only if the administrator has the printer to require permission congured
for access to features.
ENWW Printer views 7

Nu
Nu
Nu
NuNu
mbe
mbe
mbe
mbembe
r
r
r
rr Item
Item
Item
ItemItem Description
Description
Description
DescriptionDescription
3Information button Select the Information button to access a screen that provides access to several types of printer
information. Select the buttons at the bottom of the screen for the following information:
●Display Language: Change the language setting for the current user session.
●Sleep Mode: Place the printer into sleep mode.
●Wi-Fi Direct: View information for how to connect directly to the printer using a phone, tablet, or
other device with Wi-Fi.
●Wireless: View or change wireless connection settings (some models require an optional wireless
accessory).
●Ethernet: View or change Ethernet connection settings.
●HP Web Services: View information to connect and print to the printer using HP Web Services
(ePrint).
4Help button Select the Help button to open the embedded help system.
The system provides a list of help topics or information about a topic when using the Home screen, an
app, an option, or a feature.
5 Current time Displays the current time.
6 Applications area Select any of the icons to open the application. Swipe the screen sideways to access more applications.
NO
NO
NO
NONOTE:
TE:
TE:
TE:TE: The available applications vary by printer. The administrator can which applications congure
appear and the order in which they appear.
7 Home-screen page
indicator
Indicates the number of pages on the Home screen or in an application. The current page is
highlighted. Swipe the screen sideways to scroll between pages.
8Home button Select the Home button to return to the Home screen.
How t
How t
How t
How tHow to use the to
o use the to
o use the to
o use the too use the touchscreen contr
uchscreen contr
uchscreen contr
uchscreen contruchscreen control panel
ol panel
ol panel
ol panelol panel
Perform the following actions to use the printer touchscreen control panel.
T
T
T
TTable
able
able
able able 1-1
1-1
1-1
1-11-1 T
T
T
T Touchscreen con
ouchscreen con
ouchscreen con
ouchscreen conouchscreen control panel actions
trol panel actions
trol panel actions
trol panel actionstrol panel actions
Action
Action
Action
ActionAction Description
Description
Description
DescriptionDescription Example
Example
Example
ExampleExample
T
T
T
TTouch
ouch
ouch
ouchouch Touch an item on the screen to select that item
or open that menu. Also, when scrolling through
menus, touch the screen to stop the briey
scrolling.
Touch the icon to open the app.Settings Settings
8 Chapter 1 Printer overview ENWW

T
T
T
TTable 1-1
able 1-1
able 1-1
able 1-1able 1-1 T
T
T
T Touchscreen con
ouchscreen con
ouchscreen con
ouchscreen conouchscreen control panel actions (c
trol panel actions (c
trol panel actions (c
trol panel actions (ctrol panel actions (continued)
ontinued)
ontinued)
ontinued)ontinued)
Action
Action
Action
ActionAction Description
Description
Description
DescriptionDescription Example
Example
Example
ExampleExample
Swipe
Swipe
Swipe
SwipeSwipe Touch the screen and then move your nger
horizontally to scroll the screen sideways.
Swipe until the app displays.Settings
Scrol
Scrol
Scrol
ScrolScroll
l
l
ll Touch the screen and then move your nger
vertically to scroll the screen up and down. When
scrolling through menus, touch the screen briey
to stop the scrolling.
Scroll through the app.Settings
ENWW Printer views 9

Printer
Printer
Printer
Printer Printer specications
specications
specications
specicationsspecications
Determine the for your printer model.specications
●Technical specications
●Supported operating systems
●Printer dimensions
●Power consumption, electrical and acoustic emissionsspecications,
●Operating-environment range
IMPORT
IMPORT
IMPORT
IMPORTIMPORTANT
ANT
ANT
ANTANT:
:
:
:: The following are correct at the time of publication, but they are subject to change. specications
For current information, see www.hp.com/support/colorljE85055.
Technical
Technical
Technical
Technical Technical specications
specications
specications
specicationsspecications
Review the printer technical specications.
See www.hp.com/support/colorljE85055 for current information.
Product numbers f
Product numbers f
Product numbers f
Product numbers fProduct numbers for each model
or each model
or each model
or each modelor each model
●E85055dn - #T3U66A
T
T
T
TTable
able
able
able able 1-2
1-2
1-2
1-21-2 Paper handling
Paper handling
Paper handling
Paper handling Paper handling specications
specications
specications
specicationsspecications
Paper handling feature
Paper handling feature
Paper handling feature
Paper handling featurePaper handling features
s
s
ss E85055dn
E85055dn
E85055dn
E85055dnE85055dn
Tray 1 (100-sheet capacity) Included
Tray 2 (550-sheet capacity) Included
550-sheet paper tray
NO
NO
NO
NONOTE:
TE:
TE:
TE:TE: The E85055 models accept up to two optional 550-sheet trays.
Optional
2 x 550-sheet paper tray and stand
NO
NO
NO
NONOTE:
TE:
TE:
TE:TE: The E85055 models accept up to two optional 550-sheet trays that may be
installed on top of the stand.
Optional
2,700-sheet high-capacity input (HCI) paper tray and stand
NO
NO
NO
NONOTE:
TE:
TE:
TE:TE: The E85055 models accept up to two optional 550-sheet trays that may be
installed on top of the stand.
Optional
Printer stand
NO
NO
NO
NONOTE:
TE:
TE:
TE:TE: The E85055 models accept up to two optional 550-sheet trays that may be
installed on top of the stand.
Optional
Automatic duplex printing Included
T
T
T
TTable 1-3
able 1-3
able 1-3
able 1-3able 1-3 Connectivity
Connectivity
Connectivity
Connectivity Connectivity specications
specications
specications
specicationsspecications
Connectivity feature
Connectivity feature
Connectivity feature
Connectivity featureConnectivity features
s
s
ss E85055dn
E85055dn
E85055dn
E85055dnE85055dn
10/100/1000 Ethernet LAN connection with IPv4 and IPv6 Included
10 Chapter 1 Printer overview ENWW

T
T
T
TTable 1-3
able 1-3
able 1-3
able 1-3able 1-3 Connectivity
Connectivity
Connectivity
Connectivity Connectivity (c
(c
(c
(c (continued)
ontinued)
ontinued)
ontinued)ontinued)
specications
specications
specications
specicationsspecications
Connectivity feature
Connectivity feature
Connectivity feature
Connectivity featureConnectivity features
s
s
ss E85055dn
E85055dn
E85055dn
E85055dnE85055dn
Hi-Speed USB 2.0 Included
Easy-access USB port for printing from a USB drive or upgrading the Includedash rmware
Hardware Integration Pocket for connecting accessory and third-party devices Included
HP Internal USB Ports Included
HP Jetdirect 2900nw Print Server accessory for Wi-Fi connectivity and an additional
Ethernet port
Optional
HP Jetdirect 3100w accessory for Wi-Fi, BLE, NFC, and proximity badge reading Optional
T
T
T
TTable 1-4
able 1-4
able 1-4
able 1-4able 1-4 Print
Print
Print
Print Print specications
specications
specications
specicationsspecications
Print features
Print features
Print features
Print featuresPrint features E85055dn
E85055dn
E85055dn
E85055dnE85055dn
Prints 55 pages per minute (ppm) on Letter-size paper and 56 ppm on A4-size paper Included
Easy-access USB printing for printing from a USB drive Includedash
Store jobs in the printer memory to print later or print privately Included
T
T
T
TTable 1-5
able 1-5
able 1-5
able 1-5able 1-5 Other
Other
Other
Other Other specications
specications
specications
specicationsspecications
Other features
Other features
Other features
Other featuresOther features E85055dn
E85055dn
E85055dn
E85055dnE85055dn
Memory: 1.5 GB base memory
NO
NO
NO
NONOTE:
TE:
TE:
TE:TE: Memory reported on page will change from 1.5 GB to 2 GB with conguration
optional 1 GB SODIMM installed.
Included
Mass storage: 16 GB embedded Multi-Media Controller (eMMC) Included
Security: HP Trusted Platform Module (TPM) Included
Control panel: 4.3-inch color touchscreen Included
Supported operating sys
Supported operating sys
Supported operating sys
Supported operating sysSupported operating systems
tems
tems
temstems
Use the following information to ensure printer compatibility with your computer operating system.
Linux:
Linux:
Linux:
Linux:Linux: For information and print drivers for Linux, go to www.hp.com/go/linuxprinting.
UNIX:
UNIX:
UNIX:
UNIX:UNIX: For information and print drivers for UNIX®, go to www.hp.com/go/unixmodelscripts.
The following information applies to the Windows HP PCL 6 print drivers, HP print drivers for printer-specic
macOS, and to the software installer.
Windows:
Windows:
Windows:
Windows:Windows: Download HP Easy Start from to install the HP print driver. Or, go to the printer-123.hp.com/LaserJet
support website for this printer: www.hp.com/support/colorljE85055 to download the print driver or the
software installer to install the HP print driver.
macOS:
macOS:
macOS:
macOS:macOS: Mac computers are supported with this printer. Download HP Easy Start either from 123.hp.com/
LaserJet or from the Printer Support page, and then use HP Easy Start to install the HP print driver.
ENWW Printer 11specications

1.
1.
1.
1.1. Go to 123.hp.com/LaserJet.
2.
2.
2.
2.2. Follow the steps provided to download the printer software.
T
T
T
TTable 1-6
able 1-6
able 1-6
able 1-6able 1-6 Supported operating systems and prin
Supported operating systems and prin
Supported operating systems and prin
Supported operating systems and prin Supported operating systems and print drivers
t drivers
t drivers
t driverst drivers
Operating system
Operating system
Operating system
Operating systemOperating system Print driver (f
Print driver (f
Print driver (f
Print driver (fPrint driver (for Windows, or the instal
or Windows, or the instal
or Windows, or the instal
or Windows, or the instalor Windows, or the installer on the web for macOS)
ler on the web for macOS)
ler on the web for macOS)
ler on the web for macOS)ler on the web for macOS)
Windows 7, 32-bit and 64-bit The “HP PCL 6” print driver is installed for this operating system as part of printer-specic
the software installation.
Windows 8.1, 32-bit and 64-bit The “HP PCL-6” V4 print driver is installed for this operating system as part printer-specic
of the software installation.
Windows 10, 32-bit and 64-bit The “HP PCL-6” V4 print driver is installed for this operating system as part printer-specic
of the software installation.
Windows Server 2008 R2, SP 1, 64-bit The PCL 6 print driver is available for download from the printer-support printer-specic
website. Download the driver, and then use the Microsoft Add Printer tool to install it.
Windows Server 2012, 64-bit The PCL 6 print driver is available for download from the printer-support printer-specic
website. Download the driver, and then use the Microsoft Add Printer tool to install it.
Windows Server 2012 R2, 64-bit The PCL 6 print driver is available for download from the printer-support printer-specic
website. Download the driver, and then use the Microsoft Add Printer tool to install it.
Windows Server 2016, 64-bit The PCL 6 print driver is available for download from the printer-support printer-specic
website. Download the driver, and then use the Microsoft Add Printer tool to install it.
Windows Server 2019, 64-bit The PCL 6 print driver is available for download from the printer-support printer-specic
website. Download the driver, and then use the Microsoft Add Printer tool to install it.
macOS 10.13 High Sierra, macOS 10.14
Mojave
Download HP Easy Start from , and then use it to install the print 123.hp.com/LaserJet
driver.
NO
NO
NO
NONOTE:
TE:
TE:
TE:TE: Supported operating systems can change.
NO
NO
NO
NONOTE:
TE:
TE:
TE:TE: For a current list of supported operating systems and HP’s all-inclusive help for the printer, go to
www.hp.com/support/colorljE85055.
NO
NO
NO
NONOTE:
TE:
TE:
TE:TE: For details on client and server operating systems and for HP UPD driver support for this printer, go to
www.hp.com/go/upd. Under Addition
Addition
Addition
AdditionAdditional information
al information
al information
al informational information, click Specications
Specications
Specications
SpecicationsSpecications.
T
T
T
TTable 1-7
able 1-7
able 1-7
able 1-7able 1-7 Minimum system requirements
Minimum system requirements
Minimum system requirements
Minimum system requirements Minimum system requirements
Windows
Windows
Windows
WindowsWindows macOS
macOS
macOS
macOSmacOS
●Internet connection
●Dedicated USB 1.1 or 2.0 connection or a network connection
●2 GB of available hard-disk space
●1 GB RAM (32-bit) or 2 GB RAM (64-bit)
●Internet connection
●Dedicated USB 1.1 or 2.0 connection or a network connection
●1.5 GB of available hard-disk space
12 Chapter 1 Printer overview ENWW

NO
NO
NO
NONOTE:
TE:
TE:
TE:TE: The Windows software installer installs the HP Smart Device Agent Base service. The size is less le
than 100 kb. Its only function is to check for printers connected via USB hourly. No data is collected. If a USB
printer is found, it then tries to locate a JetAdvantage Management Connector (JAMc) instance on the network. If
a JAMc is found, the HP Smart Device Agent Base is securely upgraded to a full Smart Device Agent from JAMc,
which will then allow printed pages to be accounted for in a Managed Print Services (MPS) account. The driver-
only web packs downloaded from www.hp.com for the printer and installed through the Add Printer wizard do
not install this service.
To uninstall the service, open the C
C
C
CControl P
ontrol P
ontrol P
ontrol Pontrol Panel
anel
anel
anelanel Programs
Programs
Programs
ProgramsPrograms Pr
Pr
Pr
PrPrograms and Fea
ograms and Fea
ograms and Fea
ograms and Feaograms and Features
tures
tures
turestures, select or , and then select
Add/Remove Pr
Add/Remove Pr
Add/Remove Pr
Add/Remove PrAdd/Remove Programs
ograms
ograms
ogramsograms Uninstall a Pr
Uninstall a Pr
Uninstall a Pr
Uninstall a PrUninstall a Program
ogram
ogram
ogramogram or to remove the service. The name is le
HPSmartDeviceAgentBase
HPSmartDeviceAgentBase
HPSmartDeviceAgentBase
HPSmartDeviceAgentBaseHPSmartDeviceAgentBase.
Printer dimensions
Printer dimensions
Printer dimensions
Printer dimensionsPrinter dimensions
Make sure your printer environment is large enough to accommodate the printer.
T
T
T
TTable 1-8
able 1-8
able 1-8
able 1-8able 1-8 Dimensions for the base printer—E85055dn
Dimensions for the base printer—E85055dn
Dimensions for the base printer—E85055dn
Dimensions for the base printer—E85055dn Dimensions for the base printer—E85055dn
Dimension
Dimension
Dimension
DimensionDimension Printer fully cl
Printer fully cl
Printer fully cl
Printer fully clPrinter fully closed
osed
osed
osedosed Printer fully opened
Printer fully opened
Printer fully opened
Printer fully openedPrinter fully opened
Height 520 mm (20.5 in) 592 mm (23.3 in)
Depth 610 mm (24.0 in) 1018 mm (40.1 in)
Width 556 mm (21.9 in) 1051 mm (41.4 in)
Weight (with toner
catridges)
52.3 kg (115.3 lb) 52.3 kg (115.3 lb)
T
T
T
TTable 1-9
able 1-9
able 1-9
able 1-9able 1-9 Dimensions for the 550-sheet paper tray
Dimensions for the 550-sheet paper tray
Dimensions for the 550-sheet paper tray
Dimensions for the 550-sheet paper tray Dimensions for the 550-sheet paper tray
Dimension
Dimension
Dimension
DimensionDimension Accessory fully cl
Accessory fully cl
Accessory fully cl
Accessory fully clAccessory fully closed
osed
osed
osedosed Accessory fully o
Accessory fully o
Accessory fully o
Accessory fully oAccessory fully open
pen
pen
penpen
Height 150 mm (5.9 in) (includes alignment pins) 150 mm (5.9 in) (includes alignment pins)
Depth 584 mm (23 in) 1003 mm (39.5 in)
Width 556 mm (21.9 in) 640 mm (25.2 in)
Weight 10.2 kg (22.5 lb) 10.2 kg (22.5 lb)
T
T
T
TTable 1-10
able 1-10
able 1-10
able 1-10able 1-10 Dimensions for the printer with one 550-sheet paper tray
Dimensions for the printer with one 550-sheet paper tray
Dimensions for the printer with one 550-sheet paper tray
Dimensions for the printer with one 550-sheet paper tray Dimensions for the printer with one 550-sheet paper tray
Dimension
Dimension
Dimension
DimensionDimension Printer fully cl
Printer fully cl
Printer fully cl
Printer fully clPrinter fully closed
osed
osed
osedosed Printer fully opened
Printer fully opened
Printer fully opened
Printer fully openedPrinter fully opened
Height 646 mm (25.4 in) 718 mm (28.3 in)
Depth 610 mm (24.0 in) 1034 mm (40.7 in)
Width 556 mm (21.9 in) 1051 mm (41.4 in)
Weight 62.5 kg (137.8 lb) 62.5 kg (137.8 lb)
ENWW Printer 13specications

T
T
T
TTable 1-11
able 1-11
able 1-11
able 1-11able 1-11 Dimensions for the 2 x 550-sheet paper tray and s
Dimensions for the 2 x 550-sheet paper tray and s
Dimensions for the 2 x 550-sheet paper tray and s
Dimensions for the 2 x 550-sheet paper tray and s Dimensions for the 2 x 550-sheet paper tray and stand
tand
tand
tandtand
Dimension
Dimension
Dimension
DimensionDimension Accessory fully cl
Accessory fully cl
Accessory fully cl
Accessory fully clAccessory fully closed
osed
osed
osedosed Accessory fully o
Accessory fully o
Accessory fully o
Accessory fully oAccessory fully open
pen
pen
penpen
Height 347 mm (13.7 in) (includes alignment pins) 347 mm (13.7 in) (includes alignment pins)
Depth1659 mm (25.9 in) 1074 mm (42.3 in)
Width1556 mm (21.9 in) 771 mm (30.4 in)
Weight122.9 kg (50.5 lb) 22.9 kg (50.5 lb)
1Does not include stability feet.
T
T
T
TTable 1-12
able 1-12
able 1-12
able 1-12able 1-12 Dimensions for the printer with the 2 x 550-sheet paper tr
Dimensions for the printer with the 2 x 550-sheet paper tr
Dimensions for the printer with the 2 x 550-sheet paper tr
Dimensions for the printer with the 2 x 550-sheet paper tr Dimensions for the printer with the 2 x 550-sheet paper tray and stand
ay and stand
ay and stand
ay and standay and stand
Dimension
Dimension
Dimension
DimensionDimension Printer and accessories ful
Printer and accessories ful
Printer and accessories ful
Printer and accessories fulPrinter and accessories fully closed
ly closed
ly closed
ly closedly closed Printer and accessories ful
Printer and accessories ful
Printer and accessories ful
Printer and accessories fulPrinter and accessories fully opened
ly opened
ly opened
ly openedly opened
Height 844 mm (33.2 in) 916 mm (36.1 in)
Depth1659 mm (25.9 in) 1074 mm (42.3 in)
Width1556 mm (21.9 in) 1051 mm (41.4 in)
Weight175.2 kg (165.8 lb) 75.2 kg (165.8 lb)
1Does not include stability feet.
T
T
T
TTable
able
able
able able 1-13
1-13
1-13
1-131-13 Dimensions for the high-capacity input paper tray and s
Dimensions for the high-capacity input paper tray and s
Dimensions for the high-capacity input paper tray and s
Dimensions for the high-capacity input paper tray and s Dimensions for the high-capacity input paper tray and stand
tand
tand
tandtand
Dimension
Dimension
Dimension
DimensionDimension Accessory fully cl
Accessory fully cl
Accessory fully cl
Accessory fully clAccessory fully closed
osed
osed
osedosed Accessory fully o
Accessory fully o
Accessory fully o
Accessory fully oAccessory fully open
pen
pen
penpen
Height 347 mm (13.7 in) 347 mm (13.7 in)
Depth1659 mm (25.9 in) 1064 mm (41.9 in)
Width1556 mm (21.9 in) Door open: 771 mm (30.4 in)
Weight128.2 kg (62.2 lb) 28.2 kg (62.2 lb)
1Does not include stability feet.
T
T
T
TTable
able
able
able able 1-14
1-14
1-14
1-141-14 Dimensions for the printer with the high-capacity input paper tr
Dimensions for the printer with the high-capacity input paper tr
Dimensions for the printer with the high-capacity input paper tr
Dimensions for the printer with the high-capacity input paper tr Dimensions for the printer with the high-capacity input paper tray and stand
ay and stand
ay and stand
ay and standay and stand
Dimension
Dimension
Dimension
DimensionDimension Printer and accessories ful
Printer and accessories ful
Printer and accessories ful
Printer and accessories fulPrinter and accessories fully closed
ly closed
ly closed
ly closedly closed Printer and accessories ful
Printer and accessories ful
Printer and accessories ful
Printer and accessories fulPrinter and accessories fully opened
ly opened
ly opened
ly openedly opened
Height 844 mm (33.2 in) 916 mm (36.1 in)
Depth1663 mm (26.1 in) 1064 mm (41.9 in)
Width1585 mm (23 in) 1051 mm (41.4 in)
Weight180.5 kg (177.5 lb) 80.5 kg (177.5 lb)
1Does not include stability feet.
T
T
T
TTable
able
able
able able 1-15
1-15
1-15
1-151-15 Dimensions for the stand
Dimensions for the stand
Dimensions for the stand
Dimensions for the stand Dimensions for the stand
Dimension
Dimension
Dimension
DimensionDimension Accessory fully cl
Accessory fully cl
Accessory fully cl
Accessory fully clAccessory fully closed
osed
osed
osedosed Accessory fully o
Accessory fully o
Accessory fully o
Accessory fully oAccessory fully open
pen
pen
penpen
Height 347 mm (13.7 in) 347 mm (13.7 in)
14 Chapter 1 Printer overview ENWW

T
T
T
TTable 1-15
able 1-15
able 1-15
able 1-15able 1-15 Dimensions for the stand (c
Dimensions for the stand (c
Dimensions for the stand (c
Dimensions for the stand (c Dimensions for the stand (continued)
ontinued)
ontinued)
ontinued)ontinued)
Dimension
Dimension
Dimension
DimensionDimension Accessory fully cl
Accessory fully cl
Accessory fully cl
Accessory fully clAccessory fully closed
osed
osed
osedosed Accessory fully o
Accessory fully o
Accessory fully o
Accessory fully oAccessory fully open
pen
pen
penpen
Depth1659 mm (25.9 in) 1185 mm (46.7 in)
Width1556 mm (21.9 in) 556 mm (21.9 in)
Weight119 kg (41.9 lb) 19 kg (41.9 lb)
1Does not include stability feet.
T
T
T
TTable 1-16
able 1-16
able 1-16
able 1-16able 1-16 Dimensions for the printer with the s
Dimensions for the printer with the s
Dimensions for the printer with the s
Dimensions for the printer with the s Dimensions for the printer with the stand
tand
tand
tandtand
Printer and accessories ful
Printer and accessories ful
Printer and accessories ful
Printer and accessories fulPrinter and accessories fully closed
ly closed
ly closed
ly closedly closed Printer and accessories ful
Printer and accessories ful
Printer and accessories ful
Printer and accessories fulPrinter and accessories fully opened
ly opened
ly opened
ly openedly opened
Height 844 mm (33.2 in) 916 mm (36.1 in)
Depth1659 mm (25.9 in) 1185 mm (46.7 in)
Width1556 mm (21.9 in) 1051 mm (41.4 in)
Weight168.1 kg (150.2 lb) 68.1 kg (150.2 lb)
1Does not include stability feet.
Po
Po
Po
PoPower consumption, electrical
wer consumption, electrical
wer consumption, electrical
wer consumption, electrical wer consumption, electrical and ac
and ac
and ac
and ac and acous
ous
ous
ousoustic emissions
tic emissions
tic emissions
tic emissionstic emissions
specications,
specications,
specications,
specications,specications,
In order to operate properly, the printer must be in an environment that meets certain power specications.
See www.hp.com/support/colorljE85055 for current information.
CAUTION:
CAUTION:
CAUTION:
CAUTION:CAUTION: Power requirements are based on the country/region where the printer is sold. Do not convert
operating voltages. This will damage the printer and void the printer warranty.
Operating-en
Operating-en
Operating-en
Operating-enOperating-envir
vir
vir
virvironment range
onment range
onment range
onment rangeonment range
In order to operate properly, the printer must be in an environment that meets certain specications.
T
T
T
TTable
able
able
able able
1-17
1-17
1-17
1-171-17 Operating-envir
Operating-envir
Operating-envir
Operating-envir Operating-environment
onment
onment
onment onment specications
specications
specications
specicationsspecications
Environmen
Environmen
Environmen
EnvironmenEnvironment
t
t
tt Recommended
Recommended
Recommended
RecommendedRecommended All
All
All
AllAllowed
owed
owed
owedowed
Temperature 15° to 27°C (59° to 80.6°F) 10° to 32.5°C (50° to 90.5°F)
Relative humidity 30% to 70% relative humidity (RH) 10% to 80% RH
Printer hardw
Printer hardw
Printer hardw
Printer hardwPrinter hardware setup and software ins
are setup and software ins
are setup and software ins
are setup and software insare setup and software instal
tal
tal
taltallation
lation
lation
lationlation
For basic setup instructions, see the Hardware Installation Guide that came with the printer. For additional
instructions, go to HP support on the web.
Go to www.hp.com/support/colorljE85055 for HP's all-inclusive help for the printer, which includes the following
information:
●Install and congure
●Learn and use
ENWW Printer hardware setup and software installation 15

●Solve problems
●Download software and updatesrmware
●Join support forums
●Find warranty and regulatory information
●Find instructions about how to use the Microsoft Add Printer tool
16 Chapter 1 Printer overview ENWW

2
2
2
22 P
P
P
PPaper trays
aper trays
aper trays
aper traysaper trays
Discover how to load and use the paper trays, including how to load special items such as envelopes and labels.
●Introduction
●Load paper to Tray 1 (multipurpose tray)
●Load paper to Tray 2
●Load paper to the 550-sheet paper tray
●Load paper to the 2 x 550-sheet paper trays
●Load paper to the 2,700-sheet high-capacity input paper trays
●Load and print envelopes
●Load and print labels
For video assistance, see www.hp.com/videos/LaserJet.
The following information is correct at the time of publication. For current information, see www.hp.com/
support/colorljE85055.
For more inf
For more inf
For more inf
For more infFor more information:
ormation:
ormation:
ormation:ormation:
HP's all-inclusive help for the printer includes the following information:
●Install and congure
●Learn and use
●Solve problems
●Download software and updatesrmware
●Join support forums
●Find warranty and regulatory information
Intr
Intr
Intr
IntrIntroduction
oduction
oduction
oductionoduction
Use caution when loading the paper trays.
ENWW 17

CAUTION:
CAUTION:
CAUTION:
CAUTION:CAUTION: Do not extend more than one paper tray at a time.
Do not use paper tray as a step.
Keep hands out of paper trays when closing.
All trays must be closed when moving the printer.
18 Chapter 2 Paper trays ENWW
Lo
Lo
Lo
LoLoad paper t
ad paper t
ad paper t
ad paper tad paper to Tray 1 (mul
o Tray 1 (mul
o Tray 1 (mul
o Tray 1 (mulo Tray 1 (multipurpose tray)
tipurpose tray)
tipurpose tray)
tipurpose tray)tipurpose tray)
The following information describes how to load paper into Tray 1.
●Load Tray 1 (multipurpose tray)
●Tray 1 paper orientation
●Use alternative letterhead mode
Load Tr
Load Tr
Load Tr
Load TrLoad Tray 1 (mul
ay 1 (mul
ay 1 (mul
ay 1 (mulay 1 (multipur
tipur
tipur
tipurtipurpose tray)
pose tray)
pose tray)
pose tray)pose tray)
Use the following process to load paper into Tray 1.
1.
1.
1.
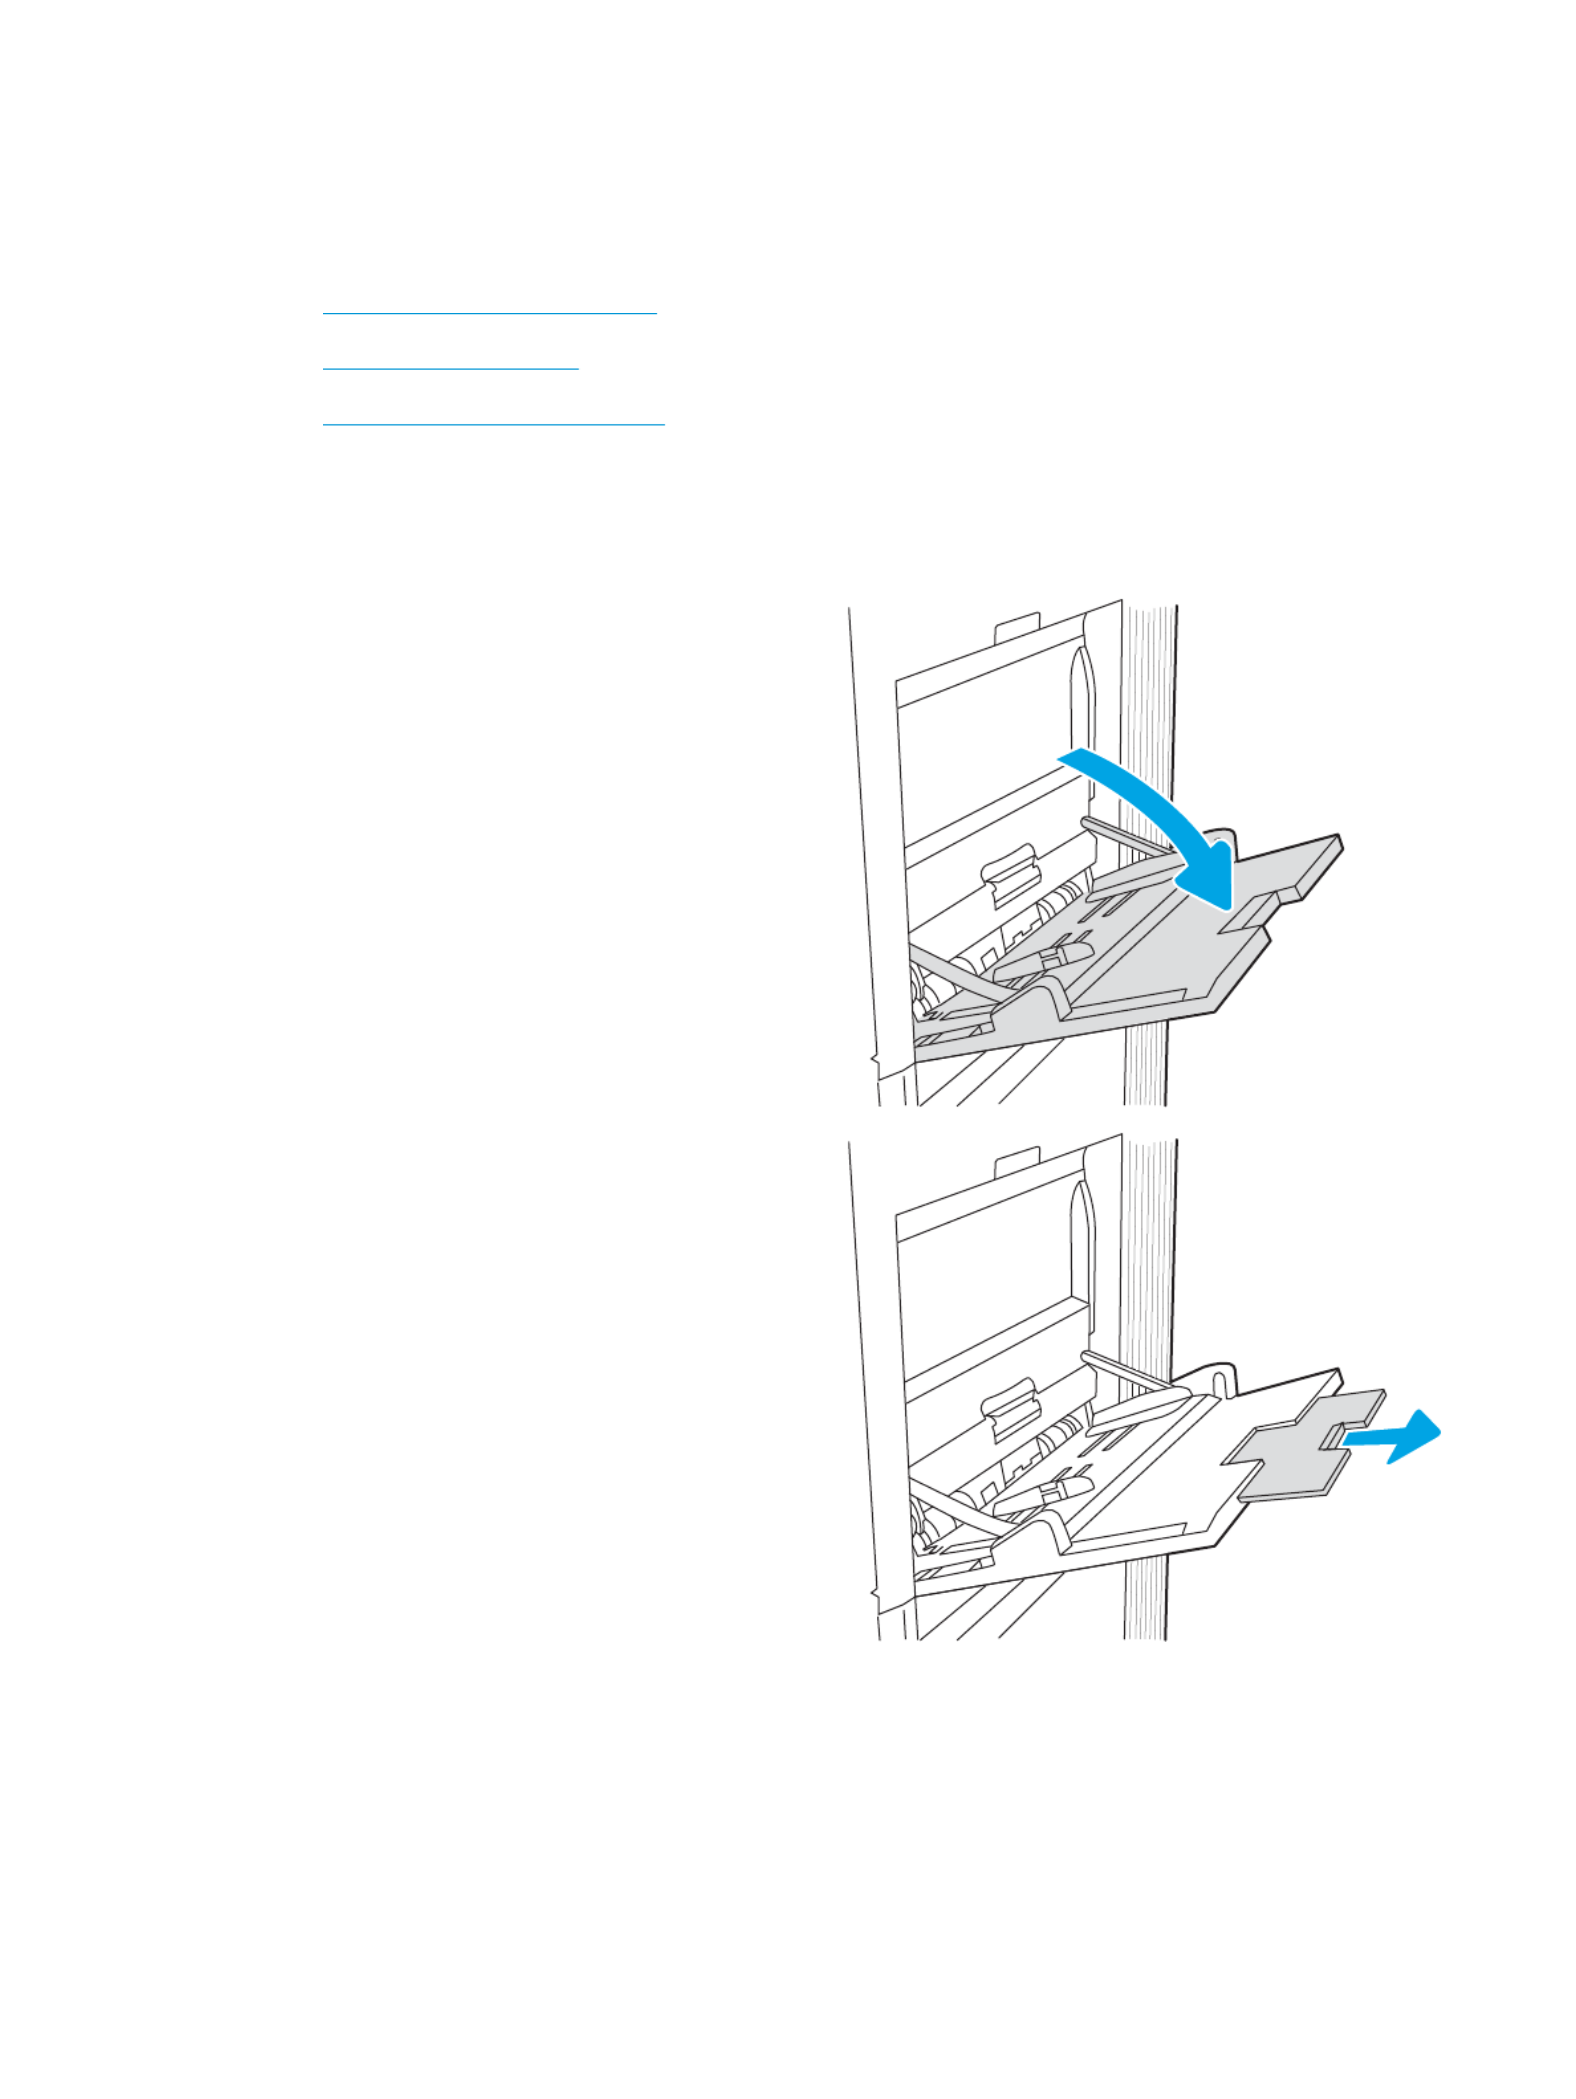
1.1. Open Tray 1.
2.
2.
2.
2.2. Pull out the tray extension to support the paper.
ENWW Load paper to Tray 1 (multipurpose tray) 19

3.
3.
3.
3.3. Use the blue adjustment latch to spread the paper
guides to the correct size, and then load paper in
the tray. For information about how to orient the
paper, see .Tray 1 paper orientation on page 20
Make sure that the paper under the line on ts ll
the paper guides.
NO
NO
NO
NONOTE:
TE:
TE:
TE:TE: The maximum stack height is 10 mm (0.4
in), or approximately 100 sheets of 75 g/m2 (20
lb) paper.
4.
4.
4.
4.4. Using the blue adjustment latch, adjust the side
guides so that they lightly touch the paper stack,
but do not bend it.
Tray 1 paper orienta
Tray 1 paper orienta
Tray 1 paper orienta
Tray 1 paper orientaTray 1 paper orientation
tion
tion
tiontion
Position paper correctly in Tray 1 to ensure the best print quality.
T
T
T
TTable
able
able
able able 2-1
2-1
2-1
2-12-1 Letterhead or preprinted—portrait
Letterhead or preprinted—portrait
Letterhead or preprinted—portrait
Letterhead or preprinted—portrait Letterhead or preprinted—portrait
Duplex mode
Duplex mode
Duplex mode
Duplex modeDuplex mode Paper size
Paper size
Paper size
Paper sizePaper size How to l
How to l
How to l
How to lHow to load paper
oad paper
oad paper
oad paperoad paper
1-sided printing 12x18, 11x17, RA3, SRA3, A3, 8K
(273x394 mm), 8K (270x390 mm), 8K
(260x368 mm), B4 (JIS), Legal, Ocio
(8.5x13), (216x340 mm), SRA4, RA4, Ocio
A4, Letter
Face-down
Bottom edge leading into the printer
20 Chapter 2 Paper trays ENWW
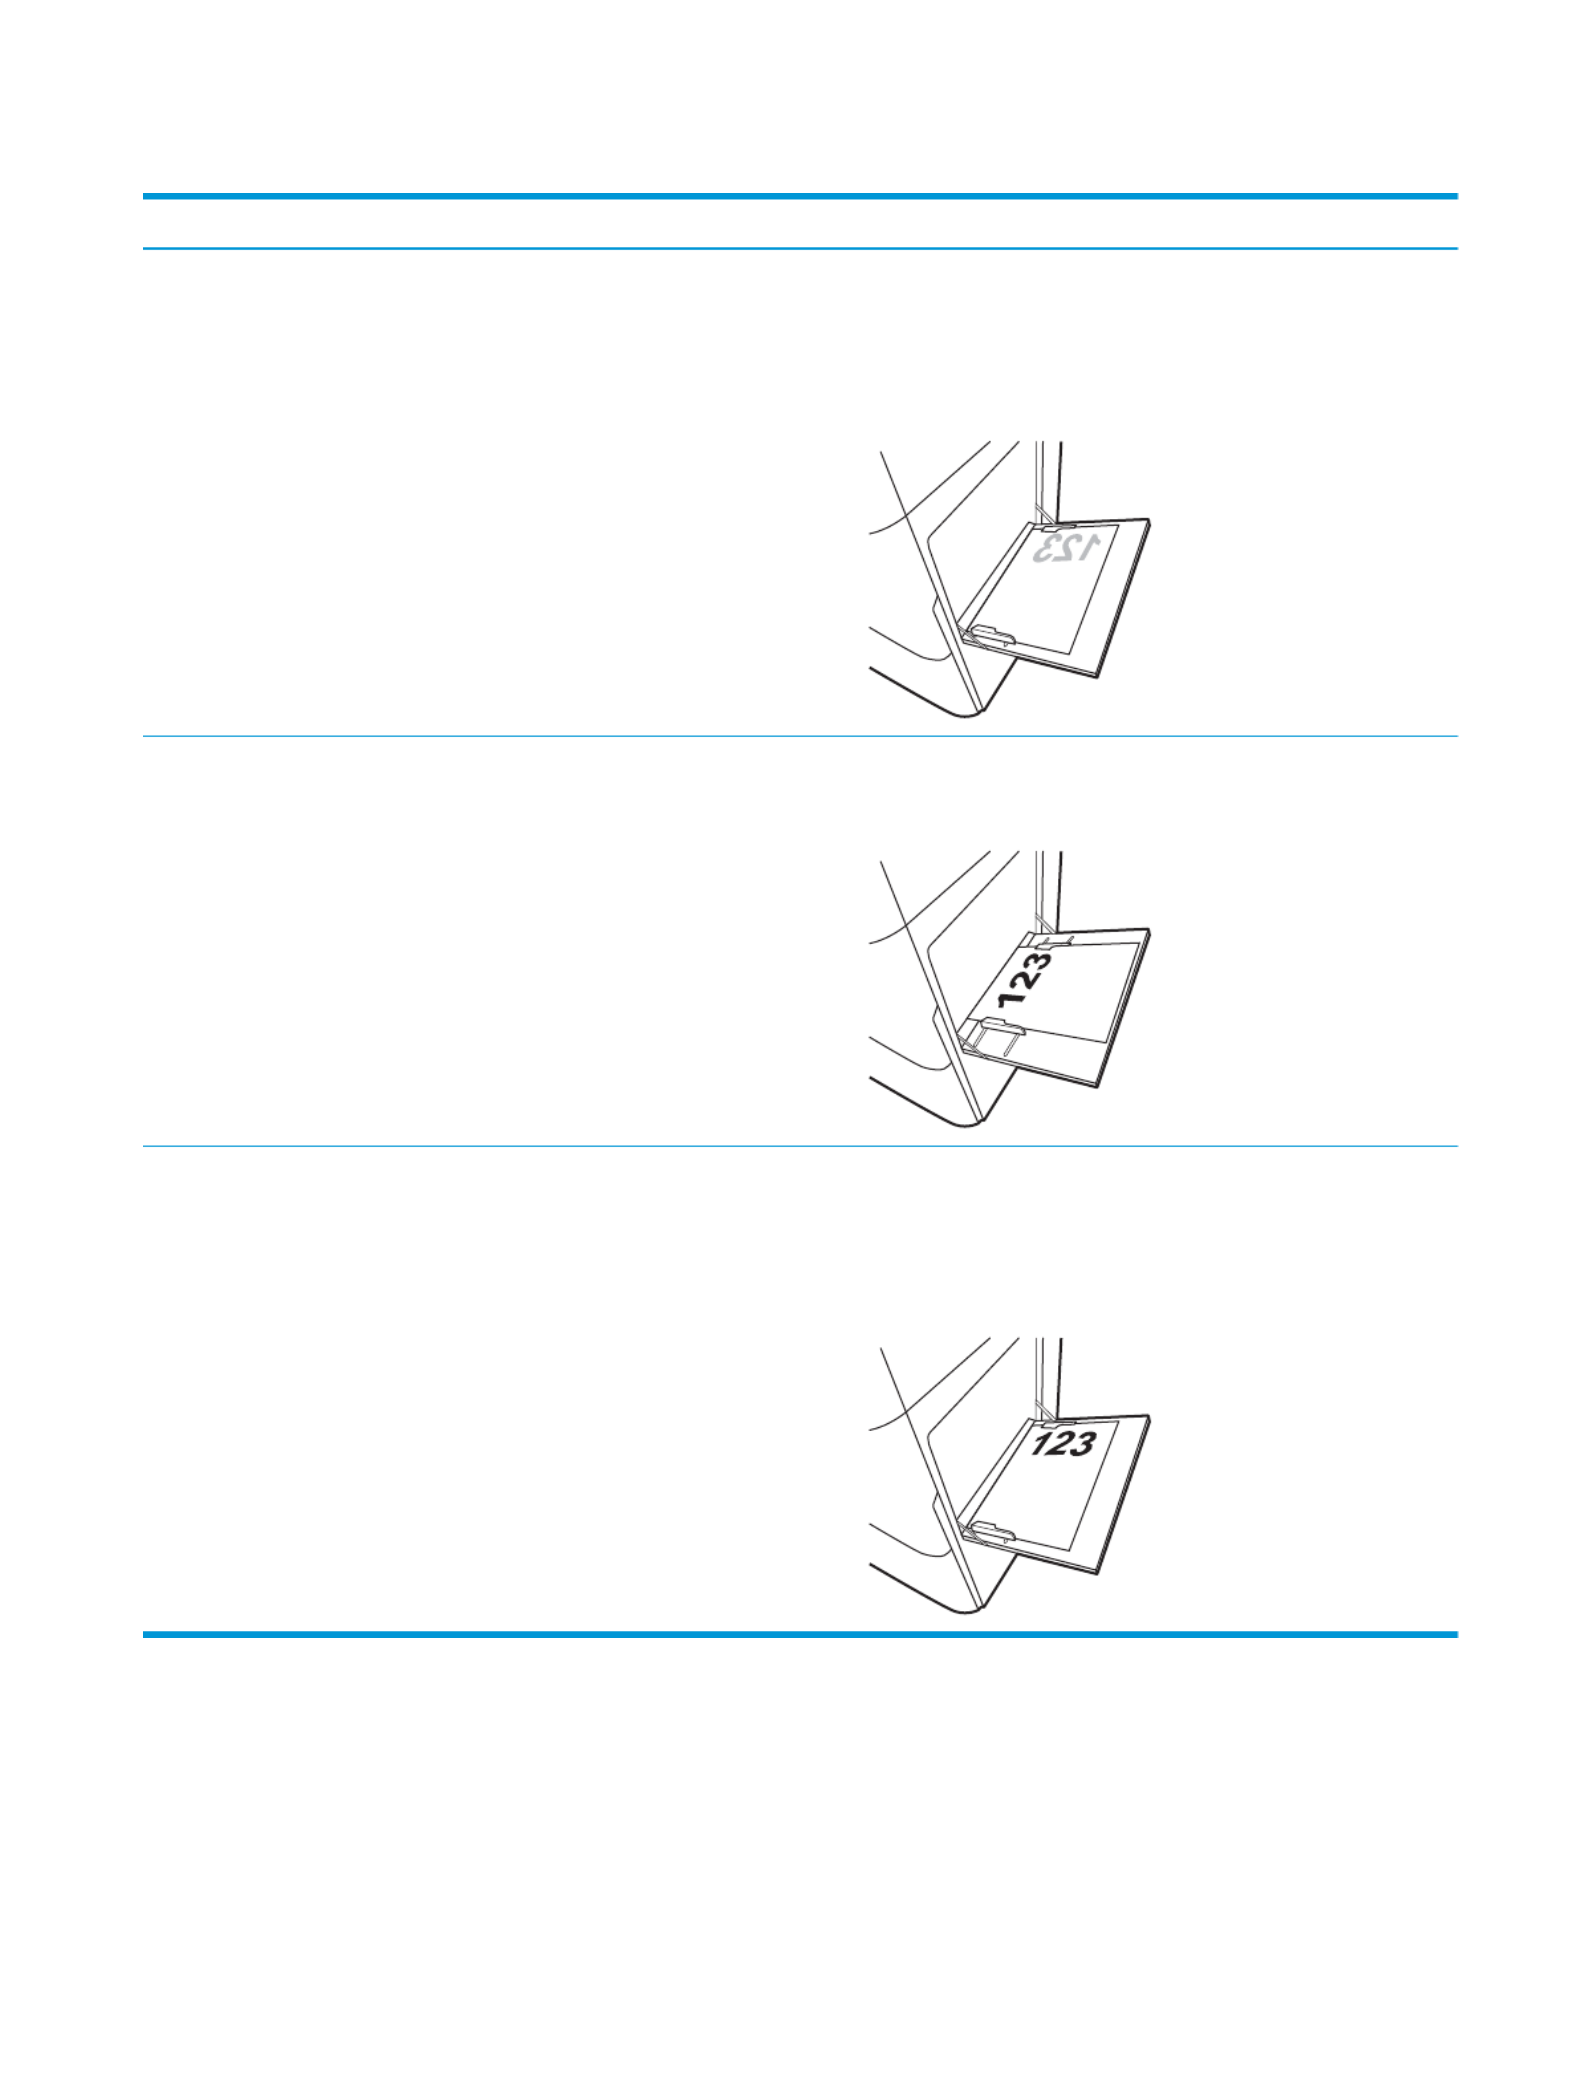
T
T
T
TTable 2-1
able 2-1
able 2-1
able 2-1able 2-1 Letterhead or preprinted—portrait (c
Letterhead or preprinted—portrait (c
Letterhead or preprinted—portrait (c
Letterhead or preprinted—portrait (c Letterhead or preprinted—portrait (continued)
ontinued)
ontinued)
ontinued)ontinued)
Duplex mode
Duplex mode
Duplex mode
Duplex modeDuplex mode Paper size
Paper size
Paper size
Paper sizePaper size How to l
How to l
How to l
How to lHow to load paper
oad paper
oad paper
oad paperoad paper
1-sided printing A4, Letter, Executive, A5, 16K
(197x273 mm) 16K (195x270 mm), 16K
(184x260 mm), B5 (JIS), Double Japan
Postcard (148x200 mm)
Face-down
Left side of pre-printed image leading into the printer
NO
NO
NO
NONOTE:
TE:
TE:
TE:TE: This is the preferred orientation when printing on A4 or
Letter.
Automatic 2-sided printing or with
Alternative Letterhead Mode
enabled
12x18, 11x17, RA3, SRA3, A3, 8K
(273x394 mm), 8K (270x390 mm), 8K
(260x368 mm), B4 (JIS), Legal, Ocio
(8.5x13), (216x340 mm), SRA4, RA4, Ocio
A4, Letter
Face-up
Top edge leading into the printer
Automatic 2-sided printing or with
Alternative Letterhead Mode
enabled
A4, Letter, Executive, A5, 16K
(197x273 mm) 16K (195x270 mm), 16K
(184x260 mm), B5 (JIS), Double Japan
Postcard (148x200 mm)
Face-up
Right side of pre-printed image leading into the printer
NO
NO
NO
NONOTE:
TE:
TE:
TE:TE: This is the preferred orientation when printing on A4 or
Letter.
ENWW Load paper to Tray 1 (multipurpose tray) 21

T
T
T
TTable 2-2
able 2-2
able 2-2
able 2-2able 2-2 Letterhead or preprinted—landscape
Letterhead or preprinted—landscape
Letterhead or preprinted—landscape
Letterhead or preprinted—landscape Letterhead or preprinted—landscape
Duplex mode
Duplex mode
Duplex mode
Duplex modeDuplex mode Paper size
Paper size
Paper size
Paper sizePaper size How to l
How to l
How to l
How to lHow to load paper
oad paper
oad paper
oad paperoad paper
1-sided printing 12x18, 11x17, RA3, SRA3, A3, 8K
(273x394 mm), 8K (270x390 mm), 8K
(260x368 mm), B4 (JIS), Legal, Ocio
(8.5x13), (216x340 mm), SRA4, RA4, Ocio
A4, Letter
Face-down
Left side of pre-printed image leading into the printer
Automatic 2-sided printing or with
Alternative Letterhead Mode
enabled
12x18, 11x17, RA3, SRA3, A3, 8K
(273x394 mm), 8K (270x390 mm), 8K
(260x368 mm), B4 (JIS), Legal, Ocio
(8.5x13), (216x340 mm), SRA4, RA4, Ocio
A4, Letter
Face-up
Right side of the pre-printed image leading into the printer
22 Chapter 2 Paper trays ENWW

T
T
T
TTable 2-2
able 2-2
able 2-2
able 2-2able 2-2 Letterhead or preprinted—landscape (c
Letterhead or preprinted—landscape (c
Letterhead or preprinted—landscape (c
Letterhead or preprinted—landscape (c Letterhead or preprinted—landscape (continued)
ontinued)
ontinued)
ontinued)ontinued)
Duplex mode
Duplex mode
Duplex mode
Duplex modeDuplex mode Paper size
Paper size
Paper size
Paper sizePaper size How to l
How to l
How to l
How to lHow to load paper
oad paper
oad paper
oad paperoad paper
1-sided printing A4, Letter, Executive, A5, 16K
(197x273 mm) 16K (195x270 mm), 16K
(184x260 mm), B5 (JIS), Double Japan
Postcard (148x200 mm)
Face-down
Bottom edge leading into the printer
NO
NO
NO
NONOTE:
TE:
TE:
TE:TE: This is the preferred orientation when printing on A4 or
Letter.
Automatic 2-sided printing or with
Alternative Letterhead Mode
enabled
A4, Letter, Executive, A5, 16K
(197x273 mm) 16K (195x270 mm), 16K
(184x260 mm), B5 (JIS), Double Japan
Postcard (148x200 mm)
Face-up
Top edge leading into the printer
NO
NO
NO
NONOTE:
TE:
TE:
TE:TE: This is the preferred orientation when printing on A4 or
Letter.
ENWW Load paper to Tray 1 (multipurpose tray) 23

T
T
T
TTable 2-3
able 2-3
able 2-3
able 2-3able 2-3 Prepunched—portrait
Prepunched—portrait
Prepunched—portrait
Prepunched—portrait Prepunched—portrait
Duplex mode
Duplex mode
Duplex mode
Duplex modeDuplex mode Paper size
Paper size
Paper size
Paper sizePaper size How to l
How to l
How to l
How to lHow to load paper
oad paper
oad paper
oad paperoad paper
1-sided printing 12x18, 11x17, RA3, SRA3, A3, 8K
(273x394 mm), 8K (270x390 mm), 8K
(260x368 mm), B4 (JIS), Legal, Ocio
(8.5x13), (216x340 mm), SRA4, RA4, Ocio
A4, Letter
Face-down
Holes toward the back of the printer
Automatic 2-sided printing or with
Alternative Letterhead Mode
enabled
12x18, 11x17, RA3, SRA3, A3, 8K
(273x394 mm), 8K (270x390 mm), 8K
(260x368 mm), B4 (JIS), Legal, Ocio
(8.5x13), (216x340 mm), SRA4, RA4, Ocio
A4, Letter
Face-up
Holes toward the back of the printer
24 Chapter 2 Paper trays ENWW

T
T
T
TTable 2-4
able 2-4
able 2-4
able 2-4able 2-4 Prepunched—landscape
Prepunched—landscape
Prepunched—landscape
Prepunched—landscape Prepunched—landscape
Duplex mode
Duplex mode
Duplex mode
Duplex modeDuplex mode Paper size
Paper size
Paper size
Paper sizePaper size How to l
How to l
How to l
How to lHow to load paper
oad paper
oad paper
oad paperoad paper
1-sided printing A4, Letter, Executive, A5, 16K
(197x273 mm) 16K (195x270 mm), 16K
(184x260 mm), B5 (JIS), Double Japan
Postcard (148x200 mm)
Face-down
Holes away from the printer
NO
NO
NO
NONOTE:
TE:
TE:
TE:TE: This is the preferred orientation when printing on A4 or
Letter.
Automatic 2-sided printing or with
Alternative Letterhead Mode
enabled
A4, Letter, Executive, A5, 16K
(197x273 mm) 16K (195x270 mm), 16K
(184x260 mm), B5 (JIS), Double Japan
Postcard (148x200 mm)
Face-up
Holes towards the printer
NO
NO
NO
NONOTE:
TE:
TE:
TE:TE: This is the preferred orientation when printing on A4 or
Letter.
ENWW Load paper to Tray 1 (multipurpose tray) 25

Use al
Use al
Use al
Use alUse alternative letterhe
ternative letterhe
ternative letterhe
ternative letterheternative letterhead mode
ad mode
ad mode
ad modead mode
Use the Alternative Letterhead Mode feature to load letterhead or preprinted paper into the tray the same way
for all jobs, whether printing to one side of the sheet of paper or to both sides. When using this mode, load paper
as for automatic duplex printing.
●Enable Alternative Letterhead Mode by using the printer control-panel menus
Enable Al
Enable Al
Enable Al
Enable AlEnable Alternative Letterhe
ternative Letterhe
ternative Letterhe
ternative Letterheternative Letterhead Mode by using the printer contr
ad Mode by using the printer contr
ad Mode by using the printer contr
ad Mode by using the printer contrad Mode by using the printer control-panel menus
ol-panel menus
ol-panel menus
ol-panel menusol-panel menus
Use the menu to set the Settings Alternative Letterhead Mode setting.
1.
1.
1.
1.1. From the Home screen on the printer control panel, navigate to and open the menu.Settings
2.
2.
2.
2.2. Open the following menus:
a.
a.
a.
a.a. Copy/Print or Print
b.
b.
b.
b.b. Manage Trays
c.
c.
c.
c.c. Alternative Letterhead Mode
3.
3.
3.
3.3. Select .On
26 Chapter 2 Paper trays ENWW

Lo
Lo
Lo
LoLoad paper t
ad paper t
ad paper t
ad paper tad paper to Tray 2
o Tray 2
o Tray 2
o Tray 2o Tray 2
The following information describes how to load paper into Tray 2.
●Load Tray 2
●Tray 2 paper orientation
●Use alternative letterhead mode
Load Tr
Load Tr
Load Tr
Load TrLoad Tray 2
ay 2
ay 2
ay 2ay 2
Use the following process to load paper into Tray 2.
NO
NO
NO
NONOTE:
TE:
TE:
TE:TE: The tray paper guides might be locked before use and might not be adjustable.
1.
1.
1.
1.1. Open the tray.
NO
NO
NO
NONOTE:
TE:
TE:
TE:TE: Do not open this tray while the printer is
printing.
2.
2.
2.
2.2. Before loading paper, adjust the paper-width
guides by squeezing the blue adjustment latches
and sliding the guides to the size of the paper
being used.
ENWW Load paper to Tray 2 27

7.
7.
7.
7.7. The tray message displays on the conguration
printer control panel.
8.
8.
8.
8.8. Press the button to accept the detected type OK
and size, or select to choose a Modify dierent
paper size or type.
For custom-size paper, specify the and X Y
dimensions for the paper when the prompt
displays on the printer control panel.
Y
X
Tray 2 paper orienta
Tray 2 paper orienta
Tray 2 paper orienta
Tray 2 paper orientaTray 2 paper orientation
tion
tion
tiontion
Position paper correctly in Tray 2 to ensure the best print quality.
T
T
T
TTable 2-5
able 2-5
able 2-5
able 2-5able 2-5 Letterhead or preprinted—portrait
Letterhead or preprinted—portrait
Letterhead or preprinted—portrait
Letterhead or preprinted—portrait Letterhead or preprinted—portrait
Duplex mode
Duplex mode
Duplex mode
Duplex modeDuplex mode Paper size
Paper size
Paper size
Paper sizePaper size How to l
How to l
How to l
How to lHow to load paper
oad paper
oad paper
oad paperoad paper
1-sided printing A4, Letter, 16K (197x273 mm) 16K
(195x270 mm), Executive, A5, 16K
(184x260 mm), B5 (JIS), Double Japan
Postcard (148x200 mm)
Face-up
Top edge at the back of the tray
NO
NO
NO
NONOTE:
TE:
TE:
TE:TE: This is the preferred orientation when printing on A4 or
Letter.
1-sided printing 11x17, A3, 8K (273x397 mm), 8K
(270x390 mm), 8K (260x368 mm), B4
(JIS), Legal, (8.5x13), Ocio Ocio
(216x340 mm), SRA4, RA4, A4, Letter
Face-up
Top edge at the right side of the tray
ENWW Load paper to Tray 2 29

T
T
T
TTable 2-5
able 2-5
able 2-5
able 2-5able 2-5 Letterhead or preprinted—portrait (c
Letterhead or preprinted—portrait (c
Letterhead or preprinted—portrait (c
Letterhead or preprinted—portrait (c Letterhead or preprinted—portrait (continued)
ontinued)
ontinued)
ontinued)ontinued)
Duplex mode
Duplex mode
Duplex mode
Duplex modeDuplex mode Paper size
Paper size
Paper size
Paper sizePaper size How to l
How to l
How to l
How to lHow to load paper
oad paper
oad paper
oad paperoad paper
Automatic 2-sided printing or with
Alternative Letterhead Mode enabled
A4, Letter, 16K (197x273 mm) 16K
(195x270 mm), Executive, A5, 16K
(184x260 mm), B5 (JIS), Double Japan
Postcard (148x200 mm)
Face-down
Top edge at the back of the tray
NO
NO
NO
NONOTE:
TE:
TE:
TE:TE: This is the preferred orientation when printing on A4 or
Letter.
Automatic 2-sided printing or with
Alternative Letterhead Mode enabled
11x17, A3, 8K (273x397 mm), 8K
(270x390 mm), 8K (260x368 mm), B4
(JIS), Legal, (8.5x13), Ocio Ocio
(216x340 mm), SRA4, RA4, A4, Letter
Face-down
Top edge at the left side of the tray
T
T
T
TTable 2-6
able 2-6
able 2-6
able 2-6able 2-6 Letterhead or preprinted—landscape
Letterhead or preprinted—landscape
Letterhead or preprinted—landscape
Letterhead or preprinted—landscape Letterhead or preprinted—landscape
Duplex mode
Duplex mode
Duplex mode
Duplex modeDuplex mode Paper size
Paper size
Paper size
Paper sizePaper size How to l
How to l
How to l
How to lHow to load paper
oad paper
oad paper
oad paperoad paper
1-sided printing A4, Letter, 16K (197x273 mm) 16K
(195x270 mm), Executive, A5, 16K
(184x260 mm), B5 (JIS), Double Japan
Postcard (148x200 mm)
Face-up
Top edge at the right side of the tray
NO
NO
NO
NONOTE:
TE:
TE:
TE:TE: This is the preferred orientation when printing on A4 or
Letter.
1-sided printing 11x17, A3, 8K (273x397 mm), 8K
(270x390 mm), 8K (260x368 mm), B4
(JIS), Legal, (8.5x13), Ocio Ocio
(216x340 mm), SRA4, RA4, A4, Letter
Face-up
Top edge at the back of the tray
30 Chapter 2 Paper trays ENWW

T
T
T
TTable 2-6
able 2-6
able 2-6
able 2-6able 2-6 Letterhead or preprinted—landscape (c
Letterhead or preprinted—landscape (c
Letterhead or preprinted—landscape (c
Letterhead or preprinted—landscape (c Letterhead or preprinted—landscape (continued)
ontinued)
ontinued)
ontinued)ontinued)
Duplex mode
Duplex mode
Duplex mode
Duplex modeDuplex mode Paper size
Paper size
Paper size
Paper sizePaper size How to l
How to l
How to l
How to lHow to load paper
oad paper
oad paper
oad paperoad paper
Automatic 2-sided printing or with
Alternative Letterhead Mode enabled
A4, Letter, 16K (197x273 mm) 16K
(195x270 mm), Executive, A5, 16K
(184x260 mm), B5 (JIS), Double Japan
Postcard (148x200 mm)
Face-down
Top edge at the left side of the tray
NO
NO
NO
NONOTE:
TE:
TE:
TE:TE: This is the preferred orientation when printing on A4 or
Letter.
Automatic 2-sided printing or with
Alternative Letterhead Mode enabled
11x17, A3, 8K (273x397 mm), 8K
(270x390 mm), 8K (260x368 mm), B4
(JIS), Legal, (8.5x13), Ocio Ocio
(216x340 mm), SRA4, RA4, A4, Letter
Face-down
Top edge at the back of the tray
T
T
T
TTable 2-7
able 2-7
able 2-7
able 2-7able 2-7 Prepunched—portrait
Prepunched—portrait
Prepunched—portrait
Prepunched—portrait Prepunched—portrait
Duplex mode
Duplex mode
Duplex mode
Duplex modeDuplex mode Paper size
Paper size
Paper size
Paper sizePaper size How to l
How to l
How to l
How to lHow to load paper
oad paper
oad paper
oad paperoad paper
1-sided printing A4, Letter, 16K (197x273 mm) 16K
(195x270 mm), Executive, A5, 16K
(184x260 mm), B5 (JIS), Double Japan
Postcard (148x200 mm)
Face-up
Holes at the left side of the tray, with the top of the form at the
rear of the printer
NO
NO
NO
NONOTE:
TE:
TE:
TE:TE: This is the preferred orientation when printing on A4 or
Letter.
1-sided printing 11x17, A3, 8K (273x397 mm), 8K
(270x390 mm), 8K (260x368 mm), B4
(JIS), Legal, (8.5x13), Ocio Ocio
(216x340 mm), SRA4, RA4, A4, Letter
Face-up
Holes at the back of the tray
ENWW Load paper to Tray 2 31
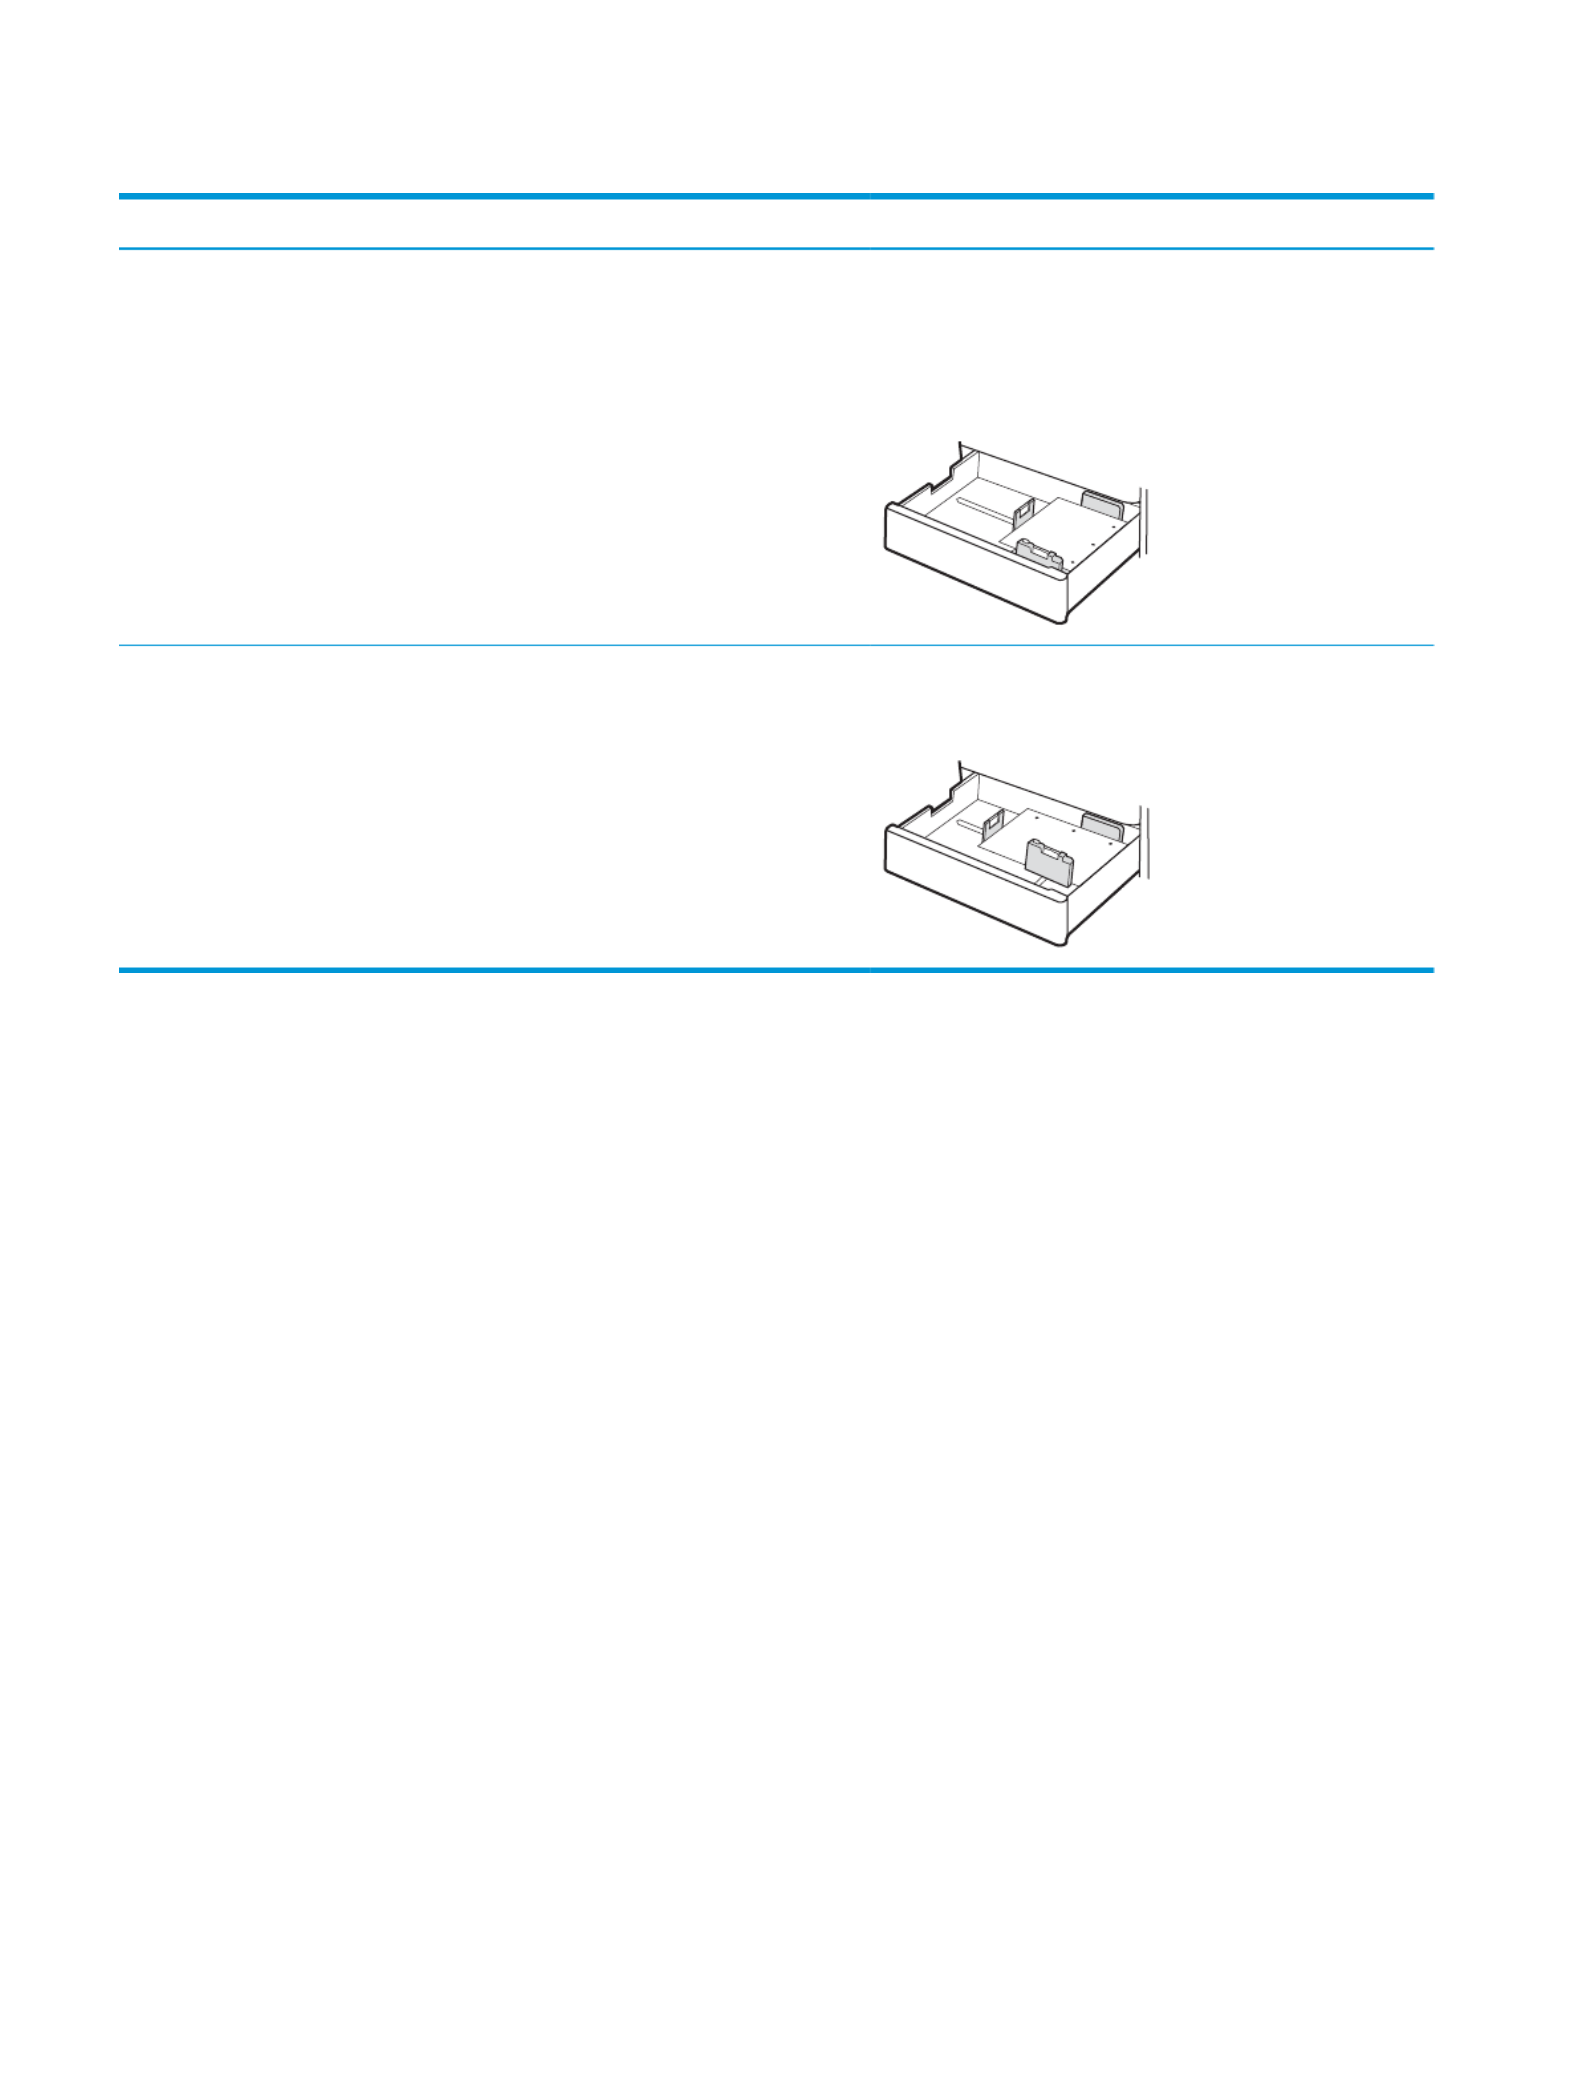
T
T
T
TTable 2-7
able 2-7
able 2-7
able 2-7able 2-7 Prepunched—portrait (continued)
Prepunched—portrait (continued)
Prepunched—portrait (continued)
Prepunched—portrait (continued) Prepunched—portrait (continued)
Duplex mode
Duplex mode
Duplex mode
Duplex modeDuplex mode Paper size
Paper size
Paper size
Paper sizePaper size How to l
How to l
How to l
How to lHow to load paper
oad paper
oad paper
oad paperoad paper
Automatic 2-sided printing or with
Alternative Letterhead Mode enabled
A4, Letter, 16K (197x273 mm) 16K
(195x270 mm), Executive, A5, 16K
(184x260 mm), B5 (JIS), Double Japan
Postcard (148x200 mm)
Face-down
Holes at the right side of the tray
NO
NO
NO
NONOTE:
TE:
TE:
TE:TE: This is the preferred orientation when printing on A4 or
Letter.
Automatic 2-sided printing or with
Alternative Letterhead Mode enabled
11x17, A3, 8K (273x397 mm), 8K
(270x390 mm), 8K (260x368 mm), B4
(JIS), Legal, (8.5x13), Ocio Ocio
(216x340 mm), SRA4, RA4, A4, Letter
Face-down
Holes at the back of the tray
32 Chapter 2 Paper trays ENWW

Use al
Use al
Use al
Use alUse alternative letterhe
ternative letterhe
ternative letterhe
ternative letterheternative letterhead mode
ad mode
ad mode
ad modead mode
Use the Alternative Letterhead Mode feature to load letterhead or preprinted paper into the tray the same way
for all jobs, whether printing to one side of the sheet of paper or to both sides. When using this mode, load paper
as for automatic duplex printing.
●Enable Alternative Letterhead Mode by using the printer control-panel menus
Enable Al
Enable Al
Enable Al
Enable AlEnable Alternative Letterhe
ternative Letterhe
ternative Letterhe
ternative Letterheternative Letterhead Mode by using the printer contr
ad Mode by using the printer contr
ad Mode by using the printer contr
ad Mode by using the printer contrad Mode by using the printer control-panel menus
ol-panel menus
ol-panel menus
ol-panel menusol-panel menus
Use the menu to set the Settings Alternative Letterhead Mode setting.
1.
1.
1.
1.1. From the Home screen on the printer control panel, navigate to and open the menu.Settings
2.
2.
2.
2.2. Open the following menus:
a.
a.
a.
a.a. Copy/Print or Print
b.
b.
b.
b.b. Manage Trays
c.
c.
c.
c.c. Alternative Letterhead Mode
3.
3.
3.
3.3. Select .On
ENWW Load paper to Tray 2 33

Lo
Lo
Lo
LoLoad paper t
ad paper t
ad paper t
ad paper tad paper to the 550-sheet paper tray
o the 550-sheet paper tray
o the 550-sheet paper tray
o the 550-sheet paper trayo the 550-sheet paper tray
The following information describes how to load paper into the 550-sheet paper tray.
●Load paper to the 550-sheet paper tray
●550-sheet paper tray paper orientation
●Use alternative letterhead mode
Load paper t
Load paper t
Load paper t
Load paper tLoad paper to the 550-sheet paper tr
o the 550-sheet paper tr
o the 550-sheet paper tr
o the 550-sheet paper tro the 550-sheet paper tray
ay
ay
ayay
Use the following process to load paper into the 550-sheet paper tray.
1.
1.
1.
1.1. Open the tray.
NO
NO
NO
NONOTE:
TE:
TE:
TE:TE: Do not open this tray while the printer is
printing.
2.
2.
2.
2.2. Before loading paper, adjust the paper-width
guides by squeezing the blue adjustment latches
and sliding the guides to the size of the paper
being used.
3.
3.
3.
3.3. Adjust the paper-length guide by squeezing the
adjustment latch and sliding the guide to the size
of the paper being used.
34 Chapter 2 Paper trays ENWW

4.
4.
4.
4.4. For any of the following paper sizes, also adjust
the blue paper-stop lever in the left rear corner of
the tray to the correct position, as indicated by the
label in the tray:
●12 x 18
●RA3
●11 x 17
●A3
●SRA3
5.
5.
5.
5.5. Load paper into the tray. For information about
how to orient the paper, see 550-sheet paper tray
paper orientation on page 36.
NO
NO
NO
NONOTE:
TE:
TE:
TE:TE: To prevent jams, do not the tray. overll
Be sure that the top of the stack is below the tray
full indicator.
6.
6.
6.
6.6. Check the paper to verify the guides lightly touch
the stack, but do not bend it.
NO
NO
NO
NONOTE:
TE:
TE:
TE:TE: Do not adjust the paper guides tightly
against the paper stack. Adjust them to the
indentations or markings in the tray.
7.
7.
7.
7.7. Close the tray.
ENWW Load paper to the 550-sheet paper tray 35

8.
8.
8.
8.8. The tray message displays on the conguration
printer control panel.
9.
9.
9.
9.9. Press the button to accept the detected type OK
and size, or select to choose a Modify dierent
paper size or type.
For custom-size paper, specify the and X Y
dimensions for the paper when the prompt
displays on the printer control panel.
X
Y
550-sheet paper tray paper orienta
550-sheet paper tray paper orienta
550-sheet paper tray paper orienta
550-sheet paper tray paper orienta550-sheet paper tray paper orientation
tion
tion
tiontion
Position paper correctly in the 550-sheet tray to ensure the best print quality.
T
T
T
TTable 2-8
able 2-8
able 2-8
able 2-8able 2-8 Letterhead or preprinted—portrait
Letterhead or preprinted—portrait
Letterhead or preprinted—portrait
Letterhead or preprinted—portrait Letterhead or preprinted—portrait
Duplex mode
Duplex mode
Duplex mode
Duplex modeDuplex mode Paper size
Paper size
Paper size
Paper sizePaper size How to l
How to l
How to l
How to lHow to load paper
oad paper
oad paper
oad paperoad paper
1-sided printing A4, Letter, 16K (197x273 mm) 16K
(195x270 mm), Executive, A5, 16K
(184x260 mm), B5 (JIS), Double Japan
Postcard (148x200 mm)
Face-up
Top edge at the back of the tray
NO
NO
NO
NONOTE:
TE:
TE:
TE:TE: This is the preferred orientation when printing on A4 or
Letter.
1-sided printing 12x18, 11x17, A3, 8K (273x397 mm), 8K
(270x390 mm), 8K (260x368 mm), B4
(JIS), Legal, (8.5x13), Ocio Ocio
(216x340 mm), SRA3, RA3, SRA4, RA4,
A4, Letter
Face-up
Top edge at the right side of the tray
36 Chapter 2 Paper trays ENWW

T
T
T
TTable 2-8
able 2-8
able 2-8
able 2-8able 2-8 Letterhead or preprinted—portrait (c
Letterhead or preprinted—portrait (c
Letterhead or preprinted—portrait (c
Letterhead or preprinted—portrait (c Letterhead or preprinted—portrait (continued)
ontinued)
ontinued)
ontinued)ontinued)
Duplex mode
Duplex mode
Duplex mode
Duplex modeDuplex mode Paper size
Paper size
Paper size
Paper sizePaper size How to l
How to l
How to l
How to lHow to load paper
oad paper
oad paper
oad paperoad paper
Automatic 2-sided printing or with
Alternative Letterhead Mode enabled
A4, Letter, 16K (197x273 mm) 16K
(195x270 mm), Executive, A5, 16K
(184x260 mm), B5 (JIS), Double Japan
Postcard (148x200 mm)
Face-down
Top edge at the back of the tray
NO
NO
NO
NONOTE:
TE:
TE:
TE:TE: This is the preferred orientation when printing on A4 or
Letter.
Automatic 2-sided printing or with
Alternative Letterhead Mode enabled
12x18, 11x17, A3, 8K (273x397 mm), 8K
(270x390 mm), 8K (260x368 mm), B4
(JIS), Legal, (8.5x13), Ocio Ocio
(216x340 mm), SRA3, RA3, SRA4, RA4,
A4, Letter
Face-down
Top edge at the left side of the tray
T
T
T
TTable 2-9
able 2-9
able 2-9
able 2-9able 2-9 Letterhead or preprinted—landscape
Letterhead or preprinted—landscape
Letterhead or preprinted—landscape
Letterhead or preprinted—landscape Letterhead or preprinted—landscape
Duplex mode
Duplex mode
Duplex mode
Duplex modeDuplex mode Paper size
Paper size
Paper size
Paper sizePaper size How to l
How to l
How to l
How to lHow to load paper
oad paper
oad paper
oad paperoad paper
1-sided printing A4, Letter, 16K (197x273 mm) 16K
(195x270 mm), Executive, A5, 16K
(184x260 mm), B5 (JIS), Double Japan
Postcard (148x200 mm)
Face-up
Top edge at the right side of the tray
NO
NO
NO
NONOTE:
TE:
TE:
TE:TE: This is the preferred orientation when printing on A4 or
Letter.
1-sided printing 12x18, 11x17, A3, 8K (273x397 mm), 8K
(270x390 mm), 8K (260x368 mm), B4
(JIS), Legal, (8.5x13), Ocio Ocio
(216x340 mm), SRA3, RA3, SRA4, RA4,
A4, Letter
Face-up
Top edge at the back of the tray
ENWW Load paper to the 550-sheet paper tray 37
T
T
T
TTable 2-9
able 2-9
able 2-9
able 2-9able 2-9 Letterhead or preprinted—landscape (c
Letterhead or preprinted—landscape (c
Letterhead or preprinted—landscape (c
Letterhead or preprinted—landscape (c Letterhead or preprinted—landscape (continued)
ontinued)
ontinued)
ontinued)ontinued)
Duplex mode
Duplex mode
Duplex mode
Duplex modeDuplex mode Paper size
Paper size
Paper size
Paper sizePaper size How to l
How to l
How to l
How to lHow to load paper
oad paper
oad paper
oad paperoad paper
Automatic 2-sided printing or with
Alternative Letterhead Mode enabled
12x18, 11x17, A3, 8K (273x397 mm), 8K
(270x390 mm), 8K (260x368 mm), B4
(JIS), Legal, (8.5x13), Ocio Ocio
(216x340 mm), SRA3, RA3, SRA4, RA4,
A4, Letter
Face-down
Top edge at the back of the tray
Automatic 2-sided printing or with
Alternative Letterhead Mode enabled
A4, Letter, 16K (197x273 mm) 16K
(195x270 mm), Executive, A5, 16K
(184x260 mm), B5 (JIS), Double Japan
Postcard (148x200 mm)
Face-down
Top edge at the left side of the tray
NO
NO
NO
NONOTE:
TE:
TE:
TE:TE: This is the preferred orientation when printing on A4 or
Letter.
T
T
T
TTable 2-10
able 2-10
able 2-10
able 2-10able 2-10 Prepunched—portrait
Prepunched—portrait
Prepunched—portrait
Prepunched—portrait Prepunched—portrait
Duplex mode
Duplex mode
Duplex mode
Duplex modeDuplex mode Paper size
Paper size
Paper size
Paper sizePaper size How to l
How to l
How to l
How to lHow to load paper
oad paper
oad paper
oad paperoad paper
1-sided printing A4, Letter, 16K (197x273 mm) 16K
(195x270 mm), Executive, A5, 16K
(184x260 mm), B5 (JIS), Double Japan
Postcard (148x200 mm)
Face-up
Holes at the left side of the tray, with the top of the form at the
rear of the printer
NO
NO
NO
NONOTE:
TE:
TE:
TE:TE: This is the preferred orientation when printing on A4 or
Letter.
1-sided printing 12x18, 11x17, A3, 8K (273x397 mm), 8K
(270x390 mm), 8K (260x368 mm), B4
(JIS), Legal, (8.5x13), Ocio Ocio
(216x340 mm), SRA3, RA3, SRA4, RA4,
A4, Letter
Face-up
Holes at the back of the tray
38 Chapter 2 Paper trays ENWW

T
T
T
TTable 2-10
able 2-10
able 2-10
able 2-10able 2-10 Prepunched—portrait (continued)
Prepunched—portrait (continued)
Prepunched—portrait (continued)
Prepunched—portrait (continued) Prepunched—portrait (continued)
Duplex mode
Duplex mode
Duplex mode
Duplex modeDuplex mode Paper size
Paper size
Paper size
Paper sizePaper size How to l
How to l
How to l
How to lHow to load paper
oad paper
oad paper
oad paperoad paper
Automatic 2-sided printing or with
Alternative Letterhead Mode enabled
A4, Letter, 16K (197x273 mm) 16K
(195x270 mm), Executive, A5, 16K
(184x260 mm), B5 (JIS), Double Japan
Postcard (148x200 mm)
Face-down
Holes at the right side of the tray
NO
NO
NO
NONOTE:
TE:
TE:
TE:TE: This is the preferred orientation when printing on A4 or
Letter.
Automatic 2-sided printing or with
Alternative Letterhead Mode enabled
12x18, 11x17, A3, 8K (273x397 mm), 8K
(270x390 mm), 8K (260x368 mm), B4
(JIS), Legal, (8.5x13), Ocio Ocio
(216x340 mm), SRA3, RA3, SRA4, RA4,
A4, Letter
Face-down
Holes at the back of the tray
ENWW Load paper to the 550-sheet paper tray 39

Use al
Use al
Use al
Use alUse alternative letterhe
ternative letterhe
ternative letterhe
ternative letterheternative letterhead mode
ad mode
ad mode
ad modead mode
Use the Alternative Letterhead Mode feature to load letterhead or preprinted paper into the tray the same way
for all jobs, whether printing to one side of the sheet of paper or to both sides. When using this mode, load paper
as for automatic duplex printing.
●Enable Alternative Letterhead Mode by using the printer control-panel menus
Enable Al
Enable Al
Enable Al
Enable AlEnable Alternative Letterhe
ternative Letterhe
ternative Letterhe
ternative Letterheternative Letterhead Mode by using the printer contr
ad Mode by using the printer contr
ad Mode by using the printer contr
ad Mode by using the printer contrad Mode by using the printer control-panel menus
ol-panel menus
ol-panel menus
ol-panel menusol-panel menus
Use the menu to set the Settings Alternative Letterhead Mode setting.
1.
1.
1.
1.1. From the Home screen on the printer control panel, navigate to and open the menu.Settings
2.
2.
2.
2.2. Open the following menus:
a.
a.
a.
a.a. Copy/Print or Print
b.
b.
b.
b.b. Manage Trays
c.
c.
c.
c.c. Alternative Letterhead Mode
3.
3.
3.
3.3. Select .On
40 Chapter 2 Paper trays ENWW

Lo
Lo
Lo
LoLoad paper t
ad paper t
ad paper t
ad paper tad paper to the 2 x 550-sheet paper trays
o the 2 x 550-sheet paper trays
o the 2 x 550-sheet paper trays
o the 2 x 550-sheet paper trayso the 2 x 550-sheet paper trays
The following information describes how to load paper into the 2 x 550-sheet paper trays.
●Load paper to the 2 x 550-sheet paper trays
●2 x 550-sheet paper tray paper orientation
●Use alternative letterhead mode
Load paper t
Load paper t
Load paper t
Load paper tLoad paper to the 2 x 550-sheet paper tr
o the 2 x 550-sheet paper tr
o the 2 x 550-sheet paper tr
o the 2 x 550-sheet paper tro the 2 x 550-sheet paper trays
ays
ays
aysays
Use the following process to load paper into the 2 x 550-sheet paper trays.
1.
1.
1.
1.1. Open the tray.
NO
NO
NO
NONOTE:
TE:
TE:
TE:TE: Do not open this tray while the printer is
printing.
2.
2.
2.
2.2. Before loading paper, adjust the paper-width
guides by squeezing the blue adjustment latches
and sliding the guides to the size of the paper
being used.
3.
3.
3.
3.3. Adjust the paper-length guide by squeezing the
adjustment latch and sliding the guide to the size
of the paper being used.
ENWW Load paper to the 2 x 550-sheet paper trays 41
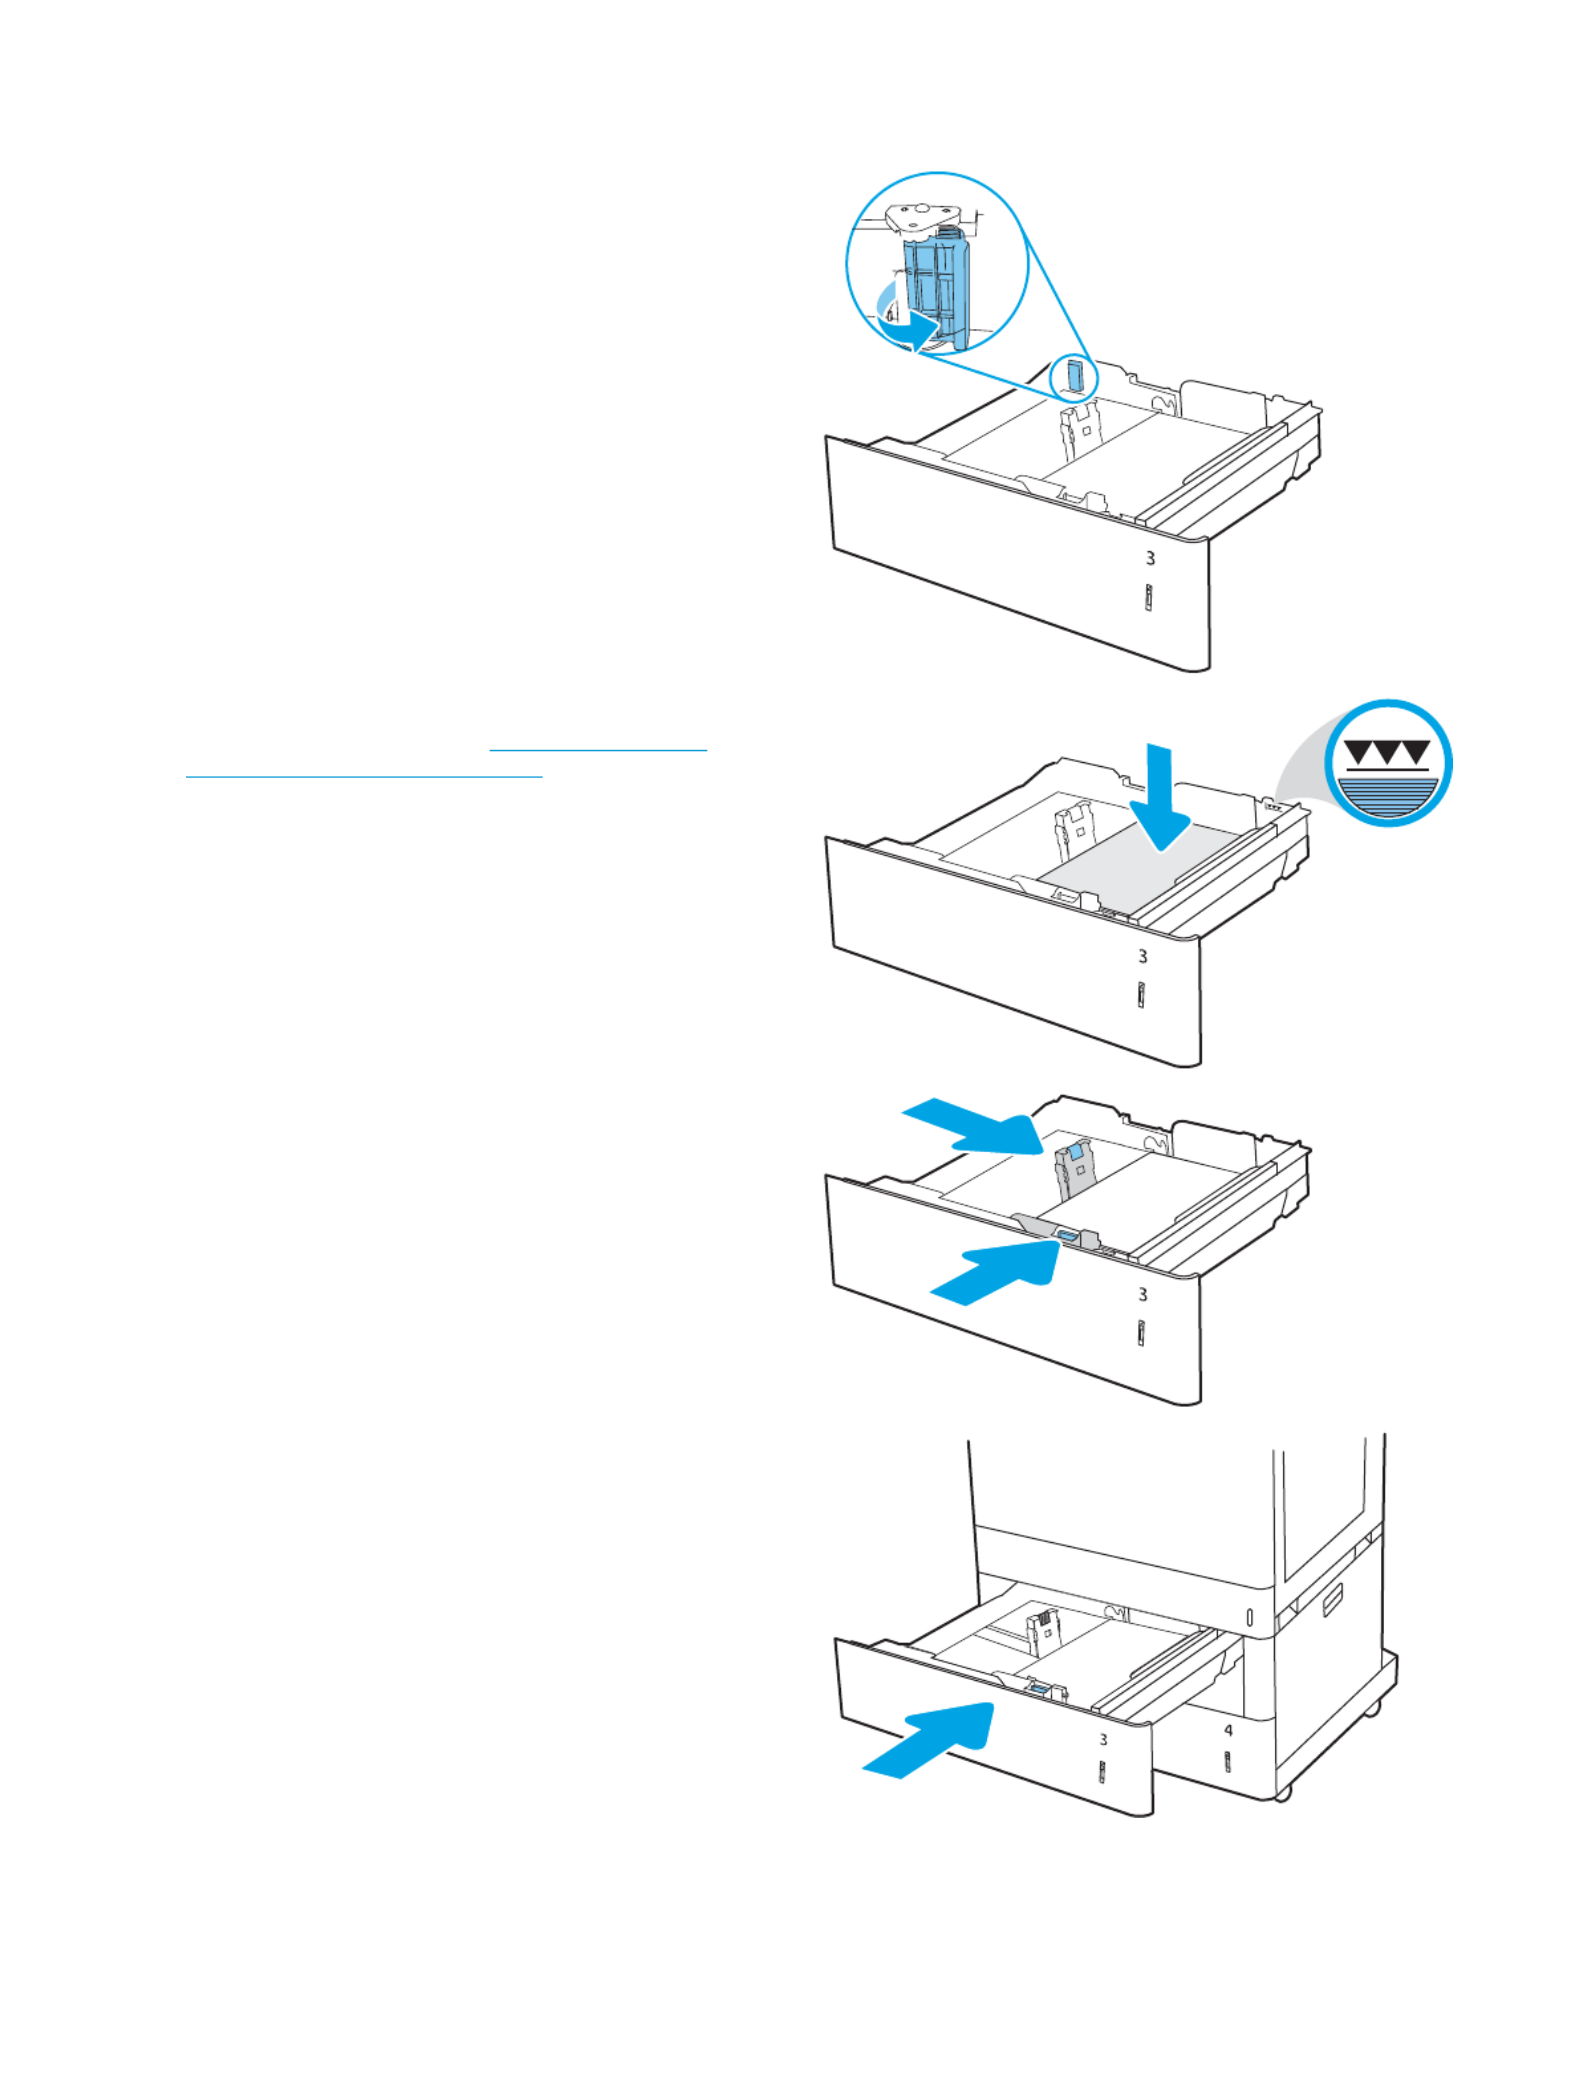
4.
4.
4.
4.4. For any of the following paper sizes, also adjust
the blue paper-stop lever in the left rear corner of
the tray to the correct position, as indicated by the
label in the tray:
●12 x 18
●RA3
●11 x 17
●A3
●SRA3
5.
5.
5.
5.5. Load paper into the tray. For information about
how to orient the paper, see 2 x 550-sheet paper
tray paper orientation on page 43.
NO
NO
NO
NONOTE:
TE:
TE:
TE:TE: To prevent jams, do not the tray. overll
Be sure that the top of the stack is below the tray
full indicator.
6.
6.
6.
6.6. Check the paper to verify the guides lightly touch
the stack, but do not bend it.
NO
NO
NO
NONOTE:
TE:
TE:
TE:TE: Do not adjust the paper guides tightly
against the paper stack. Adjust them to the
indentations or markings in the tray.
7.
7.
7.
7.7. Close the tray.
42 Chapter 2 Paper trays ENWW

8.
8.
8.
8.8. The tray message displays on the conguration
printer control panel.
9.
9.
9.
9.9. Press the button to accept the detected type OK
and size, or select to choose a Modify dierent
paper size or type.
For custom-size paper, specify the and X Y
dimensions for the paper when the prompt
displays on the printer control panel.
X
Y
2 x 550-sheet paper tray paper orienta
2 x 550-sheet paper tray paper orienta
2 x 550-sheet paper tray paper orienta
2 x 550-sheet paper tray paper orienta2 x 550-sheet paper tray paper orientation
tion
tion
tiontion
Position paper correctly in the 2 x 550-sheet trays to ensure the best print quality.
T
T
T
TTable 2-11
able 2-11
able 2-11
able 2-11able 2-11 Letterhead or preprinted—portrait
Letterhead or preprinted—portrait
Letterhead or preprinted—portrait
Letterhead or preprinted—portrait Letterhead or preprinted—portrait
Duplex mode
Duplex mode
Duplex mode
Duplex modeDuplex mode Paper size
Paper size
Paper size
Paper sizePaper size How to l
How to l
How to l
How to lHow to load paper
oad paper
oad paper
oad paperoad paper
1-sided printing A4, Letter, 16K (197x273 mm) 16K
(195x270 mm), Executive, A5, 16K
(184x260 mm), B5 (JIS), Double Japan
Postcard (148x200 mm)
Face-up
Top edge at the back of the tray
NO
NO
NO
NONOTE:
TE:
TE:
TE:TE: This is the preferred orientation when printing on A4 or
Letter.
1-sided printing 12x18, 11x17, A3, 8K (273x397 mm), 8K
(270x390 mm), 8K (260x368 mm), B4
(JIS), Legal, (8.5x13), Ocio Ocio
(216x340 mm), SRA3, RA3, SRA4, RA4,
A4, Letter
Face-up
Top edge at the right side of the tray
ENWW Load paper to the 2 x 550-sheet paper trays 43

T
T
T
TTable 2-11
able 2-11
able 2-11
able 2-11able 2-11 Letterhead or preprinted—portrait (c
Letterhead or preprinted—portrait (c
Letterhead or preprinted—portrait (c
Letterhead or preprinted—portrait (c Letterhead or preprinted—portrait (continued)
ontinued)
ontinued)
ontinued)ontinued)
Duplex mode
Duplex mode
Duplex mode
Duplex modeDuplex mode Paper size
Paper size
Paper size
Paper sizePaper size How to l
How to l
How to l
How to lHow to load paper
oad paper
oad paper
oad paperoad paper
Automatic 2-sided printing or with
Alternative Letterhead Mode enabled
A4, Letter, 16K (197x273 mm) 16K
(195x270 mm), Executive, A5, 16K
(184x260 mm), B5 (JIS), Double Japan
Postcard (148x200 mm)
Face-down
Top edge at the back of the tray
NO
NO
NO
NONOTE:
TE:
TE:
TE:TE: This is the preferred orientation when printing on A4 or
Letter.
Automatic 2-sided printing or with
Alternative Letterhead Mode enabled
12x18, 11x17, A3, 8K (273x397 mm), 8K
(270x390 mm), 8K (260x368 mm), B4
(JIS), Legal, (8.5x13), Ocio Ocio
(216x340 mm), SRA3, RA3, SRA4, RA4,
A4, Letter
Face-down
Top edge at the left side of the tray
T
T
T
TTable 2-12
able 2-12
able 2-12
able 2-12able 2-12 Letterhead or preprinted—landscape
Letterhead or preprinted—landscape
Letterhead or preprinted—landscape
Letterhead or preprinted—landscape Letterhead or preprinted—landscape
Duplex mode
Duplex mode
Duplex mode
Duplex modeDuplex mode Paper size
Paper size
Paper size
Paper sizePaper size How to l
How to l
How to l
How to lHow to load paper
oad paper
oad paper
oad paperoad paper
1-sided printing A4, Letter, 16K (197x273 mm) 16K
(195x270 mm), Executive, A5, 16K
(184x260 mm), B5 (JIS), Double Japan
Postcard (148x200 mm)
Face-up
Top edge at the right side of the tray
NO
NO
NO
NONOTE:
TE:
TE:
TE:TE: This is the preferred orientation when printing on A4 or
Letter.
1-sided printing 12x18, 11x17, A3, 8K (273x397 mm), 8K
(270x390 mm), 8K (260x368 mm), B4
(JIS), Legal, (8.5x13), Ocio Ocio
(216x340 mm), SRA3, RA3, SRA4, RA4,
A4, Letter
Face-up
Top edge at the back of the tray
44 Chapter 2 Paper trays ENWW

T
T
T
TTable 2-12
able 2-12
able 2-12
able 2-12able 2-12 Letterhead or preprinted—landscape (c
Letterhead or preprinted—landscape (c
Letterhead or preprinted—landscape (c
Letterhead or preprinted—landscape (c Letterhead or preprinted—landscape (continued)
ontinued)
ontinued)
ontinued)ontinued)
Duplex mode
Duplex mode
Duplex mode
Duplex modeDuplex mode Paper size
Paper size
Paper size
Paper sizePaper size How to l
How to l
How to l
How to lHow to load paper
oad paper
oad paper
oad paperoad paper
Automatic 2-sided printing or with
Alternative Letterhead Mode enabled
12x18, 11x17, A3, 8K (273x397 mm), 8K
(270x390 mm), 8K (260x368 mm), B4
(JIS), Legal, (8.5x13), Ocio Ocio
(216x340 mm), SRA3, RA3, SRA4, RA4,
A4, Letter
Face-down
Top edge at the back of the tray
Automatic 2-sided printing or with
Alternative Letterhead Mode enabled
A4, Letter, 16K (197x273 mm) 16K
(195x270 mm), Executive, A5, 16K
(184x260 mm), B5 (JIS), Double Japan
Postcard (148x200 mm)
Face-down
Top edge at the left side of the tray
NO
NO
NO
NONOTE:
TE:
TE:
TE:TE: This is the preferred orientation when printing on A4 or
Letter.
T
T
T
TTable 2-13
able 2-13
able 2-13
able 2-13able 2-13 Prepunched—portrait
Prepunched—portrait
Prepunched—portrait
Prepunched—portrait Prepunched—portrait
Duplex mode
Duplex mode
Duplex mode
Duplex modeDuplex mode Paper size
Paper size
Paper size
Paper sizePaper size How to l
How to l
How to l
How to lHow to load paper
oad paper
oad paper
oad paperoad paper
1-sided printing A4, Letter, 16K (197x273 mm) 16K
(195x270 mm), Executive, A5, 16K
(184x260 mm), B5 (JIS), Double Japan
Postcard (148x200 mm)
Face-up
Holes at the left side of the tray, with the top of the form at the
rear of the printer
NO
NO
NO
NONOTE:
TE:
TE:
TE:TE: This is the preferred orientation when printing on A4 or
Letter.
1-sided printing 12x18, 11x17, A3, 8K (273x397 mm), 8K
(270x390 mm), 8K (260x368 mm), B4
(JIS), Legal, (8.5x13), Ocio Ocio
(216x340 mm), SRA3, RA3, SRA4, RA4,
A4, Letter
Face-up
Holes at the back of the tray
ENWW Load paper to the 2 x 550-sheet paper trays 45

T
T
T
TTable 2-13
able 2-13
able 2-13
able 2-13able 2-13 Prepunched—portrait (continued)
Prepunched—portrait (continued)
Prepunched—portrait (continued)
Prepunched—portrait (continued) Prepunched—portrait (continued)
Duplex mode
Duplex mode
Duplex mode
Duplex modeDuplex mode Paper size
Paper size
Paper size
Paper sizePaper size How to l
How to l
How to l
How to lHow to load paper
oad paper
oad paper
oad paperoad paper
Automatic 2-sided printing or with
Alternative Letterhead Mode enabled
A4, Letter, 16K (197x273 mm) 16K
(195x270 mm), Executive, A5, 16K
(184x260 mm), B5 (JIS), Double Japan
Postcard (148x200 mm)
Face-down
Holes at the right side of the tray
NO
NO
NO
NONOTE:
TE:
TE:
TE:TE: This is the preferred orientation when printing on A4 or
Letter.
Automatic 2-sided printing or with
Alternative Letterhead Mode enabled
12x18, 11x17, A3, 8K (273x397 mm), 8K
(270x390 mm), 8K (260x368 mm), B4
(JIS), Legal, (8.5x13), Ocio Ocio
(216x340 mm), SRA3, RA3, SRA4, RA4,
A4, Letter
Face-down
Holes at the back of the tray
46 Chapter 2 Paper trays ENWW

Use al
Use al
Use al
Use alUse alternative letterhe
ternative letterhe
ternative letterhe
ternative letterheternative letterhead mode
ad mode
ad mode
ad modead mode
Use the Alternative Letterhead Mode feature to load letterhead or preprinted paper into the tray the same way
for all jobs, whether printing to one side of the sheet of paper or to both sides. When using this mode, load paper
as for automatic duplex printing.
●Enable Alternative Letterhead Mode by using the printer control-panel menus
Enable Al
Enable Al
Enable Al
Enable AlEnable Alternative Letterhe
ternative Letterhe
ternative Letterhe
ternative Letterheternative Letterhead Mode by using the printer contr
ad Mode by using the printer contr
ad Mode by using the printer contr
ad Mode by using the printer contrad Mode by using the printer control-panel menus
ol-panel menus
ol-panel menus
ol-panel menusol-panel menus
Use the menu to set the Settings Alternative Letterhead Mode setting.
1.
1.
1.
1.1. From the Home screen on the printer control panel, navigate to and open the menu.Settings
2.
2.
2.
2.2. Open the following menus:
a.
a.
a.
a.a. Copy/Print or Print
b.
b.
b.
b.b. Manage Trays
c.
c.
c.
c.c. Alternative Letterhead Mode
3.
3.
3.
3.3. Select .On
ENWW Load paper to the 2 x 550-sheet paper trays 47

Lo
Lo
Lo
LoLoad paper t
ad paper t
ad paper t
ad paper tad paper to the 2,700-sheet high-capacity input paper trays
o the 2,700-sheet high-capacity input paper trays
o the 2,700-sheet high-capacity input paper trays
o the 2,700-sheet high-capacity input paper trayso the 2,700-sheet high-capacity input paper trays
The following information describes how to load paper into the HCI paper trays.
●Load paper to the 2,700-sheet high-capacity input paper trays
●2,700-sheet HCI paper tray paper orientation
●Use alternative letterhead mode
Load paper t
Load paper t
Load paper t
Load paper tLoad paper to the 2,700-sheet high-capacity input paper tr
o the 2,700-sheet high-capacity input paper tr
o the 2,700-sheet high-capacity input paper tr
o the 2,700-sheet high-capacity input paper tro the 2,700-sheet high-capacity input paper trays
ays
ays
aysays
Use the following process to load paper into the HCI paper trays.
1.
1.
1.
1.1. Release the tray latch, and then slide the tray away
from the printer to open it.
NO
NO
NO
NONOTE:
TE:
TE:
TE:TE: Do not open this tray while the printer is
printing.
2.
2.
2.
2.2. Adjust the paper-size guide to the correct position
for the paper.
11
A4
48 Chapter 2 Paper trays ENWW

3.
3.
3.
3.3. Load paper into the tray. Check the paper to verify
the guides lightly touch the stack, but do not bend
it. For information about how to orient the paper,
see 2,700-sheet HCI paper tray paper orientation
on page 49.
NO
NO
NO
NONOTE:
TE:
TE:
TE:TE: To prevent jams, do not the tray. overll
Be sure that the top of the stack is below the tray
full indicator.
NO
NO
NO
NONOTE:
TE:
TE:
TE:TE: If the tray is not adjusted correctly, an
error message might appear during printing or the
paper might jam.
4.
4.
4.
4.4. Close the tray.
5.
5.
5.
5.5. The tray message displays on the conguration
printer control panel.
6.
6.
6.
6.6. Press the button to accept the detected type OK
and size, or select to choose a Modify dierent
paper size or type.
2,700-sheet HCI paper tray paper orienta
2,700-sheet HCI paper tray paper orienta
2,700-sheet HCI paper tray paper orienta
2,700-sheet HCI paper tray paper orienta2,700-sheet HCI paper tray paper orientation
tion
tion
tiontion
Position paper correctly in the HCI trays to ensure the best print quality.
ENWW Load paper to the 2,700-sheet high-capacity input paper trays 49

T
T
T
TTable 2-14
able 2-14
able 2-14
able 2-14able 2-14 Letterhead or preprinted—portrait
Letterhead or preprinted—portrait
Letterhead or preprinted—portrait
Letterhead or preprinted—portrait Letterhead or preprinted—portrait
Duplex mode
Duplex mode
Duplex mode
Duplex modeDuplex mode Paper size
Paper size
Paper size
Paper sizePaper size How to l
How to l
How to l
How to lHow to load paper
oad paper
oad paper
oad paperoad paper
1-sided printing A4, Letter Face-down
Top edge at the back of the tray
Automatic 2-sided printing or with
Alternative Letterhead Mode enabled
A4, Letter Face-up
Top edge at the back of the tray
50 Chapter 2 Paper trays ENWW
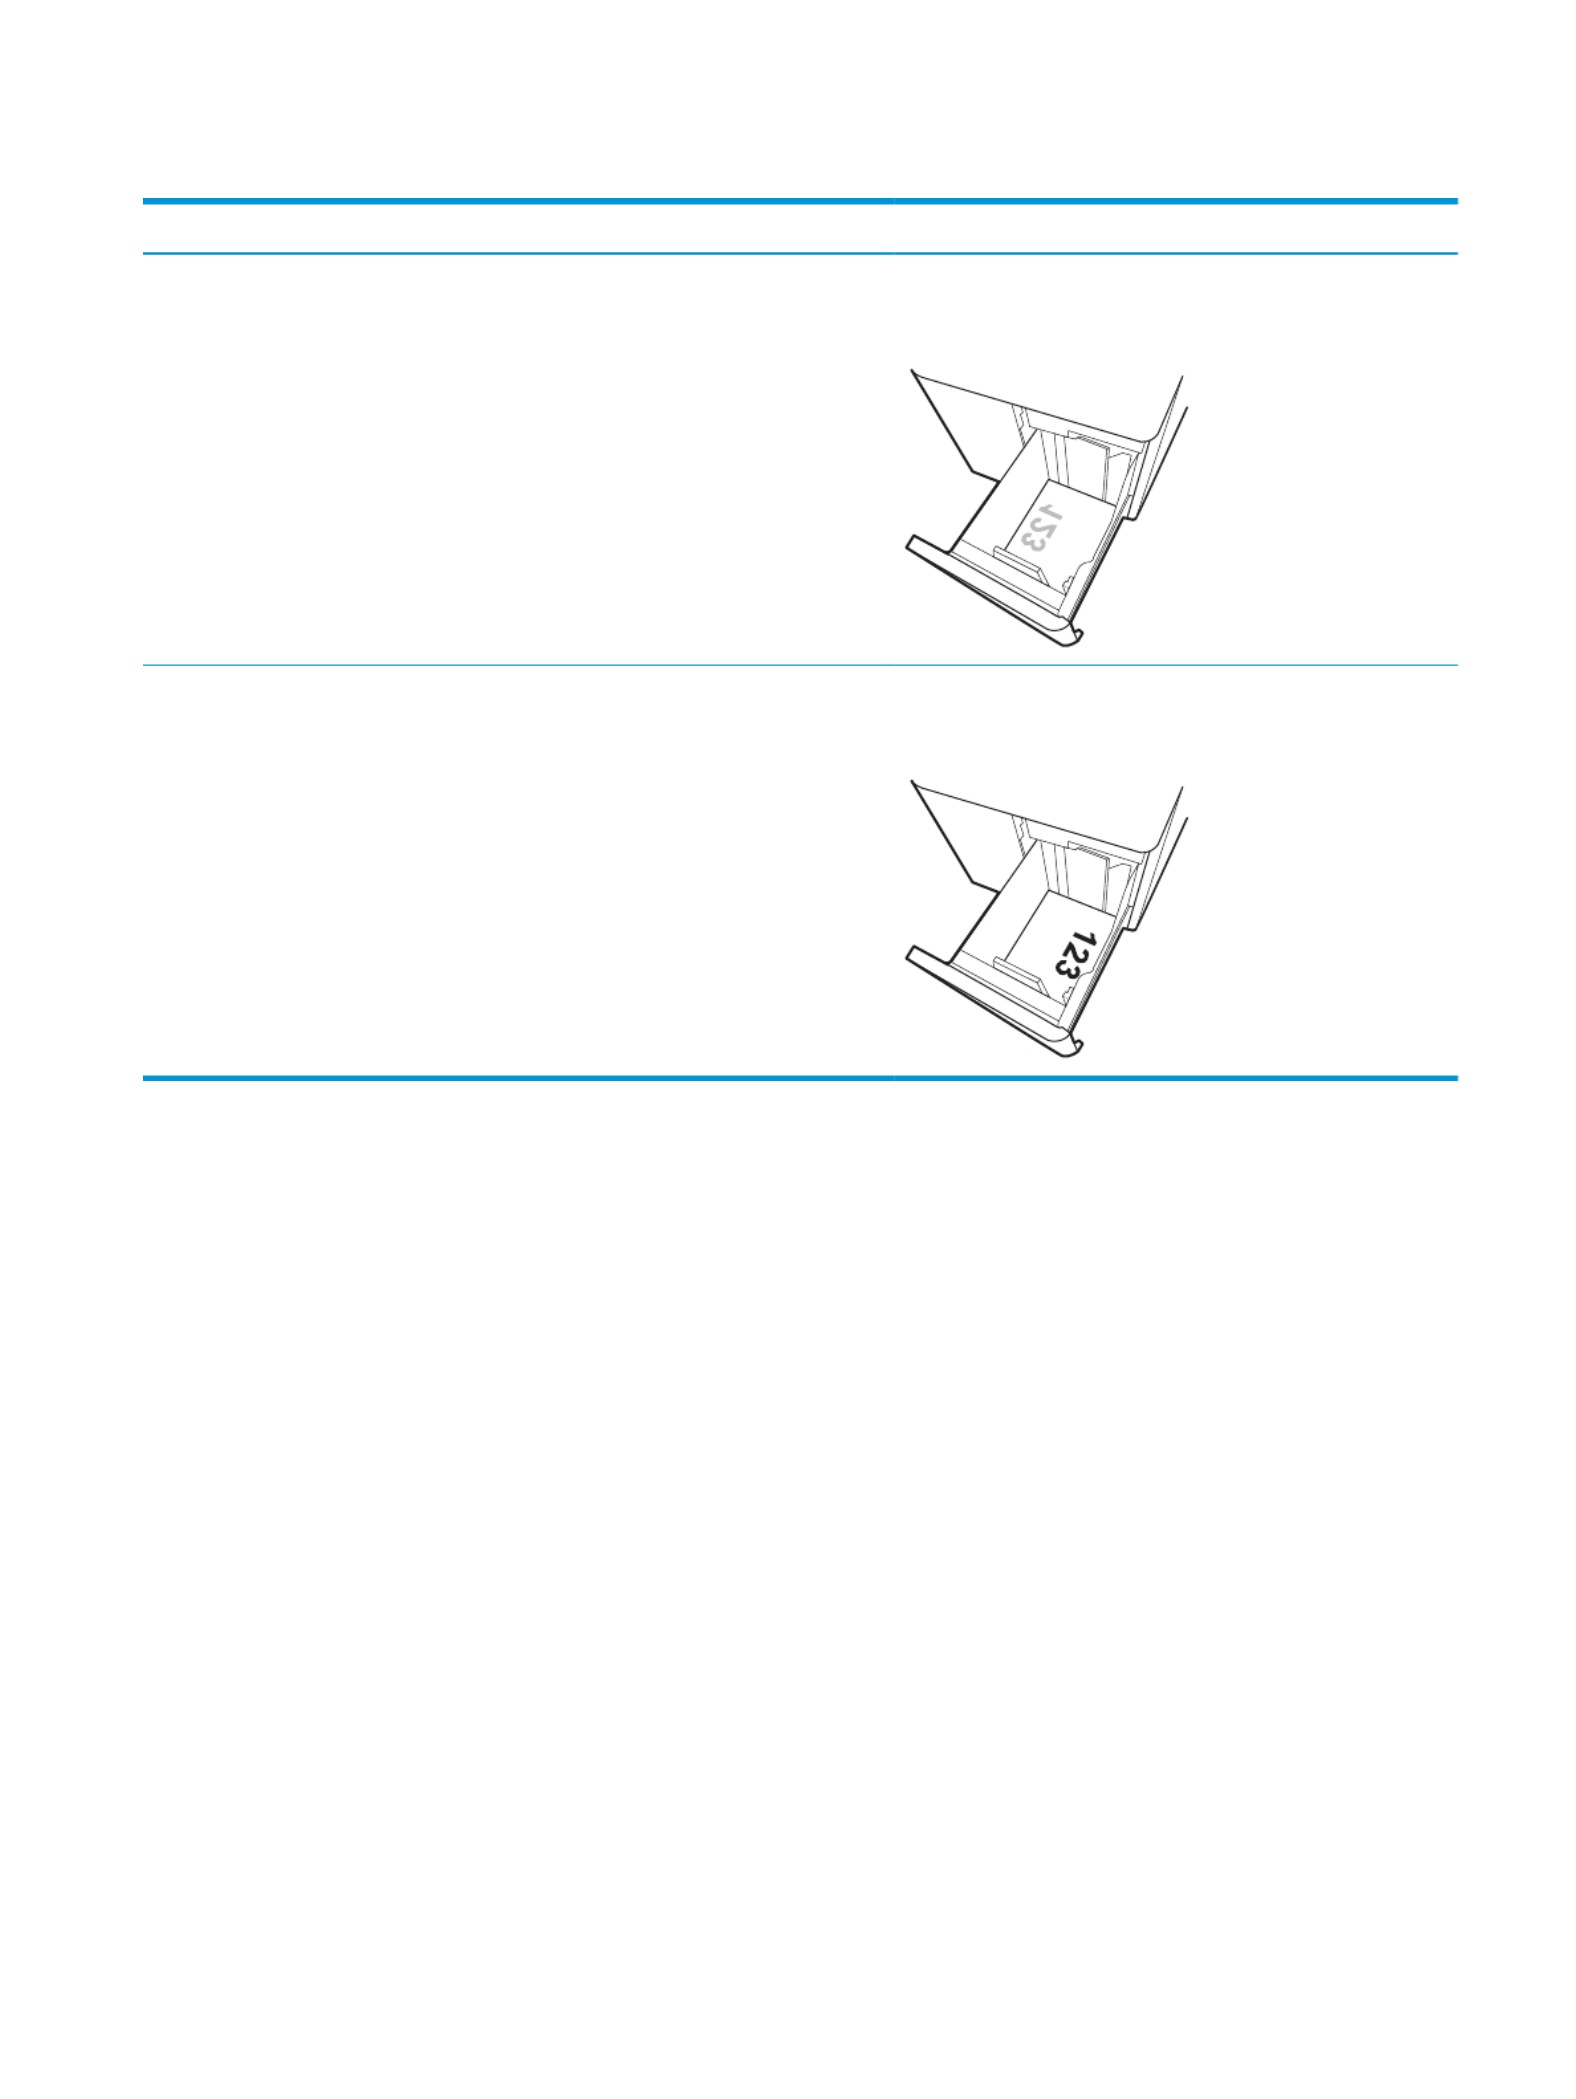
T
T
T
TTable 2-15
able 2-15
able 2-15
able 2-15able 2-15 Letterhead or preprinted—landscape
Letterhead or preprinted—landscape
Letterhead or preprinted—landscape
Letterhead or preprinted—landscape Letterhead or preprinted—landscape
Duplex mode
Duplex mode
Duplex mode
Duplex modeDuplex mode Paper size
Paper size
Paper size
Paper sizePaper size How to l
How to l
How to l
How to lHow to load paper
oad paper
oad paper
oad paperoad paper
1-sided printing A4, Letter Face-down
Top edge at the left side of the tray
Automatic 2-sided printing or with
Alternative Letterhead Mode enabled
A4, Letter Face-up
Top edge at the right side of the tray
ENWW Load paper to the 2,700-sheet high-capacity input paper trays 51
Product specificaties
| Merk: | HP |
| Categorie: | Printer |
| Model: | Color LaserJet Managed E85055dn |
| Soort bediening: | Touch |
| Kleur van het product: | Wit |
| Ingebouwd display: | Ja |
| Gewicht: | 52300 g |
| Breedte: | 556 mm |
| Diepte: | 610 mm |
| Hoogte: | 520 mm |
| Gewicht verpakking: | 59480 g |
| Breedte verpakking: | 786 mm |
| Diepte verpakking: | 736 mm |
| Hoogte verpakking: | 652 mm |
| Kleur: | Ja |
| Beeldscherm: | CGD |
| Beeldschermdiagonaal: | 4.3 " |
| Touchscreen: | Ja |
| Frequentie van processor: | 1200 MHz |
| USB-poort: | Ja |
| Ethernet LAN: | Ja |
| Markt positionering: | Bedrijf |
| Aantal USB 2.0-poorten: | 4 |
| Vermogensverbruik (max): | 60 W |
| Stroomverbruik (indien uit): | 0.08 W |
| Intern geheugen: | 1500 MB |
| Duurzaamheidscertificaten: | Blue Angel, EPEAT Silver, ENERGY STAR |
| Type processor: | Ja |
| Ethernet LAN, data-overdrachtsnelheden: | 10,100,1000 Mbit/s |
| Bekabelingstechnologie: | 10/100/1000Base-T(X) |
| Ondersteunt Windows: | Windows 10, Windows 7 Starter, Windows 7 Ultimate, Windows 8.1 |
| Temperatuur bij opslag: | -20 - 40 °C |
| Ondersteunt Mac-besturingssysteem: | Mac OS X 10.13 High Sierra, Mac OS X 10.14 Mojave, Mac OS X 10.15 Catalina |
| Geheugenslots: | 1 |
| Maximale resolutie: | 1200 x 1200 DPI |
| Aantal printcartridges: | 4 |
| Printkleuren: | Black, Cyan, Magenta, Yellow |
| Papierlade mediatypen: | Card stock, Envelopes, Glossy paper, Heavy paper, Labels, Plain paper, Recycled paper, Transparencies |
| HP-segment: | Midden- en kleinbedrijf |
| Andere ondersteundende systemen: | Android, iOS |
| Printtechnologie: | Laser |
| Modus voor dubbelzijdig afdrukken: | Auto |
| Afdruk Resolutie in kleur: | 1200 x 1200 DPI |
| Afdrukresolutie zwart: | 1200 x 1200 DPI |
| Printsnelheid (zwart, standaardkwaliteit, A4/US Letter): | 55 ppm |
| Printsnelheid (kleur, standaard, A4/US Letter): | 55 ppm |
| Duplex printen: | Ja |
| Paginabeschrijving talen: | PCL 5, PCL 6, PDF 1.7 |
| Gebruiksindicatie (maximaal): | 250000 pagina's per maand |
| Totale invoercapaciteit: | 4450 vel |
| Maximum invoercapaciteit: | 550 vel |
| Totale uitvoercapaciteit: | 500 vel |
| Maximale uitvoercapaciteit: | 500 vel |
| Maximale ISO A-series papierformaat: | A3 |
| ISO A-series afmetingen (A0...A9): | A3, A4, A5 |
| Stroomverbruik (gereed): | 77 W |
| Mobiele printing technologieën: | Apple AirPrint, Google Cloud Print, HP ePrint, Mopria Print Service |
| Tijdsduur tot de eerste pagina (zwart, normaal): | 5.9 s |
| Tijdsduur tot de eerste pagina (kleur, normaal): | 6.3 s |
| Afdrukbereik: | 5 mm |
| HP ePrint: | Ja |
| Gemiddeld stroomverbruik tijdens printen: | 870 W |
| Geluidsdrukniveau (afdrukken): | 53 dB |
| Maximaal intern geheugen: | 2000 MB |
| Type geheugen: | DDR3 |
| Totaal aantal invoerladen: | 2 |
| Maximumaantal invoerladen: | 6 |
| JIS B-series maten (B0...B9): | B4, B5 |
| Papierlade mediagewicht: | 60 - 220 g/m² |
| Maximale printafmetingen: | 316 x 453 mm |
| Energy Star Typical Electricity Consumption (TEC): | 2.669 kWh/week |
| HP Auto-Aan/Auto-Uit: | Ja |
| Afmetingen pallet (B x D x H) (imperiaal): | 31.1 x 29.92 x 82.94 " |
| Gewicht pallet (imperiaal): | 415.43 lbs |
| Capaciteit meegeleverde cartridge (zwart): | 16000 pagina's |
| Capaciteit meegeleverde cartridge (kleur): | 13000 pagina's |
| Multifunctionele ladecapaciteit: | 100 vel |
| Multifunctionele lade: | Ja |
| Printsnelheid (zwart, standaard, A3): | 26 ppm |
| Printsnelheid (kleur, standaard, A3): | 26 ppm |
| Afmetingen pallet (B x D x H): | 790 x 760 x 2107 mm |
| Opwarmtijd (vanuit slaapmodus): | 150 s |
| Pallet brutogewicht: | 188.44 g |
| Producten per pallet: | 3 stuk(s) |
| AC-ingangsspanning: | 220 - 240 V |
| AC-ingangsfrequentie: | 50/60 Hz |
| Bedrijfstemperatuur (T-T): | 15 - 27 °C |
| Relatieve vochtigheid in bedrijf (V-V): | 30 - 70 procent |
| Lagen per pallet: | 3 stuk(s) |
| Aantal dozen per palletlaag: | 1 stuk(s) |
Heb je hulp nodig?
Als je hulp nodig hebt met HP Color LaserJet Managed E85055dn stel dan hieronder een vraag en andere gebruikers zullen je antwoorden
Handleiding Printer HP

8 April 2025
2 April 2025
2 April 2025
1 April 2025
7 Februari 2025
29 Januari 2025
9 Januari 2025
6 December 2024
6 December 2024
Handleiding Printer
- Printer Sony
- Printer Samsung
- Printer Xiaomi
- Printer Panasonic
- Printer Epson
- Printer LG
- Printer Huawei
- Printer Canon
- Printer Honeywell
- Printer Olympus
- Printer Toshiba
- Printer Xerox
- Printer Agfaphoto
- Printer AVM
- Printer Brother
- Printer Builder
- Printer D-Link
- Printer Dell
- Printer Digitus
- Printer Dymo
- Printer Epson 7620
- Printer Frama
- Printer Fujifilm
- Printer Fujitsu
- Printer Ibm
- Printer Intermec
- Printer Kern
- Printer Kodak
- Printer Kogan
- Printer Konica Minolta
- Printer Kyocera
- Printer Lenovo
- Printer Lexmark
- Printer Minolta
- Printer Mitsubishi
- Printer MSI
- Printer Nec
- Printer Paxar
- Printer Polaroid
- Printer Primera
- Printer Renkforce
- Printer Ricoh
- Printer Roland
- Printer Royal Sovereign
- Printer Sagem
- Printer Seiko
- Printer Sharp
- Printer Star
- Printer Thomson
- Printer Tomy
- Printer Toshiba TEC
- Printer Triumph-Adler
- Printer Velleman
- Printer Zebra
- Printer Oce
- Printer Oki
- Printer Olivetti
- Printer Olympia
- Printer CSL
- Printer Argox
- Printer DTRONIC
- Printer Metapace
- Printer Citizen
- Printer Nilox
- Printer Approx
- Printer Ultimaker
- Printer Custom
- Printer Bixolon
- Printer Brady
- Printer GoDEX
- Printer Testo
- Printer EC Line
- Printer Sawgrass
- Printer Pantum
- Printer DNP
- Printer TSC
- Printer Equip
- Printer StarTech.com
- Printer Fichero
- Printer GG Image
- Printer Posiflex
- Printer ZKTeco
- Printer Star Micronics
- Printer Datamax-O'neil
- Printer Panduit
- Printer Dascom
- Printer HiTi
- Printer Vupoint Solutions
- Printer Elite Screens
- Printer Phoenix Contact
- Printer Videology
- Printer Colop
- Printer Raspberry Pi
- Printer Evolis
- Printer Unitech
- Printer Middle Atlantic
- Printer IDP
- Printer Fargo
- Printer Microboards
- Printer Mutoh
- Printer Tally Dascom
- Printer Nisca
Nieuwste handleidingen voor Printer

9 April 2025

1 April 2025

29 Maart 2025
29 Maart 2025

11 Maart 2025
11 Maart 2025
9 Maart 2025
4 Maart 2025
26 Februari 2025
26 Februari 2025