Honda TRX250X (2017) Handleiding
Lees hieronder de 📖 handleiding in het Nederlandse voor Honda TRX250X (2017) (218 pagina's) in de categorie Quad. Deze handleiding was nuttig voor 41 personen en werd door 2 gebruikers gemiddeld met 4.5 sterren beoordeeld
Pagina 1/218

Contents
Contents
C on te nt s
These pages give an overview of the contents of your owner’s
manual.
The first page of each section lists the topics covered in that section.
ATV Safety ..................................................................................1
Important safety information you should know, plus a look at the
safety related labels on your ATV.
Indicators & Controls.................................................................. 9
The location and function of indicators and controls on your ATV
and operating instructions for various controls and features.
Before Riding ............................................................................25
The importance of wearing a helmet and other protective gear,
how to make sure you and your ATV are ready to ride, and
important information about loading.
Basic Operation & Riding ......................................................... 39
How to start and stop the engine, shift gears, and brake. Also,
riding precautions.
TRX250X31HN6740 MOM 1 (16 )5739 01

Contents
Contents
Servicing Your Honda ..............................................................72
Why your ATV needs regular maintenance, what you need to
know before servicing your Honda, an owner maintenance
schedule, and instructions for specific maintenance and
adjustment items.
Tips ..........................................................................................147
How to store and transport your ATV and how to be an
environmentally responsible rider.
Taking Care of the Unexpected.............................................157
What to do if you have a flat tire, your engine won’t start, etc.
Technical Information ............................................................173
ID numbers, technical specifications, and other technical facts.
Consumer Information ...........................................................191
Information on warranties, emission controls, how to get Honda
service manuals.
Index........................................................................................198
Quick Reference
Handy facts about fuel, engine oil, tire sizes, and air pressures.

FOR OFF-ROAD USE ONLY
This vehicle is designed and manufactured for off-road use only.
It conforms to US EPA Noise Emission regulations, but does not
conform to Federal Motor Vehicle Safety Standards or US EPA On
Highway Exhaust Emission regulations, and operation on public
streets, roads, or highways is illegal. The vehicle is equipped with a
USDA qualified spark arrester. Obey local laws and regulations.
It conforms to US EPA and California emission regulations for ATVs.
2017
Honda TRX250X
SPORTRAX 250X
OWNER’S MANUAL

Introduction
Introduction
I nt ro duc t ion
Congratulations on choosing your Honda ATV.
When you own a Honda, you’re part of a worldwide family of
satisfied customers — people who appreciate Honda’s reputation
for building quality into every product.
Your Honda was designed as a recreational ATV for off-road use by
one rider only.
Before riding, take time to get acquainted with your ATV and how it
works. To protect your investment, we urge you to take
responsibility for keeping your ATV well maintained. Scheduled
service is a must, of course. But it’s just as important to observe the
break-in guidelines, and perform all pre-ride and other periodic
checks detailed in this manual.
We also recommend that you read this owner’s manual before you
ride. It’s full of facts, instructions, safety information, and helpful
tips. To make it easy to use, the manual contains a detailed list of
topics at the beginning of each section and an index at the back of
the book.
As you read this manual, you will find information that is preceded
by a symbol. This information is intended to help you avoid
damage to your Honda, other property, or the environment.
Read the Warranties Booklet (page 193) thoroughly so you
understand the coverages that protect your new Honda and are
aware of your rights and responsibilities.
Whenever you ride, tread lightly. By staying on established trails and
riding only in approved areas, you help protect the environment and
keep off-road riding areas open for the future.
NOTICE

ATV Safety 3
Important Safety Information
Ride Off-road Only
Your ATV is designed and manufactured for off-road use only. The
tires are not made for pavement, and the ATV does not have turn
signals and other features required for use on public roads. If you
need to cross a paved or public road, get off and walk your ATV
across.
Take Time to Learn & Practice
Even if you have ridden other ATVs, take time to become familiar
with how this ATV works and handles. Practice in a safe area until
you build your skills and get accustomed to the ATV’s size and
weight.
Because many crashes involve inexperienced or untrained riders, we
urge all riders to take a ATV operator course approved by the ATV
Safety Institute (ASI). See page 28.
Contact an authorized ATV dealer or call 1-800-887-2887 to find
out about the training courses nearest you.
Be Alert for Off-road Hazards
The terrain can present a variety of challenges when you ride off-
road. Continually “read” the terrain for unexpected turns, drop-offs,
rocks, ruts, and other hazards. Always keep your speed low enough
to allow time to see and react to hazards.

ATV Safety
4
Important Safety Information
Ride within Your Limits
Pushing limits is another major cause of ATV crashes. Never ride
beyond your personal abilities or faster than conditions warrant.
Remember that alcohol, drugs, fatigue, and inattention can
significantly reduce your ability to make good judgments and ride
safely.
Don’t Drink and Ride
Alcohol and riding don’t mix. Even one drink can reduce your ability
to respond to changing conditions, and your reaction time gets
worse with every additional drink. So don’t drink and ride, and don’t
let your friends drink and ride either.
Keep Your Honda in Safe Condition
It’s important to keep your ATV properly maintained and in safe
riding condition. Having a breakdown can be difficult, especially if
you are stranded off-road far from your base. To help avoid
problems, inspect your ATV before every ride and perform all
recommended maintenance.

ATV Safety 5
Safety Labels
Your ATV comes with a hang tag and several labels containing
important safety information. Anyone who rides the vehicle should
read and understand this information before riding.
The labels should be considered permanent parts of the vehicle. If a
label comes off or becomes hard to read, contact your dealer for
replacements.

ATV Safety
6
Safety Labels

ATV Safety 7
Safety Labels

ATV Safety
8
Safety Labels
Operating this ATV if you are under
the age of 16 increases your chance
of severe injury or death.
NEVER operate this ATV if you are
under age 16.

Indicators & Controls 9
Indicators & Controls
(cont’d)
I ndi ca to rs & Co nt ro ls
This section shows the location of all indicators and controls you
would normally use before or while riding your ATV.
The items listed on this page are described in this section.
Instructions for other components are presented in other sections of
this manual where they will be most useful.
Operation Component Locations ................................................ 11
Indicators ................................................................................... 14
Reverse and Neutral Indicators................................................. 14

Indicators & Controls
10
Indicators & Controls
Controls & Features .................................................................... 15
Fuel Valve................................................................................ 15
Choke Knob ............................................................................ 16
Ignition Switch......................................................................... 17
Start Button............................................................................. 18
Engine Stop Switch.................................................................. 18
Headlight Switch ..................................................................... 19
Headlight Dimmer Switch ........................................................ 19
Throttle Lever .......................................................................... 20
Clutch Lever/Parking Brake Lever ............................................. 20
Reverse Assist Lever ................................................................. 21
Front Brake Lever..................................................................... 22
Rear Brake Pedal...................................................................... 22
Parking Brake .......................................................................... 23
Flag Pole Bracket ..................................................................... 24

Indicators & Controls 11
Operation Component Locations
clutch lever/parking brake lever
headlight switch
start button throttle leverengine stop switch
ignition switch
reverse assist leverchoke knob
parking brake lock lever
parking brake pin
headlight
dimmer
switch
front brake lever

Indicators & Controls
12
Operation Component Locations
rear brake pedal

Indicators & Controls 13
Operation Component Locations
flag pole bracket
shift lever
seat lock lever
fuel valve

Indicators & Controls
14
Indicators
The reverse indicator (1) and the neutral indicator (2) are next to the
ignition switch.
The reverse indicator will light when the transmission is in reverse
and the ignition switch is ON (q).
The neutral indicator will light when the transmission is in neutral
and the ignition switch is ON (q).
If one of these indicators does not come on when it should, have
your dealer check for burned-out bulbs or other problems.
Reverse and Neutral Indicators
(1)
CENTER OF HANDLEBAR
(2) neutral indicator
(1) reverse indicator
(2)

Indicators & Controls 15
Controls & Features
The manual three-way fuel valve (1) is located on the left side under
the fuel tank.
The fuel valve is used to control the flow of fuel from the fuel tank
to the carburetor.
ON — normal position for riding.
OFF — for parking, storing, or transportation.
RES — for extra fuel to get to a gas supply for refueling.
Reserve Fuel
Remember to check that the fuel valve is in the ON position each
time you refuel. If the fuel valve is left in the RES position, you may
run out of fuel with no reserve.
For complete information about fueling your ATV, see page 88.
Fuel Valve
LEFT SIDE
(1)
(1) fuel valve
ON OFF RES

Indicators & Controls
16
Controls & Features
The choke knob (1) may be used when starting the engine. See
page 48.
Choke Knob d
d
d
dd
LEFT HANDLEBAR
(1)
(A)
(1) choke knob (A) fully ON
(B) fully OFF
(B)

Indicators & Controls 17
Controls & Features
The ignition switch (1) is used for starting and stopping the engine
(page 46). Insert the key and turn it to the right for the ON (q)
position.
Ignition Switch
Key Position Function
ON (q) Electrical circuits on.
OFF (w) No electrical circuits function.
CENTER OF HANDLEBAR
OFF ON
(1)
q ON
w OFF
(1) ignition switch

Indicators & Controls
18
Controls & Features
The start button (1) is used for starting the engine. Pushing the
button in starts the engine. See Starting Procedure, page 48.
When the start button is pushed, the starter motor will crank the
engine. The starter motor will operate even if the engine stop switch
is in the OFF (r) position when the start button is pushed.
The engine stop switch (2) is used to stop the engine in an
emergency. To operate, slide the switch to the OFF (r) position. The
switch must be in the RUN (e) position to start the engine, and it
should normally remain in the RUN (e) position even when the
engine is OFF.
If your ATV is stopped with the ignition switch ON (q) and the engine
stop switch OFF (r), the battery will discharge. Turn the ignition
switch to OFF (w) to prevent battery discharge.
Start Button o
o
o
oo
Engine Stop Switch
e
e
e
ee r
r
r
rr
LEFT HANDLEBAR
(1)
(1) start button o START
(2)
(2) engine stop switch r OFF
e RUN

Indicators & Controls 19
Controls & Features
The headlight switch (1) is used to turn the headlight ON (y) or OFF
(t). To operate, turn the switch to ON (y) or OFF (t).
The headlight dimmer switch (2) is used to change between the high
and low beams of the headlight. To operate, turn the switch to HI
(u) for high beam, LO (i) for low beam.
Headlight Switch
y
y
y
yy t
t
t
tt
Headlight Dimmer Switch
u
u
u
uu i
i
i
ii
LEFT HANDLEBAR
(2)
(1)
(1) headlight switch y ON
t OFF
u HI
i LO
(2) headlight dimmer switch
Indicators & Controls
20
Controls & Features
The throttle controls engine rpm (speed). To increase engine rpm,
press the throttle lever (1) with your thumb. To reduce engine rpm,
release pressure on the throttle lever. The throttle will automatically
return to the closed position (engine idle) when you remove your
thumb.
The clutch lever/parking brake lever is used to disengage the clutch
whenever shifting gears, starting and stopping. To operate, pull the
clutch lever/parking brake lever in all the way before shifting, then
slowly release it after shifting. See Clutch System, page 107.
Honda’s exclusive SportClutch feature will not allow the engine to
stall even if you stop in gear without disengaging the clutch.
Throttle Lever
Clutch Lever/Parking Brake Lever
RIGHT HANDLEBAR
(A)
(1) throttle lever
(1)
(A) to open the throttle

Indicators & Controls 21
Controls & Features
The reverse assist lever (1), located on the right side of the fuel tank,
is used to shift into reverse. To operate, pull in the clutch lever/
parking brake lever (2) with your ATV stopped. Leaving your left
hand on the clutch lever/parking brake lever, remove your right hand
from throttle and turn the reverse assist lever. While turning the
reverse assist lever, depress the shift lever (3) to reach the reverse
gear (below neutral). See Riding in Reverse, page 54.
Reverse Assist Lever
LEFT HANDLEBAR
(1) reverse assist lever
(1)
(2) clutch lever/parking brake lever
LEFT SIDE
(2)
RIGHT SIDE
(3)
(3) shift lever
Neutral
Reverse

Indicators & Controls
22
Controls & Features
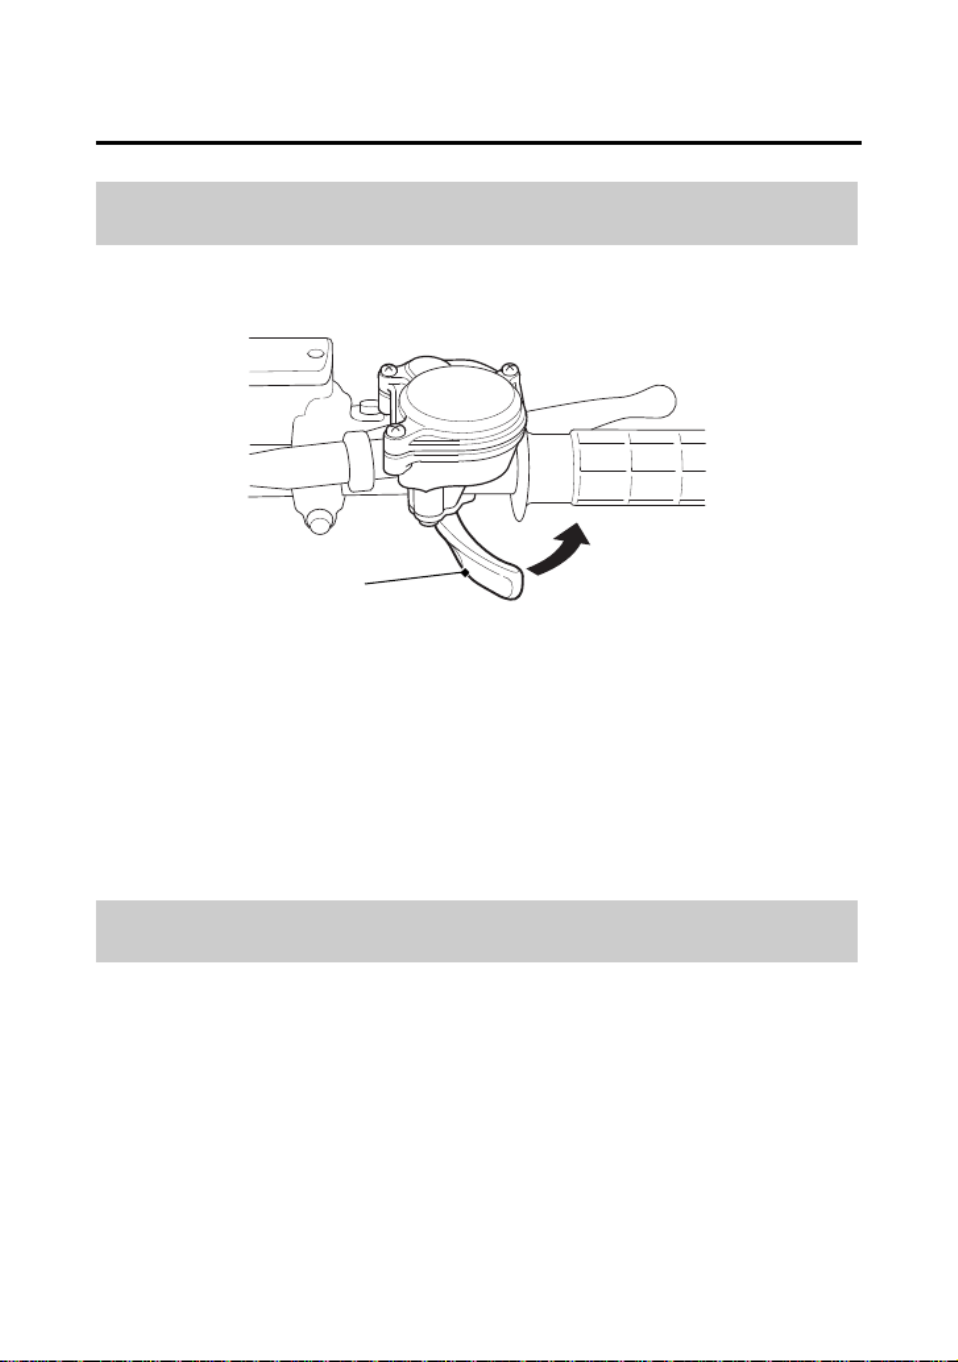
The front brake lever is used to slow or stop your ATV. To operate,
pull the lever. For information on braking techniques, see page 57.
The rear brake pedal is used to slow or stop your ATV. To operate,
depress the pedal. For information on braking techniques, see
page 57.
Front Brake Lever
Rear Brake Pedal

Indicators & Controls 23
Controls & Features
The lock lever (1) and parking brake pin (2) on the clutch lever/
parking brake lever (3) allows it to be used as a parking brake. To
operate, push down and hold the parking brake pin, squeeze the
clutch lever/parking brake lever and then lock it with the lock lever.
See Parking page 71.
To release the parking brake, squeeze the clutch lever/parking brake
lever.
Parking Brake
LEFT HANDLEBAR
(A)
(1) lock lever
(1)
(A) to lock
(2)
(2) parking brake pin
(3)
(3) clutch lever/parking brake lever

Indicators & Controls
24
Controls & Features
Flag poles are optional equipment available from your dealer. To
mount a pole in the bracket (1), follow the instructions that come
with the flag pole kit.
Flag poles are required in some riding areas. Check local regulations
before riding.
Flag Pole Bracket
RIGHT REAR
(1) flag pole bracket
(1)

Before Riding 25
Before Riding
B ef or e Ri ding
Before each ride, you need to make sure you and your Honda are
both ready to ride. To help get you prepared, this section discusses
how to evaluate your riding readiness, what items you should check
on your ATV, and adjustments to make for your comfort,
convenience, or safety. This section also includes important
information about loading.
Are You Ready to Ride?.............................................................. 26
Protective Apparel ................................................................... 26
Rider Training .......................................................................... 28
Age Recommendation ............................................................. 29
No Passengers ......................................................................... 29
No Alcohol or Drugs ................................................................ 30
Is Your ATV Ready to Ride? ........................................................ 31
Pre-ride Inspection................................................................... 31
Load Limits & Guidelines............................................................. 34
Loading ................................................................................... 34
Load Limits .............................................................................. 35
Loading Guidelines .................................................................. 36
Accessories & Modifications........................................................ 37
Accessories.............................................................................. 37
Modifications........................................................................... 38

Before Riding
26
Are You Ready to Ride?
Before you ride your ATV for the first time, we urge you to:
• Read this owner’s manual and the labels on your ATV carefully.
• Make sure you understand all the safety messages.
• Know how to operate all the controls.
Before each ride, be sure:
• You feel well and are in good physical and mental condition.
• You are wearing an approved motorcycle helmet (with chin strap
tightened securely), eye protection, and other protective
clothing.
• You don’t have any alcohol or drugs in your system.
For your safety, we strongly recommend that you always wear an
approved motorcycle helmet, eye protection, boots, gloves, long
pants, and a long-sleeved shirt or jacket whenever you ride.
Although complete protection is not possible, wearing proper gear
can reduce the chance of injury when you ride.
Following are suggestions to help you choose the proper gear.
Helmet and Eye Protection
Your helmet is your most important piece of riding gear because it
offers the best protection against head injuries. A helmet should fit
your head comfortably and securely.
Protective Apparel

Before Riding 27
Are You Ready to Ride?
An open-face helmet offers some protection, but a full-face helmet
offers more. Regardless of the style, look for a DOT (Department of
Transportation) sticker on any helmet you buy. Always wear a face
shield or goggles to protect your eyes and help your vision.
Additional Riding Gear
In addition to a helmet and eye protection, we also recommend:
• Sturdy off-road motorcycle boots to help protect your feet,
ankles, and lower legs.
• Off-road motorcycle gloves to help protect your hands.
• Riding pants with knee and hip pads, a riding jersey with padded
elbows, and a chest/shoulder protector.
3
WARNING
Operating this ATV without wearing an
approved motorcycle helmet, eye protection,
and protective clothing could increase your
chances of severe injury or death in the event
of a crash.
Always wear an approved motorcycle helmet
that fits properly and wear eye protection
(goggles or face shield), gloves, boots,
long-sleeved shirt or jacket and long pants.

Before Riding
28
Are You Ready to Ride?
Developing your riding skills is an on-going process. Even if you have
ridden other ATVs, take time to become familiar with how this ATV
works and handles. Practice riding the ATV in a safe area to build
your skills. Do not ride in rough terrain until you get accustomed to
the ATV’s controls, and feel comfortable with its size and weight.
We urge all riders to take a ATV operator course approved by the
ATV Safety Institute (ASI). For information about the ASI training
course nearest you, call the national toll-free number; (800) 887-
2887.
Other riding tips can be found in the Tips & Practice Guide for the
ATV Rider booklet that came with your ATV.
Rider Training
3
WARNING
Operating this ATV without proper
instruction could increase your risk of a crash
which could lead to serious injury or death.
Beginning and inexperienced operators
should complete the certified training course
offered by Honda. They should then regularly
practice the skills learned in the course and
the operating techniques described in the
owner’s manual.

Before Riding 29
Are You Ready to Ride?
The minimum recommended age for this ATV model is 16. For
safety, never let children under 16 years old operate this vehicle.
This ATV is designed as an operator-only vehicle. The long seat is
designed to allow the rider to change body position, not for carrying
a passenger. Never let a passenger ride on the seat or on the front or
rear cargo racks.
Age Recommendation
3
WARNING
A child using an ATV that is not
recommended for their age could lose vehicle
control while riding, resulting in severe injury
or death.
A child under 16 should never operate an ATV
with engine size greater than 90cc.
No Passengers
3
WARNING
Carrying a passenger on this ATV greatly
reduces your ability to balance and control
this ATV and could cause a crash and you or
your passenger could be injured or killed.
Never carry a passenger on this ATV.

Before Riding
30
Are You Ready to Ride?
Alcohol, drugs and ATVs don’t mix. Even a small amount of alcohol
can impair your ability to operate an ATV safely. Likewise, drugs —
even if prescribed by a physician — can be dangerous while
operating an ATV. Consult your doctor to be sure it is safe to operate
a vehicle after taking medication.
No Alcohol or Drugs
3
WARNING
Operating this ATV after consuming alcohol
or drugs can seriously affect your judgment,
cause you to react more slowly, affect your
balance and perception, and result in serious
injury or death.
Never consume alcohol or drugs before or
while operating this ATV.

Before Riding 31
(cont’d)
Is Your ATV Ready to Ride?
Before each ride, it’s important to inspect your ATV and make sure
any problem you find is corrected. A pre-ride inspection is a must,
not only for safety, but because having a breakdown, or even a flat
tire, can be a major inconvenience.
If your ATV has overturned or been involved in a collision, do not ride
the vehicle until it has been inspected by your dealer. There may be
damage or other problems you cannot see.
Check the following items before you get on the ATV:
3
WARNING
Improperly maintaining this ATV or failing to
correct a problem before riding can cause a
crash in which you can be seriously hurt or
killed.
Always perform a pre-ride inspection before
every ride and correct any problems.
Pre-ride Inspection
Engine Oil Check the level and add oil if needed
(page 94).
Check for leaks.
Fuel Check the level and add fuel (page 88) if
needed. Also make sure the fuel fill cap is
securely fastened.
Check for leaks.

Before Riding
32
Is Your ATV Ready to Ride?
Tires Use a gauge to check the air pressure. Adjust
if needed. Also look for signs of damage or
excessive wear (page 130).
Guards Check for damage or looseness (page 136).
Nuts & Bolts
Check the wheels to see that the axle nuts are
tightened. Use a wrench to make sure all
accessible nuts, bolts, and fasteners are tight.
Underbody & Exhaust
System
Check for, and remove, any dirt, vegetation
or other debris that could be a fire hazard or
interfere with the proper operation of the
vehicle.
Air Cleaner Housing
Drain Tube
Check for deposits in the drain tube. If
necessary, clean the tube (page 103) and
check the air cleaner housing.
Leaks, Loose Parts Walk around your ATV and look for anything
that appears unusual, such as a leak or loose
cable.
Cable Check the cable housings for wear. Check
the fittings for looseness. Replace or tighten
as needed.
Lights Make sure the headlight, brake light and
taillight are working properly.

Before Riding 33
Is Your ATV Ready to Ride?
Check these items after you get on the ATV:
Remember, be sure to take care of any problem you find, or have
your dealer correct it before you ride.
Throttle Check the freeplay and adjust if needed.
Press the throttle to make sure it moves
smoothly without sticking, and snaps shut
automatically when it is released, in all
steering positions (page 104).
Brakes Squeeze the front brake lever and step on
the rear brake pedal to check that the
controls operate normally. Check for
proper freeplay (page 123). Make sure
there is no brake fluid leakage (page 120).
Reverse Assist Lever Make sure the lever operates smoothly
without sticking (page 111).
Clutch Lever/Parking
Brake Lever
Check for smooth operation and adjust if
needed (page 107).
Headlight and
Headlight Dimmer Switch
Check for proper function (page 19).
Engine Stop Switch Check for proper function (page 18).
Steering Check that the wheels turn properly as you
steer the handlebar. Move the handlebar
right and left and check that there is no
excessive backlash.

Before Riding
34
Load Limits & Guidelines
Your Honda was designed as a rider-only ATV. It was not designed
to carry a passenger or cargo. A passenger or cargo could interfere
with your ability to move around to maintain your balance and
control of the ATV.
In addition, exceeding the weight limits or carrying an unbalanced
load can seriously affect your ATV’s handling, braking and stability.
Adding accessories or making modifications that change this ATV’s
design and performance can also make it unsafe. Also, the weight of
any accessories will reduce the maximum load the ATV can carry.
More specific information on load limits, accessories, and
modifications follows.
How much weight you put on your ATV, and how you load it, are
important to your safety. If you decide to carry cargo, you should be
aware of the following information.
Loading
3
WARNING
Overloading, improper loading, or carrying a
passenger can cause a crash and you can be
seriously hurt or killed.
Follow all load limits and other loading
guidelines in this manual.

Before Riding 35
Load Limits & Guidelines
Following are the load limits for your ATV:
There are limits to how much weight can be carried on your ATV.
The following load limits apply to standard equipment only.
Modifying your ATV, using non-standard equipment, or riding on
terrain that is not flat and smooth could further reduce these limits.
The weight of added accessories will reduce the maximum cargo
weight you can carry.
Load Limits
maximum weight capacity 243 lb (110 kg)
(includes the weight of the rider, all cargo, and accessories.)

Before Riding
36
Load Limits & Guidelines
As discussed on page 34, we recommend that you do not carry any
cargo on this ATV. However, if you decide to carry cargo, ride at
reduced speeds and follow these common-sense guidelines.
Carrying cargo or pulling a trailer will affect how your ATV handles
and greatly reduce its ability in accelerating, braking and making
turns and other maneuvers.
Be sure to observe the weight limits and follow these guidelines:
• Check that the tires are properly inflated.
• Never ride with a passenger. The ATV is not designed to carry a
passenger.
• Do not tow another vehicle.
• Make sure all cargo is secured before riding.
• Never exceed the maximum weight limit.
• Allow extra room for starting, stopping and turning whenever
you carry cargo or pull a trailer.
• Avoid riding on steep slopes when carrying cargo or pulling a
trailer.
• Never cross a slope when towing a trailer.
Loading Guidelines

Before Riding 37
Accessories & Modifications
Modifying your ATV or using non-Honda accessories can make your
ATV unsafe.
Before you consider making any modifications or adding an
accessory, be sure to read the following information.
We strongly recommend that you use only Honda Genuine
Accessories that have been specifically designed and tested for your
ATV. Because Honda cannot test all other accessories, you must be
personally responsible for proper selection, installation, and use of
non-Honda accessories.
Check with your dealer for assistance and always follow these
guidelines:
• Make sure the accessory does not obscure any lights, reduce
ground clearance, limit suspension travel or steering travel, or
interfere with operating any controls.
• Make sure the accessory does not interfere with your ability to
shift body position on the seat or operate hand and foot controls.
• Do not add any electrical equipment that will exceed the vehicle’s
electrical system capacity (page 178). A blown fuse can cause a
loss of lights or engine power (page 167).
3
WARNING
Improper accessories or modifications can
cause a crash in which you can be seriously
hurt or killed.
Follow all instructions in this owner’s manual
regarding accessories and modifications.
Accessories

Before Riding
38
Accessories & Modifications
We strongly advise you not to remove any original equipment or
modify your ATV in any way that would change its design or
operation. Such changes could seriously impair your ATV’s handling,
stability, and braking, making it unsafe to ride.
We also advise you not to make any modifications or remove any
equipment (such as the USDA qualified spark arrester or emission
control system components) that would make your ATV illegal in
your area.
Removing or modifying your lights, exhaust system, emission control
system, or other equipment can also make your ATV illegal.
Modifications

Basic Operation & Riding 39
Basic Operation & Riding
B as ic Ope rat io n & R idin g
This section gives basic riding instructions, including how to start and
stop your engine, how to use the throttle and brakes, and what to
do when you’re through riding.
To protect your new engine and enjoy optimum performance and
service life, refer to Break-in Guidelines (page 180).
For information about carburetor adjustment for riding at high
altitude, see page 181.
Safe Riding Precautions .............................................................. 41
Off-road Use Only.................................................................... 41
Keep Hands and Feet on Controls............................................ 42
Control Speed ......................................................................... 43
Use Care on Unfamiliar or Rough Terrain ................................. 44
Do Not Perform Stunts............................................................. 45
Starting & Stopping the Engine................................................... 46
Preparation.............................................................................. 47
Starting Procedure................................................................... 48
Flooded Engine........................................................................ 50
How to Stop the Engine........................................................... 51
Shifting Gears............................................................................. 52
Riding in Reverse ........................................................................ 54

Servicing Your Honda 93
Engine Oil
Other viscosities shown in the following chart may be used when the
average temperature in your riding area is within the indicated
range.
JASO T 903 standard
The JASO T 903 standard is an index for engine oils for 4-stroke
motorcycle engines.
There are two classes: MA and MB.
Oil conforming to the standard is labeled on the oil container. For
example, the following label shows the MA classification.
(1)
(2)
(1) oil code
(2) oil classification

Servicing Your Honda
94
Engine Oil
Refer to Safety Precautions on page 76.
Check the engine oil level each day before operating your ATV and
add if needed.
Before riding your ATV, check the engine oil level.
1.
Park your ATV on a firm, level surface.
2.
Start the engine in a well-ventilated area and let it idle for 3 – 5
minutes. Stop the engine and wait 2 – 3 minutes.
3.
Remove the oil fill cap/dipstick (1) from the front crankcase cover
and wipe it clean.
4.
Insert the oil fill cap/dipstick without screwing it in, then remove
the oil fill cap/dipstick and check the oil level. The oil level should
be between the upper level mark (2) and the lower level mark (3)
on the oil fill cap/dipstick.
5.
If required, add the specified oil into the fill cap hole, up to the
upper level mark on the oil fill cap/dipstick. Do not overfill.
6.
Reinstall the oil fill cap/dipstick.
NOTICE
Running the engine with an improper oil level can cause serious
engine damage.
Checking & Adding Oil
(2)
LEFT SIDE
(1) oil fill cap/dipstick
(3)
(1)
(3) lower level mark
(2) upper level mark

Servicing Your Honda 95
Engine Oil
Refer to Safety Precautions on page 76.
This procedure requires mechanical skill and professional tools such
as a torque wrench, as well as a means for disposing of the drained
fluid (page 156). If you do not have the skills or the tools, see your
dealer.
Drain the Engine Oil:
1.
With the ATV on the level ground, remove the oil fill cap/dipstick
from the front crankcase cover.
2.
Place an oil drain pan under the crankcase and remove the oil
drain bolt (1) and sealing washer (2).
Changing Engine Oil
UNDER ENGINE
(1) oil drain bolt
(1)
(2)
(2) sealing washer

Servicing Your Honda
96
Engine Oil
3.
Pour the drained oil into a suitable container and dispose of it in
an approved manner (page 156).
NOTICE
Improper disposal of drained fluids is harmful to the environment.
Add Engine Oil:
1.
Reinstall the oil drain bolt with the new sealing washer and
tighten it to the specified torque:
18 lbf·ft (25 N·m , 2.5 kgf·m)
2.
Fill the crankcase with the recommended grade oil
approximately:
1.6 US qt (1.5 ℓ)
3.
Reinstall the oil fill cap/dipstick.
4.
Start the engine and let it idle for 3 – 5 minutes.
5.
Stop the engine, wait 2 – 3 minutes and check the oil level. Make
sure the oil is between the upper and lower level marks on the oil
fill cap/dipstick. If necessary, add more oil but do not overfill.
6.
Reinstall the oil fill cap/dipstick.
7.
Check that there are no oil leaks.
If a torque wrench is not used for installation, see your dealer as
soon as possible to verify proper assembly.

Servicing Your Honda 97
Gear Case Oil
Refer to Safety Precautions on page 76.
Change the oil with the gear case at normal operating temperature
to assure complete and rapid draining.
Oil Recommendation
type hypoid gear oil
viscosity (weight) SAE 80W-90
suggested oil Honda shaft drive oil or equivalent
Changing Oil

Servicing Your Honda
98
Gear Case Oil
1.
Park the ATV on level ground.
2.
Place an oil drain pan under the oil drain bolt (1).
3.
Remove the oil fill cap (2), drain bolt and sealing washer (3).
4.
After the oil has completely drained, reinstall the drain bolt with
the new sealing washer and tighten it to the specified torque:
9 lbf·ft (12 N·m , 1.2 kgf·m)
5.
Pour the drained oil into a suitable container and dispose of it in
an approved manner (page 156).
NOTICE
Improper disposal of drained fluids is harmful to the environment.
6.
Fill the gear case with the recommended oil.
2.7 US oz (80 cm3)
7.
Remove the oil level check bolt (4) and sealing washer. Make sure
the oil level reaches the oil level check hole (5).
8.
Install the oil fill cap.
9.
Install the oil level check bolt with the new sealing washer and
tighten it to the specified torque:
9 lbf·ft (12 N·m , 1.2 kgf·m)
(5)
(1) oil drain bolt
(1)
REAR
(4) oil level check bolt
(2) oil fill cap (5) oil level check hole
(2)
(4)
(3)
(3)
(3) sealing washer

Servicing Your Honda 99
Air Cleaner
Refer to Safety Precautions on page 76.
Proper air cleaner maintenance is very important for off-road
vehicles. A dirty, water-soaked, worn-out, or defective air cleaner
will allow dirt, dust, mud, and other impurities to pass into the
engine.
Service the air cleaner more frequently if you ride in unusually wet or
dusty areas. Your dealer can help you determine the correct service
interval for your riding conditions.
Your ATV’s air cleaner has very specific performance requirements.
Use a new Honda Genuine air cleaner specified for your model or an
air cleaner of equal quality.
NOTICE
Using the wrong air cleaner may result in premature engine wear.
Proper air cleaner maintenance can prevent premature engine wear
or damage, expensive repairs, low engine power, poor gas mileage,
and spark plug fouling.
NOTICE
Improper or lack of proper air cleaner maintenance can cause poor
performance and premature engine wear.

Servicing Your Honda
100
Air Cleaner
1.
Remove the seat (page 87).
2.
Uncover the rubber sheet (1) from the retainer clips (2).
3.
Unlatch the retainer clips.
4.
Remove the air cleaner housing cover (3).
Cleaning
UNDER SEAT
(2)
(1)
(1) rubber sheet (3) air cleaner housing cover
(3)
(2) retainer clips

Servicing Your Honda 101
Air Cleaner
5.
Remove the screw A (4) and stay (5).
6.
Loosen the screw B (6) and remove the air cleaner assembly (7)
from the air cleaner housing.
7.
Remove the clamp (8) and air cleaner (9) from the air cleaner
body (10).
8.
Gently wash the air cleaner in clean, non-flammable (high flash
point) solvent such as kerosene — not gasoline. After cleaning,
gently squeeze out the remaining solvent. Avoid twisting or
wringing the air cleaner. This can tear the foam.
9.
Inspect for tears or cracks in the foam or seams of the air cleaner.
Replace the air cleaner if it is damaged.
10.
Allow the air cleaner to dry thoroughly before applying oil. A wet
air cleaner will not fully absorb the oil.
11.
Pour clean Pro Honda Foam Filter Oil or an equivalent over the
entire surface of the air cleaner. Use both hands to evenly spread
the oil into the air cleaner. Gently squeeze out any excess oil. (To
keep your hands dry, place the air cleaner in a clean plastic bag
before spreading the oil into the air cleaner.)
12.
Install the air cleaner on the air cleaner body.
(6) screw B
UNDER SEAT
(7) air cleaner assembly
(10) air cleaner body
(10)
(9)
(7)
(6)
(8)
(5) stay (9) air cleaner
(5) (4) (5)
(4) screw A (8) clamp

Servicing Your Honda
102
Air Cleaner
13.
Apply a thin coat of grease to the sealing surface of the air
cleaner assembly.
14.
Install the clamp.
15.
Insert the air cleaner assembly into the air cleaner housing.
16.
Install the stay and screw A.
17.
Fasten the screws.
18.
Install the air cleaner housing cover and latch the retainer clips.
Do not push the dust cover (1) too far into the air cleaner housing
(2). If the dust cover is dirty, clean it.
Dust Cover
UNDER SEAT
(2)
(1)
(1) dust cover (2) air cleaner housing

Servicing Your Honda 103
Air Cleaner
The air cleaner housing drain tube should be serviced in accordance
with the Maintenance Schedule. (Riding through water may require
more frequent inspection.) If deposits can be seen in the drain tube,
the tube must be cleaned before starting the vehicle.
If the drain tube overflows, the air filter may become contaminated
with engine oil causing poor engine performance.
1.
Remove the drain tube (1) by removing the clip (2) under the air
cleaner housing (3).
2.
Drain the deposits.
3.
Reinstall the drain tube, securing it with the clip.
Air Cleaner Housing Drain Tube
REAR
(2)
(1)
(1) drain tube (3) air cleaner housing
(2) clip
(3)

Servicing Your Honda
104
Throttle
Refer to Safety Precautions on page 76.
Inspection
Check freeplay at the throttle lever (1).
Freeplay:
1/8 – 5/16 in (3 – 8 mm)
Adjustment
1.
Slide the rubber sleeve (2) back to expose the throttle cable
adjuster (3).
2.
Loosen the lock nut (4).
3.
Turn the adjuster to obtain the correct freeplay.
4.
Tighten the lock nut and reinstall the sleeve.
5.
After adjustment, check for smooth operation of the throttle
lever from fully closed to fully open in all steering positions.
Throttle Freeplay
RIGHT HANDLEBAR
1/8 – 5/16 in
(3 – 8 mm)
(2)
(1) throttle lever
(2) rubber sleeve
(3) throttle cable adjuster
(4) lock nut
(+) increase freeplay
(−) decrease freeplay
(−)
(+)
(3) (4) (1)

Servicing Your Honda 105
Throttle
Refer to Safety Precautions on page 76.
1.
Check that the throttle assembly is positioned properly and the
securing bolts are tight.
2.
Check for smooth operation of the throttle lever from fully open
to fully closed in all steering positions. If there is a problem, see
your dealer.
3.
Inspect the condition of the throttle cables from the throttle lever
down to the carburetor. If the cable is kinked or chafed, have it
replaced.
4.
Check the cables for tension or stress in all steering positions.
5.
Lubricate the cables with a commercially available cable lubricant
to prevent premature wear and corrosion.
Throttle Inspection

Servicing Your Honda
106
Carburetor Choke Cable & Knob
Refer to Safety Precautions on page 76.
1.
Check the condition of the choke cable (1).
2.
Check the operation of the choke knob (2).
If the cable is damaged or kinked, have it replaced by your dealer.
LEFT HANDLEBAR (2)
(1)
(2) choke knob(1) choke cable

Servicing Your Honda 107
Clutch System
Refer to Safety Precautions on page 76.
Clutch adjustment may be required if the ATV stalls when shifting
into gear, if it tends to creep, or if the clutch slips, causing
acceleration to lag behind engine speed.
Inspection
Check freeplay at the clutch lever/parking brake lever (1).
Freeplay:
3/8 – 13/16 in (10 – 20 mm)
If necessary, adjust to the specified range.
Improper freeplay adjustment can cause premature clutch wear.
Clutch Adjustment
(1)
(1) clutch lever/parking brake lever
LEFT HANDLEBAR
3/8 – 13/16 in
(10 – 20 mm)

Servicing Your Honda
108
Clutch System
Upper Adjustment
Minor adjustments are generally made with the upper clutch cable
adjuster.
1.
Pull back the dust cover (2). Loosen the upper lock nut (3) and
turn the upper clutch cable adjuster (4). Tighten the upper lock
nut and check the adjustment.
2.
If the cable adjuster is threaded out near its limit or the correct
freeplay cannot be obtained using the cable adjuster, a major
adjustment must be made. Loosen the upper lock nut and turn in
the cable adjuster completely. Tighten the upper lock nut and
pull on the dust cover.
If proper adjustment cannot be obtained or the clutch does not work
correctly, the cable or clutch friction discs may be worn. See your
dealer.
LEFT HANDLEBAR
(2)
(4) upper clutch cable adjuster
(2) dust cover
(3) upper lock nut
(+) increase freeplay
(−) decrease freeplay
(−)
(+)
(3)
(4)
Servicing Your Honda 109
Clutch System
Lower Adjustment
The lower clutch cable adjuster is used if the upper clutch cable
adjuster is threaded out near its limit, or the correct freeplay cannot
be obtained.
1.
Loosen the upper lock nut and turn the upper clutch cable
adjuster all the way in (to provide maximum freeplay).
2.
Tighten the upper lock nut and pull the dust cover back to its
normal position.
3.
Hold the lower adjusting nut (5) and loosen the lower lock nut (6)
at the lower end of the cable.
4.
Turn the lower adjusting nut to obtain the specified freeplay.
5.
Hold the lower adjusting nut and tighten the lower lock nut.
Check the adjustment.
LEFT SIDE
(5)
(5) lower adjusting nut
(6) lower lock nut
(+) increase freeplay
(−) decrease freeplay
(−)
(+)
(6)

Servicing Your Honda 111
Reverse Inhibitor System
Refer to Safety Precautions on page 76.
1.
Check the operation of the reverse assist lever (1) for smooth
without sticking.
2.
Check the reverse assist lever and cable (2) for loose connections
or other damage. If the cable is worn or kinked, have it replaced
by your dealer.
RIGHT SIDE (1)
(2)
(1) reverse assist lever
(2) cable
REAR CRANKCASE

Servicing Your Honda
112
Engine Idle Speed
The best way to assure proper carburetion is to see your dealer for
regularly scheduled servicing, including carburetor adjustment.
Remember, idle speed adjustment is not a “cure-all” for other
problems in your engine’s fuel-delivery system. Adjusting the idle will
not compensate for a fault elsewhere.
The engine must be at normal operating temperature for accurate
idle speed adjustment.
For information about high altitude carburetor adjustment, see
page 181.
Refer to Safety Precautions on page 76.
1.
If the engine is cold, start it and warm it up with 10 minutes of
stop-and-go riding. Stop the engine.
2.
Park your ATV on a firm, level surface.
3.
Connect a tachometer to the engine.
4.
Shift into neutral. Start the engine.
5.
Adjust idle speed by turning the throttle stop screw (1).
Idle speed (in neutral):
1,400 ± 100 rpm
Idle Speed Adjustment
(1)
(−) decrease
RIGHT SIDE
(−)
(+)
(1) throttle stop screw (+) increase

Servicing Your Honda
114
Spark Plug
4.
Inspect the electrodes and center porcelain for deposits,
corrosion, or carbon fouling. If the corrosion or deposits are
heavy, replace the plug. Clean a carbon or wet-fouled plug with
a plug cleaner, if available, or a wire brush. Inspect the spark plug
electrodes for wear. The center electrode (2) should have a flat tip
and sharp edges, and the side electrode (3) should not be eroded.
If the electrodes and insulator tip appear unusually fouled or
burned, we suggest that you contact your dealer.
5.
Discard the spark plug if there is apparent wear or if the insulator
is cracked or chipped.
6.
Using a wire-type feeler gauge, check the spark plug gap (4). If
adjustment is necessary, bend the side electrode carefully.
The gap should be:
0.031 – 0.035 in (0.80 – 0.90 mm)
(2)
(2) center electrode
(3) side electrode
(4) spark plug gap
0.031 – 0.035 in
(0.80 – 0.90 mm)
(3)
(4)

Servicing Your Honda 115
Spark Plug
7.
With the plug washer attached, thread the spark plug in by hand
to prevent cross-threading.
8.
Tighten the spark plug:
• If the old plug is good:
1/8 turn after it seats.
• If installing a new plug, tighten it twice to prevent loosening:
a) First, tighten the plug:
b) Then loosen the plug.
c) Next, tighten the plug again:
1/8 turn after it seats.
NOTICE
An improperly tightened spark plug can damage the engine. If a
plug is too loose, the piston may be damaged. If a plug is too tight,
the threads may be damaged.
9.
Reinstall the spark plug cap. Take care to avoid pinching any
cables or wires.
NGK: 3/4 turn after it seats.
DENSO: 1/2 turn after it seats.

Servicing Your Honda
116
Valves
Refer to Safety Precautions on page 76.
Valve clearance should be:
Excessive clearance will cause noise. Insufficient clearance will cause
loss of power and possibly damage the valves.
For those who are mechanically proficient and have the proper tools,
instructions on adjusting valve clearances are given in the official
Honda Service Manual. Otherwise, the valves should be adjusted by
your dealer.
Valve Inspection
intake/exhaust: 0.005 in (0.13 mm)

Servicing Your Honda 117
Spark Arrester
Refer to Safety Precautions on page 76.
The spark arrester must be serviced every 100 operating hours to
maintain its efficiency.
Regular servicing prevents carbon build up (which can diminish
engine performance) and also complies with USDA regulations for
regular maintenance to assure proper function. The spark arrester
prevents random sparks from the combustion process in your engine
from reaching the environment.
1.
Allow the engine and muffler to cool.
2.
Remove the bolts (1), the spark arrester (2) and the gasket (3)
from the muffler (4).
(1)
(1) bolts
REAR
(2) spark arrester
(3) gasket
(4) muffler
(2)
(3)
(4)

Servicing Your Honda
118
Spark Arrester
3.
Use a brush to remove carbon deposits from the spark arrester
screen (5). Be careful to avoid damaging the spark arrester
screen.
The spark arrester must be free of breaks and holes. Replace, if
necessary. Check the gasket. Replace, if necessary.
4.
Install the spark arrester and the gasket in the muffler and tighten
the bolts securely.
(5)
(5) spark arrester screen

Servicing Your Honda 119
Brakes
The hydraulic disc brakes (front) and single mechanical drum brake
(rear) on your ATV dissipate heat generated by the friction of the
brake pads on the disc (front) and the brake shoes on the drums
(rear) as the wheels are slowed.
Hydraulic Disc Front Brake
As the front brake pads wear, brake fluid level will drop. A leak in the
system will also cause the level to drop.
There are no adjustments to perform, but fluid level and pad wear
must be inspected periodically. The system must be inspected
frequently to ensure there are no fluid leaks.
If the brake lever freeplay does not feel within the normal range
while riding, check the brake pads for wear (page 122).
Worn pads should be replaced. If the pads are not worn beyond the
recommended limit, there is probably air in the brake system. See
your dealer to have the air bled from the system.
Mechanical Drum Rear Brake
If the clutch lever/parking brake lever or brake pedal freeplay does
not feel within the normal range while riding, check the brake shoes
for wear (page 125).
The recommended brake fluid is Honda DOT 4 Brake Fluid, or any
brake fluid of equal quality and performance. Use fresh brake fluid
from a sealed container. Be sure to read the label before opening the
sealed container. An opened container may be contaminated or may
have absorbed moisture from the air.
Brake Fluid Recommendation
brake fluid Honda DOT 4 Brake Fluid

Servicing Your Honda
120
Brakes
Refer to Safety Precautions on page 76.
If your inspection indicates a low fluid level, have your dealer add the
recommended fluid.
Do not add or replace brake fluid, except in an emergency. If you do
add fluid, have your dealer check the system as soon as possible.
NOTICE
Brake fluid can damage plastic and painted surfaces. Handle with
care.
With the ATV in an upright position, check the fluid level.
It should be above the LOWER level mark (1). If the level is at or
below the LOWER level mark, check the brake pads for wear
(page 122).
Fluid Level Inspection
(1)
RIGHT HANDLEBAR
(1) LOWER level mark

Servicing Your Honda 121
Brakes
Worn brake pads should be replaced. If the pads are not worn, have
your brake system inspected for leaks.
Wipe up spills immediately. Avoid brake fluid contact with skin or
eyes. If it comes in contact with your eyes, wash them out with clean
water and immediately call a doctor. If it comes in contact with your
skin, wash with clean water and, if necessary, call a doctor.
• Make sure there are no fluid leaks.
• Check for deterioration or cracks in the hoses and fittings. If the
hoses are worn or cracked, have them replaced by your dealer.
Other Inspections

Servicing Your Honda
122
Brakes
Refer to Safety Precautions on page 76.
Brake pad wear will depend upon the severity of usage and riding
conditions. The pads will wear faster in wet or muddy conditions.
Inspect the pads visually during all regular service intervals to
determine the pad wear.
Check the wear indicator (1). If the wear indicator aligns with the
edge of the reference mark (2), both pads must be replaced, see
your dealer for this replacement.
Always inspect both pads in both the right and left front brake
calipers.
Brake Pad Wear
RIGHT FRONT (Left side similar)
(2)
(1)
(1) wear indicator (2) edge of reference mark

Servicing Your Honda 123
Brakes
Inspection
Measure the distance the rear brake pedal (1) moves before the
brake starts to take hold. Freeplay, measurement at the tip of the
end of the pedal, should be:
9/16 – 13/16 in (15 – 20 mm)
If necessary, adjust to the specified range.
Rear Brake Pedal Freeplay
(1)
RIGHT SIDE
(1) rear brake pedal
9/16 – 13/16 in
(15 – 20 mm)

Servicing Your Honda
124
Brakes
Adjustment
Adjust the freeplay of the brake pedal with the front wheels pointed
straight ahead.
1.
Turn the brake pedal adjusting nut (2), located on the brake
operating rod at the rear of the frame. Make sure the cutout on
the adjusting nut is properly seated on the brake arm pin (3).
2.
Adjust the freeplay of the rear brake pedal. Push the brake arm
(4), then check the clearance between the brake arm and the
brake arm pin.
(2)
RIGHT REAR
(2) brake pedal adjusting nut
(3)
(3) brake arm pin
(3)
(4)
(4) brake arm

Servicing Your Honda 125
Brakes
Refer to Safety Precautions on page 76.
The rear brake is equipped with an external brake wear indicator
that lets you check brake wear without disassembly. Application of
the brake control causes the arrow on the brake arm to move
toward a reference mark on the brake panel.
1.
Apply the brake control and check the movement of the arrow
(1) on the brake arm (2).
2.
Replace the brake shoe if the arrow aligns with the reference
mark (3) on the brake panel upon full application of the brake. If
replacement is necessary, see your dealer.
Brake Shoe Wear
RIGHT REAR
(1) arrow
(2)
(3) (1)
(2) brake arm
(3) reference mark

Servicing Your Honda
128
Brakes
Refer to Safety Precautions on page 76.
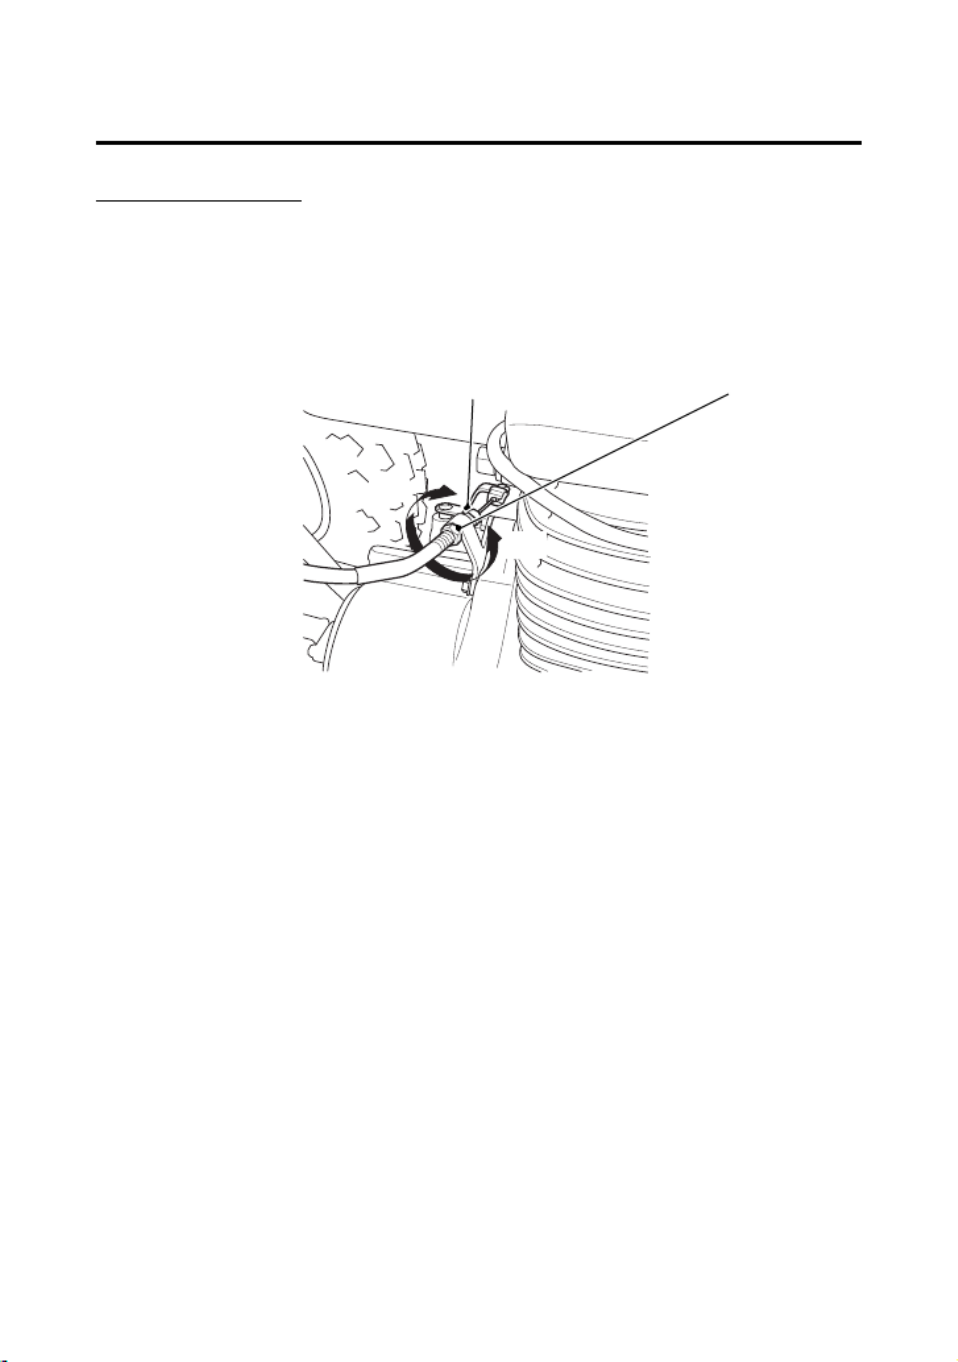
Rear Brake Only:
Check the operation of the rear brake light switch (1) at the right
side behind the engine from time to time. Adjustment is done by
turning the adjusting nut (2). Turn the nut in direction (A) if the
switch operates too late and in direction (B) if the switch operates
too soon.
Brake Light Switch Adjustment
RIGHT SIDE
(1) brake light switch
(1)
(2) adjusting nut
(2)
(A)
(B)

Servicing Your Honda 129
Brakes
Refer to Safety Precautions on page 76.
1.
Make sure the engine is OFF and the parking brake is set.
2.
Remove the rear brake drain bolt (1) from the bottom of the rear
brake cover.
If any water drains, the brake seals must be replaced by your
dealer as soon as possible.
Draining Water from Brakes
RIGHT REAR
(1) rear brake drain bolt
(1)

Servicing Your Honda
130
Tires
To safely operate your ATV, your tires must be the proper type and
size, in good condition with adequate tread, and correctly inflated.
This ATV is equipped with low pressure tubeless tires. Although the
tires are designed specifically for off-road use, they are not immune
to punctures. Always select your riding area with care.
The following pages give detailed information on how and when to
check your air pressure, how to inspect your tires for wear and
damage, and our recommendations for tire repair and replacement.
3
WARNING
Using tires that are excessively worn or
improperly inflated can cause a crash in which
you can be seriously hurt or killed.
Follow all instructions in this owner’s manual
regarding tire inflation and maintenance.

Servicing Your Honda 131
Tires
Refer to Safety Precautions on page 76.
Properly inflated tires provide the best combination of handling,
tread life, and riding comfort. Generally, underinflated tires wear
unevenly, adversely affect handling, and are more likely to fail from
being overheated. Overinflated tires make your ATV ride harshly, are
more prone to damage from surface hazards, and wear unevenly.
Make sure the valve stem caps are secure. If necessary, install new
caps.
Always check air pressure when your tires are “cold.” If you check air
pressure when your tires are “warm” — even if your ATV has only
been ridden for a few miles — the readings will be higher. If you let
air out of warm tires to match the recommended cold tire pressures,
the tires will be underinflated. Be sure to check tire pressure at the
riding site, since changes in altitude can affect air pressure.
The recommended “cold” tire pressures are:
Air Pressure
FRONT REAR
RECOMMENDED
PRESSURE 4.4 psi (30.0 kPa) 2.9 psi (20.0 kPa)

Servicing Your Honda
132
Tires
A manually operated tire pump should be used rather than the high
pressure system found in service stations. This will minimize the
possibility of tire damage from overinflation. If you use a high
pressure system at a service station, add air in small amounts and
check the pressure increase frequently to prevent possible tire
damage from overinflation.
Refer to Safety Precautions on page 76.
Whenever you check the tire pressures, you should also look for:
• Bumps or bulges in the side of the tire or the tread. Replace any
tire that has a bump or bulge.
• Cuts, slits, or cracks in the tires. Replace the tire if you can see
fabric or cord.
• Nails or other foreign objects embedded in the side of the tire or
tread.
• Excessive tread wear.
3
WARNING
Operating this ATV with improper tires, or
with uneven tire pressure may cause loss of
control, and you could be seriously injured or
killed.
• Always use the size and type tires specified
in this owner’s manual for this vehicle.
• Always maintain proper tire pressure as
described in this owner’s manual.
Inspection

Servicing Your Honda 133
Tires
Also, if you hit a pothole or other hard object while riding, stop as
soon as you safely can and carefully inspect the tires for damage.
Tread Wear
To check the condition of a tire tread, measure the groove depth (1)
in the center of the tire, or check the wear indicator (2).
For best performance, you should replace a tire before the tread
depth at the center reaches the following limits:
front 3/16 in (4 mm)
rear 3/16 in (4 mm)
Front
Rear
(1) groove depth
(2) wear indicator
(3) wear indicator
location mark
(1)
(2)(3)
(1)
3/16 in (4
mm)
NEW
Replace
NEW
Replace
3/16 in (4
mm)
Product specificaties
| Merk: | Honda |
| Categorie: | Quad |
| Model: | TRX250X (2017) |
Heb je hulp nodig?
Als je hulp nodig hebt met Honda TRX250X (2017) stel dan hieronder een vraag en andere gebruikers zullen je antwoorden
Handleiding Quad Honda

21 Juni 2023
26 Mei 2023
26 April 2023
24 April 2023
21 April 2023
17 April 2023
Handleiding Quad
Nieuwste handleidingen voor Quad

14 December 2024

25 November 2024
1 Oktober 2024
1 Oktober 2024
30 September 2024
30 Mei 2024
30 Mei 2024
30 Mei 2024

15 Augustus 2023
9 Juli 2023