Hitachi VM-E230A Handleiding
Lees hieronder de 📖 handleiding in het Nederlandse voor Hitachi VM-E230A (62 pagina's) in de categorie Camcorder. Deze handleiding was nuttig voor 61 personen en werd door 2 gebruikers gemiddeld met 4.5 sterren beoordeeld
Pagina 1/62

Table of Contents
HITACHI
Instruction Manual
8mm Video Camcorder
VM-E230A
HITACHI HOME ELECTRONICS HITACHI (HSC) CANADA INC.
(AMERICA), INC. 6740 Campobello Road
3890 Steve Reynolds Blvd., Norcross, GA 30093 Mississauga, Ontario L5N 2L8
Tel. 770-279-5600 CANADA
Tel. 905-821-4545
HITACHI SALES CORPORATION OF
HAWAII, INC
3219 Koapaka Street, Honolulu, Hawaii 96819
Tel. 808-836-3621
Thank you for buying a Hitachi product. Please take time to become familiar with the
manual and how it is set up. Keep it handy for feature reference.
QR16731 © Hitachi, Ltd. 1997 Printed in Japan KN-H(N)

Table of Contents
Table of Contents
Table of Contents ........................................................................................................................................2
For Your Safety...........................................................................................................................................7
Important Safeguards .................................................................................................................................. 9
IMPORTANT SAFETY INSTRUCTIONS FOR AC ADAPTER/CHARGER ...................................... 13
Read This First ..........................................................................................................................................14
Before You Begin...................................................................................................................................... 15
Features...............................................................................................................................................15
Components and Accessories..........................................................................................................15
Optional RF Adapter ..........................................................................................................................16
Lens Cap..............................................................................................................................................16
Using the lens cap string:..................................................................................................................16
Removing the lens cap ...................................................................................................................... 16
Getting Started...........................................................................................................................................18
Charging the Battery ..........................................................................................................................18
Additional Information........................................................................................................................ 19
Adjusting the Electronic Viewfinder .................................................................................................19
Eyepiece Adjustment .........................................................................................................................20
Adjustment the Hand Strap...............................................................................................................20
Loading Batteries................................................................................................................................ 20
Clock Battery.......................................................................................................................................21
Remote Control Batteries..................................................................................................................21
Camcorder Batteries Using Battery Pack .......................................................................................22
Removing the Battery Pack .............................................................................................................. 23
Checking the Battery's Charge......................................................................................................... 24
Using Alkaline Dry-Cell Batteries..................................................................................................... 24
Using Alternative Power Sources ....................................................................................................26
Using the AC Adapter/Charger......................................................................................................... 26
Using a Car Battery............................................................................................................................26
Inserting and Removing Cassettes.................................................................................................. 27
Inserting a Cassette ...........................................................................................................................27
Removing a Cassette.........................................................................................................................28
Protecting Recorded Material...........................................................................................................28
Using the Linear Time Counter ........................................................................................................28
Remaining Tape .................................................................................................................................28
Setting the Date and Time ................................................................................................................ 29
Correcting the Date and Time ..........................................................................................................30
Getting Started, Identifying Controls........................................................................................................31
Basic Techniques.......................................................................................................................................34
Making a Basic Recording ................................................................................................................ 34
Playing Back Your Recording...........................................................................................................35
Connecting to a Television with a VCR Attached.......................................................................... 35
Connecting to a Television with Audio In and Video In Jacks.....................................................35
Connecting to a Television without Audio In and Video In Jacks ...............................................36
Simple Playback (Using the Electronic Viewfinder) ...................................................................... 36
Using Still .............................................................................................................................................37

Table of Contents
Using Forward and Reverse Search ...............................................................................................37
To Play Back a Recording at Double the Normal Speed............................................................. 37
Advanced Techniques ...............................................................................................................................39
Date Recording...................................................................................................................................39
Using the Power Zoom ......................................................................................................................40
Using the Digital Zoom ...................................................................................................................... 41
Using the INST. ZOOM (Instant Zoom) Button.............................................................................. 41
Using Auto Focus ...............................................................................................................................42
Using Manual Focus ..........................................................................................................................43
Using Instant Review .........................................................................................................................43
Using Quick Edit .................................................................................................................................44
Using Macro ........................................................................................................................................44
Date Search.........................................................................................................................................44
Dubbing from the Camcorder to a VCR..........................................................................................45
Remote Control Range......................................................................................................................45
Using Memory .....................................................................................................................................46
Using the Display Button...................................................................................................................47
Creating and Recording A Title........................................................................................................47
Creating a Title....................................................................................................................................48
Correcting Errors ................................................................................................................................48
Recording Title on a Tape in the Camcorder.................................................................................48
Recording a Created Title while Transferring a Tape...................................................................49
Using Audio/Video Dubbing.............................................................................................................. 50
Simple Programmable Edit (The edit remote control is optional) ...............................................50
Programming the Remote Control for the VCR.............................................................................50
Operation .............................................................................................................................................52
To End Programmable Simple Edit .................................................................................................53
Attaching the Optional Wide or Tele Converter Lens ................................................................... 54
Attaching the Optional DC Camera Light .......................................................................................54
Removing the DC Camera Light ......................................................................................................55
Replacing the DC Camera Light Bulb .............................................................................................55
Viewfinder Bright, Color and Tint Control .......................................................................................56
General Maintenance................................................................................................................................. 57
Cleaning the camcorder Heads........................................................................................................57
Cleaning the Lens and Picture Tube of the Electronic Viewfinder .............................................57
Periodic Maintenance ........................................................................................................................57
Troubleshooting .................................................................................................................................. 58
CAMERA RECORDING ....................................................................................................................58
Symptom.............................................................................................................................................. 58
Check Point & Correction..................................................................................................................58
Picture does not appear in the viewfinder. .....................................................................................58
Remove the lens cap. ........................................................................................................................58
Slide the CAM/OFF/VIDEO switch to CAM....................................................................................58
The camcorder cannot go into the recording mode, even when the start/stop button is
pressed. ...............................................................................................................................................58
Check the record protect tab on the cassette................................................................................58
Push the cassette holder embossed PUSH LOCK to close it.....................................................58
Slide the CAM/OFF/VIDEO switch to CAM....................................................................................58
Picture is out of focus. .......................................................................................................................58

Important Safeguards
Important Safeguards
In addition to the careful attention devoted to quality standards in the manufacture of
your video product, safety is a major factor in the design of every instrument. But, safety
is your responsibility too.
This page lists important information that will help to assure your enjoyment and proper
use of a Video camcorder and accessory equipment. Please read it carefully before
operating your video product and keep it in a handy place for future reference.
INSTALLATION
1 Read and Follow Instructions -- All the safety and operating instructions should be
read before the video product is operated. Follow-all operating and use instructions.
2 Retain Instructions -- The safety and operating instructions should be retained for
future reference.
3 Heed Warnings -- Comply with all warnings on the video product and in the
operating instructions.
4 Polarized Plug -- This video product is equipped with a polarized alternating-current
line plug (a plug having one blade wider than the other). This plug will fit into the power
outlet only one way. This is a safety feature. If you are unable to insert the plug fully into
the outlet, try reversing the plug. If the plug should still fail to fit, contact your electrician
to replace your obsolete outlet. To prevent electric shock do not use this polarized plug
with an extension cord, receptacle or other outlet unless the blades can be fully inserted
without blade exposure. If you need an extension, use a polarized cord.
5 Power Sources -- This video product should be operated only from the type of power
source indicated on the marking label. If you are not sure of the type of power supply to
your home, consult your video dealer or local power company. For video products
intended to operate from battery power, or other sources, refer to the operating
instructions.
6 Overloading -- Do not overload wall outlets and extension cords as this can result in
a risk of fire or electric shock. Overloaded AC outlets and extension cords are
dangerous, and so are frayed power cords, damaged or cracked wire insulation and
broken plugs. They may result in a shock or fire hazard. Periodically examine the cord
and have it replaced by your service technician if appearance indicates damage or
deteriorated insulation.

Important Safeguards
7 Power-Cord Protection -- Power-supply cords should be routed so that they are not
likely to be walked on or pinched by items placed upon or against them, paying
particular attention to cords at plugs, convenience receptacles, and the point where they
exit from the appliance.
8 Ventilation -- Slots and openings in the cabinet are provided for ventilation to ensure
reliable operation of the video product and to protect it from overheating. These
openings must not be blocked or covered. The openings should never be blocked by
placing the video product on a bed, sofa, rug or other similar surface. This video product
should never be placed near or over a radiator or heat register. This video product
should not be placed in a built-in installation such as a bookcase or rack unless proper
ventilation is provided or the video product manufacturer's instructions have been
followed.
9 Attachments -- Do not use attachments unless recommended by the video product
manufacturer as they may cause hazards.
Caution: Maintain electrical safety. Powerline operated equipment or accessories
connected to this unit should bear the UL listing mark or CSA certification mark on the
accessory itself and should not have been modified so as to defeat the safety features. This
will help avoid any potential hazard from electric shock or fire. If in doubt, contact qualified
service personnel.
10 Water and Moisture -- Do not use this video product near water - for example, near
a bath tub, wash bowl, kitchen sink, or laundry tub, in a wet basement, or near a
swimming pool, and the like.
11 Accessories -- Do not place this video product on an unstable card, stand, tripod,
bracket, or table. The video product may fall, causing serious injury to a child or adult,
and serious damage to the appliance. Use only with a cart, stand, tripod, bracket, or
table recommended by the manufacturer, or sold with the video product. Any mounting
of the product should follow the manufacturer's instructions, and should use a mounting
accessory recommended by the manufacturer.
11A An appliance and cart combination should be moved with care. Quick stops,
excessive force, and uneven surfaces may cause the appliance and cart combination to
overturn.
12 Outdoor Antenna Grounding -- If an outside antenna or cable system is
connected to the video product, be sure the antenna or cable system is grounded so as
to provide some protection against voltage surges and built-up static charges. Section
810 of the National Electrical Code, ANSI/NFPA No. 70, provides information with

IMPORTANT SAFETY INSTRUCTIONS FOR AC ADAPTER/CHARGER
IMPORTANT SAFETY INSTRUCTIONS FOR AC ADAPTER/CHARGER
1. Save these Instructions -- This page contains important safety and operating
instructions for AC Adapter/Charger Model VM-AC 85A.
2. Before using AC Adapter/Charger, read all instructions and cautionary markings on
(1) AC Adapter/Charger, (2) battery and (3) product using battery.
3. Also read all instructions on pages 4 and 5.
4. Caution -- To reduce risk of injury, charge only rechargeable battery, VM-BP82G, VM-
BP82 or VM-BP84.
Other types of batteries may burst causing personal injury and damage.
5. Do not expose charger to rain or snow.
6. Use of an attachment nor recommended or sold by the battery charger manufacturer
may result in a risk of fire, electric shock, or injury to persons.
7. To reduce risk of damage to electric plug and cord, pull by plug rather than cord when
disconnecting charger.
8. Make sure cord is located so that it will not be stepped on, tripped over, or otherwise
subjected to damage or stress.
9. Do not operate charger with damaged cord or plug - replace them immediately.
10. An extension cord should not be used unless absolutely necessary.
Use of improper extension cord could result in a risk of fire and electric shock. If
extension cord must be used, make sure:
A. The pins on plug of extension cord are the same number, size, and shape as those
of plug on charger.
B. That extension cord is properly wired and in good electrical condition; and
C. That wire size should be met below:
Minimum
AWG size Length of extension cord (feet)
18 Equal to or less than 100
16 Equal to or less than 150
11. Do not operate charger if it has received a sharp blow, been dropped, or otherwise
damaged in any way; take it to a qualified serviceman.
12. Do not disassemble charger: take it to a qualified serviceman when service or repair
is required. Incorrect reassembly may result in a risk of electric shock or fire.
13. To reduce risk of electric shock, unplug charger from outlet before attempting any
maintenance or cleaning.

Before You Begin
Optional RF Adapter
If you wish to connect this camcorder to a television that does not have audio/video
input jacks you will need to use the optional RF adapter model VM-RF86A (R).
The RF adapter can be purchased by calling the telephone number below. For your
convenience Visa, Master Card, and American Express credit cards are accepted. The
RF adapter can also be purchased by mail by sending either money order or your credit
card information to the following address:
HiTRON, Inc.
675, Old Peachtree RD.
Suwanee, GA 30174
Tel: 1-800-995-4500
For more information concerning the purchase of camcorder accessories, please see
the optional accessory listing on page 59.
Lens Cap
Using the lens cap string:
Pass the string through the lens cap and grip belt and attach it as shown in the figure.
Removing the lens cap
Always attach the lens cap to protect the lens when carrying or storing the camcorder.
Getting Started
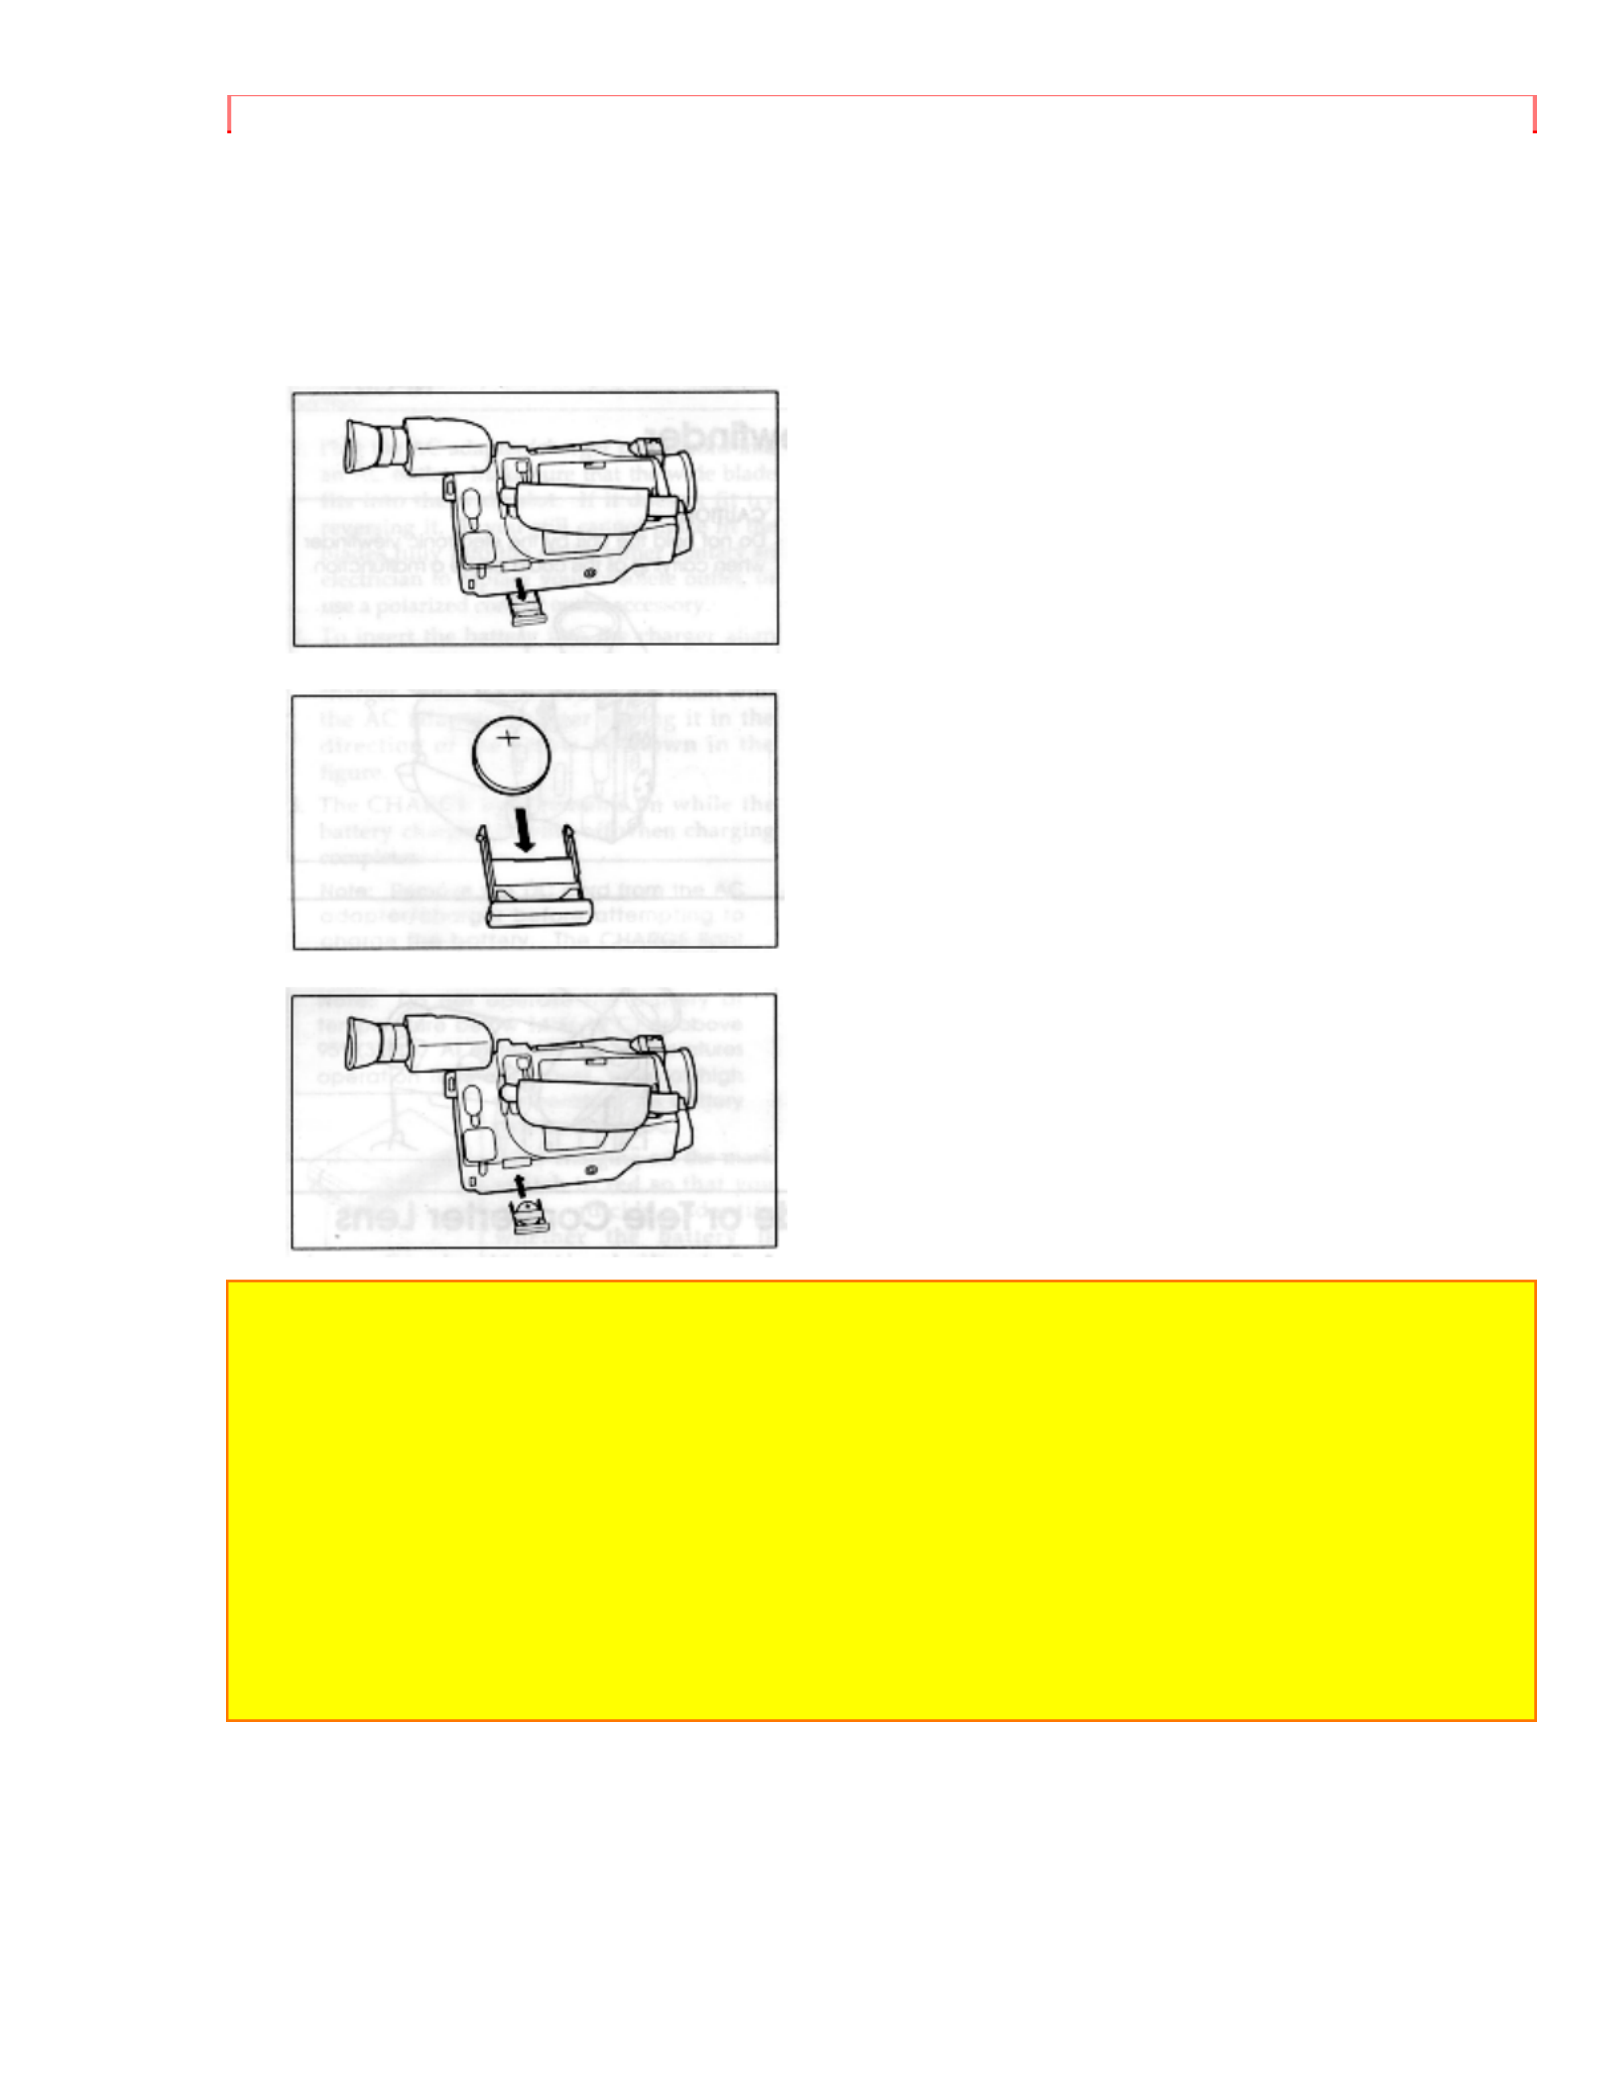
Clock Battery
Install the battery to prevent misplacing it.
1. Pull out the battery holder.
2. Insert the battery with the "+" terminal facing up.
3. Fully insert the battery holder into the camcorder.
WARNING: KEEP THE BATTERIES AWAY FROM CHILDREN AND PETS.
IF SWALLOWED CONSULT A PHYSICIAN IMMEDIATELY FOR EMERGENCY
TREATMENT.
Note: Replace the battery with 3V micro lithium cells such as Maxell CR2025 or its
equivalent.
Note: Dispose of battery safely in accordance with local laws. Do not dispose of in fire.
Note: Do not short circuit the battery.
Note: Do not take apart the battery.
Note: Do not hold the battery with the metallic tweezers.
Note: Do not re-charge the battery.
Note: Keep the battery in a dark, cool, dry place.
Remote Control Batteries
The remote control requires two "AA" batteries.
1. Slide the cover in the direction of the arrow to remove it.
Product specificaties
| Merk: | Hitachi |
| Categorie: | Camcorder |
| Model: | VM-E230A |
Heb je hulp nodig?
Als je hulp nodig hebt met Hitachi VM-E230A stel dan hieronder een vraag en andere gebruikers zullen je antwoorden
Handleiding Camcorder Hitachi

8 Juni 2023
28 Mei 2023
26 Mei 2023
24 Mei 2023
8 Mei 2023
7 Mei 2023
3 Mei 2023
30 April 2023
30 April 2023
30 April 2023
Handleiding Camcorder
- Camcorder Braun
- Camcorder HP
- Camcorder Sony
- Camcorder Samsung
- Camcorder Xiaomi
- Camcorder Panasonic
- Camcorder Nikon
- Camcorder Canon
- Camcorder Garmin
- Camcorder JVC
- Camcorder Kenwood
- Camcorder Medion
- Camcorder Olympus
- Camcorder Quintezz
- Camcorder Toshiba
- Camcorder VTech
- Camcorder Abus
- Camcorder Activeon
- Camcorder AEE
- Camcorder Agfa
- Camcorder Agfaphoto
- Camcorder Aiptek
- Camcorder Airis
- Camcorder ATN
- Camcorder Bauer
- Camcorder BenQ
- Camcorder BlackVue
- Camcorder Braun Phototechnik
- Camcorder Bresser
- Camcorder Denver
- Camcorder DJI
- Camcorder Dnt
- Camcorder DOD
- Camcorder Drift
- Camcorder Easypix
- Camcorder EE
- Camcorder Elmo
- Camcorder Ematic
- Camcorder Energy Sistem
- Camcorder Envivo
- Camcorder FHD 1080P
- Camcorder Flir
- Camcorder Fujifilm
- Camcorder Gembird
- Camcorder Genius
- Camcorder Goclever
- Camcorder GoPro
- Camcorder Hama
- Camcorder Hyundai
- Camcorder Iget
- Camcorder Insignia
- Camcorder Insta360
- Camcorder Intenso
- Camcorder Ion
- Camcorder ISAW
- Camcorder Kitvision
- Camcorder Kodak
- Camcorder Kogan
- Camcorder Konica Minolta
- Camcorder Konig
- Camcorder Kyocera
- Camcorder Lamax
- Camcorder Leica
- Camcorder Lenco
- Camcorder Leotec
- Camcorder Lexibook
- Camcorder Linksys
- Camcorder Logitech
- Camcorder Magellan
- Camcorder Maginon
- Camcorder Mamiya
- Camcorder Marshall
- Camcorder Midland
- Camcorder Minolta
- Camcorder Minox
- Camcorder Mio
- Camcorder MMTC
- Camcorder Mobius
- Camcorder Mpman
- Camcorder National Geographic
- Camcorder Nedis
- Camcorder Nikkei
- Camcorder Polaroid
- Camcorder Praktica
- Camcorder Prestigio
- Camcorder Pyle
- Camcorder RCA
- Camcorder Renkforce
- Camcorder Replay
- Camcorder Ricoh
- Camcorder Rollei
- Camcorder Sakar
- Camcorder Salora
- Camcorder Samson
- Camcorder Sanyo
- Camcorder SeaLife
- Camcorder Sencor
- Camcorder Sharp
- Camcorder Silvercrest
- Camcorder SJCAM
- Camcorder Soundmaster
- Camcorder Spypoint
- Camcorder Storex
- Camcorder TacTic
- Camcorder TomTom
- Camcorder Transcend
- Camcorder Traveler
- Camcorder Trust
- Camcorder Uniden
- Camcorder Veho
- Camcorder Viewsonic
- Camcorder Vivitar
- Camcorder Zagg
- Camcorder Zoom
- Camcorder Jay-tech
- Camcorder Jobo
- Camcorder OK
- Camcorder Oregon Scientific
- Camcorder Overmax
- Camcorder Macally
- Camcorder Naxa
- Camcorder T'nB
- Camcorder Cobra
- Camcorder Tracer
- Camcorder Hamlet
- Camcorder Akaso
- Camcorder Trevi
- Camcorder Contax
- Camcorder Hamilton Buhl
- Camcorder Swann
- Camcorder Nilox
- Camcorder Cisco
- Camcorder ARRI
- Camcorder Beaulieu
- Camcorder Bolex
- Camcorder CamOne
- Camcorder Contour
- Camcorder EVOLVEO
- Camcorder RunCam
- Camcorder Whistler
- Camcorder Dragon Touch
- Camcorder Coby
- Camcorder Mediacom
- Camcorder Zorki
- Camcorder Aida
- Camcorder DataVideo
- Camcorder SBS
- Camcorder Blackmagic Design
- Camcorder Contour Design
- Camcorder Kaiser Baas
- Camcorder DXG
- Camcorder Vupoint Solutions
- Camcorder Curve
- Camcorder Kobian
- Camcorder RSC
- Camcorder Stealth Cam
- Camcorder Aqua-Vu
- Camcorder Qoltec
- Camcorder Best Buy
- Camcorder IOPLEE
- Camcorder Microtek
Nieuwste handleidingen voor Camcorder

12 Maart 2025
12 Maart 2025
12 Maart 2025
4 Februari 2025

28 December 2024
11 December 2024
6 December 2024

6 December 2024
6 December 2024
6 December 2024