Garmin nuvi 1210T Handleiding
Lees hieronder de 📖 handleiding in het Nederlandse voor Garmin nuvi 1210T (72 pagina's) in de categorie Navigator. Deze handleiding was nuttig voor 23 personen en werd door 2 gebruikers gemiddeld met 4.5 sterren beoordeeld
Pagina 1/72

nüvi® 1200/1300/1400 series
owner’s manual
for use with these nüvi models:
1200, 1210, 1240, 1245, 1250, 1255, 1260
1300, 1310, 1340, 1350, 1370, 1390
1410, 1440, 1450, 1490

© 2009 Garmin Ltd. or its subsidiaries
Garmin International, Inc.
1200 East 151st Street,
Olathe, Kansas 66062,
USA
Tel. (913) 397.8200 or
(800) 800.1020
Fax (913) 397.8282
Garmin (Europe) Ltd.
Liberty House
Hounsdown Business Park,
Southampton, Hampshire, SO40 9LR UK
Tel. +44 (0) 870.8501241 (outside the UK)
0808 2380000 (within the UK)
Fax +44 (0) 870.8501251
Garmin Corporation
No. 68
Jangshu 2nd Road,
Shijr, Taipei County,
Taiwan
Tel. 886/2.2642.9199
Fax 886/2.2642.9099
October 2009 Part Number 190-01041-00 Rev. B Printed in Taiwan
All rights reserved. Except as expressly provided herein, no part of this manual may be reproduced,
copied, transmitted, disseminated, downloaded or stored in any storage medium, for any purpose without
the express prior written consent of Garmin. Garmin hereby grants permission to download a single copy
of this manual onto a hard drive or other electronic storage medium to be viewed and to print one copy of
this manual or of any revision hereto, provided that such electronic or printed copy of this manual must
contain the complete text of this copyright notice and provided further that any unauthorized commercial
distribution of this manual or any revision hereto is strictly prohibited.
Information in this document is subject to change without notice. Garmin reserves the right to change
or improve its products and to make changes in the content without obligation to notify any person
or organization of such changes or improvements. Go to the Garmin Web site (www.garmin.com) for
current updates and supplemental information concerning the use and operation of this and other Garmin
products.
Garmin
®
, the Garmin logo, nüvi
®
, and MapSource
®
are trademarks of Garmin Ltd. or its subsidiaries,
registered in the USA and other countries. Garmin Lock
™
, myGarmin
™
, myGarmin Agent
™
, ecoRoute
™
,
cityXplorer
™
, and nüMaps Guarantee
™
are trademarks of Garmin Ltd. or its subsidiaries. These
trademarks may not be used without the express permission of Garmin.
The Bluetooth
®
word mark and logos are owned by the Bluetooth SIG, Inc., and any use of such name
by Garmin is under license. Windows
®
is a registered trademark of Microsoft Corporation in the United
States and/or other countries. Mac
®
is a registered trademark of Apple Computer, Inc. microSD
™
is a
trademark of SanDisk or its subsidiaries.

nüvi 1200/1300/1400 Series Owner’s Manual i
Table of Contents
Table of Contents
nüvi 1200/1300/1400 Series
Models ................................ iv
Getting Started .................... 1
Looking at Your nüvi .................. 1
Using the Main Menu................. 1
Setting Up Your nüvi .................. 2
Using the Power Button ............. 4
Adjusting the Volume ................. 4
Navigating the Screens ............. 4
Finding Your Destination............ 4
Navigating in Pedestrian
Usage Mode ............................ 6
Adding a Stop ............................ 7
Changing Destinations .............. 7
Taking a Detour ......................... 7
Stopping the Route .................... 7
Where To? ........................... 8
Finding an Address .................... 8
Setting a Home Location ........... 8
Using the Go! Page ................... 9
Providing Feedback on
Points of Interest ................... 10
Finding a Place by Spelling
the Name ............................. 10
Searching Near Another
Location .................................11
Finding Recently Found
Places ................................... 12
Finding a Place Using the
Map ....................................... 13
Entering Coordinates ............... 14
Using Photo Navigation ........... 14
Using the Map Pages ....... 15
Viewing the Trip Computer ..... 16
Viewing the Turn List .............. 16
Viewing the Next Turn Page .... 17
Viewing the Junction View
Page ...................................... 17
Using the Pedestrian Map
Page ...................................... 18

ii nüvi 1200/1300/1400 Series Owner’s Manual
Table of Contents
Making Hands-Free Phone
Calls ................................... 19
Pairing Your Phone .................. 19
Receiving a Call ...................... 20
In a Call .................................. 21
Accessing the Phone Menu ..... 21
Managing Files .................. 24
Supported File Types ............... 24
Connecting Your nüvi to Your
Computer .............................. 24
Transferring Files .................... 25
Deleting Files .......................... 25
Using the Tools ................. 26
Accessing the Settings ............ 26
Using the Where Am I?
Page ...................................... 26
Accessing Help ........................ 26
Using MSN® Direct ................... 26
Using the Picture Viewer ......... 27
Accessing My Data .................. 28
Using the World Clock ............ 28
Using the Calculator ................ 28
Using the Unit Converter ........ 28
Using ecoRoute™ ..................... 29
Resetting ecoRoute Data ........ 32
Viewing Offers ......................... 33
Using Trafc ...................... 34
Understanding FM TMC
Trafc .................................... 34
Understanding MSN® Direct
Trafc .................................... 35
Adding or Renewing Trafc
Subscriptions ........................ 35
Receiving Trafc Information ... 35
Trafc in Your Area .................. 36
Trafc on Your Route ............... 36
Viewing the Trafc Map ........... 37
Viewing Trafc Delays ............. 37
Viewing Offers ......................... 37
Customizing the nüvi ....... 38
Changing the System
Settings ................................. 38
Changing the Navigation
Settings ................................. 39

nüvi 1200/1300/1400 Series Owner’s Manual iii
Table of Contents
Adjusting the Display
Settings ................................. 39
Updating the Time Settings ..... 40
Setting the Languages............. 40
Changing the Map Settings ..... 41
Changing Security Settings ..... 41
Setting the Bluetooth
Technology Options .............. 42
Changing the Proximity Points
Settings ................................. 43
Viewing Trafc Subscription
Information ............................ 43
Restoring All Settings .............. 44
Appendix ........................... 45
Caring for Your nüvi ................ 45
Locking Your nüvi .................... 46
Calibrating the Screen ............. 47
Updating the Software ............. 47
Clearing User Data .................. 47
Battery Information ................. 47
Charging Your nüvi .................. 48
Changing the Fuse .................. 48
Removing the nüvi and
Mount .................................... 48
Mounting on Your
Dashboard ............................ 49
nüMaps Guarantee™ ................ 49
Additional Maps ....................... 50
About GPS Satellite Signals .... 50
Extras and Optional
Accessories ........................... 50
Garmin Travel Guide ............... 52
Contact Garmin ....................... 52
Registering Your nüvi............... 52
Specications .......................... 53
Declaration of Conformity ........ 56
Software License Agreement... 56
Troubleshooting ...................... 57
Index .................................. 60

iv nüvi 1200/1300/1400 Series Owner’s Manual
nüvi 1200/1300/1400 Series Models
nüvi 1200/1300/1400 Series Models
Model Bluetooth
®
Technology
Lane
Assist
Junction
View
Speaks
Street Names
Speed Limits
on Map
1200 ✓
1210/1260/
1410 ✓ ✓ ✓
1240/1250 ✓ ✓
1245/1255/
1350 ✓ ✓ ✓
1300 Europe
only ✓Europe only
1310 ✓Europe
only ✓ ✓
1340 Europe
only ✓ ✓
1370 ✓ ✓ ✓ ✓
1440/1450 ✓ ✓ ✓ ✓
1390/1490 ✓ ✓ ✓ ✓ ✓
Go to Note: www.garmin.com or see the packaging contents on your product
box for more information.

nüvi 1200/1300/1400 Series Owner’s Manual 1
Getting Started
Getting Started
Looking at Your nüvi
Mini-USB connector
Speaker
microSD
™
card slot
Power button:
Press to turn the nüvi on and off.
Microphone
Depending on your nüvi Note:
model, some images and screen
shots could look different.
Using the Main Menu
➊➋➌ ➍ ➎
➏➐
➑➒➓
➊
GPS satellite strength.
➋
Bluetooth technology status.
➌
Touch to select a usage mode.
➍
Current time. Touch to change
time settings.
➎
Battery status.
➏
Touchtondadestination.
➐
Touch to view the map.
➑
Touch to make a call when
connected to a compatible
mobile phone on some models.
➒
Touch to adjust the volume.
➓
Touch to use the tools such as
settings and Help.
2 nüvi 1200/1300/1400 Series Owner’s Manual
Getting Started
Setting Up Your nüvi
Before mounting the nüvi, see the Important Safety and Product Information guide for information
about laws pertaining to windshield mounting.
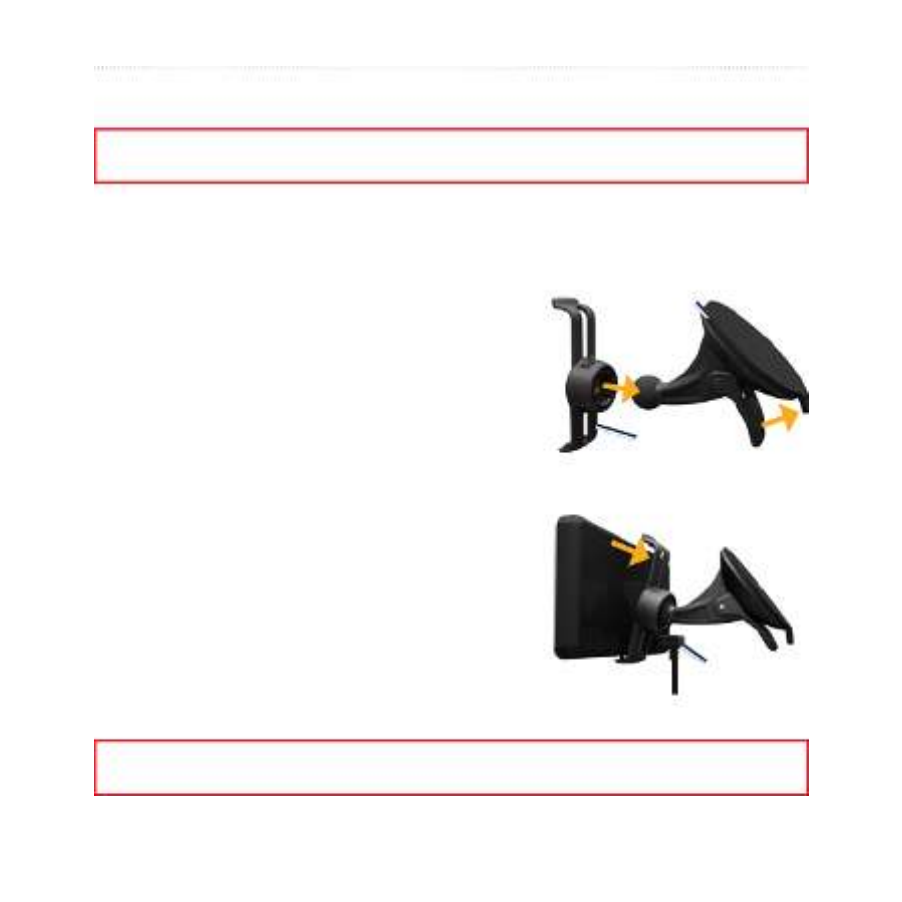
Mounting Your nüvi
1. Remove the clear plastic from the suction cup. Place the suction cup on the
windshield.
2. Flip the lever back toward the windshield.
3. Snap the cradle onto the suction cup arm.
4. Plug the vehicle power cable into the back of
your nüvi.
5. Plug the other end of the vehicle power
cable into a power outlet in your vehicle.
Your unit should turn on automatically if it is
plugged in and the vehicle is running. Follow the on-screen instructions.
6. Fit the bottom of your nüvi into the cradle.
7. Tilt your nüvi back until it snaps into place.
8. If you are using a trafc receiver in Europe,
connect the external antenna to the trafc
receiver and secure it to the windshield using
the suction cups. (Trafc receivers are included
in some nüvi packages. See page iv.)
WarNiNg: This product contains a lithium-ion battery. To prevent damage, remove the unit from the
vehicle when exiting or store it out of direct sunlight.
Suction cup mount
Cradle
Suction cup mount
Cradle
Vehicle power
cable
Vehicle power
cable

nüvi 1200/1300/1400 Series Owner’s Manual 3
Getting Started
Acquiring Satellites
1. Go outdoors to an open area,
away from tall buildings and trees.
2. Turn on your nüvi.
Acquiring satellite signals can take a
few minutes. The bars indicate
satellite strength. When at least one
of the bars is green, your nüvi has
acquired satellite signals.
Selecting a Usage Mode
Automobile
Pedestrian
Bicycle
Your nüvi offers several usage
modes for navigation methods.
Routing is calculated differently
based on your usage mode. For
example, in Pedestrian usage mode
with cityXplorer™ maps loaded, your
nüvi calculates a route that uses a
combination of public transit options,
such as riding a bus or subway, and
walking. cityXplorer maps are not
included with your nüvi. See
www.garmin.com to purchase
cityXplorer maps.
To change your usage mode:
1. From the Main menu, touch the
usage mode icon on the upper-
left corner.
2. Select a mode, and touch OK.
3. Touch Yes, and follow the
on-screen instructions to
congure your settings.
Navigating Off Road
If you are not following roadways
as you navigate, use Off Road
mode. Touch Tools Settings > >
Navigation Route Preference > >
Off Road OK > .

4 nüvi 1200/1300/1400 Series Owner’s Manual
Getting Started
Using the Power Button
Press and quickly release the Power
button to view additional options:
Touch and to adjust the
screen brightness.
Touch to prevent
Lock Screen
accidental screen touches.
Touch to turn off your
Power Off
nüvi. You can also turn off the
nüvi by holding the power button
for approximately three seconds.
Resetting Your nüvi
If your nüvi stops functioning, reset
your nüvi by pressing and holding
the button.Power
Adjusting the Volume
From the Main menu, touch Volume.
Touch and to adjust the
volume. Touch the box next to
Mute
to mute all audio.
•
•
•
Navigating the Screens
To quickly return to the Main
menu, touch and hold .
Touch and to see more
choices. Touch and hold to scroll
faster.
Finding YourYour Destination
The Where To? menu provides
several different categories for you
to use when searching for addresses,
cities, and other locations. The
detailed maps loaded in your nüvi
contain millions of points of interest,
such as restaurants, hotels, and auto
services.
•
•

nüvi 1200/1300/1400 Series Owner’s Manual 5
Getting Started
1. Touch Where To?.
2. Select a category.
3. Select a subcategory.
4. Select a destination.
5. Touch .
Go!

6 nüvi 1200/1300/1400 Series Owner’s Manual
Getting Started
Navigating in Pedestrian
Usage Mode
Using the Itinerary Page
In Pedestrian usage mode, the
Itinerary page appears after you
touch .go!
Select a leg of the route to view
more detailed instructions, or
touch to create a route.
Start
Using the Route Options
Page
In Pedestrian usage mode, the Route
Options page appears after you touch
Go! if you have cityXplorer maps for
the current metropolitan area loaded
on your nüvi. See www.garmin.com
to purchase cityXplorer maps.
1. Select a route from the Route
Options page to view the Itinerary
page. Each route on the page
offers a different combination
of public transit or pedestrian
options.
2. Touch .
Start

nüvi 1200/1300/1400 Series Owner’s Manual 7
Getting Started
Adding a Stop
1. While navigating a route, touch
> Where To?.
2. Search for the extra stop.
3. Touch Go!.
4. Touch Add as Via Point to
add this stop before your nal
destination.
Changing Destinations
1. While navigating a route, touch
> Where To?.
2. Search for the extra stop.
3. Touch Go!.
4. Touch Set as New Destination to
make this your nal destination.
Taking a Detour
1. While navigating a route, touch
.
2. Touch or .
If the route you are currently taking
is the only reasonable option, the
nüvi might not calculate a detour.
Stopping the Route
1. With a route active, touch . Menu
2. Touch Stop.

8 nüvi 1200/1300/1400 Series Owner’s Manual
Where To?
Where To?
The Where To? menu provides
several different categories you can
use to search for locations. To learn
how to perform a simple search, see
page 4.
Finding an Address
Depending on the version NOTE:
of the maps loaded on your nüvi,
the button names can change
and some steps could be ordered
differently.
1. Touch Where To? Address > .
2. Change the state, the country, or
the province, if necessary.
3. Touch Search All.
If you know the city, touch Spell
City, enter the city/postal code,
and touch . Select the Done
city/postal code in the list. (Not all
map data provides postal code
searching.)
4. Enter the number of the address,
and touch . Done
5. Enter the street name, and touch
Done.
6. Select the correct street in the list,
if necessary.
7. Touch the address, if necessary.
Setting a Home Location
Set your home location for the place
you return to most often.
1. To set your home location, touch
Where To? Go Home > .
2. Select an option:
Enter your address.
Use your current location.
Choose from a list of recently
found locations.
Going Home
To navigate home after you have set
your home location, touch Where
To? Go Home > .
•
•
•

nüvi 1200/1300/1400 Series Owner’s Manual 9
Where To?
Changing Your Home
Location
1. Touch Tools Set > My Data >
Home Location.
2. Select an option:
Enter your address.
Use your current location.
Choose from a list of recently
found locations.
Editing Your Home Location
1. Touch Where To? Favorites > >
All Favorites Home> .
2. Touch Edit, enter your changes,
and touch .Done
If you delete your home location,
you can reset it by following the
steps on .
page 8
•
•
•
Using the Go! Page
After you have selected a location to
navigate to, the Go! page opens.
➍
➋
➌➊
➎
➏
➊
Touch to view more
information for the location.
➋
Touch and to zoom in
and out.
➌
Touch to call this location when
connected to phone.
➍
Touch to save this location to
your Favorites.
➎
Touch to create a turn-by-turn
route to this location.
➏
Touch to return to the previous
page. Touch and hold to return
to the Main menu.

10 nüvi 1200/1300/1400 Series Owner’s Manual
Where To?
Providing Feedback on
Points of Interest
1. On the Go! page, touch the whiteGo! page, touch the white
box. Detailed information for the
location appears.
2. Touch for the following
Feedback
options:
Edit Rating—touch a circle to
give the point of interest (POI)
a rating from 1 to 5 stars.
Report Error—the item
will be removed from future
searches Reports will be sent .
to Garmin when your nüvi is
connected to a computer See .
page 24.
Edit Phone Number—use
the keyboard to change the
phone number.
•
•
•
Finding a Place by
Spelling the Name
Use the on-screen keyboard to spell
the name of the destination you are
looking for. You can also enter letters
contained in the name to narrow the
search.
1. Touch Where To? Points of >
Interest Spell Name > .
2. Using the on-screen keyboard,
enter letters of the name of your
destination.
3. Touch Done.
Using the On-Screen
Keyboard
When an on-screen keyboard
appears, touch a letter or number to
enter it.

nüvi 1200/1300/1400 Series Owner’s Manual 11
Where To?
Touch to add a space. Touch
and to move the cursor
(available on some nüvi models).
Touch to delete a character. Touch
and hold to erase the entire entry.
Touch to select the keyboard
Mode
language mode. Touch to
enter special characters, such as
punctuation marks. To change the
keyboard layout, see .
page 38
Searching Near AnotherNear Another
Location
1. Touch Where To? Near > .
2. Select an option:
Where I Am Now—search
near your current location.
A Different City—search near
the city you enter.
A Recent Destination—
search near recent destination
A Favorite Destination—
select a destination from
Favorites.
My Current Route—search
along your active route.
My Destination—search near
your current destination.
•
•
•
•
•
•

12 nüvi 1200/1300/1400 Series Owner’s Manual
Where To?
Finding Recently Found
Places
Your nüvi stores the last 50 of your
recentndsintheRecentlyFound
list. The most-recently viewed places
appear at the top of the list. Touch
Where To? Recently Found > to
view your recently found items.
Deleting Recently Found
Places
To remove all places from the
Recently Found list, touch
Clear
> Yes. All items from the list are
removed, but this does not delete the
actual place from your nüvi.
Using Favoritesvorites
You can save places in your
Favoritessoyoucanquicklynd
them and create routes to them.
Your home location is also stored in
Favorites.
Saving Your Current Location
From the Map page, touch . Touch
Save Location to save your current
location.
Saving Places You Find
1. From the Go! page, touch . Save
2. Touch OK. The place is saved in
Favorites.
Finding Saved Places
1. Touch Where To?.
2. Touch Favorites.
3. Select a category. Your saved
locations are listed.
Editing Saved Places
1. Touch Where To? Favorites > .
2. Select the category and the
location you want to edit.
3. Touch Edit.
4. Touch an item to edit:
Change Name—enter a new
name, and touch . Done
•

nüvi 1200/1300/1400 Series Owner’s Manual 13
Where To?
Attach Photo—select a
picture that you have loaded
on your nüvi or on a memory
card to assign to the location.
Change Map Symbol—touch
a new symbol used to mark
this location on the map.
Change Phone Number—
enter a phone number, and
touch .
Done
Change Categories—select
another category for the
location.
Delete—touch Yes to remove
this item from the Favorites
list.
Finding a Place Using
the Map
Use the Browse Map page to view
different parts of the map. Touch
Where To? Browse Map > .
•
•
•
•
•
Tips for Browsing the Map
Touch the map, and drag to view
different parts of the map.
Touch and to zoom in and
out.
Touch any object on the map.
An arrow appears, pointing at
the object, and a box displays
information on the location.
When the box displays Press for
more, several POIs exist at that
location. Press to see the list of
POIs.
Touch to save this location.
Save
Touch to navigate to the Go!
location.
If the GPS simulator is on, touch
Set Location to set your location
to the selected location. See page
38.
•
•
•
•
•
•

14 nüvi 1200/1300/1400 Series Owner’s Manual
Where To?
Entering Coordinates
If you know the geographic
coordinates of your destination, you
can use your nüvi to navigate to your
destination using the latitude and
longitude coordinates. This can be
especially helpful when geocaching.
1. Touch Where To? >
Coordinates.
2. Touch the coordinate you want to
adjust.
3. Touch Format to select the
correct coordinate format for the
type of map you are using.
4. Enter the coordinates, and touch
Next.
Using Photo Navigation
You can load pictures with location
information onto your nüvi and then
create routes to them.
1. Go to http://connect.garmin.com/
photos (not available in all areas)
to download pictures with location
information.
2. Follow instructions on the Web
site to select and load pictures.
3. Touch Where To? Favorites >
> . Pictures with location
Photos
information are listed.
4. Touch a picture.
nüvi 1200/1300/1400 Series Owner’s Manual 15
Using the Map Pages
Using the Map Pages
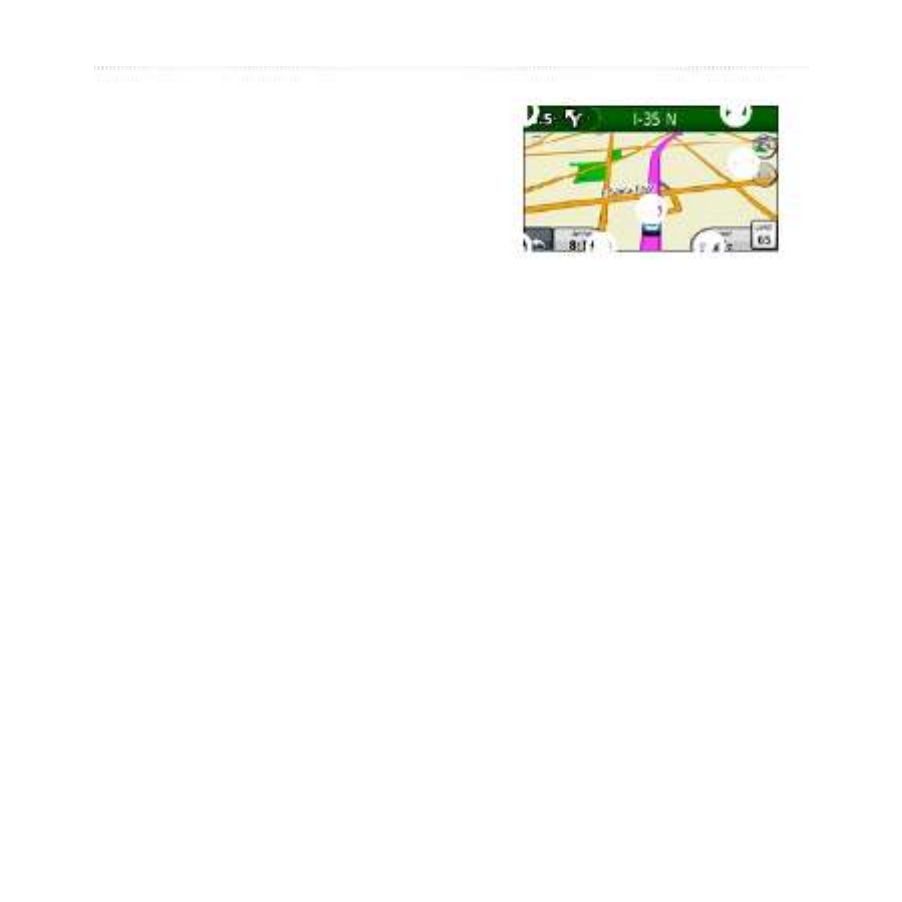
Your route is marked with a
magenta line. As you travel, your
nüvi guides you to your destination
with voice prompts, arrows on the
map, and directions at the top of
themap.Acheckeredagmarks
your destination. If you depart
from the original route, your nüvi
recalculates the route and provides
new directions.
A speed limit icon may appear as
you travel on major roadways. This
icon displays the current speed limit
of the roadway.
On some models, the turn indicator
also includes Lane Assist, which tells
you which lane you should be in to
prepare for your next maneuver. See
page iv to view a list of models that
include Lane Assist.
➊ ➋
➌
➍ ➎
➏
➐
➊
Touch to view the next turn.
➋
Touch to view the turn list.
➌
Touch to zoom in and zoom
out.
➍
Touch to return to the Main
menu.
➎
Touch to display a different
dataeld.
➏
Touch to view the Where Am I?
page.
➐
Touch to view the trip
computer.

16 nüvi 1200/1300/1400 Series Owner’s Manual
Using the Map Pages
Viewing the Trip
Computer
The trip computer displays your
current speed and provides statistics
about your trip. To view the trip
computer, touch the Speedeldon
the map.
If you make frequent NOTE:
stops, leave the nüvi turned on so
it can accurately measure elapsed
time during the trip.
Resetting Trip Computer
Information
From the map, touch the Speedeld.
Touch >
Reset Reset Trip Data
to reset the information on the trip
computer.
Touch > to reset
Reset Reset Max
the maximum speed.
Touch > to
Reset Reset Fuel Price
reset the fuel price.
Viewing the Turn List
When you are navigating a route,
the turn list displays turn-by-turn
instructions for your entire route and
the distance between turns.
Touch the text bar on the top of the
map to open the turn list. Touch a
turn on the list to view the next turn
for that route. Touch to
Show Map
view the entire route on the Browse
Map page.

nüvi 1200/1300/1400 Series Owner’s Manual 17
Using the Map Pages
Viewing the Next Turn
Page
When you are navigating a route, the
next turn shows the turn on the map
and the distance and time left before
you reach the turn.
To view an upcoming turn on the
map, touch the turn indicator in the
top left corner of the map, or touch
any turn from the turn list.
Viewing the Junction
View Page
On some nüvi models, the Junction
View page displays a view of some
upcoming junctions and in which
lane you should be driving. To view
the Junction View page, touch the
upper-left corner of the Map page.
To access the Junction View page
from the Next Turn page, touch
Junction View.
See to view which nüvi
page iv
models include Junction View.

18 nüvi 1200/1300/1400 Series Owner’s Manual
Using the Map Pages
Using the Pedestrian
Map Page
➋➊ ➊
➌
➍
In Pedestrian usage mode, your route
is displayed on a two-dimensional
map. The , , , , , ,
and icons indicate the navigation
method for that section of the route.
For example, when you see ,
board a bus at that point in the route.
➊
Touch to toggle between
legs of the route. The nüvi
zooms in and out on each leg
of your route, but it does not
automatically move to the next
leg.
➋
Touch to view the route
itinerary.
➌
Touch to zoom in and zoom
out.
➍
Touch to recenter the map on
your current location.

nüvi 1200/1300/1400 Series Owner’s Manual 19
Making Hands-Free Phone Calls
Making Hands-Free
Phone Calls
Bluetooth wireless technology is
available on some nüvi models. See
page iv.
Bluetooth wireless technology
establishes a wireless link between
two devices, such as a mobile phone
and your nüvi. To determine whether
your mobile phone with Bluetooth
technology is compatible with the
nüvi, go to www.garmin.com
/bluetooth.
Thersttimeyouusetwodevices
together you must “pair” them by
establishing a relationship using
a PIN or passkey. After the initial
pairing, the two devices can
connect automatically each time you
turn them on.
You might have to set Note:
your mobile phone to connect to
the nüvi automatically when it is
turned on.
Pairing Your Phone
To pair and connect, your phone and
the nüvi must be turned on and be
within 33 ft. (10 m) of each other.
Initiate pairing from your nüvi or
from your phone. Refer to your
phone instructions.
Pairing Using Your Phone
Settings
1. Touch Tools Settings > >
Bluetooth.
2. Select Enabled.

20 nüvi 1200/1300/1400 Series Owner’s Manual
Making Hands-Free Phone Calls
3. Enable the Bluetooth component
on your phone. This might be in a
menu called Settings, Bluetooth,
Connections, or Hands-free.
4. Initiate a search for Bluetooth
devices.
5. Select the nüvi from the list of
devices.
6. Enter the nüvi Bluetooth PIN
( ) into your phone.
1234
Pairing Using the nüvi
Settings
1. From the Main menu, touch Tools
> > > .
Settings Bluetooth Add
2. Enable the Bluetooth component
on your phone, and enable Find
Me/Discoverable/Visible mode.
These settings might be in a
Bluetooth, a Connections, or a
Hands-free menu.
3. Touch OK on the nüvi.
4. Select your phone, and touch
OK.
5. Enter the nüvi Bluetooth PIN
( ) in your phone.1234
When your phone is connected to
your nüvi, you are ready to make
phone calls. Touch on the
Phone
Main menu to access the Phone
menu.
When you turn on the nüvi, it tries to
connect to the last phone to which it
was connected.
Receiving a Call
When you get a call, the Incoming
Call window opens. Touch
answer
to answer the call. Touch to ignore
ignore the call and stop your phone
from ringing.
The internal microphone is in the
front of the nüvi; speak normally.

nüvi 1200/1300/1400 Series Owner’s Manual 21
Making Hands-Free Phone Calls
In a Call
During a call, the icon In Call
appears. Touch > to End Call
hang up. Touch > Call Options
for the following options:
Touch Tones—displays a
keypad page so that you can use
automated systems, such as voice
mail.
Transfer Audio To Phone—this
is helpful if you want to turn off
the nüvi but remain on the call,
or if you need privacy. To switch
back, touch Transfer Audio To
Device.
Mute Microphone.
Depending on the screen NOTE:
that appears on your nüvi, the In
Call icon could look different.
•
•
•
Using Call Waiting
When you are on a call and you
receive a second call (call waiting),
the Incoming Call window appears.
Touch to answer the call.
Answer
Therstcallisplacedonhold.
Switching Between Calls
1. Touch > Switch To.
2. Touch End Call to hang up. This
does not disconnect the call on
hold.
Accessing the Phone
Menu
From the Main menu, touch Phone
to open the Phone menu.
Not all phones support all NOTE:
features of the nüvi Phone menu.

22 nüvi 1200/1300/1400 Series Owner’s Manual
Making Hands-Free Phone Calls
Using Your Phone Book
Each time your phone connects
with the nüvi, the phone book is
automatically loaded into the nüvi.
It can take a few minutes for the
phone book to be available. Phone
book transfer is not available on all
phones.
1. Touch > . Phone Phone Book
2. Touch the phone book entry
(contact) you want to call.
3. Touch Call to call the contact.
Dialing a Point of Interest
1. Touch > Phone Points of
Interest.
2. Search for the point of interest
you want to call.
3. Touch Call or touch the phone
number.
Dialing a Number
1. Touch > . Phone Dial
2. Enter the number, and touch Dial.
Viewing Your Call History
Each time your phone connects
to the nüvi, your call history is
automatically transferred to the nüvi.
It can take a few minutes to transfer
this data to the nüvi.
1. Touch > . Phone Call History
2. Touch a category to view those
calls. The calls are listed in
chronological order. The most-
recent calls are at the top of the
list.
3. Touch an entry, and touch Dial.
Calling Home
Enter a phone number for your home
location so you can quickly call
home.
1. Touch > . Phone Call Home
2. The nüvi dials your home phone
number.

nüvi 1200/1300/1400 Series Owner’s Manual 23
Making Hands-Free Phone Calls
Entering Your Phone Number
1. Touch > . Phone Call Home
2. Touch Enter Phone Number to
use the keypad page or Select
From Phonebook (only available
if your phone supports phone
book transfer).
3. Touch Done Yes > . The nüvi dials
your home phone number.
To edit your home NOTE:
location or phone number, touch
Where To? Favorites Home > >
> .
Edit
Placing Calls Using Voice
Dial
You can place calls by speaking the
contact’s name. You might need to
“train” your phone to recognize your
voice dial commands. Refer to your
phone instructions.
1. Touch > Phone Voice Dial.
2. Speak the contact name.
Checking the Phone Status
Check the battery level and signal
strength for your phone by touching
Phone Status > .

24 nüvi 1200/1300/1400 Series Owner’s Manual
Managing Files
Managing Files
Youcanstoreles,suchasJPEG
imageles,intheinternalmemory
on the nüvi or on a memory card.
The nüvi is not Note:
compatible with Windows
®
95,
98, Me, Windows NT
®
, and Mac
®
OS 10.3 and earlier.
Supported File Types
JPEGandJPGimageles:see
page 27
MapsandGPXwaypointles
from MapSource®: see page 49
GPIcustomPOIlesfrom
Garmin POI Loader: see page 50
Connecting Your nüvi to
Your Computer
When you connect your nüvi to your
computer, you will see an option to
install myGarmin Agent™, which
•
•
•
monitors your computer USB ports
and allows you to easily check for
available updates. See for
page 52
more information.
1. Insert a memory card (optional).
Press it in until it clicks.
2. Connect the mini-USB connector
to the back of the nüvi.
3. Connect the larger end of the
cable to an available USB port on
your computer.
Your nüvi and memory card appear
as removable drives in My Computer
in Windows and as mounted volumes
on Mac computers.
Some computers with Note:
multiple network drives can not
display nüvi drives. See your
operatingsystemHelpletolearn
how to map the drives.

nüvi 1200/1300/1400 Series Owner’s Manual 25
Managing Files
Transferring Files
1. Browse your computer for the le
you want to copy.
2. Highlight the le., and click Edit >
Copy.
3. Open the “Garmin” or memory
card drive/volume.
4. Click Edit Paste > . The le
appears in the list of les in the
nüvi memory or on the memory
card.
5. When you are nished
transferring les, click in your
toolbar (system tray), or drag the
volume icon to the Trash on
Mac computers.
6. Unplug your nüvi from your
computer.
Deleting Files
1. Connect the nüvi to your
computer, and open the nüvi or
memory card drive/volume.
2. Highlight the le you want to
delete.
3. Press the Delete key on the
computer keyboard.
CautioN: If you do not know
thepurposeofale,donot
delete
it. Your nüvi memory contains
importantsystemlesthatshould
not be deleted.

26 nüvi 1200/1300/1400 Series Owner’s Manual
Using the Tools
Using the Tools
The Tools menu provides many
features that are helpful when you
are traveling.
From the Main menu, touch tools.
Accessing the Settings
For information about the settings,
see .
pages 38–44
Using the Where Am I?
Page
Use the Where Am I? page to
view current location information,
including hospitals, police stations,
and fuel. This feature is helpful if
you need to tell emergency personnel
your location.
1. From the Main menu, touch Tools
> Where Am I?.
2. Touch a button on the right to
view the nearest locations in that
category.
3. Touch Save Location to save
your current location.
Accessing Help
Touch to get information about Help
using your nüvi.
Touch to search help topics
Search
for a keyword.
Using MSN® Direct
You can only access MSN Direct
content with an optional MSN Direct
receiver. For more information, visit
http://garmin.msndirect.com
or www.garmin.com/trafc. To
purchase an accessory, visit
http://buy.garmin.com.

nüvi 1200/1300/1400 Series Owner’s Manual 27
Using the Tools
For information about activating
MSN Direct service or using MSN
Direct, refer to the MSN Direct
Owner’s Manual Supplement at
www.garmin.com.
Using the Picture Viewer
Use the picture viewer to view
pictures that you have stored in your
nüvi or on a memory card.
1. Touch Tools > Picture Viewer.
Touch the arrows to scroll
through the images.
2. Touch a picture to view a larger
image of it.
Touch to view information
on the selected picture.
Touch the map and drag to
view different parts of the
map.
Touch to hide the menu
bar.
•
•
•
•
3. Use the scroll bar at the bottom of
the screen to change how many
pictures appear on the screen.
Viewing a Slide Show
1. Touch Tools > Picture Viewer >
. Each picture appears for a
few moments.
2. Touch anywhere on the screen to
stop the slide show.
Navigating to a Picture
If a picture contains location
information, you can create a route
to it.
1. Touch Tools > Picture Viewer.
2. Select a picture.
3. Touch > .
Go!
See for more information page 24
about loading pictures on your nüvi.

28 nüvi 1200/1300/1400 Series Owner’s Manual
Using the Tools
Accessing My Data
Use this tool to manage and delete
your saved data, such as your
Favorites.
1. Touch Tools > My Data.
2. Select an option:
Set Home Location
Delete Selected Favorites
Clear Trip Log
View Map Errors
Using the World Clock
1. Touch Tools > World Clock.
2. To change a listed city, touch one
of the cities.
3. Enter a city name, and touch
Done.
4. Select the correct city, if
necessary.
5. Touch World Map to view a map.
Nighttime hours are shown in the
shaded area.
•
•
•
•
6. Touch to view the clocks again.
Using the Calculator
Touch Tools Calculator > to activate
the calculator.
Using the Unit Converter
1. Touch Tools Unit Converter> .
2. Touch Conversion, select a type
of measurement, and touch .
OK
3. Touch a unit of measure that you
want to change.
4. Select a unit of measure, and
touch . Repeat if necessary.
OK
5. Touch the box next to the unit of
measure to enter a value.
6. Enter a value, and touch Done.
The unit is converted.
7. Touch Clear to perform another
conversion.

nüvi 1200/1300/1400 Series Owner’s Manual 29
Using the Tools
Updating Conversion Rates
You can update the currency
conversion rates manually so that
you are always using the most
current rates.
1. Touch Tools Unit Converter > >
Conversion.
2. Select Currency, and touch .OK
3. Touch the currency buttons and
select the currencies you want to
update.
4. Touch Update.
5. Touch the boxes next to the
currencies to enter new rates.
6. Touch Save to save the new
rates. Touch to use the
Restore
original rates.
Using ecoRoute ™
Touch Tools ecoRoute > .
The ecoRoute feature calculates
your vehicle fuel economy, carbon
footprint, and the fuel price of
navigating to a destination, and
offers tools for improving fuel
efciency.
The data provided by the ecoRoute
feature are estimates only. The
data is not actually read from your
vehicle. To receive more-accurate
fuelreportsforyourspecicvehicle
and driving habits, calibrate the fuel
economy.
Thersttimeyouaccessthe
ecoRoute features you will be asked
to enter fuel and mileage information
about your vehicle.

30 nüvi 1200/1300/1400 Series Owner’s Manual
Using the Tools
Viewing the Fuel Report
If you have entered your vehicle
proleandthecurrentfuelprice,
your nüvi calculates the average
fuel economy for your vehicle, your
carbon footprint, and the cost of the
fuel consumed.
The fuel consumption data is
based on estimates for speed and
acceleration for an average vehicle.
Touch Tools ecoRoute Fuel > >
Report.
To ensure fuel data is always TIP:
recorded, keep your nüvi turned
on while driving.
Calibrating the Fuel Economy
Calibrate the fuel economy to receive
more-accurate fuel reports for your
specicvehicleanddrivinghabits.
Calibratewhenyoullupyourfuel
tank.
1. Calculate your miles per gallon or
liters per 100 kilometers.
2. Touch Tools Fuel > ecoRoute >
Report Calibrate > .
3. Touch and to enter the
result from step 1.
4. Touch OK.
Adjusting the Fuel Price
Enter fuel price information to
calculate the fuel cost of routes and
to calculate the fuel reports.
1. Touch Tools Fuel > ecoRoute >
Price.
2. Enter the current fuel price, and
touch .Done

nüvi 1200/1300/1400 Series Owner’s Manual 31
Using the Tools
Taking the Driving Challenge
The Driving Challenge tool helps
you maximize your fuel economy
by scoring your driving habits.
The higher your overall score for a
Driving Challenge, the more fuel you
could save.
Touch Tools ecoRoute Driving > >
Challenge Start > .
Understanding Your Driving
Challenge Score
Touch on the Map page to view
details about your current challenge.
The leaf color on the driving
challenge icon changes depending on
your performance in the challenge.
Your overall score is the average of
three scores:
Acceleration score —gain points for
gradual acceleration; lose points for
rapid acceleration.
Deceleration score—gain points for
gradual braking; lose points for hard
braking.
Speed score—gain points for driving
at the best speed for conserving
fuel, which is 45–60 mph for most
vehicles.
Stopping the Driving
Challenge
1. From the Map page, touch .
2. Touch Stop Yes > .
Adjusting Your Vehicle Prole
Touch Tools ecoRoute Vehicle > >
Prole.
Fuel Type—select a fuel type.

32 nüvi 1200/1300/1400 Series Owner’s Manual
Using the Tools
City Fuel Efciency—enter the
averagecityfuelefciencyforyour
vehicle.
Hwy Fuel Efciency—enter the
averagehighwayfuelefciencyfor
your vehicle.
For best results, calibrate TIP:
your fuel economy instead of
adjusting the city and highway
fuelefciencyhere.See
page 30.
Viewing the Mileage Report
Mileage reports provide the distance,
the time, the average fuel economy,
and the fuel cost of navigating to a
destination.
A mileage report is created for
every route that you drive. If you
stop a route on your nüvi, a mileage
report is created for the distance you
traveled.
1. Touch Tools > ecoRoute >
Mileage Report.
2. Select a report.
You can view up to 20 mileage
reports on your nüvi. You can also
access mileage reports in the Reports
folder on your nüvi drive/volume.
Viewing Driving Tips
Your nüvi provides driving tips to
help you save fuel.
Touch Tools ecoRoute Tips > > .
Resetting ecoRoute
Data
1. Touch Tools > ecoRoute.
2. Select the category you want to
reset, and touch .
Reset

nüvi 1200/1300/1400 Series Owner’s Manual 33
Using the Tools
Viewing Offers
If your nüvi package includes a
trafcreceiver,youwillreceive
location-relevant offers and coupons.
Ad-basedtrafcinformationisonly
available in North America.
Thetrafcreceivermustbe
connected to external power and you
must be in a coverage area to receive
ad-basedtrafcinformation.When
an offer appears on the screen, touch
the offer to search for the nearest
location related to that offer. If the
offer includes a coupon icon, touch
the coupon icon on the Go! page to
receive a coupon code. Write down
this code and present it when you
arrive at the location.
Do not attempt to CAUTION:
write down the coupon codes
while driving.
To view a list of the offers you have
received, touch Tools > Offers.
To disable offers, you must disable
trafc.TouchTools > Settings >
Trafc Enable Trafc
, and clear the
check box.
Product specificaties
| Merk: | Garmin |
| Categorie: | Navigator |
| Model: | nuvi 1210T |
| Kleur van het product: | Zwart |
| Gewicht: | 113.4 g |
| Breedte: | 93 mm |
| Diepte: | 16 mm |
| Hoogte: | 75 mm |
| Bluetooth: | Ja |
| Beeldschermdiagonaal: | 3.5 " |
| Resolutie: | 320 x 240 Pixels |
| Touchscreen: | Ja |
| Vormfactor: | Vast |
| Type stroombron: | Batterij/Accu |
| Compatibele geheugenkaarten: | MicroSD (TransFlash),SD |
| Aantal USB 2.0-poorten: | 1 |
| Ingebouwde luidsprekers: | Ja |
| Levensduur accu/batterij: | 4 uur |
| Ingebouwde camera: | Nee |
| Ondersteunt Windows: | Windows XP Home,Windows XP Home x64,Windows XP Professional,Windows XP Professional x64 |
| Ondersteunt Mac-besturingssysteem: | Mac OS X 10.0 Cheetah,Mac OS X 10.1 Puma,Mac OS X 10.2 Jaguar,Mac OS X 10.3 Panther,Mac OS X 10.4 Tiger |
| Soort aansluiting: | Aanraakscherm |
| Batterijtechnologie: | Lithium-Ion (Li-Ion) |
| Display met achtergrondverlichting: | Ja |
| Water: | Nee |
| Sport (fitness, hardlopen): | Nee |
| Outdoor: | Nee |
| Geocaching: | Nee |
| Auto: | Ja |
| Vliegen: | Nee |
| Fiets: | Nee |
| Truck: | Nee |
| Camper/caravan: | Nee |
| Golf: | Nee |
| Snelheidslimiet: | Ja |
| Inclusief mappen: | Ja |
| Kaart dekking: | Nee |
| Anti-diefstal functie: | Ja |
| Route ontwijking: | Ja |
| Foto-navigatie: | Ja |
| Traffic Message Channel (TMC): | Nee |
| Waypoints: | Ja |
| Aantal Waypoints: | 1000 |
| Map view opties: | 2D |
| Afmetingen scherm (HxV) (imperiaal): | 2.8 x 2.1 " |
| MP3-speler: | Nee |
| Kaart geheugenopslag: | Interne opbeging |
| Image viewer: | Ja |
Heb je hulp nodig?
Als je hulp nodig hebt met Garmin nuvi 1210T stel dan hieronder een vraag en andere gebruikers zullen je antwoorden
Handleiding Navigator Garmin

15 November 2024
24 September 2024
24 September 2024
24 September 2024
16 Mei 2024
1 Augustus 2023
17 Juli 2023
26 Juni 2023
20 Juni 2023
18 Juni 2023
Handleiding Navigator
- Navigator Philips
- Navigator Sony
- Navigator Asus
- Navigator Grundig
- Navigator JVC
- Navigator Kenwood
- Navigator Motorola
- Navigator Medion
- Navigator Nokia
- Navigator Pioneer
- Navigator Acer
- Navigator Airis
- Navigator Alfa Romeo
- Navigator Alpine
- Navigator Audi
- Navigator Audiovox
- Navigator Autovision
- Navigator Becker
- Navigator Binatone
- Navigator Blaupunkt
- Navigator BMW
- Navigator Boss
- Navigator Bushnell
- Navigator Danew
- Navigator Dual
- Navigator Dynavin
- Navigator Eagle
- Navigator Eclipse
- Navigator ESX
- Navigator Falk
- Navigator Furuno
- Navigator Goclever
- Navigator Harman Kardon
- Navigator Hitachi
- Navigator Honda
- Navigator Humminbird
- Navigator Igo
- Navigator Insignia
- Navigator Kalkhoff
- Navigator Kapsys
- Navigator Kia
- Navigator Lanzar
- Navigator Lenco
- Navigator Lowrance
- Navigator Magellan
- Navigator Marquant
- Navigator Maxcom
- Navigator Mazda
- Navigator Midland
- Navigator Mio
- Navigator Nav N Go
- Navigator Navigon
- Navigator Navitel
- Navigator Navman
- Navigator Parrot
- Navigator Polaroid
- Navigator Pyle
- Navigator Raymarine
- Navigator Route 66
- Navigator Sanyo
- Navigator Seecode
- Navigator Silvercrest
- Navigator Simrad
- Navigator Skoda
- Navigator Soundstream
- Navigator Sygic
- Navigator Sylvania
- Navigator Teasi
- Navigator Thomson
- Navigator TomTom
- Navigator Toyota
- Navigator Uniden
- Navigator VDO
- Navigator VDO Dayton
- Navigator Viamichelin
- Navigator Volkswagen
- Navigator Xzent
- Navigator Zebra
- Navigator Zenec
- Navigator Jensen
- Navigator Overmax
- Navigator Caliber
- Navigator Chrysler
- Navigator Clarion
- Navigator Conrad
- Navigator Cobra
- Navigator Celestron
- Navigator Scosche
- Navigator IZZO Golf
- Navigator Rand McNally
- Navigator Lark
- Navigator Whistler
- Navigator CarTrek
- Navigator GlobalSat
- Navigator Wahoo Fitness
- Navigator Coyote
- Navigator Coyote Systems
- Navigator GolfBuddy
- Navigator ModeCom
- Navigator Pharos
- Navigator V7
- Navigator Cheetah
- Navigator Cydle
- Navigator LXNAV
- Navigator Planet Audio
- Navigator Voice Caddie
- Navigator SkyCaddie
- Navigator TELE System
- Navigator Zoleo
- Navigator Dashmate
Nieuwste handleidingen voor Navigator

12 Maart 2025
14 December 2024
14 December 2024
14 December 2024
14 December 2024
7 December 2024
7 December 2024
24 November 2024
16 November 2024
16 November 2024