Fujifilm FinePix Z80 Handleiding
Fujifilm
Fotocamera
FinePix Z80
Lees hieronder de 📖 handleiding in het Nederlandse voor Fujifilm FinePix Z80 (256 pagina's) in de categorie Fotocamera. Deze handleiding was nuttig voor 44 personen en werd door 2 gebruikers gemiddeld met 4.5 sterren beoordeeld
Pagina 1/256

Before You Begin
First Steps
Basic Photography and Playback
More on Photography
More on Playback
Movies
Connections
Menus
Technical Notes
Troubleshooting
Appendix
Owner’s Manual
Thank you for your purchase of this product. This manual
describes how to use your FUJIFILM FinePix Z80 series digital
camera and the supplied software. Be sure that you have
read and understood its contents before using the camera.
BL01124-201 EN
DIGITAL CAMERA
FINEPIX Z80 series
For information on related products, visit our website at
http://www.fujifilm.com/products/digital_cameras/index.html


ii
Memory Cards
Pictures can be stored in the camera’s internal memory or on optional SD and SDHC memory cards. In this
manual, SD memory cards are referred to as “memory cards.” For more information, see page 8.
About This Manual
Before using the camera, read this Owner’s Manual and the other supplied documents. For
information on specific topics, consult the sources below.
✔
✔
✔
✔✔✔
T
T
T
TTrou
rou
rou
rouroubleshoo
bleshoo
bleshoo
bleshoobleshooting
ting
ting
tingting Troubleshooting
..............................................
..............................................
..............................................
............................................................................................ ..............................................pg. 95
pg. 95
pg. 95
pg. 95pg. 95pg. 95
✔
✔
✔
✔✔✔
Glossa
Glossa
Glossa
GlossaGlossary
ry
ry
ryry Glossary
........................................................
........................................................
........................................................
................................................................................................................ ........................................................pg. 1
pg. 1
pg. 1
pg. 1pg. 106
06
06
0606pg. 106
✔
✔
✔
✔✔✔
T
T
T
TTab
ab
ab
abable of Contents
le of Contents
le of Contents
le of Contentsle of Contents Table of Contents
..............................................
..............................................
..............................................
............................................................................................ ..............................................pg. vi
pg. vi
pg. vi
pg. vipg. vipg. vi
✔
✔
✔
✔✔✔
Warning M
Warning M
Warning M
Warning MWarning Messages a
essages a
essages a
essages aessages and Displ
nd Displ
nd Displ
nd Displnd Displays
ays
ays
aysays Warning Messages and Displays
.....................
.....................
.....................
.......................................... .....................pg. 1
pg. 1
pg. 1
pg. 1pg. 102
02
02
0202pg. 102
✔
✔
✔
✔✔✔
Camera Q & A
Camera Q & A
Camera Q & A
Camera Q & ACamera Q & A Camera Q & A
...................................................
...................................................
...................................................
...................................................................................................... ................................................... pg. iii
pg. iii
pg. iii
pg. iiipg. iiipg. iii
Know what you want to do but don’t know the
name for it? Find the answer in “Camera Q & A.”
Find out what’s behind that flashing icon or
error message in the monitor.
The “Table of Contents” gives an overview of the
entire manual. The principal camera operations
are listed here.
The meanings of some technical terms may be
found here.
Having a specific problem with the camera?
Find the answer here.


iii
Camera Q & A
Find items by task.
Camera S
Camera S
Camera S
Camera SCamera Setu
etu
etu
etuetup
p
p
ppCamera Setup
Que
Que
Que
QueQuest
st
st
ststio
io
io
ioion
n
n
nnQuestion Key phr
Key phr
Key phr
Key phrKey phras
as
as
asase
e
e
eeKey phrase See p
See p
See p
See pSee pag
ag
ag
agage
e
e
eeSee page
How do I set the camera clock? Date and time 13
Can I set the clock to local time when I travel? Time difference 88
How do I keep the monitor from turning off automatically? Auto power off 91
How do I make the monitor brighter or darker? LCD brightness 91
How do I stop the camera beeping and clicking?
Silent mode 36
Operation volume,
shutter volume 86
What do the icons in the monitor mean? Monitor 3
How much charge is left in the battery? Battery level 15
Sharin
Sharin
Sharin
SharinSharing Pict
g Pict
g Pict
g Pictg Picture
ure
ure
ureures
s
s
ssSharing Pictures
Que
Que
Que
QueQuest
st
st
ststio
io
io
ioion
n
n
nnQuestion Key phr
Key phr
Key phr
Key phrKey phras
as
as
asase
e
e
eeKey phrase See p
See p
See p
See pSee pag
ag
ag
agage
e
e
eeSee page
Can I print pictures on my home printer? Printing pictures 52


iv
Camera Q & A
T
T
T
TTaki
aki
aki
akiaking Pict
ng Pict
ng Pict
ng Pictng Pictures
ures
ures
uresuresTaking Pictures
Que
Que
Que
QueQuest
st
st
ststion
ion
ion
ionionQuestion Key phr
Key phr
Key phr
Key phrKey phras
as
as
asase
e
e
eeKey phrase See p
See p
See p
See pSee page
age
age
ageageSee page
How can I make good portraits? Intelligent Face Detection 27
Can the camera automatically select the most suitable mode? G mode 15
Is there a simple way to adjust settings for different scenes? Shooting mode 21
How do I shoot a panorama? Motion panorama 23
How do I shoot close-ups? Macro mode (Close-ups) 34
How do I keep the flash from firing?
Flash mode 35How do I stop my subjects’ eyes glowing red when I use the flash?
How do I “fill-in” shadows on back-lit subjects?
How do I take a group portrait that includes the photographer? Self-timer mode 37
How do I shoot movies? Recording movies 47
Can I join short clips into a longer movie? Successive movie 48


v
Camera Q & A
Viewi
Viewi
Viewi
ViewiViewing Pict
ng Pict
ng Pict
ng Pictng Pictures
ures
ures
uresuresViewing Pictures
Que
Que
Que
QueQuest
st
st
ststion
ion
ion
ionionQuestion Key phr
Key phr
Key phr
Key phrKey phras
as
as
asase
e
e
eeKey phrase See p
See p
See p
See pSee page
age
age
ageageSee page
How do I view my pictures? Single-frame playback 40
Is there a simple way to delete one image? Deleting pictures 20
How do I delete one or all images at once? Erase 43
Can I zoom in on pictures during playback? Playback zoom 41
How do I view a lot of pictures at once? Multi-frame playback 42
Can I protect my pictures from accidental deletion? Protect 77
Can I hide the icons in the monitor when viewing my pictures? Choosing a display format 40
Can I mark images with favorite (9) rating? 9 Favorites 40
Can I create photobooks from my favorite pictures? Photobook assist 45
How do I search for pictures? Image search 71
How do I upload pictures or videos to my blog? Mark for upload 74
How can I process images for posting to my blog? Edit for blog 71
Can I add effects to my movies? Movie edit 74


vi
About This Manual .......................................................................... ii
Camera Q & A .................................................................................... iii
Camera Setup .............................................................................. iii
Sharing Pictures .......................................................................... iii
Taking Pictures ............................................................................ iv
Viewing Pictures .......................................................................... v
Be
Be
Be
BeBefore Y
fore Y
fore Y
fore Yfore You Be
ou Be
ou Be
ou Beou Begi
gi
gi
gigiBefore You Begin
n
n
nnn
Introduction .......................................................................................1
Symbols and Conventions ..........................................................1
Supplied Accessories .................................................................... 1
Parts of the Camera ....................................................................... 2
The Monitor ...................................................................................3
First S
First S
First S
First SFirst Step
tep
tep
teptepFirst Steps
s
s
sss
Charging the Battery ..................................................................... 4
Inserting the Battery...................................................................... 6
Inserting a Memory Card ............................................................. 8
Turning the Camera on and Off ..............................................12
Shooting Mode .............................................................................12
Playback Mode ..............................................................................12
Basic Setup .......................................................................................13
Bas
Bas
Bas
BasBasic Phot
ic Phot
ic Phot
ic Photic Photogra
ogra
ogra
ograography and Pl
phy and Pl
phy and Pl
phy and Plphy and Playbac
aybac
aybac
aybacaybacBasic Photography and Playback
k
k
kkk
Taking Pictures in G (SCENE RECOGNITION) Mode ..... 15
Viewing Pictures ............................................................................20
Table of Contents
Mor
Mor
Mor
MorMore on Phot
e on Phot
e on Phot
e on Phote on Photogra
ogra
ogra
ograograph
ph
ph
phph
More on Photography
y
y
yy
y
A Shooting Mode ........................................................................ 21
Selecting a Shooting Mode......................................................21
Shooting Modes ...........................................................................22
B Intelligent Face Detection and Red-Eye Removal ... 27
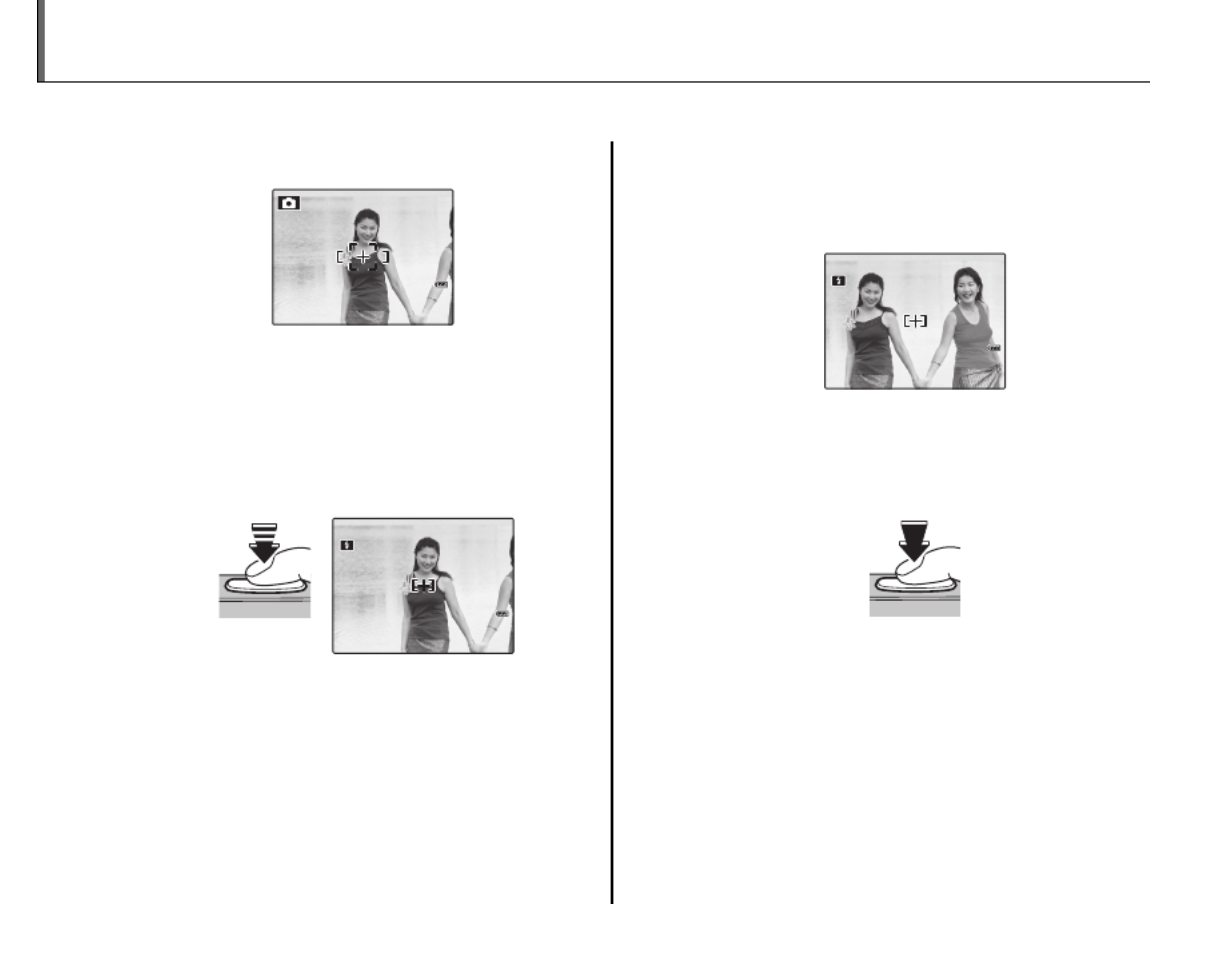
Focus Lock ........................................................................................30
5 Exposure Compensation .....................................................32
L Macro mode (Close-ups) ......................................................34
K Using the Flash (Intelligent Flash) .....................................35
J Using the Self-Timer ...............................................................37
Setting the Self-Timer ................................................................37
COUPLE TIMER ...............................................................................37
GROUP TIMER ................................................................................38
10 SEC/ 2 SEC..................................................................................38
Mor
Mor
Mor
MorMore on Playb
e on Playb
e on Playb
e on Playbe on Playbac
ac
ac
acacMore on Playback
k
k
kkk
Single-Frame Playback ...............................................................40
9 Favorites: Rating Pictures ...................................................40
Playback Zoom ..............................................................................41
Multi-Frame Playback .................................................................42
M Deleting Pictures .................................................................... 43
3 Photobook Assist ....................................................................45
Creating a Photobook ................................................................45
Viewing Photobooks ..................................................................46
Editing and Deleting Photobooks .........................................46
Movi
Movi
Movi
MoviMovie
e
e
eeMovies
s
s
sss
A Recording Movies ................................................................... 47
R Successive Movie ................................................................48
D Viewing Movies .......................................................................50


vii
Table of Contents
Conne
Conne
Conne
ConneConnect
ct
ct
ctctio
io
io
ioion
n
n
nn
Connections
s
s
ss
s
Viewing Pictures on TV ............................................................... 51
Printing Pictures via USB ...........................................................52
Connecting the Camera ............................................................52
Printing Selected Pictures ........................................................52
Printing the DPOF Print Order ................................................53
Creating a DPOF Print Order ....................................................55
Viewing Pictures on a Computer ............................................57
Installing the Software...............................................................57
Windows: Installing My FinePix Studio .............................57
Macintosh: Installing FinePixViewer ..................................59
Connecting the Camera ............................................................61
Me
Me
Me
MeMenu
nu
nu
nunuMenus
s
s
sss
The Shooting Menu ......................................................................63
Using the Shooting Menu .........................................................63
Shooting Menu Options ............................................................64
n ISO ............................................................................................65
o IMAGE SIZE ...........................................................................65
T IMAGE QUALITY ..................................................................66
W FINEPIX COLOR ....................................................................66
C WHITE BALANCE .................................................................67
E CONTINUOUS (Continuous shooting) ........................67
F AF MODE ...............................................................................68
The Playback Menu.......................................................................69
Using the Playback Menu .........................................................69
Playback Menu Options .............................................................70
V IMAGE SEARCH ....................................................................71
v EDIT FOR BLOG....................................................................71
I MOVIE EDIT ........................................................................... 74
K MARK FOR UPLOAD ...........................................................74
q SLIDE SHOW .........................................................................76
a RED EYE REMOVAL .............................................................76
O PROTECT ................................................................................77
R CROP .......................................................................................78
j RESIZE ....................................................................................79
N IMAGE ROTATE ....................................................................80
P COPY .......................................................................................81
Q VOICE MEMO ........................................................................82
P TRANSITION .........................................................................84
L MOVIE TRIMMING ..............................................................84
The Setup Menu .............................................................................85
Using the Setup Menu ...............................................................85
Setup Menu Options ...................................................................86
p TIME DIFFERENCE ...............................................................88
m FORMAT .................................................................................89
a IMAGE DISP. ..........................................................................89
b FRAME NO. ...........................................................................90
k ILLUMINATION.....................................................................90
j SOUND ...................................................................................91
f PLAYBACK VOLUME ...........................................................91
g LCD BRIGHTNESS................................................................91
d LCD MODE ............................................................................91
o AUTO POWER OFF ..............................................................91
c DIGITAL ZOOM ....................................................................92


viii
Table of Contents
T
T
T
TTec
ec
ec
ecechnic
hnic
hnic
hnichnical No
al No
al No
al Noal Note
te
te
tete
Technical Notes
s
s
ss
s
Optional Accessories ...................................................................93
Accessories from FUJIFILM .......................................................94
T
T
T
TTro
ro
ro
roroubl
ubl
ubl
ublublesh
esh
esh
esheshoot
oot
oot
ootootin
in
in
ininTroubleshooting
g
g
ggg
Troubleshooting ............................................................................95
Warning Messages and Displays ......................................... 102
App
App
App
AppAppend
end
end
endendi
i
i
iiAppendix
x
x
xxx
Glossary .......................................................................................... 106
Internal Memory/Memory Card Capacity ....................... 107
Specifications ............................................................................... 108
Caring for the Camera ............................................................... 112
Storage and Use .......................................................................112
Clean ing ......................................................................................112
Travelling .................................................................................... 112
Notes and Cautions ....................................................................113


Before You Begin
1
Introduction
Sym
Sym
Sym
SymSymbols and Conv
bols and Conv
bols and Conv
bols and Convbols and Conventions
entions
entions
entionsentionsSymbols and Conventions
The following symbols are used in this manual:
Caution: This information should be read before use to ensure correct operation.
Note: Points to note when using the camera.
Tip: Additional information that may be helpful when using the camera.
Menus and other text in the camera monitor are shown in bold. In the illustrations in this manual, the
monitor display may be simplified for explanatory purposes.
Suppl
Suppl
Suppl
SupplSupplied Accessories
ied Accessories
ied Accessories
ied Accessoriesied AccessoriesSupplied Accessories
The following items are included with the camera:
USB cable
CD-ROM
NP-45A rechargeable
battery
Strap
Attaching the Strap
Attach the strap as shown.
Documentation
BC-45B battery
charger


3
Introduction
Before You Begin
The Mon
The Mon
The Mon
The MonThe Monitor
itor
itor
itoritorThe Monitor
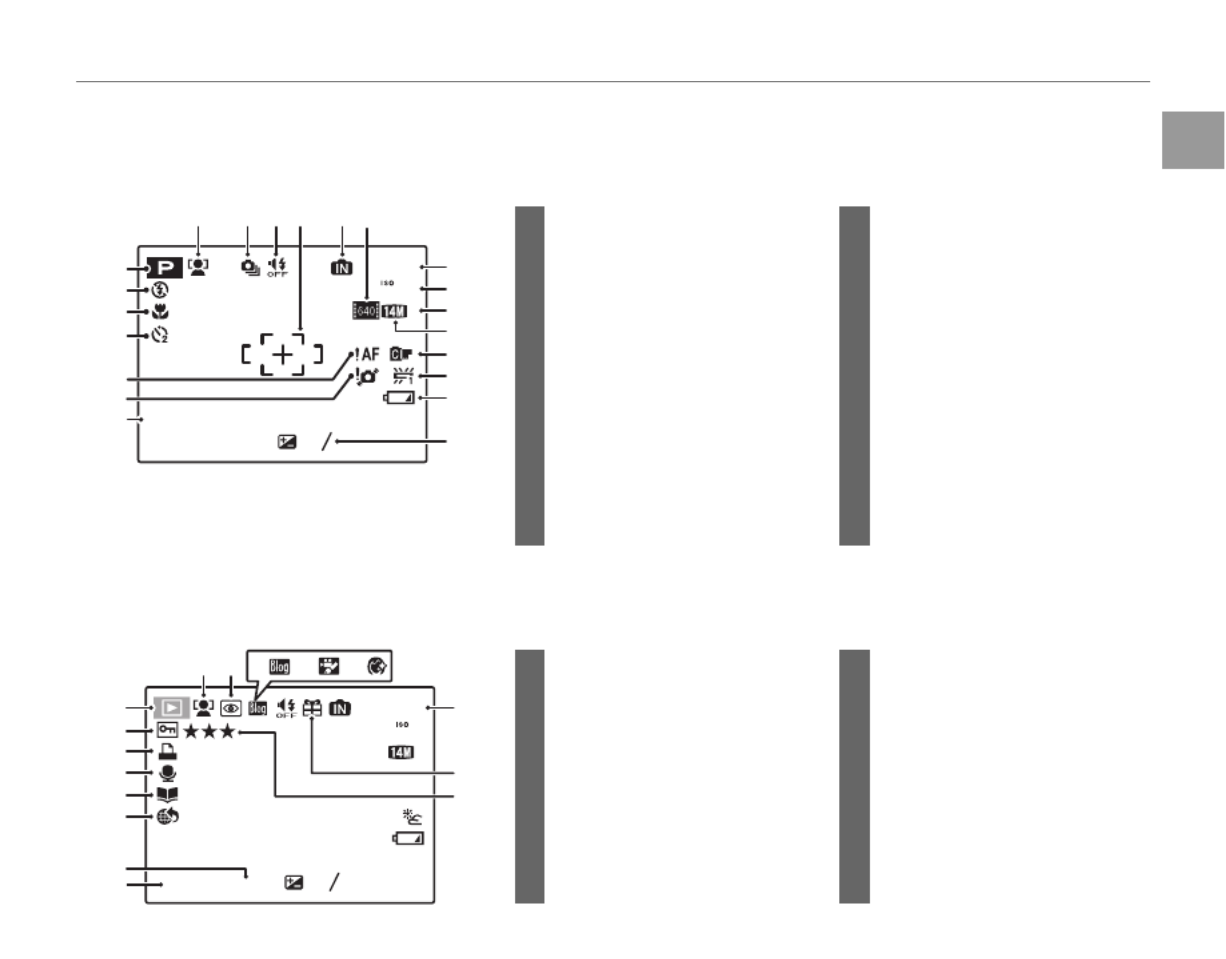
The following indicators may appear in the monitor during shooting and playback:
■
■
■
■■■
Shooti
Shooti
Shooti
ShootiShooting
ng
ng
ngng Shooting
100
19
N
2
2
2
22
2
3
3
3
33
3
-
-
-
--
1
1
1
11
-
1
12 / 31 / 2050 10 : 00
AM
1
2
3
4
5
6
7
8 9 10 11 12 13
14
15
16
17
18
19
20
21
12 Internal memory indicator *
....... 8
13 Movie quality ....................................47
14 Number of available frames
................................................................107
15 Sensitivity ............................................65
16 Image quality ...................................66
17 Image size ...........................................65
18 FINEPIX COLOR ............................... 66
19 White balance ..................................67
20 Battery level .......................................15
21 Exposure compensation ...........32
1 Shooting mode ...............................21
2 Flash mode.........................................35
3 Macro (close-up) mode............. 34
4 Self timer indicator ........................37
5 Focus warning .................................18
6 Blur warning ......................................35
7 Date and time...................................13
8 Intelligent Face Detection
indicator ..............................................27
9 Continuous mode .........................67
10 Silent mode ...................................... 36
11 Focus frame ...................................... 30
* Indicates that no memory card is inserted and that pictures will be
stored in the camera’s internal memory.
■
■
■
■■■
Playback
Playback
Playback
PlaybackPlayback Playback
2
2
2
22
2
3
3
3
33
3
-
-
-
--
1
1
1
11
-
1
100
100-0001
1/250
F
4.0
N
YouTube
12 / 31 / 2050 10 : 00
AM
1
2
3
4
5
6
7
8
9 10
14
15
16
1211 13 9 Intelligent Face Detection
indicator ............................................... 41
10 Red-eye removal indicator ......76
11 Blog image .........................................71
12 Blog movie .........................................74
13 Portrait enhancer .......................... 23
14 Frame number ................................ 90
15 Gift image .......................................... 40
16 Favorites .............................................. 40
1 Playback mode indicator ......... 40
2 Protected image ............................ 77
3 DPOF print indicator ....................53
4 Voice memo indicator.................82
5 Photobook assist ............................45
6 Upload setting .................................74
7 Aperture
8 Shutter speed

First Steps
4
Charging the Battery
The battery is not charged at shipment. Charge the battery before use.
Batteries
The camera uses an NP-45A rechargeable battery.
1 Place the battery in the charger.
Insert the battery into the supplied battery
charger as shown, making sure that the
battery is in the orientation indicated by the
E
B
F labels.
Battery charger
Battery Arrow
E
B
F
label
E
B
F label
2 Plug the charger in.
Plug the charger into a power outlet. The
charging indicator will light.
The Charging Indicator
The charging indicator shows battery charge status
as follows:
Cha
Cha
Cha
ChaCharg
rg
rg
rgrgin
in
in
ining ind
g ind
g ind
g indg indic
ic
ic
icicato
ato
ato
atoator
r
r
rrCharging indicator Bat
Bat
Bat
BatBatte
te
te
teter
r
r
rry s
y s
y s
y sy stat
tat
tat
tattatus
us
us
ususBattery status Ac
Ac
Ac
AcActi
ti
ti
tition
on
on
ononAction
Off Battery not
inserted.
Insert
the battery.
On (yellow)
Battery charging.
—
On (green) Battery fully
charged.
Remove
the battery.
Blinks (yellow) Battery fault.
Unplug the
charger and
remove the
battery.
3 Charge the battery.
Remove the battery when charging is
complete.
Charging time
See specifications of the battery charger (pg. 110).

5
Charging the Battery
First Steps
Caution: Caring for the Battery
• Do not affix stickers or other objects to the battery. Failure to observe this precaution could make it impossible
to remove the battery from the camera.
• Do not short the battery terminals. The battery could overheat.
• Only use batteries designed for use with this product. Failure to observe this precaution could result in
product malfunction.
• Do not remove the labels from the battery or attempt to split or peel the outer casing.
• The battery gradually loses its charge when not in use. Charge the battery one or two days before use.
• Read the supplied documentation for additional cautions concerning battery use.
Caution: Battery Life
• A noticeable decrease in the length of time the battery will hold a charge indicates that it has reached the end
of its service life and should be replaced.
Caution: Using the Battery Charger
• Unplug the charger when it is not in use.
• Remove dirt from the battery terminals with a clean, dry cloth. Failure to observe this precaution could prevent
the battery from charging.
• Charging times increase at low temperatures.
6
Inserting the Battery
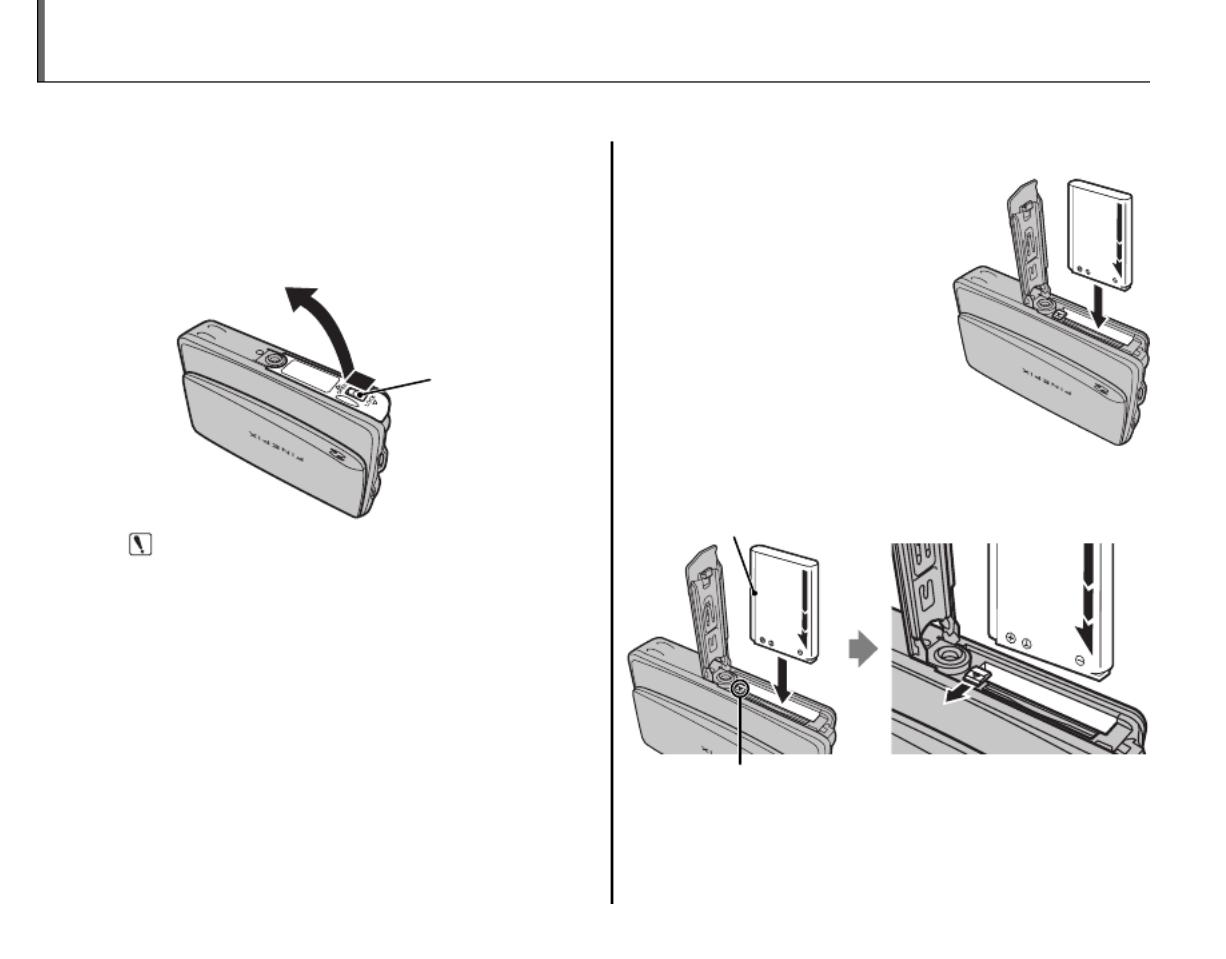
After charging the battery, insert it in the camera as described below.
1 Open the battery-chamber cover.
Open the battery-chamber cover as shown,
sliding the lock lever in the direction of the
arrow.
Lock lever
Caution
• Do not turn the camera on or off while the
battery-chamber cover is open. Failure to
observe this precaution could result in damage
to image files or memory cards.
• Do not use excessive force when handling the
battery-chamber cover.
2 Insert the battery.
Face the gold terminals
downward and align
the orange stripe on the
battery with the orange
battery latch and slide
the battery into the
camera, keeping the
battery latch pressed to
the side. Confirm that
the battery is securely latched.
Battery latch
Orange stripe


7
Inserting the Battery
First Steps
Caution
• Insert the battery in the correct orientation. Do
not use force or attempt to insert the battery
upside down or backwards. The battery will
slide in easily in the correct orientation.
3 Close the battery-chamber cover.
Removing the Battery
After turning the camera off, open the battery-
chamber cover, press the battery latch to the side,
and slide the battery out of the camera as shown.
Battery latch


8
Inserting a Memory Card
Although the camera can store pictures in internal memory, SD memory cards (sold separately) can
be used to store additional pictures.
When no memory card is inserted, d appears in the monitor and internal memory is used for recording
and playback. Note that because camera malfunction could cause internal memory to become
corrupted, the pictures in internal memory should periodically be transferred to a computer and
saved on the computer hard disk or on removable media such as CDs or DVDs. The pictures in
internal memory can also be copied to a memory card (see page 81). To prevent internal memory
from becoming full, be sure to delete pictures when they are no longer needed.
When a memory card is inserted as described below, the card will be used for recording and playback.
■
■
■
■■■
Compati
Compati
Compati
CompatiCompatible Me
ble Me
ble Me
ble Meble Memor
mor
mor
mormory Cards
y Cards
y Cards
y Cardsy Cards Compatible Memory Cards
SanDisk SD and SDHC memory cards have been tested and approved for use in the camera. A
complete list of approved memory cards is available at http://www.fujifilm.com/products/digital_
cameras/index.html. Operation is not guaranteed with other cards. The camera can not be used with
MultiMediaCard (MMC) or xD-Picture Cards.
When recording high-definition movies, use a memory card rated at Class 4 (write speed of 4 MB per
second) or higher.
Caution
• SD memory cards can be locked, making it impossible to format the card
or to record or delete images. Before inserting an SD memory card, slide
the write-protect switch to the unlocked position.
Wr
Wr
Wr
WrWrite-protect swit
ite-protect swit
ite-protect swit
ite-protect switite-protect switch
ch
ch
chchWrite-protect switch


9
Inserting a Memory Card
First Steps
■
■
■
■■■
Inser
Inser
Inser
InserInserting a M
ting a M
ting a M
ting a Mting a Memor
emor
emor
emoremory Card
y Card
y Card
y Cardy Card Inserting a Memory Card
1 Open the battery-chamber cover.
Open the battery-chamber cover as shown,
sliding the lock lever in the direction of the
arrow.
Lock lever
Note
• Be sure the camera is off before opening the
battery-chamber cover.
Caution
• Do not turn the camera on or off while the
battery-chamber cover is open. Failure to
observe this precaution could result in damage
to image files or memory cards.
• Do not use excessive force when handling the
battery-chamber cover.
2 Insert the memory card.
Holding the memory card in the orientation
shown below, slide it all the way in. Press
firmly until it clicks into place.
Click
Battery


10
Inserting a Memory Card
• Be sure card is at
correct orientation;
do not insert at an
angle or use force.
If the memory card
is not inserted
correctly, images
will be saved in the
internal memory (d will be displayed) instead
of on the memory card.
• If the battery-chamber cover cannot be closed,
do not attempt to close it with excessive force,
check that the card is correctly orientated.
3 Close the battery-chamber cover.
Removing Memory Cards
Be sure the camera is off before opening the
battery-chamber cover. Press the card in and then
release it slowly. The card can now be removed by
hand.
Caution
• The memory card may spring out if you remove
your finger immediately after pushing the card in.
• Memory cards may be warm to the touch after
being removed from the camera. This is normal
and does not indicate a malfunction.


11
Inserting a Memory Card
First Steps
Caution
• Format SD memory cards before first use, and be
sure to reformat all memory cards after using them
in a computer or other device. For more information
on formatting memory cards, see page 89.
• Memory cards are small and can be swallowed;
keep out of reach of children. If a child swallows a
memory card, seek medical assistance immediately.
• miniSD or microSD adapters that are larger or smaller
than the standard dimensions of an SD card may not
eject normally; if the card does not eject, take the
camera to an authorized service representative. Do
not forcibly remove the card.
• Do not turn the camera off or remove the memory
card while the memory card is being formatted or
data are being recorded to or deleted from the card.
Failure to observe this precaution could damage the
card.
• Do not affix labels to memory cards. Peeling labels
can cause camera malfunction.
• Movie recording may be interrupted with some
types of SD memory card.
• The data in internal memory may be erased or
corrupted when the camera is repaired. Please note
that the repairer will be able to view pictures in
internal memory.
• Formatting a memory card or internal memory in
the camera creates a folder in which pictures are
stored. Do not rename or delete this folder or use a
computer or other device to edit, delete, or rename
image files. Always use the camera to delete pictures
from memory cards and internal memory; before
editing or renaming files, copy them to a computer
and edit or rename the copies, not the originals.

12
Turning the Camera on and Off
Shooti
Shooti
Shooti
ShootiShooting Mode
ng Mode
ng Mode
ng Modeng ModeShooting Mode
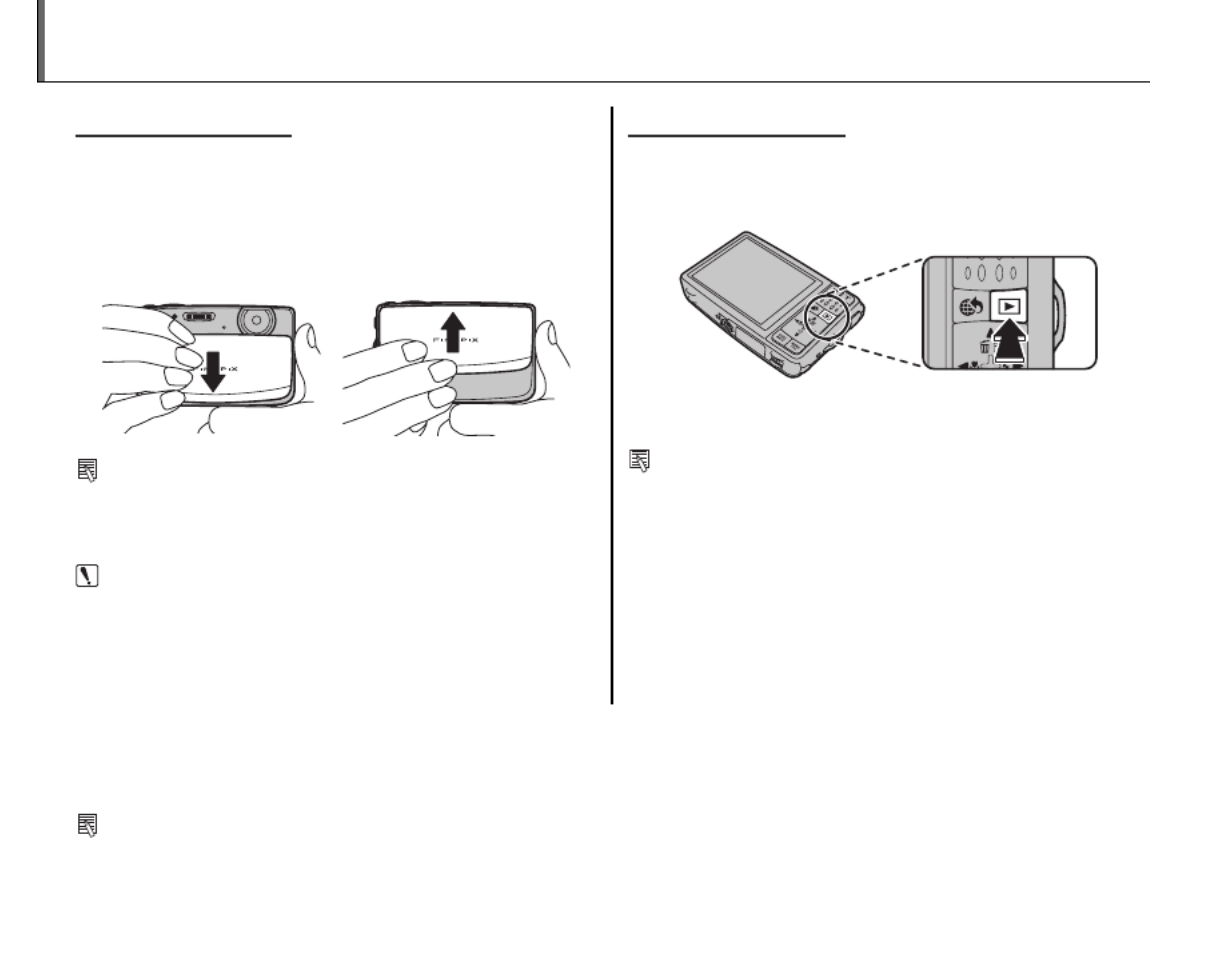
To turn the camera on, open the lens cover fully.
The camera turns off when the lens cover is
closed.
Camera On Camera Off
Tip: Switching to Playback Mode
• Press the D button to start playback. Press the
shutter button halfway to return to shooting mode.
Caution
• Pictures can be affected by fingerprints and other
marks on the lens. Keep the lens clean.
• Closing the cover does not completely cut power to
the camera.
Playback Mode
Playback Mode
Playback Mode
Playback ModePlayback ModePlayback Mode
To turn the camera on and begin playback, press
the D button for about a second.
Press the D button again to turn the camera off.
Tip: Switching to Shooting Mode
• To exit to shooting mode, press the shutter button
halfway. Press the D button to return to playback.
Tip: Auto Power Off
• The camera will turn off automatically if no operations are performed for the length of time selected in the
AUTO POWER OFF menu (see page 91).

13
First Steps
Basic Setup
A language-selection dialog is displayed the first time the camera is turned on. Set up the camera as
described below (for information on resetting the clock or changing languages, see page 85).
1 Choose a language.
START MENU
SET NO
1.1 Press the selector up, down,
left, or right to highlight a
language.
1.2
Press
MENU/OK.
2 Set the date and time.
SET NO
2012
2011
2009
2008
YY.MM.DD
1. 1 12
:
00
AM
DATE/TIME NOT SET
2010
2.1 Press the selector left or right
to highlight the year, month,
day, hour, or minute and
press up or down to change.
To change the order in which the year,
month, and day are displayed, highlight
the date format and press the selector
up or down.
2.2
Press
MENU/OK.


14
Basic Setup
Note
• You can change the language or date and time
setting later in the setup menu (pg. 85).
Tip: The Camera Clock
• If the battery is removed for an extended period,
the camera clock will be reset and the language-
selection dialog will be displayed when the camera
is turned on.
• If the battery is left in the camera for about 24 hours,
the battery can be removed for about 24 hours
without resetting the clock, language selection, or
power management options.

Basic Photography and Playback
15
Taking Pictures in G (SCENE RECOGNITION) Mode
This section describes how to take pictures in mode.SCENE RECOGNITION
1 Turn the camera on.
Fully open the lens cover.
Camera On
SCENE RECOGNITION Mode
By simply aiming the camera at the subject, the
camera determines the shooting conditions and
selects the optimal settings.
2 Check the battery level.
Check the battery level in the monitor.
q w e
r
Ind
Ind
Ind
IndIndic
ic
ic
icicato
ato
ato
atoator
r
r
rrIndicator Des
Des
Des
DesDescr
cr
cr
crcrip
ip
ip
ipipti
ti
ti
tition
on
on
ononDescription
q(white) Battery partially discharged.
w(white) Battery more than half discharged.
e (red) Low battery. Charge as soon as
possible.
r (blinks red) Battery exhausted. Turn camera off
and charge battery.


16
Taking Pictures in G (SCENE RECOGNITION) Mode
3 Frame the picture.
Position the main subject in the focus area
and use the zoom buttons to frame the
picture in the monitor.
Press W to zoom out Press T to zoom in
Zoom indicator
Holding the Camera
Hold the camera steady
with both hands and
brace your elbows against
your sides. Shaking or
unsteady hands can blur
your shots.
To prevent pictures that
are out of focus or too
dark (underexposed),
keep your fingers and
other objects away from
the lens and flash.
Tip: Focus Lock
• Use focus lock (pg. 30) to focus on subjects that are not in the focus frame.


17
Taking Pictures in G (SCENE RECOGNITION) Mode
Basic Photography and Playback
Simply by pointing the camera at the subject,
the camera automatically analyzes and selects
the most appropriate setting using scene
recognition.
The camera analyzes a
subject based on scene
recognition, then an icon
appears in the bottom
left of the monitor. (The
illustration shows camera
analysis of a portrait subject.)
Sub
Sub
Sub
SubSubjec
jec
jec
jecject
t
t
ttSubject Icon
Icon
Icon
IconIconIcon Des
Des
Des
DesDescri
cri
cri
cricripti
pti
pti
ptiption
on
on
ononDescription
PORTRAIT HFor soft-toned portraits with
natural skin tones.
LANDSCAPE IFor crisp, clear daylight shots of
buildings and landscapes.
NIGHT J
For night and twilight scenes,
using a high sensitivity setting
to minimize blurring.
MACRO KFor clear close-ups of flowers,
etc.
BACKLIT
PORTRAIT T
For a subject backlit against the
sun, preventing the background
from becoming dim.
Sub
Sub
Sub
SubSubjec
jec
jec
jecject
t
t
ttSubject Icon
Icon
Icon
IconIconIcon Des
Des
Des
DesDescri
cri
cri
cricripti
pti
pti
ptiption
on
on
ononDescription
NIGHT
PORTRAIT ZFor a subject in a dim place,
reducing blur.
Tip
• When a subject can not be analyzed by the camera,
LAUTO mode will be set.
Note
• B Intelligent Face Detection is turned on
automatically.
• The camera continuously adjusts focus on a face, or
the center area of the monitor.
• Continuous auto focus will be audible and battery
drain will increase.
PORTRAI
PORTRAI
PORTRAI
PORTRAI
PORTRAIPORTRAIT
T
T
TT
PORTRAITPORTRAI
PORTRAI
PORTRAI
PORTRAI
PORTRAIPORTRAIT
T
T
TT
PORTRAIT


18
Taking Pictures in G (SCENE RECOGNITION) Mode
4 Focus.
Press the shutter button halfway to focus on
the subject.
If the camera is able to focus, it will beep twice.
If the camera is unable to focus, the focus frame
will turn red and R will be displayed.
Note
• The lens may make a noise when the camera
focuses. This is normal.
5 Shoot.
Smoothly press the shutter
button the rest of the way down
to take the picture.
Tip: The Shutter Button
• The shutter button has two positions. Pressing the
shutter button halfway sets focus and exposure; to
shoot, press the shutter button the rest of the way
down.
Press
halfway
Press the rest of the
way down
Double
beep Click
Note
• If the subject is poorly lit, the flash may fire when the
picture is taken. To take pictures without the flash,
choose another flash mode (pg. 35).


19
Taking Pictures in G (SCENE RECOGNITION) Mode
Basic Photography and Playback
The Framing Grid
To display best framing (the framing grid) or to view
or hide other indicators in the monitor, press the
DISP/BACK button.
INFORMATION OFFINFORMATION ON
BEST FRAMING
To use best framing, position the main subject at
the intersection of two lines or align one of the
horizontal lines with the horizon. Use focus lock (pg.
30) to focus on subjects that will not be in the center
of the frame in the final photograph.

20
Viewing Pictures
Pictures can be viewed in the monitor. When taking important photographs, take a test shot and
check the results.
1 Press the D button.
The most recent picture will be displayed in
the monitor.
12 / 31 / 2050
12 / 31 / 2050
12 / 31 / 2050
12 / 31 / 2050
12 / 31 / 205012 / 31 / 2050
1/250
1/250
1/250
1/250
1/2501/250
F4.0
F4.0
F4.0
F4.0
F4.0F4.0
10 : 00 AM
10 : 00 AM
10 : 00 AM
10 : 00 AM
10 : 00 AM10 : 00 AM
12 / 31 / 2050 10 : 00 AM
1/250 F4.0
100
100
100
100
100100
100
ISO
ISO
ISO
ISO
ISOISO
ISO
100
100
100
100
100100-
-
-
--
0001
0001
0001
0001
00010001
100-0001
N
N
N
NN
-
-
-
--
1
1
1
11
2
2
2
223
3
3
33
23
-
1
N
2 View additional pictures.
Press the selector right to view
pictures in the order recorded,
left to view pictures in reverse
order.
Press the shutter button to exit to shooting
mode.
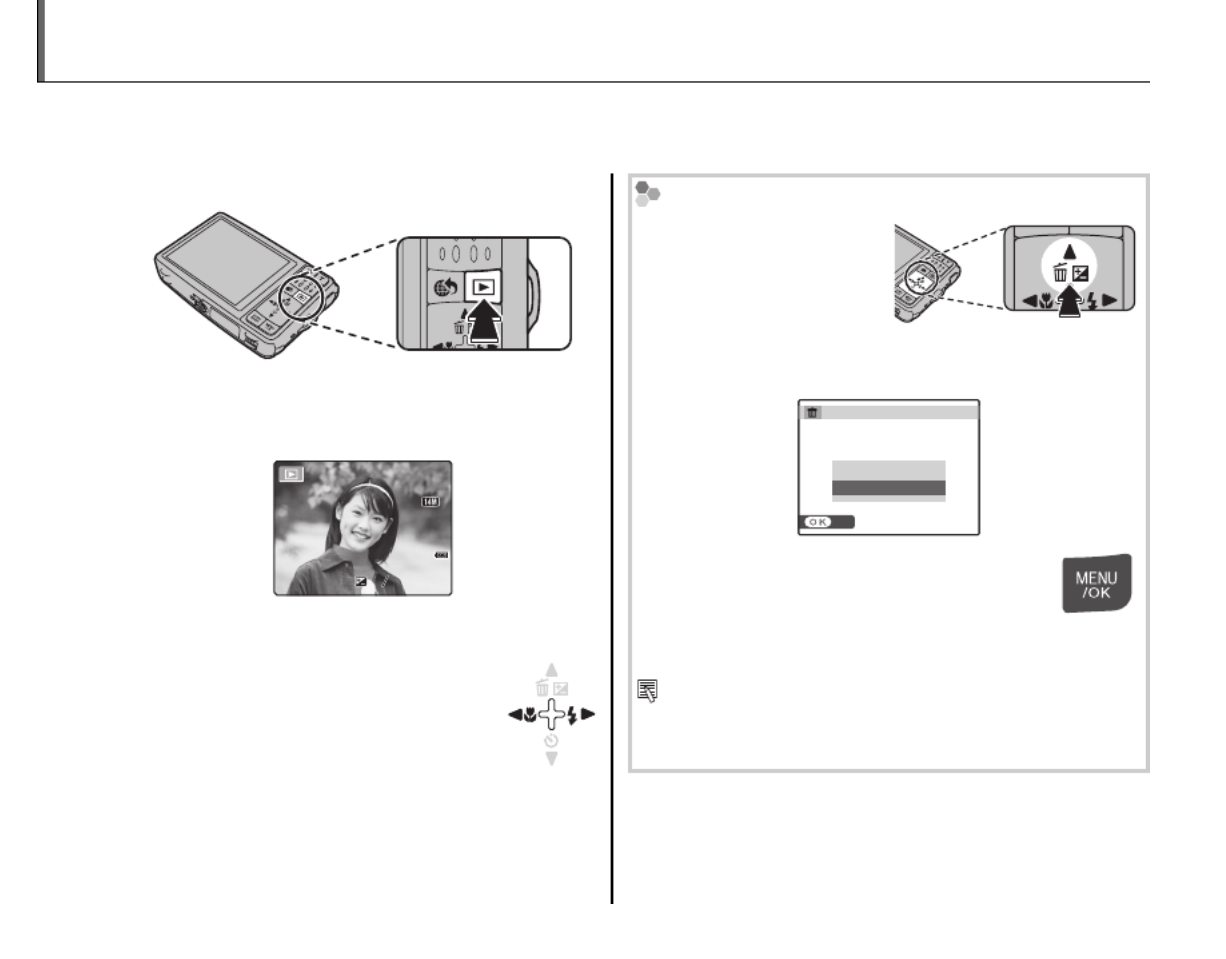
Deleting Pictures
To delete the picture
currently displayed in
the monitor, press the
selector up (I). The
following dialog will be
displayed.
ERASE OK?
SET
CANCEL
OK
To delete the picture, press the selector
up to highlight OK
and press
MENU/OK.
To exit without deleting the picture,
highlight CANCEL and press MENU/OK.
Tip: The Playback Menu
• Pictures can also be deleted from the playback
menu (pg. 43).


More on Photography
21
A Shooting Mode
Choose a shooting mode according to the scene or type of subject.
Selecti
Selecti
Selecti
SelectiSelecting a Shooti
ng a Shooti
ng a Shooti
ng a Shooting a Shooting Mode
ng Mode
ng Mode
ng Modeng Mode
Selecting a Shooting Mode
1 Press MENU/OK to display the
shooting menu.
2 Press the selector up or down to
highlight A SHOOTING MODE.
3 Press the selector right to display
shooting mode options.
SCENE RECOGNITION
CANCELSET
Selects optimum
camera settings
for certain modes.
SR
4 Press the selector up or down to
highlight the desired mode.
5 Press MENU/OK to select the
highlighted option.
G Digital IS
If the subject is poorly lit, blurring caused by
camera shake can be reduced by activating the
G DIGITAL IS (pg. 87). Note that blurring may
still occur depending on the scene or shooting
conditions.


22
A Shooting Mode
Shooti
Shooti
Shooti
ShootiShooting Modes
ng Modes
ng Modes
ng Modesng ModesShooting Modes
G
G
G
GGG SCEN
SCEN
SCEN
SCEN SCENE RECOG
E RECOG
E RECOG
E RECOGE RECOGNITIO
NITIO
NITIO
NITIONITION
N
N
NN SCENE RECOGNITION
Simply by pointing the camera at the subject,
the camera automatically analyzes and selects
the most appropriate setting using scene
recognition.
For more information, see “Taking Pictures in G
(SCENE RECOGNITION) Mode” (pg. 15).
k
k
k
kkk AUTO
AUTO
AUTO
AUTO AUTO AUTO
Choose for crisp, clear snapshot. This mode is
recommended in most situations.
P PROGR
P PROGR
P PROGR
P PROGRP PROGRAM AE
AM AE
AM AE
AM AEAM AEP PROGRAM AE
Choose this mode for complete control
of shooting settings, including exposure
compensation (pg. 32), white balance (pg. 67),
and AF mode (pg. 68).
A
A
A
AAA NA
NA
NA
NA NATUR
TUR
TUR
TURTURAL &
AL &
AL &
AL & AL & NATURAL & K
K
K
KKK (Dual Sh
(Dual Sh
(Dual Sh
(Dual Sh (Dual Shot Mode)
ot Mode)
ot Mode)
ot Mode)ot Mode) (Dual Shot Mode)
This mode helps ensure good results with backlit
subjects and in other situations with difficult
lighting. Each time the shutter button is pressed,
the camera takes two shots: one shot without
the flash to preserve natural lighting, followed
immediately by a second shot with the flash. Do
not move the camera until shooting is complete.
Note
• Do not use where flash photography is prohibited.
The flash fires even in silent mode (pg. 36).
• Only available if memory remains for two pictures.
• Continuous shooting is not available.


23
More on Photography
A Shooting Mode
B
B
B
BBB NA
NA
NA
NA NATUR
TUR
TUR
TURTURAL LIG
AL LIG
AL LIG
AL LIGAL LIGHT
HT
HT
HTHT NATURAL LIGHT
Capture natural light indoors, under low light, or
where the flash can not be used. The flash turns
off and sensitivity is raised to reduce blur.
C
C
C
CCC POR
POR
POR
POR PORTR
TR
TR
TRTRAIT
AIT
AIT
AITAIT PORTRAIT
Choose this mode for soft-toned portraits with
natural skin tones.
V
V
V
VVV POR
POR
POR
POR PORTR
TR
TR
TRTRAIT EN
AIT EN
AIT EN
AIT ENAIT ENHANCE
HANCE
HANCE
HANCEHANCER
R
R
RR PORTRAIT ENHANCER
Choose for a smooth skin effect in soft-focus
portraits.
K
K
K
KKK LAN
LAN
LAN
LAN LANDSCAPE
DSCAPE
DSCAPE
DSCAPEDSCAPE LANDSCAPE
Choose this mode for crisp, clear daylight shots
of buildings and landscapes.
W
W
W
WWW MOTIO
MOTIO
MOTIO
MOTIO MOTION P
N P
N P
N PN PANO
ANO
ANO
ANOANOR
R
R
RRAMA
AMA
AMA
AMAAMA MOTION PANORAMA
In this mode, you can take up to three pictures
and join them together to form a panorama.
Use of a tripod is recommended to assist in
composing overlapping shots.
1 Press the selector up to select a frame. Press
the selector left or right to highlight a pan
direction and press MENU/OK.
2 Take a photograph. Exposure and
white balance for the panorama are
set with the first shot.
Note
• To end shooting and create a panorama after the
first or second shot, press the multi selector up
after completing Step 2 or Step 3 and proceed to
Step 5.


24
A Shooting Mode
3 Frame the next shot to overlap with the
previous picture by superimposing 1 on
2 so that they form a solid circle (z). The
camera will release the shutter automatically.
2 31
END CANCEL
Pan direction
Display after 1st shot Shutter released
2 31
END CANCEL
4 Take the last shot as described in Step 3.
5 Press MENU/OK to save the picture.
C Caution
• Panoramas are created from multiple frames. The
camera may in some cases be unable to stitch the
frames together perfectly.
• The desired results may not be achieved with
moving subjects, subjects close to the camera,
unvarying subjects such as the sky or a field of grass,
subjects that are in constant motion, such as waves
and waterfalls, or subjects that undergo marked
changes in brightness. Panoramas may be blurred if
the subject is poorly lit.
For Best Results
Move the camera carefully to keep it horizontal.
When 1 and 2 are overlapped, the camera must
be still.
Printing Panoramas
Depending on the page size and the size of the
panorama, panoramas may print with their edges
cropped out or with wide margins at the top and
bottom or at both sides.


25
More on Photography
A Shooting Mode
L
L
L
LLL SPOR
SPOR
SPOR
SPOR SPORT
T
T
TT SPORT
Choose this mode when photographing moving
subjects. Priority is given to faster shutter speeds.
D
D
D
DDD NIG
NIG
NIG
NIG NIGHT
HT
HT
HTHT NIGHT
A high sensitivity setting is selected
automatically to minimize blurring for recording
night and twilight scenes.
U
U
U
UUU NIG
NIG
NIG
NIG NIGHT (
HT (
HT (
HT (HT (TRI
TRI
TRI
TRITRIPOD)
POD)
POD)
POD)POD) NIGHT (TRIPOD)
Slow shutter speeds are used to record night
scenes. Use of a tripod is recommended to
prevent camera shake.
E
E
E
EEE SUNS
SUNS
SUNS
SUNS SUNSET
ET
ET
ETET SUNSET
Choose this mode to record the vivid colors in
sunrises and sunsets.
F
F
F
FFF SNOW
SNOW
SNOW
SNOW SNOW SNOW
Choose for crisp, clear shots that capture the
brightness of scenes dominated by shining white
snow.
G
G
G
GGG BEACH
BEACH
BEACH
BEACH BEACH BEACH
Choose for crisp, clear shots that capture the
brightness of sunlit beaches.
I
I
I
III P
P
P
P PARTY
ARTY
ARTY
ARTYARTY PARTY
Capture indoor background lighting under low-
light conditions.
O
O
O
OOO FLOWER
FLOWER
FLOWER
FLOWER FLOWER FLOWER
Choose for vivid close-ups of flowers. The
camera focuses in the macro range and the flash
turns off automatically.
P
P
P
PPP TEX
TEX
TEX
TEX TEXT
T
T
TT TEXT
Take clear pictures of text or drawings in print.
The camera focuses in the macro range.


26
A Shooting Mode
N
N
N
NNN AUCTIO
AUCTIO
AUCTIO
AUCTIO AUCTION MOD
N MOD
N MOD
N MODN MODE
E
E
EE AUCTION MODE
Choose this mode to combine up to four
consecutive shots in a single image 640 × 480
pixels in size (p). This can be used to record
an object from different angles when posting
pictures to a web auction. To take pictures in
auction mode:
1 Select N .AUCTION MODE
2 Press DISP/BACK to display the
following layout options:
3
3
3
33
3
3
3
33
2
2
2
22
2
2
2
22
2
2
2
22 4
4
4
44
1
1
1
11 1
1
1
11
1
1
1
11
1
1
1
11
3 Press the selector left or right to
highlight an option.
4 Press MENU/OK to select the
highlighted option.
5 Take a picture. The picture will
appear in the first frame in layout.
6 Press MENU/OK to proceed to the
next picture. Repeat steps 5 and 6
until all the frames are filled.
R
R
R
RRR SUCCESSIVE M
SUCCESSIVE M
SUCCESSIVE M
SUCCESSIVE M SUCCESSIVE MOVIE
OVIE
OVIE
OVIEOVIE SUCCESSIVE MOVIE
Join a series of movie clips into a single movie
(pg. 48).


27
More on Photography
B Intelligent Face Detection and Red-Eye Removal
Intelligent Face Detection allows the camera to automatically detect human faces and set focus and
exposure for a face anywhere in the frame for shots that emphasize portrait subjects. Choose for
group portraits to prevent the camera from focusing on the background. Intelligent Face Detection
also offers a red-eye removal option for removing “red-eye” effects caused by the flash.
1 Turn Intelligent Face Detection on.
1.1
Press
MENU/OK to display the
shooting menu.
1.2 Press the selector up or
down to highlight 3 FACE
DETECTION.
1.3 Press the selector right
to display Intelligent Face
Detection options.
1.4 Press the selector up or down
to highlight the desired option.
Opt
Opt
Opt
OptOptio
io
io
ioion
n
n
nnOption Des
Des
Des
DesDesc
c
c
ccri
ri
ri
riripti
pti
pti
ptiption
on
on
ononDescription
OFF Intelligent Face Detection off.
ON Intelligent Face Detection on.
1.5
Press
MENU/OK to select the
highlighted option and return
to shooting mode.
A B icon appears in the
monitor when Intelligent Face
Detection is on.
Note
• When removing red-eye effect, select ON for
a RED EYE REMOVAL in the setup menu (pg. 87).

28
B Intelligent Face Detection and Red-Eye Removal
2 Frame the picture.
If a face is detected, it will be indicated by
a green border. If there is more than one
face in the frame, the camera will select the
face closest to the center; other faces are
indicated by white borders.
Green border
3 Focus.
Press the shutter button halfway
to set focus and exposure for
the subject in the green border.
4 Shoot.
Press the shutter button all the
way down to shoot.
Intelligent Face Detection
Intelligent Face Detection is
recommended when using the
self-timer for group portraits or
self-portraits (pg. 37).
5
5
5
55
5
5
5
55
The following functions can be used with Intelligent
Face Detection.
RED EYE REMOVAL (pg. 76)/IMAGE SEARCH
(pg. 71)/SLIDE SHOW (pg. 76)/IMAGE DISP. >
ZOOM(CONTINUOUS) (pg. 89)/PRINT ORDER
(DPOF) (pg. 55)/ (pg. 78)CROP


29
More on Photography
B Intelligent Face Detection and Red-Eye Removal
Caution
• If no face is detected when the shutter-release
button is pressed halfway (pg. 97), the camera will
focus on the subject at the center of the monitor
and red-eye will not be removed. If the camera
is unable to detect a face, turn Intelligent Face
Detection off and use focus lock (pg. 30).
• If the subject moves as the shutter button is pressed,
their face may not be in the area indicated by the
green border when the picture is taken.
• In each shooting mode, the camera will detect and
focus on faces but exposure will be optimized for
the entire scene rather than the selected portrait
subject.
Tip: Red-Eye Removal
• Select ON for the R SAVE ORG IMAGE option in
the setup menu (pg. 87) to save unprocessed copies
of pictures created with red-eye removal.

30
Focus Lock
To compose photographs with off-center subjects:
1 Position the subject in the focus frame.
2 Focus.
Press the shutter button halfway to set
focus and exposure. Focus and exposure
will remain locked while the shutter button
is pressed halfway (AF/AE lock).
Press
halfway
250
250
250
250250
250
F
F
F
FF
4.0
4.0
4.0
4.04.0
F
4.0
Repeat steps 1 and 2 as desired to refocus
before taking the picture.
3 Recompose the picture.
Keeping the shutter button pressed
halfway, recompose the picture.
250
250
250
250250
250
F
F
F
FF
4.0
4.0
4.0
4.04.0
F
4.0
4 Shoot.
Press the shutter-release button the rest of
the way down to take the picture.
Press the rest of
the way down


31
Focus Lock
More on Photography
Autofocus
Although the camera boasts a high-precision autofocus system, it may be unable to focus on the subjects
listed below. If the camera is unable to focus using autofocus, use focus lock (pg. 30) to focus on another
subject at the same distance and then recompose the photograph.
• Very shiny subjects such as mirrors or car bodies.
• Fast-moving subjects.
• Subjects photographed through a window or other reflective object.
• Dark subjects and subjects that absorb rather than reflect light, such as hair or fur.
• Insubstantial subjects, such as smoke or flame.
• Subjects that show little contrast with the background (for example, subjects in clothing that is the same
color as the background).
• Subjects positioned in front of or behind a high-contrast object that is also in the focus frame (for example, a
subject photographed against a backdrop of highly contrasting elements).


32
5 Exposure Compensation
Use exposure compensation when photographing very bright, very dark, or high-contrast subjects.
1 Press l (exposure compensation).
The exposure indicator will be displayed.
1000 F4.0
SET
2 Choose a value.
Press the selector button. The effect is
visible in the display.
Choose positive (+) values
to increase exposure
Choose negative (–) values
to reduce exposure
3 Return to shooting mode.
Press MENU/OK to return to
shooting mode.
4 Take pictures.
A Note
• A 5 icon and exposure indicator are displayed at
settings other than ±0. Exposure compensation is
not reset when the camera is turned off; to restore
normal exposure control, choose a value of ±0.


33
More on Photography
5 Exposure Compensation
Choosing an Exposure Compensation Value
• Backlit subjects: choose values from +2
/
3 EV to +1
2
/
3 EV (for an explanation of the term “EV”,
see the Glossary on page 106)
• Highly reflective subjects or very bright scenes (e.g., snowfields): +1 EV
• : +1 EV Scenes that are mostly sky
• Spotlit subjects (particularly if photographed against dark backgrounds): –2
/
3 EV
• Subjects with low reflectivity (pine trees or dark-colored foliage): –
2
/
3 EV

34
L Macro mode (Close-ups)
To select macro mode, press the selector left (L).
L icon appears in
monitor when camera
is in macro mode
When macro mode is in effect, the camera focuses on subjects near the center of the monitor. Use
the zoom buttons to frame pictures.
Note
• Use of a tripod is recommended to prevent blur caused by camera shake.


36
K Using the Flash (Intelligent Flash)
Red-Eye Removal
If intelligent face detection is selected in the
shooting menu (pg. 27) while a RED EYE
REMOVAL is set to ON in the setup menu (pg. 87),
red-eye removal is used for pictures taken when the
flash fires. Red-eye removal minimizes
“red-eye” caused when light from the
flash is reflected from the subject’s
retinas as shown in the illustration at
right.
U Silent Mode
Silent mode is useful in situations in which camera
sounds or the light of the flash may be unwelcome.
To turn silent mode on, press and hold the DISP/BACK
button until U is displayed, or change the setting in
the setup menu (pg. 86).
While silent mode is turned on, the flash does not
fire (except when using A mode), operation
sounds and the shutter sound are not heard, the
sound is muted when playing back movies or voice
memos, and the self-timer lamp and shooting
indicator do not light.
• U is displayed while silent mode is turned on.
• Press and hold the DISP/BACK button to turn silent
mode off.
• Flash, operation sounds (pg. 86), shutter sound
(pg. 86), and playback volume (pg. 87) settings
cannot be changed while silent mode is turned on.
• Silent mode cannot be turned on or off while
playing back movies or voice memos.


37
More on Photography
J Using the Self-Timer
The camera offers four types of self-timer mode,
which enable group portraits, self-portraits and
reduction of camera shake.
Sett
Sett
Sett
SettSetting the Sel
ing the Sel
ing the Sel
ing the Seling the Self-T
f-T
f-T
f-Tf-Timer
imer
imer
imerimerSetting the Self-Timer
To change the self-timer mode, press J.
COUPLE T
COUPLE T
COUPLE T
COUPLE TCOUPLE TIM
IM
IM
IMIMER
ER
ER
ERERCOUPLE TIMER
The picture is taken automatically when 2 faces
come close together.
Set the self-timer mode to x .COUPLE TIMER
Press E. Each time E is pressed, the setting for
z (distance) changes.
z : NEAR
zz : CLOSE UP
zzz
:
SUPER CLOSE
CANCEL
The more z icons, the closer the 2 faces must
be when taking a picture.
As the 2 faces come closer and the z
indicator(s) becomes full, countdown starts.
Then the picture is automatically taken.
Tip
• Pressing DISP/BACK cancels x .COUPLE TIMER
• Set Macro mode (close-up) when taking a self
portrait by holding the camera.


38
J Using the Self-Timer
GROUP TIM
GROUP TIM
GROUP TIM
GROUP TIMGROUP TIMER
ER
ER
ERERGROUP TIMER
The picture is taken automatically when all
members get together.
Set the self-timer mode to y .GROUP TIMER
Press E. Each time E is pressed, the setting for
S (numbers) changes.
Available setting for Group
timer is 1 to 4 persons.
CANCEL
When the camera recognizes the set number
of persons and the S indicator(s) becomes
full, countdown starts. Then the picture is
automatically taken.
Tip
• Pressing DISP/BACK cancels y . GROUP TIMER
• Set Macro mode (close-up) when taking a self
portrait by holding the camera.
1
1
1
110 SEC/ 2 SEC
0 SEC/ 2 SEC
0 SEC/ 2 SEC
0 SEC/ 2 SEC0 SEC/ 2 SEC10 SEC/ 2 SEC
Set the self-timer mode to c b or 10 SEC 2
SEC.
1 Focus.
Press the shutter button halfway
to focus.
Caution
• Stand behind the camera when using the
shutter button. Standing in front of the lens
can interfere with focus and exposure.
2 Start the timer.
Press the shutter button the
rest of the way down to start
the timer. The display
in the monitor shows
the number of seconds
remaining until the
shutter is released. To
stop the timer before
the picture is taken,
press DISP/BACK.
9
9
9
9
99
9
9
9
9
99


39
More on Photography
J Using the Self-Timer
The self-timer lamp on the front of the
camera will blink immediately before the
picture is taken. If the two-second timer is
selected, the self-timer lamp will blink as
the timer counts down.
Intelligent Face Detection
Because it ensures that the faces of portrait
subjects will be in focus, Intelligent Face Detection
(pg. 27) is recommended when using the self-timer
for group portraits or self-portraits. To use the self-
timer with Intelligent Face Detection, set the timer
as described in Step 1 and then press the shutter
button all the way down to start the timer. The
camera will detect faces while the timer is counting
down and adjust focus and exposure immediately
before the shutter is released. Be careful not to
move until the picture has been recorded.

40
More on Playback
To view the most recent picture in the monitor,
press the D button.
12 / 31 / 2050
12 / 31 / 2050
12 / 31 / 2050
12 / 31 / 2050
12 / 31 / 205012 / 31 / 2050
1/250
1/250
1/250
1/250
1/2501/250
F4.0
F4.0
F4.0
F4.0
F4.0F4.0
10 : 00 AM
10 : 00 AM
10 : 00 AM
10 : 00 AM
10 : 00 AM10 : 00 AM
12 / 31 / 2050 10 : 00 AM
1/250 F4.0
100
100
100
100
100100
100
ISO
ISO
ISO
ISO
ISOISO
ISO
100
100
100
100
100100-
-
-
--
0001
0001
0001
0001
00010001
100-0001
N
N
N
NN
-
-
-
--
1
1
1
11
2
2
2
223
3
3
33
23
-
1
N
Press the selector right to view
pictures in the order recorded, left to
view pictures in reverse order. Keep
the selector pressed to scroll rapidly
to the desired frame.
9
9
9
999 Fav
Fav
Fav
Fav Favori
ori
ori
oriorites: Rating Pictu
tes: Rating Pictu
tes: Rating Pictu
tes: Rating Pictutes: Rating Pictures
res
res
resres Favorites: Rating Pictures
To rate the picture currently displayed in full-
frame playback, press DISP/BACK and press the
selector up and down to select from zero to five
stars.
Tip: Favorites
• Ratings can be used for image search (pg. 71).
Choosing a Display Format
Press the DISP/BACK button to turn playback
indicators on and off.
3
10
10
10
1010 :
:
:
::00
00
00
0000
AM
AM
AM
AM AM
10 : 00
AM
100-0001
100-0001
100-0001
100-0001100-0001
100-0001
12 / 31 / 2050
12 / 31 / 2050
12 / 31 / 2050
12 / 31 / 205012 / 31 / 2050
12 / 31 / 2050
1/250
1/250
1/250
1/250
1/2501/250
F4.0
F4.0
F4.0
F4.0
F4.0F4.0
10 : 00 AM
10 : 00 AM
10 : 00 AM
10 : 00 AM
10 : 00 AM10 : 00 AM
10 : 00 AM
1/250 F4.0
100
100
100
100
100100-
-
-
--
0001
0001
0001
0001
00010001
100-0001
-
-
-
--
1
1
1
11
2
2
2
223
3
3
33
23
-
1
100
100
100
100
100100
100
ISO
ISO
ISO
ISO
ISOISO
ISO
N
N
N
NN
N
12 / 31 / 2050
12 / 31 / 2050
12 / 31 / 2050
12 / 31 / 205012 / 31 / 2050
12 / 31 / 2050
INFORMATION ON INFORMATION OFF
9 FAVORITES
Single-Frame Playback
Note
• Pictures taken using other cameras are indicated by a e (“gift image”) icon during playback.


Product specificaties
| Merk: | Fujifilm |
| Categorie: | Fotocamera |
| Model: | FinePix Z80 |
Heb je hulp nodig?
Als je hulp nodig hebt met Fujifilm FinePix Z80 stel dan hieronder een vraag en andere gebruikers zullen je antwoorden
Handleiding Fotocamera Fujifilm

24 Februari 2025
27 Januari 2025
14 December 2024
14 December 2024
14 December 2024
14 December 2024
11 Juni 2024
27 November 2023
12 Mei 2023
8 Juli 2023
Handleiding Fotocamera
- Fotocamera Braun
- Fotocamera Philips
- Fotocamera HP
- Fotocamera Sony
- Fotocamera Samsung
- Fotocamera Casio
- Fotocamera Panasonic
- Fotocamera Nikon
- Fotocamera Epson
- Fotocamera Canon
- Fotocamera Daewoo
- Fotocamera JVC
- Fotocamera Medion
- Fotocamera Olympus
- Fotocamera VTech
- Fotocamera Acer
- Fotocamera Agfa
- Fotocamera Agfaphoto
- Fotocamera Alpine
- Fotocamera Anker
- Fotocamera Argus
- Fotocamera Avaya
- Fotocamera BenQ
- Fotocamera Blaupunkt
- Fotocamera Bresser
- Fotocamera Brinno
- Fotocamera Bushnell
- Fotocamera D-Link
- Fotocamera Daitsu
- Fotocamera Denver
- Fotocamera Dorr
- Fotocamera Easypix
- Fotocamera Elmo
- Fotocamera Emerson
- Fotocamera Eufy
- Fotocamera EverFocus
- Fotocamera Ezviz
- Fotocamera Flir
- Fotocamera Fluke
- Fotocamera Foscam
- Fotocamera Fuji
- Fotocamera GE
- Fotocamera Gembird
- Fotocamera General Electric
- Fotocamera GoPro
- Fotocamera Hasselblad
- Fotocamera Hikvision
- Fotocamera Hitachi
- Fotocamera HOLGA
- Fotocamera Kodak
- Fotocamera Kogan
- Fotocamera Konica
- Fotocamera Konica Minolta
- Fotocamera Konig
- Fotocamera Kyocera
- Fotocamera Kyocera Yashica
- Fotocamera Laserliner
- Fotocamera Leica
- Fotocamera Leitz Focomat IIc
- Fotocamera Lenco
- Fotocamera Lenovo
- Fotocamera Lexibook
- Fotocamera Logitech
- Fotocamera Lorex
- Fotocamera Maginon
- Fotocamera Mamiya
- Fotocamera Meade
- Fotocamera Minolta
- Fotocamera Minox
- Fotocamera Moto Mods (Motorola)
- Fotocamera Nedis
- Fotocamera Nest
- Fotocamera Netgear
- Fotocamera Pentax
- Fotocamera Polaroid
- Fotocamera Powerfix
- Fotocamera Praktica
- Fotocamera Pyle
- Fotocamera Ricoh
- Fotocamera Ring
- Fotocamera Rollei
- Fotocamera Sanyo
- Fotocamera SeaLife
- Fotocamera Sigma
- Fotocamera Silvercrest
- Fotocamera Sinji
- Fotocamera SJCAM
- Fotocamera Spypoint
- Fotocamera Sygonix
- Fotocamera Technaxx
- Fotocamera TP Link
- Fotocamera Traveler
- Fotocamera Trust
- Fotocamera Velleman
- Fotocamera Viewsonic
- Fotocamera Vivitar
- Fotocamera Voigtlander
- Fotocamera Yashica
- Fotocamera ZeissIkon
- Fotocamera Joy-it
- Fotocamera Optoma
- Fotocamera Oregon Scientific
- Fotocamera Ozito
- Fotocamera Creative
- Fotocamera Zenit
- Fotocamera Cobra
- Fotocamera Celestron
- Fotocamera Levenhuk
- Fotocamera Aplic
- Fotocamera Arlo
- Fotocamera Imou
- Fotocamera SereneLife
- Fotocamera Akaso
- Fotocamera Trevi
- Fotocamera Intel
- Fotocamera Contax
- Fotocamera Scosche
- Fotocamera Swann
- Fotocamera SPC
- Fotocamera ARRI
- Fotocamera Bauhn
- Fotocamera Prixton
- Fotocamera RunCam
- Fotocamera FIMI
- Fotocamera Ansco
- Fotocamera Cosina
- Fotocamera Exakta
- Fotocamera Zorki
- Fotocamera Aida
- Fotocamera AVerMedia
- Fotocamera Lumens
- Fotocamera Dahua Technology
- Fotocamera UniView
- Fotocamera Reolink
- Fotocamera EVE
- Fotocamera Azden
- Fotocamera Marshall Electronics
- Fotocamera Ergoguys
- Fotocamera Burris
- Fotocamera Liiv360
- Fotocamera Watec
- Fotocamera Silvergear
- Fotocamera Digital Watchdog
- Fotocamera Fantasea Line
- Fotocamera Vimar
- Fotocamera Getac
- Fotocamera Speco Technologies
- Fotocamera Z CAM
- Fotocamera General
- Fotocamera Strex
- Fotocamera Berger & Schröter
- Fotocamera AViPAS
- Fotocamera Syrp
- Fotocamera Hanwha
- Fotocamera Videology
- Fotocamera InfiRay
- Fotocamera Pelco
- Fotocamera Videotec
- Fotocamera Cambo
- Fotocamera Kobian
- Fotocamera Red Digital Cinema
- Fotocamera Alfatron
- Fotocamera Aquapix
- Fotocamera BZBGear
- Fotocamera Seek Thermal
- Fotocamera Ikegami
- Fotocamera MuxLab
- Fotocamera Ikelite
- Fotocamera Adeunis
- Fotocamera Hoppstar
- Fotocamera IOptron
- Fotocamera Moultrie
- Fotocamera PatrolEyes
- Fotocamera Camouflage
- Fotocamera HuddleCamHD
- Fotocamera AquaTech
- Fotocamera PTZ Optics
- Fotocamera Linhof
- Fotocamera GoXtreme
- Fotocamera KanDao
- Fotocamera Kraken Sports
Nieuwste handleidingen voor Fotocamera

29 Maart 2025
29 Maart 2025
27 Maart 2025
27 Maart 2025
26 Maart 2025
12 Maart 2025
12 Maart 2025
10 Maart 2025

25 Februari 2025
24 Februari 2025