Epson SureColor SC-S80600 Handleiding
Lees hieronder de 📖 handleiding in het Nederlandse voor Epson SureColor SC-S80600 (170 pagina's) in de categorie Printer. Deze handleiding was nuttig voor 39 personen en werd door 2 gebruikers gemiddeld met 4.5 sterren beoordeeld
Pagina 1/170

Epson®SureColor®
S40600/S60600/S80600 User's Guide


3
Contents
SureColor S40600/S60600/S80600 User's Guide ...................................................................................... 7
Introduction to Your Printer........................................................................................................................ 8
Notations Used in the Documentation .................................................................................................. 8
Printer Part Locations........................................................................................................................... 8
Product Parts - Front ....................................................................................................................... 9
Product Parts - Right Side ............................................................................................................. 10
Product Parts - Inside .................................................................................................................... 11
Product Parts - Back...................................................................................................................... 12
Control Panel................................................................................................................................. 13
Consumables and Replacement Parts............................................................................................... 17
Printer Usage Guidelines ................................................................................................................... 18
Using Your Printer ......................................................................................................................... 19
Handling Ink and Cleaning Cartridges ........................................................................................... 20
Handling Media.............................................................................................................................. 21
Storing Your Printer ....................................................................................................................... 22
Media Handling .......................................................................................................................................... 23
Media Handling Precautions .............................................................................................................. 23
Loading Media.................................................................................................................................... 24
Using the Auto Take-up Reel ............................................................................................................. 38
About the Auto Take-up Reel ........................................................................................................ 38
Attaching the Take-up Roll Core to the Auto Take-up Reel ........................................................... 39
Take Up with the Printable-Side-In ................................................................................................ 43
Take Up with the Printable-Side-Out ............................................................................................ 46
Viewing and Changing Media Settings............................................................................................... 49
Removing Printed Media.................................................................................................................... 50
Printing the Amount of Media Remaining ...................................................................................... 51
Cutting Media ................................................................................................................................ 51
Removing Media From the Auto Take-up Reel.............................................................................. 54
Daily Tasks to Perform Before You Print ............................................................................................ 56
Saving Sets of Media Settings ........................................................................................................... 57

4
Tasks You Can Perform While Printing .............................................................................................. 60
Checking Consumable Status During Printing............................................................................... 61
Adjusting Heating and Drying During Printing................................................................................ 61
Correcting Banding Issues During Printing.................................................................................... 61
Printable Area and Media Size Checking ........................................................................................... 62
Print Start Positions............................................................................................................................ 64
Using the Control Panel Menus................................................................................................................ 68
Accessing the Printer's Menus ........................................................................................................... 68
Media Setup Menu Settings ............................................................................................................... 68
Adjusting Media Feed and Head Alignment................................................................................... 73
Printer Setup Menu Settings .............................................................................................................. 76
Maintenance Menu Settings............................................................................................................... 79
Printer Status Menu Settings.............................................................................................................. 81
Other Settings Menu Settings ............................................................................................................ 81
Maintenance............................................................................................................................................... 83
When to Maintain Your Product ......................................................................................................... 83
Preparing for Maintenance................................................................................................................. 86
Maintenance Supplies ................................................................................................................... 87
Maintenance Precautions.............................................................................................................. 88
Cleaning the Platen Heater and Media Edge Plates........................................................................... 89
Performing Regular Cleaning ............................................................................................................. 91
Using Ink Cleaner .......................................................................................................................... 91
Moving the Print Head for Maintenance......................................................................................... 93
Cleaning Around the Print Head .................................................................................................... 93
Cleaning the Anti-drying Caps ....................................................................................................... 95
Shaking and Replacing Ink Cartridges ............................................................................................. 102
Shaking the Ink Cartridges .......................................................................................................... 103
Replacing the Ink Cartridges ....................................................................................................... 103
Replacing the Waste Ink Bottle ........................................................................................................ 107
Replacing the Maintenance Parts .................................................................................................... 108
Replacing the Media Edge Plates .................................................................................................... 114
Print Head Maintenance................................................................................................................... 120
Checking for Clogged Print Head Nozzles................................................................................... 121

5
Cleaning the Print Head Nozzles................................................................................................. 122
Performing Pre-storage Maintenance .............................................................................................. 123
Changing the Color Mode ................................................................................................................ 124
Cleaning Inside the Front Cover....................................................................................................... 125
Cleaning the Pressure Rollers.......................................................................................................... 126
Applying Carriage Rod Grease......................................................................................................... 128
Used Parts Disposal Guidelines....................................................................................................... 133
Moving or Transporting the Product ..................................................................................................... 135
Prepare to Move the Product ............................................................................................................ 135
Setting Up the Product After Moving ................................................................................................ 136
Solving Problems .................................................................................................................................... 138
Product Status Messages ................................................................................................................ 138
Solving Printer Problems.................................................................................................................. 141
Printer Does Not Turn On ............................................................................................................ 142
LCD Screen Shuts Off ................................................................................................................. 142
After Heater Shuts Off ................................................................................................................. 142
Forgot the Administrator Password ............................................................................................. 142
Red Light Shines Inside the Printer ............................................................................................. 143
Solving Printing Problems ................................................................................................................ 143
Nothing Prints.............................................................................................................................. 143
Cannot Print Over a Network....................................................................................................... 143
Print Head Moves But Nothing Prints .......................................................................................... 144
Printing Continues After Media Roll Empties ............................................................................... 144
Removing Jammed Media........................................................................................................... 145
Solving Print Quality Problems......................................................................................................... 148
Nozzle Check Pattern Prints Incorrectly ...................................................................................... 148
Overall Print Quality Is Poor ........................................................................................................ 148
Image is not Positioned Correctly on the Media........................................................................... 149
Where to Get Help............................................................................................................................ 149
Technical Specifications ........................................................................................................................ 151
Epson Control Dashboard System Requirements............................................................................ 151
Printing Specifications...................................................................................................................... 152
Electrical Specifications ................................................................................................................... 153

6
Environmental Specifications ........................................................................................................... 154
Dimension Specifications ................................................................................................................. 155
Interface Specifications .................................................................................................................... 156
Ink Cartridge Specifications.............................................................................................................. 156
Media Specifications ........................................................................................................................ 157
Safety and Approvals Specifications ................................................................................................ 157
Notices ..................................................................................................................................................... 158
Important Safety Instructions............................................................................................................ 158
General Product Safety Instructions ............................................................................................ 158
Ink Cartridge Safety Instructions.................................................................................................. 160
FCC Compliance Statement............................................................................................................. 161
Software License Terms................................................................................................................... 162
Trademarks ...................................................................................................................................... 169
Copyright Notice............................................................................................................................... 170
A Note Concerning Responsible Use of Copyrighted Materials................................................... 170
Copyright Attribution.................................................................................................................... 170

7
SureColor S40600/S60600/S80600 User's Guide
Welcome to the SureColor S40600/S60600/S80600 User's Guide.
For a printable click PDF copy of guide, this here.

8
Introduction to Your Printer
Refer to these sections to learn more about your printer and this manual.
Notations Used in the Documentation
Printer Part Locations
Consumables and Replacement Parts
Printer Usage Guidelines
Notations Used in the Documentation
Follow the guidelines in these notations as you read your documentation:
• must be followed carefully to avoid bodily injury.Warnings
• must be observed to avoid damage to your equipment.Cautions
• contain important information about your printer.Notes
• contain additional printing information.Tips
Parent topic: Introduction to Your Printer
Printer Part Locations
Check the printer part illustrations to learn about the parts on your printer.
Product Parts - Front
Product Parts - Right Side
Product Parts - Inside
Product Parts - Back
Control Panel
Parent topic: Introduction to Your Printer

9
Product Parts - Front
1 Left maintenance cover
2 Print drying system (included with SC-S60600 and optional for SC-S40600/S80600)
3 After heater
4 Tension bar
5 Takeup reel roll core holder
6 Takeup roll support
7 switchAuto
8 switchManual
9 Ink cartridges
10 Ink cartridge lock levers
11 Cartridge check light
12 Right maintenance cover
13 Media loading lever
14 Alert light

10
15 Control panel
16 Air filters
17 Front cover
Parent topic: Printer Part Locations
Product Parts - Right Side
1 Airflow vents
2 Waste ink tube
3 Waste ink bottle
12
6 Caps (one set for SC-S40600 and two sets for SC-S60600/S80600)
7 Wiper unit
8 Flushing pad
Parent topic: Printer Part Locations
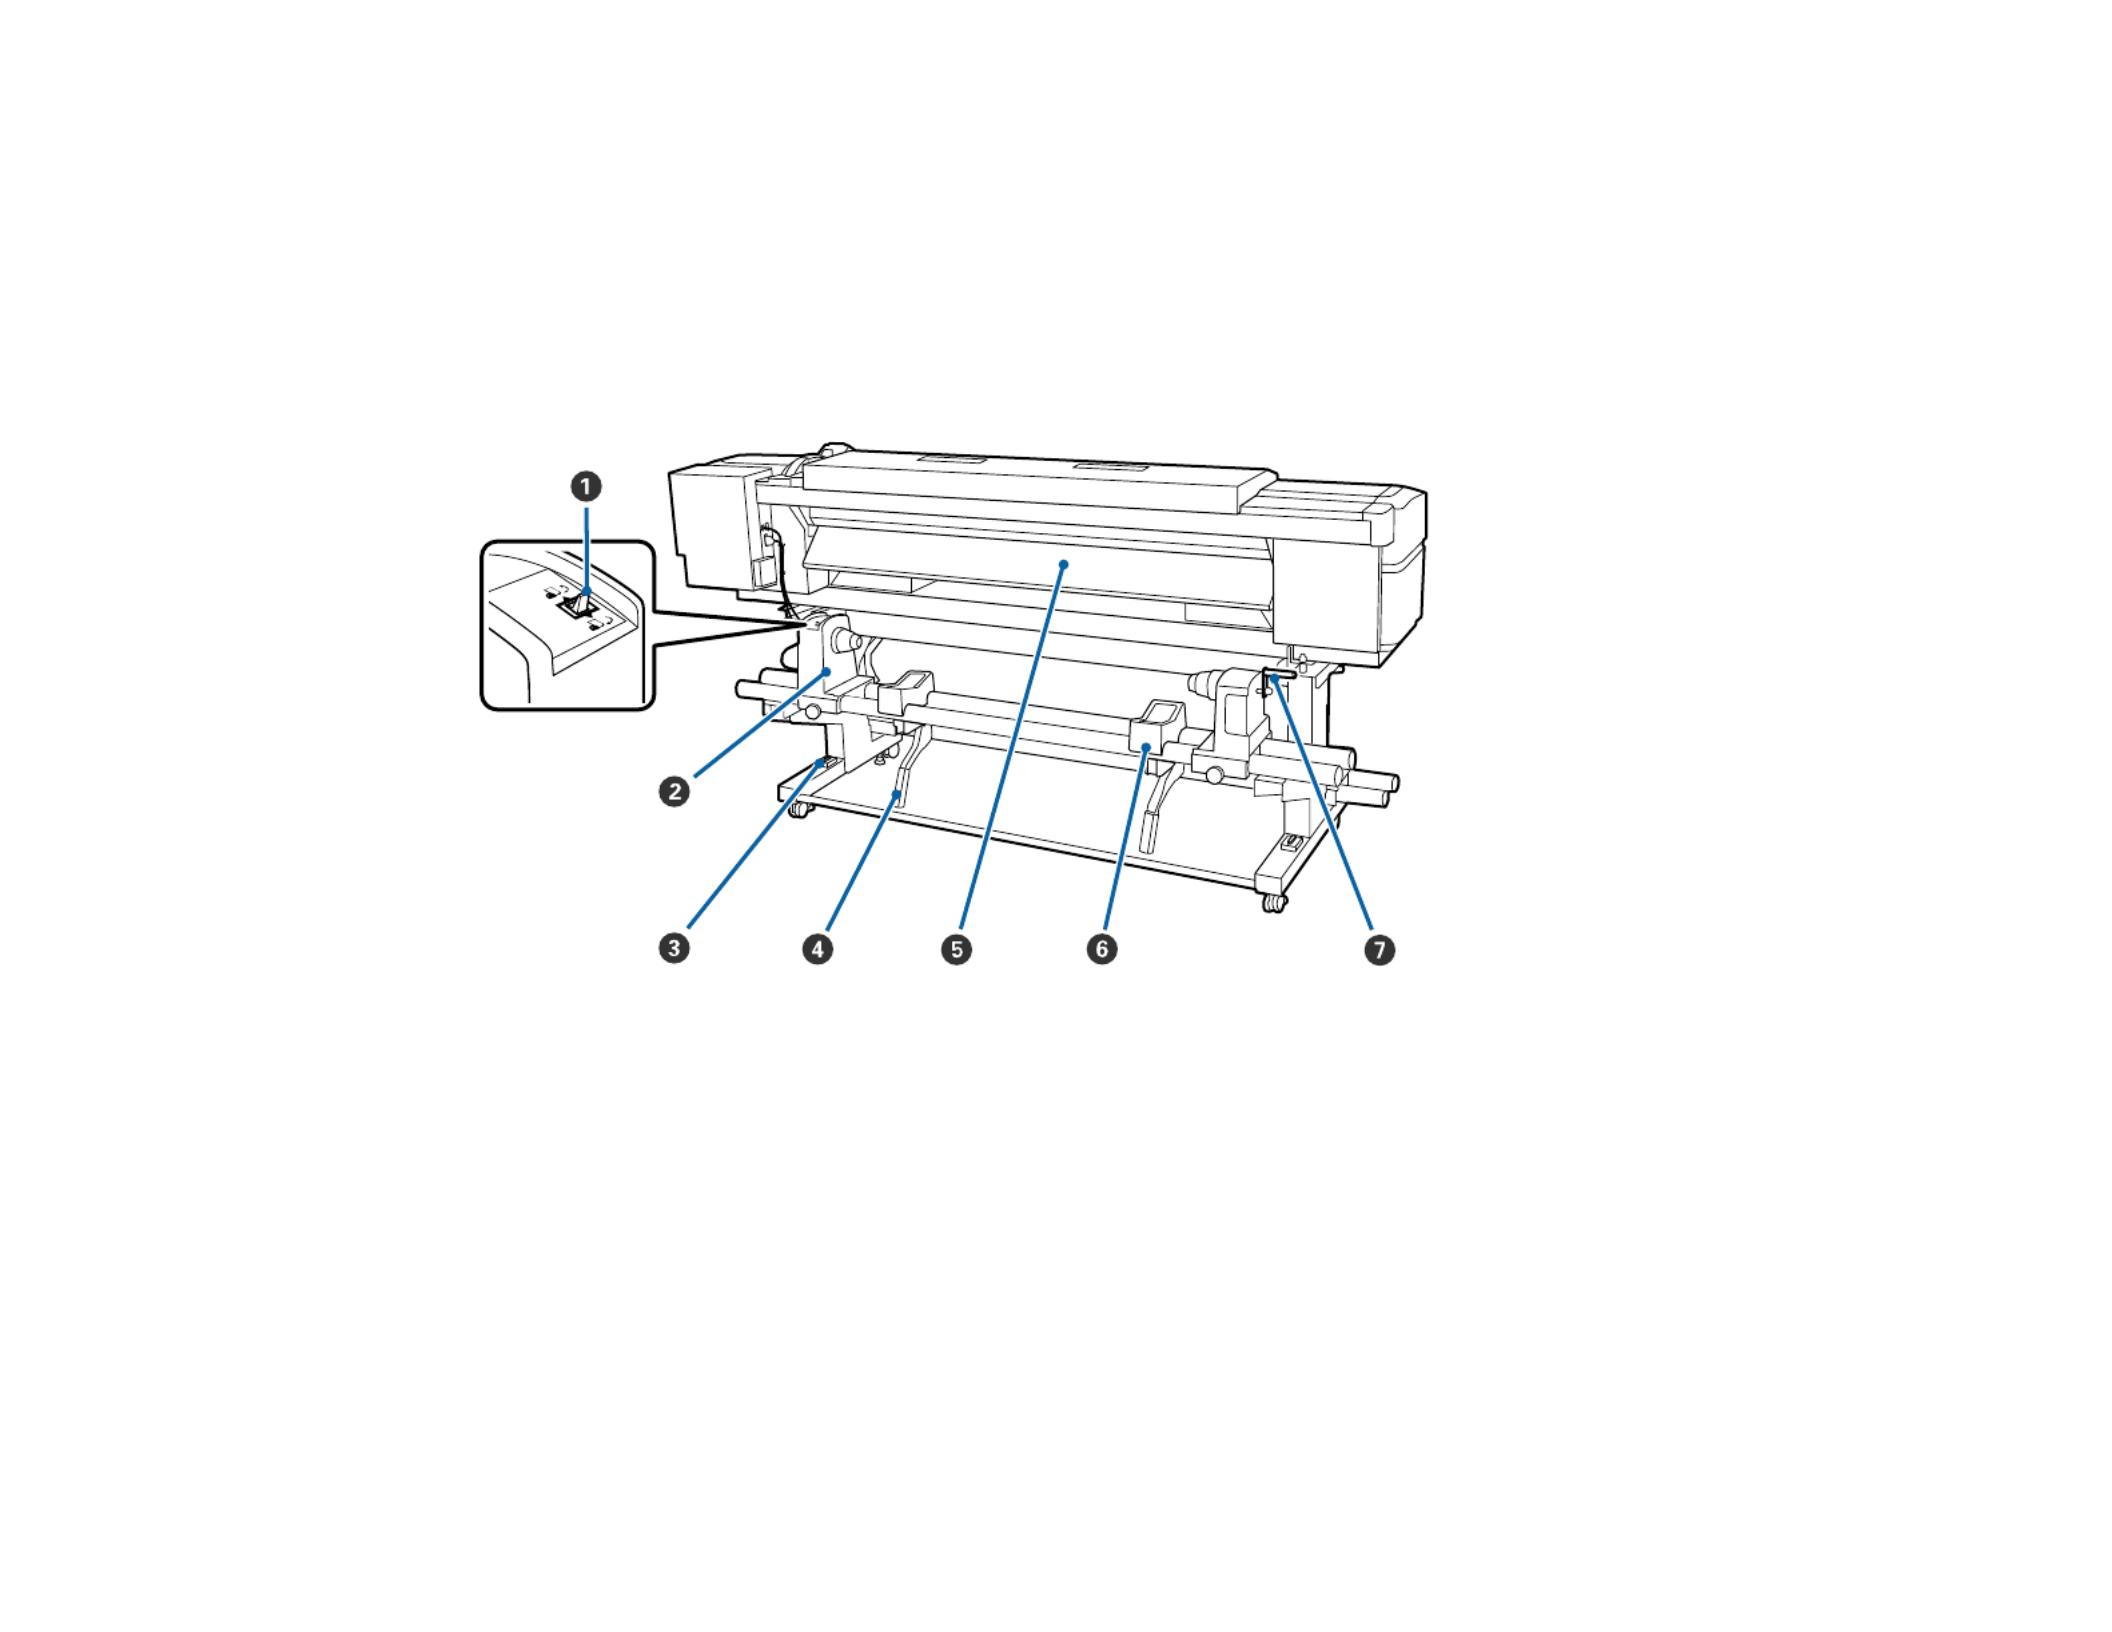
Product Parts - Back
1 Drive switch
2 Roll holder
3 Level gauge
4 Lift lever
5 Pre-heater
6 Roll support
7 Handle
Parent topic: Printer Part Locations
13
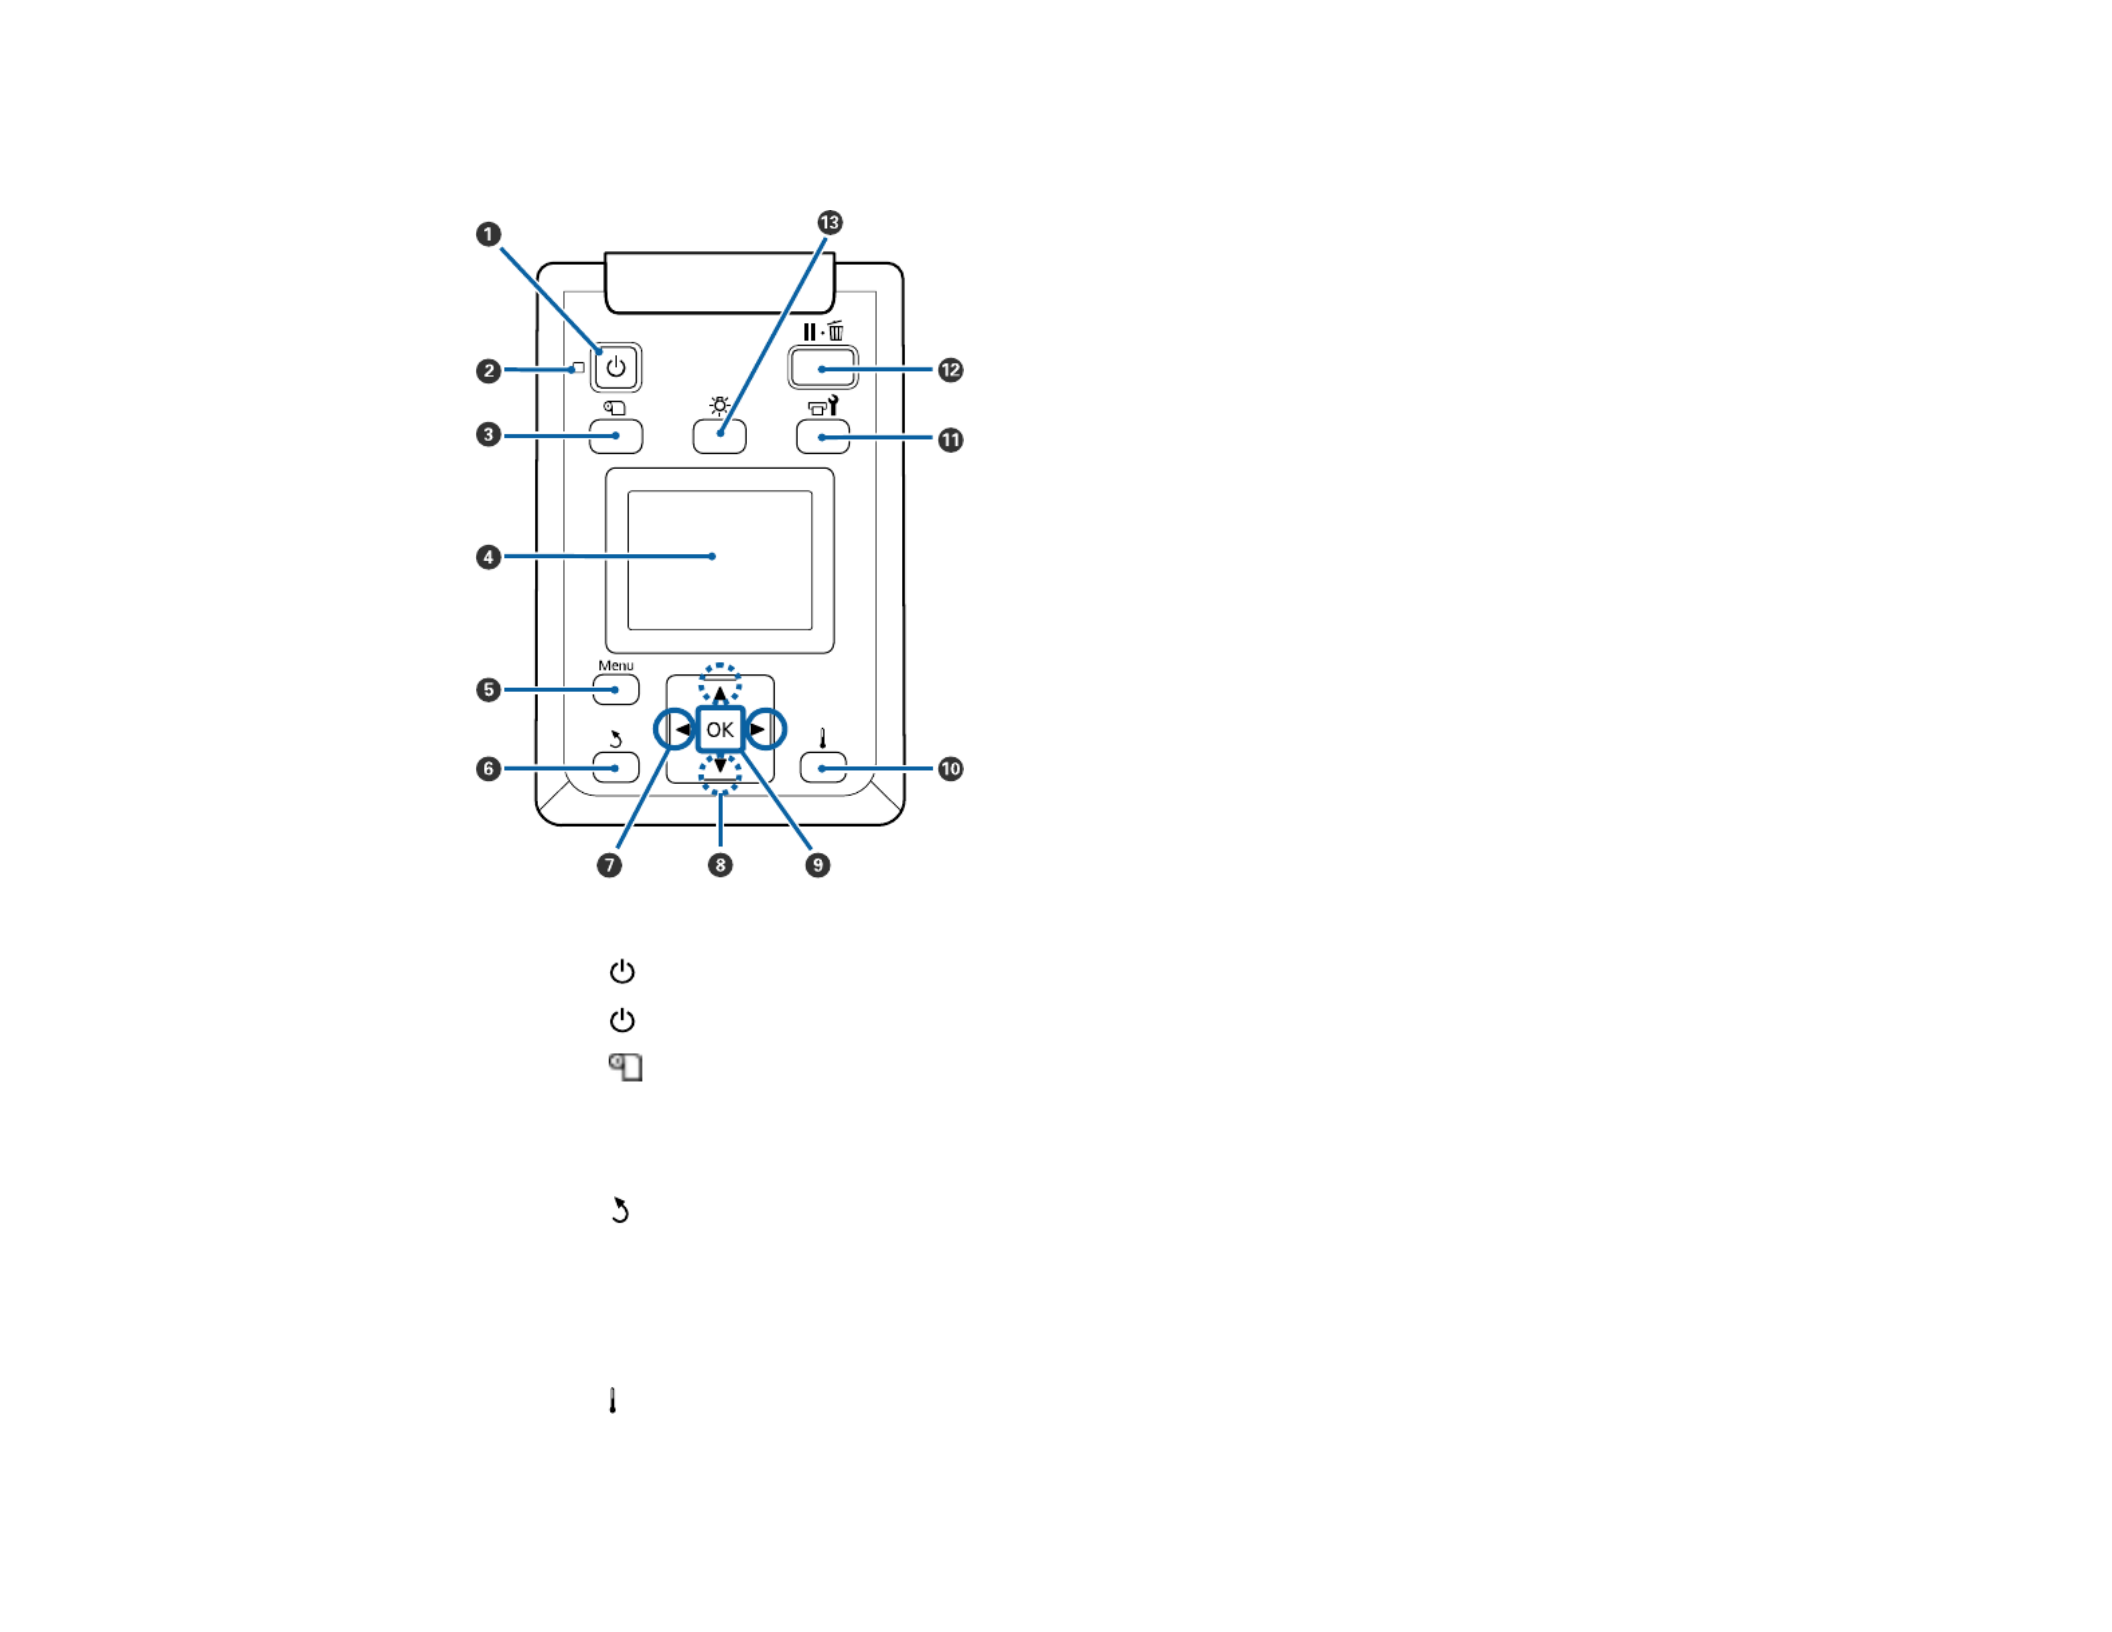
Control Panel
1The power button
2 The power light
3 The media setup button
4 LCD screen
5 The buttonMenu
6 The back button
7 The left and right arrow buttons
8 The up and down arrow buttons
9 The buttonOK
10 The heat/dry menu button

14
11 The maintenance button
12 The pause/cancel button
13 The light button
LCD Screen Display
1 Printer status and error messages
2 Heater temperature status
: Heater is at the selected temperature
: Heater has not yet reached the selected temperature
3 Feed adjustment information, if you have entered a value during printing
4 Media information
Displays the number for the selected media, the platen gap setting, the media width, and
media remaining
: Platen gap is 1.6
: Platen gap is 2.0
: Platen gap is 2.5

15
5 Ink cartridge status
Displays the printer status and approximate level of ink remaining
: Ready to print
: Ink is low; make sure you have a replacement ink cartridge handy
: Ink cartridge is expended; replace the ink cartridge
: Ink cartridge is not latched; lower the lock lever
: No ink cartridge installed; insert an ink cartridge and lower the lock lever
: An error occurred; follow the instructions on the LCD screen to clear the error
: A cleaning cartridge is installed
6 Waste ink bottle status
Displays the approximate amount of space remaining in the waste ink bottle
: No error
: Waste ink bottle is almost full; prepare a new waste ink bottle
: Waste ink bottle is full; replace the waste ink bottle

16
7 Wiper unit status
Displays the remaining amount for the wiper
: No error
: Wiper unit is low; prepare a new wiper unit
: Wiper unit is out; replace the wiper unit
: Wiper unit not installed or installed incorrectly
8 Print drying status
Displays the status of the print drying system (optional for SC-S40600)
No icon: Print drying system not installed or installed incorrectly
: Drying fan is on
: Drying fan is off
Parent topic: Printer Part Locations
Related references
Product Status Messages
Related tasks
Replacing the Waste Ink Bottle
Replacing the Maintenance Parts
Related topics
Shaking and Replacing Ink Cartridges
17
Consumables and Replacement Parts
You can purchase genuine Epson ink, paper, and accessories from an Epson authorized reseller. To
find the nearest reseller, visit (U.S.) or (Canada), or call 800-GO-proimaging.epson.com epson.ca
EPSON (800-463-7766).
SureColor S40600/S60600 ink cartridges
Slot Ink color Part number
BK Black T890100
C Cyan T890200
M Magenta T890300
Y Yellow T890400
SureColor S80600 ink cartridges
Slot Ink color Part number
BK Black T890100
C Cyan T890200
M Magenta T890300
Y Yellow T890400
LC Light Cyan T890500
LM Light Magenta T890600
LK Light Black T890700
OR Orange T890800
R Red T890900
WH White T890A00
MS Metallic Silver T890B00
Option or part Part number
Cleaning cartridge T696000

18
Option or part Part number
Maintenance parts kit; includes wiper unit,
flushing pad, air filters, and gloves
C13S210044
Ink cleaner T699300
Waste ink bottle C13T724000
Cleaning sticks C13S090013
Clean room wiper (not available in some
countries)
C13S090016
Print drying system (optional for the SC-
S40600/S80600)
C12C932381
Media edge guide C12C932411
1-year extended Epson Preferred Plus Silver
service plan
EPPS30SB1 (SC-S40600)
EPPS5070SB1 (SC-S60600/S80600)
1-year extended Epson Preferred Plus Gold
service plan
EPPS30GB1 (SC-S40600)
EPPS5070GB1 (SC-S60600/S80600)
1-year extended Epson Preferred Plus Platinum
service plan
EPPS30PB1 (SC-S40600)
EPPS5070PB1 (SC-S60600/S80600)
Parent topic: Introduction to Your Printer
Printer Usage Guidelines
Follow the guidelines in these sections as you use your printer, consumables, and print media.
Using Your Printer
Handling Ink and Cleaning Cartridges
Handling Media
Storing Your Printer
Parent topic: Introduction to Your Printer

19
Using Your Printer
Follow these guidelines as you use your printer:
• Operate the printer only within the specified operating temperature and humidity range for your
product and your media.
• Check to make sure you maintain the specified humidity range, especially in dry areas or air
conditioned environments.
• Keep the printer out of direct sunlight.
• Do not install the printer next to heat sources or directly in the path of exhaust from a ventilator or air
conditioner. Failure to observe this precaution could result in the print head nozzles drying out and
clogging.
• Make sure the product work space is kept free of dust or lint that could damage your product or clog
the print head nozzles.
• Use the product in a sufficiently ventilated area.
• Perform maintenance operations according to usage frequency or at the recommended intervals.
Failure to perform regular maintenance could reduce print quality or damage the print head.
• Do not bend or pull the waste ink tube. Otherwise ink may leak inside or outside the printer.
• Be sure that the waste ink bottle is installed whenever the printer is turned on.
• If an error occurs and the printer is turned off without first resolving the error, the print head may not be
in the home position, which may cause the print head to dry out. In this case, turn on the power and
wait until the carriage is in the home position.
• When the printer is on, do not disconnect the power cable or cut the power at the circuit breaker. The
print head may not be in the home position. In this case, turn on the power and wait a while until the
print head is in the home position.
Note: To keep the print head in the optimum operating condition, ink is used in maintenance operations
such as head cleaning in addition to printing.
Parent topic: Printer Usage Guidelines
Related references
When to Maintain Your Product
Environmental Specifications
20
Handling Ink and Cleaning Cartridges
Follow these guidelines as you handle the ink and cleaning cartridges:
• Extra ink is required to charge the print head nozzles the first time the printer is used. Be sure to have
replacement cartridges ready.
• Store ink cartridges at room temperature and away from direct sunlight.
• To ensure print quality, use ink cartridges before the expiration date printed on the packaging or within
6 months of install them.
• Allow ink cartridges and cleaning cartridges that have been stored at low temperatures for an
extended period of time to return to room temperature over a period of four hours before use.
• Do not touch the IC chips on the cartridges. Doing so may prevent normal operation and printing.
• Install ink cartridges into all the slots on the printer or the printer cannot print.
• Do not leave the printer without cartridges installed in all the slots, even when the printer is not in use.
The ink in the printer may dry out, preventing it from printing as expected.
• The IC chip on each cartridge stores information, such as ink levels, to allow the cartridge to be used
after being removed and re-installed.
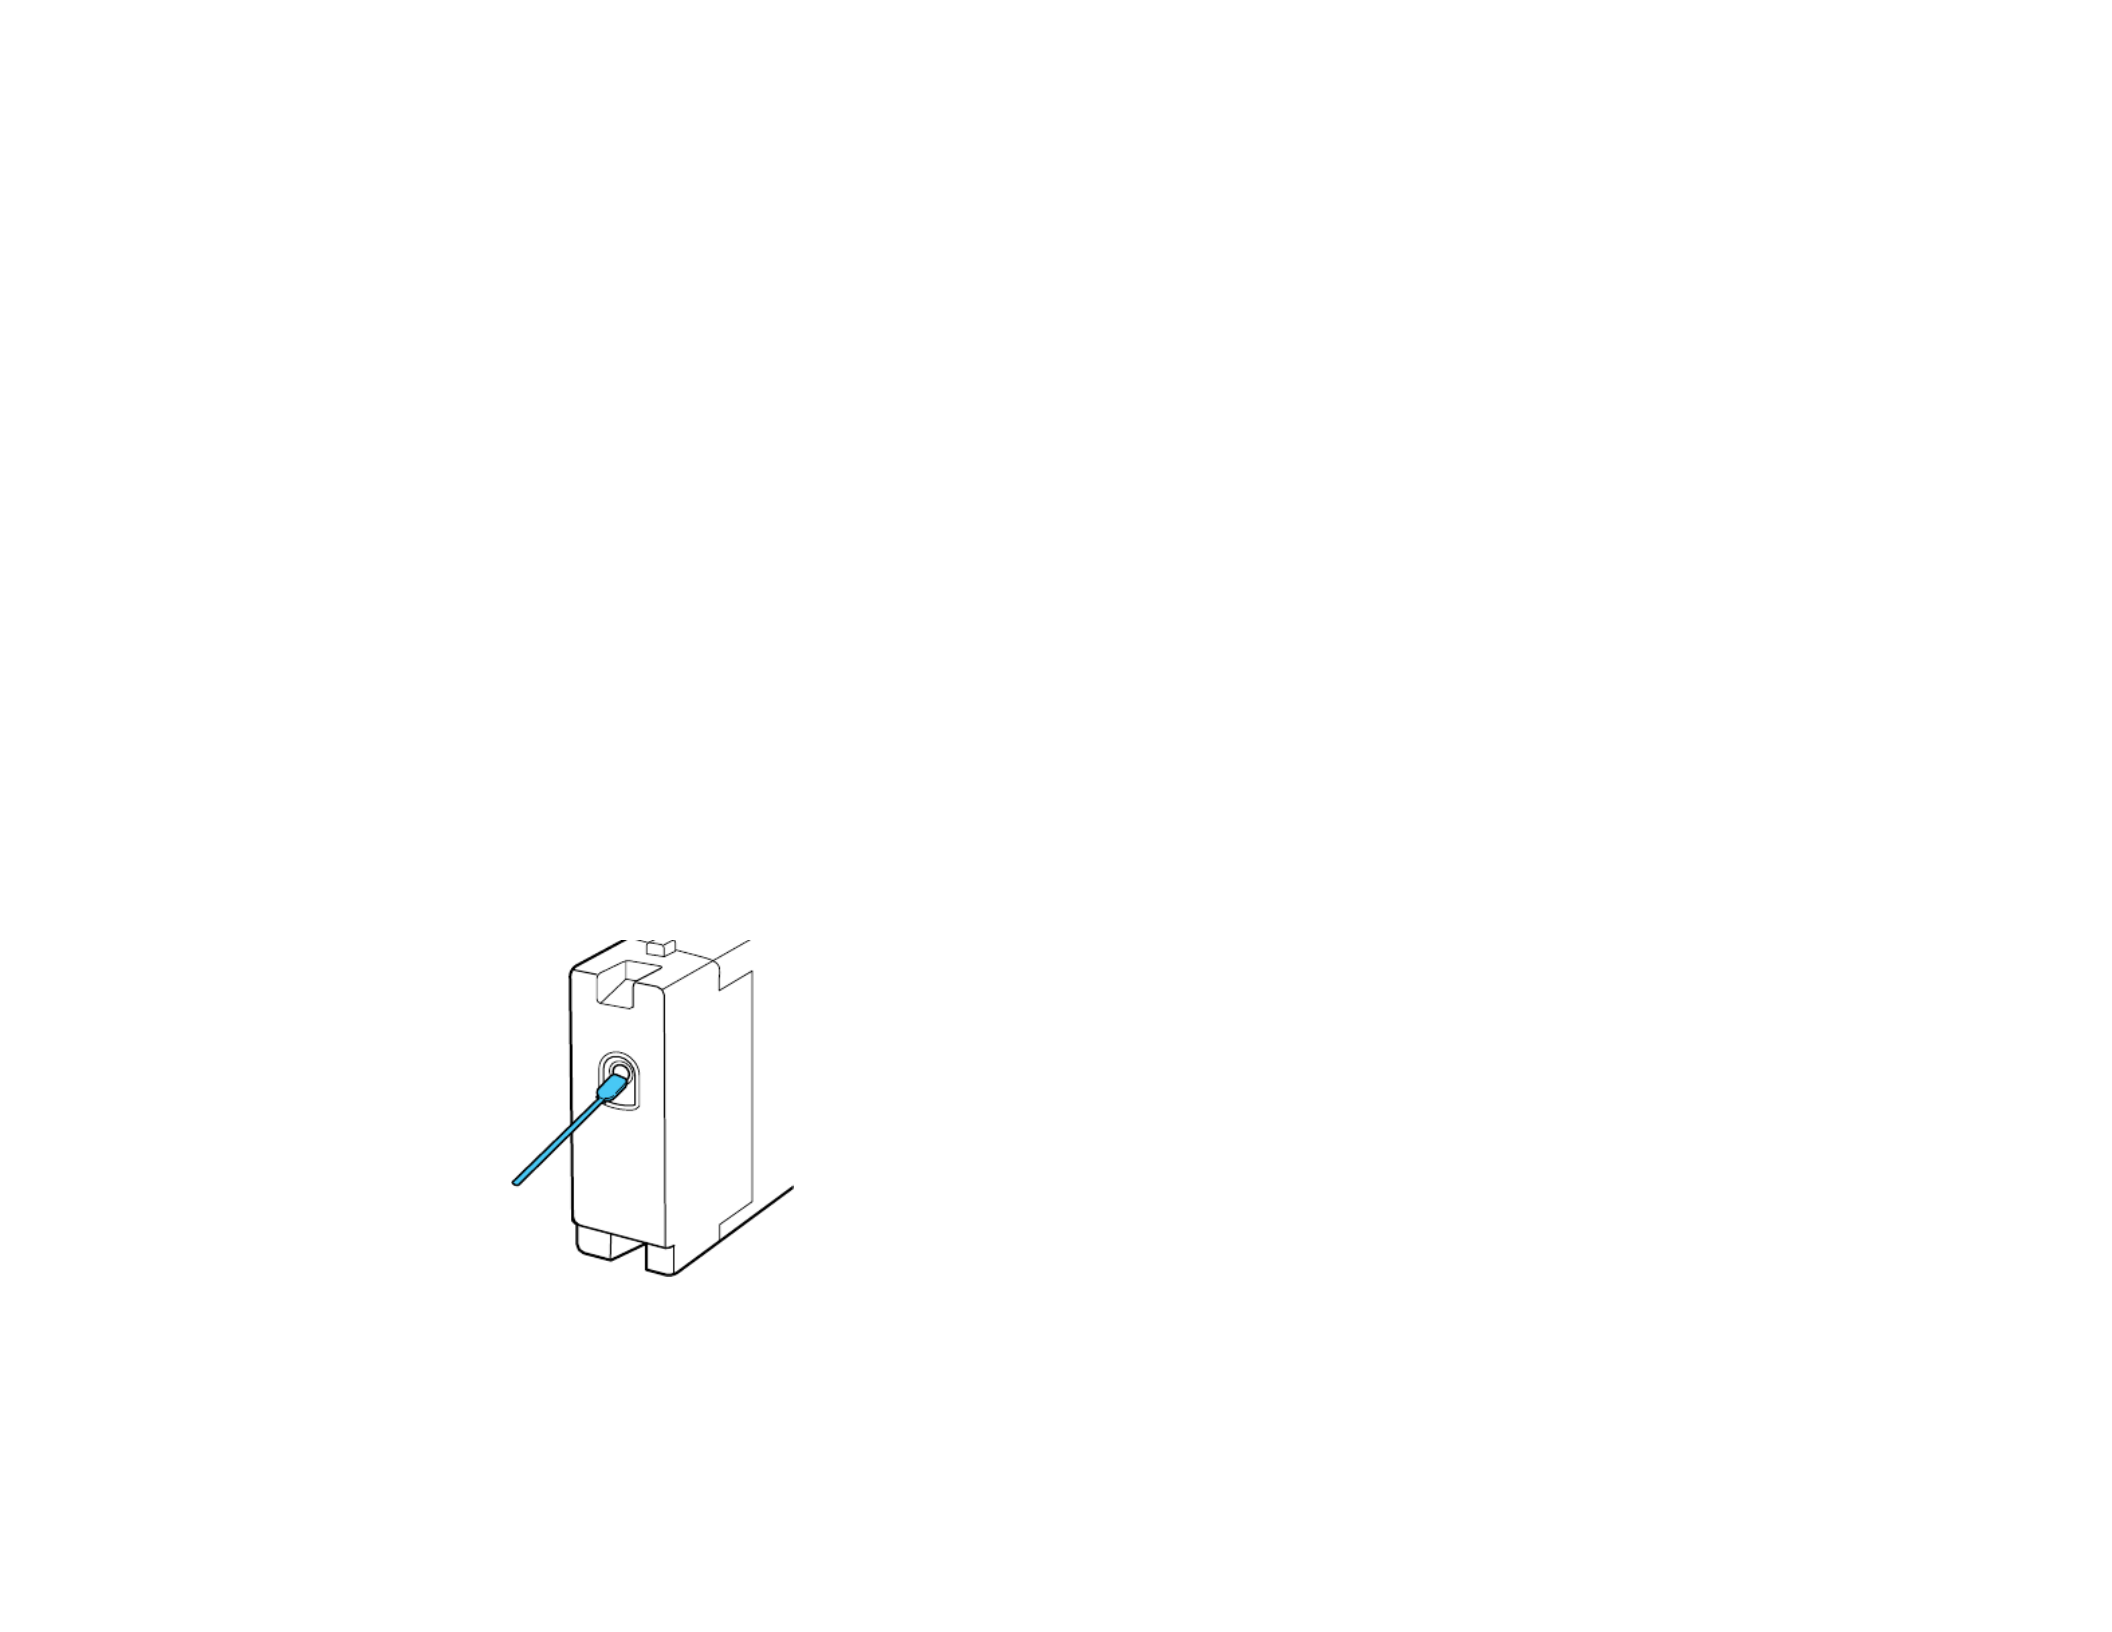
• If you remove an ink cartridge before it is empty, wipe off any ink from the ink supply port using the
cleaning stick in the maintenance kit. If ink dries on the supply port, the cartridge may leak when it is
reinstalled. Also make sure that the supply port is free of dust when storing cartridges (the port does
not need to be capped since there is a valve inside).
• Removed ink cartridges may have ink around the ink supply port, so be careful not to stain any
surfaces with ink.
• Do not dismantle or remodel ink cartridges. You may not be able to print properly.

22
• After printing, do not touch, rub, or scratch the printed surface to avoid removing the ink.
• Dry printed media completely before folding or stacking it, or the printed surface may be damaged.
• Keep printed media out of direct sunlight.
• Display and store printed media as instructed in the media documentation.
• When you are not printing on media, remove it from the printer and place it in its original packaging to
prevent deterioration.
Parent topic: Printer Usage Guidelines
Related topics
Removing Printed Media
Storing Your Printer
Follow these guidelines if you need to store your printer for a long period:
• If the printer is not going to be used for an extended period of time with the power off, wash the print
heads with cleaning cartridges (not included) and perform pre-storage maintenance. If you are unable
to wash the print heads with cleaning cartridges and perform pre-storage maintenance, turn on the
printer at least once every seven days to automatically clean the print head and prevent the nozzles
from clogging.
• Remove any loaded media before storing the printer to prevent the pressure rollers from causing
creases in the media, which may cause jams or damage to the print head.
• Make sure that the print head is in the home position before storing the printer. If it is left away from the
home position for a long time, the print quality may decline.
• Close all the covers on the printer to prevent dust and debris from getting in. If the printer will be not be
used for an extended period of time, protect it with an anti-static cloth or other cover. The print head
nozzles can become clogged if fine dust gets on the print head, and you may not be able to print
properly.
• Store the printer on a level surface; do not store it on angle, on its end, or upside down.
Parent topic: Printer Usage Guidelines
Related references
Where to Get Help
Related topics
Removing Printed Media

23
Media Handling
See these sections to load and handle media on your product.
Media Handling Precautions
Loading Media
Using the Auto Take-up Reel
Viewing and Changing Media Settings
Removing Printed Media
Daily Tasks to Perform Before You Print
Saving Sets of Media Settings
Tasks You Can Perform While Printing
Printable Area and Media Size Checking
Print Start Positions
Media Handling Precautions
Follow these guidelines as you load media in your product and remove printed media.
• Be careful when you touch the heaters and media holding plates; they may be hot and could burn you.
• Take care not to trap your fingers when opening and closing the front cover.
• Do not rub your hands along the edges of the media; the sharp edges could cut you.
• Media is very heavy, so use at least two people to carry the rolls.
• Load media just before printing on it to avoid creases from the pressure rollers; creases may cause
jams or cause the media to rub against the print head.
• Do not place unwrapped media directly on the floor or press it against your clothing to avoid damaging
the media surface.

24
• Place unused media is its original packaging for storage.
• Do not load media if the edges are uneven on the roll; this could cause feeding problems. Rewind the
media on the roll or use a different roll.
Parent topic: Media Handling
Loading Media
Before loading media in your printer, review and follow the media handling guidelines for the best results.
To remove media, follow the steps in this section in reverse.
Caution: Wait until just before printing to load media. This avoids creases in the media that may be
caused by the pressure rollers. Creased, wavy, or curled media could cause it to jam inside the printer or
contact the print head.
1. Press the power button and wait until you see this message on the LCD screen: .Load media

25
2. Open the front cover and raise the media loading lever.
3. Grasp the tabs on the media holding plates and slide them out of the way.
26
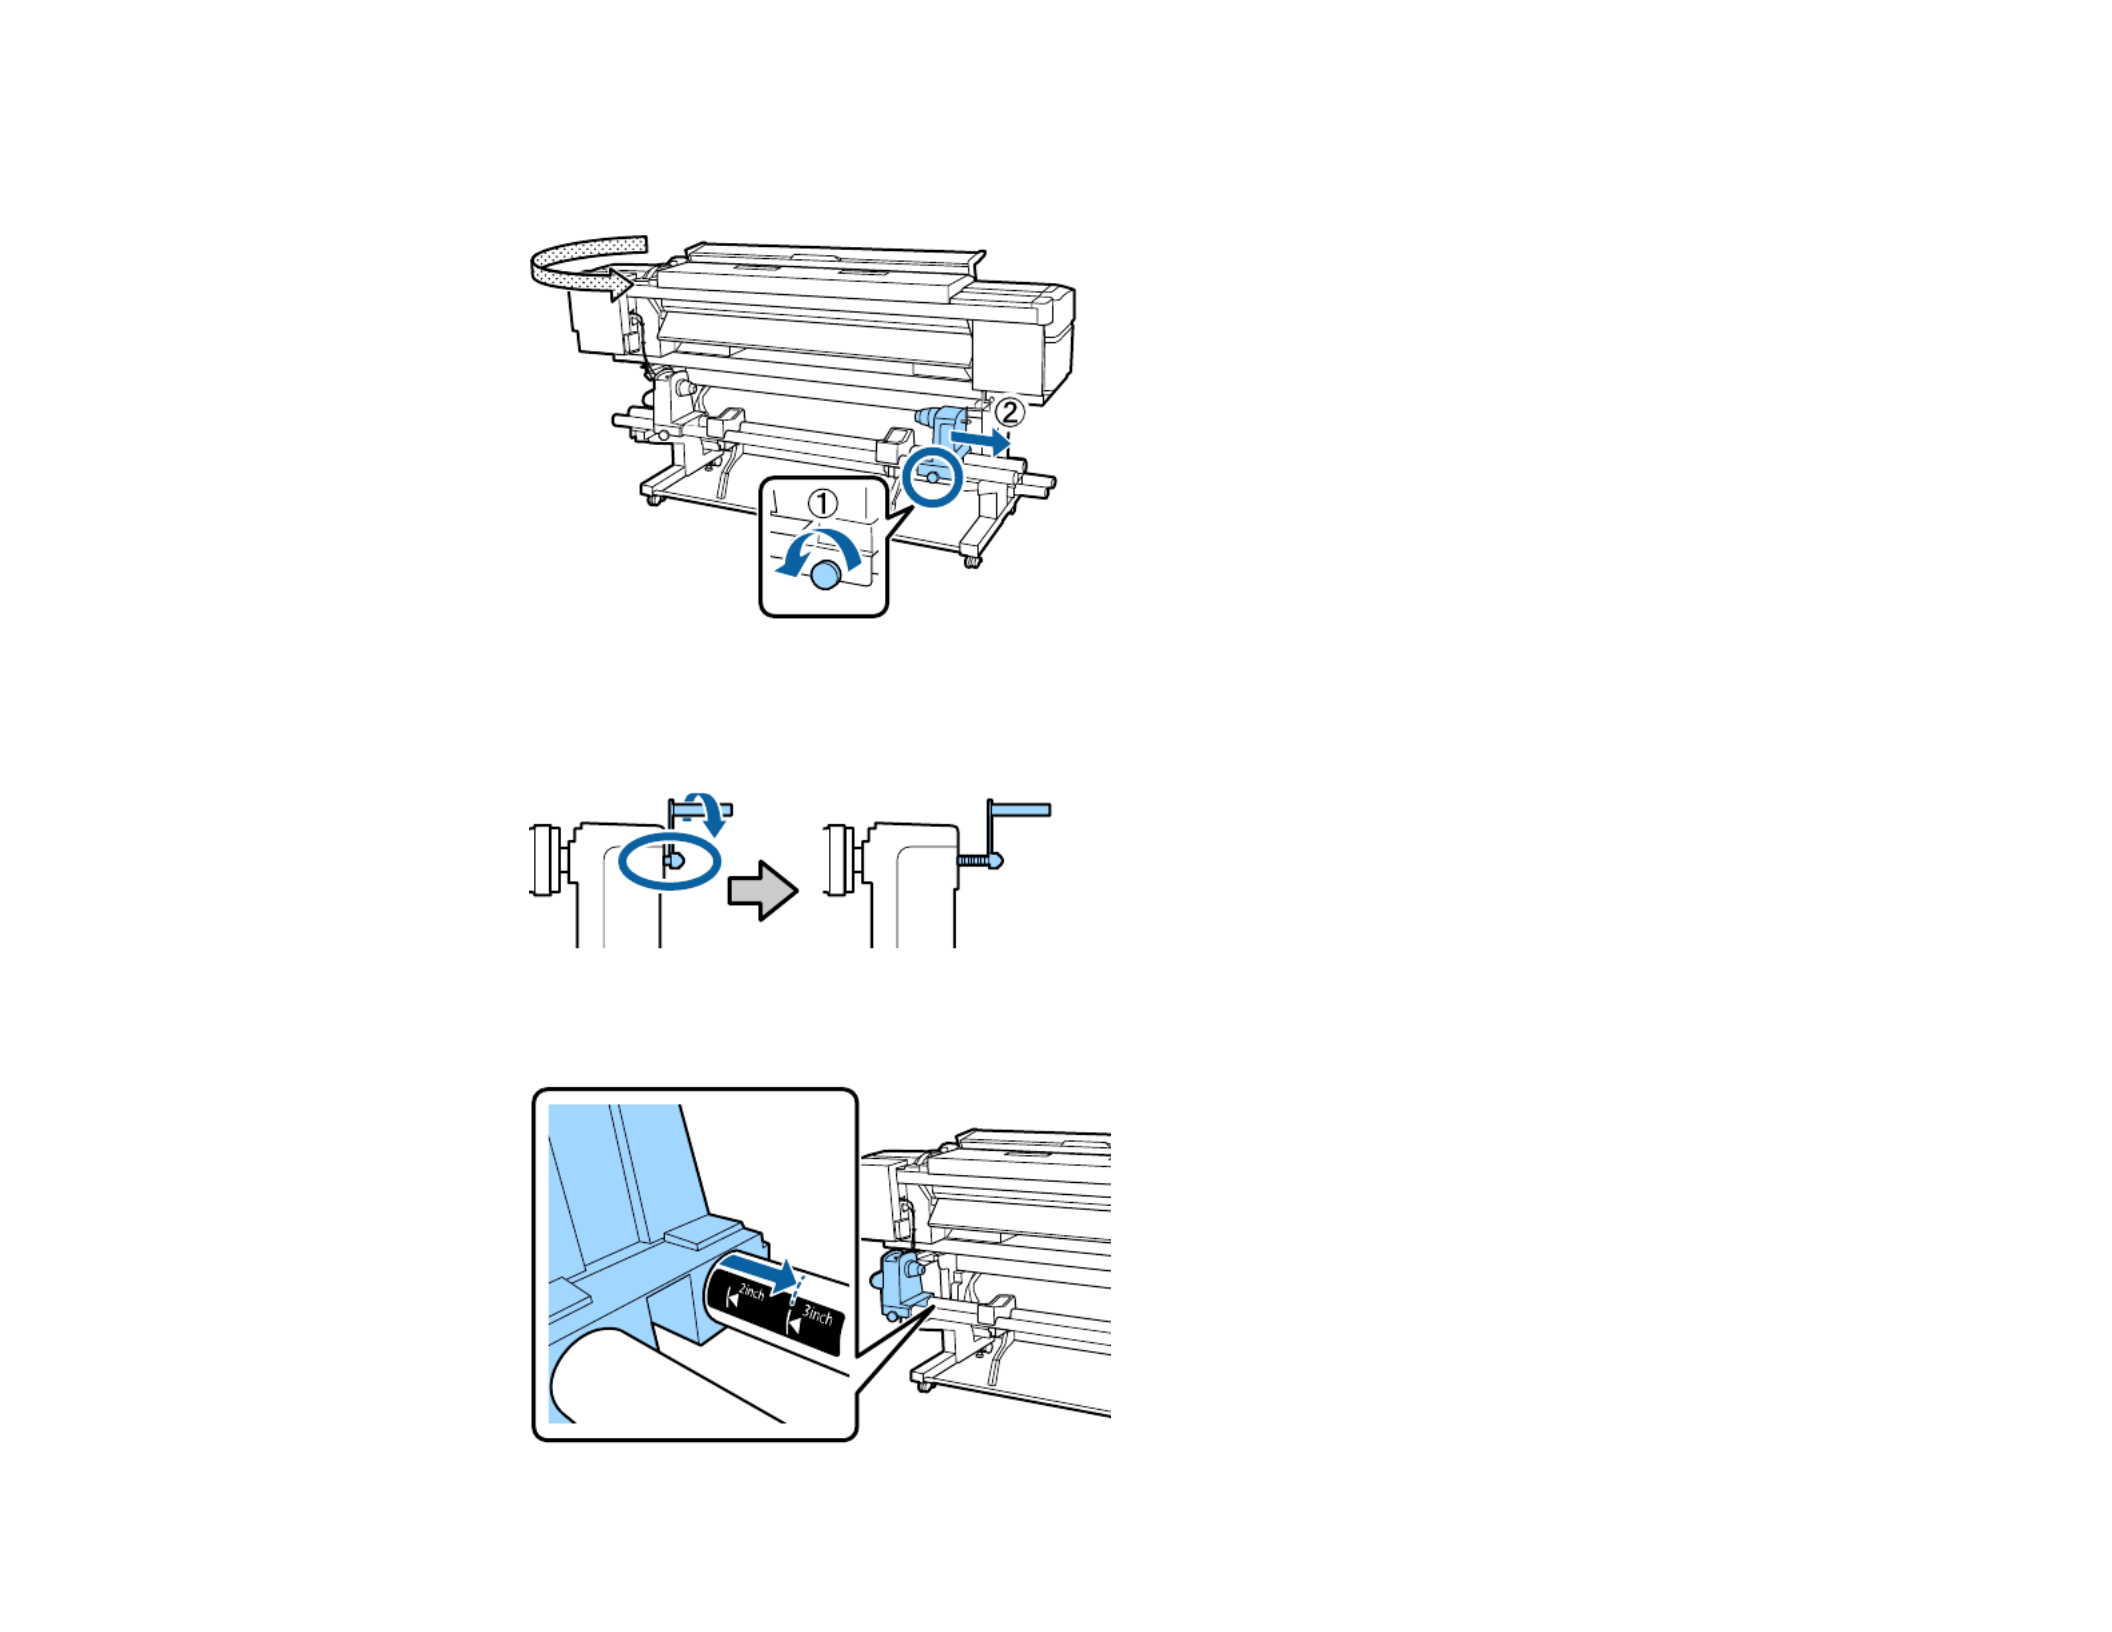
4. On the back of the product, loosen the knob for the right roll holder and slide out the roll holder wider
than your media width.
Note: If the right holder handle shaft is not visible, rotate the handle counterclockwise until it stops or
the media cannot load properly.
5. Slide the left roll holder to the core size for the media you are loading.

27
6. Fully tighten the knob on the left roll holder.
7. Place your media on the roll supports.
Note: Load the roll based on the printable side of your media.
Printable side out
28
Printable side in
8. On the left side of the product, raise the lift lever to lift the media into position.

29
9. Firmly insert the roll media onto the left roll holder, then lower the lift lever.
Note: If the outer diameter of the roll media is less than 5.5 inches (140 mm), you need to manually
lift the roll media onto the roll holder.
10. On the right side of the product, raise the lift lever to lift the media into position.

30
11. Push the right roll holder into the roll media, then lower the lift lever.

31
12. Push the center of the roll holder twice to securely insert it into the roll core.
Note: Make sure the roll holder is fully inserted into the roll core or media may not feed correctly and
slip during printing, or cause banding in your printouts.

33
14. Rotate the roll holder handle clockwise until part A shown here is hidden from view, then stop turning
the handle.

34
15. Insert your media approximately 12 inches (30 cm) into the opening shown here and lower the media
loading lever.
16. At the front of the printer, hold the media in the center and raise the media loading lever.

37
20. Slide the media edge plates against the media and adjust them so that the round holes shown here
are centered over the edges of the media.
Caution: If your media is more than 0.02 inch (0.4 mm) thick, leave the media holding plates on the
sides of the product or they could damage the print head.
Note: Make sure to correctly position the media holding plates as shown here or your printouts may
contain banding, uneven tint, or stripes. Do not use the media holding plates if the sides of your
printouts are smudged or torn.

41
4. Insert the roll core into the right roll core holder.
5. Push the left roll holder until part A is fully inserted into the roll core, then tighten the knob.
Caution: Once part A is hidden, do not push the roll holder any further or you may damage the roll
core holder.

42
6. Trim the left and right corners of the media, leaving a straight section at the center about 4 to 8
inches (10 to 20 cm) wide.
1 10 inches (25 cm)
2 4 to 8 inches (10 to 20 cm)
Parent topic: Using the Auto Take-up Reel
Related tasks
Take Up with the Printable-Side-In
Take Up with the Printable-Side-Out

43
Take Up with the Printable-Side-In
After attaching the roll core on the auto take-up reel, follow these steps to take up media with the
printable side in.
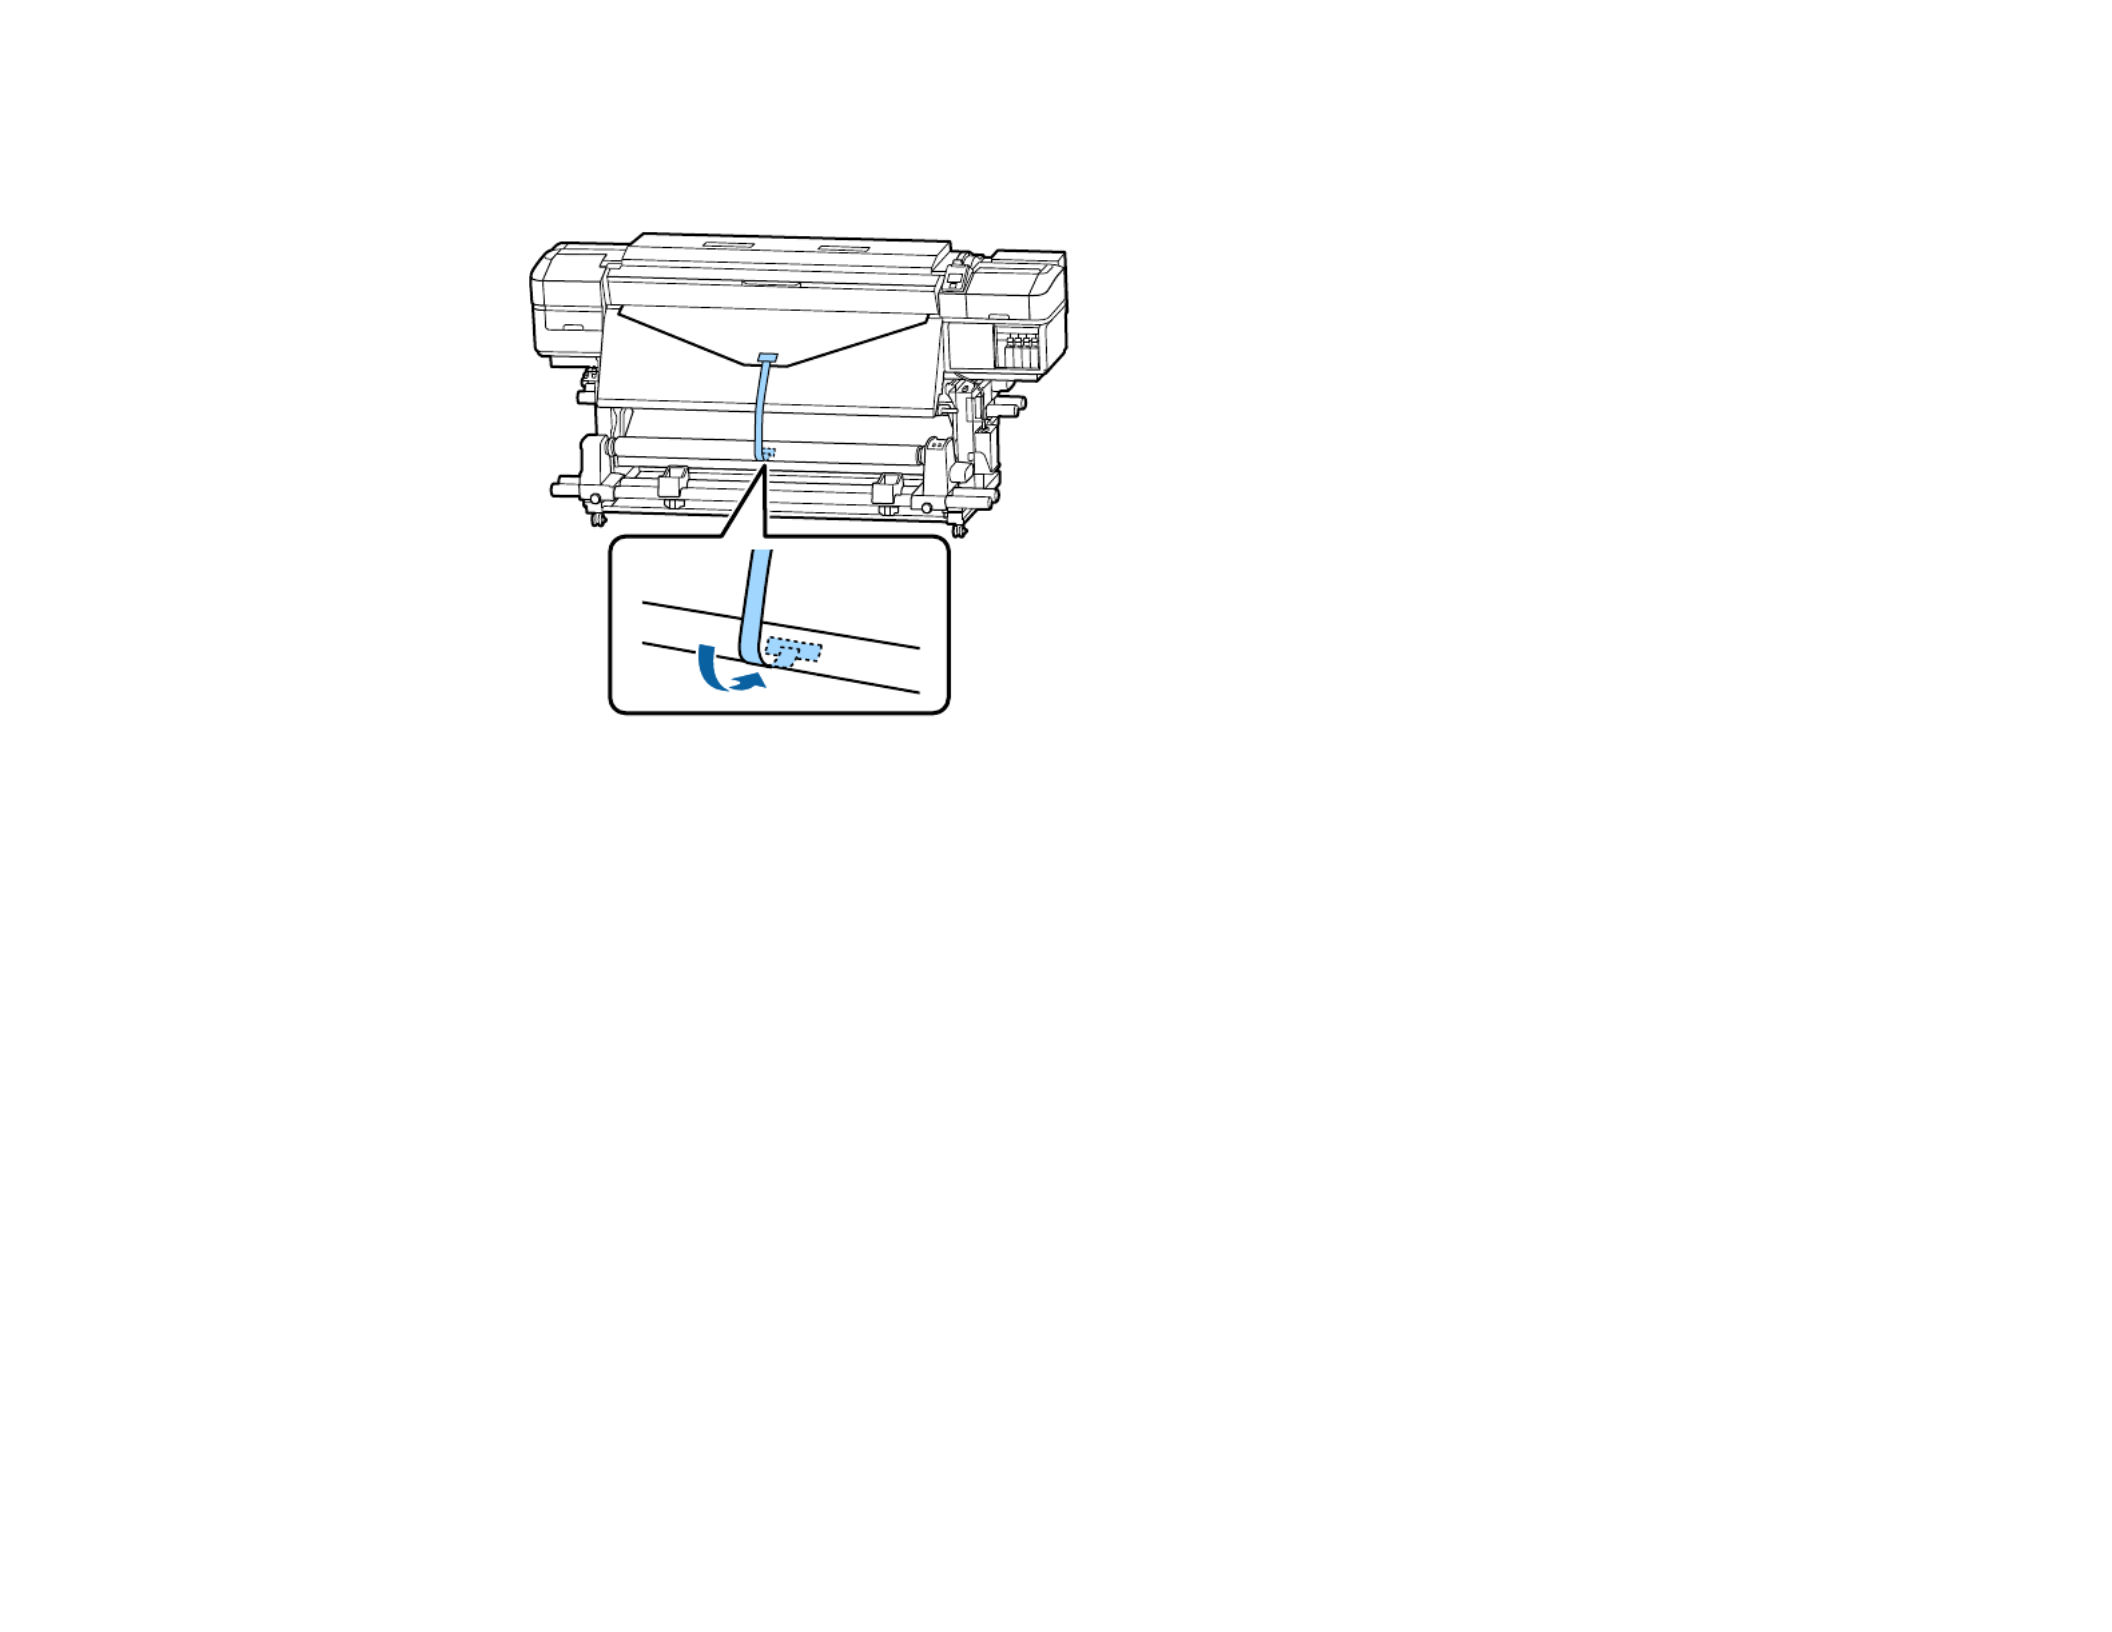
1. Cut a strip about 27.6 inches (70 cm) long from the included paper tape and attach one end to the
center of the media using adhesive tape.
1 27.6 inches (70 cm)
Note: You can also use commercially available tape or strips cut from media to attach your media to
the roll core. The paper tape or cut media strip should be about 0.8 to 1 inch (20 to 25 mm) wide and
27.6 inches (70 cm) long.

45
3. Set the switch to the position.Auto
4. Lower the tension bar until it lightly touches the paper tape.

46
Note: Make sure the media is taut; otherwise it may not be taken up correctly.
Parent topic: Using the Auto Take-up Reel
Take Up with the Printable-Side-Out
After attaching the roll core on the auto take-up reel, follow these steps to take up media with the
printable side out.
1. Cut a strip about 27.6 inches (70 cm) long from the included paper tape and attach one end to the
center of the media using adhesive tape.
1 27.6 inches (70 cm)
Note: You can also use commercially available tape or strips cut from media to attach your media to
the roll core. The paper tape or cut media strip should be about 0.8 to 1 inch (20 to 25 mm) wide and
27.6 inches (70 cm) long.
47
2. Pull the other end of the tape straight down and attach it to the roll core using adhesive tape as
shown.

48
3. Set the switch to the position.Auto
4. Lower the tension bar until it lightly touches the paper tape.
49
Note: Make sure the media is taut; otherwise it may not be taken up correctly.
Parent topic: Using the Auto Take-up Reel
Viewing and Changing Media Settings
After you load media in your product, you can select your saved media settings on the product control
panel.
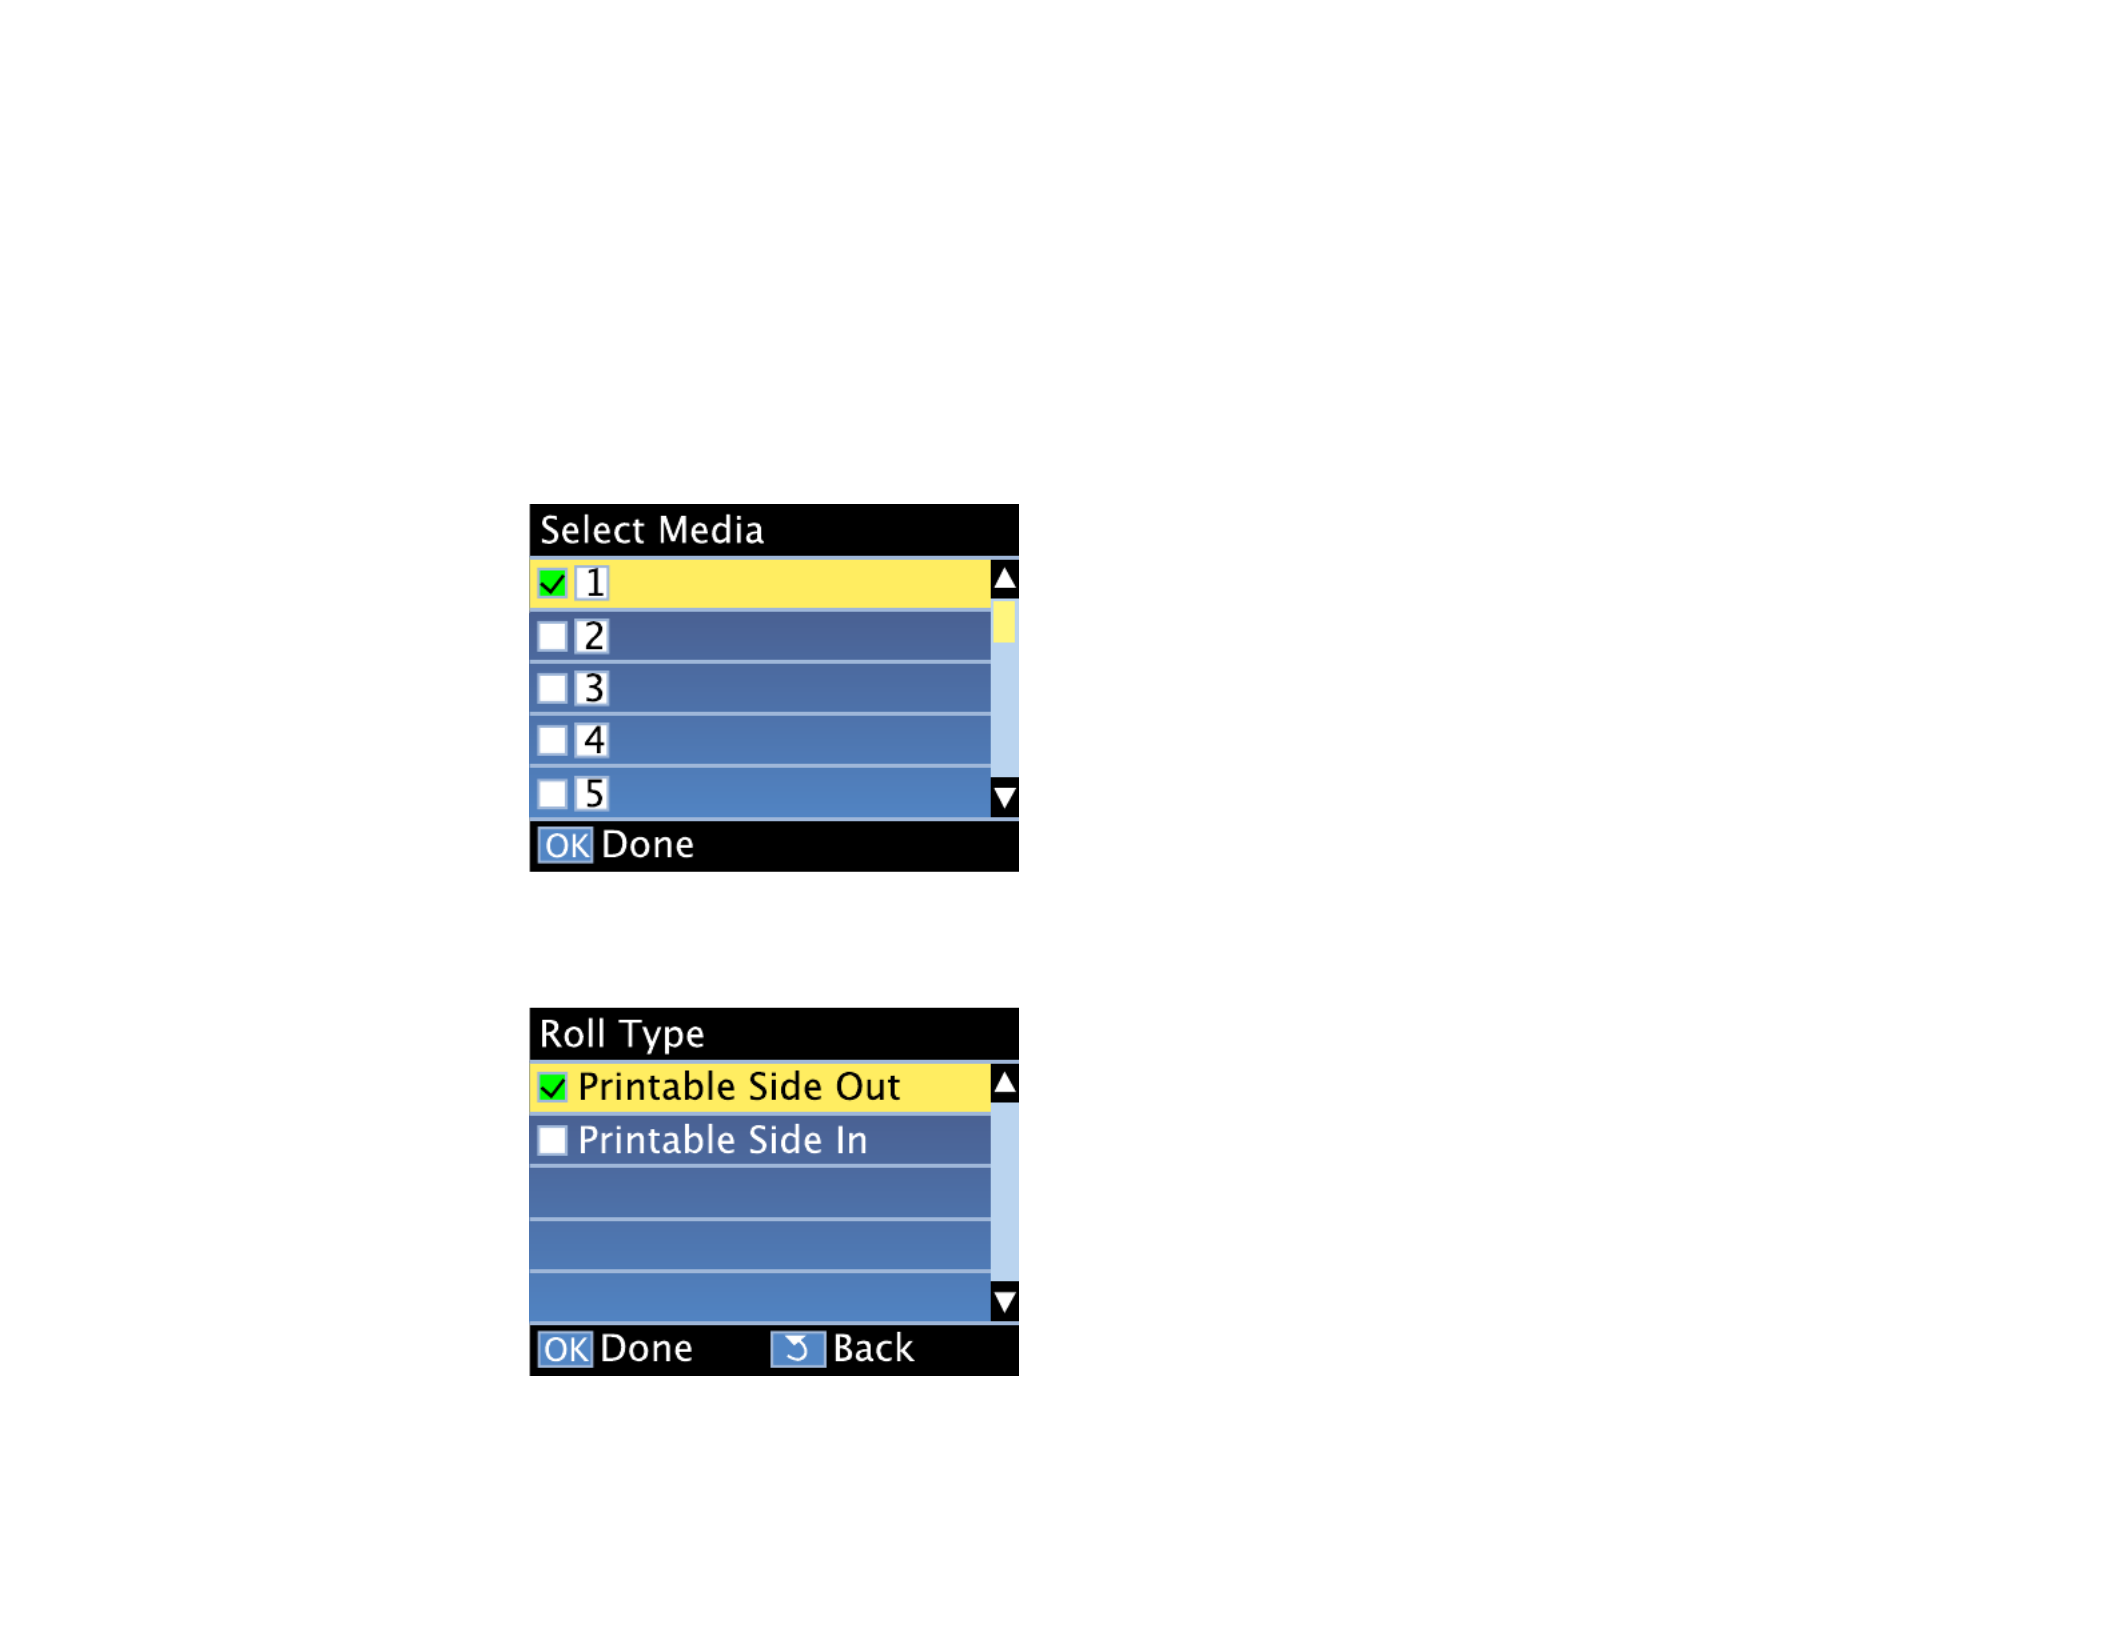
1. Press the up or down button to select the media setting number for the media you loaded and press
the button.OK
2. Press the up or down button to select the roll type you loaded and press the button.OK

50
3. Press the up or down button to select the length of the roll you loaded and press the button.OK
If you turned on the setting, you see a prompt to enter the length of the currentRemaining Setting
media.
Parent topic: Media Handling
Related references
Media Setup Menu Settings
Related tasks
Saving Sets of Media Settings
Removing Printed Media
See these sections to remove the printed roll from your product.
Printing the Amount of Media Remaining
Cutting Media
Removing Media From the Auto Take-up Reel
Parent topic: Media Handling
Related references
Used Parts Disposal Guidelines

51
Printing the Amount of Media Remaining
After you print, you can print the amount of media remaining on the leading edge of the remaining roll.
This lets you enter the number the next time you load the media for the most accurate accounting of the
media remaining on each roll
Note: Remaining SetupYou must have turned on the setting on the product control panel to calculate
the amount of media remaining.
1. Make sure your product is ready to print.
2. Press the media setup button, select in the displayed menu, and press theMedia Remaining OK
button.
3. Select and press the button.Print Remaining Length OK
4. Press the button to print the amount of media remaining.OK
Parent topic: Removing Printed Media
Related references
Media Setup Menu Settings
Cutting Media
When you finish printing, use a commercially available cutter to cut the media.
Warning: Be careful not to cut yourself when using cutters or other sharp blades. Also be careful
touching areas near the after heater since the after heater may be hot and you could be burned.
1. Press the media setup button.

52
2. Select and press the button. The printer feeds the media to the cuttingFeed To Cut Position OK
position (cutter groove).
Note: If you printed the amount of media remaining onto your media, press the up arrow button to
rewind the media as necessary to keep this information with the unprinted roll.

53
3. If you are using the auto take-up reel, raise the tension bar.
4. Use your cutting tool to cut the media along the cutting groove.
Warning: Do not place your fingers in the path of the cutting tool to avoid injuring yourself.

54
5. Do one of the following:
• If you are not using the auto take-up reel, skip the remaining step.
• If you are using the auto take-up reel, go to the next step.
6. Set the switch to , then set the switch to take up the cut media onto the take-up reel,Auto off Manual
depending on the printable side of the media:
• Move the switch to the position for printable-side-out media.
• Move the switch to the position for printable-side-in media.
Parent topic: Removing Printed Media
Removing Media From the Auto Take-up Reel
After printing on media loaded on the auto take-up reel, follow these steps to remove it.

55
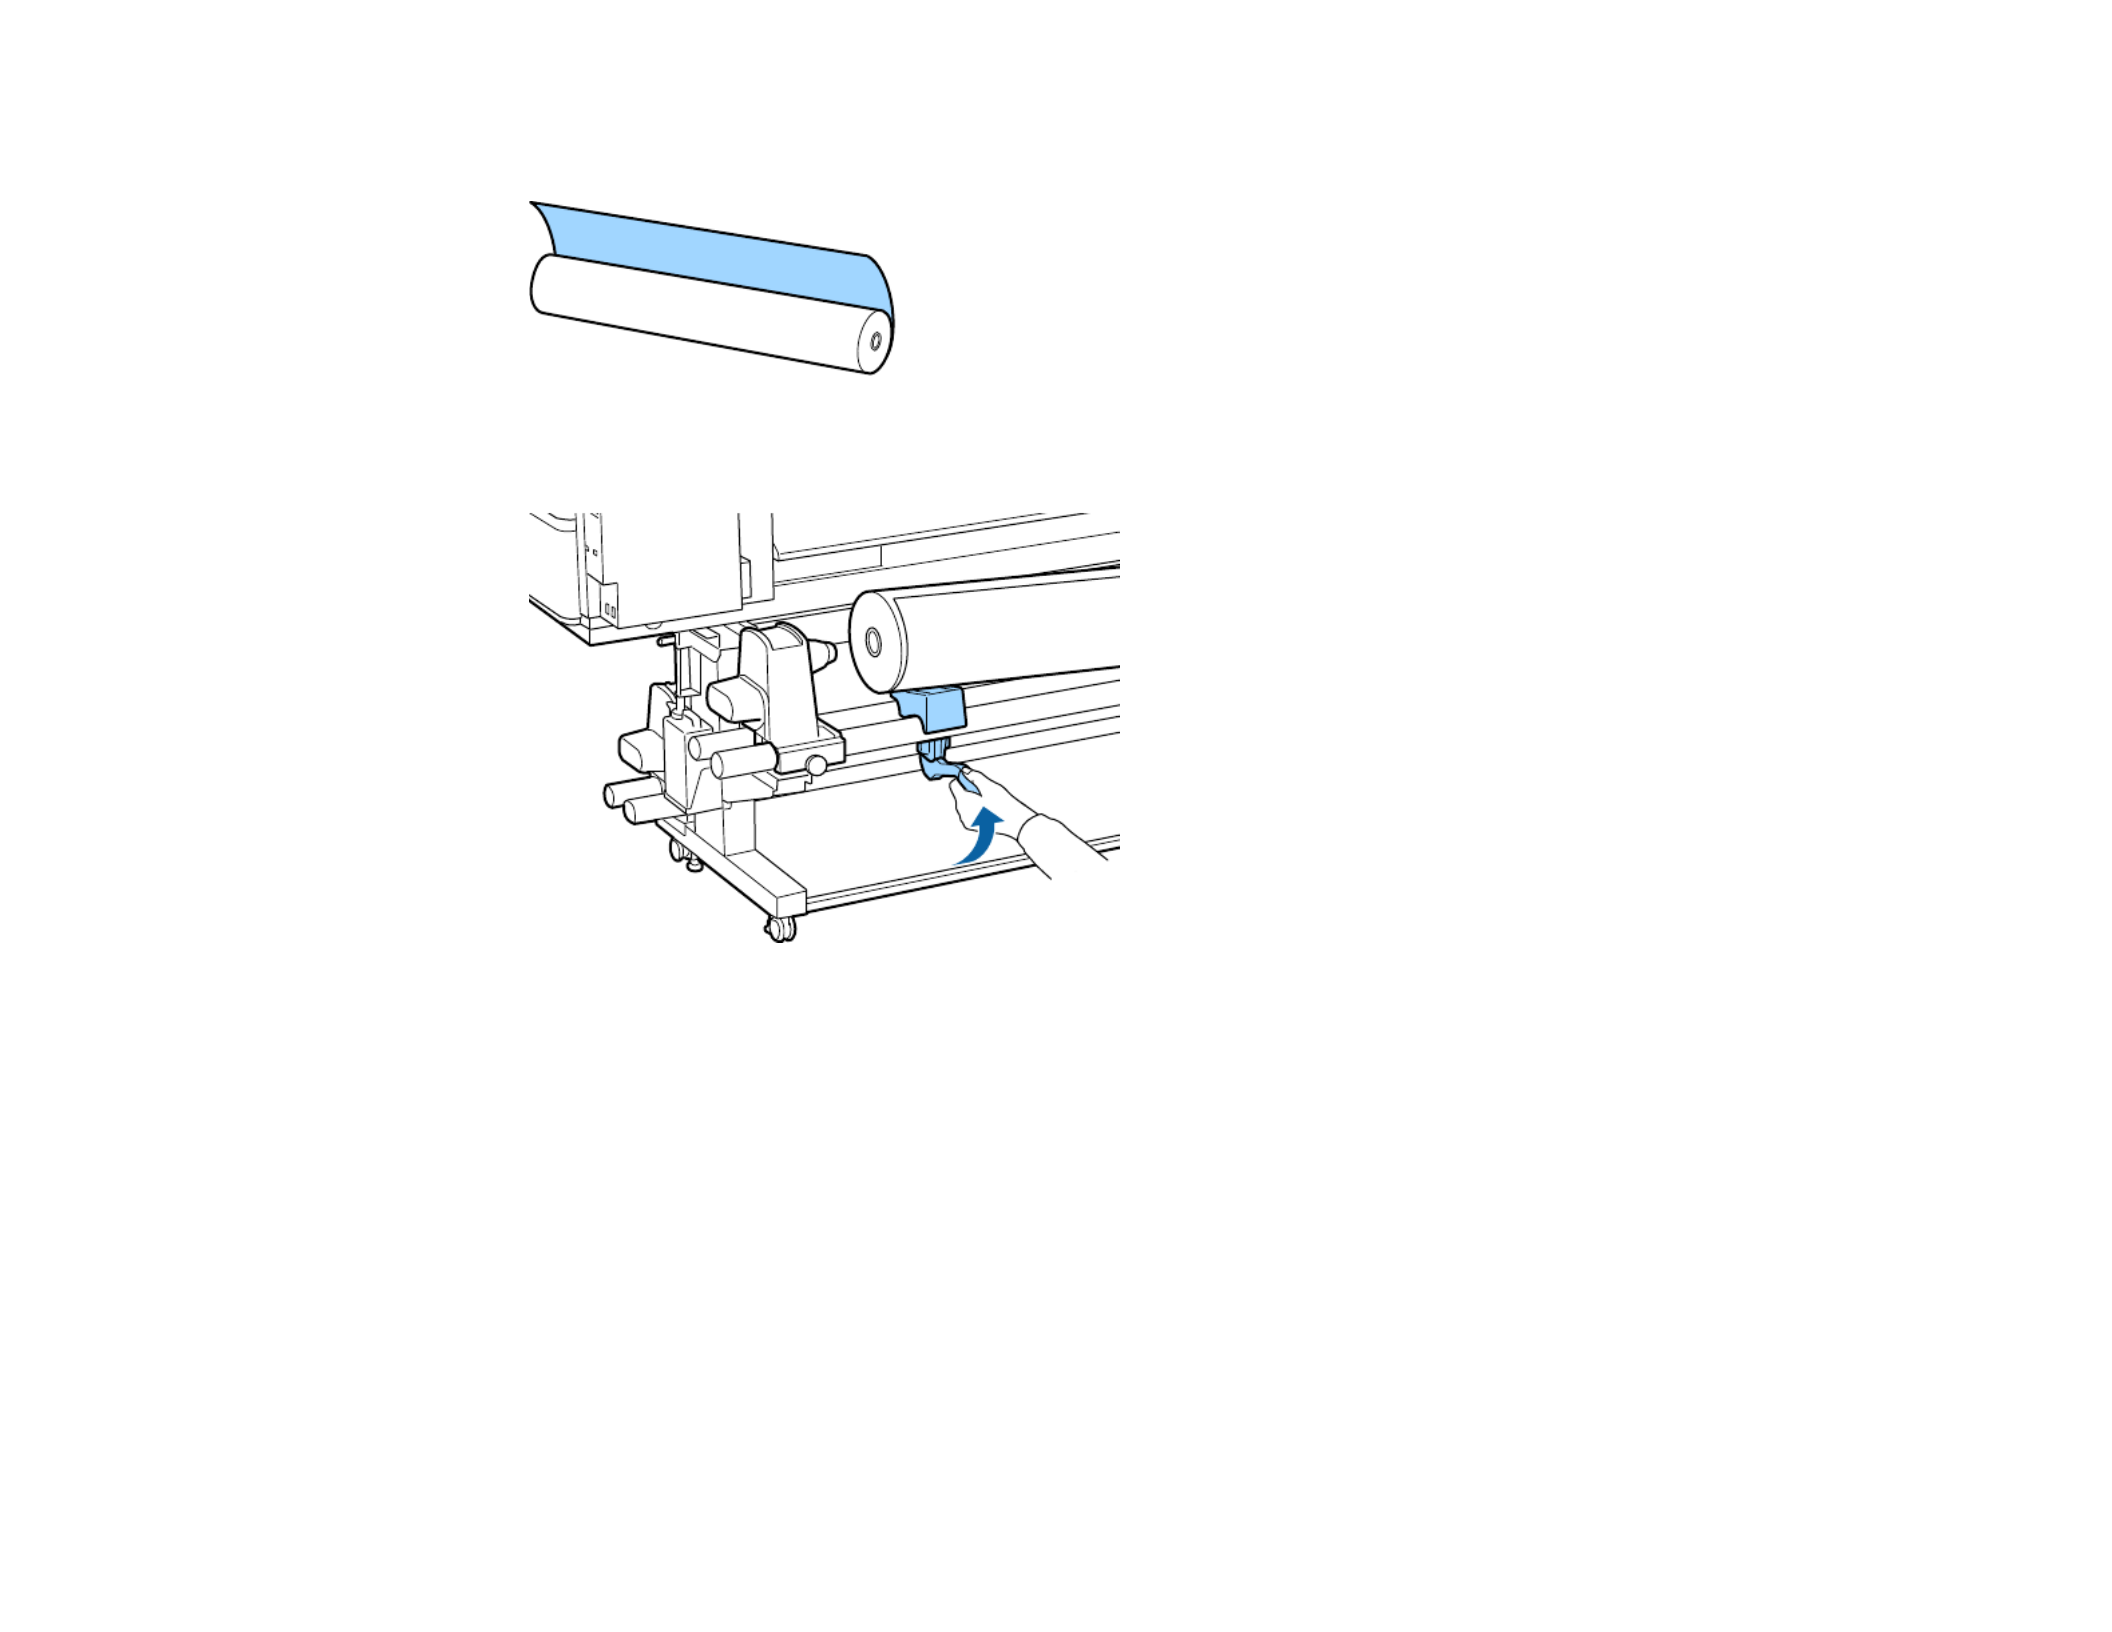
1. While supporting the left side of the media roll, loosen the left roll core holder knob and remove the
roll core holder from the roll.
2. Lower the media roll onto the roll support.
58
7. Do one of the following:
• If you want the product to automatically perform feed adjustment and head alignment, select
Auto OK, press the button, and skip the remaining steps.
Note: Film Canvas Textile Paper/OthersThis option is not available when , , , or is selected for
the setting.Media Type
• If you want to manually perform feed adjustment and head alignment, select , press theManual
OK button, and continue with the next step.
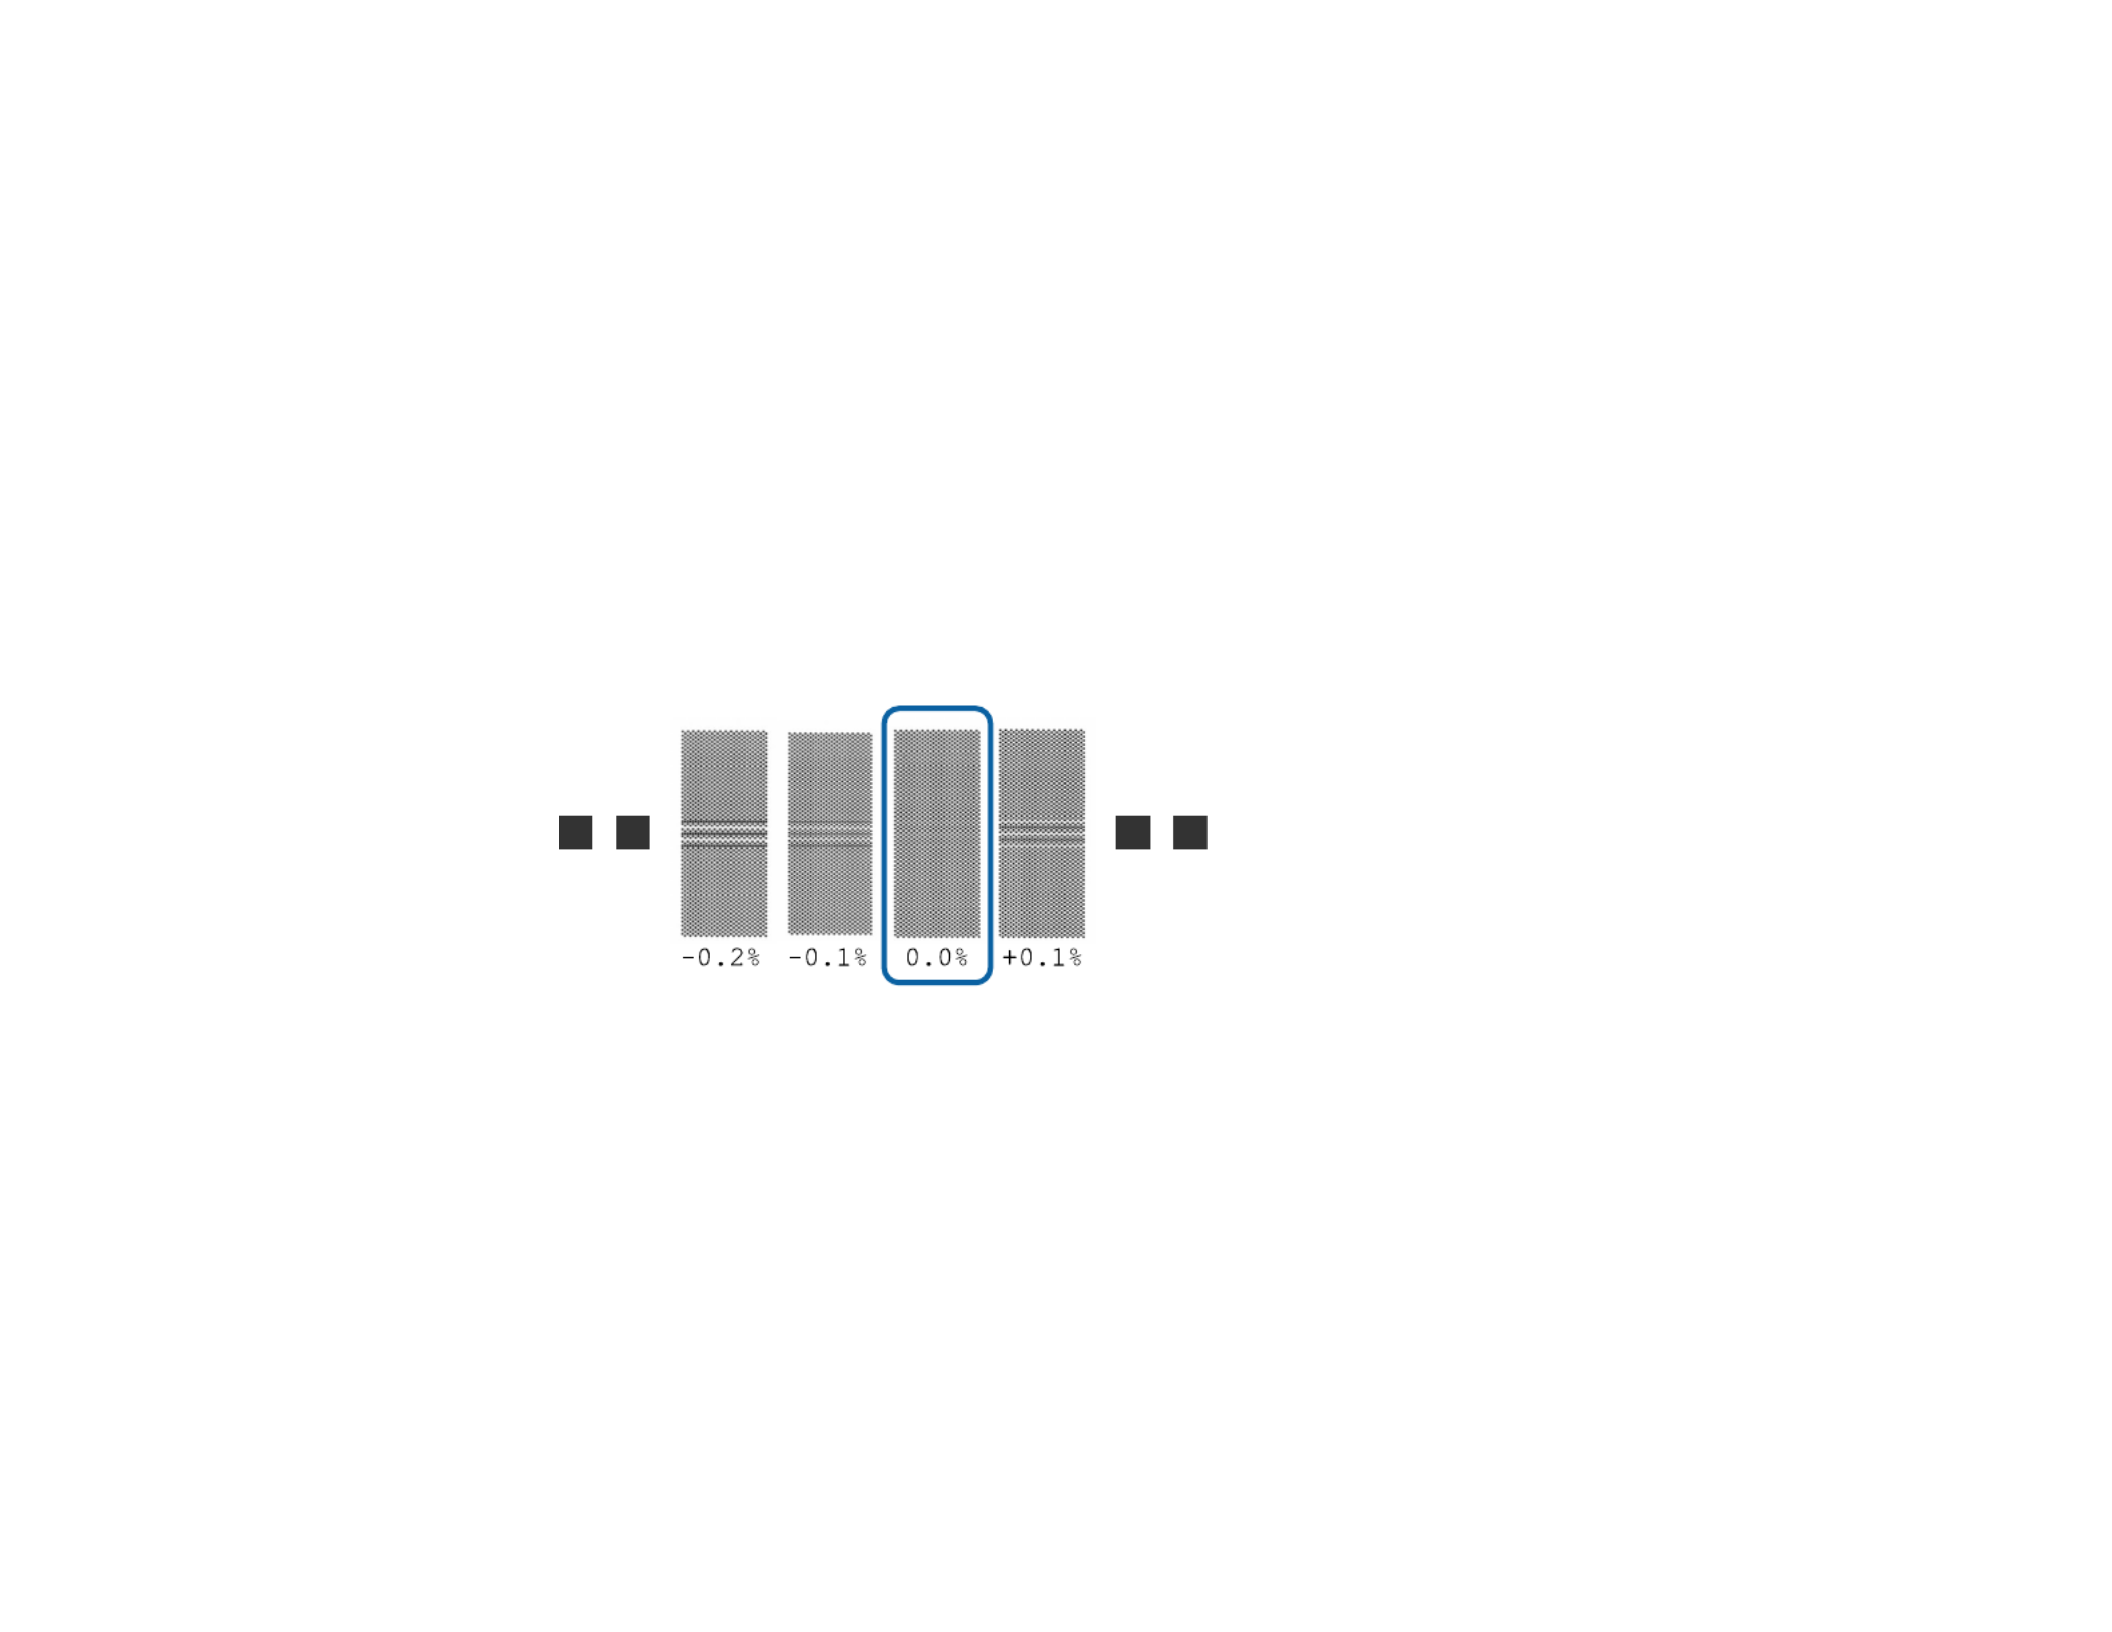
8. Do one of the following depending on the adjustment pattern that prints:
• If you see a pattern similar to the following, check the pattern for group A and B and identify the
pattern with the least amount of overlap or gap for each group. Press the up or down arrow button
to select the value for the pattern you identified from group A and press the button. Press theOK
up or down arrow button to select the value for the pattern you identified from group B and press
the button.OK

64
4 Right margin2,3
You select this margin as the total of the values for the (default setting is 0)Print Start Position
and (default setting is 0.2 inch [5 mm]) settings on the product control panel.Side Margin(Right)
You can select from 0.12 inch (3 mm) to 32.5 inches (825 mm).
5 Media width
11.8 to 64 inches (300 mm to 1626 mm); if is off, the product assumes this isMedia Size Check
64 inches (1626 mm) regardless of the actual width.
1The configured margin and the actual print results may differ depending on the RIP software you use.
Contact the RIP manufacturer for more information.
2Depending on the RIP software, you may be able to use it to set these margins. Contact the RIP
manufacturer for more information.
3When using the media holding plates, leave margins of at least 0.4 inch (10 mm) to avoid printing over
the plates. If the total of the print data width and the left and right margins exceeds the printable area, a
portion of the print data will not print.
Parent topic: Media Handling
Related references
Printer Setup Menu Settings
Print Start Positions
The print start positions determine where printing begins on the right and top sides of your media.
Product specificaties
| Merk: | Epson |
| Categorie: | Printer |
| Model: | SureColor SC-S80600 |
| Kleur van het product: | Black, Blue |
| Ingebouwd display: | Ja |
| Gewicht: | 279000 g |
| Breedte: | 2620 mm |
| Diepte: | 1090 mm |
| Hoogte: | 1311 mm |
| Gewicht verpakking: | 550000 g |
| Breedte verpakking: | 1100 mm |
| Diepte verpakking: | 3180 mm |
| Hoogte verpakking: | 1615 mm |
| Gebruikershandleiding: | Ja |
| Kleur: | Ja |
| Beeldscherm: | LCD |
| Beeldschermdiagonaal: | 2.72 " |
| USB-poort: | Ja |
| Snelstartgids: | Ja |
| Land van herkomst: | China |
| Aantal USB 2.0-poorten: | 1 |
| Stroomverbruik (in standby): | 12 W |
| Intern geheugen: | 512 MB |
| Aantal per verpakking: | 1 stuk(s) |
| Ondersteunt Windows: | Ja |
| Stroomverbruik (PowerSave): | 580 W |
| Ondersteunt Mac-besturingssysteem: | Ja |
| Maximale resolutie: | 1440 x 1440 DPI |
| Printkleuren: | Black, Cyan, Light black, Light cyan, Light magenta, Magenta, Metallic silver, Orange, Red, White, Yellow |
| Mediadikte: | 0.1 - 1 mm |
| RJ-45 ports hoeveelheid: | 1 |
| USB-connector: | USB Type-B |
| Printtechnologie: | Inkjet |
| Paginabeschrijving talen: | ESC/P-R |
| Kopiëren: | Nee |
| Scannen: | Nee |
| Meegeleverde drivers: | Ja |
| Stroomverbruik (typisch): | 880 W |
Heb je hulp nodig?
Als je hulp nodig hebt met Epson SureColor SC-S80600 stel dan hieronder een vraag en andere gebruikers zullen je antwoorden
Handleiding Printer Epson

12 Februari 2025
2 Februari 2025
2 Februari 2025
2 Februari 2025
2 Februari 2025
2 Februari 2025
2 Februari 2025
14 Januari 2025
14 December 2024
21 November 2024
Handleiding Printer
- Printer HP
- Printer Sony
- Printer Samsung
- Printer Xiaomi
- Printer Panasonic
- Printer LG
- Printer Huawei
- Printer Canon
- Printer Honeywell
- Printer Olympus
- Printer Toshiba
- Printer Xerox
- Printer Agfaphoto
- Printer AVM
- Printer Brother
- Printer Builder
- Printer D-Link
- Printer Dell
- Printer Digitus
- Printer Dymo
- Printer Epson 7620
- Printer Frama
- Printer Fujifilm
- Printer Fujitsu
- Printer Ibm
- Printer Intermec
- Printer Kern
- Printer Kodak
- Printer Kogan
- Printer Konica Minolta
- Printer Kyocera
- Printer Lenovo
- Printer Lexmark
- Printer Minolta
- Printer Mitsubishi
- Printer MSI
- Printer Nec
- Printer Paxar
- Printer Polaroid
- Printer Primera
- Printer Renkforce
- Printer Ricoh
- Printer Roland
- Printer Royal Sovereign
- Printer Sagem
- Printer Seiko
- Printer Sharp
- Printer Star
- Printer Thomson
- Printer Tomy
- Printer Toshiba TEC
- Printer Triumph-Adler
- Printer Velleman
- Printer Zebra
- Printer Oce
- Printer Oki
- Printer Olivetti
- Printer Olympia
- Printer CSL
- Printer Argox
- Printer DTRONIC
- Printer Metapace
- Printer Citizen
- Printer Nilox
- Printer Approx
- Printer Ultimaker
- Printer Custom
- Printer Bixolon
- Printer Brady
- Printer GoDEX
- Printer Testo
- Printer EC Line
- Printer Sawgrass
- Printer Pantum
- Printer DNP
- Printer TSC
- Printer Equip
- Printer StarTech.com
- Printer Fichero
- Printer GG Image
- Printer Posiflex
- Printer ZKTeco
- Printer Star Micronics
- Printer Datamax-O'neil
- Printer Panduit
- Printer Dascom
- Printer HiTi
- Printer Vupoint Solutions
- Printer Elite Screens
- Printer Phoenix Contact
- Printer Videology
- Printer Colop
- Printer Raspberry Pi
- Printer Evolis
- Printer Unitech
- Printer Middle Atlantic
- Printer IDP
- Printer Fargo
- Printer Microboards
- Printer Mutoh
- Printer Tally Dascom
- Printer Nisca
Nieuwste handleidingen voor Printer

9 April 2025

8 April 2025
2 April 2025
2 April 2025
1 April 2025

1 April 2025

29 Maart 2025
29 Maart 2025

11 Maart 2025