Epson PictureMate 500 Handleiding
Lees hieronder de 📖 handleiding in het Nederlandse voor Epson PictureMate 500 (89 pagina's) in de categorie Printer. Deze handleiding was nuttig voor 53 personen en werd door 2 gebruikers gemiddeld met 4.5 sterren beoordeeld
Pagina 1/89
1
English
Photo Printer
No part of this publication may be reproduced, stored in a retrieval
system, or transmitted in any form or by any means, electronic,
mechanical, photocopying, recording, or otherwise, without the prior
written permission of Seiko Epson Corporation. The information
contained herein is designed only for use with this Epson printer. Epson
is not responsible for any use of this information as applied to other
printers.
Neither Seiko Epson Corporation nor its affiliates shall be liable to the
purchaser of this product or third parties for damages, losses, costs, or
expenses incurred by the purchaser or third parties as a result of
accident, misuse, or abuse of this product or unauthorized
modifications, repairs, or alterations to this product, or (excluding the
U.S.) failure to strictly comply with Seiko Epson Corporation's
operating and maintenance instructions.
Seiko Epson Corporation shall not be liable for any damages or
problems arising from the use of any options or any consumable
products other than those designated as Original Epson Products or
Epson Approved Products by Seiko Epson Corporation.
Seiko Epson Corporation shall not be held liable for any damage
resulting from electromagnetic interference that occurs from the use of
any interface cables other than those designated as Epson Approved
Products by Seiko Epson Corporation.
EPSON® is a registered trademark and PictureMate™ is a trademark
of Seiko Epson Corporation.
PRINT Image Matching™ and the PRINT Image Matching logo are
trademarks of Seiko Epson Corporation.
Copyright © 2001 Seiko Epson Corporation. All rights reserved.
USB DIRECT-PRINT™ and the USB DIRECT-PRINT logo are
trademarks of Seiko Epson Corporation.
Copyright © 2002 Seiko Epson Corporation. All rights reserved.
Microsoft® and Windows® are registered trademarks of Microsoft
Corporation.
Apple® and Macintosh® are registered trademarks of Apple Computer,
Inc.
Part of the photo data stored on the Printer Software CD- ROM is
licensed from Design Exchange Co., Ltd. Copyright © 2000 Design
Exchange Co., Ltd. All rights reserved.
DPOF™ is a trademark of CANON INC., Eastman Kodak Company,
Fuji Photo Film Co., Ltd. and Matsushita Electric Industrial Co., Ltd.
The Bluetooth word mark and logos are owned by the Bluetooth SIG,
Inc. and any use of such marks by Seiko Epson Corporation is under
license.
Zip® is a registered trademark of Iomega Corporation.
SD™ is a trademark.
Memory stick, Memory Stick Duo, Memory Stick PRO, and Memory
Stick PRO Duo are trademarks of Sony Corporation.
xD-Picture Card™ is a trademarks of Fuji Photo Film Co.,Ltd.
General Notice: Other product names used herein are for identification
purposes only and may be trademarks of their respective owners. Epson
disclaims any and all rights in those marks.
Copyright © 2005 Seiko Epson Corporation. All rights reserved.
®

2
Get to Know Your PictureMate
LCD panel
Zoom button
Cancel button
Memory card light
Print button
OK button
Menu button
Back button
On button
Memory card
slot cover
Output tray
Handle
Paper
support
USB port for
computer
EXT/IF (USB)
port
Power cable
Cartridge
compartment cover
4-way scroll buttons
Battery cover
Power light

3
English
Contents
Safety Instructions
Important Safety Instructions. . . . . . . . . . . . . . . . . . . . . . . .6
Warnings, Cautions, and Notes . . . . . . . . . . . . . . . . . . . . .13
Welcome!
A Quick Introduction to the Digital Photography
Process. . . . . . . . . . . . . . . . . . . . . . . . . . . . . . . . . . . . . . . .14
Supported Photo Formats . . . . . . . . . . . . . . . . . . . . . . . . . .16
Where to Find Information . . . . . . . . . . . . . . . . . . . . . . . . .16
Preparing to Print
Loading Paper. . . . . . . . . . . . . . . . . . . . . . . . . . . . . . . . . . . .17
Paper Handling Instructions . . . . . . . . . . . . . . . . . . . . . . .18
Inserting Your Memory Card. . . . . . . . . . . . . . . . . . . . . . .19
Basic Photo Printing
Printing All Photos. . . . . . . . . . . . . . . . . . . . . . . . . . . . . . . .22
Printing Several Photos . . . . . . . . . . . . . . . . . . . . . . . . . . . .22
Printing Range of Photos. . . . . . . . . . . . . . . . . . . . . . . . . . .23
Printing Photos Searching by Date. . . . . . . . . . . . . . . . . . 24
Printing an Index. . . . . . . . . . . . . . . . . . . . . . . . . . . . . . . . . 25
Printing a Photo With a Frame . . . . . . . . . . . . . . . . . . . . . 25
Printing Camera-Selected DPOF Photos . . . . . . . . . . . . . 27
Doing More With Your Photos
Choosing a Layout . . . . . . . . . . . . . . . . . . . . . . . . . . . . . . . 28
Adding the Date or Time . . . . . . . . . . . . . . . . . . . . . . . . . . 29
Printing Photos in Black and White or Sepia . . . . . . . . . 31
Cropping Your Photo . . . . . . . . . . . . . . . . . . . . . . . . . . . . . 32
Fixing Your Photos . . . . . . . . . . . . . . . . . . . . . . . . . . . . . . . 33
Printing a Photo With a Frame Specified by Camera . . 36
Viewing a Slide Show. . . . . . . . . . . . . . . . . . . . . . . . . . . . . 36
Saving Your Photos to an External Device
Saving Photos to an External Device . . . . . . . . . . . . . . . . 37
Printing From an External Device
Printing From an External Drive. . . . . . . . . . . . . . . . . . . . 40
Printing From a PictBridge-Enabled Camera . . . . . . . . . 42

4
Printing From a Bluetooth Device. . . . . . . . . . . . . . . . . . . 44
Replacing the Photo Cartridge
Checking the Photo Cartridge Status (Ink Level) . . . . . . 50
Replacing the Photo Cartridge. . . . . . . . . . . . . . . . . . . . . . 50
Taking PictureMate With You
Setting PictureMate Preferences
Changing the View of Photos on the LCD Screen . . . . . 58
Setting the After Print Confirmation. . . . . . . . . . . . . . . . . 59
Adjusting the LCD Screen Contrast . . . . . . . . . . . . . . . . . 60
Selecting the Language on the LCD Screen . . . . . . . . . . . 60
Changing the Default Settings . . . . . . . . . . . . . . . . . . . . . . 61
Resetting All Print Settings. . . . . . . . . . . . . . . . . . . . . . . . . 61
Using PictureMate With a Computer
Installing the Printer Software. . . . . . . . . . . . . . . . . . . . . . 62
Maintaining PictureMate
Checking the Print Head Nozzles . . . . . . . . . . . . . . . . . . . 65
Cleaning the Print Head . . . . . . . . . . . . . . . . . . . . . . . . . . . 66
Aligning the Print Head. . . . . . . . . . . . . . . . . . . . . . . . . . . 67
Cleaning the Printer . . . . . . . . . . . . . . . . . . . . . . . . . . . . . . 70
Troubleshooting
Error/Warning Messages . . . . . . . . . . . . . . . . . . . . . . . . . 71
Printer Power Problems. . . . . . . . . . . . . . . . . . . . . . . . . . . 73
Print and Noise Problems . . . . . . . . . . . . . . . . . . . . . . . . . 74
Photo Quality Problems. . . . . . . . . . . . . . . . . . . . . . . . . . . 75
Problems With Paper Feeding . . . . . . . . . . . . . . . . . . . . . 76
Miscellaneous Printout Problems. . . . . . . . . . . . . . . . . . . 77
Customer Support
Contacting Customer Support . . . . . . . . . . . . . . . . . . . . . 78
Technical Support Web Site . . . . . . . . . . . . . . . . . . . . . . . 78
Options and Consumable Products
Options. . . . . . . . . . . . . . . . . . . . . . . . . . . . . . . . . . . . . . . . . 79
Consumable Products . . . . . . . . . . . . . . . . . . . . . . . . . . . . 79
Using the Optional Battery . . . . . . . . . . . . . . . . . . . . . . . . 80
Printer Specifications
Printer Specifications . . . . . . . . . . . . . . . . . . . . . . . . . . . . . 83

5
English
Index

6Safety Instructions
Safety Instructions
Important Safety Instructions
Read all of the instructions in this section before using
your printer. Also, be sure to follow all warnings and
instructions marked on the printer.
When choosing a place for the printer
Observe the following when choosing a place for the
printer:
❏Place the printer on a flat, stable surface that
extends beyond the base of the printer in all
directions. If you place the printer by the wall,
leave more than 10 cm between the back of the
printer and the wall. The printer will not operate
properly if it is tilted at an angle.
❏When storing or transporting the printer, do not
tilt it, stand it on its side, or turn it upside down.
Otherwise, ink may leak from the cartridge.
❏Leave enough space in front of the printer for the
paper to be fully ejected.
❏Avoid places subject to rapid changes in
temperature and humidity. Also, keep the printer
and the AC adapter away from direct sunlight,
strong light, water, or heat sources.
❏Do not leave the printer in a place subject to high
temperature, such as in a car. Also, keep the
printer away from direct sunlight, strong light,
and heat sources. Otherwise, the printer may be
damaged or ink may leak.
❏Avoid places subject to dust, shock, or vibration.
❏Leave enough room around the printer to allow
for sufficient ventilation.
❏Place the AC adapter near a wall outlet where the
plug can be easily unplugged.
❏Do not place or store the printer, the AC adapter,
or the optional battery outdoors.

Safety Instructions 7
English
When setting up your printer
Observe the following when setting up the printer:
❏Do not block or cover the vents and openings in
the printer.
❏Power supply cords should be placed to avoid
abrasions, cuts, fraying, crimping, and kinking.
Do not place objects on top of power-supply cords
and do not allow the AC adapter or power-supply
cords to be stepped on or run over. Be particularly
careful to keep all power-supply cords straight at
the ends and the points where they enter and
leave the AC adapter.
❏Use only the power-supply cords that comes with
this product. Use of another cord may result in fire
or electrical shock, or injury.
❏The AC adapter model A361H is designed for use
with the printer with which it was included. Do
not attempt to use it with other electronic devices
unless specified.
❏Use only the type of power source indicated on
the AC adapter's label, and always supply power
directly from a standard domestic electrical outlet
with the AC power cord that meets the relevant
local safety standards.
❏Avoid using outlets on the same circuit as
photocopiers or air control systems that regularly
switch on and off.
❏Avoid using electrical outlets controlled by wall
switches or automatic timers.
❏Keep the entire computer system away from
potential sources of electromagnetic interference,
such as loudspeakers or the base units of cordless
telephones.
❏Do not use a damaged or frayed power cord, AC
adapter, and the optional battery.
❏If you use an extension cord with the printer,
make sure that the total ampere rating of the
devices plugged into the extension cord does not
exceed the cord’s ampere rating. Also, make sure
that the total ampere rating of all devices plugged
into the wall outlet does not exceed the wall
outlet’s ampere rating.

8Safety Instructions
❏Never disassemble, modify, or attempt to repair
the AC adapter, power cord, printer, and options
by yourself except as specifically explained in the
printer's guides.
❏Unplug the printer and the AC adapter, remove
the optional battery from the printer, and refer
servicing to qualified service personnel under the
following conditions:
The power cord or plug is damaged; liquid has
entered the printer, the AC adapter, or the
optional battery; the printer, the AC adapter or
the optional battery has been dropped or the
casing damaged; the printer, the AC adapter or
the optional battery does not operate normally or
exhibits a distinct change in performance. (Do not
adjust controls that are not covered by the
operating instructions.)
❏Do not use with wet hands.
❏If you plan to use the AC adapter or the optional
battery in Germany, the building installation
must be protected by a10 or 16 amp circuit breaker
to provide adequate short-circuit protection and
over-current protection for this printer.
For United Kingdom, Singapore, and Hong Kong
users
❏Replace fuses only with fuses of the correct size
and rating.
Safety requirements
Mains plug:
Use a 3-pin mains plug that is registered with the
Safety Authority.
Flexible cord:
Use a double insulated flexible cord that is certified*
to the relevant IEC or BS standards.
Appliance connector:
Use an appliance connector certified* to the relevant
IEC or BS Standards.
* certified by member of IECEE CB Scheme.
For United Kingdom users
The following safety information applies to the AC
adapter.
❏Warning: Refer to the rating plate for the voltage
and check that the appliance voltage corresponds
to the supply voltage.

Safety Instructions 9
English
❏Important: The wires in the mains lead fitted to
this appliance are coloured in accordance with
following code: Blue - Neutral, Brown - Live
If you have to fit a plug:
❏As the colours of the mains lead of the appliance
may not match the coloured markings used to
identify the terminals in a plug, please observe the
following:
❏The blue wire must be connected to the terminal
in the plug marked with the letter N.
❏The brown wire must be connected to the terminal
in the plug marked with the letter L.
❏If damage occurs to the plug, replace the cord set
or consult a qualified electrician.
When using the printer
Observe the following when using the printer:
❏If you use the printer in places where the use of
electronic devices is limited, such as in airplanes
or hospitals, follow all instructions in those
places.
❏Do not insert objects through the slots in the
printer.
❏Take care not to spill liquid on the printer and the
AC adapter.
❏Do not put your hand inside the printer or touch
the photo cartridge during printing.
❏Always turn the printer off using the On button.
Do not unplug the printer or turn off the power to
the outlet until the power light goes out.
❏Before transporting the printer, make sure that the
photo cartridge is in place.
❏Leave the photo cartridge installed. Removing the
cartridge can dehydrate the print head and may
prevent the printer from printing.
When using a memory card
❏Use only memory cards compatible with the
printer. Refer to Loading Memory Cards.

10 Safety Instructions
When using LCD
❏The LCD panel contains a few small bright or dark
spots. These are normal and do not mean that the
LCD monitor is damaged in any way.
❏Only use a dry, soft cloth to clean the LCD panel.
Do not use liquid or chemical cleansers.
❏If the LCD panel on your printer's control panel
is damaged, contact your dealer. If the liquid
crystal solution gets on your hands, wash them
thoroughly with soap and water. If the liquid
crystal solution gets into your eyes, flush them
immediately with water. If discomfort or vision
problems remain after a thorough flushing, see a
doctor immediately.
When using the optional Bluetooth Photo
Print Adapter
Refer to the Bluetooth Photo Print Adapter's
documentation for the safety instructions.
When using the optional battery
❏If battery acid gets into your eyes or on your skin,
immediately rinse the affected area thoroughly
with water and seek medical treatment. If a
battery is swallowed, seek medical treatment
immediately.
❏Use only an Epson Li-ion battery model EU-112
for this printer according to the directions in the
user documentation. Replacing the battery with
an incorrect model may cause an explosion.
❏Use only AC adapter model A361H to charge the
battery and operate the printer.
❏Do not charge or use the battery with devices
other than the specified product. Using the
battery with other devices may damage the
battery or other devices, or may cause an
explosion.
❏To protect against short circuits, do not remove
the outside case of the battery.
❏Do not handle the battery with wet hands or use
them near water.

Safety Instructions 11
English
❏Do not expose the battery to water or high
humidity.
❏Do not drop, puncture, disassemble, mutilate, or
short-circuit the battery.
❏Do not place the battery near or into fire or water.
❏Do not use the battery that is leaking or damaged
in any way.
❏Do not charge the battery on devices except this
product.
❏Do not charge the battery near open flame or in
very hot locations.
❏Keep the battery away from heat sources.
❏Do not leave the battery in a vehicle to prevent the
battery from overheating.
❏Do not insert objects into any openings as they
may touch dangerous voltage points or
short-circuit components.
❏Prevent the battery from coming into contact with
metal objects that could short-circuit it, such as
coins or keys.
❏Do not solder wires or terminals directly to the
battery.
❏Do not touch battery terminals.
❏Keep the battery away from open flame if they
leak or smell strange.
❏If overheating, discoloration, or deformation
occur, remove the battery from this product and
do not use it.
❏Charge the battery before using it if it has not been
used for a long period.
When storing the optional battery
❏When not using the printer for a long period of
time, remove the battery from the printer and
store them separately to avoid over-discharging
the battery.
❏Do not store the battery where the temperature or
humidity is very high.
❏Store the battery out of children’s reach.

12 Safety Instructions
When disposing of the optional battery
Before disposing of the battery, make sure you
discharge them completely.
wWarning:
❏Do not dispose of batteries as ordinary
refuse. Instead, dispose of them in a
collection or recycle box in accordance with
local laws.
❏Do not incinerate or dispose of the battery
in fire.
For European users:
Do not dispose of batteries as ordinary refuse. Instead,
dispose of them in a recycle box in accordance with
local laws.
For users in the United States and Canada:
This mark indicates that the battery will be
recycled by RBRC. When you dispose of the
battery, contact RBRC.
When handling photo cartridges
Observe the following when handling photo
cartridges:
❏Do not shake photo cartridge after removing it
from the bag; this can cause leakage.
❏Do not remove or tear the label on the cartridge;
this can cause leakage.
❏Do not use a photo cartridge beyond the date
printed on the cartridge carton: otherwise, it may
result in reduced print quality. For best results,
use up the photo cartridge within six months of
installing it.
❏Do not dismantle photo cartridges or try to refill
them. This could damage the print head.

Safety Instructions 13
English
❏After bringing a photo cartridge inside from a
cold storage site, allow it to warm up at room
temperature for at least three hours before using
it.
❏Store photo cartridges in a cool, dark place.
❏The IC chip on the photo cartridge retains a
variety of cartridge-related information, such as
the amount of ink remaining, so that the cartridge
may be removed and reinstalled freely. However,
each time the cartridge is inserted, some ink is
consumed because the printer automatically
performs a reliability check.
❏Store each photo cartridge so that the bottom of
its packaging faces down.
ENERGY STAR® Compliance
As an E SNERGY TAR® Partner,
Epson has determined that this
product meets the ENERGY STAR®
guidelines for energy efficiency.
The International ENERGY STAR® Office Equipment
Program is a voluntary partnership with the computer
and office equipment industry to promote the
introduction of energy-efficient personal computers,
monitors, printers, fax machines, copiers, scanners,
and multifunction devices in an effort to reduce air
pollution caused by power generation. Their
standards and logos are uniform among participating
nations.
Warnings, Cautions, and Notes
wWarnings
must be followed carefully to avoid bodily
injury.
cCautions
must be observed to avoid damage to your
equipment.
Notes
contain important information and useful tips on the
operation of your printer.

14 Welcome!
Welcome!
PictureMate™ is your easy-to-use, personal photo lab.
Just insert a digital camera memory card and you’re
ready to print brilliant, long-lasting photos. Because
PictureMate is light and portable, you can print
whenever and wherever you take pictures. Plus, your
PictureMate photos are archival; generations from
now your PictureMate prints will be as vibrant as they
are today.
A Quick Introduction to the Digital
Photography Process
With film cameras, the process
was simple; buy film, take
pictures, leave the film at the
photo lab, and come back later
for your photos and negatives.
Since you had negatives, you
could take them back later if
you wanted reprints.
The digital process is simple too, and it gives you
complete control. Just follow these basic steps:
1. Review and Delete
After you finish taking your
photos, review them on your
digital camera’s screen. Delete
the photos you don’t want to
print or keep.
2. Print
Insert your camera’s memory
card in PictureMate, choose
your photos, and print.
3. Save
To preserve your digital photo
files (just like film negatives),
save them to a CD or your
computer. Then you can reprint
them any time.
4. Clear the Memory Card
After you save your photo files, delete them from your
memory card so you have room for more photos.
Welcome! 15
English
Special Features
Printing with your PictureMate becomes even easier
with these special features:
From the PictureMate Main Menu,
you can print all your photos or you
can select just the ones you want.
See “Basic Photo Printing” on page
21.
You can crop photos right from
PictureMate—no computer
required. See “Cropping Your
Photo” on page 32.
If your camera supports DPOF
(Digital Print Order Format), you
can pre-select which photos to print
while the memory card is still in
your camera. Then, when you
insert the card into PictureMate, it
knows which photos you chose. See “Printing
Camera-Selected DPOF Photos” on page 27.
If you have a PictBridge®- or USB
DP (USB Direct Print)-enabled
camera, you can connect the
camera to PictureMate and control
printing right from your camera.
See “Printing From a PictBridge-Enabled Camera” on
page 42.
If you have a Bluetooth®-enabled
PDA, cell phone, or computer, you
can send photos wirelessly to
PictureMate for printing. You just
need the optional Epson®
Bluetooth Photo Print Adapter. See “Printing From a
Bluetooth Device” on page 44.
Note:
PictureMate also supports P.I.M. (PRINT Image
Matching™) and Exif Print image enhancement standards
that are built into many cameras. To see if your camera is
P.I.M.-enabled, see your camera's documentation.
Main Menu
Crop
DPOF
16 Welcome!
Supported Photo Formats
Make sure your photos meet these requirements for
printing with your PictureMate:
❏JPEG files or uncompressed TIFF files only
❏Resolutions ranging from 80 ×80 to 4600 ×4600
pixels
PictureMate recognizes and prints the first 999 photos
on your memory card.
Where to Find Information
Unpacking and setting up
See your Start Here to unpack, set
up, and use your PictureMate.
Printing, changing settings, and installing the printer
software
Basics Operation Guide (this book)
explains how to print photos
directly from your camera’s
memory card. It also covers how to
print from other devices, replace
the PictureMate Photo Cartridge,
take care of PictureMate, install the printer software,
and troubleshoot problems.
Using your PictureMate with a computer
The on-screen User's Guide on the
CD provides comprehensive
information and instructions for
using PictureMate with a
computer.
JPEG TIFF
Start
Here
Basic
Operation
Guide

Preparing to Print 17
English
Preparing to Print
Before you can print, you need to load paper and insert
your memory card in PictureMate.
Loading Paper
Follow these steps to load PictureMate Photo Paper:
cCaution:
Do not load plain paper; this may damage
PictureMate.
1. Move the handle to the back and down. Then
open the paper support and output tray.
Note:
Keep the handle all the way down when printing, to
allow paper to feed through.
Open output tray
Move handle to the
back and down
Open paper support
18 Preparing to Print
2. Slide the top part of the paper support up gently
until it clicks into place.
3. Place your paper against the right edge, with the
glossy side up.
Note:
Make sure paper is glossy side up to prevent smearing.
4. Slide the left edge guide against the paper. Make
sure it is snug, but not so tight that paper can’t
move.
Note:
When you need more paper, order a PictureMate
PicturePack. See “Consumable Products” on page 79 for
more information.
Paper Handling Instructions
When storing printouts
❏Do not touch the printed side or stack your
printouts until the ink is dry.
❏To avoid scratching the image, be sure not to rub
the printed side of the paper. If the printed side is
rubbed too strongly, ink may come off the paper.
❏Do not stack printouts with the image sides
touching.
❏Do not stack printouts and conventional film
photographs with the image sides touching.
❏If you stack printouts, place a sheet of plain paper
or other absorbent paper between the individual
prints.
Edge guide
Load glossy side up
Preparing to Print 19
English
When storing unused paper
Return any unused paper to the original package, and
store it away from extreme temperatures, high
humidity, and bright lights.
When displaying printouts
❏When displaying your printouts indoors, Epson
recommends placing your printouts in glass
frames to preserve the colors in your image.
❏Avoid displaying your printouts outdoors or in a
place exposed to direct sunlight to prevent fading.
Note:
For best results, allow your prints to dry thoroughly for 24
hours before framing.
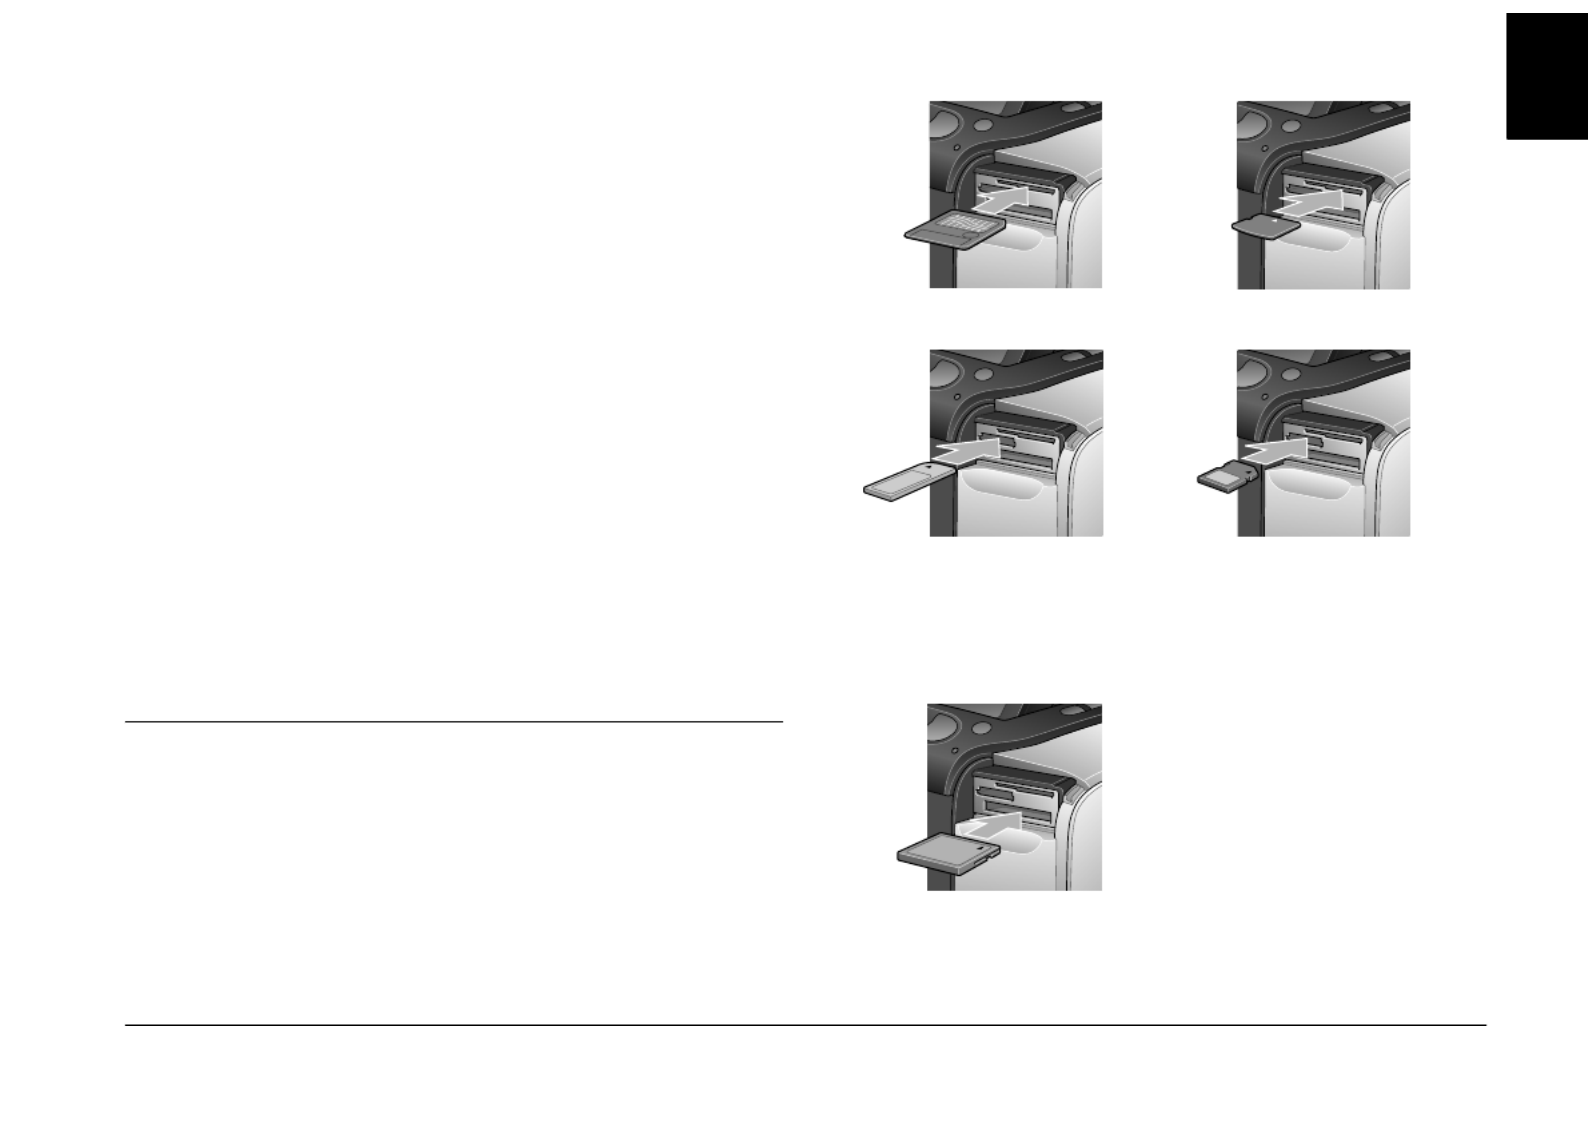
Inserting Your Memory Card
1. Press On to turn on PictureMate.
2. Open the memory card cover.
3. Insert the memory card into the correct slot, as
shown in the illustration.
Microdrive™
CompactFlash ® (Type I + II)
Sony Memory Stick ®
Memory Stick Duo™ *
Memory Stick PRO™
Memory Stick PRO Duo™ *
MagicGate™ Memory Stick
MagicGate Memory Stick Duo™ *
SD (Secure Digital)
miniSD™ card **
MMC™ (MultiMediaCard™)
xD Picture Card™
xD-Picture Card™ Type M
SmartMedia™
Top:
Middle:
Bottom:
* Requires Memory Stick Duo
adapter
** Requires miniSD adapter

20 Preparing to Print
Push the card in carefully until it stops (it won’t
go in all the way).
Insert just one card at a time.
When it is in, the card light comes on.
4. Close the memory card cover.
Now you can choose photos and layouts for printing
from the Main Menu. See “Basic Photo Printing” on
page 21.
Removing Your Memory Card
When you are ready to remove a memory card, make
sure the card light is not flashing, then pull the card
straight out of the slot.
cCaution:
Do not remove a card while the card light is
flashing; you may lose photos on your card.
Card light

Basic Photo Printing 21
English
Basic Photo Printing
You can choose the photos you want to print from the
main menu.
Print All: print all the photos on
your card.
Print Some: select several
photos, and choose one or
more copies for each.
Print Range: print a sequence
of photos on your card.
Print Index: print a thumbnail
view of all the photos stored in
your memory card.
Print by Date: search photos by
the date they were taken, and
select the photos you want.
Add Frame: print a photo with
a frame from your printer or
memory card.
Camera-selected DPOF
photos: print a set of photos
that you pre-selected in your
digital camera using DPOF.

22 Basic Photo Printing
Make sure your memory card is inserted in
PictureMate and the Main Menu is on the screen, then
follow the steps below for the option you want.
Printing All Photos
1. Press or to highlight Print All, then press OK.
2. Press or to select the number of copies.
3. Press OK to confirm your print selections.
4. Press Print to start printing.
Printing Several Photos
1. Press or to choose Print Some, then press
OK.
2. Press or to view the photo you want to
print.
Note:
You can switch the view of photos by pressing or
Basic Photo Printing 23
English
3. Press or to choose the number of copies to
print for that photo (up to 100).
4. Repeat steps 2 and 3 for additional photos.
5. Press OK to confirm your print selections.
6. Press Print to start printing.
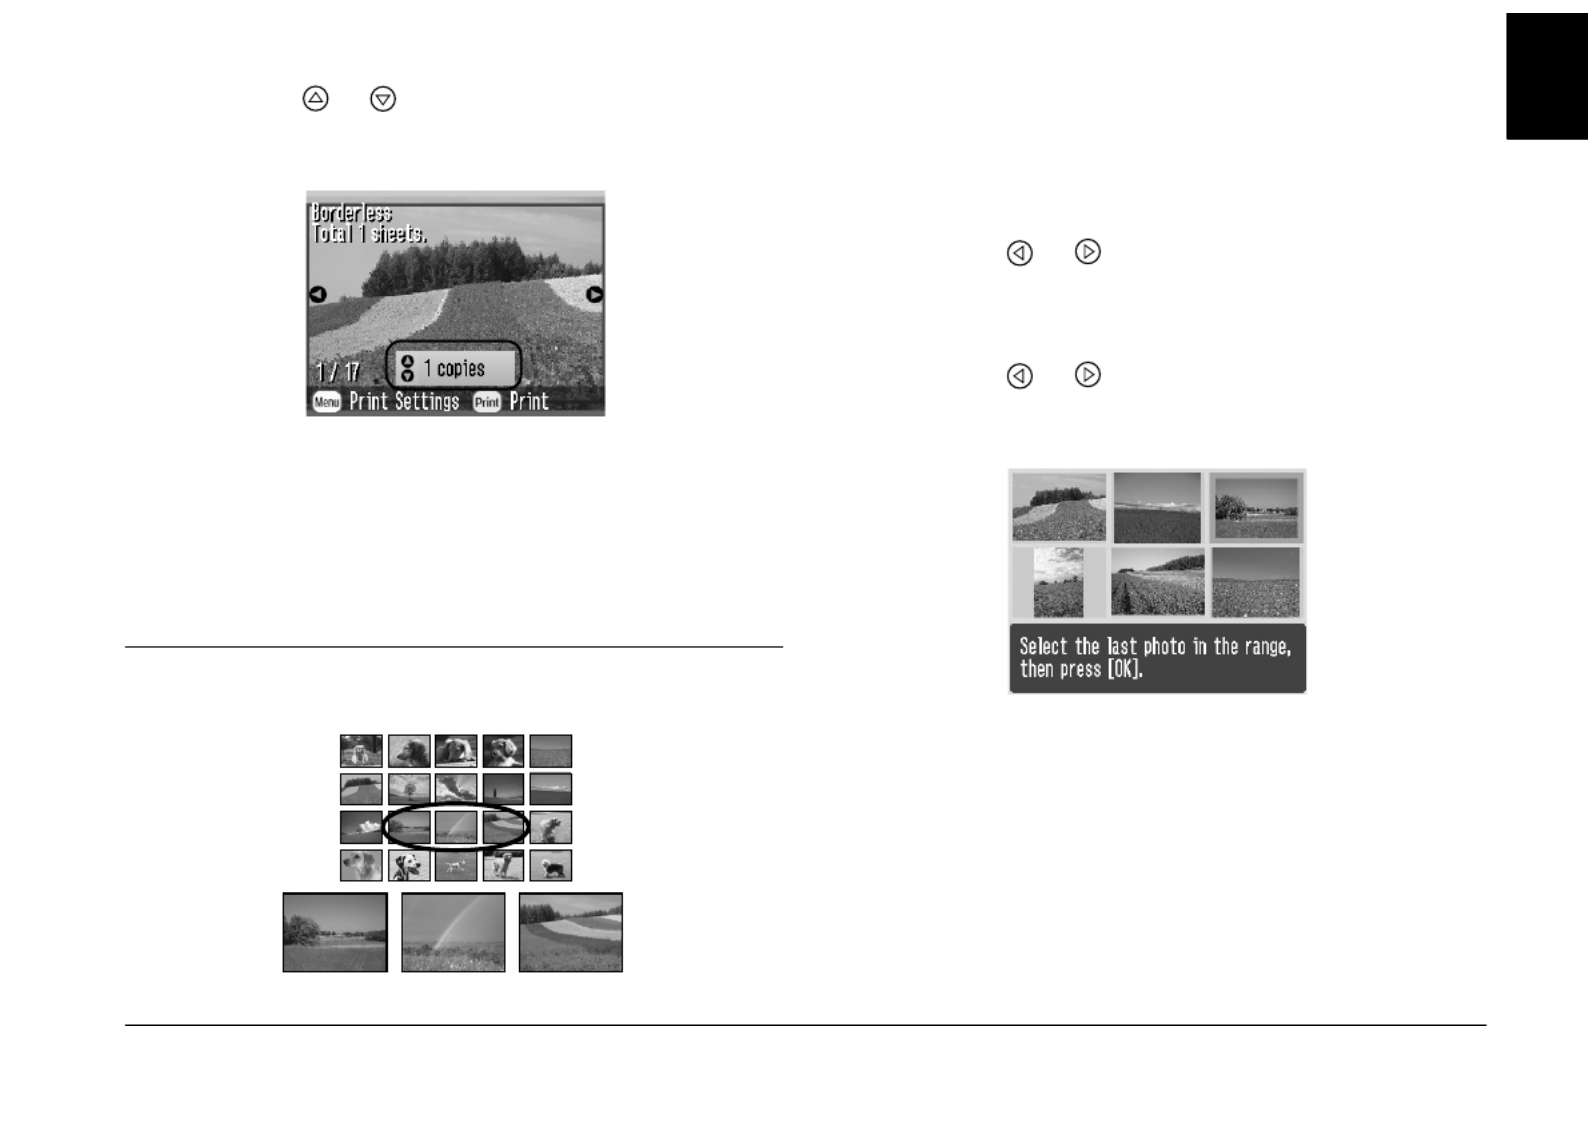
Printing Range of Photos
Follow the steps below to print a range (or sequence)
of consecutive photos from your camera’s memory
card. Selecting a range is convenient because you
don’t have to choose each individual photo.
1. Press or to highlight Print Range, then
press OK. Thumbnail images of the photos
appear.
2. Press or to choose the first photo. Then
press OK.

24 Basic Photo Printing
3. Press or to choose the last photo.
4. Make sure that the photos you want to print are
highlighted in blue, then press OK.
5. Press or to select the number of copies.
6. Press OK to confirm your print selections.
7. Press Print to start printing.
Printing Photos Searching by Date
If you know the date the photos were taken, you can
find and print them easily using this menu.
1. Press or to highlight Print by Date, then
press OK.
2. Press or to highlight the date you want,
then to check the date. To clear the check, press
.
3. Press OK.

Basic Photo Printing 25
English
4. Press or to select the photo you want.
Note:
You can switch the view of photos by pressing or
5. Press or to select the number of copies for
that photo.
6. Repeat steps 4 and 5 for additional photos.
7. Press OK to confirm your print selections.
8. Press Print to start printing.
Printing an Index
1. Press or to highlight Print Index, then press
OK.
2. Press OK to confirm your print selections.
3. Press Print to start printing.
Printing a Photo With a Frame

26 Basic Photo Printing
You can make your photo more fun by printing it with
a frame! As well as the preset frames, you can add
frames from the memory card by using PIF
DESIGNER and EPSON PRINT Image Framer Tool
software. For details on installing the software, see
“Installing the Printer Software” on page 62. For
details on using the software see the online User’s
Guide.
Note:
If you want to print a photo with a frame you previously
specified by EPSON camera, see “Printing a Photo With a
Frame Specified by Camera” on page 36.
1. Press or to select the Add Frame and press
OK.
2. Press or to select the photo and press OK.
3. Press or to select the frame and press OK.
A preview of the photo and the frame you selected
appears.
Note:
If you select a frame from the memory card, you cannot
see the preview of the photo and frame.
4. Press or to select the number of copies.
5. Press OK to confirm your print selections.
Basic Photo Printing 27
English
6. Press Print to start printing.
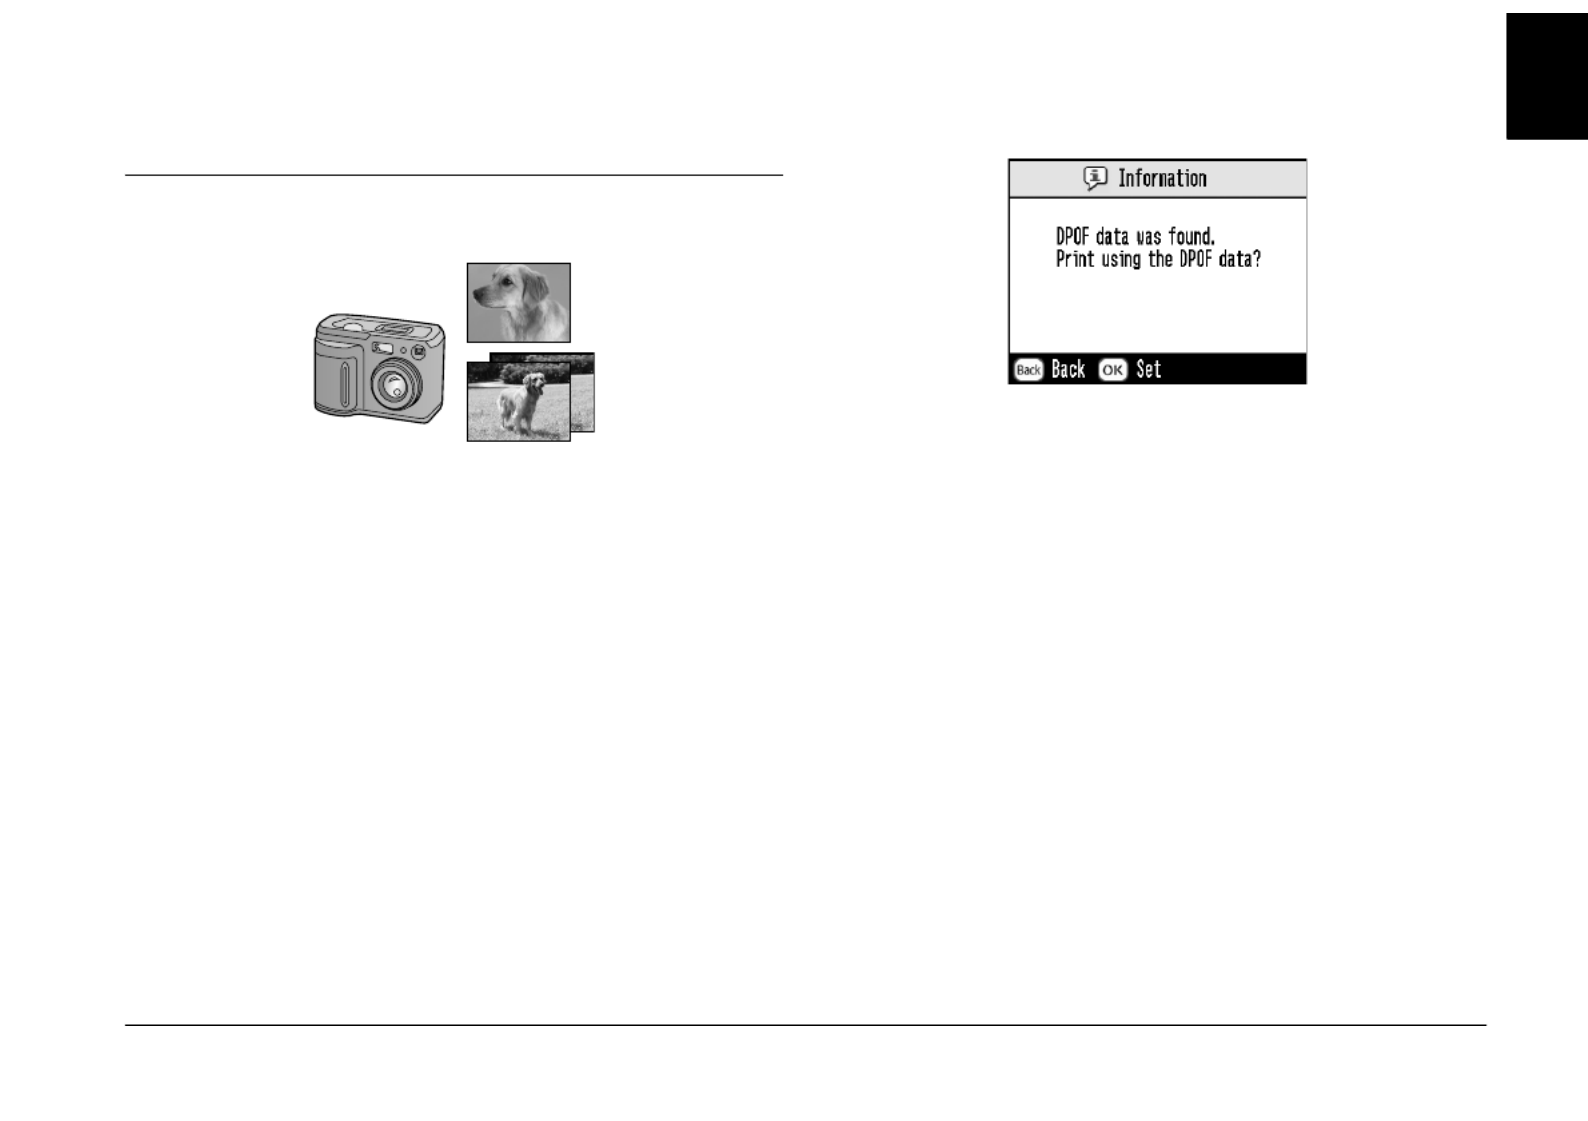
Printing Camera-Selected DPOF Photos
If your camera supports DPOF (Digital Print Order
Format), you can use it to pre-select which photos and
how many copies you want to print. See your camera’s
manual to choose photos for printing with DPOF, then
insert your memory card in PictureMate. PictureMate
automatically reads your pre-selected photos.
1. Load paper and a memory card that contains
DPOF data.
2. When this message appears, press OK.
3. Press Print to start printing.

28 Doing More With Your Photos
Doing More With Your Photos
By pressing Menu during the print settings, you can
modify your prints, as follows:
❏Print photos in various layouts
❏Print photos with the time and/or date
❏Print photos in black and white or a sepia tone
❏Print out part of the photo
❏Adjust or enhance photo prints
❏Print a photo with a frame specified by camera
You can also view all the photos stored on your
memory card in sequence like a slide show from the
Main Menu.
Choosing a Layout
1. After selecting photos and the number of copies,
press Menu.
2. Press or to highlight Layout, then press
to open the menu.
3. Press or to highlight the layout setting you
want for your photo(s), then press OK.
You have the following choices:
Borderless Index
Border Half Page
(2 per sheet without a
border)
Double
(2 per sheet with a
border)
Photo ID

Doing More With Your Photos 29
English
Note:
To print two double-sized photos on one sheet, select
multiple copies or multiple photos.
4. If you do not need to change any other settings,
press OK to close the menu.
5. Press OK to confirm your print selections.
6. Press Print to start printing.
Adjusting the amount of image enlarged
during borderless printing
When Borderless is selected the image is enlarged
automatically to eliminate the borders. This may cut
off part of your image. The following steps explain
how to control the amount of the image that is
enlarged.
1. On the Main Menu or after selecting photos, press
Menu.
2. Press or to select Setup, then press to
open the menu.
3. Press or to select Borderless Expansion,
then press .
4. Press or to select the setting, then press OK.
Note:
For most print jobs, selecting Max is recommended in order
to eliminate margins on all sides of the paper. Selecting Min
decreases the amount of the image that extends beyond the
edges of the paper; however, as this amount decreases,
margins may begin to appear on one or more sides of the
paper.
Adding the Date or Time
You can add the date and/or time your photo was
originally taken to the bottom right corner of your
print.
1. After selecting the photo(s) and number of copies,
press Menu.

30 Doing More With Your Photos
2. To print the date, press or to highlight
Date, then press to open the menu.
3. Press or to choose a setting:
❏None (default, turns off the date stamp)
❏mmm.dd.yyyy (Sep.01.2004)
❏dd.mmm.yyyy (01.Sep.2004)
❏yyyy.mm.dd (2004.09.01)
4. Press OK.
5. To print the time, press or to highlight Time,
then press to open the menu.
6. Press or to choose a setting:
❏None (default, turns off the time stamp)
❏12-hour (03:00 for 3 pm)
❏24-hour (15:00 for 3 pm)

Doing More With Your Photos 31
English
7. Press OK.
8. If you do not need to change any other settings,
press OK to close the menu.
9. Press OK to confirm your print selections.
10. Press Print to start printing.
Printing Photos in Black and White or
Sepia
You can print your photo in black and white or in a
sepia tone without changing the original photo.
Note:
A sepia print has a brownish tone, for an old-fashioned photo
look.
1. After selecting photo(s) and number of copies,
press Menu.
2. Press or to highlight Color Effect, then
press to open the menu.
3. Press or to choose B&W or Sepia, then press
OK.
4. If you do not need to change any other settings,
press OK to close the menu.
5. Press OK to confirm your print selections.
6. Press Print to start printing.

32 Doing More With Your Photos
Cropping Your Photo
You can print just part of a photo, cropping out the
area that you don’t want. You can choose only one
photo to crop at a time.
1. Choose the photo you want to crop with the Print
Some or Print by Date option. See “Printing
Several Photos” on page 22 or “Printing Photos
Searching by Date” on page 24.
2. Press to crop a photo. You will see a frame
around the cropped area.
3. Use the following procedures to set the area you
want to crop.
❏Press or to change the frame size.
❏Press , , or to move the frame.
❏Press Menu to rotate the frame.
4. Press OK to confirm the cropped image.
Note:
This setting remains in effect until you print or press
Cancel.
5. After checking the cropped image, press OK.
6. If you do not need to change any other settings,
press OK to confirm your print selections.
7. Press Print to start printing.

Doing More With Your Photos 33
English
Fixing Your Photos
PictureMate lets you correct the color and improve the
image quality of your photos without using a
computer. Three basic types of adjustments are
available:
❏Automatic adjustments
If your camera supports PRINT Image Matching
or Exif Print, you can use the printer’s P.I.M. or
Exif Print setting to automatically adjust your
photos for the best results.
If your camera doesn’t support PRINT Image
Matching or Exif Print, you can use PhotoEnhance
to make adjustments for the type of environment
in which your photos were taken.
❏Manual adjustments
If your photos are too light or too dark, you can
adjust their brightness or control the saturation
and sharpness.
If you want, you can make manual adjustments
while P.I.M., Exif Print, or PhotoEnhance are
turned on in order to fine-tune your automatic
settings.
❏Enhance small photos
If your photos are small you can increase the
resolution so that they can be printed at larger
sizes. You can also remove digital noise or
interference from photos.
Note:
These settings affect only your printed pictures. They do not
change your original image files.

34 Doing More With Your Photos
Automatically Fixing Your Photos
1. After selecting the photo(s) and number of copies,
press Menu.
2. Press or to highlight Auto Correct, then
press to open the menu.
3. Press or to choose one of the options.
❏P.I.M. - PictureMate chooses this setting
automatically if it detects P.I.M. information
that your camera saved in your digital files.
This information helps ensure an accurate
image reproduction.
❏Exif Print - PictureMate chooses this setting
automatically if it detects Exif Print
information saved in your camera’s digital
files. This information helps ensure that your
photos are printed accurately.
❏PhotoEnhance - Use this if a print does not
look good; for example, this may correct
images that are too dark, too bright, or
backlit.
❏None - Prints photos as is or bypasses P.I.M.
or Exif Print data (default setting for files with
no P.I.M. or Exif Print data).
4. Press OK.
5. If you do not need to change any other settings,
press OK to close the menu.
6. Press OK to confirm your print selections.
7. Press Print to start printing.

Doing More With Your Photos 35
English
Manually Fixing Your Photos
1. After selecting the photo(s) and number of copies,
press Menu.
2. Press or to highlight Fix Photo, then press
to open the menu.
3. Select Brightness, Saturation, or Sharpness, then
press .
4. Adjust the settings as necessary, then press OK
twice.
5. If you do not need to change any other settings,
press OK to close the menu.
6. Press OK to confirm your print selections.
7. Press Print to start printing.
Enhancing Small Photos
1. After selecting the photos and the number of
copies, press Menu.
2. Press or to select Small Image, then press
to open the menu.
3. Press or to select On, then press OK.
4. If you do not need to change any other settings,
press OK to close the menu.
5. Press OK to confirm your print selections.
6. Press Print to start printing.
36 Doing More With Your Photos
Printing a Photo With a Frame Specified
by Camera
If you want to print a photo with a frame you
previously specified by EPSON camera, follow the
steps below.
1. On the Main Menu, or after selecting photos, press
Menu.
2. Press or to select Setup, then press to
open the menu.
3. Press or to select Enable P.I.F. Relation,
then press .
4. Press or to select On, then press OK.
5. Press OK to confirm the setting, and press OK
again to close the menu.
6. Select the photos from the Print All, , Print Some
Print Range, or Print by Date menu and print.
Note:
This setting is available only when Borderless or Border is
selected in the layout setting of Change Personal Defaults.
Viewing a Slide Show
1. On the Main Menu, press or to select Play
Slide Show and press OK.
2. PictureMate shows the photos in the memory
card in sequence.
❏Press OK to pause the slide show. Press OK
again to resume the slide show.
❏Press any button except OK to end the slide
show.

Saving Your Photos to an External Device 37
English
Saving Your Photos to an External Device
You can save photo files on your memory card to a
computer when you connect it to PictureMate with a
USB cable. You can also save photos to an external
device that you connect directly to PictureMate.
Saving Photos to an External Device
Connect an external storage device directly to
PictureMate and save your photo files to one of these:
❏CD-R/RW drive (CD-R media only)
❏Iomega® Zip® disk (100, 250, or 750MB)
❏Flash memory (thumb) drive
Note:
Epson cannot guarantee the compatibility of any drives.
1. Make sure PictureMate is on.
2. Insert your memory card into PictureMate.
3. If you are using a CD-R/RW drive or Zip drive,
plug it into an electrical outlet if required.
4. Connect the drive to PictureMate:
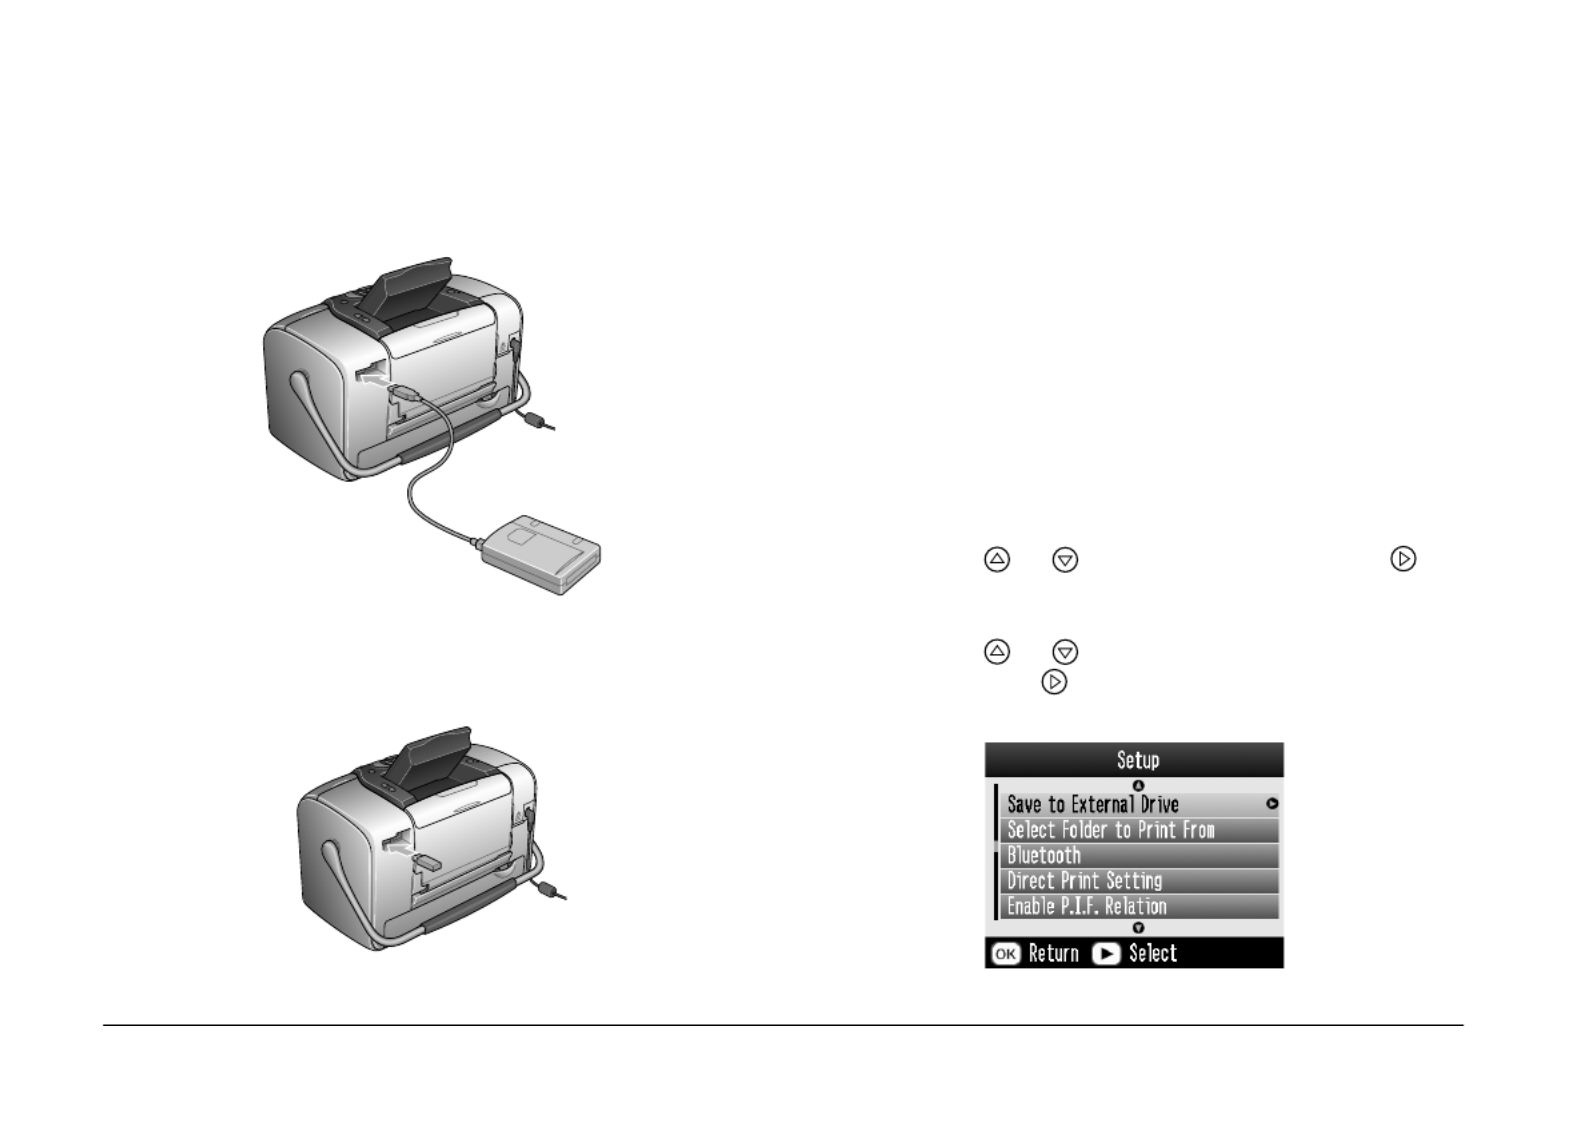
38 Saving Your Photos to an External Device
❏For a CD-R/RW or Zip drive, connect its USB
cable to the EXT/IF port on the back of
PictureMate. Then insert a CD-R or Zip disk
in the drive.
❏For a flash memory drive, plug it into the
EXT/IF port on the back of PictureMate.
Note:
❏If you see the message “Insufficient space on the
external device. Backup cannot be performed”
press Cancel and insert a new CD-R or Zip disk,
or connect a flash memory drive with more free
space.
❏If you insert a blank CD-R in the drive before
inserting a memory card in PictureMate, you may
see an error message. Eject the CD-R from the
drive to clear the error, insert your memory card,
then re-insert the CD-R.
5. On the Main Menu, press Menu.
6. Press or to select Setup, then press to
open the menu.
7. Press or to select Save to External Drive,
then press .
Saving Your Photos to an External Device 39
English
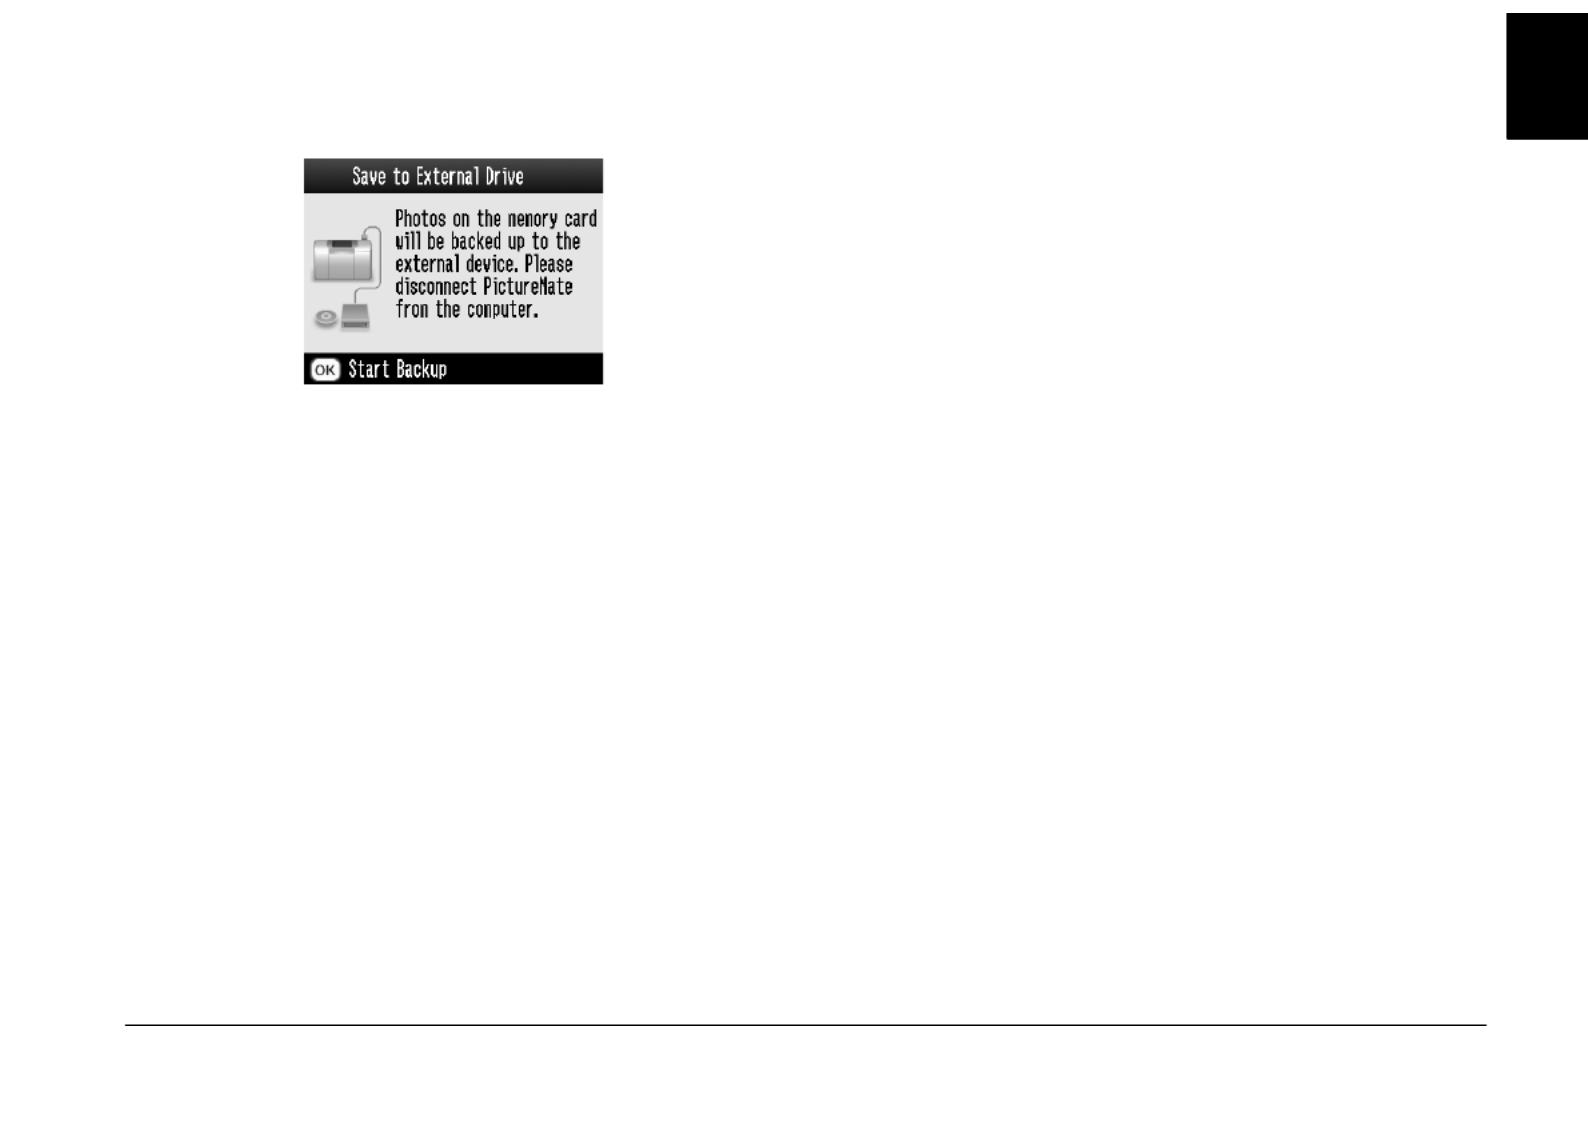
8. Confirm the following message, then press OK.
9. Press OK to start saving your photos.
cCaution
Do not remove the drive or memory card while
the photos are being saved, or you may lose
photos on your card or drive. If you need to stop
the backup, press Cancel.
You can save photos multiple times to the same disk
or drive until it is full. Each time you save photos on
the same disk or drive, they are saved in a new folder.
The first folder is named 001, the second folder is
named 002, etc. If you save on a CD-R, PictureMate
names the CD-R Photo.

40 Printing From an External Device
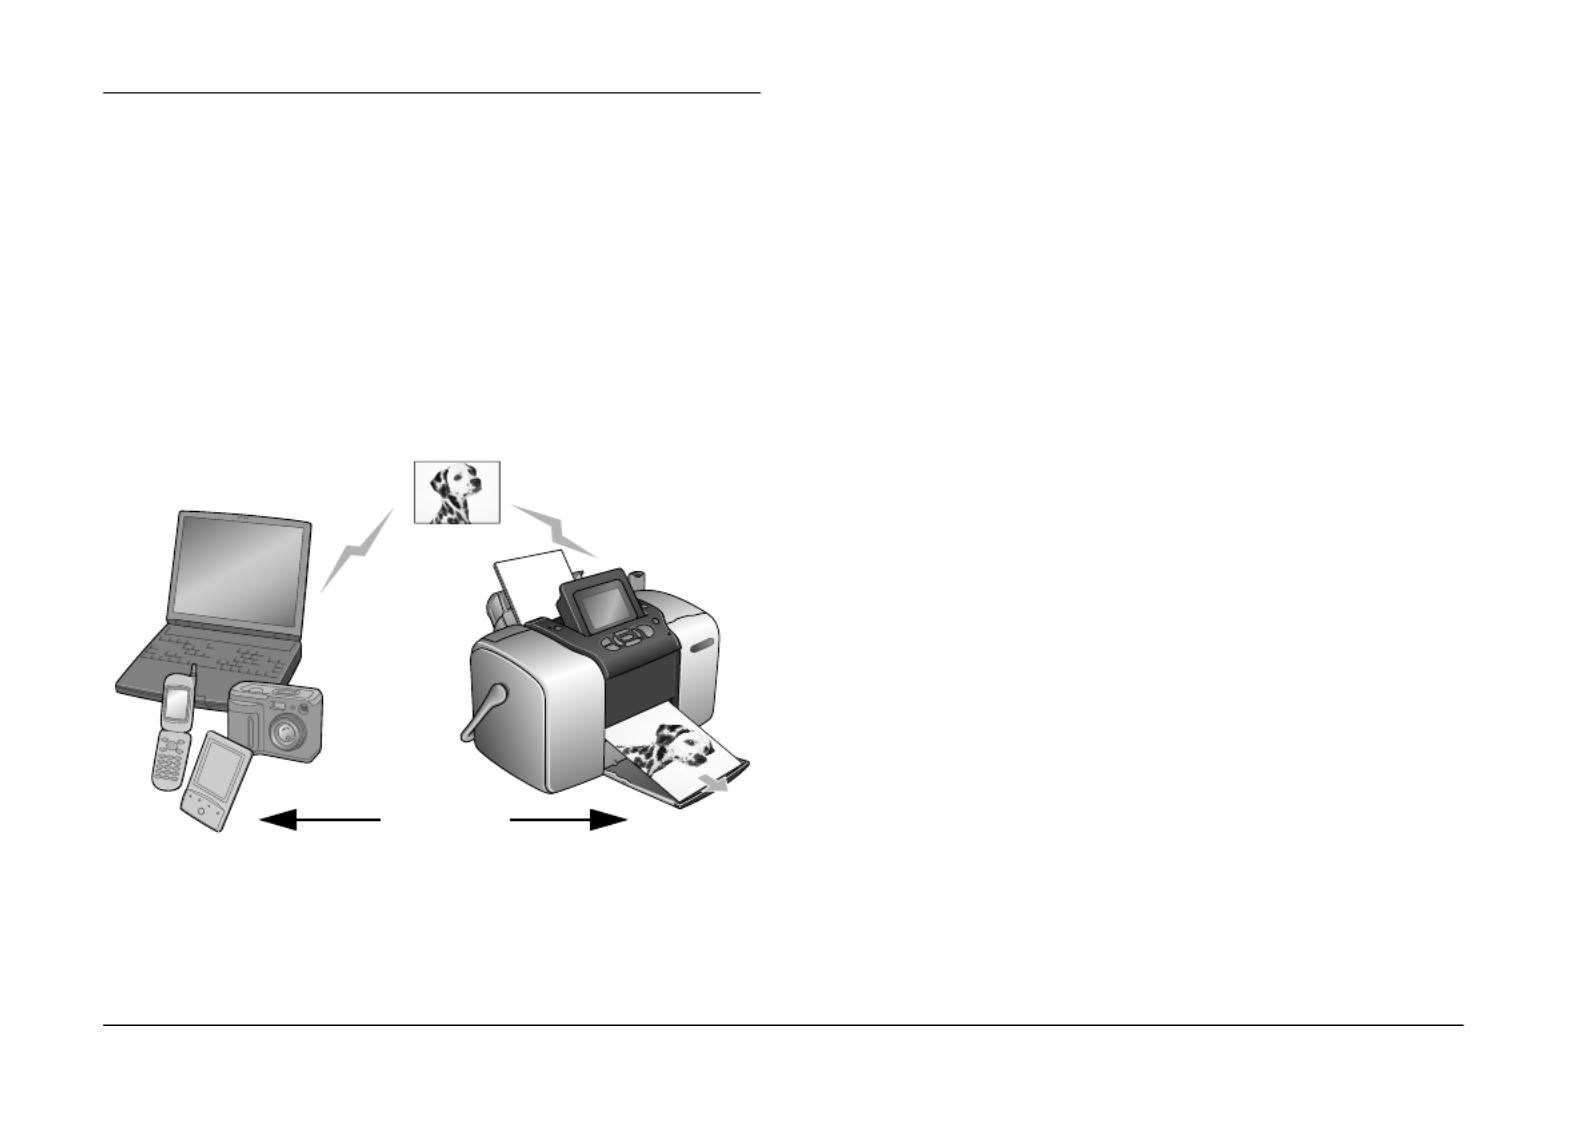
Printing From an External Device
PictureMate can print stored photos on a computer or
on another device such as an external hard drive, a
Bluetooth-enabled device, or a digital camera.
Printing From an External Drive
If you saved your photos to a CD, Zip disk, or flash
memory (thumb) drive, you can connect the drive to
the back of PictureMate and print just like you do
when you insert a memory card.
You can also print photos from a CD that you get from
a photo processing lab. (Images should be in JPEG file
format. Some CDs may not work.)
1. Make sure PictureMate is on.
2. Make sure there are no memory cards in
PictureMate’s memory card slots. The card light
should be off.
3. If a memory card is inserted, the printer will read
photos from the card, not from an external drive.
4. If PictureMate is connected to a computer,
disconnect it or turn off the computer.

Printing From an External Device 41
English
Connect your CD or Z ip d ri ve ’s US B c ab le, or pl ug
your flash memory drive into the EXT/IF port on
the back of PictureMate.
5. For a CD or Zip drive, insert a CD or Zip disk with
photos into the drive.
If you used PictureMate to save photos on the
same CD-R, Zip disk, or flash memory drive more
than once, it will have multiple folders. You see
this message:
Press or to choose the folder where your
photos are stored, then press OK. The most
recently saved folder has the largest number.

42 Printing From an External Device
6. PictureMate counts the photos on your drive, then
shows the following screen:
If you see this screen, print your photos from the
Main Menu (see “Basic Photo Printing” on page
21).
Printing From a PictBridge-Enabled
Camera
You can connect your PictBridge- or USB DP-enabled
digital camera to the back of PictureMate and use the
camera to control printing. (See your camera manual
to see if it supports the PictBridge standard or USB
DP.)
1. Make sure PictureMate is on.
2. Make sure there are no memory cards in
PictureMate’s slots. The card light should be off.
Note:
If a memory card is inserted, the printer will read
photos from the card, not from a camera.
3. Press Menu.
4. Press or to select Setup, then press .
5. Press or to select Direct Print Setting, then
press .
6. Press again to open the layout menu.
7. Press or to select the desired option, then
press OK.
8. Press OK twice to return to the Menu option.
Change the Color Effect, Auto Correct, Date,
Time, Fix Photo, and Small Image settings if
necessary.

Printing From an External Device 43
English
9. Connect your camera’s USB cable to your camera
and the EXT/IF port on the back of PictureMate.
10. Use the digital camera to select the photo you
want to print. Be sure to make the desired print
settings on the digital camera because the digital
camera settings generally take precedence over
the print settings of PictureMate. See your digital
camera's documentation for information on more
detailed settings.
11. Print from the digital camera.
44
Printing From a Bluetooth Device
About the Bluetooth Photo Print Adapter
The optional Bluetooth Photo Print Adapter is a
wireless communication module used to print from
digital cameras and other devices with Bluetooth
wireless technology without cables when connected
to the printer.
Note:
❏While this product complies with the Bluetooth
Specification, it is not guaranteed to work with all
devices enabled with Bluetooth wireless technology.
❏The communication range of this product is
approximately 10 meters; however, this may vary
depending on conditions including obstacles between
devices; signal quality; magnetic fields; static
electricity and electromagnetic interference; software;
operating system; reception sensitivity; and antenna
performance.
Available Profile
Basic Printing Profile (BPP)
Basic Imaging Profile (BIP)
Hardcopy Cable Replacement Profile (HCRP)
Object Push Profile (OPP)
Up to 10 m

45
English
Connecting and Disconnecting the
Bluetooth Photo Print Adapter
Connecting
1. Insert the Adapter connector into the EXT/IF port
as shown below.
cCaution:
Do not connect this product while the
printer is operating. Doing so may cause
the printer to malfunction.
2. The Adapter’s light comes on for one second. If
the LED does not turn on, disconnect the Adapter
from the printer, then reconnect it.
Disconnecting
Remove the Adapter’s connector from the EXT/IF
port as shown below.

46
cCaution:
❏Do not remove this product while
communicating with another device.
❏Do not disconnect this product while the
printer is operating.
Doing so may cause the printer to
malfunction.
❏Do not remove this product by pulling on
its upper section. Doing so may damage
the product.
Bluetooth Settings
Use the LCD panel on the printer to make settings for
Bluetooth wireless communication.
& See “Making settings” on page 47
Outline of settings
Setting Choices Description
BT Printer ID
Set
printer name-
(number)
(Default = 1)
If multiple printers enabled with
Bluetooth are in the same
communication range,
distinguish them by assigning
each number from 0 through 9.
To make the Device Name
setting take effect, turn the
printer off and then back on.
Connectivity
Mode
Public This mode allows devices
enabled with Bluetooth to
freely discover the printer and
print.
Private This mode prevents unknown
devices from discovering the
printer.
To print in Private mode, first
search for the printer once in
Public mode. After your
device has discovered the
printer in Public mode once, it
will subsequently be able to
communicate with and print
from it in Private mode.
Pairing This mode requires that the
four-digit Passkey be entered
into a device before it can
communicate with and print
from the printer.
BT Encryption On/Off
(Default = Off)
Select On to encrypt
communication. Encryption
requires that the four-digit
Passkey be entered into a
device before it can
communicate with and print
from the printer.
PIN Code Set Any four-digit
number
(Default =
0000)
The Passkey setting allows you
to set the four-digit Passkey
that must be entered into a
device before printing if
Bonding is selected as the
Communication Mode or if
Encryption is On.

47
English
Making settings
1. Connect the Bluetooth Photo Print Adapter to
your printer.
& See “Connecting and Disconnecting the
Bluetooth Photo Print Adapter” on page 45
cCaution:
Be sure that the printer is not operating
before connecting this product. Otherwise,
the printer may malfunction.
2. Press Menu.
3. Press or to select Setup, then press to
open the menu.
4. Press or to select Bluetooth, then press .
5. Change the settings of each item. See “Outline of
settings” on page 46 for information about
Bluetooth settings.
The Bluetooth Passkey Setting (PIN Code Set)
If you select Pairing as the Connectivity Mode or On
as the BT Encryption setting, the Passkey must be
entered into a Bluetooth wireless-capable device
before it can communicate with and print from the
printer. The default Passkey is 0000.
To change the Passkey, follow the instructions below.
A Passkey of 1234 is used as an example.
BT Device
Address
Set at the
factory
(Example)
11-11-11-11-1
1-11
Displays the unique Bluetooth
Device Address of the printer.

48
1. Press or to select PIN Code Set, then press
.
2. Press or to select a number for the first digit,
then press or to change the digit.
3. Select numbers for the second through fourth
digits in the same manner, then press OK to
activate the Passkey.
Printing
1. Make sure the Bluetooth Photo Print Adapter is
connected to PictureMate and Bluetooth settings
have been made. For details on connecting the
Bluetooth Photo Print Adapter, see “Connecting
and Disconnecting the Bluetooth Photo Print
Adapter” on page 45. See “Bluetooth Settings” on
page 46 to set the Bluetooth settings.
2. Press Menu.
3. Press or to select Setup, then press .
4. Press or to select Direct Print Setting, then
press .
5. Press again to open the layout menu.

49
English
6. Press or to select the desired option, then
press OK.
7. Press OK twice to return to the Menu option.
Change the Color Effect, Auto Correct, Date,
Time, Fix Photo, and Small Image settings if
necessary.
8. Print the data from your Bluetooth enabled
device.
Note:
The settings available may vary among Bluetooth
wireless-capable devices. For more information, refer to
your device’s documentation.
For more information about printing from Bluetooth
wireless-capable digital still cameras, digital video
cameras, PDAs, mobile PCs and other Bluetooth
wireless-capable device, refer to the documentation
for both the device and the printer.

50 Replacing the Photo Cartridge
Replacing the Photo Cartridge
Checking the Photo Cartridge Status
(Ink Level)
You can check the approximate ink level in your photo
cartridge at any time.
1. On the Main Menu or during print settings, press
Menu.
2. Press or to highlight Maintenance, then
press .
3. Press or to highlight Ink Level, then press
.
4. You see a screen showing the approximate ink
level in your photo cartridge. Press OK to close
the screen.
Replacing the Photo Cartridge
This printer uses photo cartridge equipped with an IC
chip. The IC chip accurately monitors the amount of
ink, so even if it is removed and later reinserted, all of
its ink can be used. However, some ink is consumed
each time the cartridge is inserted because the printer
automatically checks reliability.

Replacing the Photo Cartridge 51
English
wWarning:
Keep photo cartridges out of the reach of
children. Do not allow children to drink from
or otherwise handle the cartridges.
cCaution:
❏Epson recommends the use of genuine
Epson photo cartridges. Epson warranties
do not cover damage to your printer caused
by the use of ink cartridges not
manufactured by Epson.
❏Leave the old cartridge installed in the
printer until you have obtained a
replacement; otherwise, ink remaining in
the print head nozzles may dry out.
❏Do not refill photo cartridges. The printer
calculates the amount of ink remaining
using an IC chip on the photo cartridge.
Even if the cartridge is refilled, the amount
of ink remaining will not be recalculated
by the IC chip and the amount of ink
available for use will not change.
Note:
In addition to the ink used during an image printing, ink is
consumed during the print head cleaning operation, during
the self-cleaning cycle which is performed when the printer
is turned on, and during ink charging when the photo
cartridge is installed in the printer.
For more information about photo cartridges.
& See “When handling photo cartridges” on page 12
1. Make sure that PictureMate is on, but not
printing.
Note:
Check the ink status.
& See “Checking the Photo Cartridge Status
(Ink Level)” on page 50
2. Check that the message “Ink out.” is displayed on
the LCD panel. This message is not displayed if
there is some ink left.
3. Close the paper support and paper feeder.
Product specificaties
| Merk: | Epson |
| Categorie: | Printer |
| Model: | PictureMate 500 |
| Gewicht: | 2800 g |
| Stroomvoorziening: | AC 220 ~ 240v |
| Beeldscherm: | LCD |
| Beeldschermdiagonaal: | 2.4 " |
| Resolutie: | 320 x 240 Pixels |
| USB-poort: | Ja |
| Connectiviteitstechnologie: | Bedraad |
| Markt positionering: | Thuis & kantoor |
| Aantal USB 2.0-poorten: | 1 |
| Aansluitingen: | USB |
| Compatibele besturingssystemen: | Microsoft Windows98 / 2000 / XP / Me\nMac OS 9.1, Mac OS X 10.2 |
| Mac-compatibiliteit: | Ja |
| Maximale resolutie: | 5760 x 1440 DPI |
| Papierlade mediatypen: | Glossy paper, Photo paper |
| Printtechnologie: | Inkjet |
| Totale invoercapaciteit: | 20 vel |
| Direct printen: | Ja |
| Gemiddeld stroomverbruik tijdens printen: | 13 W |
| Geluidsdrukniveau (afdrukken): | 45 dB |
| PictBridge: | Ja |
| Spuitmondjes: | 6 x 90 |
| Standaard mediaformaten: | 10 x 15cm / 4"x6"\n |
| Minimale opslag schijfruimte: | 150 MB |
| Minimale processor: | Pentium II 500MHz (PC) PowerPC G4 (Mac) |
| Afmetingen (B x D x H): | 256 x 154 x 167 mm |
| Minimale RAM: | 128 MB |
| Maten print: | 10 x 15 cm |
Heb je hulp nodig?
Als je hulp nodig hebt met Epson PictureMate 500 stel dan hieronder een vraag en andere gebruikers zullen je antwoorden
Handleiding Printer Epson

12 Februari 2025
2 Februari 2025
2 Februari 2025
2 Februari 2025
2 Februari 2025
2 Februari 2025
2 Februari 2025
14 Januari 2025
14 December 2024
21 November 2024
Handleiding Printer
- Printer HP
- Printer Sony
- Printer Samsung
- Printer Xiaomi
- Printer Panasonic
- Printer LG
- Printer Huawei
- Printer Canon
- Printer Honeywell
- Printer Olympus
- Printer Toshiba
- Printer Xerox
- Printer Agfaphoto
- Printer AVM
- Printer Brother
- Printer Builder
- Printer D-Link
- Printer Dell
- Printer Digitus
- Printer Dymo
- Printer Epson 7620
- Printer Frama
- Printer Fujifilm
- Printer Fujitsu
- Printer Ibm
- Printer Intermec
- Printer Kern
- Printer Kodak
- Printer Kogan
- Printer Konica Minolta
- Printer Kyocera
- Printer Lenovo
- Printer Lexmark
- Printer Minolta
- Printer Mitsubishi
- Printer MSI
- Printer Nec
- Printer Paxar
- Printer Polaroid
- Printer Primera
- Printer Renkforce
- Printer Ricoh
- Printer Roland
- Printer Royal Sovereign
- Printer Sagem
- Printer Seiko
- Printer Sharp
- Printer Star
- Printer Thomson
- Printer Tomy
- Printer Toshiba TEC
- Printer Triumph-Adler
- Printer Velleman
- Printer Zebra
- Printer Oce
- Printer Oki
- Printer Olivetti
- Printer Olympia
- Printer CSL
- Printer Argox
- Printer DTRONIC
- Printer Metapace
- Printer Citizen
- Printer Nilox
- Printer Approx
- Printer Ultimaker
- Printer Custom
- Printer Bixolon
- Printer Brady
- Printer GoDEX
- Printer Testo
- Printer EC Line
- Printer Sawgrass
- Printer Pantum
- Printer DNP
- Printer TSC
- Printer Equip
- Printer StarTech.com
- Printer Fichero
- Printer GG Image
- Printer Posiflex
- Printer ZKTeco
- Printer Star Micronics
- Printer Datamax-O'neil
- Printer Panduit
- Printer Dascom
- Printer HiTi
- Printer Vupoint Solutions
- Printer Elite Screens
- Printer Phoenix Contact
- Printer Videology
- Printer Colop
- Printer Raspberry Pi
- Printer Evolis
- Printer Unitech
- Printer Middle Atlantic
- Printer IDP
- Printer Fargo
- Printer Microboards
- Printer Mutoh
- Printer Tally Dascom
- Printer Nisca
Nieuwste handleidingen voor Printer

9 April 2025

8 April 2025
2 April 2025
2 April 2025
1 April 2025

1 April 2025

29 Maart 2025
29 Maart 2025

11 Maart 2025