Dragon Touch Vision 4 Lite Handleiding
Dragon Touch
Camcorder
Vision 4 Lite
Lees hieronder de 📖 handleiding in het Nederlandse voor Dragon Touch Vision 4 Lite (128 pagina's) in de categorie Camcorder. Deze handleiding was nuttig voor 46 personen en werd door 2 gebruikers gemiddeld met 4.5 sterren beoordeeld
Pagina 1/128

USER MANUAL
DragonTouch Vision 4 Lite Action Camera
v3.0

01 - 21English
22 - 42Deutsch
43 - 63Español
64 - 84Français
85 - 105Italiano
106 - 126日本語

What's in the Box
Your Vision 4 Lite
Getting Started
Overview of Modes
Customizing Your Vision 4 Lite
Connecting to the App
Playing Back Your Content
Deleting Your Content
Offloading Your Content
Adjusting the Zoom Level
Maintaining Your Camera
Maximizing Battery Life
Battery Storage and Handling
Remote
Mounting Your Camera
Contact Us
2
3
5
6
7
13
14
14
15
15
15
16
16
17
19
21
CONTENTS
1
EN
2
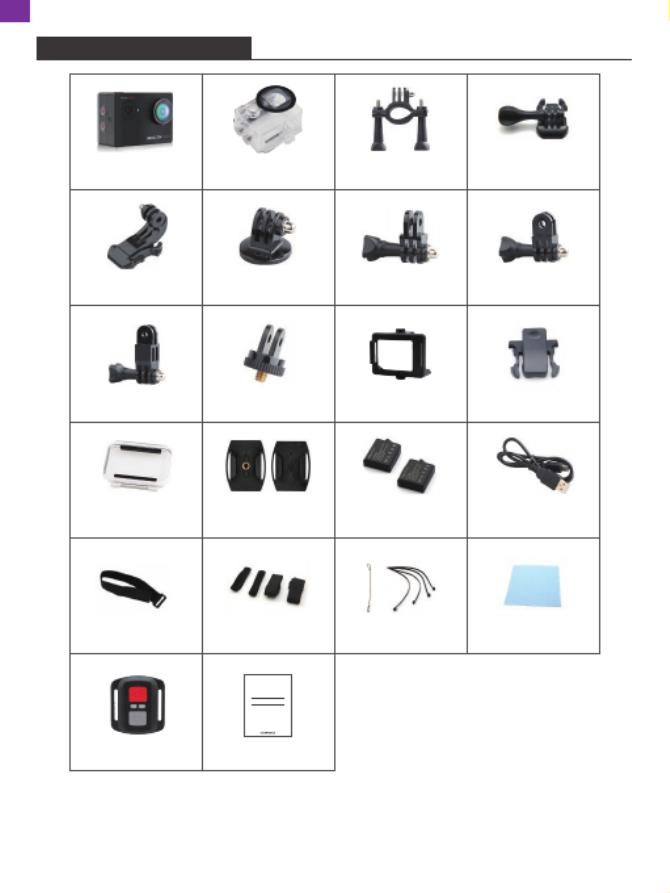
WHAT'S IN THE BOX
Mount 6
Mount 3 Mount 5Mount 4
Mount 7 Mount 8 Mount 9
Lens ClothTethers
Mount 2
Bandages
USB CableBattery
Vision 4 Lite Mount 1
Remote Quick Start Guide
Quick Star t Gu ide
Dra gon Touc h Vi sion 4 Li te A c tion C am er a
Helmet Mounts
Handle Bar/
Pole Mount
Waterproof
Housing
Protective
Backdoor
Wrist Strap
for Remote
EN

3
YOUR VISION 4 LITE
1
23
4
5
6
710
11
8
9
EN

4
Shutter/Select Button
Power/Mode/Exit Button
Memory Card Slot
USB Port/External Mic Jack
Micro HDMI Port
Lens
Screen
Charging Indicator
Working Indicator
Up/Zoom Out/Wifi Button
Down/Zoom in Button
Battery Door
Note: The camera does not record sound when it is in the waterproof case.
1
2
3
4
5
6
7
8
9
10
11
12
12
EN

5
GETTING STARTED
Welcome to your DragonTouch Vision 4 Lite. To capture videos and photos,
you need a memory Card (sold separately) to start recording.
Memory Cards
Please use brand name memory cards that meet these requirements:
• Class 10 or UHS-I rating
• Capacity up to 64GB (FAT32)
Note:
1. Format the memory card before using the camera. To keep your memory card in
good condition, reformat it on a regular basis. Reformatting erases all your
content, so make sure to offload your photos and videos before reformatting.
2. FAT32 format memory card stops recording when the file size reaches 4GB and
starts to record again on a new file.
Powering On and Off
Press and hold the Power button for 3 seconds. The camera beeps while the camera
status light is on. When information appears on the screen, your camera is on. When
the camera is on, press and hold the Power button again to power off.
Switching Modes
Turn on the camera, press the Mode button to switch to video or photo mode.
Press and hold the OK button to enter the setting menu, choose the icon
and press the OK button again, there are more shooting modes available. Press the
Mode button to exit.
Turning On and Off Wifi
To turn on the camera, press and hold the Up button to turn on Wifi, the Wifi name
and password will appear on the screen. Press the Up button again to turn off Wifi.
EN

6
There are 8 different modes: Video, Slow Motion, Loop Recording, Time Lapse
Video, Photo, Auto Photo, Burst Photo, Self-Timer.
Video Mode
Your device is on the video mode - which is the default mode - when you turn on the
camera.
In Video Mode, press the Shutter button for the camera to start recording video.
Press the Shutter button again to stop recording video.
Slow Motion Mode
In Slow Motion Video mode, press the Shutter button, the camera records
slow-motion video.
Loop Recording Mode
Loop recording allows your camera to overwrite old files with new files. Once the
memory card becomes full, the camera will delete the first video file to make room
for the latest file. For example, if the setting for loop recording is "1 Minute", then
the camera will create video clips of 1 minute in length, and a 1-minute clip will be
deleted when the camera needs more memory.
Time Lapse Video Mode
In Time Lapse Video mode, press the Shutter button, the camera records video from
frames captured at specific intervals.
Photo Mode
In Photo Mode, press the Shutter button to take photos.
Auto Photo Mode
In Auto Photo Mode, press the Shutter button, the camera will automatically take
photos at specific intervals. Press the Shutter button again to stop.
OVERVIEW OF MODES
EN

8
White Balance: Auto/Sunny/Cloudy/Incandescent/Fluorescence
Default setting is Auto.
White Balance lets you adjust the color temperature of videos and photos to
optimize for cool or warm lighting conditions.
Exposure Setting: -3/-2/-1/0/1/2/3
Default setting is 0.
Exposure lets you select an area that you want the camera to prioritize when
determining exposure. This setting is particularly useful in shots where an important
region might otherwise be over- or underexposed.
Sharpness: High/Middle/Low
Default setting is Middle.
Video Quality: High/Middle/Low
Default setting is High.
ISO: Auto/100/200/400/800/1600/3200/6400
Default setting is Auto.
ISO determines the camera's sensitivity to light and creates a trade-off between
brightness and resulting image noise. Image noise refers to the degree of graininess
in the image. In low light, higher ISO values result in brighter images, but with greater
image noise. Lower values result in lower image noise but darker images.
Time Watermark: On/Off
Default setting is On.
Turn on this setting and this camera will add date stamp to the videos and photos
you take.
Record Audio: On/Off
Default setting is On.
Turn on this setting and this camera will record audio during recording a video.
Note: The camera does not record sound when it is in the waterproof case.
EN

13
Download and install the app on the App Store or Google Play.DV KING 4K
The app lets you control your camera remotely using a smartphone orDV KING 4K
tablet. Features include camera control, live preview, playback, download and
settings.
1. Turn on the camera, press and hold the Up button to turn on Wifi. The Wifi name
and password are shown on the camera screen.
2. Connect the Wifi " " and enter the password on your smartphoneVision 4 Lite
WLAN setting.
3. Open the DV KING 4K app, choose the Wifi of the camera and tap the arrow icon
on the right, wait for seconds, the camera will automatically connect to the app.
CONNCTING TO THE APP
Wifi
Exit
Connected
Saved
connected
Vision 4 Lite_148d
Vision 4 Lite_148d
4K30FPS
Video
DV King 4k
Slowly
4K30FPS
Loop Lapse
EN

16
The camera contains sensitive components, including the battery. Avoid exposing
your camera to very cold or hot temperatures. Low or high temperature conditions
may temporarily shorten the battery life or cause the camera to stop working
properly temporarily. Avoid dramatic changes in temperature or humidity when
using the camera, as condensation may form on or within the camera.
• Do not dry the camera or battery with an external heat source such as a microwave
oven or hairdryer. Damage to the camera or battery caused by contact with liquid
inside the camera is not covered under the warranty.
• Do not store your battery with metal objects, such as coins, keys or necklaces.
If the battery terminals come in contact with metal objects, this may cause a fire.
• Do not make any unauthorized alterations to the camera. Doing so may compromise
safety, regulatory compliance, performance, and may void the warranty.
WARNING: Do not drop, disassemble, open, crush, bend, deform, puncture, shred,
microwave, incinerate or paint the camera or battery. Do not insert foreign objects
into the battery opening on the camera. Do not use the camera or the battery if it
has been damaged - for example, if cracked, punctured or harmed by water.
Disassembling or puncturing the battery can cause an explosion or fire.
BATTERY STORAGE AND HANDLING
If the battery reaches 0% while recording, the camera will save the file before
powering off.
To maximize battery life, follow these guidelines when possible:
• Turn off Wireless Connections.
• Capture video at lower frame rates and resolutions.
• Use Screen Saver setting.
MAXIMIZING BATTERY LIFE
5. Keep the camera away from high temperature and strong sunshine to avoid being
damaged.
6. Do NOT use the camera when charging. Turn off the camera before charging.
EN

23
WAS IST IN DER BOX
Halterung 6
Halterung 3 Halterung 5Halterung 4
Halterung 7 Halterung 8 Halterung 9
ReinigungstuchBänder
Halterung 2
Befestigungsgurt
USB KabelBatterie
Vision 4 Lite Halterung 1
Fernbedienung Schnellstartanleitung
Quick Star t Gu ide
Dra gon Touc h Vi sion 4 Li te A c tion C am er a
Helm Halterung
Halterung für Lenker/
Gestänge
Wasserdichtes
Gehäuse
Schutzrückwand
Handgelenkband für
die Fernbedienung
DE

27
Die Kamera verfügt über 8 verschiedene Modi: Videomodus, Zeitlupenmodus,
Loop-Aufnahmemodus, Zeitraffer-Videomodus, Fotomodus, Automatischer
Fotomodus, Serienaufnahmemodus, Selbstauslösemodus.
Videomodus
Ihr Gerät befindet sich im Videomodus - welches der Standardmodus ist - wenn Sie
die Kamera einschalten.
Drücken Sie im Videomodus den Auslöser, damit die Kamera mit der Videoaufnahme
beginnt. Drücken Sie den Auslöser erneut, um die Videoaufnahme zu beenden.
Zeitlupenmodus
Drücken Sie im Zeitlupenmodus den Auslöser, die Kamera nimmt Zeitlupenvideos
auf.
Loop-Aufnahmemodus
Die Loop-Aufnahme ermöglicht es Ihrer Kamera, alte Dateien mit neuen Dateien zu
überschreiben. Sobald die speicherkarte voll ist, löscht die Kamera die älteste
Videodatei, um Platz für die neueste Videodatei zu machen. Wenn die Einstellung
für die Loop-Aufnahme z. B. „1 Minute” ist, erstellt die Kamera Videoclips von 1ner
Minute und löscht einen 1-minütigen Clip, wenn die Kamera mehr Speicherplatz
benötigt.
Zeitraffer-Videomodus
Drücken Sie im Zeitraffervideomodus den Auslöser, die Kamera zeichnet ein Video
aus in bestimmten Intervallen aufgenommenen Bildern auf.
MODUS ÜBERSICHT
DE
Wifi Ein- und Ausschalten
Schalten Sie die Kamera ein, drücken Sie die Oben-Taste und halten Sie sie gedrückt,
um das Wifi zu aktivieren; der Wifi Name und das Passwort werden auf dem
Bildschirm angezeigt. Drücken Sie die Oben-Taste erneut, um Wifi auszuschalten.
Product specificaties
| Merk: | Dragon Touch |
| Categorie: | Camcorder |
| Model: | Vision 4 Lite |
Heb je hulp nodig?
Als je hulp nodig hebt met Dragon Touch Vision 4 Lite stel dan hieronder een vraag en andere gebruikers zullen je antwoorden
Handleiding Camcorder Dragon Touch

6 December 2024
18 Juni 2023
31 Mei 2023
27 Mei 2023
2 Mei 2023
29 April 2023
24 April 2023
11 April 2023
1 April 2023
27 Maart 2023
Handleiding Camcorder
- Camcorder Braun
- Camcorder HP
- Camcorder Sony
- Camcorder Samsung
- Camcorder Xiaomi
- Camcorder Panasonic
- Camcorder Nikon
- Camcorder Canon
- Camcorder Garmin
- Camcorder JVC
- Camcorder Kenwood
- Camcorder Medion
- Camcorder Olympus
- Camcorder Quintezz
- Camcorder Toshiba
- Camcorder VTech
- Camcorder Abus
- Camcorder Activeon
- Camcorder AEE
- Camcorder Agfa
- Camcorder Agfaphoto
- Camcorder Aiptek
- Camcorder Airis
- Camcorder ATN
- Camcorder Bauer
- Camcorder BenQ
- Camcorder BlackVue
- Camcorder Braun Phototechnik
- Camcorder Bresser
- Camcorder Denver
- Camcorder DJI
- Camcorder Dnt
- Camcorder DOD
- Camcorder Drift
- Camcorder Easypix
- Camcorder EE
- Camcorder Elmo
- Camcorder Ematic
- Camcorder Energy Sistem
- Camcorder Envivo
- Camcorder FHD 1080P
- Camcorder Flir
- Camcorder Fujifilm
- Camcorder Gembird
- Camcorder Genius
- Camcorder Goclever
- Camcorder GoPro
- Camcorder Hama
- Camcorder Hitachi
- Camcorder Hyundai
- Camcorder Iget
- Camcorder Insignia
- Camcorder Insta360
- Camcorder Intenso
- Camcorder Ion
- Camcorder ISAW
- Camcorder Kitvision
- Camcorder Kodak
- Camcorder Kogan
- Camcorder Konica Minolta
- Camcorder Konig
- Camcorder Kyocera
- Camcorder Lamax
- Camcorder Leica
- Camcorder Lenco
- Camcorder Leotec
- Camcorder Lexibook
- Camcorder Linksys
- Camcorder Logitech
- Camcorder Magellan
- Camcorder Maginon
- Camcorder Mamiya
- Camcorder Marshall
- Camcorder Midland
- Camcorder Minolta
- Camcorder Minox
- Camcorder Mio
- Camcorder MMTC
- Camcorder Mobius
- Camcorder Mpman
- Camcorder National Geographic
- Camcorder Nedis
- Camcorder Nikkei
- Camcorder Polaroid
- Camcorder Praktica
- Camcorder Prestigio
- Camcorder Pyle
- Camcorder RCA
- Camcorder Renkforce
- Camcorder Replay
- Camcorder Ricoh
- Camcorder Rollei
- Camcorder Sakar
- Camcorder Salora
- Camcorder Samson
- Camcorder Sanyo
- Camcorder SeaLife
- Camcorder Sencor
- Camcorder Sharp
- Camcorder Silvercrest
- Camcorder SJCAM
- Camcorder Soundmaster
- Camcorder Spypoint
- Camcorder Storex
- Camcorder TacTic
- Camcorder TomTom
- Camcorder Transcend
- Camcorder Traveler
- Camcorder Trust
- Camcorder Uniden
- Camcorder Veho
- Camcorder Viewsonic
- Camcorder Vivitar
- Camcorder Zagg
- Camcorder Zoom
- Camcorder Jay-tech
- Camcorder Jobo
- Camcorder OK
- Camcorder Oregon Scientific
- Camcorder Overmax
- Camcorder Macally
- Camcorder Naxa
- Camcorder T'nB
- Camcorder Cobra
- Camcorder Tracer
- Camcorder Hamlet
- Camcorder Akaso
- Camcorder Trevi
- Camcorder Contax
- Camcorder Hamilton Buhl
- Camcorder Swann
- Camcorder Nilox
- Camcorder Cisco
- Camcorder ARRI
- Camcorder Beaulieu
- Camcorder Bolex
- Camcorder CamOne
- Camcorder Contour
- Camcorder EVOLVEO
- Camcorder RunCam
- Camcorder Whistler
- Camcorder Coby
- Camcorder Mediacom
- Camcorder Zorki
- Camcorder Aida
- Camcorder DataVideo
- Camcorder SBS
- Camcorder Blackmagic Design
- Camcorder Contour Design
- Camcorder Kaiser Baas
- Camcorder DXG
- Camcorder Vupoint Solutions
- Camcorder Curve
- Camcorder Kobian
- Camcorder RSC
- Camcorder Stealth Cam
- Camcorder Aqua-Vu
- Camcorder Qoltec
- Camcorder Best Buy
- Camcorder IOPLEE
- Camcorder Microtek
Nieuwste handleidingen voor Camcorder
12 Maart 2025
12 Maart 2025
12 Maart 2025
4 Februari 2025

28 December 2024
11 December 2024

6 December 2024
6 December 2024
6 December 2024

23 November 2024