CyberLink PowerDVD 7 Handleiding
CyberLink
Foto- en/of videosoftware
PowerDVD 7
Lees hieronder de 📖 handleiding in het Nederlandse voor CyberLink PowerDVD 7 (112 pagina's) in de categorie Foto- en/of videosoftware. Deze handleiding was nuttig voor 26 personen en werd door 2 gebruikers gemiddeld met 4.5 sterren beoordeeld
Pagina 1/112

Copyright and Disclaimer
All rights reserved. No part of this publication may be reproduced, stored in a
retrieval system, or transmitted in any form or by any means electronic, mechanical,
photocopying, recording, or otherwise without the prior written permission of
CyberLink Corporation.
To the extent allowed by the laws, POWERDVD IS PROVIDED “AS IS”, WITHOUT
WARRANTY OF ANY KIND, EITHER EXPRESS OR IMPLIED, INCLUDING
WITHOUT LIMITATION ANY WARRANTY FOR INFORMATION, SERVICES, OR
PRODUCTS PROVIDED THROUGH OR IN CONNECTION WITH POWERDVD
AND ANY IMPLIED WARRANTIES OF MERCHANTABILITY, FITNESS FOR A
PARTICULAR PURPOSE, EXPECTATION OF PRIVACY, OR NON-
INFRINGEMENT.
BY USING THIS SOFTWARE, YOU AGREE THAT CYBERLINK WILL NOT BE
LIABLE FOR ANY DIRECT, INDIRECT, OR CONSEQUENTIAL LOSS ARISING
FROM THE USE OF THIS SOFTWARE OR MATERIALS CONTAINED EITHER IN
THIS PACKAGE.
The terms and conditions hereunder shall be governed and construed in accordance
with the laws of Taiwan, Republic of China.
PowerDVD and other company and product names mentioned in this publication
are registered trademarks used for identification purposes only, and remain the
exclusive property of their respective owners. Dolby, Pro Logic, MLP Lossless,
Surround EX, and the double-D symbol are trademarks of Dolby Laboratories.
CyberLink’s International Headquarters
Copyright © 2006 CyberLink Corporation.
Mailing Address CyberLink Corporation
15F, #100, Min Chuan Road, Hsin Tian City
Taipei County, Taiwan
Web Site www.CyberLink.com
Telephone 886-2-8667-1298
Fax 886-2-8667-1300


Chapter 1:
This chapter introduces the CyberLink PowerDVD program’s main
functions and the main program view. It discusses the minimum
system requirements for using the program and the method for
upgrading to the latest version of the software.
This chapter contains the following sections:
•Welcome! on p.2
•Register Your Software on p.4
•Activate PowerDVD’s Features on p.5
•Upgrade Your Software on p.6
•Uninstall Your Software on p.7
•The PowerDVD Program on p.8
•System Requirements on p.20

CyberLink PowerDVD
Welcome to the CyberLink family of home entertainment products!
CyberLink PowerDVD is a software DVD player with the features
and controls of a normal living-room DVD player. PowerDVD offers
feature-rich navigation controls for an interactive and tailored
viewing experience. Its advanced video and audio technologies
deliver the highest quality viewing and listening experience possible
on the PC.
CyberLink PowerDVD includes the following main features:
•Supports DivX, DVD (MPEG-2), DVD+VR, DVD-VR, DVD-
Audio, VCD (MPEG-1), SVCD, MiniDVD formats and DVD
files on hard disk drive (HDD) playback
•Navigation slider allows a direct and instantaneous link to
any scene
•Proprietary dual subtitles capability
•CLEV-2 (CyberLink Eagle Vision) video enhancement
technology that dynamically adjusts the brightness/
contrast/saturation ratios in scenes that are overly dark or
too bright.
•CLPV (CyberLink Pano Vision) video stretching technology
that produces minimal distortion in the center of the picture.
•Features CyberLink Multi-channel Environment Impression
technology (CLMEI-2), an audio channel expansion
technology that converts stereo sound to a multiple-channel
output.
•CyberLink Mobility Pack allows for longer movie playback
time on notebook computers.
•9X Digital zoom equipped with location indicator
•AB repeat function that lets you set your favorite scenes for
instant repeat
•Import and export your favorite bookmarks
•Bookmark viewer provides a visual display of all
bookmarked scenes
•Smart Video De-interlacing ensures a smoother and clearer
video image.
•CLVS (CyberLink Virtual Speaker) virtual surround
technology developed by CyberLink
•CyberLink Headphone technology for headphone surround
sound
New features in this version of CyberLink PowerDVD include:
•UPnP Media Network Support
•Freestyle interface offering five different viewing modes for
total control
•Say-It-Again to instantly repeat the last dialog
•Read-It-Clearly for freestyle control of subtitle positions
•New See-It-All and Notebook Maximizer deliver power-
saving features
•Support for the latest content protection standards including
VCPS and CPRM
•Support for MPEG-4 AVC (H.264) high definition video
•Support for new audio standards including DTS-ES, DTS 96/
24, DTS NEO:6, and AAC
•Improved CyberLink Eagle Vision CLEV-2 technology for
enhanced images and colors
•New customizable player skin

CyberLink PowerDVD
After you install the program, a registration window opens,
prompting you to register your product. It is important to register
your software in order to receive technical support or other
information from CyberLink. Registering your software also activates
the CLHP audio option. (See CL Headphone on p.84.)
To register your software, do this:
1. Enter your personal information in the First Name, , Last Name
and Email entry boxes.
•Check one or both of the options to receive information from
CyberLink, or uncheck if you do not wish to receive this
information.
2. Click Register Now.
•If you would like to register this product at a later time, click
Remind Me Later. The registration box will open each time
you run the program until you register.

The first time you run PowerDVD, you are prompted to upgrade
immediately from the trial version to the version you have
purchased.
To activate PowerDVD’s features, do this:
1. Open PowerDVD.
2. The Upgrade Information dialog box opens.
•You can also display this dialog box by clicking
(Configuration), then Activate.
3. Enter your activation key, then click Activate.
Note: You can copy and paste your activation key into the first
entry box.
CyberLink PowerDVD
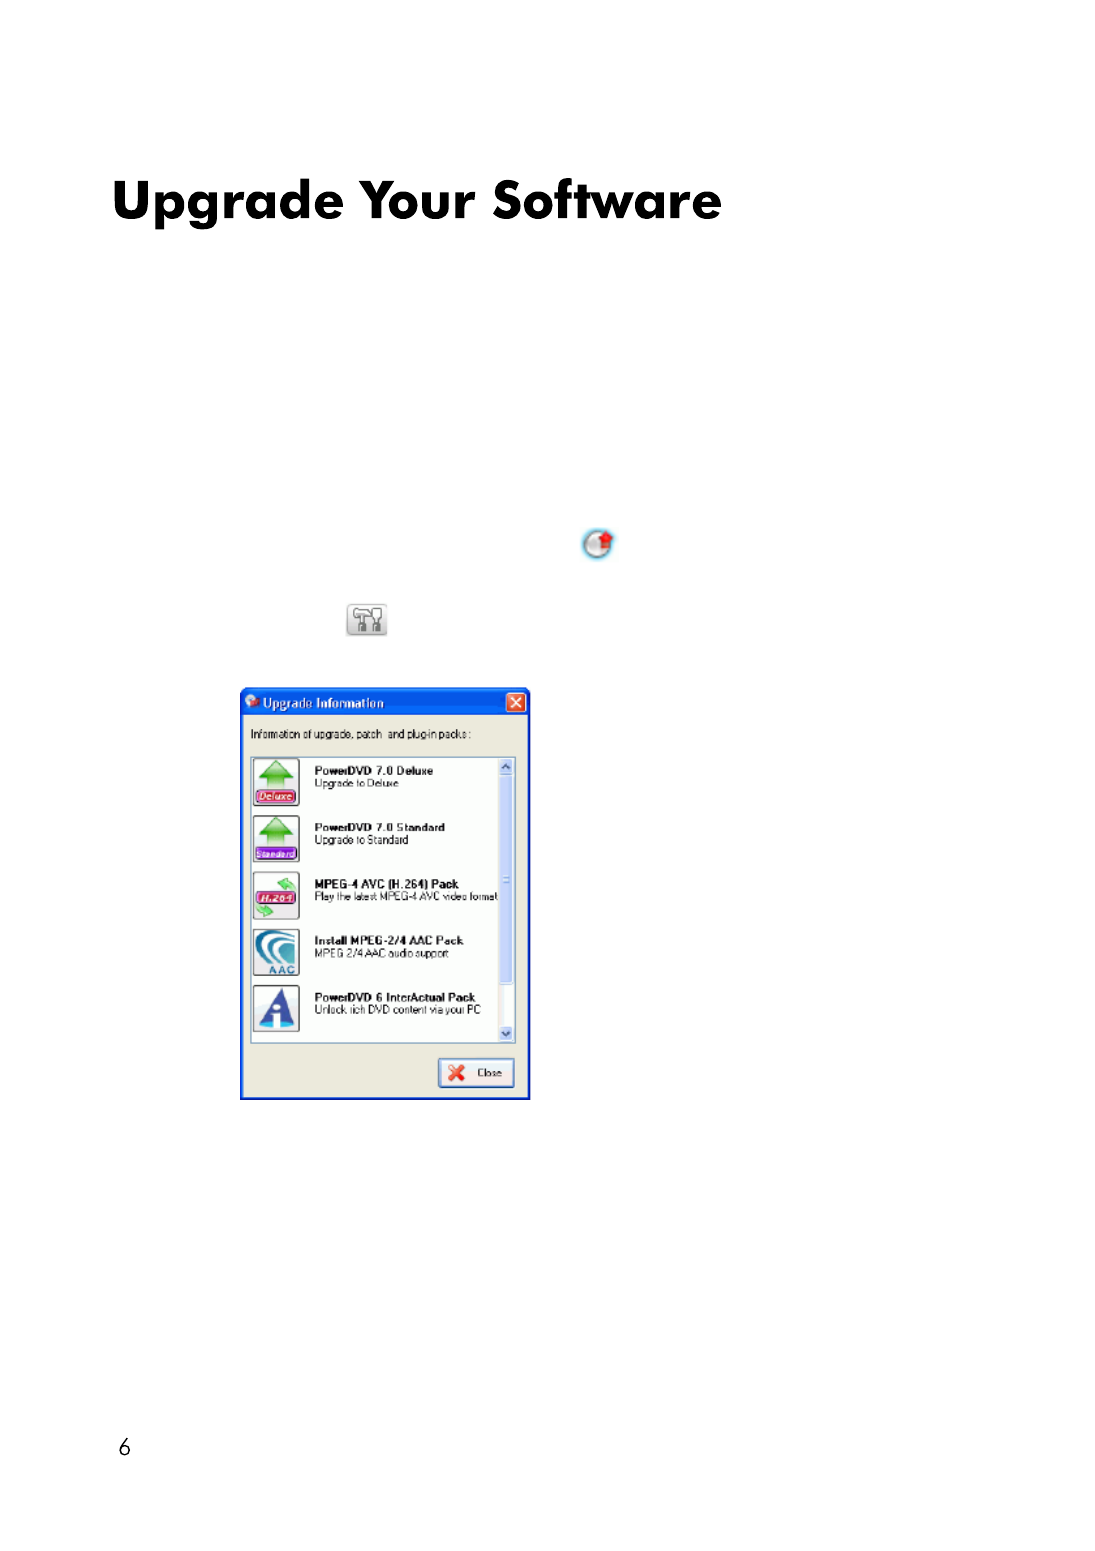
Software upgrades and enhancements may be periodically available
from CyberLink.
Note: You must be connected to the Internet to use this feature.
To upgrade your software, do this:
1. Open the Upgrade Information dialog box by doing one of the
following:
•Click the Upgrade button .
•Press F3.
•Click (Configuration), then click Upgrade. A window
opens, displaying available options.
2. Click the feature set you would like to upgrade to.
3. A web browser window opens, in which you can purchase
product upgrades and enhancements.

If you need to uninstall your CyberLink software for any reason, you
can do so either from the Windows Start menu or from the Windows
Control Panel.
To uninstall your CyberLink software from the Start menu, do this:
1. Click Start > Programs > [name of CyberLink software
package] > Uninstall [product name]. The uninstall wizard
opens.
2. Follow the uninstall wizard to remove the program.
To uninstall your CyberLink software from the Control Panel, do this:
1. Click Start > Settings > Control Panel.
2. Double-click Add or Remove Programs.
3. Select the program name, then click Change/Remove.
4. Follow the uninstall wizard to remove the program.

D Previous P Returns to previous chapter
E Step backward Ctrl+B Goes to previous frame
F Menu L Accesses all available DVD
menus
G Next audio stream H Switches among available
audio streams
H Capture frame C Captures video content as
bitmap image files
I Say-It-Again W Repeats the last dialog
J Navigational slider Visually displays elapsed
time. Click along slider to
jump to other locations
K Mute Q Mute volume
L Current media
type
Displays the current media
type
M Configuration Ctrl+C Configuration settings are
all located here
N Eject Ctrl+E Ejects the current disc drive
O Select source Ctrl+O Selects media source for
playback
P Next N Jumps to next chapter
Q Step forward T Goes to next frame
R Next subtitle U Switches among available
subtitles during playback
Button/Icon Hotkey Description

CyberLink PowerDVD
S Next angle A Switches among available
angles if any
T See-It-All Ctrl+S Activates See-It-All
function, refer to Mobile
Power Settings (Optional)
on p.93
V Speed Control Open/close shuttle speed
control
W Volume adjustment +,- Increase or decrease volume
X Display area Displays DVD title/chapter
number and elapsed time
Y Undock Player
Panel
Ctrl+T Undocks the player panel
from the video window
Button/Icon Hotkey Description
Button/Icon Hotkey Description
A Control wheel Refer to Control Wheel on
p.16
B About Ctrl+A Displays information
about PowerDVD
C Current media
type
Displays the current media
type
D Display area Displays DVD title/
chapter number and
elapsed time
E Capture frame C Captures video content as
bitmap image files
F Pin on Top Pins the Player on top of
all windows
G Next audio stream H Switches among available
audio streams
B
N
E
JKURPO
G H IA F
L M
C
S T
D
Q

CyberLink PowerDVD
H Switch to Control
Wheel mode
Switches to the Control
Wheel mode
I Next subtitle U Switches among available
subtitles during playback
J Eject Ctrl+E Ejects the current disc
drive
K Select source Ctrl+O Selects media source for
playback
L Mute Q Mute volume
M Volume adjustment +, - Increase or decrease
volume
N Navigational slider Visually displays elapsed
time. Click along slider to
jump to other locations
O Repeat Ctrl+R Repeats titles, chapters,
songs, etc.
P Full screen Z Switches to full screen and
back to windows mode
Q Shuffle V Plays tracks in random
order
R Menu L Accesses all available DVD
menus
S A/V Options pad .
(Period)
Activates/inactivates A/V
Options pad
T Menu/Number
pad
/ Activates/inactivates
Menu/Number Pad
Button/Icon Hotkey Description

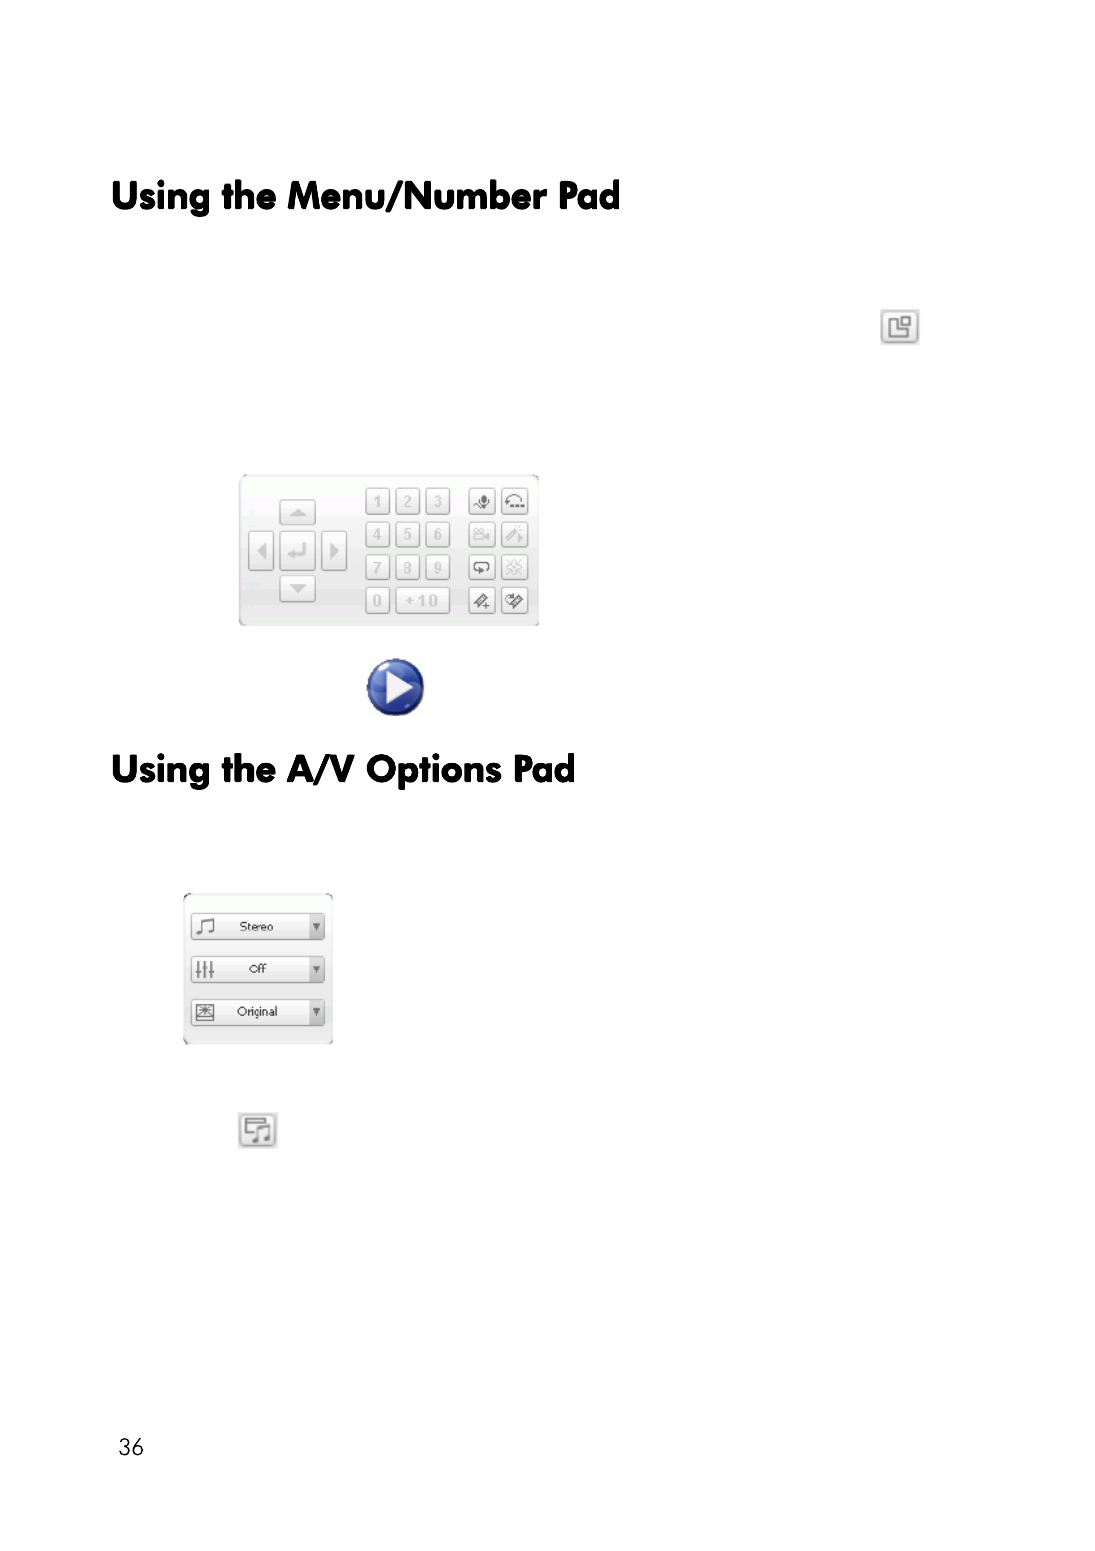
The A/V Options pad allows you to select an audio output mode, an
equalizer preset, and a video enhancement. To display the pad, go to
the Player mode and click Open A/V Options Pad . Refer to
Using the A/V Options Pad on p.36 for more information.
U Configuration Ctrl+C Configuration settings are
all located here
Button/Icon Description
A Audio output mode Displays all available audio output
modes.
B Equalizer preset Displays all available audio equalizer
presets.
C Video enhancement Displays all available video effects.
Button/Icon Hotkey Description
A
B
C

CyberLink PowerDVD
The Menu/Number pad offers navigation buttons, a pad for entering
numbers, and buttons for accessing other functions. To display the
pad, go to Player mode and click Open Menu/Number Pad .
Refer to Using the Menu/Number Pad on p.36 for more information.
Button/Icon Hotkey Description
A Navigation buttons Navigates through DVD
menus
B Enter Accepts the selected option
C 1 - +10 Number pad
D Karaoke K Switches among karaoke
modes
E Say-It-Again W Repeats the last dialog
F Next angle A Switches among available
angles if any
G See-It-All Ctrl+S Activates See-It-All
function
A C
F
HI
G
B D E
J K

H AB Repeat X Repeats selected scene
I Visualization Plays computer-generated
visualizations
J Add bookmark F2 Adds bookmarks for
specific DVD scenes
K Next bookmark Ctrl+F2 Directly goes to
bookmarked scenes
M Karaoke K Switches among karaoke
modes
Button/Icon Hotkey Description

CyberLink PowerDVD
Button/Icon Hotkey Description
A Shuttle reverse Shuttles reverse at incremental
speeds indicated by green
point
B Previous P Returns to previous chapter
C Pause Space
Bar
Pauses playback
D Shuttle forward Shuttles forward at
incremental speeds indicated
by green point
E Next N Jumps to next chapter
F Play Enter Plays media
G Step forward T Goes to next frame
H Step backward Ctrl+B Goes to previous frame
I Stop S Stops playback
B C
IH
G
F
E
A D

The mini player mode allows the user to access basic playback
functions even when PowerDVD is minimized. When the mini player
mode is enabled and PowerDVD is minimized, the playback controls
are minimized to the Windows taskbar.
To enable the mini player mode, right click an open area of the
Windows taskbar, select Toolbars, and then click PowerDVD 7. Click
the Minimize button to enter the mini player mode; click the Exit
Mini mode button to exit mini player mode.
Button/Icon Hotkey Description
A Play Enter Plays media
B Stop S Stops playback
C Next N Jumps to next chapter
D Volume adjustment +, - Increase or decrease volume
E Show/Hide Video Displays/Hides the mini
player video window
F About Ctrl+A Displays information about
PowerDVD
JF G
K
H I
E
AB C D

CyberLink PowerDVD
G Pause Space
Bar
Pauses playback
H Previous P Returns to previous chapter
I Mute Q Mute volume
J Configuration Ctrl+C Configuration settings are
all located here
K Exit Mini mode Exit the Mini Player mode
Button/Icon Hotkey Description

19
Main Controls in Control Wheel Mode
Main Controls in Control Wheel Mode
Main Controls in Control Wheel Mode
Main Controls in Control Wheel ModeMain Controls in Control Wheel Mode
The Control Wheel mode gives the user access to the most basic
playback controls on the Control Wheel. To switch to the control
wheel mode, click the Switch to Control Wheel mode icon. To exit
the control wheel mode, click the Switch to PowerDVD Player icon.
Button/Icon Hotkey Description
A Switch to
PowerDVD
Player
Switches to the PowerDVD
Player mode
B Control wheel Refer to Control Wheel on p.16
C Eject Ctrl+E Ejects the current disc drive
D Select source Ctrl+O Selects media source for
playback
B
C
A
D

CyberLink PowerDVD
20
System Requirements
Please make sure your system meets the following minimal
requirements before installation:
•Windows MCE, XP, 2000, ME
•Intel Pentium III 500M Hz (recommended: Pentium 4 1.6
GHz or Pentium M 1.0 GHz, or Athlon 1.2 GHz or higher)
•256 MB RAM or above
•DVD-ROM, DVD-R/RW, DVD-RAM, DVD+R/RW, DVD-
Dual, DVD-Multi, or a DVD-ROM/CD-RW combo drive
with 1394, USB2.0, ATAPI, SCSI, or CardBus interface
•PCI sound card, USB audio box or motherboard built-in
audio device
•Hard disk requirement of at least 60 MB
•AGP or PCI Express graphic accelerator supporting
DirectDraw overlay
•Minimal desktop resolution at 1024 x 768 or 1280 x 1024
recommended
•Screen ratio at 4:3 or 16:9 widescreen

21
Chapter 2:
Playback
Controls
This chapter describes PowerDVD’s playback controls. PowerDVD
gives you many ways of accessing playback controls in order to
make enjoying your media much easier.
This chapter contains the following sections:
•Basic Playback Controls on p.22
•Navigating During Playback on p.23
•Advanced Playback Controls on p.28
•Express Menu on p.38

CyberLink PowerDVD
22
Basic Playback Controls
PowerDVD has basic playback controls that works just like the
remote control for your DVD player. These basic playback controls
are accessible in all the different PowerDVD modes and they are
designed to be user-friendly and easy to operate. The basic playback
controls are:
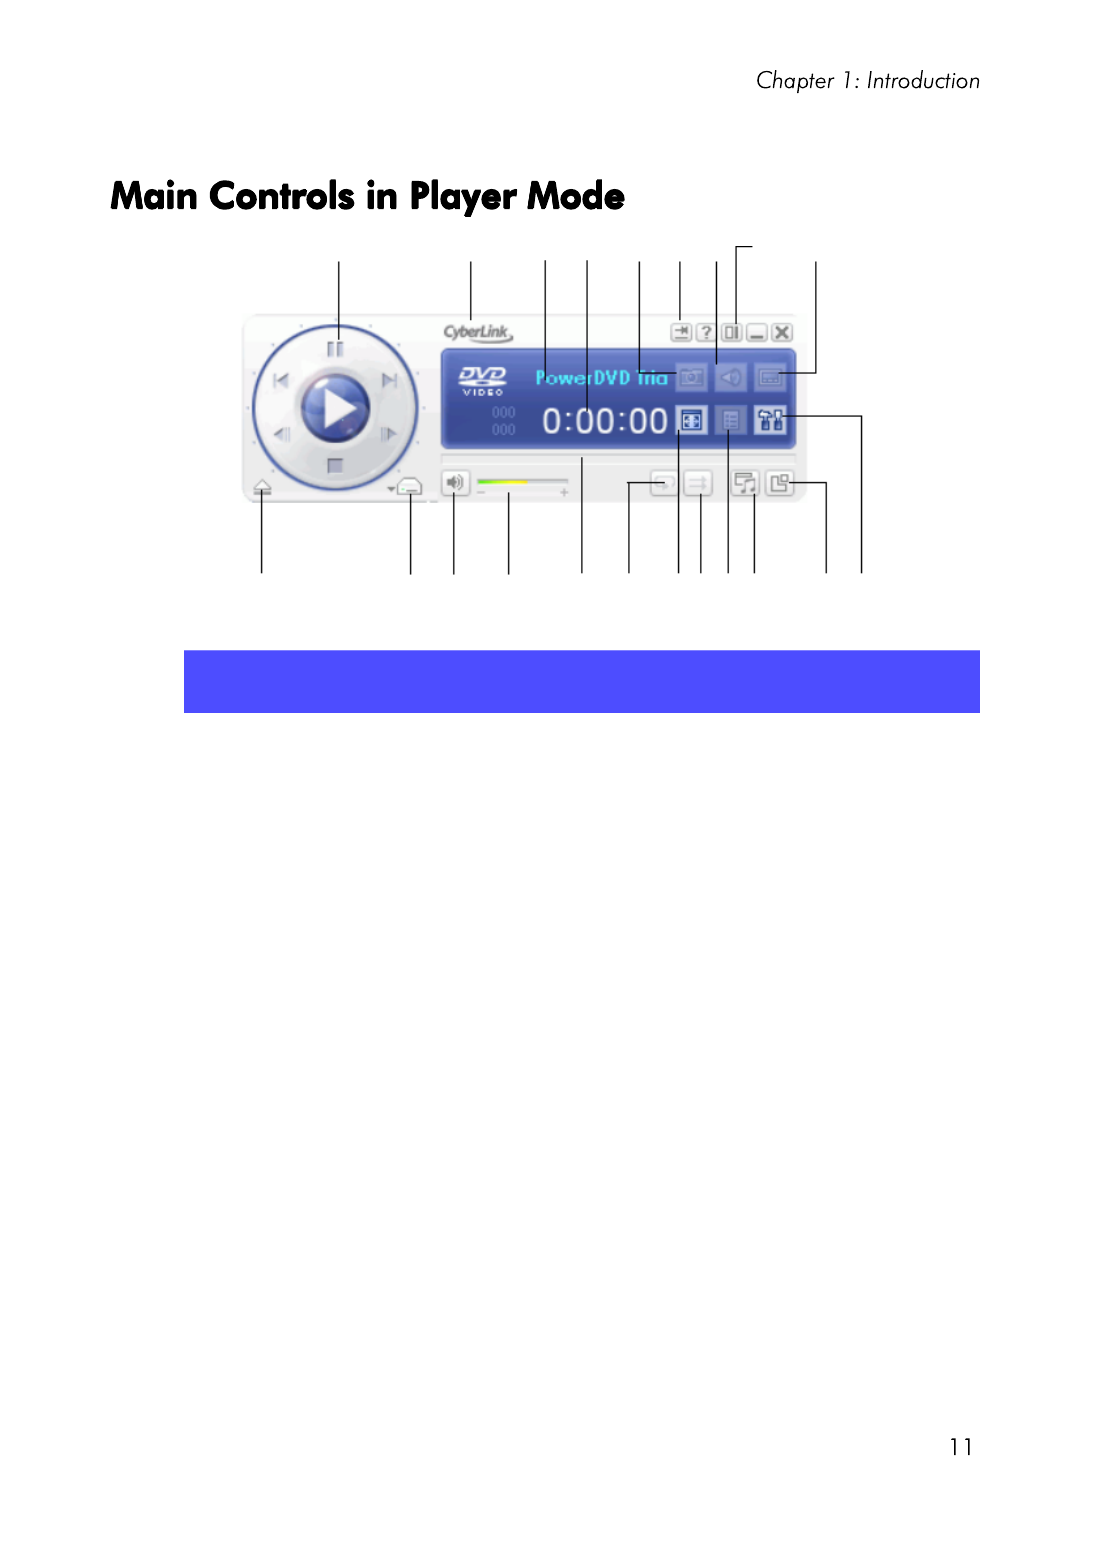
Button Function Description
Play Starts playback of the inserted disc or
the currently selected file in your
playlist.
Stop Stops playback.
Pause Pauses the current playback. Click
Play to resume playback again.
Next Jumps to the next chapter. Please see
Jump Functions on p.23 for more
details.
Previous Jumps to the previous chapter. Please
see Jump Functions on p.23 for more
details.
Step
Forward
Go to the next frame. Please see Step
Frame Functions on p.24 for more
details.
Step
Backward
Go to the previous frame. Please see
Step Frame Functions on p.24 for
more details.
Eject Ejects your disc or your drive
manually.
Chapter 2: Playback Controls
23
Navigating During Playback
If you would like to skip over certain chapters or return to more
exciting scenes, PowerDVD provides quick methods of navigation.
Jump Functions
Jump Functions
Jump Functions
Jump FunctionsJump Functions
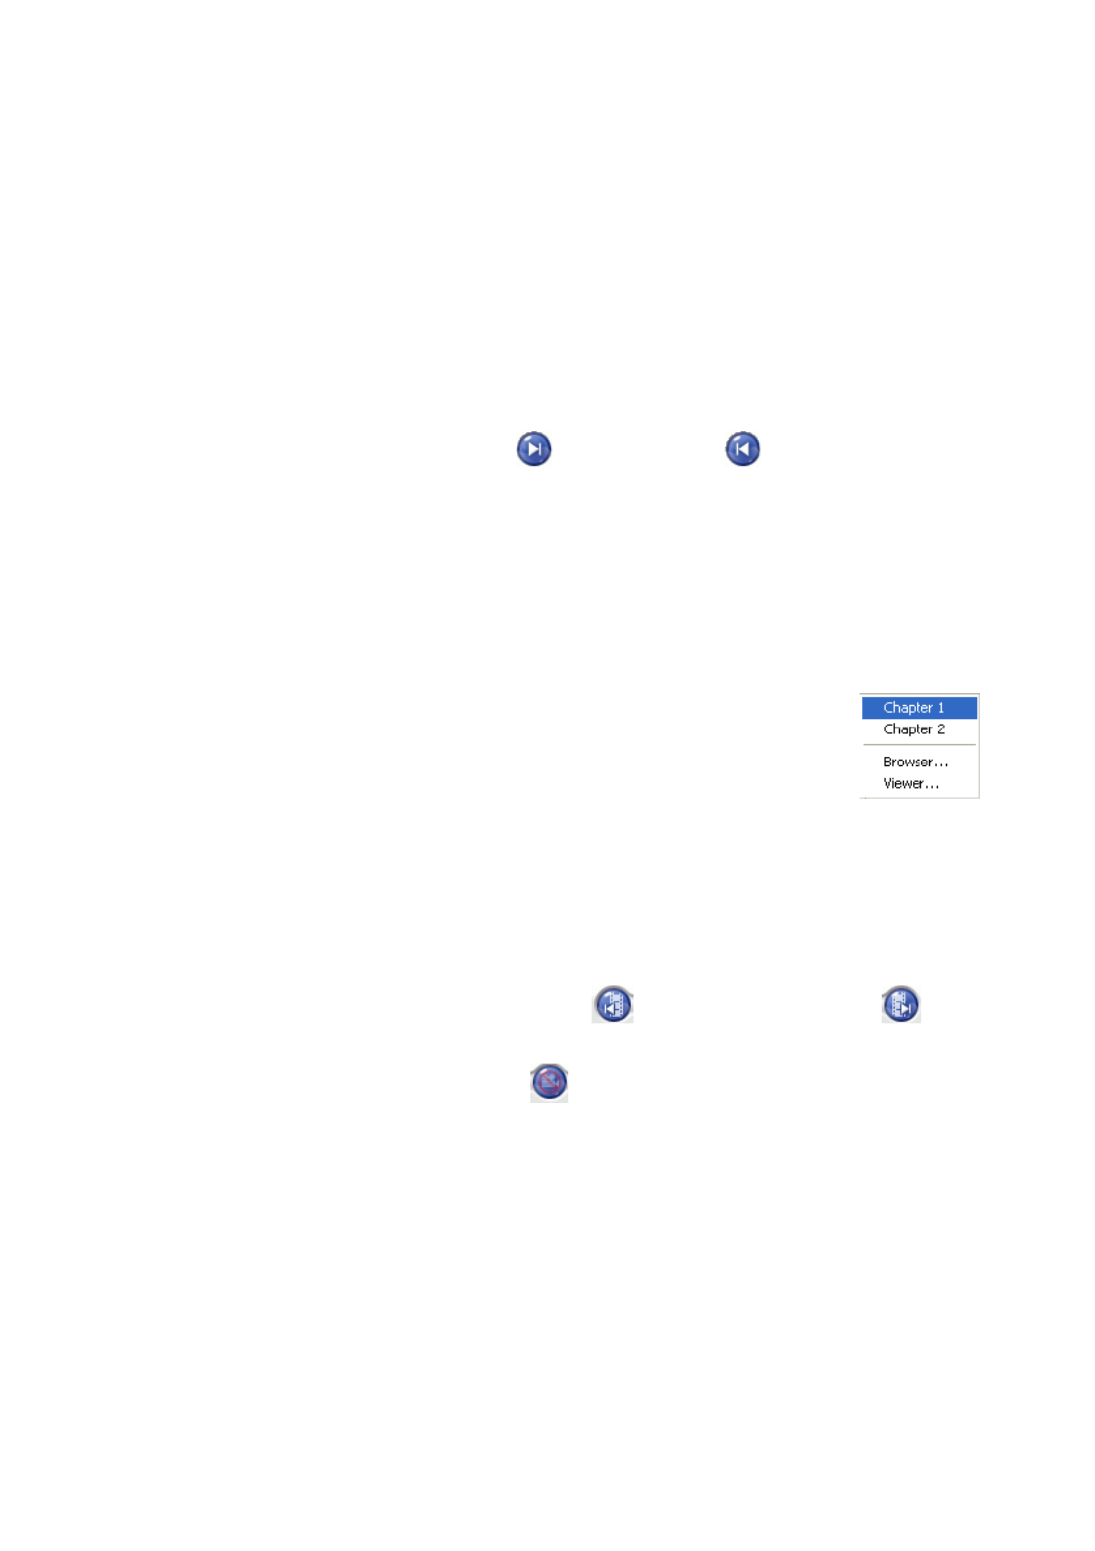
During playback, click Next and Previous during playback
or in pause mode to skip a chapter or return to the previous one. You
can also use Next and Previous to jump between media files in your
playlist.
Jump Menu
Jump Menu
Jump Menu
Jump MenuJump Menu
You may call up a shortcut menu with a simple click.
1. Point your mouse on either one of the Jump
functions and right click for the jump menu during
playback.
2. It will only display the chapters' menu but exclude
the titles' menu. If you are viewing media files, it will display the
filename.
Jump to scenes
Jump to scenes
Jump to scenes
Jump to scenesJump to scenes
During playback, click Next Scene and Previous Scene
during playback or in pause mode to skip a scene or return to the
previous one. Click Skip CM if you would like to skip
commercials.
Shuttling Forward and R
Shuttling Forward and R
Shuttling Forward and R
Shuttling Forward and RShuttling Forward and Reverse
everse
everse
everseeverse
Instead of navigating by jumping from title to title or chapter to
chapter, you may navigate the old fashion way by shuttling forward
and rewinding. Thanks to DVD technology, these navigational speeds

CyberLink PowerDVD
24
are unparalleled in speeds as compared to VHS. Please refer to
Control Wheel on p.16 for more information.
1. Click along the outside perimeter for shuttling
at various speeds during playback. The green
mark will indicate the speed.
2. Designated points on the left side disclose
reverse speeds of 0.5x, 0.75x, 1x, 1.5x, 2x, 3x,
4x, 8x, 16x, 32x. The center point is Pause,
while the right side disclose forward speeds of 0.5x, 0.75x, 1x,
1.5x, 2x, 3x, 4x, 8x, 16x, 32x.
3. You can also access the the shuttling commands in Dock mode
by clicking Open Speed Control (pic) icon. The speed control
bar will be displayed with designated points on the bar. The
lower half of the bar discloses reverse speeds of 0.5x, 0.75x, 1x,
1.5x, 2x, 3x, 4x, 8x, 16x, 32x. The center point is Pause, while the
upper half of the bar discloses forward speeds of 0.5x, 0.75x, 1x,
1.5x, 2x, 3x, 4x, 8x, 16x, 32x.
4. Click Close Speed Control (pic) icon to hide the speed control
bar.
Note: The slow motion speed of 0.5X and -0.5X are located
between the pause and 1X (play) and -1X. Click in a very precise
fashion!
Note: You can hear audio from 0.5X to 2X playback speed
without pitch distortion. This feature is especially useful for
language learning. With the combination of A-B repeat and dual-
subtitle technologies, PowerDVD offers a complete language
learning platform.
Step Frame Functions
Step Frame Functions
Step Frame Functions
Step Frame FunctionsStep Frame Functions
These functions are available anytime.
1. During playback, click Step Forward to go to the next frame
or for the previous frame, click Step Backward .

2. After you have clicked on any of the Step functions, playback
will be paused.
Note: This function steps backward but will only return to the I-
frames within a group of frames. In other words, stepping forward
will result in a greater number of frames than stepping backward.
You can jump to a specific time in a movie, video, or song in order to
begin playback from that point.
1. Right-click the navigational slider. The Time Search dialog box
opens.
2. Enter the time code (in hours:minutes:seconds), then click OK.
Playback begins from the time code you have entered.
During playback of your DVD titles, you may bookmark your
favorite scenes for future reference! So anytime in the future when
you would like to return to a specific scene, PowerDVD makes it
splendidly easy.
1. During playback, activate the Menu Pad and then click Add
Bookmark when your favorite scene is playing.
2. The Next bookmark function directly goes to the next
bookmark in chronological order. Of course, this depends if you
have previous bookmarks for that particular DVD title. Click it
during playback.
3. For information on importing or exporting bookmarks, go to
Bookmarks on p.64.

Like practically all other main functions, there is also a bookmark
menu.
1. Simply point your cursor over the video window and right click
to bring up the Express Menu. Select Bookmark to access the
Bookmark Menus.
2. You may delete old bookmarks by clicking on them individually
or delete them all at once by selecting Delete All.
There is another shortcut menu for the function.Next bookmark
1. Activate the Menu Pad and then position the cursor over this
function and right click for the menu.
2. This provides a direct link to any bookmark. The Browser will
display the bookmarks' locations as embedded in the chapters.
3. Select a chapter or bookmark and click Go To.

4. To delete a bookmark, select one and click Delete.
5. Click Close to exit.
6. If you choose the Viewer, the Bookmark Viewer will display the
first scene of every bookmark.
•You can rename a bookmark thumbnail by right-clicking on
the thumbnail and selecting Edit... Enter the name you want,
then click OK.
Note: This option will be unavailable if you enable video hardware
acceleration. This option is found in the Video configuration under
the section Hardware Acceleration.

For a quick definition of all the button functions, please refer to Main
Controls in Dock Mode on p.8 or Main Controls in Player Mode on
p.11 for more information.
Note: Your playback controls may differ depending on the mode
you are operating in. Mini Player mode offers just the basic
controls while Player mode with both the A/V Options Pad and
Menu/Number Pad activated will offer all the available button
fuctions.
To view a DVD title, simply insert the disc into the default DVD disc
drive and PowerDVD will automatically play the DVD. To manually
start a DVD title, click the Select source button and choose the
disc drive where the DVD title is located.
1. During playback, simply click the Capture button to capture
any video content as a still image.
2. To be more precise, you may pause the scene, play in slow
motion, or step frame and then capture.
Note: The location of the captured images can be set in the
Configuration area. Go to the Snapshot on p.60 for more options.
The Full Screen function switches your screen from full screen
mode to windows mode and vice-versa.
Note: In Full Screen mode, the PowerDVD player toolbar is hidden.
To access the playback toolbar, move your mouse.

This feature is available during playback. Simply click the Next audio
stream button during playback to switch among the available
audio streams (e.g. different languages). The number of audio
streams depends on the DVD title itself.
Subtitles are supplied for practically all DVD titles. The language of
the subtitles depends on the DVD region of your title. The subtitles
function is only available during playback.
During playback, click to switch among available subtitles.
When playing a video file (not on a CD or DVD), PowerDVD
searches for a subtitle file in the same directory where the video file is
located. If a file is found, the subtitles are loaded and the Subtitles
option is enabled in the Express Menu.
This feature has not gained prominence as of yet among DVD
authors, but is available on occasion for music concert DVDs. Click
Next angle during playback to switch among available angles.
PowerDVD will display the angle currently being watched each time
you select a new angle. You can also use the Express Menu to change
your Viewing Angles.
PowerDVD provides basic repeating functionality that allows you to
repeat your favorite scenes without delay.

1. Switch to the Player mode and activate the Menu Pad. Click
Repeat during playback to repeat the chapter.
2. To repeat titles, click Repeat twice. Click once more to turn
Repeat off.
You can also use Say-It-Again to repeat the current dialog you are
watching. To use Say-It-Again:
1. Simply click Say-It-Again during the playback of a dialog to
repeat the same dialog again.
2. Click once more to turn Say-It-Again off.
PowerDVD also offers customizable repeat function that lets you
select any part of the movie for repeating playback. The starting point
of the repeating playback is called A and the end is called B. This is
different from Say It Again, which only repeats the current dialog.
1. During playback, set point A by pressing AB Repeat at the
beginning of the segment you would like to repeat.
2. Click AB Repeat again in order to set point B at where you
would like the segment to end. The segment will now repeat
instantly and loop continuously.
3. To cancel AB Repeat, click the AB Repeat button , Repeat
button or navigate out of this segment's range (i.e. with the
navigational slider, shuttle, or jumping to the next or previous
chapters).

You can use PowerDVD to playback Karaoke DVDs with your
computer. Be sure to look for the Karaoke Logo on the DVD title
package.
1. Upon inserting your karaoke disc, be sure your microphone is
installed properly.
2. Click Play and then the menu screen will appear. If not,
click Select source and choose the right drive.
3. Use the navigation buttons on the Menu Pad or choose a
song by clicking on it with your mouse.
4. During playback, activate the Menu Pad and then click Karaoke
or right-click to call the Express Menu and select Karaoke.
5. Select from: dual vocal channels on (Vocals 1, 2), either Vocal 1
or Vocal 2 on, or have both off (Vocals Off).
1. Position your cursor above Karaoke and right click for the
menu.
2. Make your selection.
You can adjust the pitch of your karaoke titles using the Adjust Pitch
function.
To adjust pitch, do the following:
1. Position your cursor above Karaoke and right click for the
menu.
2. Select Adjust Pitch, then make your selection.
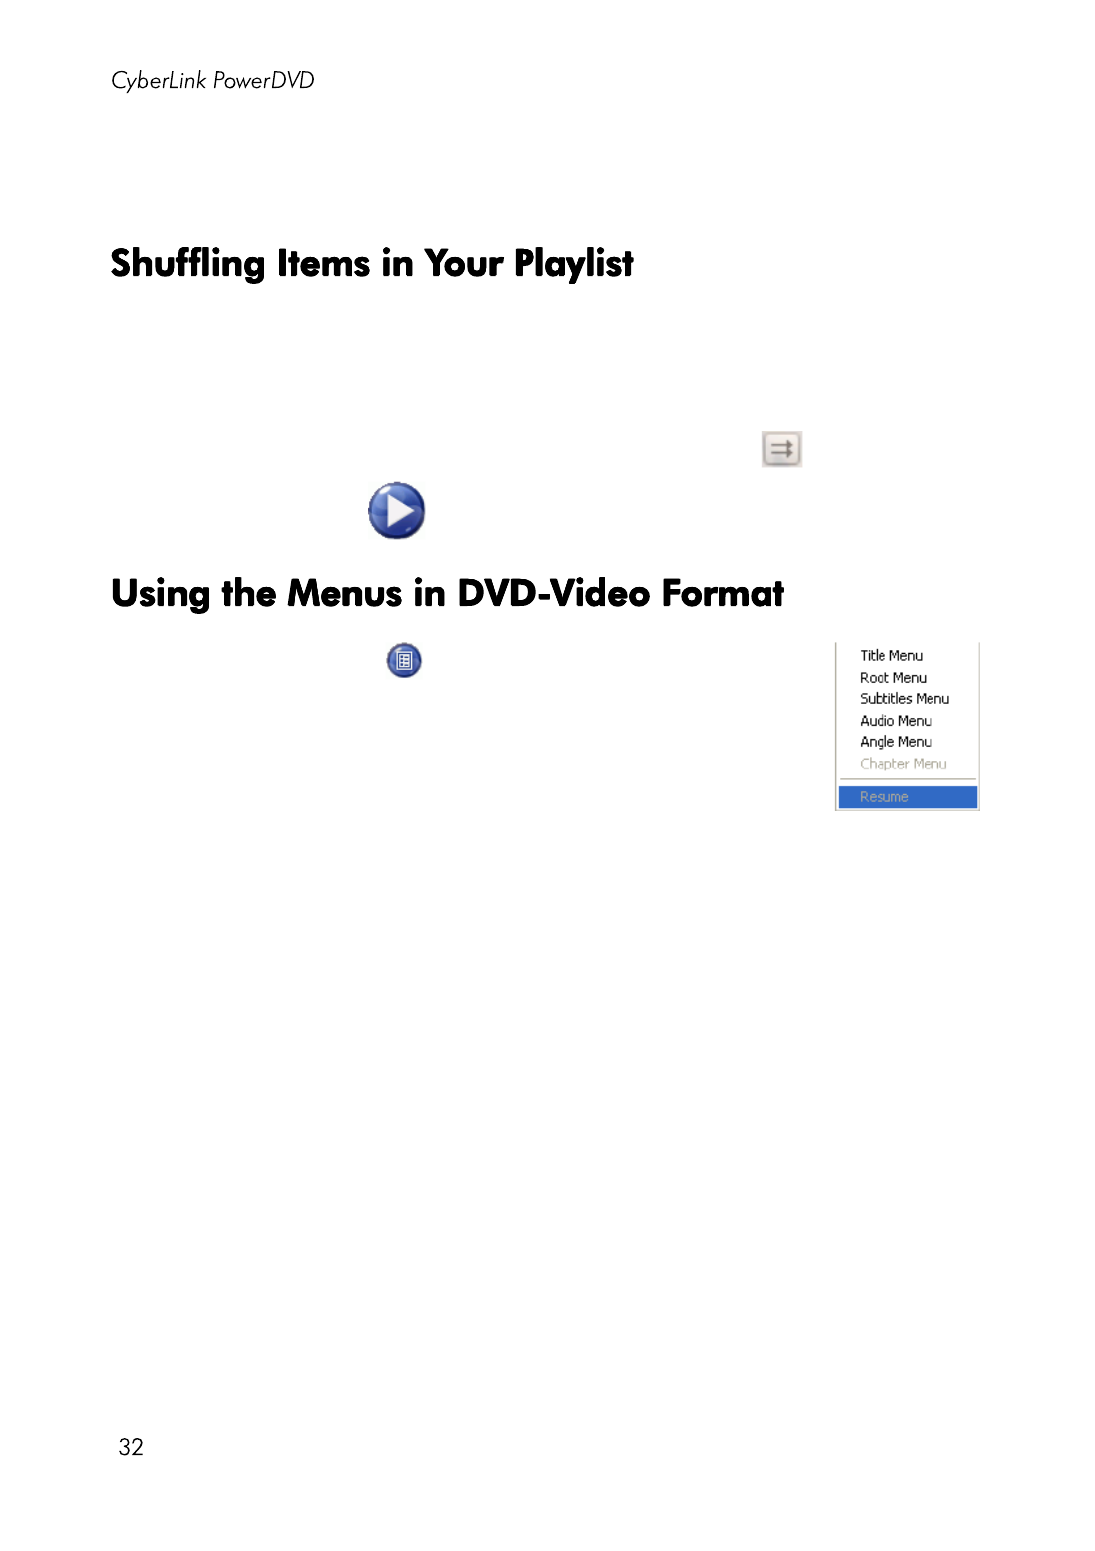
In order to spice up your playlist and to play files randomly, you may
enable the shuffle command.
1. Switch to the Player Mode to access the shuffle command.
2. After opening an audio source, click Shuffle .
3. Click Play . Files will then be played randomly.
1. Click Menu once after DVD playback has
begun (after the warning messages) or when the
title menu is displayed and a menu will appear.
All DVD titles’ menus will be different and
depend on their authoring.
•For some DVD titles, the Title and Root Menu
(for special features) are analogous. The functions of the
remaining menus are similar to the menu items for DVD
titles.
•To turn on subtitles, go to the Subtitles Menu and select one.
•The Audio Menu controls the audio language. Go there to set
audio settings.
Note: Sometimes, DVD titles will not allow you to select menus
other than the Title Menu. Users will have to directly go to the Title
Menu of the DVD itself and access the settings there if this is the
case.
•Select Resume to return to the last scene where you had left
off. This function is optimal if you interrupted playback by
jumping to a menu, and then want to return to the last scene.

1. Click Menu once after playback has begun.
2. Select Program Set Viewer to visually view the first frame of
every cell.
3. Click once on the frame that represents the cell in order to begin
playback or click Close to exit the Viewer.
•If playlists are available, they will be available for selection
here too.

Another great feature is a shortcut menu for titles and chapters that is
available anytime.
Note: When watching DVD-VR movies, the terms “Titles” and
“Chapters” are not used but instead replaced with “Programs”
and “Cells”.
1. Position your cursor on Play .
2. Right click for the menu.
3. The check mark signifies the current playback title while the
arrows to the right of the title signify further selections in the
form of chapters.
4. Click once when you have decided on the chapter.
1. Select Browser... in the Playback Menu for an alternative method
of navigating between titles and chapters.
2. The red pointer signifies which chapter you are playing
currently. Simply select a chapter and click Go To or Close to
exit.
CyberLink PowerDVD
Like any stereo’s remote control, PowerDVD has a number pad to
directly input the specific track you would like to play. To display the
pad, go to Player mode and click Open Menu/Number Pad .
1. After you have created a playlist or have inserted an Audio CD,
directly enter the number of the disc track or file you want to
play. Your entry will appear in the display area.
2. Click Play .
You can use the A/V Options pad to access audio modes, equalizer
presets, and video enhancement.
To display the pad, go to Player mode and click Open A/V Options
Pad . You can select from the following menus:
•Audio output mode: select one of the default audio modes
for audio output. For configuration options, see Advanced
Audio Configuration on p.80.
•Equalizer preset: select one of the default audio
enhancement options.

•Video enhancement: select one of the default video effects.
For configuration options, see Advanced Audio
Configuration on p.80.

A quick and handy feature, simply click on the right button of the
mouse during playback when the cursor is positioned on the video
window to activate the Express Menu. Express Menu buttons are
grouped. Users can optionally show/hide a group in the Express
Menu to meet their own preferences.
1. Basic Controls
2. Viewing Controls
4. DVD Menu Controls
5. PowerDVD Controls
3. Preference Controls

1. Basic Controls
1. Basic Controls
1. Basic Controls
1. Basic Controls1. Basic Controls
•The basic playback controls (Play, Stop, Pause and etc.) can
be found in Exit: Exits PowerDVD. on p.42.
•The Go To option is similar to the menu list found when you
right click on Play or the Jump functions. It provides a list of
all the titles and subsequent chapters including a Browser
and the Viewer (please refer to Playback Menu on p.34).
•The Bookmark... function is an added feature here that
provides the same functions as the Bookmark button and its
menu. (refer to Bookmarking Your Favorite Scenes on p.25 for
more information)
•Full Screen can be found in Full Screen Function on p.28.
2. Viewing Controls
2. Viewing Controls
2. Viewing Controls
2. Viewing Controls2. Viewing Controls
The Keep Aspect Ratio option will keep the correct aspect ratio of
your video content and window and thus letterboxing will be
applicable.
Stretch to Fit the Screen stretches the movie to fit the video window.
CLPV feature is only available in full screen mode and is for DVD
titles with a widescreen aspect ratio (i.e. optimal with 16:9 on a 4:3
monitor). It employs Cyberlink’s unique Pano Vision video
technology to stretch the movie to fit the monitor size. Choose
between Smart Stretch, Fit to Screen and Keep Subtitles.
The Pan&Scan feature is only available in full screen mode and is for
DVD titles with a widescreen aspect ratio (i.e. optimal with 16:9 on a
4:3 monitor). It enables users to view content without black bars
CyberLink PowerDVD
similar to T.V. as opposed to letterboxed screens but at the expense of
being unable to view the entire screen area at once. The default
Pan&Scan position will be centered, where a portion of the left and
right viewing area will be visually cropped off.
Note: Move the video screen simply by clicking on it and
dragging the screen in left/right directions.
This is the only area where you may access this state-of-the-art
feature that allows you to zoom in on any of your favorite DVD
scenes.
1. During DVD playback, the full screen mode must be employed.
2. Right click for the Express Menu and select Digital Zoom > 4X
or 9X.
3. Now, simply click and drag the screen to the area where you
want to zoom in. The upper left corner of your screen will
display the zoomed in area in relation (green border) to normal
screen mode (yellow border).
4. To return to the full screen mode, return to the Express Menu
(right-click) and choose Digital Zoom > Off.
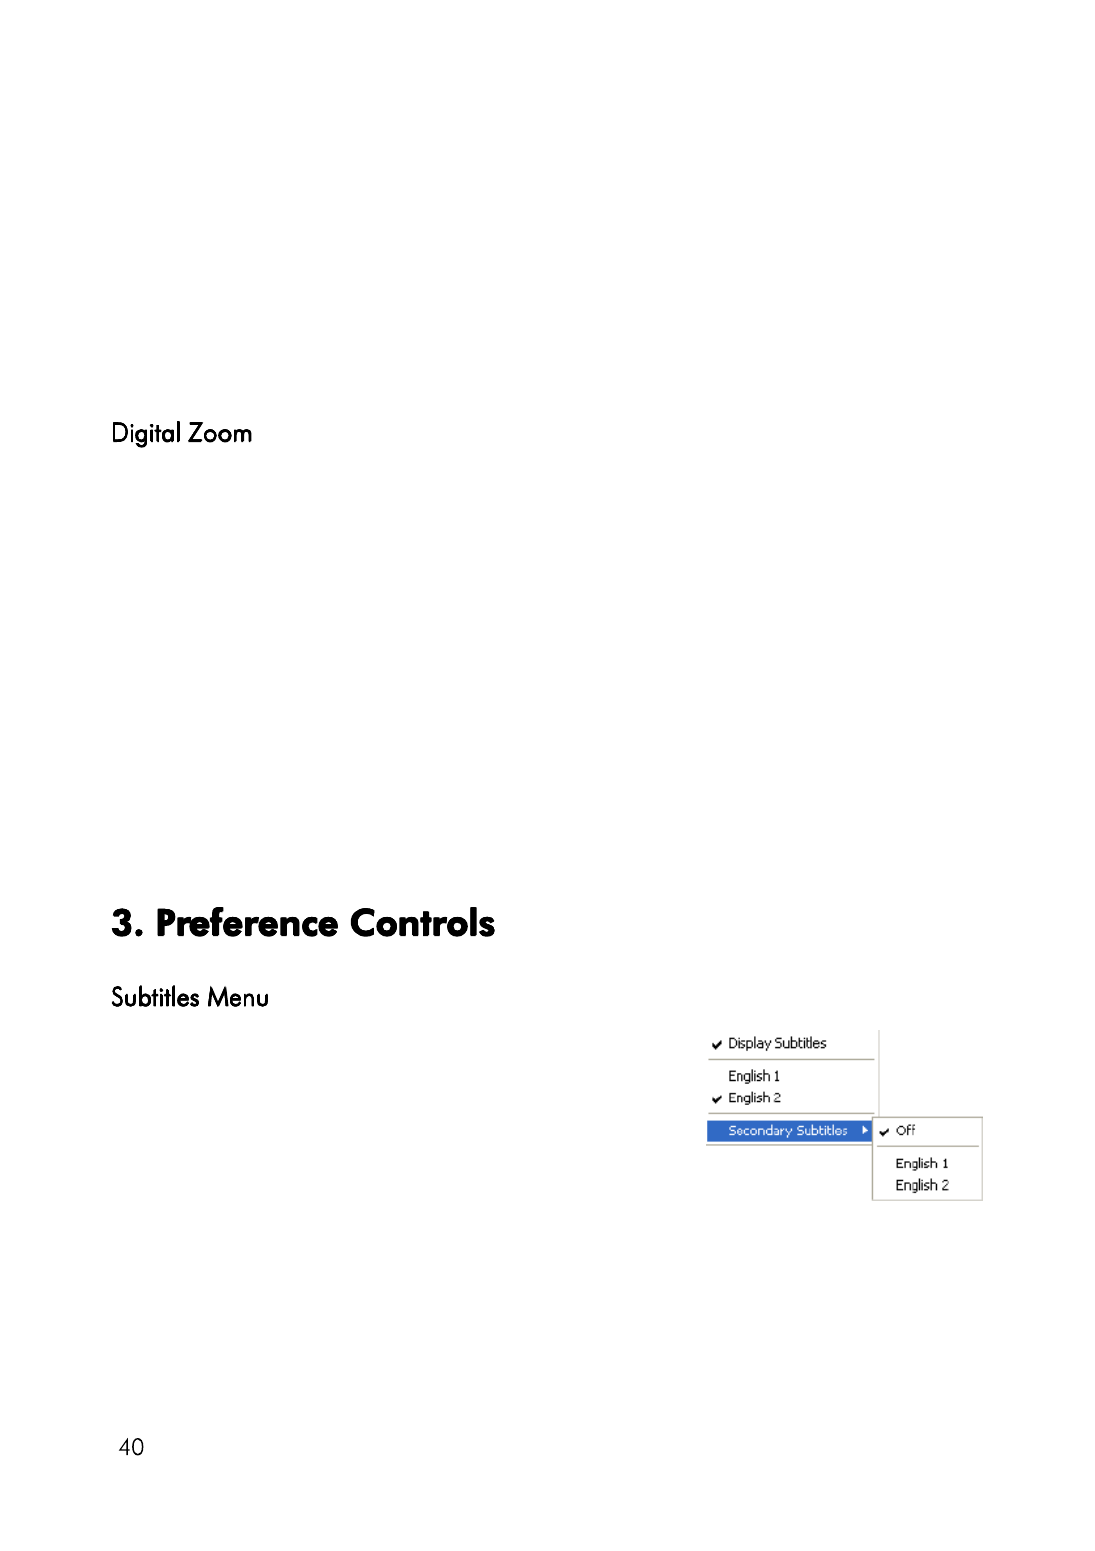
•The Primary Subtitles menu is the
selection menu for the default
subtitiles. Primary Subtitles are
usually displayed at the bottom of
the screen.
•The Secondary Subtitles menu is
for additional subtitles that may be
displayed along with the default subtitles if the user wishes
to activate it.

Chapter 2: Playback Controls
Use the Read-It-Clearly feature to adjust the position of the subtitles
so that you may view your movie without obstruction.
1. Position your cursor above the video window during playback
and right click to open the Express Menu. Select Primary
Subtitles or Secondary Subtitles and then select Read-It-
Clearly.
2. The following selections are available in the Read-It-Clearly
menu:
•Normal displays the subtitles in the default position.
•Choose For 2.35:1 to adjust the subtitle position to match
movies with 2.35:1 aspect ratio.
•Choose For 1.85:1 to adjust the subtitle position to match
movies with 1.85:1 aspect ratio.
•For Primary Subtitles, you can choose Bottom to move the
subtitles to the very bottom of the screen.
•For Secondary Subtitles, you can choose Top to move the
subtitles to the very top of the screen.
Closed Captioning, if supported by your DVD title, is made
available by national organizations and is tailored towards the
hearing impaired. The captions are found in video content and in the
form of text located somewhere on the picture. Closed captions, as
opposed to open captions, are hidden in the video signals and need a
special decoder.
Visualization feature allows you to watch computer-generated
visualizations while you listen to music. You can also access the
visualization command in the Player mode by clicking the
Visualization button on the Menu Pad.
CyberLink PowerDVD
44
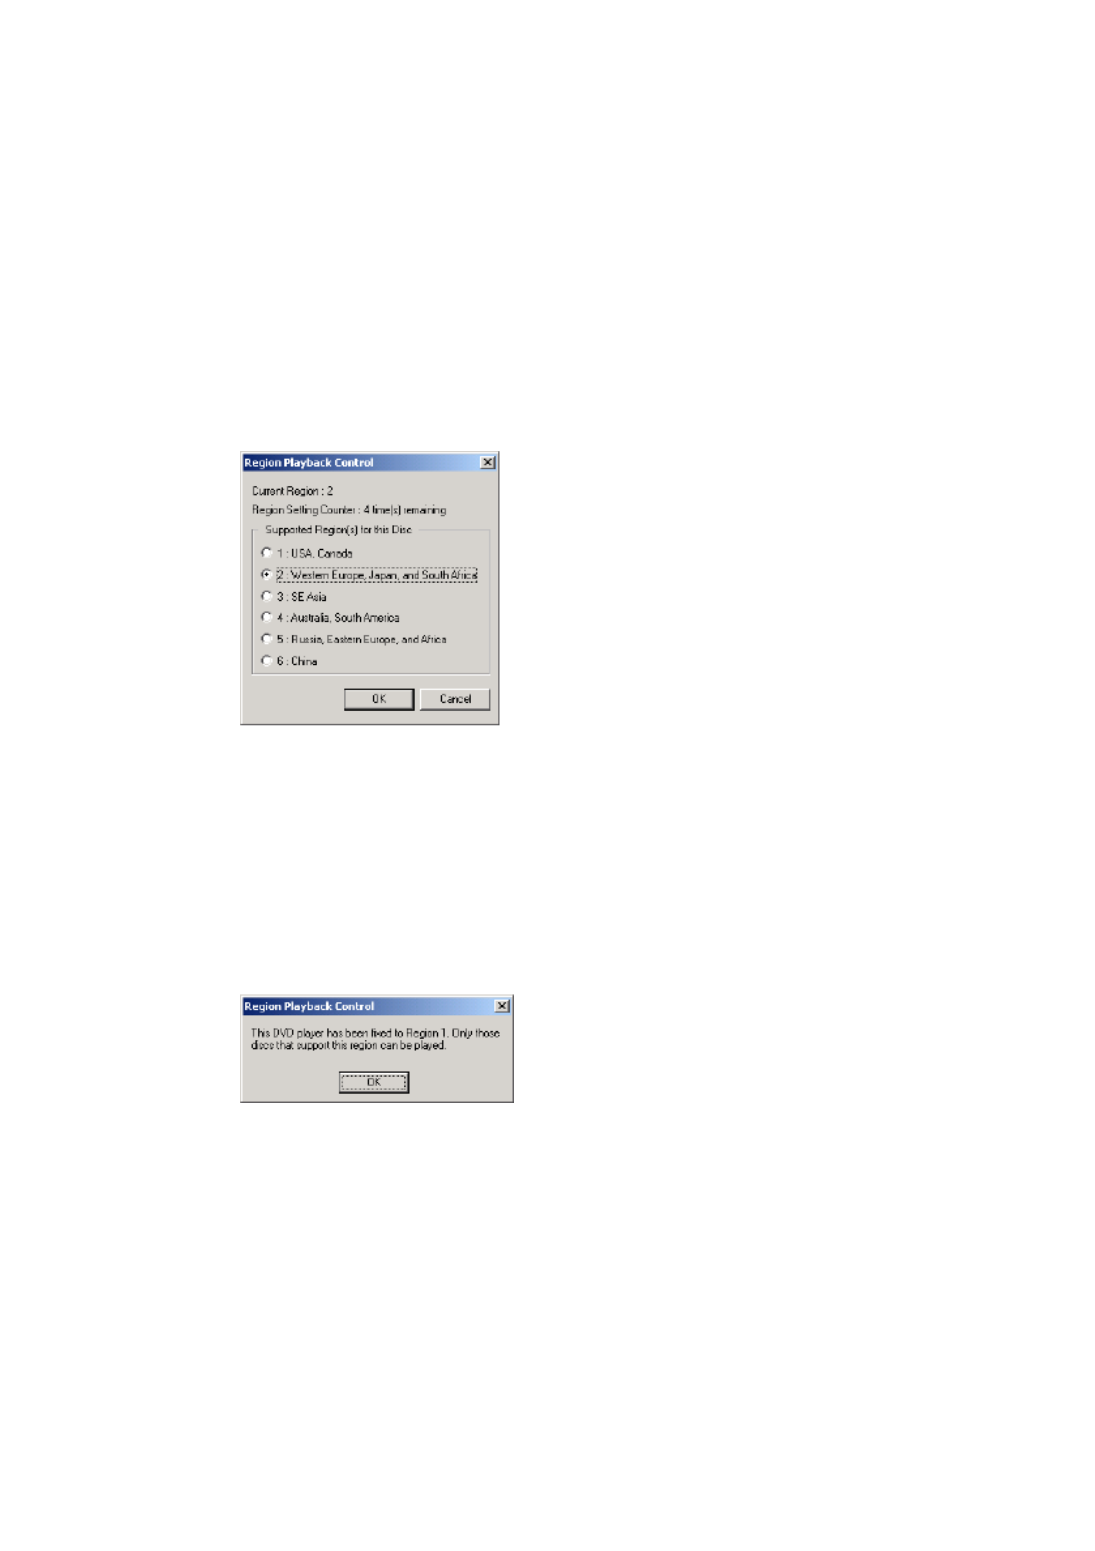
Region Code Settings
Most of the DVD titles in today's markets are governed by a regional
code that divides the world into six separate regions. This ensures
maximization of revenues for motion picture studios' theatrical and
home releases, which times and dates vary from region to region.
1. Upon inserting your DVD, note the dialog box.
2. Click OK. After the region has been set, this dialog box will no
longer prompt you unless an encoded DVD title from another
region is inserted.
Note: PowerDVD will only allow you to set the regional settings five
times until the regional code is fixed. Subsequently, playback of
DVD titles will be specific to one region. Some DVD titles may not
be region-specific.

Chapter 3: Playing Media
Playing DVDs
Now you are ready to play DVD Video titles.
1. Insert your DVD disc. Click Play . Be sure that the source is
correct. If not, click Select source and choose the right
drive.
2. A warning message or copyright information will appear
depending on the DVD title. Usually, this content cannot be
skipped over.
3. After the promotional content, you will be presented with the
main menu. With your mouse, select by clicking once.
4. The DVD will begin playing.
5. To use the Menu/Number pad, click the button in Player
mode and the Menu/Number pad will appear on the right.
6. To Stop or Pause , click them accordingly.
If you click Stop or Exit during playback, and even play other files or
DVDs immediately afterwards, the next time you click Play for that
specific DVD title, users may resume from the last scene depending
on their DVD Auto-Resume setting found in the Player Setting
configuration. This Auto-Resume feature remembers exactly where
you left off and allows users great leeway when playing multiple
discs at a time or if prematurely exiting PowerDVD.

CyberLink PowerDVD
46
1. Insert your disc.
2. Click Play . The DVD will begin playing.
3. You may also right click on Play for the Playback
Menu. Simply select a program and then the
available cells will appear. Click once on the
desired cell.
4. To Stop or Pause , click them accordingly.

PowerDVD allows you to play practically anything with digital
content, and this includes VCD formats (Video CD and Super Video
CD) or Audio CD. Of course, because of VCD/SVCD’s inherent
limitations, it will not be able to fully utilize all DVD functions.
1. Insert the VCD/SVCD and start PowerDVD. Click Play . Be
sure that the source is correct. If not, click Select source
and choose the right drive.
2. The VCD/SVCD will begin playing. Depending on the VCD/
SVCD title, some may offer a title menu. Depending on your
title, the on screen menu selection can be clicked on directly or
use the Number Pad to select.
•All VCD/SVCDs will have the capability of navigating, so
put the navigational slider to full use and navigate as you
like.
•You may also Shuttle Forward or Shuttle Reverse.
•Click Next or Previous to skip or return to chapters
depending if your title supports it.

CyberLink PowerDVD
48
For playing Audio CDs, through Select source you may select
the proper drive or play your CD by selecting Open media files.
Please refer to Playing Files on p.49 for more information.
1. Start PowerDVD, insert your Audio CD and click Play .
2. To alter your Audio CD playlist, click Menu during
playback or during pause mode.
3. For the default setting, your playlist will duplicate all the tracks
available on your Audio CD, from the left window. Click Clear
to clear your playlist or Reset to return to the default setting.
4. Select tracks and click Add to add to your Playlist. For selecting
multiple tracks, press <Ctrl> when selecting or press <Shift> to
select tracks in a row.
5. Click OK when you are finished.

Chapter 3: Playing Media
49
Playing Files
When you feel like playing files, simply follow the instructions below
to conveniently drag & drop files or to select, assemble, save, and
rearrange playlists for your pleasure.
Note: If you insert a data CD while PowerDVD is in Disc Mode (the
first option under the Select source button menu), PowerDVD will
play back all of the media files on your disc.
The simplest way is to drag & drop a file directly onto the PowerDVD
user interface and it will play right away! This includes all media file
types that are supported by PowerDVD and playlist formats (.m3u
and .pls).
1. Start PowerDVD and open the Windows Explorer (or any
folder).
2. Now, for any drag & drop assignment, it is best to shrink your
Windows Explorer window.
3. Find your file, click it, drag it over to the PowerDVD user
interface, and then drop it.
4. PowerDVD will begin playback.

CyberLink PowerDVD
1. First click Select source via user interface and select Open
media files. The Edit Playlist dialog box opens.
2. Begin selecting your file(s) by exploring your hard disk drive
(left pane) and selecting folders which have video and audio
content. Media files will be displayed in the upper right hand
pane.
•Select the Brower tab to navigate through your local drives
and directories for media contents.
•Switch to File types tab (default is Browser) for the left pane
and select the desired files to be displayed so as to speed up

Chapter 3: Playing Media
51
your search. Click Clear All to reset your file types or Select
All to select all possible file types.
•The UPnP Browser tab provides access to media contents
stored in an UPnP digital home network. Use this tab to
playback media contents in your UPnP network.
3. Select files in the upper right hand pane and click Add to add to
your playlist. To remove, select the file from your playlist pane
(lower right hand) and click Remove. Click Select All... to add
all the media files in the upper right hand pane to your playlist.
Click Remove All... to remove all the files from your playlist.
•You can add all the media files in a folder (subfolders not
included) by dragging and dropping the folder from the left
pane to your playlist.
Note: If playing more than one file, be sure to consider the order
in which you add to the playlist, for this order will be final unless
you use the shuffle or repeat functions.
Note: You may also enlarge your window by pointing to the right
corner and resizing the dialog box accordingly by clicking and
dragging. You can resize each individual panes by clicking and
dragging the dividers between the panes.
•Click Load List... if you have playlists in the .PLS or .M3U
format. This function will replace all previously loaded files.

CyberLink PowerDVD
52
However, after loading this playlist file, you may add extra
files to the list without altering the original playlist file.
•If you would like to save your newly created playlist, click
Save List... after you are done. Choose a location and click
Save.
4. Click OK after you are satisfied with your current list.
5. Now, to play your playlist, click Play . Use the Shuffle,
Repeat, or Number Pad (refer to Using the Menu/Number Pad
on p.36) functions for added convenience.

Chapter 3: Playing Media
53
Playing DVD Files from Hard
Disk Drive
PowerDVD supports playing your own personal DVD files on your
hard disk drive so you can preview it before burning it onto a DVD-
writable or CD-writable disc. All you need to do is specify the video
source and select the folder that contains your video.
1. Click Select source on the user interface and then select
Open DVD File on hard disk drive.
2. Select the folder that contains your video and then click OK
when you are done. Your DVD file will begin playback just like
any other DVD title.

56
Player Configuration
After you click on Configuration , the default is the Player
configuration which controls the behavior of the DVD player itself.
1. The first selection is if you have multiple drives, the Default CD/
DVD-ROM Drive option lets you select the most appropriate
drive. Otherwise, the default setting should be correct and will
display the title of the current disc.
2. The next section is for certain behaviors that you may turn on or
off.
•When Run PowerDVD automatically at Windows startup is
checked, every time you turn on your computer, PowerDVD
will start (in Windows OS mode) and then reside in the
system tray.
•Show tooltips will display a hint, in the form of a yellow text
box, that will reveal what the function is whenever your
cursor is positioned over a specific function or feature.
•Enable DVD+VR will enable playback for DVD+VR disc.

57
•Check Automatic Software Update from the Internet to
allow PowerDVD to update automatically from the Internet.
3. The next section is the DVD Auto-Resume Setting. If you click
Stop or Exit during playback, and even play other files or DVDs
immediately afterwards, the next time you click Play for that
specific DVD title, users have the option of resuming from the
last scene. The Auto-Resume feature remembers exactly where
you left off and allows users great leeway when playing multiple
discs at a time or if prematurely exiting PowerDVD. Select an
option from below.
•The Always play DVD title from the beginning selection
does not utilize the Auto-Resume feature.
•The Resume playback from the last scene utilizes the Auto-
Resume feature.
•If you want flexibility in choosing, select Prompt before
playback resumes. Thus, whenever playback will resume, a
prompt will allow users to select if they want to play from the
beginning or from the last scene.
4. The last section is for hybrid DVDs that contain both audio and
video.
•The Play DVD-Audio plays only the audio portion of the
disc.
•The Play DVD-Video plays only the video portion of the
disc.

When in Configuration under the Player tab, click Advanced... to
access extra settings. Then, select one of the following tabs:
•OSD on p.58
•Snapshot on p.60
•Keyboard/Mouse on p.62
•File Association on p.63
•Bookmarks on p.64
This configuration controls the On Screen Display, which informs
users when a function is in use and the current status of PowerDVD
in text form.
1. Click on Configuration , select the Player tab, click
Advanced..., and then select the OSD tab.
•Check Enable to enable. In the next field, set the time
(seconds) you would like the OSD to be displayed for.

CyberLink PowerDVD
60
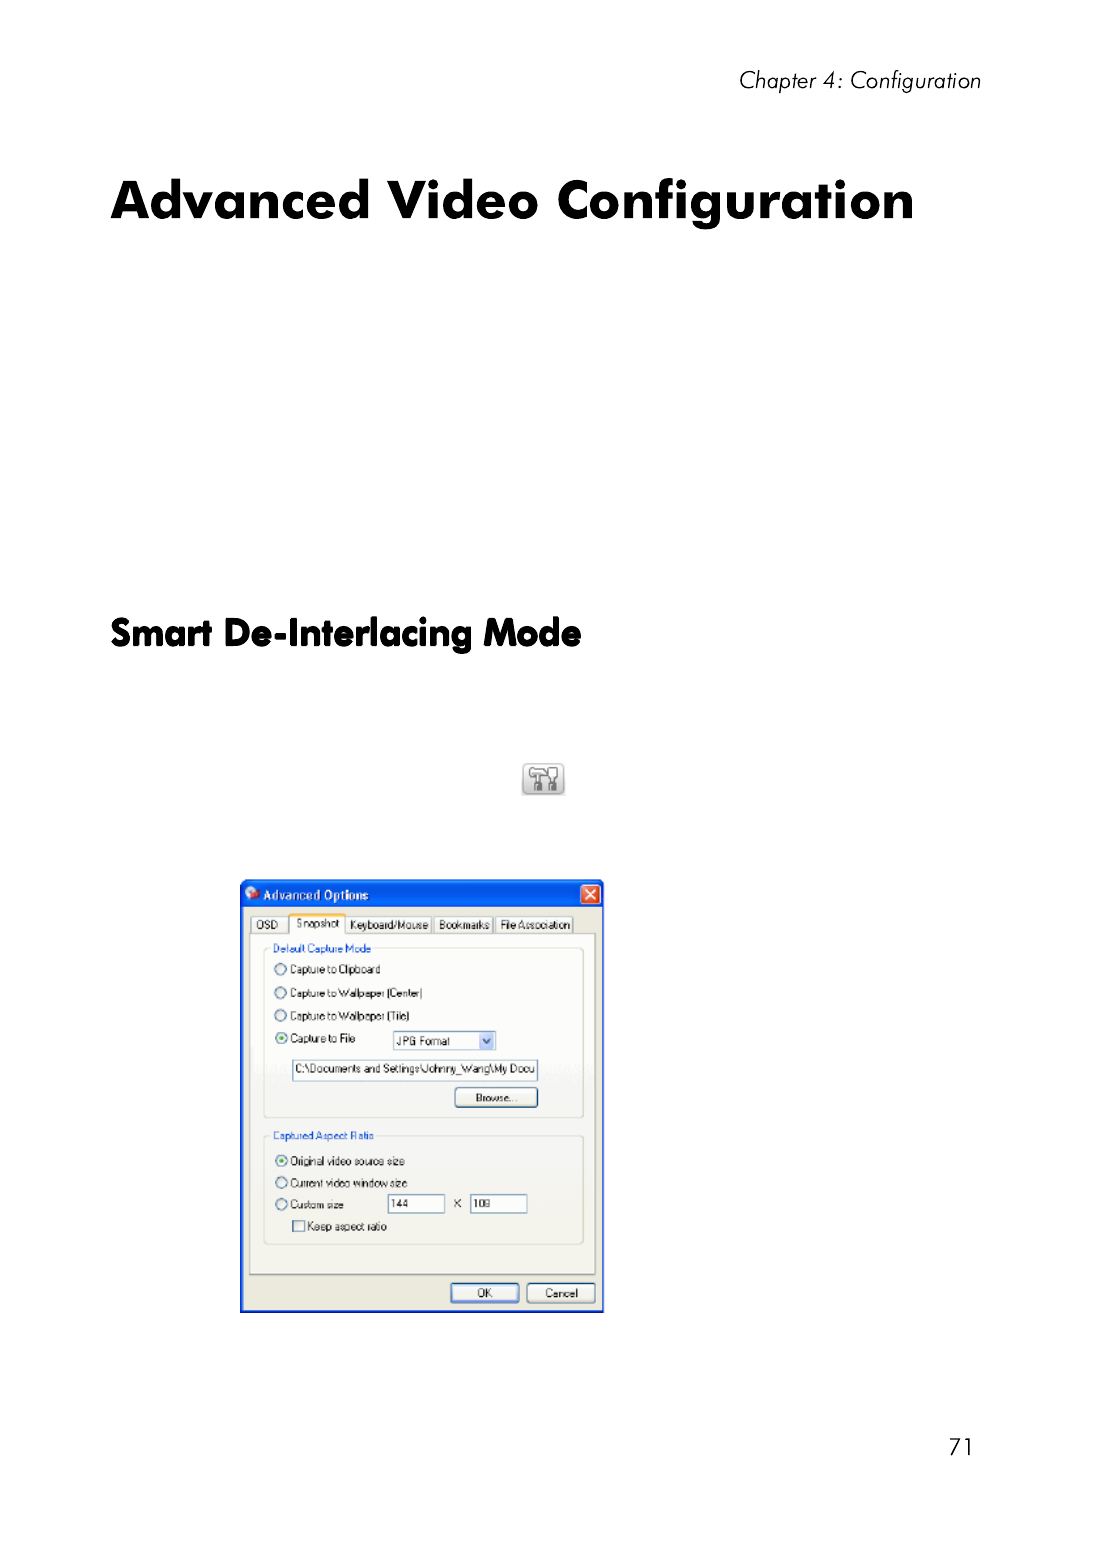
This configuration governs all the capturing settings related to the
snapshot function. Refer to Capturing Your Favorite Scenes on p.28
for more information.
1. Click on Configuration , select the Player tab, click
Advanced..., and then select the Snapshot tab.
2. The Default Capture Mode provides basic capture options:
•Capture to clipboard captures the image onto your
Windows' clipboard. Then, you may use the paste function
with software applications that support this basic function
(e.g. MS Word, MS Paint, Photoshop).
•Capture to Wallpaper (Center) will capture the image, centre
the image on your desktop, and save it automatically in your
default Windows' System folder.
•Capture to Wallpaper (Tile) will capture the image, place the
image on your desktop using a tile format, and save it
automatically in your default Windows' System folder.
•Capture to File will capture the image directly into a folder
you have selected. You can choose the file format you want to
use. Select JPG, BMP, GIF, PNG, or TIFF format from the

Chapter 4: Configuration
61
dropdown box to the right. You may also elect to change the
default file name and directory. Select Browse... to select
another folder. After finding a suitable folder, click OK.
Note: PowerDVD will numerically name the captured files
automatically. Thus, old captured files will not be replaced with
newly captured files.
You may select how you capture your favorite scenes with the
options given under the Captured Aspect Ratio section.
•To capture the Original video source size, select this option.
If the DVD title is NTSC format, the original source will be
720x480. For PAL, the size will be 720x576. This selection will
disregard the current window size.
•To capture the Current video window size, select this option.
No matter how ridiculous the current window size displayed
on your monitor, this selection will capture it!
•To capture a Custom size, select this option, then enter the
size (in pixels) of the image you want to capture.
•If you click the Keep aspect ratio option, PowerDVD
captures using the aspect ratio of the original video.

CyberLink PowerDVD
62
Ke
Ke
Ke
KeKeyboard/Mouse
yboard/Mouse
yboard/Mouse
yboard/Mouseyboard/Mouse
Mouse Scrolling Setting allows you to set a specific function for
PowerDVD if your mouse comes with a scroller (usually located
between the left and right button). For more information on using the
mouse scroll, check your User’s Guide for more information.
1. Click on Configuration , select the Player tab, click
Advanced..., and then select the Keyboard/Mouse tab.
2. Under the Mouse Scrolling Setting, select one of the following
by clicking on the drop-down menu:
•In order to set your scroller for shuttling, select Shuttle
reverse/forward.
•You may scroll a specific amount of time with Time seek. To
set the time for the Time seek (Page Up/Down) duration,
input the number of seconds (max=600). You may also seek
with your keyboard Page Up/Down keys.
•To scroll between chapters in a given DVD title or scroll
between files in your playlist, select Previous/Next.
•Or, set your scroller to Volum e adjustment.
•The Step forward/backward option allows you to step
forward or backward through the video by one frame.

63
File Association
File Association
File Association
File AssociationFile Association
PowerDVD’s File Association tab displays the file formats that
PowerDVD can play. Check the check box next to a file format to
make PowerDVD the default player for that file format. Clear the
check box if you don’t want PowerDVD to be the default player for
that file format.
1. Click on Configuration , select the Player tab, click
Advanced..., and then select the File Association tab.
2. Check the check box next to the file format to make PowerDVD
the default player for that file format.
•Clear the check box next to the file format if you don’t want
PowerDVD to be the default player for that file format.
Note: Check Play automatically upon inserting disc if you would
like PowerDVD to automatically play discs whenever they are
inserted. Check Launch PowerDVD and play when double
clicking IFO file to associate PowerDVD with IFO files.

For all bookmarks functionality, please refer to Bookmarking Your
Favorite Scenes on p.25. This configuration allows you to import and
export bookmarks that have been added for a specific DVD title on
another PowerDVD platform (i.e. another computer) where you
might want to play the same DVD title and use the same bookmarks.
1. First, you must save the .bmk file in the computer and the
bookmarks directory that you would like to import to. This may
be done simply through transferring it from email, copying it
from a floppy disk, .ZIP, SuperDrive, removable HDD, from a
rewritable CD, etc.
Note: Depending on your operating system (OS), the bookmarks
directory will be placed in different locations. Simply, conduct a
search on your hard drives for the “Bookmarks” directory or start
PowerDVD and click “Import Bookmarks...” under Configuration
to determine the location.
2. Once the .bmk file has been saved into the second computer and
the PowerDVD’s bookmarks directory, start PowerDVD.

3. Click Configuration , select the Player tab, Advanced and
then the Bookmarks tab.
4. Click Import Bookmarks....
5. Find the file in the Bookmarks directory, select it, and then click
Open. The next time you play the DVD title on this computer,
the imported bookmarks will be operational.

1. After you have added bookmarks to a specific DVD title, export
them by clicking Configuration , and selecting the Player
tab.
2. Click Advanced... and then the Bookmarks tab.
3. Click Export Bookmarks.... A dialog box will appear for you to
save it under the file extension name .bmk.
4. Enter the name and click Save. Remember where you saved it,
for you will need this file so as to import the bookmarks into
another computer.
5. Click OK when you are finished.
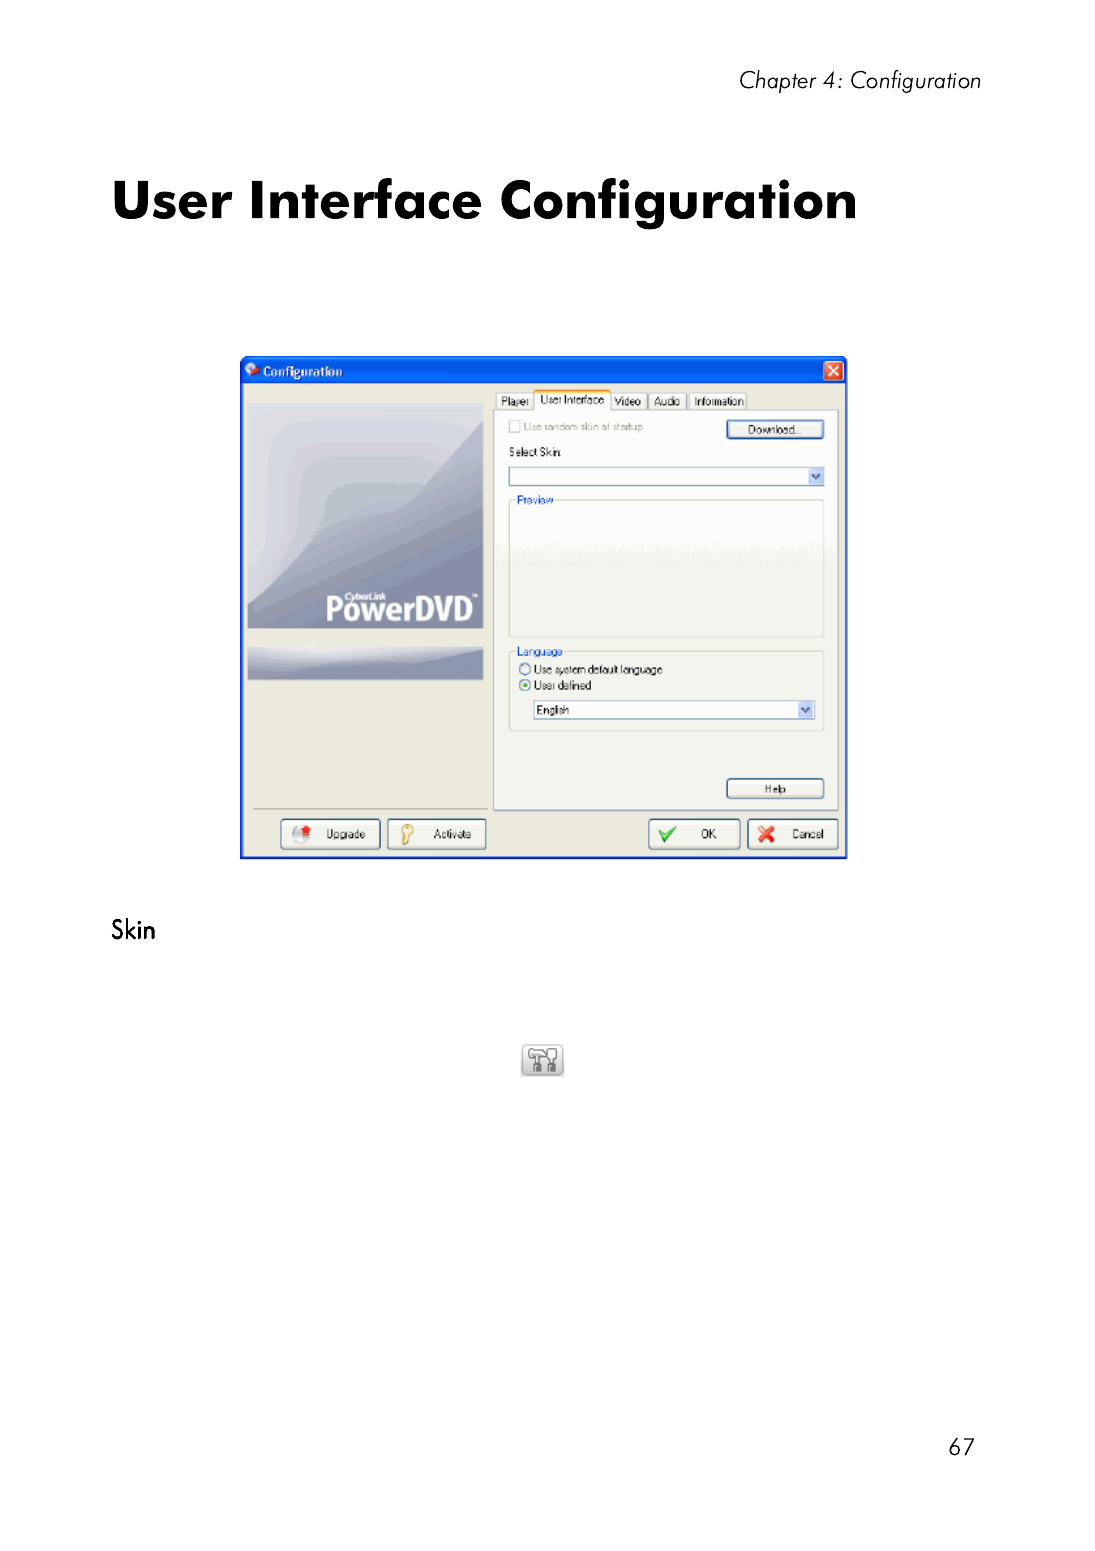
This configuration gives you creative control over your PowerDVD
appearance.
PowerDVD offers several different skins for users to use. The change
the skin of your PowerDVD player please do the following:
1. Click on Configuration , then select the User Interface tab.
2. Check Use random skin at startup to use random skins every
time you start PowerDVD.
3. To select a new skin, click on its name (the preview will be
provided below).
•Click Download to download new skins from CyberLink.
4. Click OK when you are finished.

The Language option allows users to select the language they want to
use for PowerDVD’s user interface. Users can choose between the
system default language or any languages supported by PowerDVD.
1. Click on Configuration , select the User Interface tab.
2. Select Default System Language to use the operating system
default language or select User defined and choose the language
you want to use from the drop-down box.
3. Click OK when you are finished.

1. After you click on Configuration , select the Video tab to
manage the video essentials of PowerDVD.
•The first section is Hardware Acceleration. Check Enable
hardware acceleration if you would like to activate IDCT and
Motion Compensation. By enabling this option, some
features will be unavailable.
•You have full control of your screen under Screen Control.
Check Run full screen if you would like the playback default
to use your monitor's maximum screen area. If you would
like to keep the PowerDVD Video always on top, check this
option.
•You can use the options under Video Enhancement to output
the best quality video possible:

•CLEV-2 (CyberLink Eagle Vision 2) is a video enhancement
technology developed by CyberLink that detects video
content and dynamically adjusts the brightness/contrast/
saturation ratios so that you do not need to change the color
settings if the movie you are watching contains scenes that
are overly dark or too bright. The Full option applies the
effect to the entire screen, while Split allows you to view the
effect CLEV-2 has on the current movie you are watching in
order to decide whether or not to apply the effect. Use the
Level slider to adjust the CLEV-2 effect.
•For the options under Use color profile, click on the drop-
down menu to select a profile. To create new user profiles, go
to Color on p.73 for more information.
•Check Automatically enable Read-It-Clearly in full screen
mode if you want PowerDVD to activate Read-It-Clearly
when you are watching movies in full screen.
2. To access more video settings, click Advanced... See Advanced
Video Configuration on p.71.
When in Configuration under the Video tab, click Advanced... to
access extra settings. Then, select one of the following tabs:
•Smart De-Interlacing Mode
•Dual Display Mode
•Color
•Aspect Ratio
•Display Device
Note: With the exception of De-Interlacing Mode, these options
are only available during playback.
This configuration allows for modifications according to display
screen preferences.
1. Click on Configuration , select the Video tab, click
Advanced..., and then select the Smart De-Interlacing Mode
tab.
•Choose None if you don’t wish to use de-interlacing mode.

•Select Perform hardware de-interlacing if your video card
has hardware de-interlacing.
•For the De-Interlacing Mode section, We recommand that
your use Perform smart de-interlacing and the
recommended setting is Auto-select. The Auto-select mode
will optimize the video quality by selecting a deinterlacing
mode.
•To select a de-interlacing mode yourself, check the Specify
Manually option, then select your De-Interlacing Method
and De-Interlacing Algorithm. Advanced users should
select the option that suits their needs best.
2. Click OK when you are finished.
The Dual Display Mode settings enable you to display video on two
display devices (such as a computer monitor and a TV). Available
options depend on your video display card.
1. Click on Configuration , select the Video tab, click
Advanced..., and then select the Dual Display Mode tab.
•Default driver setting: use the default setting of your display
driver.

•Full screen on secondary device (using Overlay mode): use
Overlay mode to display full-screen video output on your
secondary display device.
•Same-on-all (using Off-screen mode): use Off-screen mode
to display the same video output on both your primary and
secondary display devices.
•Don't change (use current VGA driver settings): use your
current driver settings, which may have been modified from
their default values.
1. Click on Configuration , select the Video tab, click
Advanced..., and then select the Color tab.
2. For adjusting the Color Control, simply drag and release one of
the options when in playback or pause mode. The counter to the
right of each color displays the degree of modification.
•You may click Save after adjusting and it will be saved as the
existing video profile. Click Restore to restore the original
settings for a given video profile.
Note: Depending on your display chip, some controls may not be
available for modification.

You might also wish to create your own video profile with these color
control settings rather than using the existing profile names. There
are two main ways in going about this.
1. Click New.... Then, enter a name for this setting.
2. Click OK. Now, adjust the different controls. After you are done
with your adjustment, click Save. Click OK when you are done.
The second method is for users who have adjusted the controls first.
1. After you have adjusted the controls, click New. Then, enter a
name for this setting.
2. Click OK. Now, adjust the different controls. After you are done
with your adjustment, click Save. Click OK when you are done.
Note: RestoreClicking will only restore original values of default
profiles that may have been altered. This will not apply for
personal video profiles.
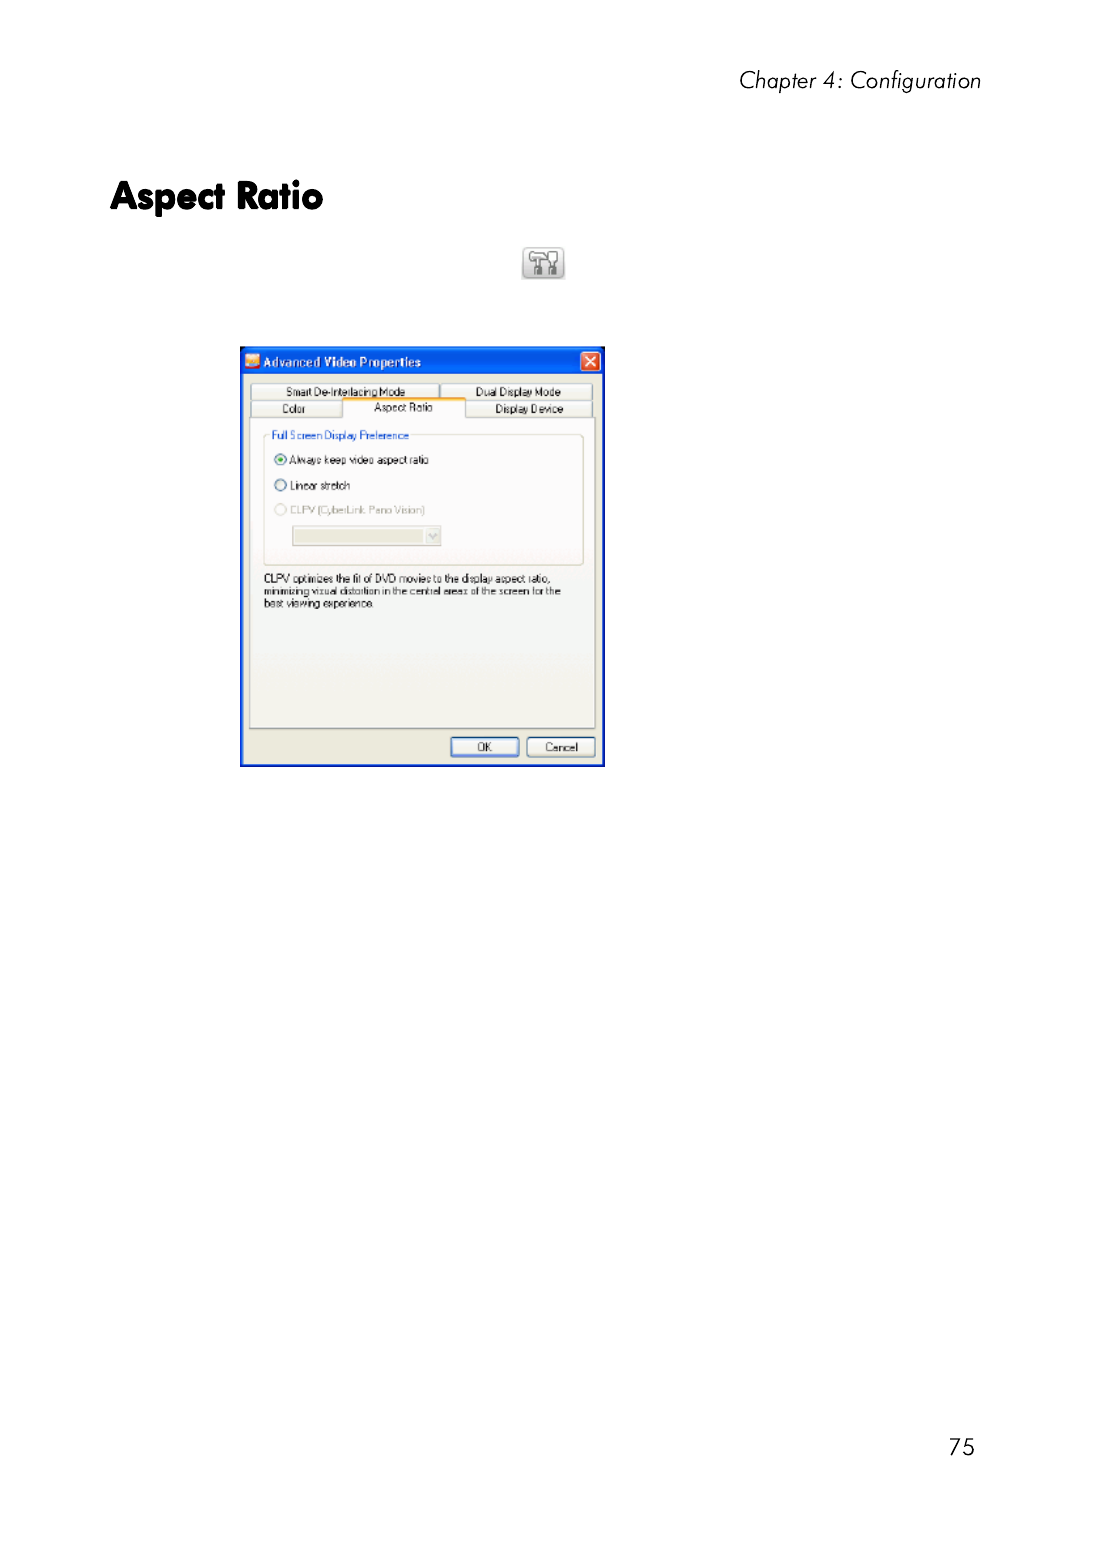
1. Click on Configuration , select the Video tab, click
Advanced..., then select Aspect Ratio. These options control
how video in 4:3 ratio is converted to 16:9 (and vice versa).
•In the Full Screen Display Preference section, the Always
keep aspect ratio option retains the original aspect ratio
whenever you resize the video display. This option is
mutually exclusive with the CLPV option below.
•Linear stretch stretches all parts of the video equally,
resulting in noticeable distortion when the aspect ratio of the
video display does not match the aspect ratio of the monitor.
•CLPV (CyberLink Pano Vision) is a non-linear video
stretching technology that produces minimal distortion in the
center of the picture. The Smart Stretch option (which is
recommended for most videos) stretches the video display to
the height of the screen and crops slightly off the sides. The
Fit to Screen option stretches the video to the complete size
of the screen without loss at the edges. The Keep Subtitles
option ensures that the subtitle remains visible when the
video display is stretched. (This option is only available for
4:3 movie content.)
2. Click OK when you are finished.

1. Click on Configuration , select the Video tab, click
Advanced..., and then select the Display Device tab.
•In the Preferred Display Device section, select whether you
want to use your Single/primary device or Secondary device
as your main movie viewing device.
•If you select Secondary device, click select the 4:3 aspect
ratio or 16:9 aspect ratio option to specify your screen’s
resolution. Usually, the default will suffice. If the default does
not match your output device, select an option from the
Others drop-down box.
2. Click OK when you are finished.

After you click on Configuration , click on Audio. If you would
like absolute control of your Audio configuration, it is advised that
you click Advanced... to access even more settings (refer to Advanced
Audio Configuration on p.80)!
1. Depending on your sound card and/or number of speakers,
choose the best suited Speaker Environment by clicking from
the drop-down menu and making your selection.
•Headphones is mainly for notebook users who listen to their
audio output on headphones.
•2 Speaker is the selection for most users playing DVD on
their desktop/laptop who only have 2 speakers or a sound
card that only outputs two channels. This selection utilizes
DirectSound, Microsoft's application programming interface
(API) and makes up the wave-audio component of the
DirectX® API.

•The Use SPDIF option is an advanced technological Digital
I Fnter ace, as opposed to transferring signals via conventional
analog interfaces, designed by the Sony and Philips
corporations. To enjoy true 6 speaker output quality, you
must have an external Dolby Digital/DTS decoder along
with a SPDIF-compliant sound card to make this selection
available.
Note: If the SPDIF audio output is enabled, the volume control for
PowerDVD will be disabled as your decoder assumes the task.
•The 4 Speaker selection is for computers equipped with
sound cards which support 4-ch output.
•The 6 Speaker selection (a.k.a. 5.1 channels) is for computers
equipped with sound cards which support 6-ch output and is
optimal for DVD Video titles that feature multichannels
encoding such as Dolby Digital 5.1 or DTS 5.1.
•The 7 Speaker and 8 Speaker options are available for users
who have multiple speakers and wish to output audio to
each of them.
2. The following selections will only be available depending on
your selection in the Speaker Environment section.
•The major difference between Dolby Surround Compatible
Downmix and Stereo is that Dolby Surround uses the Dolby
Surround downmixing algorithm and the possibility exists of
connecting an analogue Pro Logic decoder to the sound card
so as to enable 4-ch surround sound (left, right, center,
surround) for Dolby Surround. Otherwise, both are relatively
similar in 2-channel output. For more information, see
Miscellaneous on p.80.
•Dolby Headphone is a post-processing effect designed to
create a virtual surround sound experience particularly for a
headphone environment but is suitable also for both
notebook and desktop environments. For more information,
see Dolby Headphone (Optional) on p.83.
•The CyberLink Headphone option uses technology
developed by CyberLink to improve the quality of audio
output from a notebook over headphones. The Advanced

options simulate the very different experiences of listening to
sound in a well-damped Living Room, a small Theater, or a
large Stadium. For more information, see CL Headphone on
p.84.
Note: This option does not appear in all versions of PowerDVD.
•The Dolby Virtual Speaker option allows you to experience
virtual surround sound through 2 speakers. For more
information, see Dolby Virtual Speaker (Optional) on p.85.
•CyberLink Virtual Speaker is a virtual surround technology
developed by CyberLink. For more information, see
CyberLink Virtual Speaker on p.86.
•CLMEI-2 (CyberLink Multi-channel Environment
Impression technology 2) is an audio channel expansion
technology developed by CyberLink that converts a stereo
audio sound and outputs to multiple channels. For more
information, see CLMEI-2 on p.87.
•Dolby Pro Logic IIx has three options. For more information,
see Dolby Pro Logic IIx (Optional) on p.88.
•Neo:6 are available in two different modes. For more
information see Neo:6 (Optional) on p.88.
•SRS TruSurroundXT is a virtualization technology that
processes multi-channel surround sound. For more
information see SRS TruSurroundXT (Optional) on p.81.
3. Click OK or go to Advanced Audio Configuration on p.80.

When in Configuration under the Audio tab, click Advanced... to
access extra settings and a monumental stage to wield your boosted
acoustic power. Then, select one of the following tabs:
The following options are available when you select the Headphones
environment in the Audio Configuration function.
This tab allows you to configure audio properties for DVD-titles
equipped with multichannel encoding.
Note: The Miscellaneous tab is shared among the following
Headphones, 2-Speaker, and 4/6/7/8 Speaker output modes:
Stereo, Dolby Surround Compatible Downmix, and No Effect.
1. Click on Configuration , select the Audio tab, click
Advanced..., and then select the Miscellaneous tab.

1. Click on Configuration , select the Audio tab, click
Advanced..., and then select the TruSurroundXT tab.
2. The TruSurround section is a virtualization technology that
processes multi-channel surround sound into 2 speakers or a
headphone.
•Check Enable to enable TruSurround technology for
PowerDVD.
3. Dialog Clarity Enhancement is a SRS proprietary technology
that enhances the quality of movie dialog by increasing audio
clarity.
•Check Enable to enable Dialog Clarity Enhancement. Use the
slider to adjust the strength of the enhancement.
4. TruBass is a proprietary technology for bass ebhancement
applicable to speakers of any size.
•Check Enable to enable TruBass technology. Use the slider to
adjust the strength of the enhancement and the speaker size.
5. Click OK.

Refer to Audio Configuration on p.77 for more background
information.
1. Click on Configuration , select the Audio tab, click
Advanced..., and then select Dolby Headphone.
2. Select one of the following modes depending on your listening
environment.
•DH1 simulates a small, well-damped private room
appropriate for both movies and music-only recordings. It is
equivalent to the Dolby Headphone “Reference Room” and is
provided on all Dolby Headphone equipped products.
•DH2 simulates a more acoustically “live” room particularly
suited for music listening (e.g. intimate jazz clubs).
•DH3 simulates larger venues like a concert hall or movie
theater.

The CL Headphone advanced options allow you to simulate different
listening environments:
•Living Room simulates a small, well-damped private room
appropriate for both movies and music-only recordings.
•Theater simulates a more acoustically “live” room
particularly suited for music listening (e.g. intimate jazz
clubs).
•Stadium simulates larger venues like a concert hall or movie
theater.
Note: This audio option becomes available after registering your
program. For more information, see Register Your Software on p.4.

CyberLink Virtual Speaker is a virtual surround technology
developed by CyberLink.
•Living Room simulates a small, well-damped private room
appropriate for both movies and music-only recordings.
•Theater simulates a more acoustically “live” room
particularly suited for music listening (e.g. intimate jazz
clubs).
•Stadium simulates larger venues like a concert hall or movie
theater.

The following options are available when you select the 4, 6, 7, or 8-
Speaker environment in the Audio Configuration function.
Note: Selecting No Effect opens the Miscellaneous tab. For more
information, see Miscellaneous on p.80.
CLMEI-2 (CyberLink Multi-channel Environment Impression
technology 2) is an audio channel expansion technology developed
by CyberLink that converts a stereo audio sound and outputs to
multiple channels.
Three modes are provided: Movie Playback (suitable for movies,
especially those with dynamic audio position shifting), Music Mode -
Standard (simulates a concert from inside the audience), and Music
Mode - Onstage (simulates a concert from onstage).
•Use the sliders to set the Front, Rear, Center, and LFE (low
frequency effect) levels.
•Click Default to reset the sliders to their original levels.
Note: If your speakers are not capable of outputting the low
frequency 120 Hz signal, it is recommended that you reduce the
LFE option to avoid damaging your speakers.

Dolby Pro Logic IIx has three options: Movie Mode for watching
movies, Music Listening for listening to music, and DDEX Mode for
enhanced surround sound).
Neo:6 is a multi-channel matrix surround sound format. It comes in
two options: Movie Mode for watching movies and Music Mode for
listening to music.

Chapter 4: Configuration
89
This configuration is for users who are searching for pertinent
information regarding all aspects of their DVD entertainment. Click
Configuration and then the Information tab.

The region code for the player and the DVD is displayed here along
with the DVD-ROM drive designation.
•Video Mode: Refer to Video Configuration on p.69.
•Display Mode: N/A is displayed during stop mode. Usually
DirectDraw is displayed if hardware was set up properly.
•FourCC Code: FourCC Code is a Windows' designation for
the digital video format standard. Often YV12, YUY2, UYVY,
MCS3, MCAM, IMC3, etc. is displayed and may include
other formats. After installing PowerDVD, the diagnostic
program will automatically determine the best format.
•Surface Type: The default commonly used that supports
display captions is “overlay”, “Hardware Video Accelerator”
or “Hardware Video Accelerator (DxVA)”. Occasionally, it
may display “off-screen”. It is recommended that you either
lower your screen resolution, reduce color depth, or reinstall
Microsoft DirectX to make overlay mode available for
optimal performance.
Note: We recommend using DDraw compliant display cards to
utilize the Overlay feature.
These attributes outline the statistics of the current DVD or other
media types. Some of these attributes will be explained briefly.
•The Video compression mode for DVD is MPEG-2 or MPEG-
1 and for VCD, MPEG-1. SVCD may be either.
•The first figure for TV system is the number of horizontal
lines. The second is number of fields (e.g. 525/60 is standard
for NTSC television signals).

•The Aspect Ratio depends on the DVD title. 16:9 is the ratio
for most widescreen titled DVDs and widescreen televisions
nowadays.
•The Display Mode is read from your DVD title.
•Source picture resolution is the size of the resolution. The
DVD standard is 720x480 (NTSC) or 720x576 (PAL).
•Frame Rate is number of frames per second. 30 is the
standard for NTSC and 25 for PAL (MPEG-1 and 2).
•Source picture letterboxed denotes if DVD title is letterboxed
(4:3 screen ratio).
•Bitrate is the maximum bitrate size for the entire movie.
•The Audio Coding mode is the decoding mode, for example,
Dolby Digital (AC-3).
•The Sampling Rate determines the sound frequency range;
the higher, the better the quality.
•The Audio application mode displays the audio mode of
some DVD titles (such as karaoke or Surround sound titles),
but is not available for most DVDs.
•Number of Audio Channels calculates the total number of
audio channels for a given DVD title.
•Bitrate is naturally a lot smaller in size as compared to video
here and is measured in kilobits per second as opposed to
megabits per second for video.
•Number of Audio Streams calculates the total number of
streams (i.e. languages, commentaries or karaoke) for a given
DVD title. Each stream will have a different total for audio
channels. For e.g., some streams may support Dolby Digital
5.1 (6 channels total), while some may just be your basic two
channels.

•For the Number of Subtitles, there is a tally of the number of
subtitles available.
Hardware Information displays information pertinent to DVD
playback. The first section includes the CPU processor and its
accompanying clock speed and a list of CPU instruction sets
PowerDVD is optimized for:
•Processor: either Intel, AMD, Transmeta or VIA
•3DNow! Technology
•Enhanced 3DNow! Technology
•3DNow! Professional Technology
•IA MMX Technology
•IA Streaming SIMD Extension
•IA SSE 2
3DNow! belongs to AMD (Advanced Micro Devices), while the rest
are Intel Architecture (IA) technology. If detected, PowerDVD will try
to utilize the above instruction sets for optimal performance.
•The Video Accelerator is a feature that many display cards
possess. If it is detected and enabled/disabled (please refer to
Video Configuration on p.69), it will be displayed here as
either (in use) or (not in use).
•If your sound card may be classified as a Multispeaker
Audio Device, it will be displayed here as (in use). If the 4
Speaker or 6 Speaker selection is selected (please refer to
Audio Configuration on p.77) the display will read (in use),
or (not in use) if not selected.
•If your sound card may be classified as a SPDIF Output
Device, it will also be displayed here as (in use). Depending
on its status, (please refer to Audio Configuration on p.77),
either (in use) or (not in use) will be displayed.
Product specificaties
| Merk: | CyberLink |
| Categorie: | Foto- en/of videosoftware |
| Model: | PowerDVD 7 |
Heb je hulp nodig?
Als je hulp nodig hebt met CyberLink PowerDVD 7 stel dan hieronder een vraag en andere gebruikers zullen je antwoorden
Handleiding Foto- en/of videosoftware CyberLink

6 Januari 2024
6 Januari 2024
6 Januari 2024
6 Januari 2024
6 Januari 2024
6 Januari 2024
6 Januari 2024
6 Januari 2024
6 Januari 2024
6 Januari 2024
Handleiding Foto- en/of videosoftware
- Foto- en/of videosoftware Sony
- Foto- en/of videosoftware Nikon
- Foto- en/of videosoftware Canon
- Foto- en/of videosoftware Lego
- Foto- en/of videosoftware Acronis
- Foto- en/of videosoftware Adobe
- Foto- en/of videosoftware Apple
- Foto- en/of videosoftware Atomix
- Foto- en/of videosoftware AVM
- Foto- en/of videosoftware Axis
- Foto- en/of videosoftware Google
- Foto- en/of videosoftware Hasbro
- Foto- en/of videosoftware Hema
- Foto- en/of videosoftware IRIS
- Foto- en/of videosoftware Korg
- Foto- en/of videosoftware LevelOne
- Foto- en/of videosoftware LibreOffice
- Foto- en/of videosoftware Magix
- Foto- en/of videosoftware Microsoft
- Foto- en/of videosoftware Nuance
- Foto- en/of videosoftware Pinnacle
- Foto- en/of videosoftware Razer
- Foto- en/of videosoftware Roland
- Foto- en/of videosoftware Roxio
- Foto- en/of videosoftware Smartwares
- Foto- en/of videosoftware Sonos
- Foto- en/of videosoftware Sweex
- Foto- en/of videosoftware Terratec
- Foto- en/of videosoftware Ulead
- Foto- en/of videosoftware VeraCrypt
- Foto- en/of videosoftware Volkswagen
- Foto- en/of videosoftware Omni
- Foto- en/of videosoftware Bang And Olufsen
- Foto- en/of videosoftware ABBYY
- Foto- en/of videosoftware ABN AMRO
- Foto- en/of videosoftware Albelli
- Foto- en/of videosoftware Antares
- Foto- en/of videosoftware Autodesk
- Foto- en/of videosoftware AVG
- Foto- en/of videosoftware Corel
- Foto- en/of videosoftware DoorBird
- Foto- en/of videosoftware FileMaker
- Foto- en/of videosoftware Foxit
- Foto- en/of videosoftware IoSafe
- Foto- en/of videosoftware Lavasoft
- Foto- en/of videosoftware Paragon
- Foto- en/of videosoftware Parallels
- Foto- en/of videosoftware Rabobank
- Foto- en/of videosoftware Showpad
- Foto- en/of videosoftware Symantec
- Foto- en/of videosoftware UNIT4
- Foto- en/of videosoftware Western Bank
- Foto- en/of videosoftware Yuki
- Foto- en/of videosoftware Intellinet
- Foto- en/of videosoftware QSC
- Foto- en/of videosoftware PayPal
- Foto- en/of videosoftware Auralog
- Foto- en/of videosoftware Facebook
- Foto- en/of videosoftware 2nd Sense Audio
- Foto- en/of videosoftware Propellerhead
- Foto- en/of videosoftware Teklynx
- Foto- en/of videosoftware Panduit
- Foto- en/of videosoftware X-Rite
- Foto- en/of videosoftware R-Go Tools
- Foto- en/of videosoftware Wireshark
- Foto- en/of videosoftware Gimp
- Foto- en/of videosoftware Laplink
- Foto- en/of videosoftware Nik Software
- Foto- en/of videosoftware Xils Lab
- Foto- en/of videosoftware Cakewalk
- Foto- en/of videosoftware Polyverse
- Foto- en/of videosoftware AccSone
- Foto- en/of videosoftware Mariner Software
- Foto- en/of videosoftware IDIS
- Foto- en/of videosoftware NewBlueFX
- Foto- en/of videosoftware Excire
Nieuwste handleidingen voor Foto- en/of videosoftware
20 Februari 2025
27 Januari 2025
22 Augustus 2024
8 April 2024
3 April 2024
5 Maart 2024
5 Maart 2024
5 Maart 2024
22 Februari 2024
22 Februari 2024