Bushnell NatureView Cam HD 119438 Handleiding
Bushnell
Digitale camera
NatureView Cam HD 119438
Lees hieronder de 📖 handleiding in het Nederlandse voor Bushnell NatureView Cam HD 119438 (212 pagina's) in de categorie Digitale camera. Deze handleiding was nuttig voor 122 personen en werd door 2 gebruikers gemiddeld met 4.5 sterren beoordeeld
Pagina 1/212

Model#: 119438
Lit# 98-2385 / 08-12
INSTRUCTION MANUAL
VIDEO
CAM

FrançaisEspañolDeutschItaliano
Rejoignez la communauté NatureView Cam pour :
• Trouverdesinformationssurl’utilisationetlescapacitésdevotreNatureViewCam
• Partager vos expériences, vos conseils et astuces avec les autres utilisateurs de la
communautémondialeNatureViewCam
• Découvrirdesanimauxdumondeentier
• Accéderàunserviceinternetgratuitpourgéreretpublierlesphotosetvidéosprisesavec
votreNatureViewCam(vidéoshébergéessurYouTube)
Visita la web-site de la comunidad NatureView Cam donde quieras y cuando quieras:
• MásinformaciónsobrelascapacidadesyaplicacionesdelasNatureViewCam
• ComentatusexperienciasNatureViewCamconotrosusuarios,formapartedeestanueva
comunidad
• Descubreanimalesdetodoslosrinconesdelmundo
• Accedeaunserviciogratuitoparagestionartusfotosyvideoson-lineysubetusfotos(los
videossesubenatravésdeYouTube)
Visita oggi la NatureView Cam Communty del tuo paese, e se possibile:
• cercaulterioriinformazionisullefunzionalitàesulleapplicazionidelleBushnellNatureView
Cam
• discutile tueesperienzeconleNatureViewCamconaltri utenti,condividisuggerimenti,
entrainquestanuovacomunitàmondiale
• scopriglianimalidituttoilmondo
• accedialunserviziogratuitopergestireonlinelefoto/videoottenuteconleNatureView
Camecaricalevostrefoto(ivideosonocaricatisuYouTube)
Besuchen Sie noch heute die deutsche NatureView Cam Community Internetseite, dort:
• nden Sie weitere Informationen zu den Funktionen und Anwendungen der Bushnell
NatureViewCams
• könnenSiemitanderenNutzernderNatureViewCamIhreErfahrungenaustauschenund
TippsvonAnwendernausderganzenWelterhalten
• entdeckenSieTiereausderganzenWelt
• habenSieZugriaufeinenfreienService,umIhreNatureViewCamBilder/Videosonlinezu
verwaltenundIhreBilderzuspeichern(VideoswerdenbeiYouTubegespeichert)
www.natureviewcam.com

3
TABLE OF CONTENTS PAGE
ENGLISH
FRANÇAIS
ESPAÑOL
DEUTSCH
ITALIANO
4-40
41-81
82-125
126-170
171-214
Visit the NatureView Cam community website for your country today, where you can:
• seemoreinformationaboutthecapabilitiesandapplicationsoftheBushnellNatureView
Cams
• discussyourNatureViewCamexperienceswithotherusers,sharetips,belongtothisnew
worldwidecommunity
• discoveranimalsfromallovertheworld
• accessafreeservicetomanageyourNatureViewCamphotos/videosonlineandhostyour
photos(videosarehostedonYouTube)
www.natureviewcam.com
www.natureviewcam.co.uk

4
IMPORTANT NOTE
Congratulations on your purchase of one of the best wildlife
cameras on the market! Bushnell is very proud of this little
unit and we are sure you will be pleased with it as well. We
appreciate your business and want to earn your trust. Please
refer to the notes below and the instructions in this manual to
ensure that you are completely satisfied with this product.
If your Bushnell NatureView Cam does not seem to be
functioning properly or if you are having photo/video quality
issues, please check the Troubleshooting/FAQ section
on pages 33-37.
Problems are often due to something simple that was
overlooked, or require only changing one setting to solve.
If your problem continues after trying the solutions in
the Troubleshooting/FAQ section, please call Bushnell
Customer Service at (800) 423-3537. In Canada, call (800)
361-5702.
Bushnell recommends using a full set of Energizer® Lithium AA
batteries (8 or 12, depending on the model) in your NatureView
Cam to obtain maximum battery life
Do not mix old and new batteries
Do not mix battery types-use ALL lithium or ALL alkaline
Bushnell recommends using SanDisk® SD and SDHC Cards
(up to 32GB capacity, Ultra® or Extreme® series for HD video)
in this NatureView Cam
5
INTRODUCTION
About the NatureView Cam
The Bushnell NatureView Cam is a digital wildlife observation camera. It
can be triggered by any movement of wildlife in a location, detected by a
highly sensitive Passive Infra-Red (PIR) motion sensor, and then take high
quality pictures (up to 8MP still photos), or video clips.
The NatureView Cam consumes very little power (less than 0.2 mA) in
a stand-by (surveillance) state. This means it can deliver up to six months
stand-by operation time when the device is powered by the full capacity of
AA alkaline batteries, and up to twelve months utilizing lithium AA batteries.
Once motion in the monitored area is detected, the digital camera unit will
be triggered at once (typically within one second) and then automatically
take photos or videos according to previously programmed settings. The
NatureView Cam is equipped with built-in infrared LEDs that function as
a flash, so that it delivers clear photos or videos (in black & white) even in
the dark, and it can take color photos or videos under sufficient daylight.
The NatureView Cam is designed for outdoor use and is resistant against
water and snow.
Your trail camera is one of the latest generation of Bushnell Digital Cameras,
and includes many new or improved features, including:
• Auto PIR Sensitivity-the camera monitors ambient temperature
conditions and automatically adjusts the sensor/trigger signal to be
more sensitive to slight variations in temperature on hot days, less
sensitive on cold days.
• Hyper NightVision-The IR LED Flash array now has increased range,
brighter output and better coverage for improved nighttime images.
• Field Scan 2x with Live Trigger-The “time lapse” feature added in
previous models has been enhanced with the addition of the option
for a second block of recording with its own start/stop times. Trigger
signals generated by nearby wildlife activity will still generate additional
photos/videos as they normally would, independently of the Field Scan
operation.
• GPS Geotag Capability-allows the user to input the longitude and
latitude of the camera’s position, which will be embedded in each
photo file. This enables Google Earth, Picassa and other geotag
8
INSTALLING THE BATTERIES AND SD CARD
Before you begin learning how to use your NatureView Cam, you will first
need to install a set of batteries and insert an SD card. Although that may
only take you a minute, there are some important notes about both batteries
and SD cards you should be aware of, so please take the time to read the
following directions and cautions:
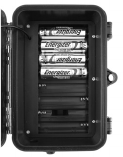
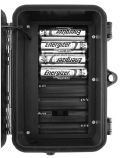
Loading Batteries
After opening the two latches on the right side of the
NatureView Cam, you will see that the NatureView
Cam has eight battery slots. For maximum battery
life, you should install a full set of batteries. The
NatureView Cam may also be operated by just four
batteries installed in the first slots only (starting on
the top or left-see photos). Battery life will be shorter
with 4 batteries, but the camera will operate normally.
Whether you use 4 or a full set, be sure to insert each
battery with correct polarity (negative or “flat” end
against the long spring of each battery slot).
Bushnell recommends using a full set of new lithium AA (Energizer® brand)
or alkaline AA batteries. NiMh Rechargeable batteries are not recommended,
as the lower voltage they produce can cause operational issues. It is also
possible to use a lead-acid external battery cell with 6V output or suitable AC
adapter-see below for more details.
Using an External Power Source (optional, user provided)
Optionally, you can connect an external 6V DC power source to the “DC
In” jack at the bottom of the NatureView Cam. It is recommended to use a
power source with a current output greater than 1550mA. However, during
bright daytime operation when no flash is required, the NatureView Cam
can function with much less current ( >400mA). Please use a compatible
power source cable (not provided) to connect the external DC power source
with the power input jack of the NatureView Cam, making sure that the
polarity is correct. Note: The power connector is a 4.0x1.7mm coaxial DC
power plug with positive “tip” (inside pin) polarity (Radio Shack P/N 274-
1532 or equivalent).
If both an external power source is connected and batteries are installed, the
NatureView Cam will be powered by the external power source.

9
When the batteries become weak, the low-battery indicator LED will glow
blue, indicating the batteries should be changed (pg 7, Front View).
Inserting the SD Card
The NatureView Cam has 32MB of internal memory, which can hold only
about 20 photos (@ 5MP resolution). This is handy for testing and getting
familiar with the camera, but you will no doubt want to leave the camera
unattended for longer than a day, so using an SD card is recommended for
all models. Insert the SD card (with the camera’s power switch in the OFF
position) before beginning to operate the camera. Don’t insert or remove the
SD card when the power switch is in the ON position.
The NatureView Cam uses a standard SD (Secure Digital) memory card
to save photos (in .jpg format) and/or videos (in .avi format). SD and SDHC
(High Capacity) cards up to a maximum 32GB capacity are supported.
High speed SD cards are recommended if you will use the 1280x720 video
resolution setting (HD). Before inserting the SD card into the card slot after
opening the camera’s front cover, please make sure that the write-protect
switch on the side of the card is “off” (NOT in the “Lock” position). The
following describes how to insert and remove the SD card:
• Insert the SD card into the card slot with its label side upwards (see
below). A “click” sound indicates that the card is installed successfully.
If the wrong side of the card is facing up, you will not be able to insert
it without force-there is only one correct way to insert cards. If the SD
card is not installed correctly, the device will not display an SD card icon
on the LCD in SETUP mode (the SD card icon displayed after switching
to SETUP mode will have a “lock” symbol inside it in it if the card is locked).
Formatting the SD card by using the NatureView Cam’s “Format”
parameter before using it for the first time is recommended, especially
when a card has been used in other devices (see “Changing Menu
Parameter Settings” for details).
• To take out the SD card, just gently push in the card (do not try to pull it
out without pushing in first). The card is released from the slot and ready
to be removed when you hear the click.
WARNING: Be sure the camera’s power is switched OFF
before inserting or removing SD cards or batteries.
10
USING THE NatureView CAM
Once you’ve prepared your NatureView Cam by properly installing
batteries and an SD card, you could simply take it outside, strap it to a tree,
switch it on and leave-and you might get some great photos that are exactly
what you wanted. However, we highly recommend that you first spend some
additional time indoors with this manual and your camera until you know a
bit more about what the 3-way switch and those control keys do. If nothing
else, you’ll probably want to at least set the date and time so the camera will
imprint them (or not-it’s your option) on your photos as they are taken, learn
how to set the camera to shoot video clips instead of still photos if you like,
and read some tips about mounting it on a tree.
THE OFF, ON, AND SETUP MODES
The NatureView Cam has three basic operational modes:
• OFF mode: Power switch in the OFF position.
• ON mode: Power switch in the ON position (LCD screen is off.)
• SETUP mode: Power switch at SETUP position (LCD screen is on).
OFF MODE
The OFF mode is the “safe” mode when any actions must be taken, e.g.,
replacing the SD card or batteries, or transporting the device. You will also
use OFF mode if you connect the camera to a computer’s USB port later
to download your photos/videos. And of course, when you are storing or
not using the camera, you will switch it to OFF. Please note that even in
the OFF mode the NatureView Cam still consumes power at a very low
level. Therefore, it’s a good idea to take the batteries out of the battery
compartment if the camera will not be used for a long time.
ON MODE
Anytime after the batteries and SD card have been inserted, you can switch
on the camera. When the power switch is moved to the top position, the
camera will enter into the ON (Live) mode. The motion indicator LED (pg.
6, “Front View”) will blink red for about 10 seconds. This interval allows time
for you to close the NatureView Cam’s front cover, lock it, and leave the
monitored area. Once in the ON mode, no manual controls are needed or
possible (the control keys have no effect). The NatureView Cam will take
11
photos or videos automatically (according to its current parameter settings)
when it is triggered by the PIR sensor’s detection of activity in the area it
covers.
You can either move the power switch directly from OFF to ON mode, or
stop at the SETUP position first to change one or more settings, then move
the switch to ON after you have finished doing so.
SETUP MODE
In the SETUP mode you can check and change the settings of the
NatureView Cam with the help of its built-in LCD (or a monitor connected to
the TV out jack). These settings, found in the SETUP Menu, let you change the
photo or video resolution, interval between photos, switch the time imprint
on, etc. Moving the power switch to the SETUP position will turn on the
LCD display, and you will see an information screen that shows how many
images have been taken, the battery level, camera or video mode, etc (Fig.
3, next page).
NOTE: Always move the power switch from OFF to SETUP mode. It is
possible that the camera could lockup if it is switched from ON to SETUP
mode. If this occurs, simply move the switch to OFF and then push it up to
SETUP again.
SETUP Mode Shortcut Keys/Functions
As mentioned earlier in “Parts & Controls”, four of the keys below the LCD
have secondary, “shortcut” functions when the camera is switched to
SETUP mode (but the MENU key has not been pressed):
• Press the UP key to quickly set the camera to shoot video clips.
• Press the DOWN key to quickly set the camera to take still photos.
• Press the RIGHT key to manually trigger the shutter. This is useful
for testing the camera-make sure you are in SETUP mode, press the
RIGHT key, and a few seconds later a photo or video (depending on
how the camera was set) will be saved to the SD card (or internal
memory if no card is inserted). The “number of images taken” counter
on the bottom left of the LCD will increase by one. If the display
indicates “SD PROTECTED” when you press the SHOT key, switch
the camera OFF, remove the SD card and slide its protect switch off.
• Press the OK key to replay (review or playback) photos/videos on a
connected TV monitor. See “Playing Back/Deleting the Photos/Videos”
(pg. 29) for more details.
12
2
2
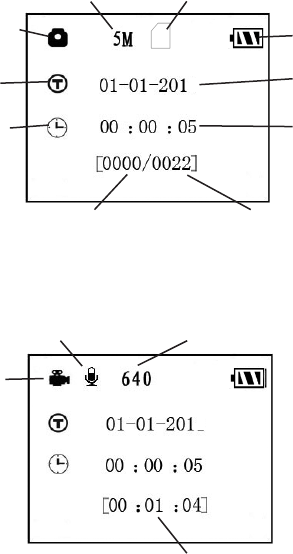
Fig. 3: SETUP Information Screen
Still Photo Mode
Time Stamp
Field Scan On
# of Photos Taken Remaining Photo Capacity
Date:Month-Day-Year
Battery Level
Image Size (Resolution) SD Card Status
Time
Hour:Minute:Second
Camera (Still Photo) Mode
Video Mode
Video Sound On Video Resolution
Available Video Recording Time
Video Mode

13
USING THE SETUP MENU TO
CHANGE SETTINGS
The main purpose of the SETUP mode is to allow you to change the
settings of the camera’s parameters (18 different ones are available!) so your
NatureView Cam operates exactly the way you want it to. You will do this
by entering the SETUP Menu and pressing the keys below the LCD display,
which will show you each parameter and its setting.
Changing Parameter Settings in SETUP Mode
A wide range of options or “parameters” are provided to allow you to set the
NatureView Cam to your operational preferences. To change the setting of
any parameter you must first switch to the SETUP mode. Once in SETUP
mode, pressing the MENU button will allow you to select any parameter and
change its setting. The name of the parameter and its current setting will be
shown on the LCD. Pressing the RIGHT or LEFT key scrolls to the next or
previous parameter (RIGHT key to move on to the next parameter and LEFT
key to go back to the previous parameter), and pressing the UP or DOWN
key lets you select a different setting for the currently displayed parameter.
Once you have selected your preferred new setting for a parameter, press
the OK button to save the new setting (actually change it). When you are
finished changing the settings of one or more parameters, press MENU
again to exit the SETUP menu. MENU can also be pressed anytime you
want to cancel changing a parameter’s setting after a new setting has been
selected (but OK has not been pressed yet). After setting the parameters
to your preferences, be sure to move the switch to ON to begin actually
taking photos or videos. No images will be captured if the switch is left in the
SETUP position (unless you press the RIGHT/Shot key after exiting the menu)-
in fact, the camera will power off automatically after a few seconds with no
key pressed.
Parameter Setting Display
Only one setting is displayed at a time, starting with the current setting for
the parameter when it is first selected (Fig. 4a). To change the setting, use the
UP/DOWN keys to display the new setting you want (Fig. 4b), then press OK
to “Execute” (make the actual change to this setting). If you want to confirm
this setting is now the current one, just press the RIGHT key to scroll to the
next parameter, then press LEFT to go back again to the previous one. You
should see the parameter setting you just made.

14
Fig. 4: Selecting Parameter Settings
(4a)
(4b)
Press MENU
Press DOWN
Press OK
15
EXAMPLES-Changing the Settings of Some Common
Parameters
Following this page, you will find tables listing all of the parameters found in
the SETUP Menu, along with their possible settings (or range of settings),
and a detailed description of what the parameter controls and what
the settings do. If you read the previous section detailing how to select
parameters and change their settings, you should be able to dive right in, find
the parameter(s) you want, and setup the camera to suit your preferences.
But maybe you’d rather walk through an example or two first:
To change any parameter’s setting, always start with the power switch in the
SETUP position. After the LCD comes on, press the MENU key.
The first parameter you will see when you first enter the SETUP Menu is
“Mode”. To change it from its default setting of “Camera” (still photos) to
“Video” (shoot video clips), press the DOWN key to select the “Video”
setting. Press the OK key to “Execute” (Set) the new setting you’ve selected
for this parameter.
Now press the RIGHT key to move to another parameter in the Menu.
Pressing it three times will take you to “Capture Number”. Try using the UP
and DOWN keys to scroll through the range of settings, then press OK to
lock in your setting for the number of photos the camera takes each time it's
triggered.
Pressing the RIGHT key until you reach the last menu item, you'll see the
“Default Set” parameter. Highlight or select “Execute” (using UP or DOWN)
and press OK to restore all parameters (including the Mode and Video
Length parameters you changed a minute ago) back to their original factory
default settings. The default settings for each parameter are indicated in bold
type in the SETUP Menu tables on the next several pages.
Be sure to set the current date and time, using the “Set Clock” parameter, if you
choose to change the “Time Stamp” parameter setting to “On” since that will tell
the camera to imprint the date and time on each of the images it captures.
16
Field Scan 2x with Live Trigger Feature
Field Scan is a revolutionary new feature for the Bushnell NatureView Cam,
which allows you to monitor a large area with time lapse images or video.
When set to “On”, the NatureView Cam will take a photo (or record a video
clip) automatically at your choice of intervals (for example, once every five
minutes) during one or two blocks of time you set up for each day, without
requiring a trigger from an active animal. This has the advantage of
giving you the ability to monitor the edge of a field that might be 50 or 150
yards away from the camera out of the PIR sensor’s range. The result is
an effective range much greater than it would normally be, with the camera
dependant on triggers generated by nearby animals. This is a great tool for
covering a larger area with only one camera.
If an animal does enter the area covered by the PIR sensor and generate a
trigger event during a time in between the Field Scan intervals you set, the
camera will capture an image or video just as it normally would, based on
your other menu settings. Here’s how to setup and use Field Scan (be sure
you’ve set the current time in “Set Clock” first, so your Field Scan recording
will stop and start at the correct times of day):
1. Move the main switch to SETUP, then press MENU.
2. Keep pressing the RIGHT key, stepping through the Setup Menu until
you reach Field Scan.
3. Press the UP key to select On, and press OK (Step 1, pg.18). You will
see "A", representing the first block of time you can define (a second
block of time later in the day, "B" can also be setup if you wish). Press
OK (Step 2). This takes you to the screen to set Start and Stop times,
which determines the clock times when the first block of Field Scan
recording will begin and end for each day. You can set these times to
the exact hour and minute you want, for a recording “window” that
lasts anywhere from just a minute to a full 24 hours.
4. Set the [Start] and [Stop] times, beginning with the Start hour, using
the UP/DOWN keys to change the setting (Step 3). The hour setting
is based on a 24-hour clock, with “00” hours = midnight, “12” hours
= noon, “23” hrs = 11PM, etc. To move to the next setting, press the
RIGHT key, change the minute for the Start time with UP/DOWN,
then on to the hour and minute settings for the Stop time.
17
5. After you finish setting the Stop minutes, press OK to confirm your
settings for the first block of Field Scan recording. If desired, you can
create a second block of time by pressing the DOWN key to select "B"
(Step 4), then press OK and follow the same process to set Start and
Stop times for Field Scan block "B" (Step 5). As an example of how you
might use these two available time blocks, you could setup Field Scan
time block "A" for the dawn hours from 6 AM to 8 AM, and block "B"
to capture images between 5:30 and 7 PM. No Field Scan recording
would occur from 8AM to 5:30PM, or from 7PM to 6AM.
6. After setting Start/Stop times to define Field Scan block "A" and/or
"B", press OK, then press the UP or DOWN key to select "Interval"
and press OK (Step 6). The Field Scan "Interval" setting lets you
control how often a photo or video clip is recorded during the block(s)
of time you defined with the Start and Stop settings. Your options are
60 minutes, 30 minutes, 15 minutes, 5 minutes (this is the default), or
1 minute (still photo mode only). Use the UP/DOWN keys to select
your preference, then press OK to save it (Step 7). Note that for videos,
"Interval" is independent of the Length of each video recording-it’s
how often videos are recorded, not how long each one lasts.
7. Here’s an example of how the camera would operate, based on the
following Field Scan settings:
Field Scan: On
Field Scan A:
[Start]: 6:00
[Stop]: 8:00
Field Scan B:
[Start]: 17:30
[Stop]: 19:00
Interval: 15M
These settings would cause the camera to capture a photo (or video,
if the camera is set to that mode) once every 15 minutes, beginning
at 6 AM, until the Field Scan "A" recording block stops at 8:00 AM.
Later that day, the camera would again take a photo or video every
15 minutes between 5:30 PM and 7:00 PM (during Field Scan time
block "B"). The next day, the camera would again record an image or
video once every 15 minutes between 6:00 and 8:00 AM, and between
Note: avoid any "overlap" of Field
Scan A & B recording blocks when
setting their start and stop times,
to assure correct operation.

19
Parameter Settings
(Bold=default)
Description
Mode Camera or
Video
Selects whether still photos or
video clips are captured when the
camera is triggered.
Image Size
(only aects
still photos)
3M Pixel,
5M Pixel,
8M Pixel,
Selects resolution for still photos
from 3 to 8 megapixels. Higher
resolution produces better quality
photos, but creates larger files
that take up more of the SD card
capacity (fills up faster). 5M is a
good compromise between quality
and file size.
Image Format
(only aects
still photos-for-
mat for video
is tied to Video
Size)
Full Screen,
Wide Screen
Selects 4:3 (Fullscreen, like old
TV sets) or 16:9 (Widescreen, like
new flat TVs) “aspect ratio” for
still photos. If you like to view your
photos on a TV set or computer
monitor, you can set the format to
match it.
Capture
Number
(only aects
still photos)
1 Photo,
2 Photo,
3 Photo
Selects how many photos are
taken in sequence per trigger
in Camera mode. This setting
affects photos taken in Field Scan
mode as well (to snap two photos
every 10 minutes, for example).
Please also refer to the Interval
parameter.
The SETUP Menu – Parameters and Settings List
w/Descriptions

20
Parameter Settings
(Bold=default)
Description
LED Control
(Multi-Flash
feature)
Low, Medium,
High
Controls how many LED lamps
fire when images are taken in low
light. “High”=all 32 LEDs fire,
which is the default setting. Set to
Medium or Low if you are getting
overexposed flash photos or will
place the camera at very close
range to the subject you want to
photograph. Note: in video mode,
24 LEDs fire in both High &
Medium (default) settings. Set to
Low if videos are overexposed.
Camera
Name
(Input)
See "Using the
Setup Menu
Input Screens"
Allows the user to set a custom
name for the camera. Useful for ID
purposes when multiple cameras
are setup, since each camera will
imprint its name on all photos/
videos it captures.
Video Size
(only aects
video clips)
1280x720,
640x480,
320x240
Selects video resolution (in pixels
per frame). Higher resolution
produces better quality videos, but
creates larger files that take up
more of the SD card capacity (fills
up faster). The default 640x480
is VGA video in standard 4:3
format. The 1280x720 setting
provides “widescreen” format HD
video. Using high speed SD cards
(SanDisk® Ultra® or Extreme®
series or similar) is recommended
if you will use the 1280x720 video
setting.

21
Parameter Settings
(Bold=default)
Description
Video
Length (only
aects video
clips)
10S (second)
default, with
60S to5S
possible range
Sets length per captured video
clip. Settings begin with 10
second default when parameter is
first selected. After stepping down
to 5S, video length settings start
over at 60S.
Interval 10S (second)
default,
with a 60M
(minute) to1S
(second) range
of settings
available.
(60M-1M
are set in
one minute
increments,
59S-1S are set
in one second
increments)
Selects the length of time that the
camera will “wait” until it responds
to any additional triggers from the
PIR after an animal is first detected
and remains within the sensor’s
range. During this user set “ignore
triggers” interval, the camera will
not capture photos/videos. This
prevents the card from filling up
with too many redundant images.
Settings begin with 10 second
default when parameter is first
selected. Note: after setting down
past “1S”, settings start over at “60M”.

22
Parameter Settings
(Bold=default)
Description
Sensor Level Low, Normal,
High, Auto
Selects the sensitivity of the PIR
sensor. The “High” setting will
make the camera more sensitive
to infrared (heat) and more easily
triggered by motion, and the “Low”
setting makes it less sensitive to
heat and motion. The High setting
can be useful when the ambient
temperature is warm (making it
more difficult for the sensor to
detect animals), and the Low
setting may help in cold weather
if the camera is being triggered
too often by anything warmer than
the surroundings. “Normal” is for
average or moderate conditions.
The default “Auto” setting will
allow the camera to determine the
best setting based on its current
operating temperature. This is
an ideal setting if the weather is
expected to change significantly
during the period the camera will
be used.

23
Parameter Settings
(Bold=default)
Description
Format Execute
(followed by an
additional No/Yes
step)
Deletes (erases) all files stored
on a card to prepare it for reuse.
Always format a card that has
been previously used in other
devices. Caution! Make sure
you have downloaded and
backed up any files you want
to preserve first! Press OK to
execute, press MENU (or select
NO then press OK) to exit without
formatting.
TV Out NTSC, PAL Selects video standard /format
for the “A/V Out” output jack. The
video standard is NTSC for the
United States, Canada, Mexico,
Asia and South America. PAL is
used primarily in Europe.
Time Stamp Off, On Select “On” if you want the date &
time (that the image was captured)
imprinted on every photo/video,
select “Off” for no imprint. Note:
the current temperature, moon
phase, and (user set) camera
name will also be imprinted on
your still photos.

25
Parameter Settings
(Bold=default)
Description
Coordinate
Input
Off, On
See "Using the
Setup Menu
Input Screens"
Allows the user to input latitude
and longitude coordinates for the
camera’s location. This data will
be embedded in the files saved on
the camera’s SD card (if “On” is
selected). This makes it possible
to see each camera’s location as a
“pushpin” on Google Earth maps
when reviewing a folder full of pho-
tos from multiple cameras, or use
other “geotag” capable software
(Picassa, etc).
Video Sound
(only affects
video clips)
On, Off Select “On” to record audio along
with the video when the camera is
set to video mode (saved file sizes
will be slightly larger).
Default Set Cancel,
Execute
Select “Execute” and press OK
to restore all parameters to the
original factory default settings.
If the camera is behaving oddly
and you think you may have
changed the setting for something
accidently (but aren’t sure which
one), this will reset all parameters
to their most commonly used or
“generic” settings.

26
USING THE SETUP MENU INPUT SCREENS
Camera Name Input
After selecting the Camera Name parameter (the only setting is "Input"),
press OK. If necessary, delete the previous or default name by pressing the
RIGHT key until the backspace symbol ( ) (located between letters "A"
& "B", also between "j" & "k") is highlighted, then keep pressing OK. Select
(highlight) each alphanumeric character you want, using the LEFT/RIGHT
keys, and pressing OK after each one to set it. When finished naming the
camera, press MENU to save the name to memory.
Coordinate Input
After selecting the Coordinate Input parameter, press UP or DOWN to
select the On setting and press OK. The latitude and longitude for any
location where you plan to place the camera can be obtained at many
websites, for example: http://itouchmap.com/latlong.html. You can enter
a nearby street address, just zip code, or use the various types of maps to
locate the approximate position. The format you will need to use to enter the
coordinates in the NatureView Cam menu screen is shown below:
Longitude
Latitude
W=West,
E=East
N=North,
S=South Minutes Seconds
Minutes Seconds
Degrees
Latitude
(3 digits)
Degrees
Longitude
(3 digits)
(La) N000,00'00"
(Lo) W000,00'00"
Note: You may see "negative" latitude or longitude coordinates online. These
designate South latitudes and West longitudes. US/Canada locations will
have North (+) latitude coordinates and West (-) longitude coordinates.
27
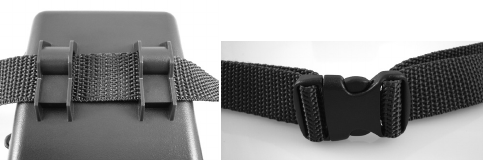
Fig. 5: Attaching the Belt
MOUNTING AND POSITIONING
THE NatureView CAM
Mounting
After you’ve set up the camera’s parameters to your personal preferences
at home or in your vehicle, you’re ready to take it outside and slide the
power switch to “ON”. When setting up the NatureView Cam for wildlife
observation or other outdoor applications, you must be sure to mount it in
place correctly and securely. We recommend mounting the NatureView
Cam on a sturdy tree with a diameter of about 6 in. (15cm). To get the
optimal picture quality, the tree should be about 16-17 ft. (5 meters) away
from the place to be monitored, with the camera placed at a height of 5-6.5 ft.
(1.5~2 m). Also, keep in mind that you will get the best results at night when
the subject is within the ideal flash range, no farther than 45’ (14m) and no
closer than 10’ (3m) from the camera.
There are two ways to mount the NatureView Cam: using the provided
adjustable web belt, or the tripod socket.
Using the adjustable web belt: Fig. 5 illustrates using the web belt on
the NatureView Cam. Push one end of the belt through the two brackets
on the back of the NatureView Cam. Thread one plastic buckle part
onto each end of the belt. Fasten the belt securely around the tree trunk
by clicking the buckle ends together after tightening the belt so there is
no slack left.

28
Using the tripod socket: The camera is equipped with a socket at the
bottom end to enable mounting on a tripod or other mounting accessories
with a standard1/4-20 thread.
Two optional mounting accessories, a “Bear Safe” metal camera box
(Model# 119653C) and Deluxe Tree Bracket (Model# 119652C) are also
available-please see your Bushnell dealer or website for more details.
Sensing Angle and Distance Test
To test whether the NatureView Cam can effectively monitor the area you
choose, this test is recommended to check the sensing angle and monitoring
distance of the NatureView Cam. To perform the test:
• Switch the NatureView Cam to the SETUP mode.
• Make movements in front of the camera at several positions within
the area where you expect the wildlife or subjects to be. Try different
distances and angles from the camera.
• If the motion indicator LED light blinks, it indicates that position can be
sensed. If it does not blink, that position is outside of the sensing area.
The results of your testing will help you find the best placement when
mounting and aiming the NatureView Cam. The height away from the
ground for placing the device should vary with the animal size appropriately.
In general, 3 to 6 feet is preferred.
You can avoid potential false triggers due to temperature and motion
disturbances in front of the camera by not aiming it at a heat source or nearby
tree branches or brush (especially on windy days).
Switching ON the Camera
Once you switch to the ON mode, the motion indicator LED (red) will blink for
about 10 seconds. This gives you time to close and lock the front cover of the
NatureView Cam and then walk away. During this time, the motion indicator
LED will blink red continuously. After it stops blinking, the PIR is active, and
any motion that is detected by it will trigger the capture of photos or videos
as programmed in the SETUP Menu. Be sure you have read the descriptions
of the Capture Number, Video Length, Interval and Sensor Level parameters.
Please note, the PIR is strongly sensitive to ambient temperature. The greater
the temperature difference between the environment and your subject, the
farther the possible sensing distance. The average sensing distance is about
45 ft.
29
Before leaving the camera unattended, please check for the following:
• Are the batteries or DC power supply inserted/connected with correct
polarity and is the power level is sufficient?
• Does the SD card have sufficient available space and is its write-
protection (lock) switch off?
• Is the Power switch in the ON position? (do not leave it in SETUP).
PLAYING BACK/DELETING THE PHOTOS/
VIDEOS
After you have setup, mounted and activated your NatureView Cam, you
will of course be eager to return later and review the images it has captured
for you. There are several different ways this can be done.
Reviewing Images Directly From the SD Card
This is the most popular method of viewing images. Since unmounting the
camera and taking it to your computer isn’t very convenient, you may find it
easier to just take the card out. By removing the SD card (swapping it for a
new empty card if you like) and taking it to your home or campsite to view
the images by using an SD card “reader” (user supplied) connected to your
computer (some computers and TVs have a built in SD card slot), you can
leave the camera in place ready to capture more images. Once connected,
the card reader works the same way as described below-please read that
section if you have any problem finding your files.
• PresstheRIGHT (Shot) key to play a video. If “Video Sound” was set
to “On” in the Setup Menu, you should hear audio from the speaker
during playback.
• Push MENU to delete an image. Image delete mode works as
described below. To exit image review mode, press the OK key.
Reviewing Images on an External Video Monitor
A TV monitor can also be used to play back pictures (or videos) from
the device. Connect a TV monitor or a viewing device (such as a digital
picture frame) that has a standard composite video input (RCA jack) to the
NatureView Cam ‘s “A/V Out” mini jack using the supplied cable. Then:
• Put the power switch in SETUP mode (switch to OFF first).
• Press the OK key. The most recently captured image will be shown on
the video monitor. For video clips, press the SHOT (RIGHT) key to

30
start playing, press again to stop.
• Press the UP key for the previous photo or video
and the DOWN key for the next one. When viewing
images, the total number of all images in the SD card
and the index of the displaying image are shown in
the center of LCD and at the bottom of the video
monitor respectively.
• Press the OK key to return to live preview state
(SETUP mode) when playback is finished.
Reviewing Images by Connecting the Camera
to a Computer
You can always unmount the entire camera from the tree and connect its
USB port to a computer-it will be recognized as a “removable disk”, without
the need to install any drivers or software. When using a PC (or Mac*) to view
photos (or video clips*), first connect the device to the computer with the
supplied USB cable. Then use commercial software with an image browser
feature, or an image browser included with the PC’s operating system to
view images saved on the SD card in the folder \DCIM\100EK113. Each
new image or video will be numbered incrementally in order of the time it was
captured. For example, you will see file names such as “EK0001.JPG” or
“EK0001.AVI”, etc. Through the file format suffix you can distinguish whether
the file is a still photo (with suffix .JPG) or a video (with suffix .AVI).
*video files may require additional software for viewing on a Mac.
The NatureView Cam supports 3 kinds of file system formats, FAT12,
FAT16, and FAT32. The default value is FAT16 to save photos and videos.
Here are some related notes:
• You don’t need to be concerned about the file system format of the
NatureView Cam unless your equipment has problems reading
the SD card. If this happens, please format the SD card with the
NatureView Cam or in your computer first and then insert the card
into your NatureView Cam and try again.
• The default file system format of the NatureView Cam is FAT16,
which most computers can read. If you format an SD card for the
NatureView Cam in your computer, you should choose the file system
format FAT16. Normally FAT16 is recommended unless you have
another image viewer that uses FAT12 or FAT32 format.
Cable from
“A/V Out”

31
Deleting Photos or Videos
If you see a photo or video during playback on the LCD or video monitor
that you want to delete, it can be done easily without leaving SETUP mode:
• Press the MENU key. You will see the first “Delete” screen, which lets
you selects the option to delete only the currently displayed photo/
video, or all photos/videos.
• Highlight the “Delete Current” or “Delete All” option, then press OK.
• Next, select “Yes” and press OK to erase only the last displayed photo
or video (if you selected “Delete Current”), or every photo and video file
on the card (if you selected “Delete All”)-or select “No” and press OK
to cancel the operation without deleting any files.
NOTE: after deleting a picture or a video file, the deleted files can’t be restored!
It is also possible to delete all files from the card by using the Format parameter
(see pg. 23).
32
DOWNLOADING THE PHOTOS/VIDEOS
To download your photos/videos to a PC or Mac*, first make sure the
NatureView Cam power switch is in the OFF position. Connect the
supplied cable to the camera’s USB port, then directly to a main USB port
on your computer-do not use front panel/keyboard USB ports or unpowered
“hubs”.
The NatureView Cam will be recognized as a standard “USB Mass
Storage” device (this may take several seconds the first time you connect it).
If you would rather leave your camera in the woods and just pull its SD card
out, an SD card reader works the same way as described in this section once
the card is inserted and the reader is connected to your computer.
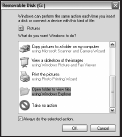
With Windows XP or later, you can then simply use the options in the pop-up
window to copy, view, or print your photos (right).
On all Windows OS, the NatureView Cam will also
be listed as a “Removable Disk” if you open the “My
Computer” window (on Macs, an icon will appear on
your desktop). The NatureView Cam’s photo files
are named “EK0001.JPG” etc, and are located in the
“DCIM\100EK113” folder on this “Removable Disk”.
Video file names will end with “.AVI”. You may copy the
photos/videos to your hard drive as you would any file-
just copy/paste or drag the file names or icons to your drive or desktop.
After the photos are copied to your hard drive, you can disconnect the
NatureView Cam. (On Mac computers, drag the “disk” that appeared on
your desktop when the camera was connected into your Trash to “eject” it
before disconnecting.) The .JPG format photo files from the NatureView
Cam may be viewed and edited with any photo software you choose to use.
The .AVI video files may be viewed with the Windows Media Player on PCs
with Windows 7. If your computer is running an older version of Windows, or
you are on a Mac, and you don’t already have a compatible video player, you
can download a free version of the DivX player from http://www.divx.com/.

33
Camera takes continuous images of no subject
A camera has what is known as a “false trigger” if the PIR sensor thinks
that there is motion and heat in front of the camera lens when there is
no subject in the image. These “False Triggers” are the result of placing
the camera in an environment where there is motion associated with tree
branches creating motion in front of the camera or an area where there
is high heat in the foreground and any motion from wind could set off the
camera. Setting a camera up over water is also a potential cause for this
issue. To remedy this situation:
1. Try moving the camera to an area that does not have any of these
issues or try changing the sensor level on the menu settings.
2. If the camera continues to take images when there is no subject in
them, try placing the camera in an inside environment and aiming at a
location where there is no motion.
3. If the camera continues to show issues, then there is probably an
electronic component issue. If this is the case, please contact our
customer service to send the camera back for repair.
Battery life is shorter than expected
1. Battery life will vary with operating temperature and the number of
images taken over time. Typically, the NatureView Cam will be able to
capture several thousand images before the batteries die.
2. Check to make sure you have used new alkaline or lithium batteries.
Bushnell recommends using a full set of Energizer® Lithium AA
batteries in your NatureView Cam model to obtain maximum
battery life.
3. Make sure that the power switch was turned to the “On” position and
that the camera was not left in “Setup” mode while in the field.
4. Make sure that you are using a good quality name brand SD card in
your camera. Bushnell recommends SanDisk® brand SD Cards up
to 32GB (Ultra® or Extreme® series for HD video). Our experience
indicates that poor quality SD cards can sometimes reduce your
NatureView Cam battery life.
Camera stops taking images or won’t take images
1. Please make sure that the SD card is not full. If the card is full, the
camera will stop taking images.
TROUBLESHOOTING / FAQ

34
2. Check the batteries to make sure that they are new alkaline or lithium
AA batteries. See note above about short battery life.
3. Make sure that the camera power switch is in the “On” position and
not in the “Off” or “Setup” modes.
4. Make sure that you are using a good quality SD card in your camera.
Bushnell recommends SanDisk® SD Cards up to 32GB (Ultra® or
Extreme® series for HD video) .
5. If the SD card has its write protect switch in the lock position, the
camera will not take images.
6. If you have used an SD card in another device before inserting it in your
NatureView Cam, you might want to try formatting the card using the
“Format” parameter in Setup mode (make sure you have backed up any
important files first, as formatting will erase all previous files). In some
cases, other devices may change the formatting of the SD card so that
it will not work properly with the NatureView Cam.
Camera won’t power up
1. Make sure that you have installed at least 4 batteries (the required
minimum #) in the battery compartment, starting at the top, filling
battery spaces 1-4 with no “gaps”.
Bushnell recommends using a full set of 8 Energizer® Lithium AA
batteries in your NatureView Cam (the max. capacity).
2. Make sure that the batteries are installed correctly, observing proper
polarity. Always place the negative (flat) end of each battery in contact
with the spring side of its slot inside the camera.
3. After moving the switch from “Off” to “Setup” or “On”, make sure
that the switch is correctly in position to ensure the proper mode (avoid
positions “between” two modes).
4. Do not move the switch directly from “On” to “Setup”-always move
the switch all the way down to “Off” first, then back up to “Setup”.
Still Photo and/or Video Quality Problems
1. Night photos or videos appear too dark
a. Check the battery indicator icon to see if battery power is full. The
flash will stop operating near the end of the battery life.
b. You will get the best results when the subject is within the ideal
flash range, no farther than 60' (19m). Subjects may appear too dark
at greater distances.
c. Please note that when the Capture Number parameter is set higher
35
than "1 Photo", or with very short Interval settings, some images
may appear darker than others due to the quick response and rapid
retriggering of the camera, allowing less time for the flash to fully
recharge before firing again.
2. Daytime photos or videos appear too dark
a. Make sure that the camera is not aimed at the sun or other light
sources during the day, as this may cause the auto exposure to produce
darker results.
3. Night photos or videos appear too bright
a. If the subject is close to the camera (less than10ft/3m), change
the LED Control parameter in the Setup Menu to "Medium" or "Low".
4. Daytime photos or videos appear too bright
a. Make sure that the camera is not aimed at the sun or other light
sources during the day.
5. Photos with streaked subject
a. In some cases with low lighting conditions and fast moving subjects,
the 5MP or 8MP resolution settings may not perform as well as the
3MP setting.
b. If you have multiple images where fast moving subjects produce
streaks on the photo, try the 3MP setting instead.
6. Red, green or blue color cast
a. Under certain lighting conditions, the sensor can become confused
resulting in poor color images.
b. If this is seen on a consistent basis, then the sensor may need
servicing. Please contact Bushnell customer service.
7. Short video clips—not recording to the length set
a. Check to make sure that the SD card is not full.
b. Make sure that the camera has good batteries in it. Near the end
of the battery life, the camera may choose to record shorter video clips
to conserve power.
Date/Time Stamp not appearing on images
1. Make sure that the “Time Stamp” parameter is set to “On”.
Photos Do Not Capture Subject of Interest
1. Check the “Sensor Level” (PIR sensitivity) parameter setting. For
warm temperature conditions, set the Sensor Level to “High” and for
cold weather use, set the sensor for “Low”. For variable weather, use
"Auto".
36
2. Try to set your camera up in an area where there is not a heat source in
the camera’s line of sight.
3. In some cases, setting the camera near water will make the camera take
images with no subject in them. Try aiming the camera over ground.
4. Try to avoid setting the camera up on small trees that are prone to
being moved by strong winds.
5. Remove any limbs which are right in front of the camera lens.
PIR Sensor LED Flashes/Doesn’t Flash
1. When the camera is in the “Setup” mode, a special LED on the front of
the camera will flash when it senses motion. This is for setup purposes
only and will help the user aim the camera.
2. During use, the LED will not flash when the camera takes an image.
This is to help keep the camera hidden from wildlife.
LCD Screen Issues
1. LCD screen powers on but no text is present.
a. After moving the switch from “Off” to “Setup” or “On”, make sure
that the switch is correctly in position to ensure the proper mode (avoid
positions “between” two modes).
b. Do not move the switch directly from “On” to “Setup”-always move
the switch all the way down to “Off” first, then back up to “Setup”.
2. LCD screen shows a faint black line after turning from “Setup” to “On”.
a. The LCD will turn off when you slide the switch to the “On”
position. In some cases, this black line will appear and then fade in
about 1 second. This is normal and the camera will function properly.
3. Screen comes on but then powers off
a. Make sure that you have installed the SD card correctly.
Camera won’t retain settings
1. Make sure that you have been saving the changes to any parameter
settings that you made while in Setup mode, by pressing “OK” after
changing the setting. If you don’t save your new setting after changing
it, the camera will continue to use the original default setting for that
parameter.
37
Moisture or Ants Inside Camera
1. To ensure humidity or rain is kept out of the camera, secure the DC In
plug firmly in place.
2. Ants can be attracted by low level electronic vibrations, and enter
through any gaps between the exterior and interior of the camera.
Make sure the DC In plug is securely attached.
Field Scan (Time Lapse) not working properly
1. Make sure that the stop and start times of Field Scan "A" and "B" do
not overlap (for example, do not set the start time of "B" to 8AM if the
stop time of "A" is 10AM).
2. When using Field Scan in video mode, the smallest interval time
available is 5 min, to avoid potential overheating of the batteries and
electronic components, which could cause operational failure or
damage to the camera. In still photo mode, a 1 min. Interval can be set.
Difficulty removing the batteries
1. Before removing the batteries from the NatureView Cam you can simply
remove the battery compartment insert bar by grasping it in the middle
and lifting out. This will give you easier access to the batteries. After
removing them, you can replace the battery compartment insert bar by
inserting one side into the battery compartment wall and flexing the
insert until you can place the second side of the bar into the opposite
wall of the battery compartment. Make sure that the bar is seated
securely. The bar should be inserted with the text/numbers printed on
the insert facing correctly up so that you can read them. Make sure
that the insert bar is inserted correctly inside the battery compartment
before replacing batteries.
Do not mix old and new batteries.
Do not mix battery types-use ALL lithium or ALL alkaline.
Rechargeable batteries are not recommended.

38
Image Sensor 5 Megapixel Color CMOS
Maximum Pixel Size 3264x2448 (8MP)
Lens F = 3.1; FOV= 50°; Auto IR-Cut-Remove (at night)
IR-Flash Range 60’ (19m)
Display Screen 24 x 32mm(1.5”)
Memory Card SD or SDHC Card, Maximum capacity 32GB
Internal RAM 32MB
Picture Size 8MP = 3264x2448; 5MP = 2560x1920;
3MP = 2048x1536
Video Size
1280x720 (widescreen), 640x480 (fullscreen), or
320x240 (fullscreen) pixels per frame at 20-30 fps
(Day) / 15-20 fps (Night)
PIR sensitivity PIR with 4 sensitivity settings: Low/Normal/High/Auto
Operation Day/Night
Response Time 0.6 second
Triggering Interval 1 sec. - 60 min. programmable
Shooting Numbers 1— 3 programmable
Video Length 5-60sec. programmable
Power Supply 8x AA batteries recommended, 4xAA as emergency
power
Stand-by Current < 0.2mA (<7mAh/day)
Power Consumption 250mA (+1300mA when all LEDs fire)
User Interface LCD display
Interface A/V out (NTSC/PAL); USB; SD card holder; 6V DC
external
Security Strap; ¼-20 attachment
Operating
Temperature -20 - 60°C (Storage temperature: -30 - 70°C)
Operating Humidity 5% - 90%
Security
authentication FCC/CE/RoHs/WEEE
TECHNICAL SPECIFICATIONS

Specifications and designs are subject to change without
any notice or obligation on the part of the manufacturer.
Your Bushnell® product is warranted to be free of defects in materials and
workmanship for two years after the date of purchase. In the event of a defect
under this warranty, we will, at our option, repair or replace the product,
provided that you return the product postage prepaid. This warranty does
not cover damages caused by misuse, improper handling, installation, or
maintenance provided by someone other than a Bushnell Authorized Service
Department.
Any return made under this warranty must be accompanied by the items
listed below:
1. A check/money order in the amount of $10.00 to cover the cost of
postage and handling
2. Name and address for product return
3. An explanation of the defect
4. Proof of Date Purchased
5. Product should be well packed in a sturdy outside shipping carton, to
prevent damage in transit, with return postage prepaid to the address
listed below:
IN U.S.A. Send To: IN CANADA Send To:
Bushnell Outdoor Products Bushnell Outdoor Products
Attn.: Repairs Attn.: Repairs
9200 Cody 25A East Pearce Street, Unit 1
Overland Park, Kansas 66214 Richmond Hill, Ontario L4B 2M9
For products purchased outside the United States or Canada please contact
your local dealer for applicable warranty information. In Europe you may
also contact Bushnell at:
Bushnell Germany GmbH
European Service Centre
Mathias-Brüggen-Str. 80
D-50827 Köln
GERMANY
Tel: +49 221 995568-0
Fax: +49 221 995568-20
This warranty gives you specic legal rights.
You may have other rights which vary from country to country.
©2012 Bushnell Outdoor Products
TWO-YEAR LIMITED WARRANTY

FCC COMPLIANCE STATEMENT:
This equipment has been tested and found to comply with the limits for a Class B digital
device, pursuant to part 15 of the FCC Rules. These limits are designed to provide reasonable
protection against harmful interference in a residential installation.
Operation is subject to the following two conditions: (1) This device may not cause harmful
interference, and (2) this device must accept any interference received, including interference
that may cause undesired operation.
This equipment generates, uses and can radiate radio frequency energy and, if not installed
and used in accordance with the instructions, may cause harmful interference to radio
communications. However, there is no guarantee that interference will not occur in a particular
installation. If this equipment does cause harmful interference to radio or television reception,
which can be determined by turning the equipment off and on, the user is encouraged to try to
correct the interference by one or more of the following measures:
· Reorient or relocate the receiving antenna.
· Increase the separation between the equipment and receiver.
· Connect the equipment into an outlet on a circuit different from that to which the receiver
is connected.
· Consult the dealer or an experienced radio/TV technician for help.
The device does not contain any user-serviceable parts. Repairs should only be made by
an Authorized Bushnell repair center. Unauthorized repairs or modifications could result in
permanent damage to the equipment, and will void your warranty and your authority to operate
this device under Part 15 regulations.
The shielded interface cable which is provided must be used with the equipment in order to
comply with the limits for a digital device pursuant to Subpart B of Part 15 of FCC Rules.
Disposal of Electric and Electronic Equipment
(Applicable in the EU and other European countries
with separate collection systems)
This equipment contains electric and/or electronic parts and must therefore not be disposed of
as normal household waste. Instead, it should be disposed at the respective collection points for
recycling provided by the communities. For you, this is free of charge.
If the equipment contains exchangeable (rechargeable) batteries, these too must be removed
before and, if necessary, in turn be disposed of according to the relevant regulations (see also the
respective comments in this unit’s instructions).
Further information about the subject is available at your community administration, your local
waste collection company, or in the store where you purchased this equipment.

42
REMARQUES IMPORTANTES
Nous vous remercions pour votre achat de l’un des meilleurs appareils
photos de surveillance sur le marché ! Bushnell est extrêmement fier
de ce concentré de technologie et nous sommes certains qu’il vous
satisfera également. Nous vous sommes très reconnaissants de votre
choix et désirons gagner votre confiance. Veuillez vous référer aux
remarques ci-dessous et aux instructions de cette notice d’utilisation
pour vous assurer d'utiliser au mieux ce produit.
Si votre NatureView Cam Bushnell ne semble pas fonctionner
correctement, ou si vous avez des problèmes de qualité avec les
photos/vidéos, veuillez consulter la section Diagnostic / Questions
Fréquemment Posées aux pages 73 à 78 de cette notice.
Les problèmes ont souvent une cause simple qui n’a pas été
remarquée, ou demandent seulement un changement de réglage
pour être résolus.
Si votre problème persiste après avoir essayé les solutions de
la section Diagnostic / Questions Fréquemment Posées, nous
vous recommandons de contacter votre revendeur Bushnell. Ce
dernier se chargera de contacter le service après-vente Bushnell
si nécessaire.
Bushnell recommande d'utiliser un jeu complet de piles AA au lithium
Energizer® (8) pour ses NatureView Cam afin de garantir une autonomie
maximale.
Ne mélangez pas des piles ayant déjà servi avec des piles neuves.
Ne mélangez pas différents types de piles. N'utilisez QUE des piles au
lithium ou QUE des piles alcalines. Les piles rechargeables ne sont pas
recommandées.
Bushnell recommande d’utiliser des cartes mémoires SanDisk® et SDHC
(capacité de stockage pouvant atteindre 32 Go) dans ses NatureView
Cams.
43
INTRODUCTION
À propos du NatureView Cam
Le NatureView Cam de Bushnell est un appareil photo de surveillance
numérique. Il peut être déclenché par tout mouvement d'un animal (ou d'un
individu) dans un endroit donné – repéré par un détecteur de mouvement
ultra sensible à capteur infrarouge passif – puis prendre des photos de
haute qualité (résolution pouvant atteindre 8 MP par interpolation), ou des
séquences vidéo.
Le NatureView Cam consomme très peu d’électricité (moins de 0.2 mA) en
mode stand-by (surveillance). Ceci signifie qu’il peut fournir jusqu’à six mois
d’autonomie en mode stand-by lorsqu’il est alimenté par huit piles alcalines
AA, et jusqu’à douze mois avec des piles AA au lithium. Une fois qu’un
mouvement est détecté dans la zone surveillée, l’appareil photo numérique
se déclenche automatiquement (généralement dans la seconde qui suit)
pour prendre des photos ou des séquences vidéo selon la configuration
établie au préalable. Le NatureView Cam est équipé de LED infrarouges
intégrées qui fonctionnent comme un flash et peuvent fournir des photos
ou des vidéos en noir et blanc de nuit, et des photos ou des vidéos en
couleur de jour. Le NatureView Cam est conçu pour être utilisé à l’extérieur
et résiste à l’eau et à la neige.
Votre NatureView Cam fait partie de la dernière génération d'appareils
de surveillance numérique Bushnell et propose de nombreuses fonctions,
nouvelles ou améliorées, notamment :
• Sensibilité infrarouge passive automatique: l'appareil surveille la
température ambiante et ajuste automatiquement le capteur / signal de
déclenchement afin qu'il soit plus sensible aux faibles variations quand
il fait chaud, et moins sensible quand il fait froid.
• Hyper Vision nocturne: le flash à LED infrarouge possède désormais
une plus grande portée, un rendu plus lumineux et une meilleure
couverture pour de meilleures images de nuit.
• Mode Field Scan 2x : la fonction Field Scan (littéralement "balayage
du terrain") introduite l'année dernière a été améliorée grâce à l'ajout
d'une seconde fenêtre d'enregistrement ayant ses propres temps
de démarrage et d'arrêt. Les signaux de déclenchement provoqués
par l'activité alentour continueront à générer des photos / vidéos
supplémentaires, indépendamment du mode Field Scan activé.

44
Fig. 1: Connexions
Micro
Pas de vis
standard
Sortie TV Prise USB
Emplacement pour carte SD
Alimentation externe
Alimentation externe
(cache en place)
• Fonction de géomarquage GPS: elle permet à l'utilisateur de saisir
la latitude et la longitude de l'emplacement du NatureView Cam, qui
seront ensuite intégrées à chaque fichier photo. Ce système permet
à Google Earth, Picassa et à d'autres logiciels compatibles avec le
géomarquage d'afficher automatiquement une carte indiquant les lieux
/ sites des prises de vue lors de leur visionnage sur un ordinateur.
Fonction particulièrement utile pour ceux qui placent des NatureView
Cams à de multiples endroits pour surveiller des zones vastes ou
éloignées les unes des autres.
• Mode Multi Flash (contrôle des LED): il évite les photos au flash
surexposées dans les gros plans.
Et bien d'autres fonctions telles que la vidéo HD avec son, les photos au
format 16/9, l'incrustation du nom du NatureView Cam (défini par l'utilisateur)
ainsi que des données ambiantes, notamment la température, et la phase de
la lune.
Indicateur de
mouvements / de faible
charge des piles
Objectif
Emplacement pour
cadenas
Capteur infrarouge
passif
FACE AVANT
Flash LED infrarouge

45
Fig. 2: Commutateur
d’alimentation et interface
de contrôle à six touches
MARCHE
CONFIGURATION
ARRÊT
Écran LCD
Marche (ON)/
Configuration
(SETUP)/
Arrêt (OFF)
HAUT/Vidéo
BAS/Photo
GAUCHE
MENU
OK/Lecture (REPLAY)
DROITE/Déclencheur
Manuel (SHOT)
Câble de raccord au
compartiment à piles
Applications
Le NatureView Cam est destiné à l'observation de la vie sauvage, mais il
peut également convenir pour de la surveillance.
PRÉSENTATION DU NatureView CAM
Le NatureView Cam dispose des connexions suivantes afin d’être
raccordé à des appareils externes: Port USB, port pour carte SD, sortie TV
et alimentation externe (p. 44, Fig. 1).
Un commutateur d’alimentation à trois positions sert à sélectionner les modes
d’opération principaux: OFF (ARRÊT), SETUP (CONFIGURATION), et
ON (MARCHE) (Fig. 2).
L’interface de contrôle à six touches sert principalement en mode SETUP
(CONFIGURATION), pour sélectionner les fonctions et paramètres
opérationnels. Comme indiqué à la Fig. 2, ces touches sont : HAUT, BAS,
GAUCHE, DROITE, OK et MENU. Quatre de ces touches peuvent
également servir pour une seconde fonction (raccourci opérations en
mode SETUP (CONFIGURATION) en plus de leur fonction principale :
La touche BAS peut servir à mettre l’appareil photo en mode Photo (icône
FACE
INTERNE
46
appareil photo), et la touche HAUT sert à mettre l’appareil photo en mode
Vidéo (icône caméscope). La touche DROITE sert également de bouton de
déclenchement manuel (« SHOT ») de l’appareil photo et le bouton OK met
l’appareil photo en mode lecture (« REPLAY »). Ces fonctions secondaires
sont indiquées par des icônes ou un texte au-dessus de la touche comme le
montre la Fig. 2 (p.45).
INSTALLATION DES PILES ET DE LA CARTE SD
Avant de pouvoir utiliser votre NatureView Cam, vous devrez d’abord
installer des piles et insérer une carte SD. Même si cela ne vous prendra
qu’une minute, vous devez prendre conscience de quelques remarques
importantes concernant à la fois les piles et les cartes SD. Nous vous
recommandons donc de prendre le temps de lire les instructions et
avertissements suivants:
Mise en place des piles
Après avoir ouvert les deux loquets à droite du NatureView Cam, vous
avez accès au compartiment à huit piles. Pour une
autonomie maximale, il faut installer un jeu complet
de piles. Le NatureView Cam peut également
fonctionner avec seulement quatre piles installées
(voir photos). L'autonomie de l'appareil est plus courte
avec 4 piles, mais il fonctionne normalement. Que vous
utilisiez 4 piles ou un jeu complet, veillez à respecter
la polarité de chaque pile (pôle négatif ou « plat » en
contact avec le long ressort de chaque emplacement).
Bushnell recommande d'utiliser un jeu complet de piles
AA au lithium neuves (de la marque Energizer®) ou des piles AA alcalines.
Nous recommandons de ne pas utiliser de piles rechargeables NiMh car leur
faible voltage peut entraîner des problèmes de fonctionnement.
Il est également possible d’utiliser une batterie externe au plomb-acide d’une
puissance de 6 volts ou un adaptateur secteur approprié - voir ci-dessous pour de
plus amples renseignements.
Utilisation d’une source de courant externe (fournie par
l’utilisateur)

47
En option, vous pouvez branchez une source de courant externe de 6V à la
prise "Alimentation externe" (g.1) située sous le NatureView Cam. Il est
recommandé d’utiliser une source d’électricité ayant une sortie de courant
supérieure à 1,550mA. Cependant, lors d’une utilisation par temps clair,
lorsque le flash n’est pas nécessaire, le NatureView Cam peut fonctionner
avec beaucoup moins de courant ( >400 mA). Veuillez utiliser un câble
d’alimentation compatible (non fourni) pour brancher l’alimentation externe
en c.c. à la prise d’alimentation du NatureView Cam, en respectant la
polarité.
Remarque: La prise d’alimentation est une prise coaxiale d’alimentation en
c.c. de 4,0x1,7 mm ayant une « borne » (broche interne) de polarité positive
(Radio Shack P/N 274-1532 ou équivalent).
Si une source d’alimentation externe est branchée et des piles installées
à la fois, le NatureView Cam sera alimenté par la source d’alimentation
externe. Lorsque les piles faiblissent, le voyant indicateur LED bleu de faible
charge des piles s’allumera, indiquant que les piles doivent être remplacées
(voir p. 44, « FACE AVANT »).
Insertion de la carte SD
Les NatureView Cams ont une mémoire interne de 32 Mo, ce qui
correspond à 20 photos environ (à une résolution de 5MP). Ceci est
pratique pour faire des essais et pour se familiariser avec l’appareil, mais
vous voudrez sans doute laisser celui-ci seul pendant plusieurs jours, par
conséquent l’emploi d’une carte SD est recommandé. Insérez la carte SD
avant de commencer à utiliser l’appareil (le commutateur d’alimentation
étant en position OFF (ARRÊT)). N’insérez pas ou n’enlevez pas la carte
SD lorsque le commutateur d’alimentation est en position ON (MARCHE).
Le NatureView Cam utilise une carte mémoire SD (Secure Digital) standard
pour sauvegarder les photos (au format .jpg) et/ou les vidéos (au format
.avi). Les cartes SD et SDHC (haute capacité) d’une capacité maximum de
32 Go sont supportées. Avant d’insérer la carte SD dans l’appareil, veuillez
vous assurez que le curseur de protection contre l’écriture situé sur la carte
AVERTISSEMENT
Veillez à ce que l’alimentation de l’appareil soit sur OFF
(ARRÊT) avant d’insérer ou de retirer la carte SD ou les
piles.
48
SD est sur « off » (c'est-à-dire PAS en position « Lock »). Ce qui suit décrit
comment insérer et enlever la carte SD:
• Insérez la carte SD dans l’emplacement pour carte, l’étiquette de la
carte vers le haut (voir ci-dessus). Un « déclic » indique que la carte
est installée avec succès. Si le mauvais côté de la carte est vers le
haut, vous ne pourrez pas l’insérer sans forcer-il n’y a qu’une seule
manière d’insérer correctement les cartes. Si la carte SD n’est pas
installée correctement, l'écran LCD n'affichera pas d'icône carte SD
en mode CONFIGURATION (SETUP) (un symbole de « cadenas »
sera visible sur l’icône carte SD affichée après être passé au mode
SETUP si la carte est verrouillée). Il est recommandé de formater la
carte SD en utilisant le paramètre « Format » du NatureView Cam
avant de l’utiliser pour la première fois, spécialement lorsque la carte
a été utilisée dans d’autres appareils (voir la section « Formater » en
page 62 pour de plus amples renseignements).
• Pour retirer la carte SD, enfoncez-là tout d’abord légèrement. Vous
allez alors entendre un clic qui indique qu'il est désormais possible de
la retirer. N'essayez pas de la retirer sans avoir fait cette manipulation
au préalable.
UTILISATION DU NatureView CAM
Une fois que vous avez préparé votre NatureView Cam en installant
correctement les piles et une carte SD, vous pouvez simplement sortir,
l’attacher à un arbre, l’allumer et vous en allez - et il se peut que vous
obteniez des photos superbes qui correspondent exactement à ce que
vous recherchez. Toutefois, nous vous recommandons de prendre le
temps de lire cette notice afin de comprendre les différents réglages
possibles que propose votre appareil. Vous voudrez probablement
régler au moins la date et l’heure pour qu’elles soient indiquées sur vos
photos, apprendre comment configurer l’appareil pour qu’il prenne des
séquences vidéos au lieu de photos si vous le désirez, et lire quelques
suggestions concernant sa fixation à un arbre.
LES MODES MARCHE, ARRÊT ET
49
CONFIGURATION
Le NatureView Cam a trois modes de fonctionnement de base:
•Mode ARRÊT: Commutateur d’alimentation en position OFF.
•Mode MARCHE: Commutateur d’alimentation en position ON
(l’écran LCD est éteint).
•Mode CONFIGURATION: Commutateur d’alimentation en position
SETUP (l’écran LCD est allumé).
Mode ARRÊT (OFF)
Le mode ARRÊT est le mode de « sécurité » permettant toute une série
d’actions, par exemple, remplacer la carte SD ou les piles, ou transporter
l’appareil. Vous utiliserez également le mode ARRÊT si vous connectez
l’appareil à un port USB d’un ordinateur plus tard pour télécharger vos
photos/vidéos. Et bien sûr, lorsque vous rangez ou n’utilisez pas l’appareil,
vous le mettrez sur ARRÊT. Veuillez remarquer que même en mode ARRÊT
le NatureView Cam continue à consommer de l’électricité à un très bas
niveau. Par conséquent, il est conseillé d’enlever les piles si vous êtes amené
à ne pas utiliser l’appareil pendant une période prolongée.
Mode MARCHE (ON)
À n’importe quel moment après que les piles et la carte SD aient été insérées
vous pouvez allumer l’appareil. Lorsque le commutateur d’alimentation sera
placé en position haute, l’appareil sera en mode MARCHE. L’indicateur
LED de mouvements (p.44, « Face Avant ») clignotera en rouge pendant
environ 10 secondes. Cet intervalle vous laissera assez de temps pour
fermer le couvercle avant du NatureView Cam, le verrouiller et quitter
la zone surveillée. Une fois en mode MARCHE, aucun contrôle manuel
n’est nécessaire ou possible (les touches de contrôle n’ont aucun effet).
Le NatureView Cam prendra automatiquement des photos ou des vidéos
(selon vos réglages) lorsqu’il est déclenché, c’est-à-dire quand le capteur
infrarouge passif détecte de l’activité dans la zone qu’il couvre. Vous pouvez
soit déplacer le commutateur d’alimentation directement du mode ARRÊT
(OFF) au mode MARCHE (ON), soit vous arrêter d’abord en position
CONFIGURATION (SETUP) pour changer l’un des réglages ou plus, puis
passer à MARCHE (ON) ensuite.
MODE CONFIGURATION (SETUP)

50
Fig. 3 : Écran d’information du mode CONFIGURATION (SETUP)
Dans le mode CONFIGURATION vous pouvez vérifier et changer les
réglages du NatureView Cam en utilisant l’écran LCD intégré (ou un
moniteur branché au jack de sortie TV). Ces réglages, accessibles depuis
le menu CONFIGURATION, vous permettent de changer la résolution des
photos ou des vidéos, l’intervalle de temps entre les photos, de choisir la
fonction impression de la date et de l’heure sur les photos, etc. Le fait de
déplacer le commutateur d’alimentation en position CONFIGURATION
(SETUP) allumera l’écran LCD, et vous pourrez voir un écran d’information
qui vous montrera combien de photos ont été prises, le niveau de charge des
piles, si l’appareil est en mode photo ou vidéo, etc. (voir Fig. 3 ci-dessus).
REMARQUE : Actionnez toujours le commutateur d’alimentation
du mode ARRÊT (OFF) vers le mode CONFIGURATION (SETUP).
Il est possible que l’appareil se bloque s’il passe du mode MARCHE
(ON) au mode CONFIGURATION (SETUP). Si cela se produit, mettez
simplement le commutateur sur ARRÊT (OFF) puis poussez-le de
nouveau vers le haut sur CONFIGURATION (SETUP).
Touches Raccourcis en mode CONFIGURATION (SETUP) :
Comme mentionné auparavant dans la partie « Présentation du NatureView
Cam », quatre touches sous l’écran LCD servent de « raccourcis » de
fonctions lorsque l’appareil est mis en mode CONFIGURATION (SETUP) ,
et à la condition que vous n’ayez pas appuyé sur la touche MENU :
• Appuyez sur la touche HAUT pour rapidement mettre l’appareil en
Mode appareil photo (photos) Mode vidéo
2
2
Impression de
la date et de
l’heure sur les
photos
Résolution Statut de la carte SD
Date: Mois-Jour-
Année
Mémoire disponible
Nombre de
photos prises
Niveau de
charge des piles
Mode Photo Mode vidéo Résolution vidéo
Son vidéo activé
Durée d'enregistrement
vidéo disponible
Affichage de
l'heure:
Heures : Minutes :
Secondes
51
mode Vidéo.
• Appuyez sur la touche BAS pour rapidement mettre l’appareil en mode
Photo.
• Appuyez sur la touche DROITE pour déclencher une photo (ou une
vidéo) manuellement. Ceci est utile pour tester l’appareil-veillez à être en
mode CONFIGURATION (SETUP), appuyez sur la touche DROITE,
et quelques secondes plus tard, une photo ou une séquence vidéo
(selon le réglage de l’appareil) sera sauvegardée sur la carte SD (ou la
mémoire interne si aucune carte n’est insérée). Le compteur « nombre
de photos prises » en bas et à gauche de l’écran LCD augmentera
d'une unité. Si l’écran indique « SD PROTECTED » lorsque vous
appuyez sur la touche DROITE (SHOT), mettez l’appareil sur OFF
(ARRÊT), retirez la carte SD et glissez le curseur de protection contre
l’écriture situé sur la carte SD en position « off ».
• Appuyez sur la touche OK pour visionner les photos/vidéos sur un
moniteur de télévision connecté. Voir page 69 pour de plus amples
d’informations.
Utilisation du Menu CONFIGURATION (SETUP)
pour changer les réglages
Le but principal du mode CONFIGURATION (SETUP) est de vous
permettre de changer les réglages des paramètres de l’appareil (jusqu'à
18 configurations différentes !) pour que votre NatureView Cam fonctionne
exactement comme vous le désirez. Vous ferez ceci en lançant le Menu
CONFIGURATION (SETUP) et en appuyant sur les touches situées sous
l’écran LCD. Cet écran vous indiquera chaque paramètre et son réglage.
Changement des réglages des paramètres en Mode
CONFIGURATION (SETUP)
De nombreux paramètres sont disponibles pour vous permettre de régler
le NatureView Cam selon vos préférences. Pour changer le réglage d’un
paramètre donné, vous devez d’abord passer au mode CONFIGURATION
(SETUP). Une fois que vous êtes dans ce mode, le fait d’appuyer sur la
touche MENU vous permettra de sélectionner n’importe quel paramètre
et changer son réglage. Le nom du paramètre et son réglage actuel sera
affiché à l’écran LCD. Le fait d’appuyer sur la touche DROITE ou GAUCHE
fait défiler vers le paramètre suivant ou précédent (la touche DROITE pour
passer au paramètre suivant et la touche GAUCHE pour revenir au paramètre
52
précédent), et le fait d’appuyer sur la touche HAUT ou BAS vous permet
de sélectionner un réglage différent pour le paramètre actuellement affiché.
Une fois que vous avez choisi votre nouveau réglage pour un paramètre,
appuyez sur la touche OK pour sauvegarder le nouveau réglage. Lorsque
vous avez fini de changer les réglages d’un ou de plusieurs paramètres,
appuyez sur MENU de nouveau pour sortir du menu CONFIGURATION
(SETUP). Il est possible d’appuyer sur MENU chaque fois que vous désirez
annuler un changement de réglage de paramètre après qu’un nouveau
réglage ait été sélectionné (à condition que vous n’ayez pas déjà appuyé
sur OK). Après avoir réglé les paramètres selon vos préférences, veillez à
déplacer le commutateur sur ON (MARCHE) pour pouvoir prendre des
photos ou des vidéos. Aucune photo ne sera prise si le commutateur reste
en position CONFIGURATION (SETUP) à moins que vous n’appuyiez sur
la touche DROITE/SHOT après être sorti du menu. L’appareil s’éteindra
automatiquement après quelques secondes si vous n’appuyez sur aucune
touche.
Sélection des réglages des paramètres
Un seul réglage peut être affiché à la fois, en commençant par le réglage
actuel du paramètre lorsqu’il est d’abord sélectionné (Fig. 4a). Pour changer
de réglage, utilisez les touches HAUT/BAS pour afficher le nouveau réglage
que vous désirez (Fig. 4b), puis appuyez sur OK pour valider (« Execute »)
le nouveau réglage. Si vous désirez vérifier que ce réglage est à présent
le réglage actuel, appuyez simplement sur la touche DROITE pour faire
défiler vers le paramètre suivant, puis appuyez sur GAUCHE pour retourner
de nouveau vers le précédent. Vous pouvez désormais constater que votre
nouveau réglage a été appliqué.
EXEMPLES - Changer les réglages de certains paramètres
56
fréquence une photo ou une vidéo est prise pendant les périodes
configurées précédemment. Vous avez le choix entre 60 minutes,
30 minutes, 15 minutes, 5 minutes (réglage par défaut) ou 1 minute
(en mode photo uniquement). Utilisez les boutons HAUT/BAS pour
sélectionner votre valeur, puis appuyez sur OK pour la sauvegarder
(Etape 7). Notez que pour les vidéos, "Interval" est indépendant de la
durée de la vidéo. Il s'agit de la fréquence à laquelle les vidéos sont
enregistrées, et non pas de la longueur de chacune.
6. Voici un exemple de fonctionnement de la caméra, sur la base des
réglages de balayage de champ suivants :
Field Scan : On
Période A :
[Start] : 6:00
[Stop] : 8:00
Période B :
[Start] : 17:30
[Stop] : 19:00
Interval : 15M
Selon ces réglages, l'appareil prend une photo (ou une vidéo, s'il
fonctionne dans ce mode) toutes les 15 minutes, à partir de 6h jusqu'à
la fin de la période "A" du balayage de champ à 8h. Le même jour,
l'appareil va à nouveau prendre une photo ou une vidéo toutes les
15 minutes de 17h30 à 19h (pendant la période "B" du balayage de
champ). Le lendemain, l'appareil recommencera à prendre une photo
ou une vidéo toutes les 15 minutes entre 6h et 8h et entre 17h30 et
19h. Il n'y aura aucun enregistrement du balayage de champ entre 8h
et 17h30 et entre 19h et 6h. Rappelez-vous que ceci est indépendant
des déclenchements normaux dus à l'activité détectée à proximité de
l'appareil - même si aucun animal (ou humain) ne pénètre dans la zone
de couverture du détecteur à infrarouge, une image sera prise, ou une
vidéo enregistrée, toutes les 15 minutes pendant la/les période(s) de
temps déterminée(s). Si un animal (ou humain) déclenche la caméra
entre les intervalles de 15 minutes , cela sera enregistré, exactement
comme si l'option de balayage de champ était désactivée.
Remarque : Des intervalles de balayage de champ courts et/ou
des tranches horaires longues risquent de réduire la durée de vie
Remarque : pour garantir le bon
fonctionnement de l'appareil,
veillez à ce que les périodes A et
B de balayage de champ ne se
chevauchent pas au moment de
régler les horaires de démarrage
et d'arrêt.

58
Paramètre Réglages
(Gras=défaut)
Description
Mode Camera
(photos)
ou Video
Sélectionne si des photos ou des
vidéos sont prises lorsque l’appareil
se déclenche.
Image Size
(résolution
photo)
(concerne
les photos
seulement)
5M Pixel,
8M Pixel,
3M Pixel
Sélectionne la résolution pour les
photos de 3 à 8 mégapixels. Une
résolution plus haute produit des
photos de meilleure qualité, mais
crée des fichiers plus grands qui
prennent plus de place sur la carte
SD (qui se remplit plus vite). 5M est
un bon compromis entre la qualité
et la taille du fichier.
Image Format
(Format
d'image)
(n'aecte que
les photos. Le
format des
vidéos est lié
à la taille de la
vidéo
Plein écran,
écran large
Sélectionnez le format 4:3
(plein écran, comme les anciens
téléviseurs) ou 16:9 (grand écran,
comme les nouveaux téléviseurs)
pour les photos. Si vous souhaitez
regarder vos photos sur un
téléviseur ou un écran d'ordinateur,
vous pouvez définir le format de
l'image pour qu'elle s'y adapte.
Capture
Number
(Nombre de
Photos)
(concerne
les photos
seulement)
1 Photo,
2 Photo,
3 Photo
Sélectionne combien de photos
sont prises en rafale à chaque
déclenchement en mode Appareil
photo. Ce réglage concerne
également les photos prises en
mode Field Scan (pour prendre
deux photos toutes les 10 minutes,
par exemple). Veuillez vous référer
également au paramètre INTERVAL
(intervalle).
Liste des paramètres et réglages du Menu
CONFIGURATION (SETUP) avec descriptions

61
Paramètre Réglages
(Gras=défaut)
Description
Sensor Level
(Sensibilité
du Capteur
infrarouge)
Low (faible),
Normal, High
(élevée), Auto
(automatique)
Sélectionne la sensibilité du capteur
infrarouge passif. Le réglage « High
» rendra l’appareil plus sensible
aux infrarouges (chaleur) et il sera
plus facilement déclenché par les
mouvements, et le réglage « Low »
le rendra moins sensible à
la chaleur et aux mouvements. Le
réglage High peut être utile lorsque
la température ambiante est chaude
(quand il est plus difficile pour le
capteur de détecter les animaux),
et le réglage Low pourra être utile
lorsqu’il fait froid et si l’appareil
se déclenche trop souvent par
n'importe quel élément plus chaud
que l’espace environnant. La valeur
par défaut réglage "Auto" permettra
à l'appareil de déterminer le
meilleur réglage en fonction de sa
température de fonctionnement
actuel. C'est un réglage idéal si des
changements de météo importants
sont prévus pendant la période où
la caméra sera utilisée.

62
Paramètre Réglages
(Gras=défaut)
Description
Format
(Formater)
Execute
(Valider)
(suivi d’une
étape No/Yes
(Non/Oui) sur
les modèles
à affichage
couleur
uniquement)
Efface tous les fichiers sauvegardés
sur la carte pour la préparer
pour sa réutilisation. Formatez
toujours une carte qui a été
utilisée auparavant dans d’autres
appareils. Avertissement ! Veillez
à télécharger et sauvegarder
tous les fichiers que vous désirez
conserver ! Appuyez sur OK pour
valider (puis sélectionnez Yes (Oui)
et appuyez sur OK encore une
fois sur les modèles à affichage
couleur), appuyez sur MENU
(ou sélectionnez No (Non) puis
appuyez sur OK) pour sortir sans
formater.
TV Out (Sortie
TV)
NTSC, PAL Sélectionne le standard/format
vidéo pour le jack de « sortie TV ».
Le standard vidéo est NTSC pour
les États-Unis, Canada, le Mexique,
l’Asie et l’Amérique du Sud. PAL est
utilisé principalement en Europe.
Time Stamp
(Incrustation
Date et Heure)
(concerne
les photos
uniquement)
Off, On Sélectionnez « On » si vous désirez
que la date et l’heure (quand
la photo/vidéo a été prise) soit
incrustées sur chaque photo/vidéo,
sélectionnez « Off » pour ne pas les
incruster. Remarque : la température
ambiante, la phase de la lune et
le nom de l'appareil (renseigné
par l'utilisateur) ne peuvent être
incrustées que sur les photos.
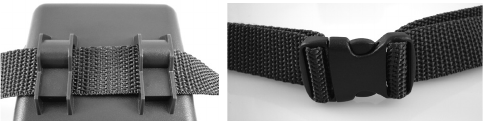
66
MONTAGE ET POSITIONNEMENT DU
NatureView CAM
Montage
Après avoir configuré les paramètres selon vos préférences, vous êtes
prêt à mettre le commutateur sur la position "ON" (marche) et à installer
le NatureView Cam sur le terrain. Lorsque vous configurez le NatureView
Cam pour détecter la faune ou pour toute autre application en extérieur,
vous devez veiller à le mettre en place correctement et solidement. Nous
recommandons de monter le NatureView Cam à un arbre robuste d’un
diamètre d’environ 15 centimètres. Pour obtenir la qualité d’image optimale,
l’arbre devra se trouver à environ 5 mètres de l’endroit à surveiller, l’appareil
étant placé à une hauteur de 1,50 à 2 mètres Gardez à l’esprit que vous
obtiendrez les meilleurs résultats de nuit, lorsque le sujet est à portée idéale
du flash, idéalement entre 3 et 5 mètres du NatureView Cam.
Il y a deux manières de monter le NatureView Cam: en utilisant soit la
sangle réglable fournie, soit le pas de vis situé sous l'appareil.
En utilisant la sangle réglable fournie : Voir la Figure 5. Enfilez l’une
des extrémités de la sangle dans l’un ou l’autre des supports à l’arrière
du NatureView Cam. Fixez une des parties de la boucle en plastique
à chaque extrémité de la sangle. Attachez solidement la sangle autour
du tronc de l’arbre en connectant ensemble les extrémités de la boucle
jusqu’à ce qu’il y ait un déclic, après avoir serré la sangle de manière à ce
qu’elle ne soit pas lâche.
En utilisant le pas de vis situé sous l’appareil : L’appareil est équipé
d’un pas de vis à son extrémité inférieure pour permettre de le monter à
Fig. 5: Fixation de la sangle

70
Le NatureView Cam supporte 3 types de formats de système de fichiers,
FAT12, FAT16 et FAT32. La valeur par défaut est FAT16 pour sauvegarder
les photos et les vidéos. Voici quelques remarques à ce sujet:
• Vous n’avez pas besoin de vous préoccupez du format du système de
fichiers du NatureView Cam à moins que votre équipement n'ait des
difficultés à lire la carte SD. Si tel est le cas, veuillez d’abord formater
la carte SD avec le NatureView Cam ou dans votre ordinateur, puis
insérez la carte dans votre NatureView Cam et essayez de nouveau.
• Le format de fichier par défaut du NatureView Cam est FAT16, que
la plupart des ordinateurs peuvent lire. Si vous formatez une carte SD
pour le NatureView Cam dans votre ordinateur, vous devrez choisir
le format de système de fichier FAT16. Normalement, FAT16 est
recommandé, à moins que vous ayez une autre visionneuse d’images
qui utilise le format FAT12 ou FAT32.
Effacer des photos ou des vidéos
Si vous désirez effacer une photo ou une vidéo, cela peut se faire facilement
sans quitter le mode CONFIGURATION (SETUP):
• Appuyez sur la touche MENU. Vous verrez le premier écran « Delete
» (effacer), qui vous donne le choix d’effacer seulement la photo/vidéo
actuellement à l’écran, ou toutes les photos/vidéos (voir ci-dessous).
• Mettez en surbrillance le choix « Delete Current » (effacer la photo/
vidéo en cours) ou « Delete All » (effacer toutes les photos/vidéos),
puis appuyez sur OK.
• Ensuite, sélectionnez« Yes » (Oui) et appuyez sur OK pour effacer
seulement la dernière photo ou vidéo affichée (si vous avez choisi
« Delete Current »), ou chaque fichier photo et vidéo sur la carte
(si vous avez sélectionné « Delete All »)-ou sélectionnez « Non » et
appuyez sur OK pour annuler l’opération en n’effaçant aucun fichier.
REMARQUE : Les fichiers effacés ne peuvent pas être restaurés !
Il est également possible d’effacer tous les fichiers de la carte en utilisant le
Paramètre « Format » (formater) (p. 62).
72
Après que les photos aient été copiées sur votre disque dur, vous pouvez
débrancher le NatureView Cam. (Sur les ordinateurs Mac, une icône
apparaîtra sur votre bureau) Il est possible de visionner ou d’éditer les fichiers
au standard .jpg du NatureView Cam avec n’importe quel logiciel photo de
votre choix. Il est également possible de visionner les fichiers vidéos .avi
avec Windows Media Player (version 7 ou plus récente) ou un autre lecteur
similaire
* Il est possible qu’un logiciel supplémentaire soit nécessaire pour
visionner les fichiers vidéo « AVI » sur un Mac.

73
Le NatureView Cam prend continuellement des
images sans sujet
Une caméra a ce qu'on appelle un « faux déclenchement » si le capteur croit
qu'il y a un mouvement et de la chaleur devant la lentille de la caméra alors
qu'il n'y a pas de sujet dans l'image. Ces « faux déclenchements » sont le
résultat du placement de la caméra dans un environnement où des branches
d'arbres créent un effet de mouvement devant la caméra, ou bien en un lieu
où il y a une forte chaleur au premier plan et où le moindre courant d’air peut
déclencher la caméra. L'installation de la caméra au dessus de l'eau peut
également causer ce problème. Pour remédier à cette situation :
1. Essayez de déplacer la caméra en un lieu où ces problèmes ne se
posent pas ou essayez de modifier la sensibilité du détecteur grâce
aux réglages du menu.
2. Si la caméra continue à prendre des images alors qu'elles ne
contiennent pas de sujet, essayez de placer la caméra en intérieur, en
l’orientant dans une direction où il n'y a aucun mouvement.
3. Si la caméra continue à poser des problèmes, il y a alors probablement
un problème avec un composant électronique. Si tel est le cas, veuillez
contacter notre service clientèle afin d'envoyer la caméra en réparation.
La durée de vie des piles est plus courte que
prévue
1. La durée de vie des piles changera selon la température ambiante et
le nombre de photos prises pendant un temps donné. Généralement,
le NatureView Cam sera capable de prendre plusieurs milliers de
photos avant que les piles ne soient déchargées.
2. Vérifiez que vous avez utilisé des piles alcalines ou au lithium neuves.
Bushnell vous recommande d'utiliser un jeu complet de piles AA
au lithium Energizer® avec votre modèle NatureView Cam pour
bénéficier d'une autonomie maximale.
3. Assurez-vous que le commutateur d’alimentation soit en position « ON
» (Marche) et que l’appareil n’ait pas été laissé en mode « SETUP »
(Configuration) sur le terrain.
4. Assurez-vous d’utiliser une marque de carte SD reconnue. Bushnell
recommande les cartes SD SanDisk® d’une capacité pouvant
DIAGNOSTIC/QUESTIONS FRÉQUEMMENT POSÉES

79
Capteur d’images 5 Mégapixels couleur CMOS
Résolution Maximale 3264x2448 (8 MP)
Objectif Focale = 3,1 ; Champ de Vision = 50 ° ; Infrarouge à
activation automatique
Portée du flash
infrarouge 19m (60 ft.)
Écran d’affichage 24x32 mm (1.5 pouces)
Carte mémoire SD ou SDHC, capacité maximum 32 Go
Mémoire interne 32 Mo
Taille des photos 8 MP = 3264x2448; 5 MP = 2560x1920; 3 MP =
2048x1536
Taille des vidéos
1280 x 720 (grand écran), 640 x 480 (plein écran), ou
320 x 240 (plein écran) pixels par image à 20-30 fps
(fréquence d'images) (jour) / 15-20 fps (nuit)
Sensibilité de
l’infrarouge passif
Infrarouge passif avec 4 réglages de sensibilité : Faible /
Normal / Elevé / Auto
Fonctionnement Jour/Nuit
Vitesse de
déclenchement 0,6 s
Intervalle de
déclenchement Programmable 1s - 60 mn
Nombres de prises de
vue en rafale Programmable 1– 3
Durée des vidéos Programmable 5-60s
Alimentation 8xAA recommandées, 4xAA alimentation d’urgence
Consommation en
stand-by (veille) <0,2 mA (<7 mA/jour)
Consommation 250 mA (+1300 mA lorsque LED-IR allumé)
Interface utilisateur Écran LCD
Interface Sortie TV (NTSC/PAL) ; USB ; emplacement pour carte
mémoire ; prise pour alimentation externe 6V
Sécurité Sangle ; filetage (¼-20) sous l’appareil pour fixation sur
pied
Température de
fonctionnement
De -20°C à +60°C
(température de stockage : de -30°C à +70°C)
Taux d’humidité pour
un bon fonctionnement 5% - 90%
Normes FCC/CE/RoHs/WEEE
CARACTÉRISTIQUES TECHNIQUES

80
GARANTIE LIMITÉE DE DEUX ANS
Votre produit Bushnell® est garanti contre les éventuels vices de matière ou de fabrication
pendant deux ans à compter de la date d’achat. En cas de défaut durant la période de
garantie, nous nous réservons la possibilité de réparer, ou d’échanger le produit, sous
condition que vous retourniez le produit en port payé. Cette garantie ne couvre pas les
dommages causés par une mauvaise utilisation, une mauvaise manipulation, une mauvaise
installation, ou un entretien incorrect effectué par une personne autre que le Centre de
Réparation agréé par Bushnell.
Tout retour effectué dans le cadre de la présente garantie doit être accompagné des
éléments ci-dessous :
1. Un chèque/ mandat de $10,00 $ pour couvrir les frais de port et de manutention
2. Nom et adresse à laquelle le produit devra être renvoyé
3. Une explication de la défaillance constatée
4. Preuve de la date d’achat
5. Le produit doit être soigneusement emballé dans un carton d’expédition, pour éviter
qu’il ne soit endommagé durant le transport, avec renvoi en port payé à l’adresse
indiquée ci-dessous :
AUX USA, envoyer à: AU CANADA envoyer à:
Bushnell Outdoor Products Bushnell Outdoor Products
Attn.: Repairs Attn.: Repairs
9200 Cody 25A East Pearce Street, Unit 1
Overland Park, Kansas 66214 Richmond Hill, Ontario L4B 2M9
Pour les produits achetés hors des États-Unis ou du Canada veuillez contacter votre reven-
deur local pour les informations applicables de la garantie. En Europe vous pouvez égale-
ment contacter Bushnell à:
Bushnell Allemagne GmbH
European Service Centre
Mathias-Brüggen-Str. 80
D-50827 Köln
ALLEMAGNE
Tél : +49 221 995568-0
Fax : +49 221 995568-20
Cette garantie vous ouvre des droits spécifiques.
Vos droits peuvent varier d’un pays à l’autre.
©2012 Bushnell Outdoor Products

81
Traitement des déchets d’équipements
électriques et électroniques
(En vigueur dans l’Union européenne et autres pays européens
ayant des systèmes de collecte des déchets séparés)
Cet équipement contient des composants électriques et/ou électroniques et
par conséquent ne doit pas être éliminé en fin de vie avec les autres déchets
ménagers. Vous devez au contraire vous débarasser de ce produit afin qu’il
soit recyclé aux points de collecte respectifs fournis par les communautés
locales. Pour vous, ceci est sans frais.
Si l’équipement contient des piles amovibles (rechargeables), celles-
ci doivent également être retirées de l’équipement et, si nécessaire, être
éliminées à leur tour conformément aux règlements en vigueur (voir également
les commentaires respectifs dans la notice d’utilisation de ce produit).
De plus amples renseignements à ce sujet sont disponibles auprès de votre
mairie, votre compagnie de ramassage d’ordures locale, ou dans le magasin
où vous avez acheté cet équipement.

83
NOTA IMPORTANTE
Felicidades por comprar una de las mejores cámaras del
mercado! Bushnell está muy orgullosa de este concentrado
de tecnología y estamos seguros que usted también quedará
complacido. Agradecemos su compra y queremos ganarnos su
confianza. Consulte las notas siguientes y las instrucciones de
este manual para asegurarse que queda plenamente satisfecho
con este producto.
Si su Bushnell NatureView Cam parece no funcionar
correctamente o si tiene problemas de calidad con los
vídeos o fotos, consulte la sección Identificación de
Problemas/Preguntas Frecuentes de las páginas 117-122.
A menudo los problemas se deben a algo tan sencillo
que no se tuvo en cuenta o se solucionan simplemente
cambiando un ajuste.
Si el problema continúa después de probar las soluciones
de la sección Identificación de Problemas/Preguntas
Frecuentes, le aconsejamos que llame a la tienda donde
lo compró, para que esta, si es necesario, se ponga en
contacto con el Servicio Atención al Cliente de Bushnell.
Bushnell recomienda la utilización de un juego de pilas de litio 8 AA
Energizer® en esto modelo NatureView Cam para obtener la máxima
duración . No se recomienda usar pilas recargables.
Bushnell recomienda utilizar tarjetas SanDisk® SD y SDHC
(hasta 32 GB de capacidad) en todas las NatureView Cam.
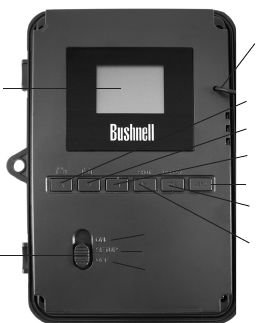
86
Fig. 2: Guía de botones
e interruptores
ACTIVADO
CONFIGURACIÓN
DESACTIVADO
Pantalla LCD
Interruptor de
encendido/
modo
ARRIBA/Vídeo
ABAJO/Foto
IZQUIERDA
MENÚ
ACEPTAR/Reproducción
(Replay)
DERECHA/Disparo (SHOT)
Cable hacia el compar-
timiento de las baterías
con el fin de supervisar áreas independientes de gran tamaño o muy
separadas.
• Multi Flash Mode (LED Control)(Modo de flash múltiple con control
LED): Evita las imágenes con flash sobreexpuestas en aplicaciones de
corto alcance.
Y muchas más funciones como vídeo en alta definición con sonido,
fotografías con formato panorámico (widescreen) o de pantalla completa
(fullscreen), nombre de la cámara imprimible (configurado por el usuario)
junto con datos actuales incluidas la temperatura, y las fases lunares.
Aplicaciones
La NatureView Cam puede usarse como cámara para observar la
naturaleza. Resulta adecuada para aplicaciones de vigilancia.
PIEZAS Y CONTROLES
La NatureView Cam incorpora las siguientes conexiones para dispositivos
externos: puerto USB, ranura para tarjetas SD, salida de TV y entrada para
alimentación CC externa (pág 85, Fig. 1).
VISTA INTERIOR

113
de la misma forma que se explica a continuación; lea esa sección si tiene
problemas para encontrar sus archivos.
Revisión de imágenes en un monitor de vídeo externo
Para reproducir las imágenes o vídeos del dispositivo
también puede utilizarse un monitor de TV. Conecte un
monitor de TV o un dispositivo de visualización (como un
marco de fotos digital) con entrad de vídeo compuesto
estándar (conector RCA) al mini-conector “Salida de TV”
de la NatureView Cam utilizando el cable suministrado.
Después:
• Ponga el interruptor de encendido en modo
CONFIGURACIÓN (primero cambie a OFF).
• Pulse la tecla OK. En el monitor aparecerá la última
imagen capturada. En el caso de los videoclips pulse la tecla de
DISPARO (DERECHA) para empezar a reproducir y vuelva a pulsarla
para parar.
• Pulse la tecla ARRIBA para ver la foto o el vídeo anterior o ABAJO
para ver los siguientes. Al mirar imágenes, en el centro de la LCD y
el la parte inferior del monitor de vídeo se muestran respectivamente
el número total de imágenes de la tarjeta SD y el índice de la imagen
visualizada.
• Cuando termine la reproducción, pulse la tecla OK para volver al
estado activo (modo de CONFIGURACIÓN).
Revisión de imágenes en un ordenador
Siempre puede desmontar toda la cámara del árbol y conectar su puerto
USB a un ordenador: se reconocerá como “disco extraíble” sin necesidad
de instalar ningún controlador ni software. Si utiliza un PC (o Mac*) para
ver fotos (o videoclips*), primero conecte el dispositivo al ordenador con
el cable USB suministrado. Después utilice un software comercial que
incorpore un explorador de imágenes, o un explorador de imágenes incluido
en el sistema operativo del PC, para ver las imágenes guardadas en la
tarjeta SD, en la carpeta \DCIM\100EK113. Cada nueva imagen o vídeo
se numerará incrementalmente en el mismo orden en que se capturaron. Por
Cable de
“Salida de TV”

114
ejemplo, verá nombres de archivo como “PICT0001.JPG” o “PICT0001.avi”.
Mediante la extensión del formato de archivo puede distinguir si el archivo es
una fotografía (con extensión .jpg) o un vídeo (con extensión .avi).
*Los archivos de vídeo “.avi” pueden precisar un software adicional para
verlos en un Mac.
La NatureView Cam admite tres tipos de formatos de sistema: FAT12,
FAT16 y FAT32. El valor determinado para guardar fotos y vídeos es FAT16.
Aquí hay algunas notas al respecto:
• No necesita preocuparse sobre el formato del sistema de archivos de
la NatureView Cam excepto si su equipo tiene problemas leyendo
la tarjeta SD. En tal caso, formatee la tarjeta SD con la NatureView
Cam o en su ordenador y después inserte la tarjeta en su NatureView
Cam e inténtelo de nuevo.
• El formado del sistema de archivos predeterminado de la NatureView
Cam es FAT16, que pueden leer la mayoría de ordenadores. Si
formatea una tarjeta SD para la NatureView Cam en su ordenador,
debería elegir el formato de sistema de archivos FAT16. Normalmente
se recomienda FAT16 excepto si tiene otro visualizador de imágenes
que utilice el formato FAT12 o FAT32.
BORRADO DE FOTOS / VIDEOS
Si durante la reproducción en la LCD de la cámara o en un monitor de
vídeo ve una foto o vídeo que quiere suprimir, puede hacerlo fácilmente sin
abandonar el modo CONFIGURACIÓN:
• Pulse la tecla MENÚ. Verá la primera pantalla “Suprimir”, que le permite
seleccionar la opción de suprimir sólo la foto o el vídeo visualizado
actualmente o todos los vídeos y fotos (consulte a continuación).
• Resalte la opción “Suprimir actual” o “Suprimir todo” y pulse OK.
• A continuación seleccione “YES” y pulse OK para borrar sólo el último
vídeo o foto visualizado (si seleccionó “zSuprimir actual”) o todos los
archivos de foto y vídeo (si seleccionó “Suprimir todo”) o seleccione
“No” y pulse OK para cancelar la operación sin borrar ningún archivo.
116
archivos de vídeo .avi pueden verse con Windows Media Player (versión 7 o
posterior) así como otros programas de reproducción de vídeo que pueden
estar incluidos en su ordenador o están disponibles en línea.
*Los archivos de vídeo “.avi” pueden precisar un software adicional para
verlos en un Mac.

117
IDENTIFICACIÓN DE PROBLEMAS/FAQS
La cámara captura imágenes contínuas sin objetos
Una cámara tiene lo que se conoce como un "disparo falso", que se activa
si el sensor Infrarrojo Pasivo cree que hay movimiento y calor frente al lente
de la cámara cuando no hay ningún objeto en la imagen. Estos "Disparos
Falsos" son el resultado de colocar la cámara en un ambiente donde hay
movimiento asociado con las ramas de los árboles, creando movimiento
frente a la cámara, o en un área donde hay alta temperatura en primer plano
y cualquier movimiento del viento puede activar la cámara. Si se coloca
la cámara sobre agua, también puede ocurrir este inconveniente. Para
remediar la situación:
1. Intente mudar la cámara a un área donde no haya ninguno de
estos inconvenientes, o cambie el nivel del sensor en el menú de
configuración.
2. Si la cámara continuá capturando imágenes cuando no hay ningún
objeto, intente colocar la cámara en un ambiente cerrado, apuntando
hacia un lugar donde no haya movimiento.
3. Si la cámara continúa con problemas, probablemente haya un problema
con un componente electrónico.
4. Si este es el caso, póngase en contacto con nuestro servicio de
atención al cliente para enviarnos la cámara para su reparación.
Las baterías duran menos de lo previsto
1. La duración de las baterías puede variar con la temperatura de
funcionamiento y el número de imágenes tomadas con el tiempo.
Habitualmente la NatureView Cam podrá captar varios miles de
imágenes antes que las baterías se agoten.
2. Compruebe que ha utilizado baterías alcalinas o de litio nuevas.
Bushnell recomienda utilizar un juego completo de pilas de litio
AA Energizer® en su NatureView Cam para obtener la máxima
duración de estas.
3. Compruebe que se puso el interruptor de encendido en la posición
“On” y que la cámara no estaba en modo de “Configuración (Setup)”
una vez en el campo.
4. Compruebe que utiliza una tarjeta SD de una marca de buena calidad

118
en su cámara. Bushnell recomienda utilizar tarjetas SD y SDHC
de marca SanDisk® hasta 32GB. Nuestra experiencia indica que las
tarjetas SD de baja calidad a veces pueden reducir la duración de las
baterías de la NatureView Cam.
La cámara deja de tomar imágenes o no toma
imágenes
1. Compruebe que la tarjeta SD no esté llena. Si la tarjeta está llena la
cámara deja de tomar imágenes.
2. Compruebe las baterías para asegurarse que son baterías AA alcalinas
o de litio nuevas. Consulte la nota anterior sobre la duración reducida
de las baterías.
3. Compruebe que el interruptor de encendido de la cámara está en la
posición “On” y no en “Off” ni “Setup”.
4. Compruebe que está utilizando una tarjeta SD de buena calidad en
su cámara. Bushnell recomienda utilizar tarjetas SanDisk® SD y
SDHC hasta 32GB.
5. Si la tarjeta SD tiene el interruptor de protección contra escritura en la
posición de bloqueo, la cámara no tomará imágenes.
6. Si tiene una tarjeta SD usada en otro dispositivo, antes de insertarla en
la NatureView Cam, debería formatearla con el parámetro “Formato”
del modo Configuración (compruebe que previamente ha hecho una
copia de seguridad de cualquier archivo importante, pues el formateo
borrará todos los archivos existentes). En algunos casos, otros
dispositivos pueden cambiar el formateo de la tarjeta SD de forma que
no funcionará correctamente con la NatureView Cam.
La cámara no se enciende
1. Compruebe que ha colocado como mínimo 4 baterías (el número
mínimo necesario) en el compartimiento de las baterías, empezando
por arriba, llenando las cavidades para batería 1-4 sin saltarse ninguno.
2. Bushnell recomienda utilizar un juego completo de 8 pilas de litio
AA Energizer® en su NatureView Cam (el máx. de capacidad).
3. Compruebe que las baterías se han colocado correctamente,
respetando la polaridad. Coloque siempre el extremo negativo (plano)
de la batería en contacto con el lado del muelle de su cavidad en la
cámara.

123
ESPECIFICACIONES TÉCNICAS
Sensor de imagen 5 Megapíxeles, a color, CMOS
Tamaño máximo en
píxeles 3264x2448 (8MP)
Objetivo F=3.1; FOV=50°; Auto IR-Cut-Remove (para uso nocturno)
Alcance del flash IR 19m (60 ft.)
Pantalla de
visualización 24x32 mm (1,5”)
Tarjeta de memoria Tarjeta SD o SDHC, Capacidad máxima 32 GB
RAM interna 32MB
Tamaño de la imagen 8MP = 3264x2448; 5MP = 2560x1920; 3MP =
2048x1536
Tamaño del vídeo
1280 x 720 (panorámica), 640 x 480 (pantalla completa), o
320 x 240 (pantalla completa) píxeles por fotograma a 20-
30 fps (día) / 15-20 fps (noche)
Sensibilidad del
sensor PIR PIR con 4 opciones de sensibilidad: Baja, Normal, Alta y
Automática ("Low", "Normal", "High" y "Auto")
Utilización Diurna/nocturna
Tiempo de respuesta 0.6 s
Intervalo de
activación Programable de 1 s a 60 min.
Número de disparo 1— 3 programable
Duración de vídeo 5-60 s programable
Alimentación
eléctrica 8 x AA recomendada, 4 x AA como alimentación de
emergencia
Corriente en modo de
espera < 0,2 mA (<7 mAh/día)
Consumo eléctrico 250 mA (+1300 mA con el LED IR encendido)
Interfaz del usuario Pantalla LCD
Interfaz Salida TV (NTSC/PAL); USB; porta-tarjeta SD; 6 V CC
externa
Amarre Correa; Fijación ¼-20
Temperatura de
funcionamiento -20 - 60°C (temperatura de almacenamiento: -30 - 70°C)
Humedad de
funcionamiento 5% - 90%
Autenticación de
seguridad FCC/CE/RoHs/WEEE
Product specificaties
| Merk: | Bushnell |
| Categorie: | Digitale camera |
| Model: | NatureView Cam HD 119438 |
Heb je hulp nodig?
Als je hulp nodig hebt met Bushnell NatureView Cam HD 119438 stel dan hieronder een vraag en andere gebruikers zullen je antwoorden
Handleiding Digitale camera Bushnell

16 Mei 2023
16 Mei 2023
16 Mei 2023
16 Mei 2023
16 Mei 2023
16 Mei 2023
16 Mei 2023
16 Mei 2023
16 Mei 2023
Handleiding Digitale camera
- Digitale camera Braun
- Digitale camera Bosch
- Digitale camera HP
- Digitale camera Sony
- Digitale camera Samsung
- Digitale camera Xiaomi
- Digitale camera Casio
- Digitale camera Panasonic
- Digitale camera Nikon
- Digitale camera Epson
- Digitale camera Canon
- Digitale camera JVC
- Digitale camera Motorola
- Digitale camera Medion
- Digitale camera Olympus
- Digitale camera Quintezz
- Digitale camera Toshiba
- Digitale camera VTech
- Digitale camera A-Rival
- Digitale camera AEE
- Digitale camera Agfa
- Digitale camera Agfaphoto
- Digitale camera Aiptek
- Digitale camera Albrecht
- Digitale camera Apeman
- Digitale camera Argus
- Digitale camera Beha-Amprobe
- Digitale camera BenQ
- Digitale camera BlackVue
- Digitale camera BML
- Digitale camera Bolyguard
- Digitale camera Brinno
- Digitale camera Denver
- Digitale camera Digital Blue
- Digitale camera Dnt
- Digitale camera Drift
- Digitale camera Easypix
- Digitale camera Ematic
- Digitale camera Envivo
- Digitale camera Fisher Price
- Digitale camera Flir
- Digitale camera Fuji
- Digitale camera Fujifilm
- Digitale camera GE
- Digitale camera Gembird
- Digitale camera General Electric
- Digitale camera Genius
- Digitale camera Geonaute
- Digitale camera Goclever
- Digitale camera GoPro
- Digitale camera Guardo
- Digitale camera HTC
- Digitale camera Ingo
- Digitale camera Insta360
- Digitale camera Ion
- Digitale camera Kodak
- Digitale camera Kompernass - Lidl
- Digitale camera Konica
- Digitale camera Konig Electronic
- Digitale camera Kyocera
- Digitale camera Lamax
- Digitale camera Leica
- Digitale camera Lexibook
- Digitale camera Liquid Image
- Digitale camera Maginon
- Digitale camera Magpix
- Digitale camera Minolta
- Digitale camera Minox
- Digitale camera Mustek
- Digitale camera Nytech
- Digitale camera Pentax
- Digitale camera Plawa
- Digitale camera Polaroid
- Digitale camera Powerfix
- Digitale camera Praktica
- Digitale camera Pulsar
- Digitale camera Qware
- Digitale camera RadioShack
- Digitale camera Red
- Digitale camera Renkforce
- Digitale camera Revue
- Digitale camera Ricoh
- Digitale camera Rollei
- Digitale camera Sakar
- Digitale camera SeaLife
- Digitale camera Sigma
- Digitale camera Silvercrest
- Digitale camera Sipix
- Digitale camera Somikon
- Digitale camera Spypoint
- Digitale camera Storex
- Digitale camera Targa
- Digitale camera Technaxx
- Digitale camera Tevion
- Digitale camera TomTom
- Digitale camera Traveler
- Digitale camera Trust
- Digitale camera Umax
- Digitale camera Veho
- Digitale camera Vivitar
- Digitale camera Voigtlaender
- Digitale camera Wanscam
- Digitale camera WASPcam
- Digitale camera Yakumo
- Digitale camera Jobo
- Digitale camera Odys
- Digitale camera Oregon Scientific
- Digitale camera Duramaxx
- Digitale camera Guide
Nieuwste handleidingen voor Digitale camera

22 Oktober 2024
1 September 2024

14 Februari 2024
4 Februari 2024

25 December 2023
25 December 2023
16 Oktober 2023
16 Oktober 2023
16 Oktober 2023
16 Oktober 2023