BMW 318i (1997) Handleiding
Lees hieronder de 📖 handleiding in het Nederlandse voor BMW 318i (1997) (179 pagina's) in de categorie Auto. Deze handleiding was nuttig voor 27 personen en werd door 2 gebruikers gemiddeld met 4.5 sterren beoordeeld
Pagina 1/179

Owner’s Manual for the vehicle.
With a quick reference guide
for your convenience.
Online Edition for Part No. 01 41 9 790 377 - © 07/98 BMW AG
A-Z
Contents

Online Edition for Part No. 01 41 9 790 377 - © 07/98 BMW AG

318i
318is
323i
Sedan 323is
Coupe 328i
Convertible 328is
Online Edition for Part No. 01 41 9 790 377 - © 07/98 BMW AG

Congratulations, and thank you for choosing a BMW.
Thorough familiarity with your vehicle will provide you with enhanced control and
security when you drive it. Therefore, we have this request:
Please take the time to read this Owner’s Manual and familiarize yourself with the
information that we have compiled for you before starting off in your new car. It con-
tains important data and instructions intended to assist you in extracting maximum use
and satisfaction from your BMW’s unique range of technical features. The manual also
contains information on care and maintenance designed to enhance operating safety
and contribute to maintaining your BMW’s value throughout an extended service life.
This Owner’s Manual should be regarded as a permanent part of the vehicle. When the
vehicle is sold, the manual should remain in the car to furnish the next owner with a
source of important information on operation, safety and maintenance procedures.
This manual is supplemented by a Service and Warranty Information booklet
(US models only). We recommend that you read this publication carefully.
Your BMW is covered by the following warranties:
ÐNew Vehicle Limited Warranty
ÐLimited Rust Perforation Warranty
ÐFederal Emissions System Defect Warranty
ÐFederal Emissions Performance Warranty
ÐCalifornia Emission Control System Limited Warranty
Detailed information on these warranties is contained in the Service and Warranty
Information booklet.
We wish you many miles of driving pleasure and satisfaction.
BMW AG
Online Edition for Part No. 01 41 9 790 377 - © 07/98 BMW AG

4
Notes on the Owner's Manual
We have made every effort to ensure
that you are able to find what you need
in this Owner's Manual as quickly as
possible. The fastest way to find certain
topics is by using the detailed index at
the end. If you require an initial over-
view of your vehicle, this can be found
in the first chapter. The detailed table of
contents immediately following the
index is intended to arouse your curios-
ity about your BMW and stimulate you
to read about it.
If at some time you wish to sell your
BMW, remember to leave the Owner's
Manual with the vehicle; consider it part
of the vehicle.
Should you have any further questions,
your BMW Retailer will be glad to assist
at any time.
Symbols used
aindicates notes you should defi-
nitely read – for the sake of your own
safety and the safety of others, and to
avoid damages to your BMW.c
bindicates notes that alert you to
specific features of your vehicle.c
Aspecial information on recycling.c
c indicates the end of a block of infor-
mation.
* indicates special equipment, country-
specific equipment and optional extras.
The individual vehicle
In buying your BMW, you have de-
cided in favor of a model with individu-
alized equipment and fittings. This
Owner's Manual describes all models
and equipment that BMW offers within
the same vehicle range.
We hope you will understand that this
manual describes equipment and fea-
tures which you might not have chosen
for your vehicle. You can easily recog-
nize any differences, as all optional
accessories are marked with an
asterisk *.
If your BMW features equipment which
is not described in this Owner's Manual
(e.g., car radio or telephone), (Supple-
mentary) Owner's Manuals are
enclosed. We ask you to read these
manuals, too.
indicates that you should study
the relevant section of this Owner's
Manual in connection with a particular
part or assembly.
© 1997 BMW AG
Munich, Germany
Reprinting, including excerpts, only with
the written consent of BMW AG,
Munich.
Order-No. 01 41 9 790 377
US VIII/97
Printed in Germany
Printed on environment-friendly paper
(recyclable and chlorine-free).
Online Edition for Part No. 01 41 9 790 377 - © 07/98 BMW AG

5
Status when going to press
BMW pursues a policy of continuous,
ongoing development that is conceived
to ensure that our vehicles continue to
embody the highest quality standards
combined with advanced, state-of-the-
art technology. For this reason, it is
possible that the features described in
this Owner’s Manual could differ from
those on your vehicle. We are unable to
completely eliminate the possibility that
errors might have occurred. We there-
fore ask you to accept that no claims of
a legal nature involving the specifica-
tions, illustrations and descriptions can
be considered.
Online Edition for Part No. 01 41 9 790 377 - © 07/98 BMW AG

For your own safety
aUse unleaded gasoline only.
Fuels containing up to 10% ethanol or
other oxygenates with up to 2.8% ox-
ygen by weight (i.e. 15% MTBE or
3% methanol plus an equivalent
amount of co-solvent) will not void the
applicable warranties with respect to
defects in materials or workmanship.
Field experience has indicated signifi-
cant differences in fuel quality (i.e.,
volatility, composition, additives, etc.)
among gasolines offered for sale in the
United States and Canada. The use of
poor-quality fuels may result in driving,
starting and stalling problems espe-
cially under certain environmental
conditions, such as high ambient tem-
perature and high altitude.
Should you encounter problems while
driving that you suspect could be
related to the fuel you are using,
we recommend that you respond
by switching to a recognized high-
quality brand.
Failure to comply with these recom-
mendations may result in unscheduled
maintenance. Follow the relevant
safety rules when you are handling
gasoline.c
a
Important safety information!
For your own safety, use genuine
parts and accessories approved by
BMW.
When you purchase accessories
tested and approved by BMW and
Original BMW Parts, you simulta-
neously acquire the assurance that
they have been thoroughly tested by
BMW to ensure optimum performance
when installed on your vehicle.
BMW warrants these parts to be free
from defects in material and work-
manship.
BMW will not accept any liability for
damage resulting from installation of
parts and accessories not approved
by BMW.
BMW cannot test every product from
other manufacturers to verify if it can
be used on a BMW safely and without
risk to either the vehicle, its operation,
or its occupants.
Original BMW Parts, BMW Accesso-
ries and other products approved by
BMW, together with professional
advice on using these items, are avail-
able from all BMW Retailers.
Installation and operation of non-BMW
approved accessories such as alarms,
radios, amplifiers, radar detectors,
wheels, suspension components,
brake dust shields, telephones
(including operation of any portable
cellular phone from within the vehicle
without using an externally mounted
antenna) or transceiver equipment
(e.g., C.B., walkie-talkie, ham radio or
similar) may cause extensive damage
to the vehicle, compromise its safety,
interfere with the vehicle’s electrical
system or affect the validity of the
BMW Limited Warranty.
See your authorized BMW Retailer for
additional information.
Do not use key or remote control to
lock doors or luggage compartment
with anyone inside the car.
"Maintenance, replacement or repair
of the emission control devices and
systems may be performed by any
automotive repair establishment or
individual using any certified automo-
tive part."c
Online Edition for Part No. 01 41 9 790 377 - © 07/98 BMW AG

7
The following only applies to vehicles owned and operated in the US.
REPORTING SAFETY DEFECTS
If you believe that your vehicle has a defect which could cause a crash or could cause injury or death, you should
immediately inform the National Highway Traffic Safety Administration (NHTSA) in addition to notifying BMW of
North America, Inc., P.O. Box 1227, Westwood, New Jersey 07675-1227, Telephone (201) 307-4000.
If NHTSA receives similar complaints, it may open an investigation, and if it finds that a safety defect exists in a
group of vehicles, it may order a recall and remedy campaign. However, NHTSA cannot become involved in indi-
vidual problems between you, your dealer, or BMW of North America, Inc.
To contact NHTSA, you may either call the Auto Safety Hotline toll-free at 1-800-424-9393 (or 202-366-0123 in
Washington, D.C. area) or write to: NHTSA, U.S. Department of Transportation, Washington, DC 20590. You can
also obtain other information about motor vehicle safety from the Hotline.
Online Edition for Part No. 01 41 9 790 377 - © 07/98 BMW AG

Online Edition for Part No. 01 41 9 790 377 - © 07/98 BMW AG

9
At a glance
Controls and features
Care and maintenance
Advanced technology
Technical data
Owner service procedure
At a glanceControlsCar careRepairsTechnicalDataIndex
Index
Online Edition for Part No. 01 41 9 790 377 - © 07/98 BMW AG

Contents
At a glance
Controls and features
Cockpit 16
Instrument cluster 18
Indicator and warning
lamps 20
Hazard warning system 22
Hazard warning triangle 22
First-aid kit 22
Refueling 23
Fuel specification 23
CARB OBD II interface 24
Tire inflation pressures 25
Locks and security systems:
Keys 30
Electronic immobilizing device 35
Doors 31
Trunk lid 33
Luggage compartment 34
Power windows 35
Sliding/tilt sunroof 36
Convertible top operation 37
Adjustments:
Seats 43
Steering wheel 45
Mirrors 46
Passenger safety systems:
Safety belts 47
Child restraint system 48
Installing child seats 49
Airbags 50
Child-safety locks 52
Rollover protection system –
convertible 52
Driving:
Steering/ignition lock 54
Starting the engine 54
Switching off the engine 55
Parking brake 56
Manual transmission 57
Automatic transmission 58
Turn signals/high beam 60
Wiper/washer system 61
Cruise control 62
Everything under control:
Odometer 63
Tachometer 63
Energy control 63
Fuel gauge 64
Coolant temperature gauge 64
Service Interval Display 64
Multi-Information Display (MID) 66
Outside temperature display
and digital clock 68
Check Control 71
Check Control with outside
temperature display and
digital clock 74
Onboard computer 77
Technology for driving comfort
and safety:
Automatic stability control
plus traction (ASC+T) 84
Online Edition for Part No. 01 41 9 790 377 - © 07/98 BMW AG

11
Contents
Controls and features
Care and maintenance
Lamps:
Parking lamps/low beams 85
Instrument panel lighting 85
Foglamps 86
Interior lamps 86
Reading lamps 86
An inviting climate:
Heated seats 87
Independent ventilation
system 87
Automatic climate control 88
Cabin convenience:
BMW Hi-Fi System 93
Glove compartment 93
Ashtray 94
Coin box, cup holder 94
Cigarette lighter 94
Center arm rest, rear 95
Through-loading system 95
Ski bag 95
Cargo loading 98
Special operating instructions:
Break-in procedures 100
Driving notes 100
Catalytic converter 102
Antilock Brake System
(ABS) 103
Disc brakes 104
Brake system 105
Winter driving 105
Roof-mounted luggage rack 107
Radio reception 108
Mobile phones 108
Hardtop – Convertible 109
Technical modifications
to the vehicle 110
Wheels and tires:
Tire inflation pressures 111
Tire tread 111
Tire replacement 112
Interaxle tire changes 112
The right choice 113
Winter tires 114
Approved wheels and tires 115
Under the hood:
Hood 118
Engine compartment 120
Washer fluids 124
Engine oil 124
Coolant 127
Brake fluid 128
Power steering fluid 128
Vehicle Identification Number 129
Care and maintenance:
The BMW Maintenance
System 130
Caring for your car 131
Cleaning and care
of the convertible top 136
Vehicle storage 137
Online Edition for Part No. 01 41 9 790 377 - © 07/98 BMW AG

Contents
Owner service procedure
Advanced technology
Technical data
Replacement procedures:
Onboard tool kit 140
Windshield wiper blades 140
Lamps and bulbs 141
Master key with
battery lamp 145
Changing tires 146
Battery 149
Fuses 151
In case of electrical
malfunction:
Fuel filler door 152
Sliding/tilt sunroof 152
Assistance, giving and receiving:
Jump-starting 153
Towing the vehicle 154
Towing 154
Airbags 156
Automatic Stability Control
plus Traction (ASC+T) 156
Radio reception 157
Safety belt tensioner 157
Engine specifications 160
Dimensions 161
Weights 163
Capacities 166
Electrical system 167
Drive belts 167
Online Edition for Part No. 01 41 9 790 377 - © 07/98 BMW AG

13
Everything from A to Z 172
Owner service procedures
from A to Z 174
Index
Online Edition for Part No. 01 41 9 790 377 - © 07/98 BMW AG

Online Edition for Part No. 01 41 9 790 377 - © 07/98 BMW AG

15
At a glance
Controls and features
Care and maintenance
Advanced technology
Technical data
Owner service procedure
Index
At a glanceControlsCar careRepairsTechnicalDataIndex
Cockpit 16
Instrument cluster 18
Indicator and warning lamps 20
Hazard warning system 22
Hazard warning triangle 22
First-aid kit 22
Refueling 23
Fuel specification 23
CARB OBD II interface 24
Tire inflation pressures 25
Online Edition for Part No. 01 41 9 790 377 - © 07/98 BMW AG

16 Cockpit
A
TO
360us306
Online Edition for Part No. 01 41 9 790 377 - © 07/98 BMW AG

Controls and featuresMaintenance At a glanceControlsCar careRepairsTechnicalDataIndex
17
1 Lamp switch 85
2 Foglamps 86
3 Horn, entire surface
4 Wiper/washer lever 61
5 Rear window defroster 91
6 Hazard warning system 22
7 Automatic cruise control* 62
8 Adjust steering wheel* 45
9 Turn signals, high beam headlamps
and headlamp flasher 60
10 Engine hood unlocking device 118
Cockpit
Online Edition for Part No. 01 41 9 790 377 - © 07/98 BMW AG

18 Instrument cluster
360us319
Online Edition for Part No. 01 41 9 790 377 - © 07/98 BMW AG

Controls and featuresMaintenance At a glanceControlsCar careRepairsTechnicalDataIndex
19
1 Fuel gauge with low-fuel
warning lamp 64
2 Indicator lamp for turn signals 20
3 Speedometer
4 Indicator and warning lamps for
dBattery charge current 20
dHigh beams 20
dEngine oil pressure 20
5 Tachometer 63
Energy control 63
6 Coolant temperature gauge 64
7 Indicator and warning lamps for
dBrake pad wear 20
dBrake system hydraulics 21
dParking brake 21
dAirbag 50
8 Indicator lamp for ASC+T 20
9 Indicator and warning lamps for
dAutomatic transmission* 20
dWarning lamp for Check Control *
71
dPlease fasten seat belts* 21
dABS 20
10 Trip odometer 63
11 Service Interval Display 64
12 Odometer 63
13 Indicator lamps for
dFoglamps* 20
dEmissions-related systems
indicator 21
dRollover protection system* 21
14 Trip odometer reset button 63
Instrument cluster
Online Edition for Part No. 01 41 9 790 377 - © 07/98 BMW AG

20
Turn signal left/right, green
k
Flashes when the turn signals
are in operation.
Battery charge current, red
vGoes out after the engine has
started.
If the lamp comes on during
normal vehicle operation:
The battery is no longer being charged.
Indicates a defect in the generator drive
belt or the charging circuit.
aIf the V-belt is defective, do not run
the coolant pump; overheating and
potential engine damage would result.
Contact your BMW Retailer.c
High beam, blue
lLights up when the high beams
are switched on or the head-
lamp flashers are activated.
Engine oil pressure, red
w
Goes out after the engine has
started. May come on briefly at
idle when the engine is hot,
but must go out again at higher engine
speed.
If the lamp comes on during normal vehi-
cle operation: stop vehicle and switch off
engine immediately. Check engine oil
level; if necessary, add oil. If oil level is
correct: contact your BMW Retailer.
Foglamps*, green
tLights up whenever you switch
on the foglamps.
Airbags, red
pThis lamp turns on for an oper-
ational check when you turn the
ignition key to position 1. If, at
the operation check, it does not go on,
or goes on while driving, have it checked
at your BMW Retailer.
Additional notes: Page 50
Automatic transmission , yellow*
OGoes out after the engine has
started.
Additional notes: Page 58
ASC+T (Automatic Stability
Control plus Traction), yellow
s
Goes out shortly after the igni-
tion is switched on:
System OK.
Additional notes: Page 84
ABS (Antilock Brake System),
yellow
oGoes out after the engine has
started. If the lamp comes on
during normal vehicle opera-
tion: ABS has been deactivated in
response to a system malfunction. Con-
ventional braking force remains unim-
paired.
Additional notes: Page 103
Brake pad wear, yellow
#Lights up when starter is actu-
ated and goes out when the
engine is started.
If the lamp comes on during normal
vehicle operation: replace brake pads
immediately.
aUse only original BMW-approved
brake pads otherwise the vehicle
authorization is no longer valid.c
Indicator and warning lamps
Online Edition for Part No. 01 41 9 790 377 - © 07/98 BMW AG

At a glanceControlsCar careRepairsTechnicalDataIndex
21
Brake hydraulics, red
n
Goes out after the engine has
started.
If the lamp comes on during
normal vehicle operation: low brake
fluid. Additional notes: Page 128
Parking brake, red
mGoes out after the engine has
started. Comes on when you
engage the parking brake.
Additional notes: Page 56
Emissions-related systems
YLamp goes out once engine
starts.
If this indicator lamp lights up
during normal vehicle operation, either
continuously or intermittently, this indi-
cates a fault in one of the emissions-
related electronic circuits. Although the
vehicle remains operational, you should
have the systems checked by a BMW
Retailer at the earliest possible opportu-
nity.
Please fasten safety belts , red*
q
(With acoustic signal if the
driver’s belt is not buckled).
Lights up briefly when the
ignition key is turned, and then goes out
(in some models it goes out after you
fasten safety belts).
BMW Convertible
Rollover Protection System
*,
yellow
;Goes out shortly after the igni-
tion is switched on:
System OK.
Indicator and warning lamps
Online Edition for Part No. 01 41 9 790 377 - © 07/98 BMW AG

22
The button flashes intermittently when
the hazard warning lamps are on.
The button is also illuminated whenever
the vehicle lighting is switched on.
The warning triangle can be stored in
the luggage compartment in a storage
shelf at the right for convenient access.
aComply with legal requirements
concerning the need to carry a warning
triangle in the car.c
On the right in the luggage compart-
ment, on a shelf.
aSome of the items in the first-aid
kit are suitable for use for a limited
period only. Therefore you should regu-
larly check the contents and replace
defective articles. These are available in
any pharmacy.
Comply with legal requirements con-
cerning the need to carry a first-aid kit in
the car.c
360de040
Hazard warning system Hazard warning triangle First aid kit* *
Online Edition for Part No. 01 41 9 790 377 - © 07/98 BMW AG

At a glanceControlsCar careRepairsTechnicalDataIndex
23
Refueling Fuel specification
To unlock the filler door in the event of a
central locking system failure, refer to
page .152
aWhen handling fuel, comply with
the safety regulations displayed by gas
stations.c
Unleaded gasoline only.
Minimum octane requirement: 89 AKI
BMW engines are equipped with knock
sensors and automatically adapt to op-
erate with fuels of different octane rat-
ings, as long as the minimum octane
requirement is met.
Higher octane fuels will provide in-
creased performance and fuel econ-
omy, while the use of gasoline with a
lower octane rating will have an adverse
effect.
aNever use leaded fuel, as it would
cause permanent damage to both the
catalytic converter and the engine-man-
agement system’s oxygen sensors.c
AKI = Anti Knock Index
360de010
Online Edition for Part No. 01 41 9 790 377 - © 07/98 BMW AG

24
The OBD II interface (data link connec-
tor) is located beneath a cover panel
(with the letters "OBD") near the foot
support in the driver’s side footwell
(arrow).
360us301
CARB OBD II interface
Online Edition for Part No. 01 41 9 790 377 - © 07/98 BMW AG

At a glanceControlsCar careRepairsTechnicalDataIndex
25
BCBC C $BCBC + /
Tire inflation pressures
If the driver's door is open, the infla-
tion pressures are also visible on the
door pillar. Inflation pressures are
indicated in psi (bar) with tires cold
(ambient temperature).
The inflation pressures apply to tires
from BMW-approved manufacturers;
your BMW Retailer will provide you
with this information. Higher pres-
sures may be required for tires from
other manufacturers.
aPeriodically check the inflation
pressure – also of the spare tire – at
least twice each month and before
setting out on an extended trip. Failing
this, incorrect tire pressure may ren-
der the car unstable or cause tire
damage resulting in an accident.c
Sedan models
BMW
model
Tire sizes
Inflation pressures are
indicated in psi (bar)
318i
185/65 R 15 88 Q, T M+S
185/65 R 15 88 T
29
(2.0)
35
(2.4)
36
(2.5)
44
(3.0)
205/60 R 15 91 H
225/55 R 15 92 V
225/50 ZR 16
205/60 R 15 91 Q, H M+S
225/50 R 16 92 Q M+S
29
(2.2)
32
(2.2)
32
(2.2)
39
(2.7)
328i
205/60 R 15 91 H
225/50 ZR 16
205/60 R 15 91 Q, H M+S
225/50 R 16 92 Q M+S
29
(2.0)
33
(2.3)
33
(2.3)
41
(2.8)
See next page for additional models
Online Edition for Part No. 01 41 9 790 377 - © 07/98 BMW AG

26
BCBC C $BCBC + /
Tire inflation pressures (cont.) Coupe models
BMW
model
Tire sizes
Inflation pressures are
indicated in psi (bar)
318is
323is
205/60 R 15 91 H
225/55 R 15 92 V
225/50 ZR 16
205/60 R 15 91 Q, H M+S
225/50 R 16 92 Q M+S
29
(2.0)
32
(2.2)
32
(2.2)
39
(2.7)
185/65 R 15 88 Q M+S 29
(2.0)
35
(2.4)
36
(2.5)
44
(3.0)
328is
205/60 R 15 91 H
225/50 ZR 16
205/60 R 15 91 Q, H M+S
225/50 R 16 92 Q M+S
29
(2.0)
33
(2.3)
33
(2.3)
41
(2.8)
See next page for additional models
Online Edition for Part No. 01 41 9 790 377 - © 07/98 BMW AG

At a glanceControlsCar careRepairsTechnicalDataIndex
27
BCBC $BC-+
max.
Tire inflation pressures (cont.) Convertible models
BMW
model
Tire sizes
Inflation pressures are
indicated in psi (bar)
318i
323i
205/60 R 15 91 H
225/55 R 15 92 V
225/50 ZR 16
205/60 R 15 91 Q, H M+S
225/50 R 16 92 Q M+S
29
(2.0)
32
(2.2)
32
(2.2)
39
(2.7)
328i
205/60 R 15 91 H
225/50 ZR 16
205/60 R 15 91 Q, H M+S
225/50 R 16 92 Q M+S
29
(2.0)
33
(2.3)
33
(2.3)
41
(2.8)
Online Edition for Part No. 01 41 9 790 377 - © 07/98 BMW AG

28
Locks and security systems:
Keys 30
Electronic vehicle immobilizer 30
Doors 31
Luggage compartment lid 33
Luggage compartment 34
Power windows 35
Sliding/tilt sunroof 36
Convertible top operation 37
Adjustments:
Seats 43
Steering wheel 45
Mirrors 46
Passenger safety systems:
Safety belts 47
Child restraint system 48
Installing child seats 49
Airbags 50
Child-safety locks 52
Rollover protection system –
convertible 52
Driving:
Steering/ignition lock 54
Starting the engine 54
Switching off the engine 55
Parking brake 56
Manual transmission 57
Automatic transmission 58
Turn signals/high beam 60
Wiper/washer system 61
Cruise control 62
Everything under control:
Odometer 63
Tachometer 63
Energy control 63
Fuel gauge 64
Coolant temperature gauge 64
Service Interval Display 64
Multi-Information Display (MID) 66
Outside temperature display
and digital clock 68
Check Control 71
Check Control with outside
temperature display and
digital clock 74
Onboard computer 77
Online Edition for Part No. 01 41 9 790 377 - © 07/98 BMW AG

At a glance
Controls and features
Care and maintenance
Advanced technology
Technical data
Owner service procedure
At a glanceControls Car careRepairsTechnicalDataIndex
Index
29
Technology for driving comfort
and safety:
Automatic Stability Control
plus Traction (ASC+T) 84
Lamps:
Headlamp switch 85
Instrument panel lighting 85
Foglamps 86
Interior lamps 86
Reading lamps 86
An inviting climate:
Heated seats 87
Independent ventilation
system 87
Automatic climate control 88
Cabin convenience:
BMW Hi-Fi System 93
Glove compartment 93
Ashtray 94
Coin box, cup holder 94
Cigarette lighter 94
Center arm rest, rear 95
Through-loading system 95
Ski bag 95
Cargo loading 98
Online Edition for Part No. 01 41 9 790 377 - © 07/98 BMW AG

30
1 Master key with battery-powered
lamp (switch on by pressing the BMW
symbol).
2 Master key without lamp.
3 Spare key to be kept in a safe place
e.g. in your wallet. This key is not
intended for continuous use.
4 Door and ignition key
This key does not operate the locks
for the glove compartment and the
luggage compartment. This is useful
e.g. at a hotel.
The electronic vehicle immobilization
unit increases the anti-theft protection
of your BMW – without additional
adjustment or activation of systems.
This electronic immobilization system is
designed to reduce the susceptibility of
the vehicle to theft by making it impos-
sible to start the engine using any
means other than the special keys fur-
nished with the vehicle.
The system features an electronic chip
integrated within the key as a supple-
ment to the conventional mechanical
locking system.
The lock mechanism itself is actually a
dual-function device, simultaneously
serving as a communications interface
designed to allow the car security sys-
tem to maintain a continuous stream of
variable, vehicle-specific signals with
the electronic circuitry in the key. The
ignition, the flow of fuel and the starter
are enabled only after the key has been
recognized as "authorized".
bExternal force can damage the
electronic circuitry integrated in the key.
Such a key can no longer be used to
start the engine.c
Replacement of a key
Replacement keys are available exclu-
sively through your authorized BMW
Retailer, who is also under obligation to
request verification of vehicle owner-
ship before issuing a substitute key.
Your BMW Retailer can also cancel or
restore the electronic system authoriza-
tion for individual keys (e.g., if a key is
lost). A deactivated key can no longer
be used to start the engine.
For US owners only
The transmitter and receiver units com-
ply with Part 15 of the FCC (Federal
Communication Commission) Regula-
tions. Operation is governed by the fol-
lowing:
FCC ID: LXBEWS
As defined in the regulations, such a
device is not to emit significant interfer-
ence and must also be shielded against
interference from external sources to
prevent unauthorized or inadvertent
activation.
aAny unauthorized modifications
or changes to these devices could void
the user’s authority to operate this
equipment.c
1 4
B
M
W
B
M
W
B
M
W
B
M
W
2 3
365de122
Keys Electronic vehicle immobilizer
Online Edition for Part No. 01 41 9 790 377 - © 07/98 BMW AG

31
At a glanceControls Car careRepairsTechnicalDataIndex
Operating central locking system
from outside the vehicle
When the front doors are closed, the
activation of a door lock or of the lug-
gage compartment lock with a key
unlocks or locks the following:
dDoors
dLuggage compartment
dFuel filler door
dBMW Convertible: the glove com-
partment.
The double-lock system is engaged at
the same time. Both the door locks and
release handles remain locked.
aNever use the keys or the remote
control* to lock an occupied vehicle, as
it would then be impossible to unlock it
from inside.c
Convenience closing* for power win-
dows and sliding/tilt sunroof: after clos-
ing the doors, hold the key in the lock
position to close the windows and slid-
ing/tilt sunroof. The windows/sunroof
stop moving immediately when you
release the key. To be able to keep the
closing system in view, convenience
closing can only be activated via the
driver's door lock for safety reasons,
even on vehicles with remote control.
Emergency lock operation
(in the event of electrical failure)
Turn the key to the end positions of the
door lock to unlock/lock the respective
door.
Activating the central locking
system from inside the vehicle
Pressing the lock button of a front door
unlocks/locks the doors and luggage
compartment, but does not arm the
alarm system.
bIf the vehicle is locked from the
inside with this lock button, the fuel
filler door remains unlocked to allow
refueling. On the BMW Convertible, the
glove compartment also remains un-
locked to allow for its use.
It is also possible to unlock the car from
the inside by pulling on one of the front
door handles.c
To preclude accidental locking of the
vehicle
dit can not be locked with the lock
button when the driver's door is open
dthe safety button of the passenger
door activates the central locking
system only when both front doors
are locked.
360de011
Doors
Online Edition for Part No. 01 41 9 790 377 - © 07/98 BMW AG

32
aChildren can lock the doors from
inside. Therefore, you should always
remove the key and take it with you to
ensure that you can unlock the car from
the outside at all times.c
In an accident, the central locking sys-
tem automatically unlocks the doors
and the interior lamps switch on.
Depending on the version, the hazard
warning flashers are also activated.
aAvoid using the inside lock buttons
to lock the rear doors while driving, as
these doors would then fail to unlock au-
tomatically in the event of an accident.c
Opening doors from the inside
Pull interior door handle of a front door
twice in succession (the initial pull
unlocks the door, the second opens it).
Central locking system button
This button operates the central locking
system when the driver’s door is
closed. It unlocks the doors and lug-
gage compartment, but does not arm
the alarm system.
The fuel filler door remains unlocked to
allow refueling.
The picture shows, as an example, the
shift arrangement for the BMW sedan.
Opening doors from the outside
Lift the handle.
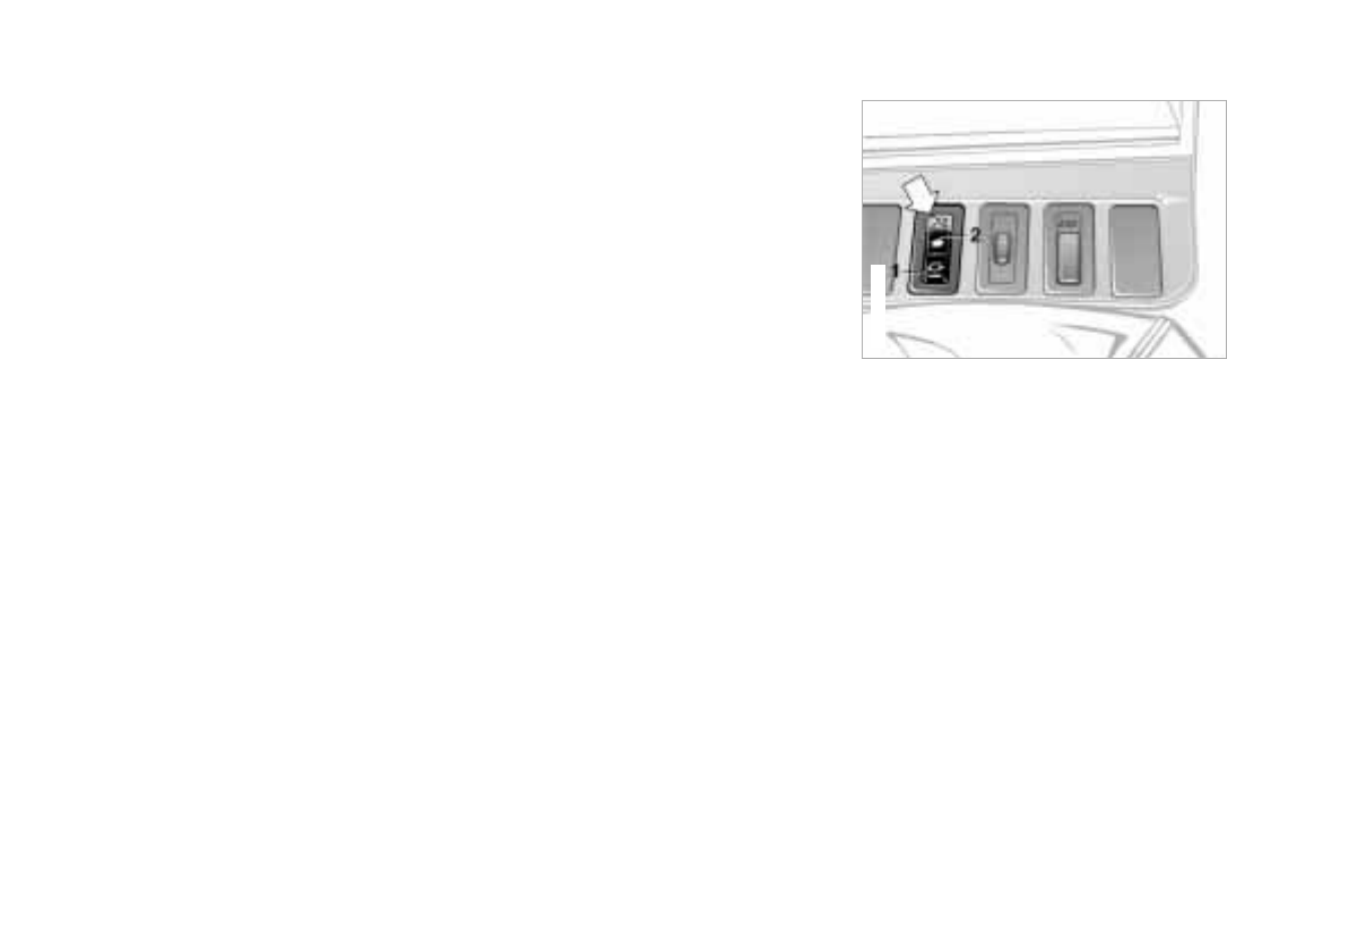
Automatic window lowering
(BMW Coupe, Convertible)
aThe door windows are lowered
somewhat when the doors are opened
and then are raised again immediately
after the doors are locked. This makes it
easier to open the doors, prevents the
rubber door seals from being damaged
and ensures proper seating of the
windows in the rubber door seals after
closing.c
Driver's door lock heating*
Lift the handle of the driver's door for
approx. 3 seconds: the heating
switches on. The switch-on time is
automatically controlled to save power.
S
360us124
Doors
Online Edition for Part No. 01 41 9 790 377 - © 07/98 BMW AG

33
At a glanceControls Car careRepairsTechnicalDataIndex
The lock actuation is only possible with
a master key.
Central locking system
To engage locks
To lock the luggage compartment
separately
The luggage compartment lid is locked
and disconnected from the central lock-
ing system. The luggage compartment
lid then remains locked when the cen-
tral locking system is unlocked with a
door lock or the lock knobs.
Access to the luggage compartment lid
is thus prevented when leaving the door
and ignition key with others (refer to
page 30); this is useful e.g., at a hotel.
To unlock car
Emergency lock operation
(in the event of electrical failure)
Turn the master key to the left as far as
possible: the luggage compartment lid
is unlocked.
After closing, the luggage compartment
lid must be locked again separately.
The luggage compartment lamp
is on when the luggage compartment
lid is open.
=Turn to the right: The luggage
compartment lid and - if the
front doors are closed - the
doors are locked and the alarm system
is armed.
360de013
>
Turn the master key to the right
until the slot is horizontal, then
extract the key from the lock.
<Turn to the left: the luggage
compartment lid and the doors
are unlocked.
Luggage compartment lid
Online Edition for Part No. 01 41 9 790 377 - © 07/98 BMW AG

34
To close
The handle recess (arrow) makes it eas-
ier to pull down the luggage compart-
ment lid.
aDo not drive with the luggage lid
open, as exhaust fumes could be drawn
into the interior of the vehicle. Should it
be absolutely necessary to operate the
vehicle with the luggage lid open:
dRaise all windows and shut the slid-
ing/tilt sunroof
dMaximize the air volume of the air
conditioning, refer to page 88.c
Luggage straps
Attach the straps to the floor of the lug-
gage compartment to secure smaller
suitcases.
The luggage straps prevent objects
placed on them from slipping.
The fittings at the corners of the lug-
gage compartment provide you with a
convenient means of attaching luggage
nets * and flexible straps for securing
suitcases and luggage.
360de302
394de302
Luggage compartment lid Luggage compartment
Online Edition for Part No. 01 41 9 790 377 - © 07/98 BMW AG

35
At a glanceControls Car careRepairsTechnicalDataIndex
Operational from ignition key posi-
tion 1.
dDepress the rocker switch until you
feel resistance:
The window continues to move as
long as the rocker switch is pressed.
dBriefly press the rocker switch to just
beyond the pressure point (one-
touch mode):
The window moves automatically.
Press and let go again to stop move-
ment.
The one-touch mode can be used to
open and close the front windows and
to open the rear windows *.
On vehicles equipped with front and
rear * power windows:
There are separate switches located
below the rear windows (except on the
BMW Convertible).
Safety switch *(arrow)
In this way the actuation of the windows
by means of rear switches, e.g., by chil-
dren, can be prevented.
aAlways keep the safety switch
(arrow) in the depressed position when
children ride in the rear seat.
Always remove the key from the ignition
when leaving the vehicle.c
After the ignition is switched off, the
windows remain operational
dwith the ignition key at position 1 and
0, or removed, or
dwhen the front doors are open (max.
15 minutes) or until the front doors
are opened for the rst time.
Convenience mode
After closing the doors, hold the key in
the lock position:
Any windows still open will close.
aCareless and inattentive closing of
the windows can lead to injuries.c
Safety feature
If one of the windows encounters resis-
tance while closing, it will respond by
halting and then opening somewhat
again.
You can deactivate this protective func-
tion, (e.g., in case of unauthorized intru-
sion into the vehicle) by pressing the
switch beyond its pressure point and
holding it there.
360us302
Power windows*
Online Edition for Part No. 01 41 9 790 377 - © 07/98 BMW AG

36
Pressing and holding down the center
button opens or closes all four side win-
dows simultaneously.
During opening, briefly press the rocker
switch to just beyond the pressure
point (one-touch mode): the side win-
dows move automatically. Press briefly
and let go again to stop movement.
Operate in ignition key position 2.
Open and lower
Press recessed button (1) until pressure
point is reached.
Close and raise
Press raised button (2) until pressure
point is reached.
At transition from closing to raising and
vice-versa: system off.
One-touch mode
(only open/raise)
Briefly press the respective button
beyond the pressure point.
The sliding/tilt sunroof moves automati-
cally. Briefly press the button a second
time to stop the sunroof.
bDuring raising, the headliner also
retracts a few inches.c
In the event of an electrical malfunc-
tion, you can also operate the sliding/tilt
sunroof manually, refer to page 152.
After the ignition is switched off, the
windows remain operational
dwith the ignition key at position 1 and
0, or removed, or
dwhen the front doors are open (max.
15 minutes) or until the front doors
are opened for the rst time.
Convenient closure*
After closing the doors, hold the key in
the lock position: the still-open sunroof
is closed.
36cde002
BMW Convertible
360de022
Power windows* Sliding/tilt sunroof*
Online Edition for Part No. 01 41 9 790 377 - © 07/98 BMW AG

37
At a glanceControls Car careRepairsTechnicalDataIndex
aCareless closing can lead to inju-
ries.
Always remove the key from the ignition
when leaving the vehicle.c
To avoid unpleasant drafts and pres-
sure variations within the passenger
compartment, you should keep the inte-
rior ventilation outlets open when the
sunroof is open and particularly when it
is raised, and select a higher blower
speed as required.
Manual convertible top
operation
The fabric top offers perfect weather
protection and can be opened and
closed simply and quickly by one
person.
Here are a few tips to ensure that you
have a lot of pleasure with your con-
vertible: It is advisable to close the top
when the vehicle is parked. The closed
convertible top not only protects the
passenger compartment from unfore-
seeable damage from the weather, it
also provides a certain degree of theft
protection.
Even with the top closed, it is always
advisable to keep valuables locked in
the luggage compartment.
Do not mount roof racks on the convert-
ible top.
Please contact your BMW Retailer for
suitable mounting equipment and other
accessories.
aWhen closing the power windows
while driving: always close the rear win-
dows first or all four windows simulta-
neously, otherwise the windows may
not seal tightly at higher speeds.c
Opening convertible top
Fold out the unlocking handle and turn
it to the end stop. Raise (relax) the top
approx. 8 in (20 cm).
36cde006
Sliding/tilt sunroof Convertible top operation*
Online Edition for Part No. 01 41 9 790 377 - © 07/98 BMW AG

38
Unlock the convertible top storage
compartment with the handle in the rear
left side panel.
bFrom ignition key position 1 or with
the door open: If the side windows are
closed, they move downward slightly
when the convertible top compartment
unlocking handle is operated.c
aTo prevent damage, it is not possi-
ble to unlock the convertible top com-
partment with the luggage compartment
open.c
Position the rear convertible top bow
vertically and hold in place. Raise the
convertible top compartment lid some-
what and unlock the catch lock by
pushing it to the right. Open the con-
vertible top compartment lid com-
pletely.
Lay the rear convertible top bow in the
convertible top compartment. Lift the
top at the front and also lay down
towards the rear.
In the process, make sure the rear win-
dow is laid down evenly and free of
folds. To prevent the rear window from
being scratched, a soft cloth should be
laid in the window fold.
Close the convertible top compartment
lid by pressing down on both sides until
they are heard to engage securely.
When the convertible top compartment
lid is closed, the central locking system
is automatically unlocked, i.e., the lug-
gage compartment is no longer locked
and can be opened again.
aIf the convertible top compartment
lid is not properly closed, the luggage
compartment can not be opened to pre-
vent damage.
To prevent damage to the convertible
top due to the permanent presence of
moisture, never fold down the top while
wet (also refer to "Car care" starting on
page 136).c
36cde007
36cde008
36cde009
Convertible top operation
Online Edition for Part No. 01 41 9 790 377 - © 07/98 BMW AG

39
At a glanceControls Car careRepairsTechnicalDataIndex
Closing convertible top
Move ignition key into position 1.
Unlock and open the convertible top
storage compartment. Lift out the top
by the side guide piece and the front
top frame.
bFrom ignition key position 1 or with
the door open: If the side windows are
closed, they move downward slightly
when the convertible top compartment
unlocking handle is operated. Move the
side windows into the desired position
or close them after closing the convert-
ible top.c
Position the rear top bow vertically.
Close the convertible top compartment
lid by pressing down on both sides until
they are heard to engage securely. Fold
down the top bow.
When the convertible top compartment
lid is closed, the central locking system
is automatically unlocked, i.e., the lug-
gage compartment is no longer locked
and can be opened again.
Pull the convertible top frame onto the
windshield frame with the locking han-
dle and lock the top by turning the han-
dle until it is heard to engage.
The rear convertible top bow is auto-
matically pressed onto the convertible
top compartment lid and closes water-
tight under tension.
bIf the convertible top or the rear
window begins to flutter at high speeds,
increase the air intake via the ventilation
control to prevent a vacuum from
resulting in the passenger compart-
ment.c
Fully automatic convertible top
operation*
The fully automatic convertible top per-
fectly combines extremely simple, com-
fortable operation with reliable protec-
tion from the elements. Here are a few
tips to ensure that you have years of
pleasure with your convertible:
It is advisable to close the top when the
vehicle is parked. The closed top not
only protects the passenger compart-
ment from unforeseen weather-related
damage, it also provides a certain
degree of theft protection. Even with
the top closed, it is always advisable to
keep valuables locked in the luggage
compartment.
Do not mount roof racks on the convert-
ible top. Please contact your BMW
Retailer for suitable mounting equip-
ment and other accessories.
To prevent damage, do not operate the
top at temperatures below 32 F (056).
To protect the battery, it is advisable to
operate the top with the engine running
when possible.
36cde010
Convertible top operation
Online Edition for Part No. 01 41 9 790 377 - © 07/98 BMW AG
40
aThe convertible top operates fully
automatically. Assistance with your
hand is necessary only as an exception
(refer to the note, next column).
Only operate the convertible top with
the vehicle stopped and do not drive off
during operation, as otherwise the pro-
cess will be interrupted. A half-opened
top can cause damage or injuries.
Remove foreign objects from the wind-
shield frame before closing the convert-
ible top, since these may prevent the top
from closing.
Do not lay objects on the convertible
top. They would fall off during top oper-
ation and cause damage or injuries.
When closing the power side windows
during driving, always close the rear
windows first or all four windows simul-
taneously, as otherwise the windows
may not seal tightly at higher speeds.c
aDo not reach into the convertible
top mechanism during opening and
closing. Keep children away from the
swiveling area of the convertible top
during operation.
Releasing the operating button for the
top immediately interrupts the automat-
ic movement. Movement can be contin-
ued in the desired direction by pressing
the appropriate button.c
bIf the convertible top has been
stored in the convertible top compart-
ment for a longer period, e.g., in the
winter when the hardtop is used, it may
be necessary to support the first auto-
matic closing operation by hand:
Should the top come to a stop shortly
before the end of the closing phase (still
open approx. 8 in/20 cm), reach into the
handle depression in the center of the
front convertible top frame and briefly
support the closing process while
pressing the button until it is automati-
cally continued.c
Opening and closing
1 To open
2 To close
Press the convertible top operating but-
ton until the opening or closing process
is completed.
The indicator lamp (arrow) lights up
continuously during convertible top
operation. The indicator lamp flashes
after releasing the button if the opening
or closing process is not yet completed.
36cde020
Convertible top operation
Online Edition for Part No. 01 41 9 790 377 - © 07/98 BMW AG

41
At a glanceControls Car careRepairsTechnicalDataIndex
bThe luggage compartment can not
be opened during convertible top oper-
ation.
The side windows move down slightly
when the convertible top operating but-
ton is pressed; if you continue to press
the button after the indicator lamp goes
out, they move up again as soon as the
opening process is completed.c
aThe side windows must be low-
ered slightly during convertible top op-
eration. If the convertible top operation
is interrupted, do not close the side win-
dows with the power window switches.
If the opening or closing process is in-
terrupted, it may not be possible to open
the luggage compartment.
To prevent damage from continuous
dampness, never fold down the convert-
ible top when wet.c
Convenience closing with the
driver's door lock
Hold the key in the "lock" position with
the door closed.
The windows/sunroof stop moving
immediately when you release the key.
bAt higher speeds, low air pressure
in the passenger compartment can
cause the convertible top or the rear
window to begin to flutter. Increase the
air intake via the ventilation control to
prevent low pressure from resulting in
the passenger compartment.c
Closing convertible top manually
when electrical operation fails
bManual closing is best carried out
from outside the vehicle with the driver's
door open and the driver's seat folded
forward. The rear seat bench must not
be occupied while doing so.c
1 Raise the left rear seat. Pull out the
strap until resistance is felt. Now con-
tinue to pull firmly (two audible clicks)
to disengage the drives for the con-
vertible top and convertible top com-
partment lid.
36cde014
Convertible top operation
Online Edition for Part No. 01 41 9 790 377 - © 07/98 BMW AG

42
2 Open the convertible top compart-
ment lid up to the stop with the lug-
gage compartment closed.
3 Grasp the convertible top on the lat-
eral guide section and on the front
soft-top frame and lift it out (arrow).
Position the rear convertible top bow
vertically and close the convertible
top compartment lid. Now fold down
the rear convertible top bow.
4 Place a screwdriver at the middle of
the cover on the front convertible top
frame, and pry it out of its recess.
5 Using the doubly bent allen key from
the onboard tool kit, place it in the
internal hexagon (arrrow).
6 The closing process is continued by
turning to the left; turn until the front
convertible top frame is locked to the
windshield frame. The rear convertible
top frame is automatically pressed
onto the convertible top compartment
lid and closes watertight under ten-
sion.
To eliminate the malfunction and re-
engage the drives, please see your
BMW Retailer.
aNever open the convertible top
manually in case of an electrical mal-
function. The convertible top compart-
ment lid can not be locked and would
open during driving.c
bPlease follow the instructions for
cleaning and care of the convertible top
in your Owner’s manual from page 136.c
36cde021
36cde022
Convertible top operation
Online Edition for Part No. 01 41 9 790 377 - © 07/98 BMW AG

43
At a glanceControls Car careRepairsTechnicalDataIndex
Longitudinal adjustment
Pull lever 1 and slide seat into desired
position.
After releasing the lever, make sure that
the locking device engages properly.
Height adjustment
Pull lever 2 and load or relieve seat as
required.
Backrest angle
Pull lever and load or relieve as required.
bYou can reduce the load on your
spinal column by sitting all the way
back in the seat with your back pressed
firmly against the backrest.
Ideal sitting posture is achieved with
your head extending from your spine in
a straight line.
For long-distance driving, you may wish
to increase the backrest angle slightly
to reduce muscular tension. Please
remember that you should always
remain able grasp the entire periphery
of the steering wheel without straight-
ening your arms.c
Front headrests
Adjust height by pulling out or pushing
in.
Adjust angle by swiveling.
Remove and install the front
headrests
Pull the headrests upward until they
stop.
With a forceful jerk, pull the headrests
out of their supports in the backrests.
Rear head restraints
Adjust height by pulling out or pushing
in.
360de016
360de017
360de303
Seats
Online Edition for Part No. 01 41 9 790 377 - © 07/98 BMW AG

44
aHead restraints reduce the risk of
neck injuries. Always position the head
restraint so that it is centered roughly at
ear level.
Never try to adjust your seat while oper-
ating the vehicle. The seat could re-
spond by moving in a way that you had
not anticipated, causing you to lose
control of the vehicle which could lead
to an accident. The front passenger
should not move the backrest into the
"reclined" position during driving.
While driving, both the driver and the
front passenger should keep the back-
rest relatively upright. Otherwise there is
a danger of the occupants "sliding
through" the belt in the event of an acci-
dent, thus considerably reducing the
protective effect of the belt (see also
safety precautions in the "Safety belts"
section, page ).47 c
BMW Sports Seat*
Additional adjustments for seat tilt and
thigh support.
Angle adjustment
Pull lever 1 and move seat as required.
Thigh support adjustment
Pull lever 2 and slide front section of
seat into the desired position.
Electrical seat adjustment*
1 Angle adjustment
2 Longitudinal adjustment
3 Height adjustment
4 Backrest angle
The tilt angle of the head restraints -
and on the BMW Sports Seat also the
thigh support - is adjusted manually.
360de018
360de019
Seats
Online Edition for Part No. 01 41 9 790 377 - © 07/98 BMW AG

45
At a glanceControls Car careRepairsTechnicalDataIndex
Lumbar support*
Adjust the curvature as desired with the
rocker switch.
You can adjust the backrest's contour
for additional support in the curvature
of your spine's lumbar region.
The upper hips and spinal column
receive supplementary support to help
you maintain a relaxed, upright posture.
Releasing backrest*
Pull up lever: the backrest can now be
folded forward.
The outer levers also serve as a storage
point for the seat belt (not on BMW
Convertible).
aThe front seat backrests must al-
ways be locked during driving.c
dPull out clamping lever.
dAdjust steering wheel tilt for your
seating position.
dPush the lever back in to clamp the
steering wheel in the new position.
aNever adjust the steering wheel
while driving – accident danger.c
360de020
360de021
360de028
Seats Adjusting steering wheel*
Online Edition for Part No. 01 41 9 790 377 - © 07/98 BMW AG

46
Exterior mirrors
1 Mirror switch for 4-way adjustment.
2 Switch for changing to the other
mirror:
dPush switch to left – driver's mirror.
dPush switch to right – passenger's
mirror.
You can also adjust the mirrors manu-
ally by pressing against the outer edges
of the lens.
aThe mirror on the passenger's side
features a lens with a more convex cur-
vature than the mirror installed on the
driver's door. When estimating the dis-
tance between yourself and other traffic,
bear in mind that the objects reflected in
the mirror are closer than they appear.
This means that estimations of the dis-
tance to following traffic should not be
regarded as precise.c
Electric heaters
Both mirrors are heated automatically
corresponding to the outside tempera-
ture with the ignition key in position 2.
Inside rearview mirror
To reduce glare from behind during
night driving: tilt small lever to dimmed
position.
Lighted make-up mirror
Fold down the sun visor, slide the cover
panel to the side.
The mirror lamps operate from ignition
key position 1 onward.
Sun visors
These can be folded down toward the
windshield or swiveled out against the
side windows.
1
2
360de304
360de030
Mirrors
Online Edition for Part No. 01 41 9 790 377 - © 07/98 BMW AG

47
At a glanceControls Car careRepairsTechnicalDataIndex
Always fasten your seat belt before
starting off.
To fasten: make sure you hear the catch
engage in the belt buckle.
To release: press the red button in the
buckle, hold the belt and guide it back
into its reel.
The safety belt inertial mechanism
locks:
din a sudden stop or crash
dwhen you pull it sharply
dduring abrupt braking and
acceleration
din curves
dwhen the vehicle is at an
extreme angle.
The safety belt can be adjusted individ-
ually to different body sizes with the
belt height adjustment:
Downward adjustment (1):
Push button downward.
Upward adjustment (2):
Grasp deflection fitting on ribbed side
sections and slide upward.
aFor your own safety, please ob-
serve the following when putting on the
safety belt, otherwise its protective
function may be impaired. Also ensure
that the other occupants follow these in-
structions.
Never allow more than one person to
wear a single safety belt. Never allow in-
fants or small children to ride in a pas-
senger's lap.
Avoid twisting the belt while routing it
firmly across the hips and shoulder. Do
not allow the belt to rest against hard or
fragile objects in your pockets. The
safety belt must not run across the
wearer's neck, nor should it be trapped
or abraded by coming into contact with
sharp edges or objects.
The belt should rest as firmly as possible
against your body You should avoid
wearing clothing that prevents it from
doing so. Pull the belt periodically to re-
tention it across your shoulder. In the
event of a frontal collision, a loose lap
belt could slide over your hips, leading
to abdominal injury. Due to the in-
creased distance between belt and
body, there would also be a delay before
restraint becomes effective.
360de032
360de033
Safety belts
Online Edition for Part No. 01 41 9 790 377 - © 07/98 BMW AG

48
Expectant mothers should always wear
their safety belts, taking care to position
the lap belt against the lower hips,
where it will not exert pressure against
the abdominal area.
Never attempt to modify the safety
belts.c
For care instructions refer to page 134.
Never install a rear-facing child restraint
system in the front passenger's seat!
Never attempt to modify either the
safety belts or any child restraint sys-
tem.
Should the safety belts be damaged or
stretched in an accident, the entire belt
system - including safety belt tension-
ers - must be replaced and the anchor-
ing mounts inspected at a BMW
Retailer.
If the safety belt tensioner has been
activated, a distance of roughly 0.8 in
(20 mm) will remain between the safety
belt lock and the tensioner module.
Installing child restraints
To install and secure child restraint sys-
tems, all rear safety belts (and the front
passenger's safety belt) are equipped
with a special locking mode.
A label with operating instructions is
attached to the belt next to the latch
plate.
To lock the belt
Extract the entire length of the belt from
the inertia reel mechanism. Allow the
reel to retract the belt somewhat and
engage the buckle, then tighten the belt
against the child restraint system. The
retraction mechanism is now locked.
Always observe the installation instruc-
tions provided by the manufacturer of
the child restraint system.
360us125
Safety belts Child restraint system
Online Edition for Part No. 01 41 9 790 377 - © 07/98 BMW AG

49
At a glanceControls Car careRepairsTechnicalDataIndex
To release the belt
Release the buckle, remove the child
restraint device and allow the inertia
reel to retract the belt completely.
bPlease also make this information
available to your passengers and urge
them to observe the instructions for
safety belt use.c
For care instructions refer to page 134.
All passengers, and especially children,
should use a restraint device when
riding in the car.
Infants or small children should never
be permitted to ride on a passenger's
lap.
Children should always sit in the rear
seat and use, depending on age, either
a child restraint system or the safety
belts installed in the vehicle. Accident
statistics have shown that children are
safer when properly restrained in the
rear seats than when riding in the front.
Infants and toddlers should be secured
with a child restraint system appropri-
ate for their size.
Children of six years and older should
wear safety belts.
Commercially available child seats
complying with legal standards are
designed to be secured using either a
lap belt or a combined lap-shoulder
belt. Because improperly installed
restraint systems can increase the risk
of injury to children, we strongly urge
you to carefully read and follow the
instructions supplied with the system.
Should the child restraint system of your
choice require the use of a securing or
tether strap, note that three anchoring
points (arrows) have been provided for
mounting it in your vehicle.
Ask your BMW Retailer to perform the
necessary installation work.
360us126
BMW Sedan/Coupe
Child restraint system Installing child seats
Online Edition for Part No. 01 41 9 790 377 - © 07/98 BMW AG

50
aBefore install-
ing any child re-
straint device or
child seat, please
read the follow-
ing:
Never install a rearward-facing child
restraint system in the front passenger
seat of this car.
Your car is equipped with an airbag
supplemental restraint system for the
front passenger. Because the backrest
on any rear-facing child restraint sys-
tem (of the kind designed for infants
under 1 year and 20 lbs.) would be
within the airbag's deployment range,
you should never mount such a device
in the front passenger seat, as the
impact of the airbag against the child
restraint's backrest could lead to seri-
ous or fatal injuries.
If it is necessary for a child (not an
infant) to ride in the front seat, certain
precautions should be taken. First,
move the passenger seat as far away
from the dashboard as possible. This
important precaution is intended to
maximize the distance between the air-
bag and the child. Older children should
be tightly secured with the safety belt.
Younger children should be secured in
an appropriate forward-facing child
restraint system that has first been
properly secured with a safety belt.
We strongly urge you to carefully read
and observe the instructions for instal-
lation and use provided by the child re-
straint's manufacturer whenever you
use such a device.
Always ensure that all occupants (of
all ages) remain properly and securely
restrained at all times.c
All rear seating positions in your vehicle
meet the recommendations of SAE
J1819, an industry recommended prac-
tice for securing child restraint systems
in motor vehicles.
1 Front airbag system, consisting of
driver and passenger airbag
2 Side airbags*
Protective effect
The front airbags provide additional
protection for the front-seat occupants
in the event of a severe frontal collision
in which the protection afforded by the
safety belts alone would no longer be
sufficient. The side airbags help protect
the front seat occupants in a severe
side impact.
360de305
Installing child seats Airbags
Online Edition for Part No. 01 41 9 790 377 - © 07/98 BMW AG

51
At a glanceControls Car careRepairsTechnicalDataIndex
The airbags are triggered by impacts
coming from the directions shown in
the illustration. Note that the supple-
mentary protection against lateral
impact is available only on vehicles
equipped with optional door-mounted
airbags.
Indicator lamp in instrument
cluster
System operational:
dThe indicator lamp comes on briefly.
System malfunction:
dThe indicator lamp fails to come on.
dIndicator lamp lights up for approx.
4 seconds, goes out briefly and then
lights up again.
A system malfunction could prevent the
system from responding to an impact
occurring within its normal response
range.
Please have your authorized BMW
Retailer inspect and repair the system
as soon as possible.
aFor your own safety, please ob-
serve the following precautions con-
cerning airbags, as otherwise their
protective function may be impaired. We
also request that you make this informa-
tion available to your passengers, and
that you urge them to observe the in-
structions for safety belt use: the air-
bags are a supplemental restraint
device designed to provide extra pro-
tection; they are not a substitute for
safety belts. Wear your safety belt at all
times. The system does not respond to
minor collisions, if the vehicle rolls over,
or if the impact is at the rear of the vehi-
cle. In this situation, only the safety belt
protects you.
When adjusting your seat, select a posi-
tion that provides maximum distance
between you and the steering wheel, the
instrument panel and the door while still
allowing comfortable and safe access to
all vehicle controls.
Always grip the steering wheel on its
rim with your hands at the 9 and 3 o’clock
positions, otherwise hand and arm inju-
ries could occur when the airbag
inflates.
Never allow any objects to obstruct the
area between the airbag and the driver/
passenger.
Do not use the cover panel above the
passenger-side airbag as a storage
area.
Do not glue, cover or in any way alter
the padded covers on the steering
wheel, the instrument panel or the side
trim panels of the front doors.
Do not install a rear-facing child re-
straint device on the front passenger
seat. Children under 12 years of age
should only sit in the back.c
Even when all these guidelines are
observed, there is still a residual risk of
mild facial injuries occurring in isolated
instances of airbag actuation. The igni-
tion and inflation noise may induce a
mild temporary hearing loss in sensitive
individuals.
Airbag information is also located on
the sun visors.
pThe indicator lamp comes on from
ignition key position 1 to indicate
that the system is operational.
390de142
Airbags
Online Edition for Part No. 01 41 9 790 377 - © 07/98 BMW AG

52
Notes on safety
Never attempt to remove the gas gener-
ator for the airbag passenger-restraint
system from the vehicle. Testing and
service procedures are to be performed
exclusively by qualified technicians. In
the event of malfunction, deactivation
or triggering (in response to an acci-
dent), always entrust repair and service
operations to your authorized BMW
Retailer.
Do not modify or tamper with either the
wiring or the individual components in
the airbag system; these include also
the padded covers on the steering
wheel, on the instrument panel or on
the side trim panels of the front doors.
Never apply adhesive materials to these
components and never cover or modify
them in any way. Do not remove or dis-
mantle the steering wheel.
The airbag generator can be disposed
of only by a BMW Retailer.
Unprofessional attempts to service the
system could lead to failure in an emer-
gency or undesired airbag activation,
either of which could result in personal
injury.
Insert the key in the slot in one of the
rear door latch mechanisms and turn
toward the outside: the door can now
be opened from the outside only.
The rollover protection system is acti-
vated automatically in the event of an
accident or in a critical driving situation
(extreme tilting in the longitudinal or lat-
eral axis, loss of ground contact). The
protective bars located behind the rear
head restraints extend within a fraction
of a second.
In addition to the roll bar integrated in
the windshield frame, the rollover pro-
tection system helps provide all vehicle
occupants, and in particular the rear
passengers, with needed headroom.
bWhen the hardtop is on, it is *
advisable to use "soft" protective cov-
ers, in order to prevent damage to the
luggage compartment lid when the sys-
tem is activated. Please contact your
authorized BMW Retailer for additional
information.c
aAlways keep the space required by
the rollover protection system free of
obstacles.
In the case of minor, non-rollover acci-
dents, passengers are protected only by
the buckled safety belt and the belt ten-
sioner and, depending on the severity of
the accident, the airbag restraint sys-
tem.c
360de012
BMW Sedan
Airbags Child-safety locks Rollover protection system*
Online Edition for Part No. 01 41 9 790 377 - © 07/98 BMW AG

53
At a glanceControls Car careRepairsTechnicalDataIndex
Following an unforeseen, automatic
extension, the rollover protection sys-
tem can be lowered again.
To do this, remove the screwdriver han-
dle and the special tool (stored on the
socket wrench) from the onboard tool
kit and push them together.
dPull out the head restraint upward.
dRemove the protective cap upward
from the protective bar.
dPush the special tool into the guide
of the click-and-pawl mechanism as
far as possible (handle rests on the
backrest) and hold in place.
dGently press down the protective bar
until the special tool is loose.
dPull out the special tool and press
down the protective bar completely
until it audibly engages.
dRemount the protective cap on the
protective bar and push on firmly.
dPush in the head restraint again.
Follow the same procedure for the sec-
ond protective bar.
Have the rollover protection system
checked by a BMW Retailer.
aThe opened convertible top can not
be closed with the rollover protection
system extended.c
Notes on safety
No changes should be made to the indi-
vidual components of the rollover pro-
tection system or to its wiring.
All work on the rollover protection sys-
tem must be carried out by a BMW
Retailer.
Work carried out incorrectly may lead to
the failure or an accidental triggering of
the system.
To check the system and to ensure its
long-term operation, it is imperative that
you observe the maintenance intervals
of the Service Interval Display. The roll-
over protection system must be in-
spected every 2 years at the latest by a
BMW Retailer.
36cde016
36cde017
Rollover protection system* – Convertible
Online Edition for Part No. 01 41 9 790 377 - © 07/98 BMW AG

54
0Steering lock engaged
The key can only be inserted and
removed in this position.
After extracting the key, turn the steer-
ing wheel a small amount to the left or
right until you hear the lock engage.
Your vehicle is equipped with an inter-
lock; this means that the ignition key
can not be turned into position 0 and
removed until the selector lever is in
position P.
Furthermore, the selector lever is locked
in position P when the ignition key is in
position 0 or removed from the ignition
switch.
To turn the key back into position 0 or
remove it, move the selector lever into
position P first.
1 Steering lock disengaged
You will often find that it is easier to turn
the ignition key from position 0 to 1 if you
move the steering wheel slightly to help
disengage the lock.
2 Ignition on
All electrical equipment and accesso-
ries are available for use.
3 Starter activation
bVehicles with manual transmis-
sion: depress the clutch pedal while
you turn on the ignition, otherwise a
blocking system will prevent the engine
from starting.c
Before starting
dApply the parking brake.
dThe manual-shift gear lever should
be in neutral; the automatic transmis-
sion selector lever should be in P
or N.
dAt low temperatures keep the clutch
pedal depressed.
dStart the engine without depressing
the accelerator.
bDo not operate the starter too briefly,
but not longer than approx. 20 seconds.
Release the ignition key as soon as the
engine starts. Do not allow the engine to
warm up by leaving it running while the
vehicle remains stationary. Instead, drive
off immediately at a moderate engine
speed.c
Should the engine fail to start on the first
attempt, e.g., if it is very hot or cold:
dStop and pause briefly before repeat-
ing the starting procedure. This pre-
vents the spark plugs from becoming
damp.
dPress the accelerator pedal halfway
down while engaging the starter.
1
2
0
3
360de009
Steering/ignition lock Starting the engine
Online Edition for Part No. 01 41 9 790 377 - © 07/98 BMW AG

55
At a glanceControls Car careRepairsTechnicalDataIndex
When starting a cold engine at extreme-
ly low temperatures (+5 F/-155 6 or be-
low) or at high altitudes (above 3,300 ft./
1,000 meters), proceed as follows:
dAt the first attempt, keep the starter
engaged for a bit longer (approx.
10 seconds).
dPress the accelerator pedal halfway
down while engaging the starter.
If you operate the vehicle for longer
periods of time at high altitudes and
very low temperatures, put into the
engine an oil with a viscosity of 5W–30
(refer to page 126). Please contact your
authorized BMW Retailer for additional
information.
aNever allow the engine to run with
the vehicle standing in an enclosed ar-
ea. The exhaust gases contain carbon
monoxide, an odorless and colorless,
but highly toxic gas. Breathing the ex-
haust gases poses an extreme health
risk, and can lead to unconsciousness
and death.
Never leave the vehicle unattended with
the engine running, as such a vehicle
represents a serious potential safety
hazard.c
Turn the ignition key to position 1 or 0.
aAlways remove the ignition key
and engage the steering lock before
leaving the vehicle.
Vehicles with manual transmission:
Always engage the parking brake when
parking on slopes and inclined surfaces,
since selecting 1st gear or reverse may
not provide adequate resistance to roll-
ing.
Vehicles with automatic transmission:
Place the selector lever in Park.c
Starting the engine Switching off the engine
Online Edition for Part No. 01 41 9 790 377 - © 07/98 BMW AG

56
To engage
The lock engages automatically when
you lift the lever. The "P" indicator lamp
appears in the instrument cluster when
you turn the ignition key to position 2
(refer to page 21).
To release
Pull up on the lever, then press the
release button and lower the lever.
The parking brake is primarily designed
to prevent the vehicle from rolling while
parked, and acts on the rear wheels.
aShould exceptional circumstances
make it necessary to engage the brake
with the vehicle in motion, do not apply
excessive pressure. Keep your thumb
pressed against the release button while
carefully pulling up the lever to apply
moderate pressure.
Excessive pressure can lead to over-
braking and loss of traction (fishtailing)
at the rear.
The brake lamps do not come on when
the parking brake is engaged.
Vehicles with manual transmission:
Always engage the parking brake when
parking on slopes and inclined surfaces,
since selecting 1st gear or reverse may
not provide adequate resistance to
rolling.
Vehicles with automatic transmission:
Place the selector lever in "Park".c
To avoid corrosion, apply the parking
brake lightly from time to time when
coasting to a standstill, e.g., at a trafc
signal, provided that it is safe to do so.
360us303
Parking brake
Online Edition for Part No. 01 41 9 790 377 - © 07/98 BMW AG

57
At a glanceControls Car careRepairsTechnicalDataIndex
The shift lever's neutral plane (dot in the
illustration) is located between 3rd and
4th gears
Whenever you shift from any gear into
"Neutral", the shift lever will automati-
cally return to the specified gear plane.
Reverse
Select only with the vehicle stationary.
Press the shift lever to the left to over-
come the slight resistance.
Backup lamps
As you do this the backup lamps will
turn on automatically when the ignition
key is in position 2.
aDo not "ride" the clutch to hold the
vehicle in place on slopes; use the park-
ing brake instead. A slipping clutch in-
creases clutch wear.c
360de044
Manual transmission
Online Edition for Part No. 01 41 9 790 377 - © 07/98 BMW AG

58
Selector lever positions
P R N D 3 2 1
Shift programs
Switch:
dA (Automatic)
dM (Manual)
Shift lever in position 3:
dSport program
See next page for an explanation of the
programs.
Range selection
A lock prevents inadvertent shifts into
certain selector lever positions. To re-
lease the shift-lock mechanism, press
the button on the front side of the se-
lector handle (arrow).
The engine can only be started in selec-
tor lever position P or N.
bYou must step on the footbrake
with the vehicle stationary before the
selector lever will move out of P or N.
The footbrake must also be depressed
before selecting a drive position, since
the vehicle "creeps" in idle when a drive
position is engaged.
At engine speeds of over 2500 rpm
a lock also prevents shifting out of P
or N.c
However, it is possible to "rock" the car
free by shifting rapidly between D and
R, e.g., should you get stuck in deep
snow or sand.
aPlace the selector lever in position
P or N and firmly engage the parking
brake before leaving the vehicle with the
engine running, otherwise the vehicle
could roll. Never leave the vehicle unat-
tended with the engine running, since
such a vehicle represents a serious po-
tential safety hazard.
If you should accidentally select Neutral
while traveling at high speed, remove
your foot from the accelerator pedal im-
mediately. Wait until the engine is at idle
speed; only then should you select a
gear, otherwise the transmission could
be damaged.c
P - Park
Select only with the vehicle stationary.
Transmission locks to prevent rear
wheels from turning.
R - Reverse
Select only with the vehicle stationary.
N - Neutral
Select only if your journey is interrupted
for a longer period. Select while the car
is being driven only if the vehicle begins
to skid.
360us304
Automatic transmission*
Online Edition for Part No. 01 41 9 790 377 - © 07/98 BMW AG

59
At a glanceControls Car careRepairsTechnicalDataIndex
D - Drive (automatic shift program)
This position is designed for driving
under all normal operating conditions.
All forward gears are selected by the
transmission as necessary.
3 - Sport Program, direct control
This position is designed for perfor-
mance-oriented driving, and features
delayed upshifts for optimal utilization
of the vehicle's power reserves.
When D is engaged, the transmission
may respond to certain conditions by
repeatedly shifting between 3rd and 4th
gears. You can select this position to
suppress upshifts into 4th gear and pre-
vent the transmission from "hunting" in
this way.
2 and 1 - Mountain ascents and
engine braking
Select these positions to prevent un-
desired shifts on mountain roads or
extended uphill and downhill stretches.
These ranges let you use the engine's
braking effect to maximum advantage.
The transmission upshifts only as far as
the selected gear (1st or 2nd).
Do not move the selector lever to either
of these positions when traveling at
speeds of 108 mph (170 km/h) or
above. The transmission downshifts
only at correspondingly low speeds.
"Kickdown" (automatic downshift)
To obtain maximum acceleration, the
accelerator pedal can be depressed
beyond the normal to the full-throttle
position, at which a pressure point must
be overcome.
Shift programs
A - Automatic program
For economical driving. This is the initial
position each time the engine is started.
M - Manual program
This program is for driving conditions
under which the selected gear is to be
retained. The transmission then remains
in this gear both when starting off and
during acceleration. With this program
you drive only in 3rd gear in position D.
It is advantageous, e.g., on slopes or
when towing a trailer, to drive in selec-
tor lever position 1 or 2, or in winter on
slippery roads in selector lever position
3, which enables gentle starts and pre-
vents undesirable shifting.
Automatic transmission*
Online Edition for Part No. 01 41 9 790 377 - © 07/98 BMW AG

60
Indicator lamp for shift
electronics
dIf the lamp fails to go out or
dif it lights up during driving, there is a
malfunction in the shifting electronics
or in the transmission.
Bring the vehicle to a stop, select trans-
mission position "P", set the parking
brake and turn the engine off (ignition
key to position 0).
Wait a few seconds, then start the
engine.
If the indicator lamp goes out after a
few seconds, normal transmission per-
formance has been restored. Drive off
normally.
If the indicator lamp does not go out, all
selector lever positions can still be
selected, however in the forward posi-
tions the vehicle has limited perfor-
mances as it drives only in the 3rd or
4th gear.
If this happens, avoid extreme engine
loads and consult the nearest autho-
rized BMW Retailer.
aNever carry out any work in the
engine compartment without first
ensuring that the transmission is in Park
or Neutral. Never leave children in the
vehicle unattended.c
For information on tow-starting, towing
and jump starting refer to pages 153
and 154.
1 High beam (blue indicator lamp)
2 Headlamp asher
3 Turn signal indicator (green indicator
lamp and rhythmic ticking of the
blinker relay).
Flashing of the indicator lamp and tick-
ing faster than normal: a turn-indicator
lamp is defective.
To signal briefly
Press the lever up to but not beyond the
lock.
O
Goes out after the engine has
started.
1
2
3
3
360de039
Automatic transmission* Turn signals/high beam
Online Edition for Part No. 01 41 9 790 377 - © 07/98 BMW AG

61
At a glanceControls Car careRepairsTechnicalDataIndex
0 Wipers retracted
1 Intermittent wipe
2 Normal wipe
3 Fast wipe
4 Brief wipe
5 Automatic windshield washer
1 Intermittent wipe
The length of the interval is varied auto-
matically according to the car's actual
road speed.
The headlamp cleaning equipment * can
also influence this interval.
dShift briefly out of 0 into 1, and back
to 0.
dThe time lapse until the switching on
(out of 0 into 1) is the desired interval
(maximum 25 seconds).
Delete the programming:
dapprox. 10 seconds after the lever is
in position 0 or
dafter switching off the engine.
2 Normal wipe
The wipers automatically revert to inter-
mittent operation when the vehicle is
stationary.
5 Automatic windshield washers
The system sprays washer fluid against
the windshield and actuates the wipers
for a brief period.
(Exception: If you pull the lever briefly,
the system sprays fluid onto the wind-
shield without activating the wipers).
aDo not use the washers when there
is a danger of the fluid freezing on the
windshield, as otherwise your vision
could be obscured. Use antifreeze (refer
to page 124).
Do not use the washers when the reser-
voir is empty, otherwise damage to the
washer pump could result.c
Windshield washer jets*
The windshield washer jets are auto-
matically heated with the ignition key in
position 2.
1
2
3
4
0
5
360us305
Wiper/washer system
Online Edition for Part No. 01 41 9 790 377 - © 07/98 BMW AG

62
You can store and automatically main-
tain any desired vehicle speed above
approx. 25 mph (40 km/h).
The stored speed is deleted when the
motor is switched off.
1 Accelerate
Tap the lever briefly:
The system records and maintains the
current vehicle speed. Every time you
tap the button the speed increases by
approx. 0.6 mph (1 km/h).
Hold the lever in this position:
The vehicle accelerates without pres-
sure on the accelerator pedal. As soon
as you release the lever, the system
records and maintains the current
speed.
2 Decelerate
Hold the lever in this position:
With the cruise control active, the system
automatically reduces the throttle open-
ing to slow the vehicle. As soon as you
release the lever, the system records and
maintains the current speed.
Tap the lever briefly:
Each time you tap it you decelerate
approx. 0.6 mph (1 km/h) if you are
cruising at a controlled speed.
3 Resume
Tap the lever briefly:
The vehicle accelerates to and main-
tains the last speed stored.
4 Off
Tap the lever briefly:
Immediately deactivates the cruise con-
trol.
In addition, the system is also automati-
cally disabled in response to the follow-
ing conditions:
dWhen you apply pressure to the
brake or clutch pedal, and when you
move the automatic transmission
selector lever from Drive to Neutral,
dif you exceed the programmed speed
by more than 10 mph (16 km/h) for a
period of more than 30 seconds.
The system is switched off and the
stored speed deleted from its memory
when you turn the ignition key to posi-
tion 0.
aRefrain from using the cruise con-
trol on twisting roads, when high traffic
density prevents driving at a constant
speed and when driving on slippery
(snow, rain, ice) or loose (stones, sand)
road surfaces.c
bIf, on a downhill gradient, the
engine braking effect is not sufficient,
the controlled speed can be exceed-ed.
Speed can drop on uphill grades if the
engine output is insufficient.c
360de063
Cruise control*
Online Edition for Part No. 01 41 9 790 377 - © 07/98 BMW AG

63
At a glanceControls Car careRepairsTechnicalDataIndex
Records the total vehicle mileage
(registers distance in kilometers on
Canadian vehicles).
Trip odometer
Records trip distances up to 999.9 miles
(kilometers).
To reset to zero
Press button.
The displays appear from ignition key
position 1.
To display with ignition switched off:
Press the reset button (arrow).
Never allow the engine to operate with
the needle in the red overspeed sector
of the gauge.
In this range the fuel supply is inter-
rupted to protect the engine, producing
the sensation of a loss of power.
Indicates the current fuel consumption
in mpg (in liters per 100 km on Cana-
dian vehicles).
When the vehicle is stationary, the nee-
dle returns to zero (maximum reading
on Canadian models).
20
40
120
140
km/h
240
220
200
180
160
140
120
100
80
60
40
20
MPH
F
360us320
360us030
360us031
Odometer Tachometer Energy control*
Online Edition for Part No. 01 41 9 790 377 - © 07/98 BMW AG

64
When you switch on the ignition, the
indicator lamp comes on briefly to indi-
cate that the system is operational.
If the indicator lamp comes on and
stays on, there are approx. 2.1 gallons
(8 liters) of fuel in the tank.
Tank volume: Page 166.
If the tilt of the vehicle varies, e.g.,
when you are driving in mountainous
areas, this may cause the needle to
fluctuate slightly.
aPlease refuel early, as driving
to the last drop of fuel can result in
damage to the engine and/or catalytic
converter.c
Blue
The engine is still cold. Drive at moder-
ate engine and vehicle speeds.
Red
Indicator lamp comes on, the warning
"COOLANT TEMPERATURE" appears
in Check Control *: engine overheated.
Switch off the engine immediately and
allow it to cool down.
Between the blue and red sectors
Normal operating range. It is not un-
usual for the needle to rise as far as the
edge of the red sector in response to
high outside temperatures or severe
operating conditions.
Checking coolant level: Page 127.
Green lamps
The number of illuminated lamps
decreases as the time for your next
maintenance visit approaches.
Yellow lamp
This field appears together with
OILSERVICE or INSPECTION.
Maintenance is due. Please contact
your BMW Retailer for an appointment.
Red lamp
Maintenance overdue.
F
R
12
UNLEADED GASOLINE
ONLY
360us032
360de007
360us009
Fuel gauge Coolant temperature Service Interval Display
Online Edition for Part No. 01 41 9 790 377 - © 07/98 BMW AG

65
At a glanceControls Car careRepairsTechnicalDataIndex
bHave your BMW Retailer carry out
the maintenance and repair. Your BMW
Retailer is always informed on the latest
maintenance work and repair tech-
niques and equipped with the required
special tools. In addition, the testing of
parts known from experience to be sub-
ject to wear is a permanent part of the
maintenance specifications.c
Service Interval Display
Online Edition for Part No. 01 41 9 790 377 - © 07/98 BMW AG

66
With the different versions you can dis-
play not only the time and the date, but
also information e.g., on economical
driving and warnings on defective sys-
tems.
The following applies to all versions:
The unit will reject implausible entries.
When entering numerical values with
the number entry keys, the numerical
value is increased by one each time the
key is pressed and after each additional
half second with the key held down.
Numbers can be entered in any order.
The entries are saved in the memory by
pressing the SET/RES or SET key.
Any interruption in the power supply,
e.g., when changing the battery, will
result in the loss of all data saved in the
memory. After the power supply is
restored, you will need to re-enter the
time, date and any switch-on times, the
distance or speed warning threshold.
Outside temperature display and
digital clock
For explanations and operating instruc-
tions, refer to page 68 ff.
Check Control
For explanations and operating instruc-
tions, refer to page 71 ff.
360us307
360us308
Multi-information display (MID)*
Online Edition for Part No. 01 41 9 790 377 - © 07/98 BMW AG

67
At a glanceControls Car careRepairsTechnicalDataIndex
Check Control with outside
temperature display and digital
clock
For explanations and operating instruc-
tions, refer to page 74 ff.
Onboard computer
For explanations and operating instruc-
tions, refer to page 77 ff.
360us309
360us310
Multi-information display (MID)*
Online Edition for Part No. 01 41 9 790 377 - © 07/98 BMW AG

68
You can
ddisplay the time and date
dpre-program an hourly reminder sig-
nal (memo) e.g., a reminder of the
news
ddisplay the outside temperature.
1 Display for outside temperature
gauge
2 Display for time and date
3 Tone symbol for active memo
function
4 Entry key for minutes/date
5 Entry key for hours/date
6 SET key for starting
7 Function key - memo
8 Function key - time/date
9 Scale selection key
10 Function key - outside temperature
10
MEMO
9 8 7 6 5 4
321
HR/DATA-TEMP °C/°F SET h/DAT min/DAT
360us109
Outside temperature display and digital clock*
To display time and date
dPress the function key (8).
When the ignition key is in position 0 or
removed, the displays appear for a few
seconds; in ignition key position 1 the
desired value is displayed indefinitely.
You can display the time in 12 or 24 hour
increments; the date can be shown in
European or US sequence. To change
setting:
dPress the HR/DAT key for approx.
3 seconds until the dots in the
display flash.
dPress the scale selection key.
In the 12-hour mode, AM or PM will
appear on the right side of the clock
display.
Online Edition for Part No. 01 41 9 790 377 - © 07/98 BMW AG

69
At a glanceControls Car careRepairsTechnicalDataIndex
Memo mode
Press the MEMO key to activate or
deactivate the signal. When MEMO is
active, a tone symbol appears in the
right display. The signal sounds every
hour at the pre-programmed time or
without programming 15 seconds
before each full hour.
Outside temperature
Data request: Press TEMP key.
If the outside temperature drops below
37.5 5 6F (+3 ), a warning signal sounds,
the temperature display automatically
appears and the unit of measure flashes
for 8 seconds.
The warning is repeated whenever the
temperature has increased to 43 5F
(+6 ) at least once before falling to 6
37.5 5 6F (+3 ) again.
aThe temperature warning device
does nothing to alter the fact that sur-
face ice can still form at temperatures
above 37.5 5 6F (+3 ), e.g., on bridges
and on shade-covered road surfaces.c
Entries
All numbers for the time and date are
entered with the entry keys according
to the following principle: The numbers
can be entered in any order. Each time
the key is pressed, or for each half sec-
ond the key is held down, the numerical
value increases by one.
Pressing the key longer starts the rapid-
advance function.
After a power failure
The dots in the display flash.
dPress the scale selection key as
required.
dEnter the time with the h/DAT and
min/DAT entry keys.
dPress SET. The clock starts.
dPress the HR/DAT key.
dEnter the date with the entry keys.
dPress SET.
dConfirm the year by pressing the SET
key or correct with the entry key and
complete the number entry by press-
ing the SET key.
360us321
Outside temperature display and digital clock*
Online Edition for Part No. 01 41 9 790 377 - © 07/98 BMW AG

70
To reset the time
Press the HR/DAT key in the clock
mode for approx. 3 seconds until the
dots in the display flash. Confirm your
entry by pressing the SET key.
To reset the date
Press the HR/DAT key in the date mode
for approx. 3 seconds until the dots in
the display flash. After entering the date
and year, confirm your entry by press-
ing the SET key.
Programming a reminder signal
Press the MEMO key for approx. 3 sec-
onds until two zeros appear in the min-
utes display. Complete the number
entry (min/Dat increase, h/Dat decrease)
by pressing the SET key.
360de144
h/DAT min/DATHR/DAT SET
360de144
h/DAT min/DATHR/DAT SET
360de144
h/DAT min/DATMEMO SET
Outside temperature display and digital clock*
Online Edition for Part No. 01 41 9 790 377 - © 07/98 BMW AG

71
At a glanceControls Car careRepairsTechnicalDataIndex
Texts with messages and warnings are
used to alert the driver to defective sys-
tems. In addition, there is a warning
lamp in the instrument panel.
The time and date can be displayed
with the digital clock.
1 Status report symbol
2 Display
3 Plus symbol for additional messages
4 CHECK key
The defective-system messages are
divided into 3 different priorities:
Priority 1
These defects are indicated immedi-
ately with the flashing warning lamp and
the flashing warning symbol (1). Several
simultaneous defects are displayed
consecutively. After 20 seconds or
when the CHECK key is pressed, the
warning lamp in the instrument cluster
stops flashing.
The messages continue to be displayed
until the defects are eliminated and can
not be deleted by pressing the CHECK
key (4).
Brake lamp electrical system
The brake lamps have failed. Fuse or
electrical circuit is defective. Refer to
page 151 or consult your BMW Retailer.
360us110
Check Control*
Brake lamps defective
Brake lamps have failed - bulbs
defective.
Replace bulbs. Refer to page 143.
Priority 2
These defects appear when the ignition
key is in position 2. The warning sym-
bols remain after the message disap-
pears. If the plus symbol (3) appears:
Additional messages are present and
can be displayed by pressing the
CHECK key.
1 Brake lamp defective
A bulb has failed. Refer to page 143.
Low beams defective,
Backup lamps defective,
License plate lamp
Bulb has failed or fuse or electrical
circuit defective. Refer to pages 141,
143 145, or visit a BMW Retailer.
Washer fluid low
Too low, top up at next opportunity.
Refer to page 124.
Check Control inactive
Messages and warnings can not be
displayed. See BMW Retailer.
Online Edition for Part No. 01 41 9 790 377 - © 07/98 BMW AG

72
Priority 3
These status reports usually appear
after the car is parked and the ignition
key returned to position 0 (if several
messages have been recorded, they will
appear consecutively, with Priority 3
messages following Priority 1 and 2
messages).
Messages remain available for a period
of approx. two minutes after the display
goes out and the ignition key has been
removed, and can be displayed by
pressing the CHECK key.
The messages can also be displayed
before you start driving with the ignition
key in position 2. The texts then go out
after a short time or when you start driv-
ing, and no warning symbols remain.
Messages are not displayed again until
the ignition key is turned to position 0.
If a plus symbol appears: display addi-
tional messages by pressing the CHECK
key.
Check coolant level
Indicates that coolant is almost down to
minimum level. Top up at the next
opportunity. Refer to page 127.
To check the Check Control display
(only when no messages are displayed):
Press the CHECK key with the ignition
key in position 2: CHECK CONTROL
OK appears in the display.
Entries
All numbers for the time and date are
entered with the entry keys according
to the following principle:
The numbers can be entered in any
order. Each time the key is pressed, or
for each half second the key is held
down, the numerical value increases by
one.
To display time and date
dPress the respective function key
(CLOCK/DATE).
When the ignition key is in position 0 or
removed, the displays appear for a few
seconds; in ignition key position 1 the
desired value is displayed indefinitely.
AM
360us322
1000 100 110
Check Control*
Online Edition for Part No. 01 41 9 790 377 - © 07/98 BMW AG

73
At a glanceControls Car careRepairsTechnicalDataIndex
After a power failure
The time display flashes and the follow-
ing appears in the left display: enter
time.
dEnter the time with the entry keys.
dPress the SET/RES key. The clock
starts.
The left display shows: enter date.
dEnter the date with the entry keys.
dPress the SET/RES key.
dConfirm the year by pressing the
SET/RES key or correct it with the
entry key and complete the number
entry by pressing the SET/RES key.
To reset the time
Press the CLOCK key until the left dis-
play indicates: Enter time. The dots
flash.
Complete the number entry by pressing
the SET/RES key.
To reset the date
Press the DATE key until the left display
indicates: Enter date. The dots flash.
Complete the number entry for the date
and year by pressing the SET/RES key.
If necessary, enter the year before
pressing the SET/RES key, as
requested in the display. Leap years are
programmed into the system and there-
fore need not be taken into account.
360de146
SET/RES
CLOCK
1000 100
1
10
360de146
SET/RES
DATE
1000 100
1
10
Check Control*
Online Edition for Part No. 01 41 9 790 377 - © 07/98 BMW AG

74
The Check Control uses texts with mes-
sages and warnings to alert the driver
to defective systems. In addition, an
indicator lamp is provided in the instru-
ment cluster. For details and operating
instructions, refer to pages 71 72, .
The outside temperature can also be
displayed.
With the digital clock you can
ddisplay the time and date,
dpre-program an hourly reminder sig-
nal (memo) e.g., a reminder of the
news.
1 Digital clock display
2 Tone symbol for active memo
function
3 Function key - date
4 Function key - clock
5 SET/RES key
6 Function key - memo
7 Scale selection key
8 Function key - outside temperature
9 Entry keys for numerical values
360us111
Check Control with outside temperature display and digital clock*
To display time and date
dPress the respective function
key (4/3).
When the ignition key is in position 0
or removed, the displays appear for a
few seconds; in ignition key position 1,
the desired value is displayed inde-
nitely.
You can display the time in 12 or 24 hour
increments; the date can be shown in
European or US sequence. To change
setting:
dPress time or date function key (4/3)
until the dots flash.
dPress scale selection key (7).
In the 12-hour mode, AM or PM will
appear on the right side of the clock
display.
Memo mode
Switch on and o with the MEMO key.
When MEMO is active, a tone symbol
appears in the right display. The signal
sounds every hour at the pre-pro-
grammed time or without program-
ming 15 seconds before each full
hour.
Online Edition for Part No. 01 41 9 790 377 - © 07/98 BMW AG

75
At a glanceControls Car careRepairsTechnicalDataIndex
Display outside temperature
Press TEMP key.
If the outside temperature drops below
37.5 5F (+36), a warning signal sounds,
the temperature display automatically
appears and flashes for 8 seconds.
The warning is repeated whenever the
temperature has increased to 43 5F
(+6 ) at least once before falling to 6
37.5 F (+3 ) again.5 6
aThe temperature warning device
does nothing to alter the fact that sur-
face ice can still form at temperatures
above 37.5 F (+3 ), e.g., on bridges 5 6
and on shade-covered road surfaces.c
Entries
All numbers for the time and date are
entered with the entry keys according
to the following principle:
The numbers can be entered in any
order. Each time the key is pressed, or
for each half second the key is held
down, the numerical value increases by
one.
After a power failure
The time display flashes and the follow-
ing appears in the left display: "Enter
time".
dEnter the time with the entry keys.
dPress the SET/RES key.
The clock starts.
The left display shows: Enter date.
dEnter the date with the entry keys.
dPress the SET/RES key.
dConfirm the year by pressing the
SET/RES key or correct it with the
entry key; complete the number entry
by pressing the SET/RES key.
AM
360us322
1000 100 110
Check Control with outside temperature display and digital clock*
Online Edition for Part No. 01 41 9 790 377 - © 07/98 BMW AG

76
To reset the time
Press the CLOCK key until the left dis-
play indicates: Enter time. The dots
flash.
Complete the number entry by pressing
the SET/RES key.
To reset the date
Press the DATE key until the left display
indicates: Enter date. The dots flash.
Complete the number entry for the date
and year by pressing the SET/RES key.
If necessary, enter the year before
pressing the SET/RES key, as request-
ed in the display. Leap years are pro-
grammed into the system and therefore
need not be taken into account.
Programming a reminder signal
Press the MEMO key for approx. 3 sec-
onds until the left display indicates:
Enter memo. Complete the number
entry by pressing the SET/RES key.
360de146
SET/RES
CLOCK
1000 100
1
10
360de146
SET/RES
DATE
1000 100
1
10
360de146
1000 100
1
10
MEMO SET/RES
Check Control with outside temperature display and digital clock*
Online Edition for Part No. 01 41 9 790 377 - © 07/98 BMW AG

77
At a glanceControls Car careRepairsTechnicalDataIndex
Allows you to select display data for
safe and economical driving.
If your car is equipped with the Check
Control option, texts with information
and warnings are used to alert the
driver to system malfunctions. In addi-
tion, an indicator lamp is provided in the
instrument cluster. For details and
operating instructions, refer to
pages 71 and 72.
With the digital clock you can
ddisplay the time and date,
dpre-program a reminder signal
(memo), e.g., to remind you of news
broadcasts.
Refer to page 74 for information and
details on using the digital clock.
1 Display
2 Arrival time
3 Entry keys for numerical values
4 Information keys
For the onboard computer version
without Check Control, pressing the
CHECK key simply activates all dis-
play elements.
5 Light-Emitting Diodes (LEDs)
6 Scale selection key
7 SET/RES key (start/stop)
360us112
Onboard computer *
Standard displays (no previous
data entries required) Page
TEMP outside
temperature 78
RANGE estimated cruising
range 79
SPEED average speed 78
CONSUM 2 levels of average
consumption 79
With previous data entries
DIST distance remaining
to destination with
estimated
arrival time 79
LIMIT speed limit warning 80
The following systems are controlled by
the onboard computer: Page
TIMER – 2 switch-on times
for independent
ventilation 81
– independent
ventilation in direct
operating mode or 82
– timer 80
CODE immobilization/
protection from
misuse 82
The onboard computer operates at igni-
tion key positions 1 and 2.
Online Edition for Part No. 01 41 9 790 377 - © 07/98 BMW AG

78
In the interest of driving safety, you
should always enter data with the vehi-
cle parked/stationary. The on-board
computer starts its calculations as soon
as the vehicle starts to move.
You can also use the remote control to
select information for display, refer to
page 83.
The scale selection key (6) allows you to
display all information in either metric or
US units.
bMessages of the Check Control
system override the display of the
onboard computer.
With the exception of Priority 1 mes-
sages, the display can be cleared by
pressing the CHECK key.c
If the malfunction display "PPPP"
appears, consult your BMW Retailer.
Outside temperature
Data request: Press TEMP key.
If the outside temperature drops below
37.5 5F (+36), a warning signal sounds;
the temperature display automatically
appears and flashes for 8 seconds.
The warning is repeated whenever the
temperature has increased to 43 F 5
(+6 ) at least once before falling to 6
37.5 F (+3 ) again.5 6
aThe temperature warning device
does nothing to alter the fact that sur-
face ice can still form at temperatures
above 37.5 F (+3 ), e.g., on bridges 5 6
and on shade-covered road surfaces.c
Average speed
To start calculations:
Key sequence as in illustration.
Data request: press SPEED key.
360us114
360us115
Onboard computer*
Online Edition for Part No. 01 41 9 790 377 - © 07/98 BMW AG

81
At a glanceControls Car careRepairsTechnicalDataIndex
To stop:
When the time is displayed:
dPress the SET/RES key.
If other information is displayed:
dKey sequence as in illustration.
Take intermediate time:
dPress the TIMER key.
The LED flashes, the intermediate time
is displayed and the timer continues to
run.
Display time again:
dPress the TIMER key again.
bThe timer stops with the ignition
key in position 0 and runs again in posi-
tion 1.c
Independent ventilation*
To enter activation times
You can select two starting times for
independent ventilation. After 30 min-
utes the ventilation shuts off again auto-
matically.
Refer to page 87 for important informa-
tion on using the independent ventila-
tion system.
When you press the TIMER key, the
current status of the ventilation appears
in the display.
Enter a switch-on time:
Before you can enter data, the ignition
key must be at position 1 and the digital
clock must be visible in the display.
Repeat key sequence as in the illustra-
tion. (Press the TIMER key twice).
Enter the second switch-on time:
Repeat key sequence as in illustration.
Correct the entered time:
Repeat the key sequence as shown in
the illustration, but enter a different
time.
After you enter the time, an asterisk ∗
appears in the display and the LED
lights up, so that you can ascertain that
a switch-on time has been selected.
During ventilation the LED blinks. It
goes off when you turn the switch off.
Request a previously selected time
(LED lights up):
dFor the first switch-on time, press the
TIMER key twice.
dFor the second switch-on time, press
the TIMER key three times.
360us311
Onboard computer*
Online Edition for Part No. 01 41 9 790 377 - © 07/98 BMW AG

82
Switch on directly
Available only with ignition key at posi-
tion 1.
Key sequence as in illustration.
Switch off directly
In ignition key position 1: key sequence
as in the illustration.
In ignition key position 0: press only the
key SET/RES.
Enter code
In addition to electronic vehicle immo-
bilization (refer to page 30), you can
attain further engine immobilization or
protection against tampering by enter-
ing a code into the onboard computer.
A code number is used to arm the sys-
tem. The code is then required for sub-
sequent starting attempts. Always
remember the code number.
To set (ignition key in position 1):
Press the keys in the sequence illus-
trated and then turn the ignition key into
position 0 or remove the key.
Code numbers from "0000" to "9999"
can be entered. (You will have to re-
enter the code each time you activate
the system).
The LED lights up for up to 36 hours
with the ignition key in position 0 or with
the key removed. If the LED flashes for
10 seconds the engine hood has not
been closed or the radio has been
removed.
To cancel with ignition key in position 1
or 2:
A gong and the display "---- Code"
request you to enter a code.
dUse entry keys to enter the code
number
dPress the SET/RES key
dStart the engine.
The system responds to attempts to
start the vehicle using an incorrect code
or no code at all by preventing the
engine from starting.
2
1
TIMER km/mls MEMO SET/RES
1000 100
10 1
SPEEDCONSUM TEMP DIST CHECK CLOCK DATE
LIMITRANGE CODE
360us313
360us122
Onboard computer*
Online Edition for Part No. 01 41 9 790 377 - © 07/98 BMW AG

83
At a glanceControls Car careRepairsTechnicalDataIndex
Remote control
You can use the turn signal lever to
select various display sequences for
computer data following entry.
To enter:
dKeep the turn signal lever depressed
until "Prog 1" appears in the display.
dPress the keys in the sequence in
which you want the information to be
displayed.
Each time you store data, the pro-
gram number in the display changes.
dPress the SET/RES key.
If you wish to display all data:
dKeep the direction indicator
depressed until "Prog 1" appears in
the display.
dPress the SET/RES key.
bFor average fuel consumption 1
and 2 please note the following: If, for
example, both consumptions are to be
displayed, the CONSUM key must be
pressed twice. If, for example, con-
sumption 2 is to be displayed (not con-
sumption 1), press the km/mls key after
pressing the CONSUM key (pressing
the km/mls key repeatedly switches
between consumption 1 and 2 as often
as desired).
Proceed in a similar manner for switch-
on times 1 and 2 for the independent
ventilation*.c
Data request:
Briefly tap the turn signal lever each
time.
R
L
360de083
Onboard computer*
Online Edition for Part No. 01 41 9 790 377 - © 07/98 BMW AG

84
Automatic Stability Control plus
Traction (ASC+T)
This system is designed to enhance
operating stability, especially while
accelerating and during cornering.
ASC+T automatically assumes opera-
tion each time you start the engine.
The indicator lamp in the instrument
cluster goes out shortly after you switch
on the ignition.
To deactivate the system
Press the button; the indicator lamp
comes on.
To reactivate the system
Press the button again; the indicator
lamp goes out.
Indicator lamp flashes
The system is actively regulating drive
torque in response to monitored vehicle
operating conditions.
Indicator lamp fails to go out after
the engine is started, or comes on
in the course of normal vehicle
operation
The system has a defect. The vehicle
normally remains operational even with-
out ASC+T. Consult your authorized
BMW Retailer for repair.
When ASC+T is switched off, you drive
with a conventional drive system. We
recommend that you deactivate the
system for increased traction
dwhen rocking the vehicle or starting
off in deep snow or on loose surfaces
(refer to "Starting off", page 105)
dor when driving with snow chains.
bBut even with ASC+T the laws of
physics can not be suspended. Any
consequences arising from traction loss
due to excessive vehicle speed remain
the responsibility of the driver. We
therefore urge you to avoid using the
additional safety margin of the system
as an excuse for taking risks.c
For more details, please refer to section
"Advanced Technology" on page 156.
ASC
360de064
ASC+T
Online Edition for Part No. 01 41 9 790 377 - © 07/98 BMW AG

85
At a glanceControls Car careRepairsTechnicalDataIndex
Parking lamps
D
Low beams
LIGHTS ON warning
When you turn the ignition key to 0, a
buzzer sounds for a few seconds after
the driver's door has been opened, if
the lamps have not been turned off.
On vehicles with alpha-numeric Check
Control*:
This warning comes through the Check
Control, refer to page 71.
Daytime-running lamps switch*
If desired, the lighting switch can be left
in the second position: when the igni-
tion is switched off, the external lighting
is also switched off.
On vehicles with daytime running fea-
ture, the lamps come on whenever the
ignition key is turned to position 2 with
the headlamp switch remaining at 0.
Adjust the illumination intensity by turn-
ing the rotary dial.
EWhen you switch off the ignition
without turning off the head-
lamps, only the parking lamps
stay on.
When you return the ignition key to
position 0, a buzzer sounds for a few
seconds to remind you that the lamps
have been left on.
0
360us312
360us323
Parking lamps/low beams Instrument lighting
Online Edition for Part No. 01 41 9 790 377 - © 07/98 BMW AG

87
At a glanceControls Car careRepairsTechnicalDataIndex
BMW Convertible
The switches for the map reading lamps
next to the interior lamp are operated in
the same manner as the interior lamp
switch.
The seat cushion and backrest can be
heated at ignition key position 2.
Press the switches with the heating
symbols:
To switch over while heating: press the
dimly lit switch.
To switch off prematurely: press the
brightly lit switch.
This ventilates the vehicle's interior and
lowers its temperature using the heater
or the air conditioner fan.
The system is operated by the onboard
computer, refer to page 77.
You can set the time for the system to
start; it will remain active for 30 min-
utes. You can also turn it on and off
directly.
As the system uses a substantial
amount of electric current, you should
refrain from activating it twice in suc-
cession without allowing the battery to
be recharged in normal operation
between use.
The independent ventilation is available
for use when the outside temperature is
above 60 5 6F (16 ), but not when driv-
ing.
The air comes out through the vents for
the upper body area. The vents must
therefore be open for the system to
operate.
Rapid heat-up as long as the
switch lights up brightly. Auto-
matic changeover to regular
heating.
Heating as long as the switch
lights up brightly. The heater
switches off automatically.
360de026
Interior lamps Seat heating*Independent ventilation*
Online Edition for Part No. 01 41 9 790 377 - © 07/98 BMW AG

88 Automatic climate control
3
B
M
W
B
M
W
A
AUTO
4
1
2
A
UTO
360de306
Online Edition for Part No. 01 41 9 790 377 - © 07/98 BMW AG

89
At a glanceControls Car careRepairsTechnicalDataIndex
1 Air ow directed against windshield
and door windows
2 Air ow toward upper body
The rotary dial on the right affords
continuous opening or closing of the
air supply, the lever changes the
direction of the air ow. The rotary dial
on the left tempers the air coming out
(page 92).
3 Front footwell ventilation
Corresponding vent outlets are also
located in the rear footwell.
4 Controls
Automatic climate control
Online Edition for Part No. 01 41 9 790 377 - © 07/98 BMW AG

90
Controls
1 Automatic air distribution
2 Individual air distribution
3 Temperature and air ow display
4 Air grill for interior temperature
sensor - please keep clear and
unobstructed
5 To defrost windshield and door
windows
6 Air conditioner
7 Recirculated-air mode
8 Rear window defroster
9 Temperature control – right-hand
side
10 Air supply
11 Temperature control – left-hand side
Air conditioning for comfort
Use the automatic system; switch on
AUTO key1. Select the interior temper-
ature that is comfortable for you, e.g.,
70 5 6F (22 ). With exterior temperatures
above 41 5 6F (5 ) you can also use air-
conditioning 6. This dries the air and
prevents window mist when e.g., per-
sons with damp clothing are in the vehi-
cle. Adjust vent 2 in such a way that the
air blows past you and does not strike
you directly. Turn the rotary control on
the left under the vents 2 for the upper
body area to a middle setting, so that
you will be driving in cooler air that
does not tire you out.
The following description gives you
additional individual settings.
Automatic air distribution
Individual air distribution
360us314
When you activate the AUTO
mode, the program takes
over the setting of the air distribution
and the air supply and, in addition,
adjusts your temperature pre-selections
to exterior conditions (summer, winter).
This program maintains a comfortable
in-car climate regardless of the season.
Select the interior temperature that is
comfortable for you, e.g., 70 5 6F (22 ).
The temperature pre-selections as well
as the lettering AUTO for the air supply
appear in indicator 3.
Open the vent outlets for the upper
body area. Switch on the air conditioner
in warm weather.
The maximum cooling capacity is
achieved when you set the rotary dial 3
(refer to page 92) to cold.
You can cancel the automatic
program by selecting distri-
bution patterns to suit your
individual requirements. You
can direct air toward the windshield and
windows 7 5, toward the upper body
and/or into the footwell 6.
AUTO
Automatic climate control
Online Edition for Part No. 01 41 9 790 377 - © 07/98 BMW AG

91
At a glanceControls Car careRepairsTechnicalDataIndex
To defrost windshield and door
windows
Air conditioner
Circulated air mode/Automatic
recirculated air control (AUC) *
Press the button repeatedly to run
through the following control sequence:
dIndicator lamps off: outside air flow
operational.
dLeft-hand indicator lamp on – AUC
mode: the system detects pollutants
in the outside air and responds by
deactivating the outside air flow as
required. The system then recircu-
lates the air currently within the vehi-
cle.
dRight-hand indicator lamp on: the
flow of outside air into the vehicle is
permanently blocked. The system
then recirculates the air currently
within the vehicle.
aIf the windshields fog over in circu-
lated air mode, switch off the circulated
air mode/Automatic recirculated air
control and increase the air supply. if
necessary.c
Rear window defroster
BMW Convertible: Heated rear-window
blower.
The rear-window blower is always
switched off with the convertible top
down.
When the hardtop * is in place, press
the rear-window heating button.
Temperature
This program is designed for
rapid removal of ice and con-
densation from the windshield and side
windows.
The air conditioner cools and
dehumidifies incoming air
before reheating it to the selected tem-
perature.
Depending on the weather, the wind-
shield may fog over briefly when the
engine is started.
Switching off the air conditioner at out-
side temperatures below approx. 41 5F
(5 ) will prevent the windows from 6
fogging up.
Frequently switching the air condi-
tioner on and off may also promote the
formation of condensation on the win-
dow surfaces.
bCondensation forms in the air
conditioner system during operation,
which then exits under the vehicle. It is
not unusual for a small puddle to form
there.c
You can respond to unpleas-
ant odors in the outside air
by temporarily excluding the outside air.
The system then recirculates the air
currently within the vehicle.
A
The indicator lamp comes
on to confirm that the rear
defroster is operating.
The defroster switches off automatically
after approx. 15 minutes.
On both the driver's and the
passenger's side you can
adjust the specific temperature. The fig-
ures in the display provide a general
indication of interior temperature. We
recommend 70 5 6F (22 ) as a standard
setting for comfortable travel, both with
and without the air conditioner. When
you start the vehicle, the system
ensures that the selected temperature
is achieved as quickly as possible and
maintained at a constant level by the
control.
Automatic climate control
Online Edition for Part No. 01 41 9 790 377 - © 07/98 BMW AG

92
Air supply
Draft-free ventilation
You can adjust the vent outlets for the
upper body area to select the optimum
airflow rates and directions for your
own personal requirements:
Use rotary controls to open and close 1
the vents throughout and infinitely-vari-
able range. Use the levers to adjust 2
the direction of the air flow.
The rotary control allows you to mix 3
the air from the outlets for your upper
body by warming or cooling it as
desired:
Turn toward blue – colder
Turn toward red – warmer
Microfilter
The microfilter removes dust and pollen
from the incoming air. The filter is
changed by your BMW Retailer when
you bring your vehicle for maintenance.
A substantial reduction in air flow indi-
cates that the filter needs to be
replaced prematurely.
In the AUTO mode, the air
supply is controlled automat-
ically and AUTO appears in display 3,
refer to the summary on page 90. Using
"+" and "–" you can vary the air flow.
Your setting is indicated by bars, the
automatic control is switched off. You
can reactivate it by pressing the AUTO
key.
When you press "-" during operation at
minimum blower speed all displays are
canceled: the fan, heating and air con-
ditioner are switched off, the air supply
is blocked. By pressing on any key of
the air conditioning you can again
engage the system.
Effective heating and cooling is ensured
at a medium blower speed.
123
360de056
Automatic climate control
Online Edition for Part No. 01 41 9 790 377 - © 07/98 BMW AG

93
At a glanceControlsCar careRepairsTechnicalDataIndex
BMW Hi-Fi System (Harman/
Kardon)
1 On
2 Off
In the "On" position, the listener is given
the impression of a considerably larger
passenger compartment with an
improved stereo effect in all seats.
This function should be switched off in
the case of poor radio reception due to
the frequent changes between stereo
and mono which result.
BMW Convertible:
You do not have to operate the con-
trols. The system detects whether the
top is open or closed and regulates the
sound automatically.
To open
Press the button and fold down the
door.
The glove compartment lamp switches
on from ignition key position 1.
To close
Fold up door.
To engage locks
Only possible with a master key.
aTo reduce the risk of injury, always
close the glove compartment immedi-
ately after use.c
Rechargeable flashlight
The connection for the rechargeable
flashlight is located on the left side of
the glove compartment.
The flashlight features overcharging
protection, so it can be left in its holder
continuously.
However, it must be removed when the
battery is disconnected or removed.
aEnsure that the flashlight is off be-
fore inserting it in its holder.c
HIFI
1
2
360de057
360de058
BMW Hi-Fi System Glove compartment*
Online Edition for Part No. 01 41 9 790 377 - © 07/98 BMW AG

94
To open
Press against the recess (arrow).
To extinguish a cigarette, tap off the ash
and gently press the tip into the funnel.
To empty
Press on the edge of the lid with the
ashtray open: the ashtray insert pops
up and can be removed.
The rear ashtray is operated in the
same manner.
The components ashtray (1), coin box
(2) and the two cup holders (3) can be
arranged as you wish.
Simultaneously press lightly on the
ribbed surfaces (arrows) of the desired
components and pull them upward.
Replace the components in the bracket
in the desired arrangement and clip into
place.
Press in. Remove as soon as the lighter
jumps back out.
aAlways hold the hot lighter by its
plastic knob, as otherwise serious
burns could result.
The cigarette lighter remains opera-
tional when the ignition key has been
removed. For this reason, children
should never be left in the car unat-
tended.c
Cigarette lighter socket
Suitable for attaching power supplies
for flashlights, car vacuum cleaners,
etc., up to a rating of approximately
200 watts at 12 volts.
Inserting plugs of a different shape or
size may damage the socket.
A
AUTO
21 3 4 5 6
7891011
AUTO
360us315
12 3
360us318
360de060
Ashtray Coin box, cup holder Cigarette lighter
Online Edition for Part No. 01 41 9 790 377 - © 07/98 BMW AG

95
At a glanceControlsCar careRepairsTechnicalDataIndex
Pull the strap to fold down the armrest.
To open drawer *:
Unlock and pull out the drawer by pull-
ing on the drawer handle. The drawer
locks in any position. The cup holder
can be shifted as necessary.
BMW Convertible
Vehicles without ski bag : Storage *
compartment, accessible by removing
the filler piece and releasing the trim
(refer to page 97).
The rear backrest is divided in the cen-
ter. Each side can be folded down sep-
arately to carry long objects.
To release:
Reach into the handle recess, press
down and pull forward.
When folding back the rear backrest,
make sure that the locking device is
properly engaged to ensure proper
operation of the safety belt. The red
slide must move downward.
If the rear backrest is not locked, the
safety belt can not be pulled out.
It makes possible a safe, convenient
transport of 3 to a maximum of 4 pairs
of skis (BMW Convertible, maximum of
2 pairs of skis).
The length of the ski bag in combination
with the additional space in the luggage
compartment makes it possible to trans-
port skis of up to 6.8 ft. (2.10 m) in
length. Because the ski bag contracts
as additional skis are inserted, the bag
is suitable for transporting only two
pairs of skis when both are a maximum
of 6.8 ft. (2.10 m) long.
If the ski bag is not used for longer peri-
ods, it should be stored in a dry place.
It is advisable to wipe off any water
which has collected on the waterproof
ski bag from time to time.
aThe ski bag must not hinder the
driver during driving.c
360de027
BMW Sedan/ Cou
p
e
Center armrest (rear)* Through-loading system* *Ski bag
Online Edition for Part No. 01 41 9 790 377 - © 07/98 BMW AG

97
At a glanceControlsCar careRepairsTechnicalDataIndex
BMW Convertible - loading the ski
bag
Removing filler piece.
Detach cut-out trim at bottom.
Extend the ski sack between the front
seats. The zipper provides convenient
access to the inside of the sack, and
can also be left open to promote drying.
bWhen remounting the trim, press it
firmly onto the guide rod at the bot-
tom.c
Open the cover panel from the luggage
compartment and use the magnetic
retainers to attach it to the lower side of
the rear shelf within the luggage com-
partment.
bSecure the stored skis or other
objects by tightening down the strap on
the ski bag at the buckle.c
For general information on the ski bag,
refer to page 95.
36cde003
36cde004
36cde005
Ski bag*
Online Edition for Part No. 01 41 9 790 377 - © 07/98 BMW AG

98
Stowing a load
If you are transporting a load in your
BMW
dStow a heavy load as far forward as
possible - directly behind the back-
rests or the front wall of the luggage
compartment - and on the oor.
dCover sharp edges and corners.
dDo not pile objects higher than the
top edge of the backrest.
dIf the load is heavy and the rear seat
is unoccupied, put the outer safety
belt in its lock. Securing load
dSecure smaller, lighter items with
retaining straps or draw straps (refer
to page 34).
dFor large, heavy items, see your
BMW Retailer for load-securing
devices *. The lashing eyes on the
corners of the luggage compartment
are used to attach these straps.
dObserve the information enclosed
with the load-securing devices.
aAlways position and secure the
load correctly, otherwise it can endan-
ger the passengers in the event of brak-
ing or swerving.
Do not exceed the permissible gross
weight and axle load (refer to page 163),
otherwise the vehicle's operating safety
is no longer assured and does not com-
ply with traffic laws.
Do not stow heavy or hard objects in the
passenger compartment, otherwise
they would be thrown around during
braking and evasive maneuvers and en-
danger the occupants.c
360us316
Cargo loading
Online Edition for Part No. 01 41 9 790 377 - © 07/98 BMW AG

At a glance
Controls and features
Care and maintenance
Advanced technology
Technical data
Owner service procedure
At a glanceControlsCar careRepairsTechnicalDataIndex
Index
99
Special operating instructions:
Break-in procedures 100
Driving notes 100
Catalytic converter 102
Antilock Brake System (ABS) 103
Disc brakes 104
Brake system 105
Winter driving 105
Roof-mounted luggage rack 107
Radio reception 108
Cellular phones 108
Hardtop – Convertible 109
Technical modifications to
the vehicle 110
Wheels and tires:
Tire inflation pressures 111
Tire tread 111
Tire replacement 112
Interaxle tire changes 112
The right choice 113
Winter tires 114
Approved wheels and tires 115
Under the hood:
Hood 118
Engine compartment 120
Washer fluids 124
Engine oil 124
Coolant 127
Brake fluid 128
Power steering fluid 128
Vehicle Identification Number 118
Care and maintenance:
The BMW Maintenance
System 130
Caring for your car 131
Cleaning and care of the
convertible top 136
Vehicle storage 137
Online Edition for Part No. 01 41 9 790 377 - © 07/98 BMW AG

100
To ensure that your vehicle provides
maximum economy throughout a long
service life, we request that you
observe the following.
Engine and differential
Up to 1,250 miles (2,000 km):
Drive at different engine speeds and
vehicle speeds, but be careful not to
exceed the following engine speed:
4,500 rpm
Refrain from using full throttle and avoid
pressing the accelerator beyond the
kickdown point.
After 1,250 miles (2,000 km) you can
gradually increase the number of revo-
lutions or the speed.
You should also observe these break-in
procedures if the engine or differential
is replaced later in the course of the
vehicle service life.
Tires
Due to technical factors associated with
their manufacture, tires do not achieve
their full traction potential until an initial
break-in period has elapsed. This
means that you should drive with addi-
tional caution for the first 200 miles
(300 km).
Brake system
Brake pads and disks attain their opti-
mal wear patterns only after approx.
300 miles (500 km).
Engine
Do not allow the engine to warm to its
normal operating temperature by leav-
ing it idling with the vehicle parked.
However, when starting in extremely
cold weather it is a good idea to allow
the engine to run at fast idle for about
30 seconds before getting underway;
this precaution ensures adequate lubri-
cation.
Avoid high engine speeds while the
engine is still cold; this helps avoid pre-
mature wear and reduced service life.
When driving under high engine loads
(acceleration, steep hills), try to keep
the engine running above 1,500 rpm.
We recommend downshifting into a
more suitable range, especially when
driving up extended inclines.
It is a good idea to follow extended
periods of low-speed operation (dense
urban traffic, stop-and-go driving) by
maintaining an engine speed consis-
tently above 3,000 rpm for several
miles. This procedure helps prevent
deposits from accumulating in the
engine.
Break-in procedures Driving notes
Online Edition for Part No. 01 41 9 790 377 - © 07/98 BMW AG

101
At a glanceControlsCar careRepairsTechnicalDataIndex
Clutch
Depress the clutch throughout its com-
plete travel range to shift gears. Do not
"ride" the clutch by driving with your
foot resting against the pedal.
aBrakes:
Do not drive with your foot resting on the
brake pedal. Even light but consistent
pedal pressure can lead to high temper-
atures, brake wear and possibly even
brake failure.
Aquaplaning:
A wedge of water can form between
tires and road surface when you oper-
ate the vehicle on wet or slushy roads.
This phenomenon is referred to as
aquaplaning, or hydroplaning, and it is
characterized by a partial or complete
loss of contact between the tires and
the road surface. The ultimate results
are loss of steering and braking control.
Water on the roads:
When driving through water (maximum
depth one foot = 30 cm) always drive at
walking speed, otherwise damage to
the engine, the electrical system and
the transmission can occur.
Rear window shelf:
Never use the rear window shelf to
store heavy or bulky objects. They
could pose a danger to the occupants
when the car is braked heavily.
Clothes hooks:
When suspending clothing from the
hooks, ensure that they will not obstruct
the driver's vision. Refrain from hanging
heavy objects from the hooks, as these
could cause personal injury when the
car is braked heavily.c
Driving notes
Online Edition for Part No. 01 41 9 790 377 - © 07/98 BMW AG

102
The catalytic converter reduces harmful
exhaust emissions.
It is designed for use with unleaded fuel
only.
Even minute quantities of lead would be
enough to permanently damage both
the catalytic converter and the system's
oxygen sensor.
To ensure efficient, trouble-free engine
operation and avoid potential damage:
dAlways have your car serviced in
accordance with maintenance
instructions.
dNever continue driving until the fuel
tank is empty.
dRespond to engine miss by switching
off the engine at once.
dNever tow-start the car unless the
engine is cold, or else unburned fuel
may reach the catalytic converter.
Better yet: use jumper cables!
dAvoid other situations in which the
fuel would not be (completely)
burned, for instance:
Frequent, extended, or repeated
starting attempts during which the
engine fails to start. (Switching off
and restarting a healthy engine
causes no damage).
Never let the engine run with any of
the spark-plug cables disconnected.
aAlways observe the above points
to prevent unburned mixture from
entering the catalytic converter. This
could result in overheating, leading to
serious damage.
High temperatures occur on all vehicles
equipped with a catalytic converter.
Heat shields are installed adjacent to
some sections of the exhaust system.
Never remove these shields; do not
apply undercoating to their surfaces.
When driving, standing at idle or park-
ing the vehicle, take care to avoid con-
tact between the exhaust system and
flammable materials (e.g., grass, hay,
leaves, etc.). Such contact could lead to
a fire, resulting in personal injury and
property damage.c
Traveling abroad
Always make sure that unleaded fuel
meeting your engine’s octane require-
ments will be available when planning
trips outside the country. The use of
fuel failing to meet the official octane
requirements could result in engine
damage.
If you are considering traveling to a
country in which unleaded fuel is not
readily available, please remember that
leaded fuel will destroy the lambda oxy-
gen sensor and the catalytic converter
on your BMW. After operation on
leaded fuel, your vehicle will no longer
meet American and Canadian exhaust
emission standards, and there will also
be a loss of fuel economy. Upon your
return to the US or Canada, you will be
expected to comply with legal ordi-
nances requiring that you replace both
the oxygen sensor and the catalytic
converter, and to have the fuel system
flushed to remove any traces of leaded
fuel.
Catalytic converter
Online Edition for Part No. 01 41 9 790 377 - © 07/98 BMW AG

103
At a glanceControlsCar careRepairsTechnicalDataIndex
ABS enhances active safety by helping
to prevent the wheels from locking under
braking. When the front wheels slide, the
driver loses steering control over the
vehicle. Traction loss at the rear wheels
can cause the rear end to break into
uncontrolled oversteer.
ABS is designed to meet two essential
requirements during every application:
dto help provide vehicle stability on all
types of road surface (asphalt,
cement, dirt, moisture, snow and ice).
dto help to retain steering and maneu-
vering capability under the same con-
ditions.
However, certain important consider-
ations must be borne in mind in connec-
tion with these requirements:
Not even ABS can suspend the normal
laws of physics. ABS alone can not pre-
vent accidents when the brakes are
applied without an adequate safety
interval between vehicles, when the car
reaches excessive rates of lateral accel-
eration in curves, or if aquaplaning
occurs. Responsibility for these types of
situations remains in the hands (and feet)
of the driver. You should never allow the
added safety of ABS to lull you into a
false sense of security, or mislead you
into taking increased risks that could
affect your own safety and that of others.
Driving with ABS
The yellow ABS warning in the instru-
ment panel goes out as soon as the
engine is started.
The system becomes operative once the
vehicle exceeds a speed of 5 mph
(8 km/h). The ABS is deactivated when-
ever the vehicle's speed drops below
approx. 2 mph (3 km/h). This means that
the wheels can lock in the nal phase of
a braking action - a factor of no signi-
cance in actual practice.
The ABS system closed-loop control cir-
cuit cycles in fractions of a second. A
pulsation at the brake pedal indicates to
the driver that ABS is active, that is, that
the car is within its maximum braking
range. In addition, the audible pulsation
that accompanies the control operation
calls your attention to the reduced trac-
tion between tires and road surface
(marginal adhesion), and reminds you
that the vehicle's speed should be
reduced to adapt to road conditions.
On road surfaces featuring a loose top
layer on a rmer substratum, e.g., on
gravel or snow, the braking distances
with ABS may be longer than with the
wheels locked. However, ABS continues
to provide enhanced vehicle and steer-
ing control under these conditions.
aTo ensure that the system remains
completely operational, never modify the
ABS. Service procedures on ABS are to
be performed by authorized technicians
only.c
ABS may fail to function with maximum
efciency when tires of different sizes
are mounted (e.g., winter tires/spare tire;
remount the correct tires at all wheels as
soon as possible).
In the event of a fault, the ABS warning
lamp in the instrument cluster lights up,
refer to page 18. The braking system
then reverts to conventional operation as
on a vehicle without ABS. However,
have the brake system checked by your
BMW Retailer as soon as possible. To
prevent undetected defects and cumu-
lative faults from adversely affecting the
brake system, refer any problems to
your authorized BMW Retailer at the
earliest opportunity.
Antilock Brake System (ABS)
Online Edition for Part No. 01 41 9 790 377 - © 07/98 BMW AG

104
Disc brakes furnish optimum decelera-
tion and braking control as well as
greater fade resistance under heavy
use.
Limited vehicle use, extended periods
with the car parked or in storage and
light loading will increase the tendency
for corrosion to form on the rotors, and
dirt to accumulate on the pads. This
happens because the minimum pres-
sure between the pad and the disc
required for the self-cleaning function
of the disc brakes is not achieved.
If the brake rotors are corroded, they
will tend to respond to braking with a
pulsating effect which even extended
application will fail to cure.
aUse only original BMW-approved
brake pads, as otherwise vehicle autho-
rization is no longer valid.c
Driving notes
While driving in wet conditions and in
heavy rain, it is a good idea to apply
light pressure to the brake pedal every
few miles - Watch traffic conditions to
ensure that this maneuver does not
endanger other road users. The heat
generated in this braking process helps
dry the brake pads and rotors.
Maximum braking force is obtained
while the wheels continue to rotate,
peaking when the wheels remain on the
verge of locking without actually doing
so. ABS maintains this state automati-
cally. If the ABS fails, you should revert
to the staggered braking technique
described above (refer to page 106).
Extended or steep mountain descents
do not necessarily have to lead to
reduced braking efficiency; downshift
to a gear in which only minimal periodic
brake applications are required (you
can move the selector lever to the
appropriate lower range if your car is
equipped with an automatic transmis-
sion).
You can further increase the engine's
braking effect by selecting a lower gear,
downshifting as far as first gear or plac-
ing the selector lever in position 1 (2).
Should engine braking prove inade-
quate, you should still avoid extended,
continuous braking. Instead of main-
taining low to moderate pressure over
an extended period of time, you should
decelerate the vehicle by applying more
substantial force at the pedal (watch for
following traffic!) and then pausing
before repeating the application. This
staggered braking technique allows the
brakes to cool in the intervals between
active braking phases, preventing over-
heating and ensuring that full braking
capacity remains available at all times.
aDo not allow the vehicle to coast by
pressing down the clutch pedal or shift-
ing into neutral while underway. Never
drive with the engine switched
off (!). The engine provides no braking
effect when the clutch is disengaged or
the transmission is in neutral, and there
is no power-assist for brakes and steer-
ing when the engine is not running.
Never allow floor mats, carpets or other
objects to protrude into the area around
the accelerator, clutch and brake pedals
and obstruct their movement.c
Disc brakes
Online Edition for Part No. 01 41 9 790 377 - © 07/98 BMW AG

105
At a glanceControlsCar careRepairsTechnicalDataIndex
Failure of one brake circuit
Pedal travel increases, more pressure is
required at the pedal.
The remaining circuit continues to pro-
vide good braking response.
aIn the event of any malfunction in
the brake system, consult the nearest
BMW Retailer as soon as possible.c
The onset of winter is often accompa-
nied by rapid changes in weather.
Adaptations in driving style should be
accompanied by preparations on the
vehicle itself to ensure that your
progress through the winter remains
safe and trouble-free.
Coolant
Ensure that the coolant contains the
year-round 50:50 ratio of water and
antifreeze with corrosion inhibitor. This
mixture provides protection against
freezing down to approximately -34 F 5
(-37 ). Replace the coolant every 6
three years.
Locks
can be made operative again using
BMW lock de-icer. This de-icer also
contains lubricants.
In addition, a treatment with BMW lock
cylinder grease is recommended.
Rubber seals and components
To prevent the weather-stripping from
freezing, apply a spray-on rubber treat-
ment or silicone spray to the door, hood
and luggage compartment lid seals.
bA complete range of car-care
products is available from any autho-
rized BMW Retailer.c
Snow chains
BMW snow chains can be mounted on *
both summer and winter tires. Mount
them in pairs on the rear wheels only
and observe the manufacturer's safety
precautions. Do not exceed a maximum
speed of 30 mph (50 km/h). For maxi-
mum traction, deactivate ASC+T when
driving with snow chains mounted, refer
to page 84.
Starting off
When driving off in deep snow or "rock-
ing" the vehicle to free it, you should
switch off ASC+T, refer to page 84.
Driving on low-traction road
surfaces
Operate the accelerator pedal sensi-
tively, avoid high engine speeds and
shift up to the next-higher gear early.
Shift down into the next lowest gear
when approaching uphill or downhill
grades. Maintain an adequate distance
between yourself and the car ahead.
Brake system Winter driving
Online Edition for Part No. 01 41 9 790 377 - © 07/98 BMW AG

106
Brakes
Winter road conditions substantially
reduce the amount of traction available
between the tires and the road surface;
the resulting - considerable - increases
in braking distance should be continu-
ally borne in mind.
ABS is intended to prevent the wheels
from locking under braking; to help the
vehicle to remain stable and sensitive to
steering. Should the ABS fail, with lock-
ing wheels as a result: Reduce the
pressure on the brake pedal until the
wheels just start to roll again while still
maintaining enough force to continue
braking. Then increase the pressure,
release the pressure when the wheels
lock, reapply pressure, etc.
This staggered braking procedure will
reduce stopping distances while help-
ing you maintain steering control.
It can allow you to steer around hazards
once you have reduced the pressure on
the brake pedal.
aNever downshift to exploit engine
braking when driving on slippery road
surfaces; it could lead to loss of rear-
wheel traction and endanger vehicle
control. ABS and ASC+T can not protect
against such loss of traction, since they
have no effect on this kind of decelera-
tion.c
bDisengage the clutch during hard
braking on road surfaces affording only
poor or uneven traction.c
Loss of lateral traction (sliding)
Release the accelerator pedal and
depress the clutch pedal or push the
selector lever to position N with auto-
matic transmission. Countersteer care-
fully and attempt to regain control of the
vehicle.
Parking
Select 1st or reverse gear. If your car is
equipped with an automatic transmis-
sion, select Park. Engage the parking
brake when parking on hills and
inclined surfaces. To prevent frost and
corrosion from locking the parking
brake liners at the drum, you can dry
them by gently pulling up the lever
while stopping (ensure that you do not
endanger following traffic).
aThe brake lamps do not light up
when the parking brake is applied.c
Winter driving
Online Edition for Part No. 01 41 9 790 377 - © 07/98 BMW AG

107
At a glanceControlsCar careRepairsTechnicalDataIndex
A special luggage system is available as
an option for your BMW. Please
observe the precautions included with
the installation instructions.
Because roof racks raise the center of
gravity of the car when loaded, they
exercise a major effect on its handling
and steering response.
You should therefore always remember
not to exceed the approved roof weight,
the approved gross vehicle weight or
the axle weights when loading the rack.
For specifications refer to "Technical
data", page 163ff.
Make sure that the load is not too heavy,
and attempt to distribute it evenly.
Always load the heaviest items first (on
the bottom).
Make sure there is sufficient space to
raise the sliding/tilt sunroof.
Secure the roof luggage correctly and
securely to prevent it from shifting or
being lost during driving (danger to fol-
lowing traffic).
Drive smoothly: avoid sudden accelera-
tion and braking maneuvers; corner
gently.
The roof load increases the surface
area exposed to the wind: increased
fuel consumption and stress on the roof
are the immediate results.
Roof-mounted luggage rack*
Online Edition for Part No. 01 41 9 790 377 - © 07/98 BMW AG

108
The reception and sound quality
obtained from mobile radios varies
according to a variety of factors, includ-
ing the broadcast range of the transmit-
ter and the directional orientation of the
antenna.
Interference factors such as high-ten-
sion power lines, buildings and natural
obstructions can all lead to unavoidable
reception interference, regardless of
how well the vehicle's sound system is
operating.
Climatic factors such as intense solar
radiation, fog, rain and snow can also
interfere with reception.
Cellular telephones without ofcial BMW
approval can generate radio interfer-
ence. This is noticeable e.g., as a low-
pitched hum in the loudspeakers.
Please refer to the supplementary oper-
ating instructions provided with your
sound system for detailed information
on its use.
Mobile communications devices (mo-
bile phones, two-way radios, etc.) not
specifically designed for use in your car
may trigger malfunctions in other vehic-
ular systems. BMW can neither test nor
assume responsibility for every individ-
ual product being offered on the mar-
ket. We recommend that you consult
your BMW Retailer before purchasing
any device of this kind.
To ensure that your BMW continues to
provide reliable and trouble-free opera-
tion, refrain from using a cellular tele-
phone or other radio device with an
antenna located inside the passenger
compartment. The antenna should
always be mounted on the outside of
the vehicle.
bBefore loading the vehicle on a
train or driving it through a car-wash,
remove the antenna.c
Radio reception Cellular phones*
Online Edition for Part No. 01 41 9 790 377 - © 07/98 BMW AG

109
At a glanceControlsCar careRepairsTechnicalDataIndex
Even in winter, when the hardtop may
be in constant use, the fabric top does
not need to be removed. Before storing
the fabric top in the convertible top
compartment, it must be absolutely dry
to prevent the formation of water and
mildew spots.
Two persons are required for mounting
and removal. Use extreme care when
working to prevent paint damage and
damage to the body and hardtop.
To make it easier to mount and remove
the hardtops, you can purchase a spe-
cially developed hardtop lift * from your
BMW Retailer.
Mounting
Lower the side windows and remove
the rod antenna if necessary to prevent
damage.
Unlock the convertible top compart-
ment lid on vehicles with manual con-
vertible top operation, or open the con-
vertible top compartment lid slightly
with the convertible top operating but-
ton on vehicles with electric convertible
top operation, as illustrated.
Remove the trim pieces on both sides
and then close the convertible top com-
partment lid again.
Before positioning the hardtop on the
car, fold down the covers below the
interior lamps at the left and right and
open the locking levers outward.
Now, with somebody else’s help, posi-
tion the hardtop on the mounts.
Close the locking lever at the back by
turning it inward (arrow) up to the stop
behind the trim.
As with the fabric top, fold out the lock-
ing handle inside and lock the hardtop
at the front by turning the handle until it
audibly engages.
36cde018
36cde019
Hardtop – Convertible*
Online Edition for Part No. 01 41 9 790 377 - © 07/98 BMW AG

110
aDo not lift the hardtop by the seals.
Accidentally shifted or pulled-out seals
cause leaks.c
Remove
Proceed as for mounting, however in
the reverse order.
Any BMW Service station will gladly
provide information on the purpose of
technical modifications to the car, the
legal position and the manufacturer's
recommendations. For this purpose,
the Retailer requires the Vehicle Identi-
fication Number and, in some cases,
also the engine number.
Light-Emitting Diodes (LEDs)
Control units, displays and other interior
equipment of your vehicle have LED's
behind protective lenses as a light
source. These LEDs resemble conven-
tional lasers and are classified by law as
"Class 1 light-emitting diodes".
aDo not remove the protective
lens and avoid staring directly at the
unfiltered beam for extended periods
(several hours), as inflammation of the
iris could result.c
Hardtop – Convertible Technical modifications to the vehicle*
Online Edition for Part No. 01 41 9 790 377 - © 07/98 BMW AG

112
To maintain good handling and vehicle
response, use only tires of a single
tread configuration from a single manu-
facturer.
aDo not use retreaded tires, as oth-
erwise driving safety may be impaired.
This is due to the possible variations in
casing structures and, in some cases, to
their extreme age, which can lead to a
decrease in their durability.c
Tread wear patterns differ at the front
and rear wheels according to the indi-
vidual operating conditions. In the inter-
est of safety and optimal vehicle
response, we advise against rotating
tires from front to rear and vice versa.
When considering the potential eco-
nomic benefits of interaxle tire rotation,
you must decide whether the expense
of having the tires rotated is likely to be
amortized during the anticipated exten-
sion in tire life. We recommend that you
discuss the matter with your BMW
Retailer.
Should you decide in favor of rotating
the tires, it is essential to observe the
following:
Leave the tires on the same side of the
vehicle (include spare in rotation pat-
tern as desired).
Braking response and traction may be
adversely affected.
Rotation should always be carried out
at short intervals, max. 3000 miles
(approx. 5000 km).
Following rotation always correct the
tire inflation pressure.
Always replace tires after 10 years,
regardless of use or tread wear.
Spare tires over 6 years old should be
used only in case of emergency. Such a
tire should be replaced by a new tire
immediately, and should not be fitted
together with new tires.
The date on which the tire was manu-
factured is indicated by the code on
the sidewall: DOT ... 327 indicates that
the tire was manufactured in Week 32
of 1997.
Tire replacement Interaxle tire changes
Online Edition for Part No. 01 41 9 790 377 - © 07/98 BMW AG

114
We recommend winter tires (M+S radial
tires) for operation under inclement win-
ter driving conditions. Although all-sea-
son M+S tires provide better winter
traction than standard summer tires
with H, V, W and ZR speed ratings, they
generally fail to provide the same levels
of performance as standard snow tires
in winter driving.
If you fit winter tires, install radial tires
of the same tread configuration and
from a single manufacturer on all four
wheels (better still: on all five wheels).
This ensures safe tracking and steering
response.
Fit BMW-approved winter tires only.
Any BMW Retailer will be glad to pro-
vide you with information on the best
winter tires for your particular driving
conditions.
Winter tires display a perceptible loss in
their ability to cope with winter driving
conditions once the tread wears to
below 0.16 in (4 mm), and should thus
be replaced.
Observe the specified tire inflation
pressures - and be sure to have the
wheel and tire assemblies balanced
every time you change the tires!
aNever exceed the maximum speed
for which the tires are rated.
Unprofessional attempts by laymen to
service tires can lead to damage and ac-
cidents.
Have this work performed by skilled pro-
fessionals only. Your BMW Retailer will
be glad to assist you.c
Store tires in a cool, dry place, away
from light whenever possible. Protect
the tires from contact with oil, grease
and fuel.
Winter tires
Online Edition for Part No. 01 41 9 790 377 - © 07/98 BMW AG

115
At a glanceControlsCar careRepairsTechnicalDataIndex
bSize 185/65 R 15 88 T tires are
only for the BMW 318i Sedan.c
bSizes 225/55 R 15 92 V,
225/55 R 92 Q, T, H M+S, 225/50 ZR 16.
These tires are not suitable for use with
snow chains.c
Modications to the vehicle are required
before retrofitting tires in the above
dimensions.
Please consult your BMW Retailer.
The use of fine-link BMW snow chains *
on summer or winter tires is only per-
mitted in pairs on the rear wheels.
Always observe the tire manufacturer’s
safety recommendations when fitting.
Tire specications Steel rim
(wheel rim)
Light-alloy wheel Rim offset
(mm)
BMW 318is Coupe, 318i Convertible, 318i Sedan
185/65 R 15 88 T 6 J x 15 H2 – 42
185/65 R 15 88 Q, T M+S 6 15 H2 J x – 42
205/60 R 15 91 H 6 Jx15 H2g7 J x 15 H2 47
205/60 R 15 91 Q, H M+S 6 Jx15 H2g7 J x 15 H2 47
225/55 R 15 92 V 6 Jx15g H2 7 J x 15 H2 47
225/50 R 16 92 Q M+S – 7 J x 16 H2 45/46
225/50 ZR 16 – 7 J x 16 H2 45/46
Approved wheels and tires
Online Edition for Part No. 01 41 9 790 377 - © 07/98 BMW AG

116
bSizes 225/55 R 15 92 V,
225/55 R 92 Q, T, H M+S, 225/50 ZR 16.
These tires are not suitable for use with
snow chains.c
Modications to the vehicle are required
before retrofitting tires in the above
dimensions.
Please consult your BMW Retailer.
The use of fine-link BMW snow chains *
on summer or winter tires is only per-
mitted in pairs on the rear wheels.
Always observe the tire manufacturer’s
safety recommendations when fitting.
Tire specications Steel rim
(wheel rim)
Light-alloy wheel Rim offset
(mm)
BMW 323is Coupe, 323i Convertible
185/65 R 15 88 Q M+S 6 15 H2 J x – 42
205/60 R 15 91 H 6 Jx15 H2g7 J x 15 H2 47
205/60 R 15 91 Q, H M+S 6 Jx15 H2g7 J x 15 H2 47
225/55 R 15 92 V 6 Jx15g H2 7 J x 15 H2 47
225/50 R 16 92 Q M+S – 7 J x 16 H2 45/46
225/50 ZR 16 – 7 J x 16 H2 45/46
Approved wheels and tires
Online Edition for Part No. 01 41 9 790 377 - © 07/98 BMW AG

117
At a glanceControlsCar careRepairsTechnicalDataIndex
bSize 225/50 ZR 16 tires are not
suitable for use with snow chains.c
Modications to the vehicle are required
if retrofitting these tires.
Please consult your BMW Retailer.
The use of fine-link BMW snow chains *
on summer or winter tires is only per-
mitted in pairs on the rear wheels.
Always observe the tire manufacturer’s
safety recommendations when fitting.
Tire specications Steel rim
(wheel rim)
Light-alloy wheel Rim offset
(mm)
BMW 328is Coupe, 328i Convertible, 328i Sedan
205/60 R 15 91 H – 7 J x 15 H2 47
205/60 R 15 91 Q, H M+S 6 Jx15 H2g7 J x 15 H2 47
225/50 R 16 92 Q M+S – 7 J x 16 H2 45/46
225/50 ZR 16 – 7 J x 16 H2 45/46
Approved wheels and tires
Online Edition for Part No. 01 41 9 790 377 - © 07/98 BMW AG

118
Unlocking
Pull the lever located under the left-
hand side of the instrument panel.
aDo not work on your vehicle with-
out appropriate skills. Always switch off
the engine and allow it to cool down be-
fore working in the engine compart-
ment.
Always disconnect the battery before
working on the electrical system. When
working on the vehicle, follow the rele-
vant instructions and information. When
you are not familiar with the relevant
specifications, have service operations
performed by your authorized BMW Re-
tailer. Failure to proceed in an informed,
professional manner when servicing
components and materials constitutes a
safety hazard for yourself and other us-
ers of the public roads.c
To open
Push the release handle – at the front
left under the hood – upward and open
the hood.
To close
Simultaneously press down both sides
of the hood; continue pressing until you
hear the latches engage.
aShould you determine that the
hood is not completely closed while
driving, stop immediately and close it
securely.c
360de085
B
M
W
360de307
B
M
W
360de308
Hood
Online Edition for Part No. 01 41 9 790 377 - © 07/98 BMW AG

119
At a glanceControlsCar careRepairsTechnicalDataIndex
Online Edition for Part No. 01 41 9 790 377 - © 07/98 BMW AG
Product specificaties
| Merk: | BMW |
| Categorie: | Auto |
| Model: | 318i (1997) |
Heb je hulp nodig?
Als je hulp nodig hebt met BMW 318i (1997) stel dan hieronder een vraag en andere gebruikers zullen je antwoorden
Handleiding Auto BMW

25 Juni 2023
21 Juni 2023
19 Juni 2023
10 Juni 2023
30 Mei 2023
27 Mei 2023
24 Mei 2023
21 Mei 2023
14 Mei 2023
13 Mei 2023
Handleiding Auto
- Auto Ford
- Auto Fiat
- Auto Opel
- Auto Pioneer
- Auto Renault
- Auto Volvo
- Auto ACME
- Auto Alfa Romeo
- Auto Audi
- Auto Audio-Technica
- Auto Dacia
- Auto Dodge
- Auto DS
- Auto Honda
- Auto Hyundai
- Auto Infiniti
- Auto Kia
- Auto Lancia
- Auto Land Rover
- Auto Lexus
- Auto Marklin
- Auto Maserati
- Auto Mazda
- Auto Mercedes-Benz
- Auto Mercury
- Auto Mini
- Auto Mitsubishi
- Auto Nissan
- Auto Peugeot
- Auto POLARIS
- Auto Porsche
- Auto Saab
- Auto Saturn
- Auto Seat
- Auto Sharper Image
- Auto Skoda
- Auto Smart
- Auto Subaru
- Auto Suzuki
- Auto Tesla
- Auto Toyota
- Auto Vauxhall
- Auto Volkswagen
- Auto Jaguar
- Auto Jeep
- Auto Abarth
- Auto Acura
- Auto Aston Martin
- Auto Buick
- Auto Cadillac
- Auto Chevrolet
- Auto Chrysler
- Auto Citroën
- Auto Genesis
- Auto GMC
- Auto Lincoln
- Auto Mahindra
- Auto MG
- Auto Polestar
- Auto Pontiac
- Auto Rover
- Auto Scion
- Auto Tata
- Auto VDL
- Auto RAM
- Auto GEM
- Auto Aguilar
- Auto Chery
- Auto Lada
- Auto McLaren
Nieuwste handleidingen voor Auto

25 Maart 2025

13 Maart 2025

10 Maart 2025
10 Maart 2025
9 Maart 2025
9 Maart 2025
9 Maart 2025

4 Maart 2025
4 Maart 2025
3 Maart 2025