Becken BAC4255 Handleiding
Becken
Airconditioners
BAC4255
Lees hieronder de 📖 handleiding in het Nederlandse voor Becken BAC4255 (182 pagina's) in de categorie Airconditioners. Deze handleiding was nuttig voor 52 personen en werd door 2 gebruikers gemiddeld met 4.5 sterren beoordeeld
Pagina 1/182

AF_Manual_AC_12000BTU_BAC4255_BAC4255N.indd 1 21/01/2019 10:24
BAC4255
BAC4255N

Dear client,
Thank you for purchasing this product.
The quality of this appliance has been certied by several
laboratory tests. This instructions manual is provided to
simplify the use of the appliance as well as to guarantee
a safe use.
Please read carefully the instructions and safety measures
described in this manual.
We sincerely hope you will be satised when using your new
appliance.
AF_Manual_AC_12000BTU_BAC4255_BAC4255N.indd 2 21/01/2019 10:24

3
EN
Portable air conditioner | Aire acondicionado portátil | Ar Condicionado Portátil
INDEX
1. SAFETY INSTRUCTIONS 4
1.1. Power Supply 5
1.2. Power Cord and Other Cables 5
1.3. Humidity and Water 5
1.4. Cleaning 6
1.5. General Precautions 6
2. OPERATING INSTRUCTIONS 12
2.1. Product Description 12
2.2. Product Usage 12
2.3. Maintenance 53
2.4. Troubleshooting 55
2.5. Technical Specifications 56
3. POST-SALE SERVICE 57
4. ENVIRONMENTAL PROTECTION 57
AF_Manual_AC_12000BTU_BAC4255_BAC4255N.indd 3 21/01/2019 10:24

4
1. SAFETY INSTRUCTIONS
Important Warnings
Before using your appliance read these instructions manual carefully
and keep it in a safe place as you may need to consult it in the future.
Before turning on your appliance, and to ensure a safe and correct
operation, do not use if:
• It has fallen to the ground;
• You notice any evidence of damage;
• Any anomaly occurs during its operation.
To avoid hazards or deterioration of your appliance through incorrect
use it is advisable to read these instructions thoroughly.
Your appliance may not be used for other purposes than the ones
intended and solely for household use. Any damage resulting from
using the appliance outside this scope, any incorrect use, as well as
any manual modifications to the product will not be covered and
automatically voids the warranty.
WARNING
RISK OF ELECTRIC SHOCK
DO NOT OPEN
Warning: to avoid the risk of electric shock, do not
remove the cover. The interior does not contain any parts
that can be repaired by the user. Ask for the Customer
Support Service.
AF_Manual_AC_12000BTU_BAC4255_BAC4255N.indd 4 21/01/2019 10:24

5
EN
Portable air conditioner | Aire acondicionado portátil | Ar Condicionado Portátil
Assistance
In case of malfunction, take your appliance to the Customer Support
Service for assistance.
This appliance can be used by children from the age of 8 and by
people with reduced physical, sensorial or mental capabilities and/or
lack of experience and knowledge if they have been given instructions
on using the appliance safely and if they understand the hazards
involved. Children may not play with the appliance. Cleaning and
maintenance must not be carried out by children without supervision.
These instructions are also available at www.suporteworten.pt
1.1. Power Supply
Make sure the main voltage is compatible with the appliance’s. If this is
not the case, please consult the Customer Support Service.
1.2. Power Cord and Other Cables
Do not tangle the cord or pull it to disconnect the appliance. Also, keep
the cord away from warm surfaces.
Never use the appliance if it has a damaged cable or socket.
Take it to the Customer Support Service for replacement.
1.3. Humidity and Water
Do not use your appliance in humid places. Do not allow the appliance
to become wet under any circumstances as this may be dangerous.
To avoid re hazard or electric shock do not expose your appliance
to humidity or water. Furthermore, do not place your appliance under
water (e.g. for cleaning).
AF_Manual_AC_12000BTU_BAC4255_BAC4255N.indd 5 21/01/2019 10:24

6
1.4. Cleaning
Before cleaning, be sure to switch o the appliance and remove the
plug from the main power supply. Always allow the unit to cool down
before cleaning.
To clean the exterior of the product, use a dry soft cloth only.
1.5. General Precautions
• Please follow the instructions in the user manual which will help you
to properly install and operate this product and enjoy its advanced
features. Please keep the instructions for future reference.
• Read all instructions before using the product.
• Maintenance and service operations are only to be carried out by
authorized professionals.
• Any damage caused by manual modications to the product is not
covered by the warranty.
• If this product is used for other purposes than the ones originally
intended, or if it is not correctly connected, the product may become
damaged and the warranty will be voided.
• This symbol indicates that ignoring instructions may cause
death or serious injury.
• Warning: To prevent death or injury to the user or other people
and property damage, the following instructions must be followed.
Incorrect operation due to ignoring of instructions may cause death,
harm or damage.
• Installation must be performed according to the installation
instructions. Improper installation can cause water leakage, electrical
shock, or re.
AF_Manual_AC_12000BTU_BAC4255_BAC4255N.indd 6 21/01/2019 10:24

7
EN
Portable air conditioner | Aire acondicionado portátil | Ar Condicionado Portátil
• Use only the included accessories and parts, and specied tools for
the installation. Using non-standard parts can cause water leakage,
electrical shock, re and injury or property damage.
• Make sure that the outlet you are using is grounded and has the
appropriate voltage. The power cord is equipped with a three-prong
grounding plug to protect against shock. Voltage information can be
found on the nameplate of the unit.
• Your unit must be used in a properly grounded wall receptacle. If
the wall receptacle you intend to use is not adequately grounded or
protected by a time delay fuse or circuit breaker (the fuse or circuit
breaker needed is determined by the maximum current of the unit.
The maximum current is indicated on the nameplate located on
unit), have a qualied electrician install the proper receptacle.
• Install the unit on a at, sturdy surface. Failure to do so could result
in damage or excessive noise and vibration.
• The unit must be kept free from obstruction to ensure proper
function and to mitigate safety hazards.
• DO NOT modify the length of the power cord or use an extension
cord to power the unit.
• DO NOT share a single outlet with other electrical appliances.
Improper power supply can cause re or electrical shock.
• DO NOT install your air conditioner in a wet room such as a
bathroom or laundry room. Too much exposure to water can cause
electrical components to short circuit.
• DO NOT install the unit in a location that may be exposed to
combustible gas, as this could cause re.
AF_Manual_AC_12000BTU_BAC4255_BAC4255N.indd 7 21/01/2019 10:24

8
• The unit has wheels to facilitate moving. Make sure not to use the
wheels on thick carpet or to roll over objects, as these could cause
tipping.
• The appliance with electric heater shall have at least 1 meter space
to the combustible materials.
• Do not touch the unit with wet or damp hands or when barefoot.
• If the air conditioner is knocked over during use, turn o the unit
and unplug it from the main power supply immediately. Visually
inspect the unit to ensure there is no damage. If you suspect the
unit has been damaged, contact a technician or the Customer
Support Service for assistance.
• During a thunderstorm, the power must be cut o to avoid damage
to the machine due to lightning.
• Your air conditioner should be used in such a way that it is
protected from moisture. e.g. condensation, splashed water, etc. Do
not place or store your air conditioner where it can fall or be pulled
into water or any other liquid. Unplug immediately if it occurs.
• All wiring must be performed strictly in accordance with the wiring
diagram located inside of the unit.
• The unit’s circuit board (PCB) is designed with a fuse to provide
overcurrent protection. The specications of the fuse are printed on
the circuit board, such as: T 3.15A/250V, etc.
Cautions
• Do not remove any xed covers. Never use this appliance if it is not
working properly, or if it has been dropped or damaged.
• Do not run the cord under carpeting. Do not the cover cord with
throw rugs, runners, or similar coverings. Do not route the cord
AF_Manual_AC_12000BTU_BAC4255_BAC4255N.indd 8 21/01/2019 10:24

9
EN
Portable air conditioner | Aire acondicionado portátil | Ar Condicionado Portátil
under furniture or appliances. Arrange the cord away from traic
area and where it will not be tripped over.
• To reduce the risk of re or electric shock, do not use this fan with
any solid-state speed control device.
• The appliance shall be installed in accordance with national wiring
regulations.
• Do not cover or obstruct the inlet or outlet grilles.
• Do not use this product for functions other than those described in
this instruction manual.
• Disconnect the power if strange sounds, smell, or smoke comes from it.
• Do not press the buttons on the control panel with anything other
than your ngers.
• Do not operate or stop the unit by inserting or pulling out the power
cord plug.
• Do not use hazardous chemicals to clean or come into contact
with the unit. Do not use the unit in the presence of inammable
substances or vapour such as alcohol, insecticides, petrol, etc.
• Always transport your air conditioner in a vertical position and stand
it on a stable, level surface during use.
• Hold the plug by the head of the power plug when taking it out.
• Turn o the product when not in use.
Warnings
Do not use means to accelerate the defrosting process or to clean
other than those recommended by the manufacturer.
AF_Manual_AC_12000BTU_BAC4255_BAC4255N.indd 9 21/01/2019 10:24

10
• The appliance shall be stored in a room without continuously
operating ignition sources (for example: open ames, an operating
gas appliance or an operating electric heater)
• Do not pierce or burn.
• Be aware that refrigerants may not contain an odour.
• Appliance BAC4255 12BTUS should be installed, operated and
stored in a room with a oor area larger than 11 m2.
• Compliance with national gas regulations shall be observed.
• Keep ventilation openings clear of obstruction.
• The appliance shall be stored so as to prevent mechanical damage
from occurring.
• A warning that the appliance shall be stored in a well-ventilated area
where the room size corresponds to the room area as specied for
operation.
• Any person involved with working on or breaking into a refrigerant
circuit should hold a current valid certicate from an industry-
accredited assessment authority, which authorises their competence
to handle refrigerants safely in accordance with an industry
recognised assessment specication.
• Servicing shall only be performed as recommended by the
equipment manufacturer. Maintenance and repair requiring the
assistance of other skilled personnel shall be carried out under
the supervision of the person competent in the use of ammable
refrigerants.
AF_Manual_AC_12000BTU_BAC4255_BAC4255N.indd 10 21/01/2019 10:24

11
EN
Portable air conditioner | Aire acondicionado portátil | Ar Condicionado Portátil
Caution: Risk of re/
ammable materials
(Required for R32/R290 units
only)
Important note: Read this manual
carefully before installing or
operating your new air conditioner
unit. Make sure to save this manual
for future reference
Explanation of symbols displayed on the unit
WARNING This symbol shows that this unit uses a
flammable refrigerant. If the refrigerant is
leaked and exposed to an external ignition
source, there is a risk of fire.
CAUTION This symbol shows that a service personnel
should be handling this equipment with
reference to the installation manual.
CAUTION This symbol shows that information is
available such as the operating manual or
installation manual.
AF_Manual_AC_12000BTU_BAC4255_BAC4255N.indd 11 21/01/2019 10:24

12
2. OPERATING INSTRUCTIONS
2.1. Product Description
control panel
upper air lter
(behind the grille)
upper air intake
drain outlet
air outlet
lower air lter
lower air intake
drain outlet
(only for pump
heating mode)
power cord buckle
power cord outlet
power plug socket
bottom tray
drain outlet
horizontal louver
blade
(swing automatically)
handle
(both sides)
panel
caster
front rear
2.2. Product usage
Warnings
• Transport of equipment containing ammable refrigerants.
See transport regulations
• Marking of equipment using signs.
See local regulations
• Disposal of equipment using ammable refrigerants.
See national regulations.
• Storage of equipment/appliances.
The storage of equipment should be in accordance with the
manufacturer’s instructions.
• Storage of packed (unsold) equipment. Storage package protection
should be constructed such that mechanical damage to the equipment
inside the package will not cause a leak of the refrigerant charge.
AF_Manual_AC_12000BTU_BAC4255_BAC4255N.indd 12 21/01/2019 10:24

13
EN
Portable air conditioner | Aire acondicionado portátil | Ar Condicionado Portátil
The maximum number of pieces of equipment permitted to be
stored together will be determined by local regulations.
• Information on servicing
1. Area checks
Prior to beginning work on systems containing ammable refrigerants,
safety checks are necessary to ensure that the risk of ignition is
minimised. For repair to the refrigerating system, the following
precautions shall be complied with prior to conducting work on the
system.
2. Work procedure
Works shall be undertaken under a controlled procedure so as to
minimise the risk of a ammable gas or vapour being present while the
work is being performed.
3. General work area
All maintenance sta and others working in the local area shall be
instructed on the nature of work being carried out. Work in conned
spaces shall be avoided. The area around the work space shall be
sectioned o. Ensure that the conditions within the area have been
made safe by control of ammable material.
4. Checking for presence of refrigerant
The area shall be checked with an appropriate refrigerant detector
prior to and during work, to ensure the technician is aware of
potentially ammable atmospheres. Ensure that the leak detection
equipment being used is suitable for use with ammable refrigerants,
i.e. no sparking, adequately sealed or intrinsically safe.
5. Presence of re extinguisher
If any hot work is to be conducted on the refrigeration equipment or
any associated parts, appropriate re extinguishing equipment shall be
available on hand. Have a dry power or CO2 re extinguisher next to
the charging area.
AF_Manual_AC_12000BTU_BAC4255_BAC4255N.indd 13 21/01/2019 10:24

14
6. No ignition sources
No person carrying out work with a refrigeration system which involves
exposing any pipe work that contains or has contained ammable
refrigerant shall use any sources of ignition in such a manner that
it may lead to risk of re or explosion. All possible ignition sources,
including cigarette smoking, should be kept suiciently far away from
the site of installation, repairing, removing and disposal, during which
ammable refrigerant can possibly be released to the surrounding
space. Prior to work taking place, the area around the equipment is
to be surveyed to make sure that there are no ammable hazards or
ignition risks. “NO SMOKING” signs shall be displayed.
7. Ventilated area
Ensure the work area is in the open or that it is adequately ventilated
before breaking into the system or conducting any hot work. A degree
of ventilation shall continue during the period that the work is carried
out. The ventilation should safely disperse any released refrigerant and
preferably expel it externally into the atmosphere.
8. Checks to the refrigeration equipment
Where electrical components are being changed, they shall be t
for the purpose and to the correct specication. At all times the
manufacturer’s maintenance and service guidelines shall be followed.
If in doubt, consult the manufacturer’s technical department for
assistance. The following checks shall be applied to installations using
ammable refrigerants:
• the charge size is in accordance with the room size within which the
refrigerant containing parts are installed;
• the ventilation machinery and outlets are operating adequately and
are not obstructed;
• if an indirect refrigerating circuit is being used, the secondary
circuits shall be checked for the presence of refrigerant; marking to
the equipment continues to be visible and legible.
AF_Manual_AC_12000BTU_BAC4255_BAC4255N.indd 14 21/01/2019 10:24

15
EN
Portable air conditioner | Aire acondicionado portátil | Ar Condicionado Portátil
• marking and signs that are illegible shall be corrected;
• refrigeration pipe or components are installed in a position where
they are unlikely to be exposed to any substance which may corrode
refrigerant containing components, unless the components are
constructed of materials which are inherently resistant to being
• corroded or are suitably protected against being so corroded.
9. Checks to electrical devices
Repair and maintenance to electrical components shall include
initial safety checks and component inspection procedures. If a fault
exists that could compromise safety, then no electrical supply shall
be connected to the circuit until it is satisfactorily dealt with. If the
fault cannot be corrected immediately but it is necessary to continue
operation, and adequate temporary solution shall be used. This shall be
reported to the owner of the equipment, so all parties are advised.
Initial safety checks shall include:
• that capacitors are discharged: this shall be done in a safe manner
to avoid possibility of sparking
• that there no live electrical components and wiring are exposed
while charging, recovering or purging the system;
• that there is continuity of earth bonding.
10. Repairs to sealed components
10.1 During repairs to sealed components, all electrical supplies shall
be disconnected from the equipment being worked upon prior to
any removal of sealed covers, etc. If it is absolutely necessary to
have an electrical supply to equipment during servicing, then a
permanently operating form of leak detection shall be located at
the most critical point to warn of a potentially hazardous situation.
AF_Manual_AC_12000BTU_BAC4255_BAC4255N.indd 15 21/01/2019 10:24

16
10.2 Particular attention shall be paid to the following to ensure that by,
working on electrical components, the casing is not altered in such
a way that the level of protection is aected. This shall include
damage to cables, excessive number of connections, terminals not
made to original specication, damage to seals, incorrect tting of
glands, etc.
• Ensure that apparatus is mounted securely.
• Ensure that seals or sealing materials have not degraded in such
a way that they no longer serve the purpose of preventing the
ingress of ammable atmospheres. Replacement parts shall be in
accordance with the manufacturer s specications.
Note
: the use of silicon sealant may inhibit the eectiveness of some
types of leak detection equipment. Intrinsically safe components do not
have to be isolated prior to working on them.
11. Repair to intrinsically safe components
Do not apply any permanent inductive or capacitance loads to the
circuit without ensuring that this will not exceed the permissible
voltage and current permitted for the equipment in use. Intrinsically
safe components are the only types that can be worked on while live in
the presence of a ammable atmosphere. The test apparatus shall be
at the correct rating.
Replace components only with parts specied by the manufacturer.
Other parts may result in the ignition of refrigerant in the atmosphere
from a leak.
12. Cabling
Check that cabling will not be subject to wear, corrosion, excessive
pressure, vibration, sharp edges or any other adverse environmental
eects. The check shall also take into account the eects of aging or
continual vibration from sources such as compressors or fans.
AF_Manual_AC_12000BTU_BAC4255_BAC4255N.indd 16 21/01/2019 10:24

17
EN
Portable air conditioner | Aire acondicionado portátil | Ar Condicionado Portátil
13. Detection of ammable refrigerants
Under no circumstances shall potential sources of ignition be used
when in the search for or detection of refrigerant leaks. A halide torch
(or any other detector using a naked ame) shall not be used.
14. Leak detection methods
The following leak detection methods are deemed acceptable for
systems containing ammable refrigerants. Electronic leak detectors
shall be used to detect ammable refrigerants, but the sensitivity may
not be adequate, or may need re-calibration (detection equipment
shall be calibrated in a refrigerant-free area). Ensure that the detector
is not a potential source of ignition and is suitable for the refrigerant.
Leak detection equipment shall be set at a percentage of the LFL of
the refrigerant and shall be calibrated to the refrigerant employed and
the appropriate percentage of gas (25 % maximum) is conrmed. Leak
detection uids are suitable for use with most refrigerants but the use
of detergents containing chlorine shall be avoided as the chlorine may
react with the refrigerant and corrode the copper pipe-work.
If a leak is suspected, all naked ames shall be removed or
extinguished. If a leakage of refrigerant is found which requires brazing,
all of the refrigerant shall be recovered from the system, or isolated (by
means of shut o valves) in a part of the system remote from the leak.
Oxygen free nitrogen (OFN) shall then be purged through the system
both before and during the brazing process.
15. Removal and evacuation
When accessing the refrigerant circuit to make repairs for any
other purpose, conventional procedures shall be used. However,
it is important that best practice is followed since ammability is a
consideration. The following procedure shall be adhered to:
• remove refrigerant;
• purge the circuit with inert gas;
• evacuate;
AF_Manual_AC_12000BTU_BAC4255_BAC4255N.indd 17 21/01/2019 10:24

18
• purge again with inert gas;
• open the circuit by cutting or brazing.
The refrigerant charge shall be recovered into the correct recovery
cylinders. The system shall be ushed with OFN to render the unit safe.
This process may need to be repeated several times. Compressed air
or oxygen shall not be used for this task.
Flushing shall be achieved by breaking the vacuum in the system with
OFN and continuing to ll it until the working pressure is achieved,
then venting to atmosphere, and nally pulling down to a vacuum. This
process shall be repeated until no refrigerant is in the system.
When the nal OFN charge is used, the system shall be vented down
to atmospheric pressure to enable work to take place. This operation is
absolutely vital if brazing operations on the pipe-work are to take place.
Ensure that the outlet for the vacuum pump is not closed to any
ignition sources and there is ventilation available.
16. Charging procedures
In addition to conventional charging procedures, the following
requirements shall be followed:
• Ensure that contamination of dierent refrigerants does not occur
when using charging equipment. Hoses or lines shall be as short as
possible to minimize the amount of refrigerant contained in them.
• Cylinders shall be kept upright.
• Ensure that the refrigeration system is earthed prior to charging the
system with refrigerant.
• Label the system when charging is complete (if not already).
• Extreme care shall be taken not to overll the refrigeration system.
• Prior to recharging the system it shall be pressure tested with OFN.
The system shall be leak tested on completion of charging but prior
AF_Manual_AC_12000BTU_BAC4255_BAC4255N.indd 18 21/01/2019 10:24

19
EN
Portable air conditioner | Aire acondicionado portátil | Ar Condicionado Portátil
to commissioning. A follow up leak test shall be carried out prior to
leaving the site.
17. Decommissioning
Before carrying out this procedure, it is essential that the technician
be completely familiar with the equipment and all its detail. It is
recommended good practice that all refrigerants are recovered safely.
Prior to the task being carried out, an oil and refrigerant sample shall
be taken.
In case analysis is required prior to re-use of reclaimed refrigerant.
It is essential that electrical power is available before the task is
commenced.
a) Become familiar with the equipment and its operation.
b) Isolate system electrically
c) Before attempting the procedure ensure that:
• mechanical handling equipment is available, if required, for handling
refrigerant cylinders;
• all personal protective equipment is available and being used
correctly;
• the recovery process is supervised at all times by a competent
person;
• recovery equipment and cylinders conform to the appropriate
standards.
d) Pump down refrigerant system, if possible.
e) If a vacuum is not possible, make a manifold so that refrigerant can
be removed from various parts of the system.
f) Make sure that cylinder is situated on the scales before recovery
takes place.
AF_Manual_AC_12000BTU_BAC4255_BAC4255N.indd 19 21/01/2019 10:24

20
g) Start the recovery machine and operate in accordance with
manufacturer’s instructions.
h) Do not overll the cylinders (no more than 80 % of the volume liquid
charge).
i) Do not exceed the maximum working pressure of the cylinder, even
temporarily.
j) When the cylinders have been lled correctly and the process
completed, make sure the cylinders and the equipment are removed
from the site promptly and all isolation valves on the equipment are
closed o.
k) Recovered refrigerant shall not be charged into another refrigeration
system unless it has been cleaned and checked.
18. Labelling
Equipment shall be labelled stating that it has been de-commissioned
and emptied of refrigerant. The label shall be dated and signed. Ensure
that there are labels on the equipment stating the equipment contains
ammable refrigerant.
19. Recovery
• When removing refrigerant from a system, either for service
or decommissioning, it is recommended good practice that all
refrigerants be removed safely.
• When transferring refrigerant into cylinders, ensure that only
appropriate refrigerant recovery cylinders are used. Ensure that the
correct numbers of cylinders for holding the total system charge are
available. All cylinders to be used are designated for the recovered
refrigerant and labelled for that refrigerant (i.e. special cylinders
for the recovery of refrigerant). Cylinders shall be complete with
pressure relief valve and associated shut-o valves in good working
order.
AF_Manual_AC_12000BTU_BAC4255_BAC4255N.indd 20 21/01/2019 10:24

21
EN
Portable air conditioner | Aire acondicionado portátil | Ar Condicionado Portátil
• Empty recovery cylinders are evacuated and, if possible, cooled
before recovery occurs. The recovery equipment shall be in good
working order with a set of instructions concerning the equipment
that is at hand and shall be suitable for the recovery of ammable
refrigerants. In addition, a set of calibrated weighing scales shall be
available and in good working order.
• Hoses shall be complete with leak-free disconnect couplings and in
good condition. Before using the recovery machine, check that it is
in satisfactory working order, has been properly maintained and that
any associated electrical components are sealed to prevent ignition
in the event of a refrigerant release. Consult the manufacturer if in
doubt.
• The recovered refrigerant shall be returned to the refrigerant
supplier in the correct recovery cylinder, and the relevant Waste
Transfer Note arranged. Do not mix refrigerants in recovery units
and especially not in the cylinders.
• If compressors or compressor oils are to be removed, ensure that
they have been evacuated to an acceptable level to make sure
that ammable refrigerant does not remain within the lubricant.
The evacuation process shall be carried out prior to returning the
compressor to the suppliers. Only electric heating to the compressor
body shall be employed to accelerate this process. When oil is
drained from a system, it shall be carried out safely.
Note About Fluorinated Gasses
• Fluorinated greenhouse gases are contained in hermetically sealed
equipment. For specic information on the type, the amount and
the CO2 equivalent in tonnes of the uorinated greenhouse gas(on
some models), please refer to the relevant label on the unit itself.
• Installation, service, maintenance and repair of this unit must be
performed by a certied technician.
AF_Manual_AC_12000BTU_BAC4255_BAC4255N.indd 21 21/01/2019 10:24
22
• Product uninstallation and recycling must be performed by a
certied technician.
Installation
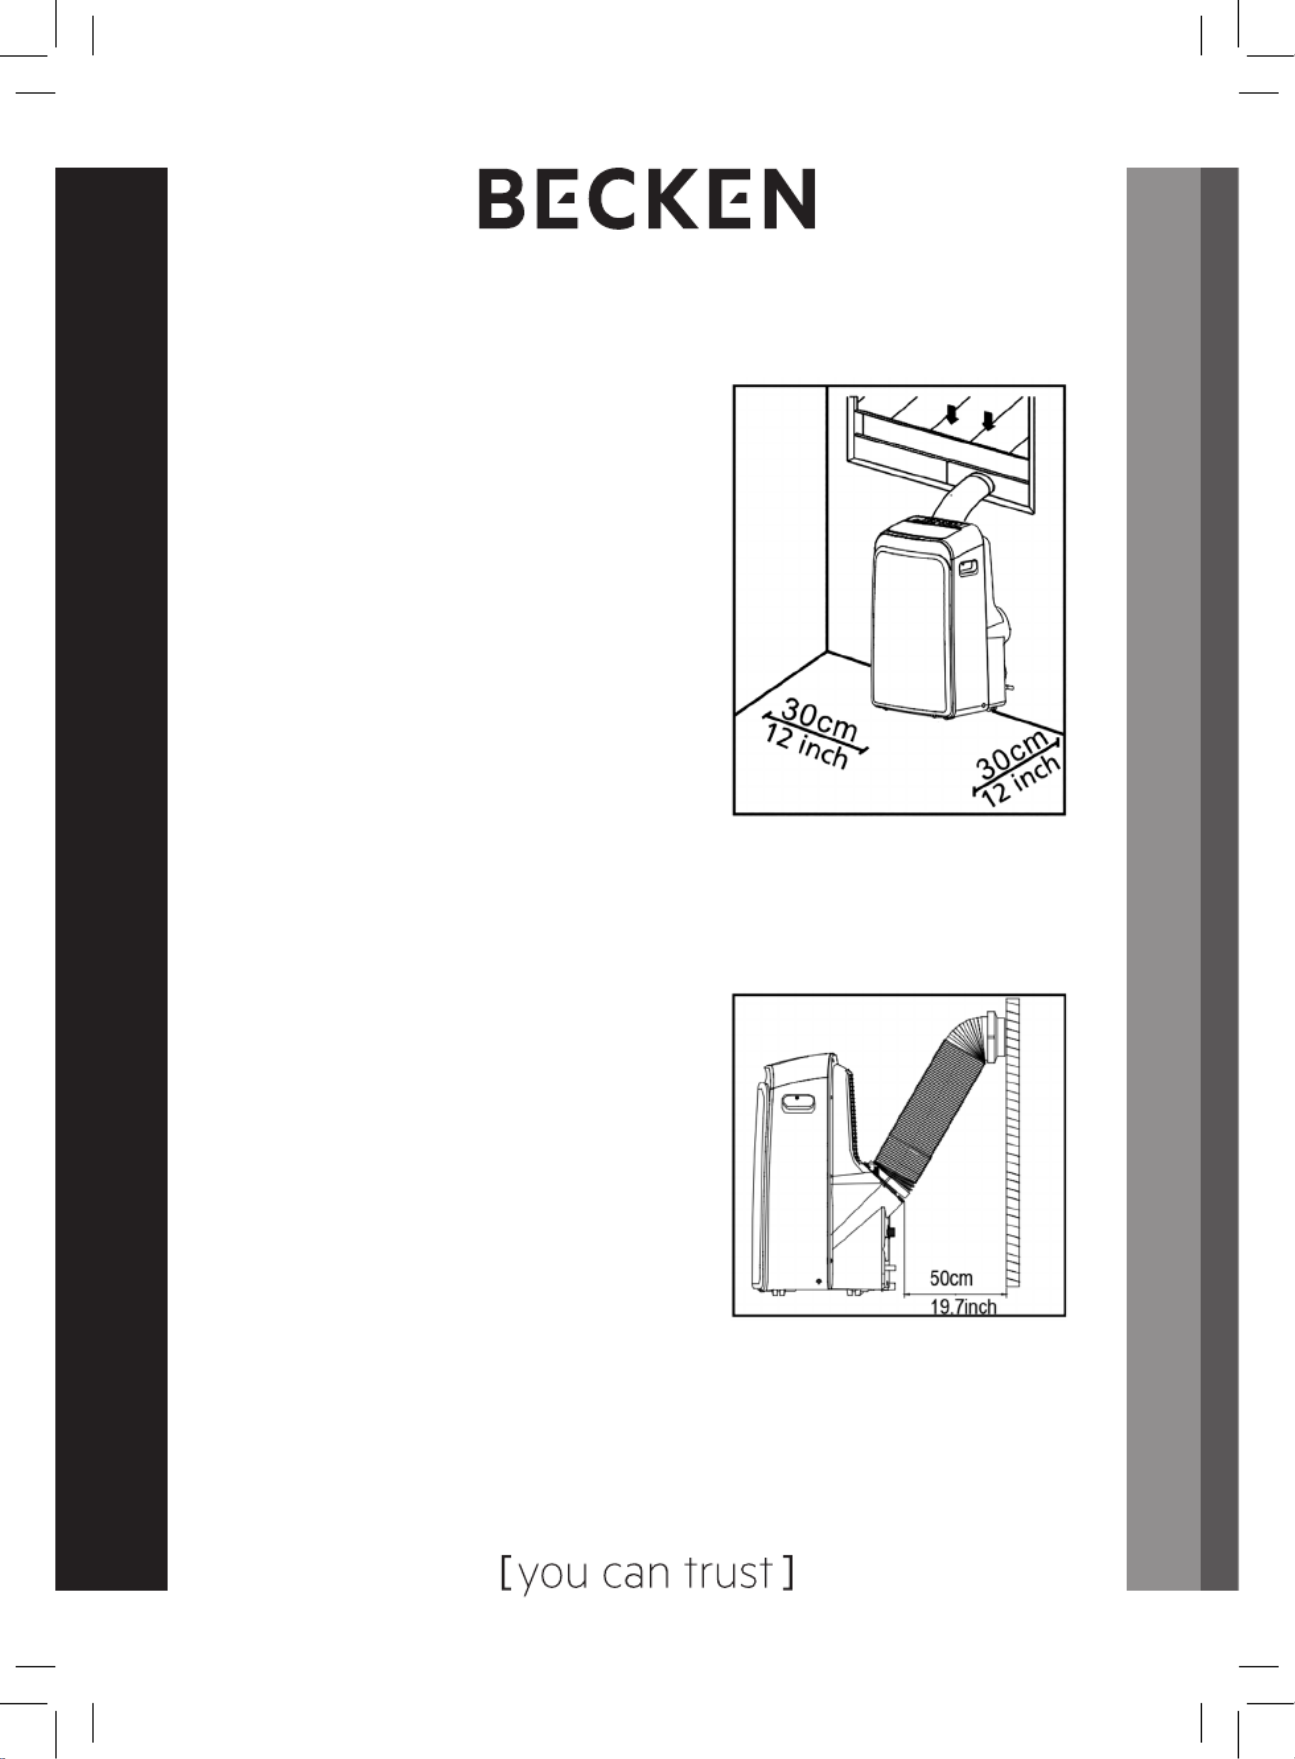
Choosing The Right Location
Your installation location should meet
the following requirements:
- Make sure that you install your unit on
an even surface to minimize noise and
vibration.
- The unit must be installed near a
grounded plug, and the Collection Tray
Drain (found on the back of the unit)
must be accessible.
- The unit should be located at least
30cm (12”) from the nearest wall to ensure proper air conditioner.
- DO NOT cover the Intakes, Outlets or Remote Signal Receptor of the
unit, as this could cause damage to the unit.
Recommend installation
Note: All the illustrations in the manual
are for explanation purpose only. Your
machine may be slightly dierent.
The actual shape shall prevail.
The unit can be controlled by the unit
control panel alone or with the remote
controller.
Tools Needed
- Medium Philips screwdriver;
- Tape measure or ruler
- Knife or scissors;
- Saw (optional, to shorten window adaptor for narrow windows)
AF_Manual_AC_12000BTU_BAC4255_BAC4255N.indd 22 21/01/2019 10:24

23
EN
Portable air conditioner | Aire acondicionado portátil | Ar Condicionado Portátil
Accessories
Check your window size and choose the t window slider
Part Description Quantity Part Description Quantity
Unit Adaptor Bolt1 pc 1 pc
Exhaust Hose 1 pc Security
Bracket
and Screw
1 set
Window Slider
Adaptor 1 pc 1 pcDrain Hose
Wall Exhaust
Adaptor A
(only for wall
installation)
1 pc Drain Hose
Adaptor
(only for heat
pump mode)
1 pc
Wall Exhaust
Adaptor B (with
cap) (only for
wall installation)
1 pc Foam Seal A
(Adhesive) 2 pc
Screw and
anchor (only
for wall
installation)
4 set Foam Seal B
(Adhesive) 2 pc
Window Slider
A1 pc Foam Seal C
(Non-adhesive) 1 pc
Window Slider
B1 pc Remote
Controller
and Battery
1 set
Power Cord
Buckle 1 pc
Note: Items with * are optional. Slight variations in design may occur.
AF_Manual_AC_12000BTU_BAC4255_BAC4255N.indd 23 21/01/2019 10:24

24
Window Installation Kit
Step One: Preparing the exhaust hose assembly
Press the exhaust hose into the window slider adaptor and unit
adaptor, clamp automatically by elastic buckles of the adaptors.
Exhaust hose
Press into Press into
Unit adaptor
Window slider
adaptor
Exhaust hose
assembly
Step Two: Install the exhaust hose assembly to the unit
Insert the unit adaptor of the Exhaust hose assembly into the lower
groove of the unit’s air outlet with the adaptor’s hook aligned with the
hole seat of the air outlet and slide down the exhaust hose assembly
along the arrow direction for installation.
Make sure the hook of the adaptor is aligned
with the hole seat of the air outlet.
Hook Hole seat
adaptor Lower groove Make sure the adaptor
is inserted into the lower
groove of the air outlet
Step Three: Preparing the adjustable window slider
1. Depending on your window’s size, adjust the window slider’s size.
2. If the length of the window requires two window sliders, use the bolt
to fasten the window sliders once they are adjusted to the proper
length.
AF_Manual_AC_12000BTU_BAC4255_BAC4255N.indd 24 21/01/2019 10:24

25
EN
Portable air conditioner | Aire acondicionado portátil | Ar Condicionado Portátil
3. For some models, if the length of the window requires three window
sliders (optional), use two bolts to fasten the window sliders once
they are adjusted to proper length.
Bolt
Window slider A Window slider B
Window slider A Window slider B Window slider c
Bolts
Note: once the exhaust hose assembly and adjustable window slider
are prepared, choose from one of the following installation methods.
Method 1: Hung Window or Sliding Window Installation (optional)
Foam seal B
(Adhesive type-shorter) Foam seal B
(Adhesive type-shorter)
Foam seal A
(Adhesive type)
Foam seal A
(Adhesive type)
or
1. Cut the adhesive foam seal A and B strips to the proper lengths,
and attach them to the window sash and frame as shown.
AF_Manual_AC_12000BTU_BAC4255_BAC4255N.indd 25 21/01/2019 10:25

26
Window
slider A
Window slider A
Window
slider B
(if required)
Window slider B
(if required)
or
2. Insert the window slider assembly into the window opening.
Foam seal C
(Non-adhesive type)
Foam seal C
(Non-adhesive type)
or
3. Cut the non-adhesive foam seal C strip to match the width of the
window. Insert the seal between the glass and the window frame
to prevent air and insects from getting into the room.
or
Security Bracket
Security
Bracket
2 Screws
2 Screws
4. If desired, install the security bracket with 2 screws as shown.
AF_Manual_AC_12000BTU_BAC4255_BAC4255N.indd 26 21/01/2019 10:25

27
EN
Portable air conditioner | Aire acondicionado portátil | Ar Condicionado Portátil
or
5. Insert the window slider adaptor into the hole of the window slider.
Method 2: Wall Installation (optional)
1. Cut a 125 mm (4.9 inch) hole into the wall for the wall exhaust adaptor B.
2. Secure the wall exhaust adaptor B to the wall using the four anchors
and screws provided in the kit.
3. Connect the exhaust hose assembly(with wall exhaust adaptor A) to
the wall exhaust adaptor B.
Expansion anchor
position
Wall Exhaust
Adaptor B
Adaptor cap
Note: Cover the hole using the adaptor
cap when not in use.
Note: to ensure proper function, DO NOT overextend or bend the
hose. Make sure that there is no obstacle around the air outlet of the
exhaust hose (in the range of 500 mm) in order to the exhaust system
works properly. All gures in this manual are for illustrations purposes
only. Your air conditioner may be slightly dierent, but the general
shape will remain the same..
AF_Manual_AC_12000BTU_BAC4255_BAC4255N.indd 27 21/01/2019 10:25

28
Control Panel Operation
Note: the control panel may be look like one of the followings:
Note: on some models is instead of °F. On some models
(WIRELESS light) is instead of • (power light).
Note: some features (ION, FOLLOW ME, HEAT, WIRELESS etc.) are
optional. ION is not applicable for R32/R290 units
HEAT
mode light HIGH fan
speed light FOLLOW ME
light
COOL
mode light MED fan speed
light ION
light
FAN
mode light LOW fan speed
light SLEEP
light
DRY
mode light AUTO fan
speed light °C Degrees
Celsius
AUTO
mode light FILTER
light °F Degrees
Fahrenheit
WIRELESS
light POWER
MANAGEMENT
light
LED
display
AF_Manual_AC_12000BTU_BAC4255_BAC4255N.indd 28 21/01/2019 10:25

29
EN
Portable air conditioner | Aire acondicionado portátil | Ar Condicionado Portátil
SWING Swing button
Used to initiate the Auto swing feature. When the operation
is ON, press the SWING button can stop the louver at the
desired angle.
SWING Wireless button (optional)
(3 SECONDS)
Used to initiate the Wireless function. When you use the
Wireless function for the rst time, press and hold the swing
button for 3 seconds to initiate the Wireless connection
mode. The LED DISPLAY shows ‘AP’ to indicate you can
set the Wireless connection. If the connection (router) is
successful within 8 minutes, the unit will exit the Wireless
connection mode automatically and the Wireless indicator
illuminates. If the connection fails within 8 minutes, the unit
exits the Wireless connection mode automatically. After
the Wireless connection is successful, you can press and
hold the SWING and DOWN (-) buttons at the same time
for 3 seconds to turn o the Wireless function and the LED
DISPLAY shows ‘OFF’ for 3 seconds, press SWING and UP(+)
buttons at the same time to turn the Wireless function on and
the LED DISPLAY shows ‘ON’ for 3 seconds.
Note: when you restart the Wireless function, it may take a
while to connect to the network automatically.
TIMER Timer button
Used to initiate the AUTO ON start time and AUTO OFF stop
time program, together with the + & - buttons. The timer on/
o indicator light illuminates under the timer on/o settings.
MODE Mode button
Selects the appropriate operating mode. Each time you press
the button, a mode is selected in a sequence between AUTO,
COOL, DRY, FAN and HEAT (cooling-only models do not
have this mode).
The mode indicator light illuminates under the dierent
mode settings.
AF_Manual_AC_12000BTU_BAC4255_BAC4255N.indd 29 21/01/2019 10:25

30
Up (+) and Down (-) buttons
+
- Used to adjust (increasing/decreasing) temperature settings
in 1° C / 1° F (or 2° F) increments in a range of 17° C / 62° F
to 30° C / 86° F (or 88° F) or the TIMER setting in a range
of 0~2 4hrs.
the control is capable of displaying temperature in Note:
degrees Fahrenheit or degrees Celsius. To convert from one
to the other, press and hold the Up and Down buttons at the
same time for 3 seconds.
FAN Fan/Ion button (Ion is optional)
ION Control the fan speed. Press to select the fan speed in four
steps-LOW, MED, HIGH and AUTO. The fan speed indicator
light illuminates under dierent fan settings. When select
AUTO fan speed, all the fan indicator lights turn dark.
On some models, when select AUTO fan speed, all the fan
indicator lights illuminate (optional).
Note: press this button for 3 seconds to start the ION feature.
The ion generator is energized and will help to remove pollen
and impurities from the air, and trap them in the lter. Press it
for 3 seconds again to stop the ION feature.
SLEEP Sleep (Eco) button
Used to initiate the SLEEP/ECO feature.
On/O Power button
LED display
Shows the set temperature in °C or °F (some models
do not display temperature in “°F”) and the Auto-timer
settings. While on DRY and FAN modes, it shows the room
temperature.
Shows Error codes and protection code:
E1 – Room temperature sensor error.
E2 – Evaporator temperature sensor error.
AF_Manual_AC_12000BTU_BAC4255_BAC4255N.indd 30 21/01/2019 10:25

31
EN
Portable air conditioner | Aire acondicionado portátil | Ar Condicionado Portátil
E3 – Condenser temperature sensor error (on some models).
E4 – Display panel communication error.
EC – Refrigerant leakage detection malfunction (on some
models).
P1 – Bottom tray is full – Connect the drain hose and drain
the collected water away. If protection repeats, call for service.
Note: when one of the above malfunctions occur, turn o the
unit and check for any obstructions. Restart the unit and if
the malfunction is still present, turn o the unit and unplug
the power cord. Contact the manufacturer or its service
agents or a similar qualied person for service.
AF_Manual_AC_12000BTU_BAC4255_BAC4255N.indd 31 21/01/2019 10:25

33
EN
Portable air conditioner | Aire acondicionado portátil | Ar Condicionado Portátil
1 – ON/OFF Button
Press this button to turn the air
conditioning ON and OFF.
2 – MODE Button
Press this button to modify the air
conditioning mode according to the
following sequence:
Note: do not select the HEAT mode if
the unit you purchased is for cooling
only, as this mode is not supported by
the cooling only appliance.
3 – FAN Button Press this button to
select the fan speed, according to the
four available steps:
you cannot change the fan speed Note:
when in AUTO or DRY modes.
4 – SLEEP Button
• Press this button to Activate/Deactivate the sleep function. It can
stay at the most comfortable temperature and save energy. This
function is available on COOL, HEAT or AUTO mode only.
• For further information, refer to SLEEP mode section.
Note: while the unit is running under SLEEP mode, this mode is cancelled
if any of the MODE, FAN SPEED or ON/OFF buttons are pressed.
AF_Manual_AC_12000BTU_BAC4255_BAC4255N.indd 33 21/01/2019 10:25
SHORT
CUT
TIMER
ON
TIMER
OFF
MODE
FAN
LED
SLEEP
FOLLOW
SWING
ME
1
2
3
4
9
5
6
7
8
11
10

34
AF_Manual_AC_12000BTU_BAC4255_BAC4255N.indd 34 21/01/2019 10:25
)
Press this button to raise the indoor temperature setting in 1º C
increments to 30º C.
)
Press this button to lower the indoor temperature setting in 1º C
increments to 17º C.
Note: temperature control is not available in FAN mode.
• Press this button to restore the current settings or resume previous
settings.
• When powering the unit for the rst time, pushing the SHORTCUT
button will make the unit run on AUTO mode, at 26º C, at AUTO fan
speed.
• Pressing this button when the remote control is on will make the
system automatically revert to the previous settings including
operating mode, setting temperature, fan speed level and sleep
feature (if activated).
• Pressing this button for more than 2 seconds will make the system
automatically restore the current operation settings including
operating mode, setting temperature, fan speed level and sleep
feature (if activated).
Press this button to start the auto-on timer sequence. Each press
will increase the auto-time setting in 30-minute increments. When
the setting time displays 10.0, each press will increase the auto-timed
setting in 60-minute increments. To cancel the auto-time program,
simply adjust the auto-on timer to 0.0.
5 – UP Button (
5 – DOWN Button (
6 – SHORTCUT Button
7 – TIMER ON Button

35
EN
Portable air conditioner | Aire acondicionado portátil | Ar Condicionado Portátil
Press this button to start the auto-o timer sequence. Each press will
increase the auto-time setting in 30-minute increments. When the
setting time displays 10.0, each press will increase the auto-time setting
in 60-minute increments. To cancel the auto-time program, simply
adjust the auto-o timer to 0.0
Button
Press this button to stop or start the horizontal auto swing fan feature
or set the desired up/down air ow direction. The auto swing fan
angles change by 6 degrees with each press. If the swing button is
pressed continuously for more than 2 seconds, the feature is activated
and will swing up and down automatically.
10 – LED FOLLOW ME Button
Press this button to Activate/Deactivate the Follow Me feature; the
remote will display your location’s current temperature. The remote
control will send this signal to the air conditioning at 3-minute intervals
until you press the Follow Me button again. The air conditioning will
cancel the Follow Me feature automatically if it does not receive a
signal at any 7 minutes intervals.
AF_Manual_AC_12000BTU_BAC4255_BAC4255N.indd 35 21/01/2019 10:25
8 – TIMER OFF Button
9 – Swing
11 – LED Button
Press this button to Activate/Deactivate the indoor screen display.
When pressing the button, the indoor screen display is cleared;
pressing it again will light up the display.

36
Mode display
AUTO COOL DRY HEAT FAN
Displayed when data transmitted
Displayed when remote control is ON
Battery display (low battery detection)
Not available for this unit
Displayed when TIMER ON time is set
Displayed when TIMER OFF time is set
Show set temperature, room temperature or timer under TIMER setting
Displayed when in Sleep Mode
Displayed when in Follow me mode
Not available for this unit
Not available for this unit
AF_Manual_AC_12000BTU_BAC4255_BAC4255N.indd 36 21/01/2019 10:25
LCD symbols
Information are displayed when the remote control is powered up.
TIMER ON
TIMER OFF

37
EN
Portable air conditioner | Aire acondicionado portátil | Ar Condicionado Portátil
Fan speed indication
Low speed
Medium speed
High speed
Auto fan speed
Note: All symbols in the gure are for illustration purposes only.
During the actual operation, the display only shows the function
symbols in use.
HOW TO USE THE BUTTONS
Auto operation
Make sure the unit is plugged in and
switched on. The OPERATION indicator
on the indoor unit’s display panel will
start ashing.
1. Press the MODE button to select Auto.
2. Press the UP/DOWN button to set the
desired temperature. The temperature
can be set between 17º C ~ 30º C in 1º C
increments.
3. Press the ON/OFF button to start the
air conditioning.
Note:
1. In the AUTO mode, the air conditioning can automatically choose
the Cooling, Fan or Heating mode by sensing the dierence between
the current ambient room temperature and the set temperature on the
remote control.
AF_Manual_AC_12000BTU_BAC4255_BAC4255N.indd 37 21/01/2019 10:25
SHORT
CUT
TIMER
ON
TIMER
OFF
MODE
FAN
LED
SLEEP
FOLLOW
SWING
ME
3
1
2

39
EN
Portable air conditioner | Aire acondicionado portátil | Ar Condicionado Portátil
Dehumidifying operation
Make sure the unit is plugged in and
switched on. The OPERATION indicator
on the indoor unit’s display panel will
start ashing.
1. Press the MODE button to select DRY
mode.
2. Press the UP/DOWN buttons to set the
desired temperature. The temperature
can be set between 17º C ~ 30º C in 1º C
increments.
3. Press the ON/OFF button to start the
air conditioning.
Note:
In the Dehumidifying mode, you cannot change the fan speed, as this
is automatically controlled.
Adjusting air ow direction
Use the SWING & buttons to adjust the desired airow
direction.
1. Up/Down direction can be adjusted with the button on the
remote control. The auto swing fan angles change by 6 degrees with
each press. If the swing button is pressed continuously for more
than 2 seconds, the feature is activated and will swing up and down
automatically.
2. Left/Right direction can be adjusted with the button on the remote
control. The auto swing fan angles change by 6 degrees with each press.
If the swing button is pressed continuously for more than 2 seconds, the
feature is activated and will swing up and down automatically.
Note: when the swing fan or its air direction aects the cooling or
heating of the air conditioning, it will automatically change the swing/
direction.
AF_Manual_AC_12000BTU_BAC4255_BAC4255N.indd 39 21/01/2019 10:25
SHORT
CUT
TIMER
ON
TIMER
OFF
MODE
FAN
LED
SLEEP
FOLLOW
SWING
ME
3
1
2

40
Timer operation
Press the TIMER ON button to set the unit’s
auto-on timer. Press the TIMER OFF button
to set the unit’s auto-o timer.
To set the Auto-on timer.
1. Press the TIMER ON button. The remote
control’s LCD will show TIMER ON, the last
Auto-on set time and the signal “H”. It is
now ready to reset the Auto-on timer to
START the operation.
2. Press the TIMER ON button again to
set the desired Auto-on timer. The timer
increases in 30-minute increments between
10 and 24 hours.
3. After setting the TIMER ON ,there will be a 1 second delay before the
remote control transmits the signal to the air conditioning unit. Then,
after approximately another 2 seconds, the signal “H” will disappear
and the set temperature will re-appear on the LCD display window.
To set the Auto-o timer.
1. Press the TIMER OFF button. The remote control’s LCD will show
TIMER OFF, the last Auto-o setting time and the signal “H”. Now it is
ready to reset the Auto-o timer to stop the operation.
2. Press the TIMER OFF button again to set the desired Auto-o timer.
The timer increases in 30-minute increments between 10 and 24 hours
and in 1-hour increments between 10 and 24 hours.
3. After setting the TIMER OFF, there will be a 1 second delay before
the remote control transmits the signal to the air conditioning unit.
Then, after approximately another 2 seconds, the signal “H “ will
disappear and the set temperature will re-appear on the LCD display
window.
AF_Manual_AC_12000BTU_BAC4255_BAC4255N.indd 40 21/01/2019 10:25
Timer on
SHORT
CUT
TIMER
ON
TIMER
OFF
MODE
FAN
LED
SLEEP
FOLLOW
SWING
ME
1
2

41
EN
Portable air conditioner | Aire acondicionado portátil | Ar Condicionado Portátil
CAUTION
• When you select the timer operation, the remote control
automatically transmits the timer signal to the indoor unit for the
specied time. Therefore, keep the remote control in a location
where it can properly transmit the signal to the indoor unit.
• The timer function set by the remote control is limited to the
following settings: 0.5, 1.0, 1.5, 2.0, 2.5, 3.0, 3.5, 4.0, 4.5, 5.0, 5.5, 6.0,
6.5, 7.0, 7.5, 8.0, 8.5, 9.0, 9.5, 10, 11, 12, 13, 14, 15, 16, 17, 18, 19, 20, 21,
22, 23 and 24.
Example of a timer setting
Start
O
Set 6 hours later
TIMER ON
(Auto-on Operation)
The TIMER ON feature is useful when you want the unit to turn
on automatically before you return home. The air conditioning will
automatically start operating at the set time.
AF_Manual_AC_12000BTU_BAC4255_BAC4255N.indd 41 21/01/2019 10:25

42
Example:
To start the air conditioning within 6 hours, proceed accordingly:
1. Press the TIMER ON button. The last setting of operation start and
the signal “H” will show on the display area.
2. Press the TIMER ON button to display “6.0H” on the remote control’s
TIMER ON display.
3. Wait 3 seconds. The digital display area will show the temperature
again. The “TIMER ON” indicator will remain on and this function is
activated.
Set 10 hours later
Stop
On
TIMER OFF
(Auto-o Operation)
The TIMER OFF feature is useful when you want the unit to turn
o automatically after you go to bed. The air conditioning will stop
automatically at the set time.
Example:
To stop the air conditioning within 10 hours, proceed accordingly:
1. Press the TIMER OFF button. The last setting of operation stop and
the signal “H” will show on the display area.
2. Press the TIMER OFF button to display “10H” on the remote control’s
TIMER OFF display.
AF_Manual_AC_12000BTU_BAC4255_BAC4255N.indd 42 21/01/2019 10:25

43
EN
Portable air conditioner | Aire acondicionado portátil | Ar Condicionado Portátil
3. Wait 3 seconds. The digital display area will show the temperature
again. The “TIMER OFF” indicator will remain on and this function is
activated.
Stop
Start
Set
On
2 hours later
after setting 10 hours later
after setting
COMBINED TIMER
(Setting both ON and OFF timers simultaneously)
TIMER OFF TIMER ON
(On Stop Start operation)
This feature is useful when you want to stop the air conditioning after
you go to bed, and start it again in the morning when you wake up or
when you return home.
Example:
To stop the air conditioning 2 hours after operation start and restart it
10 hours after.
1. Press the TIMER OFF button.
2. Press the TIMER OFF button again to display “2.0H” on the TIMER
OFF display.
3. Press the TIMER ON button.
4. Press the TIMER ON button again to display “10H” on the TIMER
ON display.
AF_Manual_AC_12000BTU_BAC4255_BAC4255N.indd 43 21/01/2019 10:25

44
5. Wait 3 seconds. The digital display area will show the temperature
again. The “TIMER ON OFF” indicator will remain on and this function
is activated.
Start
StopO
2 hours later
after setting
Set 5 hours later
after setting
TIMER ON TIMER OFF
(O Start Stop operation)
This feature is useful when you want to start the air conditioning
before you wake up and stop it after you leave the house.
Example:
To start the air conditioning 2 hours after operation start, and stop it 5
hours after.
1. Press the TIMER ON button.
2. Press the TIMER ON button again to display “2.0H” on the TIMER
ON display.
3. Press the TIMER OFF button.
4. Press the TIMER OFF button again to display “5.0H” on the TIMER
OFF display.
5. Wait 3 seconds. The digital display area will show the temperature
again. The “TIMER ON & TIMER OFF” indicator will remain on and this
function is activated.
AF_Manual_AC_12000BTU_BAC4255_BAC4255N.indd 44 21/01/2019 10:25

45
EN
Portable air conditioner | Aire acondicionado portátil | Ar Condicionado Portátil
Handling the remote control
Location of the remote control.
• Use the remote control within 8 meters from the unit, pointing it
towards the receiver. Reception is conrmed by a beep.
CAUTION
• The air conditioning will not operate if curtains, doors or other
materials block the signals from the remote control to the indoor
unit.
• Prevent any liquid from falling into the remote control.
Do not expose the remote control to direct sunlight or heat.
• If the infrared signal receiver on the indoor unit is exposed to direct
sunlight, the air conditioning may not function properly. Use curtains
to prevent the signal receiver from being under direct sunlight.
• If other electrical appliances react to the remote control, either
move these appliances or consult your local dealer.
• Do not drop the remote control. Handle with care.
• Do not place heavy objects on the remote control, or step on it.
AF_Manual_AC_12000BTU_BAC4255_BAC4255N.indd 45 21/01/2019 10:25

46
Using the remote control holder (optional)
• The remote control can be attached to a wall or pillar by using a
remote control holder (not supplied, purchased separately).
• Before installing the remote control, check the air conditioning
receives the signals properly.
• Install the remote control holder with two screws.
• To install or remove the remote control, move it up or down in the holder.
Replacing the batteries
Replace the old batteries with new ones when the following cases,
which signify exhausted batteries, occur:
• There is no beep sound when a signal is transmitted.
• Received indicator fades away.
AF_Manual_AC_12000BTU_BAC4255_BAC4255N.indd 46 21/01/2019 10:25

47
EN
Portable air conditioner | Aire acondicionado portátil | Ar Condicionado Portátil
The remote control is powered by 2 dry batteries (R03/LR03X2) in the
back part of the remote, protected by a cover.
1. Remove the cover in the back part of the remote control.
2. Remove the old batteries and insert the new batteries, placing the
(+) and (-) poles correctly.
3. Place the cover back on.
Note: When the batteries are removed, the remote control erases all
programming. After inserting new batteries, the remote control must
be reprogrammed.
CAUTION
• Do not mix old and new batteries or dierent types of batteries.
• Do not leave the batteries in the remote control if they are not
going to be used for 2 or 3 months.
• Do not dispose of batteries as unsorted municipal waste. It is
necessary to collected such waste separately for special processing.
Exhaust hose installation
The exhaust hose and adaptor must be installed or removed in
accordance with the usage mode.
For COOL, HEAT (heat pump type) or AUTO modes, the exhaust hose
must be installed.
For FAN, DEHUMIDIIFY or HEAT (electrical heat type) modes, the
exhaust hose must be removed.
AF_Manual_AC_12000BTU_BAC4255_BAC4255N.indd 47 21/01/2019 10:25

48
Operation Instructions
COOL operation
- Press the MODE button until the COOL indicator light comes on.
- Press the ADJUST buttons “+” or “-” to select your desired room
temperature. The temperature can be set within a range of 17° C ~
30° C / 62° F ~ 86° F (or 88° F).
- Press the FAN SPEED button to choose the fan speed.
HEAT operation
- Press the MODE button until the HEAT indicator light comes on.
- Press the ADJUST buttons “+” or “ - “ to select your desired room
temperature. The temperature can be set within a range of 17° C ~
30° C / 62° F ~ 86° F (or 88° F).
- Press the FAN SPEED button to choose the fan speed.
In some models, the fan speed cannot be adjusted under the HEAT
mode.
DRY operation
- Press the MODE button until the DRY indicator light comes on.
- Under this mode, you cannot select a fan speed or adjust the
temperature. The fan motor operates at LOW speed.
- Keep windows and doors closed for the best dehumidifying eect.
- Do not duct tape the window.
AUTO operation
- When you set the air conditioner to AUTO mode, it will automatically
select cooling, heating (cooling-only models do not present this
feature), or fan only operation depending on what temperature you
have selected and the room temperature itself.
- The air conditioner will control the room temperature automatically
to match the temperature you set.
- Under the AUTO mode, you cannot select the fan speed.
Note: under the AUTO mode, both the AUTO mode and the actual
operation mode indicator lights show in some models.
AF_Manual_AC_12000BTU_BAC4255_BAC4255N.indd 48 21/01/2019 10:25

49
EN
Portable air conditioner | Aire acondicionado portátil | Ar Condicionado Portátil
FAN operation
- Press the MODE button until the FAN indicator light comes on.
- Press the FAN SPEED button to choose the fan speed.
The temperature cannot be adjusted.
- Do not duct tape the window.
TIMER operation
- When the unit is on, press the TIMER button will start the Auto-o
stop program; the TIMER OFF indicator light illuminates. Press the
UP or DOWN button to set the timer. Press the TIMER button again
within 5 seconds and the Auto-on start program is initiated.
And the TIMER ON indicator light illuminates. Press the UP or DOWN
button to select the desired Auto-on start time.
- When the unit is o, press the TIMER button to initiate the Auto-on
start program. Press it again within 5 seconds to and then Auto-o
stop program is initiated.
- Press or hold the UP or DOWN button to change the Auto time by
0.5 hour increments, up to 10 hours, then at 1 hour increments up to
24 hours. The control will count down the time remaining until start.
- The system will automatically revert back to display the previous
temperature setting if there is no operation in a 5 seconds period.
- Turning the unit ON or OFF at any time or adjusting the timer setting
to 0.0 will cancel the Auto Start/Stop timer program.
SLEEP(ECO) operation
- Press this button and the selected temperature will increase (cooling)
or decrease (heating) by 1°C / 2° F(or 1° F) 30 minutes.
The temperature will then increase (cooling) or decrease (heating)
by another 1°C / 2° F(or 1° F) after an additional 30 minutes.
This new temperature will be maintained for 7 hours before it returns
to the originally selected temperature. This ends the Sleep/Eco mode
and the unit will continue to operate as originally programmed.
Note: This feature is unavailable under the FAN or DRY modes.
AF_Manual_AC_12000BTU_BAC4255_BAC4255N.indd 49 21/01/2019 10:25

50
Other features
FOLLOW ME/TEMP. SENSING feature
Note: this feature can be activated from the remote control ONLY. The
remote control serves as a remote thermostat allowing for the precise
temperature control at its location. To activate the Follow Me/Temp.
Sensing feature, point the remote control towards the unit and press
the Follow Me/Temp. Sensing button. The remote control will send this
signal to the air conditioner until press the Follow Me/Temp. Sensing
button again. If the unit does not receive the Follow Me/Temp. Sensing
signal during any 7 minutes interval, the unit will exit the Follow Me/
Temp. Sensing mode.
Note: this feature is unavailable under the FAN or DRY modes.
AUTO-RESTART
If the unit breaks o unexpectedly due to the power cut, it will restart with
the previous function setting automatically when the power resumes.
AIR FLOW DIRECTION ADJUSTMENT
The louver can be adjusted automatically. Adjust the air ow direction
automatically:
- When the Power is ON, the louver opens fully.
- Press the SWING button on the panel or remote controller to
initiate the Auto swing feature. The louver will swing up and down
automatically.
- Please do not adjust the louver manually.
WAIT 3 MINUTES BEFORE RESUMING OPERATION
After the unit has stopped or turned o accidentally, its operation
cannot restart for 3 minutes. This happens in order to protect the unit.
Operation will automatically resume after 3 minutes.
POWER MANAGEMENT feature (on some models)
When the ambient temperature is lower than the setting temperature
for a period of time, the unit will automatically start the power
management feature. The compressor and fan motor stop.
AF_Manual_AC_12000BTU_BAC4255_BAC4255N.indd 50 21/01/2019 10:25

51
EN
Portable air conditioner | Aire acondicionado portátil | Ar Condicionado Portátil
When the ambient temperature is higher than the setting temperature,
the unit will automatically stop the power management feature.
The compressor and (or) fan motor will resume.
Note: for units with power management light, the light will illuminate
under this feature.
Water drainage
- In dehumidifying modes, remove the upper drain plug from the back
of the unit, install the drain connector (5/8” universal female mender)
with 3/4” hose (locally purchased). For models without a drain
connector, just attach the drain hose to the hole. Place the open end
of the hose directly over the drain area in your basement oor.
Remove the
upper drain plug
Continuos
drain hose
- In heating pump mode, remove the lower drain plug from the back of
the unit, install the drain connector (5/8” universal female mender) with
3/4” hose (locally purchased). For the models without drain connector,
just attach the drain hose to the hole. Place the open end of the Hose
adaptor directly over the drain area in your basement oor.
Note: make sure the hose is secure so there are no leaks.
Direct the hose toward the drain, making sure that there are no kinks
that will stop the water ow. Place the end of the hose into the drain and
make sure the end of the hose is down to let the water ow smoothly.
AF_Manual_AC_12000BTU_BAC4255_BAC4255N.indd 51 21/01/2019 10:25

52
(See Figs with . Do never let it up.(See Figs with ). When the
continuous drain hose is not used, ensure that the corresponding drain
plug and knob are installed rmly to prevent leakage.
Remove the
upper drain plug
Continuous
drain hose
Drain hose
adaptor
Drain hose
adaptor
Drain hose
adaptor
Press the power
cord buckle into
the rear cover
Delivery lift ≤ 1.8 mm
When the water level of the bottom tray reaches a predetermined level,
the unit beeps 8 times and the digital display shows “P1” . At this time,
the air conditioner/dehumidication process will immediately stop.
However, the fan motor will continue to operate (this is normal).
Carefully move the unit to a drain location, remove the bottom drain
plug and let the water drain away. Reinstall the bottom drain plug
and restart the machine until the “P1” symbol disappears.
If the error repeats, call the Customer Support Service.
Note: be sure to reinstall the bottom drain plug rmly to prevent
leakage before using the unit.
AF_Manual_AC_12000BTU_BAC4255_BAC4255N.indd 52 21/01/2019 10:25

53
EN
Portable air conditioner | Aire acondicionado portátil | Ar Condicionado Portátil
2.3. Maintenance
Warnings:
• Always unplug the unit before cleaning or servicing.
• DO NOT use ammable liquids or chemicals to clean the unit.
• DO NOT wash the unit under running water. Doing so causes
electrical danger.
• DO NOT operate the machine if the power supply was damaged
during cleaning. A damaged power cord must be replaced with
a new cord from the manufacturer.
Clean the Air Filter
1. Remove the air lter.
Upper lter
(take out)
Remove
the screw,
then take
the lower
lter out
2. Clean the air lter with a hand-held vacuum.
3. Clean the grill with warm, soapy water. Be sure to use a mild detergent.
Caution
DO NOT operate the unit without lter because dirt and lint will clog it
and reduce performance.
AF_Manual_AC_12000BTU_BAC4255_BAC4255N.indd 53 21/01/2019 10:25
54
Maintenance tips
• Be sure to clean the air lter every 2 weeks for optimal performance.
• The water collection tray should be drained immediately after P1
error occurs, and before storage to prevent mold.
• In households with animals, you will have to periodically wipe down
the grill to prevent blocked airow due to animal hair.
Clean the unit
Clean the unit using a damp, lint-free cloth and mild detergent.
Dry the unit with a dry, lint-free cloth.
Store the unit when not in use
• Drain the unit’s water collection tray according to the instructions in
the following section.
• Run the appliance on the FAN mode for 12 hours in a warm room to
dry it and prevent mold.
• Turn o the appliance and unplug it.
• Clean the air lter according to the instructions in the previous
section. Reinstall the clean, dry lter before storing.
• Remove the batteries from the remote control.
Be sure to store the unit in a cool, dark place. Exposure to direct
sunshine or extreme heat can shorten the unit’s lifespan.
Note: the cabinet front may be dusted with an oil-free cloth or washed
with a cloth dampened in a solution of warm water and mild liquid
dishwashing detergent. Rinse thoroughly and wipe dry. Never use
harsh cleansers, wax or polish on the cabinet front. Be sure to wring
excess water from the cloth before wiping around the controls.
Excess water in or around the controls may cause damage to the unit.
AF_Manual_AC_12000BTU_BAC4255_BAC4255N.indd 54 21/01/2019 10:25

55
EN
Portable air conditioner | Aire acondicionado portátil | Ar Condicionado Portátil
2.4. Troubleshooting
Refer to the table below before asking for maintenance.
Problem Possible Cause Troubleshooting
The unit
does not turn
on when ON/
OFF button is
pressed
P1 Error Code The Water collection tray is
full. Turn o the unit, drain the
water from the Water collection
tray and restart the unit.
In COOL mode: room
temperature is lower than the
set temperature
Reset the temperature
The unit
does not cool
well
The air lter is blocked with
dust or animal hair
Turn o the unit and clean
the lter according to
instructions
Exhaust hose is not
connected or is blocked
Turn o the unit, disconnect
the hose, check for blockage
and reconnect the hose
The unit is low on refrigerant Call a service technician to
inspect the unit and top o
the refrigerant
Temperature setting is too high Decrease the set temperature
Windows and doors in the
room are open
Make sure all windows and
doors are closed
The room area is too large Double-check the cooling area
There are heat sources inside
the room
Remove the heat sources if
possible
The unit is
noisy and
vibrates too
much
The ground is not level Place the unit on a at, level
surface
The air lter is blocked with
dust or animal hair
Turn o the unit and clean
the lter according to
instructions
The unit
makes a
gurgling
sound
This sound is caused by the
ow of refrigerant inside the
unit
This is normal
AF_Manual_AC_12000BTU_BAC4255_BAC4255N.indd 55 21/01/2019 10:25

56
2.5. Technical Specications
Model BECKEN BAC4255 BECKEN BAC4255N
Recommended Area 23 m223 m2
BTU 12000 12000
Heating Capacity 1045 W 1045 W
Refrigerating capacity 1350 W 1350 W
Eiciency Heating A+ A+
Eiciency Cooling A A
Power Consumption
(Heating)
1.1kWh/60min 1.1kWh/60min
Power Consumption
(Cooling)
1.4kWh/60min 1.4kWh/60min
SEER / SCOP 2.6/2.8 2.6/2.8
Weight 34,4 Kg 34,4 Kg
Height 76,5 cm 76,5 cm
Width 46,7 cm 46,7 cm
Depth 39,7 cm 39,7 cm
Noise (dB) 64 dB 65 dB
Voltage 220-240V 220-240V
Frequency 50Hz 50Hz
Gas R290 R290
Refrigerating Gas 0,23 kg 0,195 kg
AF_Manual_AC_12000BTU_BAC4255_BAC4255N.indd 56 21/01/2019 10:25

57
EN
Portable air conditioner | Aire acondicionado portátil | Ar Condicionado Portátil
3. POST-SALE SERVICE
BECKEN has designed this appliance in order to guarantee maximum
reliability. However, if a problem occurs do not attempt to open the
appliance - there is a risk of electrical shock. If you are not able to solve
the problem, please contact the Customer Support Service of any
Worten, Modelo or Continente store in order to be assisted. Worten
Equipamentos para o Lar provides a 2-year warranty for manufacturing
defects from the date of purchase of the appliance.
WARNING: any attempt to repair the appliance without contacting the
manufacturer or seller will void the warranty.
All users must be familiar with these instructions. Knowing what could
go wrong can help prevent problems from occurring.
4. ENVIRONMENTAL PROTECTION
In order to protect the environment, we strive to
reduce the volume of packaging used, limiting
it to three easily sorted materials: cardboard,
paper and plastic. The appliance is manufactured
using recyclable materials after disassembled by
a specialized company. Please comply with local
regulations concerning the recycling of all materials.
AF_Manual_AC_12000BTU_BAC4255_BAC4255N.indd 57 21/01/2019 10:25

Estimado cliente:
Gracias por adquirir este producto.
Este aparato ha sido sometido a diversas pruebas que
avalan su calidad. Este manual de instrucciones está
destinado a facilitar el uso del aparato y garantizar un uso
seguro.
Lea atentamente las instrucciones, así como las medidas de
seguridad descritas en este manual.
Esperamos sinceramente que esté satisfecho con su nuevo
aparato.
AF_Manual_AC_12000BTU_BAC4255_BAC4255N.indd 58 21/01/2019 10:25

59
ES
Portable air conditioner | Aire acondicionado portátil | Ar Condicionado Portátil
ÍNDICE
1. INSTRUCCIONES DE SEGURIDAD 60
1.1. Alimentación 61
1.2. Cable de alimentación y otros cables 61
1.3. Humedad y agua 61
1.4. Limpieza 62
1.5. Precauciones generales 62
2. MANUAL DE INSTRUCCIONES 68
2.1. Descripción del producto 68
2.2. Utilización del producto 68
2.3. Mantenimiento 114
2.4. Resolución de problemas 116
2.5. Especificaciones técnicas 117
3. SERVICIO POSVENTA 118
4. PROTECCIÓN MEDIOAMBIENTAL 118
AF_Manual_AC_12000BTU_BAC4255_BAC4255N.indd 59 21/01/2019 10:25

60
1. INSTRUCCIONES DE SEGURIDAD
Avisos importantes
Antes de usar el aparato, lea atentamente este manual de instrucciones
y guárdelo en un lugar seguro, pues puede tener que consultarlo en el
futuro.
Antes de encender el aparato, y a n de garantizar su utilización de
forma correcta y segura, no lo utilice si:
• Se ha caído al suelo;
• Nota alguna señal de daño;
• Se produce alguna anomalía durante su funcionamiento.
Para evitar posibles peligros y el deterioro del aparato debido a un uso
incorrecto, se recomienda que lea atentamente las instrucciones.
Este aparato no deberá ser utilizado para otros fines que no sean los
previstos en el manual y únicamente para uso doméstico. Cualquier
daño derivado del uso del aparato fuera de este ámbito de aplicación,
cualquier uso incorrecto, así como cualquier modificación manual del
producto, no estará cubierto y anulará automáticamente la garantía.
ATENCIÓN
PELIGRO DE ELECTROCUCIÓN
NO ABRIR
Atención: para evitar el riesgo de electrocución, no
abra esta unidad. Su interior no contiene elementos que
puedan ser reparados por el usuario. Acuda al Servicio de
Atención al Cliente.
AF_Manual_AC_12000BTU_BAC4255_BAC4255N.indd 60 21/01/2019 10:25

61
ES
Portable air conditioner | Aire acondicionado portátil | Ar Condicionado Portátil
Asistencia
En caso de avería, acuda al Servicio de Atención al Cliente.
Este aparato podrá ser utilizado por niños de ocho años o más y
por personas con discapacidad física, sensorial o mental, o personas
con falta de experiencia o conocimientos, siempre que cuenten con
supervisión o se les haya proporcionado instrucciones para usar este
aparato de un modo seguro, y entiendan los riesgos que conlleva. Los
niños no deben jugar con el aparato. La limpieza y mantenimiento no
deben ser realizados por niños sin supervisión.
Estas instrucciones también están disponibles en www.suporteworten.pt
1.1. Alimentación
Compruebe que la tensión de la red eléctrica es compatible con la
indicada en el aparato. En caso de que no sea compatible, consulte al
Servicio de Atención al Cliente.
1.2. Cable de alimentación y otros cables
No enrolle el cable de alimentación ni tire de él para desenchufar el
aparato. Asimismo, manténgalo alejado de supercies calientes.
Nunca utilice este aparato si el cable o el enchufe están dañados.
En su lugar, llévelo a un Servicio de Atención al Cliente para que
proceda a su sustitución.
1.3. Humedad y agua
No utilice el aparato en lugares húmedos. No deje que el aparato se
moje en ninguna circunstancia, pues puede ser peligroso. Para evitar el
peligro de incendio o descarga eléctrica, no exponga el aparato al agua
o la humedad. Asimismo, no sumerja el aparato (por ejemplo, para
limpiarlo).
AF_Manual_AC_12000BTU_BAC4255_BAC4255N.indd 61 21/01/2019 10:25

62
1.4. Limpieza
Antes de proceder a la limpieza del aparato, apáguelo y desconecte el
cable de la corriente. Deje siempre que el aparato se enfríe antes de
efectuar cualquier operación de limpieza.
Para limpiar el exterior del producto, utilice únicamente un paño suave
y seco.
1.5. Advertencias de seguridad
• Siga las instrucciones de este manual, que le ayudarán a instalar y
poner correctamente en funcionamiento este producto y disfrutar
de sus características avanzadas. Guarde las instrucciones para
referencia futura.
• Lea todas las instrucciones antes de usar el aparato.
• Las operaciones de reparación o mantenimiento deben ser
realizadas únicamente por profesionales autorizados.
• Cualquier daño provocado por modificaciones manuales al producto
no estará cubierto por la garantía.
• Si usa el producto para otros fines que no sean para los que ha sido
originalmente diseñado, o si no está correctamente conectado, el
producto podrá sufrir daños y la garantía quedará anulada.
• Este símbolo indica que hacer caso omiso de las instrucciones puede
ocasionar la muerte o lesiones graves.
• ADVERTENCIA: Cumpla las siguientes instrucciones para evitar
lesiones o la muerte del usuario u otras personas y daños materiales.
La operación incorrecta por hacer caso omiso de las instrucciones
puede causarle la muerte, lesiones o dañar el equipo.
• La instalación debe realizarse de acuerdo con las instrucciones de
instalación. La instalación incorrecta puede provocar fugas de agua,
descargas eléctricas o incendios.
AF_Manual_AC_12000BTU_BAC4255_BAC4255N.indd 62 21/01/2019 10:25

63
ES
Portable air conditioner | Aire acondicionado portátil | Ar Condicionado Portátil
• Use solamente los accesorios y las partes incluidas, así como las
herramientas especificadas para la instalación. Usar partes no
estándar puede provocar fugas de agua, descargas eléctricas,
incendios y lesiones en las personas o daños en la propiedad.
• Asegúrese de que la salida que usa tenga puesta a tierra y el voltaje
apropiado. El cable de alimentación está equipado con un enchufe a
tierra de tres clavijas para la protección contra descargas eléctricas.
La información de voltaje se encuentra en la placa de características
de la unidad.
• La unidad deberá utilizarse en una toma de corriente debidamente
conectada a tierra. Si el enchufe de pared que va a utilizar no está
conectado a tierra ni protegido adecuadamente por un fusible de
retardo o un disyuntor (el fusible o el disyuntor que necesita están
determinados por la corriente máxima de la unidad, que se indica
en la placa de características), pida a un electricista calificado que
instale la toma de corriente adecuada.
• Instale la unidad en una superficie nivelada y maciza. De no hacerlo,
podría dañar el aparato o provocar ruido excesivo y vibraciones.
• Mantenga la unidad libre de obstrucciones para garantizar la función
adecuada y para mitigar los peligros relacionados con la seguridad.
• NO modifique la longitud del cable de alimentación ni utilice un
cable de extensión para activar la unidad.
• No comparta una misma toma de corriente con otros
electrodomésticos. Una fuente de alimentación inadecuada puede
causar incendios o descargas eléctricas.
• NO ponga en funcionamiento su aire acondicionado en una
habitación húmeda, como un cuarto de baño o un lavadero.
Demasiada exposición al agua puede ocasionar un cortocircuito en
los componentes eléctricos.
AF_Manual_AC_12000BTU_BAC4255_BAC4255N.indd 63 21/01/2019 10:25

64
• NO instale la unidad en un lugar que pueda estar expuesto a fugas
de gas combustible, dado que esto puede provocar un incendio.
• La unidad incluye ruedas que facilitan su traslado. Asegúrese de
no usarlas sobre una alfombra gruesa o para pasar por encima de
objetos, dado que podría tropezar.
• El aparato con calentador eléctrico deberá estar a 1 metro de
distancia como mínimo de los materiales combustibles.
• No toque la unidad con las manos húmedas o mojadas o si está
descalzo.
• Si el aire acondicionado cae durante su uso, apague de inmediato
la unidad y desenchúfela de la principal fuente de alimentación.
Inspeccione visualmente la unidad para asegurarse de que no esté
dañada. Si sospecha que la unidad está dañada, contacte a un técnico
o al Servicio de Atención al Cliente para obtener asistencia.
• Durante una tormenta, debe cortar el suministro de energía para
evitar daños en la máquina ocasionados por los rayos.
• Utilice su aire acondicionado de tal manera que esté protegido de
humedad; p. ej., de la condensación, salpicaduras de agua, etc. No
coloque ni guarde el aire acondicionado donde pueda caerse o
alguien pueda tirarlo al agua o cualquier otro líquido. Si esto ocurre,
desconéctelo inmediatamente.
• Tienda el cableado siguiendo estrictamente el diagrama que se
localiza en la unidad.
• La placa de circuito (PCB) de la unidad está diseñada con un
fusible que proporciona protección contra la sobrecorriente. Las
especificaciones del fusible están impresas en la placa de circuito,
como: T 3,15 A/250 V, etc.
AF_Manual_AC_12000BTU_BAC4255_BAC4255N.indd 64 21/01/2019 10:25

65
ES
Portable air conditioner | Aire acondicionado portátil | Ar Condicionado Portátil
Precauciones
• No retire las tapas fijas. No utilice este aparato si no funciona
correctamente, si está dañado o se ha caído.
• No deslice el cable por debajo de ningún alfombrado. No cubra
el cable eléctrico con alfombras, tapetes o cubiertas similares. No
coloque el cable eléctrico debajo de muebles o electrodomésticos.
Colóquelo lejos de áreas de tránsito y donde nadie pueda tropezar.
• Para reducir el riesgo de incendio o descarga eléctrica, no use este
ventilador con un dispositivo de control de velocidad de estado
sólido.
• La instalación del aparato deberá realizarse de acuerdo con las
normativas nacionales sobre cableado.
• No cubra ni obstruya las rejillas de entrada o salida.
• No utilice este producto para otras funciones distintas a las descritas
en este manual de instrucciones.
• Desconecte la alimentación si se producen ruidos extraños, o si se
desprenden olores o humo del aparato.
• Presione los botones del panel de control únicamente con sus dedos.
• No ponga en marcha ni detenga la unidad enchufándola o
desenchufándola.
• No use productos químicos peligrosos para limpiar la unidad y evite
que estos materiales entren en contacto con ella. No use la unidad
en presencia de sustancias inflamables o vapor, como alcohol,
insecticidas, gasolina, etc.
• Transporte siempre su aire acondicionado en posición vertical y
úselo en una superficie estable y nivelada.
AF_Manual_AC_12000BTU_BAC4255_BAC4255N.indd 65 21/01/2019 10:25

66
• Sostenga el enchufe por el cabezal cuando lo desconecte.
• Apague el aparato cuando no esté en uso.
Advertencias
• No utilice medios para acelerar el proceso de descongelación o para
limpiar la unidad diferentes a los recomendados por el fabricante.
• El aparato debe almacenarse en una habitación que no utilice
continuamente fuentes de ignición (por ejemplo: llamas abiertas,
de un aparato a gas o calentador eléctrico en funcionamiento)
• No perfore ni queme la unidad.
• Tenga en cuenta que los refrigerantes pueden no tener ningún olor.
• El aparato BAC4255 12 BTUS debe instalarse, poner en
funcionamiento y almacenarse en una habitación con una superficie
superior a los 11 m
2.
• Debe observarse el pleno cumplimiento de las normativas
nacionales sobre gases.
• Mantenga las aperturas de ventilación libres de obstrucciones.
• Almacene el aparato para evitar que sufra daños mecánicos.
• Advertencia de que el aparato deberá almacenarse en un área bien
ventilada donde el tamaño de la habitación corresponda al tamaño
que se especifica para su funcionamiento.
• Cualquier persona involucrada con el funcionamiento o la ruptura de
un circuito refrigerante debe tener un certificado válido vigente de una
autoridad de evaluación acreditada por la industria, que autorice su
competencia para la manipulación de refrigerantes de manera segura de
acuerdo con una especificación de evaluación reconocida por la industria.
AF_Manual_AC_12000BTU_BAC4255_BAC4255N.indd 66 21/01/2019 10:25

67
ES
Portable air conditioner | Aire acondicionado portátil | Ar Condicionado Portátil
• El mantenimiento solo debe realizarse siguiendo las
recomendaciones del fabricante del equipo. El mantenimiento y
reparación que requieran la ayuda de otro personal cualificado
deberá realizarse bajo la supervisión de la persona competente en el
uso de refrigerantes inflamables.
Precaución: Riesgo
de incendio/materiales
inamables
(Obligatorio solamente para
las unidades R32/R290)
Nota importante: Lea
atentamente este manual antes de
instalar u operar su nueva unidad
de aire acondicionado. Asegúrese
de guardar este manual para futura
consulta
Explicación de los símbolos que se muestran en la unidad
ATENCIÓNEste símbolo muestra que esta unidad utiliza
un refrigerante inflamable. Si el refrigerante
presenta una fuga y se expone a una fuente
de ignición externa, hay riesgo de incendio.
PRECAUCIÓN
Este símbolo muestra que el personal de
servicio debe estar manejando este equipo
con referencia al manual de instalación.
PRECAUCIÓN
Este símbolo muestra que la información
está disponible tanto en el manual de funcio-
namiento como en el manual de instalación.
AF_Manual_AC_12000BTU_BAC4255_BAC4255N.indd 67 21/01/2019 10:25

68
2. MANUAL DE INSTRUCCIONES
2.1. Descripción del producto
panel de control
ltro de aire
superior
(detrás de la rejilla)
entrada de aire
superior
salida de drenaje
salida de aire
ltro de aire inferior
entrada de aire inferior
salida de drenaje
(solamente para el modo de
calefacción de la bomba)
habilla de cable de alimentación
salida del cable de alimentación
toma de corriente del enchufe
salida de drenaje
de bandeja inferior
aspa de celosia de
ventilación horizontal
(oscila automáticamente)
asa
(ambos lados)
panel
rueda pivotante
Frente posterior
2.2. Utilización del producto
Advertencias
• Transporte de equipos que contienen refrigerantes inflamables.
Véase legislación sobre transporte
• Marcado de los equipos por medio de símbolos.
Véase legislación local
• Eliminación de equipos que usan refrigerantes inflamables.
Véase legislación nacional.
• Almacenamiento del equipo/aparatos.
El almacenamiento del equipo debe realizarse conforme a las
instrucciones del fabricante.
• Almacenamiento de equipos embalados (no vendidos).
Debe proporcionarse una protección del embalaje de
almacenamiento de forma que los daños mecánicos a los equipos
AF_Manual_AC_12000BTU_BAC4255_BAC4255N.indd 68 21/01/2019 10:25

69
ES
Portable air conditioner | Aire acondicionado portátil | Ar Condicionado Portátil
dentro del embalaje no provoquen ninguna fuga de la carga del
refrigerante. El número máximo de piezas de equipos que se pueden
almacenar juntas estará determinado por las regulaciones locales.
• Información acerca del servicio
1. Controles de área
Antes de comenzar a trabajar en sistemas que contienen refrigerantes
inflamables, son necesarios los controles de seguridad para garantizar
que se minimice el riesgo de ignición. Para reparar el sistema de
refrigeración, deberán respetarse las siguientes precauciones antes de
proceder a las tareas.
2. Procedimiento de trabajo
Las tareas deberán realizarse bajo un procedimiento controlado para
minimizar el riesgo de que un gas o vapor inflamables estén presentes
mientras se realiza el trabajo.
3. Área de trabajo general
Todo el personal de mantenimiento y demás personas que trabajen
en el área local deben recibir instrucciones sobre el tipo de trabajo que
se está llevando a cabo. Evite trabajar en espacios confinados. Divida
en secciones el área que rodea el espacio de trabajo. Asegúrese de
que las condiciones dentro del área se hayan asegurado mediante el
control de material inflamable.
4. Comprobación de la presencia de refrigerante
Revise el área con un detector apropiado de refrigerante antes y
durante el trabajo, para asegurarse de que el técnico es consciente
de las atmósferas potencialmente inflamables. Asegúrese de que el
equipo de detección de fugas que se utiliza sea adecuado para el uso
con refrigerantes inflamables, es decir, que no produzca chispas, que
esté debidamente sellado o que sea intrínsecamente seguro.
5. Presencia de extintor de incendios
Si realiza cualquier trabajo en caliente en el equipo de refrigeración
AF_Manual_AC_12000BTU_BAC4255_BAC4255N.indd 69 21/01/2019 10:25

70
o cualquiera de las piezas asociadas, los equipos de extinción de
incendios apropiados deberán estar disponibles y al alcance de la
mano. Disponga de un extintor de incendios en polvo seco o de CO
2
junto a la zona de carga.
6. Sin fuentes de ignición
Las personas que realicen trabajos con un sistema de refrigeración que
implique exponer cualquier tubería que contenga o haya contenido
refrigerante inflamable no deberán utilizar una fuente de ignición
de manera tal que pueda provocar riesgo de incendio o explosión.
Todas las posibles fuentes de ignición, incluyendo el consumo de
cigarrillo, deben mantenerse suficientemente lejos del lugar de
instalación, reparación, eliminación y vertido, ya que es posible que
se libere refrigerante inflamable al espacio circundante. Antes de que
realizar un trabajo, deberá examinarse el área alrededor del equipo
para asegurarse de que no existen peligros inflamables o riesgos de
ignición. Se mostrarán las señales de “NO FUMAR”.
7. Área ventilada
Asegúrese de que el área de trabajo esté en campo abierto o
adecuadamente ventilada antes de irrumpir en el sistema o de realizar
cualquier trabajo en caliente. El grado de ventilación deberá continuar
durante el período de trabajo realizado. La ventilación debe dispersar
de forma segura cualquier refrigerante liberado y preferiblemente
externamente en el ambiente.
8. Controles a los equipos de refrigeración
Cuando se cambian los componentes eléctricos, estos deberán ser
adecuados para el propósito y la especificación correcta. Siga en todo
momento las pautas de mantenimiento y servicio del fabricante.
En caso de duda, consulte el departamento técnico del fabricante
para mayor asistencia. Se aplicarán los siguientes controles en las
instalaciones que usan refrigerantes inflamables:
• el tamaño de la carga debe ser acorde con el tamaño de la
habitación dentro de la cual se instalan las piezas que contienen
refrigerante;
AF_Manual_AC_12000BTU_BAC4255_BAC4255N.indd 70 21/01/2019 10:25

71
ES
Portable air conditioner | Aire acondicionado portátil | Ar Condicionado Portátil
• la maquinaria de ventilación y las salidas están funcionando
adecuadamente y no están obstruidas;
• Si se está utilizando un circuito de refrigeración indirecto, se debe
verificar la presencia de refrigerante en los circuitos secundarios; el
marcado en el equipo sigue siendo visible y legible.
• Se corregirán las marcas y señales ilegibles;
• instale los tubos o componentes de refrigeración en una posición en
la que sea poco probable que estén expuestos a alguna sustancia
que pueda corroer los componentes que contienen refrigerante,
a menos que estos estén hechos de materiales inherentemente
resistentes a la corrosión o que estén adecuadamente protegidos
contra ella.
9. Vericación de los dispositivos eléctricos
La reparación y el mantenimiento de componentes eléctricos deberán
incluir controles de seguridad iniciales y procedimientos de inspección
de componentes. Si se produce un fallo que pueda poner en peligro
la seguridad, ningún suministro eléctrico deberá estar conectado
al circuito hasta que se corrija satisfactoriamente. Si el fallo no se
puede corregir inmediatamente, pero es necesario continuar con el
funcionamiento, se debe aplicar una solución temporal adecuada. Tal
situación se comunicará al propietario del equipo, para que todas las
partes estén informadas.
Los controles de seguridad iniciales deben incluir:
• que los capacitadores estén descargados: esto debe hacerse de
manera segura para evitar la posibilidad de chispas;
• que no haya componentes eléctricos activos y que el cableado esté
expuesto durante la carga, recuperación o purga del sistema;
• que exista continuidad de la conexión a tierra.
AF_Manual_AC_12000BTU_BAC4255_BAC4255N.indd 71 21/01/2019 10:25

72
10. Reparaciones de componentes sellados
10.1 Durante las reparaciones de componentes sellados, todos los
suministros eléctricos se deben desconectar del equipo sobre
el que trabajaron antes de retirar las tapas selladas, etc. Si es
absolutamente necesario tener un suministro eléctrico para el
equipo durante el servicio, se debe ubicar una forma permanente
de detección de fugas en el punto más crítico para advertir de una
situación potencialmente peligrosa.
10.2 Preste especial atención a lo siguiente para garantizar que, al
trabajar con componentes eléctricos, la carcasa no se altere
de tal manera que el nivel de protección se vea afectado. Esto
debe incluir daños a los cables, número excesivo de conexiones,
terminales no fabricados según la especificación original, daños en
los sellos, ajuste incorrecto de los casquillos, etc.
• Asegúrese de que el aparato esté montado de manera segura.
• Asegúrese de que los sellos o materiales de sellado no se han
degradado de tal manera que ya no sirvan para el propósito de
prevenir la entrada de atmósferas inflamables. Los repuestos deben
cumplir con los requisitos especificados por el fabricante.
Nota: el uso de un sellador de silicona puede inhibir la efectividad de
algunos tipos de equipos de detección de fugas. Los componentes de
seguridad intrínseca no tienen que ser aislados antes de trabajar en ellos.
11. Reparación de componentes de seguridad intrínseca
No aplique ninguna carga inductiva o capacitiva permanente al circuito
sin asegurarse de que esto no exceda el voltaje y la corriente permitidos
para el equipo en uso. Los componentes de seguridad intrínseca son los
únicos tipos con los que se puede trabajar mientras está en presencia de
una atmosfera inflamable. El aparato de prueba debe tener los valores
nominales correctos. Reemplace los componentes solo con las piezas
especificadas por el fabricante. Otras piezas pueden provocar la ignición
del refrigerante en el ambiente desde una fuga.
AF_Manual_AC_12000BTU_BAC4255_BAC4255N.indd 72 21/01/2019 10:25

73
ES
Portable air conditioner | Aire acondicionado portátil | Ar Condicionado Portátil
12. Cableado
Compruebe que el cableado no presente desgaste, corrosión, presión
excesiva, vibración, bordes afilados o cualquier otro efecto ambiental
adverso. La verificación también deberá tener en cuenta los efectos
del envejecimiento o la vibración continua de fuentes, tales como
compresores o ventiladores.
13. Detección de refrigerantes inamables
En ninguna circunstancia puede usar fuentes de ignición potenciales
cuando realice la búsqueda o detección de fugas de refrigerante. No
deberán utilizarse sopletes de haluro (o cualquier otro detector con
una llama sin protección).
14. Métodos de detección de fugas
Los siguiente métodos detección de fugas se consideran aceptables
para los sistemas que contienen refrigerantes inflamables. Deberán
utilizarse detectores de fugas electrónicos para detectar refrigerantes
inflamables, pero la sensibilidad puede no ser adecuada, o puede
necesitar recalibración (los equipos de detección deberán calibrarse
en un área libre de refrigerante). Asegúrese de que el detector no sea
una fuente de ignición potencial y sea adecuado para el refrigerante. El
equipo de detección de fugas deberá fijarse en un porcentaje del LFL
del refrigerante y calibrarse al refrigerante empleado. Seguidamente,
deberá confirmarse el porcentaje apropiado de gas (25 % máximo).
Los fluidos de detección de fugas son adecuados para usarse con la
mayoría de los refrigerantes, pero se debe evitar el uso de detergentes
que contengan cloro, p73-ya que esta sustancia puede reaccionar con el
refrigerante y corroer la tubería de cobre.
Si sospecha que existe una fuga, deberá eliminar o extinguir todas
las llamas sin protección. Si encuentra una fuga de refrigerante que
requiera soldadura, todo el refrigerante debe recuperarse del sistema,
o aislarse (mediante el cierre de válvulas) en una parte del sistema
alejado de la fuga. El nitrógeno libre de oxígeno (OFN) debe purgarse
a través del sistema antes y durante el proceso de soldadura.
AF_Manual_AC_12000BTU_BAC4255_BAC4255N.indd 73 21/01/2019 10:25

74
15. Eliminación y evacuación
Al acceder al circuito de refrigerante para hacer reparaciones o
para cualquier otro propósito, deberán utilizarse procedimientos
convencionales. Sin embargo, es importante que siga las mejores
prácticas p74-ya que debe tener en cuenta la inflamabilidad.
Debe seguir el siguiente procedimiento:
• retirar refrigerante;
• purgar el circuito con gas inerte;
• evacuar;
• purgar nuevamente con gas inerte;
• abrir el circuito cortándolo o soldándolo.
La carga de refrigerante debe recuperarse en los cilindros de
recuperación adecuados. El sistema se debe lavar con OFN para que la
unidad sea segura. Puede que se necesite repetir este proceso varias
veces. No se debe usar aire comprimido u oxígeno para esta tarea.
El lavado debe realizarse rompiendo el vacío en el sistema con
OFN y continuando llenándolo hasta que se alcance la presión
de funcionamiento, luego ventilando a la atmósfera y finalmente
empujándolo hacia el vacío. Este proceso se repetirá hasta que no haya
refrigerante presente en el sistema.
Cuando se utiliza la carga de OFN final, el sistema deberá ser ventilado
a la presión atmosférica para permitir que el trabajo se realice. Esta
operación es absolutamente vital para que se realicen operaciones de
soldadura en la tubería.
Asegúrese de que la salida a la bomba de vacío no esté cerca a
ninguna fuente de ignición y haya ventilación.
16. Procedimientos de carga
Además de los procedimientos de carga convencionales, se deben
seguir los siguientes requisitos:
AF_Manual_AC_12000BTU_BAC4255_BAC4255N.indd 74 21/01/2019 10:25

76
• todo el equipo de protección personal está disponible y se utiliza
correctamente;
• el proceso de recuperación está supervisado en todo momento por
una persona competente;
• el equipo de recuperación y los cilindros se ajustan a las normas
apropiadas.
d) Bombee hacia abajo el sistema de refrigerante, si es posible.
e) Si el vacío no es posible, haga un colector para que el refrigerante se
pueda eliminar de las diversas partes del sistema.
f) Asegúrese de que el cilindro esté situado en las básculas antes de la
recuperación.
g) Inicie la máquina de recuperación y póngala en funcionamiento en
conformidad con las instrucciones del fabricante.
h) No llene los cilindros en exceso (no más de 80 % de la carga de
volumen líquido).
i) No exceda la presión máxima de funcionamiento del cilindro, no tan
siquiera temporalmente.
j) Cuando se rellenen correctamente los cilindros y el proceso se
complete, asegúrese de que los cilindros y el equipo se retiren del
sitio inmediatamente y todas las válvulas de aislamiento en el equipo
queden cerradas.
k) El refrigerante recuperado no debe cargarse en otro sistema de
refrigeración a menos que se haya limpiado y revisado.
AF_Manual_AC_12000BTU_BAC4255_BAC4255N.indd 76 21/01/2019 10:25

77
ES
Portable air conditioner | Aire acondicionado portátil | Ar Condicionado Portátil
18. Etiquetado
El equipo debe estar etiquetado indicando que ha sido desmantelado
y vaciado de refrigerante. La etiqueta debe fecharse y firmarse.
Asegúrese de que haya etiquetas en el equipo indicando que contiene
refrigerante inflamable.
19. Recuperación
• Cuando retire refrigerante de un sistema, p77-ya sea para su
mantenimiento o su eliminación, se recomienda eliminar todos los
refrigerantes de manera segura.
• Cuando transfiera refrigerante a los cilindros, asegúrese de que solo
se utilicen cilindros de recuperación de refrigerante apropiados.
Asegúrese de que estén disponibles los números correctos de
cilindros para mantener la carga total del sistema. Todos los cilindros
que vaya a usar deben estar diseñados para la recuperación de
refrigerante y etiquetados para ese refrigerante (es decir, cilindros
especiales para la recuperación de refrigerante). Los cilindros deben
completarse con una válvula de alivio de presión y válvulas de cierre
asociadas en buen estado de funcionamiento.
• Los cilindros de recuperación vacíos son evacuados y, si es posible,
se enfrían antes de que se produzca la recuperación. El equipo de
recuperación debe estar en buen estado de funcionamiento con un
conjunto de instrucciones sobre el equipo que tiene a mano y debe
ser adecuado para la recuperación de refrigerantes inflamables.
Además, un conjunto de básculas calibradas debe estar disponible y
en buen estado de funcionamiento.
• Las mangueras deben estar completas y con acoplamientos
de desconexión sin fugas y en buen estado. Antes de usar la
máquina de recuperación, verifique que esté en buen estado de
funcionamiento, que se haya mantenido correctamente y que todos
los componentes eléctricos asociados estén sellados para evitar una
ignición en caso de una descarga de refrigerante. Consulte con el
fabricante en caso de duda.
AF_Manual_AC_12000BTU_BAC4255_BAC4255N.indd 77 21/01/2019 10:25

79
ES
Portable air conditioner | Aire acondicionado portátil | Ar Condicionado Portátil
Instalación
Cómo elegir la ubicación correcta
La ubicación de su instalación debe
cumplir con los siguientes requisitos:
- Asegúrese de instalar su unidad en una
superficie uniforme para minimizar el
ruido y la vibración.
- La unidad debe instalarse cerca de
un enchufe con conexión a tierra, y el
drenaje de la bandeja de recolección
(que se encuentra en la parte posterior
de la unidad) debe ser accesible.
- La unidad se debe localizar a 30 cm (12”) como mínimo de la pared
más cercana para garantizar el aire acondicionado apropiado.
- NO cubra las entradas, salidas o el receptor de señales remotas de la
unidad, dado que esto puede dañarla.
Instalación recomendada
Nota: Todas las imágenes del manual
tienen solamente fines explicativos.
Su máquina puede diferir ligeramente.
Prevalecerá la forma real.
El panel de control solo o el controlador
remoto pueden controlar la unidad.
Herramientas necesarias
- Destornillador de estrella medio;
- Cinta métrica o regla;
- Navaja de precisión o tijeras;
- Sierra (opcional, para acortar el adaptador para las ventanas angostas)
AF_Manual_AC_12000BTU_BAC4255_BAC4255N.indd 79 21/01/2019 10:25

80
Accesorios
Revise el tamaño de su ventana y elija la corredera de ventana adecuada
Pieza PiezaDescripción Cantidad Descripción Cantidad
Adaptador
de unidad
1 pieza 1 piezaPerno
Manguera
de escape
1 pieza Soporte de
seguridad y
tornillo
1 juego
Adaptador
de corredera de
ventana
1 pieza Manguera
de drenaje
1 pieza
Adaptador
A del escape
en pared
(solamente para
la instalación en
pared)
1 pieza Adaptador de
manguera de
drenaje (solo
para el modo
de bomba de
calor)
1 pieza
Adaptador B
del escape de
pared (con tapa)
(solamente para
la instalación en
pared)
1 pieza Espuma
aislante A
(adhesivo)
2 piezas
Tornillo y anclaje
(solamente para
la instalación en
pared)
4 juegos Espuma
aislante B
(adhesivo)
2 piezas
Corredera de
ventana A
1 pieza Espuma
aislante C (no
adhesivo)
1 pieza
Corredera de
ventana B
1 pieza Controlador
remoto y
batería
1 juego
Hebilla del
cable de
alimentación
1 pieza
Nota: Los artículos con * son opcionales. Los diseños pueden variar ligeramente.
AF_Manual_AC_12000BTU_BAC4255_BAC4255N.indd 80 21/01/2019 10:25

81
ES
Portable air conditioner | Aire acondicionado portátil | Ar Condicionado Portátil
Juego de instalación de ventanas
1.er paso: Preparación del ensamble de manguera de escape
Presione la manguera de escape en el adaptador de corredera de
ventana y el adaptador de la unidad, sujete automáticamente con las
hebillas elásticas de los adaptadores.
Manguera de escape
Pressionar en Pressionar en
Adaptador de unidad
Adaptador de corredera
de ventana
Ensamble de
manguera de escape
2.º paso: Instalación del ensamble de manguera de escape en la unidad
Inserte el adaptador de la unidad del ensamble de la manguera de
escape en la ranura inferior de la salida de aire con el gancho del
adaptador alineado con el asiento de perforación, y deslice dicho
ensamble a lo largo de la dirección que indica la flecha para la instalación.
Asegúrese de que el gancho del adaptador esté alineado
con el asiento de perforación de la salida de aire
Gancho Asento de perforación
Adaptador Ranura inferior Asegúrese de que el adaptador
esté insertado en la ranura
inferior de la salida de aire
3.er paso: Preparación de la corredera de ventana regulable
1. Ajuste la corredera conforme al tamaño de su ventana.
2. Si la longitud de la ventana requiere dos correderas, use el perno
para ajustarlas una vez que se regulen a la longitud correcta.
AF_Manual_AC_12000BTU_BAC4255_BAC4255N.indd 81 21/01/2019 10:25

82
3. En algunos modelos, si la longitud de la ventana requiere tres
correderas (opcional), use dos pernos para ajustarlas una vez que se
regulen a la longitud correcta.
Perno
Corredera de centana A Corredera de centana B
Corredera de centana A Corredera de centana B Corredera de centana c
Pernos
Nota: una vez que se preparan el ensamble de la manguera de
escape y la corredera de ventana regulable, elija uno de los siguientes
métodos de instalación.
Método 1: Instalación de ventana de guillotina o corredera
(opcional)
Espuma aislante B
(de tipo adhesivo, más corto) Espuma aislante B
(de tipo adhesivo, más corto)
Espuma
aislante A
(de tipo
adhesivo)
Espuma
aislante A
(de tipo
adhesivo)
o
1. Corte las tiras de la espuma aislante adhesiva s A y B a las longitudes
apropiadas, y fíjelas a la ventana corredera y al marco, como se
muestra en la imagen.
AF_Manual_AC_12000BTU_BAC4255_BAC4255N.indd 82 21/01/2019 10:25

83
ES
Portable air conditioner | Aire acondicionado portátil | Ar Condicionado Portátil
Corredera
de
ventana
A
Corredera de
ventana A
Corredera de
ventana B
(si procede)
Corredera de ventana B
(si procede)
o
2. Inserte el ensamble de la corredera de ventana en la apertura de la
ventana.
Espuma aislante C
(de tipo no adhesivo)
Espuma aislante C
(de tipo no adhesivo)
o
3. Corte la tira de la espuma aislante no adhesiva C de manera tal que
coincida con el ancho de la ventana. Inserte la espuma entre el cristal
y el marco de la ventana para evitar que entren aire e insectos en la
habitación.
o
Soporte de seguridad
Soporte de
seguridad
2
tornillos 2 tornillos
4. Si lo desea, instale el soporte de seguridad con 2 tornillos, como se
muestra en la imagen.
AF_Manual_AC_12000BTU_BAC4255_BAC4255N.indd 83 21/01/2019 10:25

84
or
5. Inserte el adaptador de la corredera de ventana en la corredera de la
ventana.
Método 2: Instalación en pared (opcional)
1. Perfore un orificio de 125 mm (4,9 pulgadas) en la pared para el
adaptador B de escape de pared.
2. Asegure dicho adaptador a la pared con los cuatro anclajes y
tornillos de que dispone el juego.
3. Conecte el ensamble de la manguera de escape (con el adaptador A
de escape embutido) al adaptador B.
Posición del anclaje de
expasión
máx. 120 cm o 47 pulgadas
min. 120 cm o 47 pulgadas
Adaptador B del
escape de pared
Tapa de
adaptador
Nota: Cubra el orcio con la tapa
de adaptador cuando no esté en uso.
Nota: para asegurar una función apropiada, NO sobre extienda ni
doble la manguera. Asegúrese de que no haya ningún obstáculo
cerca de la salida de aire de la manguera de escape (en el margen
de 500 mm) para que el sistema de escape funcione correctamente.
AF_Manual_AC_12000BTU_BAC4255_BAC4255N.indd 84 21/01/2019 10:25

85
ES
Portable air conditioner | Aire acondicionado portátil | Ar Condicionado Portátil
Todas las figuras de este manual solo tienen fines ilustrativos. Su aire
acondicionado puede ser ligeramente diferente, pero la forma general
permanecerá igual.
Funcionamiento panel de control
Nota: el panel de control puede tener el siguiente aspecto:
Nota: en algunos modelos, se usa en lugar de °F. En otros modelos,
se usa (luz de INALÁMBRICO) en lugar de •(luz de encendido).
Nota: algunas funciones (ION, FOLLOW ME, HEAT, WIRELESS, etc.)
son opcionales. ION no aplica a las unidades R32/R290.
AF_Manual_AC_12000BTU_BAC4255_BAC4255N.indd 85 21/01/2019 10:25

86
Luz de
modo
de calor,
(HEAT)
Luz de
velocidad alta
(HIGH) del
ventilador
Luz de
“sígueme”
(FOLLOW
ME)
Luz de
modo frío
(COOL)
Luz de
velocidad
media (MED)
del ventilador
Luz de ION
Luz de
modo de
ventilador
(FAN)
Luz de
velocidad baja
(LOW) del
ventilador
Luz de
reposo
(SLEEP)
Luz de
modo
seco
(DRY)
Luz de
velocidad
automática
(AUTO) del
ventilador
°C Grados
centígrados
Luz de
modo
automático
(AUTO)
Luz de filtro
(FILTER) °F Grados
Fahrenheit
Luz de
inalámbrico
(WIRELESS)
Luz de
administración
de energía
(POWER
MANAGEMENT)
Pantalla
LED
SWING Botón de oscilación (SWING)
Se usa para iniciar la función de oscilación automática.
Cuando el aparato esté encendido (ON), pulse el botón
SWING para detener la celosía de ventilación al ángulo que
desee.
AF_Manual_AC_12000BTU_BAC4255_BAC4255N.indd 86 21/01/2019 10:25

87
ES
Portable air conditioner | Aire acondicionado portátil | Ar Condicionado Portátil
SWING Botón inalámbrico (opcional)
(3 SECONDS)
Se usa para iniciar la función inalámbrica. Cuando use la
función Inalámbrica (Wireless) por primera vez, mantenga
presionado el botón de oscilación durante 3 segundos para
iniciar el modo de conexión inalámbrica. La pantalla LED
muestra “AP” para indicar que puede establecer la conexión
inalámbrica. Si la conexión (enrutador) es correcta en un
plazo de 8 minutos, la unidad saldrá automáticamente del
modo de conexión inalámbrica y se iluminará el indicador
correspondiente. Si la conexión falla en un plazo de 8
minutos, la unidad saldrá automáticamente del modo de
conexión inalámbrica. Una vez que la conexión inalámbrica
es correcta, puede mantener pulsados los botones SWING
y DOWN (-) al mismo tiempo durante 3 segundos para
desactivar la función inalámbrica, y la pantalla LED mostrará
“OFF” durante 3 segundos. Presione los botones SWING y UP
(+) al mismo tiempo para activar la función inalámbrico y la
pantalla LED mostrará “ON” durante 3 segundos.
Nota: cuando reinicie la función Inalámbrica, puede demorar
un momento en conectarse automáticamente a la red.
TIMER Botón del temporizador
Se usa para iniciar el tiempo de encendido AUTO ON y
el programa de tiempo de parada AUTO OFF, junto con
los botones + y -. La luz indicadora de encendido del
temporizador se ilumina según los ajustes del temporizador.
MODE Botón de modo
Selecciona el modo de funcionamiento apropiado. Cada vez
que pulsa el botón, se selecciona un modo en una secuencia
entre AUTO, COOL, DRY, FAN y HEAT (los modelos solo de
refrigeración no incluyen este modo).
La luz indicadora de modo se ilumina según los ajustes de los
distintos modos.
AF_Manual_AC_12000BTU_BAC4255_BAC4255N.indd 87 21/01/2019 10:25

88
Botones más (+) y menos (-)
Se usan para regular los ajustes de temperatura (aumento/
+
- descenso) en incrementos de 1 °C/1 °F (o 2 °F) en un
intervalo de 17 °C/62 °F a 30 °C/86 °F (o 88 °F) o el ajuste del
temporizador (TIMER) en un intervalo de 0 a 24 h.
Nota: el control puede mostrar la temperatura en grados
Fahrenheit o centígrados. Para convertir de una medición de
grado a otra, mantenga pulsados los botones hacia arriba y
hacia abajo al mismo tiempo, durante 3 segundos.
FAN Botón Fan/Ion (Ion es opcional)
ION Controla la velocidad del ventilador. Presione el botón del
ventilador en cuatro pasos: LOW, MED, HIGH y AUTO. La luz
indicadora de velocidad del ventilador se ilumina según los
distintos ajustes del ventilador. Al seleccionar la velocidad de
ventilador AUTO, todas las luces indicadoras del ventilador se
oscurecen. En algunos modelos, al seleccionar la velocidad de
ventilador AUTO, todas las luces indicadoras del ventilador se
iluminan (opcional).
Nota: mantenga pulsado este botón durante 3 segundos para
iniciar la función ION. El generador de iones se activa, ayuda
a eliminar el polen y las impurezas del aire y los atrapa en el
filtro. Presiónelo nuevamente durante 3 segundos para detener
la función ION.
SLEEP Botón Reposo (Sleep/Eco)
Se usa para iniciar la función de reposo (SLEEP/ECO).
Botón de encendido
Pantalla LED
Muestra la temperatura establecida en °C o °F (algunos
modelos no muestran la temperatura en grados Fahrenheit)
y los ajustes del temporizador automático. Durante los modos
DRY y FAN, muestra la temperatura ambiente.
AF_Manual_AC_12000BTU_BAC4255_BAC4255N.indd 88 21/01/2019 10:25

89
ES
Portable air conditioner | Aire acondicionado portátil | Ar Condicionado Portátil
Muestra los códigos de error y de protección:
E1: error del sensor de temperatura ambiente.
E2: error del sensor de temperatura del vaporizador.
E3-Error del sensor de temperatura del condensador (en
algunos modelos).
E-4: error de comunicación del panel de la pantalla.
E-C: mal funcionamiento en la detección de fugas del
refrigerante (en algunos modelos).
P1: la bandeja inferior está llena. Conecte la manguera de
drenaje y drene el agua recogida. Si la protección se repite,
llame al servicio técnico.
Nota: cuando ocurra uno de los siguientes errores
de funcionamiento, apague la unidad y revise si hay
obstrucciones. Reinicie la unidad y, si persiste el mal
funcionamiento, apáguela y desenchúfela. Contacte al
fabricante o a sus agentes de servicio técnico o personas
igualmente cualificadas para realizar dichas tareas.
AF_Manual_AC_12000BTU_BAC4255_BAC4255N.indd 89 21/01/2019 10:25

90
FUNCIONAMIENTO MANDO A DISTANCIA
Nota:
• El diseño de los botones se basa en modelos estándar y puede
ser ligeramente diferente del que está comprando. Sin embargo,
la forma del mando a distancia será la misma.
• Esta unidad puede realizar todas las funciones descritas aquí. Si la
unidad no puede realizar esta característica, nada sucede al pulsar el
botón correspondiente en el mando a distancia.
AF_Manual_AC_12000BTU_BAC4255_BAC4255N.indd 90 21/01/2019 10:25
SHORT
CUT
TIMER
ON
TIMER
OFF
MODE
FAN
LED
SLEEP
FOLLOW
SWING
ME

91
ES
Portable air conditioner | Aire acondicionado portátil | Ar Condicionado Portátil
1 – Botón de ENCENDIDO/APAGADO
(ON/OFF)
Presione este botón para encender y
apagar el aire acondicionado.
2 – Botón de modo (MODE)
Pulse este botón para modificar el modo
de aire acondicionado de acuerdo con la
siguiente secuencia:
Nota: no seleccione el modo de calor
(HEAT) si la unidad que compró es para
refrigeración solamente, p91-ya que este
modo no es compatible con el aparato
para refrigeración.
3 – Botón del ventilador (FAN)
Presione este botón para seleccionar la
velocidad del ventilador, de acuerdo con
los cuatro pasos correspondientes:
Nota: no puede cambiar la velocidad del
ventilador en los modos AUTO o DRY.
4 – Botón de reposo (SLEEP)
• Presione este botón para activar o desactivar la función de reposo.
Puede permanecer en la temperatura más cómoda y ahorrar energía.
Esta función está disponible solo en los modos COOL, HEAT o AUTO.
• Para más información, consulte la sección de modo de reposo
(SLEEP).
AF_Manual_AC_12000BTU_BAC4255_BAC4255N.indd 91 21/01/2019 10:25
SHORT
CUT
TIMER
ON
TIMER
OFF
MODE
FAN
LED
SLEEP
FOLLOW
SWING
ME
1
2
3
4
9
5
6
7
8
11
10

92
Nota: mientras la unidad esté funcionando en modo de reposo
(SLEEP), este modo se cancelará si se presiona cualquiera de los
botones de los modos FAN, SPEED, o ON/OFF.
)
Presione este botón para aumentar la temperatura interior en
incrementos de 1 a 30 ºC.
)
Presione este botón para disminuir la temperatura interior en
incrementos 1 a 17 ºC.
Nota: el control de la temperatura no está disponible en el modo FAN
(ventilador).
• Pulse este botón para restaurar la configuración actual o reanudar la
configuración anterior.
• Al encender la unidad por primera vez, pulsando el botón de atajos
hará que la unidad funcione en modo automático, a 26 ºC, en
velocidad del ventilador automática.
• Al presionar este botón cuando el mando a distancia está encendido,
el sistema retrocede automáticamente a la configuración anterior,
incluyendo el modo de funcionamiento, ajuste de temperatura, nivel
de velocidad del ventilador y función de reposo (si está activa).
AF_Manual_AC_12000BTU_BAC4255_BAC4255N.indd 92 21/01/2019 10:25
5 – Botón ARRIBA (
5 – Botón ABAJO (
6 – BOTÓN de atajos (SHORTCUT)

93
ES
Portable air conditioner | Aire acondicionado portátil | Ar Condicionado Portátil
• Al presionar este botón durante más de 2 segundos, el sistema
restaurará automáticamente los ajustes del funcionamiento actual,
incluyendo el modo de funcionamiento, ajuste de temperatura, nivel
de velocidad del ventilador y función de reposo (si está activa).
Pulse este botón para iniciar la secuencia del temporizador de
encendido automático. Cada vez que lo presione aumentará el
ajuste de tiempo en incrementos de 30 minutos. Cuando el ajuste
de tiempo definido muestra 10.0, cada vez que presione aumentará
la configuración programada en incrementos de 60 minutos. Para
cancelar el programa de temporizador automático, simplemente ajuste
el temporizador de encendido automático a 0.0.
Pulse este botón para iniciar la secuencia del temporizador de apagado
automático. Cada vez que presione aumentará el ajuste tiempo en
incrementos de 30 minutos. Cuando el ajuste de tiempo definido
muestra 10.0, cada vez que lo presione aumentará la configuración
programada en incrementos de 60 minutos. Para cancelar el programa
de temporizador automático, simplemente ajuste el temporizador de
apagado automático a 0.0.
AF_Manual_AC_12000BTU_BAC4255_BAC4255N.indd 93 21/01/2019 10:25
7 – Botón de temporizador de encendido automático (TIMER ON)
8 – Botón de temporizador de apagado automático (TIMER OFF)
(SWING)
Presione este botón para detener o iniciar la función de oscilación
automática horizontal del ventilador o para programar la dirección de
flujo de aire arriba/abajo deseada. El ángulo de oscilación automática
del ventilador cambia en 6 grados con cada presión. Si se presiona el
botón swing continuamente durante más de 2 segundos, la función
de oscilación se activará y la oscilación arriba y abajo se iniciará
automáticamente.
9 – Botón de oscilación

94
AF_Manual_AC_12000BTU_BAC4255_BAC4255N.indd 94 21/01/2019 10:25
10 – BOTÓN LED de seguimiento (FOLLOW ME)
Presione este botón para activar o desactivar la función de
seguimiento, el mando mostrará la temperatura actual de su ubicación.
El mando a distancia enviará esta señal al aire acondicionado a
intervalos de 3 minutos hasta que vuelva a presionar el botón FOLLOW
ME. El aire acondicionado cancelará la función de seguimiento
automáticamente si no recibe una señal en cualquier intervalo de 7
minutos.
11 – Botón LED
Presione este botón para activar o desactivar la pantalla interior. Al
presionar el botón, se apagará la visualización de la pantalla interior, y
pulsándolo de nuevo se encenderá la pantalla.
Símbolos LCD
La información se muestra cuando el mando a distancia se enciende.

95
ES
Portable air conditioner | Aire acondicionado portátil | Ar Condicionado Portátil
Modo de visualización
AUTO COOL DRY HEAT FAN
Se muestra cuando los datos se están transmitiendo.
Se muestra cuando el mando a distancia está encendido.
Indicador de batería (detección de batería baja)
No está disponible para esta unidad
Se muestra cuando el temporizador de encendido automático
(TIMER ON) está activo
Se muestra cuando el temporizador de apagado automático
(TIMER OFF) está activo
Muestra la temperatura programada, la temperatura de la
habitación o el temporizador en los ajustes del temporizador
(TIMER)
Se muestra en el modo de reposo.
Se muestra cuando está en modo de seguimiento (Follow me)
No está disponible para esta unidad
No está disponible para esta unidad
Indicador de velocidad del ventilador
Velocidad baja
Velocidad media
Velocidad alta
Velocidad del ventilador automática
Nota: Todos los símbolos en la gura son solo para nes ilustrativos.
Durante la operación real, la pantalla solo muestra los símbolos de la
función en uso.
AF_Manual_AC_12000BTU_BAC4255_BAC4255N.indd 95 21/01/2019 10:25
TIMER ON
TIMER OFF

96
CÓMO UTILIZAR LOS BOTONES
Funcionamiento automático
Asegúrese de que la unidad esté
enchufada y conectada. El indicador de
funcionamiento (OPERATION) en el
panel de la pantalla interior de la unidad
empezará a parpadear.
1. Presione el botón de modo (MODE)
para seleccionar el modo automático
(Auto).
2. Pulse el botón ARRIBA/ABAJO para
establecer la temperatura deseada. La
temperatura puede variar entre 17 y 30
ºC en incrementos de 1 ºC.
3. Presione el botón de encendido/
apagado (ON/OFF) para iniciar el aire
acondicionado.
Nota:
1. En el modo automático, el aire acondicionado puede elegir
automáticamente el modo de Refrigeración, Ventilador o Calefacción
detectando la diferencia entre la temperatura actual de la habitación y
del ambiente y jando la temperatura en el mando a distancia.
2. En el modo automático, no se puede cambiar la velocidad del
ventilador, p96-ya que se controla automáticamente.
3. Si el modo automático no es cómodo para usted, puede elegir
manualmente otro modo más cómodo.
AF_Manual_AC_12000BTU_BAC4255_BAC4255N.indd 96 21/01/2019 10:25
SHORT
CUT
TIMER
ON
TIMER
OFF
MODE
FAN
LED
SLEEP
FOLLOW
SWING
ME
3
1
2

97
ES
Portable air conditioner | Aire acondicionado portátil | Ar Condicionado Portátil
Funcionamiento de Refrigeración/
Calefacción/Ventilación
Asegúrese de que la unidad es
enchufado y conectado .
1. Pulse el botón MODE para seleccionar
frío (COOL), calor (HEAT) (disponible en
modelos con refrigeración y calefacción)
o modo de ventilación (FAN).
2. Pulse el botón ARRIBA/ABAJO para
establecer la temperatura deseada. El
temperatura se puede variar entre 17 º C
~ 30 º C en incrementos de 1 º C.
3. Presione el botón de ventilación
(FAN) para seleccionar la velocidad del
ventilador en cuatro pasos: automática,
baja, media o alta (Auto, Low, Med o
High).
4. Presione el botón ON / OFF para el aire acondicionado.
Nota: En el modo de ventilación (FAN), la temperatura programada
no se muestra en la mando a distancia y, del mismo modo, no puede
controlar la temperatura de la habitación. En este caso, solo se pueden
realizar los pasos 1, 3 y 4.
AF_Manual_AC_12000BTU_BAC4255_BAC4255N.indd 97 21/01/2019 10:25
SHORT
CUT
TIMER
ON
TIMER
OFF
MODE
FAN
LED
SLEEP
FOLLOW
SWING
ME
4
1
3
2

98
Funcionamiento de deshumidicación
Asegúrese de que la unidad es
enchufado y conectado . Operación
indicador de funcionamiento de en
interior la unidad panel de visualización
empezará a parpadear.
1. Presione el botón MODE para
seleccionar el modo de deshumidicación
(DRY).
2. Pulse el botón ARRIBA / ABAJO para
establecer el deseada temperatura . El
temperatura se puede variar entre 17 º C
~ 30 º C en incrementos de 1 º C.
3. Presione el botón ON / OFF para el aire
acondicionado.
Nota: En el modo de deshumidificación, no se puede cambiar la
velocidad del ventilador, ya que está controlada automáticamente.
Ajuste de la dirección del ujo de aire
Use los botones SWING y para ajustar la dirección del flujo de
aire deseada.
1. La dirección de arriba/abajo se puede ajustar con el botón en
el mando a distancia. Ventilador de giro automático cambian de los
ángulos 6 grados con cada pulsación. Se pulsa el botón de forma
continua durante más de 2 segundos, el característica se activa y se
moverá hacia arriba y hacia abajo automáticamente.
2. La dirección de izquierda/derecha se puede ajustar con el botón
en el mando a distancia. Ventilador de giro automático cambian de
los ángulos 6 grados con cada pulsación. Se pulsa el botón de forma
continua durante más de 2 segundos, el característica se activa y se
moverá hacia arriba y hacia abajo automáticamente.
Nota: cuando la dirección del flujo de aire del ventilador afecta
AF_Manual_AC_12000BTU_BAC4255_BAC4255N.indd 98 21/01/2019 10:25
SHORT
CUT
TIMER
ON
TIMER
OFF
MODE
FAN
LED
SLEEP
FOLLOW
SWING
ME
3
1
2

99
ES
Portable air conditioner | Aire acondicionado portátil | Ar Condicionado Portátil
a la refrigeración o calefacción del aire acondicionado, cambiará
automáticamente la oscilación/dirección.
Funcionamiento del temporizador
Presione el botón TIMER ON para
programar el temporizador de encendido
automático de la unidad. Presione el
botón TIMER OFF para programar el
temporizador de apagado automático de la
unidad.
Para programar el temporizador de
encendido automático.
1. Presione el botón TIMER ON. La pantalla
LCD del mando a distancia mostrará el
temporizador de encendido (TIMER ON),
la última hora programada de encendido
automático y la señal «H». Ahora está listo
para reiniciar el temporizador de encendido
automático para INICIAR el funcionamiento.
2. Presione el botón TIMER ON de nuevo para programar el
temporizador de encendido automático deseado. El temporizador
aumenta en incrementos de 30 minutos entre 10 y 24 horas.
3. Después de programar el temporizador de encendido automático,
habrá 1 segundo de retraso antes de que el mando a distancia
transmita la señal a la unidad del aire acondicionado. A continuación,
después de aproximadamente otros 2 segundos, la señal «H»
desaparecerá y aparecerá la temperatura programada en la ventana de
la pantalla LCD.
Para programar el temporizador de apagado automático.
1. Presione el botón TIMER OFF. La pantalla LCD del mando a distancia
mostrará el temporizador de apagado automático (TIMER OFF), la
última hora programada de apagado automático y la señal «H».
AF_Manual_AC_12000BTU_BAC4255_BAC4255N.indd 99 21/01/2019 10:25
Timer on
SHORT
CUT
TIMER
ON
TIMER
OFF
MODE
FAN
LED
SLEEP
FOLLOW
SWING
ME
1
2

100
Ahora está listo para reiniciar el temporizador de apagado automático
para detener el funcionamiento.
2. Presione el botón TIMER OFF de nuevo para programar el
temporizador de apagado automático deseado. El temporizador
aumenta en incrementos de 30 minutos entre 10 y 24 horas y en
incrementos de 1 hora entre 10 y 24 horas.
3. Después de programar el temporizador TIMER OFF, habrá 1
segundo de retraso antes de que el mando a distancia transmita la
señal a la unidad del aire acondicionado. A continuación, después
de aproximadamente otros 2 segundos, la señal «H» desaparecerá y
aparecerá la temperatura programada en la ventana de la pantalla LCD.
PRECAUCIÓN
• Cuando selecciona el funcionamiento del temporizador, el mando
a distancia transmite automáticamente la señal del temporizador
a la unidad interior durante el tiempo especificado. Por tanto,
mantenga el mando a distancia en un lugar donde pueda
transmitir la señal a la unidad interior.
• La función del temporizador programada con el mando a
distancia está limitada a los siguientes ajustes: 0.5, 1.0, 1.5, 2.0, 2.5,
3.0, 3.5, 4.0, 4.5, 5.0, 5.5, 6.0, 6.5, 7.0, 7.5, 8.0, 8.5, 9.0, 9.5, 10, 11, 12, 13,
14, 15, 16, 17, 18, 19, 20, 21, 22, 23 y 24.
AF_Manual_AC_12000BTU_BAC4255_BAC4255N.indd 100 21/01/2019 10:25

101
ES
Portable air conditioner | Aire acondicionado portátil | Ar Condicionado Portátil
Ejemplo de ajuste del temporizador
Inicio
Apagado
Programación 6 horas más tarde
TEMPORIZADOR DE ENCENDIDO (TIMER ON)
(Funcionamiento de encendido automático)
La función de temporizador de encendido automático (TIMER ON) es
útil cuando desea que la unidad se encienda automáticamente antes
de volver a casa. El aire acondicionado automáticamente entrará en
funcionamiento en el tiempo programado.
Ejemplo:
Para iniciar el aire acondicionado dentro de 6 horas, proceda de la
siguiente manera.
1. Presione el botón de encendido del temporizador. El último ajuste
del inicio del funcionamiento y la señal «H» se mostrarán en el área de
visualización.
2. Presione el botón TIMER ON para mostrar «6.0H» en la pantalla del
temporizador de encendido automático del mando a distancia.
3. Espere 3 segundos. La zona de la pantalla digital mostrará la
temperatura otra vez. El indicador «TIMER ON» permanecerá
encendido y está función está activa.
AF_Manual_AC_12000BTU_BAC4255_BAC4255N.indd 101 21/01/2019 10:25

102
Programación 10 horas más tarde
Parada
Encendido
TEMPORIZADOR DE APAGADO (TIMER OFF)
(Funcionamiento de apagado automático)
La función de temporizador de apagado automático (TIMER OFF) es
útil cuando desea que la unidad se apague automáticamente después
de irse a la cama. El aire acondicionado se detendrá automáticamente
en el tiempo programado.
Ejemplo:
Para detener el aire acondicionado en 10 horas, proceder de la
siguiente manera:
1. Presione el botón de apagado del temporizador . El último ajuste de
funcionamiento y la señal «H» se mostrará en el área de visualización.
2. Presione el botón TIMER OFF para mostrar «10H» en la pantalla del
temporizador de apagado automático del mando a distancia.
3. Espere 3 segundos. La zona de pantalla digital mostrará temperatura
otra vez. El indicador «TIMER OFF» permanecerá encendido y está
función está activa.
AF_Manual_AC_12000BTU_BAC4255_BAC4255N.indd 102 21/01/2019 10:25

103
ES
Portable air conditioner | Aire acondicionado portátil | Ar Condicionado Portátil
Parada
Inicio
Programación
Encendido
2 horas después
del inicio del
funcionamiento
10 horas después
del inicio del
funcionamiento
TEMPORIZADOR COMBINADO
(Congurando de ambos temporizadores de encendido y apagado
simultáneamente)
TIMER OFF TIMER ON
(Encendido Apagado Iniciar de la operación)
Esta función es útil cuando desea parar el aire acondicionado después
de irse a la cama y encenderlo otra vez por la mañana al despertar o
cuando vuelva a casa.
Ejemplo:
Para detener el aire acondicionado 2 horas después de que inicie el
funcionamiento y se reinicie 10 horas después.
1. Presione el botón de apagado del temporizador .
2. Presione el botón TIMER OFF de nuevo para mostrar «2.0H» en la
pantalla del temporizador.
3. Presione el botón de encendido del temporizador .
4. Presione el botón TIMER ON de nuevo para mostrar «10H» en la
pantalla del temporizador.
AF_Manual_AC_12000BTU_BAC4255_BAC4255N.indd 103 21/01/2019 10:25

104
5. Espere 3 segundos. La zona de pantalla digital mostrará temperatura
otra vez. El indicador «TIMER ON OFF» permanecerá encendido y está
función está activa.
Inicio
ParadaApagado
2 horas después
del inicio del
funcionamiento
Programación 5 horas después
del inicio del
funcionamiento
TIMER ON TIMER OFF
(Apagado Inicio Detener funcionamiento)
Esta función es útil cuando desea encender el aire acondicionado
antes de levantarse y pararlo después de salir de casa.
Ejemplo:
Para iniciar el aire acondicionado 2 horas después del inicio del
funcionamiento y detenerlo 5 horas después.
1. Presione el botón de encendido del temporizador .
2. Presione el botón TIMER ON de nuevo para mostrar «2.0H» en la
pantalla del temporizador.
3. Presione el botón de apagado del temporizador .
4. Presione el botón TIMER OFF de nuevo para mostrar «5.0H» en la
pantalla del temporizador de apagado automático.
5. Espere 3 segundos. La zona de pantalla digital mostrará temperatura
otra vez. El indicador «TIMER OFF & TIMER ON» permanecerá
encendido y está función estará activa.
AF_Manual_AC_12000BTU_BAC4255_BAC4255N.indd 104 21/01/2019 10:25

105
ES
Portable air conditioner | Aire acondicionado portátil | Ar Condicionado Portátil
Uso del mando a distancia
Ubicación del mando a distancia.
• Utilice el mando a distancia en un alcance de 8 metros de la unidad,
apuntando hacia el receptor. La recepción se confirma con un señal
sonora.
PRECAUCIÓN
• El aire acondicionado no funcionará si hay cortinas, puertas u
otros materiales que bloquean las señales del mando a distancia a
la unidad interior.
• Evite que cualquier líquido se derrame o caiga sobre el mando a
distancia. No exponga el mando a distancia a la luz solar directa o
al calor.
• Si el receptor de señal infrarroja de la unidad interior está
expuesto a la luz directa del sol, es posible que el aire
acondicionado no funcione correctamente. Para evitar que el
receptor de la señal reciba luz solar directa, use cortinas.
• Si otros aparatos eléctricos reaccionan al mando a distancia,
mueva estos aparatos de lugar o consulte a su distribuidor local.
• No deje caer el mando a distancia. Manipúlelo con cuidado.
• No coloque objetos pesados sobre el mando a distancia, ni lo pise.
AF_Manual_AC_12000BTU_BAC4255_BAC4255N.indd 105 21/01/2019 10:25

106
Utilización del soporte del mando a distancia (opcional)
• El mando a distancia puede estar fijado a una pared o columna
mediante el uso de un soporte del mando a distancia (no
suministrado, se compra por separado).
• Antes de instalar el mando a distancia, verifique que la unidad del
aire acondicionado reciba las señales correctamente.
• Instale el soporte del mando a distancia con dos tornillos.
• Para instalar o quitar el mando a distancia, muévalo hacia arriba o
hacia abajo en el soporte.
Sustitución de las pilas
Reemplace las pilas antiguas con unas nuevas cuando se presenten los
siguientes casos, que significan las baterías agotadas:
• No hay una señal sonora cuando se transmite una señal.
AF_Manual_AC_12000BTU_BAC4255_BAC4255N.indd 106 21/01/2019 10:25

107
ES
Portable air conditioner | Aire acondicionado portátil | Ar Condicionado Portátil
• El indicador recibido se desvanece.
El mando a distancia está alimentado con 2 pilas (R03/LR03X2)
situadas en la parte posterior, protegidas por una cubierta.
1. Retire la cubierta de la parte posterior del mando a distancia.
2. Retire las pilas antiguas e inserte las nuevas, colocando los polos (+)
y (-) correctamente.
3. Coloque la cubierta de nuevo.
Nota: Cuando retire las pilas, el mando a distancia borrará toda la
programación. Después de insertar pilas nuevas, el mando a distancia
de volver a programarse.
PRECAUCIONES
• No mezcle pilas viejas y nuevas o diferentes tipos de pilas.
• No deje las pilas en el mando a distancia si no va usarlo durante 2 o 3
meses.
• No deseche las pilas como basura doméstica sin clasicar. Es necesario
recoger dichos residuos por separado para un procesamiento especial.
Instalación de la manguera de escape
La instalación o remoción de la manguera de escape y el adaptador
deben realizarse de acuerdo con el modo de uso.
Para los modos COOL, HEAT (tipo de bomba de calor) o AUTO, se
debe instalar la manguera de escape.
En cambio, en los modos FAN, DEHUMIDIFY o HEAT (tipo de calor
producido por electricidad), se debe retirar la manguera de escape.
AF_Manual_AC_12000BTU_BAC4255_BAC4255N.indd 107 21/01/2019 10:25

108
Instrucciones de operación
Operación de COOL [enfriamiento]
- Presione el botón MODE hasta que se encienda la luz indicadora de
COOL.
- Presione los botones ADJUST “+” o “-” para seleccionar la
temperatura ambiente que desea. La temperatura se puede
establecer dentro de un margen de 17-30 °C/62-86 °F (o 88 °F).
- Presione el botón FAN SPEED para elegir la velocidad del ventilador
Operación de HEAT
- Presione el botón MODE hasta que se encienda la luz indicadora de
HEAT.
- Presione los botones ADJUST “+” o “-” para seleccionar la
temperatura ambiente que desea. La temperatura se puede
establecer dentro de un margen de 17-30 °C/62-86 °F (o 88 °F).
- Presione el botón FAN SPEED para elegir la velocidad del ventilador.
En algunos modelos, la velocidad del ventilador no puede ajustarse
en el modo HEAT.
Operación de DRY [seco]
- Presione el botón MODE hasta que se encienda la luz indicadora de
DRY.
- En este modo no puede seleccionar la velocidad del ventilador ni
regular la temperatura. El motor del ventilador opera a baja (LOW)
velocidad.
- Mantenga las ventanas y puertas cerradas para lograr el mejor efecto
deshumidificador.
- No cierre la ventana con cinta adhesiva.
Operación AUTO [automático]
- Cuando ajusta el aire acondicionado al modo AUTO, seleccionará
automáticamente el funcionamiento en frío, calor (los modelos solo
de refrigeración no presentan esta función) o ventilación, según qué
temperatura seleccionó y la temperatura ambiente.
- El aire acondicionado controlará automáticamente que la
temperatura ambiente coincida con la temperatura que estableció.
AF_Manual_AC_12000BTU_BAC4255_BAC4255N.indd 108 21/01/2019 10:25

109
ES
Portable air conditioner | Aire acondicionado portátil | Ar Condicionado Portátil
- En el modo automático, no puede seleccionar la velocidad del
ventilador.
Nota: en algunos modelos, en el modo AUTO se muestran las luces
indicadoras de los modos AUTO y de funcionamiento real.
Operación de FAN [ventilador]
- Presione el botón MODE hasta que se encienda la luz indicadora de FAN.
- Presione el botón FAN SPEED para elegir la velocidad del ventilador.
No se puede regular la temperatura.
- No cierre la ventana con cinta adhesiva.
Operación del TEMPORIZADOR
- Cuando la unidad está encendida, pulse el botón del temporizador
(TIMER) para iniciar el programa de parada de apagado automático;
se iluminará la luz indicadora de TIMER OFF. Presione el botón UP
o DOWN para programar el temporizador. Presione nuevamente el
botón TIMER en menos de 5 segundos y se iniciará el programa de
encendido automático.
La luz indicadora de encendido de TIMER ON se iluminará. Presione
el botón UP o DOWN para seleccionar el tiempo deseado de
encendido automático.
- Cuando la unidad esté apagada, pulse el botón TIMER para iniciar
el programa de encendido automático. Presiónelo nuevamente
en menos de 5 segundos y se iniciará el programa de apagado
automático.
- Pulse o mantenga presionada la tecla UP o DOWN para cambiar el
tiempo automático en incrementos de 0,5 horas, hasta 10 horas; y
después, en incrementos de 1 hora hasta 24 horas. El control contará
regresivamente el tiempo restante hasta el inicio.
- El sistema volverá automáticamente a mostrar el ajuste de
temperatura anterior si no hay ningún tipo de funcionamiento en un
período de 5 segundos.
- Si enciende o apaga la unidad en cualquier momento o si ajusta la
configuración del temporizador a 0,0, se cancelará el programa del
temporizador de inicio/parada automáticos
AF_Manual_AC_12000BTU_BAC4255_BAC4255N.indd 109 21/01/2019 10:25

113
ES
Portable air conditioner | Aire acondicionado portátil | Ar Condicionado Portátil
Retire el tapón de
drenaje inferior
Manguera de
drenaje continua
Adaptador de
manguera de
drenaje
Adaptador de
manguera de
drenaje
Adaptador de
manguera de
drenaje
Presione la
hebilla del cable
de alimentación
de cubierta
trasera
elevador de entrega <= 1,8 m
Cuando el nivel de agua de la bandeja inferior alcance un nivel
predeterminado, la unidad emitirá 8 pitidos y la pantalla digital
mostrará “P1”. En este momento, el aire acondicionado/proceso de
deshumidificación se detendrán inmediatamente. Sin embargo, el
motor del ventilador seguirá en funcionamiento (esto es normal).
Mueva la unidad cuidadosamente a la ubicación del drenaje; retire
el tapón de drenaje inferior y deje que el agua se desagote. Vuelva a
instalar el tapón de drenaje inferior y reinicie la máquina hasta que
desaparezca el símbolo “P1”. Si el error se repite, llame al Servicio de
Atención al Cliente.
Nota: asegúrese de reinstalar firmemente el tapón de drenaje inferior
para evitar pérdidas antes de usar la unidad.
AF_Manual_AC_12000BTU_BAC4255_BAC4255N.indd 113 21/01/2019 10:25

115
ES
Portable air conditioner | Aire acondicionado portátil | Ar Condicionado Portátil
• La bandeja colectora de agua se debe drenar de inmediato después
de que ocurra un error P1 y antes de su almacenamiento para evitar
la formación de moho.
• En los hogares con animales, deberá limpiar periódicamente la rejilla
para evitar que se obstruya el flujo de aire con el pelaje del animal.
Limpieza de la unidad
Limpie la unidad con un paño sin pelusas y con detergente suave.
Seque la unidad con un paño seco y sin pelusas.
Almacene la unidad cuando no esté en uso
• Drene la bandeja colectora de agua de acuerdo con las instrucciones
de la siguiente sección.
• Haga funcionar el aparato en el modo FAN durante 12 horas en una
habitación cálida para secarlo y evitar la formación de moho.
• Apague el aparato y desenchúfelo.
• Limpie el filtro de aire de acuerdo con las instrucciones de la sección
anterior. Reinstale el filtro limpio y seco antes de almacenar.
• Extraiga las pilas del mando a distancia.
Asegúrese de almacenar la unidad en un lugar fresco y oscuro. La
exposición a la luz directa del sol o al calor extremo puede acortar la
vida útil de la unidad.
Nota: la parte delantera del aparato se puede limpiar con un paño
limpio o se puede lavar con un paño empapado en una solución de
agua tibia y un detergente lavavajillas líquido suave. Enjuague bien y
seque con un paño. No use limpiadores abrasivos, cera o brillo en la
parte delantera del aparato. Asegúrese de retirar el exceso de agua del
paño antes de limpiar los controles.
El exceso de agua en los controles podría causar daños en la unidad.
AF_Manual_AC_12000BTU_BAC4255_BAC4255N.indd 115 21/01/2019 10:25

116
2.4. Resolución de problemas
Antes de solicitar una reparación, consulte la siguiente tabla.
Problema Causa posible Resolución de problemas
La unidad no
se enciende
cuando se
pulsa el botón
ON/OFF
Código de error P1 La bandeja colectora de agua
está llena. Apague la unidad,
drene el agua de la bandeja y
reinicie la unidad.
En el modo COOL: la
temperatura ambiente es
inferior a la establecida
Restablezca la temperatura
La unidad no
enfría bien El ltro de aire está bloqueado
con suciedad o pelaje de animalApague la unidad y limpie el
ltro según las instrucciones
La manguera de escape no está
conectada o está bloqueada
Apague la unidad, desconecte
la manguera, revise que no
haya obstrucciones y vuelva a
conectar la manguera
El nivel de refrigerante en la
unidad es bajo Llame a un técnico para que
inspeccione la unidad y la llene
de refrigerante
El ajuste de temperatura es
demasiado alto Disminuya la temperatura
establecida
Las puertas y ventanas de la
habitación están abiertas Asegúrese de que las puertas y
ventanas estén cerradas
La supercie de la habitación es
demasiado grande
Vuelva a revisar la supercie a
enfriar
En la habitación hay fuentes de
calor Retire las fuentes de calor, si es
posible
La unidad
hace ruido
y vibra
demasiado
El suelo no es uniforme Coloque la unidad en una
supercie plana y nivelada
El ltro de aire está bloqueado
con suciedad o pelaje de animal
Apague la unidad y limpie el
ltro según las instrucciones
La unidad
hace ruidos
similares a un
gorgoteo
Este sonido proviene del ujo de
refrigerante que se encuentra en
el interior de la unidad
Se trata de un sonido normal
AF_Manual_AC_12000BTU_BAC4255_BAC4255N.indd 116 21/01/2019 10:25
Product specificaties
| Merk: | Becken |
| Categorie: | Airconditioners |
| Model: | BAC4255 |
Heb je hulp nodig?
Als je hulp nodig hebt met Becken BAC4255 stel dan hieronder een vraag en andere gebruikers zullen je antwoorden
Handleiding Airconditioners Becken

4 Oktober 2022
4 Oktober 2022
Handleiding Airconditioners
- Airconditioners Electrolux
- Airconditioners Samsung
- Airconditioners Panasonic
- Airconditioners LG
- Airconditioners Bauknecht
- Airconditioners BEKO
- Airconditioners Daewoo
- Airconditioners Inventum
- Airconditioners Siemens
- Airconditioners Toshiba
- Airconditioners Vaillant
- Airconditioners Whirlpool
- Airconditioners Zibro
- Airconditioners Adler
- Airconditioners Alaska
- Airconditioners Amana
- Airconditioners Bestron
- Airconditioners Daikin
- Airconditioners Daitsu
- Airconditioners Diamant
- Airconditioners Dimplex
- Airconditioners Eurom
- Airconditioners Frigidaire
- Airconditioners Fuave
- Airconditioners Fujitsu
- Airconditioners GE
- Airconditioners Gorenje
- Airconditioners Gree
- Airconditioners Haier
- Airconditioners Haverland
- Airconditioners Hisense
- Airconditioners Hitachi
- Airconditioners Hotpoint-Ariston
- Airconditioners Kelvinator
- Airconditioners Klarstein
- Airconditioners Lloyd
- Airconditioners Maiko
- Airconditioners Master
- Airconditioners Maxicool
- Airconditioners Melissa
- Airconditioners Midea
- Airconditioners Mitsubishi
- Airconditioners Nedis
- Airconditioners Qlima
- Airconditioners RCA
- Airconditioners Royal Sovereign
- Airconditioners Sanyo
- Airconditioners Saunier Duval
- Airconditioners Sharp
- Airconditioners Suntec
- Airconditioners Tarrington House
- Airconditioners Tatung
- Airconditioners TCL
- Airconditioners Telefunken
- Airconditioners Toyotomi
- Airconditioners Tristar
- Airconditioners Trotec
- Airconditioners Western
- Airconditioners White Knight
- Airconditioners Whynter
- Airconditioners Jocel
- Airconditioners Olimpia Splendid
- Airconditioners Camry
- Airconditioners ECG
- Airconditioners Elba
- Airconditioners Heinner
- Airconditioners Rasonic
- Airconditioners Vox
- Airconditioners Wilfa
- Airconditioners Anslut
- Airconditioners Admiral
- Airconditioners Alhafidh
- Airconditioners Campomatic
- Airconditioners Comfee
- Airconditioners Danby
- Airconditioners Infiniton
- Airconditioners Orima
- Airconditioners Svan
- Airconditioners Ardes
- Airconditioners Alpatec
- Airconditioners Inventor
- Airconditioners SereneLife
- Airconditioners Mabe
- Airconditioners National
- Airconditioners Equation
- Airconditioners Godrej
- Airconditioners Airmaster
- Airconditioners AlpicAir
- Airconditioners Commercial Cool
- Airconditioners Coolix
- Airconditioners Taurus-Alpatec
Nieuwste handleidingen voor Airconditioners

4 Oktober 2022
4 Oktober 2022
4 Oktober 2022

4 Oktober 2022

4 Oktober 2022
4 Oktober 2022

4 Oktober 2022
4 Oktober 2022
4 Oktober 2022
4 Oktober 2022