Atlona AT-OME-SW32 Handleiding
Atlona
Schakelaar
AT-OME-SW32
Lees hieronder de 📖 handleiding in het Nederlandse voor Atlona AT-OME-SW32 (8 pagina's) in de categorie Schakelaar. Deze handleiding was nuttig voor 38 personen en werd door 2 gebruikers gemiddeld met 4.5 sterren beoordeeld
Pagina 1/8

Installation Guide
1
AT-OME-SW32
Omega 4K HDR 3x2 Matrix Switcher for HDMI and USB-C
with HDMI Outputs
AT-OME-SW32
1 x AT-OME-SW32
1 x Captive screw connector, 5-pin
1 x Captive screw connector, 3-pin
1 x USB-C cable
4 x Mounting screws
1 x Pair rack mount ears
1 x 24V DC power supply
1 x IEC power cord
1 x Installation Guide
Package Contents
The Atlona AT-OME-SW32 is a 3×2 matrix switcher with HDMI and USB-C inputs, and HDMI
outputs. It is HDCP 2.2 compliant and supports 4K HDR and 4K/60 4:4:4 at HDMI data rates up
to 18 Gbps. The USB-C input is ideal for AV interfacing with newer Mac®, Chromebook™, and
Windows® PCs, as well as smartphones and tablets. Additionally, 4K downscaling to 1080p
is available on HDMI output 1 when connected to an HD sink. Depending on the intended
application, the OME-SW32 can be set to specic switching modes that include mirrored outputs
(default), one of the outputs xed to an input, or unrestricted matrix switching.
For additional integration convenience, the OME-SW32 features automatic input selection,
automatic display control, balanced audio de-embedding (linked to HDMI output 1), control
via TCP/IP and RS-232, and remote management with AMS (Atlona Management System).
This versatile, compact matrix switcher is ideal for under-table mounting in meeting spaces, to
serve applications with side-by-side displays, videoconferencing, interfacing with OmniStream
networked AV systems, secondary switching into a larger AV system, and more.
IMPORTANT: Visit https://atlona.com/product/AT-OME-SW32 for the latest rmware
updates and User Manual.
Installation Guide
2
AT-OME-SW32
OUTPUT DC 24VINPUT
2
AT-OME-SW32
RS-232 LAN
1 3 1 2
L
++
AUDIO OUT
R
RX TX
IP MODE
RESET AUDIO OUT
L R
++
RS-232
RX TX
AT-OME-SW32
FW
2
1
2
1
PWR
OMEGA
TM
3
OUTPUT 1
3
OUTPUT 2 DISPLAY
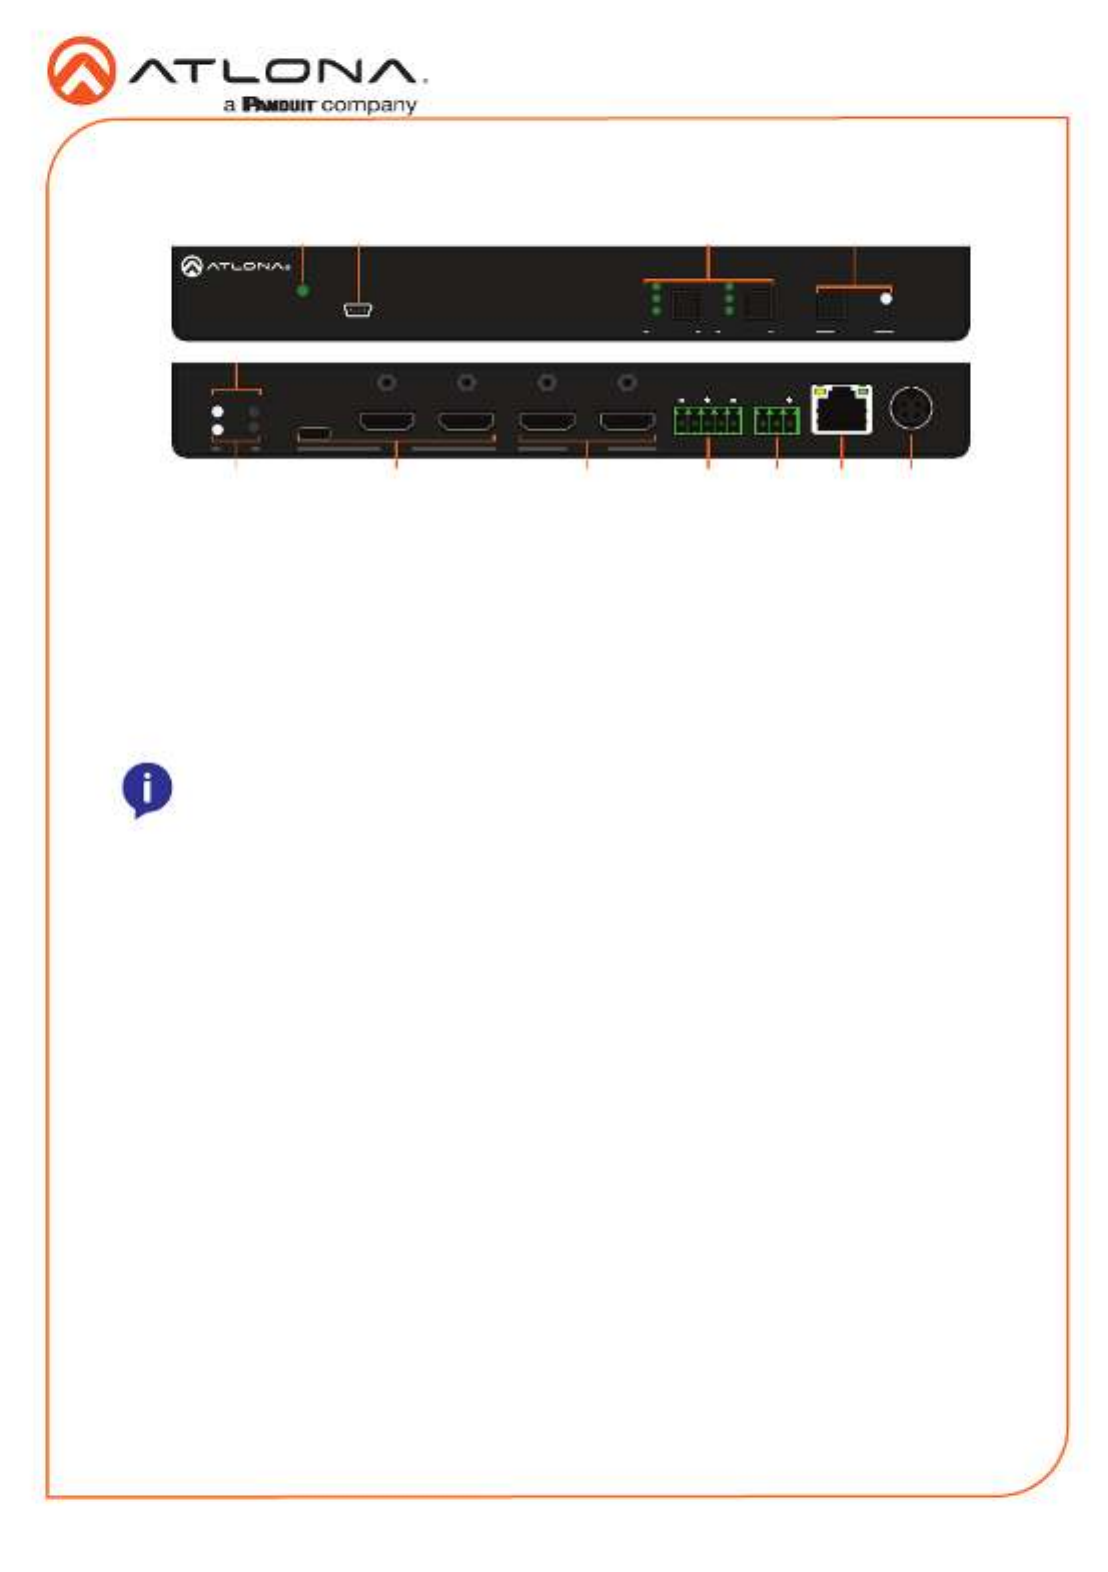
Panel Descriptions
76 8 9 10 11 12
31 2
5
4
1 PWR LED
Illuminates green when receiving power.
2 FW port
Connect a mini USB cable from this port
to a PC to rmware update the unit.
3 OUTPUT 1 & OUTPUT 2
Use the button to switch between
sources, the LEDs will illuminate to show
the selected source.
4 DISPLAY button and LED
Press the display button to trigger an on/
o command for the display. The LED will
blink while the command is being sent. By
default, the display button will mute the
video output of the HDMI ports.
5 IP MODE button and LED
Press and hold the button for 5 seconds
until the LED blinks to switch the IP mode
between DHCP and Static IP modes. The
LED will blink 2 times for DHCP and 3
times for static IP.
6 RESET button and LED
Press and hold the button for 5 seconds
until the unit resets. The LED will blink as
the unit resets to factory default settings.
7 INPUT
Connect the USB-C or HDMI sources to
these ports.
8 OUTPUT
Connect HDMI cables from these ports to
HDMI displays.
9 AUDIO OUT
Connect to an audio DSP, amplier, or
other audio distribution devices.
10 RS-232
Use for device or display control.
11 LAN
Connect an Ethernet cable from this port
to a Local Area Network (LAN).
12 DC 24V
Connect the included DC 24V power
supply to this port.
NOTE: Output two button and LED
will only be functional in Matrix Mode.
Installation Guide
3
AT-OME-SW32
Mounting Instructions
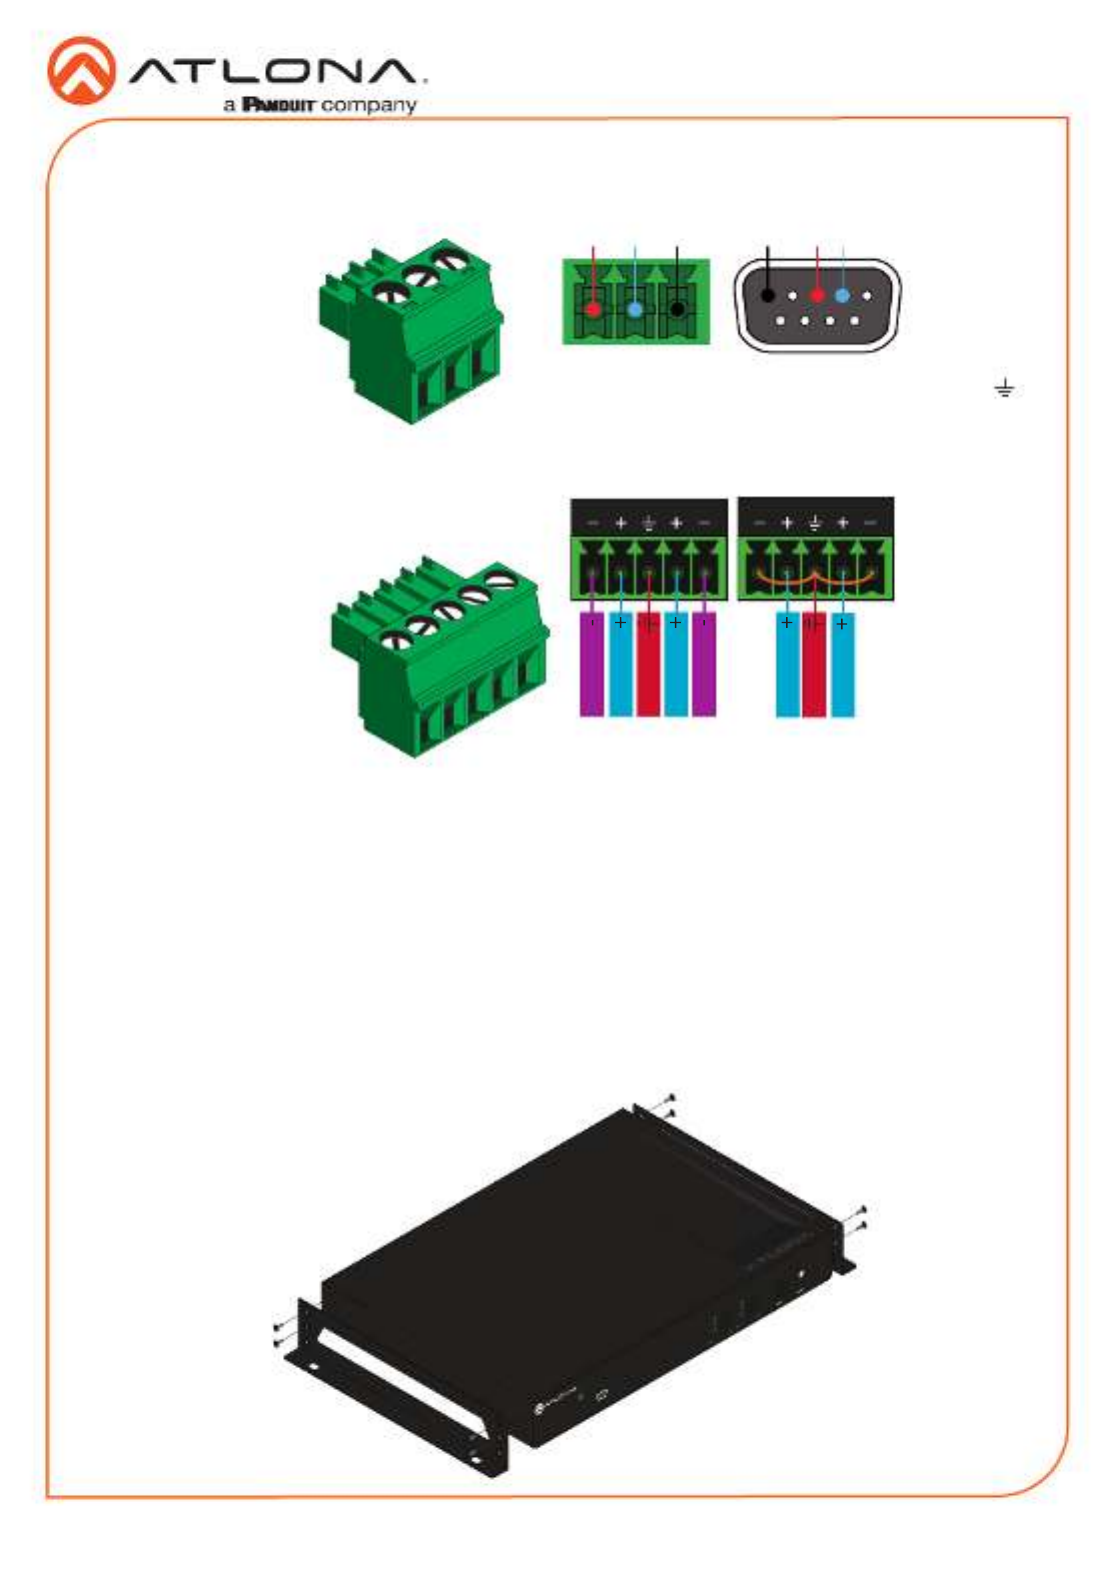
Audio
Connect to an audio DSP, amplier, or other
audio distribution devices.
RS-232
A 3-pin captive screw connector has been
included for RS-232.
Pin out will be determined by the RS-232 cable
and connect as RX (receive), TX (transmit) and
(Ground).
GND RX TX
GNDRX TX
Use a jumper between the negative and
ground pins when using an unbalanced
connection.
Balanced Unbalanced
L R
Negative
Negative
Positive
Positive
Ground
L R
Positive
Positive
Ground
The AT-OME-SW32 includes two mounting brackets and four mounting screws, which can be
used to attach the units to any at surface.
1. Remove the top 2 case screws on the side of the unit.
2. Align the mounting brackets to the side of the units.
3. Use the previously removed case screws to secure the mounting bracket to the enclosure.
4. Repeat the steps for the other side of the unit.
AT- O ME- SW32
FW
2
1
2
1
PWR
OMEGA
TM
3
OUT PUT 1
3
OUT PUT 2 DISPLAY
Product specificaties
| Merk: | Atlona |
| Categorie: | Schakelaar |
| Model: | AT-OME-SW32 |
Heb je hulp nodig?
Als je hulp nodig hebt met Atlona AT-OME-SW32 stel dan hieronder een vraag en andere gebruikers zullen je antwoorden
Handleiding Schakelaar Atlona

18 November 2024
18 Oktober 2024
18 Oktober 2024
18 Oktober 2024
18 Oktober 2024
18 Oktober 2024
12 Juli 2023
12 Juli 2023
12 Juli 2023
12 Juli 2023
Handleiding Schakelaar
- Schakelaar Bosch
- Schakelaar Philips
- Schakelaar HP
- Schakelaar IKEA
- Schakelaar Panasonic
- Schakelaar Huawei
- Schakelaar Asus
- Schakelaar Honeywell
- Schakelaar Yamaha
- Schakelaar Abus
- Schakelaar Airlive
- Schakelaar Alcatel
- Schakelaar Alecto
- Schakelaar Alpine
- Schakelaar Ansmann
- Schakelaar Apc
- Schakelaar Audiovox
- Schakelaar B-tech
- Schakelaar Basetech
- Schakelaar Behringer
- Schakelaar Belkin
- Schakelaar Berker
- Schakelaar Boss
- Schakelaar Brennenstuhl
- Schakelaar Buffalo
- Schakelaar D-Link
- Schakelaar Digitus
- Schakelaar Eaton
- Schakelaar EBERLE
- Schakelaar Ebode
- Schakelaar Edimax
- Schakelaar Elektrobock
- Schakelaar Elro
- Schakelaar Emerson
- Schakelaar Eminent
- Schakelaar Engenius
- Schakelaar Extech
- Schakelaar Finder
- Schakelaar Flamingo
- Schakelaar GAO
- Schakelaar Generac
- Schakelaar Gira
- Schakelaar Goobay
- Schakelaar Grandstream
- Schakelaar Grasslin
- Schakelaar Hager
- Schakelaar Hama
- Schakelaar Hikvision
- Schakelaar Intermatic
- Schakelaar Inverto
- Schakelaar Kathrein
- Schakelaar KlikaanKlikuit
- Schakelaar Konig
- Schakelaar Kopp
- Schakelaar Lancom
- Schakelaar LevelOne
- Schakelaar Linksys
- Schakelaar Logilink
- Schakelaar Manhattan
- Schakelaar Marmitek
- Schakelaar Mercury
- Schakelaar Merlin Gerin
- Schakelaar Mikrotik
- Schakelaar Monacor
- Schakelaar Nedis
- Schakelaar Netgear
- Schakelaar Paladin
- Schakelaar PCE
- Schakelaar Perel
- Schakelaar Plantronics
- Schakelaar Powerfix
- Schakelaar Profile
- Schakelaar Provision ISR
- Schakelaar Pyle
- Schakelaar QNAP
- Schakelaar Renkforce
- Schakelaar Rex
- Schakelaar Robbe
- Schakelaar Schneider
- Schakelaar SEC24
- Schakelaar Shimano
- Schakelaar Silvercrest
- Schakelaar Smartwares
- Schakelaar Speaka
- Schakelaar Suevia
- Schakelaar Sygonix
- Schakelaar Sylvania
- Schakelaar Tenda
- Schakelaar Tesla
- Schakelaar Theben
- Schakelaar Tiptel
- Schakelaar Toolcraft
- Schakelaar Tork
- Schakelaar TP Link
- Schakelaar Trendnet
- Schakelaar Triax
- Schakelaar Trotec
- Schakelaar Unify
- Schakelaar UPM
- Schakelaar Velleman
- Schakelaar Vivanco
- Schakelaar WHALE
- Schakelaar Worx
- Schakelaar ZyXEL
- Schakelaar Jabra
- Schakelaar Jung
- Schakelaar Omnitronic
- Schakelaar One For All
- Schakelaar Clas Ohlson
- Schakelaar CSL
- Schakelaar Monoprice
- Schakelaar Steren
- Schakelaar DoorBird
- Schakelaar Ubiquiti Networks
- Schakelaar EMOS
- Schakelaar Kaiser
- Schakelaar Cotech
- Schakelaar Hamlet
- Schakelaar Comet
- Schakelaar Vivolink
- Schakelaar Techly
- Schakelaar SIIG
- Schakelaar Merten
- Schakelaar Tripp Lite
- Schakelaar Chacon
- Schakelaar Nexa
- Schakelaar Dormakaba
- Schakelaar SPC
- Schakelaar Cisco
- Schakelaar Victron Energy
- Schakelaar Delta Dore
- Schakelaar Fantini Cosmi
- Schakelaar Vemer
- Schakelaar Matrox
- Schakelaar Gefen
- Schakelaar Ei Electronics
- Schakelaar Fibaro
- Schakelaar GEV
- Schakelaar Juniper
- Schakelaar Planet
- Schakelaar Chamberlain
- Schakelaar Intellinet
- Schakelaar CyberPower
- Schakelaar SunBriteTV
- Schakelaar Lindy
- Schakelaar IOGEAR
- Schakelaar Black Box
- Schakelaar IFM
- Schakelaar DataVideo
- Schakelaar Wago
- Schakelaar Sonance
- Schakelaar Totolink
- Schakelaar Dahua Technology
- Schakelaar AV:link
- Schakelaar PreSonus
- Schakelaar Mercusys
- Schakelaar Elation
- Schakelaar EVE
- Schakelaar Audac
- Schakelaar Vacmaster
- Schakelaar ATen
- Schakelaar RGBlink
- Schakelaar PAC
- Schakelaar Wentronic
- Schakelaar Adder
- Schakelaar Homematic IP
- Schakelaar Extron
- Schakelaar AMX
- Schakelaar OSD Audio
- Schakelaar Equip
- Schakelaar Crestron
- Schakelaar ORNO
- Schakelaar Aeon Labs
- Schakelaar Electro Harmonix
- Schakelaar StarTech.com
- Schakelaar PureLink
- Schakelaar Advantech
- Schakelaar Smart-AVI
- Schakelaar Brilliant
- Schakelaar Kramer
- Schakelaar Micro Connect
- Schakelaar KanexPro
- Schakelaar Intelix
- Schakelaar Blustream
- Schakelaar Avocent
- Schakelaar Shelly
- Schakelaar ICasa
- Schakelaar Vimar
- Schakelaar Kemo
- Schakelaar H-Tronic
- Schakelaar Legrand
- Schakelaar Kraus & Naimer
- Schakelaar Noble
- Schakelaar Intertechno
- Schakelaar Ecler
- Schakelaar Rule
- Schakelaar CYP
- Schakelaar Phoenix Contact
- Schakelaar Seuthe
- Schakelaar Maclean Energy
- Schakelaar SmartAVI
- Schakelaar Leviton
- Schakelaar DEHN
- Schakelaar Cudy
- Schakelaar Heitronic
- Schakelaar Noark
- Schakelaar Cooking Performance Group
- Schakelaar Ernitec
- Schakelaar Adviti
- Schakelaar Flic
- Schakelaar HELGI
- Schakelaar IB Connect
- Schakelaar Liberty
- Schakelaar PureTools
- Schakelaar Alfatron
- Schakelaar Cambium Networks
- Schakelaar 2USB
- Schakelaar Roline
- Schakelaar KVM-TEC
- Schakelaar BZBGear
- Schakelaar STI
- Schakelaar Epiphan
- Schakelaar Ebara
- Schakelaar Mach Power
- Schakelaar Axing
- Schakelaar Raritan
- Schakelaar ConnectPro
- Schakelaar Atlantis Land
- Schakelaar Pizzato Elettrica
- Schakelaar Baco
- Schakelaar SEADA
- Schakelaar Doepke
- Schakelaar IPGARD
- Schakelaar Setti+
- Schakelaar INOGENI
- Schakelaar Luxul
Nieuwste handleidingen voor Schakelaar
8 April 2025
4 April 2025
4 April 2025
4 April 2025
4 April 2025
3 April 2025
3 April 2025
1 April 2025
1 April 2025
1 April 2025