Apc Back- ES 550 Handleiding
Lees hieronder de 📖 handleiding in het Nederlandse voor Apc Back- ES 550 (6 pagina's) in de categorie UPS. Deze handleiding was nuttig voor 7 personen en werd door 2 gebruikers gemiddeld met 4.5 sterren beoordeeld
Pagina 1/6
Operation Manual
Back-UPS™ ES 550/700
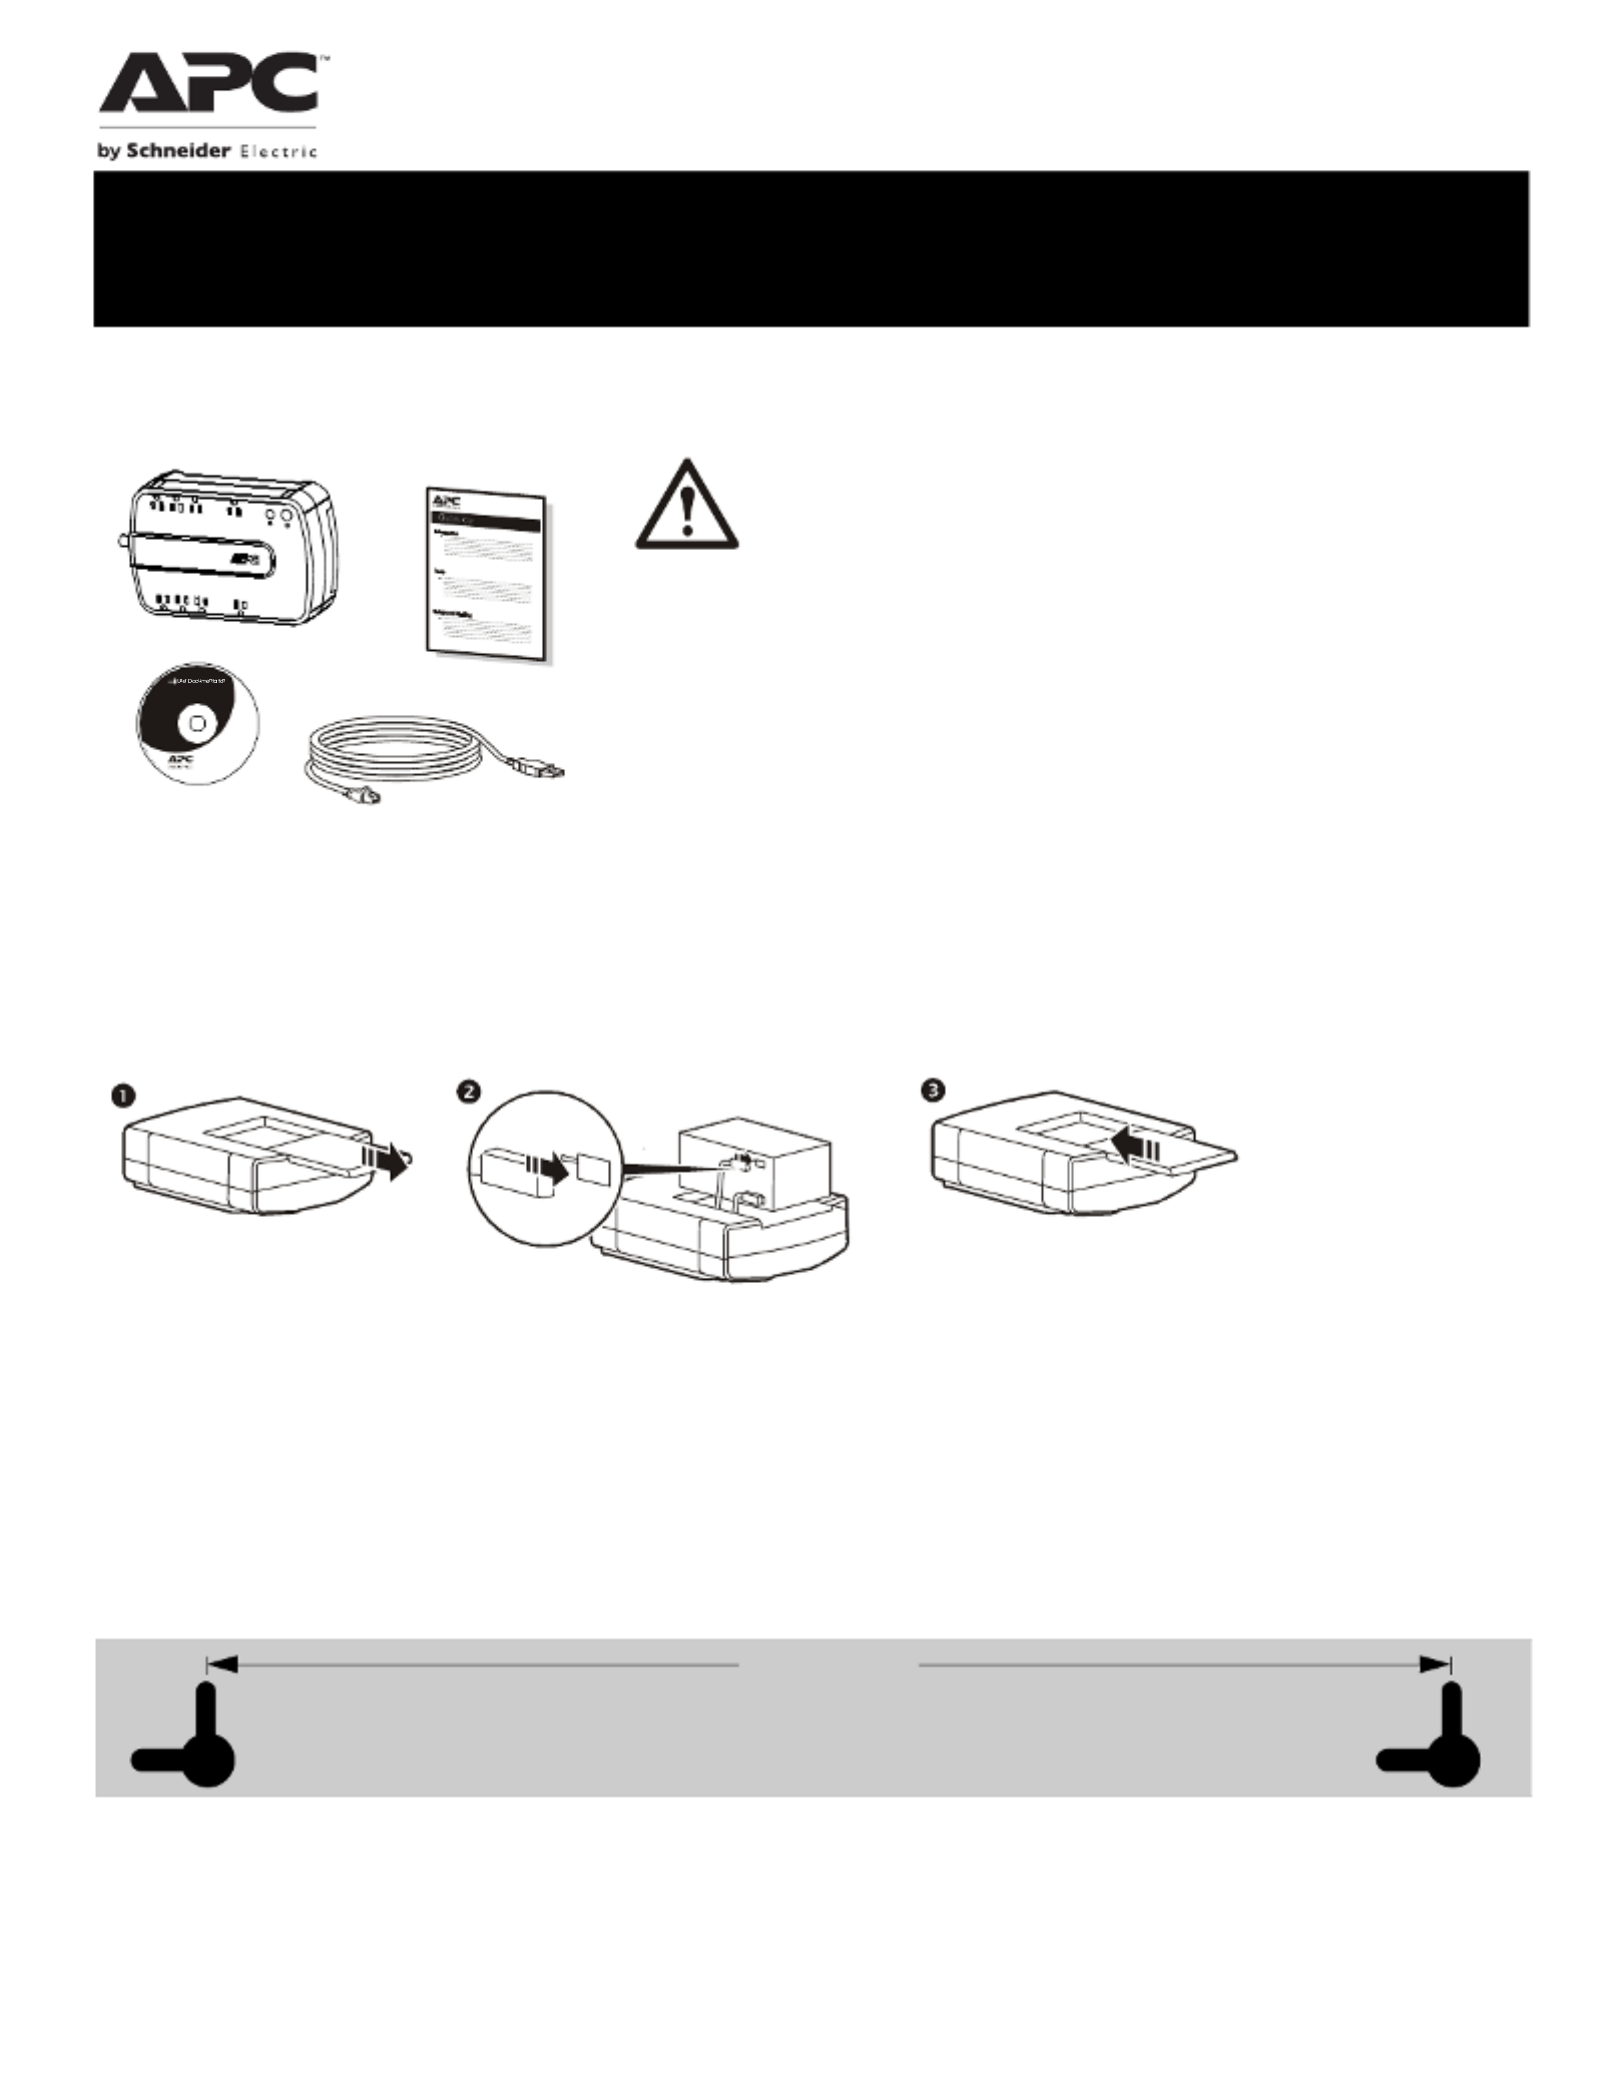
Connect the Battery
The Back-UPS is shipped with one battery cable disconnected. Remove the “Stop! Connect the Battery” label that covers the
outlets. Prior to connecting any equipment to the unit, connect the battery cable to the unused battery terminal. It is normal for
small sparks to be seen when the battery cable is connected to the battery terminal.
Wall Mount Installation
The UPS can be installed vertically or horizontally to a wall. Use the template to assist with installation and a fastener (not
included) that can support at least 6.8 kg.
1. Hold the template against the wall surface and use a nail or pin to mark the center of each hole.
2. Install a fastener into the wall at the marked locations. Allow 8 mm of the fastener to protrude from the wall.
3. Install the unit on the wall, using the fasteners.
Inventory Safety and General Information
Inspect the package contents upon receipt. Notify
the carrier and dealer if there is any damage.
Read the Safety Guide supplied with this unit before
installing the UPS.
• This UPS is intended for indoor use only.
• Do not operate this UPS in direct sunlight, in contact with fluids, or where there is
excessive dust or humidity.
• Be sure the air vents on the UPS are not blocked. Allow adequate space for proper
ventilation.
• The battery typically lasts for two to three years. Environmental factors impact battery life.
Elevated ambient temperatures, poor quality AC power, and frequent short duration
discharges will shorten battery life.
• Connect the UPS power cable directly to a wall outlet. Do not use surge protectors or
extension cords.
Charge the battery for at
least 16 hours before
use.
bu075c
Back-U P
S
bu034a
bu035a
b
u036a
165 mm
(6.50 in.)
Wall-mounting Template

Back-UPS ES 550 & 7002
Connect the Equipment
USB and Serial
Data port
To use PowerChute software, connect a USB cable (not
supplied), to the USB and serial port.
Battery Backup
+ Surge
Protection
outlets
These outlets provide battery backup power to connected
equipment for a limited period of time during power outages
and voltage fluctuations.
The Battery Backup + Surge Protection outlets provide
battery power to connected equipment only when the Back-
UPS is turned on.
Connect critical equipment such as a computer, computer
monitor, modem or other data sensitive devices to these
outlets.
Do not connect aquarium equipment, laser printers, paper
shredders, sump pumps, or fans to these outlets as the
modified sine wave output of the Back-UPS may cause
these devices to experience a decrease in performance.
Do not connect surge protectors or extension cords to these
outlets.
Controlled
outlets
These outlets provide surge protection for connected
devices.
To conserve energy the Controlled by Master outlets will
disconnect from AC power whenever the device plugged
into the MASTER outlet is turned off or goes into Standby
or Hibernation mode.
Connect a printer, scanner or other noncritical devices that
do not require battery backup protection.
Surge
Protection
outlets
These outlets provide full-time protection for connected
equipment from power surges when the Back-UPS is turned
on or off.
The Surge Protection outlets do not provide battery backup
to connected equipment.
Connect a printer, scanner or other noncritical devices that
do not require battery backup protection.
AC Power
Input
Use the supplied power cable to connect the unit to AC power.
Data Port Use the supplied RJ45/USB cable to connect the Back-UPS unit to a computer to install the software.
Circuit breaker Use to reset the system after an overload condition has occurred causing the circuit breaker to trip.
Master outlet Connect the master device to this outlet, in most cases, this will be the main computer.
In addition to providing battery backup power and surge protection, this outlet will signal the Controlled by Master outlets to
disconnect from AC power when the master device is either turned off or goes into Standby or Hibernation mode.
DSL/Modem/
FAX/Phone
Use an Ethernet cable to connect a modem to the IN port, and a computer to the OUT port.
Wall Outlet Connect the unit to a data line wall outlet
UK
bu0
52a

Back-UPS ES 550 & 700 3
PowerChute™ Personal Edition Software
Overview
PowerChute Personal Edition Software allows you to use your computer to access additional power protection and management
features of the Back-UPS.
Using PowerChute, you can:
• Preserve work in progress during a power outage by putting your computer into Hibernate mode. When the power returns, the computer will
appear exactly as it did before the power outage.
• Configure the Back-UPS management features, such as power-saving outlets, shutdown parameters, audible alarms, and more.
• Monitor and view the status of the Back-UPS, including the estimated runtime, power consumption, power event history, and more.
Available features will vary by Back-UPS model and operating system.
If you choose not to install PowerChute, the Back-UPS will still provide backup power and power protection to connected
equipment. However, you will only be able to configure a limited number of features using the display interface.
Compatibility
PowerChute is compatible with Windows operating systems only. For a detailed list of supported operating systems, go to
www.apc.com, select Software & Firmware.
For Mac operating systems, we recommend using the native shutdown application (within System Preferences) which
recognizes your battery backup and allows you to configure shutdown of your system during power outages. To access this
application, connect a USB cable from the Back-UPS DATA PORT (POWERCHUTE PORT) to a USB port on your computer, and
see the documentation provided with your computer.
Install PowerChute™ Software
To install PowerChute Personal Edition (PCPE) software, connect the supplied USB cable between the data port on the UPS and
to a computer with access to the web.
On the computer, go to www.apc.com/tools/download. Select “Software Upgrades - PowerChute Personal Edition” in the “Filter
by Software/Firmware” drop down menu. Select the appropriate operating system. Follow directions to download the software.
Turn on the Back-UPS
Press the ON/OFF switch to turn the unit ON. A single short beep and the green “Power On” indicator confirms that Back-UPS
ES is on and ready to provide protection. The UPS will automatically perform a self-test when power is applied to the unit, the
green LED will flash during the self-test.
Note: Prior to first use, charge the Back-UPS for at least 16 hours to ensure sufficient runtime. The unit is charging whenever it
is connected to AC power, whether the unit is turned ON or OFF.
Operation
Power-Saving feature
This Back-UPS is equipped with power saving outlets that conserve electricity. Configure the Back-UPS to
recognize a Master device, such as a computer or an A/V receiver, and Controlled by master peripheral devices,
such as a printer, speakers, or a scanner. When the Master device goes into Standby or Hibernation mode, or is
turned off, the Controlled by Master device(s) will be turned off as well.
The Back-UPS ships with this Power-Saving feature DISABLED. To configure this feature, follow the instructions below or use
PowerChute software.
Enable the Power-Saving Controlled outlets. Press and hold MASTER ENABLE button for two seconds. The Back-UPS will
beep to indicate the feature is enabled. The green LED above the MASTER ENABLE button will illuminate.
Disable the Power-Saving Controlled outlets. Press and hold MASTER ENABLE button for two seconds. The Back-UPS will
beep to indicate the feature is disabled. The green LED above the MASTER ENABLE button will extinguish.
Setting the threshold. The amount of power used by a device in Standby or Hibernation mode varies dependant on the
connected device. If the Controlled outlets do not turn off when the Master device is in Standby or Hibernation mode. It may be
necessary to adjust the threshold at which the Master outlet signals the Controlled outlets to shut down.
1. Be sure a master device is connected to the Master outlet. Place that device into Standby or Hibernation mode, or turn it off.
2. Press and hold the Master Enable button for six seconds, until the leaf icon flashes three times and the Back-UPS beeps three
times.
The Back-UPS will now recognize and save the threshold level as the new threshold setting for the master device.
Product specificaties
| Merk: | Apc |
| Categorie: | UPS |
| Model: | Back- ES 550 |
Heb je hulp nodig?
Als je hulp nodig hebt met Apc Back- ES 550 stel dan hieronder een vraag en andere gebruikers zullen je antwoorden
Handleiding UPS Apc

8 April 2025
8 April 2025
2 April 2025
2 April 2025
29 Maart 2025
29 Maart 2025
29 Maart 2025
29 Maart 2025
29 Maart 2025
28 Maart 2025
Handleiding UPS
- UPS HP
- UPS IKEA
- UPS AEG
- UPS Siemens
- UPS Dell
- UPS Digitus
- UPS Eaton
- UPS Emerson
- UPS Furman
- UPS Gembird
- UPS Gys
- UPS Hikvision
- UPS Lenovo
- UPS LevelOne
- UPS Riello
- UPS Schneider
- UPS Teltonika
- UPS Voltcraft
- UPS Jung
- UPS Steren
- UPS Conceptronic
- UPS Tripp Lite
- UPS Approx
- UPS Block
- UPS LC-Power
- UPS Energenie
- UPS CyberPower
- UPS Adj
- UPS East
- UPS Xtreme
- UPS Equip
- UPS Liebert
- UPS Avocent
- UPS Minute Man
- UPS Minuteman
- UPS Maruson
- UPS V7
- UPS Phoenix Contact
- UPS Puls Dimension
- UPS Vanson
- UPS Salicru
- UPS SurgeX
- UPS Murr Elektronik
- UPS Altronix
- UPS Ditek
- UPS Bxterra
- UPS Middle Atlantic
- UPS FSP
- UPS Atlantis Land
- UPS PowerWalker
- UPS FSP/Fortron
- UPS Online USV
Nieuwste handleidingen voor UPS

29 Maart 2025
4 Maart 2025
4 Maart 2025
30 Januari 2025
28 Januari 2025
28 Januari 2025
28 Januari 2025
28 Januari 2025
28 Januari 2025
27 Januari 2025