Sharp ES-NFH814AWC-PL Handleiding
Sharp
Wasmachine
ES-NFH814AWC-PL
Lees hieronder de 📖 handleiding in het Nederlandse voor Sharp ES-NFH814AWC-PL (36 pagina's) in de categorie Wasmachine. Deze handleiding was nuttig voor 17 personen en werd door 2 gebruikers gemiddeld met 4.5 sterren beoordeeld
Pagina 1/36

Home Appliances
User Manual
ES-NFH814AWC-PL

Icon Type Meaning
WARNING Serious injury or death risk
RISK OF ELECTRIC SHOCK Dangerous voltage risk
FIRE Warning; Risk of fire / flammable materials
CAUTION Injury or property damage risk
IMPORTANT / NOTE Operating the system correctly
Thank you for choosing this product.
This User Manual contains important safety information and instructions on the operation
and maintenance of your appliance.
Please take the time to read this User Manual before using your appliance and keep this
book for future reference.

CONTENTS
1. SAFETY INSTRUCTIONS ............................................................................................... .1
1.1 General Safety Warnings .2 ..............................................................................................
1.2 During Use ....................................................................................................................6
1.3 Packaging and Environment...........................................................................................7
1.4 Savings Information .8 .......................................................................................................
2. TECHNICAL SPECIFICATIONS ...................................................................................... .9
2.1 Technical Specifications .................................................................................................9
3. INSTALLATION .............................................................................................................. .10
3.1 Removing the Transit Bolts...........................................................................................10
3.2 Adjusting the Feet / Adjusting Adjustable Stays............................................................10
3.3 Electrical Connection .10 ...................................................................................................
3.4 Water Inlet Hose Connection ....................................................................................... .11
3.5 Water Discharge Connection .12 .......................................................................................
4. CONTROL PANEL OVERVIEW .12 .....................................................................................
4.1 Detergent Drawer .12 ........................................................................................................
4.2 Sections .13 ..................................................................................................................
4.3 Program Dial.................................................................................................................13
4.4 Electronic Display .13 ........................................................................................................
5. USING YOUR WASHING MACHINE .14 .............................................................................
5.1 Preparing Your Laundry .14 ...............................................................................................
5.2 Putting Laundry in the Machine .14 ...................................................................................
5.3 Adding Detergent to the Machine .15 ................................................................................
5.4 Operating Your Machine .15 ..............................................................................................
5.5 Selecting a Programme .15 ...............................................................................................
5.6 Half-Load Detection System .15 ........................................................................................
5.7 Additional Functions ....................................................................................................16
5.8 Child Lock . 18 ..................................................................................................................
5.9 Cancelling the Programme .19 .........................................................................................
5.10 Programme End .19 ........................................................................................................
6. PROGRAMME TABLE ................................................................................................... .20
6.1 Important Informations..................................................................................................23
7. CLEANING AND MAINTENANCE ................................................................................ .24
7.1 Warning .24 ..................................................................................................................
7.2 Water Inlet Filters .24 ........................................................................................................
7.3 Pump Filter . 25 ..................................................................................................................
7.4 Detergent Drawer .25 ........................................................................................................
8. Body / Drum .26 ..................................................................................................................
9. TROUBLESHOOTING ................................................................................................... .27
10. AUTOMATIC FAULT WARNINGS AND WHAT TO DO .28 ..............................................

1. SAFETY INSTRUCTIONS
Operating voltage / frequency (220-240) V~/50Hz
Total current (A) 10
Water pressure (Mpa) Maximum 1 Mpa /
Minimum 0. 1Mpa
Total power (W) 2100
Maximum washing capacity
(dry laundry) (kg) 8
• Do not install your machine on a carpet or such
grounds that would prevent the ventilation of its
base.
• The appliance is not intended for use by people
(including children) with reduced physical,
sensory or mental capabilities, or lack of
experience and knowledge unless they have been
given supervision or instruction concerning use
of the appliance by a person responsible for their
safety.
• Children of less than 3 years should be kept away
unless continuously supervised.
• Call the nearest authorized service centre for a
replacement if the power cord malfunctions.
• Use only the new water inlet hose coming
with your machine when making water inlet
connections to your machine. Never use old, used
or damaged water inlet hoses.
• Children should not play with the appliance.
Cleaning and user maintenance should not be
made by children without supervision.
EN - 1

NOTE: For a softcopy of this user
manual, please contact the following address:
“washingmachine@standardtest. info”. In your
e-mail, please provide the model name and serial
number (20 digits) which you can find on the
appliance door.
Read this user manual carefully.
Your machine is for domestic use only.
Using it for commercial purposes will cause
your warranty to be cancelled.
This manual has been prepared for more than
one model therefore your appliance may not
have some of the features described within.
For this reason, it is important to pay particular
attention to any figures whilst reading the
operating manual.
1.1 General Safety Warnings
• Thenecessaryambienttemperatureforoperation
ofyourWashingMachineis15-25°C.
• Wherethetemperatureisbelow0°C,hoses
maysplitortheelectroniccardmaynotoperate
correctly.
• Pleaseensurethatgarmentsloadedintoyour
WashingMachinearefreefromforeignobjects
suchasnails,needles,lightersandcoins.
• It is recommended that for your first wash,
you select the 90˚ Cotton programme without
laundry and half fill compartment II of the
detergent drawer with a suitable detergent.
• Residuemaybuildupondetergentandsofteners
EN - 2

exposedtoairforalongperiodoftime.Only
putsoftenerordetergentinthedraweratthe
beginningofeachwash.
• UnplugyourWashingMachineandswitchoff
thewatersupplyiftheWashingMachineisleft
unusedforalongtime.Wealsorecommendthat
youleavethedooropentopreventbuildupof
humidityinsidetheWashingMachine.
• SomewatermaybeleftinyourWashingMachine
asaresultofqualitychecksduringproduction.
ThiswillnotaffecttheoperationofyourWashing
Machine.
• Thepackagingofthemachinecouldbe
hazardoustochildren.Donotallowchildrento
playwiththepackagingorsmallpartsfromthe
WashingMachine.
• Keepthepackagingmaterialsinaplacewhere
childrencannotreachthem,ordisposeofthem
appropriately.
• Usepre-washprogramsonlyforverydirty
laundry.
Neveropenthedetergentdrawerwhilethe
machineisrunning.
• Intheeventofabreakdown,unplugthemachine
fromthemainssupplyandturnthewatersupply
off.Donotattempttocarryoutanyrepairs.
Alwayscontactanauthorisedserviceagent.
• Donotexceedthemaximumloadforthewashing
programme you have chosen.
NeverforcethedooropenwhenyourWashing
Machineisrunning.
• Washinglaundrycontainingflourmaydamage
EN - 3
yourmachine.
• Pleasefollowthemanufacturers’instructions
regardingtheuseoffabricconditionerorany
similarproductsthatyouintendtouseinyour
WashingMachine.
• Make sure that the door of your Washing Machine
is not restricted and can be opened fully.
Install your machine in a location that can be
fully ventilated and preferably has constant air
circulation.
Read these warnings. Follow the advice given
to protect yourself and others from risks and
fatal injuries.
RISK OF BURNS
Do not touch the drain hose or any discharged
water while your Washing Machine is running. The
high temperatures involved pose a burn risk.
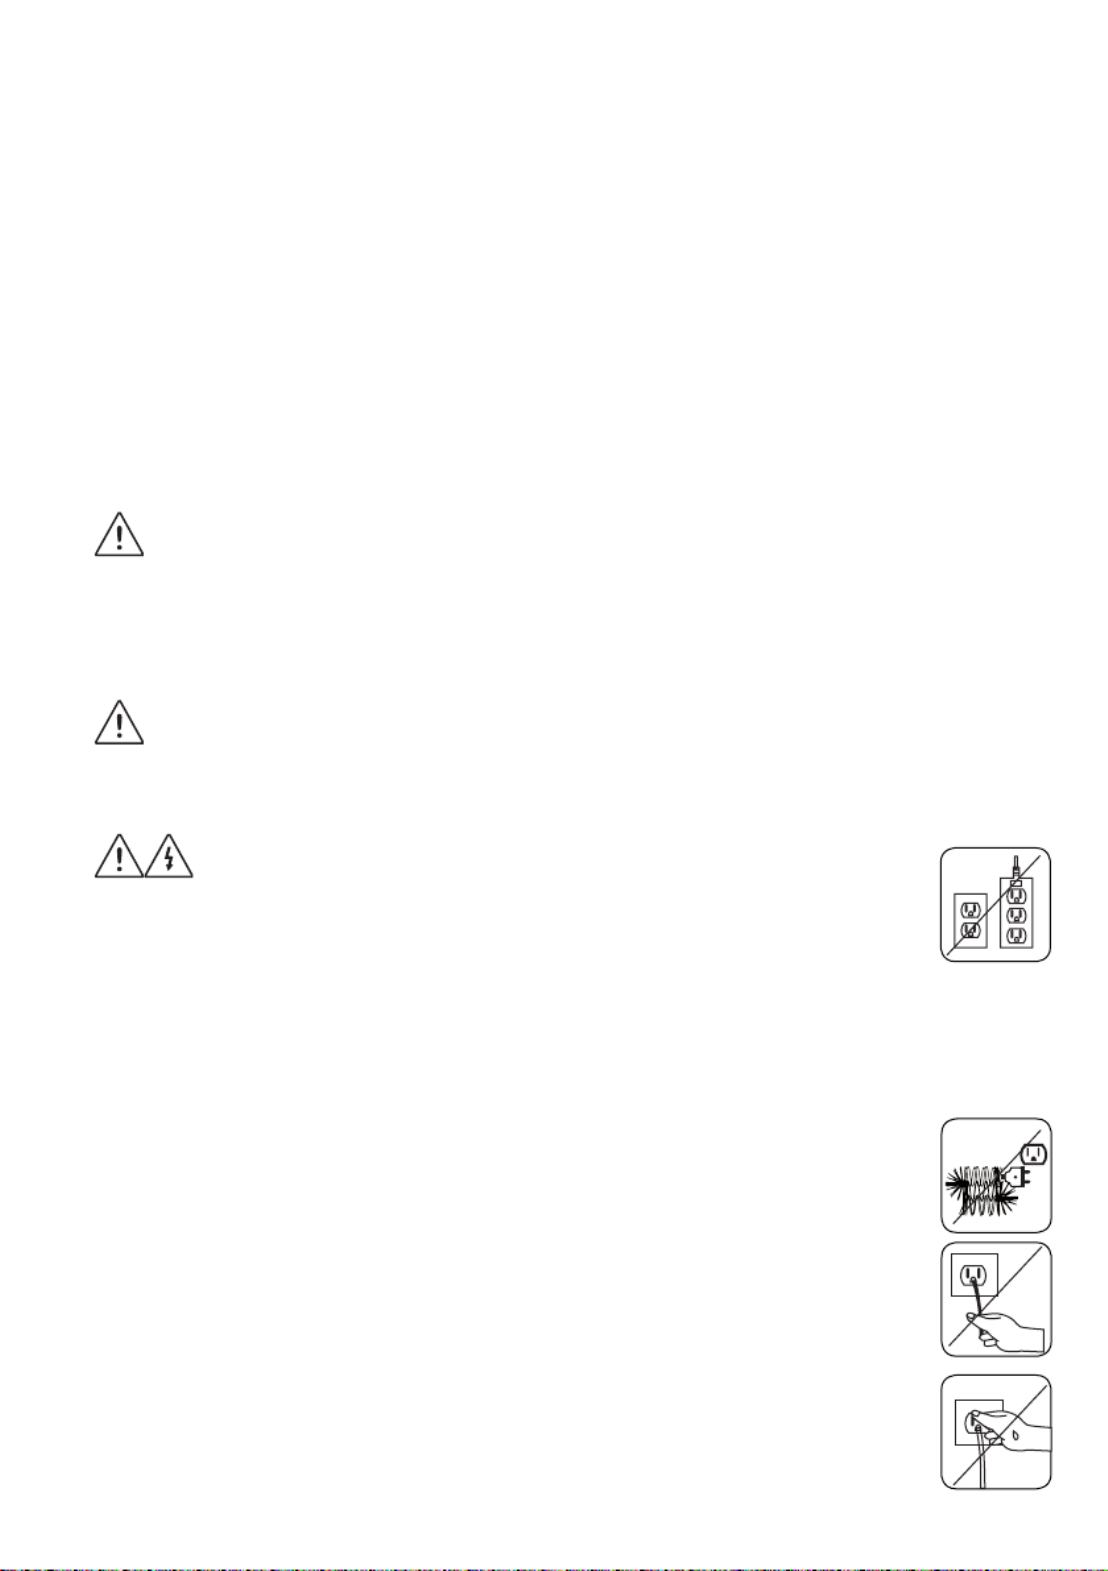
RISK OF DEATH FROM ELECTRICAL
CURRENT
• DonotconnectyourWashingMachinetothe
mainselectricitysupplyusinganextensionlead.
• Donotinsertadamagedplugintoasocket.
• Neverremovetheplugfromthesocketbypulling
the cord. Always hold the plug.
• Nevertouchthepowercord/plugwithwet
handsasthiscouldcauseashortcircuitor
electricshock.
• DonottouchyourWashingMachineifyour
hands or feet are wet.
• Adamagedpowercord/plugcancausefireor
giveyouanelectricshock.Whendamaged
EN - 4

itmustbereplaced,thisshouldonlybedoneby
qualifiedpersonnel.
Risk of flooding
• Checkthespeedofwaterflowbeforeplacingthe
drainhoseinasink.
• Take necessary measures to prevent the hose
fromslipping.
• Waterflowmaydislodgethehoseifitisnot
properlysecured.Makesurethepluginyoursink
does not block the plug hole.
Danger of Fire
• Donotstoreinflammableliquidsnearyour
machine.
• Thesulphurcontentofpaintremoversmaycause
corrosion.Neverusepaintremovingmaterialsin
yourmachine.
• Neveruseproductsthatcontainsolventsinyour
machine.
• Pleaseensurethatgarmentsloadedintoyour
WashingMachinearefreefromforeignobjects
suchasnails,needles,lightersandcoins.
Risk of fire and explosion
Risk of falling and injury
• DonotclimbonyourWashingMachine.
• Makesurehosesandcablesdonotcauseatrip
hazard.
• DonotturnyourWashingMachineupsidedown
oronitsside.
• DonotliftyourWashingMachineusingthedoor
or detergent drawer.
EN - 5

The machine must be carried by at least 2
people.
Child safety
• Donotleavechildrenunattendednearthe
machine.Childrenmightlockthemselvesinthe
machineresultinginriskofdeath.
• Donotallowchildrentotouchtheglassdoor
duringoperation.Thesurfacebecomesextremely
hotandmaycausedamagetoskin.
• Keeppackagingmaterialawayfromchildren.
• Poisoningandirritationmayoccurifdetergent
andcleaningmaterialsareconsumedor
comeintocontactwiththeskinandeyes.Keep
cleaningmaterialsoutofthereachofchildren.
1.2 During Use
• Keeppetsawayfromyourmachine.
• Pleasecheckthepackagingofyourmachine
beforeinstallationandtheoutersurfaceofthe
machineoncethepackaginghasbeenremoved.
Donotoperatethemachineifitappearsdamaged
orifthepackaginghasbeenopened.
• Yourmachinemustonlybeinstalledbyan
authorisedserviceagent.Installationbyanyone
otherthananauthorisedagentmaycauseyour
warrantytobevoid.
• This appliance can be used by children aged
8 years and above and persons with reduced
physical, sensory or mental capabilities or lack
of experience and knowledge if they have been
given supervision or instruction concerning use of
the appliance in a safe way and understand the
EN - 6

hazards involved. Children shall not play with the
appliance. Cleaning and user maintenance shall
not be done by children without supervision.
• Onlyuseyourmachineforlaundrythatislabelled
assuitableforwashingbythemanufacturer.
• Before operating the washing machine,
remove the 4 transit bolts and rubber spacers
from the rear of the machine. If the bolts are
not removed they may cause heavy vibration,
noise and malfunction of the machine and
cause the guarantee to be void.
• Your warranty does not cover damage caused by
externalfactorssuchasfire,floodingandother
sources of damage.
• Pleasedonotthrowawaythisusermanual;keep
itforfuturereferenceandpassitontothenext
owner.
NOTE: Specificationsforthemachinemayvary
dependingontheproductpurchased.
Replacement of drive belt, only by authorized
service.
Only original spare belt: 42006396 Optibelt 6 EPJ
1236
1.3 Packaging and Environment
Removal of packaging materials
Packagingmaterialsprotectyourmachinefromany
damagethatmightoccurduringtransportation.The
packagingmaterialsareenvironmentallyfriendly
astheyarerecyclable.Useofrecycledmaterial
reducesrawmaterialconsumptionanddecreases
wasteproduction.
EN - 7

1.4 Savings Information
Someimportantinformationtogetthemostefficient
useoutofyourmachine:
• Donotexceedthemaximumloadforthewashing
programmeyouhavechosen.Thiswillallowyour
machinetoruninenergysavingmode.
• Donotusethepre-washfeatureforlightlysoiled
laundry.Thiswillhelpyousaveontheamountof
electricityandwaterconsumed.
CE Declaration of conformity
WedeclarethatourproductsmeettheapplicableEuropeanDirectives,Decisionsand
Regulationsandtherequirementslistedinthestandardsreferenced.
Disposal of your old machine
Thesymbolontheproductoronitspackagingindicatesthatthisproduct
maynotbetreatedashouseholdwaste.Insteaditshallbehandedoverto
theapplicablecollectionpointfortherecyclingofelectricalandelectronic
equipment.Byensuringthisproductisdisposedofcorrectly,youwillhelp
preventpotentialnegativeconsequencesfortheenvironmentandhuman
health,whichcouldotherwisebecausedbyinappropriatewastehandling
ofthisproduct.Formoredetailedinformationaboutrecyclingofthis
product,pleasecontactyourlocalcityoffice,yourhouseholdwastedisposalserviceor
the shop where you purchased the product.
EN - 8

EN - 9
2. TECHNICAL SPECIFICATIONS
123
4
5
6
7
8
9
10
General Appearance
1. ProgrammeDial
2. ElectronicDisplay
3. Upper Tray
4. Detergent Drawer
5. Drum
6. PumpFilterCover
7. Water Inlet Valve
8. Power Cable
9. DischargingHose
10. TransitBolts
2.1 Technical Specifications
Operating
voltage /
frequency
(V/Hz)
(220-240)
V~/50Hz
Total current
(A) 10
Water
pressure
(Mpa)
Maximum:1
Mpa
Minimum:0.1
Mpa
Total power
(W)
Maximum
dry laundry
capacity(kg)
8
Spinning
revolution
(rev/min)
Programme
number 15
Dimensions
(mm)
Height
Width
Depth
845
597
2100
527
1400

EN - 10
3. INSTALLATION
3.1 Removing the Transit Bolts
X X4 4
X4
1
3
2
4
1. Beforeoperatingthewashingmachine,
removethe4transitboltsandrubber
spacersfromtherearofthemachine.
If the bolts are not removed, they
maycauseheavyvibration,noiseand
malfunctionofthemachineandvoidthe
warranty.
2. Loosenthetransitboltsbyturning
themanticlockwisewithanappropriate
spanner.
3. Removethetransitboltswithastraight
pull.
4. Fittheplasticblankingcapssuppliedin
theaccessoriesbagintothegapsleft
bytheremovalofthetransitbolts.The
transitboltsshouldbestoredforfuture
use.
NOTE: Removethetransitbolts
beforeusingthemachineforthefirsttime.
Faultsoccurringduetothemachinebeing
operatedwithtransitboltsfittedareoutof
the scope of the warranty.
3.2 Adjusting the Feet /
Adjusting Adjustable Stays
1
1. Donotinstallyourmachineonasurface
(such as carpet) that would prevent
ventilationatthebase.
• Toensuresilentandvibration-free
operationofyourmachine,installitona
firmsurface.
• Youcanlevelyourmachineusingthe
adjustable feet.
• Loosentheplasticlockingnut.
X4
2 3
2. Toincreasetheheightofthemachine,
turnthefeetclockwise.Todecrease
theheightofthemachine,turnthefeet
anticlockwise.
• Oncethemachineislevel,tightenthe
lockingnutsbyturningthemclockwise.
3. Neverinsertcardboard,woodorother
similarmaterialsunderthemachineto
levelit.
• Whencleaningthegroundonwhich
themachineislocated,takecarenotto
disturbthelevelofthemachine.
3.3 Electrical Connection
• YourWashingMachinerequiresa220-
240V, 50 mainssupply.

EN - 11
• Themainscordofyourwashing
machineisequippedwithanearthed
plug.Thisplugshouldalwaysbe
insertedtoanearthedsocketof10
amps.
• Ifyoudonothaveasuitablesocketand
fuseconformingwiththis,pleaseensure
theworkiscarriedoutbyaqualified
electrician.
• Wedonottakeresponsibilityfor
damage that occurs due to the use of
ungroundedequipment.
NOTE: Operatingyourmachine
withlowvoltagewillcausethelifecycle
ofyourmachinetobereducedandits
performancetoberestricted.
3.4 Water Inlet Hose Connection
3/4”
10 mm
1
3
2
4
1. Yourmachinemayhaveeithera
singlewaterinletconnection(cold)
ordoublewaterinletconnection(hot
andcold)dependingonthemachine
specifications.Thewhitecappedhose
shouldbeconnectedtocoldwaterinlet
and red capped hose to the hot water
inlet(ifapplicable).
• Topreventwaterleaksatthejoints,
either1or2nuts(dependingonyour
machine’sspecifications)aresupplied
inthepackagingwiththehose.Fitthese
nutstotheend(s)ofthewaterinlethose
that connect to the water supply.
2. Connectnewwaterinlethosestoa¾˝,
threaded tap.
• Connectthewhitecappedendofthe
waterinlethosetothewhitewaterinlet
valveontherearsideofthemachine
and the red capped end of the hose to
theredwaterinletvalve(ifapplicable).
• Handtightentheconnections.Ifinany
doubt,consultaqualifiedplumber.
• Waterflowwithpressureof0.1-1Mpa
willallowyourmachinetooperateat
optimumefficiency(pressureof0.1
Mpameansthatmorethan8litresof
waterperminutewillflowthroughafully
opened tap).
3. Once you have made all of the
connections,carefullyturnthewater
supply on and check for leaks.
4. Ensurethatthenewwaterinlethoses
arenottrapped,kinked,twisted,folded
or crushed.
• Ifyourmachinehasahotwaterinlet
connection,thetemperatureofthehot
watersupplyshouldnotbehigherthan
70°C.
NOTE: YourWashingMachine
must only be connected to your water
supplyusingthesuppliednewfillhose.Old
hoses must not be reused.
~ 95 cm ~ 140 cm
~ 145 cm ~ 95 cm
0 – max. 100 cm
˜˜
95 cm 150 cm

EN - 12
3.5 Water Discharge Connection
• Connectthewaterdrainhosetoa
standpipeortotheoutletelbowof
ahouseholdsink,usingadditional
equipment.
• Neverattempttoextendthewaterdrain
hose.
• Donotputthewaterdrainhosefrom
yourmachineintoacontainer,bucketor
bathtub.
• Makesurethatthewaterdrainhoseis
not bent, buckled, crushed or extended.
• Thewaterdrainhosemustbeinstalled
atamaximumheightof100cmfromthe
ground.
4. CONTROL PANEL OVERVIEW
51 2 3 4
1. Detergent Drawer
2. ElectronicDisplay
3. AdditionalFunctionsButton
4. Start/Pause Button
5. ProgrammeDial
4.1 Detergent Drawer
1
2
3
4
5
6
1. LiquidDetergentAttachments
2. MainWashDetergentCompartment
3. Softener Compartment
4. Pre-Wash Detergent Compartment
5. Powder Detergent Levels
6. Powder Detergent Scoop (*)
(*)Specificationsmayvarydependingon
themachinepurchased.

EN - 13
4.2 Sections
Main wash detergent compartment:
Thiscompartmentisforliquidorpowder
detergentsorlimescaleremover.Thefluid
detergentlevelplatewillbesuppliedinside
yourmachine.(*)
Fabric conditioner, starch, detergent
compartment:
Thiscompartmentisforsofteners,
conditionersorstarch.Followthe
instructionsonthepackaging.Ifsofteners
leaveresidueafteruse,trydilutingthemor
usingaliquidsoftener.
Pre-wash detergent compartment:
Thiscompartmentshouldbeusedonly
whenthepre-washfeatureisselected.We
recommendthatthepre-washfeatureis
usedonlyforverydirtylaundry.
(*)Specificationsmayvarydependingon
themachinepurchased.
4.3 Program Dial
• Toselectthedesiredprogramme,turn
theprogrammedialeitherclockwiseor
anti-clockwiseuntilthemarkeronthe
programmedialpointstothechosen
programme.
• Makesurethattheprogrammedialis
set exactly to the programme you want.
4.4 Electronic Display
1
8
23 4 65 7
9
1. ElectronicDisplay
2. DigitalDisplay
3. Water Temperature Adjustment Button
4. RPM Speed Adjustment Button
5. DelayedStartAdditionalFunction
6. AdditionalFunctionButton1
7. AdditionalFunctionButton2
8. Start/Pause Button
9. Start/Pause Button Lamp
Thedisplaypanelshowsthewashingdelay
timer(ifset),temperatureselection,spin
speed ,anyadditionalfunctionsselected.
The display panel shows “End” when the
selected programme is complete. The
display panel also indicates if a fault has
occurred with your machine.

EN - 14
5. USING YOUR
WASHING MACHINE
5.1 Preparing Your Laundry
1
3
5
7
2
4
6
1. Followtheinstructionsgiveninthecare
labelsontheclothing.
• Separateyourlaundryaccordingtotype
(cotton,synthetic,sensitive,wooletc.
),washingtemperature(cold,30°,40°,
60°,90°)andthedegreeofdirtiness
(slightlystained,stained,highlystained).
2. Neverwashcolouredandwhitelaundry
together.
• Darktextilesmaycontainexcessdye
and should be washed separately
severaltimes.
3. Ensurethattherearenometallic
materialsonyourlaundryorinthe
pockets;ifso,removethem.
CAUTION: Anymalfunctions
whichoccurduetoforeignmaterials
damagingyourmachinearenotcoveredby
the warranty.
4. Closezipsandfastenanyhooksand
eyes.
5. Removethemetallicorplastichooksof
curtainsorplacetheminawashingnet
or bag.
6. Reversetextilessuchaspants,
knitwear,t-shirtsandsweatshirts.
7. Washsocks,handkerchiefsandother
smallitemsinawashingnet.
Maximum
ironing
temperature
150°C
Can be dry
cleaned
Dripdry
Drycleaning
ingasoil,
pure alcohol
andR113is
allowed
Maximum
ironing
temperature
200°C
No dry
cleaning
Hang to dry
Perchloroethylene
R11, R13,
Petroleum
Normal
washing
Donotiron
Dry flat
Do not tumble
dry
Perchlorinetyhlene
R11, R113, Gas
oil
Can be
bleached Do not bleach
F P A
5.2 Putting Laundry in the Machine
• Openthedoorofyourmachine.
• Spreadyourlaundryevenlyinthe
machine.
NOTE: Take care not to exceed
themaximumloadofthedrumasthiswill
givepoorwashresultsandcausecreasing.
Refertothewashingprogrammetablesfor

EN - 15
informationonloadcapacities.
Thefollowingtableshowsapproximate
weightsoftypicallaundryitems:
LAUNDRY TYPE WEIGHT (gr)
Towel 200
Linen 500
Bathrobe 1200
Quiltcover 700
Pillowslip 200
Underwear 100
Tablecloth 250
• Loadeachitemoflaundryseparately.
• Checkthatnoitemsoflaundryare
trapped between the rubber seal and
the door.
• Gentlypushthedooruntilitclicksshut.
click
• Makesurethedoorisfullyclosed,
otherwisetheprogrammewillnotstart.
5.3 Adding Detergent to the Machine
Theamountofdetergentyouwillneedto
putinyourmachinewilldependonthe
followingcriteria:
• Ifyourclothesareonlyslightlysoiled,
do not pre-wash. Put a small amount
ofdetergent(asspecifiedbythe
manufacturer)intocompartmentIIofthe
detergent drawer.
• Ifyourclothesareexcessivelysoiled,
selectaprogrammewithpre-washand
put¼ofthedetergenttobeusedinto
compartment I of the detergent drawer
andtherestincompartmentII.
• Usedetergentsproducedforautomatic
washingmachines.Followthe
manufacturer’sinstructionsonthe
amount of detergent to use.
• In areas of hard water, more detergent
willberequired.
• Theamountofthedetergentrequired
willincreasewithhigherwashingloads.
• Putsoftenerinthemiddlecompartment
of the detergent drawer. Do not exceed
the MAX level.
• Thicksoftenersmaycausecloggingof
thedrawerandshouldbediluted.
• Itispossibletousefluiddetergentsin
allprogrammeswithoutapre-wash.To
dothis,slidethefluiddetergentlevel
plate(*)intotheguidesincompartment
IIofthedetergentdrawer.Usethelines
ontheplateasaguidetofillthedrawer
totherequiredlevel.
(*)Specificationsmayvarydependingon
themachinepurchased.
5.4 Operating Your Machine
1 2
1. Plugyourmachineintothemains
supply.
2. Turn on the water supply.
• Openthemachinedoor.
• Evenlyspreadyourlaundryinthe
machine.
• Gentlypushthedooruntilitclicksshut.
5.5 Selecting a Programme
Use the programme tables to select the
mostappropriateprogrammeforyour
laundry.
5.6 Half-Load Detection System
Yourmachinefeaturesahalf-loaddetection
system.
Ifyouputlessthanhalfthemaximum
loadoflaundryintoyourmachineitwill
automaticallysetthehalf-loadfunction,
regardless of the programme you selected.
Thismeansthattheselectedprogramme
willtakelesstimetocompleteandwilluse
less water and energy.

EN - 16
(*)Machineryspecificationsmayvary
dependingontheproductpurchased.
5.7 Additional Functions
1. Temperature Selection
Use the washing water temperature
adjustment button to alter the automatically
programmed washing water temperature.
When you select a programme the
maximum temperature for that programme
is automatically selected. To adjust the
temperature, press the water temperature
adjustment button until the desired
temperature is displayed on the digital
display.
You can gradually decrease the washing
water temperature between the maximum
washing water temperature of the selected
programme and cold washing (- - C)
selections by pressing the temperature
adjustment button.
2. Spin Speed Selection
When you select a programme, the
maximum spin speed is automatically
selected.
To adjust the spin speed between the
maximum spin speed and the cancel
spinning option (- - -), press the Spin speed
button until the desired speed is displayed.
If you have skipped the spin speed you
want to set, keep pressing the spin speed
adjustment button until the desired spin
speed is displayed again.
3. (*)Delay Timer
Auxiliaryfunctionbutton3or4DelayTimer
Youcanusethisauxiliaryfunctiontodelay
thestarttimeofthewashingcyclefor1to
23 hours .
Tousethedelayfunction:
• Press the delay key once.
• “01h” will be displayed. will light up on
the electronic display.
• Press the delay key until you reach the
time after which you want the machine
to start the washing cycle.
• If you have skipped the delay time you
would like to set, you can keep pressing
the delay key until you reach that time
again.
• To use the time delay function, you need
to press the Start/Pause key to start the
machine.
• If you want to cancel the delay:
- If you have pressed the Start/Pause
key to start the machine, you just
need to press the delay key once.
will go off on the electronic display.
- If you have not pressed the Start/
Pause key, press the delay key
continuously until goes off on the
electronic display. will go off on
the electronic display.
NOTE: In the case that you want
to select the auxiliary function feature, if the
auxiliary function LED is not on, this means
that this feature is not being used in the
washing programme you have selected.

EN - 17
4. Anti- Allergic(*)
Auxiliaryfunctionbutton3or 4 Anti-Allergic
You can add an additional rinse operation to
your laundry using this additional function.
Your machine will carry out all rinsing steps
with hot water. We recommend this setting
for laundry worn on delicate skin, baby
clothes and underwear.
To select this function, press the Antiallergic
button when the symbol is displayed.
5. Easy Ironing(*)
Auxiliaryfunctionbutton3 EasyIroningor 4
Usingthisfunctionwillresultinyourlaundry
beinglesswrinkledattheendofthe
selectedwashingprogramme.
Toselectthisfunction,presstheEasy
ironingbuttonwhenthe symbolis
displayed.
6. Pre-Wash(*)
Auxiliaryfunctionbutton3or 4 Pre-Wash
This additional function allows you to give
heavily soiled laundry a pre-wash before
the main washing programme takes place.
When using this function, put detergent in
front washing compartment of the detergent
drawer.
Toselectthisfunction,pressthePre-wash
button when the symbol is displayed.
7. Extra Rinse(*)
Auxiliaryfunctionbutton3 ExtraRinseor 4
Youcanaddanadditionalrinseoperation
to the end of the selected wash programme
usingthisadditionalfunction.Toselectthis
function,presstheExtrarinsebuttonwhen
the symbol is displayed.
8. Rapid Wash(*)
Auxiliaryfunctionbutton3 RapidWashor 4
Youcanwashyourlaundryinashorter
time,usinglessenergyandwaterby
selectingthisadditionalfunction.
Werecommendthatyouonlyusethis
optionifyouarewashinglessthanhalf
themaximumdryloadfortheselected
programme.
Toselectthisfunction,presstheRapid
wash button when the symbolis
displayed.

EN - 18
NOTE: If you put less than
halfthemaximumloadoflaundryinto
yourmachinethehalf-loadfunctionwill
beautomaticallyset,regardlessofthe
programmeyouselected.Thismeans
thattheselectedprogrammewilltakeless
timetocompleteandwilluselesswater
andenergy.Whenyourmachinedetects
half load, the symbolisdisplayed
automatically.
9. No Spin(*)
Auxiliaryfunctionbutton3 NoSpinor 4
If you don’t want to perform wringing on
your laundry, you can use this auxiliary
function. You may make the programme
active by pressing the wringing cancel
button on the display panel when the led
light of the symbol turns on.
10. Cold Wash(*)
Auxiliaryfunctionbutton3or 4 Cold Wash
Youcanusethisauxiliaryfunctionwhen
youwanttowashyourlaundrywithcold
water (tap water). You may make the
programmeactivebypressingthecold
washingbuttononthedisplaypanelwhen
theledlightofthe symbol turns on.
(*)Machineryspecificationsmayvary
dependingontheproductpurchased.
Start/Pause button
BypressingontheStart/Pausebutton,
you may start the programme you
haveselectedorsuspendarunning
programme.Ifyouswitchyourmachineto
the standby mode, the Start/Pause led on
theelectronicdisplaywillblink.
5.8 Child Lock
The Child Lock function allows you to
lock the buttons so that the wash cycle
you have chosen cannot be changed
unintentionally.
To activate child lock, press and hold
button 2 and 3 simultaneously for at
least 3 seconds. ‘’CL’’ will flash on the
electronic display for 2 seconds when the
child lock is activated.
If any button is pressed or selected
programme is changed by the programme
dial while the child lock is active, the “CL”
symbol will flash on the electronic display
for 2 seconds.
If the child lock function is active and
a programme is running, when the
programme dial is turned to the CANCEL
position and another programme
is selected the previously selected
programme continues from where it was
left.
To deactivate the child lock, press and
hold button 2 and 3 simultaneously for at
least 3 seconds until the “CL” symbol on
the electronic display disappears.

EN - 19
5.9 Cancelling the Programme
To cancel a running programme at any
time:
1. Turntheprogrammedialtothe
“STOP”position.
2. Yourmachinewillstopthewashing
operationandtheprogrammewillbe
cancelled.
3. Turntheprogrammedialtoanyother
programmetodrainthemachine.
4. Yourmachinewillperformthe
necessarydrainingoperationand
cancel the programme.
5. You can now select and run a new
programme.
5.10 Programme End
Yourmachinewillstopbyitselfassoon
as the programme you have selected
finishes.
• “”willflashontheelectronicdisplay.
• Youcanopenthemachine’sdoorand
remove the laundry.
• Leavethedoorofyourmachineopen
toallowtheinnerpartofyourmachine
to dry.
• SwitchtheprogrammedialtoSTOP
position.
• Unplugyourmachine.
• Turn the water tap off.

EN - 20
6. PROGRAMME TABLE
Programme
Washing
temperature
(°C)
Maximumdry
laundry amount
(kg)
Detergent
compartment
Programme
duration(Min.)
Laundrytype/Descriptions
COTTON *60-90-80-70-40 8 2 215
Verydirty,cottonandflaxtextiles.
(Underwear,linen,tablecloth,towel
(maximum4,0 kg), bedclothes, etc.)
ECO 40-60 *40 - 60 8 2 215
Dirtycottonandflaxtextiles.
(Underwear,linen,tablecloth,towel
(maximum4,0 kg), bedclothes, etc.)
COTTON Pre-
Wash
*60 - 50 - 40 - 30 -
“- -C” 8 1711&2
Dirtycottonandflaxtextiles.
(Underwear,linen,tablecloth,towel
(maximum 4,0 kg), bedclothes, etc.)
COTTON 20 *20- “- -C” 4 2 96
Lessdirty,cottonandlinentextiles.
(Underwear, bedsheet, tablecloth,
towel (max.2,0 kg) bedcloth, etc.)
COLOURS *40 - 30 - “- -C” 3,5 2 210
Lessdirty,cottonandlinentextiles.
(Underwear, bedsheet, tablecloth,
towel (max. 2,0 kg) bedcloth, etc.)
WOOL *30 - “- -C” 2,5 2 44 Woollenlaundrieswithmachinewash
labels.
RINSE *“- -C” 8 - 30
Providesanadditionalrinsetoany
typeoflaundryafterthewashing
cycle.
ALLERGY SAFE *60 - 50 - 40 - 30 -
“- -C” 4 2 212 Baby laundry
Spin/Drain *“- -C” 8 - 17
Youcanusethisprogramforany
typeoflaundryifyouwantan
additionalspinstepafterthewashing
cycle./Youcanusethedrainprogram
todrainthewateraccumulated
insidethemachine(addingor
removinglaundry).Toenablethe
drainprogram,turntheprogram
knobtothespin/drainprogram.After
youselect“spincancelled”usingthe
auxiliaryfunctionkey,theprogram
willstarttorun.
HAND WASH *30 - “- -C” 2,5 2 90 Laundry recommended for hand
washorsensitivelaundry.
Easy Care /
Outdoor *40 - 30 - “- -C” 3,5 2 110
Verydirtyorsynthetic-mixedtextiles.
(Nylonsocks,shirts,blouses,
synthetic-includingtrousersetc.)
Mixed *40 - 30 - “- -C” 3,5 2 105 Dirtycotton,synthetics,colourand
flaxtextilescanbewashedtogether.
Jeans / Dark
Garments *30 - “- -C” 4 2 96
Blackanddarkitemsmadeofcotton,
mixedfibreorjeans.Washinside
out.,Jeansoftencontainsexcess
dyeandmayrunduringthefirst
fewwashes.Washlightanddark
coloureditemsseparately
(**)FAST60’60°C *60 - 50 - 40 - 30 -
“- -C” 4 2 60
Dirty,cotton,colouredandlinen
textileswashedat60°Cin60
minutes.
(***) 5Rapid1 min. *30 - “- -C” 2 2 15
Inashorttimeof1 minutes,Lightly5
soiled,cotton,coloredandlinen
textilesyourcanwash.

EN - 21
NOTE: PROGRAMME DURATION MAY CHANGE ACCORDING TO THE
AMOUNT OF LAUNDRY, TAP WATER, AMBIENT TEMPERATURE AND SELECTED
ADDITIONAL FUNCTIONS.
(*) Washing water temperature of the programme is the factory default.
(**) If your machine has the rapid wash auxiliary function, you can enable the quick wash option on the
display panel and load the machine with 2 kg or less laundry to wash it in 30 minutes.
(***) Due to the short washing time of this programme, we recommend that less detergent is used. The
programme may last longer than 15 minutes if your machine detects an uneven load. You can open the
door of your machine 2 minutes after the completion of a washing operation. (The 2 minute period is
not included in the programme duration).
According to regulation 1015/2010 and 1061/2010, the programme 1 and the programme 2 are
respectively the ‘Standard 60°C cotton programme’ and the ‘Standard 40°C cotton programme’.
The Eco 40-60 programme is able to clean normally soiled cotton laundry declared to be washable at
40°C or 60°C, together in the same cycle, and that this programme is used to assess the compiance
with the EU ecodesign legislation.

EN - 22
• The most efficient programmes in terms of energy consumption are generally those that
perform at lower temperatures and longer duration.
• Loading the household washing machine up to the capacity indicated by the
manufacturer for the respective programmes will contribute to energy and water savings.
• Program duration, energy consumption and water consumption values may vary
according to wash load weight and type, selected extra functions, tap water and ambient
temperature.
• It’s recommended to use liquid detergent for the washing programmes at low
temperature. The amount of detergent to be used may vary depending on the amount
of laundry and the level of dirtiness of the laundry. Please follow the detergent
manufacturers’ recommendations for the amount of the detergent to be used.
• The noise and remaining moisture content are influenced by the spinning speed. The
higher spinning speed in the spinning phase, the higher noise and the lower remaining
moisture content.
• You can access the product database where the model information is stored by reading
the QR code on the energy label.
Programme
Name
Rated
Capacity kg
Energy
Consumption
kWh/cycle
Programme Duration
Hours:Minutes
Water
Consumption
Litres/Cycle
max.
Temperature
°C
Remaining
Moisture Content
%
1400 Rpm
Rated
Capacity
1/2 Load
1/4 Load
Rated
Capacity
1/2 Load
1/4 Load
Rated
Capacity
1/2 Load
1/4 Load
Rated
Capacity
1/2 Load
1/4 Load
Rated
Capacity
1/2 Load
1/4 Load
Cotton
90
8 2,38 03:13 82 81 53%
Cotton
60
8 1,13 03:35 52 57 53%
Eco
40-60
8 1,05 0,49 03:35 02:48 02:30 52 44 46 31 53% 53% 53%0,27 37 25
Easy Care /
Outdoor
3,5 0,56 01.50 50 42 53%
Fast 60
4 1,02 01:00 34 58 53%
Cotton
20
4 0,2 01:36 43 20 53%

EN - 23
6.1 Important Informations
• Use detergents, softeners and other additives suitable for automatic washing machines
only. Excessive foam has occurred and automatic foam absorption system has been
activated due to too much detergent usage.
• We recommend that periodic cleaning for washing machine every 2 months. For
periodic cleaning please use Drum Clean programme. If your machine do not have
Drum Clean programme, use Cottons-90 programme. When required, use limescale
removers manufactured specifically for washing machines only.
• Never force the door open when your Washing Machine is running. You can open the
door of your machine 2 minutes after the completion of a washing operation. *
• Never force the door open when your Washing Machine is running. The door will open
immediately after the washing cycle has ended. *
• The installation and repairing procedures should always carried out by the Authorised
Service Agent in order to avoid possible risks. The manufacturer shall not be held liable
for damages that may arise from procedures carried out by unauthorised persons.
(*)Specificationsmayvarydependingonthemachinepurchased.

EN - 24
7. CLEANING AND
MAINTENANCE
7.1 Warning
Turnyourmainspower
supply off and remove the
plug from the socket
beforecarryingout
maintenanceandcleaning
ofyourmachine.
Turn off the water
supplybeforestarting
maintenanceandcleaning
ofyourmachine.
CAUTION: Do not
usesolvents,abrasive
cleaners, glass cleaners
orall-purposecleaning
agents to clean your
WashingMachine.They
maydamagetheplastic
surfaces and other
componentswiththe
chemicalstheycontain.
7.2 Water Inlet Filters
Waterinletfilterspreventdirtandforeign
materialsfromenteringyourmachine.We
recommendthatthesefiltersarecleaned
whenyourmachineisunabletoreceive
sufficientwater,althoughyourwatersupply
isonandthetapisopen.Werecommend
thatyoucleanyourwaterinletfiltersevery
2 months.
• Unscrewthewaterinlethose(s)from
theWashingMachine.
• Toremovethewaterinletfilterfromthe
waterinletvalve,useapairoflong-
nosedplierstogentlypullontheplastic
barinthefilter.
• Asecondwaterinletfilterislocatedin
thetapendofthewaterinlethose.To
removethesecondwaterinletfilter,use
apairoflong-nosedplierstogentlypull
ontheplasticbarinthefilter.
• Cleanthefilterthoroughlywithasoft
brushandwashwithsoapywaterand
rinsethoroughly.Re-insertthefilterby
gentlypushingitbackintoplace.
CAUTION: Thefiltersatthe
waterinletvalvemaybecomeclogged
duetowaterqualityorlackofrequired
maintenanceandmaybreakdown.
Thismaycauseawaterleak.Anysuch
breakdowns are out of the scope of the
warranty.

EN - 25
7.3 Pump Filter
1
3
5
2
4
6
ThepumpfiltersysteminyourWashing
Machineprolongsthelifeofthepump
bypreventinglintfromenteringyour
machine.
We recommend that you clean the pump
filterevery2months.
Thepumpfilterislocatedbehindthe
coveronthefront-lowerrightcorner.
Tocleanthepumpfilter:
1. Youmayusethewashingpowder
spade(*)suppliedwithyourmachine
orliquiddetergentlevelplatetoopen
the pump cover.
2. Lodge the end of the powder spade
orliquiddetergentlevelplateinthe
openingofthecoverandgentlypress
backwards.Thecoverwillopen.
• Beforeopeningthefiltercover,place
acontainerunderthefiltercoverto
collectanywaterleftinthemachine.
• Loosenthefilterbyturning
anticlockwiseandremovebypulling.
Waitforthewatertodrain.
NOTE: Dependingonthe
amountofwaterinsidethemachine,you
mayhavetoemptythewatercollection
containerafewtimes.
3. Removeanyforeignmaterialsfrom
thefilterwithasoftbrush.
4. Aftercleaning,re-fitthefilterby
insertingitandturningclockwise.
5. Whenclosingthepumpcover,ensure
thatthemountingsinsidethecover
meettheholesonthefrontpanelside.
6. Closethefiltercover.
WARNING: Thewaterin
thepumpmaybehot,waituntilithas
cooleddownbeforecarryingoutany
cleaningormaintenance.
(*)Specificationsmayvarydependingon
themachinepurchased.
7.4 Detergent Drawer
Theuseofdetergentmaycauseresidual
buildupinthedetergentdrawerover
time.Werecommendthatyouremove
the drawer every 2 months to clean the
accumulatedresidue.
To remove the detergent drawer:
• Pullthedrawerforwardsuntilitisfully
extended.
• Press the region shown below inside
the detergent drawer you have pulled
all the way back, and continue pulling
and remove the detergent drawer from
its place
• Remove the detergent drawer and
disassemble the flush stopper. Clean
thoroughly to completely remove
Product specificaties
| Merk: | Sharp |
| Categorie: | Wasmachine |
| Model: | ES-NFH814AWC-PL |
Heb je hulp nodig?
Als je hulp nodig hebt met Sharp ES-NFH814AWC-PL stel dan hieronder een vraag en andere gebruikers zullen je antwoorden
Handleiding Wasmachine Sharp

1 December 2024
16 November 2024
26 Maart 2024
26 Maart 2024
3 Januari 2024
26 Augustus 2023
28 Juni 2023
27 Juni 2023
20 Juni 2023
20 Juni 2023
Handleiding Wasmachine
- Wasmachine Electrolux
- Wasmachine Bosch
- Wasmachine IKEA
- Wasmachine Candy
- Wasmachine Samsung
- Wasmachine Delonghi
- Wasmachine Indesit
- Wasmachine Panasonic
- Wasmachine LG
- Wasmachine AEG
- Wasmachine AEG Electrolux
- Wasmachine Bauknecht
- Wasmachine BEKO
- Wasmachine Daewoo
- Wasmachine Etna
- Wasmachine Grundig
- Wasmachine Inventum
- Wasmachine Kenwood
- Wasmachine Miele
- Wasmachine Medion
- Wasmachine Quigg
- Wasmachine Siemens
- Wasmachine Toshiba
- Wasmachine Whirlpool
- Wasmachine Zanussi
- Wasmachine Zanker
- Wasmachine Hoover
- Wasmachine Acec
- Wasmachine Adler
- Wasmachine Ahma
- Wasmachine Akai
- Wasmachine Aldi
- Wasmachine Alluxe
- Wasmachine Alpina
- Wasmachine Amana
- Wasmachine Amica
- Wasmachine Arcelik
- Wasmachine Ardo
- Wasmachine Ariston
- Wasmachine Aristona
- Wasmachine Asko
- Wasmachine Atlantic
- Wasmachine Atlas
- Wasmachine Avanti
- Wasmachine Balay
- Wasmachine Baumatic
- Wasmachine Belion
- Wasmachine Belling
- Wasmachine Bertazzoni
- Wasmachine Blaupunkt
- Wasmachine Blomberg
- Wasmachine Bluesky
- Wasmachine Bomann
- Wasmachine Bompani
- Wasmachine Brandt
- Wasmachine Butler
- Wasmachine De Dietrich
- Wasmachine Defy
- Wasmachine Domo
- Wasmachine Dyson
- Wasmachine Easymaxx
- Wasmachine Edesa
- Wasmachine Edgestar
- Wasmachine Edy
- Wasmachine Electra
- Wasmachine Elektra Bregenz
- Wasmachine Elin
- Wasmachine Eudora
- Wasmachine Eurom
- Wasmachine Eurotech
- Wasmachine Everglades
- Wasmachine Exquisit
- Wasmachine Fagor
- Wasmachine FAURE
- Wasmachine Finlux
- Wasmachine Fisher And Paykel
- Wasmachine Fisher Paykel
- Wasmachine Foppapedretti
- Wasmachine Franke
- Wasmachine Friac
- Wasmachine Frigidaire
- Wasmachine Frilec
- Wasmachine Gaggenau
- Wasmachine Galanz
- Wasmachine GE
- Wasmachine Gorenje
- Wasmachine Gram
- Wasmachine Haier
- Wasmachine Hansa
- Wasmachine Hanseatic
- Wasmachine Hilton
- Wasmachine Hisense
- Wasmachine Hitachi
- Wasmachine Horn
- Wasmachine Hotpoint
- Wasmachine Hotpoint-Ariston
- Wasmachine Husqvarna
- Wasmachine Hyundai
- Wasmachine Iberna
- Wasmachine Ignis
- Wasmachine Imesa
- Wasmachine Insignia
- Wasmachine Intex
- Wasmachine IPSO
- Wasmachine Kalorik
- Wasmachine Kelvinator
- Wasmachine Kenmore
- Wasmachine KitchenAid
- Wasmachine Klarstein
- Wasmachine Koenic
- Wasmachine Kogan
- Wasmachine Kuppersbusch
- Wasmachine Laurus
- Wasmachine Linetech
- Wasmachine Lloyd
- Wasmachine Lloyds
- Wasmachine Logik
- Wasmachine Luxor
- Wasmachine Lynx
- Wasmachine Magic Chef
- Wasmachine Manta
- Wasmachine Marynen
- Wasmachine Maytag
- Wasmachine MegaMove
- Wasmachine Meireles
- Wasmachine Mesko
- Wasmachine Mestic
- Wasmachine Midea
- Wasmachine Miele Professional
- Wasmachine Mio Star
- Wasmachine MPM
- Wasmachine Mx Onda
- Wasmachine Nabo
- Wasmachine Nedis
- Wasmachine Neff
- Wasmachine New Pol
- Wasmachine Newpol
- Wasmachine Nordland
- Wasmachine Nordmende
- Wasmachine Novamatic
- Wasmachine Pelgrim
- Wasmachine Philco
- Wasmachine PKM
- Wasmachine Polar
- Wasmachine Premier
- Wasmachine Prima
- Wasmachine Primo
- Wasmachine Privileg
- Wasmachine Proline
- Wasmachine Pyle
- Wasmachine RCA
- Wasmachine Rex
- Wasmachine Rosieres
- Wasmachine Russell Hobbs
- Wasmachine Salora
- Wasmachine Sanyo
- Wasmachine Saturn
- Wasmachine Sauber
- Wasmachine Scandomestic
- Wasmachine Scholtes
- Wasmachine Singer
- Wasmachine Smeg
- Wasmachine Stirling
- Wasmachine Sunny
- Wasmachine Swan
- Wasmachine TCL
- Wasmachine Technika
- Wasmachine Techwood
- Wasmachine Teco
- Wasmachine Teka
- Wasmachine Telefunken
- Wasmachine Tesla
- Wasmachine Thomas
- Wasmachine Thomson
- Wasmachine Tomado
- Wasmachine Trebs
- Wasmachine Upo
- Wasmachine V-Zug
- Wasmachine Vestel
- Wasmachine Vestfrost
- Wasmachine Viking
- Wasmachine Vivax
- Wasmachine Wasco
- Wasmachine Westinghouse
- Wasmachine White Knight
- Wasmachine WhiteLine
- Wasmachine WLA
- Wasmachine Wolkenstein
- Wasmachine Zanussi-electrolux
- Wasmachine Zoppas
- Wasmachine ZWF81443W
- Wasmachine Jocel
- Wasmachine Juno
- Wasmachine OK
- Wasmachine Olympia
- Wasmachine Omega
- Wasmachine OneConcept
- Wasmachine Orion
- Wasmachine Becken
- Wasmachine Black And Decker
- Wasmachine Camry
- Wasmachine Clatronic
- Wasmachine Concept
- Wasmachine Continental Edison
- Wasmachine ECG
- Wasmachine Elba
- Wasmachine Essentiel B
- Wasmachine Heinner
- Wasmachine Khind
- Wasmachine Palsonic
- Wasmachine Pitsos
- Wasmachine Profilo
- Wasmachine Vox
- Wasmachine Kunft
- Wasmachine Americana
- Wasmachine Ansonic
- Wasmachine Aspes
- Wasmachine AYA
- Wasmachine Bendix
- Wasmachine Blanco
- Wasmachine Bush
- Wasmachine Caple
- Wasmachine Castor
- Wasmachine CDA
- Wasmachine Comfee
- Wasmachine Constructa
- Wasmachine Corberó
- Wasmachine Crosley
- Wasmachine Cylinda
- Wasmachine Danby
- Wasmachine Dishlex
- Wasmachine Equator
- Wasmachine Esatto
- Wasmachine Euromaid
- Wasmachine Flavel
- Wasmachine Freggia
- Wasmachine Helkama
- Wasmachine High One
- Wasmachine Hoover-Helkama
- Wasmachine Icecool
- Wasmachine IFB
- Wasmachine Infiniton
- Wasmachine John Lewis
- Wasmachine Kernau
- Wasmachine Kleenmaid
- Wasmachine Laden
- Wasmachine Listo
- Wasmachine Monogram
- Wasmachine Nevir
- Wasmachine New World
- Wasmachine Orima
- Wasmachine Otsein
- Wasmachine Parmco
- Wasmachine ProAction
- Wasmachine Schulthess
- Wasmachine Simpson
- Wasmachine Summit
- Wasmachine Svan
- Wasmachine Thor
- Wasmachine Tisira
- Wasmachine Tricity Bendix
- Wasmachine Trieste
- Wasmachine Viva
- Wasmachine Zerowatt
- Wasmachine Premium
- Wasmachine Zenith
- Wasmachine Artusi
- Wasmachine Kubo
- Wasmachine Smart Brand
- Wasmachine Koblenz
- Wasmachine Calor
- Wasmachine Primus
- Wasmachine Patriot
- Wasmachine Triumph
- Wasmachine Cata
- Wasmachine Lamona
- Wasmachine Veripart
- Wasmachine Creda
- Wasmachine Mabe
- Wasmachine Otsein-Hoover
- Wasmachine SIBIR
- Wasmachine Speed Queen
- Wasmachine Aurora
- Wasmachine Integra
- Wasmachine Arda
- Wasmachine Arthur Martin-Electrolux
- Wasmachine Camec
- Wasmachine Curtiss
- Wasmachine Dexter
- Wasmachine Godrej
- Wasmachine Howdens
- Wasmachine Milectric
- Wasmachine Morris
- Wasmachine Ocean
- Wasmachine Rommer
- Wasmachine Sangiorgio
- Wasmachine Signature
- Wasmachine Simplicity
- Wasmachine Videocon
- Wasmachine Cecotec
- Wasmachine Cobal
- Wasmachine Nodor
- Wasmachine Samus
- Wasmachine Benavent
- Wasmachine Chiq
- Wasmachine Waltham
- Wasmachine Carson
- Wasmachine Carrefour Home
- Wasmachine SEIKI
- Wasmachine T&S
- Wasmachine Winia
- Wasmachine Ursus Trotter
- Wasmachine Ariston Thermo
- Wasmachine Element
- Wasmachine Hestan
- Wasmachine ZLine
- Wasmachine Calex
- Wasmachine DEXP
- Wasmachine Arctic Cooling
- Wasmachine Kenny
- Wasmachine PolyJohn
- Wasmachine Romo
- Wasmachine Consul
- Wasmachine Cambro
- Wasmachine LERAN
- Wasmachine Fensa
- Wasmachine Companion
- Wasmachine Codini
- Wasmachine Vedette
- Wasmachine Robinhood
- Wasmachine Sôlt
- Wasmachine Ravanson
- Wasmachine Hiberg
- Wasmachine Lemair
- Wasmachine ARC
- Wasmachine KIN
- Wasmachine Emilia
- Wasmachine BSK
- Wasmachine Germanica
- Wasmachine Adora
- Wasmachine Dexter Laundry
- Wasmachine Haden
- Wasmachine Drean
- Wasmachine Euro Appliances
- Wasmachine Tuscany
- Wasmachine Porter & Charles
- Wasmachine Café
- Wasmachine Classique
- Wasmachine Wisberg
- Wasmachine DAYA
- Wasmachine Kluge
- Wasmachine Imarflex
- Wasmachine Foron
Nieuwste handleidingen voor Wasmachine

27 Maart 2025

27 Maart 2025
27 Maart 2025

27 Maart 2025
27 Maart 2025

27 Maart 2025
27 Maart 2025
27 Maart 2025
27 Maart 2025
27 Maart 2025