Samsung UA40J5300AR Handleiding
Lees hieronder de 📖 handleiding in het Nederlandse voor Samsung UA40J5300AR (140 pagina's) in de categorie Televisie. Deze handleiding was nuttig voor 100 personen en werd door 2 gebruikers gemiddeld met 4.5 sterren beoordeeld
Pagina 1/140

E-MANUAL
Thank you for purchasing this Samsung product.
To receive more complete service, please register
your product at
www.samsung.com/register
Model______________ Serial No.______________

Contents
Connecting Antenna and External
devices
Aerial Connection
Video Device Connection
4 HDMI Connection
5 Component Connection
6 External Input Connection
TV Audio through the External Speakers
8 Digital Audio (Optical) Connection
9 Audio Output Connection
Connecting to a Computer
11 Connecting via HDMI Port
12 Connecting with the HDMI (DVI) Port
13 Connecting via Home Network
Connecting with a Mobile Device
15 Mobile Device Screen on TV (Screen Mirroring)
16 Connecting Mobile Devices without a Wireless Router
(Wi-Fi Direct)
17 Connecting via Home Network
17 Name of TV on Network
Input Signal Selection
Using Remote and Peripheral
Devices
Controlling the TV with a Keyboard
19 Connecting a Keyboard
20 Using the Keyboard
Controlling the TV with a Mouse
21 Connecting a Mouse
22 Using the Mouse
Entering Text Using QWERTY
23 Using Additional Functions
Internet Connection
Establishing a Wired Internet Connection
24 Connecting a LAN Cable
25 Connecting to a Wired Internet Network Automatically
25 Connecting to a Wired Internet Network Manually
Establishing a Wireless Internet Connection
27 Connecting to a Wireless Internet Network Automatically
28 Connecting to a Wireless Internet Network Manually
30 Connecting to a Wireless Internet Network with WPS
Troubleshooting Internet Connectivity Issues
31 Troubleshooting Wired Internet Connectivity Issues
33 Troubleshooting Wireless Internet Connectivity Issues
Mobile Network
Checking the Internet Connection Status

Smart Features
Smart Hub
37 Testing Smart Hub connections
38 Opening the Home Screen
39 Moving to the Panel Screen
39 Using the Smart Hub Tutorial
39 Resetting Smart Hub
Using Smart Hub with Samsung Account
40 Creating a Samsung Account
41 Creating a Samsung Account using a Facebook Account
42 Signing into Samsung Account
43 Linking My Samsung and App Accounts
44 Changing and Adding Information to Samsung Account
44 Deleting All Samsung Accounts from the TV
45 Using Pop-Up Menu Functions
46 Installing an App
47 Default Apps
48 Using Web Browser
51 Rearranging Apps on the SAMSUNG APPS Screen
51 Removing an App from the TV
52 Rating/Reviewing an App
52 Updating an App
53 SAMSUNG APPS Features
Playing Photos, Videos, and Music
54 Playing Media Contents from a USB Device
55 Playing Multimedia Content Saved in a Computer/Mobile
Device
57 Buttons and Functions Available while Viewing Photos
58 Buttons and Functions Available while Watching Video
60 Buttons and Functions Available while Playing Music
61 Functions on the Media Content List Screen
TV Viewing
Setting Up a Schedule Viewing
62 Setting Up Schedule Viewing
63 Managing the Schedule Viewing List
Using the Channel List
Registering, Removing, and Editing Channels
65 Registering and Removing Channels
66 Editing Registered Channels
66 Enabling/Disabling Password Protection on Channels
66 Changing Numbers
66 Locking/ Unlocking Channels
Creating a Personal Favourites List
67 Registering a Channel as Favourites
68 Viewing Favourites List Channels Only
68 Editing a Favourites List
Adding Realism to Sports
71 Enabling Cricket Mode
TV-Viewing Support Features
72 PIP Broadcast Viewing
73 Scanning for Available Channels
Using the Channel Settings
74 Country (Area)
74 Manual Tuning
75 Fine-Tuning the Screen

Picture and Sound Settings
Changing the Picture Mode and Adjusting the Picture
Quality
76 Choosing the Right Picture Mode for the Viewing
Environment
77 Adjusting the Picture Quality for Each Picture Mode
78 Fine-Tuning Each Picture Mode (Advanced Settings)
80 Adjusting the Picture for Easier Viewing (Picture Options)
Picture Support Functions
82 PIP Broadcast Viewing
83 Changing the Picture Size and Position
84 Listening to Audio Only with the Screen Turned Off
(Picture Off)
84 Resetting the Picture Mode Settings
Changing the Sound Mode and Using Sound Effects
85 Choosing the Right Sound Mode for the Environment
86 Using Sound Effects
Sound Support Functions
87 Selecting Speakers
87 Designating the TV's Installation Type
88 Enabling the Sound (Additional Settings)
88 Resetting All Sound Settings
General
Setting the Time and Using the Timer
89 Setting the Current Time
90 Using the Timers
Using the Screen Burn Protection and Energy Saving
Features
92 Preventing Screen Burn
92 Using Energy Saving Features
Using Anynet+ (HDMI-CEC)
93 Setting Up Anynet+ (HDMI-CEC)
Using the e-Manual
94 Launching the e-Manual
94 Additional e-Manual Features
95 Updating the e-Manual to the Latest Version
Updating the Software
96 Updating Software over the Internet
96 Updating Software using a USB connection
97 Enabling Automatic Software Updates
Using Other Functions
98 Enabling the High Contrast
98 Adjusting the Menu Transparency
TV-Viewing Support Features
99 Expanding the Smart Hub's Focus Area
99 Changing the Menu Language
99 Using the Indian Cinema Mode
100 Using the Joy Plus Feature function
100 Story Replay
101 screen capture
101 sound recording
102 Restrictions
102 Checking Notifications
103 Setting Up a Password
103 Enabling Game Mode
103 Locking/Unlocking the Panel Keys
103 Showing/Hiding the Samsung Logo while Booting

104 Registering the TV as a DivX-Certified Device (Watching
Paid DivX Movies)
105 Restoring the TV to the Factory Settings
105 Turning the TV into a Display Model (for retail stores)
Teletext Feature
Troubleshooting
Getting Support
108 Support through Remote Management
109 Finding the Information You Need for Service
There is a problem with the screen
110 Testing the Picture
I can't hear the sound clearly
113 Testing the Sound
There is a problem with the broadcast.
The computer won't connect.
I can't connect to the Internet.
Anynet+ (HDMI-CEC) isn't working.
I am having trouble launching/using apps.
My file won't play.
I want to reset the TV.
Other Issues
Notes and Precautions
Read Before Using SAMSUNG APPS
Web Browser Restrictions
Photo, Video, and Music File Limitations
122 Storage Device File Transfers
123 Supported External Subtitles
123 Supported Internal Subtitles
124 Supported Image Formats and Resolutions
124 Supported Music Formats and Codecs
125 Supported Video Codecs
Read After Installing the TV
127 Picture Sizes and Input Signals
127 Installing an Anti-Theft Kensington Lock
128 Read Before Setting Up a Wireless Internet Connection
Read Before Connecting a Computer (Supported
Resolutions)
129 LED 4 series
131 LED 5 series
133 Supported Resolutions for Video Signals
Licence
Glossary

Aerial Connection
"Availability depends on the specific model and area.
Before connecting any external devices and cables to the TV, first verify the model number. A sticker
containing the model number is attached to the back of the TV. The connection method varies
depending on the model.
An aerial must be connected to the TV in order to receive broadcast signals.
"An aerial connection is not necessary when a cable box or satellite receiver is used.
Connect the correct aerial cable according to your viewing environment to the TV's aerial connector, as
shown in the diagram.

HDMI Connection
Before connecting any external device or cable to the TV, first verify the TV's model number. A
sticker containing the model number is attached to the back of the TV. The connection method varies
depending on the model.
The following types of HDMI cables are recommended:
●High-Speed HDMI Cable
●High-Speed HDMI Cable with Ethernet
HDMI cables have certain requirements:
"Use an HDMI cable with a thickness of 14 mm or less.
"Using a non-certified HDMI cable may result in a blank screen or a connection error.
"Some HDMI cables and devices may not be compatible with the TV due to different HDMI specifications.
"This TV does not support HDMI Ethernet Channel. Ethernet is a LAN (Local Area Network) built with coaxial
cables standardized by the IEEE.
Refer to the diagram and connect the HDMI cable to the video device's HDMI output connector and the
TV's HDMI input connector.
"The number of connectors and their names and locations may vary depending on the model.
Once the connection has been made, you will be able to select the connected external device using
the SOURCE button.

External Input Connection
Before connecting any external device or cable to the TV, first verify the TV's model number. A
sticker containing the model number is attached to the back of the TV. The connection method varies
depending on the model.
Refer to the diagram and connect the AV cable to the TV's AV input connectors and the device's AV
output connectors.
If you are using the TV's AV input connectors, connect the video cable to the Y connector. Some
models feature a video connector as well. In this case, connect the cable to the video connector.
Once the connection has been made, you will be able to select the connected external device using
the SOURCE button.

TV Audio through the External Speakers
Your TV has a variety of connectors for audio input from devices such as Blu-ray players and DVD
players and for audio output to such devices as amplifiers. The connectors are listed below.
●Digital Audio (Optical)
●Audio Out
There are several issues to bear in mind when using audio input:
●For better audio quality, it is a good idea to use an AV receiver.
●The number of connectors and their names and locations may vary depending on the model.
●Refer to the external device's operating manual when connecting it to the TV. The number
of external device connectors and their names and locations may vary depending on the
manufacturer.

Digital Audio (Optical) Connection
Before connecting any external device or cable to the TV, first verify the TV's model number. A sticker
showing the model number is attached to the back of the TV. The connection method varies depending
on the model.
Connecting an AV receiver to the TV via a digital audio (optical) connector lets you listen to digital
audio.
Connecting a device using an optical cable does not automatically turn off the TV speakers. To turn off
the TV's speakers, set ( > > ) to something TV Sound Output Sound Speaker Settings TV Sound Output
other than TV Speaker.
Adjust the audio device's volume using its remote control.
"An unusual noise coming from the audio device while you are using it may indicate a problem with the
audio device itself. If this occurs, ask for assistance from the audio device manufacturer.
"Digital audio is only available with 5.1-channel broadcasts.
Refer to the diagram and connect the optical cable to the TV's digital audio output connector and the
device's digital audio input connector.

Audio Output Connection
"Availability depends on the specific model.
Before connecting any external device or cable to the TV, first verify the TV's model number. A
sticker containing the model number is attached to the back of the TV. The connection method varies
depending on the model.
"The connectors names and locations may vary depending on the model.
Refer to the diagram and connect the audio cable to the TV's audio output connector and the device's
audio input connector.

Connecting to a Computer
You can directly connect a computer to the TV or to the network to view the computer screen or
content on the TV. Connect the computer to the TV as follows.
●Connecting via HDMI Port
You can connect the computer to the TV using the HDMI cable to display the computer screen on
the TV.
●Connecting with the HDMI (DVI) Port
You can connect a computer to the TV by connecting the computer's DVI port to the TV's HDMI
port with the DVI to HDMI cable to display the computer screen on the TV.
●Connecting via Home Network
Quickly access the photo, video and music files saved on a computer by connecting the TV and
the computer to the same router or AP.

Connecting via HDMI Port
Before connecting any external device or cable to the TV, first verify the TV's model number. A sticker
showing the model number is attached to the back of the TV. The connection method varies depending
on the model.
For HDMI connection, one of the following HDMI cable types is recommended:
●High-Speed HDMI Cable
●High-Speed HDMI Cable with Ethernet
"Use an HDMI cable with a thickness of 14 mm or less. Using a non-certified HDMI cable may result in a
blank screen or a connection error.
"Some HDMI cables and devices may not be compatible with the TV due to different HDMI specifications.
"This TV does not support HDMI Ethernet Channel. Ethernet is a LAN (Local Area Network) built on coaxial
cables standardized by the IEEE.
"Some computers do not support HDMI interface, depending on its graphics adapter specifications. In this
case, use a DVI-to-HDMI cable to connect the computer to the TV.
Refer to the diagram and connect the HDMI cable to the external video device's HDMI output
connector and the TV's HDMI input connector.
Once the connection has been made, you will be able to select the connected external device using
the SOURCE button.

Connecting with the HDMI (DVI) Port
If the graphics adapter of your computer does not support HDMI interface, connect the computer to
the TV with the DVI (Digital Visual Interactive) to HDMI cable. However, DVI-to-HDMI connection is
supported by the HDMI port for DVI only and does not support audio signal transmission. To listen to
the computer sound, connect the external speaker to the computer’s audio output connector.
"For information on resolutions supported by the TV.
Refer to the diagram and connect the DVI-to-HDMI cable to the TV's HDMI (DVI) port and the
computer's DVI output port.
Once the connection has been made, you will be able to select the connected external device using
the SOURCE button.

Connecting via Home Network
Quickly access and view/play photo, video and music files from a computer on the TV screen.
1.
Connect the TV and the computer to the same router or AP. A home network will be configured
once the two connections are established.
"Home Network enables content-sharing between the TV, computers and mobile devices connected to
the same wired or wireless router.
2.
From the computer, select [Control Panel] > [Network and Internet] > [Network and Sharing
Centre] > [Change advanced sharing settings] and select [Choose media streaming options...] to
activate media streaming.
3.
From the list, set TV to [Allowed].
4.
Launch Windows Media Player from the computer, select [Settings] > [Library Management] and
then add the location where the photo, video and music files are saved to view/play the files
on the TV screen. For more information on viewing/playing media files, refer to the "Playing
Multimedia Content Saved in a Computer/Mobile Device" section.
"It will be possible to view/play on the screen files moved to Windows Media Player's default folder.
"As long as File Sharing is activated, unauthorised access may be allowed. Disable File Sharing if data
access is not required.

Connecting with a Mobile Device
Connect mobile device such as a smartphone or tablet to the TV directly or indirectly over a shared
network and display the mobile device screen or contents on the TV screen. Connect the mobile
device to the TV as follows.
●Mobile Device Screen on TV (Screen Mirroring)
Wirelessly connect the TV to the mobile device with the mirroring function to view the mobile
device's screen on the TV.
"This option is available only with mobile devices that support mirroring.
"Depending on the software in your mobile.
●Connecting Mobile Devices without a Wireless Router (Wi-Fi Direct)
Wi-Fi Direct enables you to connect the TV to a mobile device without a router or AP. Quickly
access and play photo, video and music files from a connected mobile device on the TV screen.
"This option is available only with mobile devices that support Wi-Fi Direct.
●Connecting via Home Network
View/play on the TV photo, video and music files from a mobile device connected to the same
router or AP as the TV.

Mobile Device Screen on TV (Screen Mirroring)
" Availability depends on the specific model and area.
"Depending on the software in your mobile
Network Screen Mirroring > Try Now
Wirelessly connect a mirroring-enabled mobile device to the TV and play the video and audio files
stored on the device on the TV. Mirroring refers to the function that plays the video and audio files
located on a mobile device on a TV and on the mobile device simultaneously.
"To use the function, the mobile device must support a mirroring function such as AllShare Screen Mirroring
Cast or . To check whether your mobile device supports the mirroring function, please visit Screen Mirroring
the mobile device manufacturer's website.
"The video or audio may intermittently stop depending on network conditions.
Connecting via a mobile device
1.
On the mobile device, run . The mobile device searches for available devices to Screen Mirroring
connect to.
2.
From the search result list, select TV. The TV displays a pop-up window.
3.
In the pop-up window, select to connect the mobile device.Allow
"All previously allowed mobile devices will automatically connect without needing approval.
"If you select , the device won't appear and can't be activated in this way. Navigate to > Deny Network
Screen Mirroring Device Manager > to allow the previously denied mobile device.
Not searching for the TV on mobile devices
1.
Navigate to > to run . Also, you can select Network Screen Mirroring Screen Mirroring Screen
Mirroring on a list by pressing .SOURCE
2.
Run mirroring on the mobile device. Display a list while automatically searching for mobile
devices.
3.
Select the TV and it connects automatically.
"When the mobile devices cannot connect, try turning the TV off and on.
Allow/Reject the connection via mobile devices
"This is only available for watching when mobile devices allow the connection.
1.
Navigate to > > Network Screen Mirroring Device Manager to select Device Manager. This
displays a list of required mobile devices connection.
2.
You can allow access or deny connections with mobile devices.

Connecting Mobile Devices without a Wireless Router (Wi-Fi
Direct)
Network Wi-Fi Direct > Try Now
Wi-Fi Direct lets you connect mobile devices directly to your TV using wireless technology. After
connecting a device to the TV using Wi-Fi Direct, it will be possible to view/play video, photo, and
music files from the device on the TV.
" The mobile device must support Wi-Fi Direct. Make sure the mobile device you intend to use supports Wi-Fi
Direct.
1.
Enable Wi-Fi Direct on the mobile device and then launch . The TV automatically Wi-Fi Direct
scans for and displays a list of available devices. The TV's name also appears on the mobile
device.
2.
Select the device from the list to initiate a connection. If a connection request is made by the TV,
a permission message appears on the mobile device and vice versa.
3.
Allow the connection. This completes the connection process.

Connecting via Home Network
View/play photo, video and music files from a mobile device on the TV.
1.
Connect both the TV and the mobile device to the same router or AP. A home network will be
configured once the connections are established.
" Home Network enables content-sharing between the TV, computers and mobile devices connected to
the same wired or wireless router.
2.
Enable File Sharing on the mobile device. The mobile device's shared contents can be viewed/
played on the TV. For more information on multimedia contents, refer to the "Playing Multimedia
Content Saved in a Computer/Mobile Device" section.
" As long as File Sharing is activated, unauthorised access may be allowed. Disable File Sharing if data
access is not required.
Name of TV on Network
Network Device Name > Try Now
Choose or enter a TV name to be displayed on the network.
1.
Select from the menu. A list will appear.Device Name Network
2.
Choose a name from the list. Alternatively, select to enter a name manually. You can User Input
view the specified TV name on the network.

Input Signal Selection
You can select a connected external device using the button.SOURCE
For example, to switch to a gaming console connected to the second HDMI connector, press SOURCE
button. From the list, select to change the input signal to HDMI mode. Connector Source HDMI2
names may vary depending on the model.
The following options are available in the screen:Source
●TOOLS Button
Select a port connected to an external device, and press and hold the Enter button. The following
functions are available:
" Available options for each connector may vary.
–Anynet+ (HDMI-CEC): Displays a list of Anynet+ (HDMI-CEC)-compliant devices that are
connected to the TV.
–This option is only available when .Anynet+ (HDMI-CEC) is set to On
–Edit Name: Rename devices connected to the TV for easier identification of external sources.
For example, you can designate a computer connected to the TV via an HDMI-DVI cable as
DVI PC. Alternatively, simply designate a computer connected to the TV via an HDMI cable as
PC. You can also designate an AV device connected to the TV via an HDMI-DVI cable as DVI
Devices.
–Disconnect USB Device: Used to safely remove a USB device connected to the TV.
" This option is only available when a USB device has been selected.
–Information: View detailed information about the connected devices.

Controlling the TV with a Keyboard
System Device Manager Keyboard Settings > > Try Now
You can use a keyboard to control the TV.
" Certain models do not support USB HID class keyboards.
Connecting a Keyboard
Connecting a USB Keyboard
Plug the keyboard cable into the TV's USB port. A connection message appears on the screen.

Using the Keyboard
Use the following remote features with the USB keyboard connected to the TV.
●Arrow Keys (moving the focus), Windows Key ( Button), Menu List Key ( Button), MENU TOOLS
Enter Key (Select/run item), ESC ( Button), Number Keys (Number Buttons)RETURN
●F1 (a), F2 ( b), F3 ( {), F4 ( }), F5 ( ), F6 ( Button), F7 ( Button), F8 (SOURCE CH LIST MUTE
Button), F9/F10 (Volume Buttons), F11 / F12 (Channel Buttons)
●Page Up/Page Down: Scroll web browser pages up/down.
●Holding down the Enter key: On the Smart Hub screen, navigate to an item and hold down the
Enter key to display the Options menu.
" The Options menu depends on the context.
Changing Keyboards Try Now
" Availability depends on the specific model.
Select System Device Manager Keyboard Settings Select Keyboard > > > . Designate which keyboard
to use.
" Only one keyboard can be used at a time.
Input Languages, Keyboard Type, and Switch Language Key Try Now
Select System Device Manager Keyboard Settings Keyboard Options > > > . The following options are
available:
●Keyboard Language
If the keyboard supports multiple languages, choose which language you want to use from the
list.
●Keyboard type
Specify the type of language selected under .Keyboard Language
" The Keyboard type list varies depending on which language was selected under .Keyboard Language
●Switch Input Language
If the keyboard supports multiple languages, choose from the list which key to use to switch
between languages.

Controlling the TV with a Mouse
System Device Manager Mouse Settings > > Try Now
You can use a mouse to control the TV with greater ease and comfort.
" Certain models do not support USB HID class mice.
Connecting a Mouse
Connecting a USB Mouse
Plug the mouse cable into the TV's USB port. A connection message appears on the screen.

Using the Mouse
Once a USB mouse is connected to the TV, a pointer will appear on the TV's screen. You can use this
pointer to control the TV as you would a computer.
●Selecting and Running an Item
Left-click on the mouse.
●Displaying the Volume, Mute, and Channel Buttons
Select the volume/channel icon on the screen while watching TV. Use the onscreen buttons to
adjust the volume or switch the channel.
" Select the volume/channel icon again to hide the buttons.
●Showing Tools Buttons
Right-clicking shows the Tools buttons on the screen so that you can easily use the TV
functions.
" The Tools buttons may vary depending on the function.
●Displaying the Context-sensitive Menu on Smart Hub
On the Smart Hub screen, navigate to an item, and hold down the left mouse button for 1 second.
The Options menu available to the selected item appears.
" The Options menu depends on the context.
●Scrolling the TV Menu or Screen
Move the mouse wheel up or down. This scrolls the TV menu or screen up/down.
●Exiting the TV Menu or Feature
Click on the X button. This closes the menu.
" The X button appears when a mouse is being used. Left-clicking once while using a feature displays
the X button.
Changing Mice Try Now
Select System Device Manager Mouse Settings Select Mouse > > > . Designate which mouse to use.
" Only one mouse may be used at a time.
Changing Mouse Buttons and Pointer Speed Try Now
Select System Device Manager Mouse Settings Mouse Options > > > . The following options are
available:
●Primary Button
Choose which (left or right) button to use to select and run items.
●Pointer Speed
Adjust the movement speed of the pointer that appears on the screen.

Entering Text Using QWERTY
A QWERTY keypad appears when you need to enter text (entering the network password, logging into
your Samsung account, etc.), allowing you to enter text using your remote control.
Using Additional Functions
Select on the QWERTY keyboard screen. The following options are available:
●Recommend text
Enable/disable the Recommended Text feature. Enabling the feature allows you Recommend text
to quickly enter text starting with the characters you typed in by displaying recommended words.
To enter the word "Internet," for example, all you have to do is enter "In" and select the word
"Internet" from the list of recommended words. The word is memorised so that you can enter the
same text again more easily.
●Reset recommended text data
Delete both the recommended words and the memorised words to clear the list.
●Predict Next Letter
Enable/disable the Text Prediction feature. Enabling the Text Prediction feature eliminates the
need to find and select individual character keys. To enter the word "Internet," for example, select
"I". A predicted word will then appear next to the I key. Simply select the predicted word to enter
"Internet".
" This feature is limited to words that have previously been added to the dictionary.

Establishing a Wired Internet Connection
Connecting the TV to the Internet gives you access to online services and SMART features, and lets
you update the TV's software quickly and easily through the Internet.
Connecting a LAN Cable
Use a LAN cable.
" The TV will not be able to connect to the Internet if the network speed is below 10Mbps.
" Use Cat 7 LAN cables to link your TV to the Internet Access Points.
There are three ways to connect the TV to the Internet. Refer to the diagrams and connect the LAN
cable to the LAN connector on the back of the TV.
●External Modem
●① IP Router + External Modem②
●Wall-mounted LAN Outlet
Connecting to a Wired Internet Network Automatically
Network Network Settings > Try Now
Automatically connect to an available network.
1.
Set the , and then select .Network type to Wired Connect
2.
The TV attempts to connect to an available network. Once successful, you will see a confirmation
message. Select . If the attempt fails, try again, or connect manually.OK
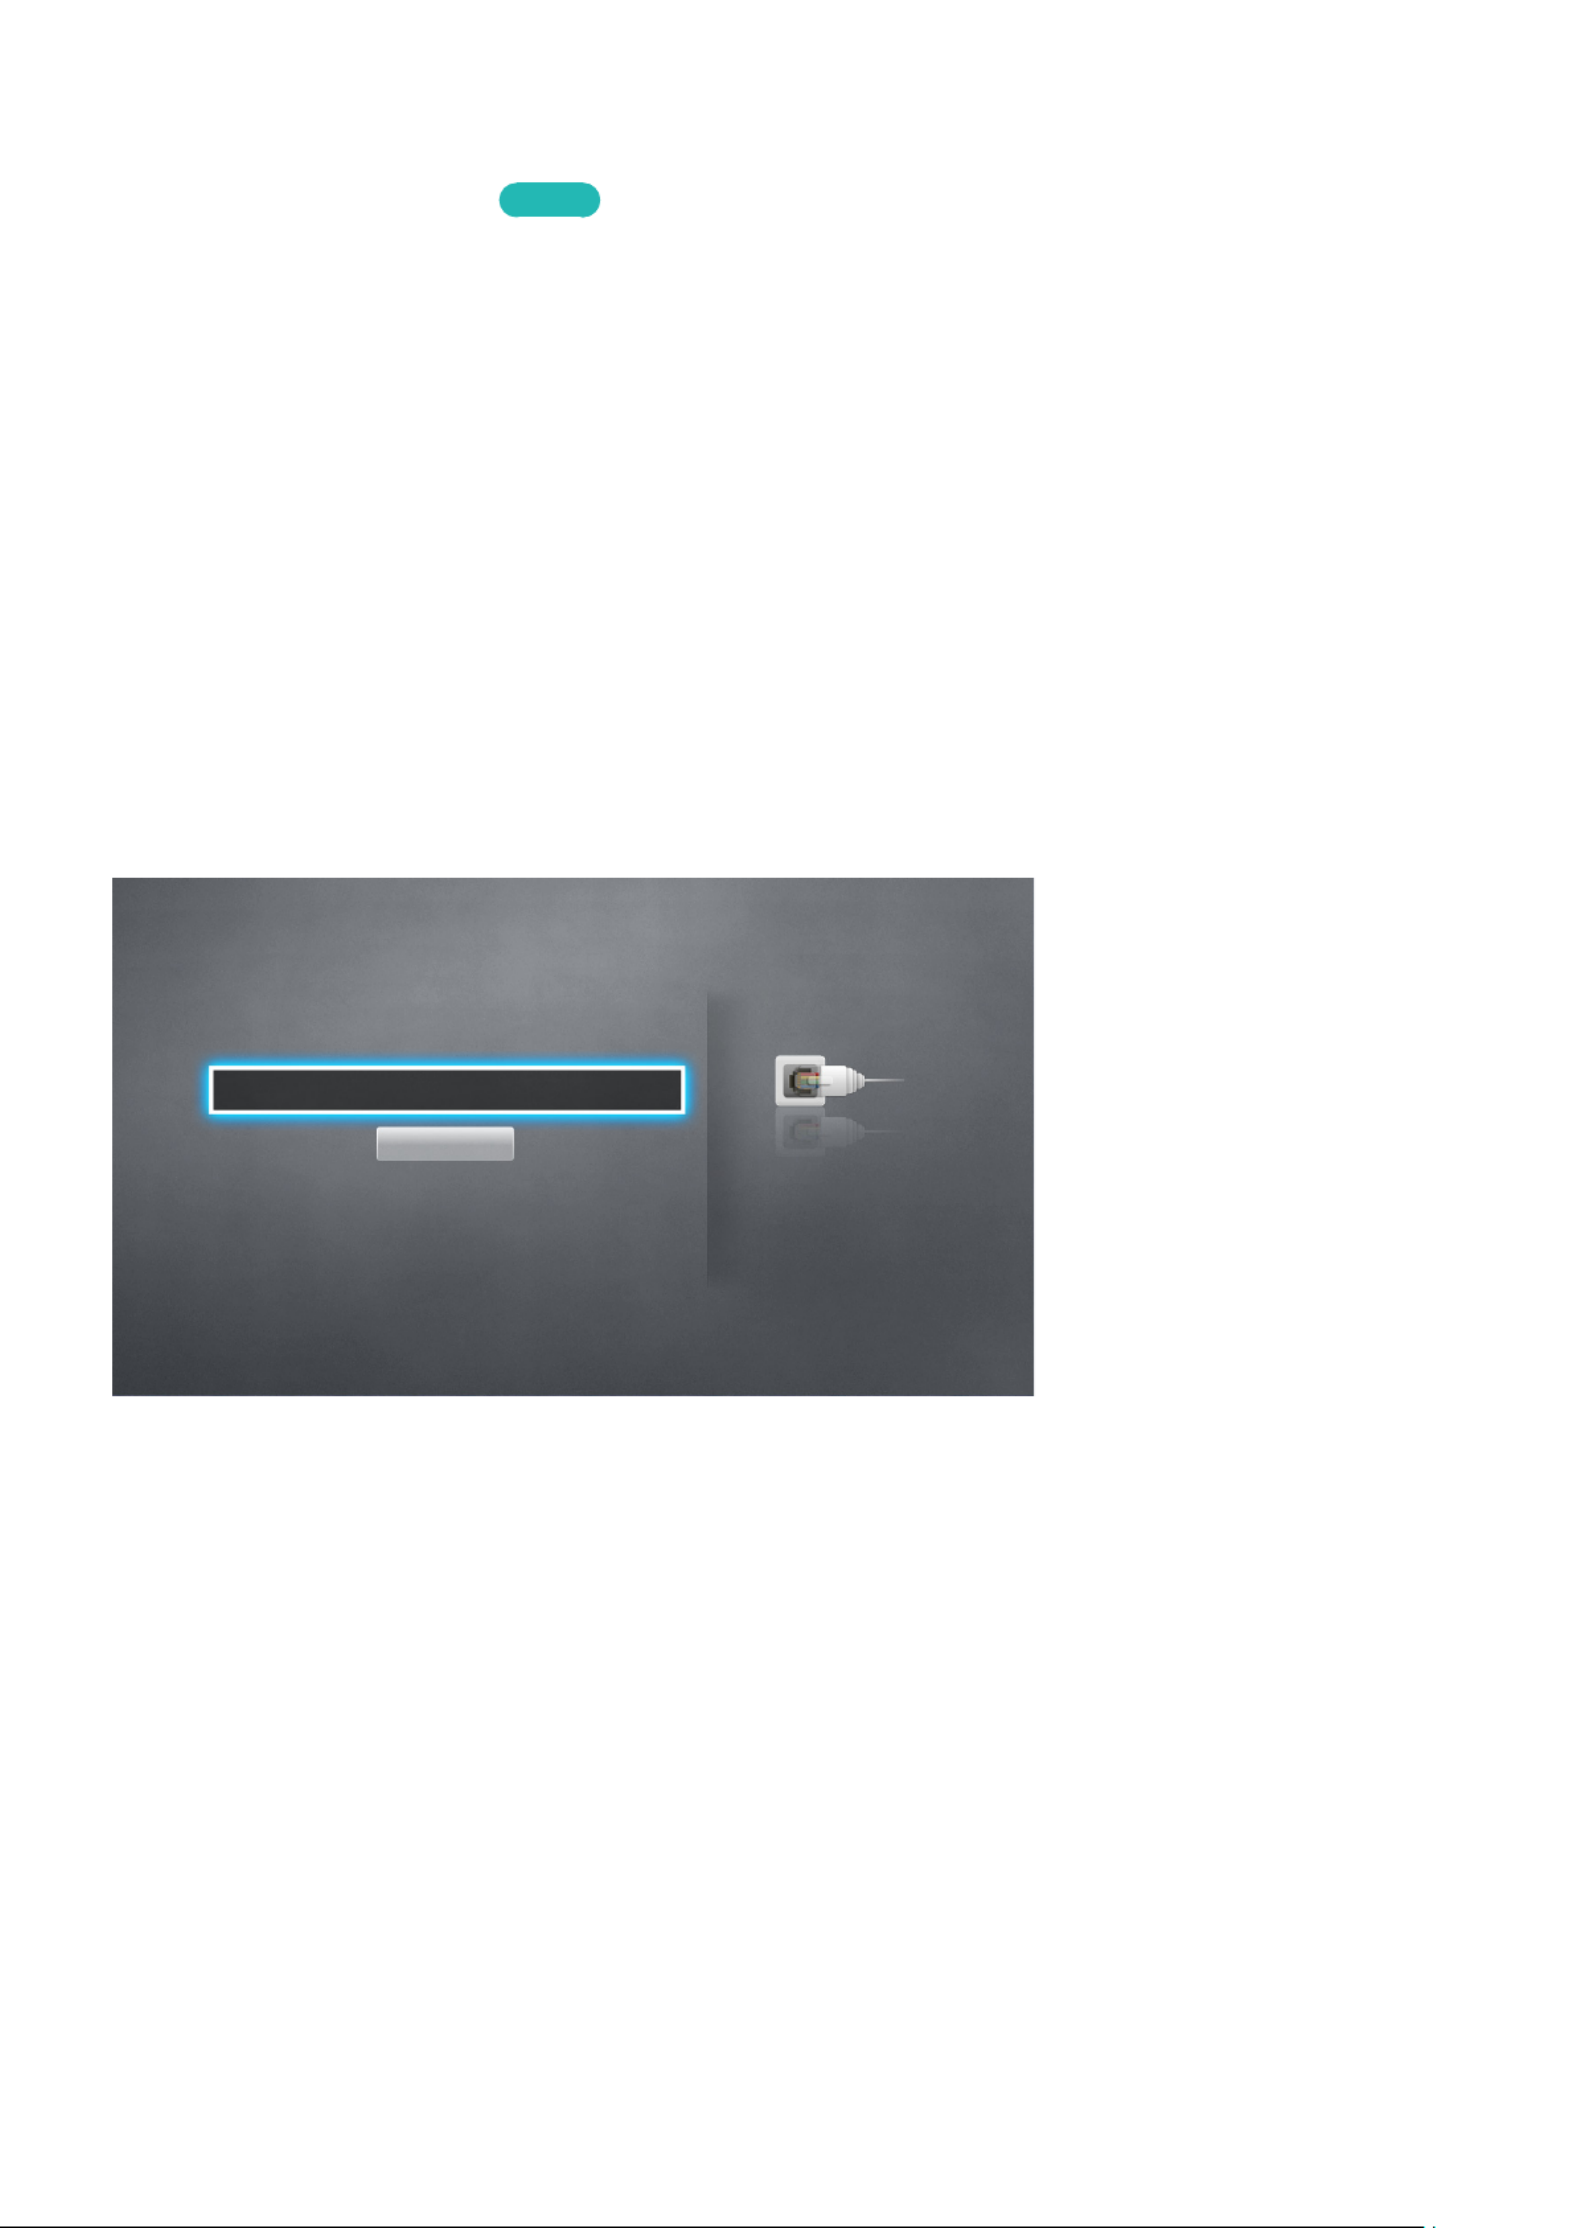
Connecting to a Wired Internet Network Manually
Network Network Settings >
With networks that require a static IP address, you will need to enter the IP address, subnet mask,
gateway, and DNS values manually to connect to the network. To get these values, contact your
Internet Service Provider (ISP).
" Refer to the "Dynamic versus Static IP Addresses" section for more information on dynamic IP and static IP
addresses.
1.
Set the , and then select .Network type to Wired Connect
Network Settings
Select your network type.
Network type Wired
Connect
You can connect your TV
to the internet.

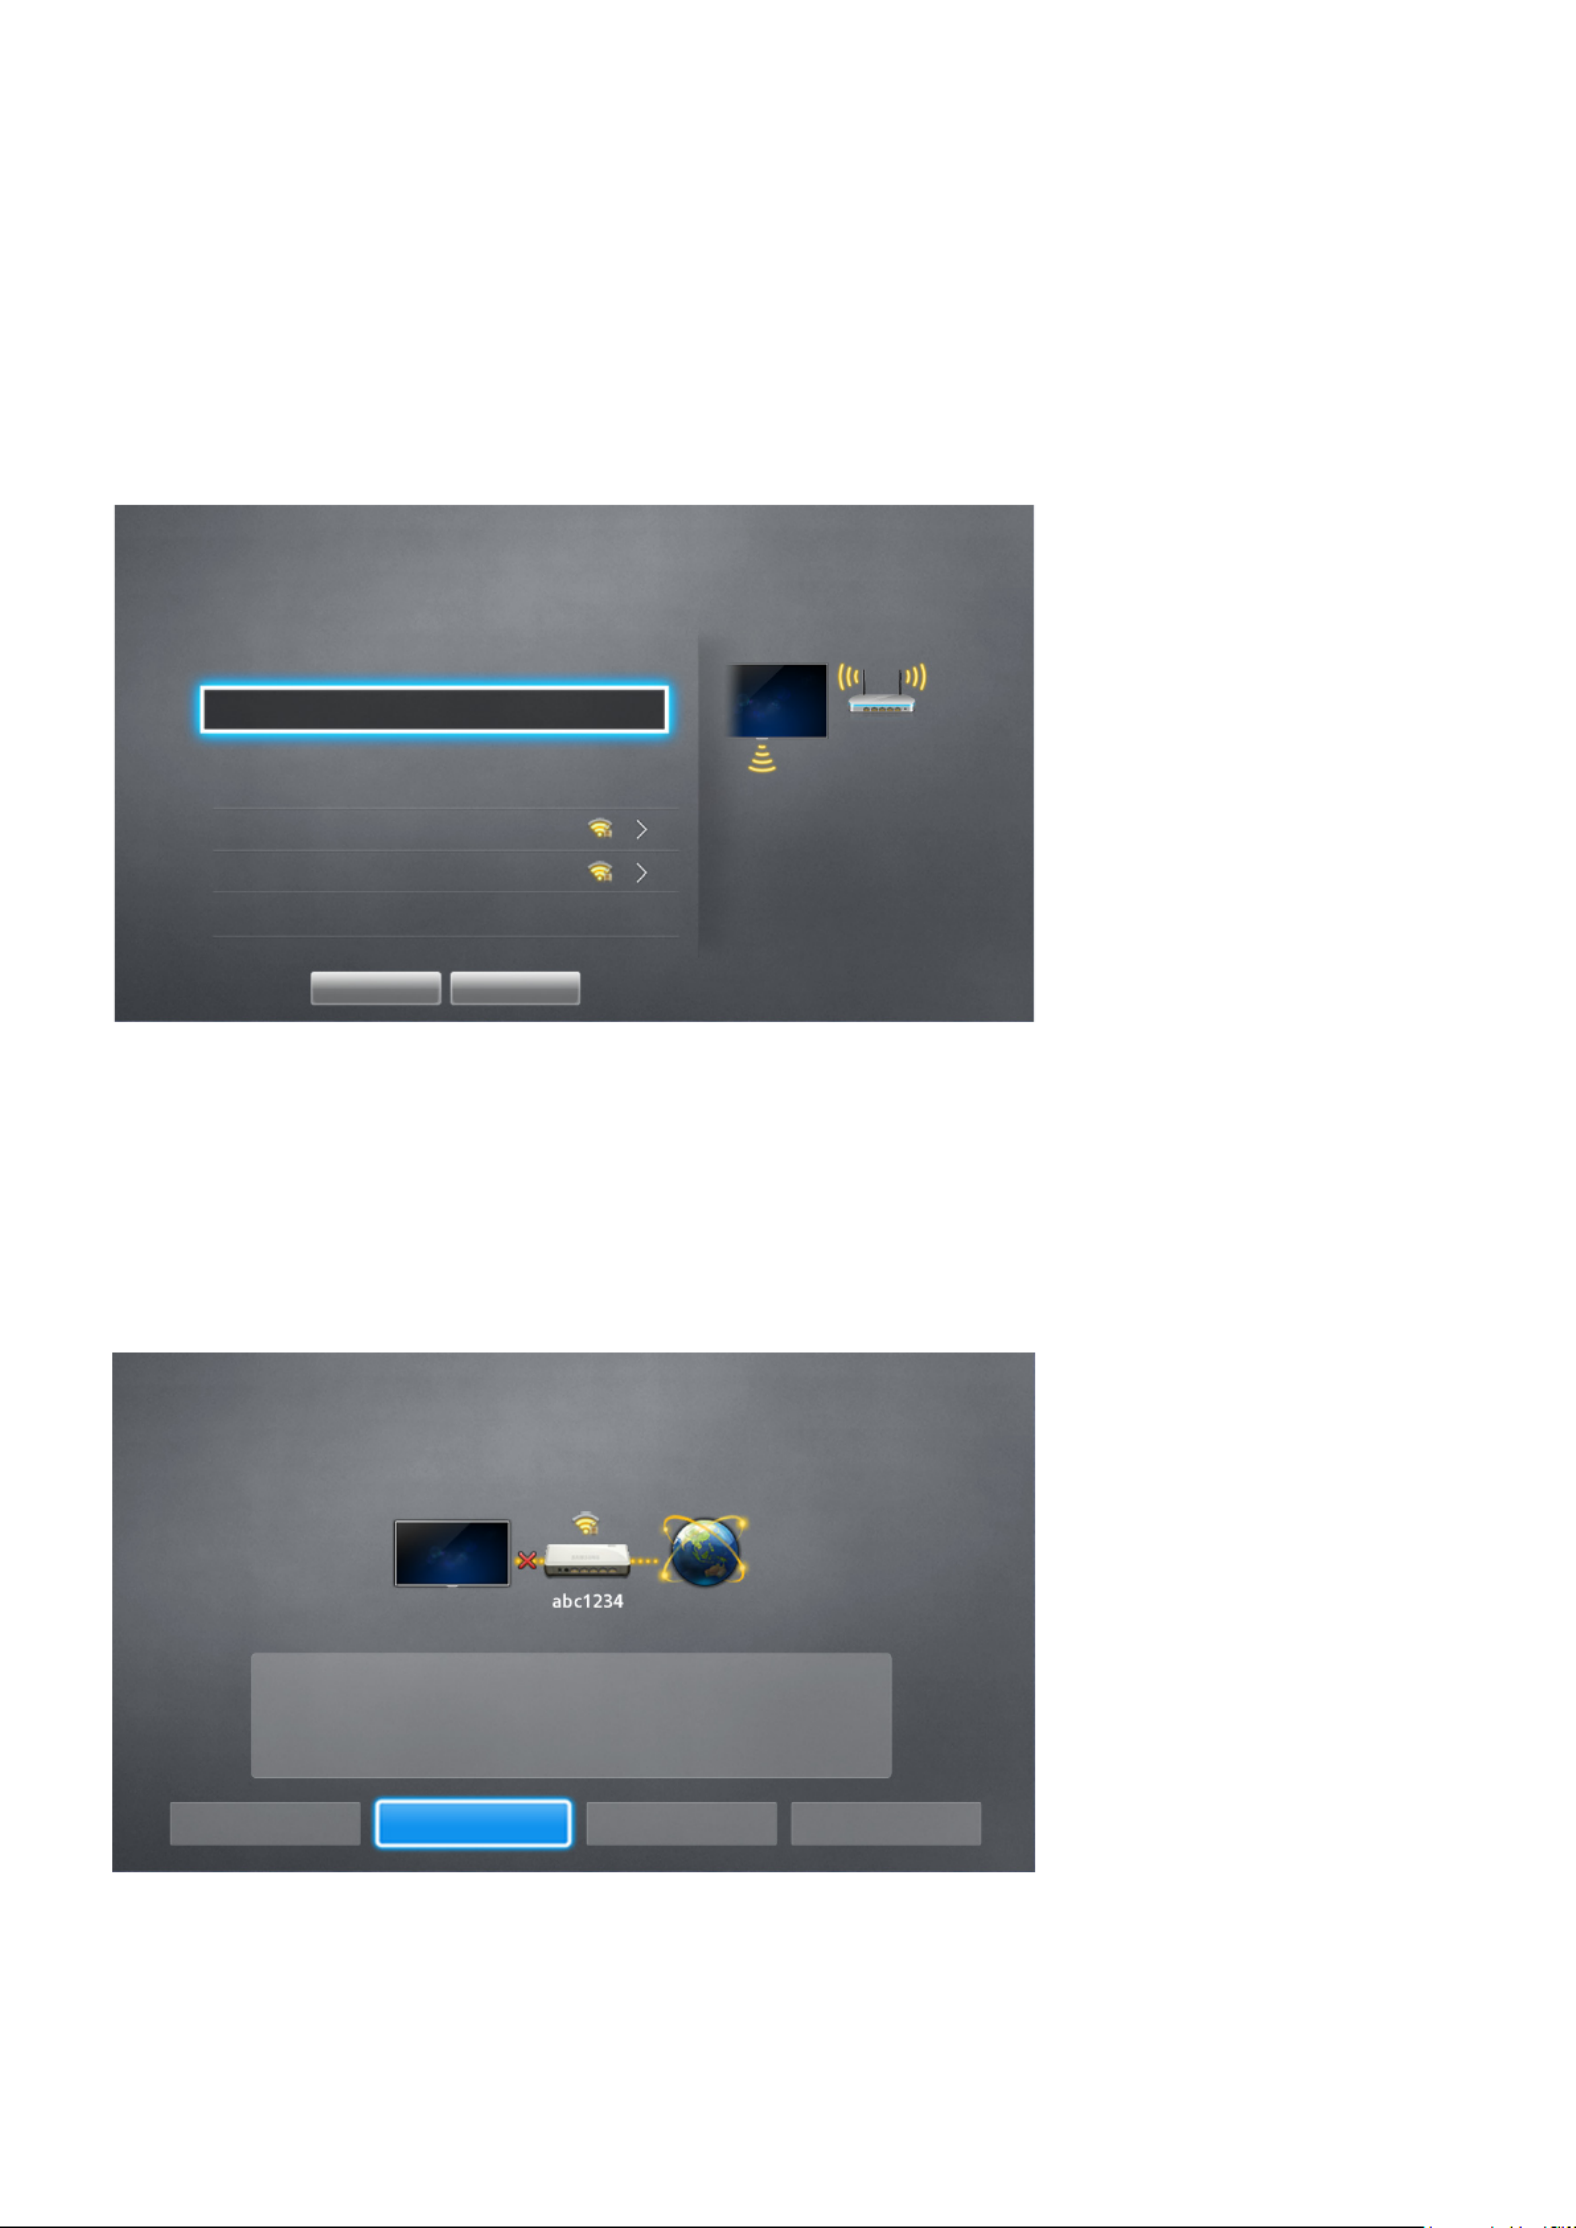
2.
Select Stop when the TV attempts to connect to the network. Once the network connection has
been interrupted, select IP Settings.
Network Configuration
Connection verification cancelled.
Wired network connection test stopped.
Change Network IP Settings Retry Close
3.
In the IP Settings screen, set the , IP setting to Enter manually, enter the IP Address Subnet
Mask Gateway DNS Server, , and values, and then select .OK
●Use one of the following methods to enter the numerical values.
Set the numbers using the u and d buttons. Enter the numbers directly using numerical
button.
IP Settings
IP setting Enter manually
IP Address 0.0.0.0
Subnet Mask 0.0.0.0
Gateway 0.0.0.0
DNS setting Enter manually
DNS Server 0.0.0.0
OK Cancel
4.
The TV attempts to connect to the network again using the specified settings. A confirmation
message appears once a connection is established. Select .OK
"The network connection speed may differ depending on the DNS server settings.
"For details on the DNS server settings, contact your Internet service provider (ISP).

Establishing a Wireless Internet Connection
" The connection method varies depending on the model.
Connecting the TV to the Internet gives you access to online services and SMART features, and lets
you update the TV's software quickly and easily through the Internet.
Connecting to a Wireless Internet Network Automatically
Network Network Settings >
Connect the TV to the Internet via a wireless router. Make sure you have the wireless router's SSID
(name) and security key settings before attempting to connect. The security key can be found on the
wireless router's configuration screen.
1.
On the Network Settings screen, set . The TV automatically displays a Network type to Wireless
list of available wireless networks.
2.
Select a network (SSID). If the network you want doesn't appear in the list, select , Add Network
and enter the network's SSID manually.
3.
Enter the security key and select . If the selected network is not security-enabled, the TV Done
attempts to connect right away.
4.
A network connection will be attempted. Once a connection is established, the TV displays a
confirmation message. Select . If the attempt fails, try again, or connect manually.OK
Connecting to a Wireless Internet Network Manually
Network Network Settings >
With networks that require a static IP address, you will need to enter the IP address, subnet mask,
gateway and DNS values manually to connect to the network. To get the IP address, subnet mask,
gateway and DNS values, contact your Internet Service Provider (ISP).
" Refer to the "Dynamic versus Static IP Addresses" section for more information on dynamic IP and static IP
addresses.
1.
Setting the automatically displays a list of available wireless networks.Network type to Wireless
Network Settings
Select your network type.
Network type Wireless
Wireless network
AP0000 You can connect your TV to
the internet. Please select
which wireless network to
use.
AP0001
Add Network
Refresh WPS(PBC)
2.
Select the network (SSID) you want to connect to. If the wireless router doesn't appear in the list,
select Add Network, and enter the network's SSID manually.
3.
Enter the security key and select . If the selected network is not security-enabled, the TV OK
attempts to connect right away.
4.
Select when the TV attempts to connect to the network. Once the network connection has Stop
been interrupted, select IP Settings.
Network Configuration
Connection verification cancelled.
Wireless network connection test stopped.
Change Network IP Settings Retry Close

5.
In the IP Settings screen, set the , IP setting to Enter manually, enter the IP Address Subnet
Mask Gateway DNS Server, , and values, and then select .OK
●Use one of the following methods to enter the numerical values.
Set the numbers using the u and d buttons. Enter the numbers directly using numerical
button.
IP Settings
IP setting Enter manually
IP Address 0.0.0.0
Subnet Mask 0.0.0.0
Gateway 0.0.0.0
DNS setting Enter manually
DNS Server 0.0.0.0
OK Cancel
6.
The TV attempts to connect to the network again using the specified settings. A confirmation
message appears once a connection is established. Select .OK
" The network connection speed may differ depending on the DNS server settings.
" For details on the DNS server settings, contact the Internet service provider (ISP).

Connecting to a Wireless Internet Network with WPS
Network Network Settings >
With wireless routers that support WPS (Wi-Fi Protected Setup) or PBC (Push Button Configuration),
it's possible to press a button on the router to connect the TV to the Internet.
" This functionality is not available with wireless routers that do not support WPS. Check to see if your
wireless router supports WPS.
1.
Setting the automatically displays a list of available wireless networks.Network type to Wireless
2.
Select WPS(PBC) and then press the WPS or PBC button located on the wireless router within two
minutes.
3.
The TV exchanges the network name (SSID) and security key automatically and then attempts to
connect to the Internet. A confirmation message appears once a connection is established. Select
OK.

Troubleshooting Internet Connectivity Issues
If you are not able to connect the TV to the Internet, read the information below.
Troubleshooting Wired Internet Connectivity Issues
No network cable found
Make sure the network cable is plugged in. If it is connected, make sure the router is turned on. If it is
on, try turning it off and on again.
IP auto setting failed
Do the following or configure the manually.IP Settings
1.
Ensure that the DHCP server is enabled on the router and reset the router.
2.
If this does not work, contact your Internet Service Provider for more information.

Unable to connect to the network
Do the following:
1.
Check all .IP Settings
2.
Ensure that the DHCP server is enabled on the router. Then, unplug the router and plug it back in.
3.
If this does not work, contact your Internet Service Provider for more information.
Connected to a local network, but not to the Internet
1.
Make sure that the Internet LAN cable is connected to the router's external LAN port.
2.
Check the DNS values in the .IP Settings
3.
If the problem persists, contact your Internet Service Provider.
Network setup is complete, but unable to connect to the Internet
If the problem persists, contact your Internet Service Provider.

Troubleshooting Wireless Internet Connectivity Issues
Wireless network connection failed
Selected wireless router not found. Go to and select the correct router.Network Settings
Unable to connect to a wireless router
Check the following:
1.
Check if the router is turned on. If it is, turn it off and on again.
2.
Enter the correct security key if required.
IP auto setting failed
Do the following or configure the manually.IP Settings
1.
Make sure that the DHCP server is enabled on the router. Then, unplug the router and plug it back
in.
2.
Enter the correct security key if required.
3.
If this does not work, contact your Internet Service Provider for more information.

Mobile Network
"Availability depends on the specific model and area.
While connecting to the mobile network, some functions might be unavailable.
Refer to the diagram and insert the Mobile Dongle (sold separately) into the USB port. The Mobile
Dongle must be connected to the TV in order to connect to the mobile network. However, the Mobile
Dongle is sold separately and is not available from Samsung.
"If you have any problems using online services, please contact your Internet service provider.
The mobile service providers and their devices that support this function are as follows:
●Glo Bolt (Model No: E303)
●Etisalat (Model No: E303)
●Smart Communication (Model No: E3131S-3)
●Globe Telecom (Model No: E3331, E359S-2)
●Viettel (Model No: E173Eu-1)
●Vinaphone (Model No: E303u-1, E303s-1)
●DTAC (Model No: E3131)
●AIS (Model No: E3131, E303)
●Telcomsel (Model No: E303)
●Indosat (Model No: E303)
●Airtel (Model No: E1731, E3276S, E3276s-920, E3272)
●Idea (Model No: E1732)
●Tata Docomo (Model No: E177)
●Open Dongles - Airtel, Idea, TataDocomo, Aircel, Vodafone (Model No: E303C, E303U, E3121B,
E3131B, E369 mini)
●Zain (Model No: E367u-1, E303s-1)
●Orange (Model No: E367u-1, E3131s-2)

Checking the Internet Connection Status
Network Network Status > Try Now
Network
Network Status
Network Settings
Wi-Fi Direct
Multimedia Device Settings
Screen Mirroring
Device Name [TV]Samsung LE...
"Actual menu screen may differ depending on the TV model.
View the current network and Internet status.

Smart Hub
Smart Hub Open Smart Hub > Try Now
With Smart Hub, you can surf the web, download apps. In addition, you can use photo, video, and
music files stored on external storage devices.
"Some Smart Hub services are paid services. To purchase such a service, the service provider account or
Samsung Apps TV account (Samsung account) is required.
"Make sure the TV is connected to the Internet. The TV must be connected to the Internet in order to use
Smart Hub.
"Some features of Smart Hub require an Internet connection and may not be available depending on the
service provider, language, or region.
"To use Smart Hub, you must agree to the end user agreement and privacy policy. Otherwise, you will not
be able to access the features and services related to them. You can view the entire content of the Terms &
Policy by navigating to > Smart Hub Terms & Policy. If you don't wish to use Smart Hub anymore, you can
withdraw the agreement. Try Now
"Smart Hub service outages can be caused by disruptions in your Internet service.
Testing Smart Hub connections
Support Self Diagnosis Smart Hub Connection Test > >
If Smart Hub is not functioning, navigate to > > Support Self Diagnosis Smart Hub Connection Test.
Diagnose the problem by checking the internet connection, your ISP, the Samsung server and the
Samsung Apps panels.
"After completing the test, if Smart Hub continues to have problems, contact your Internet Service Provider
or a Samsung Contact Centre.

Opening the Home Screen
Press the button while watching TV to open the .SMART HUB Home Screen
On the Home Screen, search through favourite apps, channels or sources and quickly access
previously run or frequently used functions.
Setting your favourite item
1.
Press the button to open the , and move to a desired item.SMART HUB Home Screen
2.
Press and hold the Enter button. A context-sensitive menu appears.
3.
In the context-sensitive menu, select Add to Favourites to add the selected item to the favourite
list, which will move first of the list.
"To delete a favourite item, select it and press and hold the Enter button to display the context-sensitive
menu. Then, select Remove from Favourites.
Deleting browsing history
1.
Press the button to open the , and select . You will be asked SMART HUB Home Screen Clear All
to confirm your selection.
2.
Select on the screen. Your browsing history is deleted completely.Yes
"However, the Favourites list items will not be deleted.
"You can also delete your browsing history by selecting in the > Clear All Smart Hub Home Screen
Settings menu.

Moving to the Panel Screen
Press the SMART HUB button to open the Home Screen, and select the Panel icon. On the Panel
screen for each service panel, the following are available:
"Usability depends on the specific model and local region.
● SAMSUNG APPS
You can enjoy variety of free and paid news, sports, weather, and gaming apps on the TV as you
would on a smart phone or tablet.
Using the Smart Hub Tutorial
Support Smart Hub Tutorial >
From the menu, select Support Smart Hub Tutorial. This will familiarize yourself with the basics of
Smart Hub and panels.
Resetting Smart Hub
Smart Hub Reset Smart Hub > Try Now
Reset all saved information relating to Samsung accounts and linked service accounts, as well as
Smart Hub service agreements and applications.

Using Smart Hub with Samsung Account
Samsung Account
Log In
Edit profile
Link Service Accounts
Remove Accounts from TV
Create Account
Terms and Conditions, Privacy Policy
"Actual menu screen may differ depending on the TV model.
Creating a Samsung Account
Smart Hub Samsung Account > Try Now
Some Smart Hub services are paid services. To purchase such a service, the service provider account
or Samsung Apps TV account (Samsung account) is required.
You can create a Samsung Account using your email address.
"To create a Samsung Account, you must agree to the Samsung Account end user agreement and privacy
policy. Otherwise, you cannot create a Samsung Account. You can view the entire content of the agreement
by navigating to > > Smart Hub Samsung Account Terms and Conditions, Privacy Policy.
"Alternatively, you can create a Samsung Account at http://content.samsung.com. You can use one ID for
both the TV and the website.

Signing into Samsung Account
Smart Hub Samsung Account Log In > >
Logging into and Saving a Samsung Account
If you haven't logged into your Samsung Account on the TV, you must save your Samsung Account on
the TV.
1.
Navigate to > and select .Smart Hub Samsung Account Log In
2.
Select + and select .Sign In
3.
Enter your ID and password and then select .Sign In
"Check the option if you wish to log into automatically.Sign me in automatically Smart Hub
"If you forgot your password, select to receive password reset instructions via email.Reset password
4.
Select an image to be used as the profile picture. The has been saved on the Samsung Account
TV.
5.
Select to log into your Samsung Account.Done
Easily Logging Into Your Samsung Account Saved on the TV
1.
Navigate to > and select .Smart Hub Samsung Account Log In
2.
Choose your Samsung Account and select .Sign In
3.
Using the login method configured for the selected Samsung Account, log into your Samsung
Account.

Linking My Samsung and App Accounts
Smart Hub Samsung Account Link Service Accounts > >
Linking your Samsung Account to accounts of apps installed on the TV lets you automatically log into
your linked app accounts when you log into your . For example, you can download Samsung Account
the Facebook app and link your Facebook account to your . In this case, logging into Samsung Account
your then automatically logs you into your Facebook account as well.Samsung Account
"To use , you must first log into your Samsung Account.Link Service Accounts
Linking an App Account
1.
Navigate to > and select . A list of apps that Smart Hub Samsung Account Link Service Accounts
can be linked to your Samsung Account is shown.
2.
Select an app from the list. The Link to other accounts window appears on the screen.
3.
Enter the current ID and password of the app to log in. When the login is complete, the app
account is linked to the Samsung Account.
Disconnecting a Linked Account
1.
Navigate to > , select . Select an app to Smart Hub Samsung Account Link Service Accounts
unlink.
2.
A confirmation dialog box appears. Select to unlink the app.Yes

Changing and Adding Information to Samsung Account
Smart Hub Samsung Account >
Using the menu, you can manage your Samsung Account.Samsung Account
"To change the account information, you must be logged into your Samsung Account.
1.
Navigate to > and select .Smart Hub Samsung Account Edit profile
2.
Enter the password and then select . The edit profile screen appears.Done
The profile editing screen provides the following features.
●Changing Profile Image
If you select on the login screen, you can change the profile image.Edit Profile Picture
●Choosing a Samsung Account Login Method for TV
Select Sign-in Method on the login screen and choose a login method. You can determine how
to log into the TV with the saved Samsung Account.
●Setting Auto Login
Check the option if you wish to log into automaticallySign me in automatically Smart Hub
●Entering Basic User Information
You can enter your given name, surname, and date of birth.
●Add a Credit Card to Your Samsung Account
Select Add Card to add a credit card to your Samsung Account. Adding a credit card to your
account makes it easier to purchase online movies and TV shows. Follow the easy directions on
the screen.
●Receiving e-mail about Samsung services
You can determine whether to receive e-mail about Samsung services. Containing the latest
information.
Deleting All Samsung Accounts from the TV
Smart Hub Samsung Account Remove Accounts from TV > >
Navigate to > and select . The account and Smart Hub Samsung Account Remove Accounts from TV
password information saved on the TV is deleted, and the account information of any linked apps are
also deleted.
"To delete your account information, you must be signed in with your Samsung Account.

Using Pop-Up Menu Functions
Move the focus to an app and press and hold the Enter button. You can use the following functions:
●Move
Relocates the selected app.
●Delete
Removes the selected app.
●Delete Multiple
Removes multiple apps at once.
●View details
Move to the detailed information of the selected app.
●Change view
You can change view mode sort by .Custom view or Most Played
●Lock/Unlock
You can lock or unlock a selected app from the screen.
●Update apps
You can update the selected app.

Installing an App
"When the TV's internal memory is insufficient, you can install an app on a USB device.
"Only when the USB device is connected are the app icons installed on the USB viewable on the SAMSUNG
APPS screen. You can use an app installed on a USB device only when the USB device is connected to the
TV. If the USB device is disconnected while the app is running, the app is terminated.
"The app installed on the USB device is not available on a different TV, or a PC.
Quick Installation
1.
On the SAMSUNG APPS screen, select Most Popular What's New Categories, , or .
"The Most Popular What's New and show the most popular and newest Samsung Apps. To view the
entire app list, select . You can view all Samsung Apps classified by genre.Categories
2.
Move the focus to an app and press and hold the Enter button. A pop-up menu appears.
3.
On the pop-up menu on the screen, select .Download
"While an app is being installed, the progress bar appears at the bottom of the app icon so that you can
easily figure out the installation progress.
4.
The selected app is installed on the TV.
"You can view installed apps on the screen.SAMSUNG APPS

Using Web Browser
Web Browser is an Internet browsing app. Using Web Browser, you can surf the Internet on the TV in
the same manner as you would using a PC even while watching a TV programme on PIP.
"Use a keyboard and mouse for a more convenient web browsing experience.
"The browsing screen may differ from that on a PC.
Browsing Methods
Web Browser provides two browsing methods: Pointer Browsing Link Browsing Pointer and .
Browsing enables you to move the pointer for selection while allows using the direction Link Browsing
arrows to move the focus.
The default browsing method of Web Browser is Pointer Browsing. To enable , select Link Browsing
the Link Browsing icon.
Command and Status Bar at a Glance
Open the Web Browser to display the command and status bar at the top of the screen. The following
items are available:
● Back
Move to the previous page.
● Forward
Move to the next page.
● Bookmarks & History
Move to the screen. On this screen, add the current page to Bookmarks, or Bookmarks & History
move, edit, or delete a bookmarked page. Easily access visited pages by navigating the History
screen.
● Home Page
Move to the main screen.
●Address Bar
Check the address of the current page, or enter a web page address to move to the page.
● / Refresh Stop
Reload the current page or stop reloading the current page.

● Add to Bookmark
Add the current page to Bookmarks.
●Search
Make a keyword search using the user-specified search engine.
"To change the search engine, select the icon and then select a search engine in the Set Search
Engine menu.
● Zoom
Zoom in or out of the current web page.
● PIP
Use Web Browser while watching a TV programme on the same screen.
"Depending on the country and model.
● / Link Browsing Pointer Browsing
Select one from two browsing methods supported by Web Browser.
● Settings
Configure the Web Browser settings.
● Close
Exit Web Browser.
●New Tab
Open a new tab.
Browsing Preferences
Select the item on the screen. Configure the browsing settings to your needs or convenience.
"Some items may not be available depending on the web page. Unavailable items are grayed out.
●Approved Sites
To prevent children from accessing inappropriate web pages, limit access to pre-registered web
pages.
"You will be asked to enter a password when selecting . Enter the password. The default Approved Sites
password is 0000.
Approved Sites feature: Enable/disable the .Approved Sites feature
Reset password for Approved Sites: Change the password.
Add current site: Add the current web page to .Approved Sites
Manage Approved Sites: Enter the address of the web page that you want to add to Approved
Sites, or select one from the list and delete it.
"Enabling the with no web page listed will restrict access to any web page.Approved Sites feature
Product specificaties
| Merk: | Samsung |
| Categorie: | Televisie |
| Model: | UA40J5300AR |
Heb je hulp nodig?
Als je hulp nodig hebt met Samsung UA40J5300AR stel dan hieronder een vraag en andere gebruikers zullen je antwoorden
Handleiding Televisie Samsung

28 Maart 2025
27 Maart 2025
27 Maart 2025
25 Maart 2025
11 Maart 2025
11 Maart 2025
11 Maart 2025
11 Maart 2025
11 Maart 2025
11 Maart 2025
Handleiding Televisie
- Televisie Electrolux
- Televisie Philips
- Televisie Sony
- Televisie Xiaomi
- Televisie Casio
- Televisie Panasonic
- Televisie LG
- Televisie AEG
- Televisie BEKO
- Televisie Daewoo
- Televisie Grundig
- Televisie JVC
- Televisie Medion
- Televisie Nokia
- Televisie Pioneer
- Televisie Siemens
- Televisie Toshiba
- Televisie Xiron
- Televisie Yamaha
- Televisie Abus
- Televisie Acer
- Televisie Ag Neovo
- Televisie Airis
- Televisie Aiwa
- Televisie Akai
- Televisie Albrecht
- Televisie Alden
- Televisie Aldi
- Televisie Allview
- Televisie Alphatronics
- Televisie AOC
- Televisie Apex
- Televisie Arcelik
- Televisie Aristona
- Televisie Audiosonic
- Televisie Avtex
- Televisie Bang Olufsen
- Televisie Belson
- Televisie BenQ
- Televisie Blaupunkt
- Televisie Bluesky
- Televisie Brandt
- Televisie Daitsu
- Televisie Dell
- Televisie Denver
- Televisie Difrnce
- Televisie Digihome
- Televisie Dual
- Televisie Durabase
- Televisie Dyon
- Televisie E-motion
- Televisie Emerson
- Televisie Energy Sistem
- Televisie Engel
- Televisie Fantec
- Televisie Ferguson
- Televisie Finlux
- Televisie Fujitsu
- Televisie Funai
- Televisie GPX
- Televisie Graetz
- Televisie Haier
- Televisie Hannspree
- Televisie Hisense
- Televisie Hitachi
- Televisie HKC
- Televisie Hoher
- Televisie Horizon
- Televisie Humax
- Televisie Hyundai
- Televisie Icy Box
- Televisie Iiyama
- Televisie ILive
- Televisie Innoliving
- Televisie Insignia
- Televisie Intenso
- Televisie ITT
- Televisie Kogan
- Televisie Kuppersbusch
- Televisie Lenco
- Televisie Lenovo
- Televisie Lexibook
- Televisie Loewe
- Televisie Logik
- Televisie Luxor
- Televisie Magnavox
- Televisie Magnum
- Televisie Manhattan
- Televisie Manta
- Televisie Marantz
- Televisie Marquant
- Televisie Megasat
- Televisie Metz
- Televisie Mitsubishi
- Televisie Mpman
- Televisie MT Logic
- Televisie Muse
- Televisie Mx Onda
- Televisie Nabo
- Televisie Nec
- Televisie Nedis
- Televisie Newstar
- Televisie Nextbase
- Televisie Nikkei
- Televisie Nordmende
- Televisie Packard Bell
- Televisie Peaq
- Televisie Philco
- Televisie Polar
- Televisie Polaroid
- Televisie Premier
- Televisie Proline
- Televisie Pyle
- Televisie Qilive
- Televisie RCA
- Televisie Reflex
- Televisie Reflexion
- Televisie Rm 2000
- Televisie Roadstar
- Televisie Saba
- Televisie Sagem
- Televisie Salora
- Televisie Sanyo
- Televisie Sbr
- Televisie Schaub Lorenz
- Televisie Schneider
- Televisie Seg
- Televisie Selfsat
- Televisie Sencor
- Televisie Sharp
- Televisie Silvercrest
- Televisie Sogo
- Televisie Soundmaster
- Televisie Strong
- Televisie Sunny
- Televisie Sunstech
- Televisie Superior
- Televisie Sweex
- Televisie Sylvania
- Televisie TCL
- Televisie Teac
- Televisie TechLine
- Televisie Technika
- Televisie Technisat
- Televisie Techwood
- Televisie Tele 2
- Televisie Teleco
- Televisie Telefunken
- Televisie Terris
- Televisie Tesla
- Televisie Tevion
- Televisie Thomson
- Televisie Time
- Televisie Tve
- Televisie Uniden
- Televisie United
- Televisie Vestel
- Televisie Viewpia
- Televisie Viewsonic
- Televisie Vision Plus
- Televisie Vivax
- Televisie Vivo
- Televisie Vizio
- Televisie Voxx
- Televisie Walker
- Televisie Westinghouse
- Televisie Wharfedale
- Televisie Woxter
- Televisie Xoro
- Televisie XS4ALL
- Televisie Yasin
- Televisie Zalman
- Televisie Ziggo
- Televisie Jay-tech
- Televisie Jensen
- Televisie JGC
- Televisie JTC
- Televisie Odys
- Televisie OK
- Televisie Oki
- Televisie Online
- Televisie Onn
- Televisie Opera
- Televisie Oppo
- Televisie Optoma
- Televisie Orion
- Televisie Oyster
- Televisie Changhong
- Televisie Clatronic
- Televisie Continental Edison
- Televisie ECG
- Televisie Palsonic
- Televisie Vox
- Televisie Bang And Olufsen
- Televisie GoGEN
- Televisie Krüger And Matz
- Televisie Naxa
- Televisie Proscan
- Televisie Voxicon
- Televisie Kunft
- Televisie Aspes
- Televisie AYA
- Televisie Bush
- Televisie High One
- Televisie Infiniton
- Televisie Kernau
- Televisie Nevir
- Televisie Orima
- Televisie Svan
- Televisie Grunkel
- Televisie SereneLife
- Televisie Zenith
- Televisie Citizen
- Televisie Kubo
- Televisie Smart Brand
- Televisie Alba
- Televisie Edenwood
- Televisie Elbe
- Televisie Majestic
- Televisie Trevi
- Televisie Cello
- Televisie NPG
- Televisie Orava
- Televisie Star-Light
- Televisie Videocon
- Televisie Cecotec
- Televisie Bauhn
- Televisie MBM
- Televisie Furrion
- Televisie Coby
- Televisie Doffler
- Televisie DGM
- Televisie Planar
- Televisie Chiq
- Televisie Monster
- Televisie Antarion
- Televisie Felson
- Televisie SEIKI
- Televisie SunBriteTV
- Televisie Tucson
- Televisie CGV
- Televisie LTC
- Televisie Caratec
- Televisie Séura
- Televisie AudioAffairs
- Televisie Element
- Televisie Peerless-AV
- Televisie XD Enjoy
- Televisie Inovia
- Televisie DirecTV
- Televisie Telesystem
- Televisie Kemo
- Televisie EKO
- Televisie Mitsai
- Televisie V7
- Televisie ISymphony
- Televisie Pantel
- Televisie ATYME
- Televisie HCI
- Televisie Inno-Hit
- Televisie Lin
- Televisie Elements
- Televisie Englaon
- Televisie Astar
- Televisie Visco
- Televisie Tivax
- Televisie H&B
- Televisie Norcent
- Televisie TELE System
- Televisie TIM
- Televisie Kivi
- Televisie Mach Power
- Televisie Axing
- Televisie FFalcon
- Televisie Smart Tech
- Televisie Mitzu
- Televisie JTC24
- Televisie Coocaa
- Televisie SYLVOX
- Televisie RevolutionHD
- Televisie FOX Electronics
- Televisie QBell Technology
- Televisie Aconatic
- Televisie Mitchell & Brown
- Televisie Mystery
- Televisie Linsar
Nieuwste handleidingen voor Televisie

9 April 2025
9 April 2025

9 April 2025
9 April 2025
9 April 2025
9 April 2025
9 April 2025
9 April 2025
9 April 2025

8 April 2025