Samsung T24H390SIX Handleiding
Lees hieronder de 📖 handleiding in het Nederlandse voor Samsung T24H390SIX (157 pagina's) in de categorie Monitor. Deze handleiding was nuttig voor 52 personen en werd door 2 gebruikers gemiddeld met 4.5 sterren beoordeeld
Pagina 1/157

E-MANUAL
Thank you for purchasing this Samsung product.
To receive more complete service, please register your
product at
www.samsung.com/register
Model______________ Serial No.______________

Contents
Quick Guides
Connecting the to the TVSamsung Smart Remote
Using Smart Hub
Using Voice Interaction
3 Running Voice Interaction
5 Read Before Using Voice Interaction
Updating the TV’s Software
6 Updating the TV’s software to the latest version
6 Updating the TV automatically
Getting Support
7 Getting support through Remote Management
8 Finding the contact information for service
8 Requesting service
Connections
Connection Guide
Connecting an Antenna (Aerial)
Connecting to the Internet
11 Connecting to your Internet network
13 Resetting Your Network
Troubleshooting Internet Connectivity Issues
13 Troubleshooting wired Internet connectivity issues
14 Troubleshooting wireless Internet connectivity issues
Connecting Video Devices
15 HDMIConnecting with an cable
16 Connecting with a component cable (Only for models with
COMPONENT IN / AV IN)
17 Connecting with a composite cable (Only for models with
COMPONENT IN / AV IN)
18 Connecting with a component cable
18 Connecting with a composite (A/V) cable
Audio Input and Output Connections
19 HDMI ( )Connecting with an ARC cable
19 Connecting with a digital audio (optical) cable
19 Connecting through a wireless network
20 Connecting Bluetooth Devices
Connecting a Computer
20 Connecting through the HDMI port ― Screen Sharing (HDMI)
Connecting a Mobile Device
21 Connecting to a Network
21 Viewing the screen of a mobile device on your TV (Screen
Sharing)
22 Managing a Mobile Device
Switching between external devices connected to the TV
22 Changing the input signal
23 Editing the name and icon of an external device
24 Using additional functions
Connection Notes
24 Connection notes for HDMI
25 Connection notes for audio devices
26 Connection notes for computers
26 Connection notes for mobile devices
Remote Control and Peripherals
About the Samsung Smart Remote
Connecting to the Samsung Smart Remote
Controlling External Devices with the Samsung Smart Remote
- Using the Universal Remote
Using Anynet+ (HDMI-CEC)
30 Connecting an external device through Anynet+ and using
their menus

Controlling the TV with a Keyboard
31 Connecting a USB keyboard
31 Connecting a Bluetooth keyboard
31 Using the keyboard
Entering Text using the On-Screen QWERTY Keyboard
33 Using additional functions
33 Entering Text using the remote control's microphone and the
on-screen QWERTY keyboard
Smart Features
Smart Hub
35 Displaying the Home Screen
38 Launching Smart Hub automatically
38 Launching the last used app automatically
38 Testing Smart Hub connections
38 Resetting Smart Hub
Using a Samsung account
39 Creating and managing your Samsung account
40 Signing in to a Samsung account
Using the Apps Service
42 Installing and running an app
43 Managing purchased or installed apps
Using the e-Manual
45 Launching the e-Manual
45 Using the buttons in the e-Manual
Using the Internet
Playing pictures/video/music
47 Playing media content
Using the Music Service
Using Voice Interaction
49 Running Voice Interaction
50 Read Before Using Voice Interaction
TV Viewing
Viewing Digital Broadcast Information at a Glance
52 Using the guide
Recording Programmes
55 Recording programmes
56 Managing the schedule recording list
56 Viewing recorded programmes
Setting Up a Schedule Viewing
57 Setting up a schedule viewing for a channel
58 Editing a schedule viewing
58 Setting the Schedule Viewing Time
Using Timeshift
59 Buttons and functions available while recording a programme
or Timeshift
Using the Channel List
Editing channels
61 Removing registered channels
61 Editing registered channels
Creating a Personal Favourites List
62 Registering channels as favourites
63 Viewing and selecting channels on Favourites lists only
Editing a Favourites List
63 Adding channels to favourites list
63 Removing channels from a favourites list
64 Rearranging a favourites list
64 Renaming a favourites list

TV-Viewing Support Functions
64 Changing the broadcast signal
64 Scanning for available channels
65 Restricting Viewing to Specific Channels
65 Selecting the broadcasting audio option
66 Using Programme Rating Lock
66 Configuring advanced broadcasting settings
66 Reading digital text
67 Selecting the broadcast audio language
67 Tuning broadcast signals manually
68 Fine-tuning analogue broadcasts
68 Transferring channel list
68 Deleting operator profileCAM
68 Setting satellite system
69 Changing teletext language
69 Showing common interface menu
Picture and Sound
Adjusting the Picture Quality
70 Choosing a picture mode
71 Configuring advanced picture settings
Setting the Viewing Environment for External Devices
73 Playing games on an optimised screen
73 Using HDMI black level
74 Registering the TV as a -certified device (watching for pay DivX
DivX movies)
Picture Support Functions
74 Changing the picture size
75 Changing the picture size automatically
75 Changing the picture size in 4:3 or Screen Fit mode
Adjusting the Sound Quality
76 Choosing a sound mode
76 Configuring advanced sound settings
Using the Sound Support Functions
77 Selecting speakers
77 Listening to the TV through Bluetooth devices
78 Listening to the TV through a Multiroom speaker
System and Support
Setting the Time and Using the Timer
79 Setting the current time
80 Using the timers
Using the Screen Burn Protection and Energy Saving Functions
81 Preventing screen burn
81 Reducing the energy consumption of the TV
Updating the TV’s Software
82 Updating the TV’s software to the latest version
82 Updating the TV automatically
Protecting the TV from Hacking and Malicious Code
83 Scanning the TV and connected storage for malicious code
Using Other Functions
83 Running the accessibility functions
84 Enabling voice guides for the visually impaired
84 Audio Description
85 Watching TV broadcasts with subtitles
86 White text on black background (high contrast)
86 Enlarging the font (for the visually impaired)
86 Learning about the remote control (for the visually impaired)
86 Learning about the TV menu
86 Listening to the TV through Bluetooth devices (for the hearing
impaired)
87 Configuring advanced system settings
88 Checking digital channel signal info and strength
88 Restoring the TV to the factory settings
Running Data Service Automatically
HbbTV

Using a TV Viewing Card (“CI or CI+ Card”)
91 Connecting the “CI or CI+ Card” via COMMON INTERFACE slot
with the CI CARD Adapter
92 Using the “CI or CI+ Card”
Teletext Feature
94 Typical Teletext page
Troubleshooting
Getting Support
95 Getting support through Remote Management
96 Finding the contact information for service
96 Requesting service
Diagnosing TV operational issues
There Is a Problem with the Picture
97 Testing the picture
I Can't Hear the Sound Clearly
99 Testing the sound
There Is a Problem with the Broadcast
My Computer Won't Connect
The TV Won't Connect to the Internet
Data Service
The Schedule Recording/Timeshift Function Isn't Working
Anynet+ (HDMI-CEC) Isn't Working
I Have Trouble Launching/Using Apps
My File Won't Play
I Want to Reset the TV
Other Issues
Precautions and Notes
Before Using the Recording and Timeshift Functions
107 Before using the recording and schedule recording functions
109 Before using the timeshift function
Supported broadcasting audio options
Read Before Using Apps
Read Before Using the Internet
Read Before Playing Photo, Video, or Music Files
113 Limitations on use of photo, video, and music files
114 Supported external subtitles
114 Supported internal subtitles
115 Supported image formats and resolutions
115 Supported music formats and codecs
116 Supported video codecs
Read After Installing the TV
118 Picture sizes and input signals
119 Installing an anti-theft lock
119 Read before setting up a wireless Internet connection
Read Before Connecting a Computer (Supported Resolutions)
120 IBM
120 MAC
121 VESA DMT
Supported Resolutions for Video Signals
122 CEA-861
Read Before Using Bluetooth Devices
123 Restrictions on using Bluetooth
Buttons and Functions
124 Buttons and functions available while playing multimedia
content
Licence

Accessibility Guidance
Using the Remote control
128 Samsung Smart RemoteOrientation of the
128 Samsung Smart RemoteDescription of the
Using the accessibility menu
130 Accessibility short cut menu
131 Step by Step instructions to.
133 Setting accessibility settings using Voice Interaction
Using the TV with Voice Guide on
134 Watching TV
Using the guide
Setting Up a Schedule Viewing
Using the Channel List
141 Creating a Personal Favourites List
Recording
144 Using the instant and schedule recording options from the
guide screen:
145 Using the Instant and Schedule Recording options from
programme info window
145 Recording a programme you are currently watching directly
from live TV
145 Changing the recording time
146 Viewing recorded programmes
146 Deleting a recorded programme
Using Smart Hub
147 Smart Hub
148 Displaying the Home Screen in the Smart Hub
Using the e-Manual
150 e-ManualLaunching the
Using Voice Interaction
151 Running Voice Interaction

- 4 -
●If you say voice commands like "Channel number 11 Volume 10" and " ", you can set the channel and volume.
●If you say an accessibility-related command such as "Subtitle" or "Voice Guide", the command is applied
directly and you will see a notification that the function is operating.
●When playing back media content, you can execute commands such as " ", " ", "Play Pause Stop Rewind", " ", and
"Fast Forward".
"The function does not operate for all apps.
●You can set the timer with the command "Sleep reservation in 30 minutes".
●To change the source, say " ", " ", or " ".HDMI TV USB
●To change the picture mode, say "Movie Picture Mode" or "Set Picture Mode to Standard".
●To search, say "Search ****" or "Search **** in YouTube".
●To view Help, say " ", " " or "Help What can I say User guide".
"The supported language may differ by geographical region.
"When you press the button once, the Help Guide is displayed. Use the Voice Interaction function as instructed in
the Guide.

- 5 -
Read Before Using Voice Interaction
Precautions for voice interaction
●To use Voice Interaction, you must have a Samsung account. For more information, refer to "Using a Samsung
account".
●The supported voice interaction languages and features may differ by geographical region.
●If the language set differs from the language of your country, some features are not available.
●The function is available only when the TV is connected to the Internet.
●Voice interaction is available only on TVs that support it and come with remote controls that have a
microphone.
●Symbols including "-" and special characters are not supported. Consequently, if a word or sentence contains
numeric values or symbols, the function may not operate properly.
●Searched results may not provide complete results.
●You may be required to pay for some apps. Consequently, you may encounter a service application or contract.
●To change the current channel by saying channel names as voice commands, you must finish Set Up Service
Provider Settings General Start Setup. ( )
●To use the voice text input function and Smart search function, you must consent to provisions allowing third
parties to collect and use your voice data.
●To use the interactive voice interaction function, you must.
–Agree to Smart Hub's Terms of Use
–Agree to a guidance regarding the collection and use of personal information for the Smart Hub service.
–Consent to the collection and use of personal information for the voice interaction-based service.
Requirements for using voice interaction
●The voice interaction rate differs with the volume/tone, pronunciation, and ambient sound environment (TV
sound and ambient noise).
●The optimal volume for voice commands is between 75 dB and 80 dB.

- 6 -
Updating the TV’s Software
View your TV's software version and update it if necessary.
Settings Support Software Update
Updating the TV’s software to the latest version
[ DO NOT turn off the TV’s power until the update is complete. The TV will turn off and on automatically after
completing the software update. Video and audio settings will be reset to their defaults after a software
update.
Updating through the Internet
Settings Support Software Update Update Now
"Updating from the Internet requires an active Internet connection.
Updating through a USB device
Settings Support Software Update Update Now
After downloading the update file from the Samsung website and storing it on a USB device, connect the USB device
to the TV to update.
"To update using a USB flash drive, download the update package from Samsung.com to your computer. Then, save the
update package in the USB device's top-level folder. Otherwise, the TV will not be able to locate the update package.
Updating the TV automatically
Settings Support Software Update Auto update
If the TV is connected to the Internet, you can have the TV update its software automatically while you are watching
the TV. When the background update is completed, it is applied the next time the TV is turned on.
If you agree to the Smart Hub terms and conditions, Auto update On is set to automatically. If you want this function
disabled, use the Select button to turn it off.
"This function may take a longer time if another network function is running concurrently.
"This function requires an Internet connection.

- 8 -
Finding the contact information for service
Settings Support About This TV
You can view the address of the Samsung website, the call centre phone number, your TV's model number, your TV's
software version, Open Source Licence and other information you may need to get service support from a Samsung
call agent or the Samsung website.
"You can also view information by scanning the QR code of your TV.
"You can also start this function by pressing and holding the button for 5 or more seconds.
"This function is not available on certain models in specific geographical areas.
Requesting service
Settings Support Request Support
You can request service when you encounter a problem with the TV. Select the item matching the problem that
you encountered, and then select Request Now or Schedule Appointment Send. Your service request will be
registered. The Samsung Contact Centre will contact you to set up or confirm your service appointment.
"This function is not available in specific geographical areas.
"You must agree to the terms and conditions for the service request.
"This function requires an Internet connection.

- 9 -
Connections
You can watch live broadcasts by connecting an antenna and antenna cable to your TV and can get access to the
Internet by using a LAN cable or wireless router. Using various connectors, you can also connect external devices.
Connection Guide
You can view detailed information about external devices that can be connected to the TV.
Source Connection Guide
It guides you the way to connect various external devices such as the cable box, game console, and PC through
pictures. If you select the connection method to an external device, the information details appear.
Connection Guide
Cable Box/Disc Player HDMI
Game Console
PC
Audio device
Mobile Device
External Storage
Accessory
"The image on your TV may differ from the image above depending on your model and geographical area.
- 10 -
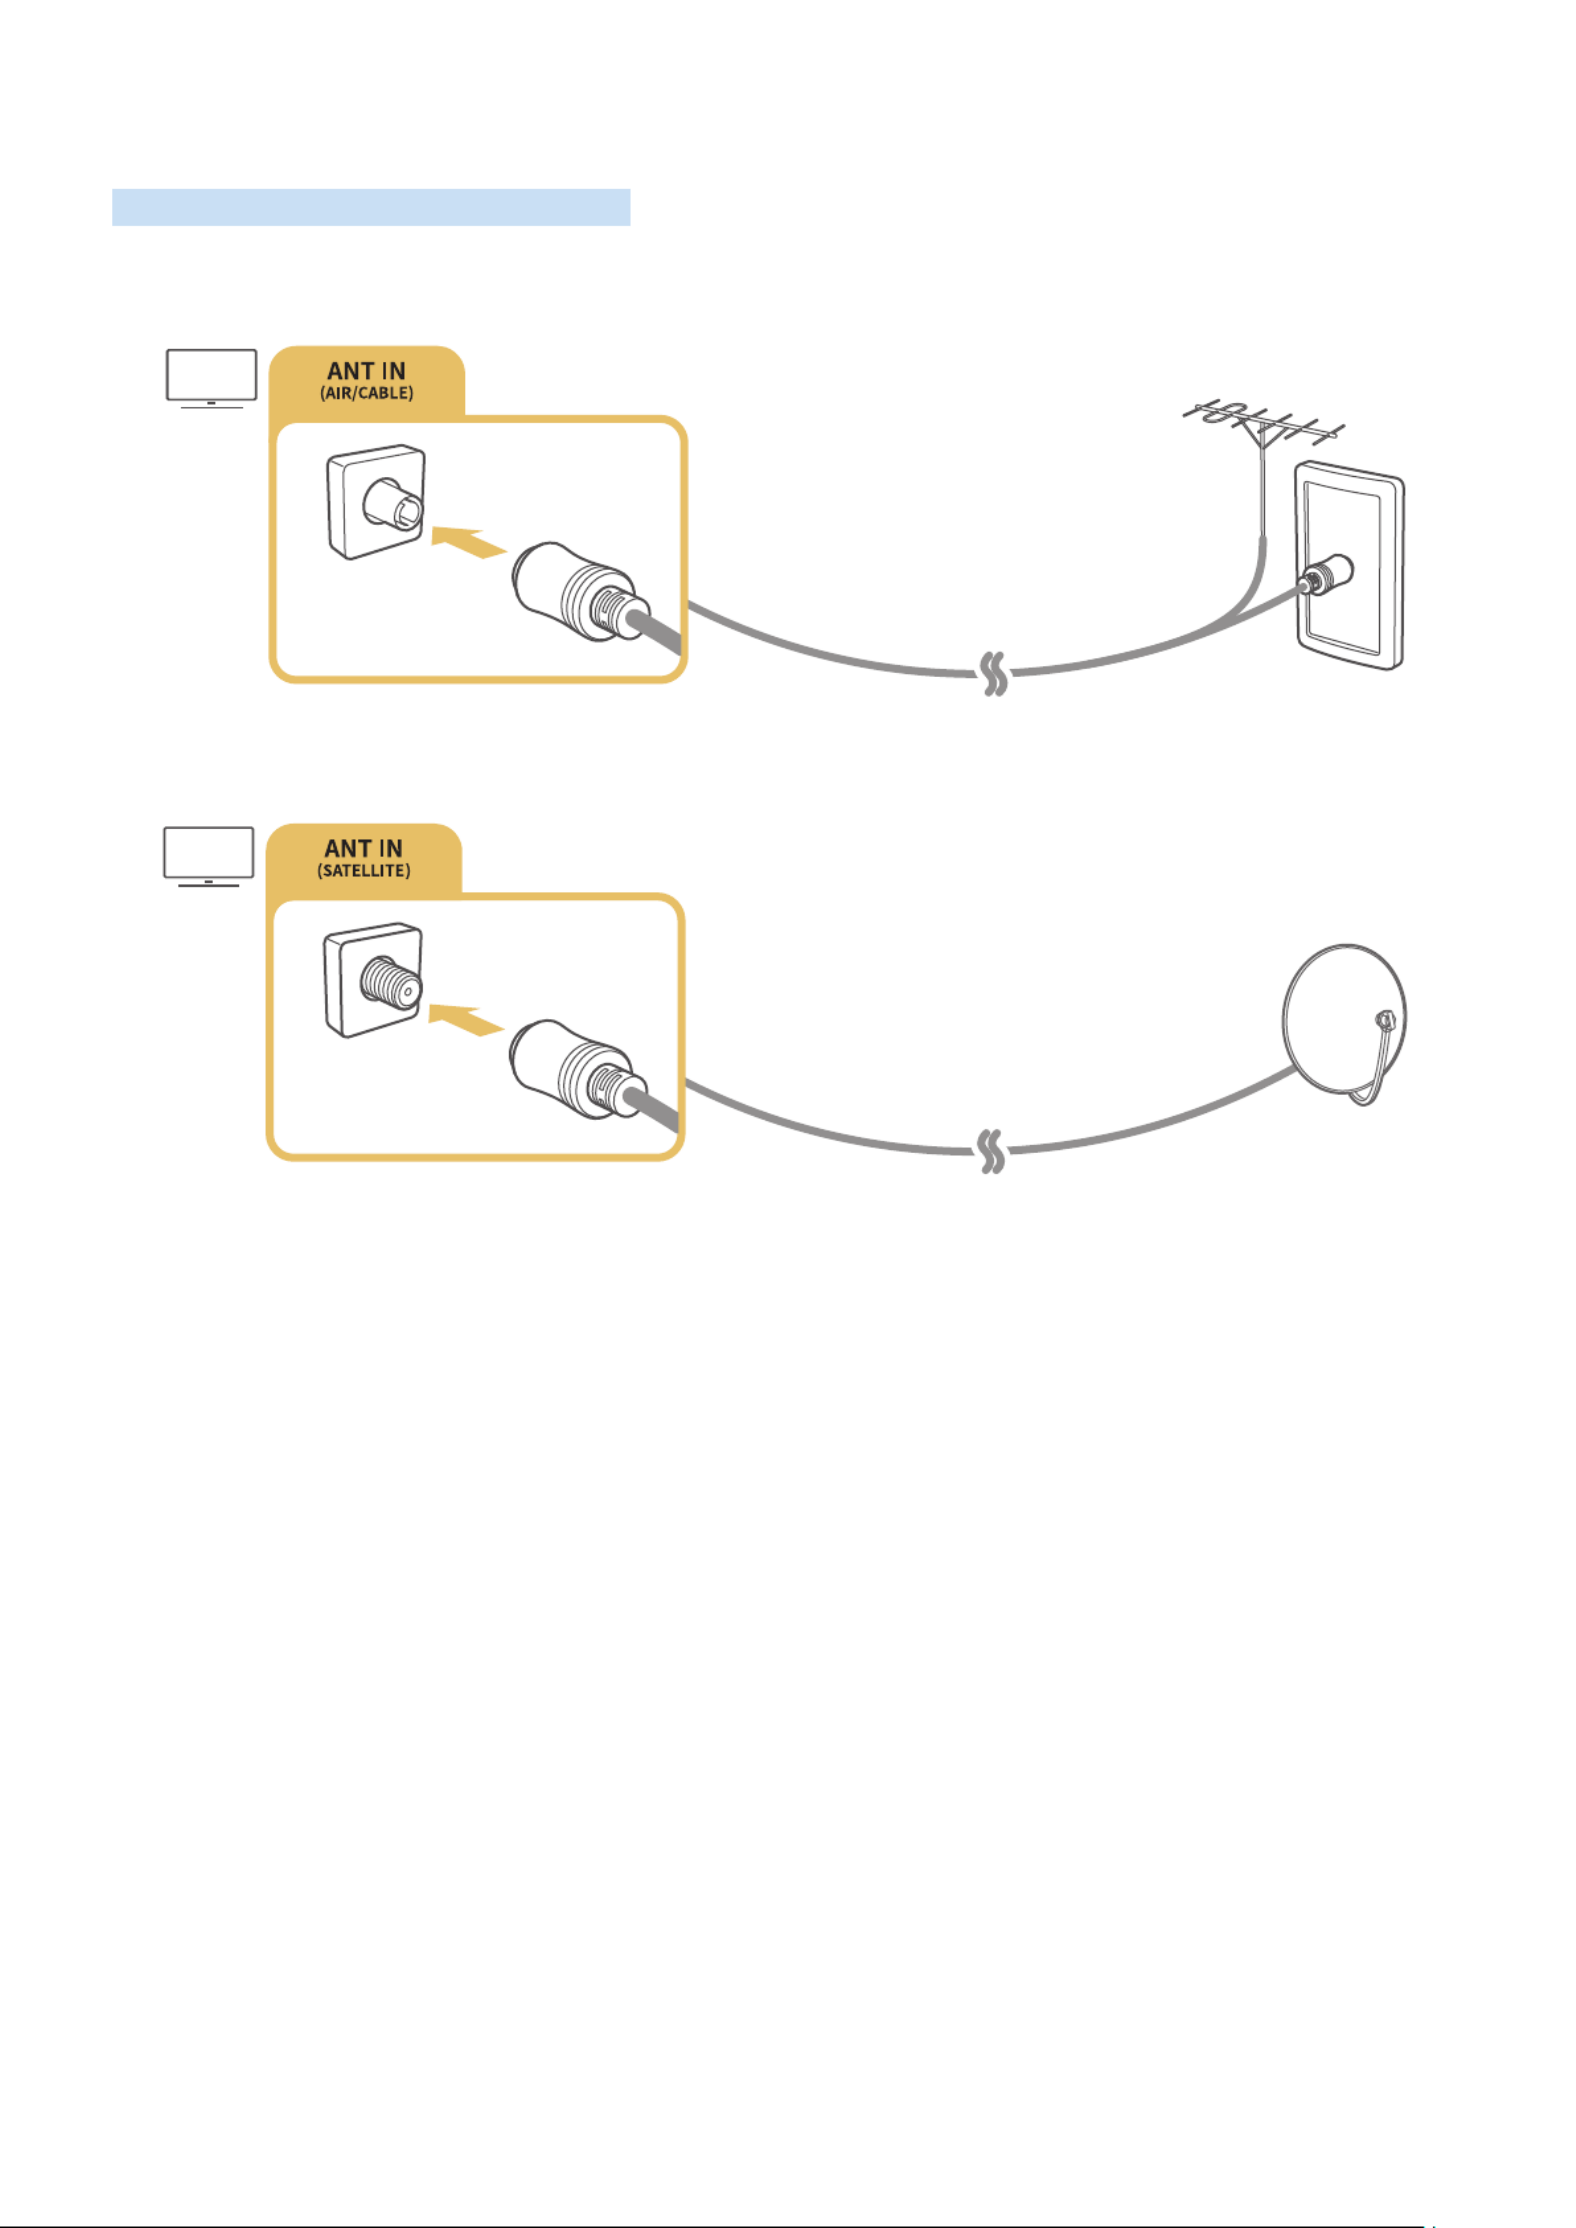
Connecting an Antenna (Aerial)
You can connect an antenna cable to your TV.
"An antenna connection is not necessary if you connect a cable or satellite box.
It is best to connect the both connectors using a Multi-Switch or DiSEqC. Switch, etc and to set Aerial Connection
Type to Dual Oscillator.
"A connection method may differ with the models.
"DVB-T2 system may not be available in specific geographical areas.
"Availability depends on the specific model and geographical area.

- 11 -
Connecting to the Internet
You can get access to the Internet through your TV.
Connecting to your Internet network
Settings General Network Open Network Settings Try Now
Connect to an available network.
Establishing a wired Internet connection
Settings General Network Open Network Settings Wired
If you connect a LAN cable, the TV automatically accesses the Internet.
"Use a CAT 7 (*STP type) cable for the connection.
* Shielded Twist Pair
"The TV will not be able to connect to the Internet if your network speed is below 10 Mbps.

- 12 -
Establishing a wireless Internet connection
Settings General Network Open Network Settings Wireless
Make sure that you have the wireless router's SSID (name) and password settings before attempting to connect, and
then follow the directions on the screen.
Wireless Connection
Select your wireless network.
Refresh
"The image on your TV may differ from the image above depending on your model and geographical area.
"If no wireless router is found, select Add Network at the bottom of the list and enter the network name (SSID).
"If your wireless router has a WPS button, select at the bottom of the list, and then push the WPS or PBC Use WPS or PBC
button on your router within 2 minutes. The TV will connect automatically.

- 13 -
Checking the Internet connection status
Settings General Network Network Status Try Now
View the current network and Internet status.
Resetting Your Network
Settings General Network Reset Network
Restore the network settings to the factory defaults.
Changing the name of the TV on a network
Settings General System Manager Device Name Try Now
You can change the name of the TV on the network. Select User Input at the bottom of the list and change the name.
Troubleshooting Internet Connectivity Issues
If your TV won't connect to the Internet, try the solutions below.
Troubleshooting wired Internet connectivity issues Try Now
After reading the following content, troubleshoot the wired Internet connection issue. If the problem persists,
contact your Internet Service Provider.
No network cable found
Make sure that the LAN cable is plugged in on both ends. If it is plugged in, make sure that the router is turned on. If
the router is on, try turning it off and then on.

- 14 -
IP auto setting failed
1.
Configure the settings in IP Settings.
2.
Make sure that the DHCP server is enabled on the router, and then reset the router.
Unable to connect to the network
1.
Check all IP Settings.
2.
After checking the DHCP server status (must be active) on the router, remove the LAN cable, and then connect
it again.
Connected to a local network, but not to the Internet
1.
Make sure that the Internet LAN cable is connected to the router's external LAN port.
2.
Check the DNS values in IP Settings.
Network setup is complete, but unable to connect to the Internet
If the problem persists, contact your Internet Service Provider.
Troubleshooting wireless Internet connectivity issues
After reading the following content, troubleshoot the wireless Internet connection issue. If the problem persists,
contact your Internet Service Provider.
Wireless network connection failed
If a selected wireless router is not found, go to Open Network Settings, and then select the correct router.
Unable to connect to a wireless router
1.
Check if the router is turned on. If it is, turn it off and then on.
2.
Enter the correct password if required.
- 15 -
IP auto setting failed
1.
Configure the settings in IP Settings.
2.
Make sure that the DHCP server is enabled on the router. Then, unplug the router and plug it back in.
3.
Enter the correct password if required.
Unable to connect to the network
1.
Check all IP Settings.
2.
Enter the correct password if required.
Connected to a local network, but not to the Internet
1.
Make sure that the Internet LAN cable is connected to the router's external LAN port.
2.
Check the DNS values in IP Settings.
Network setup is complete, but unable to connect to the Internet
If the problem persists, contact your Internet Service Provider.
Connecting Video Devices
Make the correct video connections between your TV and your external devices.
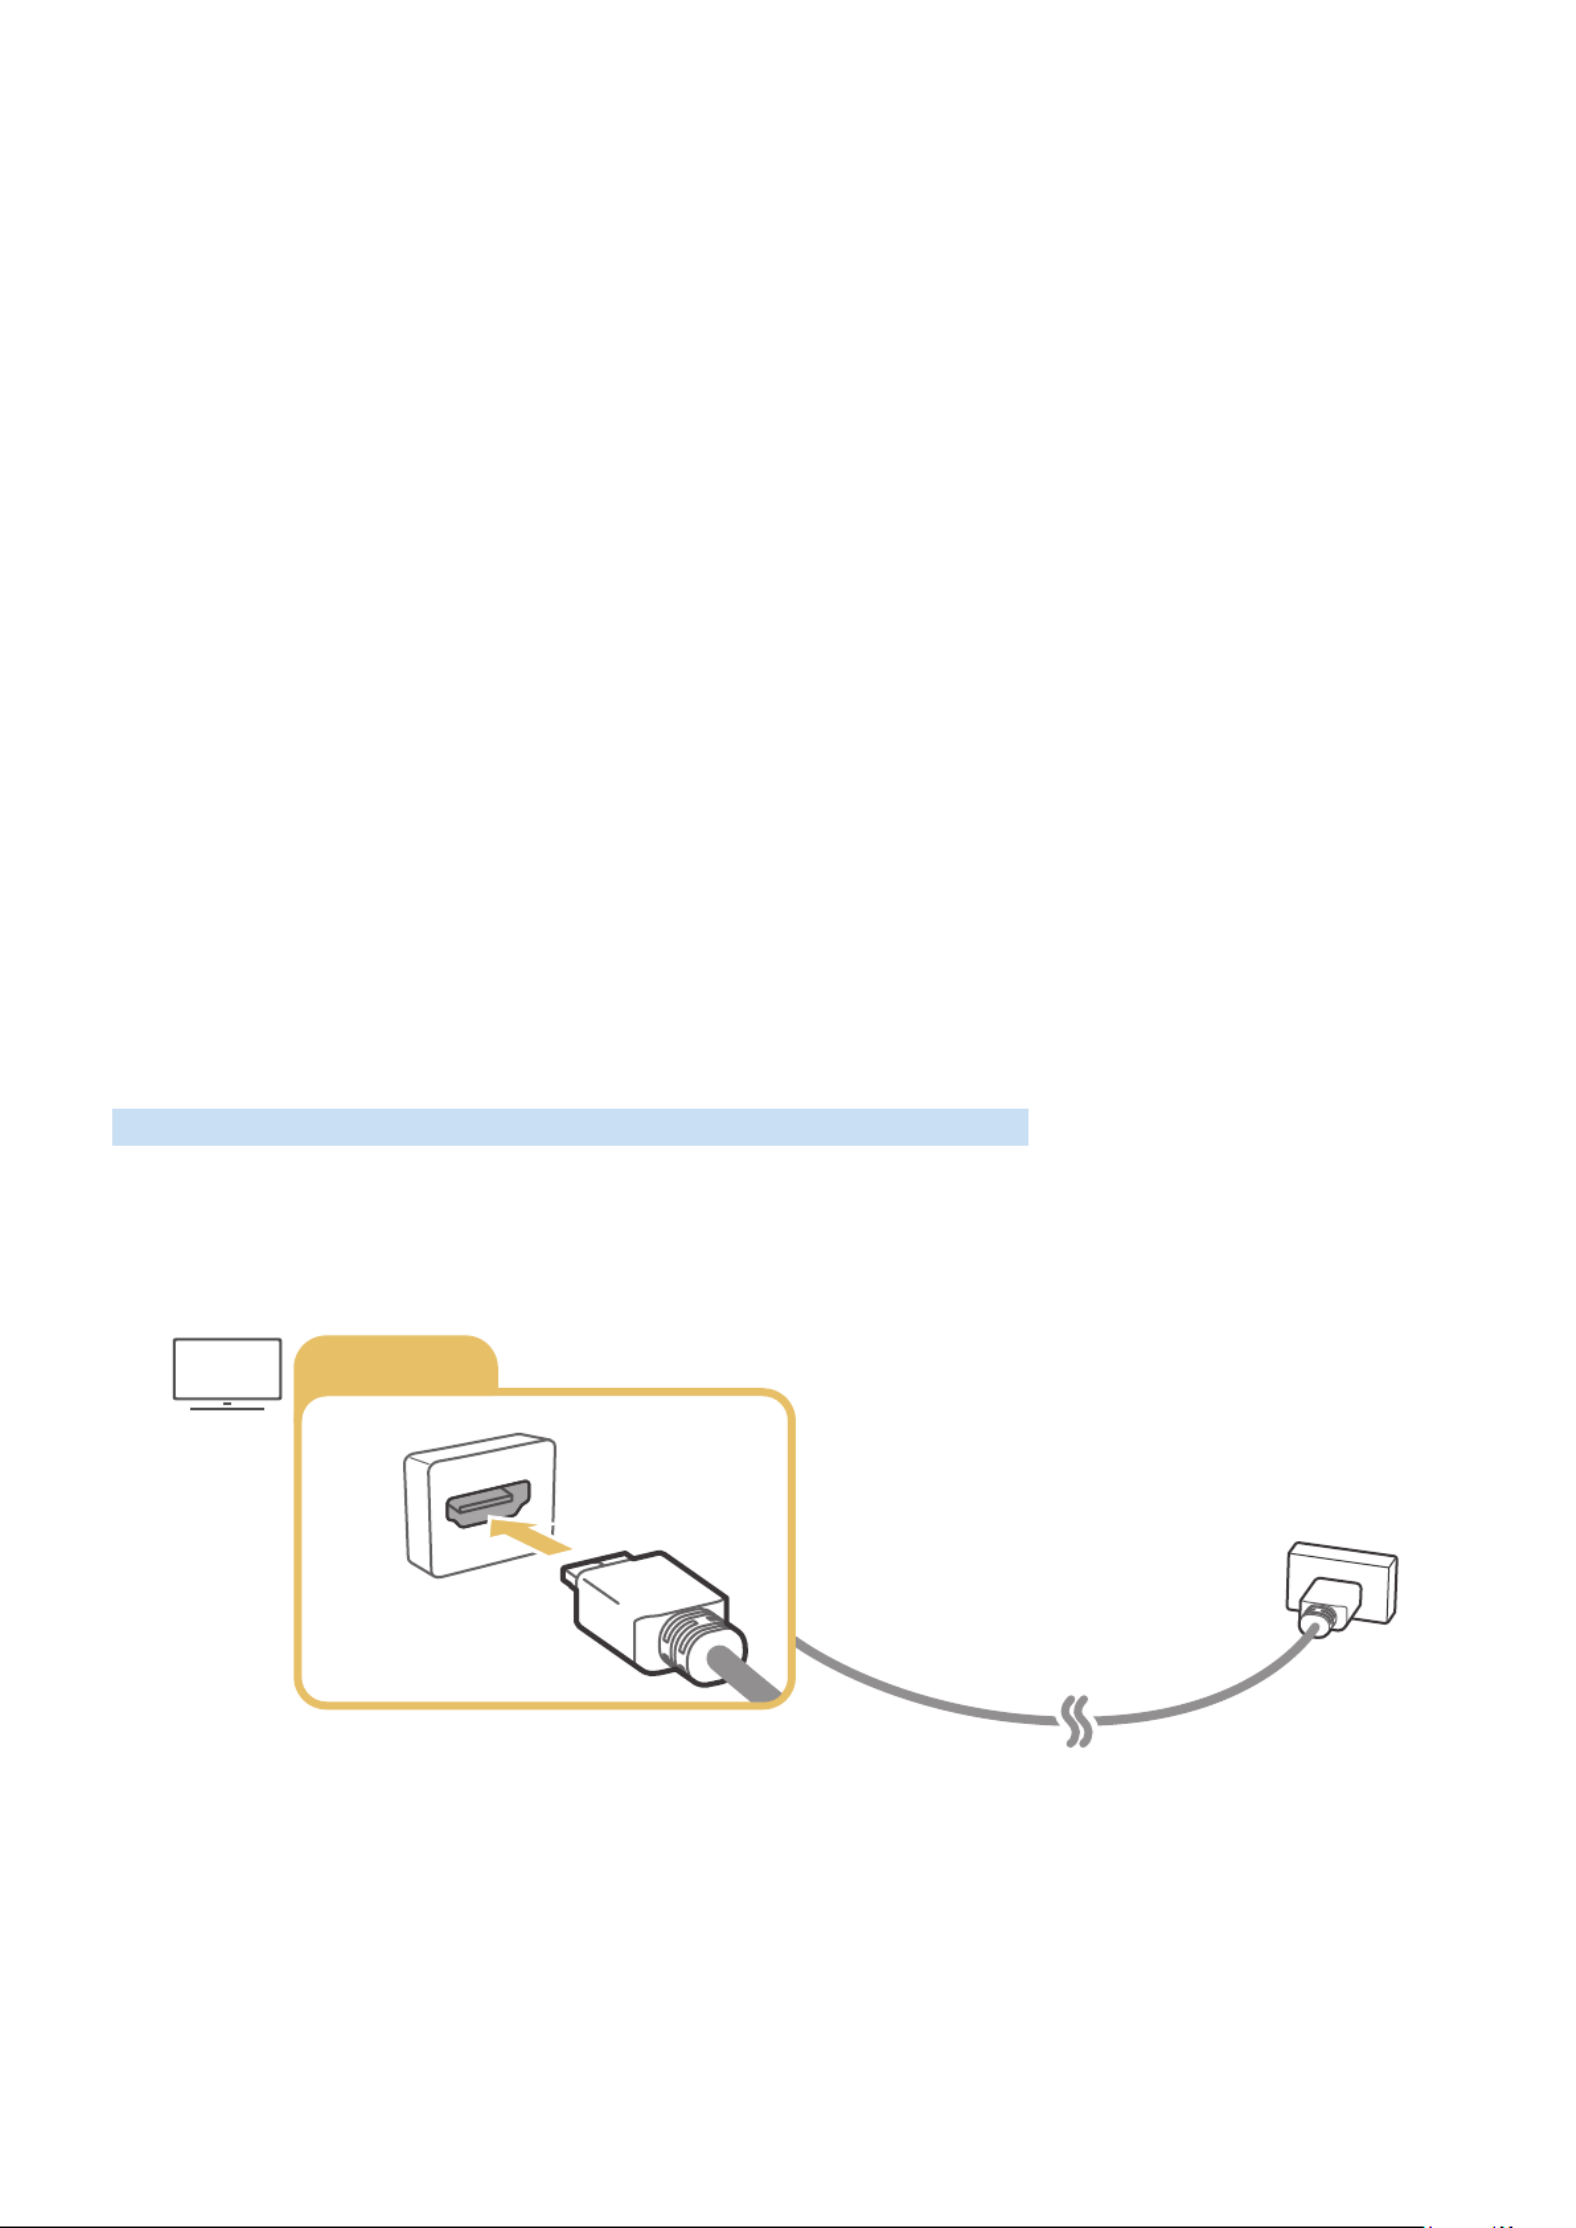
Connecting with an HDMI cable
HDMI IN

- 16 -
Connecting with a component cable (Only for models with COMPONENT IN /
AV IN)
A Component connection lets you enjoy video resolutions up to 1080p. To watch video from most DVD and Blu-ray
players, use the Component connection.
Review the illustration below, and then connect Component IN and AV IN on the TV to Component OUT on
the external device by using the provided component and AV adaptors. Make sure to connect the same colour
connectors together. (blue to blue, yellow to yellow, etc.)
COMPONENT IN / AV IN
COMPONENT IN
AV IN
"To use component equipment, connect both the component adapter (blue) and the AV adapter (yellow).
"Availability depends on the specific model and geographical area.
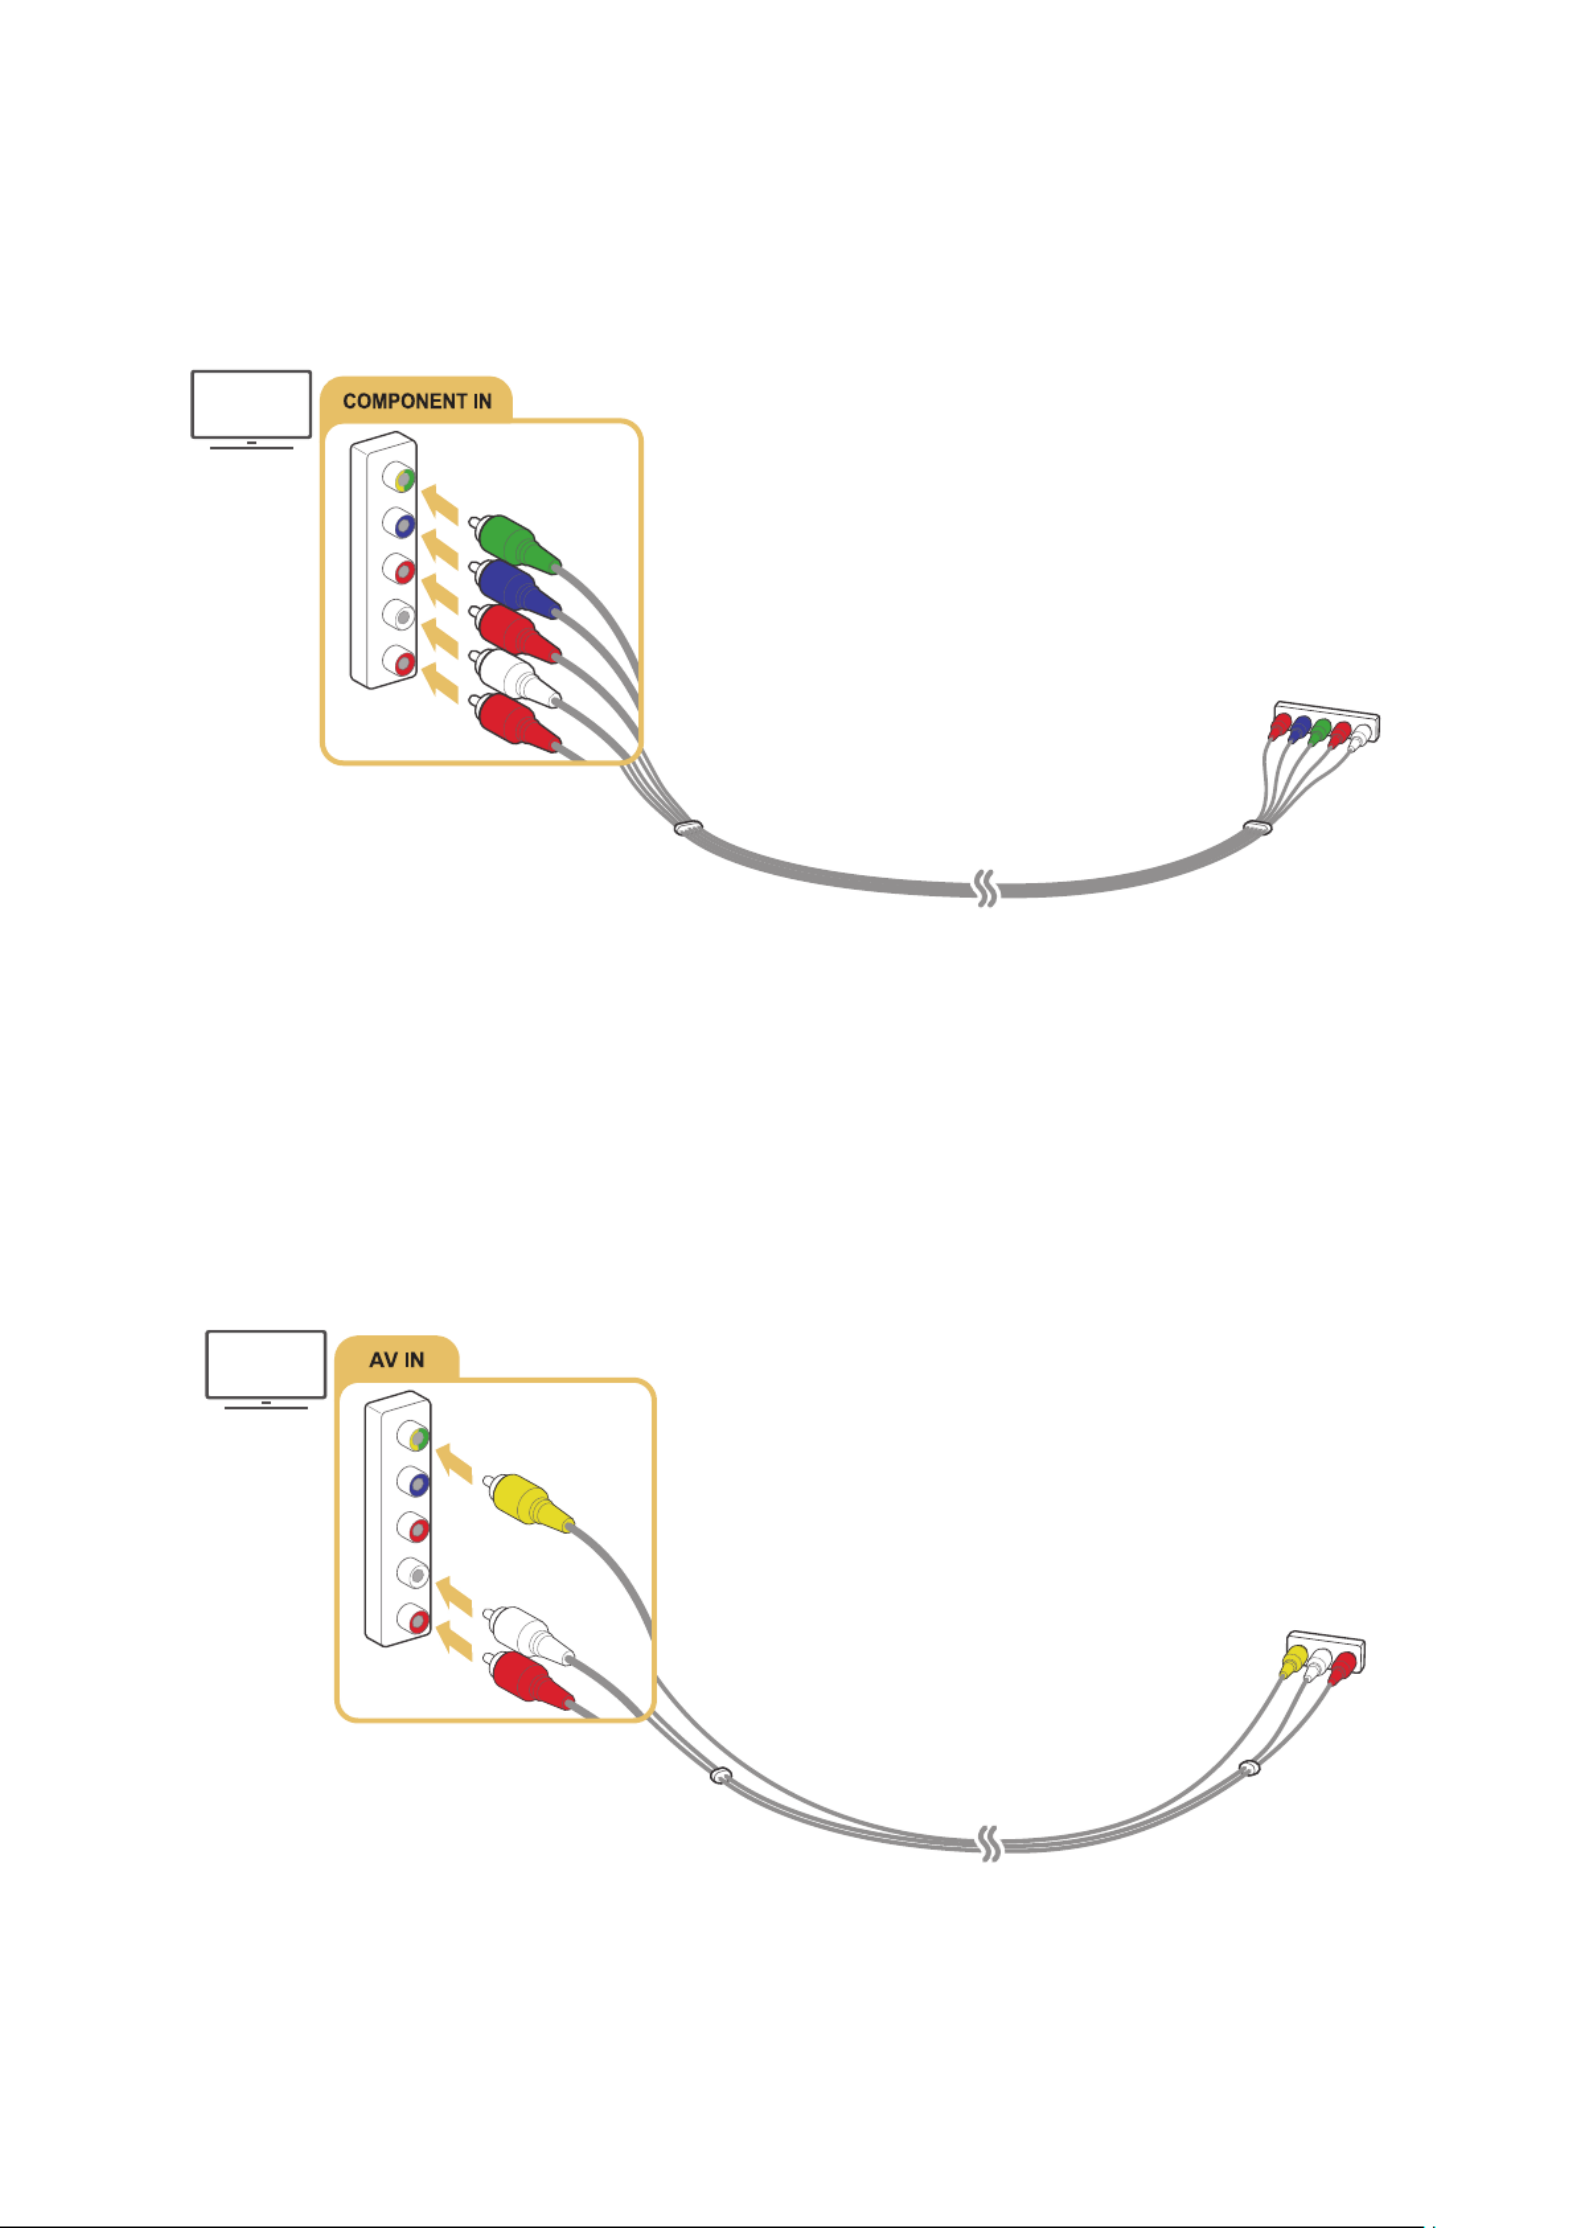
- 18 -
Connecting with a component cable
Connect the component cable to the component input connectors of the TV and the component output connectors
of the device as shown in the image below.
Make sure the cable colours match the connector colours.
"Availability depends on the specific model and geographical area.
Connecting with a composite (A/V) cable
Connect the AV cable to the AV input connectors of the TV and the AV output connectors of the device as shown in
the image below.
Make sure the cable colours match the connector colours.
"Availability depends on the specific model and geographical area.
- 20 -
Connecting Bluetooth Devices
For more information about how to connect and use external speakers, refer to the Connection Guide (
Source Connection Guide ) and their user manuals.
"This function is not available on certain models in specific geographical areas.
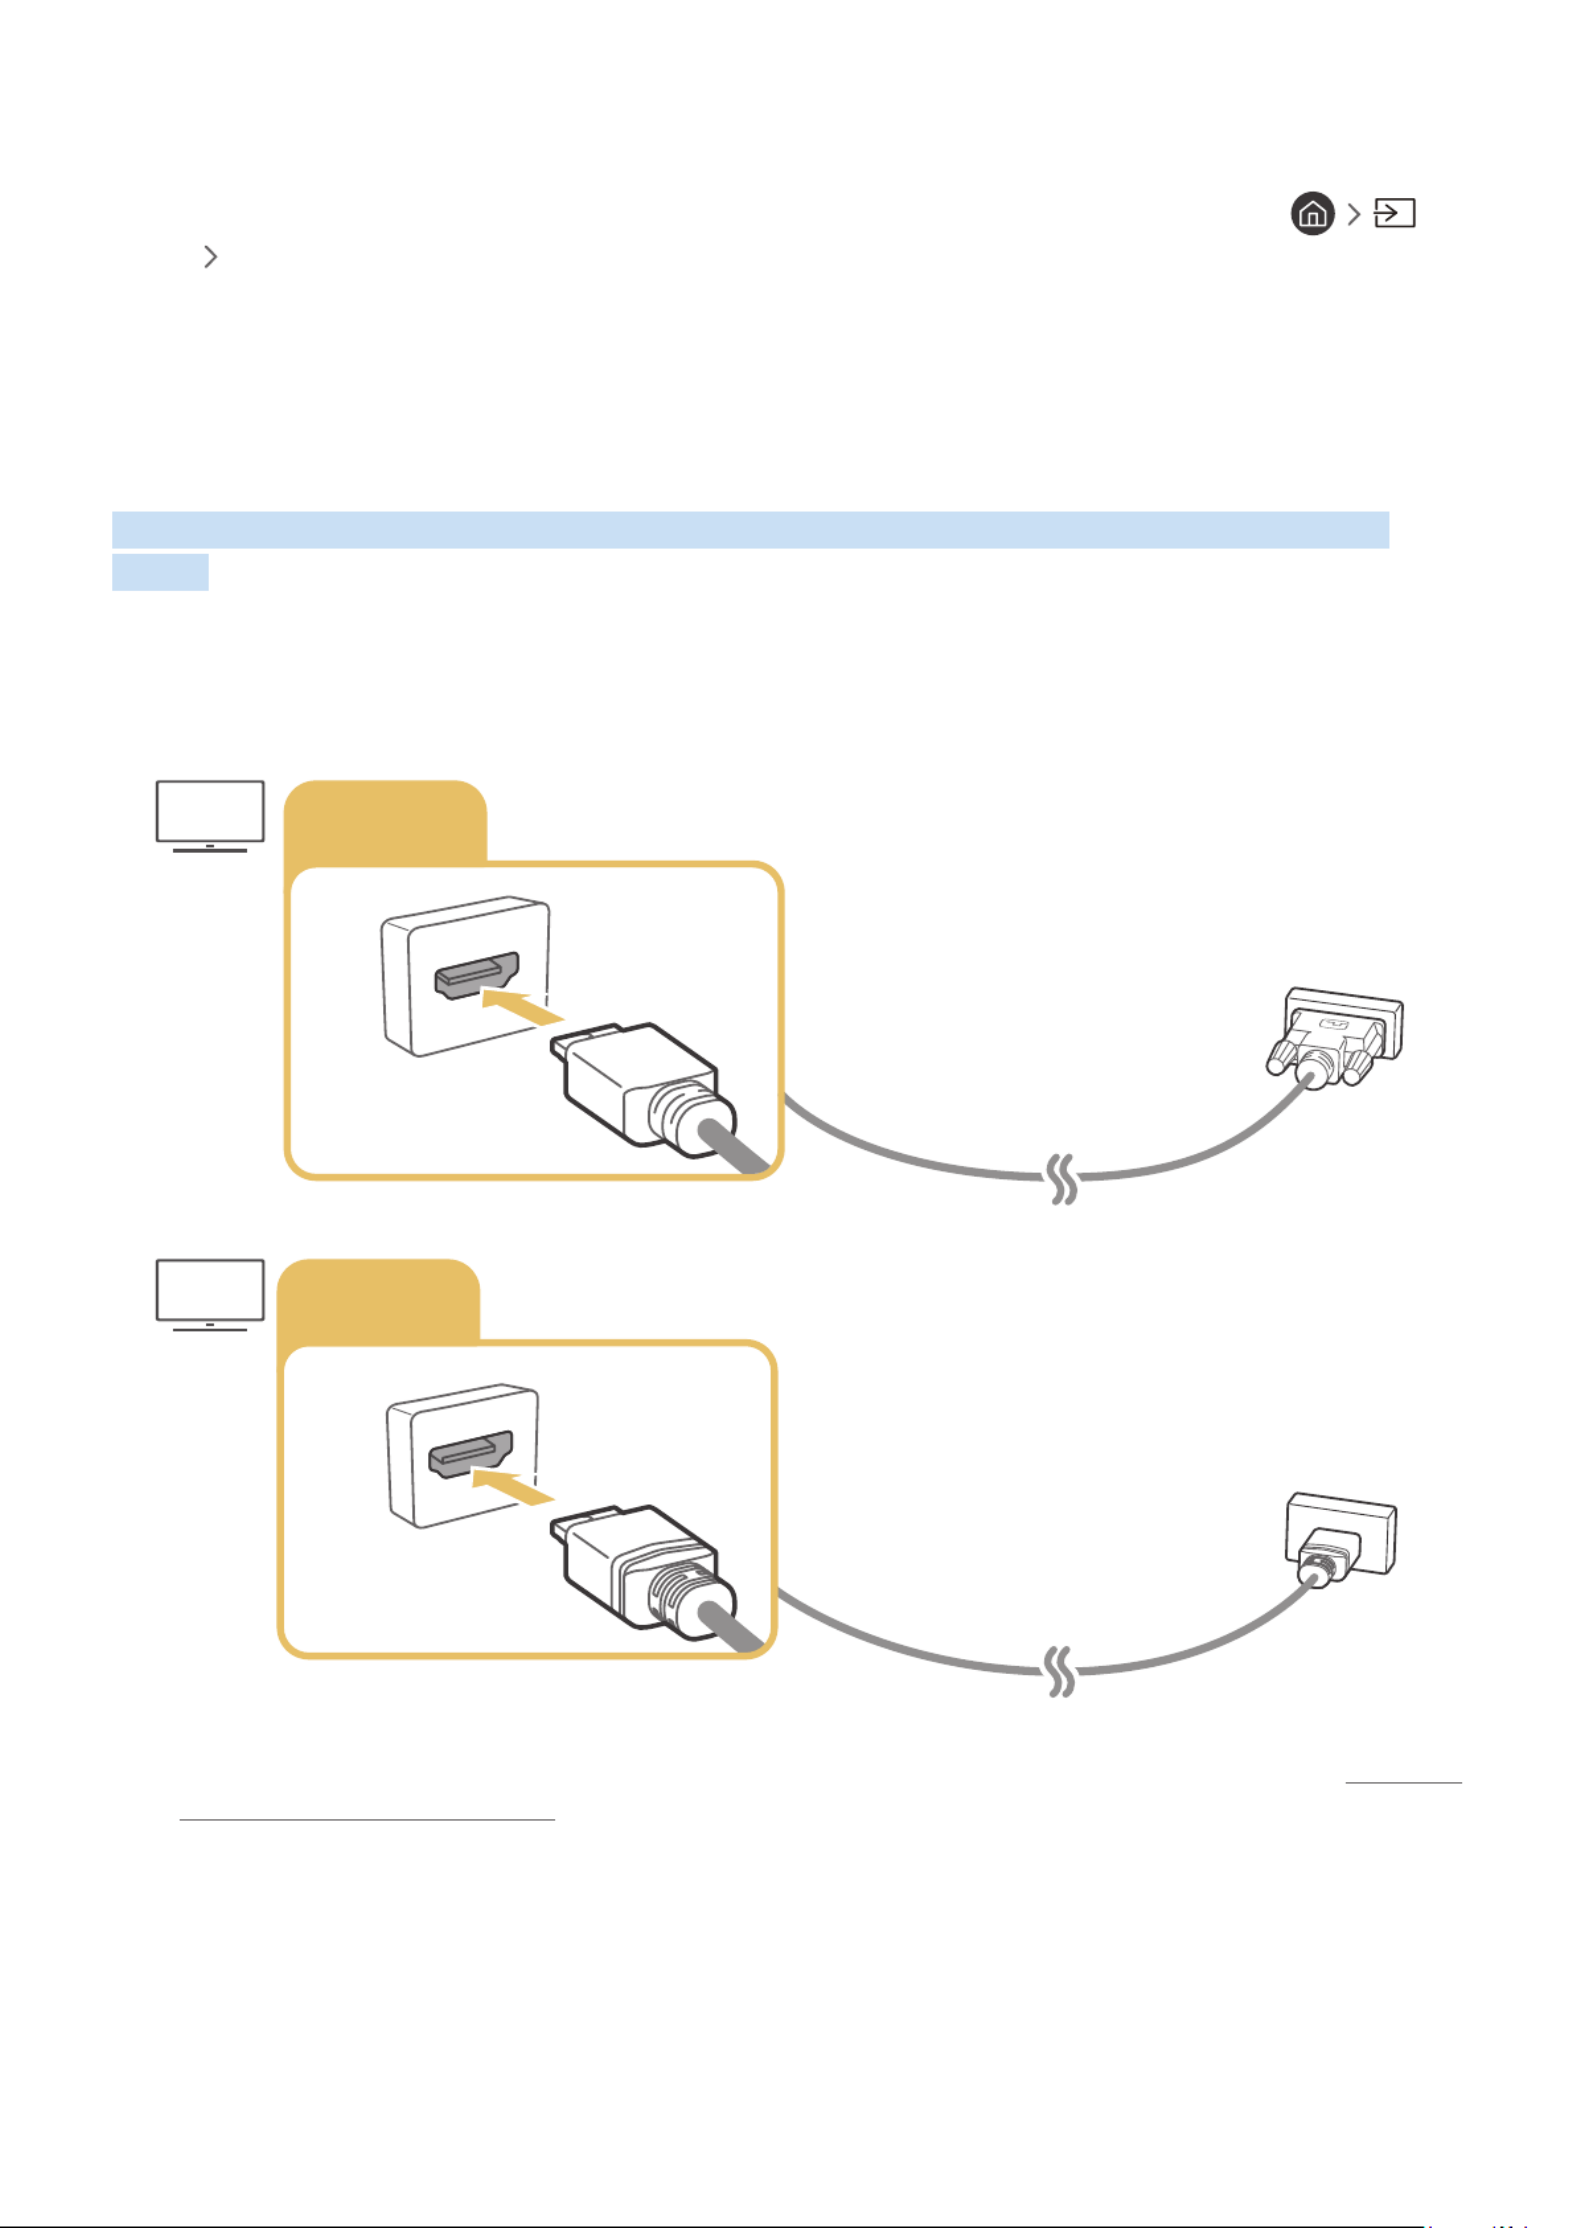
Connecting a Computer
Use the TV as a computer monitor or connect the TV to a computer via your network and access the computer's
content.
Connecting through the HDMI port ― Screen Sharing (HDMI)
HDMI IN
HDMI
DVI
HDMI IN
"When your PC is connected, select PC for the . For more information about the port settings, refer to "Device Icon Editing the
name and icon of an external device".

- 21 -
Connecting a Mobile Device
View a mobile device's screen and multi-media content by connecting the mobile device to your TV or network.
After you connect a mobile device that supports screen mirroring to your TV, you can use screen mirroring to view
the screen of the mobile device on your TV wirelessly and play the video, audio, or photo files currently playing on the
mobile device on your TV.
Connecting to a Network
Connecting to the Same Wireless Network
Connect the mobile device and TV to the same wireless network.
"For more information about the wireless network connection, refer to "Establishing a wireless Internet connection".
"For more information about the wireless network connection from a mobile device, refer to its user guide.
"When a mobile device is connected to the TV using the Wi-Fi direct function, you can enjoy the photos, videos, and music
stored on the mobile device through the TV.
Viewing the screen of a mobile device on your TV (Screen Sharing)
You can play media content on the TV's screen saved on your mobile device by connecting with mirroring function,
and contents sharing.
1.
Launch the Smart View (Screen Mirroring) function on your mobile device. The mobile device searches for
available devices to connect to.
2.
Select the TV from the list. Then the TV is connected to the mobile device.
●If there is no TV found, try again after turning both off and on.
●If you have multiple TVs, assign a different name to each TV in Settings General System
Manager Device Name to make selection easy.

- 22 -
Managing a Mobile Device
Settings General External Device Manager Device Connection Manager Try Now
●Access Notification
Set whether to display a notification when a mobile device attempts to connect to the TV for the first time.
●Device List
View and manage a list of mobile devices that have requested permission to connect to the TV.
Switching between external devices connected to the TV
You can switch between TV programmes and the content of external devices.
Changing the input signal
Source
When you select a connected external device on the Source screen, the output of the selected device is displayed on
the TV's screen.
On the standard remote control, press the button.SOURCE
"To control a device (Blu-ray player, game console, etc.) that supports universal remote control with the TV's remote,
connect the device to an HDMI port on the TV, and then turn on the device. Lets you switch to the output of the device
automatically or lets you configure universal remote control for the device automatically. To configure the device for
universal remote control automatically, point the TV's remote control at the device. Note that this function may not be
supported depending on the device and geographical area.
"When a USB device is connected to the USB port, a pop-up message appears that lets you switch easily to the media
content listed on the device.

- 23 -
Editing the name and icon of an external device
Source
You can change the port name for a connected external device or add it to Home Screen.
Edit
Information
Source Add to Home
Source
"The image on your TV may differ from the image above depending on your model and geographical area.
1.
Move the focus to a connected external device.
2.
Press the Up directional button. The following 2 functions become available. (Note that available functions
may differ with the port type.)
1 Edit
You can change the port name of an external device for easy identification.
2 Information
You can view the detailed information about the external devices connected to the TV.
3 Add to Home
You can add the port of an external device to the Home Screen for quick switching.

- 24 -
Using additional functions
You can use the following features on the Source screen.
●Connection Guide: The guide to device connections
●Universal Remote: The function that lets you register external devices to your Samsung Smart Remote and
control them using the standard remote control.
"This function is not available on certain models in specific geographical areas.
"For more information, refer to "Controlling External Devices with the Samsung Smart Remote - Using the Universal
Remote".
Connection Notes
When connecting an external device, note the following:
"The number of connectors and their names and locations may differ with the model.
"Refer to the external device's operating manual when connecting it to the TV. The number of external device connectors
and their names and locations may differ with the manufacturer.
Connection notes for HDMI
●The following types of HDMI cables are recommended:
–High-Speed HDMI Cable
–High-Speed HDMI Cable with Ethernet
●Use an HDMI cable with a thickness of 0.66 inches (17 mm) or less.
●Using a non-certified HDMI cable may result in a blank screen or a connection error.

- 25 -
●Some HDMI cables and devices may not be compatible with the TV due to different HDMI specifications.
●This TV does not support HDMI Ethernet Channel. Ethernet is a Local Area Network (LAN) built with coaxial
cables standardised by the IEEE.
●Many computer graphics adaptors do not have HDMI ports, but have DVI ports instead. If your PC does not
support HDMI video out, connect your PC with an HDMI-DVI cable.
"For more information, refer to "Connecting a Computer".
Connection notes for audio devices
●For better audio quality, it is a good idea to use an AV receiver.
●Connecting a device using an optical cable does not automatically change the audio output to the devices
speakers. To change the audio output to the device, do one of the following:
–Use the Quick Settings screen to change to the connected device:
Use the Select button to select Audio Out/Optical Sound Output Settings on the menu. ( up
directional button ).Sound Output
–Use the Settings screen to change to the connected device:
Select Audio Out/Optical Sound Output Settings Sound Sound Output on the menu. ( ).
●An unusual noise coming from a connected audio device while you are using it may indicate a problem with
the audio device itself. If this occurs, ask for assistance from the audio device's manufacturer.
●Digital audio is only available with 5.1-channel broadcasts.

- 26 -
Connection notes for computers
●For the resolutions supported by the TV, refer to "Read Before Connecting a Computer (Supported
Resolutions)".
●As long as file sharing is activated, unauthorised access may occur. When you do not need to access data,
disable file sharing.
●Your PC and Smart TV must be connected to each other on the same network.
●When sharing content with other network-based devices such as those in an IP (Internet Protocol) storage
system, sharing may not be supported due to the network’s configuration, quality, or functionality, for
example, if the network has an NAS (Network-Attached Storage) device.
Connection notes for mobile devices
●To use the Smart View function, the mobile device must support a sharing function such as AllShare Cast or
Smart View. To check whether your mobile device supports the sharing function, please visit the mobile device
manufacturer's website.
●To use Wi-Fi Direct, the mobile device must support the Wi-Fi Direct function. Please check if your mobile
device supports Wi-Fi Direct.
●The mobile device and your Smart TV must be connected to each other on the same network.
●The video or audio may stop intermittently, depending on network conditions.
●When sharing content with other network-based devices such as those in an IP (Internet Protocol) storage
system, sharing may not be supported due to the network’s configuration, quality, or functionality, for
example, if the network has an NAS (Network-Attached Storage) device.

- 27 -
Remote Control and Peripherals
You can control TV operations with your Samsung Smart Remote. Pair external devices such as a keyboard for ease
of use.
About the Samsung Smart Remote
Learn about the buttons on the Samsung Smart Remote.
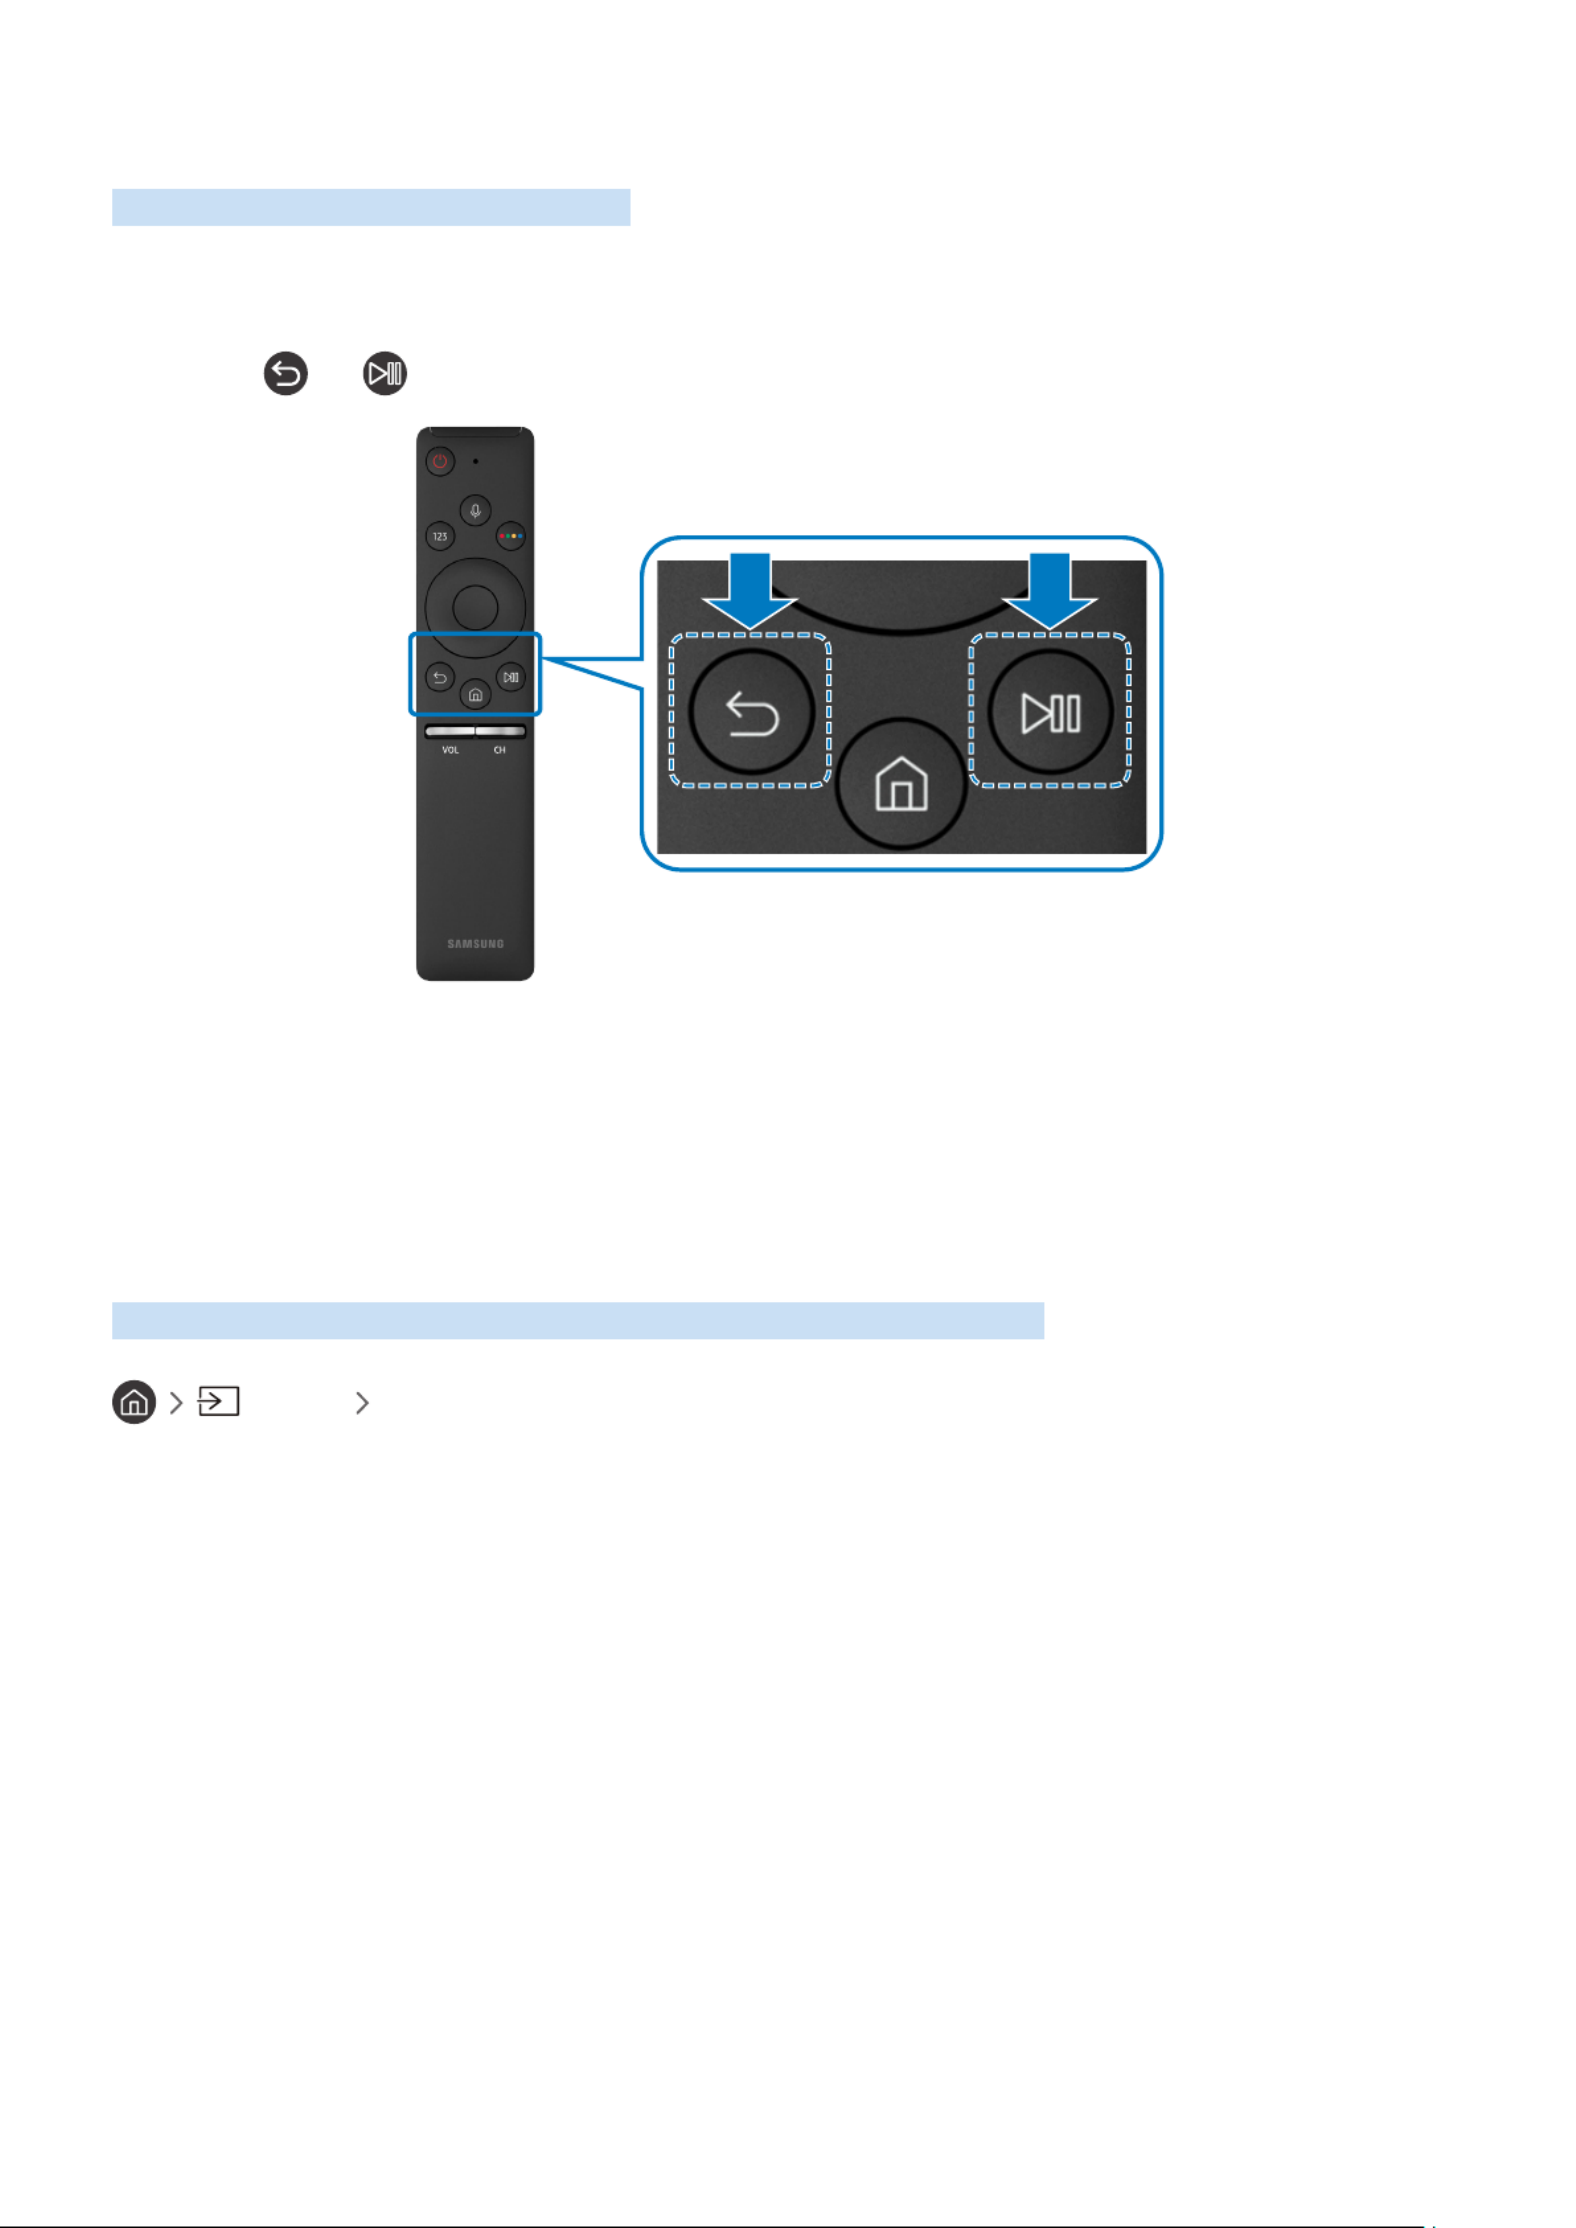
- 29 -
Connecting to the Samsung Smart Remote
Pair the TV with the Samsung Smart Remote.
When you turn on the TV for the first time, the Samsung Smart Remote pairs to the TV automatically. If the Samsung
Smart Remote does not pair to the TV automatically, point it at the remote control sensor of the TV, and then press
and and buttons simultaneously for 3 seconds or more. hold the
"Availability depends on the specific model.
Controlling External Devices with the Samsung Smart Remote -
Using the Universal Remote
Control the TV and connected external devices with the Samsung Smart Remote.
Source Universal Remote
You can control external devices connected to the TV using the remote control. To control external devices, register
them by following the instructions on the screen.
"Availability depends on the specific model.
"You can also use the Anynet+ (HDMI-CEC) function to operate external Samsung devices with your TV's remote control
without any additional setup.
"Certain external devices connected to the TV may not support the universal remote feature.
"Do not place any obstacles in front of an external device. It may cause signals from the remote control to be transmitted
improperly.
"The TV memorises both the external device and its connection port (HDMI 1, HDMI 2, etc.).

- 31 -
Controlling the TV with a Keyboard
Connecting a keyboard makes it easier to control the TV.
Connecting a USB keyboard
Plug the keyboard cable into the USB port.
Connecting a Bluetooth keyboard
Settings General External Device Manager Keyboard Manager Add Bluetooth
Keyboard
"This function is not available on certain models in specific geographical areas.
"If your device was not detected, position the keyboard close to the TV, and then select . The TV scans for available Refresh
devices again.
Using the keyboard
Keyboard Remote control functions
Directional keys Moves the focus
Windows key Displays the TV settings
Enter key Selects or runs a focused item
ESC key Returns to the previous screen
F1 / F2 / F3 / F4 key Colour buttons ― / / /
F5 key Launches the Home Screen
F6 key Displays the source screen
F7 key Launches the Channel List
F8 key Mutes the sound
F9 / F10 key Adjusts the volume
F11 / F12 key Changes the channel

- 33 -
Using additional functions
Select on the QWERTY keyboard screen. The following options are available:
"The options available may differ depending on the function running currently.
●Recommend text
●Reset Recommended Text Memory
●Predict Next Character (when using direction buttons)
●Language
Entering Text using the remote control's microphone and the on-screen
QWERTY keyboard
When the QWERTY keyboard is on the screen, press and hold the button on the Samsung Smart Remote, speak
into the microphone on the Samsung Smart Remote, and then release the button. What you say appears on the
screen as text.
"This function is not available on certain models in specific geographical areas.

- 34 -
Smart Features
You can enjoy various apps with Smart Hub.
Smart Hub
View descriptions of Smart Hub's basic functions.
After pressing the button on your remote control, you can surf the web and download apps with Smart Hub.
" Some of the Smart Hub services are paid services.
" To use , the TV must be connected to the Internet.Smart Hub
" Some features may not be available depending on the service provider, language, or region.Smart Hub
" Smart Hub service outages can be caused by disruptions in your Internet service.
" You can view the entire text of the Terms and Privacy Policy document by navigating to Settings Support
Terms and Privacy Policy. If you want to stop using , you can cancel the agreement. Smart Hub Try Now
" To cancel the Smart Hub service agreement though it is a required one, select ( Reset Settings Support
Self Diagnosis Reset ), and then press the right directional button at the Smart Hub Terms & Conditions, Privacy Policy
step.

- 36 -
●Audio Language
You can select a audio language.
●Subtitle
Turns the subtitles on or off.
●Network
You can view the current network and Internet status.
2 Source
You can select an external device connected to the TV.
" For more information about connecting external devices, refer to "Switching between external devices connected to the
TV".
3 Search
You can search the apps or games in Smart Hub services.
4 APPS
You can enjoy a wide range of content including news, sports, weather, and games by installing the corresponding
apps on your TV.
" To use this feature, the TV must be connected to the Internet.
" For more information, refer to " ".Using the Apps Service
Product specificaties
| Merk: | Samsung |
| Categorie: | Monitor |
| Model: | T24H390SIX |
Heb je hulp nodig?
Als je hulp nodig hebt met Samsung T24H390SIX stel dan hieronder een vraag en andere gebruikers zullen je antwoorden
Handleiding Monitor Samsung

20 Februari 2025
20 Februari 2025
5 Februari 2025
5 Februari 2025
25 November 2024
25 November 2024
25 November 2024
24 November 2024
24 November 2024
24 November 2024
Handleiding Monitor
- Monitor Bosch
- Monitor Philips
- Monitor HP
- Monitor Sony
- Monitor Xiaomi
- Monitor Panasonic
- Monitor Epson
- Monitor LG
- Monitor Huawei
- Monitor Asus
- Monitor Canon
- Monitor Daewoo
- Monitor Garmin
- Monitor Honeywell
- Monitor JVC
- Monitor JBL
- Monitor Medion
- Monitor Olympus
- Monitor Pioneer
- Monitor Toshiba
- Monitor Xerox
- Monitor Yamaha
- Monitor Yealink
- Monitor Abus
- Monitor Acer
- Monitor Acti
- Monitor Ag Neovo
- Monitor Alesis
- Monitor Alienware
- Monitor Alpine
- Monitor AOC
- Monitor AOpen
- Monitor Apc
- Monitor Apple
- Monitor Archos
- Monitor Asrock
- Monitor Barco
- Monitor Behringer
- Monitor Belinea
- Monitor BenQ
- Monitor Blaupunkt
- Monitor BlueBuilt
- Monitor Boss
- Monitor Brandson
- Monitor Danfoss
- Monitor Dell
- Monitor Denver
- Monitor Eizo
- Monitor Emachines
- Monitor EverFocus
- Monitor Faytech
- Monitor Focal
- Monitor Fujitsu
- Monitor Ganz
- Monitor GeoVision
- Monitor Gigabyte
- Monitor GlobalTronics
- Monitor Godox
- Monitor Haier
- Monitor Hannspree
- Monitor Hercules
- Monitor Hikvision
- Monitor Hisense
- Monitor Hitachi
- Monitor HKC
- Monitor Hyundai
- Monitor Ibm
- Monitor IHealth
- Monitor Iiyama
- Monitor InFocus
- Monitor Insignia
- Monitor Interlogix
- Monitor Kogan
- Monitor Konig
- Monitor LaCie
- Monitor Legamaster
- Monitor Lenovo
- Monitor LightZone
- Monitor M-Audio
- Monitor Mackie
- Monitor Mad Catz
- Monitor Marquant
- Monitor Marshall
- Monitor Maxdata
- Monitor Maxell
- Monitor Midas
- Monitor Mirai
- Monitor Mitsubishi
- Monitor Monacor
- Monitor MSI
- Monitor Nec
- Monitor Newstar
- Monitor Packard Bell
- Monitor Peaq
- Monitor Peerless
- Monitor Plantronics
- Monitor Prestigio
- Monitor Provision ISR
- Monitor Pyle
- Monitor Razer
- Monitor RCF
- Monitor Renkforce
- Monitor Ricoh
- Monitor Ring
- Monitor Salora
- Monitor Samson
- Monitor Sanyo
- Monitor Schneider
- Monitor Sharp
- Monitor Silvercrest
- Monitor Simrad
- Monitor Skytronic
- Monitor Smart
- Monitor Soundstream
- Monitor Sunny
- Monitor Sunstech
- Monitor Tannoy
- Monitor TCL
- Monitor Terra
- Monitor Tesla
- Monitor Thomson
- Monitor Triton
- Monitor Velleman
- Monitor Viessmann
- Monitor Viewsonic
- Monitor Vitek
- Monitor Vivitek
- Monitor Waeco
- Monitor Westinghouse
- Monitor Wyse - Dell
- Monitor Xoro
- Monitor Zalman
- Monitor Jay-tech
- Monitor Jensen
- Monitor Joy-it
- Monitor Jung
- Monitor Odys
- Monitor Omron
- Monitor ONYX
- Monitor Optoma
- Monitor Orion
- Monitor 3M
- Monitor Continental Edison
- Monitor Caliber
- Monitor CSL
- Monitor Monoprice
- Monitor Shure
- Monitor Voxicon
- Monitor EMOS
- Monitor Festo
- Monitor Newline
- Monitor Atlona
- Monitor Hamlet
- Monitor Cooler Master
- Monitor NZXT
- Monitor Thermaltake
- Monitor Citizen
- Monitor Kubo
- Monitor Eurolite
- Monitor Corsair
- Monitor Deltaco
- Monitor KeepOut
- Monitor Ozone
- Monitor Tripp Lite
- Monitor Chauvet
- Monitor Approx
- Monitor Cisco
- Monitor KTC
- Monitor ARRI
- Monitor Bauhn
- Monitor LC-Power
- Monitor HyperX
- Monitor Atomos
- Monitor Yorkville
- Monitor Jupiter
- Monitor Adam
- Monitor Genelec
- Monitor AORUS
- Monitor Avocor
- Monitor DoubleSight
- Monitor Planar
- Monitor SEIKI
- Monitor EC Line
- Monitor MicroTouch
- Monitor HoverCam
- Monitor ELO
- Monitor IFM
- Monitor DataVideo
- Monitor Kindermann
- Monitor ART
- Monitor Da-Lite
- Monitor Allen & Heath
- Monitor ProXtend
- Monitor AJA
- Monitor Adj
- Monitor Ikan
- Monitor Element
- Monitor Dahua Technology
- Monitor Neumann
- Monitor Peerless-AV
- Monitor PreSonus
- Monitor IK Multimedia
- Monitor Swissonic
- Monitor QSC
- Monitor ESI
- Monitor Marshall Electronics
- Monitor RGBlink
- Monitor POSline
- Monitor Dynaudio
- Monitor Krom
- Monitor Vorago
- Monitor Extron
- Monitor Promethean
- Monitor Fostex
- Monitor Prowise
- Monitor Neets
- Monitor AMX
- Monitor Stairville
- Monitor Crestron
- Monitor I3-Technologies
- Monitor CTOUCH
- Monitor SMART Technologies
- Monitor BOOX
- Monitor SPL
- Monitor Aputure
- Monitor Drawmer
- Monitor Blue Sky
- Monitor Advantech
- Monitor Iadea
- Monitor Sonifex
- Monitor Kali Audio
- Monitor Kramer
- Monitor Avantone Pro
- Monitor AVer
- Monitor ITek
- Monitor Posiflex
- Monitor Vimar
- Monitor Speco Technologies
- Monitor Akuvox
- Monitor Antelope Audio
- Monitor X-Rite
- Monitor EKO
- Monitor IBoardTouch
- Monitor PeakTech
- Monitor Elite Screens
- Monitor Hollyland
- Monitor Mitsai
- Monitor V7
- Monitor Palmer
- Monitor TV One
- Monitor Christie
- Monitor Hanwha
- Monitor Phoenix Contact
- Monitor COMMBOX
- Monitor Yiynova
- Monitor Pelco
- Monitor Lilliput
- Monitor KRK
- Monitor Ernitec
- Monitor Planet Audio
- Monitor Datacolor
- Monitor Fluid
- Monitor Postium
- Monitor HELGI
- Monitor Desview
- Monitor Syscom
- Monitor Allsee
- Monitor Alogic
- Monitor Night Owl
- Monitor ProDVX
- Monitor Varad
- Monitor PureTools
- Monitor CTL
- Monitor Game Factor
- Monitor Nixeus
- Monitor Chimei
- Monitor Blue Sea
- Monitor AMCV
- Monitor SWIT
- Monitor TVLogic
- Monitor Feelworld
- Monitor GeChic
- Monitor Oecolux
- Monitor ADS-TEC
- Monitor Satco
- Monitor SideTrak
- Monitor TRIUMPH BOARD
- Monitor Casalux
- Monitor Positivo
- Monitor Transvideo
- Monitor Innocn
- Monitor Shimbol
- Monitor Raysgem
- Monitor Motrona
- Monitor Ikegami
- Monitor Wohler
- Monitor Elvid
- Monitor Portkeys
- Monitor Neat
- Monitor Mimo Monitors
- Monitor Gamber-Johnson
- Monitor Enttec
- Monitor American Dynamics
- Monitor AIS
- Monitor Eve Audio
- Monitor Wortmann AG
- Monitor Viotek
- Monitor Vidi-Touch
- Monitor CoolerMaster
- Monitor Mobile Pixels
- Monitor Atlantis Land
- Monitor HEDD
- Monitor Colormetrics
- Monitor Monkey Banana
- Monitor SmallHD
- Monitor IStarUSA
- Monitor Qian
- Monitor UPERFECT
- Monitor Freedom Scientific
- Monitor OSEE
- Monitor GVision
- Monitor Mybeo
- Monitor Bearware
- Monitor IOIO
- Monitor DTEN
- Monitor Cocopar
- Monitor Titan Army
- Monitor BookIT
- Monitor Wimaxit
- Monitor Delvcam
- Monitor Xenarc
- Monitor Japannext
Nieuwste handleidingen voor Monitor

8 April 2025

8 April 2025

7 April 2025
7 April 2025

4 April 2025

4 April 2025

2 April 2025
1 April 2025
30 Maart 2025
30 Maart 2025