Samsung LN-32B530 Handleiding
Lees hieronder de 📖 handleiding in het Nederlandse voor Samsung LN-32B530 (202 pagina's) in de categorie Televisie. Deze handleiding was nuttig voor 65 personen en werd door 2 gebruikers gemiddeld met 4.5 sterren beoordeeld
Pagina 1/202

LCD TV
user manual
imagine the possibilities
Thank you for purchasing this Samsung product.
To receive more complete service, please
register your product at
www.samsung.com/register
Model Serial No.
Contact SAMSUNG WORLDWIDE
If you have any questions or comments relating to Samsung products, please contact the SAMSUNG customer care center.
Comuníquese con SAMSUNG WORLDWIDE
Si desea formular alguna pregunta o comentario en relación con los productos de Samsung, comuníquese con el centro de
atención al cliente de SAMSUNG.
Country Customer Care Center
Web Site Address
CANADA 1-800-SAMSUNG(726-7864) www.samsung.com/ca
Samsung Electronics Canada Inc., Customer
Service 55 Standish Court Mississauga,
Ontario L5R 4B2 Canada
Samsung Electronique Canada Inc., Service
à la Clientèle 55 Standish Court Mississauga,
Ontario L5R 4B2 Canada
U.S.A 1-800-SAMSUNG(726-7864) www.samsung.com/us
Samsung Electronics America, Inc.
105 Challenger Road
Ridgefield Park, NJ 07660-0511
BN68-01883A-01


© 2009 Samsung Electronics Co., Ltd. All rights reserved.
Important Warranty Information Regarding Television Format Viewing
See the warranty card for more information on warranty terms.
Wide screen format LCD Displays (16:9, the aspect ratio of the screen width to height) are primarily designed to view wide screen
format full-motion video. The images displayed on them should primarily be in the wide screen 16:9 ratio format, or expanded to
ll the screen if your model offers this feature and the images are constantly moving. Displaying stationary graphics and images
on screen, such as the dark sidebars on nonexpanded standard format television video and programming, should be limited to no
more than 5% of the total television viewing per week.
Additionally, viewing other stationary images and text such as stock market reports, video game displays, station logos, web sites
or computer graphics and patterns, should be limited as described above for all televisions. Displaying stationary images that
exceed the above guidelines can cause uneven aging of LCD Displays that leave subtle, but permanent burned-in ghost images in
the LCD picture. To avoid this, vary the programming and images, and primarily display full screen moving images, not stationary
patterns or dark bars.
On LCD models that offer picture sizing features, use these controls to view different formats as a full screen picture.
Be careful in the selection and duration of television formats used for viewing. Uneven LCD aging as a result of format selection
and use, as well as burned-in images, are not covered by your Samsung limited warranty.
U.S.A Only
The product unit accompanying this user manual is licensed under certain intellectual property rights of certain third parties.
In particular, this product is licensed under the following US patents: 5,991,715, 5,740,317, 4,972,484, 5,214,678, 5,323,396,
5,539,829, 5,606,618, 5,530,655, 5,777,992, 6,289,308, 5,610,985, 5,481,643, 5,544,247, 5,960,037, 6,023,490, 5,878,080,
and under US Published Patent Application No. 2001-44713-A1.
This license is limited to private non-commercial use by end-user consumers for licensed contents. No rights are granted for
commercial use. The license does not cover any product unit other than this product unit and the license does not extend to
any unlicensed product unit or process conforming to ISO/IEC 11172-3 or ISO/IEC 13818-3 used or sold in combination with
this product unit. The license only covers the use of this product unit to encode and/or decode audio les conforming to the
ISO/IEC 11172-3 or ISO/IEC 13818-3. No rights are granted under this license for product features or functions that do not
conform to the ISO/IEC 11172-3 or ISO/IEC 13818-3.
Other countries
The product unit accompanying this user manual is licensed under certain intellectual property rights of certain third parties.
This license is limited to private non-commercial use by end-user consumers for licensed contents. No rights are granted for
commercial use. The license does not cover any product unit other than this product unit and the license does not extend to
any unlicensed product unit or process conforming to ISO/IEC 11172-3 or ISO/IEC 13818-3 used or sold in combination with
this product unit. The license only covers the use of this product unit to encode and/or decode audio les conforming to the
ISO/IEC 11172-3 or ISO/IEC 13818-3. No rights are granted under this license for product features or functions that do not
conform to the ISO/IEC 11172-3 or ISO/IEC 13818-3.
SAMSUNG ELECTRONICS NORTH AMERICAN LIMITED WARRANTY STATEMENT
Subject to the requirements, conditions, exclusions and limitations of the original Limited Warranty supplied with Samsung
Electronics (SAMSUNG) products, and the requirements, conditions, exclusions and limitations contained herein, SAMSUNG
will additionally provide Warranty Repair Service in the United States on SAMSUNG products purchased in Canada, and
in Canada on SAMSUNG products purchased in the United States, for the warranty period originally specied, and to the
Original Purchaser only.
The above described warranty repairs must be performed by a SAMSUNG Authorized Service Center. Along with this
Statement, the Original Limited Warranty Statement and a dated Bill of Sale as Proof of Purchase must be presented to the
Service Center. Transportation to and from the Service Center is the responsibility of the purchaser.
Conditions covered are limited only to manufacturing defects in material or workmanship, and only those encountered in
normal use of the product.
Excluded, but not limited to, are any originally specied provisions for, in-home or on-site services, minimum or maximum
repair times, exchanges or replacements, accessories, options, upgrades, or consumables.
For the location of a SAMSUNG Authorized Service Center, please call toll-free:
In the United States : 1-800-SAMSUNG (1-800-726-7864)
In Canada : 1-800-SAMSUNG
Precautions When Displaying a Still Image
A still image may cause permanent damage to the TV screen
Do not display a still image on the LCD panel for more than 2 hours as it can cause screen image retention. This image
retention is also known as “screen burn”. To avoid such image retention, reduce the degree of brightness and contrast of the
screen when displaying a still image.
Watching the LCD TV in 4:3 format for a long period of time may leave traces of borders displayed on the left,
right and center of the screen caused by the difference of light emission on the screen.
Playing a DVD or a game console may cause a similar effect to the screen.
Damages caused by the above effect are not covered by the Warranty.
Displaying still images from Video games and PC for longer than a certain period of time may produce partial after-images.
To prevent this effect, reduce the ‘brightness’ and ‘contrast’ when displaying still images.
❑
N
●
●
●
N
N
❑
●
●
●


English - 1
General Information
List of Features .....................................................................2
Accessories ..........................................................................2
Viewing the Control Panel ....................................................3
Viewing the Connection Panel ..............................................4
Remote Control ....................................................................6
Installing Batteries in the Remote Control ............................6
Connections (LN32B530, LN37B530, LN40B530, LN46B530)
Connecting VHF and UHF Antennas ....................................7
Connecting Cable TV ...........................................................7
Connecting a DVD / Blu-ray player / Cable Box /
Satellite receiver (Set-Top Box) via HDMI .................................. 8
Connecting a DVD / Blu-ray player / Cable Box /
Satellite receiver (Set-Top Box) via DVI ...............................9
Connecting a DVD / Blu-ray player / Cable Box /
Satellite receiver (Set-Top Box) via Component cables .......9
Connecting a VCR ..............................................................10
Connecting a Digital Audio System ....................................10
Connecting an Amplier / DVD Home Theater ...................11
Connecting a Camcorder....................................................12
Connecting a PC ................................................................13
Connections (LN52B530)
Connecting VHF and UHF Antennas ..................................14
Connecting Cable TV .........................................................14
Connecting a DVD / Blu-ray player / Cable Box /
Satellite receiver (Set-Top Box) via HDMI ................................ 15
Connecting a DVD / Blu-ray player / Cable Box /
Satellite receiver (Set-Top Box) via DVI .............................16
Connecting a DVD / Blu-ray player / Cable Box /
Satellite receiver (Set-Top Box) via Component cables ........ 16
Connecting a VCR.................................................................
17
Connecting a Digital Audio System ....................................17
Connecting an Amplier / DVD Home Theater ...................18
Connecting a Camcorder....................................................19
Connecting a PC ................................................................20
Operation
Viewing the menus .............................................................21
Plug & Play Feature............................................................22
■
■
■
■
■
■
■
■
■
■
■
■
■
■
■
■
■
■
■
■
■
■
■
■
■
■
■
■
Channel Control
Conguring the Channel Menu ...........................................23
Managing Channels............................................................23
Picture Control
Conguring the Picture Menu .............................................25
Using Your TV as a Computer (PC) Display .......................27
Setting up the TV with your PC ..........................................28
Sound Control
Conguring the Sound Menu ..............................................29
Setup
Conguring the Setup Menu ...............................................30
Input / Support
Conguring the Input Menu ................................................34
Conguring the Support Menu............................................34
Anynet
+
Connecting Anynet
+ Devices .............................................35
Setting Up Anynet+ .............................................................36
Switching between Anynet
+ Devices ..................................37
Recording ...........................................................................38
Listening through a Receiver (Home theater).....................38
Troubleshooting for Anynet
+ ...............................................39
Appendix
Troubleshooting ..................................................................40
Installing the Stand .............................................................41
Disconnecting the Stand.....................................................41
Wall Mount Kit Specications (VESA) ................................42
Using the Anti-Theft Kensington Lock ................................42
Securing the TV to the Wall ................................................43
Specications .....................................................................44
Dimensions .........................................................................45
■
■
■
■
■
■
■
■
■
■
■
■
■
■
■
■
■
■
■
■
■
■
■
CONTENTS
License
TruSurround HD, SRS and Symbol are trademarks of SRS Labs, Inc.
TruSurround HD technology is incorporated under license from SRS Labs, Inc.
Manufactured under license from Dolby Laboratories. Dolby and the double-D symbol are trademarks
of Dolby Laboratories.
Symbol
N O T
Note One-Touch Button TOOL Button
❑
❑
English

English - 2
GENERAL INFORMATION
Figures and illustrations in this User Manual are provided for reference only and may differ from actual product appearance.
Product design and specications may be changed without notice in order to enhance product performance.
List of Features
Adjustable picture settings that can be stored in the TV’s memory.
Automatic timer to turn the TV on and off.
A special sleep timer.
Excellent Digital Interface & Networking :
With a built-in HD digital tuner, non-subscription HD broadcasts can be viewed with no Cable Box/Satellite receiver (Set-Top
Box) needed.
HDMI/DVI connection of your PC to this TV.
Excellent Picture Quality
SRS TruSurround HD provides a virtual surround system.
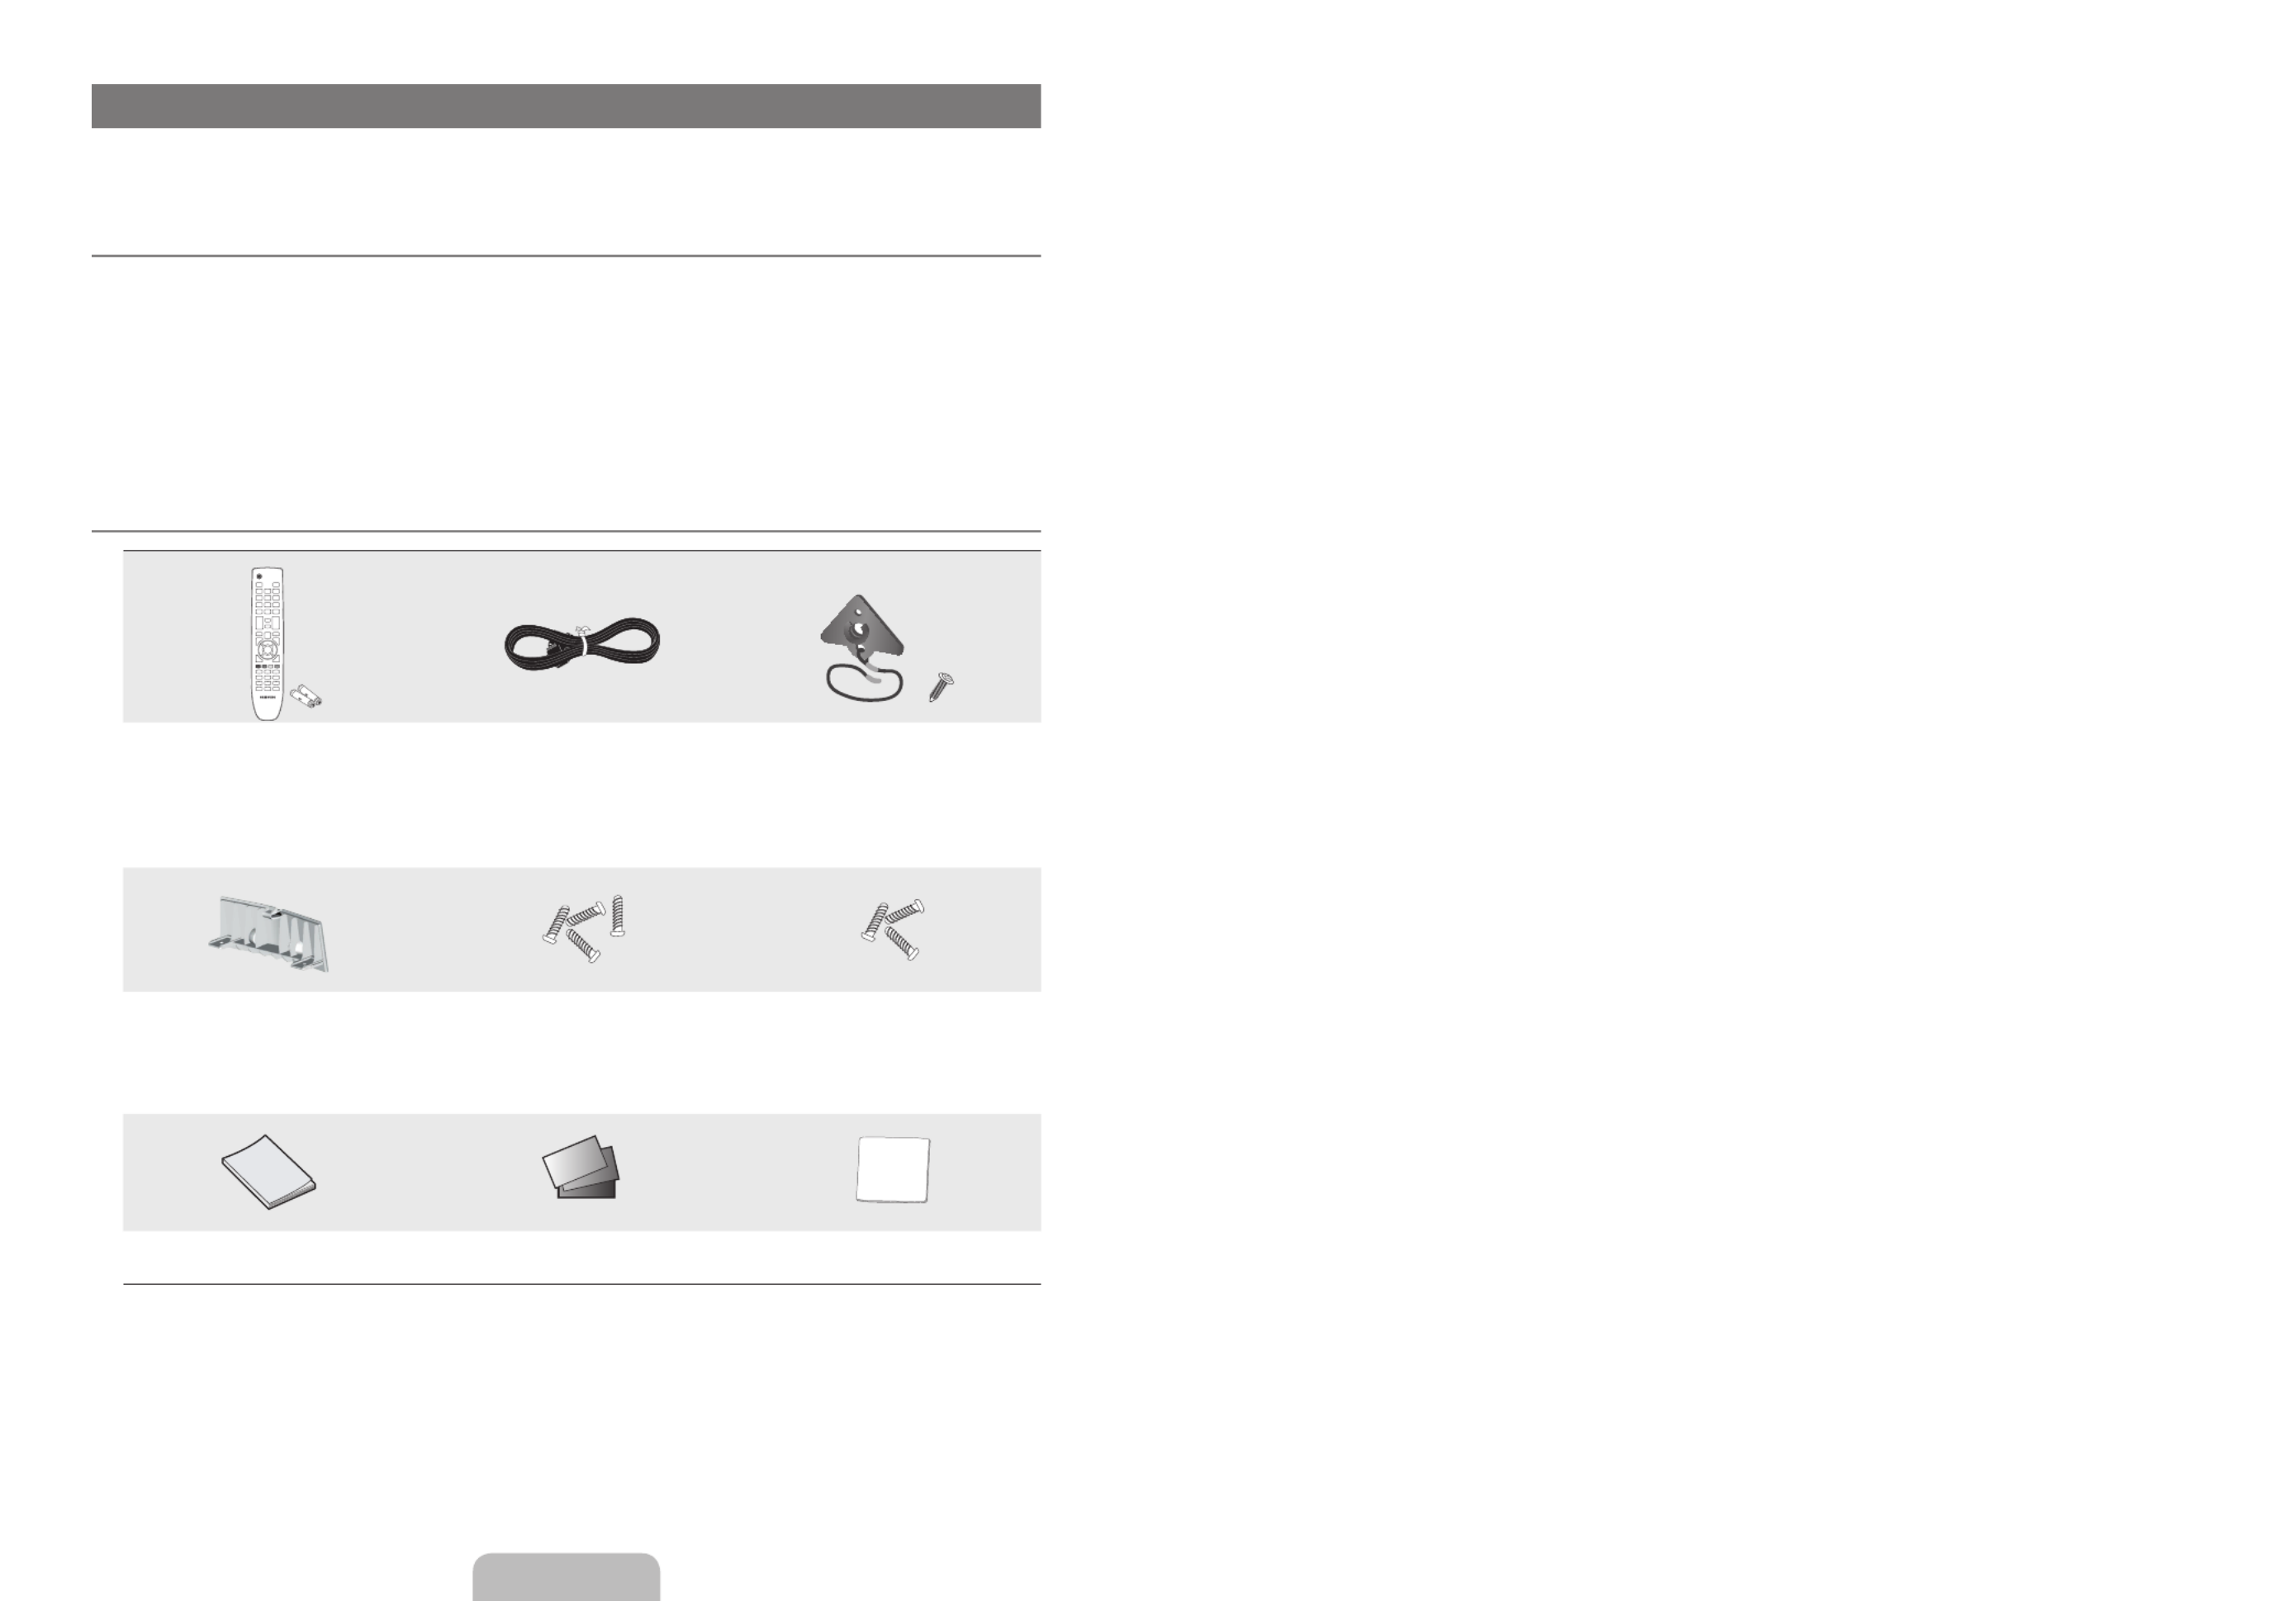
Accessories
Remote Control
(BN59-00856A) &
Batteries (AAA X 2)
Power Cord
(3903-000144)
TV-Holder & Screw (M4 X 16)
(LN32B530 : BN96-10788A)
(LN37B530 : BN96-10788A)
(LN40B530 : BN96-10788A)
(LN46B530 : BN96-10788A)
(LN52B530 : BN96-10788A)
Cover-Bottom
(LN32B530 : BN63-05356A)
(LN37B530 : BN63-05330A)
(LN40B530 : BN63-05330A)
(LN52B530 : BN63-05332A)
Screw (M4 X L16)
(6002-001294)
Screw (M4 X L14)
(LN32B530: 6003-001334)
Owner’s Instructions Warranty Card /
Safety Guide Manual
Cleaning Cloth
(BN63-01798B)
Please make sure the following items are included with your LCD TV. If any items are missing, contact your dealer.
The items color and shape may vary depending on the model.
N
¦
●
●
●
●
●
●
●
●
¦
N
N


English - 4
Viewing the Connection Panel
The product color and shape may vary depending on the model.
¦
N
LN52B530
[TV Rear Panel]
[TV Side Panel]
1
1
#
3 4 65 7
89
0!
LN32B530, LN37B530, LN40B530, LN46B530
89
73$@
2 40 5 6
[TV Rear Panel]


English - 6
Remote Control
You can use the remote control up to a distance of about 23 feet from the TV.
The performance of the remote control may be affected by bright light.
The product color and shape may vary depending on the model.
N
N
N
1
POWER: Turns the TV on and
off.
2
NUMERIC BUTTONS: Press to
change the channel.
3
_: Press to select additional
channels (digital) being
broadcast by the same station.
For example, to select channel
‘54-3’, press ‘54’, then press _
and ‘3’.
4
MUTE
M
: Press to temporarily
cut off the sound.
5
y
: Press to increase or
decrease the volume.
6
CH LIST: Used to display
Channel Lists on the screen.
7
TOOLS: Use to quickly select
frequently used functions.
8
INFO: Press to display
information on the TV screen.
9
COLOR BUTTONS: Use these
buttons in the Channel list menus
etc.
0
S.MODE: Press to select the
sound mode.
!
P.MODE: Press to select the
picture mode.
@
Use these buttons in the DMA
and Anynet+ modes. (
∏
: This
remote can be used to control
recording on Samsung recorders
with the Anynet+ feature)
#
TV: Selects the TV mode directly.
$
PRE-CH: Enables you to return
to the previous channel you were
watching.
%
z
: Press to change
channels.
^
SOURCE: Press to display
and select the available video
sources.
&
FAV.CH: Press to switch to your
favorite channels.
*
MENU: Displays the main on-
screen menu.
(
RETURN: Returns to the
previous menu.
)
UP▲/DOWN▼/LEFT◄/
RIGHT►/ENTER
E
: Use to
select on-screen menu items and
change menu values.
a
EXIT: Press to exit the menu.
b
P.SIZE: Picture size selection.
c
SRS: Selects SRS TruSurround
HD mode.
d
CC: Controls the caption
decoder.
e
MTS: Press to choose stereo,
mono or Separate Audio
Program (SAP broadcast).
Installing Batteries in the Remote Control
1. Lift the cover at the back of the remote control upward as shown in the gure.
2. Install two AAA size batteries.
Make sure to match the ‘+’ and ‘–’ ends of the batteries with the diagram inside the
compartment.
3. Replace the cover.
Remove the batteries and store them in a cool, dry place if you won’t be using the
remote control for a long time. (Assuming typical TV usage, the batteries should last for about one year.)
If the remote control doesn’t work, check the following:
Is the TV power on?
Are the plus and minus ends of the batteries reversed?
Are the batteries drained?
Is there a power outage or is the power cord unplugged?
Is there a special uorescent light or neon sign nearby?
¦
¦
N
N
N
●
●
●
●
●
1#
$
%
^
&
*
(
)
a
b
c
d
e
2
3
4
5
6
7
8
9
0
!
@


English - 7
CONNECTIONS (LN32B530, LN37B530, LN40B530, LN46B530)
Connecting VHF and UHF Antennas
If your antenna has a set of leads that look like the diagram to the right, see ‘Antennas with 300
Ω Flat Twin Leads’ below.
If your antenna has one lead that looks like the diagram to the right, see ‘Antennas with 75 Ω
Round Leads’.
If you have two antennas, see ‘Separate VHF and UHF Antennas’.
Antennaswith300ΩFlatTwinLeads
If you are using an off-air antenna (such as a roof antenna or ‘rabbit ears’) that has 300Ω twin
at leads, follow the directions below.
1. Place the wires from the twin leads under the screws on a 300-75 Ω adapter (not
supplied). Use a screwdriver to tighten the screws.
2. Plug the adaptor into the terminal on the back of the TV.ANT IN
Antennaswith75ΩRoundLeads
Plug the antenna lead into the terminal on the back of the TV.ANT IN
Separate VHF and UHF Antennas
If you have two separate antennas for your TV (one VHF and one UHF), you must combine
the two antenna signals before connecting the antennas to the TV. This procedure requires an
optional combiner-adaptor (available at most electronics shops).
1. Connect both antenna leads to the combiner.
2. Plug the combiner into the terminal on the bottom of the rear panel.ANT IN
Connecting Cable TV
To connect to a cable TV system, follow the instructions below.
Cable without a Cable Box
Plug the incoming cable into the terminal on the back of the TV.ANT IN
Because this TV is cable-ready, you do not need a cable box to view unscrambled cable
channels.
Connecting to a Cable Box that Descrambles All Channels
1. Find the cable that is connected to the ANT OUT terminal on your cable box.
This terminal might be labeled ‘ANT OUT’, ‘VHF OUT’ or simply, ‘OUT’.
2. Connect the other end of this cable to the terminal on the back of the TV.ANT IN
¦
¦
N
N
ANT IN
ANT IN
UHF
VHF
ANT IN
UHF
VHF
ANT IN
ANT IN ANT OUT
ANT IN
English - 8
Connecting to a Cable Box that Descrambles Some Channels
If your cable box descrambles only some channels (such as premium channels), follow the instructions below. You will need a two-
way splitter, an RF (A/B) switch and four lengths of RF cable. (These items are available at most electronics stores.)
1. Find and disconnect the cable that is connected to the ANT IN terminal on your cable box.
This terminal might be labeled ‘ANT IN’, ‘VHF IN’ or simply, ‘IN’.
2. Connect this cable to a two-way splitter.
3. Connect an RF cable between the OUTPUT terminal on the splitter and the IN terminal on the cable box.
4. Connect an RF cable between the ANT OUT terminal on the cable box and the B–IN terminal on the RF(A/B) switch.
5. Connect another cable between the other OUT terminal on the splitter and the A–IN terminal on the RF (A/B) switch.
6. Connect the last RF cable between the OUT terminal on the RF (A/B) switch and the terminal on the rear of the TV.ANT IN
After you have made this connection, set the A/B switch to the ‘A’ position for normal viewing. Set the A/B switch to the ‘B’
position to view scrambled channels. (When you set the A/B switch to ‘B’, you will need to tune your TV to the cable box’s
output channel, which is usually channel 3 or 4.)
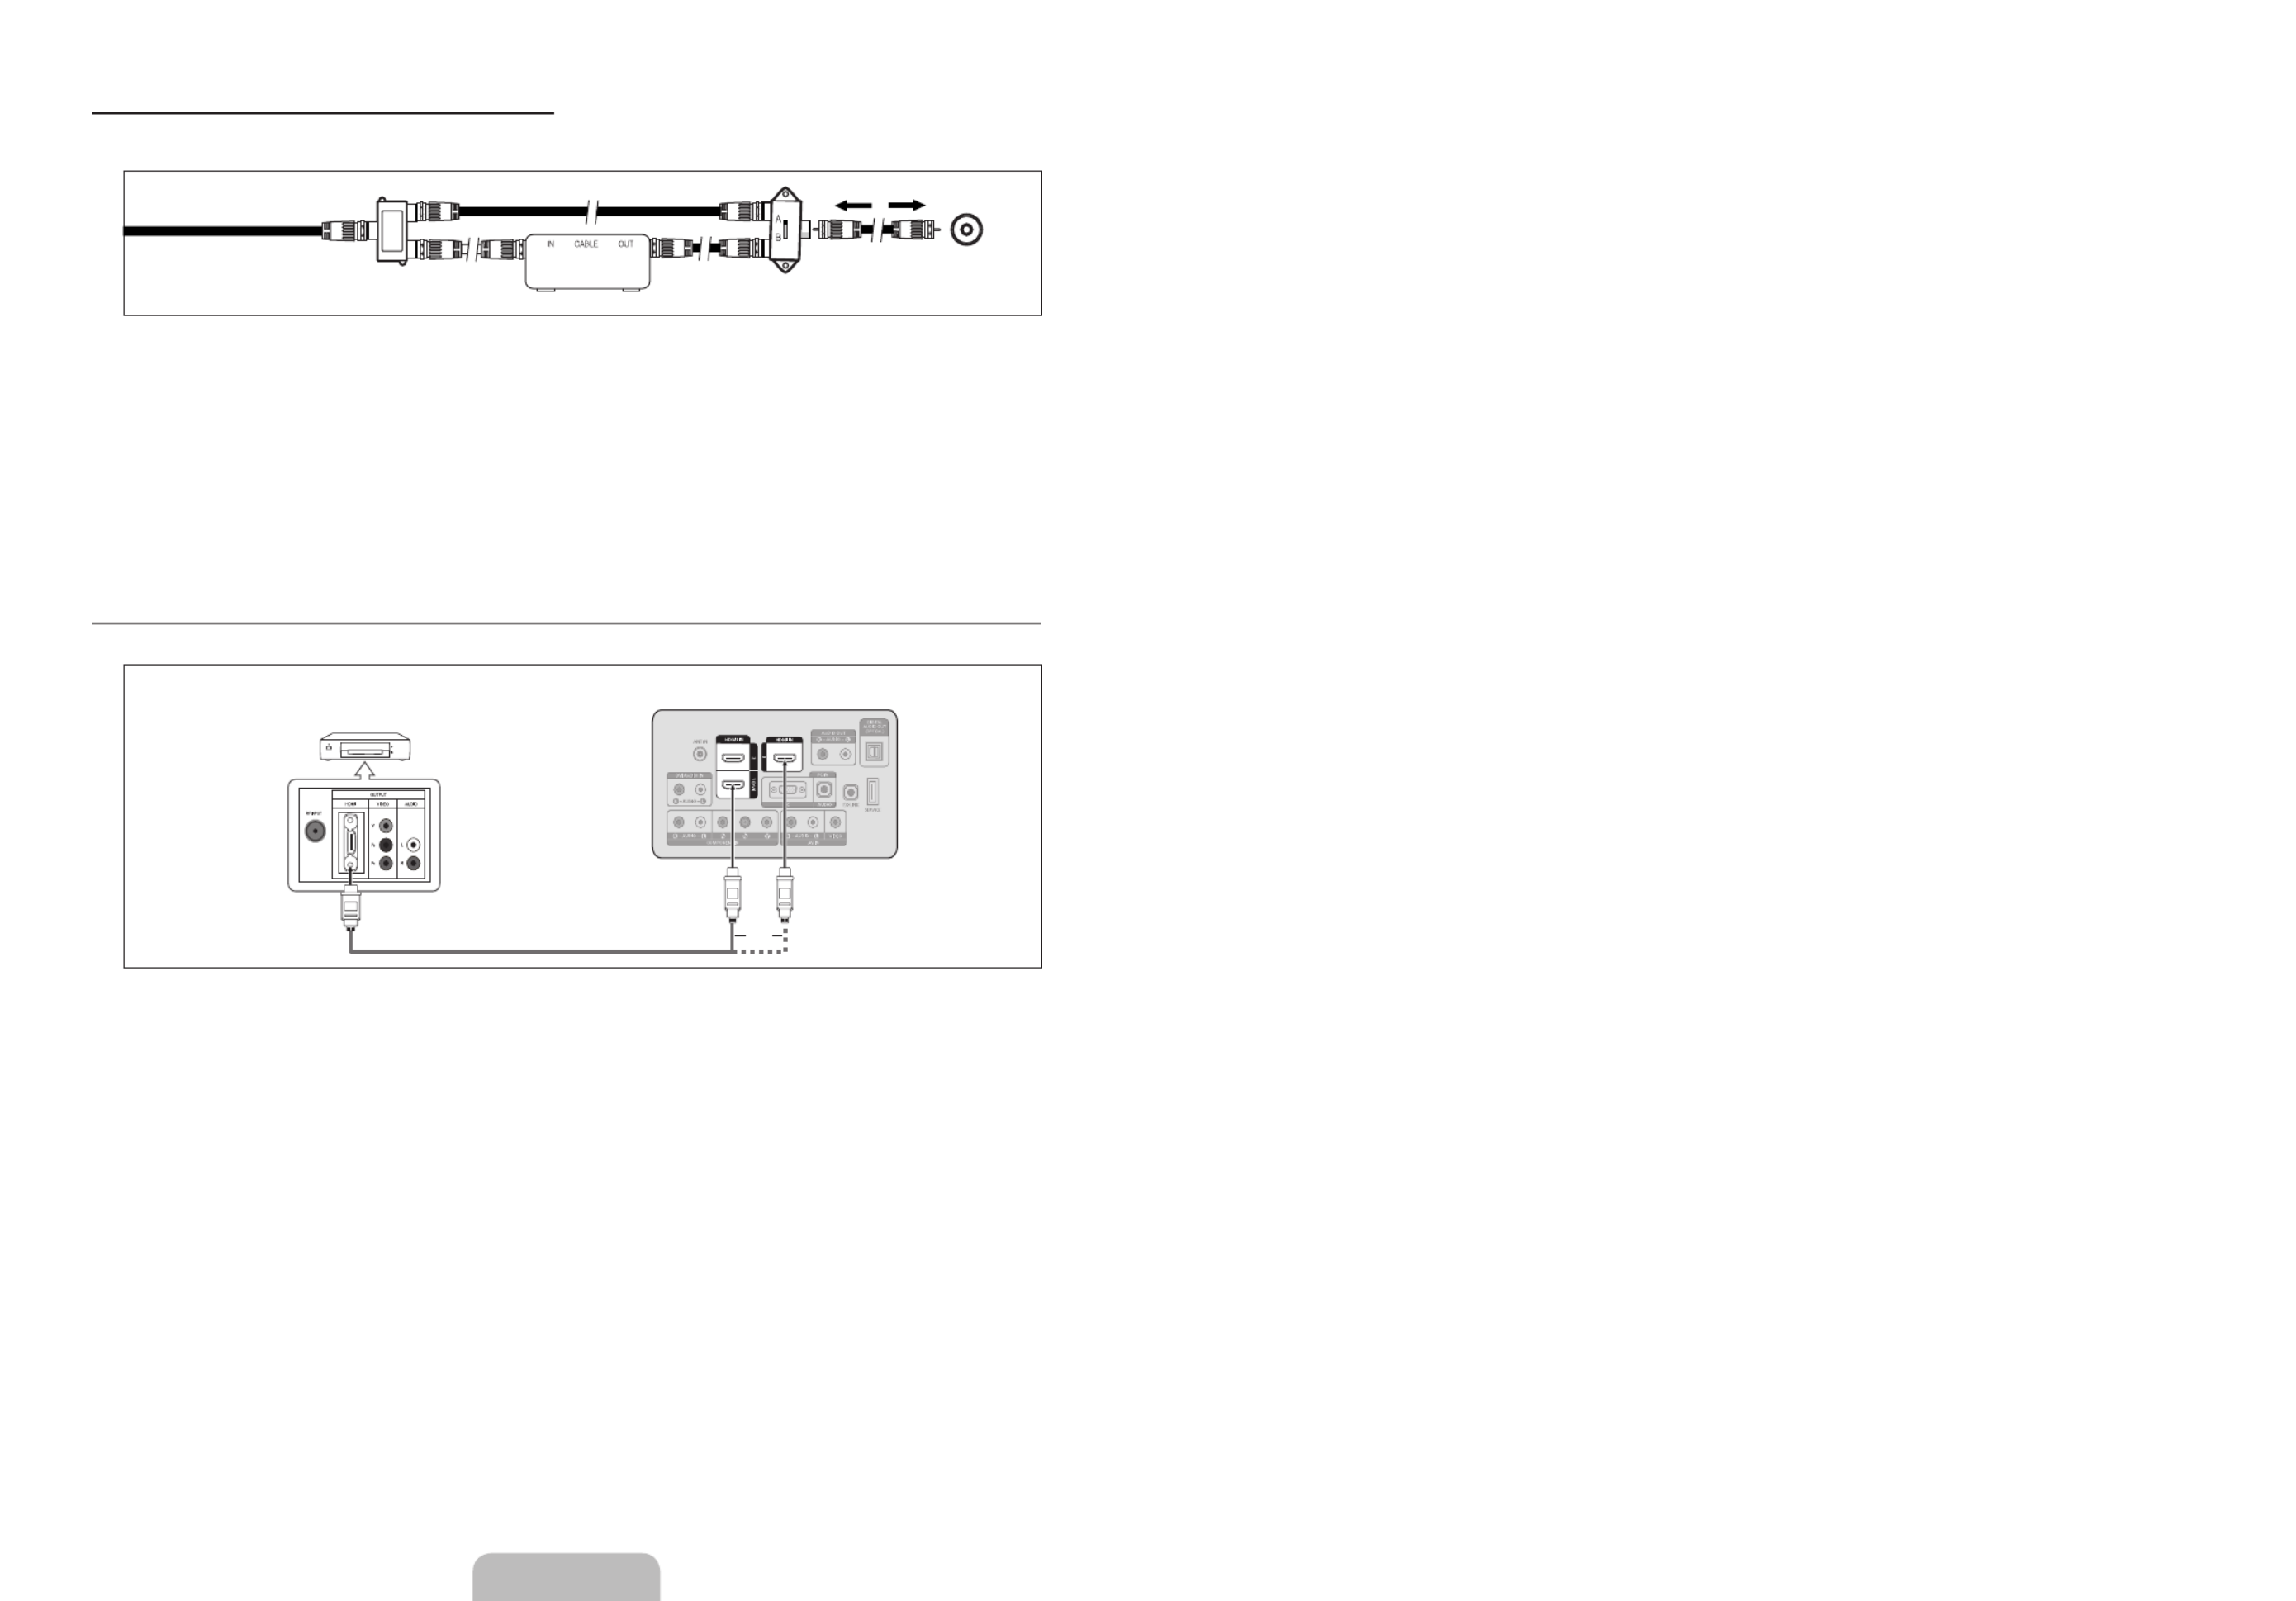
Connecting a DVD / Blu-ray player / Cable Box / Satellite receiver (Set-Top Box) via HDMI
This connection can only be made if there is an HDMI Output connector on the external device.
1. HDMI IN (1, 2 3)Connect an HDMI Cable between the or jack on the TV and the HDMI jack on the DVD / Blu-ray Player or
Cable Box / Satellite receiver (Set-Top Box).
What is HDMI?
HDMI(High-Denition Multimedia Interface), is an interface that enables the transmission of digital audio and video signals
using a single cable.
The difference between HDMI and DVI is that the HDMI device is smaller in size and has the HDCP (High Bandwidth Digital
Copy Protection) coding feature installed.
Each DVD / Blu-ray player / Cable Box / Satellite receiver (Set-Top Box) has a different back panel conguration.
The TV may not output sound and pictures may be displayed with abnormal color when DVD / Blu-ray player / Cable Box /
Satellite receiver (Set-Top Box) supporting HDMI versions older than 1.3 are connected. When connecting an older HDMI
cable and there is no sound, connect the HDMI cable to the jack and the audio cables to the HDMI IN 1 (DVI) DVI AUDIO
IN [R-AUDIO-L] jacks on the back of the TV. If this happens, contact the company that provided the DVD / Blu-ray player /
Cable Box / Satellite receiver (Set-Top Box) to conrm the HDMI version, then request an upgrade.
HDMI cables that are not 1.3 may cause annoying icker or no screen display.
N
¦
N
●
●
N
N
N
Splitter
Cable Box
Incoming cable
TV Rear
ANT IN
RF (A/B) Switch
DVD / Blu-ray player / Cable Box /
Satellite receiver (Set-Top Box)
1
HDMI Cable (Not supplied)
TV Rear Panel
or

English - 9
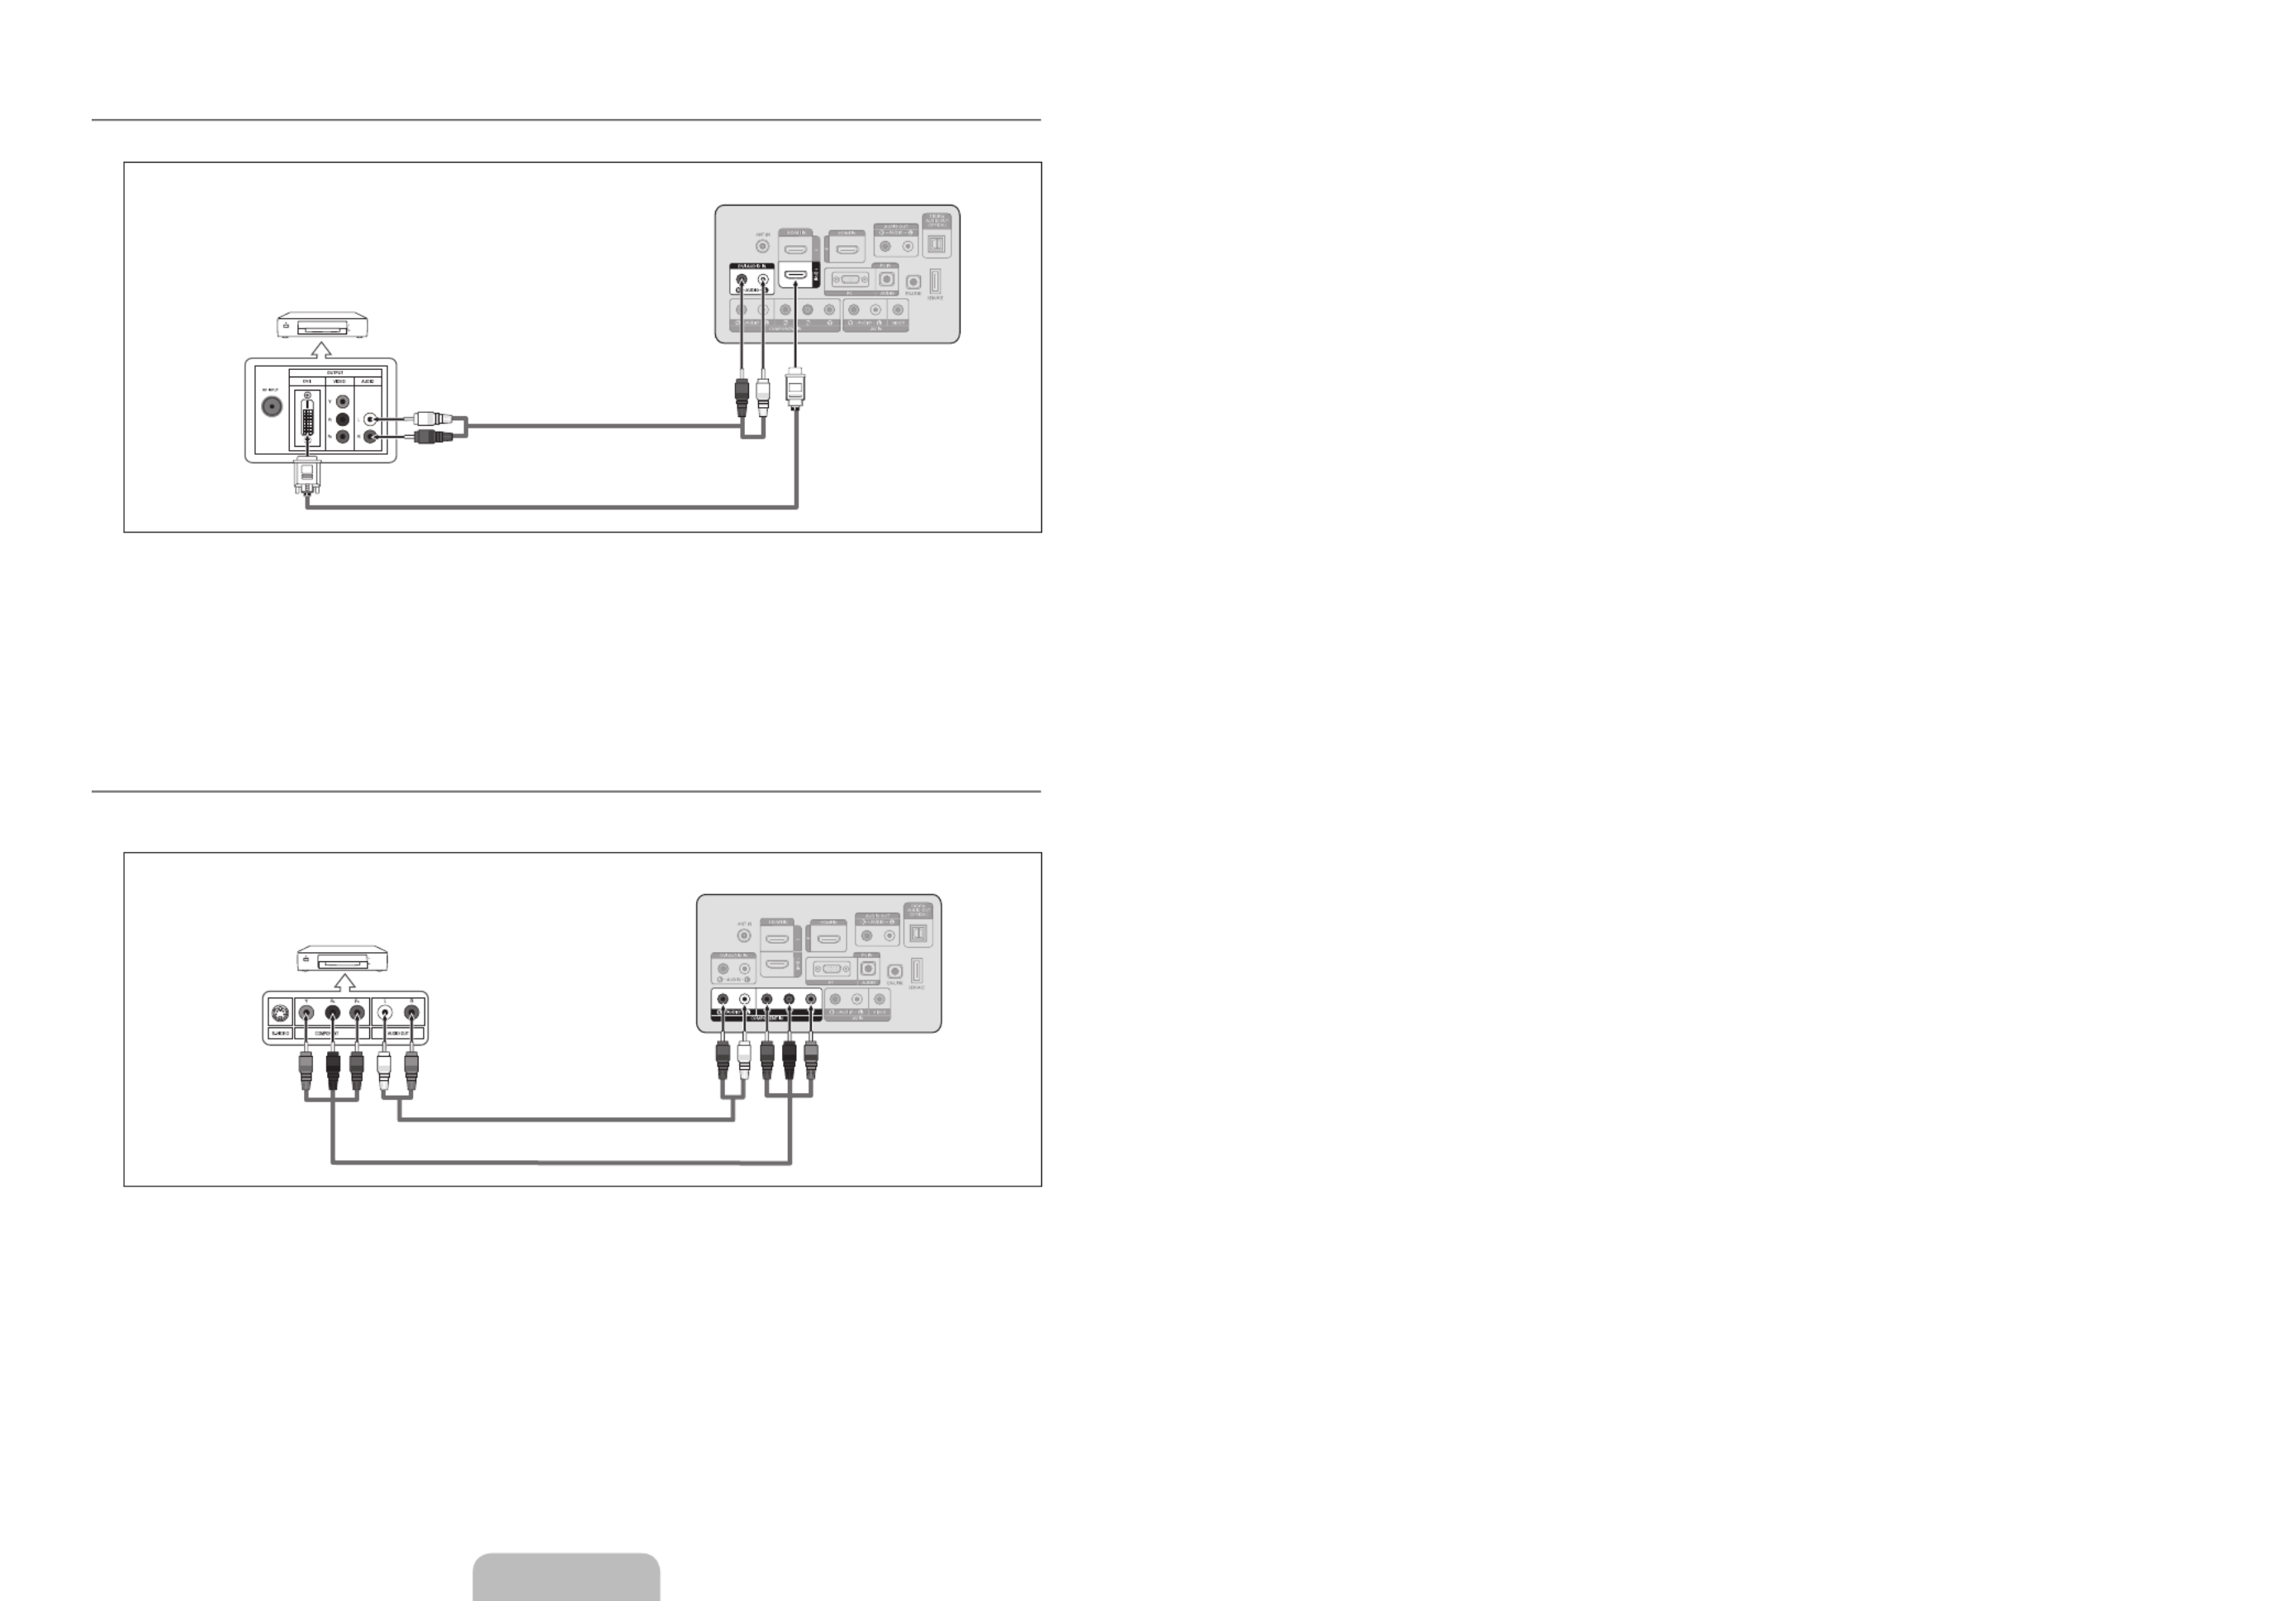
Connecting a DVD / Blu-ray player / Cable Box / Satellite receiver (Set-Top Box) via DVI
This connection can only be made if there is a DVI Output connector on the external device.
1. Connect a DVI to HDMI Cable or DVI-HDMI Adapter between the jack on the TV and the DVI jack on the HDMI IN 1 (DVI)
DVD / Blu-ray player / Cable Box / Satellite receiver (Set-Top Box).
2. Connect Audio Cables between the DVI AUDIO IN [R-AUDIO-L] jack on the TV and the DVD / Blu-ray player / Cable Box /
Satellite receiver (Set-Top Box).
Each DVD / Blu-ray player / Cable Box / Satellite receiver (Set-Top Box) has a different back panel conguration.
When connecting a DVD / Blu-ray player / Cable Box / Satellite receiver (Set-Top Box), match the color of the connection
terminal to the cable.
When using an HDMI / DVI cable connection, you must use the jack.HDMI IN 1 (DVI)
Connecting a DVD / Blu-ray player / Cable Box / Satellite receiver (Set-Top Box) via Component cables
The rear panel jacks on your TV make it easy to connect a DVD / Blu-ray player / Cable Box / Satellite receiver (Set-Top Box) to
your TV.
1. COMPONENT IN [Y, P , P ]Connect a Component Cable between the B R jacks on the TV and the COMPONENT [Y, P , P ] B R
jacks on the DVD / Blu-ray player / Cable Box / Satellite receiver (Set-Top Box).
2. Connect Audio Cables between the jacks on the TV and the AUDIO OUT jacks on the DVD / COMPONENT IN [R-AUDIO-L]
Blu-ray player / Cable Box / Satellite receiver (Set-Top Box).
Component video separates the video into Y (Luminance (brightness)), Pb (Blue) and Pr (Red) for enhanced video quality.
Be sure to match the component video and audio connections. For example, if connecting a Component video cable to
COMPONENT IN COMPONENT IN, connect the audio cable to also.
Each DVD / Blu-ray player / Cable Box / Satellite receiver (Set-Top Box) has a different back panel conguration.
When connecting a DVD / Blu-ray player / Cable Box / Satellite receiver (Set-Top Box), match the color of the connection
terminal to the cable.
¦
N
N
N
¦
N
N
N
DVD / Blu-ray player / Cable Box /
Satellite receiver (Set-Top Box)
TV Rear Panel
2
Audio Cable (Not supplied)
1
DVI to HDMI Cable (Not supplied)
DVD / Blu-ray player / Cable Box /
Satellite receiver (Set-Top Box)
2
Audio Cable (Not supplied)
1
Component Cable (Not supplied)
TV Rear Panel

English - 10
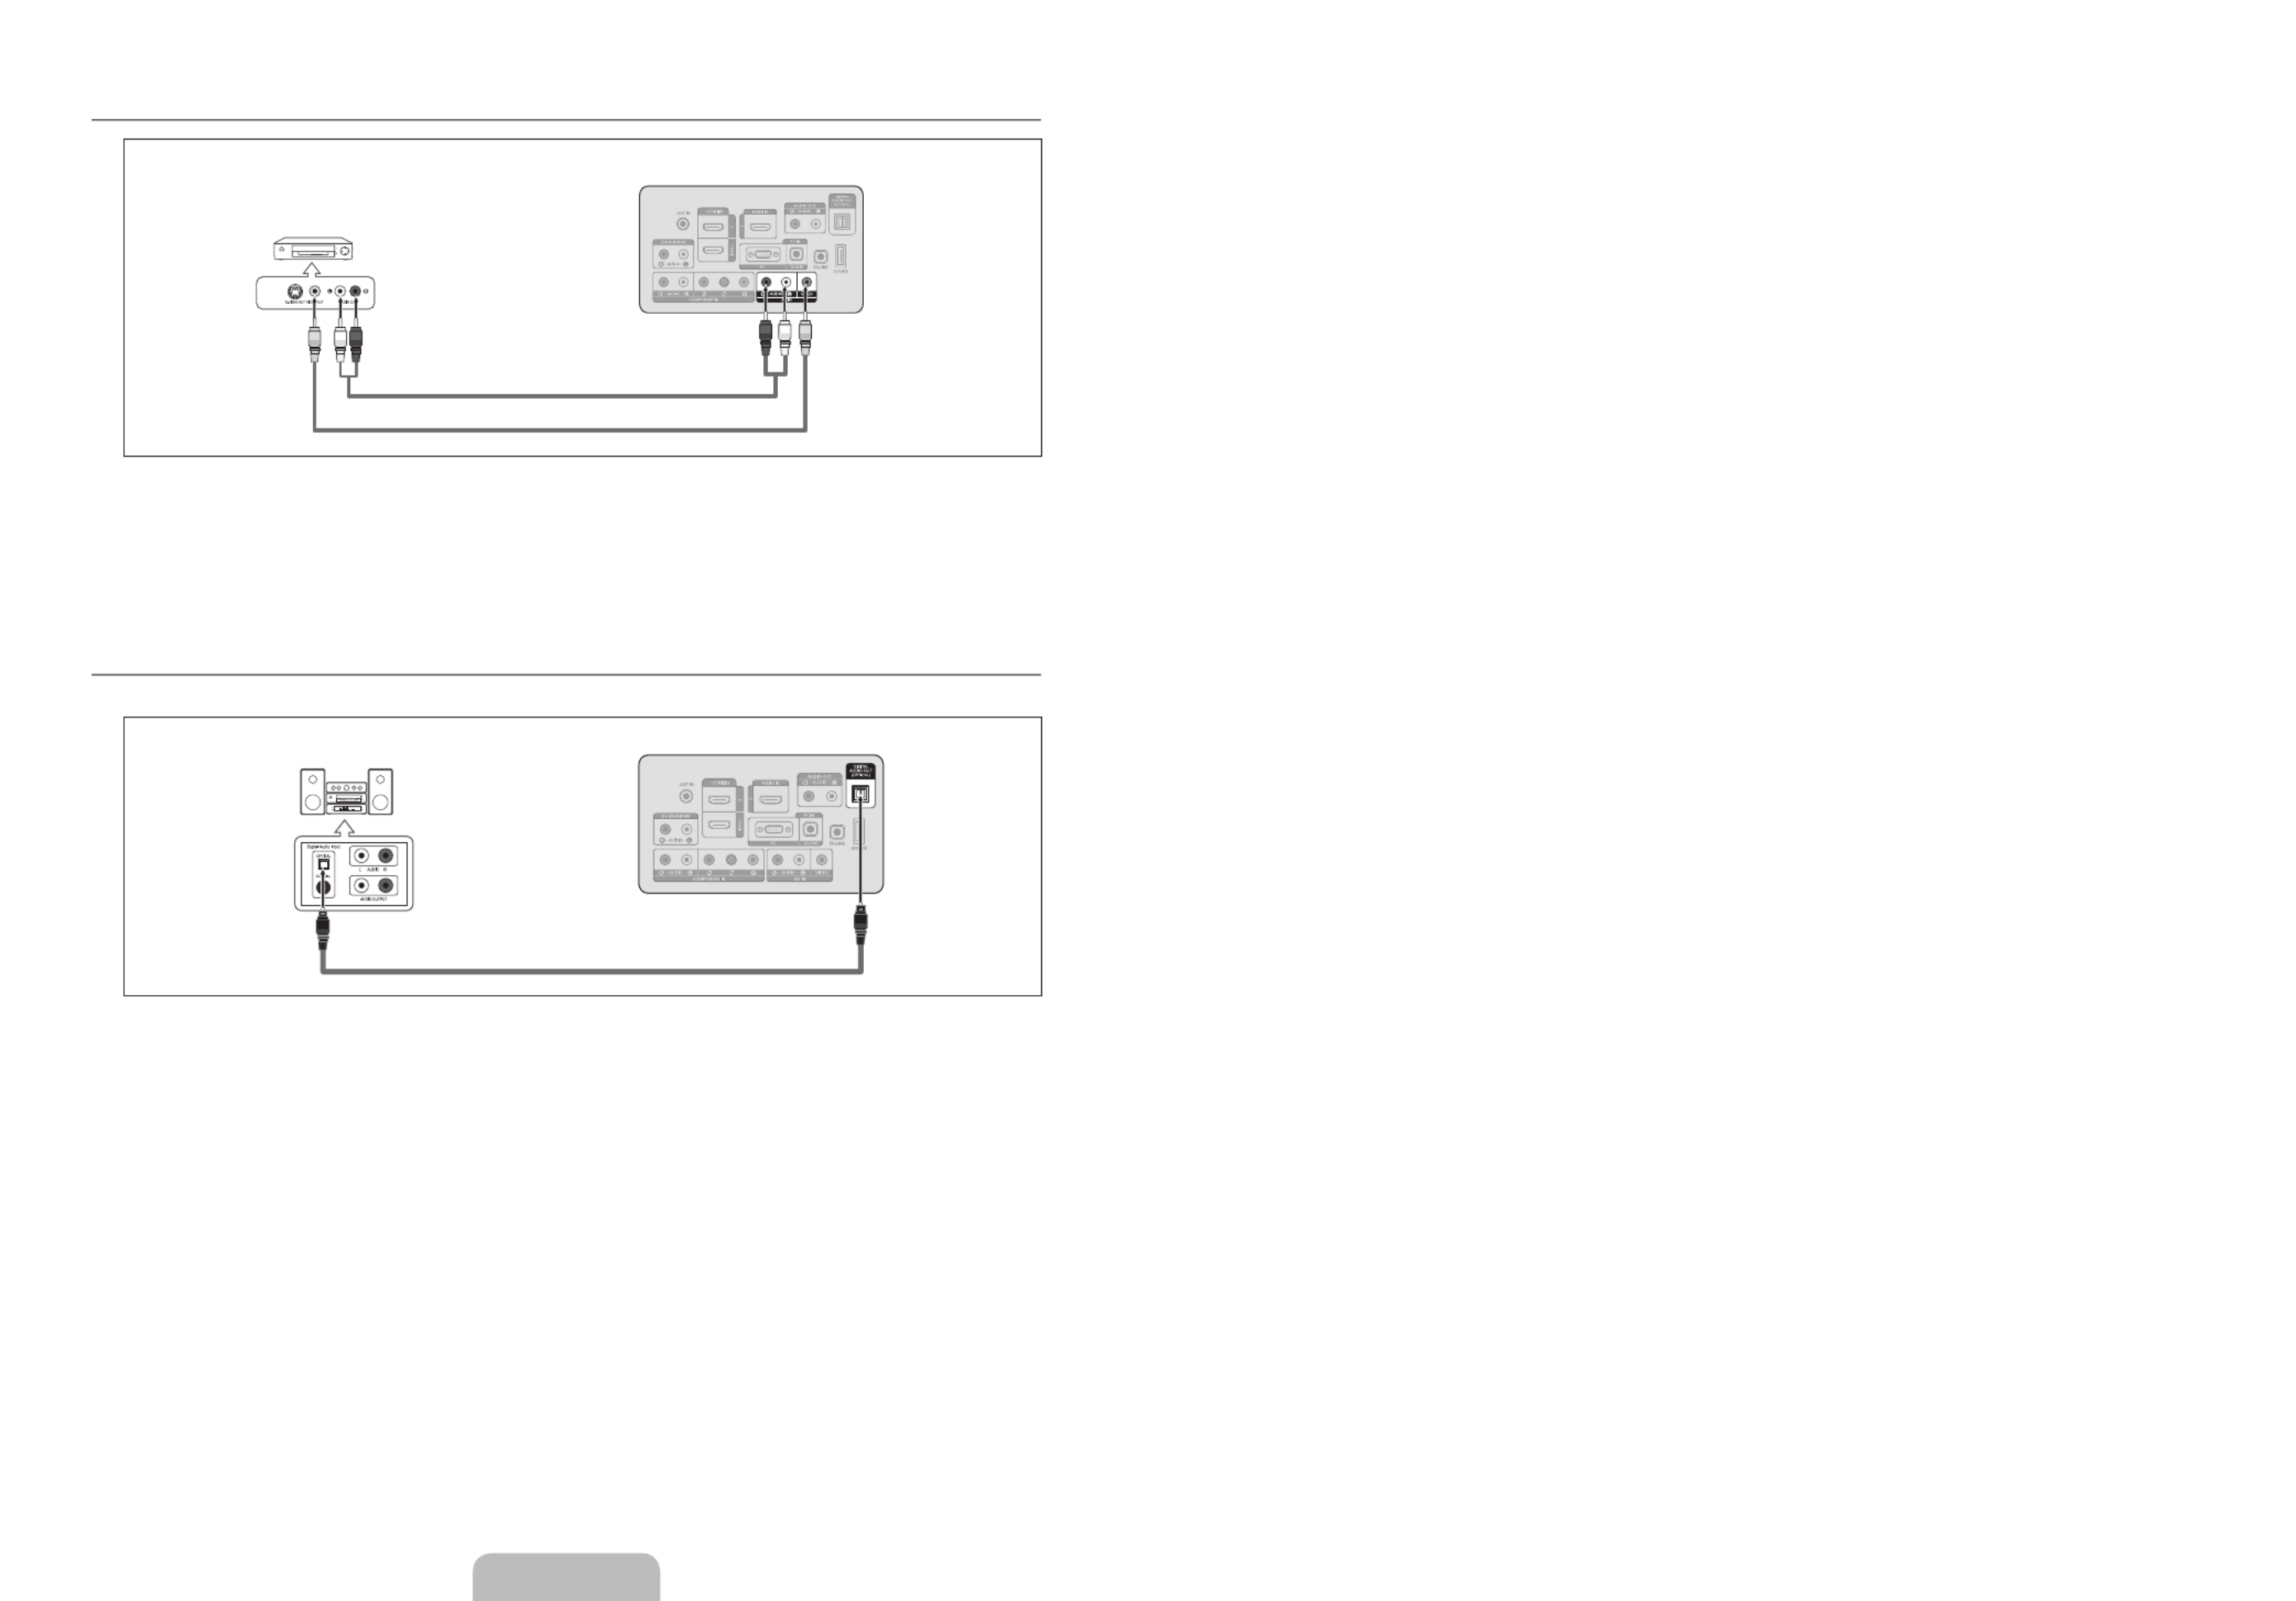
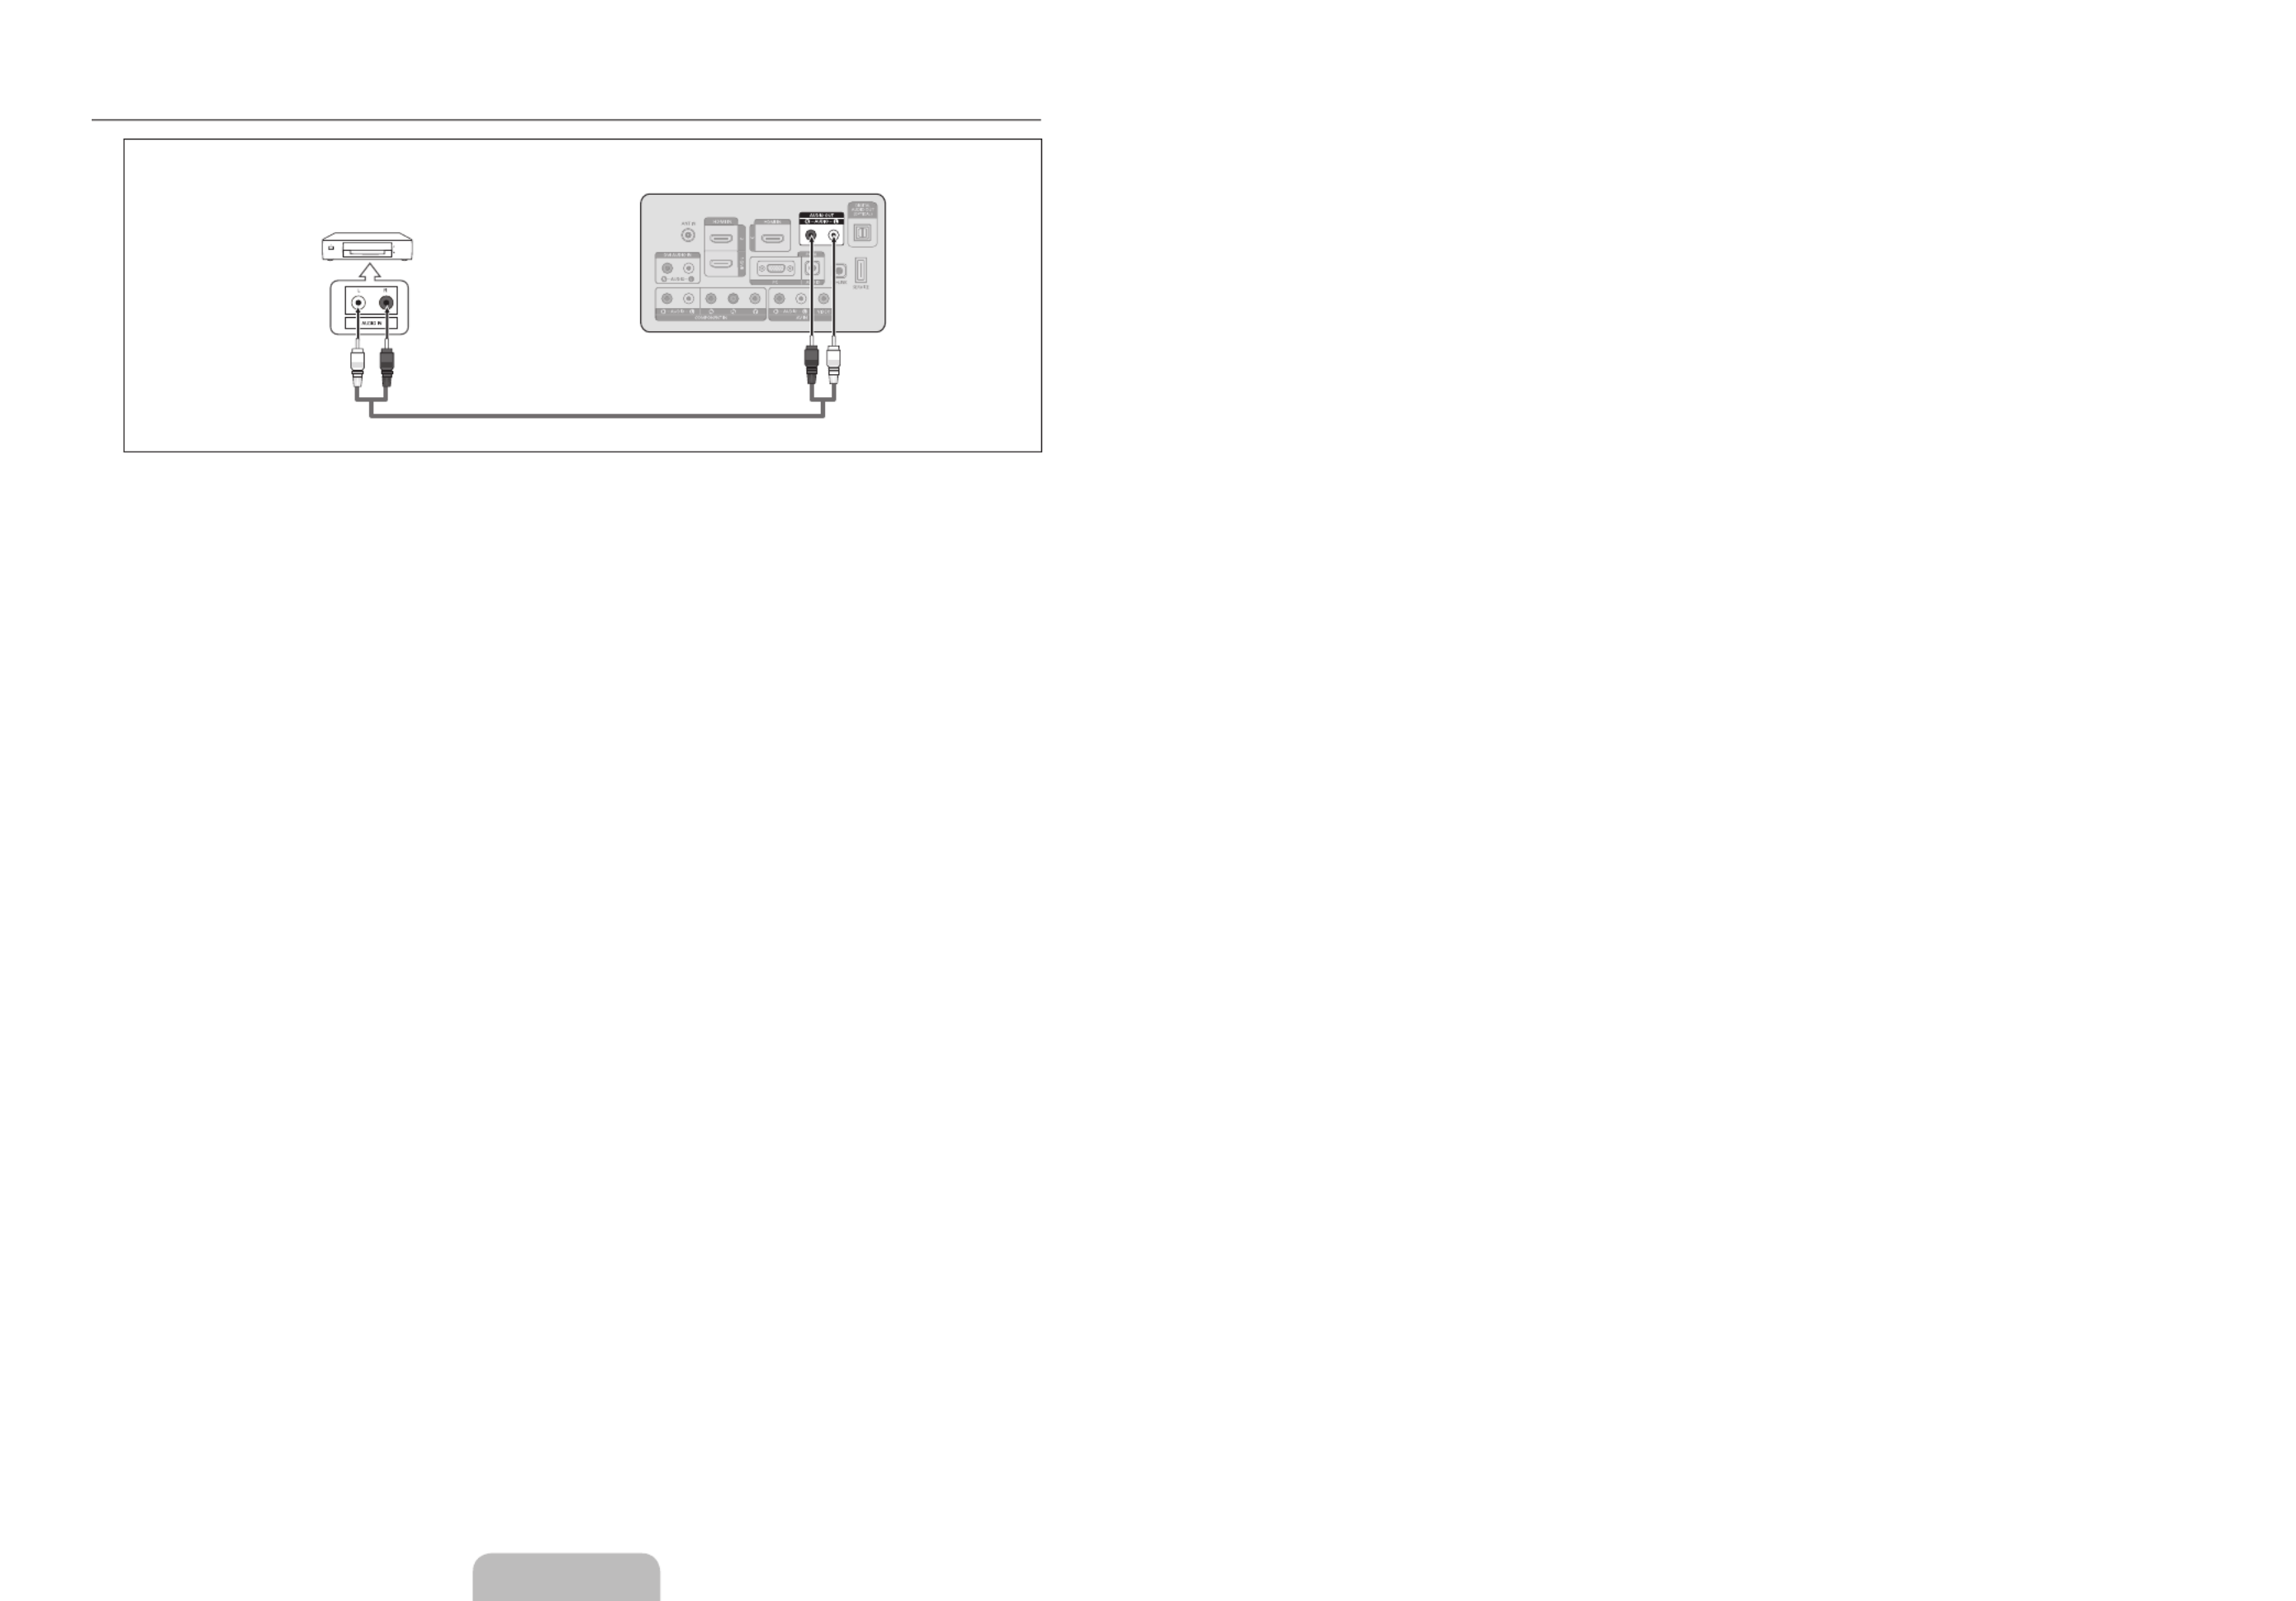
Connecting a VCR
1. AV IN [VIDEO]Connect a Video Cable between the jack on the TV and the VIDEO OUT jack on the VCR.
2. Connect Audio Cables between the AV IN [R-AUDIO-L] jacks on the TV and the AUDIO OUT jacks on the VCR.
If you have a ‘mono’ (non-stereo) VCR, use a Y-connector (not supplied) to connect to the right and left audio input jacks
of the TV. Alternatively, connect the cable to the ‘ ’ jack. If your VCR is stereo, you must connect two cables.R
Each VCR has a different back panel conguration.
When connecting a VCR, match the color of the connection terminal to the cable.
Connecting a Digital Audio System
The rear panel jacks on your TV make it easy to connect a Digital Audio System (Home theater/Receiver) to your TV.
1. DIGITAL AUDIO OUT (OPTICAL)Connect an Optical Cable between the jacks on the TV and the Digital Audio Input jacks on
the Digital Audio System.
When a Digital Audio System is connected to the DIGITAL AUDIO OUT (OPTICAL) jack: Decrease the volume of the TV
and adjust the volume level with the system’s volume control.
5.1CH audio is possible when the TV is connected to an external device supporting 5.1CH.
Each Digital Audio System has a different back panel conguration.
When the Home Theater receiver is set to On, you can hear sound output from the TV’s Optical jack. When the TV is
displaying a DTV(air) signal, the TV will send out 5.1 channel sound to the Home theater receiver. When the source is a
digital component such as a DVD / Blu-ray player / Cable Box / Satellite receiver (Set-Top Box) and is connected to the
TV via HDMI, only 2 channel sound will be heard from the Home Theater receiver. If you want to hear 5.1 channel audio,
connect the digital audio out jack on DVD / Blu-ray player / Cable Box / Satellite receiver (Set-Top Box) directly to an
Amplier or Home Theater, not the TV.
¦
N
N
N
¦
N
N
N
N
2
Audio Cable (Not supplied)
VCR Rear Panel
1
Video Cable (Not supplied)
TV Rear Panel
Digital Audio System
1
Optical Cable (Not supplied)
TV Rear Panel

English - 11
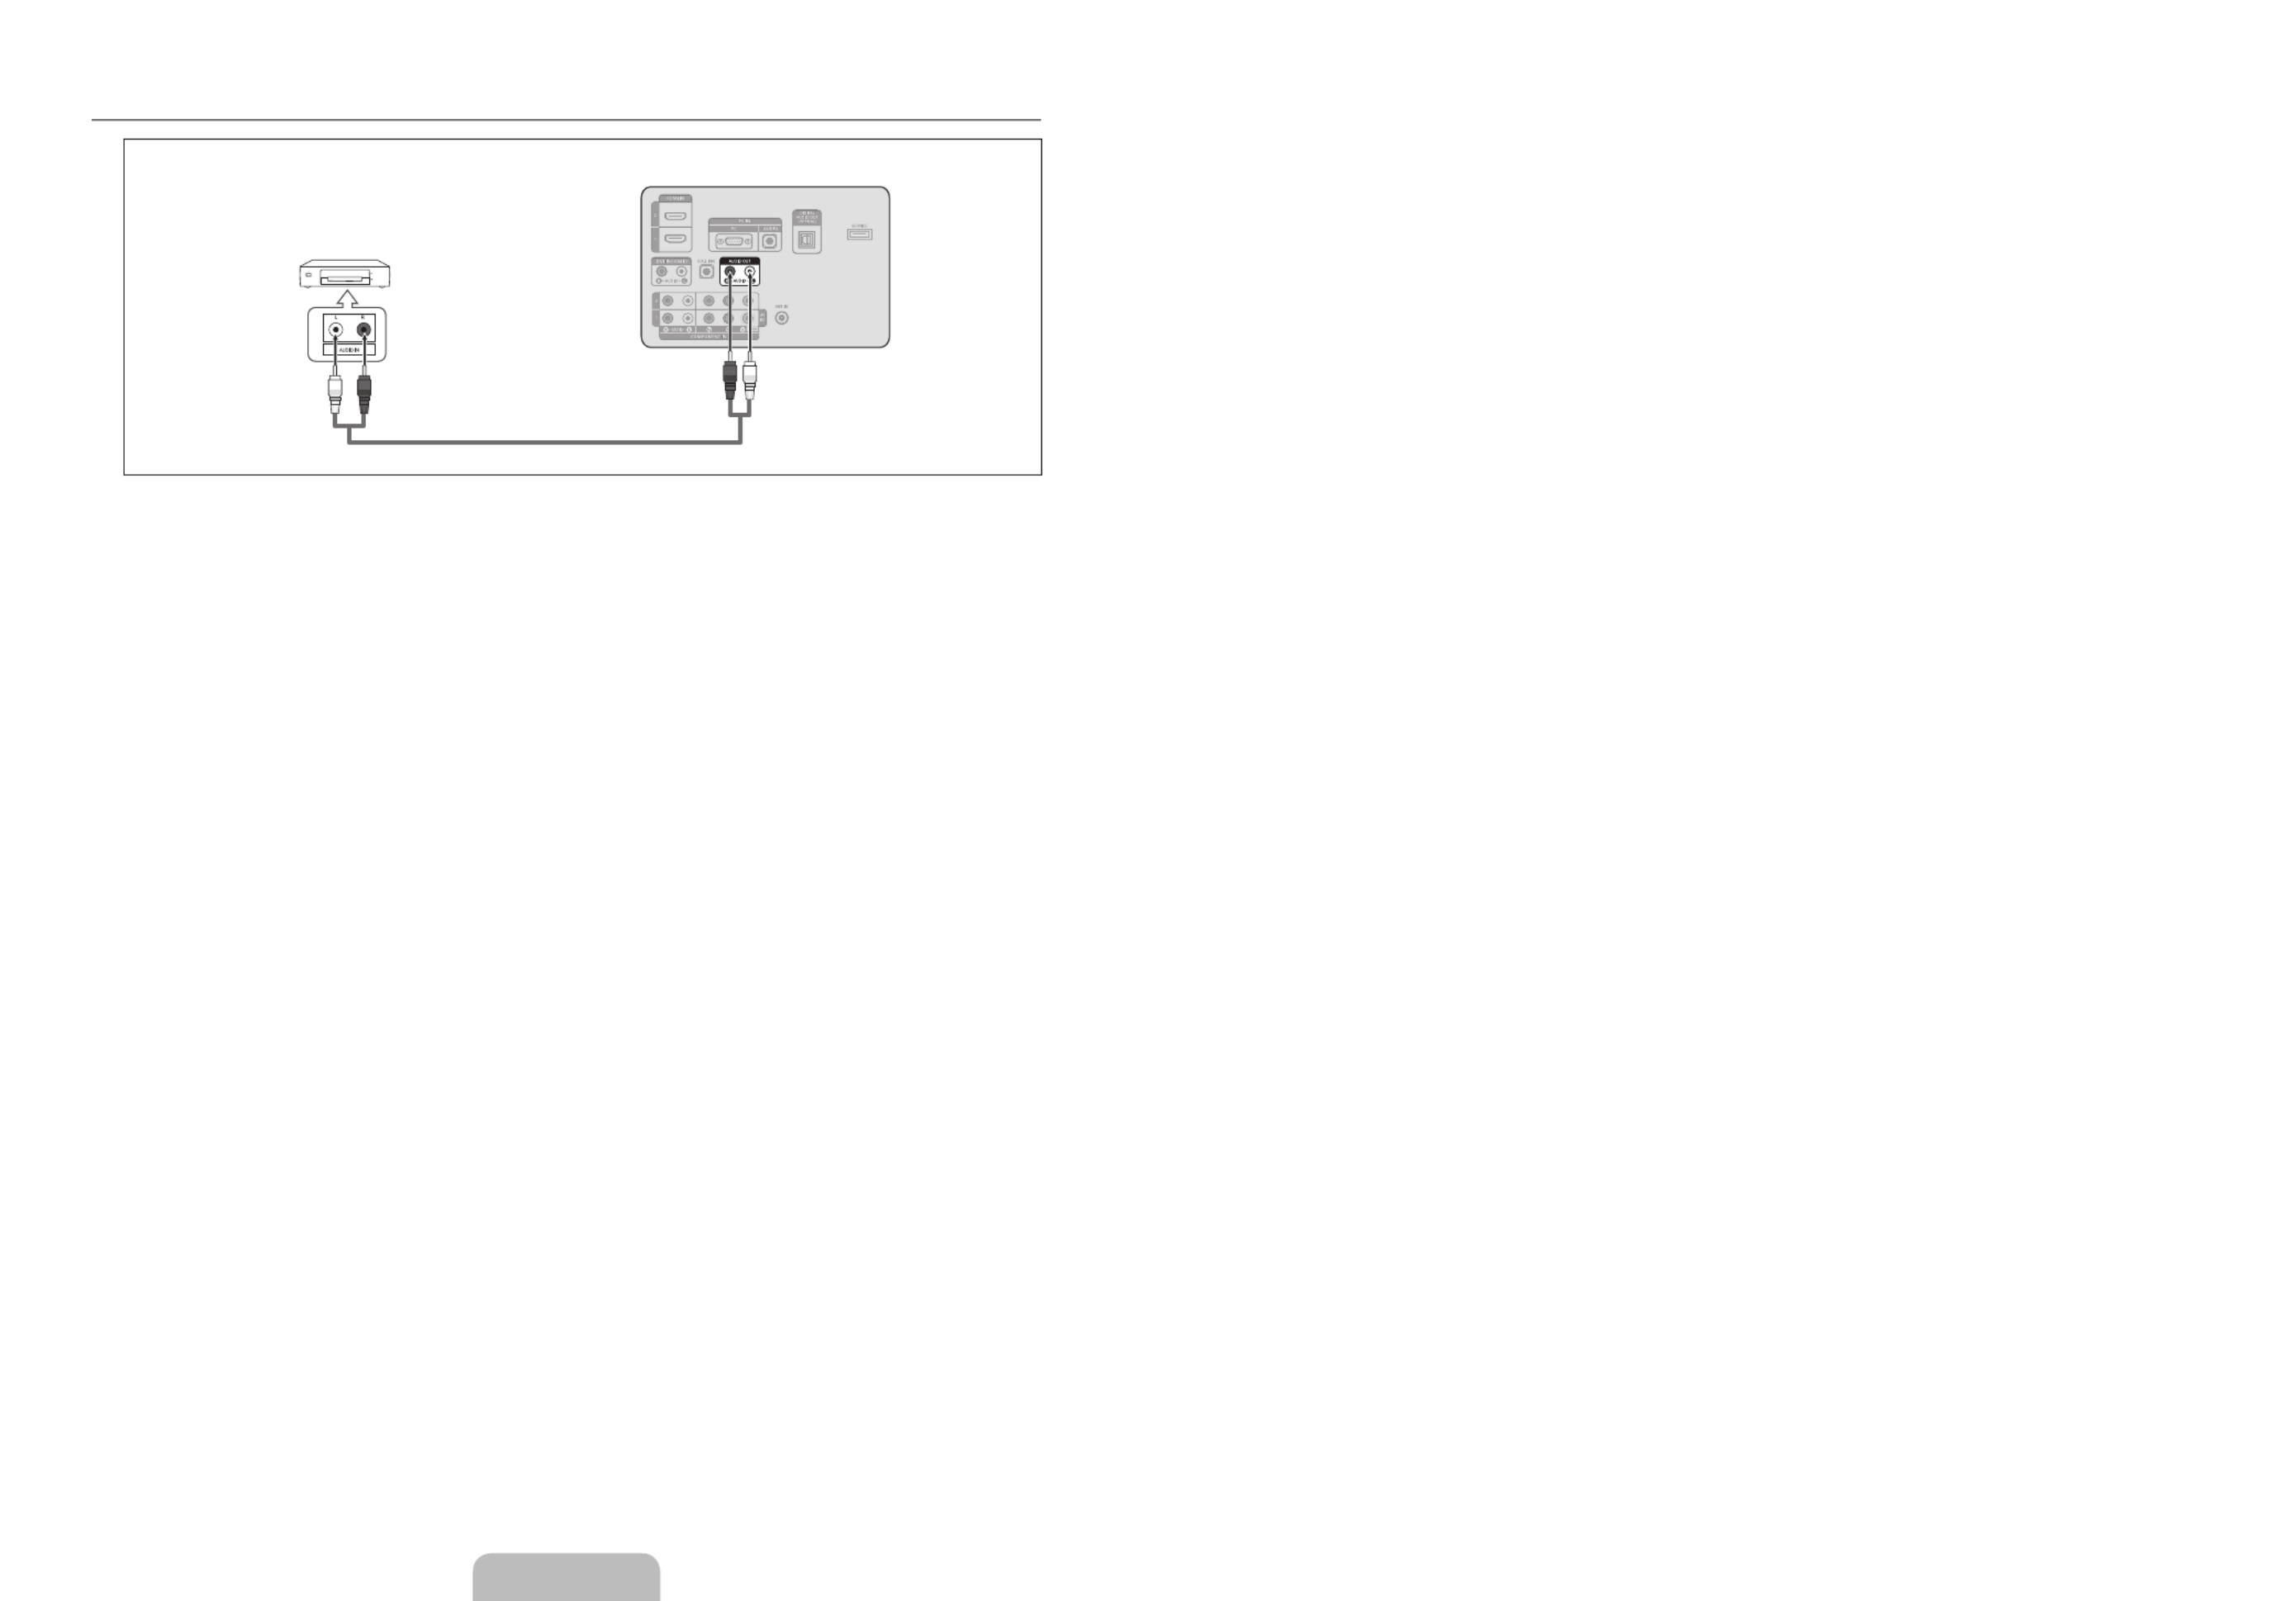
ConnectinganAmplier/DVDHomeTheater
1. Connect Audio Cables between the AUDIO OUT [R-AUDIO-L] jacks on the TV and Audio Input jacks on the Amplier / DVD
Home Theater.
When an audio amplier is connected to the AUDIO OUT [R-AUDIO-L] jacks: Decrease the volume of the TV and adjust
the volume level with the Amplier’s volume control.
Each Amplier/DVD Home Theater has a different back panel conguration.
When connecting an Amplier/DVD Home Theater, match the color of the connection terminal to the cable.
¦
N
N
N
TV Rear Panel
1
Audio Cable (Not supplied)
Amplier/DVDHomeTheater


English - 12
Connecting a Camcorder
Using a Video Cable
1. AV IN [VIDEO]Connect a Video Cable between the jack on the TV and the VIDEO OUT jack on the camcorder.
2. Connect Audio Cables between the AV IN [R-AUDIO-L] jacks on the TV and the AUDIO OUT jacks on the camcorder.
Each Camcorder has a different back panel conguration.
When connecting a Camcorder, match the color of the connection terminal to the cable.
Using an HDMI Cable
1. HDMI IN (1, 2 3)Connect an HDMI Cable between the or jack on the TV and the HDMI OUT jack on the camcorder.
¦
N
N
TV Rear Panel
1
Video Cable (Not supplied)
2
Audio Cable (Not supplied)
Camcorder
TV Rear Panel
HD Camcorder
1
HDMI Cable (Not supplied) or


English - 13
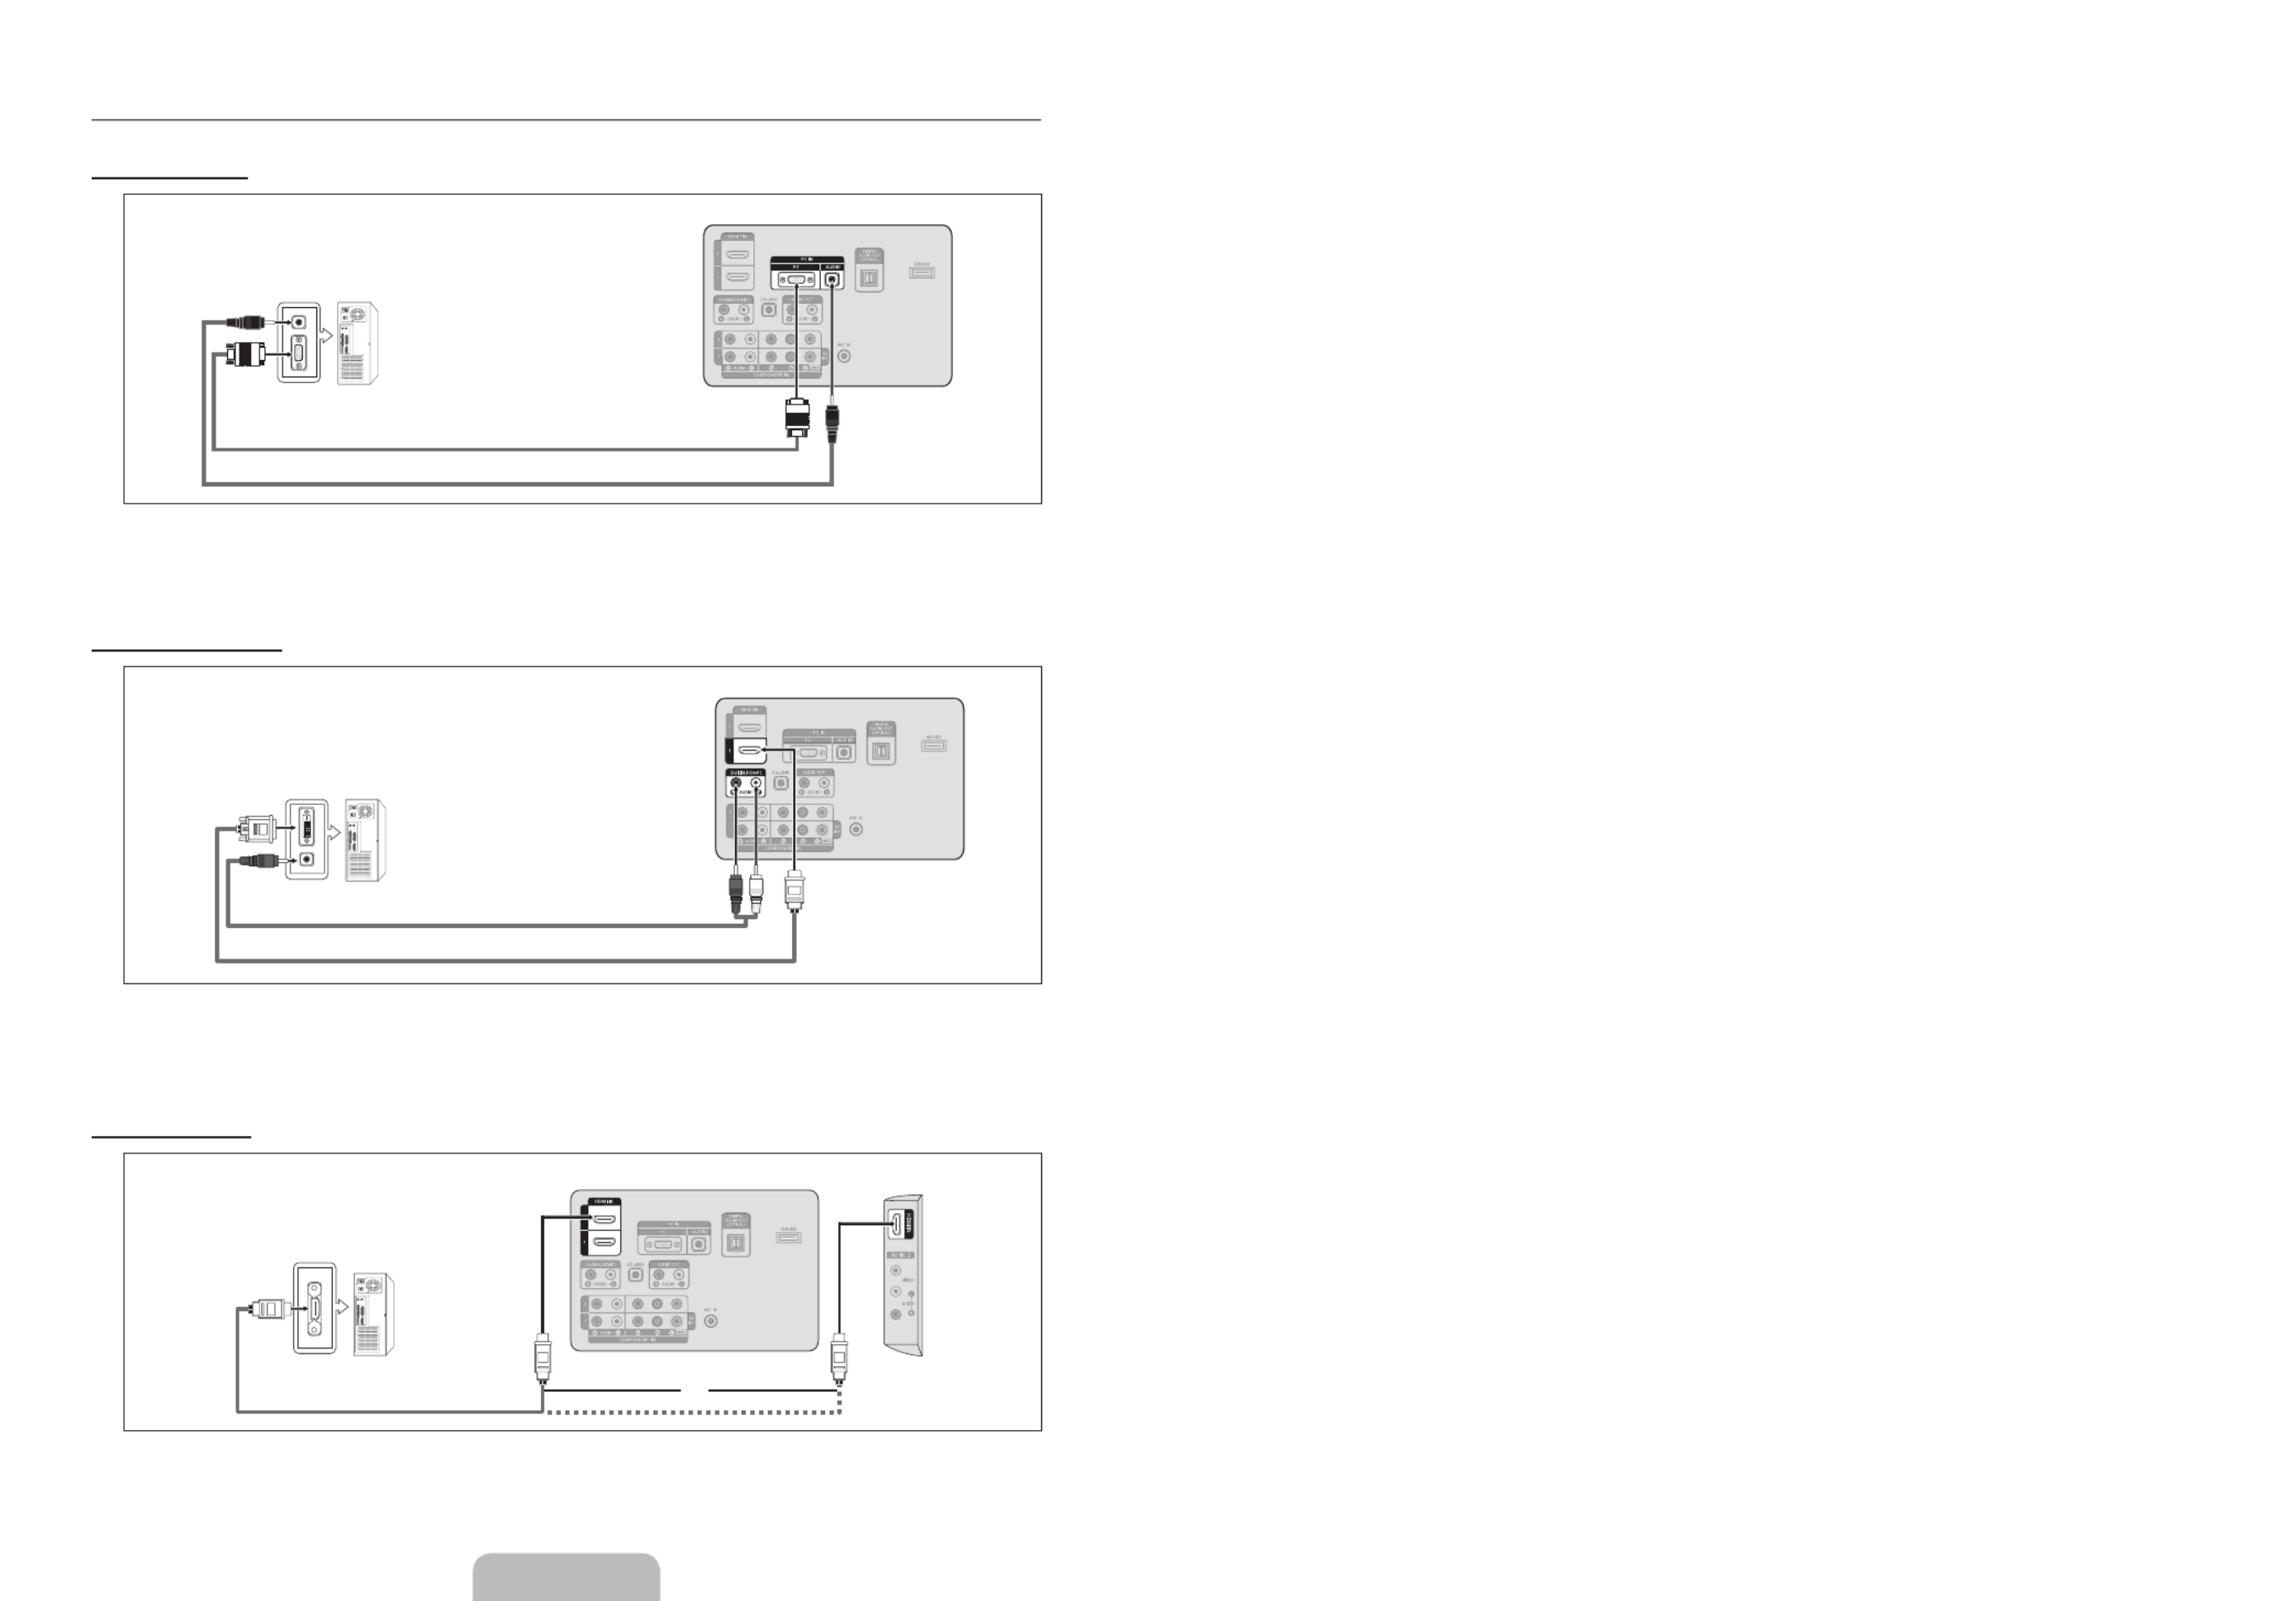
Connecting a PC
Using a D-Sub Cable
1. PC IN [PC]Connect a D-Sub Cable between connector on the TV and the PC output connector on your computer.
2. Connect a PC Audio Cable between the jack on the TV and the Audio Out jack of the sound card on your PC IN [AUDIO]
computer.
When connecting a PC, match the color of the connection terminal to the cable.
Using an HDMI/DVI Cable
1. HDMI IN 1 (DVI)Connect an HDMI/DVI cable between the jack on the TV and the PC output jack on your computer.
2. Connect a 3.5 mm Stereo miniplug / 2RCA Cable between the jack on the TV and the Audio Out DVI AUDIO IN [R-AUDIO-L]
jack of the sound card on your computer.
When using an HDMI/DVI cable connection, you must use the terminal.HDMI IN 1 (DVI)
Using an HDMI Cable
1. HDMI IN (1, 2 3)Connect an HDMI cable between the or jack on the TV and the PC output jack on your computer.
Each PC has a different back panel conguration.
¦
N
N
N
TV Rear Panel
2
3.5 mm Stereo mini-plug/2RCA Cable (Not supplied)
1
HDMI/DVI Cable (Not supplied)
PC
TV Rear Panel
PC
1
D-Sub Cable (Not supplied)
2
PC Audio Cable (Not supplied)
PC
TV Rear Panel
1
HDMI Cable (Not supplied)
or


English - 14
CONNECTIONS (LN52B530)
Connecting VHF and UHF Antennas
If your antenna has a set of leads that look like the diagram to the right, see ‘Antennas with 300
Ω Flat Twin Leads’ below.
If your antenna has one lead that looks like the diagram to the right, see ‘Antennas with 75 Ω
Round Leads’.
If you have two antennas, see ‘Separate VHF and UHF Antennas’.
Antennaswith300ΩFlatTwinLeads
If you are using an off-air antenna (such as a roof antenna or ‘rabbit ears’) that has 300Ω twin
at leads, follow the directions below.
1. Place the wires from the twin leads under the screws on a 300-75 Ω adapter (not
supplied). Use a screwdriver to tighten the screws.
2. Plug the adaptor into the terminal on the back of the TV. ANT IN
Antennaswith75ΩRoundLeads
Plug the antenna lead into the terminal on the back of the TV.ANT IN
Separate VHF and UHF Antennas
If you have two separate antennas for your TV (one VHF and one UHF), you must combine
the two antenna signals before connecting the antennas to the TV. This procedure requires an
optional combiner-adaptor (available at most electronics shops).
1. Connect both antenna leads to the combiner.
2. Plug the combiner into the terminal on the bottom of the rear panel.ANT IN
Connecting Cable TV
To connect to a cable TV system, follow the instructions below.
Cable without a Cable Box
Plug the incoming cable into the terminal on the back of the TV.ANT IN
Because this TV is cable-ready, you do not need a cable box to view unscrambled cable
channels.
Connecting to a Cable Box that Descrambles All Channels
1. Find the cable that is connected to the ANT OUT terminal on your cable box.
This terminal might be labeled ‘ANT OUT’, ‘VHF OUT’ or simply, ‘OUT’.
2. Connect the other end of this cable to the terminal on the back of the TV.ANT IN
¦
¦
N
N
ANT IN
ANT IN
UHF
VHF
ANT IN
UHF
VHF
ANT IN
ANT IN ANT OUT
ANT IN


English - 15
Connecting to a Cable Box that Descrambles Some Channels
If your cable box descrambles only some channels (such as premium channels), follow the instructions below. You will need a two-
way splitter, an RF (A/B) switch and four lengths of RF cable. (These items are available at most electronics stores.)
1. Find and disconnect the cable that is connected to the ANT IN terminal on your cable box.
This terminal might be labeled ‘ANT IN’, ‘VHF IN’ or simply, ‘IN’.
2. Connect this cable to a two-way splitter.
3. Connect an RF cable between the OUTPUT terminal on the splitter and the IN terminal on the cable box.
4. Connect an RF cable between the ANT OUT terminal on the cable box and the B–IN terminal on the RF(A/B) switch.
5. Connect another cable between the other OUT terminal on the splitter and the A–IN terminal on the RF (A/B) switch.
6. Connect the last RF cable between the OUT terminal on the RF (A/B) switch and the terminal on the rear of the TV.ANT IN
After you have made this connection, set the A/B switch to the ‘A’ position for normal viewing. Set the A/B switch to the ‘B’
position to view scrambled channels. (When you set the A/B switch to ‘B’, you will need to tune your TV to the cable box’s
output channel, which is usually channel 3 or 4.)
Connecting a DVD / Blu-ray player / Cable Box / Satellite receiver (Set-Top Box) via HDMI
This connection can only be made if there is an HDMI Output connector on the external device.
1. HDMI IN (1, 2 3)Connect an HDMI Cable between the or jack on the TV and the HDMI jack on the DVD / Blu-ray Player or
Cable Box / Satellite receiver (Set-Top Box).
What is HDMI?
HDMI(High-Denition Multimedia Interface), is an interface that enables the transmission of digital audio and video signals
using a single cable.
The difference between HDMI and DVI is that the HDMI device is smaller in size and has the HDCP (High Bandwidth Digital
Copy Protection) coding feature installed.
Each DVD / Blu-ray player / Cable Box / Satellite receiver (Set-Top Box) has a different back panel conguration.
The TV may not output sound and pictures may be displayed with abnormal color when DVD / Blu-ray player / Cable Box /
Satellite receiver (Set-Top Box) supporting HDMI versions older than 1.3 are connected. When connecting an older HDMI
cable and there is no sound, connect the HDMI cable to the jack and the audio cables to the HDMI IN 1 DVI IN (HDMI1)
[R-AUDIO-L] jacks on the back of the TV. If this happens, contact the company that provided the DVD / Blu-ray player /
Cable Box / Satellite receiver (Set-Top Box) to conrm the HDMI version, then request an upgrade.
HDMI cables that are not 1.3 may cause annoying icker or no screen display.
N
¦
N
●
●
N
N
N
Splitter
Cable Box
Incoming cable
TV Rear
ANT IN
RF (A/B) Switch
TV Rear Panel
DVD / Blu-ray player / Cable Box /
Satellite receiver (Set-Top Box) TV Side Panel
1
HDMI Cable (Not supplied) or
TV Rear Panel


English - 16
Connecting a DVD / Blu-ray player / Cable Box / Satellite receiver (Set-Top Box) via DVI
This connection can only be made if there is a DVI Output connector on the external device.
1. Connect a DVI to HDMI Cable or DVI-HDMI Adapter between the jack on the TV and the DVI jack on the DVD / HDMI IN 1
Blu-ray player / Cable Box / Satellite receiver (Set-Top Box).
2. Connect Audio Cables between the jack on the TV and the DVD / Blu-ray player / Cable Box / DVI IN (HDMI 1) [R-AUDIO-L]
Satellite receiver (Set-Top Box).
Each DVD / Blu-ray player / Cable Box / Satellite receiver (Set-Top Box) has a different back panel conguration.
When connecting a DVD / Blu-ray player / Cable Box / Satellite receiver (Set-Top Box), match the color of the connection
terminal to the cable.
When using an HDMI / DVI cable connection, you must use the jack.HDMI IN 1
Connecting a DVD / Blu-ray player / Cable Box / Satellite receiver (Set-Top Box) via Component cables
The rear panel jacks on your TV make it easy to connect a DVD / Blu-ray player / Cable Box / Satellite receiver (Set-Top Box) to
your TV.
1. COMPONENT IN (1 2) [Y, P , P ]Connect a Component Cable between the or B R jacks on the TV and the COMPONENT [Y, PB,
PR] jacks on the DVD / Blu-ray player / Cable Box / Satellite receiver (Set-Top Box).
2. Connect Audio Cables between the or jacks on the TV and the AUDIO OUT jacks on the COMPONENT IN(1 2) [R-AUDIO-L]
DVD / Blu-ray player / Cable Box / Satellite receiver (Set-Top Box).
Component video separates the video into Y (Luminance (brightness)), Pb (Blue) and Pr (Red) for enhanced video quality.
Be sure to match the component video and audio connections. For example, if connecting a Component video cable to
COMPONENT IN 1 COMPONENT IN 1, connect the audio cable to also.
Each DVD / Blu-ray player / Cable Box / Satellite receiver (Set-Top Box) has a different back panel conguration.
When connecting a DVD / Blu-ray player / Cable Box / Satellite receiver (Set-Top Box), match the color of the connection
terminal to the cable.
¦
N
N
N
¦
N
N
N
TV Rear Panel
DVD / Blu-ray player / Cable Box /
Satellite receiver (Set-Top Box)
2
Audio Cable (Not supplied)
1
Component Cable (Not supplied)
DVD / Blu-ray player / Cable Box /
Satellite receiver (Set-Top Box)
TV Rear Panel
2
Audio Cable (Not supplied)
1
DVI to HDMI Cable (Not supplied)


English - 17
Connecting a VCR
1. AV IN 1 [Y/VIDEO] AV IN 2 [VIDEO]Connect a Video Cable between the or jack on the TV and the VIDEO OUT jack on the
VCR.
2. Connect Audio Cables between the AV IN 1 ( AV IN 2) [R-AUDIO-L]or jacks on the TV and the AUDIO OUT jacks on the VCR.
If you have a ‘mono’ (non-stereo) VCR, use a Y-connector (not supplied) to connect to the right and left audio input jacks
of the TV. Alternatively, connect the cable to the ‘ ’ jack. If your VCR is stereo, you must connect two cables.R
Each VCR has a different back panel conguration.
When connecting a VCR, match the color of the connection terminal to the cable.
When connecting to AV IN 1 AV IN 1 [Y/VIDEO], the color of the jack (Green) does not match the color of the video cable
(Yellow).
Connecting a Digital Audio System
The rear panel jacks on your TV make it easy to connect a Digital Audio System (Home theater/Receiver) to your TV.
1. DIGITAL AUDIO OUT (OPTICAL)Connect an Optical Cable between the jacks on the TV and the Digital Audio Input jacks on
the Digital Audio System.
When a Digital Audio System is connected to the DIGITAL AUDIO OUT (OPTICAL) jack: Decrease the volume of the TV
and adjust the volume level with the system’s volume control.
5.1CH audio is possible when the TV is connected to an external device supporting 5.1CH.
Each Digital Audio System has a different back panel conguration.
When the Home Theater receiver is set to On, you can hear sound output from the TV’s Optical jack. When the TV is
displaying a DTV(air) signal, the TV will send out 5.1 channel sound to the Home theater receiver. When the source is a
digital component such as a DVD / Blu-ray player / Cable Box / Satellite receiver (Set-Top Box) and is connected to the
TV via HDMI, only 2 channel sound will be heard from the Home Theater receiver. If you want to hear 5.1 channel audio,
connect the digital audio out jack on DVD / Blu-ray player / Cable Box / Satellite receiver (Set-Top Box) directly to an
Amplier or Home Theater, not the TV.
¦
N
N
N
N
¦
N
N
N
N
Digital Audio System
1
Optical Cable (Not supplied)
TV Rear Panel
3
3
TV Side Panel
2
Audio Cable (Not supplied)
VCR Rear Panel
1
Video Cable (Not supplied)
TV Rear Panel

English - 18
ConnectinganAmplier/DVDHomeTheater
1. Connect Audio Cables between the AUDIO OUT [R-AUDIO-L] jacks on the TV and Audio Input jacks on the Amplier / DVD
Home Theater.
When an audio amplier is connected to the AUDIO OUT [R-AUDIO-L] jacks: Decrease the volume of the TV and adjust
the volume level with the Amplier’s volume control.
Each Amplier / DVD Home Theater has a different back panel conguration.
When connecting an Amplier / DVD Home Theater, match the color of the connection terminal to the cable.
¦
N
N
N
TV Rear Panel
1
Audio Cable (Not supplied)
Amplier/DVDHomeTheater


English - 20
Connecting a PC
Using a D-Sub Cable
1. PC IN [PC]Connect a D-Sub Cable between connector on the TV and the PC output connector on your computer.
2. Connect a PC Audio Cable between the jack on the TV and the Audio Out jack of the sound card on your PC IN [AUDIO]
computer.
When connecting a PC, match the color of the connection terminal to the cable.
Using an HDMI/DVI Cable
1. HDMI IN 1Connect an HDMI/DVI cable between the jack on the TV and the PC output jack on your computer.
2. Connect a 3.5 mm Stereo miniplug / 2RCA Cable between the jack on the TV and the Audio Out DVI IN (HDMI1) [R-AUDIO-L]
jack of the sound card on your computer.
When using an HDMI/DVI cable connection, you must use the terminal.HDMI IN 1
Using an HDMI Cable
1. HDMI IN (1, 2 3)Connect an HDMI cable between the or jack on the TV and the PC output jack on your computer.
Each PC has a different back panel conguration.
¦
N
N
N
TV Rear Panel
PC
2
3.5 mm Stereo mini-plug/2RCA Cable (Not supplied)
1
HDMI/DVI Cable (Not supplied)
3
PC
TV Rear Panel TV Side Panel
1
HDMI Cable (Not supplied) or
TV Rear Panel
PC
1
D-Sub Cable (Not supplied)
2
PC Audio Cable (Not supplied)


English - 21
OPERATION
Viewing the menus
Before using the TV, follow the steps below to learn how to navigate the menu in order to select
and adjust different functions.
1. Press the button.MENU
The main menu is displayed on the screen. Its left side has the following icons: Picture,
Sound, Channel, Setup, Input, Application, Support.
2. Press the ▲ or ▼ button to select one of the icons.
Press the ◄ or ► button to access the icon’s sub-menu.
3. Press the ▲ or ▼ button to move to items in the menu.
Press the ENTER
E
button to enter items in the menu.
4. Press the ▲/▼/◄/► button to change the selected items.
Press the button to return to the previous menu.RETURN
5. Press the button to exit from the menu.EXIT
Using the remote control buttons
Button Operations Button Operations
MENU
m
Display the main on-screen menu. ▲/▼/◄/►/
ENTER
E
Move the cursor and select an item.
Select the currently selected item.
Conrm the setting.
RETURN
R
Return to the previous menu.
EXIT
e
Exit the on-screen menu.
Example: Setting the TV’s Brightness in the Picture Menu
Adjusting the Brightness to 80
1. Press the button to display the menu.MENU
2. Press the ENTER
E
button to select .Picture
3. Press the ▲ or ▼ button to select Brightness.
4. Press the ENTER
E
button.
5. Press the ◄ or ► button until the Brightness changes to 80.
6. Press the ENTER
E
button.
Press the button to exit from the menu.EXIT
¦
N
N
Mode : Standard
Backlight : 8
Contrast : 95
Brightness : 45
Sharpness : 50
Color : 50
Tint (G/R) : G50/R50
Picture
Mode :Standard ►
Backlight : 8
Contrast : 95
Brightness : 45
Sharpness : 50
Color : 50
Tint (G/R) : G50/R50
Picture
Backlight : 8
Contrast : 95
Brightness :45 ►
Sharpness : 50
Color : 50
Tint (G/R) : G50/R50
Advanced Settings
Picture Option
Picture Reset
Picture
Brightness 45
U
Move
L
Adjust
E
Enter
R
Return
Brightness 80
U
Move
L
Adjust
E
Enter
R
Return
Mode : Standard
Backlight : 8
Contrast : 95
Brightness : 45
Sharpness : 50
Color : 50
Tint (G/R) : G50/R50
Picture
Connecting a PC

English - 22
Plug & Play Feature
When the TV is initially powered on, basic settings proceed automatically and subsequently.
1. Press the POWER
P
button on the remote control.
You can also use the POWER
P
button on the TV.
The message is Menu Language, Store Demo, Channels, and Time will be set.
displayed.
2. Press the ENTER
E
button, then menu is automatically Sets the menu language.
displayed.
3. Press the ▲ or ▼ button to select the language, then press the ENTER
E
button. The message Select ‘Home Use’ when
installing this TV in your home. is displayed.
4. Press the ◄ or ► button to select Store Demo Home Use ENTERor , then press the
E
button. The message Select the
Antenna source to memorize. is displayed.
We recommend setting the TV to mode for the best picture in your home environment.Home Use
Store Demo Store Demo mode is only intended for use in retail environments. If the unit is accidentally set to mode and
you want to return to (Standard): Press the volume button on the TV. When the volume OSD is displayed, Home Use
press and hold the button on the TV for 5 seconds.MENU
5. Press the ▲ or ▼ button to memorize the channels of the selected connection. Press the ENTER
E
button to select .Start
Air: Air Cable: Cable Auto: Air Cable antenna signal. / antenna signal. / and antenna signals.
In Cable mode, you can select the correct signal source among , and STD, HRC IRC by pressing the ▲, ▼, ◄ or ►
button, then press the ENTER
E
button. If you have Digital cable, select the cable system signal source for both Analog
and Digital. Contact your local cable company to identify the type of cable system that exists in your particular area.
6. Press the ENTER
E
button to select . The TV will begin memorizing all of the available channels.Start
To stop the search before it has nished, press the ENTER
E
button with selected.Stop
After all the available channels are stored, it starts to remove scrambled channels. The Auto program menu then
reappears. Press the ENTER
E
button when channel memorization is complete. The message is Set the Clock Mode.
displayed.
7. Press the ENTER
E
button.
Press the ▲ or ▼ button to select Auto ENTER, then Press the
E
button. The message is Set to daylight saving time.
displayed. If you select is displayed. Manual, Set current date and time
8. Press the ▲ or ▼ button to select Off, On Auto ENTER or , then press the
E
button.
9. Press the ▲ or ▼ button to highlight the time zone for your local area. Press the ENTER
E
button. If you have received a
digital signal, the time will be set automatically. If not, see page 30 to set the clock.
10. The connection method to provide the best quality HD is offered. After conrming the method, press the ENTER
E
button.
11. The message Enjoy your watching. ENTER is displayed. When you have nished, press the
E
button.
If you want to reset this feature...
1. Press the , then press the MENU Setup button to display the menu. Press the ▲ or ▼ button to select ENTER
E
button.
2. Press the ENTER
E
button again to select .Plug & Play
The feature is only available in the TV mode.Plug & Play
¦
N
N
N
N
N
N
N
N
N
Plug & Play
Menu Language, Store Demo, Channels, and Time will be set.
E
Enter
Start


English - 23
CHANNEL CONTROL
ConguringtheChannelMenu
Antenna→Air/Cable
Before your television can begin memorizing the available channels, you must specify the type
of signal source that is connected to the TV (i.e. an Air or a Cable system).
Press the button to display the TOOLS Tools menu. You can also set the Antenna by
selecting Tools→SwitchtoCable(or Switch to Air).
Auto Program
Air: Air antenna signal. / Cable: Cable antenna signal. / Auto: Air and Cable antenna
signals
When selecting the Cable TV system: Selects the cable system. STD, HRC and IRC
identify various types of cable TV systems. Contact your local cable company to identify the type of cable system that exists in
your particular area. At this point the signal source has been selected.
After all the available channels are stored, it starts to remove scrambled channels (Clear Scrambled Channels). The Auto
program menu then reappears.
If you want to stop Auto Programming, press the ENTER
E
button. The Stop Auto Program? message will be displayed.
Select Yes ENTER by pressing the ◄ or ► button, then press the
E
button.
Clear Scrambled Channels (digital channels only)
This function is used to lter out scrambled channels after Auto Program is completed. This process may take up to 20~30
minutes.
To stop searching scrambled channels: Press the ENTER
E
button to select Stop Yes. Press the ◄ button to select , then
press the ENTER
E
button.
This function is only available in mode.Cable
Channel List
For detailed procedures on using the , refer to the ‘Managing Channels’ instructions.Channel List
You can select these options by simply pressing the button on the remote control.CH LIST
Fine Tune (analog channels only)
Use ne tuning to manually adjust a particular channel for optimal reception.
If you do not store the ne-tuned channel in memory, adjustments are not saved.
* will appear next to the name of ne-tuned channels.
To reset the ne tuning setting, press the ▼ button to select Reset ENTER, then press the
E
button.
Managing Channels
Using this menu, you can add / delete or set favorite channels and use the program guide for
digital broadcasts.
All Channels
Shows all currently available channels.
Added Channels
Shows all added channels.
Favorite
Shows all favorite channels.
To select the favorite channels you have set up, press the FAV.CH button on the remote control.
¦
❑
T
❑
N
N
N
❑
N
N
❑
O
❑
N
N
N
¦
O
Antenna :Air ►
Auto Program
Clear Scrambled Channel
Channel List
Fine Tune
Channel
2 Air
4 Air
4-2 ♥ TV #8
8 Air
13 Air
13-1 ♥ TV #3
Alice’s Adventures in Wonderland
Added Channels
Air Zoom Select
T
Tools


English - 24
Programmed
Shows all current reserved Programs.
Select a channel in the All Channels, Added Channels Favorite or screen by pressing the ▲ / ▼ buttons, and pressing the
ENTER
E
button. Then you can watch the selected channel.
Using the Color buttons with the Channel List
Green Zoom ( ): Enlarges or shrinks a channel number.
Yellow Select ( ): Selects multiple channel lists. You can perform the add / delete or add to Favorite / delete from Favorite
function for multiple channels at the same time. Select the required channels and press the yellow button to set all the
selected channels at the same time. The
c
mark appears to the left of the selected channels.
TOOLS Tools Add Delete Add to Favorite Delete from Favorite Timer Viewing, Channel ( ): Displays the (or ), (or ),
Name Edit, Select All Deselect All Auto Program (or ) and menus (The Options menus may differ depending on the
situation.)
Channel Status Display Icons
♥ : A channel set as a Favorite.
c
: A channel selected by pressing the yellow button.
(
: A Program currently being broadcast.
)
: A reserved program
Channel List Option Menu (in All Channels / Added Channels / Favorite)
Press the button to use the option menu.TOOLS
Option menu items may differ depending on the channel status.
Add / Delete
You can delete or add a channel to display the channels you want.
All deleted channels will be shown on menu.All Channels
A gray-colored channel indicates the channel has been deleted.
The menu only appears for deleted channels.Add
You can also delete a channel from the or menu in the same Added Channels Favorite
manner.
Add to Favorite / Delete from Favorite
You can set channels you watch frequently as Favorite.
Press the button to display theTOOLS Tools menu. You can also set the add to (or delete from) Favorites by selecting Tools
→AddtoFavorite (or ).Delete from Favorite
The symbol will be displayed and the channel will be set as a favorite.♥
All favorite channels will be shown in the menu.Favorite
Timer Viewing
If you reserve a program you want to watch, the channel is automatically switched to the reserved channel in the Channel List;
even when you are watching another channel. To reserve a program, set the current time rst. (See page 30.)
Only memorized channels can be reserved.
You can set the channel, month, day, year, hour and minute directly by pressing the number buttons on the remote control.
Reserving a program will be shown in the menu.Programmed
Digital Program Guide and Viewing Reservation
When a digital channel is selected, and you press the ► button, the Program Guide for the channel appears. You can reserve
a program according to the procedures described above.
Channel Name Edit (analog channels only)
Channels can labeled so that their call letters appear whenever the channel is selected.
The names of digital broadcasting channels are automatically assigned and cannot be labeled.
Select All / Deselect All
Select All: You can select all the channels in the channel list.
Deselect All: You can deselect all the selected channels.
You can only select Deselect All when there is a selected channel.
Auto Program
For further details on setting up options, refer to page 23.
N
N
–
–
–
N
–
–
–
–
N
N
N
N
N
N
T
N
N
N
N
N
N
N
●
●
N
N
2 Air
4 Air
4-2 ♥ TV #8
8 Air
13 Air
13-1 ♥ TV #3
Alice’s Adventures in Wonderland
All Channels
Delete
Add to Favorite
Timer Viewing
Channel Name Edit
Select All
Auto Program
Air Zoom Select
T
Tools


English - 26
DynamicContrast→Off/Low/Medium/High
You can adjust the screen contrast so that the optimal contrast is provided.
Gamma
You can adjust the primary color (red, green, blue) Intensity. (-3 ~ +3)
Color Space
Color space is a color matrix composed of red, green and blue colors. Select your favorite color space to experience the most
natural color.
Native: Native Color Space offers deep and rich color tone.
Auto: Auto Color Space automatically adjusts to the most natural color tone based on program sources.
White Balance
You can adjust the color temperature for more natural picture colors.
R-Offset / G-Offset / B-Offset / R-Gain / G-Gain / B-Gain: You can adjust the ‘temperature’ in the light areas by Color
changing the values of . Recommended for advanced users only.R, G, B
Reset: The previously adjusted white balance will be reset to the factory defaults.
Flesh Tone
You can emphasize the pink ‘esh tone’ in the picture.
Changing the adjustment value will refresh the adjusted screen.
EdgeEnhancement→Off/On
You can emphasize object boundaries in the picture.
Picture Options
In PC mode, you can only make changes to the Color Tone Size and from among the
items in .Picture Options
ColorTone→Cool/Normal/Warm1/Warm2
Warm1 Warm2 Movie or is only activated when the picture mode is .
Settings can be adjusted and stored for each external device you have connected to an
input of the TV.
Size
Occasionally, you may want to change the size of the image on your screen. Your TV comes
with six screen size options, each designed to work best with specic types of video input. Your cable box/satellite receiver may
have its own set of screen sizes as well. In general, though, you should view the TV in 16:9 mode as much as possible.
Alternately, you can press the P.SIZE button on the remote control repeatedly to change the picture size.
16:9 : Sets the picture to 16:9 wide mode.
Zoom1: Magnies the size of the picture on the screen.
Zoom2 Zoom1: Magnies the size of the picture more than .
Wide Fit: Enlarges the aspect ratio of the picture to t the entire screen.
4:3 : Sets the picture to 4:3 normal mode.
Screen Fit: Use the function to see the full image without any cutoff when HDMI (720p/1080i/1080p), Component
(1080i/1080p) or DTV (1080i) signals are input.
16:9 Zoom1 Zoom2
Wide Fit 4:3 Screen Fit
●
●
●
●
N
❑
N
N
N
O
●
●
●
●
●
●
Picture Options
Color Tone : Normal ►
Size : 16:9
Digital NR : Auto
HDMI Black Level : Normal
Film Mode : Off
U
Move
E
Enter
R
Return
16:9 Zoom1
U
Move Zoom2
U
Move
Wide Fit
U
Move 4:3 Screen Fit


English - 27
Temporary image retention may occur when viewing a static image on the set for more than two hours.
After selecting or , then press the Zoom1, Zoom2 Wide Fit Position: Press the ◄ or ► button to select ENTER
E
button.
Press the ▲ or ▼ button to move the picture up and down.
After selecting in HDMI (1080i/1080p) or Component (1080i/1080p) mode, you made need to center the picture: Screen Fit
Press the ◄ or ► button to select Position ENTER, then press the
E
button. Press the ▲, ▼, ◄ or ►button to move the
picture.
Reset Reset ENTER: Press the ◄ or ►button to select , then press the
E
button. You can initialize the setting.
HD (High Denition): 16:9 - 1080i/1080p (1920x1080), 720p (1280x720)
Settings can be adjusted and stored for each external device you have connected to an input of the TV.
Input Source Picture Size
TV, AV, Component (480i, 480p) 16:9, Zoom1, Zoom2, 4:3
DTV(1080i), Component (1080i, 1080p), HDMI (720p, 1080i, 1080P) 16:9, 4:3, Wide Fit, Screen Fit
PC 16:9, 4:3
DigitalNR→Off/Low/Medium/High/Auto
If the broadcast signal received by your TV is weak, you can activate the Digital Noise Reduction feature to help reduce any static
and ghosting that may appear on the screen.
When the signal is weak, select one of the other options until the best picture is displayed.
HDMIBlackLevel→Normal/Low
You can select the black level on the screen to adjust the screen depth.
This function is active only when an external device is connected to the TV via HDMI. The function may not HDMI Black Level
be compatible with all external devices.
FilmMode→Off/Auto
The TV can be set to automatically sense and process lm signals from all sources and adjust the picture for optimum quality.
Film Mode is supported in TV, Video, Component (480i / 1080i) and HDMI (480i / 1080i).
PictureReset→ResetPictureMode/Cancel
Resets all picture settings to the default values.
Reset Picture Mode: Current picture values return to default settings.
Using Your TV as a Computer (PC) Display
Setting Up Your PC Software (Based on Windows XP)
The Windows display-settings for a typical computer are shown below. The actual screens on your PC will probably be different,
depending upon your particular version of Windows and your particular video card. However, even if your actual screens look
different, the same basic set-up information will apply in almost all cases. (If not, contact your computer manufacturer or Samsung
Dealer.)
1. First, click on ‘Control Panel’ in the Windows start menu.
2. When the control panel window appears, click on ‘Appearance and Themes’ and a display dialog-box will appear.
3. When the control panel window appears, click on ‘Display’ and a display dialog-box will appear.
4. Navigate to the ‘Settings’ tab on the display dialog-box.
The correct size setting (resolution): Optimum: 1920 X 1080 pixels
If a vertical frequency option exists on your display settings dialog box, the correct value is or . Otherwise, just click 60 60 Hz
OK and exit the dialog box.
N
N
N
N
N
N
N
N
❑
N
¦

English - 28
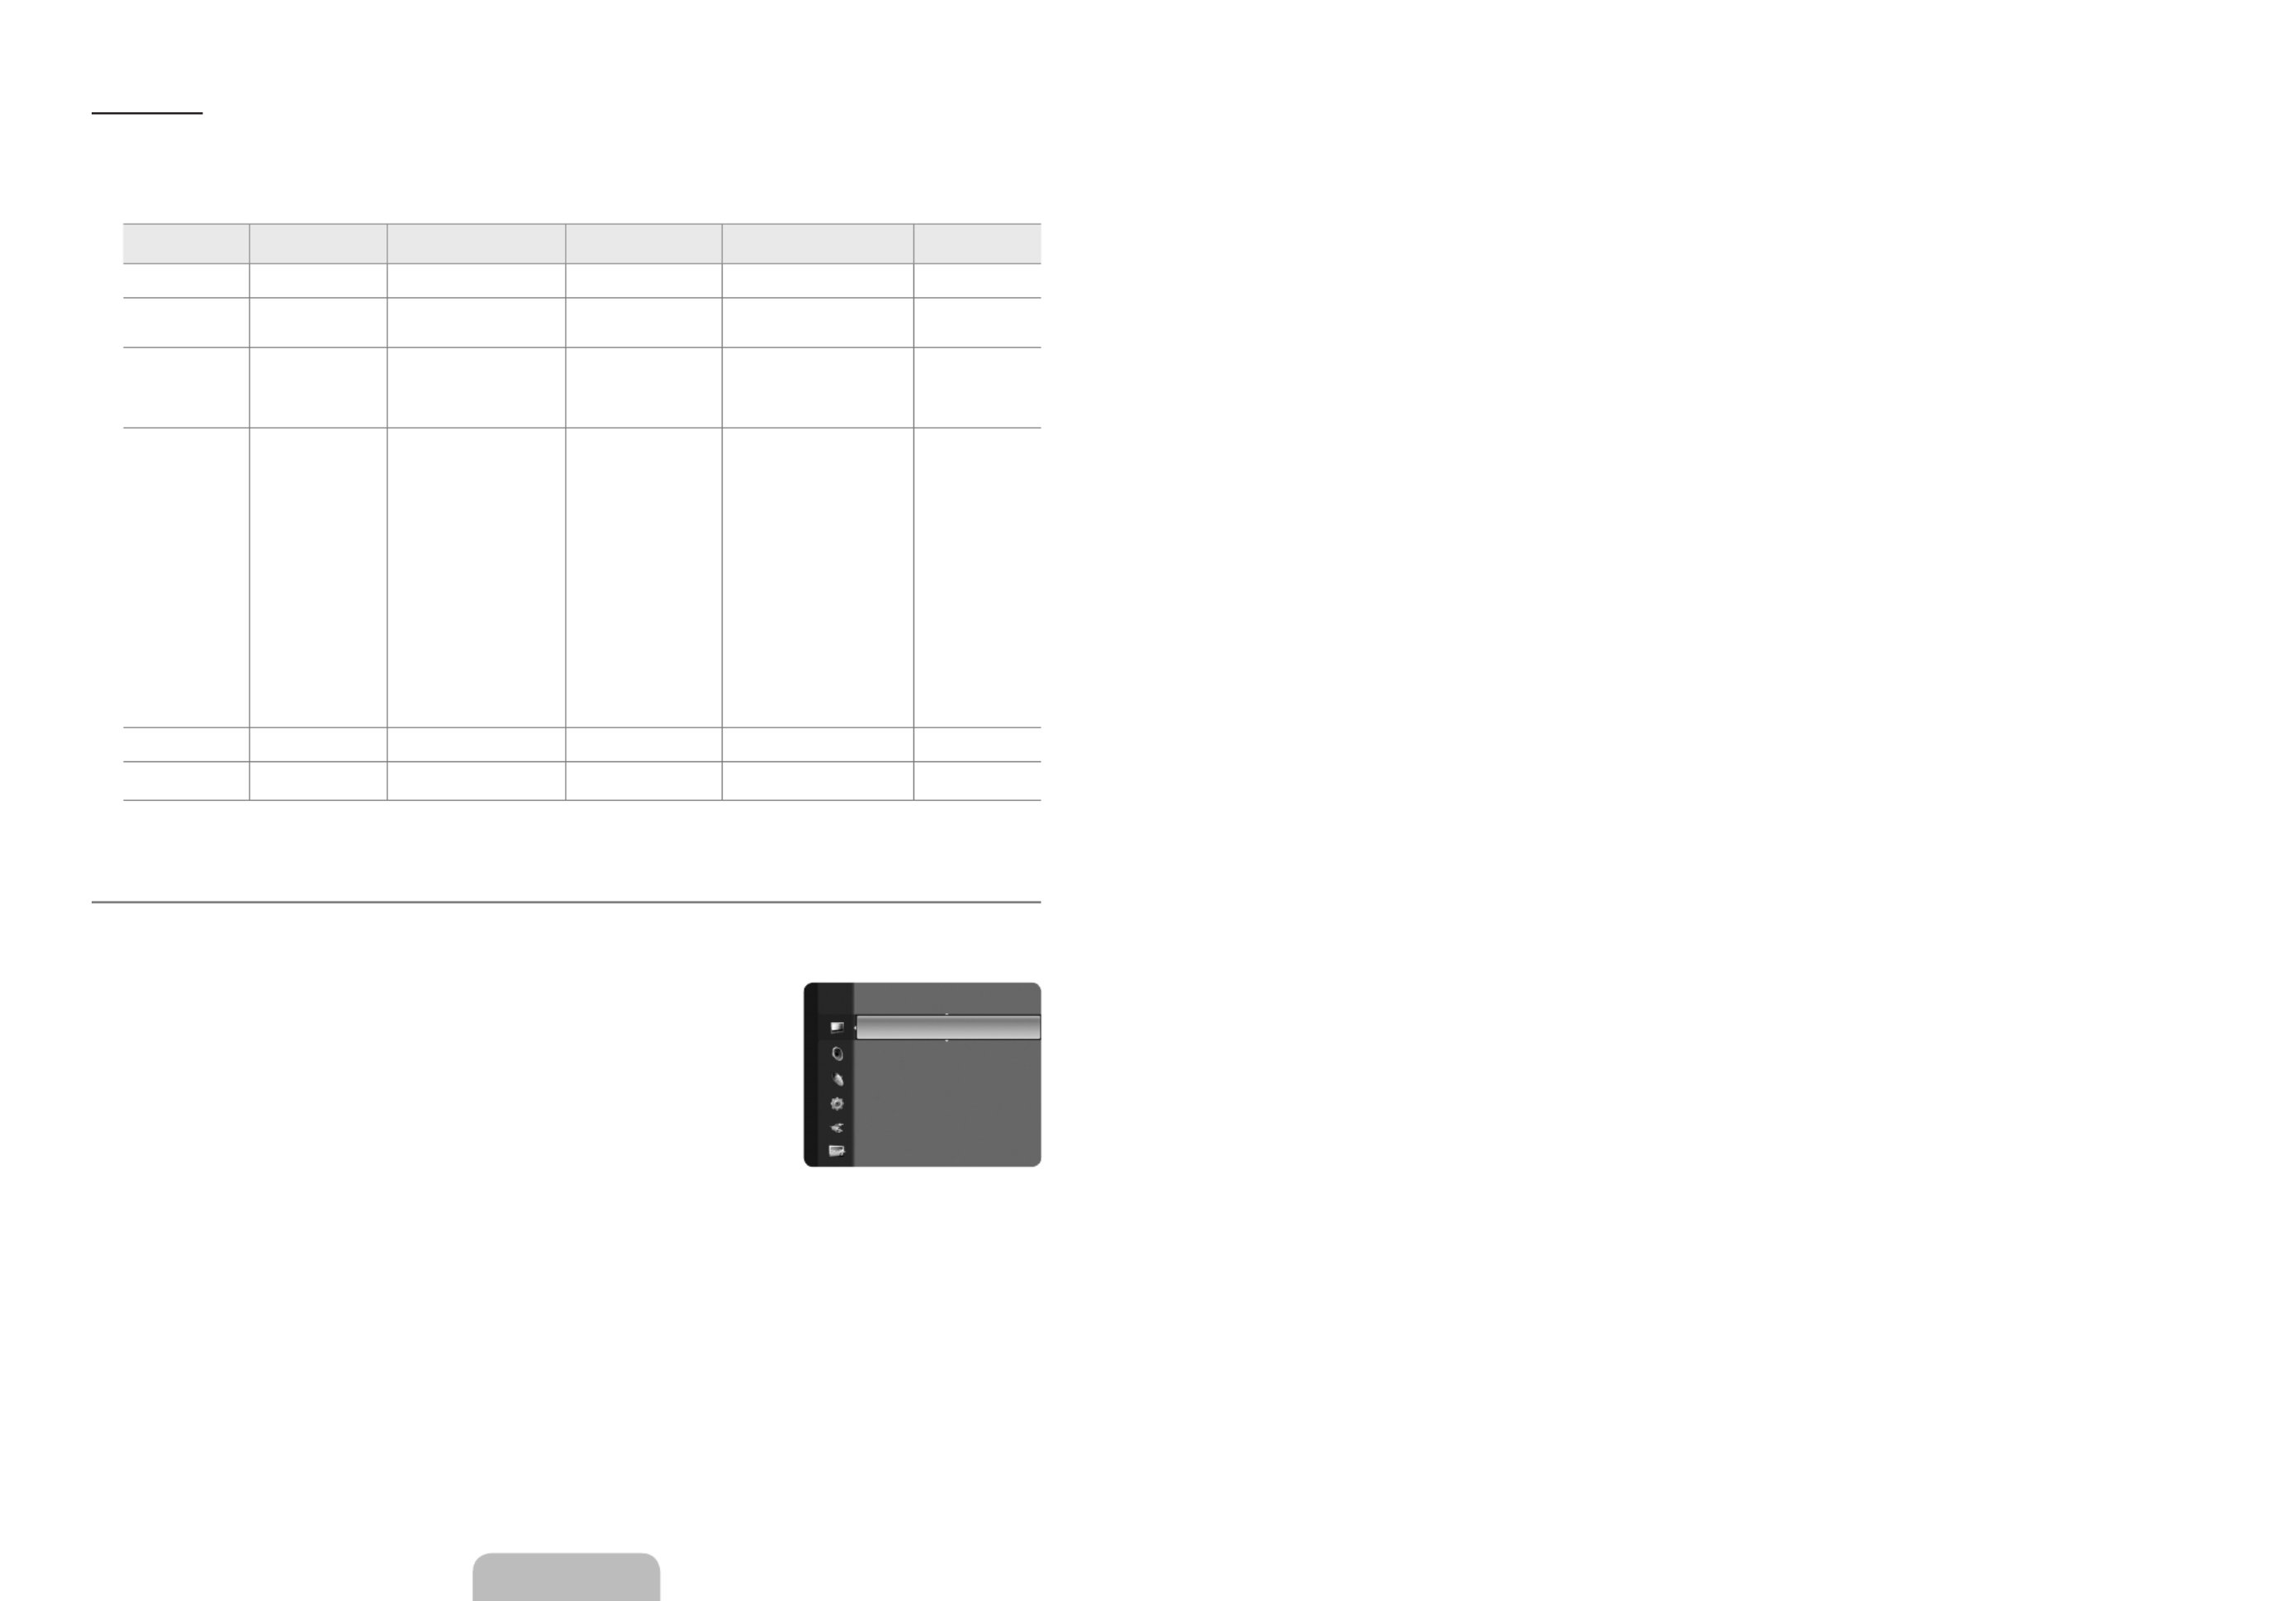
Display Modes
If the signal from the system equals the standard signal mode, the screen is adjusted automatically. If the signal from the system
doesn’t equal the standard signal mode, adjust the mode by referring to your videocard user guide; otherwise there may be no
video. For the display modes listed below, the screen image has been optimized during manufacturing.
D-Sub and HDMI/DVI Input
Mode Resolution Horizontal Frequency
(KHz)
Vertical Frequency
(Hz)
Pixel Clock Frequency
(MHz)
Sync Polarity
(H / V)
IBM 640 X 350 31.469 70.086 25.175 +/-
720 X 400 31.469 70.087 28.322 -/+
MAC 640 X 480 35.000 66.667 30.240 -/-
832 X 624 49.726 74.551 57.284 -/-
1152 X 870 68.681 75.062 100.000 -/-
VESA CVT 720 X 576 35.910 59.950 32.750 -/+
1152 X 864 53.783 59.959 81.750 -/+
1280 X 720 44.772 59.855 74.500 -/+
1280 X 960 75.231 74.857 130.000 -/+
1280 X 720 56.456 74.777 95.750 -/+
VESA DMT 640 X 480 31.469 59.940 25.175 -/-
640 X 480 37.861 72.809 31.500 -/-
640 X 480 37.500 75.000 31.500 -/-
800 X 600 37.879 60.317 40.000 +/+
800 X 600 48.077 72.188 50.000 +/+
800 X 600 46.875 75.000 49.500 +/+
1024 X 768 48.363 60.004 65.000 -/-
1024 X 768 56.476 70.069 75.000 -/-
1024 X 768 60.023 75.029 78.750 +/+
1152 X 864 67.500 75.000 108.000 +/+
1280 X 1024 63.981 60.020 108.000 +/+
1280 X 1024 79.976 75.025 135.000 +/+
1280 X 800 49.702 59.810 83.500 -/+
1280 X 800 62.795 74.934 106.500 -/+
1280 X 960 60.000 60.000 108.000 +/+
1360 X 768 47.712 60.015 85.500 +/+
1440 X 900 55.935 59.887 106.500 -/+
1440 X 900 70.635 74.984 136.750 -/+
1680 X 1050 65.290 59.954 146.250 -/+
VESA GTF 1280 X 720 52.500 70.000 --/+
1280 X 1024 74.620 70.000 128.943 -/-
VESA DMT /
DTV CEA 1920 X 1080p 67.500 60.000 148.500 +/+
When using an HDMI / DVI cable connection, you must use the jack.HDMI IN 1
Setting up the TV with your PC
Preset: Press the button to select PC mode.SOURCE
Auto Adjustment
Use the Auto Adjust function to have the TV set automatically adjust the video signals it
receives. The function also automatically ne-tunes the settings and adjusts the frequency
values and positions.
Press the button to display theTOOLS Tools menu. You can also set the Auto Adjustment
by selecting Tools→AutoAdjustment.
This function does not work in DVI-HDMI mode.
Screen
The purpose of the picture quality adjustment is to remove or reduce picture noise. If the noise is not removed by ne tuning alone,
then make the vertical frequency adjustments on your PC and ne tune again. After the noise has been reduced, re-adjust the
picture so that it is aligned on the center of the screen.
Coarse / Fine
The purpose of picture quality adjustment is to remove or reduce picture noise. If the noise is not removed by Fine-tuning alone,
then adjust the frequency as best as possible (Coarse) and Fine-tune again. After the noise has been reduced, readjust the picture
so that it is aligned on the center of screen.
PC Position
Adjust the PC’s screen positioning if it does not t the TV screen. Press the ▲ or ▼ button to adjusting the Vertical-Position. Press
the ◄ or ►button to adjust the Horizontal-Position.
Image Reset
You can replace all image settings with the factory default values.
N
¦
N
❑
T
N
❑
Brightness : 45
Sharpness : 50
AutoAdjustment ►
Screen
Advanced Settings
Picture Options
Picture Reset
Picture


English - 29
SOUND CONTROL
ConguringtheSoundMenu
Mode→Standard/Music/Movie/ClearVoice/Custom
You can select a sound mode to suit your personal preferences.
Press the button on the remote control repeatedly to select one of the sound S.MODE
settings.
Equalizer
The sound settings can be adjusted to suit your personal preference.
Mode
Selects the sound mode among the predened settings.
Balance L/R
Adjusts the balance between the right and left speaker.
100Hz / 300Hz / 1KHz / 3KHz / 10KHz (Bandwidth Adjustment)
To adjust the level of different bandwidth frequencies.
Reset
Resets the equalizer settings to the default values.
SRSTruSurroundHD→Off/On
SRS TruSurround HD is a patented SRS technology that solves the problem of playing 5.1 multichannel content over two
speakers. TruSurround delivers a compelling, virtual surround sound experience through any two-speaker playback system,
including internal television speakers. It is fully compatible with all multichannel formats.
Press the button on the remote control to select or .SRS On Off
Preferred Language (digital channels only)
Digital-TV broadcasts are capable of simultaneous transmission of many audio tracks (for example, simultaneous translations of
the program into foreign languages).
You can listen in a language other than the by pressing the button on the remote control.Preferred Language MTS
Preferred Language is available only in Digital TV mode.
You can only select the language from among the actual languages being broadcast.
Multi-Track Sound (MTS) (analog channels only)
Press the button on the remote control repeatedly to select or .MTS Mono, Stereo SAP
Mono: Choose for channels that are broadcasting in mono or if you are having difculty receiving a stereo signal.
Stereo: Choose for channels that are broadcasting in stereo.
SAP: Choose to listen to the Separate Audio Program, which is usually a foreign-language translation.
Multi-Track Sound is available only in Analog TV mode.
Depending on the particular program being broadcast, you can listen to or .Mono, Stereo SAP
AutoVolume→Off/On
Each broadcasting station has its own signal conditions, and so it is not easy to adjust the volume every time the channel is
changed. This feature lets you automatically adjust the volume of the desired channel by lowering the sound output when the
modulation signal is high or by raising the sound output when the modulation signal is low.
¦
❑
O
❑
❑
O
❑
O
N
N
❑
O
●
●
●
N
N
❑
Mode :Custom ►
Equalizer
SRS TruSurround HD : Off
Preferred Language : English
Multi-Track Sound : Mono
Auto Volume : Off
Speaker Select : TV Speaker
Sound


English - 31
Timer 1 / Timer 2 / Timer 3
Three different on / off timer settings can be made. You must set the clock rst.
On Time: Set the hour, minute, am/pm, and activate/inactivate. (To activate the timer with the setting you’ve chosen, set to
Activate.)
Off Time: Set the hour, minute, am/pm, and activate/inactivate. (To activate the timer with the setting you’ve chosen, set to
Activate.)
Volume: Set the desired volume level.
Antenna Air Cable: View antenna type. ( or )
You can set the Antenna by selecting Channel→Antenna. (see page 23)
Channel: Select the desired channel.
Repeat Once, Everyday, Mon~Fri, Mon~Sat, Sat~Sun Manual: Select or .
When Manual ENTER is selected, press the ►button to select the desired day of the week. Press the
E
button over the
desired day and the
c
mark will appear.
You can set the hour, minute and channel by pressing the number buttons on the remote control.
Auto Power Off
When you set the timer On, the television will eventually turn off, if no controls are operated for 3 hours after the TV was
turned on by the timer. This function is only available in timer On mode and prevents overheating, which may occur if a TV is
on for too long time.
V-Chip
The V-Chip feature automatically locks out programs that are deemed inappropriate for children. The user must enter a PIN
(personal ID number) before any of the V-Chip restrictions are set up or changed.
V-Chip function is not available in HDMI, Component or PC mode.
The default PIN number of a new TV set is ‘0-0-0-0’
If you forget the PIN, press the remote-control buttons in the following sequence, which resets the pin to 0-0-0-0 : POWER
(off) → MUTE→8→2→4→POWER (on).
Allow all Block all: Press to unlock all TV ratings. / : Press to lock all TV ratings.
V-ChipLock→Off/On
You can block rated TV Programs.
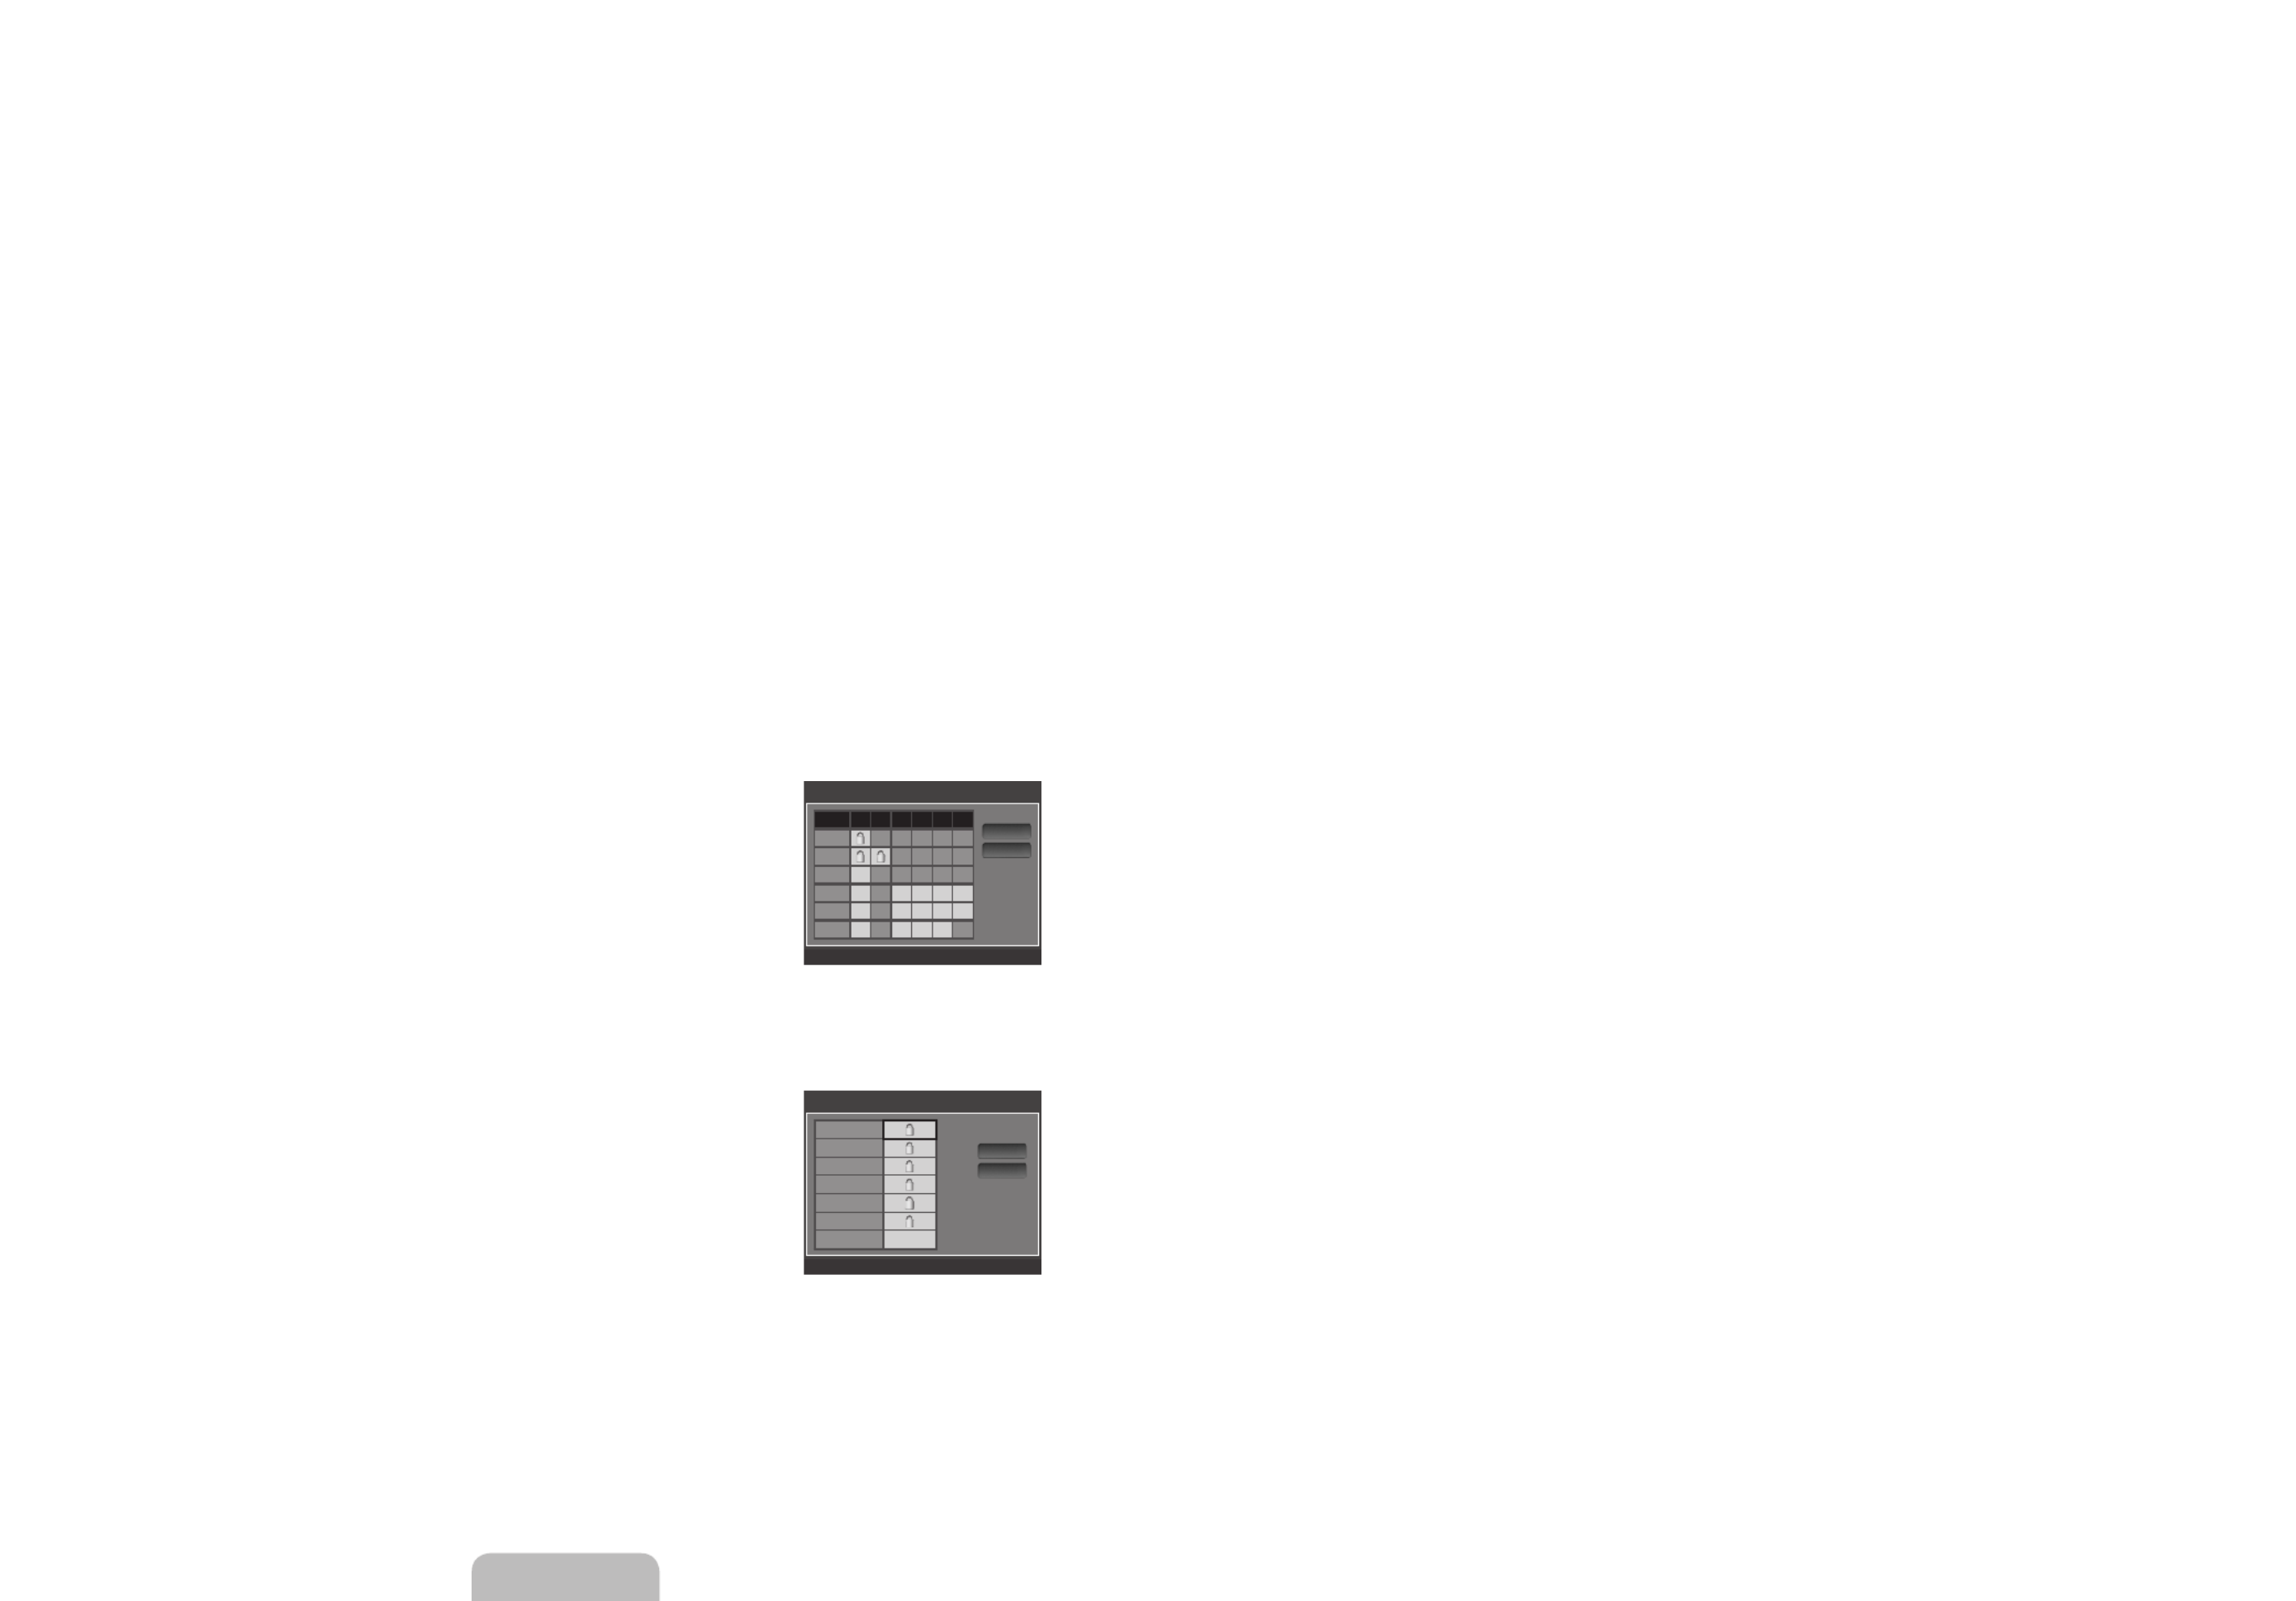
TV Parental Guidelines
You can block TV programs depending on their rating. This function allows you to control what
your children are watching.
TV-Y: Young children / TV-Y7 TV-G: Children 7 and over / : General audience /
TV-PG TV-14 TV-MA: Parental guidance / : Viewers 14 and over / : Mature audience
ALL FV V: Lock all TV ratings. / : Fantasy violence / : Violence / : Sexual situation / S
L: Adult Language / : Sexually Suggestive DialogD
The V-Chip will automatically block certain categories that are more restrictive. For
example, if you block TV-Y category, then TV-Y7 will automatically be blocked. Similarly,
if you block the TV-G category, then all the categories in the young adult group will be
blocked (TV-G, TV-PG, TV-14 TV-MA D, L, S, V and ). The sub-ratings ( ) work together
similarly.
The V-chip will automatically block certain categories that are ‘More restrictive’. For example, if you block sub-rating in L TV-
PG L TV-14 TV-MA, then the sub-ratings in and will automatically be blocked.
MPAA Rating
You can block movies depending on their MPAA rating. The Motion Picture Association of
America(MPAA) has implemented a rating system that provides parents or guardians with
advance information on which lms are appropriate for children.
G: General audience (no restrictions).
PG: Parental guidance suggested.
PG-13: Parents strongly cautioned.
R: Restricted. Children under 17 should be accompanied by an adult.
NC-17: No children under age 17.
X: Adults only.
NR: Not rated.
The V-Chip will automatically block any category that is ‘More restrictive’. For example, if you block the category, then PG-13
R NC-17 X, and will automatically be blocked also.
●
●
●
●
N
●
●
N
N
N
❑
N
N
N
N
●
●
N
N
●
●
●
●
●
●
●
N
TV Parental Guidelines
ALL FV V S L D
TV-Y
TV-Y7
TV-G
TV-PG
TV-14
TV-MA
n
Move
E
Enter
R
Return
Allow All
Block All
MPAA Rating
G
PG
PG-13
R
NC-17
X
NR
n
Move
E
Enter
R
Return
Allow All
Block All

English - 32
Canadian English
C: Programming intended for children under age 8.
C8+: Programming generally considered acceptable for children 8 years and over to watch on their own.
G: General programming, suitable for all audiences.
PG: Parental Guidance.
14+: Programming contains themes or content which may not be suitable for viewers under the age of 14.
18+: Adult programming.
The V-Chip will automatically block any category that is ‘More restrictive’. For example, if you block category, then G PG, 14+
and will automatically be blocked also.18+
Canadian French
G: General
8 ans+: Programming generally considered acceptable for children 8 years and over to watch on their own.
13 ans+: Programming may not be suitable for children under the age of 13.
16 ans+: Programming is not suitable for children under the age of 16.
18 ans+: Programming restricted to adults.
The V-Chip will automatically block any category that is ‘More restrictive’. For example, if you block category, then 8 ans+ 13
ans+, 16 ans+ 18 ans+ and will automatically be blocked also.
Downloadable U.S. Rating
Parental restriction information can be used while watching DTV channels
If information is not downloaded from the broadcasting station, the Downloadable U.S.
rating menu is deactivated.
Parental restriction information is automatically downloaded while watching DTV channels.
It may take several seconds.
The menu is available for use after information is downloaded Downloadable U.S. rating
from the broadcasting station. However, depending on the information from the
broadcasting station, it may not be available for use.
Parental restriction levels differ depending on the broadcasting station. The default menu
name and Downloadable US rating changes depending on the downloaded information.
Even if you set the On-screen display to your desired language, the menu will appear in English Downloadable U.S. Rating
only.
The rating will automatically block certain categories that are more restrictive.
The rating titles (For example: Humor Level..etc) and TV ratings (For example: ..etc) may differ depending on the DH, MH, H
broadcasting station.
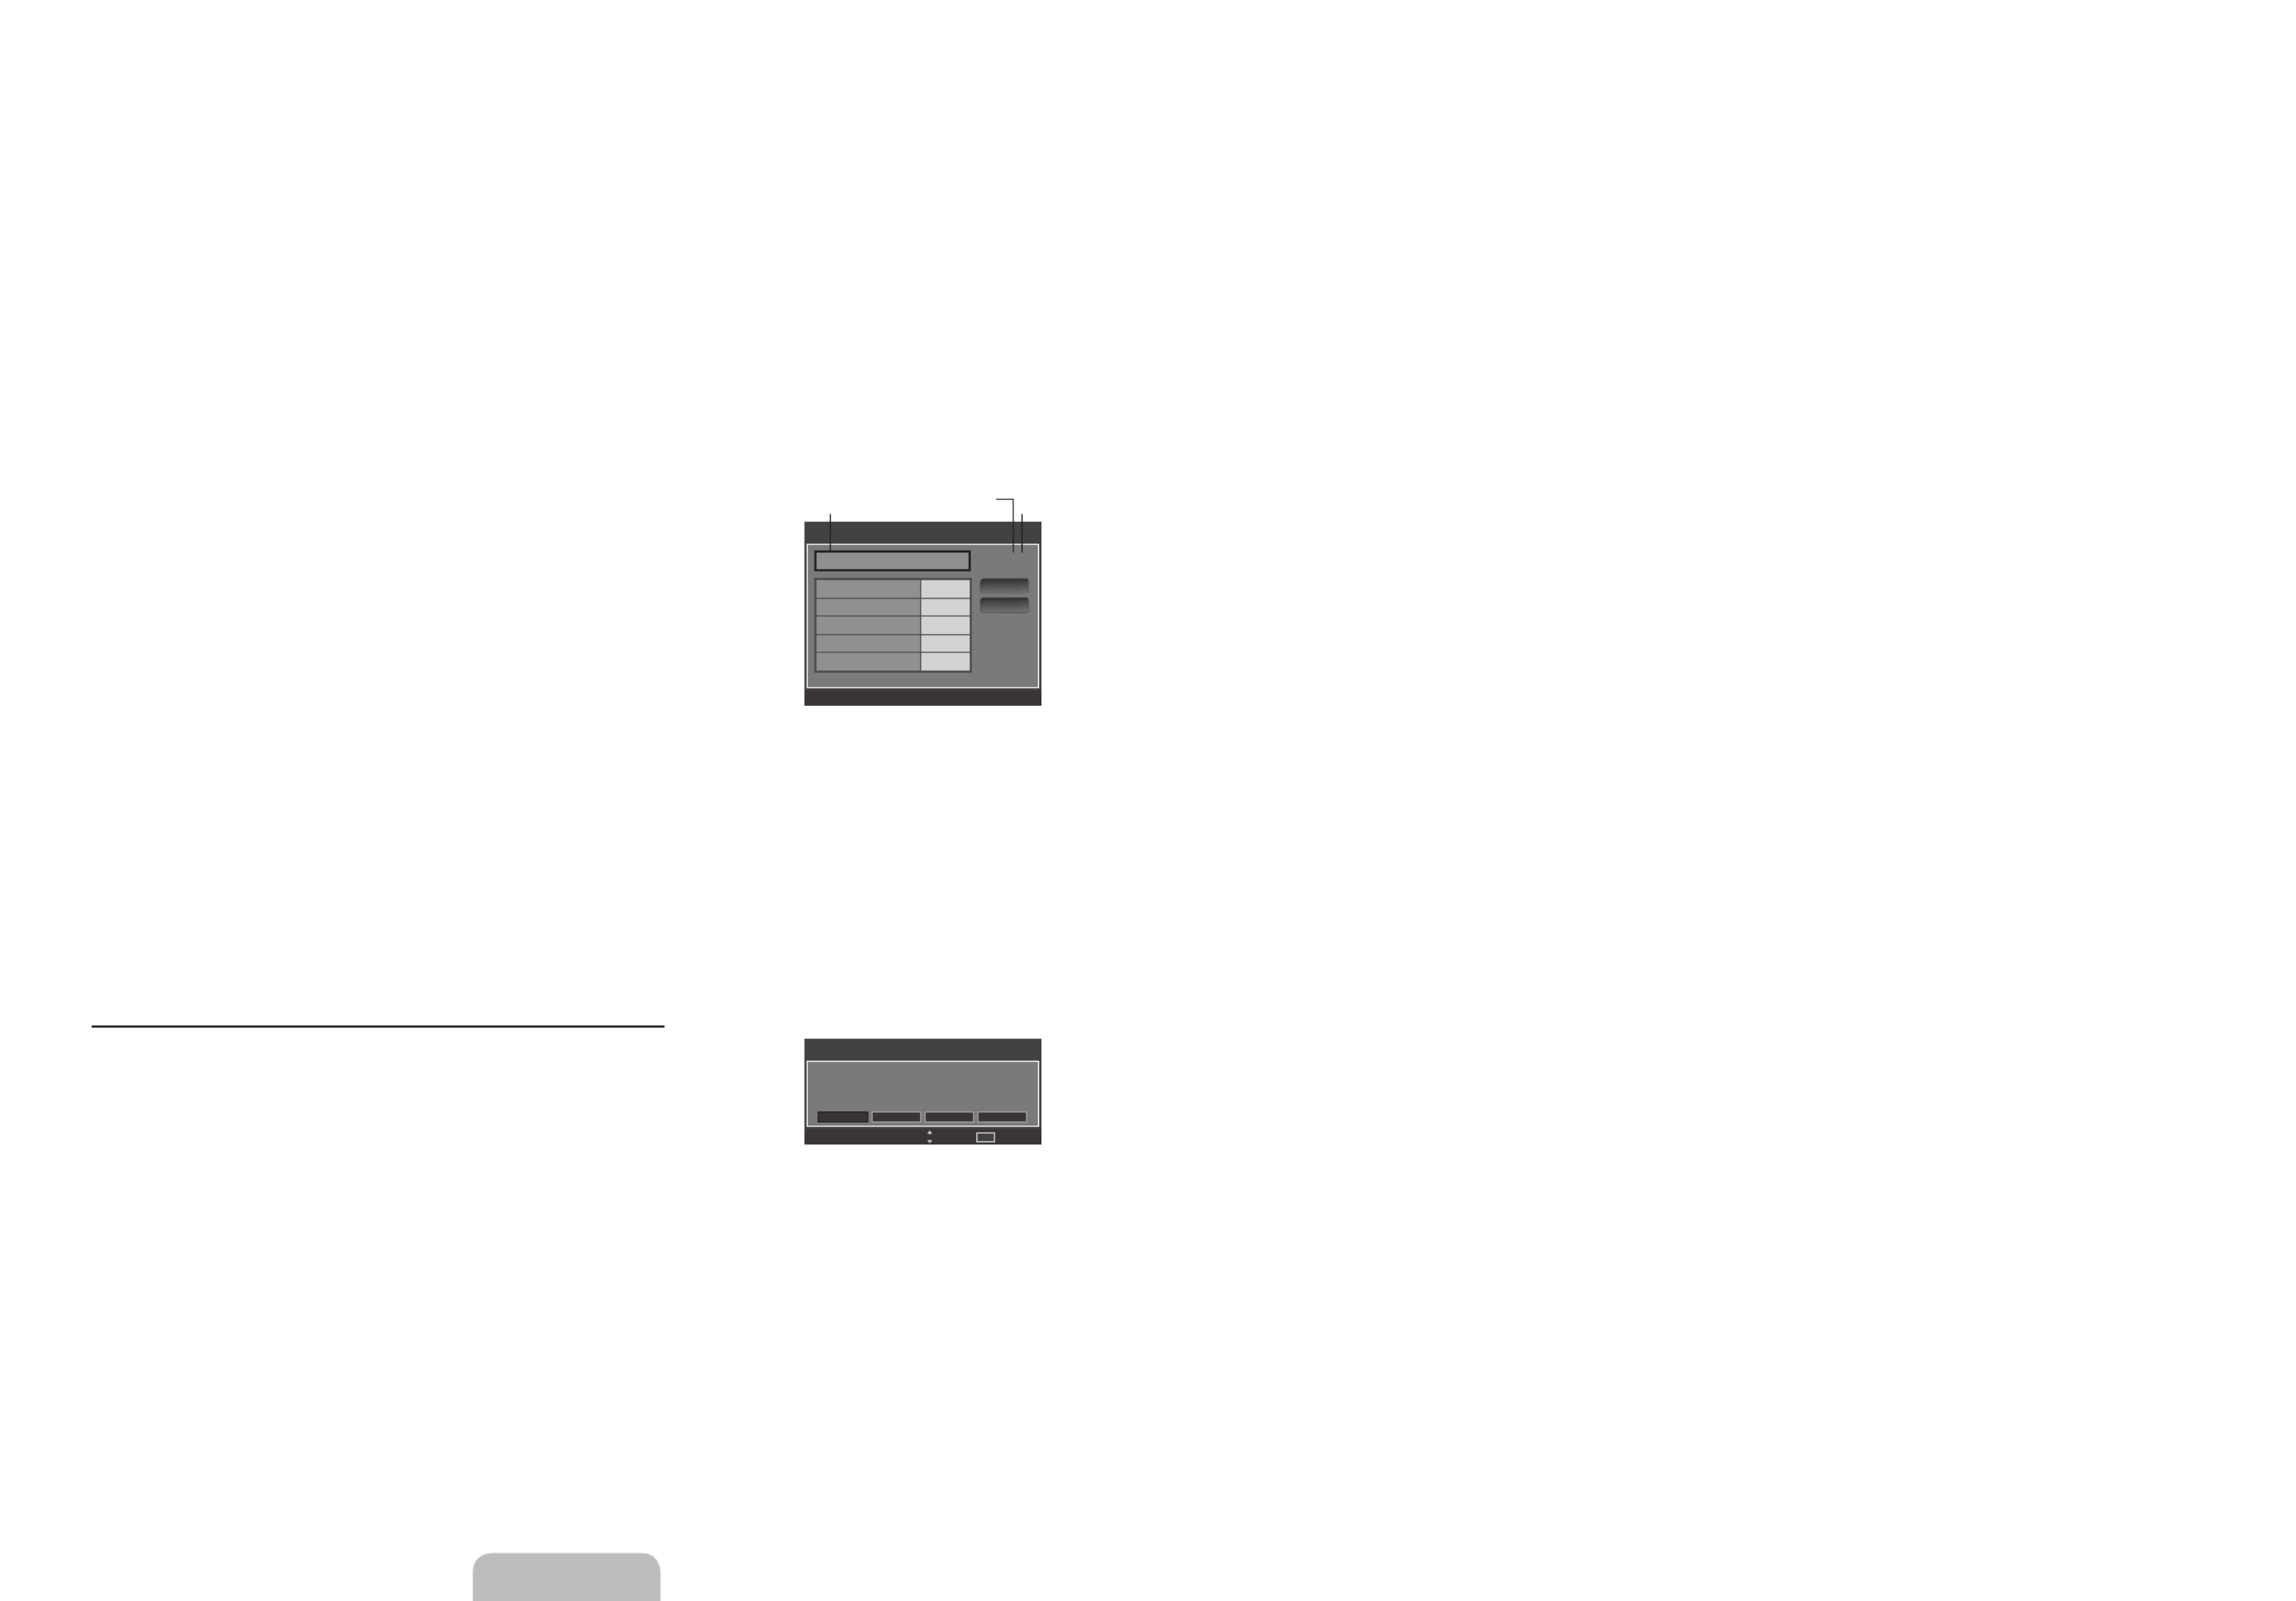
Change PIN
The screen will appear. Choose any 4 digits for your PIN and enter them.Change PIN
As soon as the 4 digits are entered, the ConrmNewPIN screen appears. Re enter the same 4 digits. When the Conrm screen
disappears, your PIN has been memorized.
If you forget the PIN, press the remote-control buttons in the following sequence, which resets the pin to 0-0-0-0 : POWER
(off) → MUTE→8→2→4→POWER (on).
How to Reset the TV after the V-Chip Blocks a Channel (Emergency Escape)
If the TV is tuned to a restricted channel, the V-Chip will block it. The screen will go blank and
the following message will appear:
1. Enter your PIN, then press the ENTER
E
button and press the ▲ or ▼ button to
temporarily disable the V-Chip Lock.
If you forget the PIN, press the remote-control buttons in the following sequence, which resets
the pin to 0-0-0-0 : (on)POWER (off) → MUTE→8→2→4→POWER
Caption (On-Screen Text Messages)
Caption→Off/On
You can switch the caption function on or off. If captions are not available, they will not be displayed on the screen.
Press the button on the remote control to turn the Caption on or off.CC
The Caption feature doesn’t work in Component, HDMI or PC modes.
●
●
●
●
●
●
N
●
●
●
●
●
N
N
N
N
N
N
N
N
N
N
❑
O
N
Downloadable U.S. Rating
Humor Level 1/2►
DH
MH
H
VH
EH
n
Move
E
Enter
R
Return
Allow All
Block All
Rating title
The number of all
rating information
The number of current
rating information
Received Rating: TV-14/NL
This channel is blocked by a Parental Lock. Prees enter the PIN
to unblock.
CH
Change 0~9 Enter PIN


English - 33
Caption Mode
You can select the desired caption mode.
The availability of captions depends on the program being broadcast.
Default / CC1~CC4 / Text1~Text4 (analog channels only)
The Analog Caption function operates in either analog TV channel mode or when a signal is supplied from an external device
to TV. (Depending on the broadcasting signal, the Analog Caption function may operate on digital channels.)
Default / CC1~CC4 / Text1~Text4 / Service1~Service6 (digital channels only)
The Digital Captions function operates on digital channels.
Service1~6 in digital caption mode may not be available depending on the broadcast.
Digital Caption Options (digital channels only)
Size Default Small Standard Large: This option consists of , , and . The default is .Standard
Font Style Default Style0 ~ Style 7: This option consists of , . You can change the font you want. The default is .Style 0
Foreground Color Default, White, Black, Red, Green, Blue, Yellow, Magenta Cyan: This option consists of and . You can
change the color of the letter. The default is .White
Background Color Default, White, Black, Red, Green, Blue, Yellow, Magenta Cyan: This option consists of and . You can
change the background color of the caption. The default is .Black
Foreground Opacity Default, Transparent, Translucent, Solid Flashing: This option consists of and . You can change the
opacity of the letter.
Background Opacity Default, Transparent, Translucent, Solid Flashing: This option consists of and . You can change the
background opacity of the caption.
Return to Default Size, Font Style, Foreground Color, Background color, Foreground Opacity: This option sets each of
and to its default.Background Opacity
The are only enabled when the is Service 1 ~ Service 6. (If is the Digital Caption Options Caption Mode Caption Mode
default, the are enabled depending on the broadcast.) Digital Caption Options
The availability of captions depends on the program being broadcast.
Default means to follow the standard set by the broadcaster.
Foreground and Background cannot be set to have the same color.
Foreground Opacity Background Opacity and cannot be both set to Transparent.
Melody→Off/Low/Medium/High
A melody sound can be set to come on when the TV is powered On or Off.
The Melody does not play.
When no sound is output from the TV because the button has been pressed.MUTE
When no sound is output from the TV because the volume has been reduced to minimum with the VOL – button.
When the TV is turned off by Sleep Timer function.
GameMode→Off/On
When connecting to a game console such as PlayStation TM or Xbox TM, you can enjoy a more realistic gaming experience by
selecting the game menu.
Restrictions on game mode (Caution)
To disconnect the game console and connect another external device, set to in the setup menu. Game Mode Off
If you display the TV menu in , the screen shakes slightly. Game mode
If is :Game Mode On
Picture mode is automatically changed to and cannot be changed. Standard
Sound mode is automatically changed to and cannot be changed. Adjust the sound using the equalizer. Custom
Game Mode is not available in regular TV and PC mode.
If the picture is poor when external device is connected to TV, check if is . Set to and Game Mode On Game Mode Off
connect external devices.
EnergySaving→Off/Low/Medium/High/Auto
This feature adjusts the brightness of the TV in order to reduce power consumption. When watching TV at night, set the Energy
Saving High mode option to to reduce eye fatigue as well as power consumption.
N
●
●
N
●
●
●
●
●
●
●
N
N
N
N
N
❑
N
–
–
–
❑
N
–
–
N
–
–
N
N
❑

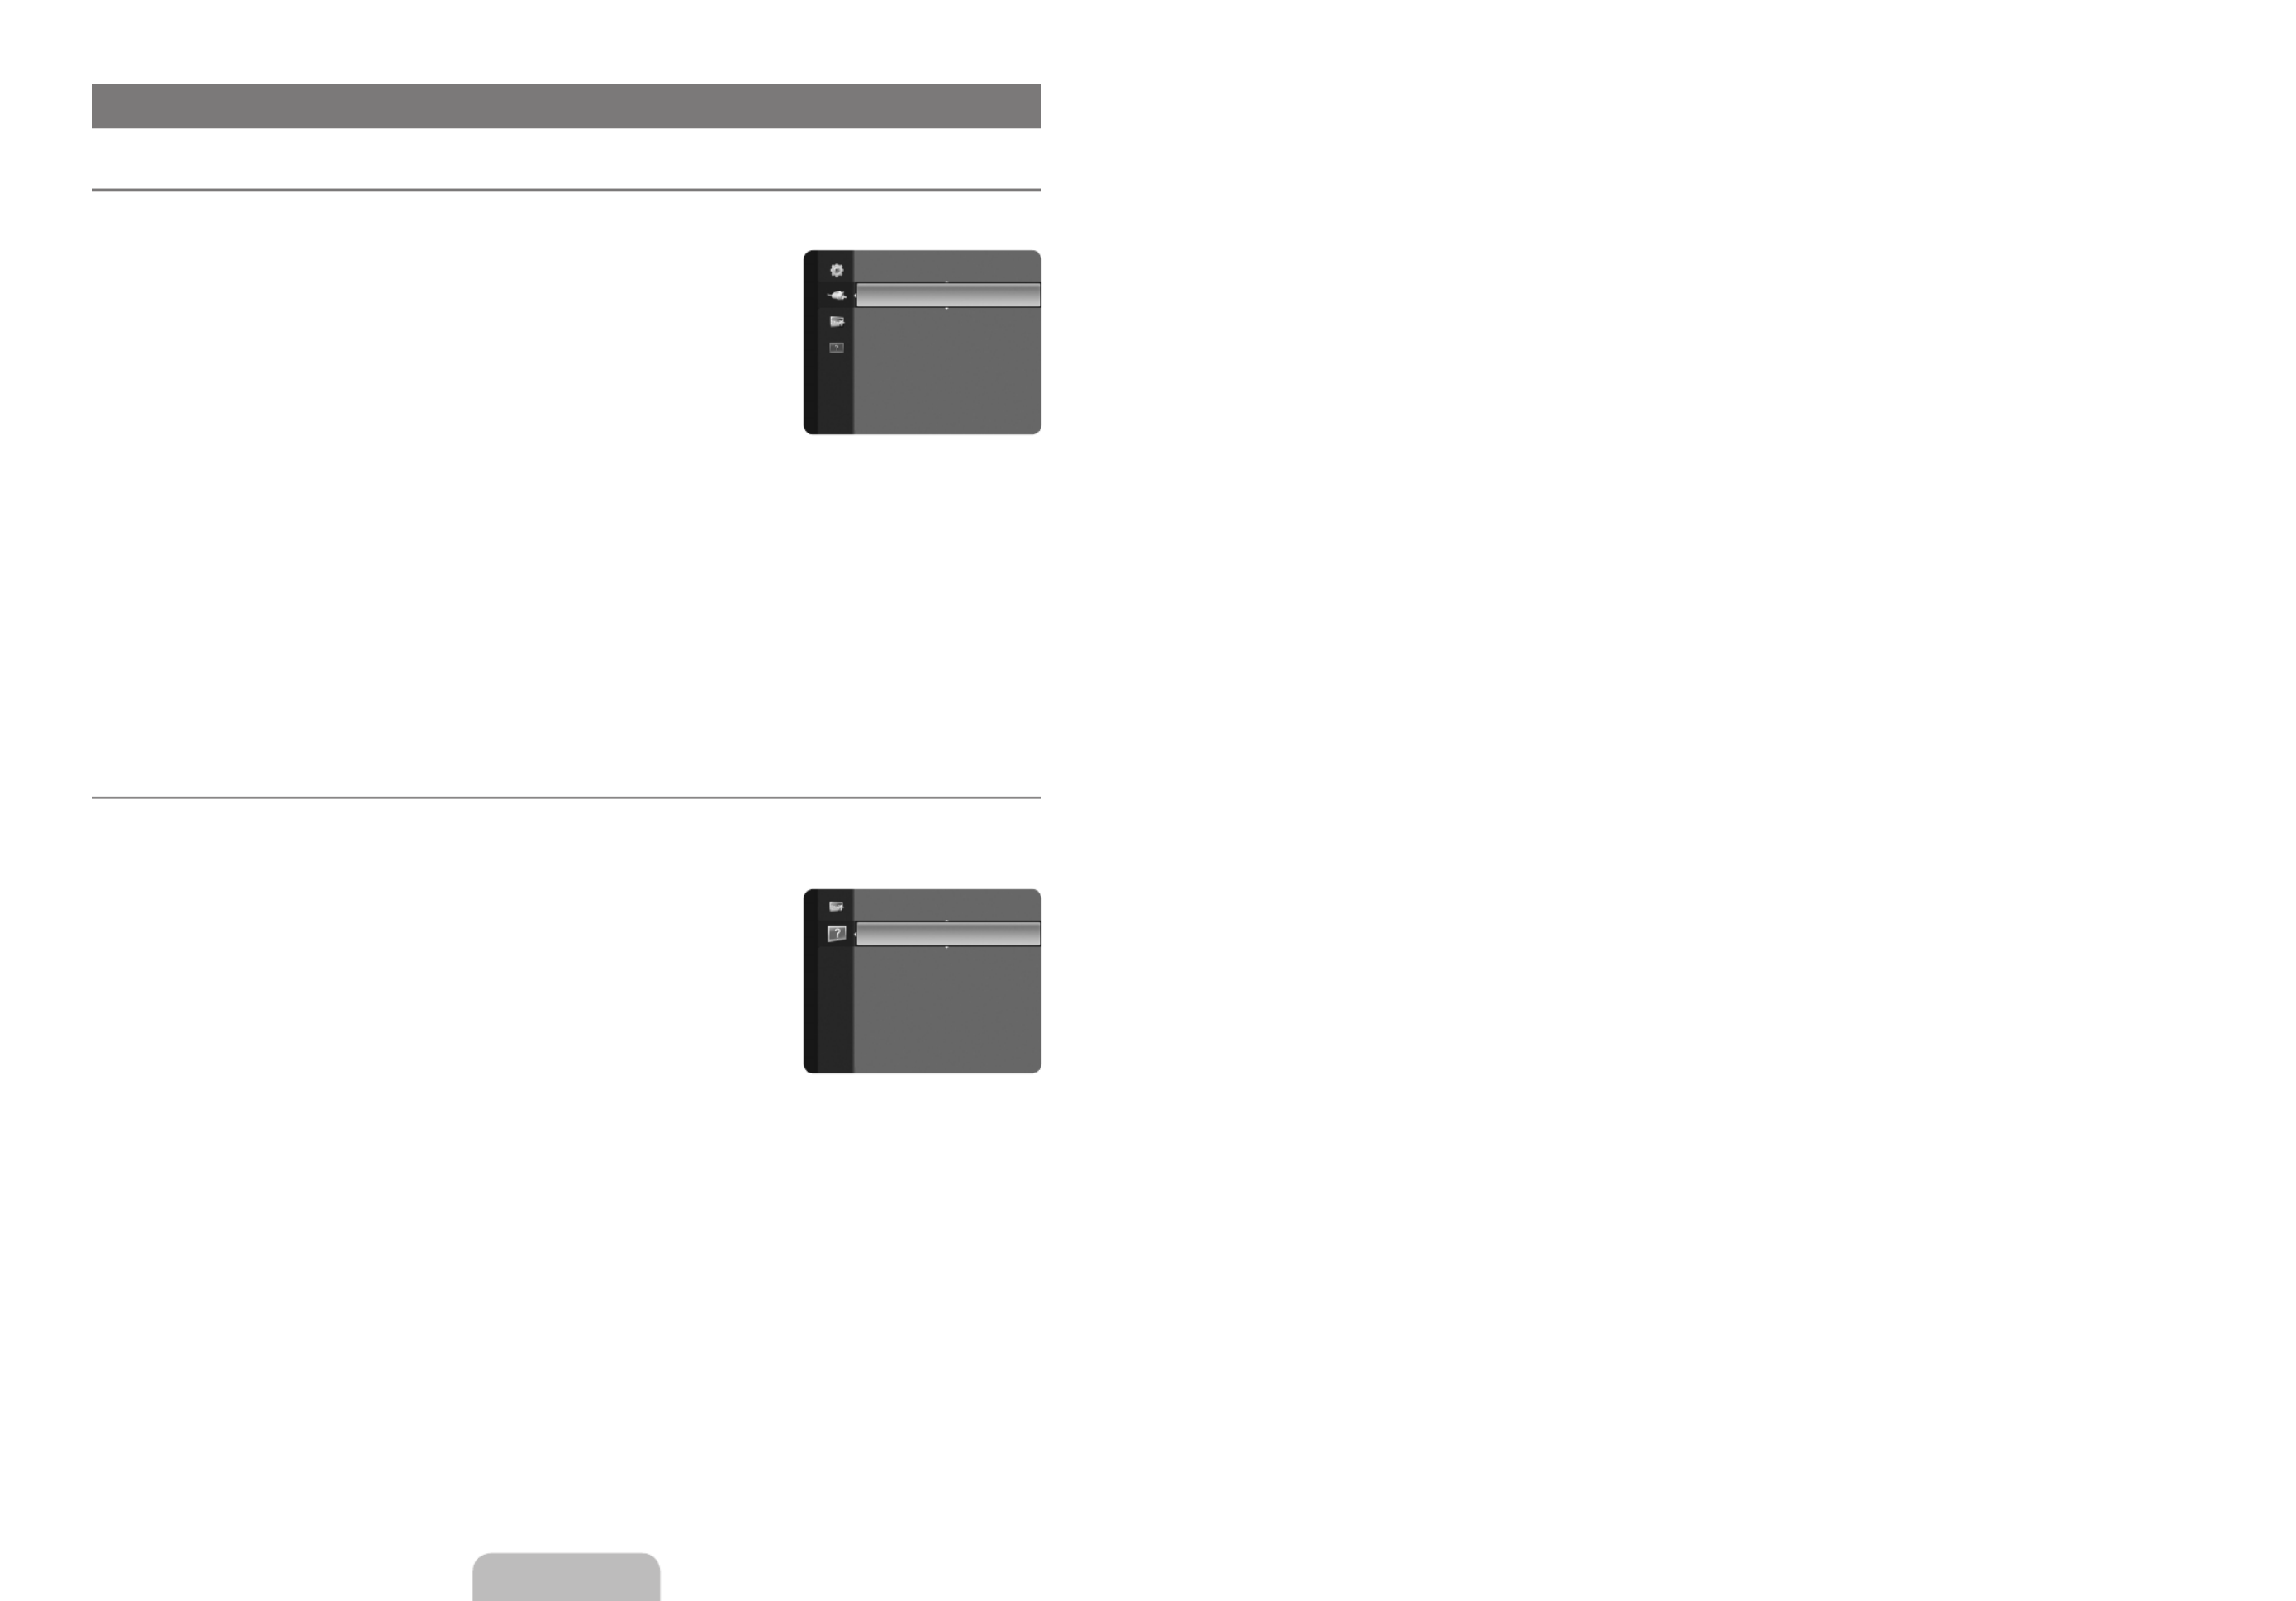
English - 34
INPUT / SUPPORT
ConguringtheInputMenu
Source List
Use to select TV or other external input sources such as DVD / Blu-ray players / Cable Box /
Satellite receivers (Set-Top Box) connected to the TV. Use to select the input source of your
choice.
Press the button on the remote control to view an external signal source.SOURCE
TV, AV1, AV2, Component1, Component2, PC, HDMI1/DVI, HDMI2, HDMI3 (LN52B530)
TV, AV, Component, PC, HDMI1/DVI, HDMI2, HDMI3 (LN32B530, LN37B530, LN40B530,
LN46B530)
You can choose only those external devices that are connected to the TV. In the Source
List, connected inputs will be highlighted and sorted to the top. Inputs that are not
connected will be sorted to the bottom.
Using the Color buttons on the remote with the Source list
Red ( ): Refreshes the connected external devices. Press this if your Source is on and connected, but does not Refresh
appear in the list.
TOOLS Tools Edit Name Information ( ): Displays the and menus.
Edit Name
Name the device connected to the input jacks to make your input source selection easier.
VCR / DVD / Cable STB / Satellite STB / PVR STB / AV Receiver / Game / Camcorder / PC / DVI PC / DVI / TV / IPTV / Blu-ray
/ HD DVD / DMA
When a PC with a resolution of 1920 X 1080@60Hz is connected to the port, you should set the mode HDMI IN 1 HDMI1/DVI
to in the of the mode. DVI PC Edit Name Input
ConguringtheSupportMenu
Self Diagnosis
Picture Test
If you think you have a picture problem, perform the picture test. Check the color pattern on the
screen to see if the problem still exists.
Yes Yes: If the test pattern does not appear or there is noise in the test pattern, select .
There may be a problem with the TV. Contact Samsung’s call center for assistance.
No No: If the test pattern is properly displayed, select . There may be a problem with your
external equipment. Please check your connections. If the problem still persists, refer to
the external device’s user manual.
Sound Test
If you think you have a sound problem, please perform the sound test. You can check the
sound by playing a built-in melody sound through the TV. ‘Does the problem still exist with this sound test?’ appears on the screen.
If you hear no sound from the TV’s speakers, before performing the sound test, make sure is set to Speaker Select TV
speaker in the Sound menu.
The melody will be heard during the test even if is set to or the sound is muted by pressing Speaker Select External Speaker
the button.MUTE
Yes Yes: If during the sound test you can hear sound only from one speaker or not at all, select . There may be a problem with
the TV. Contact Samsung’s call center for assistance.
No No: If you can hear sound from the speakers, select . There may be a problem with your external equipment. Please check
your connections. If the problem still persists, refer to the external device’s user manual.
Signal Strength (digital channels only)
Unlike analog channels, which can vary in reception quality from ‘ ’ to clear, digital (HDTV) channels have either perfect snowy
reception quality or you will not receive them at all. So, unlike analog channels, you cannot ne tune a digital channel. You can,
however, adjust your antenna to improve the reception of available digital channels.
If the signal strength meter indicates that the signal is weak, physically adjust your antenna to increase the signal strength.
Continue to adjust the antenna until you nd the best position with the strongest signal.
¦
❑
O
N
N
–
–
❑
N
¦
❑
●
●
N
N
●
●
N
SelfDiagnosis ►
Software Upgrade
HD Connection Guide
Contact Samsung
Support
Source List
Edit Name
Input


English - 35
Software Upgrade
Samsung may offer upgrades for TV’s rmware in the future. Please visit Samsung.com or
contact the Samsung call center at 1-800-SAMSUNG (726-7864) to receive information about
downloading upgrades and using a USB drive. Upgrades will be possible by connecting a USB
drive to the port located on your TV.SERVICE
Insert a USB drive containing the rmware upgrade into the SERVICE port on the side of
the TV.
Please be careful to not disconnect the power or remove the USB drive while upgrades are
being applied. The TV will turn off and turn on automatically after completing the rmware
upgrade. Please check the rmware version after the upgrades are complete. When
software is upgraded, video and audio settings you have made will return to their default
(factory) settings. We recommend you write down your settings so that you can easily reset them after the upgrade.
HD Connection Guide
This menu presents the connection method that provides the optimal quality for the HD TV.
Refer to this information when connecting external devices to the TV.
Contact Samsung
View this information when your TV does not work properly or when you want to upgrade the software.
You can view the information regarding the call center, product and software le download method.
❑
N
N
❑
❑
ANYNET
+
Connecting Anynet + Devices
Anynet + is a function that enables you to control all connected Samsung devices that support Anynet + with your Samsung TV’s
remote.
The Anynet + system can be used only with Samsung devices that have the Anynet + feature. To be sure your Samsung device has
this feature, check if there is an Anynet + logo on it.
To connect to a TV
1. HDMI IN (1, 2 3)Connect the or jack on the TV and the HDMI OUT jack of the corresponding Anynet + device using an HDMI
cable.
¦
TV
Anynet + Device 1 Anynet + Device 2 Anynet + Device 3
HDMI 1.3 Cable HDMI 1.3 Cable
HDMI 1.3 Cable
USB drive


English - 36
To connect to Home Theater
1. HDMI IN (1, 2 3)Connect the or jack on the TV and the HDMI OUT jack of the corresponding Anynet + device using an HDMI
cable.
2. Connect the HDMI IN jack of the home theater and the HDMI OUT jack of the corresponding Anynet + device using an HDMI
cable.
Connect the Optical cable between the DIGITAL AUDIO OUT (OPTICAL) jack on your TV and the Digital Audio Input on the
Home Theater.
When following the connection above, the Optical jack only outputs 2 channel audio. You will only hear sound from the Home
Theater’s Front Left and Right speakers and the subwoofer. If you want to hear 5.1 channel audio, connect the DIGITAL
AUDIO OUT (OPTICAL) jack on the DVD / Satellite Box (ie Anynet Device 1 or 2) directly to the Ampli er or Home Theater,
not the TV.
Connect only one Home Theater.
You can connect an Anynet + device using the HDMI 1.3 cable. Some HDMI cables may not support Anynet + functions.
Anynet + works when the AV device supporting Anynet + is in the Standby or On status.
Anynet + supports up to 12 AV devices in total. Note that you can connect up to 3 devices of the same type.
Setting Up Anynet +
Press the button to display theTOOLS Tools menu. You can also display Anynet + menu by selecting Tools→Anynet +
(HDMI-CEC).
Setup
Anynet + (HDMI-CEC)→Off/On
To use the Anynet + Function, Anynet + (HDMI-CEC) must be set to On.
When the Anynet + (HDMI-CEC) function is disabled, all the Anynet + related operations
are deactivated.
AutoTurnOff→No/Yes
Setting an Anynet + Device to turn Off Automatically when the TV is Turned Off
The active source on the TV remote must be set to TV to use the Anynet + function.
If you set Auto Turn Off Yes to , connected external devices are also turned off when the
TV is turned off. If an external device is still recording, it may or may not turn off.
N
N
N
N
N
N
¦
T
❑
N
N
N
Anynet
+
(HDMI-CEC) ►
Application
Anynet +(HDMI-CEC) : On
Auto Turn Off : Yes
U
Move
E
Enter
R
Return
Device List
Setup
U
Move
E
Enter
R
Return
TV
Anynet + Device 1 Anynet + Device 2
Anynet + Device 3
HDMI 1.3 Cable HDMI 1.3 Cable
HDMI 1.3 Cable
Optical Cable
Home Theater
HDMI 1.3 Cable


English - 37
Switching between Anynet + Devices
1. TOOLS ENTERPress the button. Press the
E
button to select Anynet + (HDMI-CEC).
2. Press the ▲ or ▼ button to select Device List ENTER, then press the
E
button.
Anynet + devices connected to the TV are listed.
If you cannot nd a device you want, press the red button to scan for devices.
3. Press the ▲ or ▼ button to select a particular device and press the ENTER
E
button. It
is switched to the selected device.
Only when you set Anynet + (HDMI-CEC) Application Device to On in the menu, the
List menu appears.
Switching to the selected devices may take up to 2 minutes. You cannot cancel the
operation during the switching operation.
The time required to scan for devices is determined by the number of connected devices.
When the device scan is complete, the number of devices found are not displayed.
Although the TV automatically searches the device list when the TV is turned on via the power button, devices connected to
the TV when the TV is on or under some conditions are not automatically displayed in the device list. Press the red button to
search for the connected device.
If you have selected external input mode by pressing the button, you cannot use the AnynetSOURCE + function. Make sure to
switch to an Anynet + device by using the .Device List
Anynet + Menu
The Anynet + menu changes depending on the type and status of the Anynet + devices connected to the TV.
Anynet + Menu Description
View TV Anynet + mode changes to TV broadcast mode.
Device List Shows the Anynet + device list.
(device_name) Menu Shows the connected device menus. E.g. If a DVD recorder is connected, the disc menu of the
DVD recorder will appear.
(device_name) Operation Shows the play menu of the connected device. E.g. If a DVD recorder is connected, the play
menu of the DVD recorder will appear.
Record: (*recorder) Starts recording immediately using the recorder. (This is only available for devices that support
the recording function.)
Stop Recording: (*recorder) Stops recording.
Receiver Sound is played through the receiver.
If more than one recording device is connected, they are displayed as (*recorder) and if only one recording device is
connected, it will be represented as (*device_name).
TV Remote Control Buttons Available in Anynet + Mode
Device Type Operating Status Available Buttons
Anynet + Device
After switching to the device, when the menu
of the corresponding device is displayed on the
screen.
Numeric buttons ▲/▼/◄/►/ENTER
E
buttons
Color buttons / buttonEXIT
After switching to the device, while playing a le
π
(Backward search) /
µ
(Forward search) /
∏
(Stop) /
∂
(Play) /
∑
(Pause)
Device with built-in
Tuner
After switching to the device, when you are
watching a TV program
z
button
Audio Device When Receiver is activated
y
/ buttonMUTE
The Anynet + function only works when the active source on the TV remote control is set to TV.
The
∏
button works only while in the recordable state.
You cannot control Anynet + devices using the buttons on the TV. You can control Anynet + devices only using the TV remote
control.
The TV remote control may not work under certain conditions. If this occurs, reselect the Anynet + device.
The Anynet + functions do not operate with other manufacturers’ products.
The
π
,
µ
operations may differ depending on the device.
¦
N
N
N
N
N
N
N
N
N
N
N
N
N
N
N
View TV
Device List
Record : DVDR
DVDR Menu
DVDR Operation
Setup
U
Move
E
Enter
R
Return


English - 38
Recording
You can make a recording of a TV program using a Samsung recorder.
1. Press the button. Press the TOOLS ENTER
E
button to select Anynet + (HDMI-CEC).
2. Press the ▲ or ▼ button to select Recording Immediately and press the ENTER
E
button. Recording begins.
When there is more than one recording device
When multiple recording devices are connected, the recording devices are listed.
Press the ▲ or ▼ button to select a recording device and press the ENTER
E
button. Recording begins.
When the recording device is not displayed
Select and press the red button to search devicesDevice List
3. Press the button to exit.EXIT
You can record the source streams by selecting : (device_name).Record
Pressing the
∏
button will record whatever you are currently watching. If you are watching video from another device, the
video from the device is recorded.
Before recording, check whether the antenna jack is properly connected to the recording device. To properly connect an
antenna to a recording device, refer to the recording device’s users manual.
Listening through a Receiver (Home theater)
You can listen to sound through a receiver instead of the TV speaker.
1. Press the button. Press the TOOLS ENTER
E
button to select Anynet + (HDMI-CEC).
2. Press the ▲ or ▼ button to select . Press the ◄ or ► button to select Receiver On Off or .
3. Press the button to exit.EXIT
If your receiver supports audio only, it may not appear in the device list.
The receiver will work when you have properly connected the optical in jack of the
receiver to the DIGITAL AUDIO OUT (OPTICAL) jack of the TV.
When the Home Theater receiver is set to On, you can hear sound output from the
TV’s Optical jack. When the TV is displaying a DTV(air) signal, the TV will send out
5.1 channel sound to the Home theater receiver. When the source is a digital component such as a DVD and is connected
to the TV via HDMI, only 2 channel sound will be heard from the Home Theater receiver.
If there is a power interruption to the TV when the is set to (by disconnecting the power cord or a power Receiver On
failure), the may be set to when you turn the TV on again. Speaker Select External Speaker
¦
N
N
N
N
N
¦
N
N
N
N
View TV
Device List
Record : DVDR
DVDR Menu
DVDR Operation
Setup
U
Move
E
Enter
R
Return
View TV
Device List
Record : DVDR
DVDR Menu
DVDR Operation
Receiver : Off
Setup
U
Move
E
Enter
R
Return


English - 40
APPENDIX
Troubleshooting
If the TV seems to have a problem, rst try this list of possible problems and solutions. If none of these troubleshooting tips apply,
please visit Samsung.com or contact the Samsung call center at 1-800-SAMSUNG (726-7864).
Problem Possible Solution
Poor picture. Try another channel. / Adjust the antenna. / Check all wire connections.
Poor sound quality. Try another channel. / Adjust the antenna.
No picture or sound. Try another channel. / Press the button.SOURCE
Make sure the TV is plugged in. / Check the antenna connections.
No sound or sound is too low at
maximum volume.
First, check the volume of units connected to your TV (digital broadcasting receiver, DVD,
cable broadcasting receiver, VCR, etc.). Then, adjust the TV volume accordingly.
Picture rolls vertically. Check all wire connections.
There is a problem with the picture Run the Picture test in the Self diagnostic menu.
There is a problem with the sound Run the Sound test in the Self diagnostic menu.
The TV operates erratically. Unplug the TV for 30 seconds, then try operating it again.
The TV won’t turn on. Make sure the wall outlet is working.
Remote control malfunctions. Replace the remote control batteries.
Clean the upper edge of the remote control (transmission window).
Check the battery terminals.
‘Check signal cable’ message. Ensure that the signal cable is rmly connected to the PC source.
‘Not Supported Mode’ message. Check the maximum resolution and connected device’s Video frequency.
Compare these values with the data in the Display Modes.
Digital broadcasting screen
problem.
Please check the digital signal strength and input antenna.
The image is too light or too dark. Adjust the Brightness and Contrast. / Adjust the Fine tuning.
Black bars on the screen. Make sure the broadcast you’re receiving is High Denition (HD).
HD channels sometimes broadcast Standard Denition (SD) programming, which can
cause black bars.
Set your cable/satellite box to stretch or widescreen mode to eliminate the bars.
Picture has a Red/Green or Pink
tint.
Make sure the Component cables are connected to the correct jacks.
Closed Captioning not working. If you are using a Cable/Satellite box, you must set Closed Captioning on the box, not
your TV.
Snowy picture. Your cable box may need a rmware upgrade. Please contact your Cable company.
Ghosting on picture. This is sometimes caused by compatibility issues with your cable box.
Try connecting Component cables instead.
Horizontal bars appear to icker,
jitter or shimmer on the image.
Adjust the Coarse tuning and then adjust the Fine tuning.
Vertical bars appear to icker, jitter
or shimmer on the image.
Adjust the Coarse tuning and then adjust the Fine tuning.
Screen is black and power indicator
light blinks steadily.
On your computer check: Power, Signal Cable.
The TV is using its power management system.
Move the computer's mouse or press any key on the keyboard.
Image is not stable and may
appear to vibrate when you have
a computer connected to the PC
input.
If the setting is not correct, use your computer utility program to change the display
settings.
Your TV supports multiscan display functions within the following frequency domain:
- Horizontal frequency (KHz): 30~60
- Vertical frequency (Hz): 60~75
- PC Maximum refresh rate (at 60 Hz): 1920 X 1080
Image is not centered on the
screen.
Adjust the horizontal and vertical position.
The screen position must be adjusted on the output source (i.e. STB) with a digital signal.
¦


English - 42
WallMountKitSpecications(VESA)
Install your wall mount on a solid wall perpendicular to the oor. When attaching to other
building materials, please contact your nearest dealer. If installed on a ceiling or slanted wall, it
may fall and result in severe personal injury.
Standard dimensions for wall mount kits are shown in the table above.
When purchasing our wall mount kit, a detailed installation manual and all parts necessary
for assembly are provided.
Do not use screws longer than the standard dimension, as they may cause damage to the
inside of the TV set.
For wall mounts that do not comply with the VESA standard screw specications, the
length of the screws may differ depending on their specications.
Do not use screws that do not comply with the VESA standard screw specications.
Do not fasten the screws too strongly, this may damage the product or cause the product to fall, leading to personal injury.
Samsung is not liable for these kinds of accidents.
Samsung is not liable for product damage or personal injury when a non-VESA or non-specied wall mount is used or the
consumer fails to follow the product installation instructions.
Our 57” and 63” models do not comply with VESA Specications. Therefore, you should use our dedicated wall mount kit for
this model.
Do not exceed 15 degrees tilt when mounting this TV.
Product Family inches VESA Spec. (A * B) Standard Screw Quantity
LCD-TV
19 ~ 22 100 X 100 M4
4
23 ~ 29 200 X 100
30 ~ 40 200 X 200 M6
46 ~ 55 400 X 400
M857 ~ 70 800 X 400
80 ~ 1400 X 800
PDP-TV
42 ~ 50 400 X 400
M8 4
58 ~ 63 600 X 400
70 ~ 800 X 400
80 ~ 1400 X 800
LFD
30 ~ 39 200 X 200 M6
4
40 ~ 52 400 X 400
M855 ~ 70 800 X 400
70 ~ 1400 X 800
Do not install your Wall Mount Kit while your TV is turned on. It may result in personal injury due to electric shock.
Using the Anti-Theft Kensington Lock
The Kensington Lock is a device used to physically x the system when using it in a public
place. The appearance and locking method may differ from the illustration depending on the
manufacturer.
Refer to the manual provided with the Kensington Lock for proper use. The locking device has
to be purchased separately.
The location of the Kensington Lock may be different depending on its model.
1. Insert the locking device into the Kensington slot on the LCD TV (
1
) and turn it in the
locking direction (
2
).
2. Connect the Kensington Lock cable (
3
).
3. Fix the Kensington Lock to a desk or a heavy stationary object.
¦
N
N
N
N
N
N
N
N
N
¦
N
3
1
2

English - 49
LN52B530
TOP VIEW
JACK PANEL DETAIL 5.2"H X 6.6"W
FRONT VIEW / SIDE VIEW
REAR VIEW
NOTE: All drawings are not necessarily to scale. Some
dimensions are subject to change without prior notice. Refer to
the dimensions prior to performing installation of your TV. Not
responsible for typographical or printed errors.
© 2009 Samsung Electronics America, Inc
31.5
34.4
24.4
45.6
25.7
10.2
3.1
50.0
15.7 (400 mm)
15.7 (400 mm)
Product specificaties
| Merk: | Samsung |
| Categorie: | Televisie |
| Model: | LN-32B530 |
Heb je hulp nodig?
Als je hulp nodig hebt met Samsung LN-32B530 stel dan hieronder een vraag en andere gebruikers zullen je antwoorden
Handleiding Televisie Samsung

28 Maart 2025
27 Maart 2025
27 Maart 2025
25 Maart 2025
11 Maart 2025
11 Maart 2025
11 Maart 2025
11 Maart 2025
11 Maart 2025
11 Maart 2025
Handleiding Televisie
- Televisie Electrolux
- Televisie Philips
- Televisie Sony
- Televisie Xiaomi
- Televisie Casio
- Televisie Panasonic
- Televisie LG
- Televisie AEG
- Televisie BEKO
- Televisie Daewoo
- Televisie Grundig
- Televisie JVC
- Televisie Medion
- Televisie Nokia
- Televisie Pioneer
- Televisie Siemens
- Televisie Toshiba
- Televisie Xiron
- Televisie Yamaha
- Televisie Abus
- Televisie Acer
- Televisie Ag Neovo
- Televisie Airis
- Televisie Aiwa
- Televisie Akai
- Televisie Albrecht
- Televisie Alden
- Televisie Aldi
- Televisie Allview
- Televisie Alphatronics
- Televisie AOC
- Televisie Apex
- Televisie Arcelik
- Televisie Aristona
- Televisie Audiosonic
- Televisie Avtex
- Televisie Bang Olufsen
- Televisie Belson
- Televisie BenQ
- Televisie Blaupunkt
- Televisie Bluesky
- Televisie Brandt
- Televisie Daitsu
- Televisie Dell
- Televisie Denver
- Televisie Difrnce
- Televisie Digihome
- Televisie Dual
- Televisie Durabase
- Televisie Dyon
- Televisie E-motion
- Televisie Emerson
- Televisie Energy Sistem
- Televisie Engel
- Televisie Fantec
- Televisie Ferguson
- Televisie Finlux
- Televisie Fujitsu
- Televisie Funai
- Televisie GPX
- Televisie Graetz
- Televisie Haier
- Televisie Hannspree
- Televisie Hisense
- Televisie Hitachi
- Televisie HKC
- Televisie Hoher
- Televisie Horizon
- Televisie Humax
- Televisie Hyundai
- Televisie Icy Box
- Televisie Iiyama
- Televisie ILive
- Televisie Innoliving
- Televisie Insignia
- Televisie Intenso
- Televisie ITT
- Televisie Kogan
- Televisie Kuppersbusch
- Televisie Lenco
- Televisie Lenovo
- Televisie Lexibook
- Televisie Loewe
- Televisie Logik
- Televisie Luxor
- Televisie Magnavox
- Televisie Magnum
- Televisie Manhattan
- Televisie Manta
- Televisie Marantz
- Televisie Marquant
- Televisie Megasat
- Televisie Metz
- Televisie Mitsubishi
- Televisie Mpman
- Televisie MT Logic
- Televisie Muse
- Televisie Mx Onda
- Televisie Nabo
- Televisie Nec
- Televisie Nedis
- Televisie Newstar
- Televisie Nextbase
- Televisie Nikkei
- Televisie Nordmende
- Televisie Packard Bell
- Televisie Peaq
- Televisie Philco
- Televisie Polar
- Televisie Polaroid
- Televisie Premier
- Televisie Proline
- Televisie Pyle
- Televisie Qilive
- Televisie RCA
- Televisie Reflex
- Televisie Reflexion
- Televisie Rm 2000
- Televisie Roadstar
- Televisie Saba
- Televisie Sagem
- Televisie Salora
- Televisie Sanyo
- Televisie Sbr
- Televisie Schaub Lorenz
- Televisie Schneider
- Televisie Seg
- Televisie Selfsat
- Televisie Sencor
- Televisie Sharp
- Televisie Silvercrest
- Televisie Sogo
- Televisie Soundmaster
- Televisie Strong
- Televisie Sunny
- Televisie Sunstech
- Televisie Superior
- Televisie Sweex
- Televisie Sylvania
- Televisie TCL
- Televisie Teac
- Televisie TechLine
- Televisie Technika
- Televisie Technisat
- Televisie Techwood
- Televisie Tele 2
- Televisie Teleco
- Televisie Telefunken
- Televisie Terris
- Televisie Tesla
- Televisie Tevion
- Televisie Thomson
- Televisie Time
- Televisie Tve
- Televisie Uniden
- Televisie United
- Televisie Vestel
- Televisie Viewpia
- Televisie Viewsonic
- Televisie Vision Plus
- Televisie Vivax
- Televisie Vivo
- Televisie Vizio
- Televisie Voxx
- Televisie Walker
- Televisie Westinghouse
- Televisie Wharfedale
- Televisie Woxter
- Televisie Xoro
- Televisie XS4ALL
- Televisie Yasin
- Televisie Zalman
- Televisie Ziggo
- Televisie Jay-tech
- Televisie Jensen
- Televisie JGC
- Televisie JTC
- Televisie Odys
- Televisie OK
- Televisie Oki
- Televisie Online
- Televisie Onn
- Televisie Opera
- Televisie Oppo
- Televisie Optoma
- Televisie Orion
- Televisie Oyster
- Televisie Changhong
- Televisie Clatronic
- Televisie Continental Edison
- Televisie ECG
- Televisie Palsonic
- Televisie Vox
- Televisie Bang And Olufsen
- Televisie GoGEN
- Televisie Krüger And Matz
- Televisie Naxa
- Televisie Proscan
- Televisie Voxicon
- Televisie Kunft
- Televisie Aspes
- Televisie AYA
- Televisie Bush
- Televisie High One
- Televisie Infiniton
- Televisie Kernau
- Televisie Nevir
- Televisie Orima
- Televisie Svan
- Televisie Grunkel
- Televisie SereneLife
- Televisie Zenith
- Televisie Citizen
- Televisie Kubo
- Televisie Smart Brand
- Televisie Alba
- Televisie Edenwood
- Televisie Elbe
- Televisie Majestic
- Televisie Trevi
- Televisie Cello
- Televisie NPG
- Televisie Orava
- Televisie Star-Light
- Televisie Videocon
- Televisie Cecotec
- Televisie Bauhn
- Televisie MBM
- Televisie Furrion
- Televisie Coby
- Televisie Doffler
- Televisie DGM
- Televisie Planar
- Televisie Chiq
- Televisie Monster
- Televisie Antarion
- Televisie Felson
- Televisie SEIKI
- Televisie SunBriteTV
- Televisie Tucson
- Televisie CGV
- Televisie LTC
- Televisie Caratec
- Televisie Séura
- Televisie AudioAffairs
- Televisie Element
- Televisie Peerless-AV
- Televisie XD Enjoy
- Televisie Inovia
- Televisie DirecTV
- Televisie Telesystem
- Televisie Kemo
- Televisie EKO
- Televisie Mitsai
- Televisie V7
- Televisie ISymphony
- Televisie Pantel
- Televisie ATYME
- Televisie HCI
- Televisie Inno-Hit
- Televisie Lin
- Televisie Elements
- Televisie Englaon
- Televisie Astar
- Televisie Visco
- Televisie Tivax
- Televisie H&B
- Televisie Norcent
- Televisie TELE System
- Televisie TIM
- Televisie Kivi
- Televisie Mach Power
- Televisie Axing
- Televisie FFalcon
- Televisie Smart Tech
- Televisie Mitzu
- Televisie JTC24
- Televisie Coocaa
- Televisie SYLVOX
- Televisie RevolutionHD
- Televisie FOX Electronics
- Televisie QBell Technology
- Televisie Aconatic
- Televisie Mitchell & Brown
- Televisie Mystery
- Televisie Linsar
Nieuwste handleidingen voor Televisie

9 April 2025
9 April 2025

9 April 2025
9 April 2025
9 April 2025
9 April 2025
9 April 2025
9 April 2025
9 April 2025

8 April 2025