Pioneer AVIC-F260-2 Handleiding
Lees hieronder de 📖 handleiding in het Nederlandse voor Pioneer AVIC-F260-2 (77 pagina's) in de categorie Navigatie. Deze handleiding was nuttig voor 46 personen en werd door 2 gebruikers gemiddeld met 4.5 sterren beoordeeld
Pagina 1/77

Owner’s Manual
HIDE-AWAY NAVIGATION SYSTEM
FOR TRUCKS/CAMPER VANS
AVIC-F160-2
HIDE-AWAY NAVIGATION SYSTEM
AVIC-F260-2
For details on software updates,
visit www.naviextras.com.
English

Declaration of Conformity with regard to the R&TTE Directive 1999/5/EC
Manufacturer:
PIONEER CORPORATION
EU Representative’s:
Pioneer Europe NV
Haven 1087, Keetberglaan 1,
B-9120 Melsele, Belgium/Belgique
English:
Hereby, Pioneer, declares that this [*] is in compliance
with the essential requirements and other relevant
provisions of Directive 1999/5/EC.
Suomi:
Pioneer vakuuttaa täten että [*] tyyppinen laite on
direktiivin 1999/5/EY oleellisten vaatimusten ja sitä
koskevien direktiivin muiden ehtojen mukainen.
Nederlands:
Hierbij verklaart Pioneer dat het toestel [*] in
overeenstemming is met de essentiële eisen en de andere
relevante bepalingen van richtlijn 1999/5/EG
Français:
Par la présente Pioneer déclare que l’appareil [*] est
conforme aux exigences essentielles et aux autres
dispositions pertinentes de la directive 1999/5/CE
Svenska:
Härmed intygar Pioneer att denna [*] står I överens-
stämmelse med de väsentliga egenskapskrav och övriga
relevanta bestämmelser som framgår av direktiv 1999/5/
EG.
Dansk:
Undertegnede Pioneer erklærer herved, at følgende
udstyr [*] overholder de væsentlige krav og øvrige
relevante krav i direktiv 1999/5/EF
Deutsch:
Hiermit erklärt Pioneer, dass sich dieses Gerät [*] in
Übereinstimmung mit den grundlegenden Anforde-
rungen und den anderen relevanten Vorschriften der
Richtlinie 1999/5/EG bendet". (BMWi)
Ελληνικά:
ΜΕ ΤΗΝ ΠΑΡΟΥΣΑ Pioneer ΔΗΛΩΝΕΙ ΟΤΙ [*] ΣΥΜ-
ΜΟΡΦΩΝΕΤΑΙ ΠΡΟΣ ΤΙΣ ΟΥΣΙΩΔΕΙΣ ΑΠΑΙΤΗΣΕΙΣ ΚΑΙ ΤΙΣ
ΛΟΙΠΕΣ ΣΧΕΤΙΚΕΣ ΔΙΑΤΑΞΕΙΣ ΤΗΣ ΟΔΗΓΙΑΣ 1999/5/ΕΚ
Italiano:
Con la presente Pioneer dichiara che questo [*] è
conforme ai requisiti essenziali ed alle altre disposizioni
pertinenti stabilite dalla direttiva 1999/5/CE.
Español:
Por medio de la presente Pioneer declara que el [*]
cumple con los requisitos esenciales y cualesquiera
otras disposiciones aplicables o exigibles de la Directiva
1999/5/CE
Português:
Pioneer declara que este [*] está conforme com os
requisitos essenciais e outras disposições da Directiva
1999/5/CE.
Čeština:
Pioneer tímto prohlašuje, že tento [*] je ve shodě se
základními požadavky a dalšími příslušnými ustanove-
ními směrnice 1999/5/ES
Eesti:
Käesolevaga kinnitab Pioneer seadme [*] vastavust
direktiivi 1999/5/EÜ põhinõuetele ja nimetatud direktiivist
tulenevatele teistele asjakohastele sätetele.
Magyar:
Alulírott, Pioneer nyilatkozom, hogy a [*] megfelel a
vonatkozó alapvetõ követelményeknek és az 1999/5/EC
irányelv egyéb elõírásainak.
Latviešu valoda:
Ar šo Pioneer deklarē, ka [*] atbilst Direktīvas 1999/5/
EK būtiskajām prasībām un citiem ar to saistītajiem
noteikumiem.
Lietuvių kalba:
Šiuo Pioneer deklaruoja, kad šis [*] atitinka esminius
reikalavimus ir kitas 1999/5/EB Direktyvos nuostatas.
Malti:
Hawnhekk, Pioneer jiddikjara li dan [*] jikkonforma mal-
ħtiġijiet essenzjali u ma provvedimenti oħrajn relevanti li
hemm d-Dirrettiva 1999/5/EC
Slovenčina:
Pioneer týmto vyhlasuje, že [*] spĺňa základné požiadavky
a všetky príslušné ustanovenia Smernice 1999/5/ES.
Slovenščina:
Pioneer izjavlja, da je ta [*] v skladu z bistvenimi
zahtevami in ostalimi relevantnimi določili direktive
1999/5/ES.
Română:
Prin prezenta, Pioneer declara ca acest [*] este in
conformitate cu cerintele esentiale si alte prevederi ale
Directivei 1999/5/EU.
български:
С настоящето, Pioneer декларира, че този [*] отго-
варя на основните изисквания и други съответни
постановления на Директива 1999/5/EC.
Polski:
Niniejszym Pioneer oświadcza, że [*] jest zgodny z
zasadniczymi wymogami oraz pozostałymi stosownymi
postanowieniami Dyrektywy 1999/5/EC
Norsk:
Pioneer erklærer herved at utstyret [*] er i samsvar med
de grunnleggende krav og øvrige relevante krav i direktiv
1999/5/EF.
Íslenska:
Hér með lýsir Pioneer yr því að [*] er í samræmi við
grunnkröfur og aðrar kröfur, sem gerðar eru í tilskipun
1999/5/EC
Hrvatski:
Ovime tvrtka Pioneer izjavljuje da je ovaj [*] u skladu
osnovnim zahtjevima i ostalim odredbama Direktive
1999/5/EC.
Türkçe:
esas şar
eder.
[*] AVIC-F160-2, AVIC-F260-2
28-8, Honkomagome 2-chome, Bunkyo-ku,
Tokyo 113-0021, JAPAN
http://www.pioneer-car.eu
Engb
2

Thank you for buying this Pioneer product.
Please read through these instructions so you will know how to operate your model
properly. After you have finished read ing the instructions, keep this document in a
safe place for future reference.
Important
!The screens shown in the examples may
differ from actual screens, which may be
changed without notice for performance
and function improvements.
!The screen examples shown in this manual
are the ones for AVIC-F160-2. If you use a
different model, the screens that appear
may differ from the examples in the man-
ual.
Precaution
Introduction
Licence agreement 7
–PIONEER AVIC-F160-2, AVIC-F260-2 7
–END USER LICENSE AGREEMENT 9
About the data for the map database 11
Important safety information 11
–Fuel cost management 13
–Traffic information 13
–Speed limit indication 13
–Lorry navigation 13
Additional safety information 13
–To avoid battery exhaustion 13
–Handling the SD card slot 13
Notes before using the system 14
–In case of trouble 14
–Visit our website 14
–About this product 14
Checking part names and functions 14
Inserting an SD memory card 15
Resetting the microprocessor 15
Before you start
On first-time startup 16
Regular startup 17
How to use the navigation menu screens
Screen switching overview 18
What you can do on each menu 19
Operating list screens (e.g. route settings
screen) 19
Operating the on-screen keyboard 19
Monitoring the GPS reception quality 20
How to use the map
How to read the map screen 21
Frequently shown route events 22
Seeing the current position on the map 22
–Checking the detailed information
about the current position 23
Browsing the data field 24
Display during motorway driving 24
Operating the map screen 25
–Changing the scale of the map 25
–Smart Zoom 25
–Changing the view angle of the
map 25
–Switching the map between 2D and
3D 26
–Scrolling the map to the position you
want to see 26
–Viewing information about a specified
location 26
Searching for and selecting a location
Searching for a location by address 27
Searching for a location by entering the
midpoint of a street 28
Searching for a location by entering the city/
town centre 28
Finding the location by specifying the
postcode 28
Searching for Points of Interest (POI) 29
– “Searching for POIs using Quick
Search”29
Engb 3
Contents

–Searching for POIs using preset
categories 30
Searching for POIs by categories 30
Searching for a POI directly from the name of
the facilities 32
Searching for a nearby POI 33
Selecting a location by using Find on“
Map”33
Selecting destination from stored
locations 34
Selecting a location you searched for
recently 35
–Smart History 35
–History 35
Searching for a location by coordinates 35
Searching for a location by scrolling the
map 36
After the location is decided
Setting a route to your destination 37
–Setting a route using a searched
location 37
–Checking route alternatives when
planning the route 37
– “ ”Setting a route using the My Route
menu 38
Checking and modifying the current
route
Displaying the route overview 40
Checking route parameters and accessing
route related functions 40
Modifying the route calculation
conditions 40
–Changing the vehicle used 40
–Setting the vehicle parameters 41
–Setting the route calculation 43
–Changing road types used 43
Setting the waiting time at waypoints 44
Setting driving time alerts 45
Modifying the route 45
–Selecting a new destination when a
route is already set 46
–Setting a new starting position for the
route 46
Editing the list of destinations 47
Cancelling the current route guidance 47
Checking route alternatives for the current
route 48
Watching the simulation of the route 48
Navigating in off-road mode 49
Registering and editing locations
Storing a location in Favourites“ ” 50
Saving a location as an alert point 50
Editing an alert point 51
Using traffic information
Checking historical traffic information 52
Receiving real-time traffic information
(TMC) 52
–Checking the traffic incidents on the
map 53
Customising preferences
Displaying the settings screen 54
Setting the volume and the guidance voice
for navigation system 54
Customising the quick menu 55
Setting the traffic information 56
Setting the user profiles 57
Customising the map screen settings 57
Setting the visual guidance 58
Customising the display settings 59
Customising the regional settings 60
Setting the Trip Monitor 60
Starting the configuration wizard 60
Resetting to the default settings 61
Contents
Engb
4

Other operations
More menu 62
Installation
Important safeguards 63
Precautions before connecting the
system 63
Before installing this product 64
To prevent damage 64
Precautions before installation 65
Connecting the system 66
Installing with the hook and loop
fastener 67
Appendix
Positioning technology 68
–Positioning by GPS 68
Handling large errors 68
–When positioning by GPS is
impossible 68
–Conditions likely to cause noticeable
positioning errors 68
Route setting information 70
–Route search specifications 70
SD and SDHC logo 71
Display information 72
Glossary 73
Specifications 74
Engb 5
Contents

Certain country and government laws may pro-
hibit or restrict the placement and use of this
system in your vehicle. Please comply with all
applicable laws and regulations regarding the
use, installation and operation of your naviga-
tion system.
If you want to dispose this product, do not mix
it with general household waste. There is a se-
parate collection system for used electronic
products in accordance with legislation that re-
quires proper treatment, recovery and recy-
cling.
Private households in the member states of
the EU, in Switzerland and Norway may return
their used electronic products free of charge
to designated collection facilities or to a retai-
ler (if you purchase a similar new one). For
countries not mentioned above, please con-
tact your local authorities for the correct meth-
od of disposal. By doing so you will ensure
that your disposed product undergoes the ne-
cessary treatment, recovery and recycling and
thus prevent potential negative effects on the
environment and human health.
CAUTION
This product is evaluated in moderate and tropi-
cal climate condition under the Audio, video and
similar electronic apparatus - Safety require-
ments, IEC 60065.
The graphical symbol placed on the
product means direct current.
Engb
6
Chapter
01 Precaution

Licence agreement
PIONEER AVIC-F160-2, AVIC-F260-2
THIS IS A LEGAL AGREEMENT BETWEEN
YOU, AS THE END USER, AND PIONEER
CORP. (JAPAN) ( PIONEER ). PLEASE READ“ ”
THE TERMS AND CONDITIONS OF THIS
AGREEMENT CAREFULLY BEFORE USING
THE SOF TWARE INSTALLED ON THE
PIONEER PRODUCTS. BY USING THE SOFT-
WARE INSTALLED ON THE PIONEER PRO-
DUCTS, YOU AGREE TO BE BOUND BY THE
TERMS OF THIS AGREEMENT. THE SOFT-
WARE INCLUDES A DATABASE LICENCED BY
THIRD PARTY SUPPLIER(S) ( SUPPLIERS ),“ ”
AND YOUR USE OF THE DATABASE IS COV-
ERED BY THE SUPPLIERS SEPARATE’
TERMS, WHICH ARE ATTACHED TO THIS
AGREEMENT (refer to page 9). IF YOU DO NOT
AGREE WITH ALL OF THESE TERMS, PLEASE
RETURN THE PIONEER PRODUCTS (INCLUD-
ING THE SOFTWARE, AND ANY WRITTEN MA-
TERIALS) WITHIN FIVE (5) DAYS OF RECEIPT
OF THE PRODUCTS, TO THE AUTHORISED
PIONEER DEALER FROM WHICH YOU PUR-
CHASED THEM.
1 GRANT OF LICENCE
Pioneer grants to you a non-transferable, non-
exclusive licence to use the software installed
on the Pioneer products (the Software ) and“ ”
the related documentation solely for your own
personal use or for internal use by your busi-
ness, only on such Pioneer products.
You shall not copy, reverse engineer, translate,
port, modify or make derivative works of the
Software. You shall not loan, rent, disclose,
publish, sell, assign, lease, sublicence, market
or otherwise transfer the Software or use it in
any manner not expressly authorised by this
agreement. You shall not derive or attempt to
derive the source code or structure of all or
any portion of the Software by reverse engi-
neering, disassembly, decompilation, or any
other means. You shall not use the Software to
operate a service bureau or for any other use
involving the processing of data for other per-
sons or entities.
Pioneer and its licensor(s) shall retain all copy-
right, trade secret, patent and other proprie-
tary ownership rights in the Software. The
Software is copyrighted and may not be cop-
ied, even if modified or merged with other pro -
ducts. You shall not alter or remove any
copyright notice or proprietary legend con-
tained in or on the Software.
You may transfer all of your licence rights in
the Software, the related documentation and a
copy of this Licence Agreement to another
party, provided that the party reads and agrees
to accept the terms and conditions of this Li-
cence Agreement.
2 DISCLAIMER OF WARRANTY
The Software and related documentation are
provided to you “AS IS . PIONEER AND ITS LI-”
CENSOR(S) (for the purpose of provisions 2
and 3, Pioneer and its licensor(s) shall be col-
lectively referred to as Pioneer ) MAKES AND“ ”
YOU RECEIVE NO WARRANTY, WHETHER EX-
PRESS OR IMPLIED, AND ALL WARRANTIES
OF MERCHANTABILITY AND FITNESS FOR
ANY PARTICULAR PURPOSE ARE EX-
PRESSLY EXCLUDED. SOME COUNTRIES DO
NOT ALLOW EXCLUSION OF IMPLIED WAR-
RANTIES, SO THE ABOVE EXCLUSION MAY
NOT APPLY TO YOU. The Software is complex
and may contain some nonconformities, de-
fects or errors. Pioneer does not warrant that
the Software will meet your needs or expecta-
tions, that operation of the Software will be
error free or uninterrupted, or that all noncon-
formities can or will be corrected. Further-
more, Pioneer does not make any
representations or warranties regarding the
use or results of the use of the Software in
terms of its accuracy, reliability or otherwise.
Engb 7
Chapter
02
Introduction
Introduction

END USER LICENSE AGREEMENT
PLEASE READ THIS END USER LICENSE
AGREEMENT CAREFUL BEFORE USING THE
HERE DATABASE
NOTICE TO THE USER
T
HIS IS A LICENSE AGREEMENT - AND NOT AN
AGREEMENT FOR SALE - BETWEEN YOU AND HERE
B.V. FOR YOUR COPY OF THE HERE NAVIGABLE MAP
DATABASE, INCLUDING ASSOCIATED COMPUTER
SOFTWARE, MEDIA AND EXPLANATORY PRINTED
DOCUMENTATION PUBLISHED BY HERE (JOINTLY “THE
DATABASE”). BY USING THE DATABASE, YOU ACCEPT
AND AGREE TO ALL TERMS AND CONDITIONS OF THIS
END USER LICENSE AGREEMENT (“AGREEMENT”).
IF YOU DO NOT AGREE TO THE TERMS OF THIS
AGREEMENT, PROMPTLY RETURN THE DATABASE,
ALONG WITH ALL OTHER ACCOMPANYING ITEMS, TO
Y
OUR SUPPLIER FOR A REFUND.
OWNERSHIP
T
he Database and the copyrights and intellectual
property or neighboring rights therein are owned by
HERE or its licensors. Ownership of the media on
which the Database is contained is retained by HERE
and/or your supplier until after you have paid in full any
amounts due to HERE and/or your supplier pursuant
to this Agreement or similar agreement(s) under which
goods are provided to you.
LICENSE GRANT
HERE grants you a non-exclusive license to use the
Database for your personal use or, if applicable, for use
in your business’ internal operations. This license does
not include the right to grant sub-licenses.
LIMITATIONS ON USE
T
he Database is restricted for use in the specific
system for which it was created. Except to the extent
explicitly permitted by mandatory laws (e.g. national
laws based on the European Software Directive
(91/250) and the Database Directive (96/9)), you may
not extract or reutilize substantial parts of the contents
of the Database nor reproduce, copy, modify, adapt,
translate, disassemble, decompile, reverse engineer
any portion of the Database. If you wish to obtain
interoperability information as meant in (the national
laws based on) the European Software Directive, you
shall grant HERE reasonable opportunity to provide
said information on reasonable terms, including costs,
to be determined by HERE.
TRANSFER OF LICENSE
You may not transfer the Database to third parties,
except when installed in the system for which it was
created or when you do not retain any copy of the
Database, and provided that the transferee agrees
to all terms and conditions of this Agreement and
confirms this in writing to HERE. Multi-disc sets
may only be transferred or sold as a complete set as
provided by HERE and not as subset thereof.
LIMITED WARRANTY
HERE warrants that, subject to the warnings set out
below, for a period of 12 months after acquisition of
your copy of the Database, it will perform substantially
in accordance with HERE’s Criteria for Accuracy and
Completeness existing on the date you acquired the
Database; these criteria are available from HERE
at your request. If the Database does not perform
in accordance with this limited warranty, HERE
will use reasonable efforts to repair or replace your
non-conforming copy of the Database. If these
efforts do not lead to performance of the Database in
accordance with the warranties set out herein, you will
have the option to either receive a reasonable refund
of the price you paid for the Database or to rescind this
Agreement. This shall be HERE’s entire liability and
your sole remedy against HERE. Except as expressly
provided in this section, HERE does not warrant nor
make any representations regarding the use of results
of the use of the Database in terms of its correctness,
accuracy, reliability, or otherwise. HERE does not
warrant that the Database is or will be error free.
No oral or written information or advice provided by
HERE, your supplier or any other person shall create
a warranty or in any way increase the scope of the
limited warranty described above. The limited warranty
set forth in this Agreement does not affect or prejudice
any statutory legal rights that you may have under the
legal warranty against hidden defects.
If you did not acquire the Database from HERE
directly, you may have statutory rights against the
person from whom you have acquired the Database
in addition to the rights granted by HERE hereunder
according to the law of your jurisdiction. The above
warranty of HERE shall not affect such statutory rights
and you may assert such rights in addition to the
warranty rights granted herein.
Engb 9
Chapter
02
Introduction
Introduction

LIMITATION OF LIABILITY
T
he price of the Database does not include any
consideration for assumption of risk of consequential,
indirect or unlimited direct damages which may
arise in connection with your use of the Database.
Accordingly, in no event shall HERE be liable for any
consequential or indirect damages, including without
limitation, loss of revenue, data, or use, incurred by
you or any third party arising out of your use of the
Database, whether in an action in contract or tort or
based on a warranty, even if HERE has been advised of
the possibility of such damages. In any event HERE’s
liability for direct damages is limited to the price of
your copy of the Database.
T
HE LIMITED WARRANTY AND LIMITATION OF
LIABILITY, SET FORTH IN THIS AGREEMENT, DO NOT
AFFECT OR PREJUDICE YOUR STATUTORY RIGHTS
WHERE YOU HAVE ACQUIRED THE DATABASE
OTHERWISE THAN IN THE COURSE OF A BUSINESS.
WARNINGS
T
he Database may contain inaccurate or incomplete
information due to the passage of time, changing
circumstances, sources used and the nature of
collecting comprehensive geographic data, any of
which may lead to incorrect results. The Database
does not include or reflect information on - inter alia
- neighborhood safety; law enforcement; emergency
assistance; construction work; road or lane closures;
vehicle or speed restrictions; road slope or grade;
bridge height, weight or other limits; road or traffic
conditions; special events; traffic congestion; or travel
time.
GOVERNING LAW
T
his Agreement shall be governed by the laws of
the jurisdiction, in which you reside at the date of
acquisition of the Database. Should you at that
moment reside outside the European Union or
Switzerland, the law of the jurisdiction within the
European Union or Switzerland where you acquired
the Database shall apply. In all other cases, or if the
j
urisdiction where you acquired the Database cannot
be defined, the laws of the Netherlands shall apply.
T
he courts competent at your place of residence at the
time you acquired the Database shall have jurisdiction
over any dispute arising out of, or relating to this
Agreement, without prejudice to HERE’s right to bring
claims at your then current place of residence.
Engb
10
Chapter
02 Introduction

About the data for the map
database
!Modifications related to roads, streets/high-
ways, terrain, construction and other things
before/during the development period may
not be reflected in this database. Inevitably,
those modifications after that period are
not reflected in this database.
!Regardless of existing and newly-built
things, the data may be different from the
actual condition.
!For details about the map coverage of this
navigation system, refer to the information
on our website.
!It is strictly prohibited to reproduce and use
any part or the whole of this map in any
form without permission from the copyright
owner.
!If the local traffic regulations or conditions
deviate from this data, follow the local traf-
fic regulations (such as signs, indications,
etc.) and conditions (such as construction,
weather, etc.).
!The traffic regulation data used in the map
database applies only to standard sized
passenger vehicles. Note that regulations
for larger vehicles, motorbikes, and other
non-standard vehicles are not included in
the database.
!©1987-2016 HERE. All rights reserved.
!For copyright of contents, please check the
About window in the software.
=For details, refer to on pageMore menu
62.
Important safety information
WARNING
!Do not attempt to install or service this pro-
duct by yourself. Installation or servicing of
this product by persons without training and
experience in electronic equipment and auto-
motive accessories may be dangerous and
could expose you to the risk of electric shock,
injury or other hazards.
!If liquid or foreign matter should get inside
this navigation system, park your vehicle to
safe place and turn the ignition switch off
(ACC OFF) immediately and consult your deal-
er or the nearest authorised Pioneer Service
Station. Do not use the navigation system in
this condition because doing so may result in
a fire, electric shock, or other failure.
!If you notice smoke, a strange noise or odour
from the navigation system, or any other ab-
normal signs on the LCD screen, turn off the
power immediately and consult your dealer or
the nearest authorised Pioneer Service Sta-
tion. Using this navigation system in this con-
dition may result in permanent damage to the
system.
!Do not disassemble or modify this navigation
system, as there are high-voltage components
inside which may cause an electric shock. Be
sure to consult your dealer or the nearest
authorised Pioneer Service Station for internal
inspection, adjustments or repairs.
!Do not allow this product to come into contact
with liquids. Electrical shock could result.
Also, damage to the product, smoke, and over-
heating could result from contact with liquids.
Engb 11
Chapter
02
Introduction
Introduction

CAUTION
When a route is calculated, the route and voice
guidance for the route are automatically set.
Also, for day or time traffic regulations, only infor-
mation about traffic regulations applicable at the
time when the route was calculated is consid-
ered. One-way streets and street closures may
not be taken into consideration. For example, if a
street is open during the morning only, but you
arrive later, it would be against the traffic regula-
tions so you cannot drive along the set route.
When driving, please follow the actual traffic
signs. Also, the system may not know some traf-
fic regulations.
Before using your navigation system, be sure
to read and fully understand the following
safety information:
!Read the entire manual before operating
this navigation system.
!This navigation system may in certain cir-
cumstances display inaccurate position of
your vehicle, the distance of objects shown
on the screen, and compass directions. In
addition, the system has certain limita-
tions, including the inability to identify one-
way streets, temporary traffic restrictions
and potentially unsafe driving areas. Please
exercise your own judgement in the light of
actual driving conditions.
!The navigation features of your navigation
system (and rear view camera option if pur-
chased) are intended solely as an aid to
you in the operation of your vehicle. It is
not a substitute for your attentiveness, jud-
gement, and care when driving.
!Certain country and government laws may
prohibit or restrict the placement and use
of this system in your vehicle. Please com-
ply with all applicable laws and regulations
regarding the use, installation and opera-
tion of your navigation system.
!Do not operate this navigation system (or
the rear view camera option if purchased) if
doing so will divert your attention in any
way from the safe operation of your vehicle.
Always observe safe driving rules and fol-
low all existing traffic regulations. If you ex-
perience difficulty in operating the system
or reading the display, park your vehicle in
a safe location and apply the handbrake be-
fore making the necessary adjustments.
!Never allow others to use the system un-
less they have read and understood the op-
erating instructions.
!Never use this navigation system to route
to hospitals, police stations or similar facil-
ities in an emergency. Stop using any func-
tions relating to the hands-free phoning
and please call the appropriate emergency
number.
!Route and guidance information displayed
by this equipment is for reference purposes
only. It may not accura tely reflect the latest
permissible routes, road conditions, one
way streets, road closures, or traffic restric-
tions.
!Traffic restrictions and advisories currently
in force should always take precedence
over guidance given by the navigation sys-
tem. Always obey current traffic restric-
tions, even if the navigation system
provides contrary advice.
!Failure to set correct information about the
local time may result in the navigation sys-
tem providing improper routing and gui-
dance instructions.
!Never set the volume of your navigation
system so high that you cannot hear out-
side traffic and emergency vehicles.
!The data encoded in the built-in memory is
the intellectual property of the provider, and
the provider is responsible for such con-
tent.
!Keep this manual handy as a reference for
operating procedures and safety informa-
tion.
!Pay close attention to all warnings in this
manual and follow the instructions care-
fully.
!Please remember to wear your seat belt at
all times while operating your vehicle. If
you are in an accident, your injuries can be
considerably more severe if your seat belt
is not properly fastened.
Engb
12
Chapter
02 Introduction

!Never use headphones while driving.
Fuel cost management
These calculations are based only on the infor-
mation that you provide and not on any data
from the vehicle. The fuel mileage displayed is
only a reference value, and does not guarantee
that the fuel mileage displayed can be ob-
tained.
Traffic information
!Pioneer does not bear responsibility for the
accuracy of the information transmitted.
!Pioneer does not bear responsibility for
changes to information services provided
by broadcasting stations or by related com-
panies, such as cancellation of services or
changing to pay-services. Also, we do not
accept return of the product for this rea-
son.
Speed limit indication
The speed limit is based on the map database.
The speed limit in the database may not
match the actual speed limit of the current
road. This is not a definite value. Be sure to
drive according to the actual speed limit.
Lorry navigation
pThis function is only available on AVIC-
F160-2.
!Based on the dimensions and other en-
tered parameters of your vehicle, this sys-
tem warns you when you are approaching
a restricted road segment or such roads
must be used in your route.
!Warnings are both visual and audible.
There are different kinds of warnings:
!When approaching a restricted road
segment without a route, you are
warned that there is a restricted area
ahead.
!Restricted road segments are excluded
from your routes but in some cases
some restricted roads need to be used
to reach the given destination. In this
case you receive a warning and you
must accept that you have restricted
roads in your route or you can stop the
navigation and continue without an ac-
tive route.
pPlease note that lorry navigation is only as
accurate and comprehensive as the restric-
tions received with the map. Restrictions
may not cover lower priority roads and in
most cases the coverage changes as you
move around your map region. You are ob-
liged to always obey the restrictions dis-
played on the road.
Additional safety information
To avoid battery exhaustion
Be sure to run the vehicle engine while using
this product. Using this product without run-
ning the engine can drain the battery.
WARNING
Do not install this product in a vehicle that does
not have an ACC wire or circuitry available.
Handling the SD card slot
The SD memory card and SDHC memory card
are collectively referred to as the SD memory“
card .”
CAUTION
!Keep the SD memory card out of the reach of
small children to prevent them from acciden-
tally swallowing it.
!Ejecting an SD memory card during data
transfer can damage the SD memory card. Be
sure to eject the SD memory card by the pro-
cedure described in this manual.
!To prevent data loss and damage to the sto-
rage device, never remove it from this naviga-
tion system while data is being transferred.
Engb 13
Chapter
02
Introduction
Introduction
!If data loss or corruption occurs on the sto-
rage device for any reason, it is usually not
possible to recover the data. Pioneer accepts
no liability for damages, costs or expenses
arising from data loss or corruption.
!Never insert or eject an SD memory card
while driving.
!Do not insert anything other than SD memory
cards into the SD card slot.
Notes before using the system
In case of trouble
Should the navigation system fail to operate
properly, contact your dealer or nearest
authorised Pioneer Service Station.
Visit our website
Visit us at the following site:
http://www.pioneer-car.eu
!Register your product. We will keep the de-
tails of your purchase on file to help you
refer to this information in the event of an
insurance claim such as loss or theft.
!We offer the latest information about
PIONEER CORPORATION on our website.
About this product
This navigation system does not work correctly
in areas other than Europe. The RDS (Radio
Data System) function operates only in areas
with FM stations broadcasting RDS signals.
The RDS-TMC service can also be used in the
area where there is a station that broadcasts
the RDS-TMC signal.
The names of private corporations, pro-
ducts and other entities described in this
product are the registered trademarks or
trademarks of their respective firms.
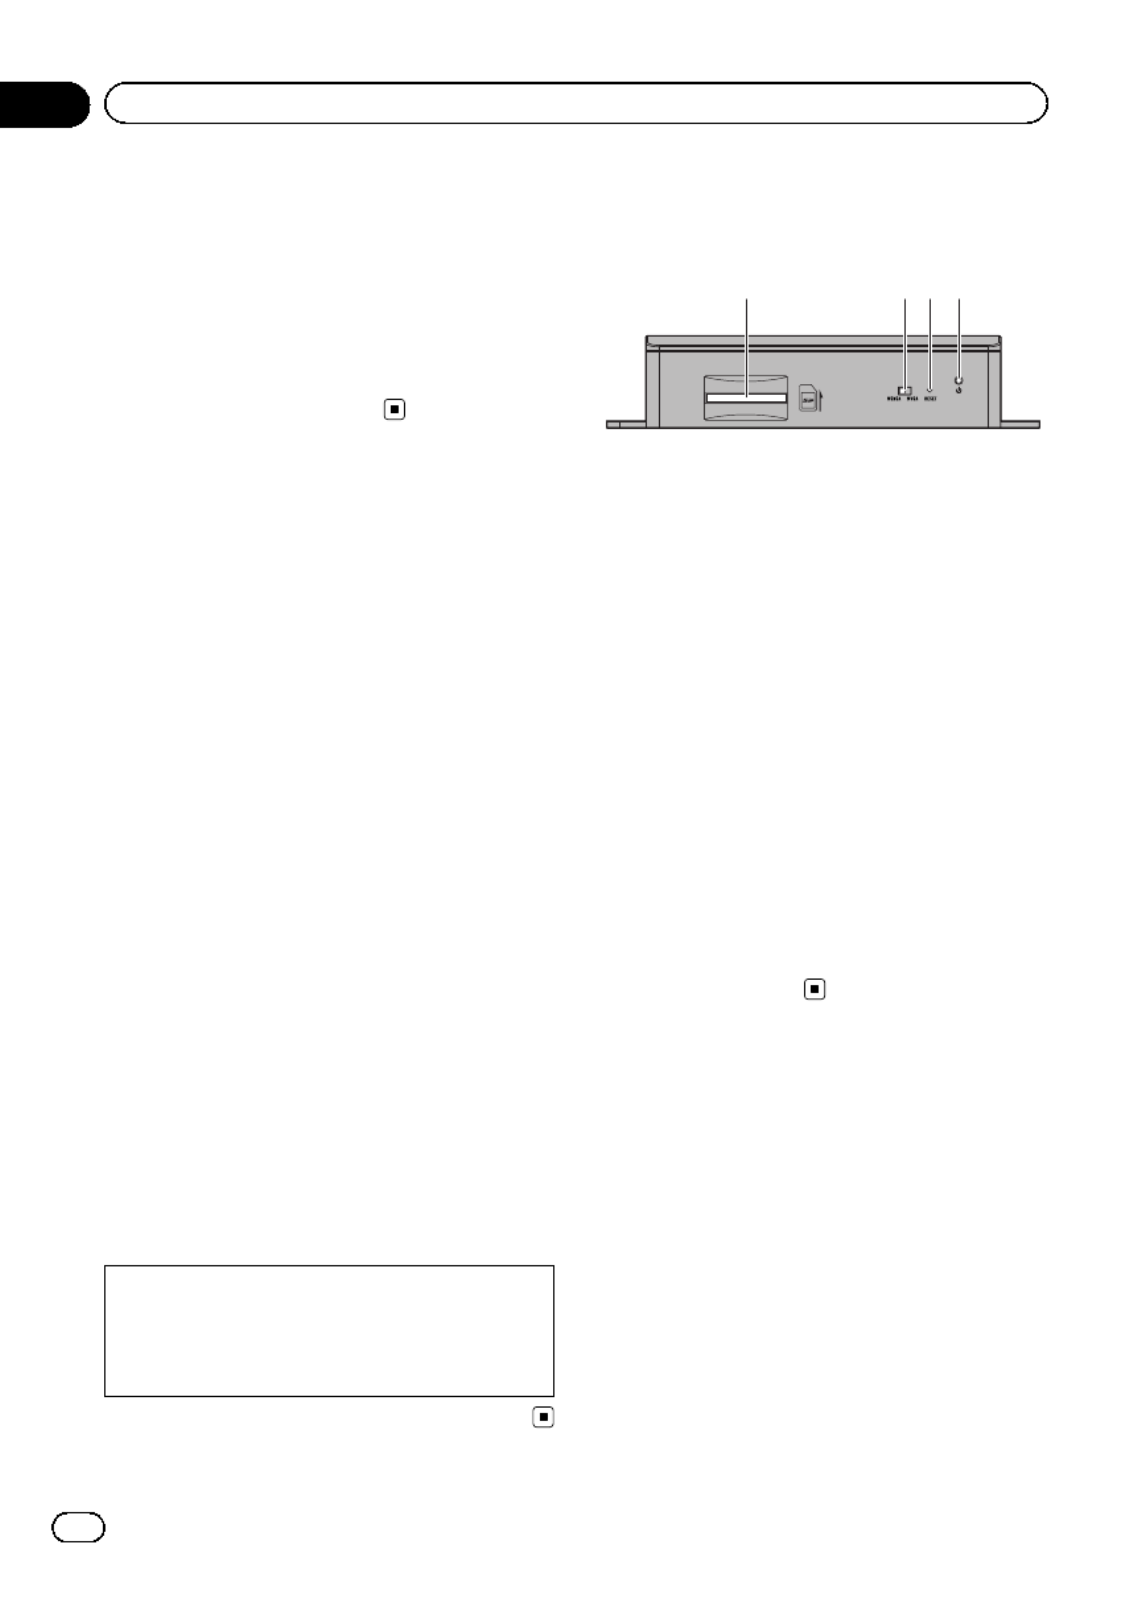
Checking part names and
functions
3 421
1SD card slot
pAn SD memory card containing map
data is inserted at the factory.
pDo not erase the map data stored on the
SD memory card (inserted at the factory).
Without the data, the navigation function
is disabled.
2Video output selector switch
The switch is used to change the resolution
of video output to the AV receiver.
!When the switch is set to the left,
WQVGA video is output.
!When the switch is set to the right,
WVGA video is output.
3Reset button
=For details, refer to Resetting the micro-
processor on page 15.
4Power indicator
Engb
14
Chapter
02 Introduction

Inserting an SD memory card
pThe included SD memory card must be in-
serted into the SD card slot for prior to
using the AVIC-F160-2 or AVIC-F260-2 for
the first time.
1 Insert an SD memory card into the SD
card slot.
2 Gently press the card in against the
spring latch until it stops, then release.
The card will lock firmly into place inside the
SD card slot.
Resetting the microprocessor
CAUTION
Please refer to the related section before clearing.
The microprocessor should be reset under the
following conditions:
!Prior to using this product for the first time
after installation.
!If this product fails to operate properly.
!If there appears to be problems with the op-
eration of the system.
!When changing the combination of equip-
ment.
!When adding/removing additional pro-
ducts that connect to the navigation sys-
tem.
!If your vehicle position is shown on the
map with a significant positioning error.
%Press the reset button on this product
with a pointed object such as the tip of a
pen.
Reset button
Engb 15
Chapter
02
Introduction
Introduction

On first-time startup
When you use the navigation system for the
first time, an initial setup process starts auto-
matically. Follow the steps below.
1 Start the engine to boot up the system.
2 Wait approximately 10 seconds, and
then press the MODE button of the AV re-
ceiver.
After a short pause, the navigation splash
screen appears.
3 Set the video output selector switch ac-
cording to your AV receiver.
pIf the screen remains black after pressing
the button of the AV receiver, set theMODE
switch to the other side.
=For details, refer to Checking part names
and functions on page 14.
4 Select the language that you want to
use on the screen, then touch [Done].
pLater you can change it in set-“ ”Regional
tings.
=For details, refer to Customising the regional
settings on page 60.
The navigation system will restart and the
“ ”End User Licence Agreement screen is dis-
played.
5 Read the terms carefully, checking its
details, and then touch [Accept] if you
agree to the conditions.
The configuration wizard starts.
6 Touch [Next] to continue.
7 Select the language that you want to
use for voice guidance messages, then
touch [Next].
pLater you can change it in “Sound and
Warnings” settings.
=For details, refer to Setting the volume and
the guidance voice for navigation system on
page 54.
8 If needed, modify the time format and
unit settings, then touch [Next].
pLater you can change it in set-“ ”Regional
tings.
=For details, refer to Customising the regional
settings on page 60.
Engb
16
Chapter
03 Before you start
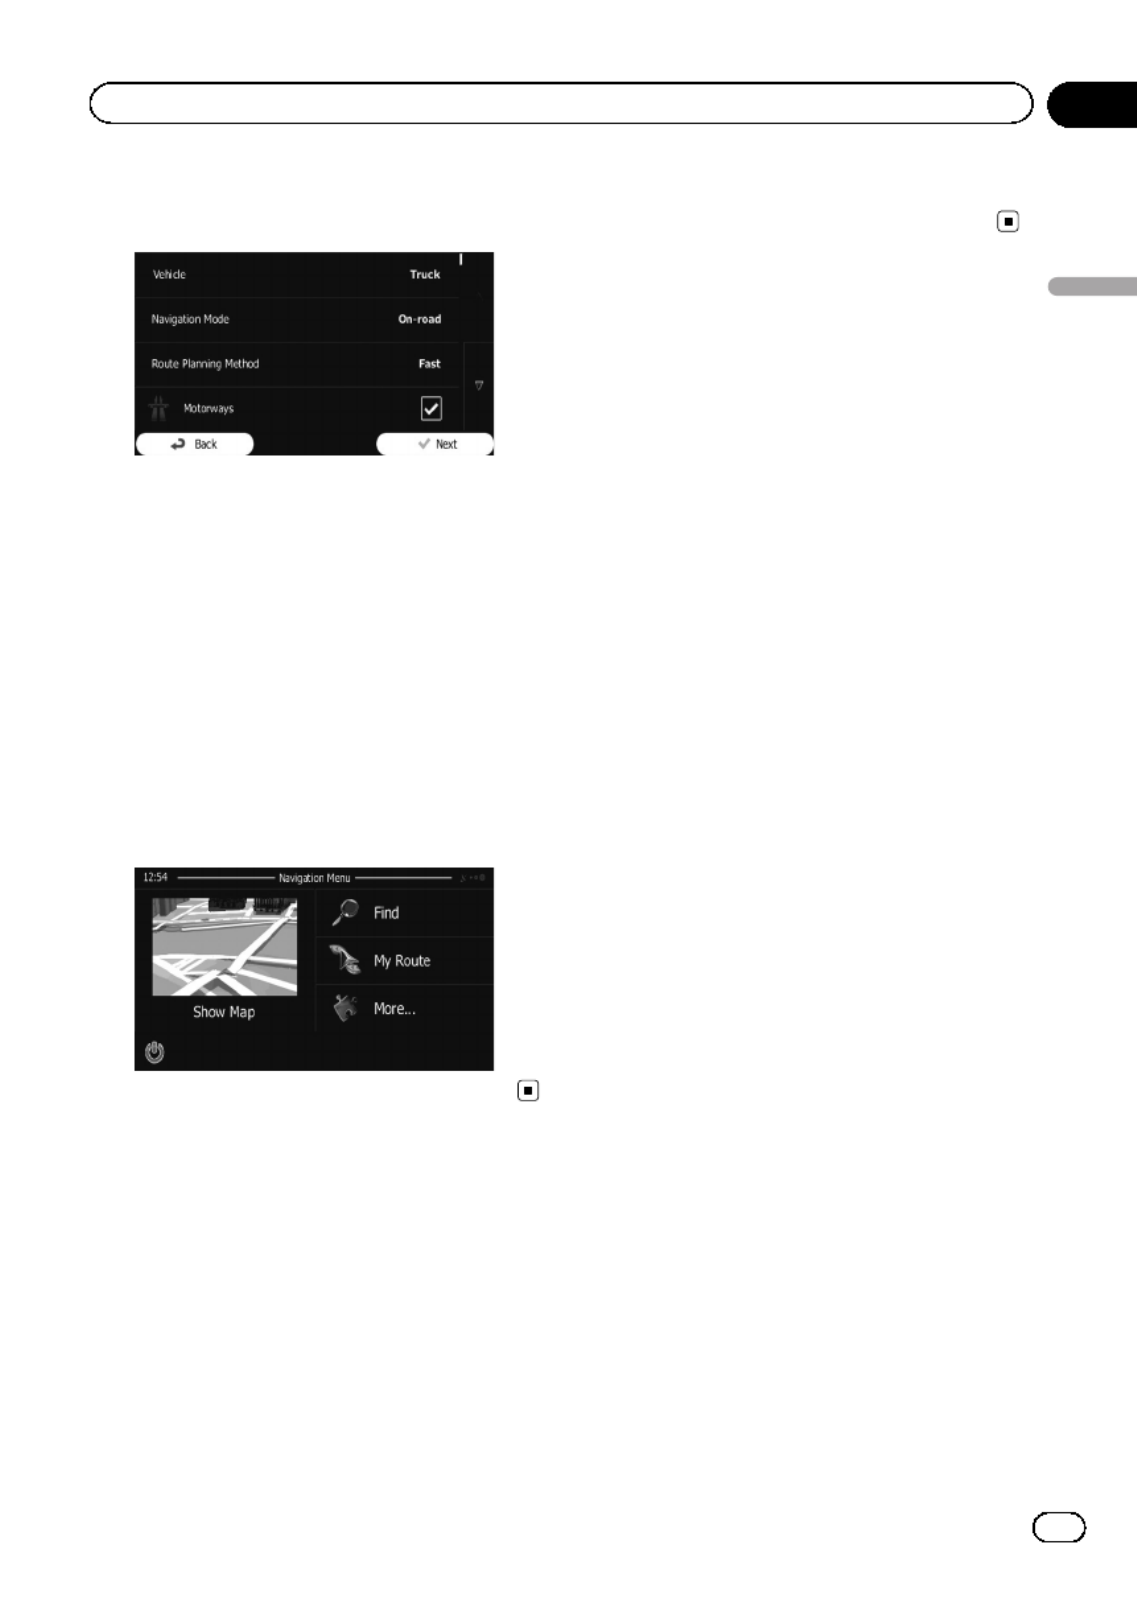
9 If needed, modify the default route
planning options, then touch [Next].
p Later you can change them in “Route Set-
tings”.
= For details, refer to Modifying the route cal-
culation conditions on page 40.
p You can restart the configuration wizard
later from the menu.“ ”Settings
= For details, refer to Starting the configuration
wizard on page 60.
10 Touch [Finish].
The initial setup is now complete.
After touching [ ], theFinish “Navigation
Menu” screen appears and you can start
using the navigation system.
Regular startup
1 Start the engine to boot up the system.
2 Press the MODE button of the AV recei-
ver.
After a short pause, the navigation screen ap-
pears.
p The display will turn off if you press the
MODE button of the AV receiver immedi-
ately after the navigation system restarts, so
wait (approximately 10 seconds) after re-
start before pressing the button.MODE
Engb 17
Chapter
03
Before you start
Before you start

Screen switching overview
Navigation screen
Press the button of the AV receiver.MODE
AV receiver screen (e.g. AVH-X5800DAB)
Engb
18
Chapter
04 How to use the navigation menu screens
What you can do on each
menu
1 Map screen
Touch [ ] on theShow Map “Navigation
Menu” screen.
2 Quick menu
Registering your favourite menu items in
shortcuts allows you to quickly jump to the re-
gistered menu screen by a simple touch on
the quick menu screen. The master volume
slider at the bottom of the screen adjusts the
sound volume of the device. All sounds of this
system are affected.
p You can customise the menu options.
= For details, refer to Customising the
quick menu on page 55.
3 “ ”Navigation Menu screen
Touch [ ] on the map screen to displayMenu
the screen.“ ”Navigation Menu
This is the starting menu to access the desired
screens and operate the various functions.
4 “ ”Find menu
You can search for your destination on this
menu.
Other features include useful functions to
support your navigation.
5 “ ”My Route menu
You can display your route information on the
map. You can also perform route-related ac-
tions such as editing or cancelling your route
on this menu.
6 “ ”More... menu
You can customise the way the navigation sys-
tem works, to simulate demo routes or to run
some additional applications.
7 Traffic summary screen
You can check the summary of traffic events
on the set route.
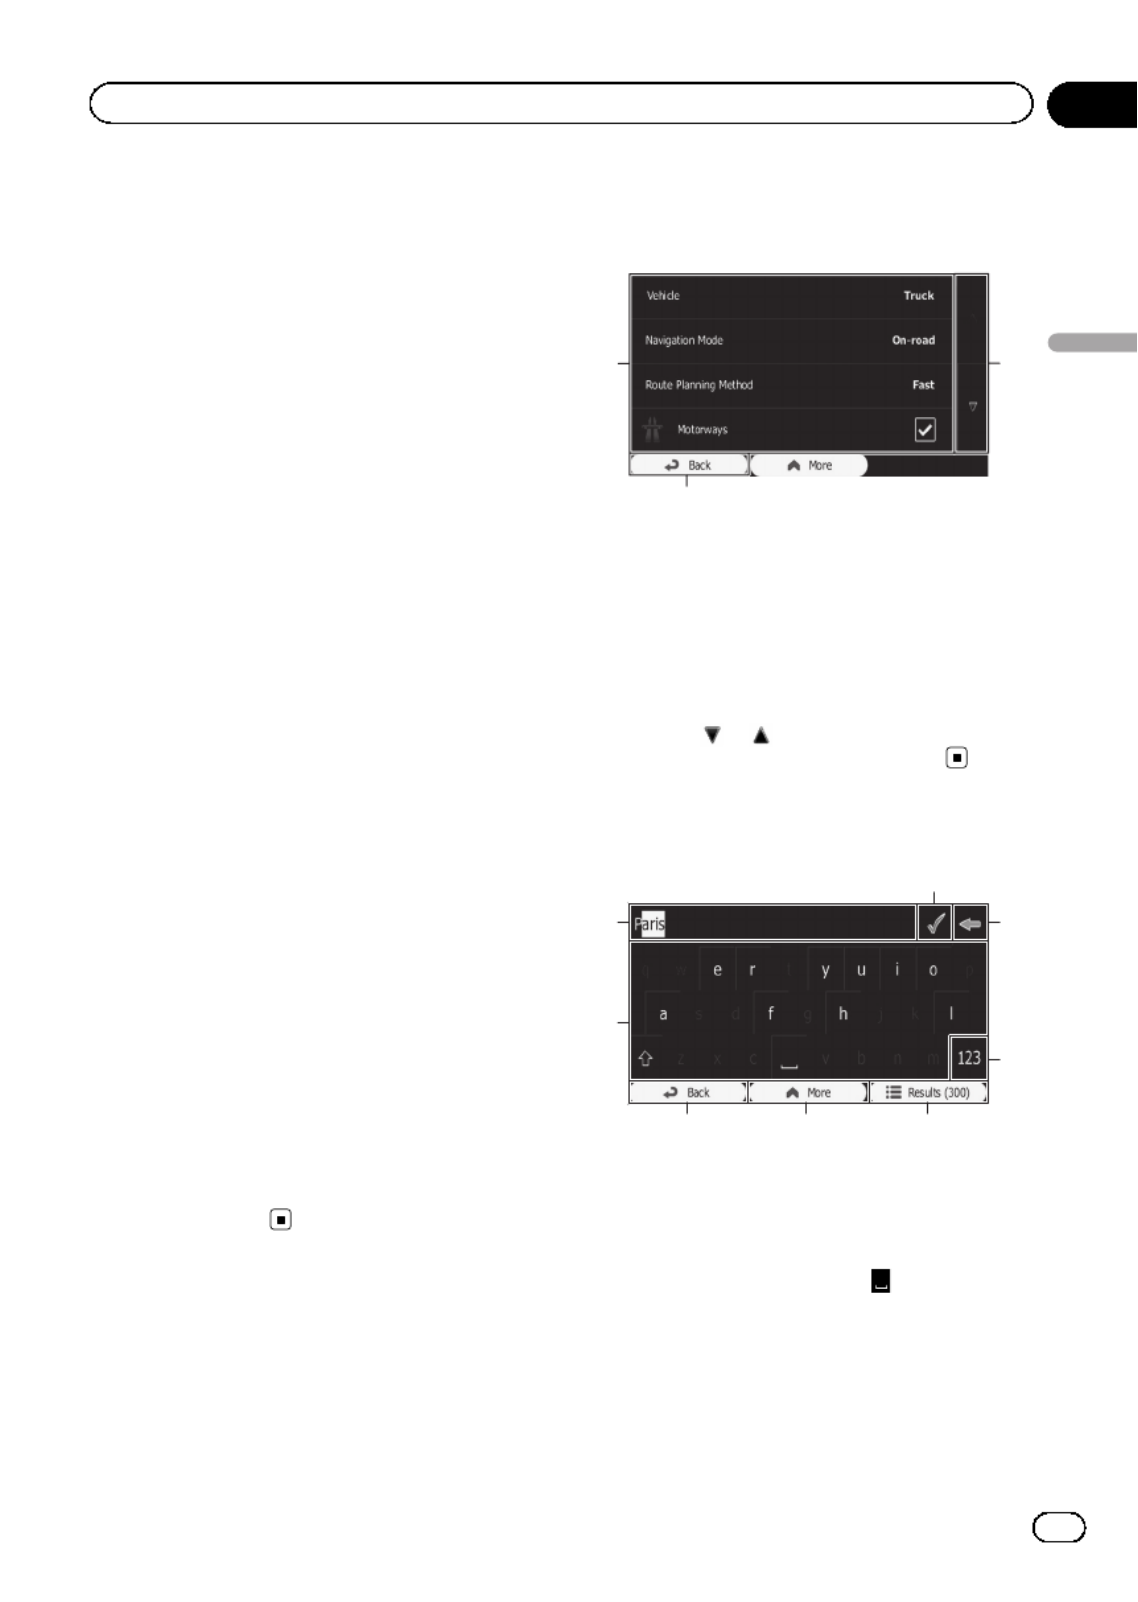
Operating list screens (e.g.
route settings screen)
1
2
3
1 Listed items
Touching an item on the list allows you to nar-
row down the options and proceed to the next
operation.
2 Back
The previous screen returns. Touching and
holding [ ] returns to the map screen.Back
3 Touching or on the right of screen allows
you to see the next or previous page.
Operating the on-screen
keyboard
2
3 4 5
6
7
8
1
1 Text box
Displays the characters that are entered.
2 Keyboard
Touch the keys to enter the characters.
p To enter a space, touch at the bottom
centre of the screen.
Engb 19
Chapter
04
How to use the navigation menu screens
How to use the navigation menu screens

p When entering text, the first character
appears in upper case while the rest of
the text is in lower case. Touch to
enter an upper case letter or touch
twice to turn on Caps Lock. Touch again
and lower case letters return.
3 Back
The previous screen returns. Touching and
holding [ ] returns to the map screen.Back
4 More
Touching [ ] switches to another key-More
board layout, for example from an English key-
board to a Greek keyboard.
5 Results
Touch to finalise the keyboard entry (open the
list of search results).
If the desired name does not show up, the
names that match the string appear in a list
after entering a couple of characters (to open
the list of results before it appears automati-
cally, touch [ ]).Results
6
Touch to switch to a keyboard offering nu-
meric and symbol characters.
7
Touch to correct your entry on the keyboard.
Touching and holding deletes several char-
acters or the entire input string.
8
Touch to finalise the keyboard entry (accept
the suggested search result).
Monitoring the GPS
reception quality
In the top right corner, the GPS reception qual-
ity icon shows the current accuracy of the po-
sition information.
Indicator Meaning
: GPS navigation possible
: Insufficient GPS navigation
: GPS navigation not possible
: No connection to GPS receiver
Engb
20
Chapter
04 How to use the navigation menu screens

Most of the information provided by your navigation system can be seen on the map. You need to be-
come familiar with how information appears on the map.
How to read the map screen
1
7 8
2
3
4
6
9
5
a
b
p Information with an asterisk (*) appears
only when the route is set.
p Depending on the conditions and settings,
some items may not be displayed.
1 Name of the street to be used (or next gui-
dance point)*
Shows information about the next guidance
point (manoeuvre) and the next street or the
next city/town.
2 Next guidance point (manoeuvre)*
When you approach the next manoeuvre, this
appears in orange. Both the type of the event
(turn, roundabout, exiting motorway, etc.) and
its distance from the current position are dis-
played. A smaller icon shows the type of the
second next manoeuvre if it is near the first
one.
= For details, refer to Frequently shown
route events on page 22.
3 Distance to the next guidance point (man-
oeuvre)*
Shows the distance to the next manoeuvre.
4 Second manoeuvre arrow*
Shows the turning direction after the next gui-
dance point and the distance to it.
5 Current position
Indicates the current location of your vehicle.
The apex of the triangular mark indicates your
orientation and the display moves automati-
cally as you drive.
p The exact location of the arrow mark de-
pends on the vehicle type used for route
calculation and the navigation mode.
= For details, refer to Changing the vehicle
used on page 40.
6 Menu key
Touch [Menu] to return to the “Navigation
Menu” screen.
= For details, refer to What you can do on
each menu on page 19.
7 Street name (or city name) that your vehi-
cle is travelling along
8 Data field
Engb 21
Chapter
05
How to use the map
How to use the map

Touching this field displays route information
during navigation. By default, only one data
field is displayed. Touch this field to see all
data fields.
= For details, refer to Browsing the data
field on page 24.
9Current route*
The route currently set is highlighted in colour
on the map.
= For details of the POI icons, refer to Cus-
tomising the map screen settings on
page 57.
aTraffic information
The recommended route is not always the
same between two points. Whenever suitable
data exists, traffic information can be taken
into account in the route calculation.
bQuick menu
Touching this key causes the quick menu to
appear.
= For details, refer to onQuick menu
page 19.
Frequently shown route
events
Icon Description
Turn left.
Turn right.
Turn back.
Bear right.
Turn sharp left.
Icon Description
Keep left.
Continue straight in the intersec-
tion.
Go left on the roundabout, 3rd exit
(next manoeuvre).
Enter roundabout (second next
manoeuvre).
Enter motorway.
Exit motorway.
Board ferry.
Leave ferry.
Approaching a waypoint.
Approaching the destinatio n.
Seeing the current position
on the map
1 Display the Navig ation Menu screen.“ ”
= For details of the operations, refer to Screen
switching overview on page 18.
Engb
22
Chapter
05 How to use the map

2 Touch [Show Map] on the Navigation“
Menu screen.”
The map screen appears showing the current
position (a blue arrow by default), recom-
mended route (an orange line) and surround-
ing map area.
p The arrow mark appears in blue by default.
You can change this icon.
= For details of the POI icons, refer to Custo-
mising the map screen settings on page 57.
When there is no GPS position, the arrow
mark is transparent. It shows your last known
position. The more green dots you see in a sa-
tellite symbol in the top left corner, the closer
you are to get the valid GPS position.
When GPS position is available, the arrow
mark is displayed in full colour, now showing
your current position.
Checking the detailed information
about the current position
You can get the detailed information about the
current position (or about the last known posi-
tion if GPS reception is not available) from the
“ ”Where Am I? screen. You can also search
for useful Points Of Interest (POI) nearby on
the screen. Follow the steps below to open the
“ ”Where Am I? screen.
1 Display the map screen.
= For details of the operations, refer to Screen
switching overview on page 18.
2 If the current street is displayed below
the arrow mark (current position), touch it
to open the Where Am I? screen.“ ”
# Touch in the top right corner of the screen
to open the quick menu screen, then touch
[ ].Where Am I?
The screen provides the following information:
! Latitude and longitude (coordinate of the
current position in WGS84 format)
! Altitude (elevation information coming from
the GPS receiver often inaccurate)–
! House number on the left
! House number on the right
! Position information (current or last
known)/time left since it was last updated
! Address details of the current position
(when available)
p To save the current position as a “Fa-
vourites” destination, touch [More].
= For details, refer to Storing a location in
“Favourites” on page 50.
p You can also search for assistance near
your current position.
= For details, refer to Searching for a nearby
POI on page 33.
Engb 23
Chapter
05
How to use the map
How to use the map

Browsing the data field
The data fields are different when you are navi-
gating the current route and when you have
no specified destination (the orange line is not
displayed). The data field provides the follow-
ing information.
! When the route is set:
Distance to final destination, time needed
to reach the final destination and estimated
arrival time
! When the route is not set:
Current speed, speed limit of the current
road and current time
p The estimated time of arrival is an ideal
value calculated based on the value set for
“ ”Max. Speed and the actual driving
speed. The estimated time of arrival is only
a reference value, and does not guarantee
arrival at that time.
= For details, refer to Setting the vehicle
parameters on page 41.
p You can change the value by touching and
holding any of the fields.
Display during motorway
driving
In certain locations of the motorway, lane in-
formation is available, indicating the recom-
mended lane to be in to easily manoeuvre the
next guidance.
Lane information
While driving on the motorway, motorway exit
numbers and motorway signs may be dis-
played in the vicinity of interchanges and
exits.
If you are approaching a complex intersection
and the needed information exists, the map is
replaced with a 3D view of the junction.
Signposts
Junction view
p If the data for these items is not contained
in the map data, the information is not
available even if there are signs on the ac-
tual road.
Engb
24
Chapter
05 How to use the map

An icon showing a petrol station or a restau-
rant will appear on the map during you are
driving on motorways. Touch the icon to open
the details of the next few exits or service sta-
tions.
Motorway exit services
pYou can add any of them as a waypoint to
your route.
=For details, refer to Setting a route using the
“ ”My Route menu on page 38.
pIf you want to display other types of POIs
for the exits, you can change the icons in
“ ”Visual Guidance Settings .
=For details, refer to Setting the visual gui-
dance on page 58.
Operating the map screen
Changing the scale of the map
You can change how much of the map is dis-
played on the screen with street names and
other text displayed in the same font size.
1 Display the map screen.
=For details of the operations, refer to Screen
switching overview on page 18.
2 Touch anywhere on the map during na-
vigation.
The map stops following the current position
and control keys appear.
3 Touch or to change the map scale.
pMap scaling has a limit in 3D map view
mode. If you zoom out further, the map
switches to 2D view mode.
=For details, refer to Switching the map be-
tween 2D and 3D on page 26.
4 Touch [Back] to move the map back to
follow the current GPS position.
Smart Zoom
Your navigation system features Smart Zoom“ ”
that works in two ways:
!When the route is set:
When approaching a turn, it will zoom in
and raise the view angle to let you easily re-
cognise your manoeuvre at the next junc-
tion. It the next turn is at a distance, it will
zoom out and lower the view angle to be
flat so you can see the road in front of you.
!When the route is not set:
“ ”Smart Zoom will zoom in if you drive
slowly and zoom out when you drive at
high speed.
Changing the view angle of the
map
You can change the view angle of the map hor-
izontally or vertically.
pYou can change the vertical view angle of
the map in 3D mode only.
=For details, refer to Switching the map be-
tween 2D and 3D on page 26.
1 Display the map screen.
=For details of the operations, refer to Screen
switching overview on page 18.
Engb 25
Chapter
05
How to use the map
How to use the map

pSome information regarding traffic regula-
tions depends on the time when the route
calculation is performed. Thus, the infor-
mation may not correspond with a certain
traffic regulation when your vehicle actually
passes through the location in question.
Also, the information on the traffic regula-
tions provided applies for a passenger vehi-
cle, and not for a truck or other delivery
vehicles. Always follow the actual traffic
regulations when driving.
Searching for a location by
address
The most frequently used function is “Find
Address”, in which the address is specified
and the location is searched.
pDepending on the search results, some
steps may be skipped.
1 Touch [Menu] on the map screen.
The screen appears.“ ”Navigation Menu
=For details of the operations, refer to Screen
switching overview on page 18.
2 Touch [Find], then [Find Address].
3 Touch [Country], enter the first few let-
ters of the country on the keyboard and
then select one country from the list of re-
sults.
By default, your navigation system proposes
the country and city/town where you are. If no
changes are required, skip steps 3 and 4.
4 Touch [Town] and enter the name of
the city/town on the keyboard.
5 Touch [Street] and enter the street
name on the keyboard.
6 Touch [House Number] and enter the
house number on the keyboard.
pTo enter letters, touch .
7 When the entry is complete, touch
[Done].
pIf the entered house number cannot be
found, the midpoint of the street is selected
as the destination.
The searched location appears on the map
screen.
=For subsequent operations, refer to Setting
a route to your destination on page 37.
Engb 27
Chapter
06
Searching for and selecting a location
Searching for and selecting a location

Searching for a location by
entering the midpoint of a
street
You can also navigate to the midpoint of a
street if the house number is not available.
1 Touch [Menu] on the map screen.
The screen appears.“ ”Navigation Menu
=For details of the operations, refer to Screen
switching overview on page 18.
2 Touch [Find], then [Find Address].
3 If necessary, modify the country.
=For details of the operations, refer to Search-
ing for a location by address on page 27.
4 Touch [Street] and enter the street
name on the keyboard.
5 Touch [Select Street].
The map screen appears with the selected
point in the middle. The midpoint of the street
is selected as the destination.
=For subsequent operations, refer to Setting
a route to your destination on page 37.
Searching for a location by
entering the city/town centre
You can search for a location by entering the
city/town centre.
1 Touch [Menu] on the map screen.
The screen appears.“ ”Navigation Menu
=For details of the operations, refer to Screen
switching overview on page 18.
2 Touch [Find], then [Find Address].
3 If necessary, modify the country.
=For details of the operations, refer to Search-
ing for a location by address on page 27.
4 Touch [Town] and enter the name of
the city/town on the keyboard.
5 Touch [Select Town].
The map screen appears with the selected
point in the middle. The centre of the dis-
played city/town becomes the destination of
the route.
=For subsequent operations, refer to Setting
a route to your destination on page 37.
Finding the location by
specifying the postcode
If you know the postcode of the location that
you want to find, you can use it to find the lo-
cation.
pDepending on the search results, some
steps may be skipped.
1 Touch [Menu] on the map screen.
The screen appears.“ ”Navigation Menu
=For details of the operations, refer to Screen
switching overview on page 18.
2 Touch [Find], then [Find Address].
3 If necessary, modify the country.
=For details of the operations, refer to Search-
ing for a location by address on page 27.
Engb
28
Chapter
06 Searching for and selecting a location

The list of places opens with names contain-
ing the entered character sequence.
5 Scroll the list and touch the place you
want.
A full screen map appears with the selected
point in the middle. The name and address of
the place is displayed at the top of the screen.
=For subsequent operations, refer to Setting
a route to your destination on page 37.
pTo see the details of the selected place,
touch .
Touching [ ] returns to the map screen.Back
pThe places in the list are ordered by their
distance from the current or last known po-
sition, from the destination or by the length
of the necessary detour. To change the
order, follow the steps below:
Touch [ ], then touch one of the listMore
items.
Searching for POIs using preset
categories
The preset search allows you to quickly find
the most frequently selected types of POIs.
1 Touch [Menu] on the map screen.
The screen appears.“ ”Navigation Menu
=For details of the operations, refer to Screen
switching overview on page 18.
2 Touch [Find], then [Find Places].
The preset search categories are as follows.
!Petrol Station Along Route:
!Parking At My Destination:
!Restaurant Along Route:
!Accommodation At My Destination:
pWhen the route is set, accommodation is
searched around the destination of the
route.
pWhen the route is not set, they are searched
around the current position.
pWhen the current position is not available
either (no GPS signal), they are searched
around the last known position.
3 Touch the POI you want.
The searched location appears on the map
screen.
=For subsequent operations, refer to Setting
a route to your destination on page 37.
Searching for POIs by
categories
You can search for POIs by their categories
and subcategories.
1 Touch [Menu] on the map screen.
The screen appears.“ ”Navigation Menu
=For details of the operations, refer to Screen
switching overview on page 18.
Engb
30
Chapter
06 Searching for and selecting a location
Product specificaties
| Merk: | Pioneer |
| Categorie: | Navigatie |
| Model: | AVIC-F260-2 |
| Kleur van het product: | Zwart |
| Geïntegreerde geheugenkaartlezer: | Ja |
| Compatibele geheugenkaarten: | SD |
| Ingangsspanning: | 12 V |
Heb je hulp nodig?
Als je hulp nodig hebt met Pioneer AVIC-F260-2 stel dan hieronder een vraag en andere gebruikers zullen je antwoorden
Handleiding Navigatie Pioneer

23 December 2022
16 Augustus 2022
8 Februari 2022
16 Augustus 2022
16 Augustus 2022
15 Augustus 2022
17 Augustus 2022
15 Augustus 2022
17 Augustus 2022
16 Augustus 2022
Handleiding Navigatie
- Navigatie Panasonic
- Navigatie Ford
- Navigatie Fiat
- Navigatie Garmin
- Navigatie Grundig
- Navigatie JVC
- Navigatie Kenwood
- Navigatie Medion
- Navigatie Opel
- Navigatie Quintezz
- Navigatie Volvo
- Navigatie A-Rival
- Navigatie Airis
- Navigatie Apelco
- Navigatie Archos
- Navigatie Audi
- Navigatie Audiovox
- Navigatie Autovision
- Navigatie Becker
- Navigatie Binatone
- Navigatie Bluetech
- Navigatie Bullit
- Navigatie Danew
- Navigatie Eagle
- Navigatie Eclipse
- Navigatie Falk
- Navigatie Fujitsu Siemens
- Navigatie GlobalTronics
- Navigatie Goclever
- Navigatie GoRider
- Navigatie Hagenuk
- Navigatie Holux
- Navigatie Igo
- Navigatie Igo 8
- Navigatie Invion
- Navigatie Keomo
- Navigatie Kia
- Navigatie LX NAV
- Navigatie Macrom
- Navigatie Magellan
- Navigatie Mappy
- Navigatie Marquant
- Navigatie Mazda
- Navigatie Mio
- Navigatie Nav N Go
- Navigatie Navigon
- Navigatie Navitel
- Navigatie Navman
- Navigatie Navteq
- Navigatie Packard Bell
- Navigatie Parrot
- Navigatie PENTAGRAM
- Navigatie Prestigio
- Navigatie Raymarine
- Navigatie Raystar
- Navigatie Roadnavigator
- Navigatie RoHS
- Navigatie Route 66
- Navigatie Seat
- Navigatie Seecode
- Navigatie Simrad
- Navigatie Skoda
- Navigatie Snooper
- Navigatie Sungoo
- Navigatie Suzuki
- Navigatie Sygic
- Navigatie Tacx
- Navigatie TakeMS
- Navigatie Targa
- Navigatie TomTom
- Navigatie Toyota
- Navigatie VDO Dayton
- Navigatie Viamichelin
- Navigatie VW
- Navigatie WayteQ
- Navigatie Xzent
- Navigatie Zenec
Nieuwste handleidingen voor Navigatie

16 Oktober 2023

13 Oktober 2023
7 Oktober 2023
7 Oktober 2023
7 Oktober 2023
7 Oktober 2023
7 Oktober 2023
7 Oktober 2023

5 Oktober 2023
5 Oktober 2023