Pantech Burst P9070 Handleiding
Pantech
Smartphone
Burst P9070
Lees hieronder de 📖 handleiding in het Nederlandse voor Pantech Burst P9070 (186 pagina's) in de categorie Smartphone. Deze handleiding was nuttig voor 49 personen en werd door 2 gebruikers gemiddeld met 4.5 sterren beoordeeld
Pagina 1/186

Thank you for choosing the Pantech Burst, our latest smartphone. The
Pantech Burst has many features designed to enhance your mobile
experience. With its unique and stylish design, you will enjoy the entire
Burst experience.
This User Guide contains important and useful information that will
maximize your familiarity with all that the Pantech Burst has to offer.


Some of the contents in this manual may differ from your phone depending on the software of the phone. Actual color of the phone
may vary.
Your phone is designed to make it easy for you to access a wide variety of content. For your protection, we want you to be aware that
some applications that you enable may involve the location of your phone being shared. For applications available through AT&T, we
offer privacy controls that let you decide how an application may use the location of your phone and other phones on your account.
However, the AT&T privacy tools do not apply to applications available outside of AT&T. Please review the terms and conditions
and the associated privacy policy for each location-based service to learn how location information will be used and protected.
In addition, your AT&T phone may be used to access the Internet and to download, and/or to purchase goods, applications, and
services from AT&T or elsewhere from third parties. AT&T provides tools for you to control access to the Internet and certain Internet
content. These controls may not be available for certain devices which bypass AT&T controls.
Service provided by AT&T Mobility. Portions © 2012 AT&T Intellectual Property. All rights reserved. AT&T, the AT&T logo and all other
AT&T marks contained herein are trademarks of AT&T Intellectual Property and/or AT&T affiliated companies. All other marks
contained herein are the property of their respective owners.
Copyright © 2012. Pantech. All Rights Reserved.


3
Important Safety Information
Safety information
The following shows how to maintain your mobile phone,
together with necessary precautions.
x
Keep your mobile phone and its accessories out of the
reach of children and pets.
x
Maintain your mobile phone in dry conditions and keep it
within normal operating temperatures. It may be damaged
at temperatures higher than 55°C/131°F or lower than
-20°C/-4°F.
x
Do not dry your phone in a microwave oven. Sparks may
occur and cause an explosion or fire.
x
Do not use or store your mobile phone in dusty, dirty areas.
xDo not disassemble your mobile phone.
x
Do not drop or cause severe impact to your mobile phone.
xDo not clean your mobile phone with chemical products,
cleaning solvents or detergents.
x
Contact your dealer immediately if your mobile phone does
not work properly.
x
Use only authorized batteries, battery chargers, and
accessories. Any malfunction or damage caused by the
use of unauthorized batteries, battery chargers, and
accessories will void the limited product warranty.
x
Ensure that the battery and the battery charger do not
come in contact with conductive objects.
x
For optimal performance, use cases and accessories that
do not contain magnets.
Safety precautions
The following list shows precautions to keep your device as
you use it.
xUsing a mobile phone while driving is prohibited.
xUsing a mobile phone while driving can distract your
attention and cause an accident. Always turn your phone
off to drive safely.
x
In an emergency, use a hands-free device built into your car
or pull over in a safe place first.
xCheck local laws and regulations and comply with them,
with regard to the prohibition of mobile phone use while
driving.
Turn off in restricted areas
Always turn your phone off in areas where mobile phone use is
restricted.
Turn off in an aircraft
Always turn your phone off or select the airplane mode
(Tap > > ) when you are in an Settings More… Airplane mode
aircraft. Electromagnetic waves emitted by your phone may
affect the electronic navigation equipment in the aircraft.
Turn off in hospitals and near medical
equipment
Always turn your phone off in hospitals and obey their
regulations. Turn your phone off when using medical
equipment for private purposes. Always consult with the
medical equipment’s manufacturer or an expert regarding
phone use near the medical equipment.


4
Important Safety Information
Turn off in dangerous areas
Always turn your phone off in areas where explosive or
dangerous materials (e.g. fuels or chemical products) are
located and obey relevant instructions or signs. Do not insert
or remove your mobile phone’s battery in such areas.
Install a hands-free device in a safe location
Install a hands-free device away from the steering wheel and
airbag expansion areas. Otherwise, a driver may be injured by
the hands-free devices in a car accident.
Keep away from other electronic devices
Mobile phones emit electromagnetic waves that may affect
nearby electronic devices. After turning on your phone, do not
place it near other sensitive electronic goods.
About battery usage
Your phone is powered by a lithium-ion (Li-Ion) battery. In
other words, you can recharge your battery while some charge
remains without reducing its effectiveness as a result of the
“memory effect” inherent in other battery technologies.
x
Do not use a damaged battery or charger.
xDo not disassemble, open crush, bend, deform, puncture,
or shred the battery.
x
Do not modify, remanufacture, or insert foreign objects into
the battery.
x
Do not immerse or expose the battery to water or other
liquids, fire, explosions, or other hazards.
x
Do not put your battery in contact with conductive objects.
x
Dispose of and recycle used batteries in accordance with
local regulations. Do not dispose of batteries by burning;
they may explode.
x
Do not use an unauthorized charger or battery.
x
Use the battery only for the device for which it is specified.
x
Use the battery with a charging device that has been
qualified for the device per this standard. Use of an
unqualified battery or charger may present a risk of fire,
explosion, leakage, or other hazard.
x
Do not short-circuit a battery or allow metal conductive
objects to come into contact with the battery terminals.
x
Replace the battery only with another battery that has
been qualified with the device per this standard, IEEE-
Std-1725-2006.
x
Children should be supervised when they use the battery.
x
Avoid dropping the phone or the battery. If the phone or
the battery is dropped, especially on a hard surface, and
the user suspects damage, take it to a service center for
inspection.
x
Use the battery for its specified purpose only.
x
The closer you move to your network’s base station, the
longer you can use your phone because less battery power
is required for connection.
x
The battery recharging time varies depending on remaining
the battery capacity and the battery, and charger type.
x
Battery life inevitably shortens over time.
x
Since overcharging may shorten battery life, remove the
phone from its charger once it is fully charged. Unplug the
charger once charging is complete. Leaving the battery
in hot or cold places, especially inside a car in summer or
winter, may reduce its capacity and life.


5
Important Safety Information
x
To prevent injury or burns, ensure that no metal objects
come into contact with the + and – terminals of the battery.
Basic instructions
Useful tips
To understand information contained in this user guide, please
keep in mind the following:
x
It is assumed that you start operating applications of the
phone from the Applications screen.
1. Tap on the home screen to access the applications
menu screen.
2. Flick the screen right or left and select to run the
application you want to use.
Main home screen Applications menu screen
x
Words in bold type refer to the relevant action on
the screen. For example, “Tap Share contact.” in this
instruction manual guides you to follow the correct
actions. In this way, you will tap the onscreen menu, “Share
contact,” in the Contacts menu window.
x
Words in all capital letters refer to hard keys. For example,
LOCK/PWR indicates the lock/power key on the top left of
the handset that locks the screen or turns on/off power.
x
The symbol “>” refers to the next action. For example, “Tap
Settings > ” means that you should tap Language & input
Settings first and next.Language & input
x
The term, ‘Applications menu’ refers to the screen where all
applications of the phone appear.
x
Home screen refers to the screen that appears first when
you unlock the screen.
x
Idle mode refers to the status when you stay on the home
screen ready to run an application.
About Google accounts
It is recommended that you have a Google account to
use some applications provided by Google, e.g. Calendar,
Latitude, Google Play, Talk, and Gmail on the phone. For more
information on setting up a Google account, refer to “Creating
a Google account” on page 23.


6
Table of contents
Safety information ......................................................................................3
Safety precautions ......................................................................................3
About battery usage ...................................................................................4
Basic instructions ........................................................................................5
1. Getting Started ...........................................9
Inside the package ......................................................................................9
SIM/USIM card and battery ........................................................................9
Charging the battery ................................................................................10
About the internal memory .....................................................................10
Managing the memory card ....................................................................10
Turning the phone on/off .......................................................................... 11
Unlocking the screen ................................................................................. 11
Locking the screen .....................................................................................11
Product overview ...................................................................................... 12
Using the touch screen ............................................................................ 15
Understanding the home screen............................................................ 16
Customizing the home screen ................................................................ 17
Using the main home menu options ...................................................... 19
Viewing tips for the home screen .......................................................... 20
Using the Quick Settings screen ........................................................... 20
Using the applications menu ................................................................... 21
Closing running applications .................................................................22
Activating the phone ................................................................................23
Creating a Google account ......................................................................23
Synchronizing Google accounts ............................................................23
Gripping the phone ...................................................................................24
2. Connectivity ..............................................25
Using a Wi-Fi network ...............................................................................25
Connecting to a mobile network ............................................................26
Using Bluetooth .........................................................................................26
Using the phone as modem .....................................................................27
Connecting to a PC ....................................................................................28
3. Call & Message ......................................... 30
Calling ......................................................................................................... 30
Messaging ................................................................................................... 32
Managing contacts ...................................................................................36
4. Communication ........................................39
Receiving and sending emails .................................................................39
Using Gmail ................................................................................................ 40
Using Twitter .............................................................................................. 41
Using Facebook..........................................................................................42
Using S-Board ............................................................................................42
Using Google Talk ..................................................................................... 44
5. Entertainment ..........................................45
Using Camera .............................................................................................45
Using Gallery ............................................................................................. 46
Using Camcorder ......................................................................................47
Using Video Player.................................................................................... 48
Using Movies .............................................................................................. 50
Using Music Player .................................................................................... 50


7
Table of contents
Enjoying YouTube ......................................................................................52
Accessing the Internet .............................................................................53
Installing or uninstalling applications ...................................................55
Using Google Maps ....................................................................................56
Using Local .................................................................................................57
Using Latitude ............................................................................................57
Searching with Google .............................................................................59
Using RSS Reader ......................................................................................59
6. Tools ............................................................ 61
Calendar ...................................................................................................... 61
Handy Memo ...............................................................................................62
Voice Recorder ..........................................................................................63
Alarm/Clock ............................................................................................... 64
Calculator .................................................................................................. 66
Converter .................................................................................................... 67
Sketch Pad ..................................................................................................67
Voice Dialer ................................................................................................ 68
Compass .................................................................................................... 68
Navigation ................................................................................................. 70
Weather ...................................................................................................... 70
Document Viewer ...................................................................................... 71
7. AT&T SERVICES .........................................73
Amazon Kindle ...........................................................................................73
AT&T Code Scanner ...................................................................................73
AT&T Family Map ........................................................................................73
AT&T Locker ................................................................................................73
AT&T Navigator ..........................................................................................74
AT&T Smart Wi-Fi .......................................................................................74
Live TV .........................................................................................................74
Device Help ................................................................................................75
YPmobile .....................................................................................................75
myAT&T ........................................................................................................75
Messages ....................................................................................................75
8. Setting ........................................................76
Wireless & networks ..................................................................................76
Call settings ................................................................................................76
Sound ...........................................................................................................78
Display .........................................................................................................78
Storage ........................................................................................................79
USB connection settings .........................................................................79
Battery .........................................................................................................79
Apps ............................................................................................................ 80
Power saver ............................................................................................... 80
Accounts & sync ....................................................................................... 80
Location services ..................................................................................... 80
Security ...................................................................................................... 80
Language & input ......................................................................................83
Backup & reset .......................................................................................... 84
Date & time ................................................................................................ 84
Accessibility ...............................................................................................85
Developer option .......................................................................................85


8
Table of contents
Software update ....................................................................................... 86
About phone .............................................................................................. 86
Resetting the phone ................................................................................ 86
Appendix ........................................................87
PC Suite .......................................................................................................87
Troubleshooting checklist .......................................................................87
Specifications ........................................................................................... 88
FCC Hearing-Aid Compatibility Regulations for
Wireless Devices....................................................................................... 88
FCC Regulatory Compliance .................................................................. 89
Warranty ..................................................................................................... 91
Legal notice ................................................................................................93


9
1. Getting Started
Follow the outlined steps that should be taken first before
using Burst.
Inside the package
The package should contain the following items:
xHandset
xBattery
xUSB/Wall Charger
xQuick Start Guide
SIM/USIM card and battery
About the SIM/USIM card
When you subscribe to the network operator, you receive
the Subscriber Identity Module (SIM) card or the Universal
Subscriber Identity Module (USIM) card that contains your
registration information, PIN code, etc. You should keep it
secure and handle it carefully. Do not bend, scratch or expose
it to moisture. Avoid static electricity.
About the battery
This phone uses a lithium-ion (Li-Ion) battery. Make sure to
use the authorized battery and charger only. Maximum time to
use the battery might vary depending on the temperature and
service types offered by the service provider. For more details,
contact your nearest dealer.
Note The Li-Ion battery can be recharged while some charge
remains without reducing its effectiveness as a result of the “memory
effect” inherent in other battery technologies.
Installing the SIM/USIM card and battery
1.
Remove the battery cover from the unit.
x
To remove the battery cover, place
your fingernail in the groove at the
bottom of the unit, and then lift it up.
2. Insert the SIM/USIM card into the slot.
Ensure that the gold contacts of the
card go against the metal contacts of
the phone.
3. Slide the connector of the battery into
the notch located at the top of the
unit. Insert and press the lower side of
the battery until you hear a click. Make
sure you align the gold contacts on the
battery end with the contacts on the
phone. If the contacts on the battery
are not properly aligned, the phone
and the battery could be damaged.
4. To remove the battery, lift the bottom
of the battery up and remove. To
remove the SIM card, slide the SIM
card in the direction of the arrow as
shown.
5. To place the battery cover back onto
the unit, slide the one end of the cover
into the groove, and then push it
down.


10
Getting Started
About the internal memory
The internal memory is divided into two areas: internal system
storage and internal media storage. Downloaded and preloaded
applications are saved in the internal system storage. Pictures
and video files taken with the built-in camera, downloaded
music files or attachments downloaded from MMS, emails or
web browser are saved in the internal media storage. You can
move the downloaded applications to internal media storage
through the Settings menu. When you insert the SD card into
the phone, you can change the default save location.
Managing the memory card
You should manage the microSD card carefully. If you do
not follow the steps described below you can cause serious
damage to the card.
Installing the microSD™ card
1. Remove the battery cover from the
unit.
2. Insert the microSD™ card into the
slot. Ensure that the gold contacts
of the card go against the metal
contacts of the phone.
3. To remove the memory card, slide the memory card out in
the opposite direction of the arrow.
About the microSD™ card
A microSD™ card is a removable flash memory card where you
can save data. Save pictures and contacts, and downloaded
applications to the SD card. You can expand the external
memory space up to 32GB.
Correct method of inserting the battery
Correct Incorrect
Charging the battery
1. Connect with the charger adapter on the top right side.
Make sure you align the connector as shown in the image.
Correct Incorrect
Note Make sure to align the connector as shown in the image.
Otherwise, the charging connector will be damaged and the battery
will not be charged.
2. Disconnect the charger from the
phone when the battery is fully
charged.


11
Getting Started
It is recommended that you format the microSD™ card before
using the phone.
Viewing available memory
1. Tap Settings from the applications menu.
2. Tap Storage.
3. Flick the screen and check the status of the SD card and
internal media storage.
Unmounting the SD Card
1. Tap Settings from the applications menu.
2. Tap Storage Unmount SD card OK> > .
3. Press and hold the LOCK/PWR key.
4. Tap Power off OK> .
5. Open the battery cover.
6. Remove the battery.
7. Remove the SD card.
Note If you want to mount the SD card, tap Settings > > Storage
Mount SD card.
Formatting the microSD card
1. Tap Settings from the applications menu.
2. Tap > > .Storage Unmount SD card OK
3. Tap Erase SD card Erase SD card > > Erase everything.
Turning the phone on/off
To turn on
1. Press and hold the LOCK/PWR key for a few seconds.
To turn off
1. Press and hold the LOCK/PWR key.
2. Tap Power off.
3. Tap OK.
To restart
You can turn off and then restart the phone.
1. Press and hold the LOCK/PWR key.
2. Tap Restart.
3. Tap OK.
Unlocking the screen
The screen is locked by default when you turn on the phone. To
unlock the screen:
1. Press the LOCK/PWR key.
2. Drag to the center of the screen
to unlock.
3. Draw a pattern if the screen is
protected by pattern lock. Enter a
PIN or a password if the screen is
locked by a PIN or a password.
For more information on screen
lock, refer to “ ” on page 80.Security
Unlocking the
screen
Locking the screen
Lock the screen to protect information or conserve battery life.
To lock the screen, press the LOCK/PWR key.


12
Getting Started
Product overview
MENU
HOME BACK
SEARCH
Speaker
Front-side
camera
Proximity
sensor Earphone jack
Microphone
Camera flash
Microphone
LOCK/PWR
Rear camera
Rear speaker
Internal
antenna area
Front view Rear view
Key Function
MENU Displays options available; rearranges the
home screen.
HOME Moves to the home screen; manages
applications that are running.
BACK Quits an application; returns to the previous
menu.
Key Function
SEARCH Searches through the Internet; searches
applications, contacts, and messages that are
saved.
LOCK/PWR Locks the screen; turns on/off the phone.
Note Make sure not to cover the proximity sensor with an LCD
protection film. If the sensor is covered, you might have difficulty
using the touch screen.


13
Getting Started
Hard keys from the touch mode
Key Function
VOLUME Adjusts all sound volumes.
Side view
Rear camera
Internal
antenna area
USB port
Volume keys
Using 3.5pi stereo earphone
You can control your stereo earphone by inserting the stereo
earphone’s plug into earphone jack on the phone.
NoteThe stereo earphones that support common call management
features including making and answering calls have not been
standardized. Therefore, the phone may not be compatible with
some stereo earphones.


14
Getting Started
Screen indicators
Icon Description
A call is in progress.
Missed call
Call on hold
A call is in progress using a Bluetooth device.
Microphone muted
The speakerphone is active.
New voicemail
New SMS message
New MMS message
New Email
New Google Talk message
No SIM or USIM card
Silent mode activated
Vibrate mode activated
An error has occurred.
Icon Description
Firmware upgrade is available.
Power saver mode is on.
An alarm has been set.
Timer has been set.
Music is playing.
Another device is attempting to play back
content.
Data manager is connected.
GPS is active.
Sync in progress
Downloading data
Uploading data
Connected to a Bluetooth headset
Bluetooth is active.
Bluetooth tethering is active.
Wi-Fi signal strength


15
Getting Started
Icon Description
Portable Wi-Fi hotspot is active.
USB tethering is active.
Bluetooth tethering is active.
Connected to a computer via a supported
USB cable connection
USB debugging mode activated
Connected to the LTE 4G network
Signal strength: The number of bars increases
when the signal is strong.
No signal
Airplane mode is active.
Battery level: The greener the icon, the more
charge that is remaining.
The battery is charging.
Using the touch screen
Run an application or perform functions using the touch
screen. The following finger actions help you easily understand
how to use the touch screen and the phone.
Tap: Tap once to access a menu or an option.
Tap and hold: Tap the screen for a few seconds.
Double tap: Tap an item twice.
Drag: Tap and hold your finger on an item, and then move your
finger without releasing it from the screen.
Flick: Place a finger on the screen and move the screen up or
down, or left or right.
Pinch: Place two fingers on the screen and move them apart
to zoom in a picture, a document or a web page, or move them
together to zoom out.
Select and tap: Tap one in the list of options available.
Press and hold: Press a key for a few seconds.
Note Use one finger at a time except when multi-touch is applicable.
The phone will not recognize actions when you use more than two
fingers at the same time.
CAUTION
x
Do not use sharp tools that can scratch the touch screen.
x
Do not allow the touch screen to come in contact with water or
chemicals. The touch screen may malfunction in humid conditions
or in chemicals.
xDo not sit on the phone. The touch screen can be damaged.


16
Getting Started
Understanding the home screen
The home screen is where you’ll find all your applications. You
can have up to 5 home screens and browse them with a flick.
Icons of the home screen
No. Description
Background screen
Panel location
Views the number of panels and the location of
the current panel.
Basic launcher
Views shortcut icons and the applications
menu icon.
Extended launcher
x
Flick the basic launcher left or right to extend
the launcher.
x
Tap a shortcut icon or folders and move here
to insert.
Main home menu
xPress Q to display the main home menu.
Navigating the home screen
The phone provides five different screens where you can place
items according to your preference.
1. Flick the screen to the left or right.
2. Tap a desired application or widget to run.
Flicking through home screens


17
Getting Started
Using the blind mode for the home screen
By hiding the icons and widgets, you can enjoy the wallpaper in
a full view.
1. Spread two fingers apart on the home screen to hide icons
and widgets on the home screen.
xThe blind mode is activated.
2. Pinch two fingers together on the home screen to show the
icons and widgets on the home screen.
xThe blind mode is deactivated.
Spreading two fingers
apart
Blind mode is activated
Note The blind mode is activated for all home screens. You can
deactivate the blind mode by pressing any hard key on the handset.
Customizing the home screen
Rearranging or deleting a panel
1. On the background screen, pinch two fingers together.
2. To move a panel, tap and hold a panel, and then drag it to a
desired location.
3. To delete a panel, tap and hold a panel and move it to at
the top of the screen.
Pinching two fingers
together
Panel editing screen
Note You can set the main home screen by tapping on a desired
home screen.


18
Getting Started
Adding a folder
You can add a folder that contains shortcuts or application
icons to the background screen.
1. On the background screen, tap and hold an icon, and then
drag it onto another icon.
2. Release your finger when a folder is created.
Selecting an icon Folder created
To Add an icon to a folder
Tap and hold an icon on the background screen, and then drag
it onto the folder.
Note
xOpen the folder and tap to change the title or color of the folder.
xTap to close the folder.
Rearranging or deleting icons, widgets, or
folders
You can rearrange or delete icons, widgets, or folders on the
background screen or the basic launcher bar.
1. On the background screen or the
basic launcher bar, tap and hold an
icon, widget, or folder.
2. To move a panel, tap and hold a
panel, and then drag it to a desired
location.
3. To delete a panel, tap and hold one,
and move it to at the top of the
screen.
Editing icons,
widgets,
or folders


19
Getting Started
Using the main home menu options
1. Tap and hold the background screen.
Or press Q.
2. Tap a desired menu icon.
Tapping and holding the
background screen
Main menu displayed
Adding a widget
1. Tap Widget on the main home
menu.
2. Tap and hold an item, and then drag
it to the desired location.
x
Tap an item to align it with other
icons automatically.
Adding a widget
Setting the home screen wallpapaer
1. Tap Wallpaper on the main home
menu.
2. Tap a tab from among Live
Wallpapers Wallpapers Gallery, , ,
and Download Wallpapers.
3. Tap a desired wallpaper, and then
tap .Set wallpaper
Setting the
home screen
wallpaper
Changing the home screen theme
1. Tap Home Theme on the main
home menu.
2. Flick the screen to the left or right
to select a theme, and then tap
Apply.
xTap to edit the theme name.
x Tap to delete the theme.
Note You cannot delete the Standard
(Current theme).
Setting the
home screen
theme


20
Getting Started
Viewing tips for the home screen
1. Tap Tips on the main home menu.
2. Check each tip and tap to move to the previous tip or Back
tap to move to the next tip.Next
Tip page 1 Tip page 2 Tip page 3
Using the Quick Settings screen
No. Description
Turns on or off Vibrate mode, Wi-Fi, Airplane
Mode, GPS, Bluetooth, Data, Power Saver, Auto
Rotate, or Auto Sync.
Accesses the settings for Sound, Wi-Fi, Display,
Power Saving, Bluetooth, Lock, Sync, Hotspot, or
Manage Apps.
Closes the Quick Settings screen by dragging it
upward.
Views running applications, notifications for
application updates, missed calls, new emails, or
new messages.
Clears all of the notifications.
Closes the Detail Settings.
Accesses the settings.

21
Getting Started
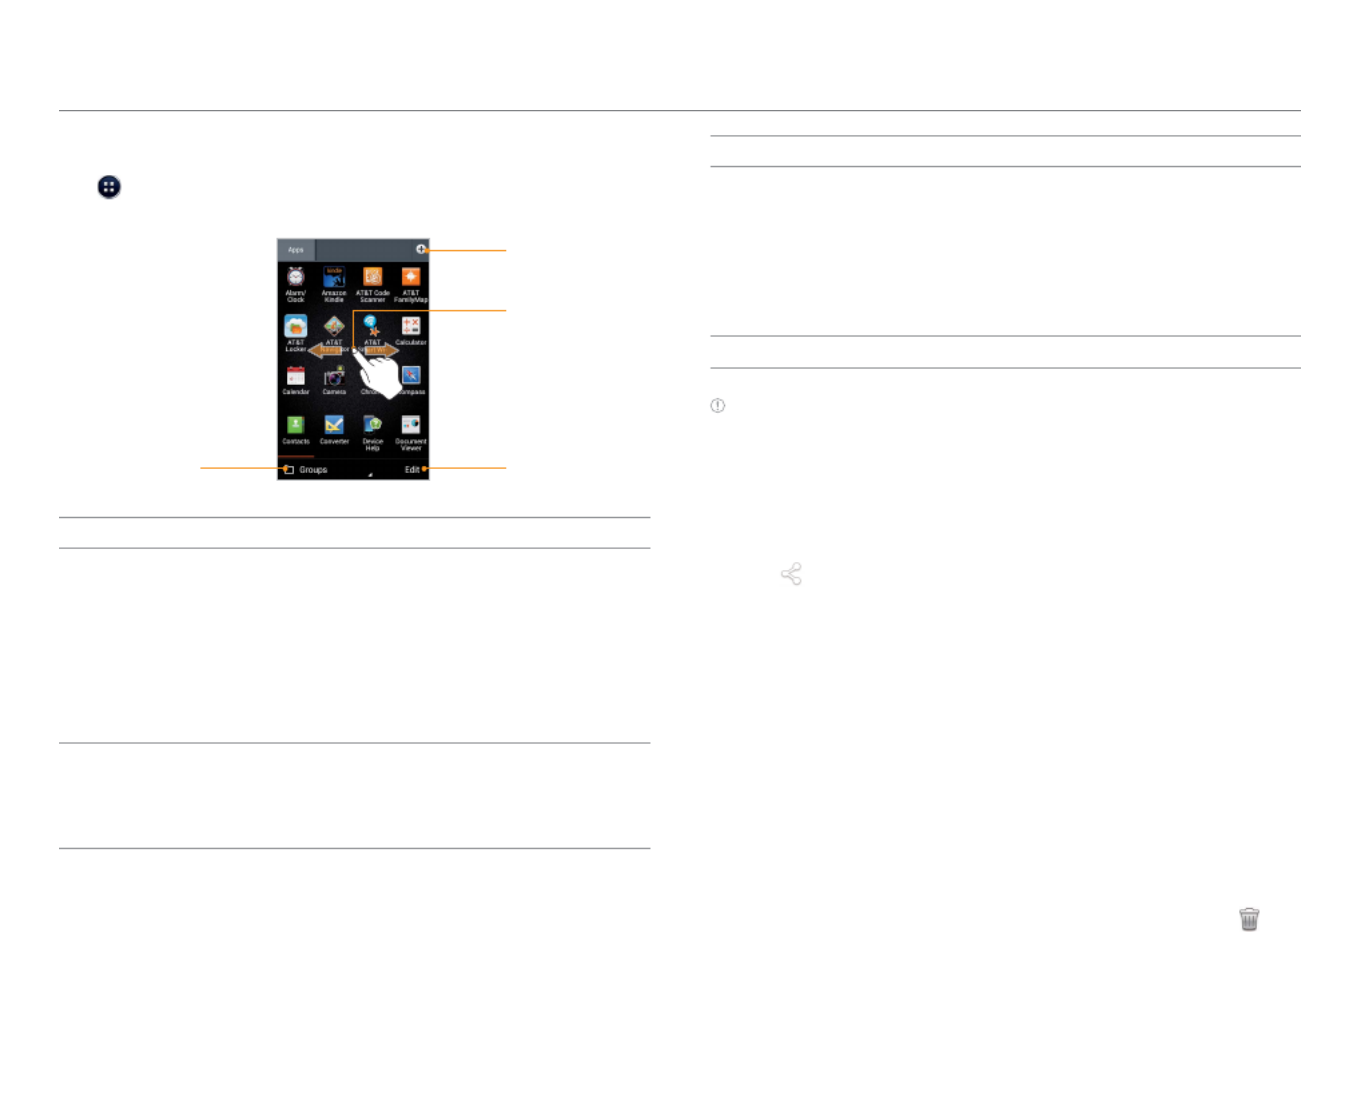
Using the applications menu
Tap to open the applications menu.
No. Description
Sorts applications.
xT
ap to arrange icons manually.Groups
x
Tap Alphabetical
to sort icons in alphabetical
order. (flick upward or downward to search for
applications.)
x
Tap Downloads to view downloaded
applications.
Views application information, or moves,
uninstalls, or hides applications.
x
Tap an icon to uninstall, hide, or view the
application information.
No. Description
Main applications menu
xTap an icon to run the application.
x
Flick the screen to the left or right to move to
the previous or next page.
x
Tap and hold an icon to create a shortcut on
the home screen.
Creates a new group.
Note You cannot uninstall pre-installed applications.
Sharing downloaded applications
1. Press Q and tap . Share
2. Select and tap a desired application.
3. Tap .
4. Tap Bluetooth, Facebook Google+ Twitter Gmail, , , , or
Messages. The sharing application may vary depending on
the availability of the application.
Managing groups
1. Press Q and tap .Manage groups
Or pinch two fingers in the application menu.
2. To add a new group, tap and enter the title and New group
select a color, and tap OK.
3. To move a panel, tap and hold a panel, and then drag it to a
desired location.
4. To delete a panel, tap and hold a panel and move it to at
the top of the screen.

22
Getting Started
Viewing tips for applications menu
1. Press Q and tap .Tips
2. Check each tip and tap to move to the previous tip or Back
tap to move to the next tip. Next
Tip page 1 Tip page 2
Closing running applications
If you start an application and do not close it with the Task
Manager, the application remains active even when you switch
to the home screen or start another application. Launching
multiple applications can slow down the performance of the
device. Close unnecessary applications with the Task Manager
and check the CPU’s usage and RAM usage with the Task
Manager, and then optimize the system.
No. Description
Selects a category.
Closes all the applications.
Ends the application.
Views the tips.
Selects a view type.
1. T
ap Task Manager from the applications menu.
2. Tap End next to an application.
x
Tap Total X apps End All to close all applications.


23
Getting Started
Activating the phone
Go through the following steps when you turn on the phone
for the first time. If you want to set up the phone as your choice
even while using the phone, tap > Settings Setup Wizard.
1. Press and hold the LOCK/PWR key to turn on the phone.
2. Select and tap a language for the phone and tap .Start
3. Tap Connect to Wi-Fi network, and then select and tap an
available Wi-Fi network.
x
Tap Skip, and go to step 4 to connect to the network
later.
4. Tap Connect > .Next
x
If the Wi-Fi network is secured, enter the password for it.
5. Tap Tap to set up Google Account Add a Google or
Account to set up a Google account, and then follow the
necessary steps.
x
Tap Skip, and go to step 6 to set up an account later.
6. Tap OFF next to See location in applications (such as
Maps) using wireless networks to use Google location,
and then tap Agree for Location consent.
7. Tap Finish.
Creating a Google account
1. Tap Settings from the applications menu.
2. Tap Accounts & sync > ADD ACCOUNT > .Google
3. Tap New to create a new account.
x
Tap Existing if you have a Google account.
4. Follow the on-screen instructions.
Note
x
You must sign in to your Google account to use applications that
require it.
x
You can add other accounts, such as Facebook, Picasa or Twitter.
Synchronizing Google accounts
1. Tap Settings from the applications menu.
2. Tap Account & sync.
3. Select and tap an account.
4. Tap the check boxes to synchronize Google account.
xSync Calendar: Syncs Calendar with a Google account.
x
Sync Contacts: Syncs Contacts with a Google account.
xSync Gmail: Syncs Gmail with a Google account.
xSync Google Photos: Syncs Google Photos with a
Google account.
xSync Google Play Books: Syncs Google Play Books with
a Google account.
xSync Google Play Magazines: Syncs Google Play
Magazines with a Google account.
xSync Google Play Movies: Syncs Google Play Movies
with a Google account.
x
Sync Web: Syncs web sites with a Google account.

24
Getting Started
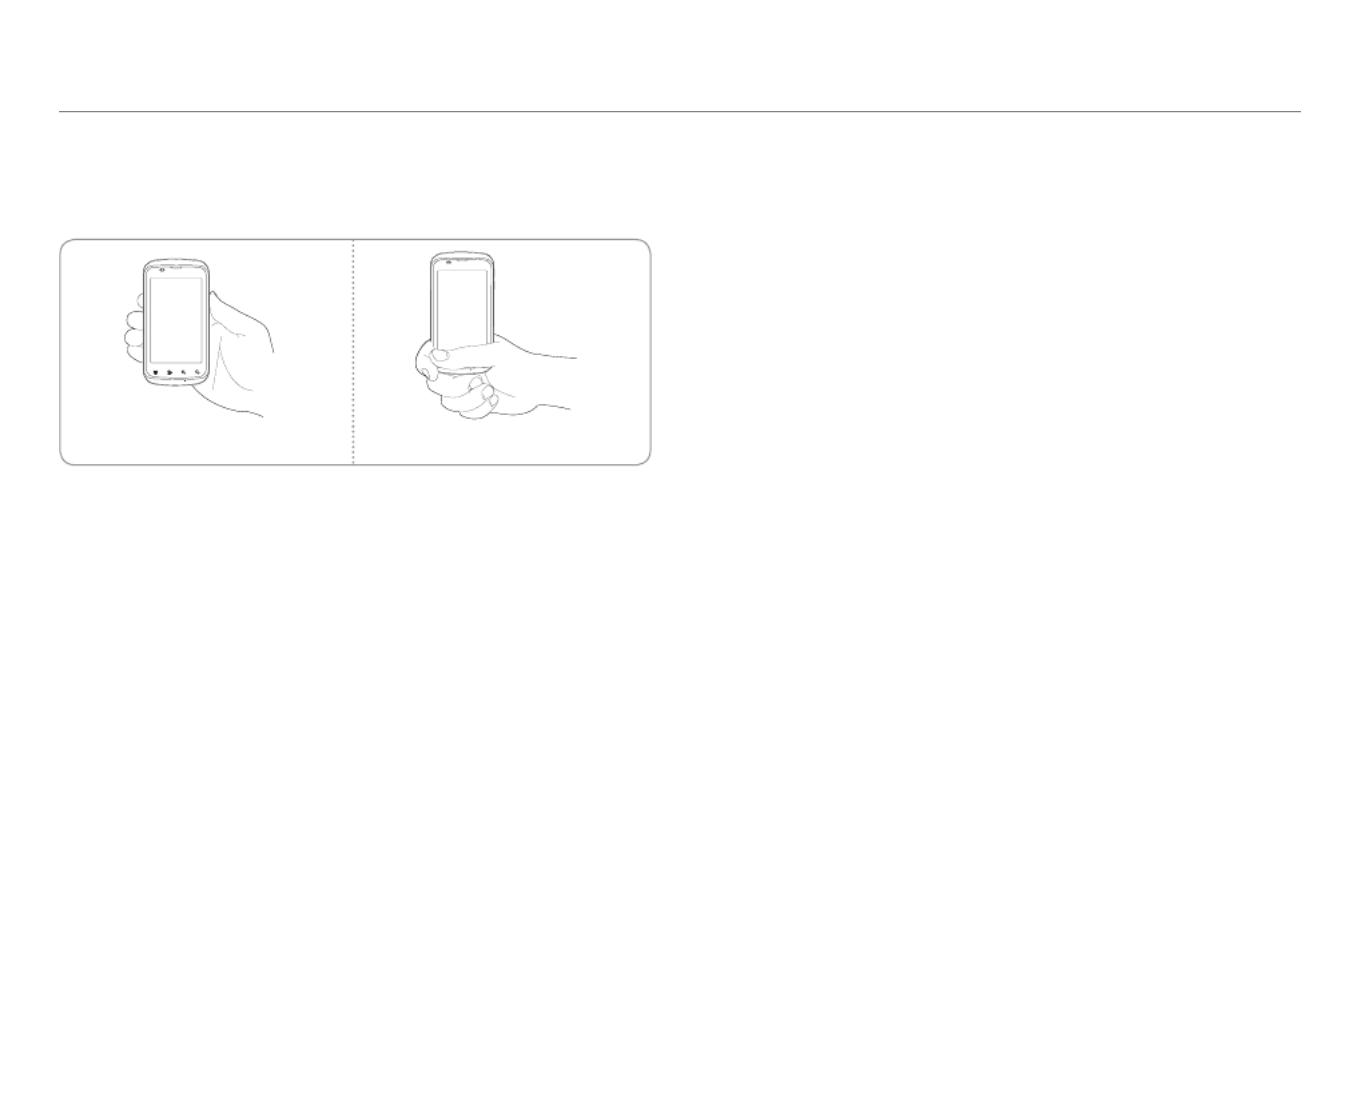
Gripping the phone
Hold the phone in the right position for a call as shown in the
image below.
Correct Incorrect
xMake sure not to block the internal antenna embedded
in the phone. Check the location of the antenna on the
illustration on page 12.
xMetal accessories can affect the quality of calls.


25
This chapter explains how to connect to wireless networks using
your phone.
Using a Wi-Fi network
No. Description
Searches for available Wi-Fi networks again.
Adds Wi-Fi network.
Unsecured network
Secured network
Turns Wi-Fi on or off.
Connecting to a Wi-Fi network
1. Tap Settings
from the applications menu
.
2. Tap Wi-Fi.
3. Tap OFF to On to activate the function.
4. Select and tap a network. You should enter the password
if the network is secured. indicates a secured Wi-Fi
network.
5. Tap Connect. Once the network is remembered, the phone
will automatically connect to it when in range.
Using the Quick Settings
1. Tap on the top of the screen and drag it down.
2. Tap in Quick Settings. The icon turns red when the
function is on.
Searching for Wi-Fi networks
1. Tap Settings
from the applications menu
.
2. Tap Wi-Fi.
3. Tap OFF ON to to activate the function. The phone scans
networks automatically every ten seconds. The newly found
networks appear on the bottom of the list.
Adding a Wi-Fi network
1. Tap Settings
from the applications menu
.
2. Tap Wi-Fi.
3. Tap OFF ON to to activate the function.
4. Tap ADD NETWORK.
5. Enter Network SSID and select the security type.
6. Tap Save.
2. Connectivity

26
Connectivity
Disconnecting a Wi-Fi network
1. Tap the network that is connected to the phone.
2. Tap Forget to disconnect the network.
Note You can also disconnect the Wi-Fi network by pressing and
holding the network and tapping Forget network.
Connecting to a mobile network
You will need a data plan to access a mobile network.
1. Tap on the top of the home screen and drag it down.
2. Tap Data to access a mobile network.
The icon turns red when the function is on.
x
Tap Data again to disconnect from a mobile network.
To configure mobile network settings
Tap > > > , and then check Settings More... Mobile networks
Data Services to enable data access over mobile networks.
Using Bluetooth
Bluetooth function enables wireless connections between
electronic devices. You can send images,texts, and business
cards by using this function.
With Bluetooth function, the phone provides:
xConnection to hands-free devices.
xConnection to electronic devices.
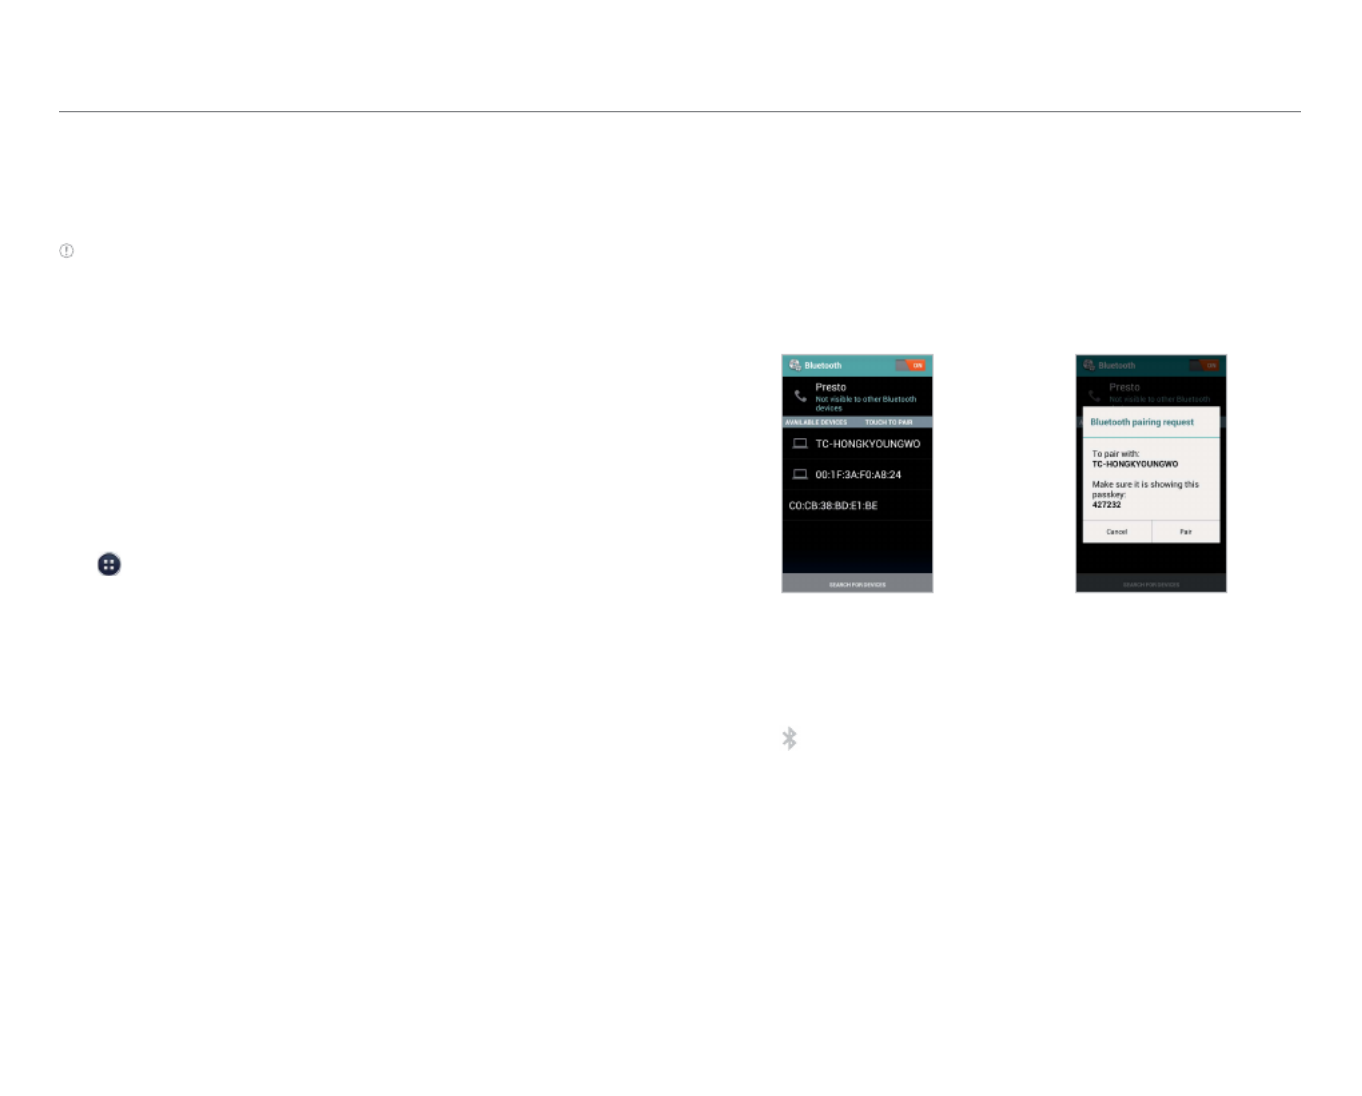
Pairing with devices
1. Tap Settings
from the applications menu
.
2. Tap Bluetooth.
3. Tap OFF ON to to activate the function.
4. Select and tap a device from the list.
5. Tap Pair to connect to and pair with the device.
Scanning devices Requesting pairing
Using the Quick Settings
1. Tap on the top of the home screen and drag it down.
2. Tap in Quick Settings. The icon turns red when the
function is on.


27
Connectivity
Managing the Bluetooth settings
1. Tap Settings from the applications menu.
2. Tap Bluetooth.
3. Press Q.
4. Select and tap a setting item.
xRename phone: Renames the phone name that will be
displayed on the paired device.
xVisibility timeout
: Sets the time for Bluetooth to be
turned off.
xShow received files: Views the files received from the
paired device.
Sharing a picture using Bluetooth
1. Tap Gallery
from the applications
menu
.
2. Select and tap a picture to share.
3. Tap > .Bluetooth
4. Select and tap a device from those
paired with the phone. The other
party will receive a message to
accept the file.
Note The paired Bluetooth device is
displayed with the icon . Selecting
Bluetooth
Using the phone as modem
The phone provides other devices with an Internet connection.
Activating the USB tethering
1. Connect the phone with an electronic device using a USB
cable.
2. Tap Settings
from the applications menu
.
3. Tap More... > Tethering & portable hotspot.
4. Tap USB tethering to activate the function. The electronic
device that is connected to the phone can now access the
Internet.
Note You cannot use a few applications that require Internet
connection while using tethering.
Activating the Bluetooth tethering
You can share data connection of one device with the other
through Bluetooth connection. The Bluetooth tethering will
work within the Bluetooth range of reception.
1. Tap Settings from the applications menu.
2. Tap More... > Tethering & portable hotspot.
3. Tap Bluetooth tethering.
Becoming a portable Wi-Fi hotspot
1. Tap Settings
from the applications menu
.
2. Tap More... > Tethering & portable hotspot.
3. Tap Portable Wi-Fi hotspot. The phone can offer the
Internet connection to other devices around you.

28
Connectivity
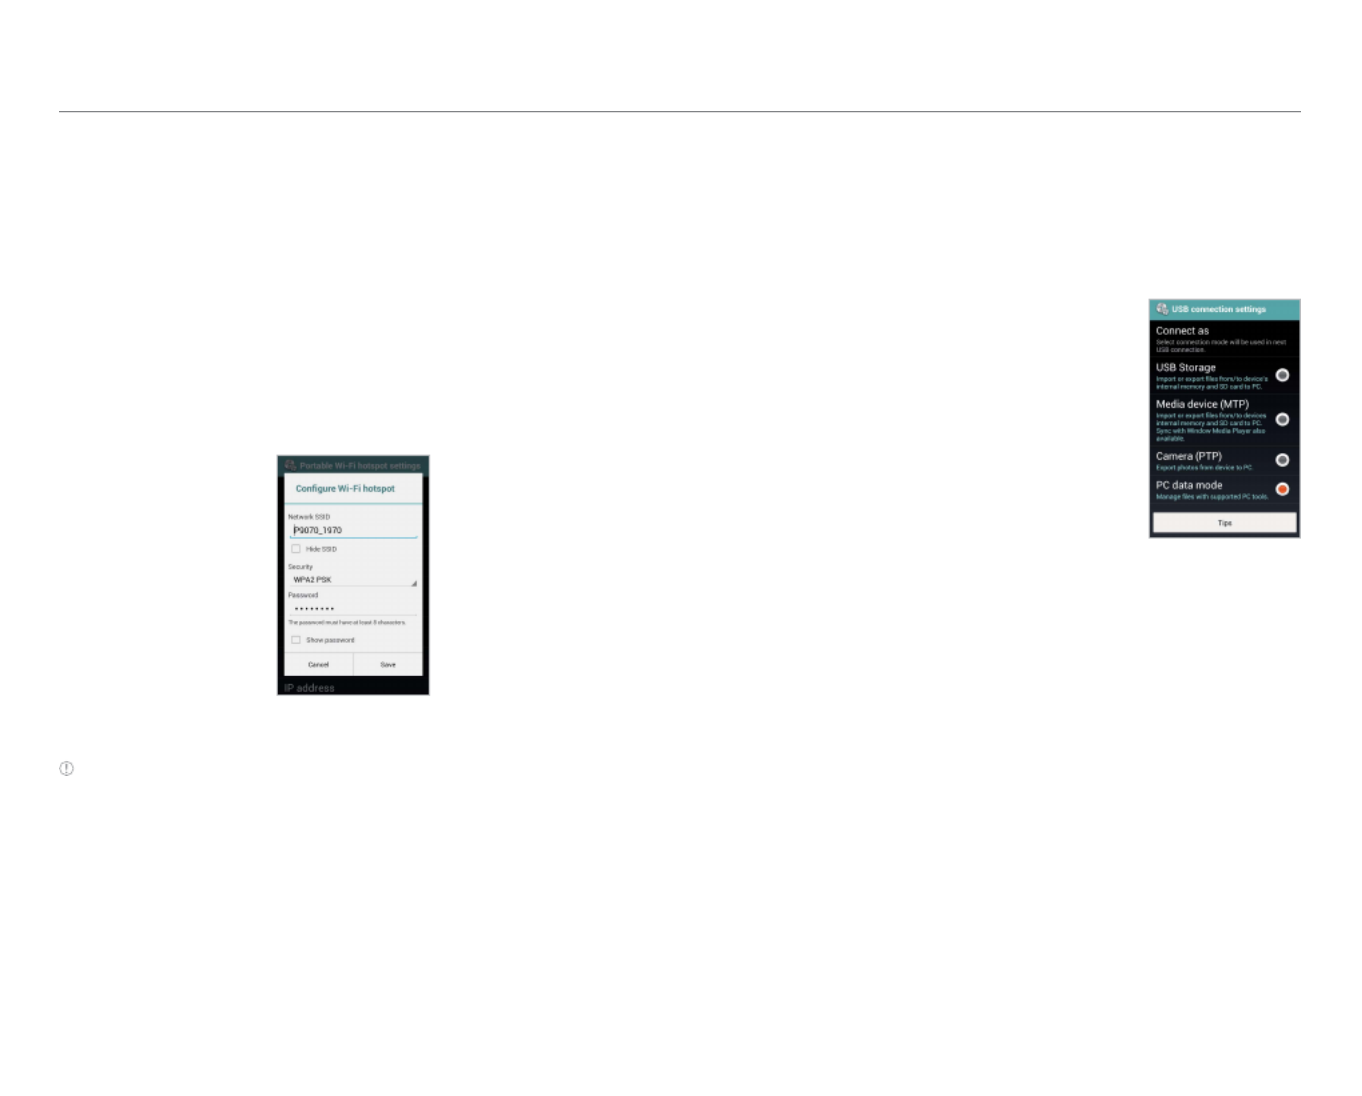
Setting options for portable Wi-Fi hotspot
1. Tap Settings
from the applications menu
.
2. Tap More... > Tethering & portable hotspot.
3. Tap Portable Wi-Fi hotspot settings > Configure Wi-Fi
hotspot.
4. Enter a name for Network SSID. Tap Hide SSID if you want to
hide the SSID.
5. Tap WPA2 PSK for security and select the related items if
you want to allow limited devices to access the Internet
through the phone, and tap .Save
Configuring Wi-Fi hotspot
Note A password for the security type is randomly set to 8 digit
numbers. You can see the password by selecting the “ Show
password” check box.
Connecting to a PC
You can synchronize files and exchange data with a computer
using a PC data cable.
Selecting the USB mode
1. Tap Settings
from the applications
menu
.
2. Tap USB connection settings.
3. Select and tap a USB mode.
x
Tap USB Storage if you want to
save large files on the phone.
x
Tap if you Media device(MTP)
want to transfer media files
between the phone and a PC.
x
Tap Camera(PTP) if you want to
transfer photos from the phone
and a PC.
Selecting the
USB mode
x
Tap PC data mode if you want to manage files with
supported PC tools.
x
Tap Show settings when USB Connected if you want to
select the USB mode whenever the phone is connected.
4. Connect a USB cable to the phone.
5. Connect the other end of the cable to your computer.


29
Connectivity
Using the phone as mass storage device
You can copy files between your computer and the microSD™
card in the phone. The applications which need microSD™
card, such as Handy Memo, Voice Recorder, Sketch Pad, Music
Player, Camera, Camcorder, will not run during mass storage
mode.
Transferring files to a PC
1. Set the USB mode to USB Storage.
2. Connect the phone to your
computer using a USB cable.
3. Tap Turn on USB storage OK> .
4. Select the files you want, and then
transfer them to a PC.
Note Tap Turn off USB storage on the
notifications screen if you want to turn off
the function.
Turning on USB
storage
Transferring files through Media Transfer
Media Transfer Protocol (MTP) is a communication method
specifically optimized for the transfer of audio and video
file formats. With the MTP connection, you can transfer
media files among your computer, the microSD™, and eMMC
simultaneously on the phone. Once you have turned on the
MTP connection, media files are collected through Windows
Media Player 10 or later.
Transferring files via MTP
1. Set the USB mode to .Media device (MTP)
2. Connect the phone to your computer using a USB cable.
3. Select files to transfer from the phone or your PC.
4. Transfer files to your PC or the phone.
Turning on/off the USB mode in the Quick
Settings
1. Connect the phone to your computer using a USB cable.
2. Tap on the top of the home screen and drag it down.
3. Tap a USB connection item.
4. Select and tap a USB mode.


30
3. Call & Message
Calling
Making a call
1. Tap Phone from the launcher.
2. Enter an area code and a phone
number.
3. Tap .
Note Tap to delete. Tap and hold to
delete the whole number.
Phone main display
Answering and ending a call
1. Drag to the right to answer a call.
2. Tap to end a call during
conversation. After ending a call, its
summary is shortly displayed.
Incoming call
Rejecting a call
1. Drag into the circle to reject a call.
Note You can also send a message before rejecting a call by
dragging into the circle.
Adjusting the volume
1. Press the upper volume key to increase the volume during a
call.
2. Press the lower volume key to decrease the volume during a
call.
Note
x
Press the volume key in idle mode if you want to adjust the ringtone
volume. If you want to set it to the vibrate mode, press the volume
key all the way down until the mode appears.
x
You can disable or enable the noise suppression function during
a call. Tap > . Tap or Noise suppression On Off to turn on or off
the speaker. For more information about the noise suppression
function, refer to “Setting Noise Suppression” on page 77.
Holding and unholding a call
1. Tap during a call. The party will hear nothing.
2. Tap to resume the call.
3. Tap to finish the call.
Swapping a call for a multiparty call
1. The first party will hear a waiting sound.
2. Tap to change the calling party.
3. Tap to finish the call.
Making a conference call
1. Tap Phone from the launcher.
2. Enter an area code and a phone number.
3. Tap Add call to invite a third party to the call.
4. Tab Merge calls to make conference.


31
Call & Message
Checking your voice mail
1. Tap Phone from the launcher.
2. Tap and hold on the keypad.1
Note The screen moves to the voice mail contact editing screen if
the number has not been designated for the voice mail.
Making an emergency call
1. Tap Emergency call when the screen is locked.
2. Tap 911 or other numbers you set as emergency numbers.
Checking missed calls
1. Tap Phone from the launcher.
2. Tap Call log and check missed calls.
3. Select and tap a number.
4. Tap if you want to return a call.
Checking the call history
1. Tap Phone from the launcher.
2. Tap Call log.
3. Select and tap a contact to see.
4. Tap if you want to make a call to the contact.
Note The displayed call time is not equal to the call charge.
Saving a dialed number as a new contact
1. Tap Phone from the launcher.
2. Enter a telephone number.
3. Press Q and . Add to Contacts
4. Tap CREATE NEW CONTACT.
5. Enter necessary information and tap Save.
Talking through the phone speaker
1. Tap during a call.
2. Tap if you want to stop using the function.
Talking through Bluetooth
If a Bluetooth headset or hands-free device is paired with the
handset, it automatically connects to the handset when you
make a call. You can make or answer a call by pressing the call
key on the Bluetooth headset or hands-free device.
1. Pair the handset with a Bluetooth headset or hands-free
device (For more information, refer to “Pairing with
devices” on page 26).
2. Start talking.
Note
xInstructions on using Bluetooth headsets or hands-free devices
may vary depending on device type. Refer to the device user
manual for more details.
x
Some headsets may automatically attempt to reconnect when
they are disconnected. The service status of the reconnection may
differ from your settings.
x
You can switch between a headset and the handset by long-
pressing the call key on the Bluetooth headset when the hands-
free device is connected. You can also tap > on the Bluetooth
screen during a call. Some Bluetooth headsets do not support the
switching function.


32
Call & Message
Muting a call
1. Tap during a call.
2. Tap if you want to turn off the function.
Adding a call
1. Tap Add call to make a call to another party during a call
with a party.
2. Enter a telephone number and tap .
Note The current call is held when you make a call with another party.
Messaging
Sending a new message
1. Tap Messages
from the launcher
.
2. Tap .
3. Enter a recipient’s number or email address.
4. Enter a message.
xTap to attatch a picture, video, audio, contact, etc.
5. Tap Send.
Note An unsent message remains in the list. If you want to delete it,
tap and hold the message and tap Delete message > .Delete
Entering a message using voice
1. Tap Messages from the launcher.
2. Tap and tap in the body of the text.
3. Tap in the virtual keyboard and speak your message.
4. Tap Send.
About Swype
Swype is a fast and easy way to enter
a message. For example, drag your
finger on the screen keyboard as
shown and input “Quick”.
Entering “Quick”
Creating a message using Swype
1. Tap Settings
from the applications menu
.
2. Tap Language & input > Default > Swype.
3. Drag your finger on the screen and enter the message.
Entering a message using the keyboard
Use different keyboard settings for different characters.
1. Tap Messages from the launcher.
2. Tap and tap in the body of the text.
3. Tap to select and enter letters for the message.
xWhen is selected, the next letter to be entered will be
capitalized.
xWhen is selected, all letters to be entered will be
capitalized.
4. Tap if you want to enter a number or/and symbols. Tap >
if you want to enter special characters.

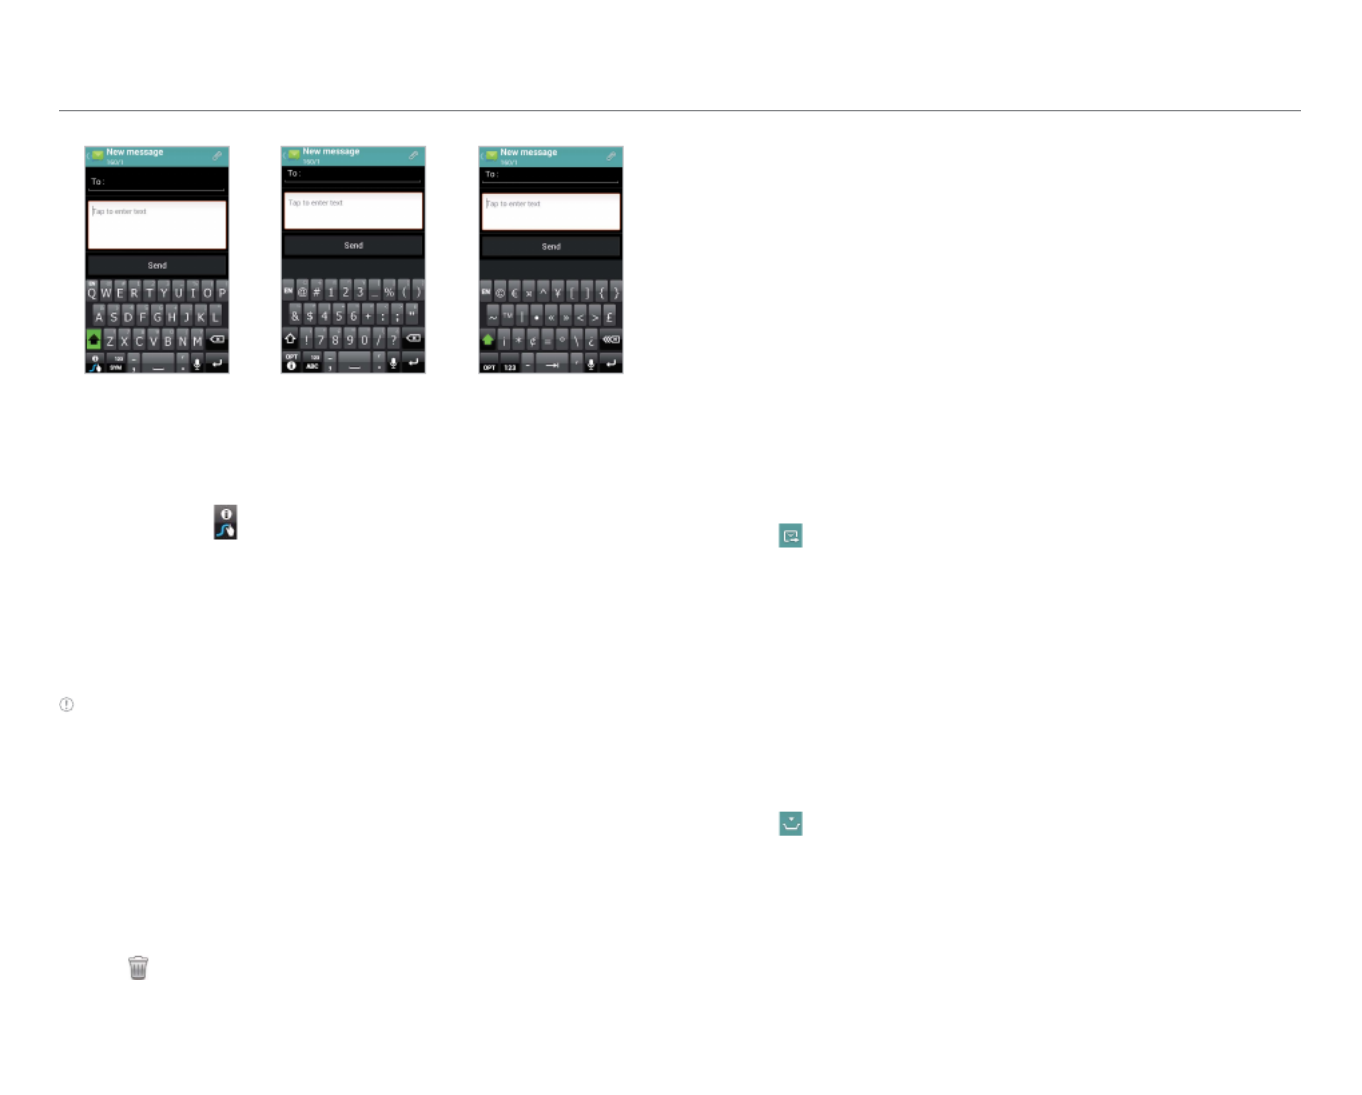
33
Call & Message
Capital letters Numbers and
symbols
Special
characters
Setting Swype options
1. Tap and hold on the keyboard > .Settings
2. Tap Language if you want to change the language for Swype.
3. Tap Show tips if you want to see the flashing indicator for
quick help. The check box is selected by default.
4. Tap Swype help or Tutorial if you want to learn more about
how to use Swype.
Note The following Swype options are also available in the Swype
settings menu: Audio feedback / Vibrate on keypress / Auto-spacing /
Auto-capitalization / Show complete trace / Speed vs. accuracy, etc
Deleting messages
1. Tap Messages from the launcher.
2. Select and tap a conversation.
3. Press Qand tap .Delete
4. Select and tap a desired message.
5. Tap > .Delete
Forwarding messages
1. Tap Messages from the launcher.
2. Select and tap a message that you want to deliver.
3. Tap and hold the desired message, and tap Forward.
4. Enter a recipient’s number or email address.
5. Edit the message in the message field.
6. Tap Send.
Sending a message using a Quick Text
1. Tap Messages from the launcher.
2. Press Q.
3. Tap Quick text and select and tap a message.
4. Tap .
5. Enter a recipient’s number or email address.
6. Tap Send.
Adding a Quick Text
1. Tap Messages from the launcher.
2. Press Q and tap .Quick text
3. Press Q and tap .Add new
4. Enter a quick text.
5. Tap .
Product specificaties
| Merk: | Pantech |
| Categorie: | Smartphone |
| Model: | Burst P9070 |
Heb je hulp nodig?
Als je hulp nodig hebt met Pantech Burst P9070 stel dan hieronder een vraag en andere gebruikers zullen je antwoorden
Handleiding Smartphone Pantech

29 Mei 2023
22 Mei 2023
12 Mei 2023
5 Mei 2023
25 April 2023
24 April 2023
23 April 2023
19 April 2023
15 April 2023
14 April 2023
Handleiding Smartphone
- Smartphone Philips
- Smartphone HP
- Smartphone Sony
- Smartphone Samsung
- Smartphone Xiaomi
- Smartphone Panasonic
- Smartphone Brondi
- Smartphone LG
- Smartphone Huawei
- Smartphone Asus
- Smartphone AEG
- Smartphone Fysic
- Smartphone Garmin
- Smartphone Gigaset
- Smartphone Honeywell
- Smartphone Motorola
- Smartphone Medion
- Smartphone Nokia
- Smartphone Toshiba
- Smartphone Wiko
- Smartphone Yarvik
- Smartphone Acer
- Smartphone Aiwa
- Smartphone Albrecht
- Smartphone Alcatel
- Smartphone Alcatel-Lucent
- Smartphone Alecto
- Smartphone Aligator
- Smartphone Allview
- Smartphone Amazon
- Smartphone Amplicom
- Smartphone Amplicomms
- Smartphone Androidtech
- Smartphone Apple
- Smartphone AQISTON
- Smartphone Archos
- Smartphone AT Telecom
- Smartphone Audioline
- Smartphone Auro
- Smartphone Avus
- Smartphone Beafon
- Smartphone Benefon
- Smartphone BenQ
- Smartphone Binatone
- Smartphone Blackberry
- Smartphone Blaupunkt
- Smartphone Blu
- Smartphone Bluebird
- Smartphone BQ
- Smartphone Brigmton
- Smartphone Bury
- Smartphone Danew
- Smartphone Dell
- Smartphone Denver
- Smartphone Doogee
- Smartphone Doro
- Smartphone Easypix
- Smartphone Echo
- Smartphone Ecom
- Smartphone Emporia
- Smartphone Energizer
- Smartphone Energy Sistem
- Smartphone Fairphone
- Smartphone Fero
- Smartphone Garmin-Asus
- Smartphone Geemarc
- Smartphone General Mobile
- Smartphone Gigabyte
- Smartphone Gionee
- Smartphone Goclever
- Smartphone Google
- Smartphone GreatCall
- Smartphone Haier
- Smartphone Hammer
- Smartphone Handheld
- Smartphone Hannspree
- Smartphone Hisense
- Smartphone HomTom
- Smartphone Honor
- Smartphone HTC
- Smartphone Hyundai
- Smartphone I.safe Mobile
- Smartphone Iget
- Smartphone Infinix
- Smartphone InFocus
- Smartphone Intermec
- Smartphone Intex
- Smartphone Itel
- Smartphone ITT
- Smartphone Kazam
- Smartphone Klipad
- Smartphone Kodak
- Smartphone Kogan
- Smartphone KPN
- Smartphone Kurio
- Smartphone Kyocera
- Smartphone Lava
- Smartphone Leagoo
- Smartphone Lenovo
- Smartphone Leotec
- Smartphone Lexibook
- Smartphone Logicom
- Smartphone Lumigon
- Smartphone Manta
- Smartphone Maxcom
- Smartphone Maxx
- Smartphone Media-tech
- Smartphone Meizu
- Smartphone Micromax
- Smartphone Microsoft
- Smartphone Mio
- Smartphone Mitsubishi
- Smartphone Mobistel
- Smartphone Mpman
- Smartphone Mustang
- Smartphone Nec
- Smartphone Nedis
- Smartphone Neffos
- Smartphone NGM
- Smartphone Nordmende
- Smartphone NTech
- Smartphone NUU Mobile
- Smartphone Palm
- Smartphone Phicomm
- Smartphone Polaroid
- Smartphone Prestigio
- Smartphone Profoon
- Smartphone Razer
- Smartphone RCA
- Smartphone Realme
- Smartphone RugGear
- Smartphone Sagem
- Smartphone Sanyo
- Smartphone Sencor
- Smartphone Sharp
- Smartphone Silvercrest
- Smartphone Sonim
- Smartphone Sony Ericsson
- Smartphone Spice
- Smartphone Storex
- Smartphone Sunny
- Smartphone Sunstech
- Smartphone Swissvoice
- Smartphone Switel
- Smartphone T-Mobile
- Smartphone TCL
- Smartphone Tecdesk
- Smartphone Telefunken
- Smartphone Telme
- Smartphone Telstra
- Smartphone Tesla
- Smartphone Thomson
- Smartphone Tiptel
- Smartphone TP Link
- Smartphone Trekstor
- Smartphone Ulefone
- Smartphone UMi
- Smartphone UTStarcom
- Smartphone Vestel
- Smartphone Vivax
- Smartphone Vivo
- Smartphone Vodafone
- Smartphone Wileyfox
- Smartphone Wolder
- Smartphone Wolfgang
- Smartphone Xtreamer
- Smartphone Yota
- Smartphone Zipy
- Smartphone ZTE
- Smartphone O2
- Smartphone OK
- Smartphone Olympia
- Smartphone OnePlus
- Smartphone Oppo
- Smartphone Overmax
- Smartphone CSL
- Smartphone Krüger And Matz
- Smartphone NGS
- Smartphone Umidigi
- Smartphone Facom
- Smartphone Bush
- Smartphone Infiniton
- Smartphone Nevir
- Smartphone Aplic
- Smartphone Alba
- Smartphone Majestic
- Smartphone Trevi
- Smartphone XD
- Smartphone AT&T
- Smartphone Billow
- Smartphone SPC
- Smartphone EVOLVEO
- Smartphone Lark
- Smartphone BGH
- Smartphone CAT
- Smartphone Coolpad
- Smartphone Crosscall
- Smartphone Custom
- Smartphone EStar
- Smartphone Freeman
- Smartphone Karbonn
- Smartphone Keneksi
- Smartphone Konrow
- Smartphone M3 Mobile
- Smartphone Maxwest
- Smartphone Mediacom
- Smartphone ORA
- Smartphone Oukitel
- Smartphone Piranha
- Smartphone Plum
- Smartphone TAG Heuer
- Smartphone Tremay
- Smartphone Cubot
- Smartphone JCB
- Smartphone Aspera
- Smartphone CRUX
- Smartphone Casper
- Smartphone Unnecto
- Smartphone MyPhone
- Smartphone Primux
- Smartphone ToughGear
- Smartphone Komu
- Smartphone Verykool
- Smartphone Senifone
- Smartphone Syco
- Smartphone Pharos
- Smartphone ITTM
- Smartphone Cyrus
- Smartphone Posh Mobile
- Smartphone THL
- Smartphone NGM-Mobile
- Smartphone Nothing
- Smartphone Tecno
- Smartphone Olitech
- Smartphone Mobiola
- Smartphone TIM
- Smartphone Nubia
- Smartphone LeEco
- Smartphone Best Buy
- Smartphone GSmart
- Smartphone Bea-fon
- Smartphone Opticon
- Smartphone Saiet
- Smartphone Jitterbug
- Smartphone POCO
- Smartphone HMD
- Smartphone Opis
- Smartphone Krüger&Matz
- Smartphone Volla
- Smartphone Nothing Tech
- Smartphone Kalley
Nieuwste handleidingen voor Smartphone

2 April 2025

29 Maart 2025
9 Maart 2025
25 Februari 2025
25 Februari 2025
25 Februari 2025

25 Februari 2025
25 Februari 2025
25 Februari 2025
25 Februari 2025