Panasonic RR-XS420 Handleiding
Panasonic
Hifi systeem
RR-XS420
Lees hieronder de 📖 handleiding in het Nederlandse voor Panasonic RR-XS420 (235 pagina's) in de categorie Hifi systeem. Deze handleiding was nuttig voor 39 personen en werd door 2 gebruikers gemiddeld met 4.5 sterren beoordeeld
Pagina 1/235

Operating Instructions
Bedienungsanleitung
Istruzioni per l’uso
Mode d’emploi
Instrucciones de funcionamiento
Manual de Instruções
IC Recorder
Digitales Diktiergerät
Registratore IC
Magnétophone à puce
Grabadora IC
Gravador de IC
RR-XS450
RR-XS420
ENGLISH
DEUTSCH
ITALIANO
FRANÇAIS
PORTUGUÊS
ESPAÑOL

*
g

bli
bm
bn
bo g
bp *
bq
br &
bs
bt W
ck
cl
cm
cn
co cl
cp
cq
1
2
3
4
5
6
7u
8q
9
bk

➜
➜
➜
➜
➜
➜
➜
➜
➜
➜
➜
➜
➜
➜
➜
➜
➜
➜
➜
➜
➜
➜
➜
➜
➜
➜
➜
➜
➜
➜

➜
*

VQT4J81
8
8
3
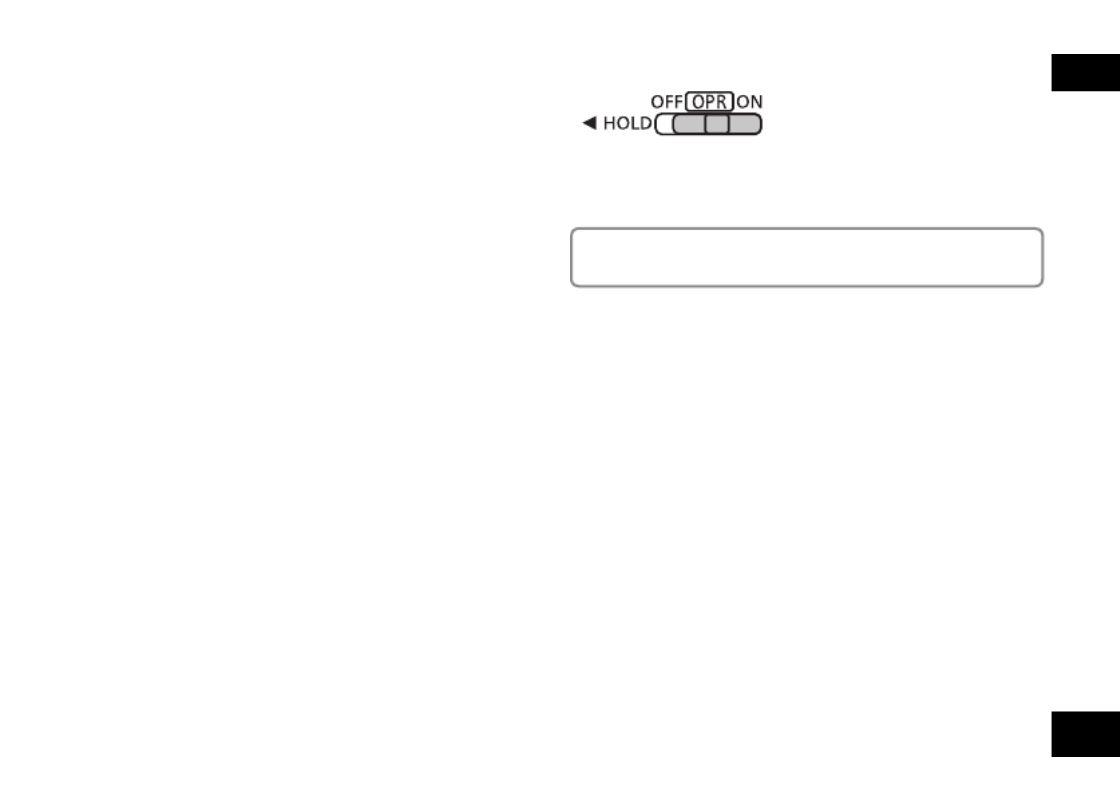
Slide the OPR/HOLD switch to the [ON] side.
4Slide the OPR/HOLD switch to the [OFF]
side.
Status indicator
OPR/HOLD
switch
The status indicator lights and recharging starts.
Also, “CHARGING” is shown in the unit’s display and
the battery indicator changes as shown below.
CHARGING
*While charging, sliding the OPR/HOLD switch to the
[ON] side can cancel charging halfway.
*
When the status indicator goes out, charging is complete.
g Disconnecting the unit
Double-click the icon (Windows XP: [ ], Windows Vista/
Windows 7: [ ]) on the task tray at the bottom of the
computer screen and follow the on-screen instructions
to remove the unit. (The icon may not be displayed
depending on the OS settings.)
After the unit is removed, this unit turns off.
Inserting the battery/Charging
*If BATT. SETTING in the common menu is set to
“ALKALINE”, the battery cannot be charged.
*When using a rechargeable battery, use the supplied
rechargeab le battery or the optional rechargeable
battery ( page 2). If commercially sold batteries ➜
other than the above are used, operation is not
guaranteed. Do not charge a dry cell battery.
*If charging does not start, slide the OPR/HOLD switch
to the [ON] side once , and then to the [OFF] again.
*If the temperature of this unit has risen, an
undesignated rechargeab le battery has been inserted,
or BATT. SETTING has been set to “ALKALINE”, “
”
is displayed. ( page 77)➜
*When the computer is in sleep mode or is restarted,
recharging ma y be impossible.
*Charging is possible even during data transfer.
*The rechargeable battery does not need to be fully
depleted bef ore recharging.
*
The rechargeable battery or this unit may become hot
while charging, but this is not a malfunction.
*If the usage time becomes remarkably short even
though the battery is fully recharged, the battery
has reached the end of its lifespan. Purchase a new
rechargeable battery ( page 2).➜
VQT4J81
9
9
ENGLISH
Turning the Power ON/OFF
g When using a dry cell battery (not supplied)
*An AAA LR03 alkaline battery (not supplied) can also
be used.
*If you use an alkaline battery, set the BATT. SETTING
in the common men u to “ALKALINE”. ( page 59)➜
OPR/HOLD switch
Turning the power ON:
Slide the OPR/HOLD switch to [ON] side to turn the
power on. Then, the display lights on.
Set the current date and time when turning this unit
on for the first time. ( page 11)➜
Turning the power OFF:
Slide the OPR/HOLD switch to [OFF] side while the unit
is in the stop state.
g Auto power off
The power automatically turns off after a preset time (the
factory setting is 15 minutes) elapses while recording is
stopped.
If the power is turned off by the auto power off function,
slide the OPR/HOLD switch to the [OFF] side before
turning the power on. ( page 59)➜

VQT4J81
10
10
Hold function
Button operations are ignored when the Hold function
is on.
To switch the Hold function on:
Slide the OPR/HOLD switch to the [HOLD] side during
recording or playback.
To switch the Hold function off:
Slide the OPR/HOLD switch in the opposite direction of
[HOLD].
*When the Hold function is on, operation is ignored
even if the buttons are pressed while the power is on
(“HOLD ON” is displayed), enabling you to prevent
unintended operations such as the stopping of
recording or playback.
*When recording or playback finishes while the Hold
function is on, the po wer turns off automatically.
Turning the Power ON/OFF
g About the battery indicator
Blinking
The remaining battery level is displayed as below
while this unit is operating.
*If the battery runs out, “ ” blinks. Replace the
battery or charge the rechargeable battery as soon as
possible.
*Please replace battery within approx. 1 minute for
preser vation of the clock data.
*Depending on the battery status or the operation
content to use , even if the power turns off due to the
battery exhaustion, this unit may be used for a while if
turned on again. However, the unit may suddenly turn
off during operation due to the low level of battery.
*Some level of battery is required when recording, or
perf orming Deleting files ( page 19), Dividing files ➜
( page 51), Deleting index ( page 38), FORMAT ➜ ➜
( page 60). If the battery indicator shows “➜”
(blinking) and these operations are performed, the
power turns OFF automatically.
*Remove the battery from the unit if you will not use it
for a long period of time.
*Make sure to turn the power off before removing
the batter y.
• If the battery is removed while the unit is on, data
may be lost or this unit may be damaged.

VQT4J81
11
11
ENGLISH
The clock has not been set at the time of purchase.
The clock is used as a file name ( page 67) or to preserve recording date and time ➜
information. Set the correct date and time. If the power is turned on when the clock is
not set, the screen shown in step
4 is displayed.
• Turn the power on. ( page 9)➜
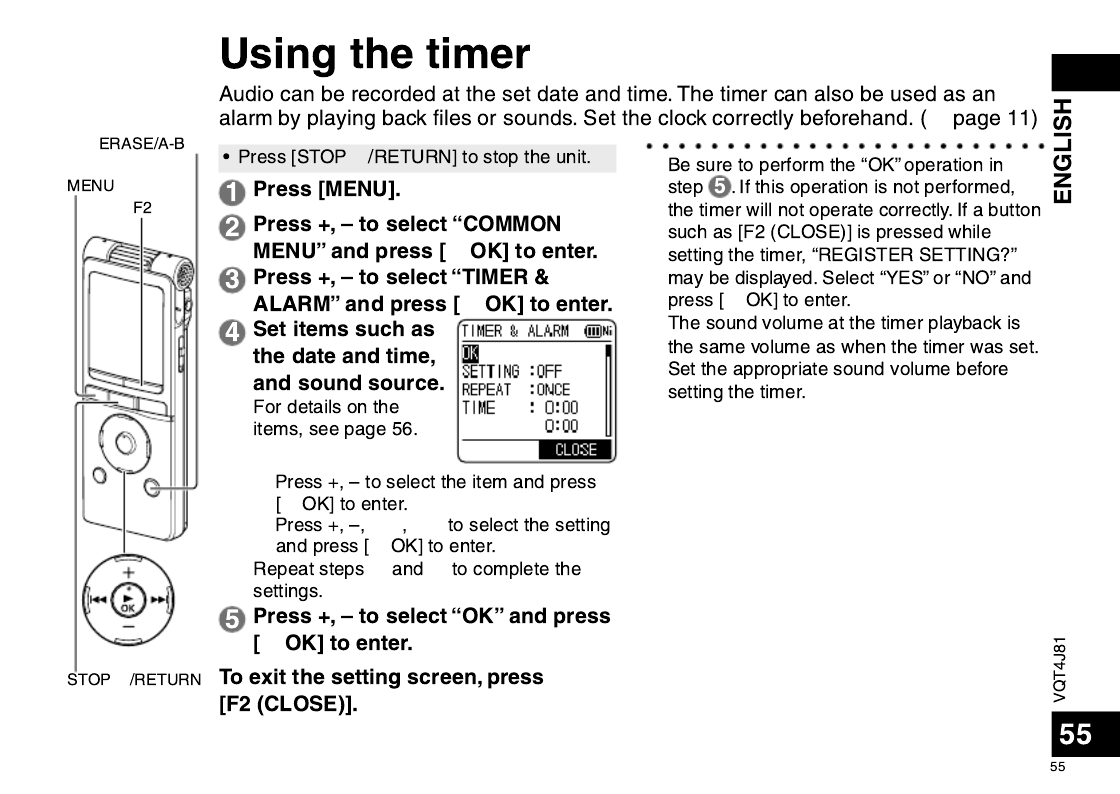
1Press [MENU].
2 Press +, – to select “COMMON
MENU” and press [ OK] to enter. q
3 Press +, – to select “DATE & TIME”
and press [ OK] to enter. q
4Press +, – to set
the year and press
i.
The above illustration is a display example.
5Press +, – to set the month and
press .i
6Press +, – to set the date and press
i.
7Press +, – to set the clock
indication method and press .i
“ ” and “ / ” are displayed for the 24h AM PM
24-hour display and the 12-hour display
respectively.
8Press +, – to set the hour and press
i.
9Press +, – to set the minute.
To change the setting, press , to u i
move between the items, and then press
+, – again to make the setting.
10
Press [ OK] to enter.q
The date and time are set and the clock
starts to operate.
To exit the setting screen, press
[F2 (CLOSE)].
*The clock operates with the monthly loss/gain of approx. 60 seconds at normal temperature.
*The clock setting will be lost if the battery is removed or completely exhausted.
Setting the clock
F2
MENU

VQT4J81
12
12
File and Folder Selecting the folder
• Press [STOP /RETURN] to stop the unit.g
1Press [F2 (FOLDER)].
2 Press +, –, to u, i
select the folder and
press [ OK] to enter. q
“P1 to P5” present playlist files
( page 49).➜
• “ ” (OTHER FOLDER) is for the playback of files
recorded by a device other than this unit. This
unit can also play music files recorded with (or
transferred by) some Panasonic Stereo System
devices equipped with the USB recording function.
Switching between the internal memory
and SD card:
If the SD card is inserted, the items for SD card
are displayed on the screen in step 2. Press
[F1 (MEMORY)] to select the memory.
When the internal memory is selected
When the SD card is selected
When the SD card is selected,
“ ” is displayed on the screen.
File
Recorded audio data from the starting point to the ending
point is saved as a file.
The saved data is called a file.
Folder
This is where files are stored. This unit has the following
folders.
• “A”, “B”, “C” and “D” folders for microphone recording
( page 15). ➜
• “L” folder for files recorded from other devices
connected to this unit ( page 35). ➜
• “ ” folder (Recycle) where deleted files are placed
( page 54). ➜
• “M” folder for music ( page 48).➜
• “ ” (OTHER FOLDER) where the folders created by
the device other than this unit are placed ( page 70).➜
Using each folder according to the purposes of recording
enables you to search files easily later. Up to 199 files
can be recorded in each recording folder.
Folders are created in the internal memory. When an SD
card ( page 46) is inserted, folders are created in the ➜
same way on the SD card.
In this manual, microSD/microSDHC card is written as
“SD card”.

VQT4J81
13
13
ENGLISH
• Press [STOP /RETURN] to stop the unit.g
1Press [LIST ] for approx. 1 second or
more.
Go to step
2 if an SD card is inserted ( page 46), ➜
and step
3 if not.
2Press +, – to select “INT.
MEMORY” (internal
memory ) or “microSD
CARD” and press [ OK] q
to enter.
List screen
3Press +, – to select the
folder and press [ OK] q
to enter.
If folders have been created in
the MUSIC folder or OTHER
FOLDER ( ), repeat step
3
to select the target folder.
: Folder
4
Press +, – to select the le
and press [ OK] to enter.q
File playback starts.
Selecting the folder or le in the list screen
When “MUSIC” or “OTHER FOLDER” is selected in step
3
, PLAYLIST folders (only for MUSIC) and folders or files
transferred from the computer are displayed. (For details of
PLAYLIST, see page 49.) If a folder exists (on the second
hierarchy) under the folder (e.g. Artist A), select “Artist
A” and press [ OK]. Then, the folder under “Artist A” is q
displayed. (For details of folder hierarchy, see page 69.)
Pressing several times on the screen in step u 4 will
switch the screen to screens in steps 2 or 3. Also, it
is possible to move among folder hierarchies to select
folders and files.
*When there is no file in the selected folder, “NO FILE”
is displa yed.
*The “A”, “B”, “C”, “D”, “L”, “M”, “ (recycle bin)” and
“ ” folders are displayed as “MIC_A (MIC_A_SD),
MIC_B (MIC_B_SD), MIC_C (MIC_C_SD), MIC_D
(MIC_D_SD), LINE (LINE_SD), MUSIC, RECYCLE
and OTHER FOLDER” respectively on the list screen.
(The indications in the brackets are displayed when
using the SD card.)
*Pressing [LIST ] while the unit is stopped or during
playback will directly display the screen (current folder)
shown in step 4.

VQT4J81
14
14
Switching microphone position
ZOOMSTEREO
Microphone position Recommended uses
STEREO Suitable for recording events such as a meeting or
performance by a large number of people.
Operates as an ordinary stereo microphone.
ZOOM Suitable for recording events such as a lecture or
interview, where sound is emitted from a speci c
direction.
Records with the sound in front of you emphasised.
The indication changes depending
on the microphone position.
You can switch the microphone position to ZOOM to record with the sound in front of you emphasised. Switch the
microphone position depending on the use.
*This unit has recording scenes ( page 20) for which the recommended recording settings are registered for each ➜
use, and switching the microphone position also changes the recording scene. (Direct scene ( page 23))➜
*Do not switch the microphone position during recording. The intended recording characteristics will not be obtained.
*
The microphone position function operates when the built-in microphone is used. It does not operate when an external microphone
is connected for recording (
➜
page 33) or when a different device is connected for recording to this unit (
➜
page 35).

VQT4J81
15
15
ENGLISH
• Turn the power on. ( page 9)➜
• Press [STOP /RETURN] to stop the unit.g
• Select the microphone position. ( page 14)➜
1Press [F2 (FOLDER)].
2Press u, i
to select the
recording
destination folder
and press [ OK] q
to enter.
For microphone recording, select a folder
among folders “A”, “B”, “C” and “D”.
(The factory setting is “A”)
When you select a folder except for “A”, “B”,
“C” or “D”, recording is automatically saved
in “A”.
*Change the recording mode or microphone sensitivity as necessary. ( pages 25, 26)➜
*A function is available for simultaneously retrieving all the recording settings recommended for
the recording scene . ( page 20)➜
*If the file size exceeds 2 GB during recording, the recording stops tentatively at the point when
the data reaches 2 GB . Then, the recording resumes with a new file. Recording is not available
during the interval (approx. 2 seconds) from when the recording stops to when the recording
resumes.
*Note if your finger or an object touches this unit during recording, the noise will be
recor ded through the microphone.
3Press [REC ] (Recording starts).*
The recording indicator
lights on.
4Press [STOP /RETURN] to stop g
recording.
To pause recording:
1 Press [REC *] during recording.
Recording indicator blinks.
2 Press [REC *] again to resume recording.
Recording
F2
REC *
STOP /RETURNg

VQT4J81
16
16
Recording
Screen display during recording:
1
2
3
4
5
6
7
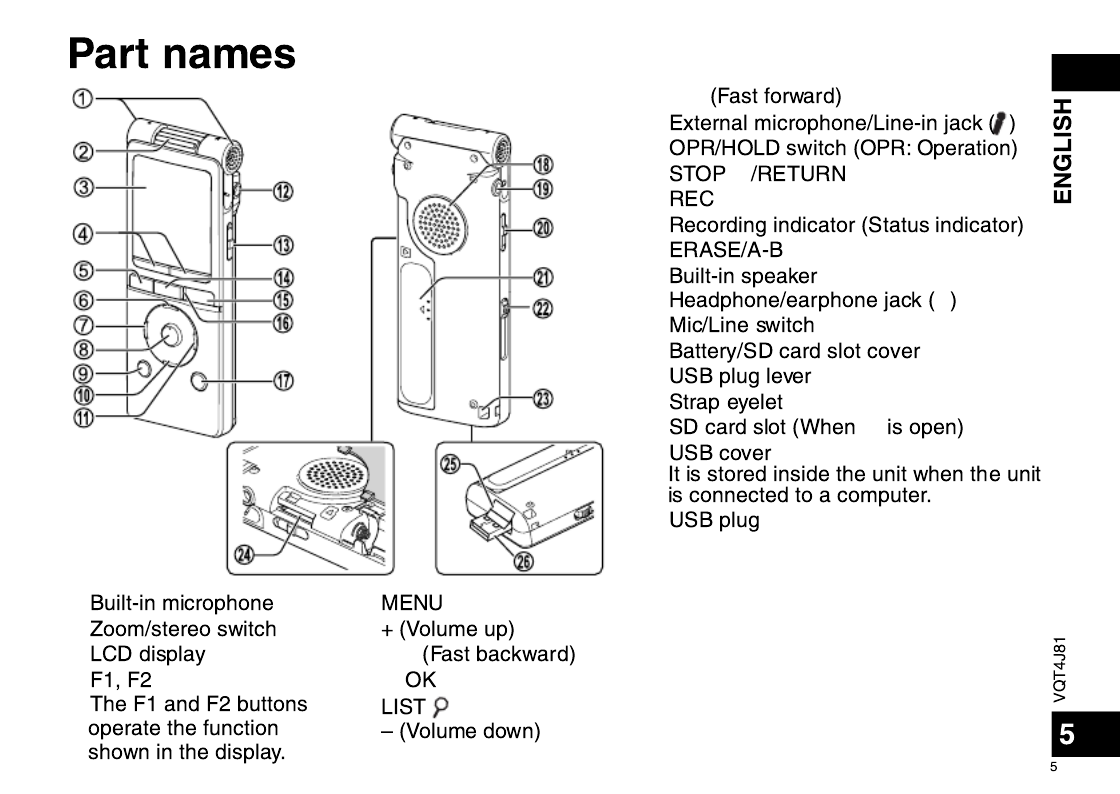
1 Status indication
: During recording*
h : During recording pause, recording standby, past recording
standby
2 Folder name ( page 12), File number➜
3 Level meter
Displays the volume input into this unit. (Stereo (L/R))
L and R volumes are displayed respectively during monaural
recording ( page 25) as well. Note that the monaural ➜
recording data are synthesised from L and R.
4 Recording mode ( page 25)➜
5 OVER indication
If the input volume is excessive and the level meter swings,
“ ” is displayed.
6 Possible remaining recording time
Displays the remaining recording time (possible recording time)
in the selected recording mode.
7 Microphone sensitivity ( page 26)➜
See page 6 for other screen displays.
Note when recording
This unit is equipped with a high-sensitivity
microphone. Accordingly, if a breath or wind
directly hits the microphone during recording,
the wind-cutting sound may be recorded or
voice may be difficult to hear.
1. This can be
prevented by
blocking the
wind with your
body so that
the wind does
not directly hit the unit.
Keep distance
2. During dictation
recording, slightly
move this unit
from front of your
mouth or keep
distance.
Turning the “LOW CUT FILTER” ( page 26) to ➜
“ON” reduces the sound of low frequency range.
This may help the reduction of the wind-cutting
sound.
*Sound may jump during recording (especially
PCM recording) depending on use conditions
of the inter nal memory and SD card.
Formatting them on this unit ( page 60) ➜
before recording is recommended.

VQT4J81
17
17
ENGLISH
•
Press [
STOP g
/RETURN] to stop the unit.
• Select a folder. ( page 12)➜
• Select a file. ( right)➜
1Press [ OK] (Playback starts).q
Adjusting the volume
Turn up the volume: Press +.
Turn down the volume: Press –.
Volume range is 0 to 20.
(The factory setting is “10”.)
If you turn the unit off with the volume set to 17
or more, the volume will be set to 16 next time
the unit is turned on.
Operations during playback
Jump (Skip): Press u, i.
Press u midway while playing a file and
the playback jumps to the beginning of the
file. To return to the previous file, press u
within approx. 1 second from the beginning
of the file.
Fast backward/Fast forward (Search):
Press and hold .u, i
To stop: Press [STOP /RETURN].g
Playing
Press u, i to select.
Each time you press, the file number changes.
Folder
name
Memory
usage
indication
Screen display example while stopped
File number/Total number of files
in the folder
Remaining
recording time
FOLDER
( page 12)➜
Select a le
You can also select the file on the list screen.
( page 13)➜
*The unit remembers the last file played and
the stop position f or each folder.
STOP /RETURNg
VQT4J81
18
18
Checking information
You can check the file information or current time.
• Press [STOP /RETURN] to stop the unit.g
1Press [STOP /RETURN].g
The information screen
appears.
2 Move the information screen up or down
using + or –.
The following contents can be confirmed on the
information screen.
Current time :Current time
Remaining recording time :
(Possible recording time)
Possible remaining
recording time in the
recording mode currently
being set
Recording date and time :
Date and time when the
selected file was recorded
Total playback time :Length of the selected file
File format :Format of the selected file
This is not displayed for the M (MUSIC) folder or
OTHER FOLDER ( ).
To exit the information screen:
Press [STOP /RETURN].g
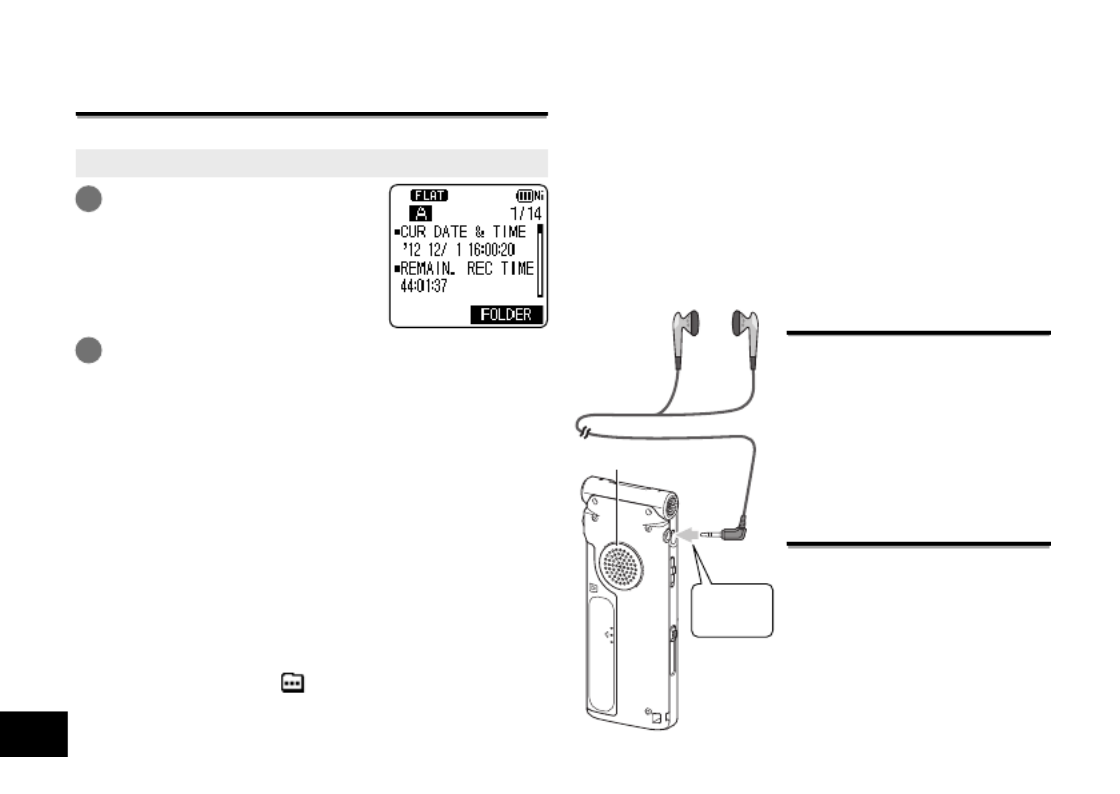
Playing
Connect stereo earphones (not supplied).
Plug type: ø 3.5 mm stereo mini plug
Recommended additional earphones:
Panasonic RP-HV154, RP-HJE120
(the product number is correct as of May 2012.)
Listening to the audio
using earphones
Monitoring the
recording in progress
Adjusting the volume:
You can adjust the volume by
pressing +, –, but the recording
level ( page 27) is not ➜
affected.
Listening to the audio
during playback
The audio during playback
comes from the speaker.
Listening may be difficult in
noisy places due to the speaker
output. In that case, connect
stereo earphones (not supplied).
*The built-in speaker is turned
off when earphones are
connected.
Built-in speaker
Insert
securely.

➜
g
&
q
q
*
➜
*
*➜
*
➜
➜
➜
&
&
&
g

20
Selecting the recording scene
g
1Press [MENU] for
approx. 1 second
or more.
2Press +, – to select the scene and
press [ OK] to enter.q 3
3Press +, – to select “LOAD” and
press [ OK] to enter.q
To exit the setting screen, press
[F2 (CLOSE)].
*
*2
*
*
➜
*
*
g

VQT4J81
21
21
ENGLISH
g The factory setting of recording scenes
Recording Scene
Application
Setting Item
(page)
LANG. STUDY KARAOKE MUSIC PERF.
CONVERSATION
MEETING LECTURE FAVORITE
Recording
your own
voice for
pronunciation
practice etc.
Loud volume
recording
such as
karaoke
High quality
recording
such as
musical
performances
Recording
other
people’s
voices for
interviews
or meetings
etc.
Records a
broad sound
band. For
recording
meetings
etc.
Records
sounds
such as in
classroom
lectures etc.
You can
register your
own settings
Recording mode
(25)
MP3:
192 kbps
MP3:
320 kbp
s
PCM:
44.1 kHz
MP3:
64 kbps
MP3:
192 kbps
MP3:
192 kbps
MP3:
192 kbps
Microphone
sensitivity (26) HIGH HIGH HIGH HIGH HIGH HIGH HIGH
Recording level
(27) AUTO MANUAL
MANUAL
AUTO AUTO AUTO AUTO
Low cut filter
(26) ON OFF OFF ON ON ON OFF
Recording peak
limiter (28) OFF ON OFF OFF OFF OFF OFF
Self timer recording
(30)
OFF OFF OFF OFF OFF OFF OFF
VAS setting
(31)
OFF OFF OFF OFF OFF OFF OFF
Past Recording
Settings (32) OFF OFF OFF OFF OFF OFF OFF
Preset an appropriate recording level to enable recordings with superior sound. For details, see “Setting the
recording level manually” ( pages 27 and 28).➜
VQT4J81
22
22
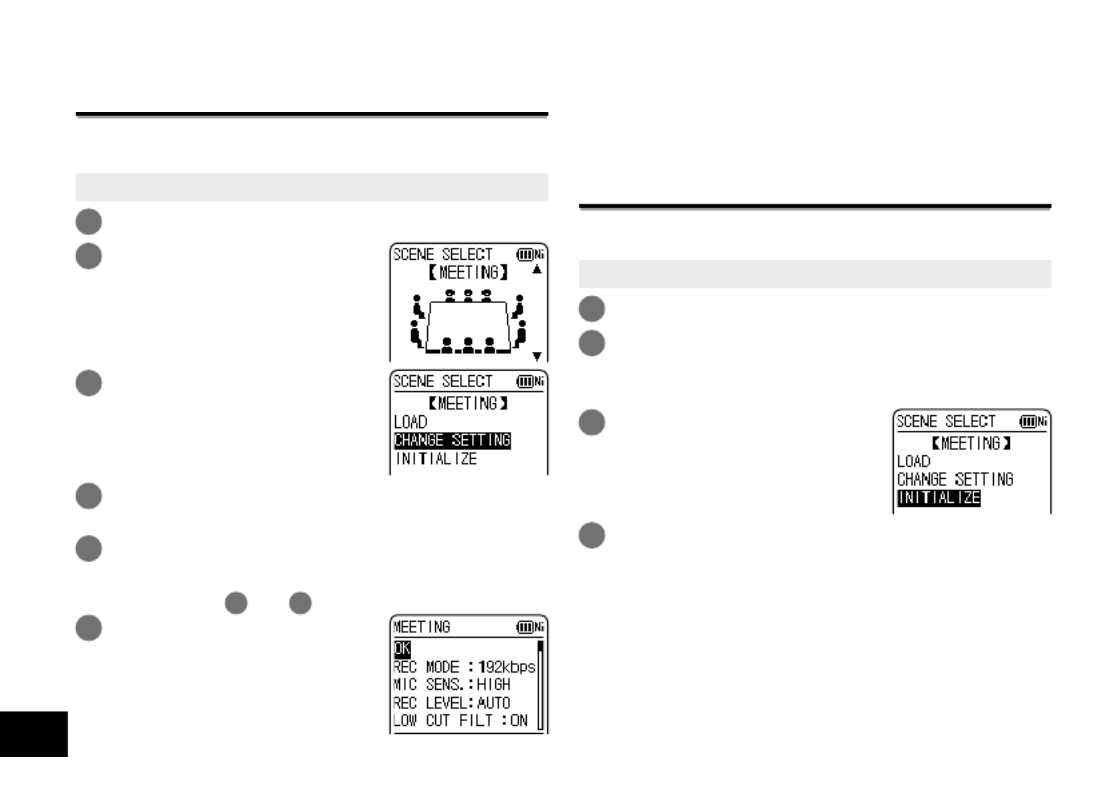
Changing recording scene settings
The setting details of each recording scene can
be changed according to preference.
• Press [STOP /RETURN] to stop the unit.g
1
Press [MENU] for approx. 1 second or more.
2Press +, – to select the
recording scene and
press [ OK] to enter.q
3Press +, – to select
“CHANGE SETTING” and
press [ OK] to enter.q
4Press +, – to select the item you want to
change and press [ OK] to enter.q
5Press +, – to select the setting and press
[ OK] to enter.q
Repeat steps 4 and 5 to change other items.
6When you have
completed the settings,
press +, – to select “OK”
and press [ OK] to enter.q
To select the changed recording scene, select
“LOAD” ( page 20).➜
To exit the setting screen, press [F2 (CLOSE)].
Initialising recording scene settings
Returns individual recording scenes whose settings have
been changed to the factory settings.
• Press [STOP /RETURN] to stop the unit.g
1
Press [MENU] for approx. 1 second or more.
2Press +, – to select the recording scene
you want to initialise and press [ OK] to q
enter.
3Press +, – to select
“INITIALIZE” and press
[ OK] to enter.q
4Press +, – to select “YES” and press
[ OK] to enter.q
The selected recording scene setting is returned to
the factory setting.
To select the initialised recording scene, select
“LOAD” ( page 20)➜
To exit the setting screen, press [F2 (CLOSE)].
Selecting the recording scene

23
ENGLISH
Direct scene
Microphone position
Recording scene
➜
*
➜
*
*
➜
*

VQT4J81
24
24
Direct scene
Changing direct scene setting
• Press [STOP /RETURN] to stop the unit.g
1
Press [MENU].
2Press +, – to select “MIC REC MENU” and
press [ OK] to enter.q
3Press +, – to select “DIRECT SCENE” and
press [ OK] to enter.q
4Press +, – to select the
microphone position
(“STEREO” or “ZOOM”)
and press [ OK] to enter.q
5Press +, – to select the
recording scene and
press [ OK] to enter.q
If you wish to change the recording scene for the
other microphone position, perform steps 4 and 5
to set the recording scene.
To exit the setting screen, press [F2 (CLOSE)].
Setting direct scene setting to OFF
• Press [STOP /RETURN] to stop the unit.g
1
Press [MENU].
2Press +, – to select “MIC REC MENU” and
press [ OK] to enter.q
3Press +, – to select “DIRECT SCENE” and
press [ OK] to enter.q
4Press +, – to select “SETTING” and press
[ OK] to enter.q
5Press +, – to select
“OFF” and press
[ OK] to enter.q
To exit the setting screen, press [F2 (CLOSE)].
Direct scene setting indication
: ON
Nothing is displayed for “OFF”
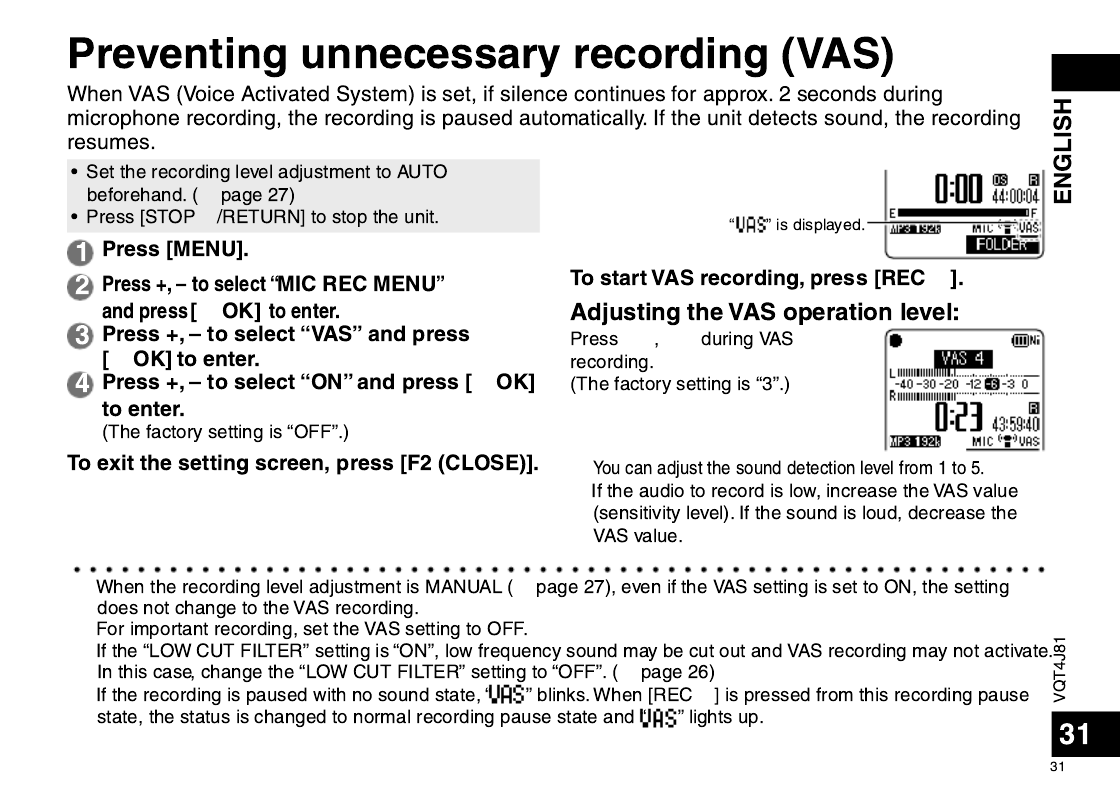
•
During playback, recording, or recording standby, “ ” is
not displayed even if you set direct scene setting to “ON”.
VQT4J81
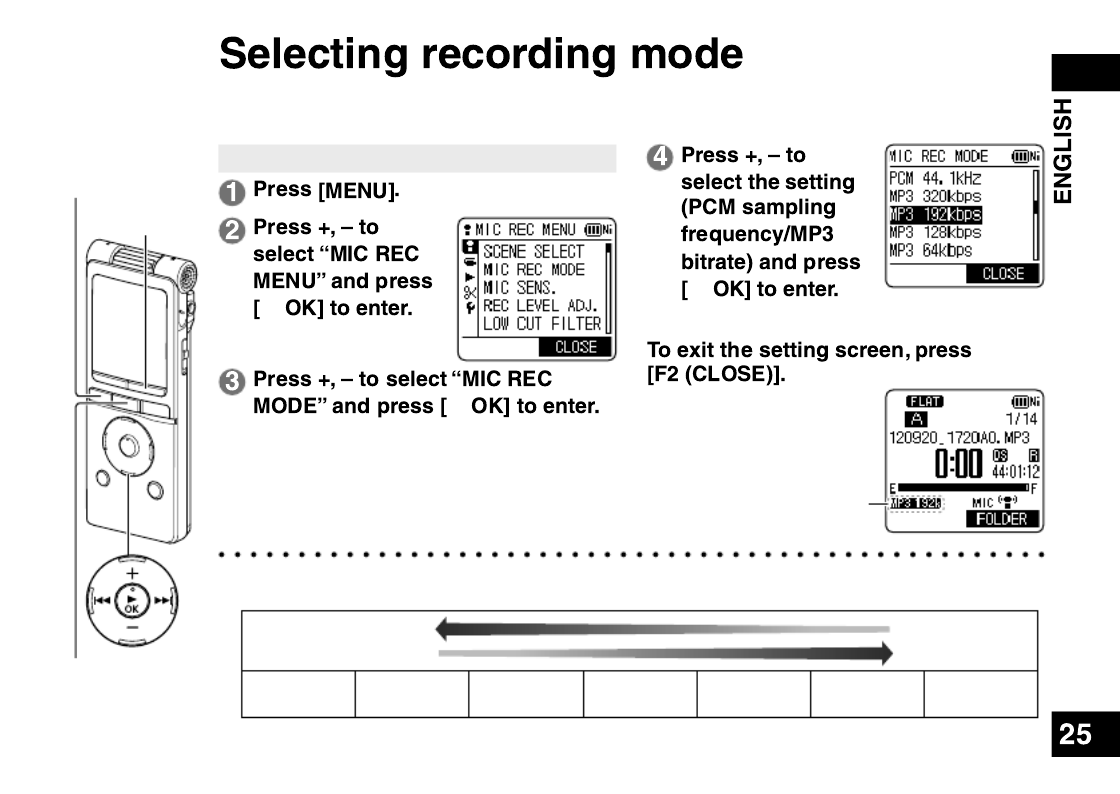
25
• Press [STOP /RETURN] to stop the unit.g
q
q
q
(The factory setting is “MP3 192kbps”.)
The selected recording mode
is displayed.
You can change the sound quality. This allows you to provide the best sound quality for
the particular purpose.
*Depending on the recording mode setting, the sound quality and remaining recording time
( page 86) will differ.➜
High quality recording
Long recording
Recording
format
PCM
44.1 kHz
MP3
320 kbps
MP3
192 kbps
MP3
128 kbps
MP3
64 kbps
MP3
32 kbps
*When the recording mode is set to “MP3 32kbps”, the recording becomes monaural.
STOP /RETURNg
F2
MENU

VQT4J81
26
26
Switch the microphone sensitivity according
to the volume of the sound source. When the
sound source volume is loud, set the sensitivity
to “LOW”. When it is low, set the sensitivity to
“HIGH”.
• Press [STOP /RETURN] to stop the unit.g
1Press [MENU].
2Press +, – to select “MIC REC MENU”
and press [ OK] to enter.q
3Press +, – to select “MIC SENS.”
and press [ OK] to enter.q
4Press +, – to select “HIGH” or “LOW” and
press [ OK] to enter.q
(The factory setting is “HIGH”.)
To exit the setting screen, press [F2 (CLOSE)].
When the microphone position is
“STEREO” ( page 14), “ ➜ ” is
displayed for High, and “ ” for Low.
When the microphone position is “ZOOM”, “ ” is
displayed for High, and “ ” for Low.
Switching microphone sensitivity
Sound of low frequency range is reduced during
microphone recording. This is effective when
reducing noise of air conditioning equipment,
etc. while recording at a meeting, etc. (LOW CUT
FILTER)
• Press [STOP /RETURN] to stop the unit.g
1Press [MENU].
2Press +, – to select “MIC REC MENU”
and press [ OK] to enter.q
3Press +, – to select “LOW CUT FILTER”
and press [ OK] to enter.q
4Press +, – to select “ON” and press [ OK] q
to enter.
(The factory setting is “OFF”.)
To exit the setting screen, press [F2 (CLOSE)].
“ ” is displayed.
Reducing low frequency
noise during recording

g
q
q
q
*
u i
➜
*
*
g

*
*
1 30 1 30
*
*
*
➜
➜ ➜
g
q
q
q
*
*

➜
*
q
1
2u i
3
q
*
*

*
g
q
q
q
**
*
➜
**
*g
*
g
*➜
*
*
➜
**
➜
g
q
q
q
*
u i
*
*

g
q
q
q
➜
g
*
*
g
*
*
➜
*
➜
*
*

g
*
*
*➜
*
*

W
*
*
*
*
g
q
q
q
L R
➜

*
1
2
*
*
*
*
➜
*
g
q
q
q
g

*
*
*
*
*
*
*
g
q
q
q

➜
*
*
*
*
u
➜
g
&
q
q
*
*
g
&
q
*
➜ ➜
*
➜
&
&
&u i
g
*
*
*
q
q
u i
q
*
q
q
q
q
q
q
q
*
q
u i
q
q
q
➜
*

q
q
q
➜

q
q
q
*
*
➜

q
q
1
2u i
3
q

VQT4J81
47
47
ENGLISH
Using the le search function
Using the file search function enables you to
search the files recorded on this unit.
You cannot search for files in the MUSIC (M)
folder or OTHER FOLDER ( ).
g Types of le search
CALENDAR
SRCH
Recorded files are refined by date and
displayed in a list.
DAY OF WEEK Recorded files are refined by day of the
week and displayed in a list.
RECENT R.
FILE
Recorded files are displayed in
recording date order, starting from the
most recent. (20 files)
File search
• Press [STOP /RETURN] to stop the unit.g
1Press [LIST ] for approx. 1 second or
more.
Go to step
2 if an SD card is inserted ( page 46), ➜
and step
3 if not.
2Press +, – to select “INT.
MEMORY” (internal
memory ) or “microSD
CARD” and press [F1
(SEARCH)].
3Press +, – to select the
type of le search and
press [ OK] to enter.q
“ ” (internal memory) or “ ”
(SD card) is displayed as the
search target.
When “CALENDAR SRCH” is selected:
Press +, –, , to select u i
the recorded date and press
[ OK] to enter.q
The cursor only moves to dates
on which files were recorded.
When “DAY OF WEEK” is selected:
Press +, – to select the day of
the week and press [ OK] to q
enter.
Only one day of the week can
be selected.
4Press +, – to select the le and press
[ OK] to enter.q

VQT4J81
48
48
• Transfer music files to this unit from the
computer. ( page 71)➜
Selecting a le from folder “M”:
See page 12 for selecting a folder and pages 13
and 17 for selecting a file.
1Select the le and press [ OK].q
Playback elapsed time
Total playback time
(Length of the selected
file (duration of time))
1
2
3
If the file contains track information (ID3 tag,
etc.), 1 track name, 2 artist name and 3
album name are displayed. (If there is no track
name, the file name is displayed. If there is
no artist name or album name, “UNKNOWN
ARTIST” or “UNKNOWN ALBUM” is
displayed.) If they are not fitted in the screen,
the scroll display will appear.
See page 17 for playback operations.
*Only WMA/MP3 files and PCM (WAV) files
recorded on this unit can be played.
*In MUSIC folder, up to 199 files per one
folder can be recognised and played back.
If subfolders are created, number of files
playable is reduced by the equivalent number
of subfolders created. ( “Folder structure on ➜
this unit”, page 69)
*Copyright-protected WMA/MP3 music files
cannot be pla yed.
*WMA/MP3 music files with variable bit rate
ma y be played, but the playback elapsed time
display or bit rate display may differ from the
actuality, or the repeat positions during A-B
repeat may differ from the set positions.
*If the ID3 tag of the file contains data that
this unit cannot read, the track name, artist
name, etc. may not be displayed properly.
*A file of 2 GB or more in size cannot be
pla yed back.
*If playback of a file of 100 hours or more
pla yback time has exceeded 100 hours, the
“hour” indication in “hour: minute: second”
blinks.
ID3 tag: track name and other information
stored in MP3 files.
Listening to music on this unit (WMA/MP3 music les)
F2
F1
STOP /RETURNg

VQT4J81
49
49
ENGLISH
Folder cue function
This function enables you to switch subfolders
within the MUSIC (M) folder easily while playing
back files in the MUSIC folder.
Folder cue cannot be performed while playing a
PLAYLIST.
1Press [F2 ( CUE)] during playback.
“FOLDER SKIP” is displayed,
which changes to the folder cue
display “ ”.
2Press when “ ” is displayed.u, i
•
The first track in the previous or following folder is
cued.
• While folder cue is being displayed, the playback
speed cannot be changed. Also, Fast forward/Fast
backward operations are not available. Also, the
MENU or LIST button cannot be operated.
Cancelling folder cue:
The setting can be cancelled using any of the following
methods. When this is cancelled, files can be skipped
using , .u i
• Press [F2 ( CUE)] again.
• Press [ OK].q
• Press [STOP /RETURN]. (Playback is completed.)g
You can register tracks in the MUSIC (M) folder to
a playlist and play them in the desired order.
Registering your favourite tracks to
a playlist
1Select the MUSIC (M) folder on the list
screen ( page 13).➜
You can also select OTHER FOLDER ( ).
2
Press +, – to select the le
or the folder and press
[F1 (PLAYLIST)] to enter.
When selecting folders or
selecting files by switching
folders, press and you can u
move within hierarchies. (For
details of file and folder selection
methods, see page 13.)
3Press to select the playlist u, i
and press [ OK] to enter. (Select from q
PLAYLIST 1 to 5.)
The file or all files within the folder are registered to
the selected playlist.
*
Playlist files are displayed as “PLAYLIST1.M3U to
PLAYLIST5.M3U” in “PLAYLIST” folder within “MUSIC” folder.
*Do not edit PLAYLIST 1 to 5.M3U on a computer.
*A maximum of 99 files can be registered to 1 playlist.
Using the playlist function

VQT4J81
51
51
ENGLISH
Editing: Dividing les
Using the editing settings, you can edit files recorded on this unit in a variety of methods.
Displaying the editing setting screen
• Press [STOP /RETURN] to stop the unit.g
1Press [MENU].
2Press +, – to select “EDIT MENU” and
press [ OK] to enter.q
3Press +, – to select the
item to edit and press
[ OK].q
• Press [F1 (TAB)] to switch to other setting screens.
• The setting details and change methods differ
according to the item. For details, see the
corresponding page.
To exit the setting screen, press [F2 (CLOSE)].
Dividing les
You can divide 1 file into 2 files at a specified
position.
1While playing, press [STOP /RETURN] at g
the point where you wish to divide the le.
2Select “DIVIDE” in the editing setting
screen ( left).➜
3Press +, – to select “YES”
and press [q OK] to enter.
While the file is being divided, the status indicator
flashes.
*Files in the MUSIC (M) folder, OTHER FOLDER ( )
or recycle bin ( ) folder cannot be divided.
*A file length of approx. 2 seconds or more is
necessar y for dividing a file.
*You cannot divide a file at the beginning of the file.
*Divided files cannot be recovered. It is recommended
that y ou make a backup copy of the file in advance.
*After the file is divided, the number of files in the folder
increases b y one. ( page 67)➜
*If a file containing index marks is divided, the
index marks will disappear after the file is divided.
( page 38)➜
*If there is no empty space in the internal memory or
SD card or if there is already a total of 199 files in the
folder, you cannot use this function to divide a file.
VQT4J81
52
52
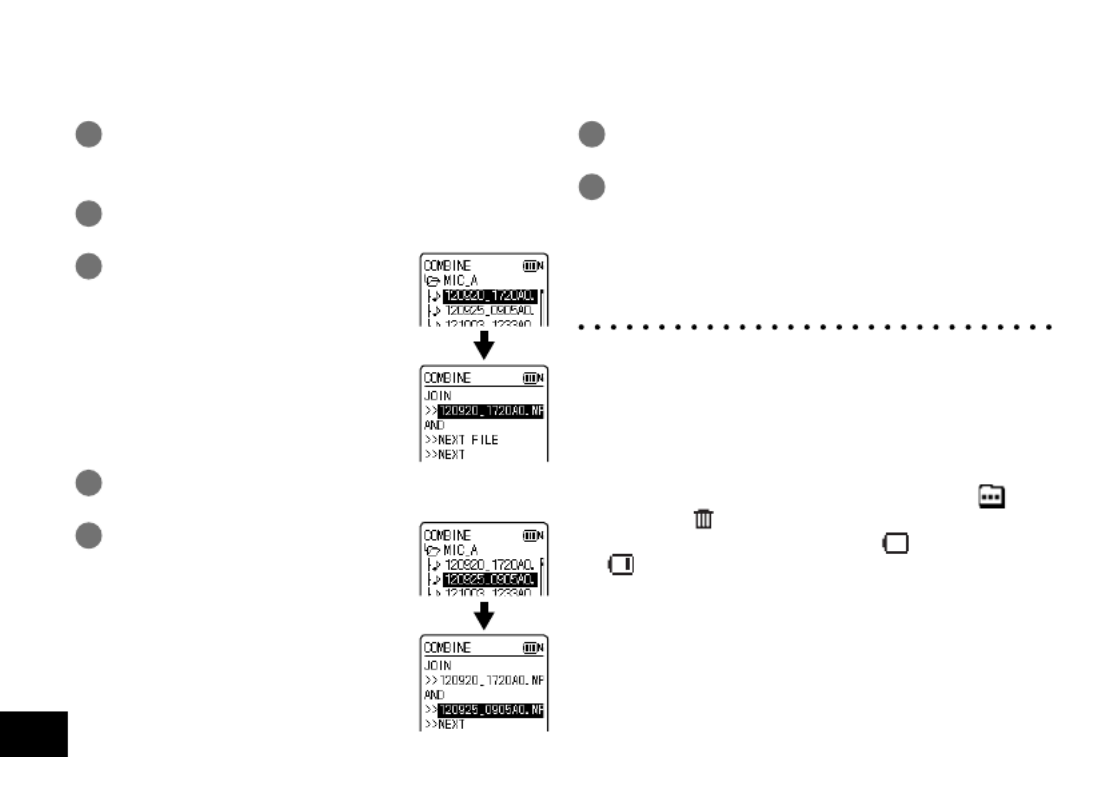
Editing: Combining les
1Select “COMBINE” in the editing setting
screen ( “Displaying the editing setting ➜
screen”, page 51).
2Press +, – to select “PREVIOUS FILE” and
press [ OK] to enter.q
3Press +, – to select the le
to be combined and press
[ OK] to enter.q
When selecting the file in another
folder, you can move within folder
hierarchies by pressing . (For u
details of file and folder selection
methods, see page 13.)
4Press +, – to select “NEXT FILE” and press
[ OK] to enter.q
5Press +, – to select the le to
be combined at the back of
the previous le and press
[ OK] to enter.q
6Press +, – to select “NEXT” and press
[ OK] to enter.q
7Press +, – to select “YES” and press
[ OK] to enter.q
While the files are being combined, the status
indicator flashes.
• If you press [F2 (CLOSE)] before combining is
complete, the combine process is cancelled.
*Combined files cannot be returned to their original
state . It is recommended that you make backup copies
of the files in advance.
*If indexed files are combined, the indexing is erased.
*The combined file is saved in the same folder as the
pre vious files.
Files cannot be combined in following cases.
*
Files in the MUSIC (M) folder, OTHER FOLDER
( )
or
recycle bin
( )
folder.
*
When the battery indicator displays “ ” (blinking) or
“ ”.
*Combining files from the internal memory with files
from the SD card.
*If the total file size after combining will exceed 2 GB.
*If there is less free memory space than the size of the
“NEXT FILE”.
*
If the recording mode of the two files is different.
2 files recorded on this unit can be combined into 1 file.

VQT4J81
53
53
ENGLISH
Copying le
1Select “COPY” in the editing setting screen
( “Displaying the editing setting screen”, ➜
page 51).
2Press +, – to select the le to be copied
and press [ OK] to enter.q
• When selecting the file in another folder, you can
move within folder hierarchies by pressing u.
(For details of file and folder selection methods,
see page 13.)
• When copying files in the LINE (LINE_SD) folder,
go to step 5.
3Press +, – to select the copy
destination (“INTERNAL
MEMORY” or “microSD
CARD”) and press [ OK] q
to enter.
4Press +, – to select the copy
destination folder and press
[ OK] to enter.q
5Press +, – to select “YES” and press
[ OK] to enter.q
While the file is being copied, the status indicator
flashes.
Moving les
Select “MOVE” in step 1 on the left to move files. The
operation is the same as that for file copy.
Editing: Copying or moving les
*If you press [F2 (CLOSE)] before copying or moving is complete, the process is cancelled.
*Files in the MUSIC (M) folder, OTHER FOLDER ( ) or recycle bin ( ) folder cannot be copied or moved.
*When the battery indicator displays
“ ” (blinking) or “ ”
, files cannot be copied or moved.
*If the size of the file to be copied or moved exceeds the amount of free space in the destination, the file cannot be
copied or mo ved.
Recorded files can be copied or moved between the internal memory and SD card. Microphone
recording files can be copied or moved among folders A, B, C and D.

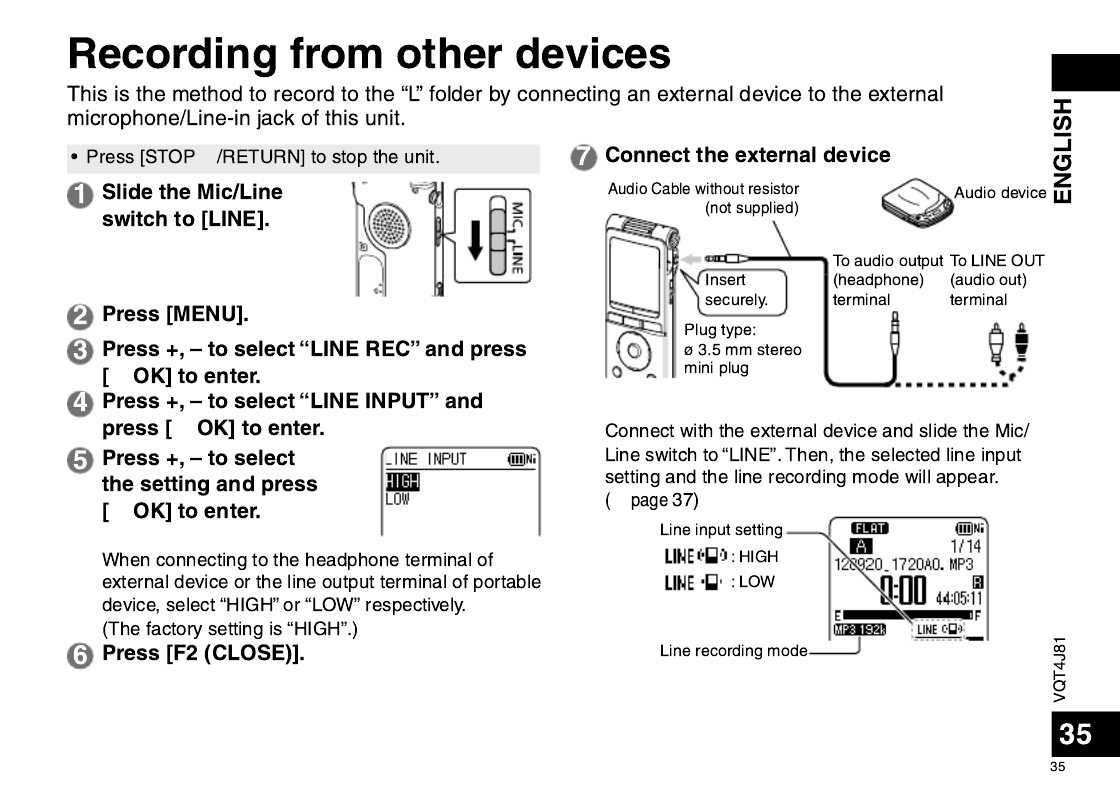
g
u i
q
u i
&
1
2
1
2
q
q
q
*✽
✽
g
&
q
q
q
*
➜
g
q
q
1
q
2u i
q
1 2
q
*
q
*
g
&
1
q
q
2
q
u
i
q
u

g
*
*
*
*
*
*
➜
*
➜ ➜
➜
*
*

g
q
q
q
➜
➜
q
*g
VQT4J81
59
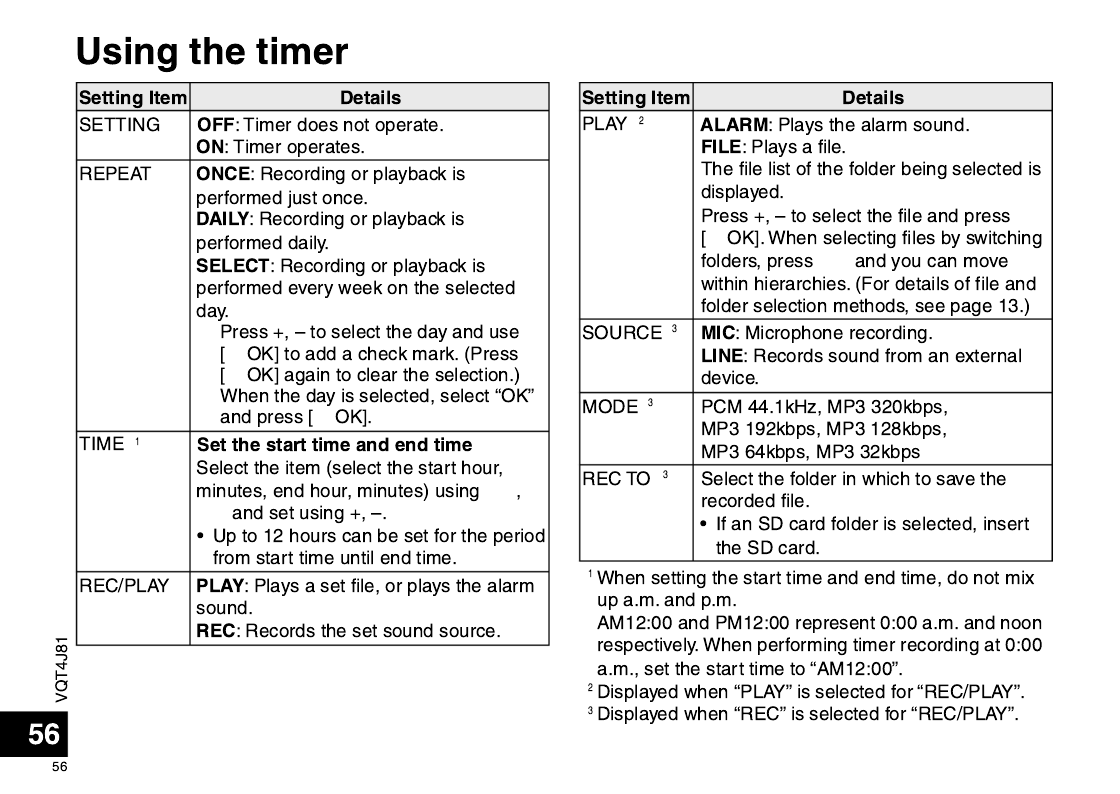
Set the type of batteries used (rechargeable nickel
metal-hydride batteries or alkaline batteries).
Type of battery
: Rechargeable battery
: Alkaline battery
Type of battery: RECHARGEABLE, ALKALINE
(The factory setting is “RECHARGEABLE”.)
*If the type of battery and setting do not match, the
batter y indicator is not displayed correctly.
*If BATT. SETTING is set to “ALKALINE”, the
rechargeab le battery cannot be charged.
This function automatically turns the power off if there
is no operation for a certain period of time such as
when recording is stopped. This function helps you
save battery when you forget to turn off the power.
AUTO POWER OFF: 0 min (OFF) to 15 min
(The factory setting is “15min”.)
*You can set the time in 1-minute increments.
*When “OFF” is set, the “AUTO POWER OFF” function
does not oper ate.
Set the backlight lighting time when the button is
pressed.
Lighting time: OFF (does not light), 5 sec, 15 sec, always
ON
(The factory setting is “15 sec”.)
*The backlight may not light when the remaining
batter y power is low.
*The backlight does not light in the following conditions.
– While a file is being moved, copied or combined.
Use this function to adjust the contrast of the
screen. You can choose from 10 levels for the
adjustment.
Contrast adjustment: 1 (L) to 10 (H)
(The factory setting is “5”.)
*
1
q
2
q
*
*
*
*
*

q

✽
✽
✽
✽
✽
✽
✽
✽
✽
✽
✽
✽

*
*
*
*
*
*

*
*
*
g
g

➜
→
ユーザー名
➜
*

*
*
*
*
*
*
➜
➜

“_” (1-byte)
001_120920_1720A0.MP3
1 452 3 6
1
2
3
4
5
6
001_120920_1720A0.MP3
002_120925_0905A0.MP3
003_121003_1233A0.MP3
004_121231_1915A0.MP3
001_120920_1720A0.MP3
002_121003_1233A0.MP3
003_121231_1915A0.MP3
➜
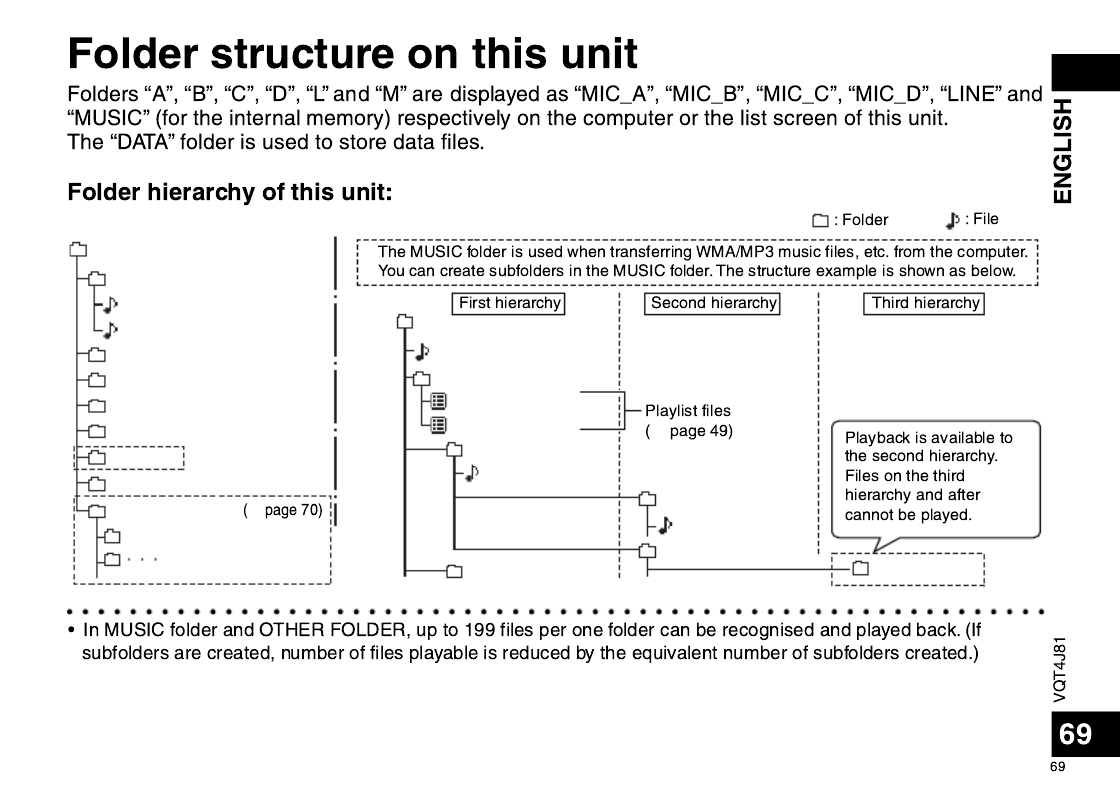
Internal memory (SD card)
MIC_A (MIC_A_SD)
MUSIC
Music 01.MP3
PLAYLIST
Artist A
Artist B
Music A.MP3
MIC_B (MIC_B_SD)
MIC_C (MIC_C_SD)
MIC_D (MIC_D_SD)
LINE (LINE_SD)
MUSIC ✽
RECYCLE
001_120920_1720A0.MP3
002_120925_0905A0.MP3
Album A1
Music A1-1.MP3
Album A2
Album A2-1
PLAYLIST1.M3U
PLAYLIST2.M3U
OTHER FOLDER
DATA
✽
➜
➜
*
*
*
*
➜
*
➜
*
*
*
➜
*
➜
➜
➜
➜
➜

➜
➜
✽✽✽
✽✽✽
➜

VQT4J81
75
75
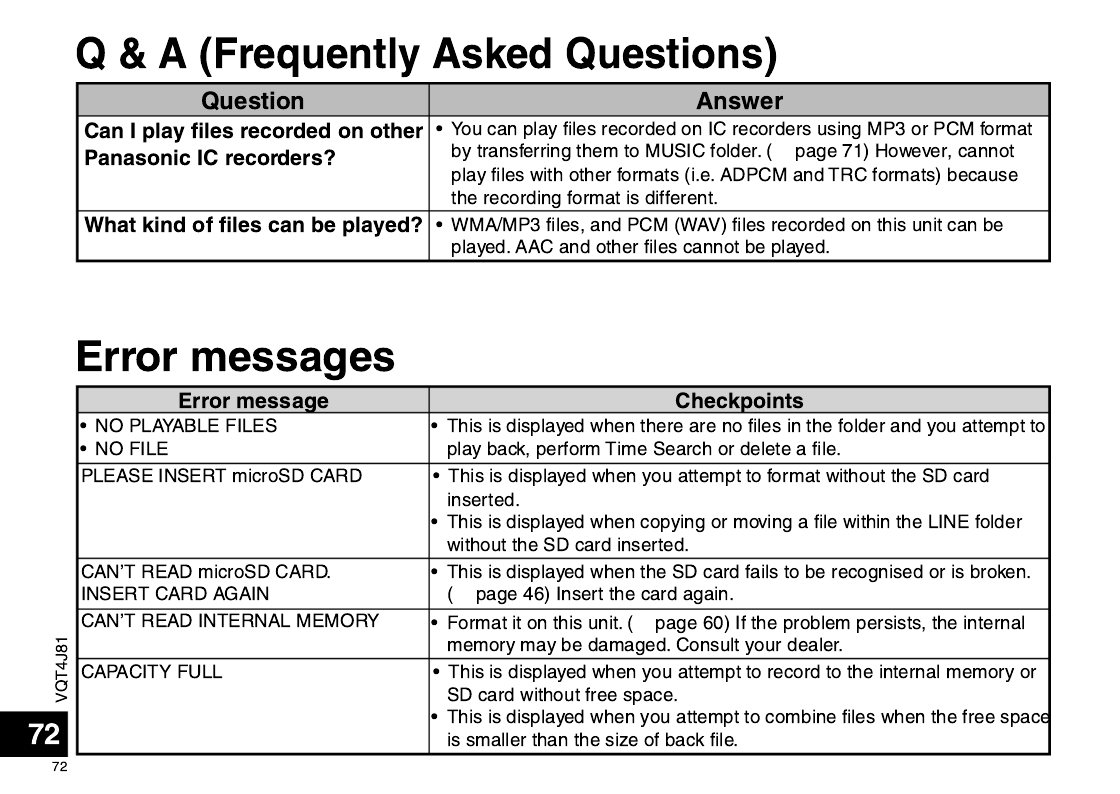
ENGLISH
Error message Checkpoints
COPY/MOVE DESTINATION
FOLDER FULL
• The file cannot be copied (moved) because the number of files in the
copy (move) destination folder has reached the limit (199). Delete files
in the copy (move) destination folder or specify another folder as copy
(move) destination.
EMPTY RECYCLE BIN • This is displayed when you attempt to delete files or folders with the
maximum number of files (199) present in the recycle bin folder and no
more files can be moved to the recycle bin ( ). ( page 54)➜
✽ FOLDER FULL
CAN’T RESTORE
• This is displayed when you attempt to restore files from the recycle
bin ( ) to the original folder and the maximum number of recordable
files are present in the original folder. ( means the folder name for the ✽
original folder.) ( page 54)➜
CAN’T MOVE FILE.
EMPTY RECYCLE BIN
• This may be displayed when there is no free space on the SD card.
( page 54)➜
CAN’T FORMAT • The internal memory or the SD card may be damaged. Consult your
dealer.
CAN’T ADD FILES.
PLAYLIST FULL
• This is displayed when you attempt to register files with the playlist
with the number exceeding maximum number (99) of files that can be
registered with each playlist. ( page 49)➜
CAN’T ADD ALL FILES TO PLAYLIST • This is displayed when not all files can be registered because the
number of files exceeds the maximum number (99) of files that can be
registered while registering the files with playlist. ( page 49)➜
CAN’T EDIT PLAYLIST.
NO FILE
•
The editing operation for the playlist is impossible because there are
no files registered in the selected playlist (PLAYLIST1 to 5.M3U).
( page 49)➜

VQT4J81
76
76
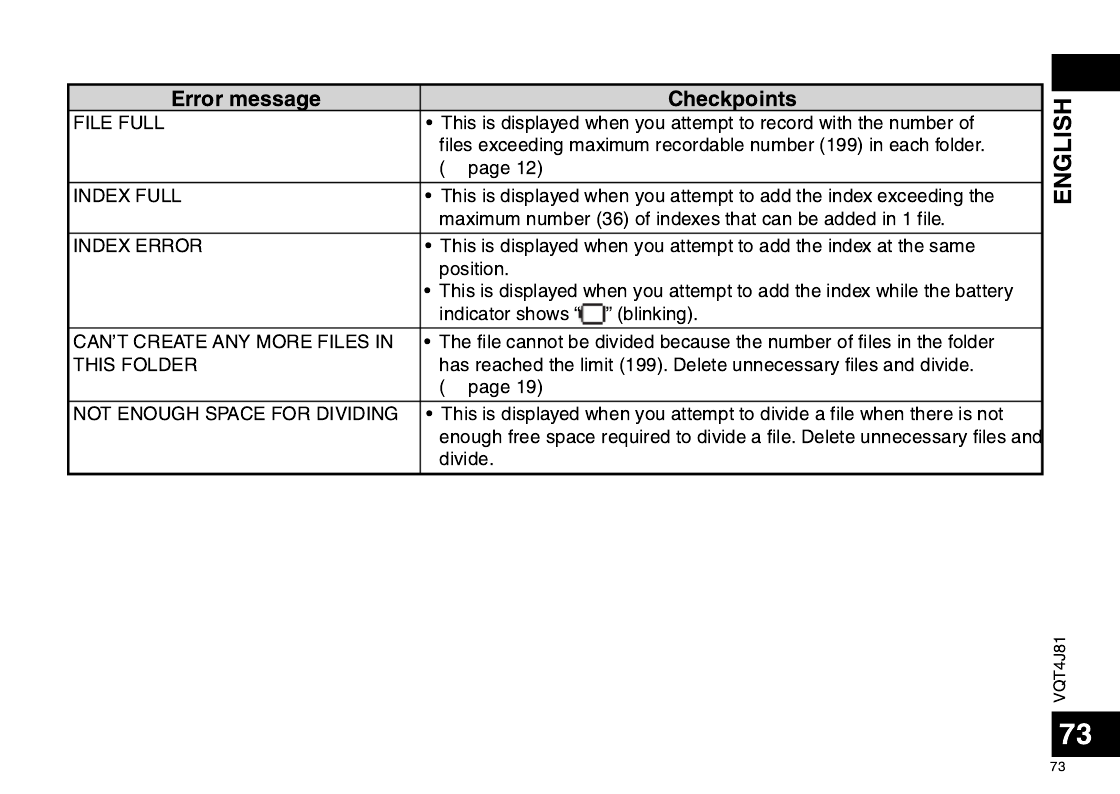
Error message Checkpoints
✽✽✽ USE ONLY ALPHANUMERICS • Some of the character strings in the file name or folder name are not
supported (characters other than Japanese and English). Such files and
folders cannot be added to the playlist.
INSERT microSD CARD FOR TIMER
RECORDING
• This is displayed when the SD card is not inserted at the completion of
the timer recording setting.
CAN’T START TIMER OPERATION • This is displayed when the timer has failed such as when the SD card
is not inserted or the recording is in progress during timer recording
setting.
CAN’T . FILE IS OUTSIDE PLAY ✽✽✽
RANGE OF ALL SONG MODE (MAX
3,000 SONGS)
• This is displayed when you attempt to select files beyond the playback
range (max. 3,000 files) for all repeat (random) of MUSIC or OTHER
FOLDER, or when you attempt to set all repeat (random) while selecting
files beyond the playback range (max. 3,000 files). ( page 41)➜
“ ” indication differs depending on the operations.✽✽✽
Error messages

VQT4J81
77
77
ENGLISH
Before requesting service, make the following checks. If you are in doubt about some of the check points, or if the
remedies indicated in the chart do not solve the problem, consult your dealer for instructions.
Symptom Checkpoints
Battery
Cannot use a battery that can
still be used on other equipment.
• This unit considers the battery as empty even if there is actually power left in
it. This is to preserve the clock setting.
• Did you set the “AUTO POWER OFF” function? (This function turns the
power off if there is no operation for a certain period of time* such as when
the unit is stopped.) ( page 59)➜
The factory setting is 15 minutes.
Playback is extremely short
despite recharging.
• The rechargeable battery life is over. (Number of recharging times of
supplied rechargeable battery: Approx. 300) Replace with a new specified
rechargeable battery (optional).
“
” is displayed when the
battery is recharged.
Cannot recharge batteries.
• The temperature of this unit has risen. Disconnect the unit from the computer
and leave it for a while. Then, recharge the battery again.
• Are you trying to recharge a battery other than the specified rechargeable
battery or an alkaline battery? Insert the specified rechargeable battery
(supplied) and recharge it.
• The rechargeable battery is not properly inserted. Remove the battery
completely once. Then, insert it again.
• Is alkaline battery set in the battery switching setting?
Switch the setting to the rechargeable battery setting and recharge it.
( page 59)➜
Troubleshooting guide

VQT4J81
78
78
Symptom Checkpoints
Operations
The unit does not start. • Make sure the battery is correctly inserted. Remove the battery completely
and then insert it back into the unit again.
• The battery has run down. When using the specified rechargeable battery
(supplied), recharge it. When using the AAA (LR03) battery, replace it with a
new one. ( page 7)➜
No operation. • The Hold function is on. Switch Hold off. ( page 10)➜
• You cannot operate on this unit when the unit is connected to a computer.
Recording
The memory is used completely
earlier than expected.
• Remaining recording time largely differs depending on the recording mode.
( page 86) Select a suitable recording mode according to the purpose for ➜
use. ( page 25)➜
• Is much data stored? Delete unnecessary files.
Recording is suspended by
itself.
• VAS is functioning. ( page 31)➜
Howling occurs when listening
to the recording in progress with
earphones.
• Turn down the volume. ( page 17)➜
• Keep earphones and this unit separate. ( page 18)➜
• When you are using an external microphone, keep earphones and external
microphone separate.
Recording ended halfway. • If the unit receives a shock (e.g. it is dropped), if the battery comes off or the
battery runs out during recording, recording data may not be updated.
• There may be no space left in the memory.
Troubleshooting guide

VQT4J81
80
80
Troubleshooting guide
Symptom Checkpoints
Recording
Sound is recorded in a
recording mode other than the
set recording mode.
• Did you change the microphone position before recording? When the direct
scene setting is set to ON, changing the microphone position will change the
recording mode to the set recording mode. ( page 23)➜
Recorded sound is too loud or
too low.
• Is the recording level adjustment set to manual? ( page 27) If so, set the ➜
proper recording level ( page 28) or set the recording level adjustment ➜
setting to AUTO.
• Switch the microphone sensitivity. ( page 26)➜
The level meter does not move
during recording. The recorded
file produces no sound.
• Is the recording level adjustment set to “MANUAL” and is the recording level
set to “0”? Adjust the recording level. ( page 28)➜
Playing
No sound from the speaker. • There is no sound when you have connected earphones. ( page 18)➜
Cannot hear any sound. • Adjust the sound volume. ( page 17)➜
A file in the MIC_A to MIC_D,
LINE or RECYCLE folder cannot
be played.
• The file name was changed. Only files named according to the file naming
rules can be played in folder MIC_A through MIC_D, LINE or RECYCLE.
Even if file names are not changed, if some file numbers overlaps in the
folder, those files cannot be played. ( page 68) Playback is possible if they ➜
are transferred to the MUSIC (M) folder. ( page 71)➜
• The transfer destination is wrong. If the file transferred from the computer is
stored in the recording folder, it cannot be played back on this unit. Transfer
the file to the MUSIC (M) folder. ( page 71)➜

VQT4J81
81
81
ENGLISH
Symptom Checkpoints
Playing
Cannot play a file in the MUSIC
(M) folder or OTHER FOLDER
( ), or the playback is not
correct.
• PCM (WAV) files recorded on this unit and WMA/MP3 files can be played on
this unit. Other file formats such as AAC cannot be played.
• In MUSIC folder and OTHER FOLDER, up to 199 files per one folder can
be recognised and played back. (If subfolders are created, number of
files playable is reduced by the equivalent number of subfolders created.)
Transferred files exceeding the maximum number cannot be played.
• For MUSIC (M) folder or OTHER FOLDER ( ), playback is available to
the second hierarchy. Files on the third hierarchy and after cannot be played
( page 69).➜
• Copyright-protected files cannot be played even if they are transferred via
Explorer.
• Was the file erased after registered with the playlist? Transfer the file as it
was or delete the file name from the playlist. ( page 50)➜
Playback speed is too fast or slow.
• You changed the playback speed. ( page 39)➜
There is no sound from the
earphones or it is difficult to
hear or noisy.
• Ensure the plug is inserted firmly.
• Wipe the plug clean.
The selected file changes on
its own.
“NO PLAYABLE FILES” is
displayed.
• If this unit is connected to the computer and then a file on the unit is deleted,
the file selected on this unit may change. For the MUSIC folder, the file
immediately under the MUSIC folder is selected. If there are no files, “NO
PLAYABLE FILES” is displayed. Reselect the file.
There is no sound or the
volume is low during A-B repeat
playback.
• Is the shadowing function set to ON? ( page 43)➜

VQT4J81
82
82
Symptom Checkpoints
Timer
Timer recording does not
operate properly.
(Timer Recording failed.)
• Set the clock with correct date and time. ( page 11)➜
• The folder at the recording destination is full. Delete unnecessary files.
( page 19)➜
• The battery has run down. Replace with a new battery. ( page 7) ➜
When using the rechargeable battery, recharge it. ( page 7)➜
• Is there sufficient space in the internal memory? Delete unnecessary files.
( page 19)➜
• Is the unit connected to the computer, etc.? Disconnect it from the computer.
• If the unit is still used even if the timer playback time comes, the current
operation is prioritised. Press [STOP /RETURN] to stop the unit.g
• If another recording is in progress even if the timer recording start time
comes, the current recording is prioritised. Stop the recording. However, if
you are using the unit for operations other than recording, the timer recording
is prioritised.
Others
The power cannot be turned on. • The battery may have run out. Replace the battery with the new one or charge
the rechargeable battery. (➜ page 7)
The power automatically turns
off.
• Did you set the “AUTO POWER OFF” function? (This function turns the
power off if there is no operation for a certain period of time* such as when
the unit is stopped.) ( page 59)➜
The factory setting is 15 minutes.
SD card cannot be recognised. • The SD card is not properly inserted. Turn off the unit and reinsert the SD
card. ( page 46)➜
• Was the SD card formatted using the computer, etc.? Format it on this unit.
( page 60)➜
Troubleshooting guide

VQT4J81
83
83
ENGLISH
Symptom Checkpoints
Others
Cannot delete a file or folder. • If WMA/MP3 music files transferred from the computer are Read-only, or
subfolders are created in the MUSIC folder or OTHER FOLDER, they cannot
be deleted on this unit. Delete them on the computer. ( page 66)➜
Free space does not increase
even after files were deleted.
• Empty the recycle bin folder. ( page 54)➜
Cannot divide a file. • Is there sufficient space in the internal memory?
• 199 recorded files (maximum recordable number) may be present in the
folder. If the folder contains 199 recorded files, dividing a file is not possible.
• Is the recording time for the file too short? Use a file with longer recording
length. A file length of approx. 2 seconds or more is necessary for dividing
a file.
•
Play the file up to the position where you want to divide it, and then press
[STOP /RETURN]. (g
➜
page 51)
This unit is not recognised by a
computer.
• Connect this unit with the computer properly. ( page 63)➜
• Disconnect this unit from the computer and connect it again.
• Disconnect all USB devices (excluding the mouse and keyboard in normal
operation) and connect this unit alone. If the computer is equipped with
multiple USB terminals, connect this unit to a different USB terminal.
• Is the unit connected via the USB hub? Disconnect the hub once and directly
connect this unit to the USB terminal.
• The OS on the computer may not be compliant with this unit. ( page 62)➜
• Is the network drive assigned? If the network drive is assigned, the drive
letters (alphabet letters in the drive name) conflict and this unit’s drive name
may become invisible. Change the assignment of the network drive before
connection.

VQT4J81
85
85
ENGLISH
Power
Rechargeable battery DC 1.2 V (1 AAA rechargeable
Ni-MH (nickel-metal hydride)
battery, HHR-4AGE)
USB charging (charging time:
approx. 2 hours)
Dry-cell battery DC 1.5 V (1 AAA LR03 battery
(alkaline battery))
Audio
Sampling frequency
(The bracket [ ] shows
the recording mode.)
44.1 kHz [PCM 44.1kHz]
44.1 kHz [MP3 320kbps]
44.1 kHz [MP3 192kbps]
44.1 kHz [MP3 128kbps]
22.05 kHz [MP3 64kbps]
16 kHz
[MP3 32kbps] (Monaural)
Recording format Linear PCM (16 bit)/MP3
Playable bit rate
1
16 kbps to 320 kbps (MP3)
32 kbps to 192 kbps (WMA)
Playable sampling
frequency
1
8 kHz to 48 kHz (MP3)
22.05 kHz to 48 kHz (WMA)
Frequency characteristic
(-10 dB, during recording/
playback.)
(The bracket [ ] shows
the recording mode.)
20 Hz to 21,000 Hz [PCM 44.1kHz]
20 Hz to 21,000 Hz [MP3 320kbps]
20 Hz to 20,000 Hz [MP3 192kbps]
20 Hz to 17,000 Hz [MP3 128kbps]
20 Hz to 7,500 Hz [MP3 64kbps]
20 Hz to 6,700 Hz [MP3 32kbps]
Built-in microphone S/N
45 dB (PCM 44.1 kHz) Filter (JIS A)
1
For MUSIC (M) folder and OTHER FOLDER ( )
Speci cations
USB
USB2.0 (Hi-Speed) DC 5 V / 500 mA
Audio
Output
Earphone ø 3.5 mm, 16 , Ω
Max. 11 + 11 mW
Speaker
Output
ø 20 mm, 8 , Ω
90 mW (RMS)
Audio
Input
External
Microphone/
Line-in
ø 3.5 mm,
0.80 mV plug in power
Max. Dimensions (W × H × D)
40.8 mm × 103.1 mm × 16.2 mm
Cabinet Dimensions (W × H × D)
38.5 mm × 102.5 mm × 14.8 mm
Mass Approx. 54 with batteryg
Approx. 43 without batteryg
Operating
Temperature
0 °C to 40 °C
Operating Humidity 20% RH to 80% RH
(No condensation)
Rechargeable
temperature range
5 °C to 35 °C
Internal Memory 4 GB
2
(RR-XS450)
2 GB
2
(RR-XS420)
2 Usable capacity will be less.
VQT4J81
86
86
Battery life (may be less depending on the operating
conditions.)
When the supplied rechargeable battery (HHR-4AGE) is used
Recording mode Rec
1
Play
2
PCM 44.1kHz (Stereo) approx. 17 h. 30
min.
approx. 10 h.
MP3 320kbps (Stereo) approx. 20 h. 30
min.
approx. 10 h. 30 min.
MP3 192kbps (Stereo) approx. 20 h. 30
min.
approx. 10 h. 30 min
.
MP3 128kbps (Stereo) approx. 21 h.
approx. 10 h. 30 min.
MP3 64kbps (Stereo) approx. 25 h.
approx. 11 h.
MP3 32kbps (Monaural) approx. 27 h. 30 min.
approx. 11 h.
When the Panasonic alkaline (AAA LR03) battery is used
Recording mode Rec
1
Play
2
PCM 44.1kHz (Stereo) approx. 25 h. approx. 19 h.
MP3 320kbps (Stereo) approx. 30 h. approx. 20 h. 30 min.
MP3 192kbps (Stereo) approx. 30 h. approx. 20 h. 30 min.
MP3 128kbps (Stereo) approx. 31 h. approx. 20 h. 30 min.
MP3 64kbps (Stereo) approx. 36 h. 30 min. approx. 21 h. 30 min.
MP3 32kbps (Monaural) approx. 38 h. approx. 21 h. 30 min.
1
Without recording monitor, Recording indicator: OFF,
recording level adjustment setting: AUTO, When using
the internal memory
2
When audio is output from speaker (Volume: 11,
Playback speed control: 100%)
Speci cations
Standard recordable time (may be less depending on
the operating conditions.)
RR-XS450: When using the internal memory (4 GB)
Recording mode Recording time Bit rate
PCM 44.1kHz (Stereo)
approx. 6 h. 1411 kbps
MP3 320kbps (Stereo)
approx.
27 h. 320 kbps
MP3 192kbps (Stereo)
approx. 45 h. 192 kbps
MP3 128kbps (Stereo)
approx. 68 h. 128 kbps
MP3 64kbps (Stereo)
approx. 136 h. 64 kbps
MP3 32kbps (Monaural)
approx. 272 h. 32 kbps
RR-XS420: When using the internal memory (2 GB)
Recording mode Recording time Bit rate
PCM 44.1kHz (Stereo)
approx. 3 h. 1411 kbps
MP3 320kbps (Stereo)
approx. 13
h. 320 kbps
MP3 192kbps (Stereo)
approx. 22
h. 192 kbps
MP3 128kbps (Stereo)
approx. 33
h
. 30 min. 128 kbps
MP3 64kbps (Stereo)
approx.
67 h. 64 kbps
MP3 32kbps (Monaural)
approx. 134 h. 32 kbps
*Specifications are subject to change without notice.

VQT4J81
87
87
ENGLISH
Care and use
To reduce risk of radio interference caused by
headphone-, earphone- or microphone cables,
only use adequate accessories with a cable
length of less than 3 m.
g Unit
• Avoid using or placing this unit near sources of
heat.
• To avoid product damage, do not expose this
product to rain, water or other liquids.
•
The unit’s speaker does not have magnetic
shielding. Do not place the unit near televisions,
personal computers, magnetised cards (bank cards,
commuter passes) or other devices easily influenced
by a magnet.
g Batteries
•
Do not peel off the covering on batteries and do
not use the batteries if the covering has been
peeled off.
• Align the poles and correctly when ( )
inserting the battery.
• Remove the battery if you do not intend to use
the unit for a long time.
• Do not heat or expose to flame.
• Do not leave the battery(ies) in a car exposed
to direct sunlight for a long period of time with
doors and windows closed.
• Do not attempt to recharge dry cell batteries.
• Battery mishandling can cause electrolyte
leakage which can damage items the fluid
contacts and may cause a fire. If electrolyte
leaks from the batteries, consult your dealer.
Wash thoroughly with water if electrolyte comes
in contact with any part of your body.
• Keep the AAA LR03 batteries and the
rechargeable batteries out of reach of children
to prevent swallowing. Accidental swallowing of
batteries can result in stomach and intestinal
damage.
•
When carrying batteries in a pocket or bag, ensure
no metal objects such as necklaces are placed
together with them. Contact with metal may cause
short-circuiting which can cause a fire. For safety,
carry the batteries in the battery carrying case.
g Rechargeable battery
• To store or carry the rechargeable battery,
put the removed battery into the battery case
(supplied), avoiding metallic objects (clip, etc.).

VQT4J81
90
90
Clean this unit with a dry and soft cloth.
•
If the unit becomes too dirty, wring a cloth moistened in water, wipe the dirt with it and clean with a dry cloth.
•
Do not use solvents including benzine, thinner, alcohol, kitchen detergent, a chemical wiper, etc. This might
cause the exterior case to be deformed or the coating to come off.
Maintenance

VQT4J81
91
91
ENGLISH
Information for Users on Collection and Disposal of Old Equipment and used Batteries
These symbols on the products, packaging, and/or accompanying documents mean that used
electrical and electronic products and batteries should not be mixed with general household waste.
For proper treatment, recovery and recycling of old products and used batteries, please take them
to applicable collection points, in accordance with your national legislation and the Directives
2002/96/EC and 2006/66/EC.
By disposing of these products and batteries correctly, you will help to save valuable resources and
prevent any potential negative effects on human health and the environment which could otherwise
arise from inappropriate waste handling.
For more information about collection and recycling of old products and batteries, please contact your
local municipality, your waste disposal service or the point of sale where you purchased the items.
Penalties may be applicable for incorrect disposal of this waste, in accordance with national legislation.
For business users in the European Union
If you wish to discard electrical and electronic equipment, please contact your dealer or supplier for
further information.
[Information on Disposal in other Countries outside the European Union]
These symbols are only valid in the European Union. If you wish to discard these items, please
contact your local authorities or dealer and ask for the correct method of disposal.
Cd
Note for the battery symbol (bottom two symbol examples):
This symbol might be used in combination with a chemical symbol. In this case it complies with the
requirement set by the Directive for the chemical involved.

VQT4J81
93
93
ENGLISH
For Latin American Countries Only
Useful Information
Customer Service
Customer Service Directory
Obtain products information and operative assistant; localize the closer distributor or
Service Center; buy spare parts and accessories by our web site to Latin American:
http://www.lar.panasonic.com
Also you may contact us directly by our Contact Center:
Panama 800-PANA (800-7262)
Colombia 01-8000-94PANA (01-8000-947262)
Ecuador 1800-PANASONIC (1800-726276)
Costa Rica 800-PANA737 (800-7262737)
El Salvador 800-PANA (800-7262)
Guatemala 1-801-811-PANA (1-801-811-7262)
Chile 800-390-602
From a cell phone: 797-5000
Venezuela 800-PANA-800 (800-7262-800)
Uruguay 0-800-PANA (0-800-7262)
Peru 0800-00726
Argentina 0800-333-PANA (0800-333-7262)
0810-321-PANA (0810-321-7262)
Mexico Service
To obtain information in the Republic of Mexico contact us at:
email: atencion.clientes@mx.panasonic.com
Or you may contact us in the next following phones numbers:
01800-VIP-PANA (01800-847-7262) - Interior
(55) 5000-1200 - Mexico D.F. and Metropolitan Area

VQT4J81
2
94
1 AAA Ni-MH-Akku
*Im Text als Akku angegeben.
1 Batterietransporttasche
1 USB-Verlängerungskabel
Den wiederaufladbaren Akku durch einem Akku vom Typ
[HHR-4MVE] für Europa oder [HHR-4MVT] für Asien und
Lateinamerika ersetzen. (Stand Mai 2012)
Mitgeliefertes Zubehör
Einlegen der Batterie
Au aden der Batterie
2USB-Stecker des Geräts in den Computer stecken.
Wenn das Gerät nicht direkt mit dem Computer verbunden werden
kann, das USB-Verlängerungskabel (mitgeliefert) benutzen.
Erstmaliger Anschluss des Gerätes an den PC
Da mehrere „Neue Hardware gefunden“ Meldungen
erscheinen werden, das Gerät nicht vom PC abtrennen bis alle
Meldungen verschwinden.
*
Das Gerät nie von der Stromversorgung trennen und die
SD-Karte nicht entfernen, während „ACCESS…“ angezeigt
wird, ansonsten kann das Gerät beschädigt werden.
3
Den OPR/HOLD-Schalter auf die [ON]-Seite schieben.
4
Den OPR/HOLD-Schalter auf die [OFF]-Seite schieben.
Die Statusanzeige leuchtet auf und das Aufladen beginnt.
*
Wird der OPR/HOLD-Schalter in Richtung [ON]-Seite geschoben,
kann das Laden während des Ladevorgangs abgebrochen werden.
*
Wenn die Statusanzeige erlischt, ist der Ladevorgang abgeschlossen.
gTrennen des Gerätes
Doppelklicken auf das Bildsymbol (Windows XP: [ ], Windows Vista/
Windows 7: [ ]) in der Taskleiste am unteren Rand des Bildschirms
und den Anweisungen auf dem Bildschirm zum Entfernen des
Geräts folgen. (Je nach den im Betriebssystem vorgenommenen
Einstellungen erscheint dieses Symbol u.U. nicht in der Taskleiste.)
Nach dem Abtrennen des Gerätes, stellt sich das Gerät aus.
*
Bei Verwendung eines wiederaufladbaren Akkus den mitgelieferten
wiederaufladbaren Akku oder den als optionales Zubehör erhältlichen,
aufladbaren Akku verwenden. Bei einer Verwendung von anderen,
handelsüblichen Batterien und Akkus ist der Betrieb nicht gewährleistet.
*
Es kann auch eine Alkalibatterie vom Typ AAA LR03 (nicht
mitgeliefert) verwendet werden.
Dieses Handbuch beschreibt die grundlegenden
Arbeitsvorgänge und Funktionen des Geräts.
1 AAA Ni-MH-Akku (mitgeliefert)
Auf korrekte Ausrichtung der Batterie
achten.
1Herausnehmen des USB-Steckers.
Drücken und gleichzeitig
schieben, bis ein „Klick“-
Laut zu hören ist.
Aufbewahren des USB-Steckers:

VQT4J81
3
95
DEUTSCH
Ein- und Ausschalten des Gerätes
Einschalten des Gerätes:
Den OPR/HOLD-Schalter auf die [ON]-Seite schieben, um das Gerät
einzuschalten. Anschließend schaltet sich die Display-Beleuchtung ein.
Ausschalten des Gerätes:
Den OPR/HOLD-Schalter zur [OFF]-Seite
schieben
, während das
Gerät im gestoppten Zustand ist.
gAutomatisches Abschalten:
Nach einer voreingestellten Zeit (die Werkseinstellung lautet
15 Minuten) wird das Gerät automatisch ausgeschaltet, wenn die
Aufzeichnung unterbrochen wird.
Wenn der Strom durch die automatische Ausschaltfunktion
ausgeschaltet wurde, vor dem Einschalten den OPR/HOLD-
Schalter in Richtung [OFF]-Seite schieben.
( Seite 24)➜
HOLD-Funktion
Bei angestellter HOLD-Funktion sind die Tastenbetätigungen
gesperrt.
Zum Einschalten der Hold-Funktion:
Den OPR/HOLD-Schalter während der Aufnahme oder der
Wiedergabe auf die [HOLD]-Seite schieben.
Zum Ausschalten der Hold-Funktion:
Den Schalter OPR/HOLD-Schalter in die entgegengesetzte
Richtung von [HOLD] schieben.
Einstellen der Uhr
1[MENU] drücken.
2+, – drücken, um „COMMON MENU“ auszuwählen
und [ OK] zur Eingabe drücken. q
3+, – drücken, um „DATE & TIME“ auszuwählen und
[ OK] zur Eingabe drücken. q
4+, – zur Einstellung der Jahreszahl drücken und
i drücken.
5+, – zur Einstellung des Monats drücken und i
drücken.
6+, – zur Einstellung des Datums drücken und i
drücken.
7+, – zur Einstellung des Uhranzeigeverfahrens
drücken und drücken.i
„ “ und „ / 24h AM PM “ werden jeweils für die
24-Stundenanzeige und die 12-Stundenanzeige angezeigt.
8+, – zur Einstellung der Stunde drücken und i
drücken.
9+, – zur Einstellung der Minute drücken.
u i, zur Änderung der Einstellung drücken, um zwischen
den Punkten hin und her zu schalten und anschließend +, –
erneut drücken, um die Einstellung vorzunehmen.
10
[ OK] zur Eingabe drücken.q
Das Datum und die Uhrzeit sind eingestellt und die Uhr beginnt
mit dem Betrieb.
[F2 (CLOSE)] drücken, um den Einstellungsbildschirm zu
verlassen.

VQT4J81
4
96
Auswahl des Ordners Wechseln der Mikrofonposition
1Drücken von [F2 (FOLDER)].
2+, –, drücken, um den Ordner u, i
auszuwählen und [ OK] zur Eingabe drücken.q
•
„ “ (OTHER FOLDER) dient zur Wiedergabe von Dateien,
die von einem anderen Gerät als diesem aufgezeichnet wurde.
Dieses Gerät kann auch Musikdateien wiedergeben, die mit mit
USB-Aufnahmefunktion ausgestatteten Panasonic-Stereogeräten
aufgezeichnet (oder von diesen übertragen) wurden.
Umschalten zwischen dem internen Speicher und einer SD-Karte:
Wenn die SD-Karte eingesetzt ist, werden die Punkte für die
SD-Karte im Gleichschritt mit 2 angezeigt. Zur Auswahl des
Speichers [F1 (MEMOR Y)] drücken.
• In diesem Handbuch wird eine microSD/microSDHC-Karte
als „SD-Karte“ bezeichnet.
Auswahl des Ordners oder der
Datei im Listen-Bildschirm
1
[LIST ] etwa 1 Sekunde oder länger gedrückt halten.
Zu Schritt 2 gehen, wenn eine SD-Karte ( Seite 18) ➜
eingesetzt ist, und zu 3, falls dies nicht der Fall ist.
2+, – drücken, um „INT. MEMORY “ (interner
Speicher) oder „microSD CARD“ auszuwählen,
und zur Eingabe [ OK] drücken.q
3+, – drücken, um den Ordner auszuwählen und
[ OK] zur Eingabe drücken.q
Wenn Ordner im Ordner MUSIC oder OTHER FOLDER ( ) erstellt
worden sind, Schritt
3
zur Auswahl des Zielordners wiederholen.
4+, – drücken, um die Datei auszuwählen und
[ OK] zur Eingabe drücken.q
Die Wiedergabe der Datei beginnt.
Mikrofonposition Empfohlene Einsatzweisen
STEREO
Funktioniert wie
ein gewöhnliches
Stereomikrofon.
Geeignet zum Aufzeichnen
von Ereignissen wie einer
Besprechung oder einer
Aufführung mit vielen Beteiligten.
ZOOM
Verstärkt während der
Aufnahme den Ton
unmittelbar vor Ihnen.
Geeignet zum Aufzeichnen von
Ereignissen wie Vorlesungen oder
Interviews, bei denen der Ton
aus einer bestimmten Richtung
kommt.

VQT4J81
5
97
DEUTSCH
Mithören des Tons über Ohrhörer
Stereo-Ohrhörer (nicht mitgeliefert) anschließen.
Steckerausführung: ø 3,5 mm Stereo-Klinkenstecker
Empfohlener zusätzlicher Ohrhörer: Panasonic RP-HV154, RP-HJE120
(Stand Mai 2012)
Eingebauter
Lautsprecher
Stecker fest
anschließen.
Überwachen der aktuellen
Aufnahme
Einstellen der Lautstärke:
Die Lautstärke des mitgehörten Tons
kann durch Drücken von +, – eingestellt
werden, ohne den Aufnahmepegel zu
beeinflussen.
Abhören des
Wiedergabetons
Während der Wiedergabe wird der Ton
über den eingebauten Lautsprecher
ausgegeben. In einer lauten Umgebung
ist der Lautsprecherton möglicherweise
schwer zu hören. In einem solchen
Fall empfiehlt sich der Anschluss eines
Stereo-Ohrhörers (nicht mitgeliefert).
Aufnahme
Wiedergabe
1Drücken von [F2 (FOLDER)].
2u i, drücken, um den Aufnahme-Zielordner
auszuwählen und [ OK] zur Eingabe drücken.q
Für die Mikrofonaufnahme einen Ordner aus den Ordnern „A“,
„B“, „C“ und „D“ wählen. (Die Werkseinstellung ist „A“.)
3[REC ] drücken (Aufnahme startet).*
4[STOP /RETURN] drücken, um die Aufnahme zu g
stoppen.
Zum Pausieren der Aufnahme:
1 [REC *] während der Aufnahme drücken.
Aufnahmeanzeige blinkt.
2 [REC *] erneut drücken, um mit der Aufnahme fortzufahren.
1[ OK] drücken (Wiedergabe beginnt).q
Einstellen der Lautstärke
Erhöhen der Lautstärke: + drücken.
Verringern der Lautstärke: – drücken.
Funktionen bei Wiedergabe
Sprung (Skip): u, i drücken.
Suchlauf rückwärts/vorwärts:
gedrückt halten.u, i
Beenden der Aufnahme: [STOP /RETURN] drücken.g
Prüfung der Information.
1[STOP /RETURN] drücken.g
Der Informationsschirm erscheint.
2Den Informationsschirm unter Benutzung von
+ oder – auf- oder abwärts bewegen.
So verlassen Sie den Informationsbildschirm:
[STOP /RETURN] drücken.g

VQT4J81
7
99
DEUTSCH
Ändern der Einstellungen für den Aufnahme-Ort
1
[MENU] etwa 1 Sekunde oder länger gedrückt halten.
2+, – drücken, um den Aufnahme-Ort auszuwählen
und [ OK] zur Eingabe drücken.q
3+, – drücken, um „CHANGE SETTING“
auszuwählen und [ OK] zur Eingabe drücken.q
4
+, – drücken, um den Punkt, der geändert werden
soll, auszuwählen und [ OK] zur Eingabe drücken.q
5+, – drücken, um die Einstellung auszuwählen und
[ OK] zur Eingabe drücken.q
Die Schritte
4
und
5
zur Änderung anderer Punkte wiederholen.
6Nach Fertigstellung der Einstellungen, +, –
drücken, um „OK“ auszuwählen und [ OK] zur q
Eingabe drücken.
Zur Auswahl des geänderten Aufnahmeorts, „LOAD“
auswählen.
[F2 (CLOSE)] drücken, um den Einstellungsbildschirm zu verlassen.
Initialisieren der Einstellungen für den Aufnahme-Ort
1
[MENU] etwa 1 Sekunde oder länger gedrückt halten.
2+, – drücken, um den Aufnahme-Ort auszuwählen
und [ OK] zur Eingabe drücken.q
3+, – drücken, um „INITIALIZE“ auszuwählen und
[ OK] zur Eingabe drücken.q
4+, – drücken, um „YES“ auszuwählen und [ OK] q
zur Eingabe drücken.
Der ausgewählte Aufnahme-Ort wird wieder auf die
Voreinstellung zurückgesetzt.
Zum Initialisieren des geänderten Aufnahmeorts, „LOAD“
auswählen.
[F2 (CLOSE)] drücken, um den Einstellungsbildschirm zu verlassen.
Diese Funktion dient dazu, die Aufnahmeszene in Verbindung mit
dem Umschalten der Mikrofonposition umzuschalten.
*Zum Zeitpunkt des Kaufs ist STEREO „MEETING“ zugewiesen,
und ZOOM ist „LECTURE“ zugewiesen.
Ändern der Direktszeneneinstellung
1[MENU] drücken.
2+, – drücken, um „MIC REC MENU“ auszuwählen,
und [ OK] zur Eingabe drücken.q
3+, – drücken, um „DIRECT SCENE“ auszuwählen,
und [ OK] zur Eingabe drücken.q
4
+, – drücken, um die Mikrofonposition („STEREO“
oder „ZOOM“) auszuwählen, und [
q
OK] zur
Eingabe drücken.
5
+, – drücken, um die Aufnahmeszene auszuwählen,
und [
q
OK] zur Eingabe drücken.
Wenn Sie die Aufnahmeszene für das andere Mikrofonposition
ändern wollen, führen Sie zum Einstellen der Aufnahmeszene
die Schritte
4
und
5
aus.
[F2 (CLOSE)] drücken, um den Einstellungsbildschirm zu
verlassen.
Direktszene

VQT4J81
8
100
Wahl des Aufnahmemodus
Direktszene
1[MENU] drücken.
2+, – drücken, um „MIC REC MENU“ auszuwählen
und [ OK] zur Eingabe drücken.q
3+, – drücken, um „MIC REC MODE“ auszuwählen
und [ OK] zur Eingabe drücken.q
4+, – drücken, um die Einstellung (PCM
Abtastfrequenz-/ MP3-Bitrate) auszuwählen und
[ OK] zur Eingabe drücken.q
(Die Werkseinstellung ist „MP3 192kbps“.)
[F2 (CLOSE)] drücken, um den Einstellungsbildschirm zu
verlassen.
*Je nach eingestelltem Aufnahmemodus sind die Tonqualität und
die verbleibende Aufnahmezeit unterschiedlich.
Aufnahmeformat
PCM: 44,1 kHz Hochwertige
Aufnahme
MP3: 320 kbit/s
MP3: 192 kbit/s
MP3: 128 kbit/s
MP3: 64 kbit/s
MP3: 32 kbit/s Lange
Aufnahme
*Wenn der Aufnahmemodus auf „MP3 32kbps“ eingestellt ist,
wird die Aufnahme monophon.
Einstellen der Direktszeneneinstellung auf OFF
1[MENU] drücken.
2+, – drücken, um „MIC REC MENU“ auszuwählen,
und [ OK] zur Eingabe drücken.q
3+, – drücken, um „DIRECT SCENE“ auszuwählen,
und [ OK] zur Eingabe drücken.q
4+, – drücken, um „SETTING“ auszuwählen, und
[ OK] zur Eingabe drücken.q
5+, – drücken, um „OFF“ auszuwählen, und [ OK] q
zur Eingabe drücken.
[F2 (CLOSE)] drücken, um den Einstellungsbildschirm zu
verlassen.

VQT4J81
10
102
[F2 (CLOSE)] drücken, um den Einstellungsbildschirm zu verlassen.
Nach dem Verlassen des Einstellungsbildschirms wird der
EQ-Modusname nicht angezeigt.
Drücken von [REC ] startet Aufnahme.*
EQ-Modus Wirkung und Anwendung
FLAT Dieser (Basis)-Modus verstärkt keinen
bestimmten Tonbereich.
EXTRA BASS Verstärkt den Bassbereich sehr stark.
BASS Verstärkt den Bassbereich leicht.
MIDDLE Verstärkt den Mittelbereich.
BASS&TREBLE
Verstärkt den Bass- und den Hochtonbereich leicht.
TREBLE Verstärkt den Hochtonbereich leicht.
EXTRA TREBLE
Verstärkt den Hochtonbereich sehr stark.
USER
Dieser Modus ermöglicht die Anpassung der
Frequenzbänder von 150 Hz, 500 Hz, 1 kHz,
4 kHz und 12 kHz.
(Die Werkseinstellung ist „FLAT“.)
Selbstauslöser
1[MENU] drücken.
2+, – drücken, um „MIC REC MENU“ auszuwählen
und [ OK] zur Eingabe drücken.q
3+, – drücken, um „SELF TIMER“ auszuwählen und
[ OK] zur Eingabe drücken.q
4+, – drücken, um die Zeit auszuwählen und [ OK] q
zur Eingabe drücken.
(Die Werkseinstellung ist „OFF“.)
[F2 (CLOSE)] drücken, um den Einstellungsbildschirm zu verlassen.
Einstellung des Aufnahme-Peak-Limiters
(Aufnahme-Spitzenwertbegrenzer) auf ON
1[MENU] drücken.
2+, – drücken, um „MIC REC MENU“ auszuwählen
und [ OK] zur Eingabe drücken.q
3+, – drücken, um „PEAK LIMITER“ auszuwählen
und [ OK] zur Eingabe drücken.q
4+, – drücken, um „ON“ auszuwählen und [ OK] q
zur Eingabe drücken.
(Die Werkseinstellung ist „OFF“.)
[F2 (CLOSE)] drücken, um den Einstellungsbildschirm zu verlassen.
Einstellung des Aufnahme-EQ
1
[REC ] für 1 Sekunde oder länger gedrückt halten.*
Das Gerät geht in den Aufnahme-Bereitschaftszustand über.
2[MENU] drücken.
3+, – drücken, um „REC EQ“ auszuwählen und
[ OK] zur Eingabe drücken.q
4
+, – drücken, um den Aufnahme-EQ-Modus zu wählen.
Bei der Wahl eines anderen Modus als „USER“, fortfahren mit Schritt
5
.
Einstellung bei Auswahl von „USER“:
1 Nach Schritt 4, [F1 (EDIT)] drücken
2
u i, drücken, um das zu ändernde Frequenzband zu wählen,
und +, – drücken, um den Aufnahmepegel (±12 dB) anzupassen.
3 Wenn die Einstellungen für das zu ändernde Frequenzband
abgeschlossen sind, fortfahren mit Schritt 5.
5[ OK] zur Eingabe drücken.q
Manuelle Einstellung des Aufnahmepegels

VQT4J81
11
103
DEUTSCH
Verhindern einer unerwünschten
Aufnahme (VAS)
1[MENU] drücken.
2+, – drücken, um „MIC REC MENU“ auszuwählen
und [ OK] zur Eingabe drücken.q
3+, – drücken, um „VAS“ auszuwählen und [ OK] q
zur Eingabe drücken.
4+, – drücken, um „ON“ auszuwählen und [ OK] q
zur Eingabe drücken.
(Die Werkseinstellung ist „OFF“.)
[F2 (CLOSE)] drücken, um den Einstellungsbildschirm zu verlassen.
[REC ] drücken, um mit der VAS-Aufnahme zu beginnen.*
Anpassung des VAS-Betriebspegels:
u i, während der VAS-Aufnahme drücken.
(Die Werkseinstellung ist „3“.)
Frühere Aufnahmefunktion (PRE-RECORD)
Zur Aufnahme unter Benutzung der früheren
Aufnahmefunktion:
1
[REC ] für 1 Sekunde oder länger gedrückt halten.*
Das Gerät wechselt in den Aufnahme-Standby-Modus.
Schaltet auf 1 Sek., 2 Sek., 3 Sek. um und hält bei 3 Sek. an.
Die Mikrofon-Audiodaten werden stets etwa 3 Sekunden vor
der Aufnahme aktualisiert, und das Gerät befindet sich im
Standby.
2[REC ] drücken.*
Die Aufnahmeanzeigen leuchten und die Aufnahme beginnt
direkt nach dem erhaltenen Audio-Inhalt.
Beenden der Aufnahme: [STOP /RETURN] drückeng
1[MENU] drücken.
2+, – drücken, um „MIC REC MENU“ auszuwählen
und [ OK] zur Eingabe drücken.q
3+, – drücken, um „PRE-RECORD“ auszuwählen
und [ OK] zur Eingabe drücken.q
4+, – drücken, um „ON“ auszuwählen und [ OK] q
zur Eingabe drücken.
(Die Werkseinstellung ist „OFF“.)
[F2 (CLOSE)] drücken, um den Einstellungsbildschirm zu verlassen.
Aufnahme mit einem extern
angeschlossenen Mikrofon
1Den Mic/Line-Schalter auf [MIC] schieben.
2Das externe Mikrofon anschließen.
Externes Mikrofon
(nicht mitgeliefert)
Steckerausführung:
ø 3,5 mm Stereo-Klinkenstecker
Stecker fest
anschließen.
3[REC ] zum Starten der Aufnahme drücken.*

VQT4J81
12
104
10
[REC ] zum Starten der Aufnahme drücken.*
11
Spielen des externen Gerätes.
Dieses Gerät hat die folgende Synchron-Aufnahmefunktion.
Diese Funktion erkennt die Stille zwischen Titeln usw. und zeichnet
jeden Titel als separate Datei auf, z. B. als ersten Titel, zweiten
Titel usw. Wird ein Ton vom externen Gerät erkannt, beginnt die
Aufnahme automatisch. Wird für etwa 2 Sekunden oder mehr
Stille erkannt, wird die Aufnahme angehalten. Durch das erneute
Erkennen von Ton wird die Aufnahme wieder aufgenommen.
Synchron-Aufnahmeeinstellung
1[MENU] drücken.
2+, – drücken, um „LINE REC“ auszuwählen und
[ OK] zur Eingabe drücken.q
3+, – drücken, um „SYNCHRO REC“ auszuwählen
und [ OK] zur Eingabe drücken.q
4+, – drücken, um „ON (Auto Stop)“ oder
„ON (Manual Stop)“ auszuwählen und [ OK] zur q
Eingabe drücken.
Auto: Die Aufnahme pausiert, wenn etwa 2 Sekunden lang
oder länger Stille erkannt wird, und sie stoppt, wenn die
Stille etwa 15 Sekunden oder länger andauert.
Manual: Selbst wenn die Stille andauert, wird die Aufnahme
weiterhin angehalten (Standby) bis
[STOP /RETURN] gedrückt wird.g
(Die Werkseinstellung ist „OFF“.)
[F2 (CLOSE)] drücken, um den Einstellungsbildschirm zu
verlassen.
Synchron-Aufnahme:
1Die Schritte 1 bis
11
ausführen ( links).➜
Aufnahme von anderen Geräten
1Den Mic/Line-Schalter auf [LINE] schieben.
2[MENU] drücken.
3+, – drücken, um „LINE REC“ auszuwählen und
[ OK] zur Eingabe drücken.q
4+, – drücken, um „LINE INPUT“ auszuwählen und
[ OK] zur Eingabe drücken.q
5+, – drücken, um die Einstellung auszuwählen und
[ OK] zur Eingabe drücken.q
Beim Anschluss an den Kopfhörer-Anschluss eines externen
Gerätes oder den Line-Ausgang eines tragbaren Gerätes
„HIGH“ beziehungsweise „LOW“ wählen.
(Die Werkseinstellung ist „HIGH“.)
6Drücken von [F2 (CLOSE)].
7Anschließen des externen Gerätes
An das externe Gerät anschließen und den Mic/Line-Schalter
auf „LINE“ schieben. Dann erscheint die ausgewählte Line-
Eingangs-Einstellung und der Line-Aufnahme-Modus.
8
[REC ] für 1 Sekunde oder länger gedrückt halten.*
Das Gerät geht in den Aufnahme-Bereitschaftszustand über.
9Wiedergabe des externen Geräts und Einstellung
des Input / Output-Levels.
1
Wenn das Level-Meter schwankt und „ “ angezeigt wird, ist
die Lautstärke des externen Gerätes zu hoch. Die Lautstärke
des externen Geräts auf den Bereich „ “ einstellen, selbst
wenn so die Lautstärke auf Maximum gedreht wird.
Zur Rekonfiguration der Einstellungen des Line-Inputs,
[MENU] drücken und den Schritten 4 bis 6 folgen.
2
Wenn Sie den Eingangs-/Ausgangspegel eingestellt haben,
halten Sie die Tonquelle des anderen Geräts an der Stelle an, an
der Sie die Aufnahme beginnen wollen.

VQT4J81
14
106
Wiedergabe mit geringfügigem Rücklauf
1[ OK] während der Wiedergabe drücken.q
Bei jedem Drücken des Knopfes läuft die Wiedergabe für
ungefähr 3 Sekunden (Werkseinstellung) zurück.
Einstellung der Rücklaufzeit:
1[MENU] drücken.
(Während der Wiedergabe zu Schritt 3 wechseln.)
2+, – drücken, um „PLAY MENU“ auszuwählen und
[ OK] zur Eingabe drücken.q
3+, – drücken, um „SLIGHT RETURN“ auszuwählen
und [ OK] zur Eingabe drücken.q
4
+, – drücken, um die Anzahl der Sekunden (1 bis 5)
auszuwählen und [ OK] zur Eingabe drücken.q
(Die Werkseinstellung ist „3 sec“.)
[F2 (CLOSE)] drücken, um den Einstellungsbildschirm zu verlassen.
Wiederholwiedergabe (REPEAT)
Wiedergabe von einer festgelegten
Position (TIME SEARCH)
1[MENU] drücken.
(Während der Wiedergabe zu Schritt 3 wechseln.)
2+, – drücken, um „PLAY MENU“ auszuwählen und
[ OK] zur Eingabe drücken.q
3+, – drücken, um „TIME SEARCH“ auszuwählen
und [ OK] zur Eingabe drücken.q
4Die Wiedergabestartposition einstellen.
(Den Wert für „TIME“ ändern, um die Startposition einzustellen.)
u i, drücken, um „00:00:00“ (Stunden:Minuten:Sekunden)
zu wählen und +, – zum Ändern der Werte drücken.
5[ OK] drücken.q
Die Wiedergabe beginnt von der festgelegten Position.
Um den Einstellvorgang abzubrechen, [F2 (CLOSE)] drücken.
1[MENU] drücken.
(Während der Wiedergabe zu Schritt 3 wechseln.)
2+, – drücken, um „PLAY MENU“ auszuwählen und
[ OK] zur Eingabe drücken.q
3+, – drücken, um „REPEAT“ auszuwählen und
[ OK] zur Eingabe drücken.q
4+, – drücken, um Art der Wiedergabewiederholung
auszuwählen und [ OK] zur Eingabe drücken.q
(Die Werkseinstellung ist „OFF“.)
[F2 (CLOSE)] drücken, um den Einstellungsbildschirm zu
verlassen.
OFF: Die Wiedergabe wird nacheinander von der
ausgewählten Datei bis zur letzten Datei in einem Ordner
durchgeführt, und dann stoppt die Wiedergabe.
ONE: Die laufende Datei wird wiederholt abgespielt.
FOLDER REPEAT: Alle Dateien des Ordners werden
wiederholt abgespielt.
FOLDER RANDOM: Alle Dateien im Ordner werden wiederholt
abgespielt.
ALL REPEAT: Beim Ordner MUSIC (M) oder OTHER
FOLDER ( ) werden alle Dateien* im Ordner wiederholt
abgespielt. Für andere Ordner ist die Funktionsweise die
gleiche wie für „FOLDER REPEAT“.
ALL RANDOM: Beim Ordner MUSIC (M) oder OTHER
FOLDER ( ) werden alle Dateien* im Ordner wiederholt in
zufälliger Reihenfolge abgespielt. Für andere Ordner ist die
Funktionsweise die gleiche wie für „FOLDER RANDOM“.
Die maximale Anzahl der erfassten Dateien ist 3.000

VQT4J81
15
107
DEUTSCH
Shadowing
Einstellen des Shadowing:
1[MENU] drücken.
(Während der Wiedergabe zu Schritt 3 wechseln.)
2+, – drücken, um „PLAY MENU“ auszuwählen und
[ OK] zur Eingabe drücken.q
3+, – drücken, um „SHADOWING“ auszuwählen
und [ OK] zur Eingabe drücken.q
4+, – drücken, um die Art des Shadowing
auszuwählen, und [ OK] zur Eingabe drücken.q
Wenn Sie „ON (small volume)“ wählen, beträgt die Lautstärke
beim Shadowing etwa ein Drittel der aktuellen Lautstärke.
(Die Werkseinstellung ist „OFF“.)
[F2 (CLOSE)] drücken, um den Einstellungsbildschirm zu
verlassen.
Sprünge in regulären
Intervallen (TIME SKIP)
Sprünge in regulären Intervallen
1Während der Wiedergabe [ OK] etwa 1 Sekunde q
oder länger gedrückt halten.
Der Modus wechselt zum Time-Skip-Modus und „ “ wird
angezeigt. Der Skip-Modus wechselt jedes Mal, wenn der
Knopf gedrückt wird.
2u i, drücken.
Bei jedem Drücken des Knopfes werden 5 Sekunden
übersprungen (Werkseinstellung).
Zum Wechseln des Sprungintervalls
1[MENU] drücken.
(Während der Wiedergabe zu Schritt 3 wechseln.)
2+, – drücken, um „PLAY MENU“ auszuwählen und
[ OK] zur Eingabe drücken.q
3+, – drücken, um „TIME SKIP“ auszuwählen und
[ OK] zur Eingabe drücken.q
4+, – drücken, um die Zeit auszuwählen und [ OK] q
zur Eingabe drücken.
Das Sprungintervall kann auf 5 Sek., 10 Sek., 30 Sek., 1 Min.,
5 Min., 10 Min., oder 15 Min. eingestellt werden.
(Die Werkseinstellung ist „5sec“.)
[F2 (CLOSE)] drücken, um den Einstellungsbildschirm zu
verlassen.

VQT4J81
16
108
Verwenden der Shadowing-Funktion:
1Die A-B-Wiederholwiedergabe ausführen.
( Seite 13)➜
Das Shadowing erfolgt bei A-B-Wiederholwiedergabe ohne
Ton oder mit leisem Ton.
Einstellen der Lautstärke zum Shadowing:
Sie können die Lautstärke des Shadowing-Teils getrennt vom A-B-
Wiederholwiedergabeteil einstellen.
• Wenn A-B-Wiederholwiedergabe abgebrochen wird oder die
Shado wing-Einstellung während der Wiedergabe geändert wird,
wird die Lautstärke des Shadowing-Teils auf die ursprüngliche
Einstellung zurückgesetzt.
Ton besser hörbar machen
(VOICE EMPHASIS)
1[MENU] drücken.
(Während der Wiedergabe zu Schritt 3 wechseln.)
2+, – drücken, um „PLAY MENU“ auszuwählen und
[ OK] zur Eingabe drücken.q
3+, – drücken, um „VOICE EMPHASIS“
auszuwählen und [ OK] zur Eingabe drücken.q
4+, – drücken, um die Art der Stimmverstärkung
auszuwählen, und [ OK] zur Eingabe drücken.q
(Die Werkseinstellung ist „NORMAL“.)
[F2 (CLOSE)] drücken, um den Einstellungsbildschirm zu
verlassen.
Shadowing
NORMAL: Ton wird so wiedergegeben, wie er aufgenommen
wurde.
NOISE CXL L: Störgeräusche werden in geringem Umfang
reduziert.
NOISE CXL H: Störgeräusche werden in großem Umfang
reduziert.
FOCUS FRONT: Der Ton auf der Vorderseite wird verstärkt.
FOCUS LEFT: Der Ton auf der linken Seite wird verstärkt.
FOCUS RIGHT: Der Ton auf der rechten Seite wird verstärkt.
VQT4J81
17
109
DEUTSCH
Einstellung des Wiedergabe-
EQ (SOUND EQ)
EQ-Modus
Wirkung und Anwendung
FLAT Die Tonequalizer-Funktion wird nicht verwendet. Der
Originalton ohne Veränderung wird gehört.
BASS Verstärkt den Bassbereich sehr stark.
CLEAR Verstärkt den Hochtonbereich sehr stark.
HEAVY Verstärkt den Bass- und den Hochtonbereich leicht.
SOFT Verstärkt den Mittelbereich.
VOICE Reduziert Geräusche, um menschliche Stimmen
besser hörbar zu machen.
USER
Dieser Modus ermöglicht die Anpassung der Frequenzbänder
von 150 Hz, 500 Hz, 1 kHz, 4 kHz und 12 kHz.
(Die Werkseinstellung ist „FLAT“.)
1[MENU] drücken.
(Während der Wiedergabe zu Schritt 3 wechseln.)
2+, – drücken, um „PLAY MENU“ auszuwählen und
[ OK] zur Eingabe drücken.q
3+, – drücken, um „SOUND EQ“ auszuwählen und
[ OK] zur Eingabe drücken.q
4+, – drücken, um den Ton-EQ-Modus zu wählen.
Bei der Wahl eines anderen Modus als „USER“, fortfahren mit
Schritt 5
.
Einstellung bei Auswahl von „USER“:
1 Nach Schritt 4, [F1 (EDIT)] drücken.
2 Auf u i, drücken, um das Frequenzband auszuwählen,
das geändert werden soll; auf +, – drücken, um die
Lautstärke einzustellen (±6 dB).
3 Wenn die Einstellungen für das zu ändernde Frequenzband
abgeschlossen sind, fortfahren mit Schritt 5.
5[ OK] zur Eingabe drücken.q
[F2 (CLOSE)] drücken, um den Einstellungsbildschirm zu
verlassen.

VQT4J81
18
110
Unter Benutzung der
Dateisuchfunktion
gArten von Dateisuche
CALENDAR SRCH Gespeicherte Dateien werden nach Datum
geordnet und in einer Liste angezeigt.
DAY OF WEEK Gespeicherte Dateien werden nach
Wochentag geordnet und in einer Liste
angezeigt.
RECENT R. FILE Die gespeicherten Dateien werden
in chronologischer Reihenfolge nach
Aufnahmedatum angezeigt, beginnend mit
dem jüngsten Datum. (20 Dateien)
Dateisuche
1
[LIST ] etwa 1 Sekunde oder länger gedrückt halten.
Zu Schritt 2 gehen, wenn eine SD-Karte eingesetzt ist, und
zu 3, falls dies nicht der Fall ist.
2+, – drücken, um „INT. MEMORY“ (interner
Speicher) oder „microSD CARD“ auszuwählen,
und dann [F1 (SEARCH)] drücken.
3+, – drücken, um die Art der Dateisuche
auszuwählen und [ OK] zur Eingabe drücken.q
“ “ (interner Speicher) oder „ “ (SD-Karte) wird als Suchort
angezeigt.
Wenn „CALENDAR SRCH“ ausgewählt ist:
+, –, , drücken, um den gespeicherten Termin u i
auszuwählen und [ OK] zur Eingabe drücken.q
Wenn „DAY OF WEEK“ ausgewählt ist:
+, – drücken, um den Wochentag auszuwählen, und [ OK] q
zur Eingabe drücken.
Es kann nur ein Wochentag ausgewählt werden.
Benutzung einer SD-Karte
Einsetzen der SD-Karte
1Das Gerät ausschalten und die Abdeckung des
Batteriefachs/SD-Kartensteckplatzes öffnen.
2Die SD-Karte einstecken und die Abdeckung des
Batteriefachs/SD-Kartensteckplatzes schließen.
Die Karte in die korrekte Richtung ( ) ausrichten und sie
vollständig einsetzen, bis ein „Klick“-Ton zu hören ist.
Zum Entfernen der SD-Karte:
1 Das Gerät ausschalten und die Abdeckung des Batteriefachs/
SD-Kartensteckplatzes öffnen.
2 Die SD-Karte vorsichtig schieben.
3 Wenn die SD-Karte ein wenig hervorsteht, die Karte langsam
herausziehen.
*Umschalten zwischen dem internen Speicher und der SD-Karte
durch das Dr ücken von [F2 (FOLDER)] für mehr als als
1 Sekunde bei Anzeige des gestoppten Bildschirms ist möglich.
*Dieses Gerät ist kompatibel mit 2 GB microSD-Karten und 4 GB
bis 32 GB microSDHC-Kar ten. (Stand Mai 2012)
*Je nach Hersteller oder Typ der Karte arbeitet das Gerät
eventuell nicht richtig.
*Für Details bezüglich der Karten, für die eine Bestätigung
vorliegt, dass sie gemäß unseren Herstellungsstandards
ordnungsgemäß funktionieren, siehe die unten angegebene
Support-Webseite.
http://panasonic.net/support/
*Wenn eine SD-Karte eingesetzt, aber „microSD“ nicht auf dem
SELECT FOLDER-Bildschir m angezeigt wird usw., erkennt das
Gerät die SD-Karte nicht.
*Bewahren Sie die Speicherkarte außerhalb der Reichweite von
Kindern auf, damit sie nicht von diesen verschluckt werden kann.
VQT4J81
19
111
DEUTSCH
Hören von Musik mit diesem Gerät
(Abspielen von WMA/MP3 -Musikdateien)
4+, – drücken, um die Datei auszuwählen und
[ OK] zur Eingabe drücken.q
Wahl einer Datei aus dem Ordner „M“:
1Datei auswählen und [ OK] drücken.q
Ordner-Cue-Funktion
1[F2 ( CUE)] während der Wiedergabe drücken.
„FOLDER SKIP“ wird angezeigt, zur Ordner-Cue-Anzeige „ “.
2u i, drücken, wenn „ “ angezeigt wird.
Aufheben der Ordner-Cue-Funktion:
Diese Einstellung kann durch eine der folgenden Methoden
aufgehoben werden.
• [F2 ( CUE)] noch einmal drücken. Wenn dies abgebrochen
wird, können Dateien mit, u i, übersprungen werden.
• [ OK] drücken.q
• [STOP /RETURN] drücken. (Wiederhabe ist abgeschlossen.)g
Verwendung der Playlist-Funktion
Ihre Lieblingstitel in einer Playlist registrieren
1
Den Ordner MUSIC (M) im Listenbildschirm wählen ( Seite 4).➜
Sie können auch OTHER FOLDER ( ) wählen.
2
+, – drücken, um die Datei oder den Ordner
auszuwählen und [F1 (PLAYLIST)] zur Eingabe drücken.
Bei der Auswahl von Ordnern, drücken, um sich innerhalb der u
Rangfolge der Hierarchieebenen zu bewegen. (Einzelheiten hinsichtlich
der Datei- und Ordnerauswahlmethoden sind auf Seite 4 zu finden.)
3
u i, drücken, um die Playlist auszuwählen und [ OK] q
zur Eingabe drücken. (Aus der PLAYLIST 1 bis 5 wählen.)
• Die Datei oder alle Dateien in dem Order werden in der
ausgewählten Playlist registriert.
Wiedergabe von in einer Playlist registrierten Titeln
1Die Playlist auswählen (von P1 bis P5) ( Seite 4). ➜
2
u i, drücken, um die Datei, die wiedergegeben
werden soll, auszuwählen. Dann [ OK] drücken.q
Ändern der Reihenfolge der Playlist-Titel
1
Die Playlist (von P1 bis P5) im Listenbildschirm auswählen
( Seite 4).➜
2+, – drücken, um die Datei auszuwählen, die
geändert werden soll, und [F1 (EDIT)] drücken.
3+, – drücken, um „CHANGE ORDER“ auszuwählen
und [ OK] zur Eingabe drücken.q
„ “ wird auf der linken Seite zum ausgewählten Dateinamen hinzugefügt.
4
+, – drücken, um die ausgewählte Datei zur gewünschten
Position zu bewegen und [ OK] zur Eingabe drücken.q
• Die Reihenfolge der Titel ist nun geändert worden.

VQT4J81
20
112
Löschen von in einer Playlist registrierten
Tracks (Titeln)
1Die Playlist (von P1 bis P5) im Listenbildschirm
auswählen ( Seite 4).➜
2+, – drücken, um die Datei auszuwählen, die
gelöscht werden soll, und [F1 (EDIT)] drücken.
3+, – drücken, um „ERASE FILE“ auszuwählen und
[ OK] zur Eingabe drücken.q
Beim Abbrechen aller registrieren Tracks (Titel):
1 +, – drücken, um „ERASE ALL“ auszuwählen und [ OK] q
zur Eingabe drücken.
4+, – drücken, um „YES“ auszuwählen und [ OK] q
zur Eingabe drücken.
Bearbeiten: Teilen von Dateien
Bearbeiten: Zusammenführen von Dateien
Anzeigen des Einstellbildschirms für das
Bearbeiten
1[MENU] drücken.
2+, – drücken, um „EDIT MENU“ auszuwählen und
[ OK] zur Eingabe drücken.q
3+, – drücken, um den zu bearbeitenden Punkt
auszuwählen und [ OK] zur Eingabe drücken.q
• [F1 (TAB)] drücken, um zu anderen Einstellungsbildschirmen
umzuschalten.
• Die Einstellungsdetails und Änderungsmethoden sind für
verschiedene Einstellpunkte unterschiedlich. Für nähere
Informationen, siehe die entsprechende Seite.
[F2 (CLOSE)] drücken, um den Einstellungsbildschirm zu
verlassen.
Teilen von Dateien
1
Während der Wiedergabe [STOP /RETURN] an dem g
Punkt drücken, an dem die Datei geteilt werden soll.
2„DIVIDE“ im Bearbeitungs-Einstellungsbildschirm
( links) auswählen.➜
3+, – drücken, um „YES“ auszuwählen und [ OK] q
zur Eingabe drücken.
Während die Datei geteilt wird, blinkt die Statusanzeige.
1
„COMBINE“ im Bearbeitungs-Einstellungsbildschirm
( links) auswählen.➜
2+, – drücken, um „PREVIOUS FILE“ auszuwählen
und [ OK] zur Eingabe drücken.q
3
+, – drücken, um die Datei, die zusammengeführt werden
soll, auszuwählen, und [
q
OK] zur Eingabe drücken.
Wenn die Datei in einem anderen Ordner ausgewählt wird,
kann sie durch Drücken von
u
innerhalb der Ordnerhierarchie
verschoben werden. (Einzelheiten hinsichtlich der Datei- und
Ordnerauswahlmethoden sind auf Seite 4 zu finden.)
4+, – drücken, um „NEXT FILE“ auszuwählen und
[ OK] zur Eingabe drücken.q
5+, – drücken, um die Datei auszuwählen, die nach
der vorherigen Datei angehängt werden soll, und
[ OK] zur Eingabe drücken.q
6+, – drücken, um „NEXT“ auszuwählen und
[ OK] zur Eingabe drücken.q
7+, – drücken, um „YES“ auszuwählen und [ OK] q
zur Eingabe drücken.
Während die Dateien zusammengeführt werden, blinkt die Statusanzeige.
•
Wenn [F2 (CLOSE)] gedrückt wird, bevor das Zusammenführen
abgeschlossen ist, wird der Zusammenführungsprozess abgebrochen.
Verwendung der Playlist-Funktion

VQT4J81
21
113
DEUTSCH
Kopieren von Dateien
1„COPY“ im Bearbeitungs-Einstellungsbildschirm
( Seite 20) auswählen.➜
2+, – drücken, um die Datei, die kopiert werden soll,
auszuwählen, und [ OK] zur Eingabe drücken.q
•
Wenn die Datei in einem anderen Ordner ausgewählt
wird, kann sie durch Drücken von
u
innerhalb der
Ordnerhierarchie verschoben werden. (Einzelheiten
hinsichtlich der Datei- und Ordnerauswahlmethoden sind auf
Seite 4 zu finden.)
• Beim Kopieren von Dateien in den LINE (LINE_SD)-Ordner,
zu Schritt 5 gehen.
3+, – drücken, um den Kopie-Zielspeicher
(„INTERNAL MEMORY“ oder „microSD CARD“)
auszuwählen, und zur Eingabe [ OK] drücken.q
4+, – drücken, um den Kopier-Zielordner
auszuwählen und [ OK] zur Eingabe drücken.q
5+, – drücken, um „YES“ auszuwählen und [ OK] q
zur Eingabe drücken.
Während die Datei kopiert wird, blinkt die Statusanzeige.
Verschieben von Dateien
„MOVE“ unter Schritt 1 links auswählen, um die Daten zu
verschieben. Das Vorgehen ist das gleiche wie beim Kopieren
einer Datei.
Bearbeiten: Kopieren oder
Verschieben von Dateien
Papierkorbfunktion
Zurückbewegen von Dateien aus dem
Papierkorb zum ursprünglichen Ordner
1Drücken von [F2 (FOLDER)].
2+, –, drücken, um „ “ auszuwählen und u, i
[ OK] zur Eingabe drücken.q
Der Papierkorb-Ordner ist im internen Speicher bzw. der
SD-Karte vorhanden.
3u i, benutzen, um die Datei, die zurückgeführt
werden soll, auszuwählen und [ERASE/A-B&] zur
Eingabe drücken.
4+, – drücken, um „RESTORE FILE“ auszuwählen
und [ OK] zur Eingabe drücken.q
5+, – drücken, um „YES“ auszuwählen und [ OK] q
zur Eingabe drücken.
Die Statusanzeige blinkt, und die ausgewählte Datei wird zum
Ende des ursprünglichen Ordner zurückbewegt.
[ OK] drücken, um zum Bildschirm im Schritt q 3
zurückzukehren.

&
q
q
q
q
q
1q
2u i
q
1 2
q
1q
q
2
q

*
*
*
*
*
*
*
*
g
g

Product specificaties
| Merk: | Panasonic |
| Categorie: | Hifi systeem |
| Model: | RR-XS420 |
| Kleur van het product: | Wit |
| Gewicht: | 54 g |
| Breedte: | 40.8 mm |
| Diepte: | 16.2 mm |
| Hoogte: | 103.1 mm |
| Ondersteund audioformaat: | MP3, WMA |
| Compatibele geheugenkaarten: | MicroSD (TransFlash), MicroSDHC |
| Ingebouwde luidsprekers: | Ja |
| Ondersteund aantal accu's/batterijen: | 1 |
| Interface: | USB |
| Ingebouwde microfoon: | Ja |
| Levensduur accu/batterij: | 19 uur |
| Totale opslagcapaciteit: | 2 GB |
| Oplaadbaar: | Ja |
| Maximale opneem tijd: | 134 uur |
| Opname modes: | Linear pulse code modulation (LPCM) |
| MP3 afspelen: | Ja |
| Ondersteunde mediatypen: | Intern geheugen & flash-kaart |
| Recording battery life: | 10 uur |
| Loudspeaker diameter: | 20 mm |
| Compatibele batterij grootte: | AAA |
| Batterijtechnologie: | Nikkel-Metaalhydride (NiMH) |
Heb je hulp nodig?
Als je hulp nodig hebt met Panasonic RR-XS420 stel dan hieronder een vraag en andere gebruikers zullen je antwoorden
Handleiding Hifi systeem Panasonic

28 Mei 2024
28 Mei 2024
21 Mei 2024
22 April 2024
11 April 2024
3 April 2024
4 Februari 2024
19 Januari 2024
29 November 2023
16 November 2023
Handleiding Hifi systeem
- Hifi systeem Philips
- Hifi systeem Sony
- Hifi systeem Samsung
- Hifi systeem LG
- Hifi systeem Huawei
- Hifi systeem Asus
- Hifi systeem AEG
- Hifi systeem Garmin
- Hifi systeem Grundig
- Hifi systeem JVC
- Hifi systeem JBL
- Hifi systeem Kenwood
- Hifi systeem Karcher
- Hifi systeem Motorola
- Hifi systeem Medion
- Hifi systeem Nokia
- Hifi systeem Olympus
- Hifi systeem Onkyo
- Hifi systeem Pioneer
- Hifi systeem VTech
- Hifi systeem Yamaha
- Hifi systeem Acoustic Solutions
- Hifi systeem Ade
- Hifi systeem Aiwa
- Hifi systeem Akai
- Hifi systeem Akg
- Hifi systeem Albrecht
- Hifi systeem Alpine
- Hifi systeem Altec Lansing
- Hifi systeem Alto
- Hifi systeem American Audio
- Hifi systeem AOC
- Hifi systeem Arcam
- Hifi systeem Arturia
- Hifi systeem Audio Pro
- Hifi systeem Audio-Technica
- Hifi systeem Audiolab
- Hifi systeem Audiosonic
- Hifi systeem Audison
- Hifi systeem Audizio
- Hifi systeem Auna
- Hifi systeem Autotek
- Hifi systeem AVM
- Hifi systeem BeamZ
- Hifi systeem Behringer
- Hifi systeem Belkin
- Hifi systeem Bigben
- Hifi systeem Blaupunkt
- Hifi systeem Bluesound
- Hifi systeem Bluetrek
- Hifi systeem Bose
- Hifi systeem Boss
- Hifi systeem Boston Acoustics
- Hifi systeem Brandson
- Hifi systeem Brigmton
- Hifi systeem Dali
- Hifi systeem DAP
- Hifi systeem DAP Audio
- Hifi systeem Denon
- Hifi systeem Denver
- Hifi systeem Devialet
- Hifi systeem Dual
- Hifi systeem Duronic
- Hifi systeem E-bench
- Hifi systeem Ebode
- Hifi systeem Elac
- Hifi systeem Elta
- Hifi systeem Ematic
- Hifi systeem Energy Sistem
- Hifi systeem Envivo
- Hifi systeem ESX
- Hifi systeem Fender
- Hifi systeem Fenton
- Hifi systeem Ferguson
- Hifi systeem Fiio
- Hifi systeem Focal
- Hifi systeem Focusrite
- Hifi systeem Franklin
- Hifi systeem Geemarc
- Hifi systeem Gembird
- Hifi systeem Gemini
- Hifi systeem General Electric
- Hifi systeem Geneva
- Hifi systeem GPX
- Hifi systeem Griffin
- Hifi systeem Hama
- Hifi systeem Harman Kardon
- Hifi systeem Hercules
- Hifi systeem Hitachi
- Hifi systeem Homedics
- Hifi systeem Honor
- Hifi systeem House Of Marley
- Hifi systeem HUMANTECHNIK
- Hifi systeem Hyundai
- Hifi systeem Icon
- Hifi systeem ILive
- Hifi systeem Iluv
- Hifi systeem Imperial
- Hifi systeem Infinity
- Hifi systeem Ion
- Hifi systeem Karcher Audio
- Hifi systeem KEF
- Hifi systeem Kicker
- Hifi systeem Klipsch
- Hifi systeem Konig
- Hifi systeem Korg
- Hifi systeem Laser
- Hifi systeem LD Systems
- Hifi systeem Lenco
- Hifi systeem Loewe
- Hifi systeem Logik
- Hifi systeem Logitech
- Hifi systeem Lowrance
- Hifi systeem Luxman
- Hifi systeem Lynx
- Hifi systeem M-Audio
- Hifi systeem Mac Audio
- Hifi systeem Mackie
- Hifi systeem Magnat
- Hifi systeem Magnavox
- Hifi systeem Magnum
- Hifi systeem Manhattan
- Hifi systeem Marantz
- Hifi systeem Marmitek
- Hifi systeem Marquant
- Hifi systeem Marshall
- Hifi systeem MB Quart
- Hifi systeem Meridian
- Hifi systeem Midland
- Hifi systeem Monacor
- Hifi systeem Monitor Audio
- Hifi systeem Mpman
- Hifi systeem Mtx Audio
- Hifi systeem Muse
- Hifi systeem Nacon
- Hifi systeem NAD
- Hifi systeem Nec
- Hifi systeem Nedis
- Hifi systeem Netgear
- Hifi systeem Nextbase
- Hifi systeem Nikkei
- Hifi systeem Paradigm
- Hifi systeem Peaq
- Hifi systeem Peavey
- Hifi systeem Plantronics
- Hifi systeem Polk
- Hifi systeem Power Dynamics
- Hifi systeem Pure
- Hifi systeem Pyle
- Hifi systeem Quantis
- Hifi systeem Razer
- Hifi systeem RCA
- Hifi systeem RCF
- Hifi systeem Reflexion
- Hifi systeem Revo
- Hifi systeem Revox
- Hifi systeem Roadstar
- Hifi systeem Rockford Fosgate
- Hifi systeem Roland
- Hifi systeem Rotel
- Hifi systeem Sagem
- Hifi systeem Salora
- Hifi systeem Samson
- Hifi systeem Sangean
- Hifi systeem Saramonic
- Hifi systeem Schneider
- Hifi systeem Scott
- Hifi systeem Sencor
- Hifi systeem Sennheiser
- Hifi systeem Sharkoon
- Hifi systeem Sharp
- Hifi systeem Silvercrest
- Hifi systeem Skytec
- Hifi systeem Sonoro
- Hifi systeem Sonos
- Hifi systeem Sony Ericsson
- Hifi systeem Soundmaster
- Hifi systeem Soundstream
- Hifi systeem Starkey
- Hifi systeem Steelseries
- Hifi systeem Steinberg
- Hifi systeem Stereoboomm
- Hifi systeem Sunstech
- Hifi systeem Superior
- Hifi systeem Swissvoice
- Hifi systeem Tannoy
- Hifi systeem Tascam
- Hifi systeem TC Helicon
- Hifi systeem TCM
- Hifi systeem Teac
- Hifi systeem Technaxx
- Hifi systeem Technics
- Hifi systeem Technisat
- Hifi systeem Telefunken
- Hifi systeem Terratec
- Hifi systeem Teufel
- Hifi systeem Thomson
- Hifi systeem Toa
- Hifi systeem Tristar
- Hifi systeem Universal Remote Control
- Hifi systeem Velleman
- Hifi systeem Vivax
- Hifi systeem Vizio
- Hifi systeem Vonyx
- Hifi systeem Watson
- Hifi systeem Wolfgang
- Hifi systeem Xoro
- Hifi systeem Zoom
- Hifi systeem Jabra
- Hifi systeem Jamo
- Hifi systeem JB Systems
- Hifi systeem Jensen
- Hifi systeem JL Audio
- Hifi systeem OK
- Hifi systeem Omnitronic
- Hifi systeem OneConcept
- Hifi systeem Oppo
- Hifi systeem Orbitsound
- Hifi systeem Oregon Scientific
- Hifi systeem Anthem
- Hifi systeem Cambridge
- Hifi systeem McIntosh
- Hifi systeem Camry
- Hifi systeem Clatronic
- Hifi systeem Continental Edison
- Hifi systeem ECG
- Hifi systeem Bang And Olufsen
- Hifi systeem Bowers And Wilkins
- Hifi systeem Caliber
- Hifi systeem Creative
- Hifi systeem CSL
- Hifi systeem Exibel
- Hifi systeem GoGEN
- Hifi systeem Krüger And Matz
- Hifi systeem Naxa
- Hifi systeem NGS
- Hifi systeem Proscan
- Hifi systeem Shure
- Hifi systeem Steren
- Hifi systeem Kunft
- Hifi systeem Clarion
- Hifi systeem Cobra
- Hifi systeem Bush
- Hifi systeem Crosley
- Hifi systeem Nevir
- Hifi systeem DPA
- Hifi systeem MXL
- Hifi systeem Aplic
- Hifi systeem Atlona
- Hifi systeem Irradio
- Hifi systeem Defender
- Hifi systeem Alba
- Hifi systeem Majestic
- Hifi systeem Trevi
- Hifi systeem Crunch
- Hifi systeem SIIG
- Hifi systeem Sven
- Hifi systeem Lenoxx
- Hifi systeem Scosche
- Hifi systeem Canton
- Hifi systeem ClearOne
- Hifi systeem Tripp Lite
- Hifi systeem QTX
- Hifi systeem Musical Fidelity
- Hifi systeem SPC
- Hifi systeem Sanus
- Hifi systeem Block
- Hifi systeem Pro-Ject
- Hifi systeem Rega
- Hifi systeem Vision
- Hifi systeem Crown
- Hifi systeem Mark Levinson
- Hifi systeem Rane
- Hifi systeem Coby
- Hifi systeem Massive
- Hifi systeem WAGAN
- Hifi systeem Monster
- Hifi systeem Cardo
- Hifi systeem Dreamgear
- Hifi systeem Auto-T
- Hifi systeem AudioAffairs
- Hifi systeem DataVideo
- Hifi systeem ART
- Hifi systeem Sonance
- Hifi systeem HK Audio
- Hifi systeem Galaxy Audio
- Hifi systeem Bigben Interactive
- Hifi systeem Ikan
- Hifi systeem Native Instruments
- Hifi systeem Apogee
- Hifi systeem Pyle Pro
- Hifi systeem PreSonus
- Hifi systeem Electro-Voice
- Hifi systeem IK Multimedia
- Hifi systeem IDance
- Hifi systeem Chord
- Hifi systeem ESI
- Hifi systeem Rode
- Hifi systeem Anchor Audio
- Hifi systeem ATen
- Hifi systeem Cmx
- Hifi systeem Russound
- Hifi systeem Comica
- Hifi systeem Audient
- Hifi systeem RGBlink
- Hifi systeem PAC
- Hifi systeem Dynaudio
- Hifi systeem DBX
- Hifi systeem Tivoli Audio
- Hifi systeem Senal
- Hifi systeem Victrola
- Hifi systeem Numan
- Hifi systeem Extron
- Hifi systeem Ibiza Sound
- Hifi systeem Nxg
- Hifi systeem MIPRO
- Hifi systeem Solid State Logic
- Hifi systeem HiFi ROSE
- Hifi systeem OSD Audio
- Hifi systeem Andover
- Hifi systeem Crestron
- Hifi systeem RME
- Hifi systeem Avid
- Hifi systeem Adastra
- Hifi systeem Konig & Meyer
- Hifi systeem Avante
- Hifi systeem Music Hall
- Hifi systeem Shokz
- Hifi systeem Electro Harmonix
- Hifi systeem Eissound
- Hifi systeem AudioControl
- Hifi systeem SPL
- Hifi systeem Smart-AVI
- Hifi systeem Primare
- Hifi systeem Sonifex
- Hifi systeem Xantech
- Hifi systeem Audioengine
- Hifi systeem Kramer
- Hifi systeem IFi Audio
- Hifi systeem Motu
- Hifi systeem Zvox
- Hifi systeem KanexPro
- Hifi systeem SVS
- Hifi systeem Vocopro
- Hifi systeem Werma
- Hifi systeem Walrus Audio
- Hifi systeem Glide Gear
- Hifi systeem AVer
- Hifi systeem Universal Audio
- Hifi systeem Teradek
- Hifi systeem Vimar
- Hifi systeem Speco Technologies
- Hifi systeem Morel
- Hifi systeem Antelope Audio
- Hifi systeem CE Labs
- Hifi systeem Z CAM
- Hifi systeem Aquatic AV
- Hifi systeem Parasound
- Hifi systeem Promate
- Hifi systeem SoundCast
- Hifi systeem Hollyland
- Hifi systeem Cyrus
- Hifi systeem Boytone
- Hifi systeem Astell&Kern
- Hifi systeem TV One
- Hifi systeem Maretron
- Hifi systeem Xact
- Hifi systeem Ruark Audio
- Hifi systeem Lotronic
- Hifi systeem Esoteric
- Hifi systeem ANT
- Hifi systeem Leviton
- Hifi systeem Atlas Sound
- Hifi systeem NUVO
- Hifi systeem JK Audio
- Hifi systeem Lexicon
- Hifi systeem Fluance
- Hifi systeem Altra
- Hifi systeem PowerBass
- Hifi systeem Kiloview
- Hifi systeem On-Q
- Hifi systeem Vantage Point
- Hifi systeem Planet Audio
- Hifi systeem Fluid
- Hifi systeem IFi
- Hifi systeem Goodis
- Hifi systeem Roon
- Hifi systeem Voco
- Hifi systeem Hosa
- Hifi systeem Linear
- Hifi systeem SSV Works
- Hifi systeem Sound Devices
- Hifi systeem Vankyo
- Hifi systeem Glorious
- Hifi systeem SWIT
- Hifi systeem Key Digital
- Hifi systeem CAD Audio
- Hifi systeem The Box
- Hifi systeem Polsen
- Hifi systeem BSS Audio
- Hifi systeem AmpliVox
- Hifi systeem Audiofrog
- Hifi systeem Memphis Audio
- Hifi systeem Rolls
- Hifi systeem WyreStorm
- Hifi systeem Accsoon
- Hifi systeem Juke Audio
- Hifi systeem Best Buy
- Hifi systeem DiGiGrid
- Hifi systeem CLXmusic
- Hifi systeem Nuheara
- Hifi systeem Majority
- Hifi systeem Metric Halo
- Hifi systeem Prism Sound
- Hifi systeem MoFi
- Hifi systeem Antelope
- Hifi systeem Auvi
- Hifi systeem Technical Pro
- Hifi systeem Switchcraft
- Hifi systeem Digigram
- Hifi systeem Titanwolf
- Hifi systeem Liam&Daan
- Hifi systeem Crystal Video
- Hifi systeem Atoll
- Hifi systeem Bennett & Ross
- Hifi systeem Beatfoxx
- Hifi systeem Pronomic
- Hifi systeem NEAR
- Hifi systeem INKEE
- Hifi systeem Vaxis
Nieuwste handleidingen voor Hifi systeem

1 April 2025
31 Maart 2025
28 Maart 2025
28 Maart 2025
28 Maart 2025
28 Maart 2025
28 Maart 2025
28 Maart 2025
28 Maart 2025
28 Maart 2025