Odys Connect 8+ Handleiding
Bekijk gratis de handleiding van Odys Connect 8+ (1 pagina’s), behorend tot de categorie Tablet. Deze gids werd als nuttig beoordeeld door 87 mensen en kreeg gemiddeld 4.6 sterren uit 7 reviews. Heb je een vraag over Odys Connect 8+ of wil je andere gebruikers van dit product iets vragen? Stel een vraag
Pagina 1/1
ODYSCONNECT8+QUICKSTARTGUIDE
Introduction
ODYS
CONNECT8+isaMIDwithfullcolorscreen.
Althoughthisproductissafe,pleaseobservetheinformationandwarningsfromtheusermanual.
Theusermanualisinstalledatthedevicesinternalmemoryandcanbeaccessedoverthe
mainmenu.Pleaserefertotheusermanualfordetailedinstructions,conformityand
supportinformation.
‐Toopentheuser’s
manualpleasetaponthemanualiconyoucanseeatthehomescreen
toopenthefolderwherethemanualsarestoredin.
TurningOn/Off
Toturnonthedevice,pressandholdthePowerbuttonontheunituntilyou‐seethebootupscreen
thenmayrelease.Ittakeafewminutestothestartupsystem,pleasewaitbeforeyouproceed.
Toturnoffthedevice,pressandholdthePowerbuttonuntil
youseetheoption“PowerOff”,tapon
“PowerOff”andtapthenon“OK”.
Tip:Thisdevicewillsleepwiththescreenoffifitstaysinactiveforafewseconds.Youcanbrieflypress
thethePowerbuttontoturnonscreenandwakeitup.
PowerOnandOfftheDisplay
‐Shortlypressthe[Power]buttontoturnoffthedisplay.
‐Pressthe[Power]buttonagainshortlyturnthedisplayonagain.
LanguageSetting
‐ConfirmthetworequestsatthetapingatbeginningbyOK.
‐Tapon[Settings]andselect[Language&Input]
‐
Tapon[Language]andselectyourdesiredlanguageontherightside.
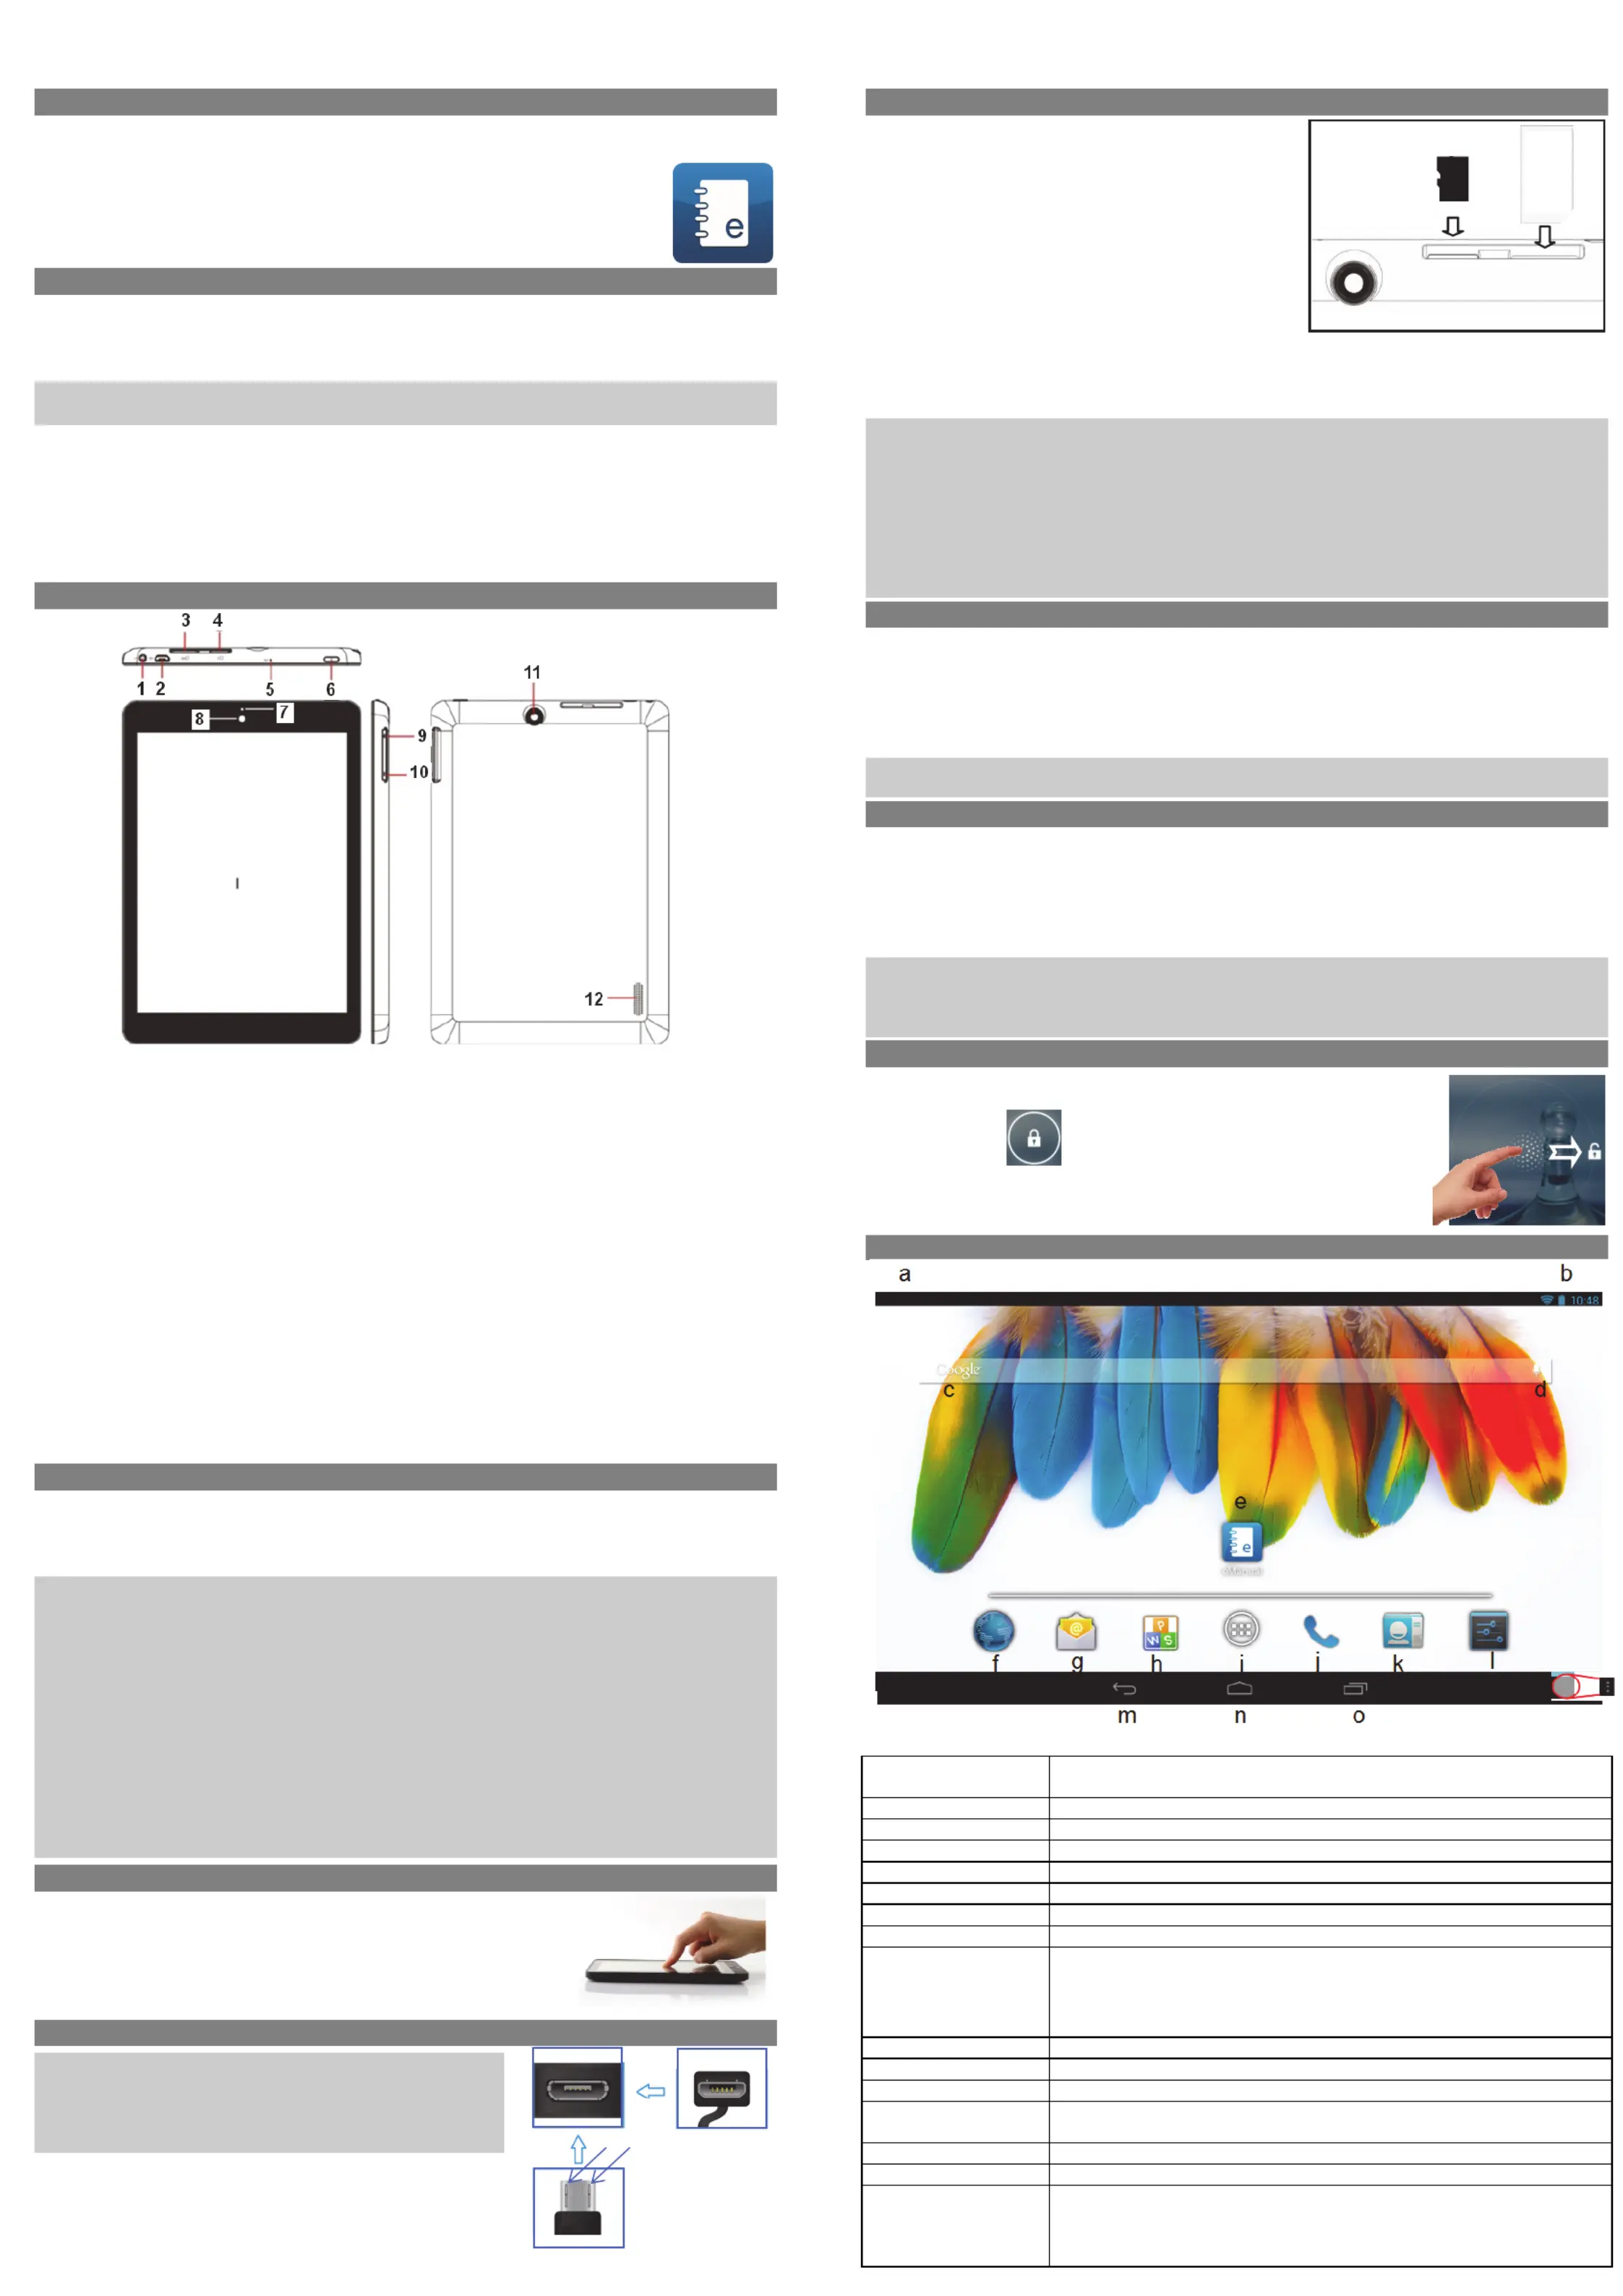
GettingStarted
1.HeadphonejackAudiooutputconnectionforhead‐phones
Note:Speakeroutputisautomaticallydisabledwhenheadphonesare
connectedtotheplayer.
2.2.0MicroUSBHi‐
speed
Connecttodataacomputertotransfer(e.g.,music,videos,photos,files).
SupportUSBstick,Surfstick,KeyBoardandMouse.
Note:
A
OTGsupportingadaptorcableisrequired(optional)
3.SimCardSlotAccommodatesanySimCard.
4.MicroSDCardSlotAccommodatesanystandardSD/SDHCmemorycard.
5.Microphone
6.PowerButtonPressandtoturntheholdthepowerswitchonoffordevice;
Brieflypresstheswitchtoturnthescreenonoroff.
Pressandtoholdfor10Secondsresetandrestartthedeviseifitfreezes
orotherwisebehavesabnormal.
7.ChargeIndicator
8.FrontCameraFront‐facingcamerafortakingavatarpictures
9.Volumekey+Shortlypresstoincreasevolumelevel.
10.Volumekey‐Shortlypresstodecreasevolumelevel.
11.RearCameraRear‐facingcamerafortakingpictures
12.Speaker
ChargingBattery
Thedevicehas‐abuiltinrechargeablebattery.Noextrabatteryinstallationisrequired.Justcharge
thebattery.devicewhenitindicateslow
Tochargethethebattery,connectthetodeviceanystandardwalloutletviaUSBportusingthe
poweradaptor.aboutIttakes5hourstofullycharge
thebattery.
Note:
a.adviceWetouseonlythedeliveredpoweradapterwiththistablet.
b.Youcanoperatethedeviceevenwhenitisbeingcharged.Butforextendedbatterylife,itis
suggestedNOTtousethedevicewhenitischarging.
c.Itisrecommendedtothechargethebatterybeforeyouusethedeviceforfirsttime.
d.beusedFormaximumperformance,lithiumion‐batteriesneedtooften.Ifyoudon’tusethe
deviceoften,besuretorechargethebatteryatleastoncepermonth.
e.Shouldtherechargeablebatteryofthedevicedischargecompletely,connectthedevice(usingthe
adapter)tothemainpowersourceforapproximately‐510minutesbeforeattemptingnormal
operation.
f.someIncases,deviceswhichhavebeenchargedforlongerperiodsoftimemaynotbeabletobe
switchedbackandon.ShouldthisoccuryouhavetomakeaReset.Pressholdfor10Secondsto
resetandrestartthedevice.
Touchscreen
Thetouchscreenisacapacitivedisplayanddesignedforprecisionand
respondsbestwhentouchedwiththesmallestpointpossible.Usethe
flatpadofyourfingertotouchthescreen.
ConnectviaUSB
Pleasenote:Onlyuseconnectingcablewithamaximumlengthof
80cm.PleasemakesurewhenconnectingtheUSBadapteror
connectorcablesattentiontothecorrectalignmentoftheconnector
beforeinsertingitintotheUSBsocketinsertionontheunit.Incorrect
maycausedamagetoplugandsocket.
Onthesideofoftheplugthereareusuallysmallsizeshooks
thatsecurethefixation.
Payspecialattentiononofthepositionthehooks,theyshow
upwardswhenconnectingcableswhilethescreenisabove.
InstallingMemoryCard
Thisdevicecanreadfilesdirectlyfrommemorycardand
USBmemory.
Tousememoryacard,cardfindtheslotatthesideof
thedeviceandtheninsertthememorycardintotheslot
inthecorrectorientationorConnectUSBMemoryusing
theprovidedUSBadaptorcable.To
accessthefiles
storedinthethememorycard,enterExplorermodeby
tappingtheExplorericonandselectthe“SDCard”
directory.
‐CheckthattheMicroSDcardisinthecorrectposition
withthecontactpinfacingdownwardsasillustrated.You
maydamagethecardandthereader
ifMicroSDcardisnotinsertedincorrectposition.
‐PushtheMicroSDcardintothecardslotuntilitclicks.
‐ToremoveMicroSDcard,pushthecardonceagainuntilitclicks.
Note:WerecommendusingonlyMicroSDorSDHCcardsupto32GBcapacity.
‐WhenaMicroSDcardisinsertedfrominorejectedthedevice,itmaytakethefewsecondsfor
devicetoupdatethecontent.
‐PleaseavoidinsertingorejectingMicroSDcardwhenotheroperationisrunningasthismaycause
thesystemhang.
‐DoNotremovethecardifthecontentcardinsidetheisbeingplayed.Thiswillhaltthe
operationofthedeviceandmightcauseasystemhang.
‐OnlyusetheprovidedUSBadaptorcabletoattachUSBmemorydevices.
‐Pleaseuseyourfingernailstoproperlyinsertorremovethecard.
InstallingSIMcard
TouseaSIMSIMcard,findthetheandcardslotatbacksideofthedevicetheninsertthecardinto
thetheslotincorrectorientation
‐CheckthattheSIMcardisinthecorrectpositionwiththecontactpinfacingdownwardsas
illustrated.Youmaydamagethe
cardandtheposition.readerifisSIMcardnotinsertedincorrect
‐PushtheSIMcardintothecardslotuntilitclicks.
‐ToremoveSIMcard,pushtheSIMcardonceagainuntilitclicks.
Note:TheSIMCardcanonlyberecognizedifthedevicewasturnedoffwhileinserting.
MicroSIMCardsarenotsupported.
TransferringFiles
Beforereadingorplayingfiles,youneedtototransfermediafilesfromacomputerthedevice.
(1)suppliedConnectthedevicetotheacomputerwithUSBcable.
(2)Onceconnected,oneremovablediskItdrivewillshowonyourcomputer.representstheinternal
memoryofthethedeviceand
memorycardinsertedintothedevice.Nowyoucancopyfilesfromor
toasthesediskdrivejustyouwouldonyourharddrive.
3)Disconnectthethedevicefromcomputer.
Note:‐ThepreinstalledapplicationsandAndroidOSoccupyaconsiderablepartofcapacity–nearlymorethan
1GB,itisnormalhugethatyouseedifferencebetweenavailablememoryspaceandtotalcapacity.
Caution!ThedevicesupportsAdobeDRMcontents.AdobeDigitalEditions(ADE)isrequired.Pleaserefertothe
user’smanualforcloserinformation’sonhowtouseDRMprotectedfiles.
Screenlock
Thescreenautomaticallyturnsoffandafterlocksitselfasetperiodoftime.
Whenthescreenturnedoff,pressthethePowerbuttontolightupscreen.
Pushthelockicon
anddragittotheopenlockattherightsideto
unlock.
Home Screen
a.SystemHintsInformstheuserifattachedmemoryorupdatesareandavailableothersystem
statusinformation’s
b.Systemsettings
c.GoogleSearchBar
d.GoogleVoiceSearch
e.ebookeManualManualinformat
f.BrowserTaptotolaunchtheBrowservisityourfavoritewebsites.
g.E‐MailToopenthemailclient
h.KingsoftOffice
i.ApplicationsiconTaponthisicontorevealallapplicationsinstalledonyourTablet
- YoucancopytheapplicationsontotheHomescreenbypressing
andholdingontheiricons.
- YoucandeletetheapplicationfromtheHomeScreenbydragging
theiriconstotheCrossthatappearsatthetopofthescreen.
j.Telephone
k.Contacts
l.SystemSettings
m.BacksoftkeyTaptotothethethereturnpreviousscreen.Ifkeyboardisonscreen,taptoclose
thekeyboard.
n.HomesoftkeyTaptotothereturnhomescreen.
o.RunningappsShowappswhicharecurrentlyrunninginbackground.
p.MenusoftKeyTaptoviewtheoptionmenu
Note:WhenyouTaptheMenukeyfromwithinanapplication,youwillseethe
optionsforthatapplication.Butyouwillnotseethemonstartscreen.
Caution!Someappsmayshowthisiconatthetoprightcorner.
v1.0
Top
Bottom
Hooks
Screen
p
Backside
SimSlotCardMicroSDSlot
Camera
Provicer
523503423048WD
MC
UM
TS/GSM
SIM
Product specificaties
| Merk: | Odys |
| Categorie: | Tablet |
| Model: | Connect 8+ |
| Kleur van het product: | Zwart |
| Gewicht: | 383 g |
| Breedte: | 198 mm |
| Diepte: | 136.5 mm |
| Hoogte: | 9.65 mm |
| Capaciteit van de accu/batterij: | - mAh |
| AC-adapterfrequentie: | 50 - 60 Hz |
| AC-adapter ingangsspanning: | 100 - 240 V |
| Bluetooth: | Ja |
| Beeldschermdiagonaal: | 7.85 " |
| Resolutie: | 1024 x 768 Pixels |
| Oorspronkelijke beeldverhouding: | 4:3 |
| Frequentie van processor: | 1.3 GHz |
| Processormodel: | MT8382 |
| Aantal processorkernen: | 4 |
| Interne opslagcapaciteit: | 8 GB |
| Maximale capaciteit van de geheugenkaart: | 32 GB |
| 2G standaarden: | GSM |
| 3G standaarden: | WCDMA |
| Wi-Fi-standaarden: | 802.11b, 802.11g, Wi-Fi 4 (802.11n) |
| Generatie mobiel internet: | 3G |
| GPS: | Ja |
| Locatie positie: | Ja |
| Grafische adapter: | Mali 400 MP2 |
| Vormfactor: | Slate |
| Resolutie camera achterzijde (numeriek): | 2 MP |
| Resolutie camera voorzijde (numeriek): | - MP |
| Video recording: | Ja |
| Type camera achterzijde: | Enkele camera |
| Inclusief besturingssysteem: | Android |
| Platform: | Android |
| Type aansluitplug: | 3,5 mm |
| Ethernet LAN: | Nee |
| Meegeleverde kabels: | USB |
| Geïntegreerde geheugenkaartlezer: | Ja |
| Compatibele geheugenkaarten: | MicroSD (TransFlash), MicroSDHC |
| Touch screen type: | Capacitief |
| E-mail: | Ja |
| Assisted GPS (A-GPS): | Ja |
| Snelstartgids: | Ja |
| Inclusief AC-adapter: | Ja |
| LED backlight: | Ja |
| Microfoon, line-in ingang: | Nee |
| Ingebouwde luidsprekers: | Ja |
| Aantal ingebouwde luidsprekers: | 1 |
| Maximale videoresolutie: | - Pixels |
| Ingebouwde microfoon: | Ja |
| Intern geheugen: | 1 GB |
| Opslagmedia: | Flash |
| Levensduur accu/batterij: | - uur |
| Intern geheugentype: | DDR3-SDRAM |
| Operating systeem versie: | 4.2.2 |
| Wifi-standaard: | Wi-Fi 4 (802.11n) |
| Accu/Batterij oplaadtijd: | 5 uur |
| Soort apparaat: | Mobiele tablet |
| Intel® Wireless Display (Intel® WiDi): | Nee |
| Totale opslagcapaciteit: | 8 GB |
| Camera voorzijde: | Ja |
| Intel® My WiFi Technology (Intel® MWT): | Nee |
| Intel® Smart Response Technology: | Nee |
| Intel® Hyper Threading Technology (Intel® HT Technology): | Nee |
| Intel® Turbo Boost Technology: | Nee |
| Intel® Small Business Advantage (Intel® SBA): | Nee |
| Intel® Identity Protection Technology (Intel® IPT): | Nee |
| Camera achterzijde: | Ja |
| Hoofdtelefoon uit: | Ja |
| Intel® Anti-Theft Technology (Intel® AT): | Nee |
| Intel® Rapid Start Technology: | Nee |
| Intel® Smart Connect Technology: | Nee |
| Toetsenbord inbegrepen: | Nee |
| Mobiele netwerkverbinding: | Ja |
| Basisstationaansluiting: | Nee |
| Combo koptelefoon/microfoon port: | Nee |
| SmartCard-slot: | Nee |
| Micro-USB 2.0 ports hoeveelheid: | 1 |
| AC-adapter, uitgangsspanning: | 5 V |
| AC-adapter, uitgangsstroom: | 1.5 A |
| Batterijtechnologie: | Lithium-Polymeer (LiPo) |
Heb je hulp nodig?
Als je hulp nodig hebt met Odys Connect 8+ stel dan hieronder een vraag en andere gebruikers zullen je antwoorden
Handleiding Tablet Odys

19 Maart 2024
19 Maart 2024
19 Maart 2024
19 Maart 2024
18 Maart 2024
Handleiding Tablet
Nieuwste handleidingen voor Tablet
6 Juli 2026
23 Juni 2026
11 Juni 2026
11 Mei 2026
11 Mei 2026
10 Mei 2026
10 Mei 2026
10 Mei 2026
8 Mei 2026
3 Mei 2026